1
PARTNER MAIL VS®
Voice Messaging System
Release 5
Installation and Programming
zpzÐÕÕzÐÕ
Xbk ¥æpÐzz¥ÉÐ
ÅÅ×k ¥
kXkNk ¥p
Copyright 1998 Lucent Technologies
All Rights Reserved
Printed in USA
585-322-532
Comcode 108355173
Issue 1
December 1998
Notice
Every effort was made to ensure that the information in this book was complete and accurate at the time of printing.
However, information is subject to change.
Your Responsibility for Your System's Security
Toll fraud is the unauthorized use of your telecommunications system by an unauthorized party, for example, persons other
than your companys employees, agents, subcontractors, or persons working on your companys behalf. Note that there
may be a risk of toll fraud associated with your telecommunications system, and if toll fraud occurs, it can result in
substantial additional charges for your telecommunications services.
You and your System Manager are responsible for the security of your system, such as programming and configuring your
equipment, to prevent unauthorized use. The System Manager is also responsible for reading all installation, instruction,
and system administration documents provided with this product in order to fully understand the features that can introduce
risk of toll fraud and the steps that can be taken to reduce that risk.
Lucent Technologies does not warrant that this product is immune from or will prevent unauthorized use of common-carrier
telecommunication services or facilities accessed through or connected to it. Lucent Technologies will not be responsible
for any charges that result from such unauthorized use.
Federal Communications Commission Statement
This equipment has been tested and found to comply with the limits for a Class A digital device, pursuant to Part 15 of the
FCC Rules. These limits are designed to provide reasonable protection against harmful interference when the equipment is
operated in a commercial environment. This equipment generates, uses, and can radiate radio frequency energy and, if not
installed and used in accordance with the instruction manual, may cause harmful interference to radio communications.
Operation of this equipment in a residential area is likely to cause harmful interference, in which case the user will be
required to correct the interference at his own expense.
Canadian Department of Communications (DOC) Interference Information
This digital apparatus does not exceed the Class A limits for radio noise emissions set out in the radio interference
regulations of the Canadian Department of Communications.
Le Présent Appareil Numérique német pas de bruits radioélectriques dépassant les limites applicables aux appareils
numériques de la class A préscrites dans le reglement sur le brouillage radioélectrique édicté par le ministère des
Communications du Canada.
Trademarks
PARTNER, PARTNER MAIL VS, PARTNER MAIL, MLS-34D, MLS-18D, MLS-12D, MLS-12, MLS-6, MLC-6, MDC 9000,
MDW 9000, MDW 9010, and MDW 9030P are registered trademarks of Lucent Technologies in the U.S. and other countries.
Microsoft, Windows, and Windows NT are registered trademarks of Microsoft Corporation.
Ordering Information
Call:
Lucent Technologies Publications Center
Voice 1 800 457-1235 International Voice 317 361-5353
Fax 1 800 457-1764
International Fax 317 361-5355
Write:
Lucent Technologies Publications Center
2855 N. Franklin
Indianapolis, IN 46219
Order: Document No. 585-322-532, Issue 1, December 1998, Comcode 108355173
Support Telephone Number
In the continental U.S., Lucent Technologies provides a toll-free customer helpline 24 hours a day. Call the Lucent
Technologies Helpline at 1 800 628-2888 or your Lucent Technologies authorized dealer if you need assistance when
installing, programming, or using your system. Consultation charges may apply. Outside the continental U.S., contact your
local Lucent Technologies authorized representative.
Lucent Technologies Fraud Intervention
If you suspect you are being victimized by toll fraud and you need technical support or assistance, call Technical Service
Center Toll Fraud Intervention Hotline at 1 800 643-2353²
WWW Home Page
The WWW home page for Lucent Technologies is www.lucent.com.
Important Safety Instructions
!
WARNING:
The following list provides basic safety precautions that should always be
followed when using the system:
1. Read and understand all instructions.
2. Follow all warnings and instructions marked on the product.
3. Unplug all telephone connections before cleaning. DO NOT use liquid
cleaners or aerosol cleaners. Use a damp cloth for cleaning.
4. This product should be serviced by (or taken to) a qualified repair
center when service or repair work is required.
5. DO NOT use this product near water, for example, in a wet basement
location.
6. DO NOT place this product on an unstable cart, stand, or table.
7. Never push objects of any kind into slots or openings as they may
touch dangerous voltage points or short out parts that could result in
a risk of fire or electric shock. Never spill liquid of any kind on the
product.
8. Avoid using this product during an electrical storm. There may be a
remote risk of electric shock from lightning.
9. DO NOT use the telephone to report a gas leak in the vicinity of the
leak.
10. The product is provided with a three-wire grounding type plug. This is
a safety feature. DO NOT defeat the safety purpose of the grounding
type plug. DO NOT staple or otherwise attach the AC power supply
cord to building surfaces.
!
CAUTION:
DO NOT block or cover the ventilation slots and openings. They prevent
the product from overheating. DO NOT place the product in a separate
enclosure unless proper ventilation is provided.
SAVE THESE INSTRUCTIONS
Contents
About This Document
■
■
■
■
■
1
Overview
■
■
■
■
■
2
Purpose
Terminology
How to Use This Guide
Product Safety Statements
How to Comment on This Guide
Reference Materials
Identifying Your Communications System
Tutor Feature
Languages
Voice Messaging Services
Automated Attendant Service
Call Answer Service
Voice Mail Service
Security
System Security Guidelines
Security Policy and User Education
System Manager Activities Checklist
Installation
■
■
■
Before You Start
Installing the PARTNER MAIL VS Module
Connecting a PC to the
PARTNER MAIL VS
xi
xi
xii
xiii
xiv
xiv
xv
xv
1-1
1-3
1-3
1-4
1-6
1-11
1-13
1-15
1-15
1-16
1-18
2-1
2-1
2-2
2-6
iii
Contents
3
Understanding Programming
■
■
4
Initial Programming
■
■
■
■
■
■
■
■
■
■
iv
Communications System Programming
Planning Forms
Using System Programming
Voice Messaging System Programming
Planning Forms
Using System Programming
Overview
Voice Mail System Configurations
Upgrading Your Voice Mail System from a 2-Port
to a 4-Port Configuration
Initial Programming Checklist
Communications System Programming Checklist
Voice Messaging System Programming Checklist
Initial Communications System Setup
VMS Hunt Group Extensions
Outgoing Call Restriction
Voice Messaging System Programming
Language
Changing the System Administration Prompt
Language
Automated Attendant Service
Voice Mail Service
Line Ownership
Communications System Programming
Automated Attendant Service
Call Answer Service
Telephone Button Programming
Verifying System Operation
Voice Mail Service
Automated Attendant Service
Call Answer Service
Generating Configuration Reports
Performing a System Backup
Performing a System Restore
3-1
3-1
3-2
3-4
3-6
3-6
3-9
4-1
4-1
4-2
4-2
4-3
4-3
4-4
4-6
4-6
4-7
4-8
4-8
4-8
4-10
4-16
4-21
4-22
4-22
4-28
4-31
4-35
4-35
4-35
4-37
4-38
4-41
4-43
Contents
5
System Management
■
■
■
■
General Information
Changing Your Password
Changing the System Administration Prompt
Language
Training Co-Workers
Language
Modifying the Language Mode
Playing the System, Primary, or Secondary
Language
Modifying the System, Primary, or Secondary
Language
Automated Attendant Service
Menu Definition, Prompt, and Announcements
Automated Attendant Line Assignment
Playing the Menu Definition and Announcements
Playing the Day or Night Menu Prompt
Modifying the Menu Definition, Day Menu Prompt,
and Announcements
Modifying the Night Menu Prompt
Group Call Distribution (Option 1)
VMS Hunt Delay (PARTNER ACS Release 3.0
or later)
VMS Hunt Delay (All Other PARTNER Systems)
Automatic Extension Privacy
VMS Hunt Schedule (PARTNER ACS
Release 3.0 or later)
VMS Hunt Schedule (All Other PARTNER Systems)
Modifying Mailboxes
Hardware Considerations
Guest Mailboxes
Checking a Mailbox's Status
Deleting a Mailbox
Creating a Mailbox
Reinitializing a Password
Reinitializing a Mailbox
Changing Mailbox Message Length or Size
Playing a Mailbox's Language
Modifying a Mailbox's Language
Administering Outcalling for a Mailbox
5-1
5-2
5-2
5-3
5-3
5-10
5-11
5-12
5-14
5-17
5-20
5-23
5-26
5-27
5-29
5-33
5-35
5-36
5-36
5-37
5-38
5-38
5-39
5-42
5-42
5-44
5-45
5-46
5-48
5-49
5-50
5-52
5-53
5-54
v
Contents
■
■
■
■
■
6
Troubleshooting
■
■
vi
Administering Record-a-Call for a Mailbox
Automatic VMS Cover
VMS Cover Rings (PARTNER ACS Release 3.0
or later)
VMS Cover Rings (All Other PARTNER Systems)
Line Coverage
VMS Line Coverage
Extension Line Coverage
Telephone Button Programming
VMS Cover (F15)
Do Not Disturb (F01)
Voice Mailbox Transfer (F14)
Voice Mail Auto Dial
Station Lock (F21)
Record-a-Call (PARTNER ACS Release 3.0
or later) (F24)
Call Screening (PARTNER ACS Release 3.0
or later) (F25)
Generating a Configuration Report
Performing a System Backup
Performing a System Restore
When You Need Help
Automated Attendant Service
Outside Callers Hear Ringing, but System Does
Not Answer
Outside Callers Hear Silence, Tones, or Ringing
During Transfer
System Does Not Answer Immediately
System Cuts Off Part of Greeting
System Transfers Call to Receptionist Before
Playing the Menu Prompt
System Does Not Transfer Calls Properly
System Does Not Respond to Entered Digits
Unanswered Transferred Calls Ring Continually
5-56
5-58
5-59
5-59
5-60
5-61
5-67
5-68
5-68
5-69
5-69
5-70
5-70
5-71
5-71
5-73
5-76
5-78
6-1
6-1
6-2
6-2
6-3
6-4
6-5
6-5
6-5
6-6
6-6
Contents
■
■
■
■
Call Answer Service
Call Answer Service Takes Too Long to
Answer Calls
Call Answer Service Terminates Message While
Caller Is Recording
Messages Cannot Be Deposited in Mailbox
Voice Mail Service
Subscriber Unable to Log In to Voice Mail
Date or Time in Message Headers Is Incorrect
Subscriber Cannot Forward Messages to Another
Subscriber
Subscribers Hear Busy Signal When Calling In
to Voice Mail
Message Light Does Not Turn Off
Outcalling Is Delayed
Outcalling to a Digital Pager Is Not Working
Outcalling to a Telephone Is Not Working
Language
Cannot Switch Between Primary and Secondary
Languages
Cannot Understand Language Prompts
Error Messages
6-7
6-7
6-7
6-7
6-9
6-9
6-9
6-10
6-10
6-11
6-12
6-12
6-13
6-14
6-14
6-14
6-15
A
Specifications
A-1
B
FCC Information
B-1
■
■
Federal Communications Commission (FCC)
Interference Information
FCC Notification and Repair Information
IC Notification and Repair Information
Renseignements sur la notification du ministére
des Communications du Canada et la réparation
B-1
B-2
B-3
B-4
vii
Contents
C
Warranty Information
■
■
D
Repair Information
In-Warranty Repairs
Post-Warranty Repairs
Lucent Technologies Warranty and Limitation
of Liability
Limitation of Liability
Dial Plans
Systems with Fax Tone Detect
E
Case Studies
■
■
■
Purpose
Case Study #1
About the Customer
Filling Out the Planning Forms
Post-Installation Recommendations
Case Study #2
About the Customer
Filling Out the Planning Forms
Post-Installation Recommendations
C-1
C-1
C-1
C-2
C-3
C-4
D-1
D-7
E-1
E-1
E-2
E-2
E-4
E-8
E-29
E-29
E-30
E-34
GL
Glossary
GL-1
IN
Index
IN-1
Menu Map and System Programming Reference
viii
Figures
1
Overview
1-1.
2
2-2.
D
Voice Messaging System Extensions for
PARTNER Advanced Communications System
Release 2.0 or later with 308 and PARTNER MAIL
Voice Messaging System Modules
2-3
Installing the PC Card
2-4
Understanding Programming
3-1.
5
1-5
Installation
2-1.
3
Voice Messaging Service
Programming Menus
3-10
System Management
5-1.
Language Menu
5-10
5-2.
Automated Attendant Service Menu
5-18
5-3.
Modifying Mailboxes
5-40
5-4.
Line Ownership
5-61
Dial Plans
D-1.
Dial Plan for PARTNER Advanced Communications
System Release 2.0 or Later
D-2
D-2.
Dial Plan for PARTNER Advanced Communications
System Release 2.0 or Later
D-3
D-3.
Dial Plan for PARTNER Endeavor Release 1.0 and
PARTNER Advanced Communications System
Release 1.0, 1.1, 2.0 or Later
D-4
Dial Plan for PARTNER Endeavor Release 1.0 and
PARTNER Advanced Communications System
Release 1.0, 1.1, 2.0 or Later
D-5
D-4.
ix
Figures
D-5.
x
Voice Messaging System Extensions for
PARTNER Plus and PARTNER II Communications
Systems
D-6
D-6.
Dial Plan for Systems with Fax Tone Detect and a
Voice Messaging System Module
D-8
D-7.
Dial Plan for Systems with Fax Tone Detect and a
Voice Messaging System Module
D-9
About This Document
Purpose
This guide provides instructions for installing, upgrading, programming,
and managing the PARTNER MAIL VS ® Voice Messaging System on the
PARTNER ® Plus, PARTNER II, PARTNER Endeavor, or PARTNER Advanced
Communications System (ACS). It is intended for the technician who installs the
hardware and programs the initial system settings and for the System Manager,
the person who is responsible for managing the system on an on-going basis.
xi
About This Guide
Terminology
This guide uses the following terms:
■
■
■
■
xii
Voice messaging system (VMS): The PARTNER MAIL VS Voice Messaging
System.
Subscribers: Users who have a mailbox on the voice messaging system.
Communications system (CS): in most countries, Release 3.1 or later
of the PARTNER Plus and PARTNER II systems, Release 1.0 of the
PARTNER Endeavor, and Release 1.0 or later of the PARTNER Advanced
Communications Systems. In the U.K., Release 2.0 or later of the
PARTNER Plus system. (Some VMS features are not available on all
communications systems.)
System phones: the telephones specifically designed to work with the
communications system, including (where available) the PARTNER-34D,
PARTNER-18D, PARTNER-18, PARTNER 6, PARTNER Endeavor-34D,
PARTNER Endeavor-18D, PARTNER Endeavor-18, PARTNER Endeavor-6,
MLS-34D, MLS-18D, MLS-12D, MLS-12, MLS-6, MDC 9000, and
MDW 9000LC-6, MDC 9000, MDW 9000, MDW 9010, and MDW 9030P.
How to Use This Guide
How to Use This Guide
If you are the technician, refer to the appropriate chapters to help you:
■
■
■
■
Install the voice messaging system hardware. Chapter 2 provides
instructions for installing and upgrading the voice messaging system
module in the communication system's control unit.
Refresh your memory about programming. Chapter 3 offers general
programming information for both the communications system and the
voice messaging system.
Perform initial programming. Chapter 4 provides step-by-step
programming instructions for integrating the voice messaging system with
the communications system. It also provides test procedures that you
should use after installation to ensure that the system is working properly.
Solve problems. Chapter 6 provides information to help you identify and
correct problems you may have with the voice messaging system.
If you are the System Manager, refer to the appropriate chapters to help you:
■
■
■
■
Learn about the voice messaging system. Chapter 1 describes the
voice messaging system's features and services.
Learn about programming. Chapter 3 offers general programming
information for both the communications system and the voice messaging
system.
Manage the voice messaging system. Chapter 5 provides instructions
for changing system settings to accommodate the changing needs of the
business. It also offers guidelines for setting up and using the
receptionist's extension.
Solve problems. Chapter 6 provides information to help you identify and
correct problems you may have with the voice messaging system.
After you are experienced with the system, refer to the Menu Map and System
Programming Reference pages at the back of this book to confirm or change
system settings.
This guide contains some information about communications system features as
well as voice messaging system features. For detailed information about a
specific communications system feature, refer to the Programming and Use
guide for the communications system.
xiii
About This Guide
Product Safety Statements
Product safety statements are identified in this guide by a
! CAUTION:
Indicates the presence of a hazard that will or can cause minor personal
injury or property damage if the hazard is not avoided.
! DANGER:
Indicates the presence of a hazard that can cause severe or fatal personal
injury if the hazard is not avoided.
How to Comment on This Guide
A feedback form is located at the end of this guide, after the appendixes.
If the form is missing, send your comments and recommendations for
changes to Publications Manager, Lucent Technologies, 211 Mount Airy Road
(Room 2W-226), Basking Ridge, NJ 07920 (FAX 1 908 953-6912).
xiv
Reference Materials
Reference Materials
In addition to this guide, the following materials are available (the order numbers
are in parentheses) for the voice messaging system:
■
■
Using the PARTNER MAIL VS Voice Messaging System (585-322-531)
provides instructions for using the voice messaging system features
(including how to listen to voice mail messages, record a personal
greeting, program a personal operator, create group lists, and program
Outcalling numbers and schedule).
PARTNER MAIL VS Voice Messaging System Planning Forms
(585-322-533) contains the forms that the System Manager must complete
before programming the voice messaging system.
To order these materials, call the Lucent Technologies BCS Publications
Fulfillment Center at 1 800 457-1235 in the continental U.S. or at
1 317 361-5353.
Some of these materials also are available in other languages. For more
information about these materials or about communications system materials,
contact the BCS Publications Fulfillment Center, your Lucent Technologies
Representative or local Authorized Dealer.
Identifying Your Communications
System
Not all voice messaging system features are available on all PARTNER
communications systems. To determine which PARTNER Advanced
at a display phone.
Communications System you are using, press
The system displays the communications system and its release number.
f59
xv
Overview
1
The PARTNER MAIL VS Voice Messaging System is designed to work with the
communications system to automate the call handling needs of the business.
The voice messaging system:
■
■
Expands easily from a 2-port to a 4-port configuration to accommodate
growth and ensure optimal performance. Both configurations include a
maximum of 48 mailboxes.
Handles up to two calls (in the 2-port configuration) or four calls (in the
4-port configuration) simultaneously and provides service for a
predetermined number of subscribers.
You can program your voice messaging system to answer outside calls, play a
customized message prompting the caller to press digits for the party with whom
the caller wants to speak, and efficiently route the call to the appropriate party
all without the aid of a receptionist.
PARTNER MAIL VS provides four Automated Attendants, each of which answers
different lines. You can create up to two Automated Attendant Announcements (in
each language selected for the system) for each Automated Attendant. For
example, you can offer callers a choice of a standard business hours/location
announcement or a frequently updated announcement featuring special offers
for your sales department and two other announcement choices for your service
department.
When a called party does not answer or is busy on another call, the voice
messaging system allows callers to leave a private message or to transfer to
another system extension or the receptionist's extension for assistance.
1-1
Overview
Subscribers (that is, your employees who have been assigned voice mailboxes)
can use the voice messaging system to retrieve messages from any touch-tone
phone on the premises or from a remote location, to create a Personal Greeting
for their mailbox, to forward messages with comment to one or more mailboxes
on the system, to create and send a message to other mailboxes on the system.
In addition, you can assign subscribers permission to have the system outcall a
list of up to five telephone and pager numbers according to a predefined
schedule whenever a new message is received. If you have a PARTNER
Advanced Communications System Release 3.0 or later, subscribers can listen
while a caller is leaving a message in their mailbox. You can also assign these
subscribers permission to record a conversation while they are active on a call at
an internal telephone.
The voice messaging system also offers a built-in Tutor feature, which is
discussed in the next section.
1-2
Tutor Feature
Tutor Feature
Tutor is an on-line help feature that allows users to easily access and listen to
information about commonly-used communications system features. Any user
can access the Tutorusers do not have to be voice messaging system
subscribers.
Tutor provides information about the following subjects:
■
■
■
System phone features such as ringing patterns, volume control,
speakerphone, display, buttons, and lights.
Various types of internal calls including group paging calls, voice interrupt
on busy calls, and hands-free answer on intercom calls.
System features such as Conference, Transfer, Auto Dialing, Personal
Speed Dialing, Last Number Redial, and Save Number Redial.
To access the Tutor menu, users simply make a call to the voice messaging
system. The system plays:
Welcome to PARTNER MAIL VS. Please enter extension
and #. Otherwise, to access PARTNER Tutor, press * 4.
*4
, they hear instructions for using Tutor, followed by a list of
When users dial
topics and subtopics. The user can then enter the topic and subtopic numbers of
their choice. Refer to Using the Tutor Feature in Chapter 5 for a list of topic and
subtopic numbers.
Instruction labels, which are designed for placement in the handset cradle on the
base of the system phone, are shipped with the voice messaging system
hardware.
Languages
The voice messaging system supports multiple languages. You can choose to
have outside callers hear all voice prompts and customized messages in one of
the supported languages (Monolingual Mode) or you can let outside callers
choose between two available languages preselected for the system by the
System Manager (Bilingual Mode).
When the system operates in Monolingual Mode, the language you choose for
voice prompts is referred to as the System Language. When the system operates
in Bilingual Mode, the language you choose for voice prompts when calls are first
answered is referred to as the Primary Language. Outside callers then have the
option of switching to the Secondary Language for the remainder of the call.
1-3
Overview
Voice Messaging Services
The voice messaging system provides three types of service:
■
■
■
Automated Attendant Service. Answers outside calls and transfers them
to the destination selected by the caller or plays an Announcement
selected by the caller.
Call Answer Service. Allows the caller to leave a message or to transfer
to another extension if the called party is busy or does not answer.
Voice Mail Service. Allows subscribers to listen to messages and
manage their own mailbox.
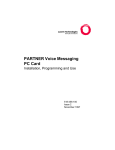
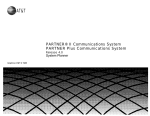
Figure 1-1 provides an overview of the features associated with each service.
1-4
Voice Messaging Services
PARTNER MAIL VS
Voice Messaging System
VMS Programming
Multiple
Automated Attendant Service
Call Answer Service
Voice Mail Service
Prompts caller to leave a message
or transfer to another extension or
transfer to a personal operator
when the called party does not
answer.
Prompts caller to make a choice
from a menu of options, then
transfers the call to the selected
destination (including an extension,
mailbox, or Centrex number), or
plays the selected announcement.
Allows subscribers to:
■ Listen to a caller leaving a
message
■ Create and send messages
■ Create Personal Group
Distribution Lists
■ Listen to messages
■ Adjust playback volume while
listening to messages
■ Forward messages with comment
to other mailboxes
■ Delete messages
■ Set up Outcalling to a list of
pager and telephone numbers
■ Record a personal greeting
■ Specify a Personal Operator
■ Change password
■ Record a call
VMS Hunt Schedule
CS Programming
Always
Communications
system always
routes calls to
Automated
Attendant
Service.
Day Only
Night Only
Communications
system routes
calls to Automated Attendant
Service when
Night Service is
on.
Communications
system routes
calls to Automated Attendant
Service when
Night Service is
off.
VMS Extension
Coverage
VMS Line
Coverage
Caller hears the
called party’s
personal greeting and can leave
a message.
Caller hears the
line owner’s
personal greeting and can leave
a message.
Automatic
VMS Coverage
Manual
VMS Coverage
Voice Mailbox
Transfer
System users
press a button to
transfer callers
directly to a voice
mailbox without
ringing the
extension first.
VMS Hunt Delay
Immediate
Call Handling
Automated Attendant
Service answers outside
calls immediately. The
receptionist acts as a back
-up for unanswered calls.
Figure 1-1.
Delayed
Call Handling
The receptionist answers
outside calls. Calls not
answered by the specified
number of rings go to the
Automated Attendant
Service.
Subscribers
have voice mail
coverage on all
the time at their
Extension.
Subscribers can
turn voice mail
coverage on and
off at their
Extension.
Send All Calls
Subscribers can use Do
Not Disturb in conjunction with automatic or
manual VMS coverage.
Doing so enables callers
to receive Call Answer
Service immediately—
calls do not ring the
extension first
Voice Messaging Service
1-5
Overview
Automated Attendant Service
The Automated Attendant Service can answer and route outside calls without
assistance from a receptionist. Release 5.0 offers four Automated Attendants,
allowing the incoming lines that are directed to the voice messaging system to be
answered by separate Automated Attendants. The System Manager is
responsible for assigning lines to the appropriate Automated Attendant.
By programming multiple Automated Attendants, you can customize how calls
are answered for separate areas of your business that use different sets of lines.
After an outside call is answered, the Automated Attendant Service plays a
customized message (called the menu prompt). Typically the message
welcomes callersto let them know they have reached the correct number
then offers callers a menu of options for transferring to the desired party or
listening to an Announcement. (It is recommended that the menu offer not more
than five options to avoid confusing callers.) A call can be transferred to an
extension number (including the receptionists), preprogrammed mailbox
number, or to a preprogrammed Centrex number.
With the Multiple Automated Attendant feature, you can record up to two
Announcements for each Automated Attendant. Note that each of these
Automated Attendants operates in the same language (or language
combinations, if the system is configured for Bilingual Mode). Announcements
are often used to answer frequently asked questions, such as business hours
and location, emergency service, special offers, etc. Each Announcement can
be up to four minutes in length. Callers can choose to listen to these
Announcements, so your staff has more time to answer other calls and perform
other tasks.
For each Automated Attendant, you can customize the menu prompt for use
during normal business hours (called the Day Menu Prompt) and for use after
normal business hours (called the Night Menu Prompt). For example, you can set
up Automated Attendant Service so that callers hear the following prompt during
the day if the system is set for Monolingual Mode and the System Language is
U.S. English:
Thank you for calling the ANY Travel Agency. We’re open
Monday through Saturday from 9 to 5. If you know the
extension you want, dial it now. For getaway package
information, press 3. For airline or hotel reservations,
press 4. For other assistance, press 0 or remain on the
line. To replay this message, press * 4.
Note that callers who want general information regarding the current discount
travel package or agency location can choose to listen to an Announcement. For
they hear the following Announcement:
example, when callers press
3
Are you tired of battling the ice, snow, and
after-Christmas sale crowds? Take advantage of our January
sunny escape package-3 days and 2 nights in San Juan,
1-6
Voice Messaging Services
Puerto Rico for $439 per person, including hotel and
airfare. To speak to an agent about this package or other
winter getaways, press * 8 and extension 13.
For after-hours callers, you can set up Automated Attendant Service to play this
prompt:
You have reached the ANY Travel Agency. Our hours are 8
to 5, Monday through Friday. Please press 9 to leave a
message and we will return your call when the office opens.
For a system set for Bilingual Mode, the Day Menu Prompt should let callers
know that they can switch from the Primary Language to the Secondary
while listening to an Automated
Language. Note that callers can also press
Attendant Announcement to switch between the Primary and Secondary
Languages. In the following example, the Primary Language is Latin American
Spanish and the Secondary Language is U.S. English:
*1
Gracias por llamar a Software México. For English,
press * 1. Si usted tiene teléfono de tonos y conoce
el número de extensión, marquelo ahora. De lo contrario,
espere a ser atendido por nuestra operadora.
For after-hours callers, you can set up Automated Attendant Service to play this
prompt:
Gracias por llamar a Software México. For English, press *
1. Nuestro horario de oficina es de 9 a 14:30 horas y de
16 a 18 horas. Si usted tiene teléfono de tonos y conoce
el número de la extensión a la que desea llamar, marquelo
ahora. De lo contrario, espere y deje un mensaje con la
operadora.
NOTE:
When the system is installed initially, Automated Attendant Service has this
factory-set Day Menu Prompt:
Hello, welcome to PARTNER MAIL VS. Please enter the
extension number of the person you wish to reach or press
0 to reach the receptionist.
Note that if a caller chooses to dial 0 to reach an operator (or if the caller fails to
make any selection), the call can be routed automatically to extension 10
(default). If you wish, you may program a Selector Code to transfer a caller
directly to another specified mailbox. The Selector Code is the first digit dialed by
the caller in response to the menu prompts. A corresponding Selector Code
Action can be assigned to each of the Selector Codes allowing callers to transfer
to another extension or group, a preprogrammed mailbox or Centrex number, or
to an Announcement.
1-7
Overview
In addition, Automated Attendant Service has this factory-set Night Menu
Prompt:
Good Evening. Welcome to PARTNER MAIL VS. Please enter
the extension number of the person you wish to reach, or
press 9 to leave a message with the receptionist.
Automated Attendant Service is useful for many businesses, such as car
dealerships, insurance agencies, and stores. For example, a car dealership can
use Automated Attendant Service to allow its customers to reach the customer
service department directly (even if that department is located elsewhere and is
connected to the business by Centrex service). This frees sales people to handle
customer transactions while the Automated Attendant Service transfers service
calls to the appropriate department. In this case, the Automated Attendant
Service can be programmed to prompt the caller to enter a single digit to reach
any available customer service representative.
Communications System Features Affecting
Automated Attendant Service
When planning Automated Attendant Service for each Automated Attendant, you
must choose settings for the following communications system features:
■
■
■
■
Group Call Distribution. Specifies the outside lines that are to be
answered by each Automated Attendant Service.
VMS Hunt Delay. Specifies whether the Automated Attendant Service is
to provide immediate or delayed call handling.
VMS Hunt Schedule. Specifies when the communications system is to
route calls to the Automated Attendant Service.
Transfer Return Extension. Specifies where unanswered calls are
transferred by the voice mail system.
Each of these features is explained briefly below. For more information about
these communications system features, see the Programming and Use guide for
your communications system.
Group Call Distribution
This feature lets you specify the outside lines for which you want Automated
Attendant Service coverage. You can specify some or all of your company's
outside lines.
VMS Hunt Delay
This option specifies after how many rings the communications system will route
calls to the Automated Attendant Service. The setting you choose for this feature
depends on whether the Automated Attendant Service or your receptionist acts
as the primary call handler. Refer to Automated Attendant Service Scenarios,
later in this chapter.
1-8
Voice Messaging Services
On PARTNER ACS Release 3.0 or later, you can specify the VMS Hunt Delay by
the number of rings (from 0 to 6) after which the Automated Attendant Service
answers calls. You can specify this on a per-line basis. The greater the number of
rings, the greater the delaygiving the receptionist more time to answer a call
before it is routed to the Automated Attendant Service. Note that the number of
rings you specify for this option will depend on whether you subscribe to Caller
ID service from your local telephone company. (See Chapter 4 for more
information.) You can also specify different settings for day and night operation.
For all other communications systems, you can choose one of the following
settings, which will be used for both day and night operation:
■
■
Immediate (factory setting). The Automated Attendant Service answers
outside calls on the second ring (default) and plays the Day or Night Menu
Prompt. The receptionist can act as backup. Callers using rotary phones
or callers requesting assistance can be transferred to the receptionist's
extension.
Delayed. The Automated Attendant Service answers outside calls after the
fourth ring. This delay gives the receptionist time to answer the call.
VMS Hunt Schedule
This feature determines when the communications system is to route calls to the
Automated Attendant Service. On the PARTNER ACS Release 3.0 or later, this
feature allows you to specify this information for each line. For all other
communications systems, the information you specify applies to all lines
receiving Automated Attendant Service. VMS Hunt Schedule works in
conjunction with the communication system's Night Service feature so that the
voice messaging system can play the appropriate menu prompt. In other words,
the menu prompt the caller hears depends on the VMS Hunt Schedule setting
you select and the status of the Night Service button at the receptionist's
extension.
You can choose one of the following VMS Hunt Schedule settings:
■
■
■
Always (factory setting). Routes outside calls to Automated Attendant
Service for call handling all the time. When Night Service is off, the Day
Menu Prompt plays; when Night Service is on, the Night Menu Prompt
plays.
Day Only. Routes outside calls to Automated Attendant Service only when
Night Service is off. The Day Menu Prompt plays.
Night Only. Routes outside calls to Automated Attendant Service only
when Night Service is on. The Night Menu Prompt plays.
Transfer Return Extension
For extensions associated with the mail system unit, this option specifies where
unanswered calls that are transferred by the voice mail system return. If the mail
system transfers a call to an extension and the call is not answered, the
communications system transfers the call to the Transfer Return Extension that
1-9
Overview
you have programmed. The call rings at this extension until it is answered. For
extensions that do not have Voice Mail coverage, this option can be programmed
to ensure that unanswered calls transferred by the mail system return to the
designated extension, where they ring until answered.
Automated Attendant Service Scenarios
The following sample scenarios illustrate typical ways in which Automated
Attendant Service for an individual Automated Attendant is set up with the
communications system features:
■
Case 1: The receptionist is the primary call handler both day and night.
Automated Attendant Service handles overflow.
1. Use Group Call Distribution (#206) Setting 1 to identify the lines to
be answered by Automated Attendant Service.
2. Set VMS Hunt Schedule (#507) to Always.
3. Set VMS Hunt Delay (#506) to Delayed.
■
Case 2: Automated Attendant Service is the primary call handler.
1. Use Group Call Distribution (#206) Setting 1 to identify the lines to
be answered by Automated Attendant Service.
2. Set VMS Hunt Schedule (#507) to Always.
3. Set VMS Hunt Delay (#506) to Immediate.
■
Case 3: The receptionist answers calls during the day; Automated
Attendant Service answers calls at night.
1. Use Group Call Distribution (#206) Setting 1 to identify the lines to
be answered by Automated Attendant Service.
2. Set VMS Hunt Schedule (#507) to Night Only.
3. Set VMS Hunt Delay (#506) to Immediate.
Music On Hold
If you use Automated Attendant Service, you also may want to use the
communications system's Music On Hold feature. When Music On Hold is Active
and an audio source is connected to the system, callers waiting to be transferred
hear music or recorded material. If Music On Hold is Not Active, callers hear
tones, ringing, or silence (depending on how the communications system is set
up) while they are being transferred.
For more information, see Music On Hold and Ring on Transfer in the
Programming and Use guide for the communications system.
1-10
Voice Messaging Services
Call Answer Service
This service offers callers the following options when they reach an extension that
is unable to answer their call:
■
■
*1
If the system is in Bilingual Mode, press
while listening to the
personal greeting to switch between the Primary and Secondary
Languages.
Leave a detailed, confidential message in the called party's mailbox.
0
Press *8 to transfer to another system extension.
Callers can press 0 or *8 before, during, or after leaving a message.
■
Press
to transfer to the receptionist's extension for assistance or to the
extension (or Guest Mailbox) administered as the Personal Operator.
■
NOTE:
Until subscribers record a personal greeting for their mailbox, outside
callers hear this factory-set message in either the System Language
(Monolingual Mode) or the Primary Language (Bilingual Mode):
Extension XX is not available. To leave a message,
wait for the tone. After recording hang up or press 1 for
more options.
Communications System Features Affecting Call
Answer Service
Call Answer Service works with the following communications system features:
■
VMS Extension Coverage
■
Do Not Disturb
■
VMS Line Coverage Extension
■
Voice Mailbox Transfer
Each of these features is explained further in this section. For more information
on these communications system features, see the Programming and Use guide
for your communications system.
1-11
Overview
VMS Extension Coverage
VMS Extension Coverage may be either automatic or manual.
■
Automatic VMS Coverage: When the communications system's
Automatic VMS Cover feature (#310) is Assigned for an extension,
intercom and transferred callers can leave messages or transfer to
another extension when the called person does not answer by the fourth
ring (or by the number of rings specified with the communications
system's VMS Cover Rings feature (#321 on PARTNER ACS Release 3.0 or
later, #117 on all other communications systems)1. The system greets the
caller with the subscriber's personal greeting (or with the system greeting
if a personal greeting is not recorded). If the system is in Bilingual Mode
and the subscriber recorded a personal greeting in two languages, the
.
caller can switch between the two languages by pressing
*1
■
Manual VMS Coverage: Regardless of the Automatic VMS Cover setting,
the communications system allows subscribers to press a programmed
button to turn voice mail coverage on and off at their extension. To make
this possible, the VMS Cover feature (F15) must be programmed on a
button with lights on the subscriber's system phone.
Do Not Disturb
The Do Not Disturb button can be used to prevent calls for the extensions from
audibly alerting (lights still flash). Subscribers (with PARTNER II Communications
System 4.0 or any PARTNER ACS release) who have VMS Extension Coverage
either automatic or manualcan use this communications system feature when
they want calls sent to their mailboxes immediately.
Line Coverage Extension
Line Coverage Extension (#208) identifies an extension as the line owner of a
specific outside line so unanswered calls on that line will be sent to the owners
voice mailbox when either Automatic VMS Cover (#310) or VMS Cover (see
Manual VMS Coverage above) is on at the owners extension. Typically, line
coverage is assigned to lines, such as personal lines, that are not assigned
Automated Attendant Service coverage. You can use VMS Cover Rings (#321 on
PARTNER ACS Release 3.0 or later, #117 on all other communications systems)
to specify the number of times calls ring before they are sent to the line owners
mailbox.
VMS Line Cover
As an alternative to Line Coverage Extension, you can program VMS Line Cover
(#206, Option 3). Calls are routed directly to the voice mailbox of a specific user
after four rings, when you program VMS Line Cover for the lines assigned to Hunt
Group 7 and assign a line owner in the voice messaging system.
1.
1-12
VMS Cover Rings (#117) is not available on all systems. Check the Programming and
Use guide for the communications system.
Voice Messaging Services
Voice Mailbox Transfer
A Voice Mailbox Transfer (F14) button can be programmed on a user's phone to
transfer callers directly to a subscriber's mailbox without ringing the extension
first. This feature is useful when a user is handling calls for a subscriber who is
not at his or her desk or when transferring calls to a guest mailbox.
Voice Mail Service
This service allows subscribers to manage their own mailboxes. With it, a
subscriber can:
■
Create and send messages to other system mailboxes.
■
Listen to messages, then save or delete them.
■
Forward messages with comment to another subscribers mailbox.
■
■
■
■
■
■
■
■
■
Record a personal greeting (in Bilingual Mode, the user may record his or
her personal greeting in both the Primary and Secondary Languages).
Create and maintain Personal Group Lists.
Change the default password for his or her mailbox to ensure that
messages are kept confidential.
Listen to a caller leaving a message in the subscribers mailbox. (Note that
this feature is available only to subscribers using a PARTNER ACS
Release 3.0 or later.)
Specify a Personal Operator for their mailbox.
Have the system outcall a list of specified telephone and pager numbers
according to a predefined schedule whenever a new message is
received.
Transfer to another extension or to the receptionist's extension.
Listen to and forward recorded conversations at your extension. (Note that
this feature is available only to subscribers using a PARTNER ACS
Release 3.0 or later with a 4-port PARTNER MAIL VS R5.0 configuration for
whom the System Manager has administered the feature.)
4
7
Adjust the playback volume while listening to messages. To increase the
to
volume of messages being played back, press , or press
decrease the volume.
A subscriber's extension number and mailbox number are the same. When a
caller leaves a message, the voice messaging system places the message in the
subscriber's mailbox, and turns on the message light (if available) at the
subscriber's phone when a new message is received. If the subscriber has
Outcalling privileges, the system will call the list of telephone and pager numbers
specified by the subscriber if the message is received during the hours specified
in the subscribers Outcalling schedule and Outcalling is turned on. The
1-13
Overview
subscriber can also define the time interval between outcall attempts and the
number of times the list of Outcalling numbers is dialed for each attempt.
Subscribers can retrieve messages at their convenience from any touch-tone
phone either while on-site or from an off-site location. The system informs
subscribers of the number of new and old (saved) messages in their mailboxes,
and plays new messages first. Subscribers can refer to their Using PARTNER
MAIL VS® booklet for instructions on recording a personal greeting, changing a
password, forwarding a message, specifying an outcall list and schedule for
Outcalling, and performing other Voice Mail Service procedures.
Voice Mail Service also allows the System Manager to program the voice
messaging system. See Voice Messaging System Programming in Chapter 3
for more information.
When subscribers call into the Voice Mail Service, they hear this factory-set
prompt in either the System Language (Monolingual Mode) or the Primary and
Secondary Language (Bilingual Mode):
Welcome to PARTNER MAIL VS. Please enter extension
and #. Otherwise, to access PARTNER Tutor, press * 4.
The System Manager can change, on a per mailbox basis, the language
subscribers hear after they access their mailboxes. The mailbox language can
be different from the System Language selected in Monolingual Mode or the
Primary and Secondary Languages selected in Bilingual Mode.
Mailboxes
The voice messaging system provides 48 mailboxes, which are assigned to
extensions 10 through 57.
NOTE:
To protect system security, the System Manager should delete any unused
mailboxes.
Guest Mailboxes
The System Manager can use any of the 48 mailboxes that come with the voice
messaging system as guest mailboxes for users who do not have their own
phone, but still require mailboxes. If this is the case, either the Automated
Attendant Service or system users can transfer a caller directly to the guest
mailbox where the caller can leave a message. Guests can call the voice
messaging system from any touch-tone phone to retrieve their messages. For
more information on guest mailboxes, see Guest Mailboxes in Chapter 5.
1-14
Security
Security
The System Manager is responsible for the security of the system. It is important
that you fully understand and appropriately administer this product to reduce
your risk of incurring charges that result from unauthorized use of the system.
Under the law, you, the customer are responsible for paying part or all of those
unauthorized calls.
Be aware that criminals called hackers may attempt to gain unauthorized access
to your communications system and your voice mail system. Hackers often try to
trick a companys employees into providing them with access to an outside line
or an outside operator. They may also concentrate their activities in two areas
related to the mail system:
■
■
*8
They try to dial into a mailbox, then execute a transfer by dialing
.
Then they dial an access code, followed by a digit string to either direct
dial or access a network operator to complete the call.
They try to locate unused or unprotected mailboxes and use them as
drop-off points for their own messages.
System Security Guidelines
To reduce the risk of unauthorized use of your communications and voice mail
systems, you should
■
■
■
■
■
■
■
require that the System Managers Password be changed from the factory
setting. Use a hard-to-guess value.
delete any unused mailboxes immediately.
require all employees who have voice mailboxes to use passwords to
protect their mailboxes.
permit no Outcalling or permit this privilege only for those with legitimate
business need.
advise subscribers to change their passwords (a 4-digit password is
recommended) when they log into the Voice Mail Service for the first time
and frequently thereafter. Subscribers can refer to the instructions for
changing their passwords in Using the PARTNER MAIL VS ®.
familiarize yourself with the impact of the Outcalling feature on system
performance and security. If Outcalling is not permitted on the system,
Outgoing Call Restriction should be set to Inside Only for the voice mail
system extensions. It is strongly recommended that you use the
communications system Call Restriction features (that is, Outgoing Call
Restriction used with Allowed and Disallowed Lists) to restrict Outcalling
numbers. See Outgoing Call Restriction in Chapter 4 for details.
monitor your call reporting system records of outgoing calls to identify
possible system abuse.
1-15
Overview
You should also
■
■
provide effective physical security for the room containing your
telecommunications equipment and the room with administrative tools,
records, and System Administration information. These areas should be
locked when unattended.
provide a secure trash disposal for all sensitive information, including your
companys telephone directories, call accounting records, or anything that
may supply information about your communications system. This trash
should be shredded.
Security Policy and User Education
As part of your responsibility for protecting system security, you should establish
and communicate security policies for all system users. You should let users
know what measures they should take to protect system security and explain
how hackers may try to gain access to the system. In particular, you should
provide users with the following information:
■
■
■
All reports of trouble, requests to move extensions, or any other
administrative details associated with the communications system or the
voice mail system should be handled by one person (the System
Manager) or within one department. Anyone claiming to be a telephone
company representative should be referred to this person or department.
If a caller claims to be an authorized telephone company representative,
verify his or her identity before permitting that person any access to the
system.
Establish well-controlled policies for passwords:
Establish a specific date for changing passwords (for example, the
first of each month) and help users remember to do it.
Advise subscribers to use a 4-digit password.
Tell users that passwords should not be recycled. They should be
hard to guess and should not contain:
■
all the same numbers (for example, 4444)
■
sequential characters (for example, 1234)
■
personal information that can be associated with them (such
as their name, birthdate, telephone number, or social
security number)
Discourage the practice of writing down passwords. If a password
needs to be written down, keep it in a secure place and never
discard it while it is still active.
Tell users never to program passwords onto Auto Dial buttons.
Display phones reveal the programmed numbers.
1-16
Security
■
■
Educate employees that hackers may try to trick them into providing them
with dial tone or dialing a number for them.
Ask users to tell you if any of the following suspicious activity occurs:
inability to log into Voice Mail
lost mail messages or altered greetings
inability to get an outside line
series of calls where there is silence on the other end or the caller
hangs up
sudden increase in wrong numbers
caller complaints that your lines are busy
callers claiming to represent the phone company. Ask for a
callback number.
callers trying to obtain sensitive information or asking for assistance
in placing outside or long-distance calls. Ask for a callback
number.
increases in internal requests for assistance in making outside calls
(particularly international calls or requests for dial tone).
■
■
■
■
■
Make users with Outcalling privileges aware of the potential risks and their
responsibilities.
Never distribute the office telephone directory to anyone outside the
company.
Collect old office telephone directories and shred them.
Never discuss your telephone systems numbering plan with anyone
outside your company.
Any time a call appears to be suspicious, call the Technical Service Center
at 1 800 628-2888 (in the U.S.).
1-17
Overview
System Manager Activities Checklist
For each new PARTNER MAIL VS system, perform the following activities:
■
■
■
■
■
1-18
Complete the communications system and voice messaging system
planning forms (see Chapter 3).
Install the voice messaging system (see Chapter 2).
Change the factory-set password for the System Managers login (99) in
the voice messaging system (see Chapter 5).
Change the System Administration Programming Language, if necessary
(see Chapter 4).
Complete the appropriate communications system and voice messaging
system programming (see the Initial Programming Checklist in
Chapter 4).
■
Verify system operation (see Chapter 4).
■
Generate a System Configuration Report (see Chapter 4).
■
Perform a system backup (see Chapter 4).
Installation
2
This chapter provides instructions for installing the voice messaging system's
hardware in the communications system's control unit. It also includes
instructions for connecting a printer to the system to allow you to print the System
Configuration Report.
Before You Start
Refer to Appendix A to verify that you have the appropriate voice messaging
system and communications system hardware. Then
■
■
Make sure the communications system control unit, processor module(s),
and line/extension modules have been installed.
Make sure this installation meets the environmental and electrical
requirements listed in Appendix A of this guide.
2-1
Installation
Installing the PARTNER MAIL VS
Module
To install the voice messaging system module in the communications system's
control unit:
1. Turn off power to the communications system's control unit: either pull out
the main circuit breaker on the upper right rear corner of the control unit or
move the on/off switch to the off position, or remove the power cord from
the AC outlet.
! CAUTION:
Failure to turn off power may damage the control unit and/or the
voice messaging system.
2. Install the voice messaging system module in the first available slot to the
right of the last installed communications system module (in a 5-slot
configuration). Keep in mind the following guidelines:
The voice messaging system module should always be installed
after the communications system modules to ensure consecutive
extension numbering.
On the PARTNER Endeavor or Advanced Communications System,
you must install the voice messaging system module in the slot to
the right of the PARTNER ACS module in the 2-slot carrier (see
Figure D- 4 in Appendix D).
If your system has a 5-slot carrier, you may install the voice
messaging system module in any slot except the center slot (see
Figure 2-1, as well as Figures D-1, D-2, D-3 in Appendix D).
If the control unit is upgraded with more communications system
modules, the voice messaging system module should be removed,
the new modules should be installed, and the voice messaging
system module should be installed in the first available slot after the
communication system modules. The VMS Hunt Group Extensions
and Transfer Return Extensions must then be reprogrammed (see
Chapter 4).
Do not install the voice messaging system module in the first slot of
the PARTNER Plus system control unit or the PARTNER II system
primary carrier (see Figure D-5).
NOTE:
Push slowly but firmly in the center of the module until the module
locks into place, and is attached to the rear of the backplane. (A
click indicates that the connectors are attached to the rear of the
backplane.) Use the carrier shelf as a reference, and do not tilt,
slant, or force the module. If it does not insert easily, remove the
module, clear any obstruction, and reinsert it.
2-2
Installing the PARTNER MAIL VS Module
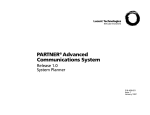
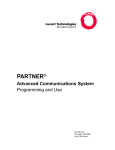
3. Refer to Figure 2-1 or to the figures in Appendix D, which illustrate the
most common configurations and dial plans, to determine the dial plan for
your system. Then record the extensions associated with the PARTNER
MAIL VS module on Form B1 of the System Planner for the
communications system.
Note that the communications system recognizes the voice
messaging system module as a 6-extension module (such as a 200,
206, or 400 module). Therefore, Figure 2-1 depicts the voice
messaging system module as a (shaded) 6-extension module, which
is how it appears to the communications system, even though the
voice messaging system module has no physical line jacks.
5-Slot Carrier
ACS
Processor
Module
308
308
308
PFT
L
I
N
E
S
Line
Jacks
4
7
1
10
5
6
8
9
2
3
11
12
18
26
10
34
19
20
27
28
11
12
35
36
21
29
13
37
22
30
14
38
23
31
15
39
24
32
16
40
25
33
17
41
PFT
E
X
T
E
N
S
I
O
N
S
Extension
Jacks
2-port
Systems
4-port
Systems
Figure 2-1.
If PARTNER MAIL VS
Is Installed In Slot:
5
Then Assign These
46, 47
Exts. To Hunt Group 7:
If PARTNER MAIL VS
Is Installed In Slot:
5
Then Assign These
44, 45,
Exts. To Hunt Group 7: 46, 47
Voice Messaging System Extensions for PARTNER Advanced
Communications System Release 2.0 or later with 308 and PARTNER MAIL
Voice Messaging System Modules
2-3
Installation
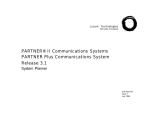
Figure 2-2.
Installing the PC Card
4. To install the PC Card (that is, a 2-Port Card with Backup and Restore or
4-Port Expansion Card with Backup and Restore), insert the card in the
vertical slot on the lower front of the voice messaging system module (see
the area labeled Slot for PC Card in Figure 2-2). Make sure the arrows on
the card label face up and in. Also make sure the card is pushed in all the
way.
NOTE:
After you have administered the voice messaging system for the first
time, it is recommended that you perform a system backup. See
Chapter 4 for details.
5. Turn on power to the control unit. The Power LED should lightif it does,
skip to Step 6. If the Power LED does not light, power down the control
unit, reseat the voice messaging system module, then power up the
control unit again. If the Power LED still does not light, call for support as
indicated on the inside front cover of this guide.
2-4
Installing the PARTNER MAIL VS Module
6. After the voice messaging system module is powered up, it performs
some self-diagnostic tests. When these tests are complete the LED on the
voice messaging system module works as follows:
LED Color and Pattern
State
Steady Green
ON
Steady Red
Test Failed
If the LED lights steady red (that is, the test failed), do the following:
Power down the voice messaging system.
Re-install the PC Card.
Power up the control unit again.
If the LED lights steady red again, contact your local Authorized Dealer or
the Lucent Technologies Technical Service Center at 1 800 628-2888.
7. At this point, do one of the following:
■
■
■
■
To determine which voice messaging system and communications
system planning forms must be completed before you begin
programming, see Chapter 3.
To review system programming guidelines, see Chapter 3.
To review the programming required for your PARTNER Voice
Messaging System, refer to the Initial Programming Checklist in
Chapter 4, and complete the appropriate procedures included in
that chapter.
To update PARTNER Voice Messaging System programming, refer
to Chapter 5 or to the System Programming Reference pages at the
end of this guide.
2-5
Installation
Connecting a PC to the
PARTNER MAIL VS
You can generate a Configuration Report in the PARTNER MAIL VS system and
send it to your PC, where it is saved in a text file that you can open and print. See
the instructions for generating a Configuration Report in chapters 4 and 5.
To connect a PC to the PARTNER MAIL VS, you need the following equipment:
■
a PC with an available serial (COM) port and running Windows 95,
Windows NT 4.0 or later, or Windows 98
■
a D8W-87 cable
■
an AT&T 355A connector (or equivalent)
■
a 25-pin female-to-female connector
■
a 25-pin to 25-pin serial cable
■
a 9-pin to 25-pin adapter (if your PC has a 9-pin serial (COM) port)
To connect your PC to the PARTNER MAIL VS:
1. Turn off your PC.
2. Connect the D8W-87 cable to the PMVS serial port (see the area labeled
COM in Figure 2-2).
3. Connect the other end of the D8W-87 cable to the AT&T 355A connector.
4. Connect the 25-pin female-to-female connector to the AT&T 355A
connector.
5. Connect the 25-pin to 25-pin serial cable to the 25-pin female-to-female
connector.
6. Perform one of the following steps:
If your PC has a 25-pin serial (COM) port, connect the other end of
the 25-pin to 25-pin serial cable to the serial (COM) port on your
PC.
If your PC has a 9-pin serial (COM) port, connect the 9-pin to 25-pin
adapter to the other end of the 25-pin to 25-pin serial cable, and
then connect the 9-pin connector into the serial (COM) port on your
PC.
7. Turn on your PC.
2-6
Understanding Programming
3
This chapter provides general programming information for the communications
system and the voice messaging system. Both systems must be programmed so
they can work together as an integrated unit. Before you begin any
programming, you must ensure that all required communications system and
voice messaging system planning forms described in this chapter are
completed. You will refer to these forms during programming.
Communications System
Programming
When the communications system is installed, it uses factory settings that reflect
the most common usage of the equipment. You can change these settings as
required to customize them for the business.
You can program the communications system from extension 10. Some systems
also allow programming from extension 11. Check the Programming and Use
guide for the communications system for more information. If your system
supports programming from both extensions, you may find it more convenient to
program from extension 11. This capability allows the receptionist to continue
handling calls at extension 10 while you program.
System Programming changes settings for the system as a whole, or for
individual lines or extensions. (Refer to the Programming and Use guide for the
communications system for more information about System Programming
options.)
On some communications systems, a password may be required to enter System
Programming mode. Check the Programming and Use guide for the
communications system for more information.
3-1
Understanding Programming
Planning Forms
Refer to the communications system's System Planner when you are changing
system settings, and be sure to record any changes you make. The following
forms from the System Planner contain information about the voice messaging
system:
■
■
■
■
3-2
Form A: System Configuration. Contains basic information about the
system including the line number and type of voice messaging service
required for each line.
Form B1: System Extensions. Contains basic information about each
extension. This includes the type of phone or auxiliary equipment at the
extension, and the name of the user or a description of how the extension
is used.
Form B2: Customized Extension Settings. Contains feature settings,
such as Automatic VMS Cover and Automatic Extension Privacy, and
group assignments for each extension.
Form C: Button Assignments. Specifies which features are
programmed on buttons for each extension. This includes VMS Cover, Do
Not Disturb, Voice Mailbox Transfer, and Voice Mail Messages buttons.
Communications System Programming
Using the Forms
The following table shows what procedures should be used and to which
communications systems forms they correspond in planning for voice mail
system installation and programming:
To
Use Feature/Procedure
Complete
CS Form
Assign the extensions associated with the VMS
hardware to Hunt Group 7.
Hunt Group Extensions
(#505)
B2
Assign lines to Hunt Group 7 so calls can ring directly to the VMS and receive Automated Attendant
Service.
Group Call Distribution
(#206, Option 1)
B1
Assign lines to Hunt Group 7 so calls can ring directly to the VMS and receive Call Answer Service.
Group Call Distribution
(#206, Option 3)
B1
Identify an extension as an owner of an outside line
so calls on that line can ring directly to the owners
voice mailbox when Automatic VMS Cover or VMS
Cover is on at owners ext.
Line Coverage Extension
(#208)
A, B2
Determine how quickly outside calls should be answered by the Automated Attendant Service of the
VMS (i.e., by the number of rings on PARTNER
ACS Release 3.0 or later; immediate or delayed
call handling on all other systems). On PARTNER
ACS Release 3.0 or later, this feature can be administered on a per-line basis and differently for
day and night.
VMS Hunt Delay (#506)
A
Determine when outside calls should ring the VMS
Hunt Group (always, day only, or night only) depending on the status of the Night Service Button
at ext. 10. On PARTNER ACS Release 3.0 or later,
this feature can be administered on a per-line basis.
VMS Hunt Schedule
(#507)
A
Determine whether an extensions unanswered intercom and transferred calls and outside calls on
lines assigned ownership (#208) are automatically
covered by the VMS.
Automatic VMS Cover
(#310)
B2
Specify the number of times intercom and transferred calls or outside calls on lines assigned ownership ring at extensions before they are sent to the
VMS.
VMS Cover Rings (#117;
on PARTNER ACS Release 3.0 or later #321)
A
Identify the extension to which a call transferred by
the VMS should be routed if the destination extension does not answer and does not have voice mail
coverage active. (The transfer return extension for
the VMS is typically ext. 10).
Transfer Return Extension (#306)
B1
3-3
Understanding Programming
Using System Programming
System Programming requires a system display phone at extension 10
(or 11 if available), with a programming overlay placed over the phone's dialpad.
System Programming procedures are identified by # and a 3-digit code (for
example, the procedure code for System Date is #101).
You can program the system in one of two ways:
■
■
Direct Method. You access a programming procedure directly by dialing
the code for that procedure. This method works best when you are using
only a few procedures during the programming session, and you know the
to change the system date.
codes. For example, press
#101
Cycle Method. You cycle through a sequence of procedures in numerical
order by pressing N or P. You should use this
method when programming the communications system for the first time,
or when you are changing a series of related settings. However,
procedures #399, #609, and #728 are skipped when you cycle through
procedures.
NOTE:
You can talk on the telephone while you program. This is useful if you need
to call for support while programming. However, you must place the call
before you enter programming mode, and you must use the handset (not
the speakerphone) to talk.
The Programming Overlays
i
During System Programming, the normal functions of several buttons on the
phone at extension 10 (or 11 if available) change. For example, left
, which is the button used to enter programming mode. To
becomes
identify these buttons while programming, place the appropriate programming
overlay provided with the system over the dialpad of the phone at extension 10 or
11.
s
Use the following special buttons while programming:
■
■
N P cycle forward and backward through the
n and p cycle forward and backward through a procedure's
and
programming procedures.
parameters. A parameter is typically an outside line, an extension, or a
telephone list entry.
■
■
3-4
D d
and
cycle forward and backward through the valid list
entries. These buttons work only for fixed data, such as a line or extension
number. They do not work for variable data such as date, time, password,
telephone numbers, or doorphone assignments.
r returns the current setting to the factory setting.
Communications System Programming
■
■
■
e ends an entry of variable length, such as a telephone number in an
Allowed Phone Number List.
s starts the System Programming process.
c starts the Centralized Telephone Programming process (that
is, customizing individual telephones from extension 10, or 11
if available).
■
f, when followed by 00, enters or exits programming mode.
Programming Mode
To enter programming mode:
1. At extension 10 (or 11 if available), make sure the programming overlay is
in place over the system phone's dialpad.
f00.
3. Press ss.
2. Press
4. Enter the System Password, if required.
5. Enter the specific programming procedure codes.
3-5
Understanding Programming
Voice Messaging System Programming
Before you program the voice messaging system, obtain completed copies of
planning forms for the communications system and the voice messaging system.
These forms provide the names, extensions, mailboxes and other information
required to program the voice messaging system.
Planning Forms
You need the following forms for the voice messaging system:
■
■
■
Form 2: Mailbox Assignments. Shows factory-set mailbox assignments.
Allows you to delete mailbox assignments, to indicate whether Outcalling
capability and Record-a-Call permission are assigned, and to identify the
language used for each mailbox.
Form 3: Menu Definition. Shows the lines assigned to an Automated
Attendant, the Dial 0/Timeout Extension, and transfer options for
Automated Attendant Service. Allows you to specify the action to be taken
for each selector code. (A separate copy of this form should be made for
each Automated Attendant.)
■
Form 3A: Automated Attendant Announcement—System Language
or Primary Language. Shows the announcement number(s) and the
script(s) used to record the associated announcement(s) in the System
Language for Monolingual Mode or the Primary Language for Bilingual
Mode. You can record up to two announcements. (A separate copy of this
form should be made for each Automated Attendant.)
■
Form 3B: Automated Attendant Announcement—Secondary
Language. Used only if the system is set for Bilingual Mode. Shows the
announcement number(s) and the script(s) used to record the associated
announcement(s) in the Secondary Language for Bilingual Mode. You can
record up to two announcements. (A separate copy of this form should be
made for each Automated Attendant.)
■
Form 4: Day Menu Prompt—System Language or Primary Language.
Shows the script used to record the Day Menu Prompt in the System
Language for Monolingual Mode or the Primary Language for Bilingual
Mode. (A separate copy of this form should be made for each Automated
Attendant.)
■
3-6
Form 1: Language. Shows the Language Mode, Monolingual or
Bilingual. Also specifies the System Language for Monolingual Mode or
the Primary and Secondary Language for Bilingual Mode. It also shows
the System Administration Prompt Language, in which programming
prompts are played.
Form 4A: Day Menu Prompt—Secondary Language. Used only if the
system is set for Bilingual Mode. Shows the script used to record the Day
Menu Prompt in the Secondary Language. (A separate copy of this form
should be made for each Automated Attendant.)
Voice Messaging System Programming
■
■
■
Form 5: Night Menu Prompt: System Language or Primary Language.
Shows the script used to record the Night Menu Prompt in the System
Language for Monolingual Mode or the Primary Language for Bilingual
Mode. (A separate copy of this form should be made for each Automated
Attendant.)
Form 5A: Night Menu Prompt: Secondary Language. Used only if the
system is set for Bilingual Mode. Shows the script used to record the Night
Menu Prompt in the Secondary Language. (A separate copy of this form
should be made for each Automated Attendant.)
Form 6: Line Ownership. Identifies the lines assigned VMS Line
Coverage. Also shows for each owned line, the associated telephone
number, the name of the subscriber who owns the line, and the owner's
mailbox number.
3-7
Understanding Programming
Using the Forms
The following table shows which voice mail system forms should be completed
according to your voice mail system feature selection:
To
Use VMS
Form
Select Language Mode, System Administration
Prompt Language, System Language, Primary and
Secondary Language
1
1
Assign Mailboxes to subscribers, identify Mailbox
Language and Outcalling and Record-a-Call privileges, administer Mailbox Message Length and Size
2
4
Identify lines assigned to an Automated Attendant,
Dial 0/Timeout Extension, Menu Definition (i.e., Direct
Extension Transfer, Selector Code Transfer, Centrex
Transfer, Mailbox Transfer, and Announcements),
Ext. # or Group # for Selector Code Transfer, or Annc.
#. Required for Automated Attendant Service.
3
3
Script Automated Attendant Announcements (in System or Primary Language). Required if Annc. # is
assigned to a Selector Code.
3A
3
Script Automated Attendant Announcements (in Secondary Language). Required for Bilingual Mode if
Annc. # is assigned to a Selector Code.
3B
3
Script the Day Menu Prompt (in System or Primary
Language). Required if VMS Hunt Schedule is set
to Day Only or Always.
4
3
Script the Day Menu Prompt (in Secondary Language). Required for Bilingual Mode if VMS Hunt
Schedule is set to Day Only or Always.
4A
3
Script the Night Menu Prompt (in System or Primary
Language). Required if VMS Hunt Schedule is set
to Night Only or Always.
5
3
Script the Night Menu Prompt (in Secondary Language). Required for Bilingual Mode if VMS Hunt
Schedule is set to Night Only or Always.
5A
3
Assign Line Ownership (cannot be assigned to lines
assigned Automated Attendant coverage). Required
if VMS Line Coverage exists for one or more lines.
6
6
3-8
From Programming
Main Menu, press
Voice Messaging System Programming
Using System Programming
A special login number is required to program the voice messaging system. The
following information applies to this login:
■
■
■
The login number is 99.
By default, the language associated with this login is either the System
Language chosen for Monolingual Mode or the Primary Language chosen
for Bilingual Mode. If you wish, you can specify another choice by
programming the System Administration Prompt Language.
This login's factory-set Password is 1234. If you are the System Manager,
refer to Changing Your Password in Chapter 5 to change the password
before you begin to program the system.
To begin programming the voice messaging system, you make a call to the Voice
Mail Service, enter the login and password, and select option 9 (you are not
prompted for this option). This takes you to the Programming Main Menu (shown
in Figure 3-1).
3-9
Understanding Programming
The Programming Main Menu
The Programming Main Menu allows you to access the Language Mode and the
language(s) associated with that mode, the Automated Attendant Service Menu,
mailbox assignments, line ownership assignments, and reports and backup and
restore features.
Call Voice Mail Service (Press Intercom 7 7 7 )
Enter Login (Press 9 9 # )
Enter Mailbox Password (Press 1 2 3 4
)
Select
Programming
Main Menu
(Press 9 )
Language
(Press 1 )
Figure 3-1.
Automated
Attendant
(Press 3 )
Mailboxes
(Press 4 )
Line
Ownership
(Press 6 )
Reports &
Backup/Restore
(Press 8 )
Programming Menus
Accessing the Programming Main Menu
To access the Programming Main Menu:
1. Press
i777 or a programmed Voice Mail Auto Dial button.
The system plays:
Welcome to PARTNER MAIL VS. Please enter extension
and #. Otherwise, to access PARTNER Tutor, press * 4.
2. Press
99#.
The system plays:
Enter password and #.
3-10
Voice Messaging System Programming
3. Enter the Password and press #. (The factory-set Password is 1234.)
The system plays:
System Manager.
PARTNER MAIL VS Release 5.
The system plays the available programming options. It does not play
option 9 (the Programming Main Menu), which only the System Manager
can access.
4. Press
9 to access the Programming Main Menu.
The system plays:
To program the System Language, press 1; for Automated
Attendants, press 3; for mailboxes, press 4; for line
ownership, press 6; for Reports and System Backup and
Restore, press 8. If finished press * #.
Programming Guidelines
Once you are familiar with the voice messaging system, use these shortcuts to
save time while programming:
■
■
■
■
You do not have to wait for a prompt to play before entering digits for the
next step.
*# to return to the previous menu.
Press *4 to repeat the current menu options.
Press *7 at any point during programming to restart at the
Press
Programming Main Menu.
■
■
■
Use the handset rather than the speakerphone to record prompts and
greetings to avoid background noise in your recordings.
To ensure that you hear voice prompts, turn off your microphone when
programming the system using the speakerphone.
Hang up to exit programming.
3-11
Initial Programming
4
Overview
This chapter identifies the 2- and 4-port voice messaging system configurations.
It tells you how to perform initial programming of the voice messaging and
communications systems. The first two procedures allow you to access and
program the voice messaging systemyou must perform these procedures first
for every installation. The next set of procedures covers voice messaging system
programming. The last section covers how to program the communications
system.
The order of the procedures in this chapter enables you to assign lines to multiple
Automated Attendants, to program the Menu Definition, and to record the Day
and/or Night Prompts and Automated Attendant Announcements for each
Automated Attendant before the voice messaging system begins to handle
callsthis order is recommended for voice messaging systems that are being
added to existing communications systems. If this is a new installation, however,
you can program the communications system first, then the voice messaging
system if you prefer.
When you have completed programming the voice messaging system, it is
recommended that you generate a Configuration Report, according to the
instructions provided in this chapter, to keep a record of all current voice
messaging system settings.
NOTE:
When you have completed programming the voice messaging
system for the first time, it is recommended that you perform a
system backup (see Performing a System Backup, later in this
chapter) and remove the PC Card (see Chapter 2).
4-1
Initial Programming
You can either follow the step-by-step instructions or use the Programming Quick
Reference at the end of this manual as a quick guide. If you use the step-by-step
instructions, note that Step 1 of each procedure for the voice messaging system
is logging in. However, if you are already logged in, you can skip Step 1.
Finally, some features and procedures in this chapter may not be available on
your communications system. If you are not sure, check the Programming and
Use guide for that system.
Voice Mail System Configurations
The PARTNER Mail VS supports the following configurations:
■
2 voice channels (ports), 48 mailboxes
■
4 ports, 48 mailboxes
Figure 2-1 (in Chapter 2) and the figures in Appendix D show the possible
extension numbers for the most common configurations.
Upgrading Your Voice Mail System from a 2-Port
to a 4-Port Configuration
If you are upgrading your voice mail system to a 4-port configuration, when you
return power to the system the previously existing programming (including
existing mailbox assignment information, personal greetings, and passwords) is
saved.
You do not need to reprogram the system; however, you should add two
extensions to the VMS Hunt Group (Extension Hunt Group 7). These additional
extensions correspond to the middle two extensions on the module. For example,
if you are upgrading from two to four ports and you had already assigned
extensions 20 and 21 to the VMS Hunt Group, you would now add extensions 18
and 19 to the VMS Hunt Group. You must perform this task to ensure that the
system functions properly. See Initial System Setup, earlier in this chapter, for
specific instructions on how to assign the additional VMS Hunt Group Extensions.
4-2
Initial Programming Checklist
Initial Programming Checklist
Communications System Programming Checklist
You must perform the following for every installation:
■
VMS Hunt Group Extensions (#505)
You must program this feature first before programming any other feature.
Assign the PARTNER MAIL VS systems extensions to the PARTNER
communications system Hunt Group 7 (#505). Refer to Figure 2-1 and to
the figures in Appendix D to determine which voice messaging system
extensions should be assigned to Hunt Group 7.
■
Transfer Return Extension (#306)
For each of the voice messaging system extensions, assign an extension
as the destination for Transfer Return calls. If the voice messaging system
transfers a call to an extension that has no voice mail coverage and the
call is not answered, the communications system transfers the call to the
Transfer Return Extension. If you want calls returned to the receptionists
extension, for example, assign that extension as the Transfer Return
Extension. The call will ring at this extension until it is answered.
■
Outgoing Call Restriction (#401)
This feature, which is strongly recommended when Outcalling privileges
are assigned to subscribers, restricts all extensions associated with the
mail system unit from making outside calls. In addition, be sure to create
and assign Allowed and Disallowed Phone Lists as needed for Outcalling
numbers.
You may also need to program the following:
■
Automated Attendant Service
Group Call Distribution (#206 - Option 1)
VMS Hunt Delay (#506)
Automatic Extension Privacy (#304)
VMS Hunt Schedule (#507)
Night Service (#503)
Music On Hold (#602)
Disallowed Phone Numbers (#404/#405) (if Outcalling is permitted)
Allowed Phone Numbers (#407/#408) (if Outcalling is permitted)
■
Call Answer Service
Line Coverage Extension (#208)
Automatic VMS Cover (#310)
4-3
Initial Programming
VMS Cover Rings (#117) (#321 on PARTNER ACS Release 3.0
or later)
■
Telephone Button Programming - Manual VMS Cover (F15), Do Not
Disturb (F01), Voice Mailbox Transfer (F14), Voice Mail Auto Dial, Station
Lock (F21), Record-A-Call (F24), Call Screening (F25)
Voice Messaging System Programming Checklist
Perform the following procedures before you begin programming the voice
messaging system. At the System Managers login (99):
■
Change the System Managers factory-set password (Option 5).
Before you begin programming the voice messaging system, change the
System Managers password to prevent unauthorized programming of the
system.
■
Change the System Administration Prompt Language (Option 1).
The default System Administration Prompt Language, which you can
change, is the System Language (Monolingual Mode) or the Primary
Language (Bilingual Mode).
From the Programming Main Menu, you may also program:
■
Language
By default, the voice messaging system operates in Monolingual Mode
with the System Language set to English. By selecting Language Mode,
you can set the system to operate in Bilingual Mode and choose a Primary
and Secondary Language.
■
Automated Attendant Service
By default, all lines are assigned to Automated Attendant Service. If you
are using multiple Automated Attendant Service, you should add lines to
each of the Automated Attendants.
In addition, you can program a Day Menu for each Automated Attendant,
including any Dial 0/Timeout Extension and Selector Code Actions (by
default all Selector Codes are set to Direct Extension Transfer). You can
also record a Night Menu Prompt to correspond to the Day Menu.
■
Voice Mail Service
You can use the Mailboxes option of the Programming Main Menu to
delete unused mailboxes, modify a mailboxs language, modify a
mailboxs message length or size, assign Outcalling privileges, and
administer Record-a- Call.
■
4-4
Line Ownership
Initial Programming Checklist
When you have completed programming, it is strongly recommended that you
perform the following activities (for which corresponding procedures are
included in this chapter):
■
Verify system operation.
■
Generate a System Configuration Report.
This report can be directed to a PC running a terminal emulation program.
Instructions for connecting a PC to your PARTNER MAIL VS system are
included in Chapter 2.
■
Perform a system backup.
Instructions for installing the PC Card that came with your
PARTNER MAIL VS system are included in Chapter 2. Instructions for
performing a system backup are provided later in this chapter.
4-5
Initial Programming
Initial Communications System Setup
You must perform the first two procedures for every installation. The procedure
for Outgoing Call Restriction is strongly recommended to ensure system security.
For the following procedures, you need to know the extension numbers
associated with the PARTNER MAIL VS system module. Figure 2-1 (in Chapter 2)
and the figures in Appendix D show the possible extension numbers for the most
common configurations. For the extension numbers appropriate to this
installation, locate Form B1 of the System Planner for the communications
system.
VMS Hunt Group Extensions
You must use this procedure to assign the extensions associated with the voice
messaging system module to Hunt Group 7. This Hunt Group, which is called the
VMS Hunt Group, is used exclusively for the voice messaging system.
To assign the PARTNER MAIL VS extensions specified on Form B1 to
Hunt Group 7:
1. At extension 101, press
f00ss.
2. Enter the System Password, if required.
3. Press
#505.
4. At the Group: prompt, press
7.
5. At the Extension: prompt, enter the first PARTNER MAIL VS extension
number specified on Form B1.
D until the display reads 1 Assigned.
7. Press n or p until the next PARTNER MAIL VS extension
number specified on Form B1 displays.
8. Press D until the display reads 1 Assigned.
6. Press
9. If additional PARTNER MAIL VS extensions are shown on Form B1, repeat
Steps 7 and 8 for each one.
10. Continue with Transfer Return Extensions on the next page.
1.
4-6
Some systems also allow programming from extension 11. Check the Programming and
Use guide for the communications system.
Initial Communications System Setup
Transfer Return Extensions
For extensions associated with the voice mail system unit, use the following
procedure. If the voice mail system transfers a call to an extension that does not
answer, the communications system transfers the call to the designated Transfer
Return Extension. The call rings at this extension until it is answered.
To assign extension 10 as the transfer return extension for the PARTNER
MAIL VS extensions specified on Form B1:
1. Press
#306 .
2
2. At the Extension: prompt, enter the first PARTNER MAIL VS extension
number specified on Form B1.
3. At the Data: prompt, press
n p
10.
4. Press
or
until the next PARTNER MAIL VS extension
number specified on Form B1 displays.
5. At the Data: prompt, press
10.
6. If additional PARTNER MAIL VS extensions are specified on Form B1,
repeat Steps 4 and 5 for each one.
7. Press
f00 to exit programming.
8. Continue with the next section for information about programming the
voice messaging system.
Outgoing Call Restriction
Use this procedure to restrict all extensions associated with the voice mail
system unit from making outside calls. Outgoing call restriction is strongly
recommended, in particular, to protect system security when Outcalling
privileges are assigned to subscribers on Form 2B.
NOTE:
If Outcalling is permitted, be sure to create and assign Allowed and
Disallowed Phone Lists as needed for Outcalling numbers. See Disallowed
Phone Numbers and Allowed Phone Numbers, later in this chapter, for
instructions.
1. Press
#401.
2. At the Extension: prompt, enter the first PARTNER MAIL VS extension
number specified on Form B1.
D until the display reads 2 Inside Only.
4. Press n or p until the next PARTNER MAIL VS extension
3. Press
number specified on Form B1 displays.
2.
In some countries, the procedure code for Transfer Return Extension is #309. Check the
Programming and Use guide for the communications system.
4-7
Initial Programming
5. Press
D until the appropriate value displays.
6. Repeat Steps 4 and 5 for each PARTNER MAIL VS extension.
7. Press
f00 to exit programming.
8. Refer to the next section for information about programming the voice
messaging system.
Voice Messaging System Programming
Language
Before you begin, locate Form 1 for the voice messaging system. Keep in mind
that the Language settings apply to all Automated Attendants, the Call Answer
Service, and the Voice Mail Service (unless a subscriber uses the Mailbox
Language option to change this language). Check to see if any of the Language
settings are changed from the factory defaults and implement the changes
according to the following procedure.
NOTE:
In addition to administering the Language settings for the voice messaging
system Announcements and prompts that callers and subscribers will hear,
you can specify another language for the System Administration Prompt
Language. See Changing the System Administration Prompt Language
below.
Changing the System Administration Prompt
Language
The System Administration Prompt Language is the language in which
programming prompts are played. The default setting is the System Language
for a system operating in Monolingual Mode or the Primary Language for a
system operating in Bilingual Mode. You have the option to specify another
language for the programming prompts. Even if the System Language changes,
the language that you specify for the System Administration Prompt Language
will remain the same.
To change the default System Administration Prompt Language:
i777 or the programmed Voice Mail Auto Dial button.
2. Press 99#.
3. Enter the existing password (for example, 1234) and press #.
4. Press 1 to change the System Administration Prompt Language.
1. Press
5. Select the appropriate language.
6. Press
4-8
*7 to return to the Main Menu, or hang up to quit.
Voice Messaging System Programming
Changing the System Language
To change the System Language as specified on Form 1:
1. If necessary, access the Programming Main Menu. If you are already at
the Programming Main Menu, skip to Step 2.
i777 or the programmed Voice Mail Auto Dial
b. Press 99#.
c. Enter the password and press #.
d. Press 9.
2. Press 1 for Language.
a. Press
button.
3. Do one of the following:
■
■
4. Press
For Monolingual Mode (default), go to Step 4.
2
1
For Bilingual Mode, press
to select Language Mode.
to specify Bilingual Mode.
Then, press
2 for System Language.
5. Do one of the following:
■
For Monolingual Mode (default), go to Step 6.
■
For Primary Language, press
1.
For Secondary Language, press 2.
6. Press 6 to modify System Language.
■
7. Enter the number corresponding to the System Language specified on
Form 1.
8. Press
9 to confirm your selection.
9. To modify the other language, press
Otherwise, skip this step.
10. Press
*# and repeat Steps 5 through 8.
*7 to return to the Programming Main Menu.
11. Continue with the section, Automated Attendant Service.
4-9
Initial Programming
Automated Attendant Service
Before you begin, locate the following voice messaging system forms: Forms 1,
2, 3, 3A, 4, and 5 (make a copy for each Automated Attendant). If the system is
set for Bilingual Mode, also locate Forms 3B, 4A, and 5A. If Automated Attendant
Service is not to be used, skip to Voice Mail Service.
Assigning Lines
When the voice messaging system is first installed, all lines are assigned to
Automated Attendant 1. You must identify the lines that will be assigned to other
Automated Attendants, as specified on Form 3. Each line can be assigned to one
Automated Attendant only. If you are using only one Automated Attendant, the
system automatically assigns them to Automated Attendant 1; therefore, you may
skip the following procedure.
NOTE:
If you plan to specify a Centrex number for Centrex Transfer in the
Automated Attendant Menu Definition, all lines assigned to that Automated
Attendant must be Centrex lines.
1. If necessary, access the Programming Main Menu. If you are already at
the Programming Main Menu, skip to Step 2.
i777 or the programmed Voice Mail Auto Dial
b. Press 99#.
c. Enter the password and press #.
d. Press 9.
a. Press
button.
The system plays the system programming options.
2. Press
3 for Automated Attendant.
The system prompts you to specify the Automated Attendant.
3. Enter the Automated Attendant number (from 1 to 4).
6 for line assignment.
5. Press 2 to add lines.
4. Press
#
6. Enter the line number and press
. Repeat this step until you have
assigned all appropriate line numbers to this Automated Attendant.
When you are assigning lines at Automated Attendant 2, 3, or 4, the
system indicates that the line is assigned to Automated Attendant 1.
The system prompts:
Do you want to change the line assignment, press 9 to
confirm or 6 to cancel.
4-10
Voice Messaging System Programming
9
7. Press
to confirm that you want to modify the line assignment from its
default setting at Automated Attendant 1.
The system plays the line number and its reassignment to the Automated
Attendant you specified in Step 3.
8. Press
*7 to return to the Programming Main Menu.
9. Repeat Steps 2 through 8 for each additional Automated Attendant, or
continue with Menu Definition, Day Menu Prompt, and Announcements.
Menu Definition, Day Menu Prompt, and
Announcements
Refer to Form 3 to define the Automated Attendant Service menu for Automated
Attendant 1, to Form 4 (and Form 4A for systems operating in Bilingual Mode) to
record the Day Menu Prompt, and to Form 3A (and Form 3B for systems
operating in Bilingual Mode) to record the Automated Attendant
Announcement(s). Repeat this procedure for each additional Automated
Attendant.
You can use this procedure to do the following:
■
Specify the Automated Attendant Menu Definition (including the selector
codes and the Dial 0/Timeout Extension).
■
Record an Automated Attendant Announcement.
■
Record the Automated Attendant Menu Prompt.
It is important to understand that you must approve each element (that is, the
Menu Definition, the Day Menu Prompt, and any Announcements), as well as
save all of these entries (in Step 28). If you exit at any point before saving your
approved entries, your entries will be lost. This procedure is designed to
ensure that callers do not hear the incomplete menu while you are in the process
of building/modifying it.
1. If necessary, access the Programming Main Menu. If you are already at
the Programming Main Menu, skip to Step 2.
i777 or the programmed Voice Mail Auto Dial
b. Press 99#.
c. Enter the password and press #.
d. Press 9.
a. Press
button.
The system plays the system programming options.
2. Press
3 for Automated Attendant.
The system prompts you to specify the Automated Attendant.
3. Enter the Automated Attendant number (from 1 to 4).
4. Press
1 for Day Menu.
4-11
Initial Programming
5. Press
6 to modify the Menu Definition and/or Day Menu Prompt.
6. Do one of the following:
Press
0 to specify a Dial 0/Timeout Extension. Go to Step 7.
Enter a Selector Code for which information is specified in Column
C of Form 3, and go to Step 8. If Column C is empty, skip to
Step 12.
7. To specify the Dial 0/Timeout Extension:
a. Press
9 to make the modification.
b. Enter the extension, Hunt Group, or Calling Group number
specified in Column D of From 3. (The default extension is 10.)
c. Go to Step 14.
8. Press
9 to confirm that you are modifying this Selector Code action.
To specify Selector Code Transfer as the Selector Code Action, go
to Step 9.
To specify Announcement as the Selector Code Action, go to
Step 10.
To specify Direct Extension Transfer as the Selector Code Action
(the factory setting for Selector Codes 1 through 8), go to Step 11.
To specify Mailbox Transfer as the Selector Code Action, go to
Step 12.
To specify Centrex Transfer as the Selector Code Action, go to
Step 13.
9. For Selector Code Transfer:
a. Press
1.
b. Enter the extension, Hunt Group, or Calling Group number
specified in Column D of Form 3.
c. Press
#.
d. Go to Step 14.
10. For Announcement:
a. Press
3.
b. Enter the Announcement number (1 or 2) specified in Column C of
Form 3A.
c. Go to Step 16.
4-12
Voice Messaging System Programming
11. For Direct Extension Transfer:
a. Press
5.
For direct extension transfer, the selector code represents a range
of extensions. For example, selector code 1 allows outside callers
to transfer directly to any extension that begins with a 1
extensions 1019.
b. Go to Step 14.
12. For Mailbox Transfer:
a. Press
6.
b. Enter the mailbox number specified in Column D of Form 3.
c. Go to Step 14.
13. For Centrex Transfer:
a. Press
7.
b. Enter the Centrex number specified in Column D of Form 3, and
wait for the system to time out.
1 to continue.
d. Press *# to approve.
e. Press 9 to confirm.
c. Press
f. Go to Step 14.
14. Return to Step 6 for the next Selector Code for which there is information in
Column C. When you are finished programming all Selector Codes, go to
Step 15.
*# to approve your entries and finish modifying the Menu
15. Press
Definition.
16. At this point, do one of the following:
#
If you do not want to record a Day Menu Prompt or Announcement,
to approve the Menu Definition and go to Step 26.
press
If you want to record the Day Menu Prompt in the Primary
Language, continue with Step 17.
If you want to record the Day Menu Prompt or Announcement in the
Secondary Language, go to Step 22.
17. Lift the handset, press
18. Press
1 and record the Menu Prompt from Form 4.
1 after recording.
4-13
Initial Programming
19. Choose an option or skip this step:
21
1
Press
to immediately re-record this Menu Prompt. Begin
after recording.
recording immediately after the beep; press
Repeat, if desired.
23 to play back this Menu Prompt.
Press *3 to delete this Menu Prompt and return to Step 17 to be
prompted for re-recording.
20. Press *# to approve this Day Menu Prompt.
Press
21. If you want to record the Day Menu Prompt or Announcement in the
Secondary Language, continue with Step 22; otherwise, skip to Step 24.
2
23. Press 1 after recording.
22. Press
and record the Menu Prompt from Form 4A (or Announcement
from Form 3B).
24. Choose an option or skip this step:
21
Press
to immediately re-record this Menu Prompt or
Announcement. Begin recording immediately after the beep; press
after recording. Repeat, if desired.
1
23 to play back this Menu Prompt or Announcement.
Press *3 to delete this Menu Prompt or Announcement and
return to Step 22 to be prompted for re-recording.
25. Press *# to approve this Day Menu Prompt or Announcement.
26. Press # to approve and save all entries. The Menu Definition, Day Menu
Prompts, and Announcements (if any) now take effect.
27. Press *7 to return to the Programming Main Menu.
Press
28. Continue with Night Menu Prompt or go to the section, Voice Mail
Service.
Night Menu Prompt
To record the Night Menu Prompt specified on Form 5 (for systems operating in
Monolingual Mode) or in the Primary and Secondary Language specified on
Forms 5 and 5A (for systems operating in Bilingual Mode):
1. If necessary, access the Programming Main Menu. If you are already at
the Programming Main Menu, skip to Step 2.
i777 or the programmed Voice Mail Auto Dial
b. Press 99#.
c. Enter the password and press #.
d. Press 9.
a. Press
button.
The system plays the system programming options.
4-14
Voice Messaging System Programming
2. Press
3 for Automated Attendant.
The system prompts you to specify the Automated Attendant.
3. Enter the Automated Attendant number (from 1 to 4).
2 for Night Menu.
5. Press 6 to modify the Night Menu Prompt.
4. Press
6. At this point, do one of the following:
If your system is operating in Monolingual Mode, continue with
Step 7.
If you want to record the Night Menu Prompt in the Primary
Language, continue with Step 7.
To record the Night Menu Prompt in the Secondary Language, skip
to Step 12.
7. Lift the handset, press
8. Press
1, and record the Menu Prompt from Form 5.
1 after recording.
9. Choose an option or skip this step:
21
1
Press
to immediately re-record this Menu Prompt. Begin
after recording.
recording immediately after the beep; press
Repeat, if desired.
23 to play back this Menu Prompt.
Press *3 to delete this Menu Prompt and return to Step 7 to be
prompted for re-recording.
10. Press *# to approve this Night Menu Prompt.
Press
11. If you want to record the Night Menu Prompt in the Secondary Language,
continue with Step 12; otherwise, skip to Step 15.
2 and record the Menu Prompt from Form 5A.
13. Press 1 after recording.
12. Press
14. Choose an option or skip this step:
21
1
Press
to immediately re-record this Menu Prompt. Begin
after recording.
recording immediately after the beep; press
Repeat, if desired.
23 to play back this Menu Prompt.
Press *3 to delete this Menu Prompt and return to Step 11 to be
prompted for re-recording.
15. Press *# to approve this Night Menu Prompt.
16. Press # to approve and save all changes. The Night Menu Prompts now
Press
take effect.
4-15
Initial Programming
17. Press
*7 to return to the Programming Main Menu.
18. Continue with the next section, Voice Mail Service.
Voice Mail Service
Before you begin, locate Form 2 for the voice messaging system. Check to see if
any mailbox is to be deleted, if a Mailbox Language is changed for any mailbox,
if the mailbox size or message length is changed, or if any Outcalling or
Record-a-Call permission is to be assigned.
! SECURITY ALERT:
As a safeguard against toll fraud, delete unused mailboxes.
■
■
■
■
■
■
If no mailbox is deleted, no mailbox's language is changed, no Outcalling
and no Record-a-Call permission is assigned, skip to Line Ownership.
If any mailbox is to be deleted, use the procedure below.
If Mailbox Language is changed for any mailbox, see Modifying a
Mailbox's Language later in this section.
If the message length or size of a mailbox needs to be adjusted, see
Changing Mailbox Message Length or Size later in this section.
If Outcalling is chosen, see Assigning Outcalling Privileges later in this
section.
If Record-a-Call is chosen, see Administering Record-a-Call later in this
section.
Deleting a Mailbox
NOTE:
The receptionist's mailbox (at extension 10) cannot be deleted.
To delete mailboxes as specified on Form 2:
1. If necessary, access the Programming Main Menu. If you are already at
the Programming Main Menu, skip to Step 2.
i777 or the programmed Voice Mail Auto Dial
b. Press 99#.
c. Enter the password and press #.
d. Press 9.
a. Press
button.
The system plays the system programming options.
2. Press
4-16
4 for Mailboxes.
Voice Messaging System Programming
#
3. Enter the number of a mailbox to be deleted as indicated on Form 2,
.
followed by
*3 to delete the mailbox.
5. Press 9 to confirm mailbox deletion.
4. Press
6. Repeat Steps 3 through 5 for each mailbox to be deleted.
7. Press
*7 to return to the Programming Main Menu.
8. Continue with the appropriate mailbox administration procedures in the
remainder of this section or Line Ownership, later in this chapter.
Modifying a Mailbox's Language
To modify a mailbox's language as specified on Form 2:
1. If necessary, access the Programming Main Menu. If you are already at
the Programming Main Menu, skip to Step 2.
i777 or the programmed Voice Mail Auto Dial
b. Press 99#.
c. Enter the password and press #.
d. Press 9.
a. Press
button.
The system plays the system programming options.
4 for Mailboxes.
3. Enter the number of a mailbox whose language is to change as indicated
on Form 2, followed by #.
4. Press 6 for Mailbox Language.
5. Press 6 to modify Mailbox Language.
2. Press
6. Enter the number corresponding to the Mailbox Language specified on
Form 2.
7. Press
9 to confirm.
8. Repeat Steps 3 through 7 for each mailbox whose language is to be
changed.
9. Press
*7 to return to the Programming Main Menu.
10. Continue with the appropriate mailbox administration procedures in the
remainder of this section or Line Ownership, later in this chapter.
4-17
Initial Programming
Changing Mailbox Message Length or Size
You can adjust a subscribers mailbox message length or storage space by
changing the default message length (4 minutes) or mailbox size (60 minutes for
the receptionists mailbox and 20 minutes for all others). The message length
administered by this procedure applies to the message that callers can leave in
the subscribers mailbox, the message that the subscriber can create and send,
and to the comment that a subscriber can add to a forwarded message.
1. If necessary, access the Programming Main Menu. If you are already at
the Programming Main Menu, skip to Step 2.
i777 or the programmed Voice Mail Auto Dial
b. Press 99#.
c. Enter the password and press #.
d. Press 9.
a. Press
button.
The system plays the system programming options.
2. Press
4 for Mailboxes.
#
3. Enter the number of a mailbox whose message length and size is to
change as indicated on Form 2, followed by .
2 for Administer Message Length and Mailbox Size.
5. Press 1 to confirm that you want to change the message length and
4. Press
mailbox size.
#
6. Enter the message length (that is, a value of 2 to 60 minutes), followed by
.
Note that this message length must be less than or equal to the mailbox
size that you enter in Step 7.
7. Enter the mailbox size (that is, a value of 5 to 180 minutes), followed by
#.
Note that this mailbox size must be greater than or equal to the message
length that you entered in Step 6.
8. Press
*# to accept the message length and mailbox size.
9. Repeat Steps 3 through 8 for each mailbox that you want to resize.
10. Press
*7 to return to the Programming Main Menu.
11. Continue with the appropriate mailbox administration procedures in the
remainder of this section or Line Ownership, later in this chapter.
4-18
Voice Messaging System Programming
Assigning Outcalling Privileges
When the system is first installed, the Outcalling feature is not assigned to any
mailbox.
! CAUTION:
Before you assign mailboxes Outcalling privileges, you should consider the
several system performance and security issues: If the privilege is assigned
to a majority of users and their message traffic is heavy, system
performance could be adversely affected. Outcalling attempts could be
delayed. In rare instances, an Outcall may not be performed if it is delayed
beyond the scheduled Outcalling period.
Additionally, there are no restrictions on the Outcalling numbers entered by
subscribers. Therefore, it is strongly recommended that you limit the
number of subscribers who have the Outcalling privilege. And call
restrictions should be used for the communications system. See Outgoing
Call Restriction earlier in this chapter for details.
To enable the Outcalling feature for a mailbox as specified on Form 2:
1. If necessary, access the Programming Main Menu. If you are already at
the Programming Main Menu, skip to Step 2.
i777 or the programmed Voice Mail Auto Dial
b. Press 99#.
c. Enter the password and press #.
d. Press 9.
a. Press
button.
The system plays the system programming options.
2. Press
4 for Mailboxes.
#
3. Enter the number of a mailbox whose Outcalling permission is to change
.
as indicated on Form 2, followed by
5 for Outcalling Administration.
5. Press 9 to turn on the Outcalling feature.
4. Press
6. Repeat Steps 3 through 5 for each mailbox whose Outcalling permission
is to be changed.
7. Press
*7 to return to the Programming Main Menu.
4-19
Initial Programming
8. Continue with the appropriate mailbox administration procedures in the
remainder of this section or Line Ownership, later in this chapter.
NOTE:
Although you have assigned Outcalling for a specific mailbox, the
subscriber must specify at least one Outcalling number (up to five
telephone or pager numbers alone or in combination are permitted).
Subscribers must also turn outcalling on before this feature will function. If
they wish, subscribers may also establish an Outcalling schedule that
defines when the system places outcalls, specify how much time elapses
between outcall attempts, and define how many outcall attempts are made
per cycle.
Administering Record-a-Call (for PARTNER ACS
Release 3.0 or later)
This feature is available only on the PARTNER ACS Release 3.0 or later with a
4-port PARTNER MAIL VS Release 5.0 configuration. When the system is first
installed, the Record-a-Call feature, which allows a subscriber to record a
conversation while active on a call, is not assigned to any mailbox. That is, the
Record-a-Call message length is set to 0 for each mailbox. A maximum of two
subscribers can record conversations at any time.
Although you assign Record-a-Call for a specific mailbox with this procedure,
you must also preprogram a feature button for this feature. See Telephone
Button Programming, later in this chapter.
! CAUTION:
Keep in mind that Record-a-Call messages count toward the maximum
capacity (size) of a mailbox. When the system storage limit is reached, even
if storage space is still available in an individual mailbox, the system will not
accept any new voice mail messages or record any conversations.
Therefore, it is strongly recommended that you limit the number of
subscribers who have this privilege and that you remind them to delete
unnecessary messages from their mailboxes on a regular basis.
To enable the Record-a-Call (RAC) feature for a mailbox as specified on Form 2:
1. If necessary, access the Programming Main Menu. If you are already at
the Programming Main Menu, skip to Step 2.
i777 or the programmed Voice Mail Auto Dial
b. Press 99#.
c. Enter the password and press #.
d. Press 9.
a. Press
button.
The system plays the system programming options.
4-20
Voice Messaging System Programming
2. Press
4 for Mailboxes.
#
3. Enter the number of a mailbox whose Record-a-Call permission is to
change as indicated on Form 2, followed by .
4. Press
#
7 for Record-a-Call Administration.
5. Enter a Record-a-Call message length (from 1 to 60 minutes), followed by
.
6. Repeat Steps 3 through 5 for each mailbox whose Record-a-Call
permission is to be changed.
7. Press
*7 to return to the Programming Main Menu.
8. Continue with the next section, Line Ownership.
Line Ownership
Before you begin, locate Form 6 for the voice messaging system.
■
If Form 6 is filled out, use the procedure below to assign ownership.
■
If Form 6 is not filled out, skip to Communications System Programming.
Assigning Line Ownership
To assign an owner to an outside line as specified on Form 6:
1. If necessary, access the Programming Main Menu. If you are already at
the Programming Main Menu, skip to Step 2.
i777 or the programmed Voice Mail Auto Dial
b. Press 99#.
c. Enter the password and press #.
d. Press 9.
a. Press
button.
The system plays the system programming options.
6 for Line Ownership.
3. Press 4 to assign Line Ownership.
2. Press
4. Enter a line number specified in Column A of Form 6, followed by
#
#.
5. Enter the line owner's mailbox number specified in Column D of Form 6,
.
followed by
6. Repeat Steps 4 and 5 for each owned line.
7. Hang up to exit voice messaging system programming.
8. Refer to the next section to program the communications system.
4-21
Initial Programming
Communications System
Programming
Automated Attendant Service
Before you begin, locate Forms A, B1, and C of the System Planner for the
communications system.
Refer to Form A, Page 1, Line Coverage, to see if any lines are checked for
VMSAA. If so, use this section to program Automated Attendant Service for
each Automated Attendant; otherwise, skip to Call Answer Service.
Group Call Distribution (Option 1)
Use this procedure to specify the outside lines on which Automated Attendant
Service is required.
To assign VMS-AA lines specified on Form A, Page 1, Line Coverage, to Hunt
Group 7:
1. At extension 103, press
f00ss.
2. Enter the System Password if required.
3. Press
#206 .
4
4. At the Group: prompt, press
7.
5. At the Line: prompt, enter the first VMS-AA line specified in the Line
Coverage column of Form A, Page 1.
D until the display reads 1 Assigned.
7. To program another line, press n or p until the appropriate
line number displays.
8. Press D until the display reads 1 Assigned.
6. Press
9. Repeat Steps 7 and 8 for each VMS-AA line on Form A.
10. Continue with VMS Hunt Delay below.
3.
4.
4-22
Some systems also allow programming from extension 11. Check the Programming and
Use guide for the communications system.
In some countries, the procedure code for Group Call Distribution is #205. Check the
Programming and Use guide for the communications system.
Communications System Programming
VMS Hunt Delay (PARTNER ACS Release 3.0
or later)
Check Form A, Page 2, VMS Hunt Delay. If Delayed is specified, follow the
procedure below, which allows you to specify the VMS Hunt Delay for each line.
Otherwise, skip to Automatic Extension Privacy later in this section.
NOTE:
See VMS Hunt Delay on Page 2 of Form A; be sure that the appropriate
number of rings is specified. The default setting is 2, but you can change
this value for more immediate call handling. If you do not subscribe to
Caller ID service from your local telephone company, you can specify 0
rings. If you do subscribe to Caller ID service, specify 1.
To change the VMS Hunt Delay setting as specified on Form A, Page 2:
1. Press
#506.
2. At the Mode: prompt, enter 1 (Day) or 2 (Night).
3. At the Line: prompt, enter the first line number.
D until the appropriate value displays.
5. To program another line, press n or p until the appropriate
4. Press
line number displays. Then repeat Step 4.
6. Continue with VMS Hunt Schedule later in this section.
VMS Hunt Delay (All Other PARTNER Systems)
Check Form A, Page 2, VMS Hunt Delay. If Delayed is specified, follow the
procedure below. (The setting that you specify in this procedure applies to all
Automated Attendants.) Otherwise, skip to Automatic Extension Privacy later in
this section.
To change the VMS Hunt Delay setting from Immediate to Delayed as specified
on Form A, Page 2:
#506.
2. Press D until the appropriate value displays.
1. Press
3. Continue with VMS Hunt Schedule later in this section.
4-23
Initial Programming
Automatic Extension Privacy
Use this procedure to prevent users from accidentally picking up calls sent to the
voice messaging system.
To set Automatic Extension Privacy (#304) to Assigned for the PARTNER MAIL VS
extensions specified on Form B1:
1. Press
#304.
2. Enter the first PARTNER MAIL VS extension number specified on
Form B1.
D until the display reads 1 Assigned.
4. Press n or p until the next PARTNER MAIL VS extension
number specified on Form B1 displays.
5. Press D until the display reads 1 Assigned.
3. Press
6. If additional PARTNER MAIL VS extensions are specified on Form B1,
repeat Steps 4 and 5 for each one.
7. Continue with VMS Hunt Schedule below.
VMS Hunt Schedule (PARTNER ACS Release 3.0
or later)
Check Form A, Page 2, VMS Hunt Schedule. If Day Only or Night Only is
selected, follow the procedure below, which allows you to specify the VMS Hunt
Schedule for each line. Otherwise, skip to the next section Night Service.
To change the VMS Hunt Schedule setting from Always to Day Only or Night Only
as specified on Form A, Page 2:
1. Press
#507.
2. At the Line: prompt, enter the first line number.
D until the appropriate value displays.
4. To program another line, press n or p until the appropriate
line number displays.
5. Press D until the appropriate value displays.
3. Press
6. Repeat Steps 4 and 5 as necessary.
7. Continue with Night Service later in this section.
4-24
Communications System Programming
VMS Hunt Schedule (All Other PARTNER
Systems)
Check Form A, Page 2, VMS Hunt Schedule. If Day Only or Night Only is
selected, follow the procedure below. (The setting that you specify in this
procedure applies to all Automated Attendants.) Otherwise, skip to the next
section Night Service.
To change the VMS Hunt Schedule setting from Always to Day Only or Night Only
as specified on Form A, Page 2:
#507.
2. Press D until the appropriate value displays.
1. Press
3. Continue with Night Service Button later in this section.
Night Service
Check Form C for extension 10. If a Night Service button is specified, follow the
procedure below.
To program Night Service on a button with lights at extension 10 as specified on
Form C:
1. Press
#503.
2. At this point, do one of the following:
D
If you want to assign Night Service to the first available button on
the system phone, press
until the display reads:
Night Service
1 Assigned-Ext10
Go to Step 3.
If you want to assign Night Service to a specific button5, press
3.
The display reads:
Night Service
3 Select Button
Press the desired programmable button with lights to assign Night
Service to that button.
3. Label the Night Service button at extension 10.
4. Continue with the next section, Music On Hold.
5.
Select button (option 3) is not available on all systems. Check the Programming and Use
guide for the communications system.
4-25
Initial Programming
Music On Hold
If desired, program Music On Hold. See the Programming and Use guide for the
communications system for instructions. Continue with the next section,
Disallowed Phone Numbers.
Disallowed Phone Numbers
If Outcalling is permitted, a Disallowed Phone Number List (#404) can be created
to restrict calls.
Creating a Disallowed Phone Number List
Check communications system Planning Form D to see if a Disallowed Phone
Number List is needed for Outcalling. If so, continue with the procedures in this
section; otherwise, skip to Allowed Phone Numbers.
To create a list of Disallowed Phone Numbers:
1. Press
#404.
2. At the List Number: prompt, enter the list number (1-4).
3. At the Entry: prompt, select a list entry (01-10).
4. At the Data--------------- prompt, enter the first number.
5. To save the number in memory, you must press
e.
6. At this point:
r and repeat
To delete the number you just entered, press r.
To enter other numbers in this list, press n and repeat Steps
To change the number you just entered, press
Steps 4 and 5.
4 and 5.
Assigning the Disallowed Phone Number List
The Disallowed Phone Number List that was created for Outcalling should be
assigned to all voice messaging system extensions.
To assign a Disallowed Phone Number List to the extensions:
1. Press
#405.
2. Enter the number of the extension to be programmed.
3. Enter the list number (1-4).
D until the display reads 1 Assigned.
5. To program another extension, press NP and repeat
4. To assign the list, press
from Step 2.
4-26
Communications System Programming
Allowed Phone Numbers
If Outcalling is permitted, an Allowed Phone Number List (#407) can be created
to identify numbers to which Outcalling is allowed.
Creating an Allowed Phone Number List
Check communications system Planning Form D to see if an Allowed Phone
Number List is needed for Outcalling. If so, continue with the procedures in this
section; otherwise, skip to the next section.
NOTE:
If the PARTNER MAIL VS extensions were restricted to Inside Only using
Outgoing Call Restriction (#401), Outcalling will not work unless an Allowed
Phone Number List is created and assigned. Outcalls can be made only to
the numbers included in the list.
To create a list of Allowed Phone Numbers:
1. Press
#407.
2. At the List Number: prompt, enter the list number (1-4).
3. At the Entry: prompt, select a list entry (01-10).
4. At the Data--------------- prompt, enter the first number.
5. To save the number in memory, you must press
e.
6. At this point:
r and repeat
To delete the number you just entered, press r.
To enter other numbers in this list, press n and repeat Steps
To change the number you just entered, press
Steps 4 and 5.
4 and 5.
Assigning the Allowed Phone Number List
The Allowed Phone Number List that was created for Outcalling should be
assigned to all voice messaging system extensions.
To assign the Allowed Phone Number List to the extensions:
1. Press
#408.
2. Enter the number of the extension to be programmed.
3. Enter the list number (1-4).
D until the display reads 1 Assigned.
5. To program another extension, press NP and repeat
4. To assign the list, press
from Step 2.
4-27
Initial Programming
Call Answer Service
Before you begin, locate Forms A and B2 of the System Planner for the
communications system.
■
■
■
Refer to Form A, Page 1, Line Coverage. If either check marks or
extension numbers appear in the VMS-Mail column, use Line Coverage
below to program personal lines for Call Answer Service.
If nothing is specified in the VMS-Mail column of Form A, refer to Form B2
to see if Automatic VMS Cover is assigned to any extensions. If it is, refer
to Automatic VMS Cover and VMS Cover Rings later in this chapter.
If neither VMS-Mail for personal lines or Automatic VMS Cover is specified,
skip to Telephone Button Programming.
Line Coverage
Refer to Form A, Page 1, Line Coverage, VMS-Mail:
■
■
If check marks appear for any lines in this column, use the procedure in
VMS Line Coverage below.
If extension numbers are specified for any lines in this column, use the
procedure in Line Coverage Extension below.
VMS Line Coverage (Option 3)
To assign VMS-Mail lines checked on Form A, Page 1, Line Coverage, to Hunt
Group 7:
1. Press
#206 .
6
2. At the Group: prompt, press
7.
3. At the Line: prompt, enter the first line checked in the VMS-Mail column.
D until the display reads 3 VMS Line Cover.
5. To program another line, press n or p until the appropriate
line number displays.
6. Press D until the display reads 3 VMS Line Cover.
4. Press
7. Repeat Steps 5 and 6 for each VMS-Mail line checked on Form A.
8. If extension numbers are specified for any lines in this column, use the
following procedure in Line Coverage Extension. Otherwise, continue
with the section, Automatic VMS Cover.
6.
4-28
In some countries, the procedure code for Group Call Distribution is #205. Check the
Programming and Use guide for the communications system.
Communications System Programming
Line Coverage Extension
To assign line coverage for the extension numbers specified in the VMS-Mail
column on Form A, Page 1, Line Coverage:
1. Press
#208 .
7
2. At the Line: prompt, enter the first line for which an extension is specified
in the VMS-Mail column of Form A, Page 1, Line Coverage.
3. At the Data: prompt, enter the number of the extension specified in the
VMS-Mail column.
4. To program another line, press
line number displays.
n or p until the appropriate
5. At the Data: prompt, enter the number of the extension specified in the
VMS-Mail column.
6. Repeat Steps 4 and 5 for each VMS-Mail line for which an extension
number is written on Form A.
7. Continue with the next section, Automatic VMS Cover.
Automatic VMS Cover
Check Form B2 to see if Automatic VMS Cover is assigned to any extensions. If it
is, follow the procedure below. If not, skip to VMS Cover Rings.
To change the Automatic VMS Cover setting for an extension to Assigned as
indicated on Form B2:
1. Press
#310.
2. Enter the number of the first extension to which Automatic VMS Cover is to
be assigned.
D until the display reads 1 Assigned.
4. To program another extension, press n or p until the
extension number shows on the display.
5. Press D until the display reads 1 Assigned.
3. Press
6. Repeat Steps 4 and 5 for each extension to which Automatic VMS Cover is
to be assigned.
7. Continue with VMS Cover Rings below.
7.
Extension Line Coverage (#208) is not available on all systems. Check the Programming
and Use guide for the communications system.
4-29
Initial Programming
VMS Cover Rings (PARTNER ACS Release 3.0
or later)
Check Form A, Page 2, to see if VMS Cover Rings (#321) is different from the
factory setting of 3. If it is, follow the procedure below beginning with
Step 1, to specify the VMS Cover Rings for each extension. If not, skip to Step 3
of the procedure below.
To change the number of times calls ring before they are sent to the voice
messaging system as indicated on Form A, Page 2, VMS Cover Rings:
1. Press
#321.
2. Enter the number of the first extension for which VMS Cover Rings is to be
specified.
D until the appropriate value displays.
4. To program another extension, press n or p until the
extension number shows on the display.
5. Press D until the appropriate value displays.
3. Press
6. Repeat Steps 4 and 5 for each extension for which VMS Cover Rings
setting is to be specified.
7. Press
f00 to exit programming mode.
8. Continue with the next section, Telephone Button Programming.
VMS Cover Rings (All Other PARTNER Systems)
Check Form A, Page 2, to see if VMS Cover Rings (#117)8 is different from the
factory setting of 3. If it is, follow the procedure below, beginning with
Step 1, to specify the VMS Cover Rings for the system. If not, skip to Step 3 of the
procedure below.
To change the number of times calls ring before they are sent to the voice
messaging system as indicated on Form A, Page 2, VMS Cover Rings:
1. Press
#117.
2. Enter the VMS Cover Rings setting specified on Form A.
3. Press
f00 to exit programming mode.
4. Continue with the next section, Telephone Button Programming.
8.
4-30
VMS Cover Rings (#117) is not available on all systems. Check the Programming and Use
guide for the communications system.
Communications System Programming
Telephone Button Programming
Before you begin, locate Form C of the System Planner for the communications
system. Be sure you have a version of the form for each subscriber's phone.
Use this section to program buttons on subscribers' phones, including the
receptionist's phone. This section uses Centralized Telephone Programming.
When you are finished programming, be sure to label all buttons on subscribers'
phones.
VMS Cover (F15)
This button allows the subscriber to turn voice mail coverage on and off.
To program a VMS Cover button as specified on Form C:
1. Press
f00ssc.
2. Enter the number of the extension to be programmed.
3. Press a programmable button with lights.
4. Press
f15.
5. At this point, do one of the following:
Go to Step 3 of the next procedure to program another button for
this extension.
c
Press
and go to Step 2 of any button programming
procedure in this section to program a button for a different
extension.
Press
f00 to exit.
4-31
Initial Programming
Do Not Disturb (F01)
Used in conjunction with either automatic VMS cover or manual VMS cover, this
button lets a subscriber send callers immediately to his or her mailbox (instead of
ringing the extension first).
To program a Do Not Disturb (DND) button as specified on Form C:
1. Press
f00ssc.
2. Enter the number of the extension to be programmed.
3. Press a programmable button with lights.
4. Press
f01.
5. At this point, do one of the following:
Go to Step 3 of the next procedure to program another button for
this extension.
c
Press
and go to Step 2 of any button programming
procedure in this section to program a button for a different
extension.
Press
f00 to exit.
Voice Mailbox Transfer (F14)
This button lets any system user transfer calls directly to a subscriber's mailbox
(including guest mailboxes), without ringing the extension first.
To program a Voice Mailbox Transfer (VMBox) button as specified on Form C:
1. Press
f00ssc.
2. Enter the number of the extension to be programmed.
3. Press a programmable button.
4. Press
f14 .
9
5. At this point, do one of the following:
Go to Step 3 of the next procedure to program another button for
this extension.
c
Press
and go to Step 2 of any button programming
procedure in this section to program a button for a different
extension.
Press
9.
4-32
f00 to exit.
In some countries, the feature code for Voice Mailbox Transfer is
Programming and Use guide for the communications system.
15
. Check the
Communications System Programming
Voice Mail Auto Dial
This intercom Auto Dial button allows the subscriber to access the voice
messaging system with the touch of one button.
To program a Voice Mail button as specified on Form C:
1. Press
f00ssc.
2. Dial the number of the extension to be programmed.
3. Press a programmable button.
4. Press left
i777.
5. At this point, do one of the following:
c
Press
and go to Step 2 of any button programming
procedure in this section to program a button for a different
extension.
Press
f00 to exit.
Station Lock (F21)
The Station Lock feature is available only to subscribers with a system or
standard touch-tone telephone. This button allows subscribers to lock their
telephones when they leave their desks for an extended period of time. To lock
the telephone, the subscriber presses the programmed Station Lock button and
enters a four-digit code. To unlock the telephone, the subscriber re-enters the
code. It is recommended that the button programmed for this purpose have
lights.
To program a Station Lock button:
1. Press
f00ssc.
2. Enter the number of the extension to be programmed.
3. Press a programmable button.
4. Press
f21.
5. Program another button for this extension or press
programming mode.
f00 to exit
6. Label the button at the users extension.
4-33
Initial Programming
Record-a-Call (PARTNER ACS Release 3.0
or later) (F24)
The Record-a-Call feature is available only on the PARTNER Advanced
Communications System Release 3.0 or later with a 4-port PARTNER MAIL VS
Release 5.0 configuration and a system telephone. This Record-a-Call (RAC)
button allows the subscriber to begin recording a call in progress with one touch
of a button. (If the system detects 15 seconds of silence after recording has
begun, the system automatically turns off the Record-a-Call feature, and the
subscriber must press the programmed feature button to resume recording the
conversation.) The recorded conversation is saved in the subscribers mailbox.
The button programmed for this purpose must have lights.
To program a Record-a-Call button:
1. Press
f00ssc.
2. Enter the number of the extension to be programmed.
3. Press a programmable button with lights.
4. Press
f24.
5. Program another button for this extension, or press
programming mode.
f00 to exit
6. Label the button at the users extension.
Call Screening (PARTNER ACS Release 3.0
or later) (F25)
The Call Screening feature is available only on the PARTNER Advanced
Communications System Release 3.0 or later and a system telephone. This
feature allows a subscriber to listen to a caller leaving a message in his or her
mailbox. A subscriber can turn this feature on or off by pressing the programmed
button. The button programmed for this purpose must have lights.
To program a Call Screening button:
1. Press
f00ssc.
2. Enter the number of the extension to be programmed.
3. Press a programmable button with lights.
4. Press
f25.
5. Program another button for this extension or press
programming mode.
6. Label the button at the users extension.
4-34
f00 to exit
Verifying System Operation
Verifying System Operation
After you finish programming the voice messaging system and the
communications system, you should perform the tests described in this section
to verify system operation.
If your system allows programming from extension 1110, you should perform
these tests from extension 11 to keep extension 10 free for the receptionist to
handle calls.
Voice Mail Service
i777
Make a call to the VMS Hunt Group by pressing
or the
programmed Voice Mail Auto Dial button. You should hear the Voice Mail Service
greeting:
Welcome to PARTNER MAIL VS. Please enter extension
and #. Otherwise, to access PARTNER Tutor, press * 4.
Automated Attendant Service
■
■
If the VMS Hunt Schedule is set for Day Only or Always, follow the
procedure for Day Menu.
If the VMS Hunt Schedule is set for Night Only, follow the procedure for
Night Menu.
Day Menu
1. Make sure the Night Service button at extension 10 is off.
2. Call in on a line answered by the Automated Attendant Service when Day
Service is in effect.
3. If the system is set for:
Immediate, Automated Attendant Service should answer the call on
the second ring.
Delayed, Automated Attendant Service should answer the call after
the fourth ring.
NOTE:
For PARTNER Advanced Communications System Release 3.0 or
later, this setting is specified in number of rings.
4. Listen for the Day Menu Prompt.
10.
Some systems allow programming from extension 11. Check the Programming and Use
guide for the communications system.
4-35
Initial Programming
5. After the prompt, choose an option from the day menu.
6. Make sure your call is transferred to the appropriate extension or group, or
the correct Announcement is played.
7. Repeat Steps 2 through 6 for each option on the day menu.
*1
8. If the system is set for Bilingual Mode, press
to check the Day Menu
Prompt in the Secondary Language. You should also hear any recorded
Announcement.
9. Repeat Steps 2 through 4 for each line that has Automated Attendant
Service coverage.
10. If the VMS Hunt Schedule is set for Always, continue with Night Menu
below.
Night Menu
1. Make sure the Night Service button at extension 10 is on.
2. Call in on a line answered by the Automated Attendant Service when Night
Service is in effect.
3. If the system is set for:
Immediate, Automated Attendant Service should answer the call on
the second ring.
Delayed, Automated Attendant Service should answer the call after
the fourth ring.
NOTE:
For PARTNER Advanced Communications System Release 3.0 or
later, this setting is specified in number of rings.
4. Listen for the Night Menu Prompt.
5. If you already tested the Day Menu, go to Step 8. Otherwise, after the
prompt, choose an option from the night menu.
6. Make sure your call is transferred to the appropriate extension or group, or
the correct announcement is played.
7. Repeat Steps 2 through 6 for each option on the night menu.
*1
to check the Night
8. If the system is set for Bilingual Mode, press
Menu Prompt in the Secondary Language. You should also hear any
recorded Announcement.
Line Assignment
1. Call in on each line assigned to Automated Attendant 1.
2. Verify that the correct Automated Attendant Menu plays.
3. Repeat Steps 1 and 2 for each Automated Attendant.
4-36
Verifying System Operation
Call Answer Service
VMS Extension Coverage
1. Press the Do Not Disturb button at the appropriate destination extensions
to quickly route your test calls to Call Answer Service.
2. For extensions that do not have Automatic VMS Cover, turn on coverage
by pressing the VMS Cover button at those extensions.
3. Call the first extension that has VMS coverage (either automatic or
manual). If Do Not Disturb is on at the extension, Call Answer Service
should answer the call after one ring and you should hear the default
greeting for that mailbox. (If Do Not Disturb is not on, the call rings at the
extension before Call Answer Service answers it.)
4. Repeat this procedure for every extension that has voice mail coverage.
VMS Line Coverage
1. Call in on the first line that is programmed for VMS Line Cover.
Call Answer Service should answer the call on the fifth ring and the
factory-set greeting should prompt you to leave a message in that line
owners mailbox.
2. Repeat this procedure for every line that has VMS Line Cover.
Line Coverage Extension
1. Make sure VMS Cover is on at the owner's extension.
2. Call in and make sure the call goes to VMS Cover by the number of rings
specified by VMS Cover Rings11 (#117, #321 on PARTNER ACS
Release 3.0).
3. Verify that you hear the factory-set mailbox greeting for the line owner.
4. Repeat this procedure for every Line Coverage extension.
11.
VMS Cover Rings (#117) is not available on all systems. Check the Programming and Use
guide for the communications system.
4-37
Initial Programming
Generating Configuration Reports
When you have verified the systems operation, you can generate a Configuration
Report as a convenient reference. This report can be directed to a PC running a
terminal emulation program (see Chapter 2 for instructions on how to connect a
PC to your PARTNER MAIL VS system).
When you generate a Configuration Report in the PARTNER MAIL VS system and
send it to your PC, it is saved in a text file that you can open and print. The
procedures in this section explain how to set up HyperTerminal, the terminal
emulation program, and how to run the report.
The Configuration Report shows the current settings for:
■
System Language Mode and Primary and Secondary Language choices
■
System Administration Prompt Language
■
For each Automated Attendant
All Menu Definitions, including Dial 0/Timeout Extension and
Selector Code assignments
All Automated Attendant line assignments
■
Line Ownership
■
For each mailbox:
Mailbox extension number
Maximum message length and mailbox size parameter
Mailbox language parameter
Outcalling permission
Record-a-Call message length
Personal Operator
Outcalling information, including numbers, schedule, cycles, and
interval
Personal Group Lists
4-38
Generating Configuration Reports
Setting Up HyperTerminal
To generate the report, you will use the HyperTerminal application, which is
provided with Windows® 95, Windows NT® 4.0 or later, and Windows 98. To set
up HyperTerminal:
1. From the Start menu, choose Programs>Accessories>HyperTerminal.
The HyperTerminal window appears.
2. Click on HyperTerminal.
The Connect Description dialog box appears.
3. In the Name box, type Direct 2400, and then choose the OK button.
The Phone Number dialog box appears.
4. In the Connect using box, choose the COM port on your PC that is
connected to the PMVS serial port (for example, if you are using COM1,
choose Direct to Com1).
5. Choose the OK button.
The COM Properties dialog box appears.
6. In the Bits per second box, choose 2400.
7. In the Data bits box, choose 8.
8. in the Parity box, choose None.
9. In the Stop bits box, choose 1.
10. In the Flow control box, choose Xon/Xoff.
11. Choose the OK button to close the COM Properties dialog box.
12. From the File menu, choose Exit to close HyperTerminal.
A confirmation dialog box appears.
13. Choose the Yes button to save the HyperTerminal session you just
created.
HyperTerminal closes, and an icon for Direct 2400 is displayed. The Direct
2400 file contains the settings required to capture the report on the PC.
14. To run the report, go to Running the Configuration Report.
4-39
Initial Programming
Running the Configuration Report
To generate a Configuration Report:
1. From the Start menu on your PC, choose
Programs>Accessories>HyperTerminal.
The HyperTerminal window appears.
2. Click on the Direct 2400 icon that was created when you performed the
procedure in Setting Up HyperTerminal.
The HyperTerminal window appears.
3. From the Transfer menu, choose Capture Text.
The Capture Text dialog box appears, displaying the default text file to
which the Configuration Report will be saved. You may change the text file
to which the Configuration Report will be saved. Be sure to note the path
and file name of this text file.
4. Choose the Start button.
5. At your telephone, access the Programming Main Menu. If you are already
at the Programming Main Menu, skip to Step 6.
i777 or the programmed Voice Mail Auto Dial
b. Press 99#.
c. Enter the password and press #.
d. Press 9.
a. Press
button.
The system plays the system programming options.
8 for Reports and Backup/Restore.
7. Press 1 to access the Reports Menu.
8. Press 1 to run the Configuration Report. (Note that the Configuration
6. Press
Report is the only report currently available).
The report is displayed in the HyperTerminal window. This information is
also saved to the text file you specified in Step 3.
9. From the Transfer menu on your PC, choose Capture Text.
A submenu appears.
10. Choose Stop.
11. From the File menu, choose Exit to close HyperTerminal.
You can now open, view, and print the text file that contains the
Configuration Report.
4-40
Performing a System Backup
Performing a System Backup
You can perform a system backup to save the settings that you have
programmed and prompts that you have recorded for your voice messaging
system. This information is saved on a PC Card, which protects the programmed
configuration data from being lost. You can restore this information to the system
from the PC Card according to the instructions in the next section.
The PARTNER MAIL VS system must be idle when you perform a backup. Any
calls being handled by PARTNER MAIL VS will be disconnected when the
backup procedure begins. PARTNER MAIL VS will not answer calls while the
system backup is being performed.
For most systems, the system backup can be performed in three minutes or less.
If your voice messaging system uses multiple Automated Attendants with all
Announcements recorded at up to four minutes, the system backup can take
approximately 20 minutes to complete. The system backup saves the following
information:
■
System Language Mode and Primary and Secondary Language choices
■
System Administration Prompt Language
■
For each Automated Attendant
All Menu Definitions, including Dial 0/Timeout Extension and
Selector Code assignments
For systems operating in Monolingual Mode, all Automated
Attendant Announcements are saved.
For systems operating in Bilingual Mode, only
Announcements for Automated Attendants 1 and 2 are
saved.
Day and Night Menu Prompts
For systems operating in Monolingual Mode, all menu
prompts are saved.
For systems operating in Bilingual Mode, only the menu
prompts for Automated Attendants 1 and 2 are saved.
All Automated Attendant line assignments
Line Ownership
■
For each mailbox:
Mailbox extension number
Maximum message length and mailbox size parameter
Mailbox language parameter
Outcalling permission
Record-a-Call message length
4-41
Initial Programming
Personal Operator
Personal Group List
Outcalling information, including numbers, schedule, cycles, and
interval
NOTE:
Personal greetings and messages are not saved.
To perform system backup:
1. Be sure the PC Card is installed (see the area labeled Slot for PC Card in
Figure 2-2).
2. If necessary, access the Programming Main Menu. If you are already at
the Programming Main Menu, skip to Step 3.
i777 or the programmed Voice Mail Auto Dial
b. Press 99#.
c. Enter the password and press #.
d. Press 9.
a. Press
button.
The system plays the system programming options.
8 for Reports and Backup/Restore.
4. Press 8 to perform a system backup. The system prompts:
3. Press
Please wait for backup confirmation. This may take up
to three minutes. Do you want to continue? Press 9 to
confirm or 6 to cancel.
5. Press
9 to confirm that you want to perform the system backup.
Do not hang up until you hear the backup confirmation prompt.
When the backup is complete, the system prompts:
Backup Successful
The system returns you to the Programming Main Menu.
NOTE:
If the system prompts that the backup has failed, call the Technical
Service Center at 1 800 628-2888 (or call your Lucent Technologies
Representative or local Authorized Dealer) and report the error code
that accompanied the failure prompt.
4-42
Performing a System Restore
Performing a System Restore
You can restore the settings (that is, programming and recorded prompts) that
you have saved to a PC Card after system backup.
The PARTNER MAIL VS system must be idle when you perform a restore
operation. Any calls being handled by PARTNER MAIL VS will be disconnected
when the restore procedure begins. PARTNER MAIL VS will not answer calls
while the system restore is being performed. For most systems, the system
restore can be performed in three minutes or less. If your voice messaging
system uses multiple Automated Attendants with all Announcements recorded at
up to four minutes, the system restore can take approximately 20 minutes to
complete.
To restore the system:
1. Be sure the PC Card is installed (see the area labeled Slot for PC Card in
Figure 2-2).
2. If necessary, access the Programming Main Menu. If you are already at
the Programming Main Menu, skip to Step 3.
i777 or the programmed Voice Mail Auto Dial
b. Press 99#.
c. Enter the password and press #.
d. Press 9.
a. Press
button.
The system plays the system programming options.
8 for Reports and Backup/Restore.
4. Press 9 to restore the system. The system plays the backup date saved
3. Press
in the PC Card and prompts:
Warning: This may erase current settings. Do you want
to continue? Press 9 to confirm or 6 to cancel.
5. Press
9 to confirm that you want to restore the system.
Do not hang up until you hear the restore confirmation prompt.
When the system is restored, the system prompts:
Restore Successful
The system restarts automatically, and the new configuration takes effect.
NOTE:
If the system prompts that the restore has failed, call the Technical
Service Center at 1 800 628-2888 (or call your Lucent Technologies
Representative or local Authorized Dealer) and report the error code
that accompanied the failure prompt.
4-43
System Management
5
This chapter provides the programming procedures you can use to make
changes to the voice messaging system to reflect changes in your company.
Most changes you make will occur because of personnel changes. You should
refer to the System Configuration Report as you make changes and generate a
new report each time you have completed making changes. The following list
identifies areas of system programming that you are likely to change as you
manage the system on an on-going basis:
■
■
■
■
■
Language. Allows you to change the Language Mode (Monolingual or
Bilingual) and the language(s) supported by that mode. Note that you can
also change the System Administration Prompt Language to any of the
supported languages.
Automated Attendant Service. Allows you to change/delete lines
assigned to an Automated Attendant, to change the prompt that outside
callers hear when the Automated Attendant answers calls, and to redefine
menu options for transferring outside callers to specific destinations and
for changing announcements that callers can choose to hear. Allows you
to specify the extension to which calls are transferred when a caller
presses 0 or takes no action in response to menu prompts.
Mailbox Assignments. Allows you to delete and create mailboxes, reset
mailboxes and subscriber's passwords to factory settings, assign/cancel
Outcalling and Record-a-Call privileges for a subscribers mailbox, and
change the language a subscriber hears when using Voice Mail Service.
Also allows you to change a mailboxs size and message length.
Line Coverage. Allows you to modify line coverage using either VMS Line
Coverage or Extension Line Coverage.
Telephone Button Programming. Allows you to program buttons on
subscriber's system phones for convenient use of voice messaging
system features.
5-1
System Management
If you are a new System Manager, you should review the following section for
general information that you need to know in your new role. You should use the
rest of this chapter on an as-needed basis. Also, if you have not done so already,
you should read Chapter 1 for a description of the voice messaging system's
features and services and Chapter 3 for an overview of voice messaging system
and communications system programming.
General Information
This section tells you how to change the System Manager's password, which is
required for changing voice messaging system settings. It also provides
information that you should share with all system users and other information that
is specifically for the receptionist at extension 10.
Changing Your Password
The factory setting for login 99 (the System Manager's) Password is 1234.
To prevent unauthorized programming of the system, you should change the
default password immediately after installation or any time the password has
been reset. You can assign up to four digits for a Password. It is recommended
that you create a Password from random, non-sequential digits.
If you change the Password and forget it, you must contact the BCS Technical
Service Center at 1 800 628-2888 or call your Lucent Technologies
Representative or local Authorized Dealer for instructions on how to reset the
Password.
To change the Password for login 99:
i777 or the programmed Voice Mail Auto Dial button.
2. Press 99#.
3. Enter the existing password (for example, 1234) and press #.
4. Press 5 to change the password.
1. Press
The prompt asks you to enter your new password.
5. Enter up to four digits for the new password and press
The prompt asks you to re-enter your new password.
6. Enter your new password again followed by
The new password is now active.
7. Hang up to quit.
5-2
#.
#.
General Information
Changing the System Administration Prompt
Language
The System Administration Prompt Language is the language in which
programming prompts are played. The default setting is the System Language
form systems operating in Monolingual Mode or the Primary Language for
systems operating in Bilingual Mode. You have the option to specify another
language for the programming prompts. Even if the System or Primary Language
changes, the language that you specify for the System Administration Prompt
Language will remain the same.
To change the default System Administration Prompt Language:
i777 or the programmed Voice Mail Auto Dial button.
2. Press 99#.
3. Enter the existing password (for example, 1234) and press #.
4. Press 1 to change the System Administration Prompt Language.
1. Press
5. Select the appropriate language.
Training Co-Workers
Telephone Security (PARTNER ACS Release 3.0
or later)
You should remind system users with system and standard touch-tone
telephones to use the Station Lock feature whenever they leave their desks for an
extended period of time. To lock their telephone, users press the Station Lock
button that you program for them and enter a four-digit code. They re-enter this
code to unlock their telephone. (See Telephone Button Programming, later in
this chapter.)
Language
You should let system users know about the following language options:
■
■
You can change the language of voice prompts that a subscriber hears
when recording a personal greeting, retrieving messages, and other Voice
Mail services. This language can be different from the System Language
set for Monolingual Mode or the Primary and Secondary Languages set
for Bilingual Mode.
If the system is set for Bilingual Mode, subscribers can record the
personal greeting in the Primary Language and in the Secondary
Language. They should include a sentence early in the greeting that lets
callers know that they can switch to the other language by pressing
while the greeting is playing.
*1
5-3
System Management
Outcalling
You should let system users know that they can turn this feature on or off, retrieve
their messages from a touch-tone phone, as well as enter and change their
Outcalling number(s) and schedule. Instructions for performing these tasks are
provided in Using the PARTNER MAIL VS ® Voice Messaging System.
In addition, you should provide users with the following information about the
Outcalling feature:
■
■
■
■
Although you are responsible for assigning Outcalling privileges to a
subscribers mailbox, the subscriber must turn on Outcalling and specify
an Outcalling number (or numbers). Otherwise, the system does not notify
subscribers when new messages have arrived in their mailboxes.
If the subscriber is logged into the system, the system does not place an
outcall.
If the subscriber disconnects from the system without listening to a new
message, the outcall is placed according to schedule.
Subscribers can specify up to five Outcalling numbers that the system will
dial in sequence.
A number can be repeated in this list.
The list may contain a combination of telephone and pager/beeper
numbers.
■
■
■
■
■
■
5-4
Each Outcalling number may contain up to 60 digits, including the * and #
symbols.
The 9 dialed to get an outside line must be included in the Outcalling
number. And a pause (*) should be included after the 9.
Subscribers may also specify a schedule (that is, a start time and end
time) for Outcalling. For example, they may direct the system to outcall
only during the hours of 7:30 p.m. to 8:00 a.m. Otherwise, the default
schedule is 24 hours.
The start and end times entered by a user are based on a 24-hour clock;
however, the voice playback of these times is based on the system
language selection of 12 or 24-hour format. In the example above,
the subscriber would enter the start time of 7:30 p.m. as 1930# and
8:00 a.m. as 0800#.
If a message arrives at a subscribers mailbox after the specified
Outcalling time interval, Outcalling notification for that message is not
initiated at the next Outcalling time interval.
Subscribers can specify the number of Outcalling cycles (that is, the
number of times the system attempts to outcall when a message is
received). By default the system attempts to outcall three times within a
specified time interval. The subscriber may choose a value from one
through nine to specify the number of outcall attempts per cycle.
General Information
■
■
Subscribers can specify the minimum time interval between Outcalling
attempts. By default the system attempts to outcall within a minimum time
interval of 15 minutes between attempts. However, during heavy message
traffic periods the time interval may be longer. Subscribers may specify an
interval from five to 99 minutes.
For a pager/beeper number:
Subscribers can program a callback number as part of the
Outcalling number.
Subscribers are advised to enter several pauses (where each
pause is represented by a *) after the Outcalling number (before
entering their PIN and/or callback number) to allow the paging
system sufficient time to answer. Subscribers should experiment to
determine the correct number of pauses needed after the pager
service number. It is important to ensure that enough time is
allowed for the call to be dialed and answered before additional
information (such as the PIN or callback number) is dialed.
It is strongly recommended that subscribers verify that the system
can function properly with the Outcalling number as it is entered.
Subscribers should leave a message in their own mailbox during a
scheduled Outcalling period to ensure that the system places the
call to their beeper.
■
For a telephone number:
After the system has sent all the digits of the Outcalling number, the
system plays a message that announces the subscribers mailbox
number and notification that a new message has arrived. It also
instructs the subscriber how to access the new message and how
to cancel the Outcalling notification. This message is repeated five
times unless it is interrupted by the subscriber.
The subscriber may make up to three attempts to log in during the
outcall before the system disconnects.
*#
A subscriber can cancel Outcalling for a new message without
when
logging in or listening to the new message by pressing
listening to the Outcalling notification message.
5-5
System Management
Record-a-Call (PARTNER ACS Release 3.0
or later)
You should let system users know that they can turn this feature on or off by
pressing a button that you have programmed on their telephone. Instructions for
using this feature are provided in Using the PARTNER MAIL VS® Voice
Messaging System.
In addition, you should provide users with the following information:
■
■
■
■
A subscriber can only record a conversation while active on a call at an
internal telephone and only when you have assigned the subscriber
permission to use this feature.
If the system detects 15 seconds of silence after recording has begun, the
system automatically turns off the Record-a-Call feature, and the
subscriber must press the programmed feature button to resume
recording the conversation. The resumed recording is saved as another
message.
After a call has been recorded, it is saved in the subscribers mailbox. This
recorded conversation can be forwarded to another subscriber.
Subscribers should delete saved conversations on a regular basis to
avoid depleting mailbox and system storage space.
Call Screening (PARTNER ACS Release 3.0
or later)
This feature allows subscribers to listen while a caller is leaving a message in
their mailbox. Let subscribers know when you have programmed a button on
their telephone allowing them to use this feature. Instructions for using this
feature are included in Using the PARTNER MAIL VS® Voice Messaging System.
Using the Tutor Feature
Tutor is an on-line help feature that allows all system users (not just voice
messaging system subscribers) to easily access and listen to information on
commonly-used communications system features. You should let system users
know about this feature and recommend that users stick the Tutor Service label
(provided with the voice messaging system hardware) into the depression for the
handset mouthpiece on the base of their system phone.
i777
*4
To access the Tutor menu, users simply call the voice messaging system by
and enter
after they hear the Please enter
dialing
extension prompt. Voice prompts request the user to enter topic and
subtopic numbers.
5-6
General Information
The available topics are:
1 Autodial Features
3 Fixed Features
1 Last Number Redial
1 Transfer
2 Save Number Redial
2 Conference
3 Personal Speed Dial
4 About Your Phone
4 Intercom Auto Dial
1 Buttons and Lights
5 Outside Auto Dial
2 Display
2 Internal Calls
1 Hands Free Answer on Intercom
2 Voice Interrupt On Busy
3 Speakerphone
4 Volume
5 Ring Patterns
3 Group Paging
Information about each subtopic is presented in short, easy to understand
segments. After a segment plays, the user hears one beep or two beeps:
■
■
*4
#
*4
#
One beep means that there is more information about the subtopic. The
to replay the previous segment or
to play the next
user can press
segment.
Two beeps indicate the end of the information about the subtopic. The
to replay the previous segment or
to return to the
user can press
Tutor Main Menu.
NOTE:
Tutor's prompts play in either the System Language selected for
Monolingual Mode or the Primary Language selected for Bilingual Mode.
This cannot be changed.
5-7
System Management
Receptionist's Responsibilities
After the voice messaging system is installed, the receptionist at extension 10
should be aware of certain interactions between the voice messaging system
and the receptionist's extension.
NOTE:
You can change the receptionists extension number from the factory
setting of extension 10.
Use the following list as a guide when you explain these interactions to the
receptionist:
■
■
The receptionists mailbox can handle up to 180 minutes of stored
messages (or 120 messages).
For each Automated Attendant, unless programmed otherwise, when the
Automated Attendant Service answers outside calls, the receptionist will
or stays on the line after
receive calls from any caller who presses
hearing the menu prompt. VMS shows on the display of the
receptionist's phone to identify calls transferred by the voice messaging
system.
0
■
■
■
The personal greeting recorded at the receptionist's mailbox should be
more general than personal, since this mailbox is the destination for
business calls when the receptionist is not available.
If the receptionist requests a personal mailbox, you can create a guest
mailbox for that purpose. See Guest Mailboxes later in this chapter for
instructions. Once the guest mailbox is created, the receptionist should
tell people who might call to dial the extension number of the guest
mailbox to leave personal messages when they call and hear the
Automated Attendant Service prompt.
Additionally, the receptionist can record a note on the personal greeting at
extension 10 to notify callers of the guest mailbox. For example, the
personal greeting for extension 10 can also say If you would like to leave
. In this example, 33
a personal message for Ms. Smith, dial
represents the 2-digit extension number of the guest mailbox. Remind the
receptionist to log in to the guest mailbox regularly to check for messages,
since the guest mailbox does not have an associated phone with a
message waiting light.
*833
■
5-8
If Automatic VMS Cover is not assigned to extension 10, you should
program a VMS Cover button and a Do Not Disturb button on the system
phone at extension 10. Then instruct the receptionist to press both the
VMS Cover and Do Not Disturb buttons (to turn the features on) whenever
the receptionist leaves the desk or leaves for the day. This ensures that
any calls routed to extension 10 when the receptionist is away are
immediately covered by the voice messaging system. If the receptionist
has Automatic VMS Cover, program only the Do Not Disturb button at the
extension.
General Information
■
If selector code 9 on the Automated Attendant Service menu is left at the
factory setting (which is highly recommended), callers who press 9 from
the Automated Attendant Menu are routed directly to the receptionist's
mailbox to leave a message. If this is the case, let the receptionist know
that he or she should review the messages each morning and distribute
them to the appropriate people.
Group Calling Tips
It is important to note that voice mail coverage is not provided for group calls. If
your system is set up for group transfer, be sure that the receptionist is aware of
the following items:
■
■
■
1.
If the Automated Attendant Service transfers a call to a Hunt Group or
Calling Group1, and all members in the group are busy (members are
either on the phone or have Do Not Disturb on), the call is transferred to
the receptionist's extension. When callers transfer to a busy group, they
hear Music On Hold, tones, ringing, or silence (depending on how the
communications system is set up) until the receptionist answers.
If the Automated Attendant Service transfers a call to a Calling Group and
the call is not answered, the call is transferred to the receptionist's
extension after the programmed number of transfer return rings. The call
will not be sent to the voice mailbox.
If the Automated Attendant Service transfers a call to a Hunt Group that
has only one available member and that member does not answer the call,
the call is transferred to the receptionist's extension after the programmed
number of transfer return rings. The call will not be sent to the voice
mailbox.
Calling Groups are not available on all systems. Check the Programming and Use guide
for the communications system.
5-9
System Management
Language
You can choose the Language Mode, either Monolingual or Bilingual, and the
Language(s) used by that mode (see Figure 5-1). Monolingual Mode supports a
single System Language that callers hear when they call in to the voice
messaging system. Bilingual Mode supports two languages, a Primary
Language and a Secondary Language. Callers who call in to a voice messaging
system set for Bilingual Mode, hear the Automated Attendant Service menu
prompt, announcements, and mailbox greetings in the Primary Language, but
.
have the option of switching to the Secondary Language by pressing
*1
Programming
Main Menu
(Press 9 )
Language
(Press 1 )
System
Language
(Press 2 )
Language
Mode
(Press 1 )
Monolingual
Mode
(Press 1 )
Bilingual
Mode
(Press 2 )
No
Play System
Language
(Press 2 )
Bilingual
Mode?
Modify System
Language
(Press 6 )
Yes
Play Primary
Language
(Press 1 2 )
Modify Primary
Language
(Press 1 6 )
Play Secondary
Language
(Press 2 2 )
Figure 5-1.
5-10
Language Menu
Modify
Secondary
Language
(Press 2 6 )
Language
If you need to change current programming for Language, you can use the
instructions presented in this section. For example:
■
■
If you want to change the Language Mode from Monolingual to Bilingual or
Bilingual to Monolingual, use Modifying the Language Mode.
If you want to change the current System Language used in Monolingual
Mode or the current Primary and/or Secondary Language used in
Bilingual Mode, use Modifying the System, Primary, or Secondary
Language.
Modifying the Language Mode
Update Form 1 for the voice messaging system to show the change in Language
Mode.
When you change the Language Mode, the system continues to use any
recorded messages associated with the selected language. For example, if you
change from Monolingual to Bilingual Mode and the System Language in
Monolingual Mode was Latin American Spanish, callers will hear Latin American
Spanish as the Primary Language. Also, when you change the mode, listen to the
Automated Attendant Service Day and Night Menu Prompts to make sure they
are still relevant, and re-record them if necessary.
To change the Language Mode:
1. Access the Programming Main Menu:
i777 or the programmed Voice Mail Auto Dial
b. Press 99#.
c. Enter the password and press #.
d. Press 9.
a. Press
button.
The system plays the system programming options.
2. Press
1 for Language.
The system plays:
To program Language Mode, press 1. To program System
Language, press 2. If finished, press * #.
3. Press
1 for Language Mode.
The system plays the current Language Mode then:
For Monolingual Mode, press 1. For Bilingual Mode,
press 2. If finished, press * #.
5-11
System Management
4. Either:
Press
1 for Monolingual Mode.
The system plays:
System is in Monolingual Mode. To program
Language Mode, press 1. To program System
Language, press 2. If finished, press * #.
Press
2 for Bilingual Mode.
The system plays:
System is in Bilingual Mode. To program Language
Mode, press 1. To program System Language, press
2. If finished, press * #.
5. At this point, do one of the following:
To change the System Language if the system is set for
Monolingual Mode, go to Step 3 of Modifying the System, Primary,
or Secondary Language.
To change the Primary Language if the system is set for Bilingual
Mode, go to Step 3 of Modifying the System, Primary, or
Secondary Language.
To change the Secondary Language if the system is set for
Bilingual Mode, go to Step 3 of Modifying the System, Primary, or
Secondary Language.
Press
quit.
*7 to return to the Programming Main Menu or hang up to
Playing the System, Primary, or Secondary
Language
To listen to the current System, Primary, or Secondary Language:
1. Access the Programming Main Menu:
i777 or the programmed Voice Mail Auto Dial
b. Press 99#.
c. Enter the password and press #.
d. Press 9.
a. Press
button.
The system plays the system programming options.
2. Press
1 for Language.
The system plays:
To program Language Mode, press 1. To program System
Language, press 2. If finished, press * #.
5-12
Language
3. Press
2 for System Language.
If the system is operating in Monolingual Mode, the system plays:
To play System Language, press 2. To modify System
Language, press 6. If finished press * #.
If the system is operating in Bilingual Mode, the system plays:
To program Primary Language, press 1. To program
Secondary Language, press 2. If finished press * #.
4. Do one of the following:
If the system is operating in Monolingual Mode, press
Step 5.
2 and go to
The system plays:
System language is LANGUAGE (where LANGUAGE is the
current language). To play System Language, press
2. To modify System Language, press 6. If
finished, press * #.
1 for the
If the system is operating in Bilingual Mode, press 2 for the
If the system is operating in Bilingual Mode, press
Primary Language. Go to Step 6.
Secondary Language. Go to Step 6.
5. If the system is operating in Monolingual Mode, do one of the following:
To change the System Language, go to Step 4 of Modifying the
System, Primary, or Secondary Language.
Press
quit.
*7 to return to the Programming Main Menu or hang up to
6. If the system is operating in Bilingual Mode, do one of the following:
Press
2 to play the Primary Language. Go to Step 7.
The system plays:
Primary language is LANGUAGE (where LANGUAGE is
the current language). To play Primary Language,
press 2. To modify Primary Language, press 6. If
finished, press * #.
Press
2 to play the Secondary Language. Go to Step 7.
The system plays:
Secondary language is LANGUAGE (where LANGUAGE is
the current language). To play Secondary
Language, press 2. To modify Secondary Language,
press 6. If finished, press * #.
5-13
System Management
7. If the system is operating in Bilingual Mode, do one of the following:
To change the Primary Language, go to Step 7 of Modifying the
System, Primary, or Secondary Language.
To change the Secondary Language, go to Step 7 of Modifying the
System, Primary, or Secondary Language.
Press
quit.
*7 to return to the Programming Main Menu or hang up to
Modifying the System, Primary, or Secondary
Language
Update Form 1 for the voice messaging system to show the change in the
System Language selected for Monolingual Mode or the change in Primary or
Secondary Language selected for Bilingual Mode.
When you change the Language selection, the system uses any recorded
messages already associated with the new language. After changing the
Language selection, listen to the Automated Attendant Service Day and Night
Menu Prompts to make sure they are still relevant, and re-record them if
necessary.
NOTE:
When you change the Language selection, the Mailbox Language for any
mailboxes that were left at the factory setting also change to reflect the new
Language selection. Any mailboxes that were assigned a different
language do not change.
To change the System, Primary, or Secondary Language:
1. Access the Programming Main Menu:
i777 or the programmed Voice Mail Auto Dial
b. Press 99#.
c. Enter the password and press #.
d. Press 9.
a. Press
button.
The system plays the system programming options.
2. Press
1 for Language.
The system plays:
To program Language Mode, press 1. To program System
Language, press 2. If finished, press * #.
5-14
Language
3. Press
2 for System Language.
If the system is operating in Monolingual Mode, the system plays:
To play System Language, press 2. To modify System
Language, press 6. If finished press * #.
If the system is operating in Bilingual Mode, the system plays:
To program Primary Language, press 1. To program
Secondary Language, press 2. If finished, press * #.
4. Do one of the following:
If the system is operating in Monolingual Mode, press
6.
The system plays the current System Language, then prompts you
to enter the number corresponding to the desired language. Go to
Step 5.
1 for Primary
If the system is operating in Bilingual Mode, press 2 for Secondary
If the system is operating in Bilingual Mode, press
Language. Go to Step 7.
Language. Go to Step 7.
5. If the system is operating in Monolingual Mode, press the number for the
language you want to use. Go to Step 6.
The system plays:
For LANGUAGE (where LANGUAGE is the current language),
press 9 to confirm or 6 to cancel.
6. If the system is operating in Monolingual Mode, either:
Press
6 to cancel your selection. Go to Step 10.
The system plays:
System Language has not been changed.
Press
9 to confirm your selection. Go to Step 10.
The system plays:
System Language has been changed.
7. If the system is operating in Bilingual Mode, either:
Press
6 to modify the Primary Language.
The system plays the current Primary Language, then prompts you
to enter the number corresponding to the desired language. Go to
Step 8.
Press
6 to modify the Secondary Language.
The system plays the current Secondary Language, then prompts
you to enter the number corresponding to the desired language.
Go to Step 8.
5-15
System Management
8. If the system is operating in Bilingual Mode, press the number for the
language you want to use. Go to Step 9.
The system plays:
For LANGUAGE (where LANGUAGE is the current language),
press 9 to confirm or 6 to cancel.
9. If the system is operating in Bilingual Mode, either:
Press
6 to cancel your selection. Go to Step 10.
The system plays:
(Primary/Secondary) Language has not been changed.
Press
9 to confirm your selection. Go to Step 10.
The system plays:
(Primary/Secondary) Language has been changed.
10. Press
5-16
*7 to return to the Programming Main Menu or hang up to quit.
Automated Attendant Service
Automated Attendant Service
PARTNER MAIL VS Release 5.0 provides up to four Automated Attendants, each
of which answers different lines within your business. Automated Attendant
Service (see Figure 5-2) can provide both day and night operation so callers can
hear an appropriate prompt in either the System or Primary Language when they
call your company. The voice messaging system switches to day or night
operation depending on the setting of the Night Service button at extension 10
the receptionist's extension.
You can customize the day and/or night menu to welcome the caller and offer the
caller a list of options for transferring to a system extension, group, or mailbox, or
for hearing an Announcement that you record. If your business has multiple
locations connected with Centrex service from your local telephone company,
you can also program the system to transfer calls to a specific Centrex number
when the caller selects the associated option from the menu.
In addition, you can specify an extension (Dial 0/Timeout Extension) to which
calls are transferred when a caller dials 0 or does not select one of the listed
options on the menu.
For each Automated Attendant, you can record up to two Announcements (of up
to four minutes each). Announcements can tell callers about your business hours
and location, emergency cover information, and seasonal or special offers. If the
system is set for Bilingual Mode, you can record up to two Announcements in
each language. Be sure to record the Day and Night Menu Prompts in both the
to
Primary and Secondary Languages as well. Then callers can press
switch between the languages.
*1
5-17
System Management
Figure 5-2.
5-18
Automated Attendant Service Menu
Automated Attendant Service
If you need to change current programming for the Automated Attendant Service,
you can use the instructions presented in this section. For example:
■
■
■
■
If you want to add or delete lines assigned to any of the four Automated
Attendants, use Modifying Lines Assigned to Automated Attendants.
If you want to change the transfer options available for outside callers, use
Modifying the Menu Definition, Day Menu Prompt, and Announcements
and Modifying the Night Menu Prompt to update the options, prompts,
and/or Announcements callers hear.
If you add a line to the system that requires Automated Attendant Service,
use Group Call Distribution to include the new line.
If you want to change the way Automated Attendant Service handles calls,
use VMS Hunt Delay and/or VMS Hunt Schedule. Note that the settings
you choose for VMS Hunt Delay and VMS Hunt Schedule on one
Automated Attendant will apply to all Automated Attendants if you have a
PARTNER Plus, PARTNER II, PARTNER Endeavor, or PARTNER ACS
Release 1.0 or 2.0. If you have a PARTNER ACS 3.0 (or later), these
selections can be made for each line on each Automated Attendant.
5-19
System Management
Menu Definition, Prompt, and Announcements
When the Automated Attendant Service answers a call, the caller hears a menu
prompt that requests the caller to press one or more buttons on the dialpad to
transfer to a specific extension or group of extensions, or to hear an
Announcement. After the caller presses the button(s), the system transfers the
call to the appropriate extension or group, and the caller hears Music On Hold,
tones, ringing, or silence, or an Announcement (depending on how the
communications system is set up). Menu Definition lets you specify the
extensions or groups to which outside callers are transferred or the
Announcements that callers hear. Each of your Automated Attendants can have
its own Menu Definition and Announcements.
The voice messaging system uses the Menu Definition for both day and night
operation. To set up the menu, you define digits 1 through 9, called Selector
Codes. The Selector Code is the first digit dialed by the caller in response to the
menu prompts. A corresponding Selector Code Action can be assigned to each
of the selector codes for the following types of call transfer:
■
■
Direct Extension Transfer. This is the factory setting for selector codes 1
through 8. If you use the factory setting, callers can enter an extension
number directly from the menu. For direct extension transfer, the selector
code represents a range of extensions. For example, selector code 1
allows outside callers to transfer directly to any extension that begins with
a 1extensions 1019. For selector code 2, outside callers can transfer
directly to any extension that begins with a 2extensions 2029, and so
on.
Selector code 9 is different from selector codes 1 through 8. If you leave
selector code 9 at the factory setting, outside callers are transferred
directly to the receptionist's mailbox (although you can specify another
mailbox) where they can leave a message. This is especially useful for
night operation. If you use it, callers are routed directly to the receptionist's
mailboxthe system does not ring the extension first.
You can also change the factory setting and use selector code 9 for any of
the following purposes.
■
■
5-20
Selector Code Transfer. You can assign any of the selector codes to one
specific extension or group. Then when a caller presses the single-digit
selector code, the system transfers the call to the specific extension or
Calling Group or Hunt Group that you assigned to that digit.
Mailbox Transfer. You can assign any of the selector codes to transfer a
call to a preprogrammed mailbox number. Then when a caller presses the
single-digit selector code, the system transfers the call to the specific
mailbox that you assigned to this selector code action.
Automated Attendant Service
■
■
■
Centrex Transfer. If your business uses Centrex service supplied by the
local telephone company, you can assign any of the selector codes to
transfer a call to a preprogrammed Centrex number. Then when a caller
presses the single-digit selector code, the system transfers the call to the
Centrex number that you assigned to this selector code action. If you use
Centrex Transfer as an option on a particular Automated Attendant, all
lines assigned to that Automated Attendant must be Centrex lines.
Dial 0/Timeout Extension Transfer. You can specify a Dial 0/Timeout
Extension Transfer. Then when a caller presses 0 or does not select any
of the options listed on the menu, the system transfers the call to the
specific extension that you assigned.
Announcement. You can assign any of the selector codes to an
Announcement number. When a caller presses the single-digit selector
code, the system plays an Announcement (primary or secondary) that you
assigned to that digit. Each Announcement can be up to four minutes in
length. You can set the system to play the Announcement and hang up or
and an extension number.
prompt the caller to press
*8
NOTE:
Voice mail coverage is not provided for group calls. See Group
Calling Tips, earlier in this chapter, for more information.
Depending on your business, you can define the menu so that some options
accommodate callers during normal business hours and other options
accommodate after-hours callers. Keep in mind, though, that the menu definition
that you select for the Day Menu will be used by the voice messaging system to
the Night Menu as well.
For example: The ANY Travel Agency wants to give outside callers the ability to
transfer directly to any employee in their system by dialing the employee's 2-digit
extension number. The company has employees assigned at extensions 10
through 25. Therefore, the company leaves Selector Codes 1 and 2 at the factory
setting (Direct Extension Transfer). This leaves Selector Codes 3 through 9
available for Selector Code Transfer. In this case, ANY Travel Agency assigns
Selector Code 3 to extension 21 and Selector Codes 4 and 5 to Hunt Groups 1
and 2, respectively.
A sample Day Menu Prompt for the ANY Travel Agency follows:
Thank you for calling the ANY Travel Agency. If you know
the extension of the person you are calling, enter the
extension number now. To speak with a cruise specialist,
press 3. For corporate travel, press 4. For personal
travel, press 5. For assistance, press 0 or, if you have
a rotary phone, stay on the line.
5-21
System Management
A sample night menu prompt for the ANY Travel Agency follows:
You have reached the ANY Travel Agency.
are 9 to 5, Monday through Friday. To
press 9 and we will return your call as
If this is an emergency, press 6 for our
assistance information.
Our business hours
leave a message,
soon as possible.
special traveler’s
In this case, the caller who needs after-hours assistance can press
following Announcement:
6 to hear the
If you have misplaced your airline tickets or passport,
missed your flight or limousine pickup, or have any other
travel emergency after ANY Travel’s standard business
hours, call 1 800 555 6060 to speak with our special
traveler’s assistance program representative.
Other Options
Automated Attendant Service provides the following built-in optionsno
programming requiredfor use in your menu prompt:
■
Another type of transfer option, which is always available to outside and
inside callers, may be useful in certain situations. With this type of
, the system prompts them to enter an
transfer, when callers press
extension number. Using the example above, if you assigned Selector
Code Transfer to Selector Codes 1 and 2 (rather than starting the
, to allow
assignment from 3), you could request callers to press
them to transfer to extensions 10 to 29.
*8
*8
■
■
■
5-22
As shown in the sample Day Menu Prompt, you can also instruct a caller to
stay on the line for assistance. If so, the voice messaging system
automatically transfers the call to the receptionist's extension (or to the
specified Dial 0/Timeout extension). This option is especially important for
callers who have rotary phones.
0
As shown in the sample Day Menu Prompt, callers can press
at any
time to transfer automatically to the receptionist's extension (or to the
specified Dial 0/Timeout extension) for assistance.
*1
If the system is set for Bilingual Mode, callers can press
to switch
between the Primary and Secondary Languages. In this case, you must
record two messages for the Day and Night Menu Prompts and
Automated Attendant Announcements: one each in the Primary and
Secondary Languages.
Automated Attendant Service
Automated Attendant Line Assignment
You can add lines to an Automated Attendant, review assigned lines, or delete
lines from one Automated Attendant and assign them to another Automated
Attendant following the procedures in this section. If you use only one Automated
Attendant (Automated Attendant 1), you do not need to specify the Automated
Attendant to which the lines are assigned; the system will do this automatically
for you.
Note that if you plan to use Centrex Transfer in the Menu Definition for an
Automated Attendant, all lines assigned to that Automated Attendant must be
Centrex lines.
Playing the Automated Attendant Line
Assignments
This procedure lets you listen to the current line assignments for a specified
Automated Attendant.
To review the lines that have been assigned:
1. If necessary, access the Programming Main Menu. If you are already at
the Programming Main Menu, skip to Step 2.
i777 or the programmed Voice Mail Auto Dial
b. Press 99#.
c. Enter the password and press #.
d. Press 9.
a. Press
button.
The system plays the system programming options.
2. Press
3 for Automated Attendant.
The system prompts you to specify the Automated Attendant.
3. Enter the Automated Attendant number (from 1 to 4).
4. Press
6 for line assignment.
The system plays:
To review line assignments, press 1. To add a line,
press 2. To delete a line, press * 3. If finished,
press * #.
5. Press
1 to review assigned lines.
The system plays the lines assigned to this Automated Attendant.
6. Press
*7 to return to the Programming Main Menu.
7. Repeat Steps 2 through 5 for each additional Automated Attendant, or
continue with Modifying Assigned Lines or Deleting Assigned Lines.
5-23
System Management
Modifying Assigned Lines
To modify the lines assigned to a specific Automated Attendant:
1. If necessary, access the Programming Main Menu. If you are already at
the Programming Main Menu, skip to Step 2.
i777 or the programmed Voice Mail Auto Dial
b. Press 99#.
c. Enter the password and press #.
d. Press 9.
a. Press
button.
The system plays the system programming options.
2. Press
3 for Automated Attendant.
The system prompts you to specify the Automated Attendant.
3. Enter the Automated Attendant number (from 1 to 4).
4. Press
6 for line assignment.
The system plays:
To review line assignments, press 1. To add a line,
press 2. To delete a line, press * 3. If finished,
press * #.
5. Press
2 to modify a line assignment.
The system prompts:
Enter line number followed by #. To quit, press * #.
6. Enter the line number you want to modify.
If you are using multiple Automated Attendants and the line is already
assigned, the system indicates that the line is assigned to another
Automated Attendant.
The system prompts:
Do you want to change the line assignment, press 9 to
confirm or 6 to cancel.
If the line is not already assigned to another Automated Attendant, the
system plays the line number and its assignment to this Automated
Attendant.
7. Press
9 to confirm that you want to modify the line assignment.
The system plays the line number and its reassignment to the Automated
Attendant you specified in Step 3.
8. Press
*7 to return to the Programming Main Menu.
9. Repeat Steps 2 through 8 for each additional Automated Attendant, or
hang up to quit.
5-24
Automated Attendant Service
Deleting Assigned Lines
You can delete a line from a specific Automated Attendant using this procedure.
If you do not want a line to receive any Automated Attendant service, you must
reprogram the communications system using the Group Call Distribution feature
(#206, Option 1) to delete the line from the VMS Hunt Group.
To delete lines assigned to an Automated Attendant:
1. If necessary, access the Programming Main Menu. If you are already at
the Programming Main Menu, skip to Step 2.
i777 or the programmed Voice Mail Auto Dial
b. Press 99#.
c. Enter the password and press #.
d. Press 9.
a. Press
button.
The system plays the system programming options.
2. Press
3 for Automated Attendant.
The system prompts you to specify the Automated Attendant.
3. Enter the Automated Attendant number (from 1 to 4).
4. Press
6 for line assignment.
The system plays:
To review line assignments, press 1. To add a line,
press 2. To delete a line, press * 3. If finished,
press * #.
5. Press
*3 to delete an assigned line.
The system prompts:
Enter line number followed by #. To quit, press * #.
6. Enter the line number you want to delete.
NOTE:
You can delete only lines that are assigned to the Automated
Attendant that you specified in Step 3.
The system plays the line number and its current assignment.
The system prompts:
Do you want to delete the line assignment, press 9 to
confirm or 6 to cancel.
5-25
System Management
7. Press
9 to confirm that you want to delete the line.
The system confirms the deletion.
8. Press
*7 to return to the Programming Main Menu.
9. Repeat Steps 2 through 8 for each additional Automated Attendant, or
hang up to quit.
Playing the Menu Definition and
Announcements
For a specific Automated Attendant, this procedure lets you listen to the current
Menu Definition and any Announcement associated with a Selector Code. The
Menu Definition is accessed through the Day Menu.
To play the current menu definition:
1. Access the Programming Main Menu:
i777 or the programmed Voice Mail Auto Dial
b. Press 99#.
c. Enter the password and press #.
d. Press 9.
a. Press
button.
The system plays the system programming options.
2. Press
3 for Automated Attendant.
The system prompts you to specify the Automated Attendant.
3. Enter the Automated Attendant number (1 to 4).
The system plays:
To program the Day Menu, press 1.
press 2.
4. Press
For the Night Menu,
1 for the Day Menu.
The system plays:
To play the menu, press 2; to modify the menu, press 6.
If finished, press * #.
5. Press
2.
The system plays:
To play the menu prompt, press 1. To play the Menu
Definition, press 2. If finished, press * #.
5-26
Automated Attendant Service
6. Press
2 to play the Menu Definition.
The system plays the current Menu Definition. If an Announcement is
recorded, the system plays the Selector Code number and associated
Announcement number.
7. Either:
#
if you do not want to listen to the Announcement and go to
Press
the next Selector Code.
1
to play the
If the system is operating in Monolingual Mode, press
recorded Announcement assigned to the Selector Code.
1
If the system is operating in Bilingual Mode, press 2 to play the
to play the
If the system is operating in Bilingual Mode, press
Primary Language Announcement assigned to the Selector Code.
Secondary Language Announcement assigned to the Selector
Code.
The system plays the recorded Announcement and goes to the next
Selector Code.
8. Press
*7 to return to the Programming Main Menu or hang up to quit.
Playing the Day or Night Menu Prompt
To listen to the current Day or Night Menu Prompt:
1. Access the Programming Main Menu:
i777 or the programmed Voice Mail Auto Dial
b. Press 99#.
c. Enter the password and press #.
d. Press 9.
a. Press
button.
The system plays the system programming options.
2. Press
3 for Automated Attendant.
The system prompts you to specify the Automated Attendant.
3. Enter the Automated Attendant number (1 to 4).
The system plays:
To program the Day Menu, press 1.
press 2. If finished, press * #.
For the Night Menu,
5-27
System Management
4. Either:
1 for the Day Menu.
Press 2 for the Night Menu.
Press
The system plays:
To play the menu, press 2; to modify the menu, press 6.
If finished, press * #.
5. Press
2.
The system plays:
To play the menu prompt, press 1. To play the Menu
Definition, press 2. If finished, press * #.
6. To play the Menu Prompt, press
1.
If the system is operating in Monolingual Mode, the system plays the Day
or Night Menu Prompt depending on your choice in Step 4.
If the system is operating in Bilingual Mode, the system plays:
To play Primary Language prompt, press 1. To play
Secondary Language prompt, press 2. If finished,
press * #.
7. Either:
1 for the Primary Language prompt.
Press 2 for the Secondary Language prompt.
Press
The system plays the Day or Night Menu Prompt (depending on your
choice in Step 4) in either the Primary or Secondary Language
(depending on your choice in this step).
8. Repeat Step 7 to play the Day or Night Menu Prompt in the other
language.
9. Press
5-28
*7 to return to the Programming Main Menu or hang up to quit.
Automated Attendant Service
Modifying the Menu Definition, Day Menu
Prompt, and Announcements
For each Automated Attendant, update Forms 3 and 4 for the voice messaging
system to show modifications to the Menu Definition and/or Day Menu Prompt for
systems operating in Monolingual Mode (Forms 3B and 4A for systems operating
in Bilingual Mode); update Forms 3 and 3A for the voice messaging system to
show modifications to the Announcements, if any, for systems operating in
Monolingual Mode (Form 3B for systems operating in Bilingual Mode).
You can use the following procedure to do the following:
■
Modify the Automated Attendant Menu Definition (including Selector
codes and the Dial0/Timeout Extension).
■
Re-record an Automated Attendant Announcement.
■
Re-record the Automated Attendant Menu Prompt.
! CAUTION:
It is important to understand that you must approve each element (that is,
the Menu Definition, the Day Menu Prompt, and any Announcements, as
well as save all of these entries (in Step 27). If you exit at any point before
saving your approved entries, your entries will be lost. This procedure is
designed to ensure that callers do not hear the incomplete menu while you
are in the process of modifying it.
To change the Menu Definition, Day Menu Prompt, and/or Announcements:
1. Access the Programming Main Menu:
i777 or the programmed Voice Mail Auto Dial
b. Press 99#.
c. Enter the password and press #.
d. Press 9.
a. Press
button.
The system plays the system programming options.
2. Press
3 for Automated Attendant.
The system prompts you to specify the Automated Attendant.
3. Enter the Automated Attendant number (1 to 4).
The system plays:
To program the Day Menu, press 1.
press 2. If finished, press * #.
For the Night Menu,
5-29
System Management
4. Press
1.
The system plays:
To play the menu, press 2; to modify the menu, press 6.
If finished, press * #.
5. Press
6.
The system plays:
Please enter a selector code from 1 to 9. Press 0 for
the Dial 0/Timeout action. When finished modifying the
Menu Definition, press * #.
6. If you want to modify only the Day Menu Prompt, go to Step 16. Otherwise,
continue with Step 7.
7. Do one of the following:
Press
0 to specify a Dial 0/Timeout Extension. Go to Step 8.
Enter a Selector Code from 1 through 9. Go to Step 9.
The system plays the current Selector Code Action (or
Announcement Number and Announcement), then asks:
Do you want to make a modification?
confirm or 6 to cancel.
Press 9 to
8. To specify the Dial 0/Timeout Extension:
a. Press
9 to make the modification.
b. Enter the extension number specified in Column D of Form 3. (The
default is extension 10.)
c. Go to Step 15.
9. Press
9 to confirm that you want to modify this Selector Code.
The system plays:
For selector code transfer, press 1; for announcement,
press 3; for direct extension transfer, press 5; for
mailbox transfer, press 6; for Centrex transfer,
press 7.
If you want to return the Selector Code to the factory setting (Direct
Extension Transfer for Selector Code 1 through 8), go to Step 10.
If you want to assign a different extension or group to the Selector
Code, go to Step 11.
If you want to change the Announcement, go to Step 12.
If you want to specify Mailbox Transfer to the Selector Code, go to
Step 13.
If you want to specify Centrex Transfer to the Selector Code, go to
Step 14.
5-30
Automated Attendant Service
10. To return to Direct Extension Transfer:
a. Press
5.
For direct extension transfer, the selector code represents a range
of extensions. For example, selector code 1 allows outside callers
to transfer directly to any extension that begins with a 1
extensions 1019.
b. Go to Step 15.
11. To change the Selector Code Transfer extension or group:
a. Press
1.
b. Enter the desired extension or group number specified in Column D
of Form 3.
c. Go to Step 15.
12. To change an Announcement:
a. Press
3.
b. Enter the Announcement number (1 or 2) specified in Column D of
Form 3.
c. Go to Step 18.
13. To change Mailbox Transfer:
a. Press
6.
b. Enter the desired mailbox number specified in Column D of Form 3.
c. Go to Step 15.
14. To change Centrex Transfer:
a. Press
7.
b. Enter the desired Centrex number specified in Column D of Form 3,
and wait for the system to time out.
1 to continue.
d. Press *# to approve.
e. Press 9 to confirm.
c. Press
f. Go to Step 15.
15. Return to Step 7 for the next Selector Code you want to modify. When you
have finished programming Selector Codes, go to Step 16.
*# to approve your entries and finish modifying the Menu
16. Press
Definition.
The system plays:
To record a new prompt for this menu, press 1. To use
the existing prompt and save any Menu Definition
changes, press #.
5-31
System Management
#
18. To record a new Day Menu Prompt or Announcement, lift the handset,
press 1, and record after the beep. The prompt or Announcement can be
up to four minutes long (factory-set length).
19. Press 1 when you are finished recording.
17. If you do not want to record a new Day Menu Prompt or Announcement,
and go to Step 28; otherwise, continue with Step 18.
press
20. Choose an option or skip this step:
21
Press
to immediately re-record the Day Menu Prompt or
Announcement. Begin recording immediately after the beep; press
after recording. Repeat, if desired.
1
23
Press *3 to delete the Day Menu Prompt or Announcement and
Press
to play back the Day Menu Prompt or Announcement.
Repeat, if necessary.
return to Step 18 to be prompted for re-recording.
21. Do one of the following:
*#
For systems operating in Monolingual Mode, press
to
approve the Day Menu Prompt or Announcement. You have now
completed this procedure.
*#
to approve
For systems operating in Bilingual Mode, press
the Day Menu Prompt or Announcement. Continue with Step 22.
22. If you want to record the Day Menu Prompt or Announcement in the
Secondary Language, continue with Step 23; otherwise, skip to Step 25.
2
24. Press 1 after recording.
23. Press
and record the Menu Prompt from Form 4A (or Announcement
from Form 3B).
25. Choose an option or skip this step:
21
Press
to immediately re-record the Day Menu Prompt or
Announcement. Begin recording immediately after the beep; press
after recording. Repeat, if desired.
1
23
Press *3 to delete the Day Menu Prompt or Announcement and
return to Step 23 to be prompted for re-recording.
26. Press *# to approve this Day Menu Prompt or Announcement.
27. Press # to approve and save all entries. The Menu Definition, Day Menu
Prompts, and Announcements (if any) now take effect.
28. Press *7 to return to the Programming Main Menu or hang up to quit.
Press
to play back the Day Menu Prompt or Announcement.
Repeat, if necessary.
5-32
Automated Attendant Service
Modifying the Night Menu Prompt
Update Forms 5 and 5A for the voice messaging system to show modifications to
the Night Menu Prompt; then use the updated form(s) while performing the
following procedure.
To change the Night Menu Prompt:
1. Access the Programming Main Menu:
i777 or the programmed Voice Mail Auto Dial
b. Press 99#.
c. Enter the password and press #.
d. Press 9.
a. Press
button.
The system plays the system programming options.
2. Press
3 for Automated Attendant.
The system prompts you to specify the Automated Attendant.
3. Enter the Automated Attendant number (1 to 4).
The system plays:
To program the Day Menu, press 1.
press 2. If finished, press * #.
4. Press
For the Night Menu,
2.
The system plays:
To play the menu, press 2; to modify the menu, press 6.
If finished, press * #.
5. Press
6.
If the system is operating in Monolingual Mode, the system plays:
To record a new prompt for this menu, press 1.
the existing prompt, press #.
To use
If the system is operating in Bilingual Mode, the system plays:
To record Primary Language prompt, press 1. To record
Secondary Language prompt, press 2. To save any
recordings, press #.
6. Lift the handset:
1
Press 2 to record the Night Menu Prompt in the Secondary
to record the Night Menu Prompt in the Primary
Press
Language.
Language.
7. Record the prompt after the beep.
5-33
System Management
8. Press
1 when you are finished recording.
9. Choose an option or skip this step:
21
1
Press
to immediately re-record this Night Menu Prompt. Begin
after recording.
recording immediately after the beep; press
Repeat, if desired.
23 to play back this Night Menu Prompt.
Press *3 to delete this Night Menu Prompt.
Press
If the system is operating in Monolingual Mode, the system plays:
Deleted. To record a new prompt for this menu,
press 1. To use the existing prompt, press #.
Return to Step 6.
If the system is operating in Bilingual Mode, the system plays:
Deleted.
press 1.
press 2.
To record Primary Language prompt,
To record Secondary Language prompt,
To save any recordings, press #.
Return to Step 6.
10. Do one of the following:
*#
to
For systems operating in Monolingual Mode, press
approve this Night Menu Prompt. This system confirms that the
Night Menu Prompt is approved and you have now finished this
procedure.
For systems operating in Bilingual Mode, press
with Step 11.
*# and continue
11. To record the Night Menu Prompt in the other language, repeat Steps 6
through 10. Otherwise, go to Step 12.
12. Press
# to approve all changes.
The new Night Menu Prompt(s) now takes effect.
13. Press
5-34
*7 to return to the Programming Main Menu or hang up to quit.
Automated Attendant Service
Group Call Distribution (Option 1)
Use this communications system procedure to specify a new outside line on
which you want Automated Attendant Service.
Update Line Coverage on Form A, Page 1 of the System Planner for the
communications system to show modifications to VMS-AA lines before you
begin.
To assign VMS-AA lines to Hunt Group 7:
1. Press
f00ss.
2. Enter the System Password, if required.
3. Press
#206 .
2
4. At the Group: prompt, press
7.
5. At the Line: prompt, enter the first VMS-AA line to be programmed as
specified in the Line Coverage column of Form A, Page 1.
D
6. Press
until the display reads 1 Assigned. (Be careful not to
choose 3 VMS Line Cover because you will assign VMS Line Coverage
rather than Automated Attendant Service to the line.)
7. To program another line, press
line number displays.
8. Press
n or p until the appropriate
D until the display reads 1 Assigned.
9. Repeat Steps 7 and 8 for each VMS-AA line.
10. Press
2.
f00 to exit programming.
In some countries, the procedure code for Group Call Distribution is #205. Check the
Programming and Use guide for the communications system.
5-35
System Management
VMS Hunt Delay (PARTNER ACS Release 3.0
or later)
Use this communications system procedure to specify either immediate or
delayed call handling. You can change this setting for each line assigned to the
Automated Attendants. You can also specify a different VMS Hunt Delay setting
for Day and Night Service.
NOTE:
See VMS Hunt Delay on Page 2 of Form A; be sure that the appropriate
number of rings is specified. The default setting is 2, but you can change
this value for more immediate call handling. If you do not subscribe to
Caller ID service from your local telephone company, you can specify 0
rings. If you do subscribe to Caller ID service, it is recommended that you
specify 1.
Update Form A, Page 2 of the System Planner for the communications system to
show modifications to the VMS Hunt Delay setting before you begin.
To change the VMS Hunt Delay setting:
1. Press
f00ss.
2. Enter the System Password, if required.
3. Press
#506.
4. At the Mode: prompt, enter 1 (Day) or 2 (Night).
5. At the Line: prompt, enter the first line number.
D until the appropriate value displays.
7. To program another line, press n or p until the appropriate
line number displays. Then repeat Step 6.
8. Press f00 to exit programming.
6. Press
VMS Hunt Delay (All Other PARTNER Systems)
Use this communications system procedure to specify either immediate or
delayed call handling. Any changes you make will apply to all Automated
Attendants.
Update Form A, Page 2 of the System Planner for the communications system to
show modifications to the VMS Hunt Delay setting before you begin.
To change the VMS Hunt Delay setting:
1. Press
f00ss.
2. Enter the System Password, if required.
3. Press
5-36
#506.
Automated Attendant Service
D until the appropriate value displays.
5. Press f00 to exit programming.
4. Press
Automatic Extension Privacy
Use this procedure to prevent users from accidentally picking up calls sent to the
voice messaging system.
Update Form B1 of the System Planner for the communications system to show
Automatic Extension Privacy (#304) as Assigned for the PARTNER MAIL VS
extensions.
To change the Automatic Extension Privacy setting:
1. Press
f00ss.
2. Enter the System Password, if required.
3. Press
#304.
4. Enter the first PARTNER MAIL VS extension number specified on
Form B1.
D until the display reads 1 Assigned.
6. Press n or p until the next PARTNER MAIL VS extension
number specified on Form B1 displays.
7. Press D until the display reads 1 Assigned.
5. Press
8. If additional PARTNER MAIL VS extensions are specified on Form B1,
repeat Steps 6 and 7 for each one.
9. Press
f00 to exit programming.
5-37
System Management
VMS Hunt Schedule (PARTNER ACS
Release 3.0 or later)
Use this communications system procedure to specify when the communications
system is to route calls to the voice messaging system. You can change this
setting for each line assigned to the Automated Attendants.
Update Form A, Page 2 of the System Planner for the communications system to
show modifications to the VMS Hunt Schedule setting before you begin.
To change the VMS Hunt Schedule setting:
1. Press
f00ss.
2. Enter the System Password, if required.
3. Press
#507.
4. At the Mode: prompt, enter 1 (Day) or 2 (Night).
5. At the Line: prompt, enter the first line number.
D until the appropriate value displays.
7. To program another line, press n or p until the appropriate
line number displays. Then repeat Step 6.
8. Press f00 to exit programming.
6. Press
VMS Hunt Schedule (All Other PARTNER
Systems)
Use this communications system procedure to specify when the communications
system is to route calls to the voice messaging system. Any changes you make
apply to all Automated Attendants.
Update Form A, Page 2 of the System Planner for the communications system to
show modifications to the VMS Hunt Schedule setting before you begin.
To change the VMS Hunt Schedule setting:
1. Press
f00ss.
2. Enter the System Password, if required.
#507.
4. Press D until the appropriate value displays.
5. Press f00 to exit programming.
3. Press
5-38
Modifying Mailboxes
Modifying Mailboxes
The voice messaging system is shipped with 48 mailboxes already created. The
characteristics of mailboxes are as follows:
■
■
Receptionist's Extension. Extension 10 has a default storage capacity
of 60 minutes (which can be administered for up to 180 minutes) or 120
messages. Each message has a default length of four minutes and a
length range of 2 to 60 minutes.
All Other Extensions. Other extensions each have a default storage
capacity of 20 minutes (which can be administered for up to 180 minutes)
or 120 messages.
5-39
System Management
Programming
Main Menu
(Press 9 )
Mailboxes
(Press 4 )
Mailbox Number
(Enter Number
+ #)
Yes
Administer
Message Length
& Mailbox Size
(Press 2 )
Reinitialize
Password
(Press 3 )
Reinitialize
Mailbox
(Press 4 )
Administer
Outcalling
(Press 5 )
Program
Mailbox
Language
(Press 6 )
Administer
Record-A-Call
(Press 7 )
Delete
Mailbox
(Press * 3 )
Figure 5-3.
5-40
Modifying Mailboxes
Mailbox
Number
Exists?
No
Create
Mailbox
(Press 4 )
Modifying Mailboxes
If you need to change current mailbox programming, you can use the
instructions presented in this section. For example:
■
■
■
■
■
■
■
If an employee leaves the company, you can set up the previously
assigned mailbox number for a new employee. To do so, use
Reinitializing a Mailbox, which returns the mailbox to its factory settings
and deletes any messages that were in the mailbox.
If you want to keep the maximum number of mailboxes available for
subscribers, use Deleting a Mailbox to delete mailboxes from extensions
to which you connect auxiliary equipment (such as doorphones and fax
machines).
If a subscriber needs more storage space in his or her mailbox, use
Changing Mailbox Message Length or Size.
If a subscriber forgets his or her password, use Reinitializing a Password
to return the password to the factory setting (1234).
If a subscriber would like to interact with Voice Mail Service using a
language different from the one assigned to his or her mailbox, use
Modifying a Mailbox's Language.
If you want to activate or deactivate Outcalling for a subscribers mailbox,
refer to Administering Outcalling for a Mailbox. As the default setting,
Outcalling privileges are denied. Even after you activate Outcalling for a
subscribers mailbox, the subscriber must also turn on this feature and
specify an Outcalling number (or list of numbers) by following the
procedure in Using the PARTNER MAIL VS ® Voice Messaging System.
If you want to activate or deactivate Record-a-Call privileges for a
subscribers mailbox, refer to Administering Record-a-Call for a Mailbox.
As the default setting, Record-a-Call privileges are denied (that is,
message length is set to 0). Even after you activate Record-a-Call for a
subscribers mailbox, you must also program a telephone button for this
feature. The subscriber should follow the Record-a-Call procedure in
Using the PARTNER MAIL VS ® Voice Messaging System.
Before you change mailbox assignments, you should review the next two
sections Hardware Considerations and Guest Mailboxes.
5-41
System Management
Hardware Considerations
Remember that mailbox numbers and extension numbers are the same. You can
also assign available mailboxes to extensions that do not have phones
connected to them so that guestsemployees who work off-premises most of
the time, such as salespeoplecan access messages while on the road. See
Guest Mailboxes later in this chapter.
After initial installation, you have default mailboxes for extensions 10 through 57.
You should always delete unused mailboxes to protect your systems security.
When you create mailboxes for new subscribers, you can use any mailbox in
your system's dial plan. The dial plan is the maximum number of extensions
supported by your system. You can have mailboxes for extensions 11 through
57. (Note that the mailbox at extension 10 cannot be deleted.) Figure 2-1
in Chapter 2 and the figures in Appendix D show the most common dial plans.
Guest Mailboxes
You can assign available mailboxes to extensions in the dial plan that do not
have phones connected to them. Guest mailboxes are useful for employees who
work off-premises most of the time. Guest mailboxes provide all the benefits of a
regular mailbox (including Outcalling privileges) except the subscriber does not
receive visual indication of a message deposited in the mailbox since there is no
phone (and therefore no message waiting light) associated with the mailbox.
Guests can call the voice messaging system from any touch-tone phone to
retrieve their messages.
Review the following notes before you program guest mailboxes:
■
■
■
5-42
If you have empty slots in the carrier, you can assign guest mailboxes to
those extensions in the dial plan that correspond to the empty slot(s).
When you assign guest mailboxes, it is recommended that you start
assignments from the high end of the dial plan. (On a PARTNER Plus
system, work backwards from extension 33; on a PARTNER II system,
work backwards from extension 57; on a PARTNER Advanced
Communications System 3.0 or PARTNER Endeavor, work backwards from
extension 49, or on a PARTNER Advanced Communications System 1.0 or
1.1, work backwards from extension 41.)
After you create a guest mailbox, use Automatic VMS Cover, later in this
section, to assign automatic coverage to the guest mailbox. Calls to these
extensions are routed immediately to the mailboxthe call does not try
ringing the extension first.
If you do not have empty slots in the carrier, you can assign guest
mailboxes to the unused extension numbers associated with the voice
messaging system module. You also need to assign automatic coverage
to these guest mailboxes. You can use any of the six extensions on the
voice messaging system module for guest mailbox assignments.
Modifying Mailboxes
■
■
Calls routed to these extensions are routed to the subscribers mailbox
depending on the extension used. Refer to the table below to determine
whether calls are routed on an immediate or delayed basis.
For a 2-port system:
If the bottom two extensions are used, calls are routed to the
subscribers mailbox on an immediate basis.
If the remaining four extensions are used, calls are routed to the
subscribers mailbox after four rings (or after the number of rings
programmed in the VMS Cover Ring Interval).
■
For a 4-port system:
If the bottom four extensions are used, calls are routed to the
subscribers mailbox on an immediate basis.
If the remaining two extensions are used, calls are routed to the
subscribers mailbox after four rings (or after the number of rings
programmed in the VMS Cover Ring Interval).
■
■
A 2-port voice messaging system uses the bottom two extension numbers
associated with the slot in which the module is installed (see Figure 2-1 in
Chapter 2 and the figures in Appendix D). For example, if the module is
installed in the last slot on a PARTNER ACS 5-slot configuration (see
Figure 2-1), it uses extensions 46 and 47. In this case, you can use
extensions 42 through 47 for guest mailboxes.
A 4-port system uses the bottom four extensions (for example, 44, 45, 46,
and 47). In this case, you can use extensions 42 through 47 for guest
mailboxes.
5-43
System Management
Checking a Mailbox's Status
Use this procedure to determine if a mailbox exists:
1. Access the Programming Main Menu:
i777 or the programmed Voice Mail Auto Dial
b. Press 99#.
c. Enter the password and press #.
d. Press 9.
a. Press
button.
The system plays the system programming options.
2. Press
4 to program mailboxes.
The system tells you how many mailboxes currently exist and how many
are allowed, then:
Please enter the mailbox number followed by # or
press # for the next mailbox.
#
3. Enter the number of the mailbox that you want to check followed by
simply press .
The system responds as follows:
If you entered a mailbox number followed by
you if the mailbox exists.
#
#, or
#, the system tells
If you entered , the system tells you the number of the first
existing mailbox.
# repeatedly to hear the next existing mailbox number.
5. Press *7 to return to the Programming Main Menu or hang up to quit.
4. Press
5-44
Modifying Mailboxes
Deleting a Mailbox
Update Form 2 for the voice messaging system to show mailboxes to be deleted;
then use the updated form while performing the following procedure.
Review the following notes before you delete a mailbox:
■
■
■
■
The receptionist's mailbox (at extension 10) cannot be deleted.
Any messages in the mailbox are lost when a mailbox is deleted. The
message light is turned off. The personal greeting is lost.
If you delete a mailbox from an extension that has VMS Cover assigned,
unassign Automatic VMS Cover or remove the VMS Cover button. This
action prevents unanswered intercom and transferred calls to this
extension from being transferred to the receptionist's extension.
If you delete a mailbox that was assigned a line owner using VMS Line
Cover, either delete line ownership from that line or assign a different
mailbox as the owner of that line. Similarly, if you delete a mailbox that was
assigned a line owner using Extension Line Coverage, either unassign
coverage or assign a different extension as the owner.
! SECURITY ALERT:
As a safeguard against toll fraud, delete unused mailboxes.
To delete a mailbox:
1. Access the Programming Main Menu:
i777 or the programmed Voice Mail Auto Dial
b. Press 99#.
c. Enter the password and press #.
d. Press 9.
a. Press
button.
The system plays the system programming options.
2. Press
4 to program mailboxes.
The system tells you how many mailboxes exist and how many are
allowed, then:
Please enter the mailbox number followed by # or
press # for the next mailbox.
5-45
System Management
3. Enter the number of the mailbox you want to delete followed by
#.
The system says if the mailbox exists, then:
To administer the message length and mailbox size,
press 2. To reinitialize the password, press 3. To
reinitialize the mailbox, press 4. To administer
Outcalling, press 5. To program the Mailbox Language,
press 6. To administer Record-a-Call, press 7. To
delete the mailbox, press *3. If finished with this
mailbox, press *#, or for the next mailbox, press #.
4. Press
*3.
The system plays:
Mailbox XX has YY new messages and ZZ old messages. Do
you want to delete? Press 9 to confirm or 6 to cancel.
5. Press
9 to confirm mailbox deletion.
The system plays:
Deleted.
6. Press
*7 to return to the Programming Main Menu or hang up to quit.
Creating a Mailbox
Update Form 2 for the voice messaging system to show mailboxes to be created;
then use the updated form while performing the following procedure.
The default message length will be 4 minutes, and the default mailbox size will be
20 minutes for these mailboxes.
Review the following notes before you create a mailbox:
■
■
■
5-46
Mailboxes can be created for extensions 11 through 33 for the PARTNER
Plus, 11 through 49 for PARTNER Endeavor and Advanced
Communications System 3.0, 11 through 41 for PARTNER Advanced
Communications System 1.0 or 1.1, and 11 through 57 for the PARTNER II
system. See Hardware Considerations earlier in this chapter for details.
When a mailbox is created, it uses the factory set password (1234) and
the factory set Mailbox Language in either the System Language (in
Monolingual Mode) or Primary Language (in Bilingual Mode). The Mailbox
Language can be changed on a per mailbox basis. See Modifying a
Mailbox Language, later in this chapter for details.
You can create a guest mailbox for an extension that does not have a
phone connected to it. See Guest Mailboxes earlier in this chapter for
details.
Modifying Mailboxes
To create a mailbox:
1. Access the Programming Main Menu:
i777 or the programmed Voice Mail Auto Dial
b. Press 99#.
c. Enter the password and press #.
d. Press 9.
a. Press
button.
The system plays the system programming options.
2. Press
4 to program mailboxes.
The system tells you how many mailboxes exist and how many are
allowed, then:
Please enter the mailbox number followed by # or
press # for the next mailbox.
3. Enter the number of the mailbox you want to create followed by
#.
The system plays:
Mailbox XX does not exist. To create this mailbox,
press 4. If finished with this mailbox, press *#, or
press # for the next mailbox.
4. Press
4.
The system plays:
Created.
5. Press
*7 to return to the Programming Main Menu or hang up to quit.
5-47
System Management
Reinitializing a Password
If a subscriber forgets the password for his or her mailbox, you can reinitialize the
password to the factory setting of 1234 so the user can retrieve messages.
Remind the subscriber to change the password immediately after logging in for
the first time.
To reinitialize a password to 1234:
1. Access the Programming Main Menu:
i777 or the programmed Voice Mail Auto Dial
b. Press 99#.
c. Enter the password and press #.
d. Press 9.
a. Press
button.
The system plays the system programming options.
2. Press
4 to program mailboxes.
The system tells you how many mailboxes exist and how many are
allowed, then:
Please enter the mailbox number followed by # or
press # for the next mailbox.
#
3. Enter the number of the mailbox whose password you want to reinitialize
.
followed by
The system plays:
Mailbox XX exists. To administer the message length and
mailbox size, press 2. To reinitialize the password,
press 3. To reinitialize the mailbox, press 4. To
administer Outcalling, press 5. To program the Mailbox
Language, press 6. To administer Record-a-Call, press
7. To delete the mailbox, press *3. If finished with
this mailbox, press *#, or for the next mailbox, press
#.
4. Press
3.
The system plays:
The password has been reinitialized.
5. Press
5-48
*7 to return to the Programming Main Menu or hang up to quit.
Modifying Mailboxes
Reinitializing a Mailbox
To prepare a previously used mailbox for a new subscriber, you can reinitialize
the mailbox. This procedure deletes any messages left in the mailbox and turns
off the phone's message light (if lit), erases the personal greeting (if recorded),
changes the password back to the factory setting (1234), and changes the
Mailbox Language back to either the System Language (Monolingual Mode) or
the Primary Language (Bilingual Mode).
To reinitialize a mailbox:
1. Access the Programming Main Menu:
i777 or the programmed Voice Mail Auto Dial
b. Press 99#.
c. Enter the password and press #.
d. Press 9.
a. Press
button.
The system plays the system programming options.
2. Press
4 to program mailboxes.
The system tells you how many mailboxes exist and how many are
allowed, then:
Please enter the mailbox number followed by # or
press # for the next mailbox.
3. Enter the number of the mailbox you want to reinitialize followed by
#.
The system plays:
Mailbox XX exists. To administer the message length and
mailbox size, press 2. To reinitialize the password,
press 3. To reinitialize the mailbox, press 4. To
administer Outcalling, press 5. To program the Mailbox
Language, press 6. To administer Record-a-Call, press
7. To delete the mailbox, press *3. If finished with
this mailbox, press *#, or for the next mailbox, press
#.
4. Press
4.
The system plays:
Mailbox XX has YY new and ZZ old messages. Do you want
to reinitialize this mailbox? Press 9 to confirm or 6
to cancel.
5-49
System Management
5. Press
9.
The system plays:
Reinitialized.
6. Press
*7 to return to the Programming Main Menu or hang up to quit.
Changing Mailbox Message Length or Size
You can adjust a subscribers mailbox message length or storage space by
changing the default message length (4 minutes) or mailbox size (60 minutes for
the receptionists mailbox and 20 minutes for all others). Be sure update to Form
2 to indicate changes to the message length or size of a mailbox.
The message length administered by this procedure applies to the message that
callers can leave in the subscribers mailbox, the message that the subscriber
can create and send, and to the comment that a subscriber can add to a
forwarded message.
1. If necessary, access the Programming Main Menu. If you are already at
the Programming Main Menu, skip to Step 2.
i777 or the programmed Voice Mail Auto Dial
b. Press 99#.
c. Enter the password and press #.
d. Press 9.
a. Press
button.
The system plays the system programming options.
2. Press
4 for Mailboxes.
The system tells you how many mailboxes exist and how many are
allowed, then:
Please enter the mailbox number followed by # or
press # for the next mailbox.
#
3. Enter the number of a mailbox whose message length and size is to
change as indicated on Form 2, followed by .
The system plays:
Mailbox XX exists. To administer the message length and
mailbox size, press 2. To reinitialize the password,
press 3. To reinitialize the mailbox, press 4. To
administer Outcalling, press 5. To program the Mailbox
Language, press 6. To administer Record-a-Call, press
7. To delete the mailbox, press *3. If finished with
this mailbox, press *#, or for the next mailbox, press
#.
5-50
Modifying Mailboxes
4. Press
2 for Administer Message Length and Mailbox Size.
The system plays the message length and mailbox size.
1
5. Press
to confirm that you want to change the message length and
mailbox size.
#
6. Enter the message length (that is, a value of 2 to 60 minutes), followed by
.
Note that this message length must be less than or equal to the mailbox
size that you enter in Step 7.
7. Enter the mailbox size (that is, a value of 5 to 180 minutes), followed by
#.
Note that this mailbox size must be greater than or equal to the message
length that you entered in Step 6.
8. Press
*# to accept the message length and mailbox size.
9. Repeat Steps 3 through 8 for each mailbox that you want to resize.
10. Press
*7 to return to the Programming Main Menu.
5-51
System Management
Playing a Mailbox's Language
To play the language currently used for a mailbox:
1. Access the Programming Main Menu:
i777 or the programmed Voice Mail Auto Dial
b. Press 99#.
c. Enter the password and press #.
d. Press 9.
a. Press
button.
The system plays the system programming options.
2. Press
4 to program mailboxes.
The system tells you how many mailboxes exist and how many are
allowed, then:
Please enter the mailbox number followed by # or
press # for the next mailbox.
#
3. Enter the number of the mailbox whose language you want to play
.
followed by
The system plays:
Mailbox XX exists. To administer the message length and
mailbox size, press 2. To reinitialize the password,
press 3. To reinitialize the mailbox, press 4. To
administer Outcalling, press 5. To program the Mailbox
Language, press 6. To administer Record-a-Call, press
7. To delete the mailbox, press *3. If finished with
this mailbox, press *#, or for the next mailbox, press
4. Press
6.
The system plays:
To play Mailbox Language, press 2. To modify Mailbox
Language, press 6. If finished, press *#.
5. Press
2.
The system plays:
Mailbox language is LANGUAGE (where LANGUAGE is the
current language).
6. Press
5-52
*7 to return to the Programming Main Menu or hang up to quit.
Modifying Mailboxes
Modifying a Mailbox's Language
Update Form 2 for the voice messaging system to show the languages assigned
to mailboxes; then use the updated form while performing the following
procedure.
To modify a mailbox's language:
1. Access the Programming Main Menu:
i777 or the programmed Voice Mail Auto Dial
b. Press 99#.
c. Enter the password and press #.
d. Press 9.
a. Press
button.
The system plays the system programming options.
2. Press
4 to program mailboxes.
The system tells you how many mailboxes currently exist and how many
are allowed, then:
Please enter the mailbox number followed by # or
press # for the next mailbox.
#
3. Enter the number of the mailbox whose language you want to modify
.
followed by
The system plays:
Mailbox XX exists. To administer the message length and
mailbox size, press 2. To reinitialize the password,
press 3. To reinitialize the mailbox, press 4. To
administer Outcalling, press 5. To program the Mailbox
Language, press 6. To administer Record-a-Call, press
7. To delete the mailbox, press *3. If finished with
this mailbox, press *#, or for the next mailbox, press
4. Press
6.
The system plays:
To play Mailbox Language, press 2. To modify Mailbox
Language, press 6. If finished, press *#.
5. Press
6.
The system plays the current Mailbox Language, then prompts you to
enter the number corresponding to the desired language.
5-53
System Management
6. Enter the number corresponding to the language you want to use for this
mailbox.
The system plays:
For LANGUAGE (where LANGUAGE is the current language),
press 9 to confirm or 6 to cancel.
7. Either:
Press
9 to confirm.
The system plays:
Mailbox Language has been changed.
Press
6 to cancel.
The system plays:
Mailbox Language has not been changed.
8. Press
*7 to return to the Programming Main Menu or hang up to quit.
Administering Outcalling for a Mailbox
The Outcalling feature dials a telephone or pager number (or a series of up to
five numbers) to notify a subscriber that a new message has arrived in the
subscribers voice mailbox. With this feature subscribers can be alerted to the
arrival of new messages whether theyre at their desks, on the road, or at an
alternate work location. Subscribers have the option to determine the schedule
for when Outcalling begins and ends, how many Outcalling attempts are made
per cycle, and how much time will elapse between attempts.
Before subscribers can turn on Outcalling, specify the Outcalling number, and
establish an Outcalling schedule, you must assign Outcalling privileges for their
mailboxes. You may also remove Outcalling privileges by following the
instructions below. Be sure to update Form 2 to indicate the current status of
Outcalling privileges for each mailbox.
! CAUTION:
Before you assign mailboxes Outcalling privileges, you should review the
system performance and security issues discussed in detail in Chapter 1.
There are no restrictions on the Outcalling Numbers entered by
subscribers. Therefore, it is strongly recommended that you limit the
number of subscribers who have the Outcalling privilege. And call
restrictions should be used for the communications system. See Outgoing
Call Restriction in Chapter 4 for details.
5-54
Modifying Mailboxes
To assign or remove Outcalling privileges for a mailbox:
1. Access the Programming Main Menu:
i777 or the programmed Voice Mail Auto Dial
b. Press 99#.
c. Enter the password and press #.
d. Press 9.
a. Press
button.
The system plays the system programming options.
2. Press
4 to program mailboxes.
The system tells you how many mailboxes exist and how many are
allowed, then:
Please enter the mailbox number followed by # or
press # for the next mailbox.
#
3. Enter the number of the mailbox for which you want to activate/deactivate
.
Outcalling privileges followed by
The system plays:
Mailbox XX exists. To administer the message length and
mailbox size, press 2. To reinitialize the password,
press 3. To reinitialize the mailbox,
press 4. To administer Outcalling, press 5. To program
the Mailbox Language, press 6. To administer
Record-a-Call, press 7. To delete the mailbox,
press *3. If finished with this mailbox, press *#, or
for the next mailbox, press #.
4. Press
5 to administer Outcalling.
The system plays:
To turn on Outcalling, press 9.
press 6.
5. Either:
Press
To turn off Outcalling,
9 to activate Outcalling.
The system plays:
Outcalling is turned on.
Press
6 to deactivate Outcalling.
The system plays:
Outcalling is turned off.
6. To activate/deactivate Outcalling for another mailbox, repeat steps 3
through 5.
7. Press
*7 to return to the Programming Main Menu or hang up to quit.
5-55
System Management
Administering Record-a-Call for a Mailbox
This feature is available only on the PARTNER Advanced Communications
System Release 3.0 or later with a 4-port PARTNER MAIL VS Release 5.0
configuration.
The Record-a-Call feature allows a subscriber who is using an internal telephone
to record a conversation while active on a call. After the conversation is recorded
in the voice mailbox, the system turns on the Message Waiting Light of the
associated extension. If Outcalling is active, the system will attempt to notify the
subscriber that the new message has arrived. Subscribers can treat a saved
conversation as they would any other message in the mailbox.
NOTE:
If the system detects 15 seconds of silence after recording has
begun, the system automatically turns off the Record-a-Call feature,
and the subscriber must press the programmed feature button to
resume recording the conversation. The resumed conversation is
saved as another message.
Before subscribers can use the feature, you must assign Record-a-Call privileges
for their mailboxes by specifying a value of 1 to 60 minutes as the maximum
Record-a-Call message length. You must also program a telephone button to
activate this feature according to the instructions in the Programming and Use
guide for the communications system. You may also remove these privileges by
following the instructions below. Be sure to update Form 2 to indicate the current
status of Record-a-Call privileges for each mailbox.
! CAUTION:
Keep in mind that Record-a-Call messages count toward the maximum
capacity (size) of a mailbox. When the system storage limit is reached, even
if storage space is still available in an individual mailbox, the system will not
accept any new voice mail messages or recorded conversations.
Therefore, it is strongly recommended that you limit the number of
subscribers who have this privilege and that you remind them to delete
unnecessary messages from their mailboxes on a regular basis.
To assign or remove Record-a-Call privileges for a mailbox:
1. Access the Programming Main Menu:
i777 or the programmed Voice Mail Auto Dial
b. Press 99#.
c. Enter the password and press #.
d. Press 9.
a. Press
button.
The system plays the system programming options.
5-56
Modifying Mailboxes
2. Press
4 to program mailboxes.
The system tells you how many mailboxes exist and how many are
allowed, then:
Please enter the mailbox number followed by # or
press # for the next mailbox.
#
3. Enter the number of the mailbox for which you want to activate/deactivate
.
Record-a-Call privileges followed by
The system plays:
Mailbox XX exists. To administer the message length and
mailbox size, press 2. To reinitialize the password,
press 3. To reinitialize the mailbox,
press 4. To administer Outcalling, press 5. To program
the Mailbox Language, press 6. To administer
Record-a-Call, press 7. To delete the mailbox,
press *3. If finished with this mailbox, press *#, or
for the next mailbox, press #.
4. Press
7 to administer Record-a-Call.
The system plays:
Enter the Record-a-Call message length in minutes from
1 to 60 followed by #. To turn this feature off, enter
0#. If finished, press *#.
5. Either:
Enter a value from 1 to 60 followed by # to activate Record-a-Call.
The system repeats the Record-a-Call message length you
specified. The Record-a-Call message length must be less than or
equal to the mailbox size.
Press
0# to deactivate Record-a-Call.
The system plays:
The Record-a-Call feature is turned off.
Press
*# to quit.
6. To activate/deactivate Record-a-Call for another mailbox, repeat steps 3
through 5.
7. Press
*7 to return to the Programming Main Menu or hang up to quit.
5-57
System Management
Automatic VMS Cover
Use this communications system procedure to assign automatic voice mail
coverage to the appropriate extensions. Remember to use this procedure to
assign automatic coverage to newly created guest mailboxes. Calls to these
extensions are routed immediately to the mailboxthe call does not try ringing
the extension first.
Update Form B2 of the System Planner for the communications system before
you begin.
To assign Automatic VMS Cover to extensions:
1. Press
f00ss.
2. Enter the System Password, if required.
3. Press
#310.
4. Enter the number of the extension to be covered by the voice messaging
system.
D until the display reads 1 Assigned.
6. To program another extension, press n or p until the
extension number shows on the display. Then repeat Step 5.
7. Press f00 to exit programming mode.
5. Press
5-58
Modifying Mailboxes
VMS Cover Rings (PARTNER ACS Release 3.0
or later)
Use this communications system procedure to change the number of times calls
should ring at the extension before they are sent to the subscriber's mailbox.
Note that the VMS Cover Rings can be specified for each station on a PARTNER
ACS Release 3.0 or later.
Update Form A, Page 2 of the System Planner for the communications system
before you begin.
To change the number of times calls ring before they are sent to the voice
messaging system:
1. Press
f00ss.
2. Enter the System Password, if required.
3. Press
#321.
4. Enter the number of the first extension for which VMS Cover Rings is to be
specified.
D until the appropriate value displays.
6. To program another extension, press n or p until the
extension number shows on the display. Then repeat Step 3.
7. Press f00 to exit programming mode.
5. Press
8. Continue with the next section, Telephone Button Programming.
VMS Cover Rings (All Other PARTNER Systems)
Check Form A, Page 2, to see if VMS Cover Rings (#117)3 is different from the
factory setting of 3. If it is, follow the procedure below, beginning with
Step 1, to specify the VMS Cover Rings for the system. If not, skip to Step 3 of the
procedure below.
To change the number of times calls ring before they are sent to the voice
messaging system as indicated on Form A, Page 2, VMS Cover Rings:
1. Press
f00ss.
2. Enter the System Password, if required.
3. Press
#117.
4. Enter the VMS Cover Rings setting.
5. Select another procedure or exit programming mode.
3.
VMS Cover Rings (#117) is not available on all systems. Check the Programming and Use
guide for the communications system.
5-59
System Management
Line Coverage
This feature lets callers who call in on a covered line leave messages in the
mailbox of a specific subscriber. Line coverage typically is used for personal
lines or outside access to the voice messaging system if Automated Attendant
Service is not used.
There are two ways to set up line coverage:
■
For VMS Line Coverage, you must program the voice messaging system's
Line Ownership feature and the communication system's Group Call
Distribution (#206)4 feature.
With this method, when a call on a covered line is not answered within five
rings, the voice messaging system routes the caller to the line owner's
mailbox. The caller then hears the personal greeting for the line owner's
mailbox.
■
For Extension Line Coverage, you only need to program the
communication system's Line Coverage Extension (#208)5 feature.
This method provides flexibility for calls ringing on covered lines. You can
specify the number of times calls ring at the user's extension before going
to the user's mailbox, using the communication system's VMS Cover Rings
(#117/#321 on PARTNER ACS 3.0) feature. In addition, if the users
extension has Do Not Disturb on, calls on the line can go immediately to
coverage.
For both types of line coverage, voice mail coverage must be on at the users
extension.
NOTE:
A line can be assigned coverage as described in this section or it can be
assigned Automated Attendant Service coveragea single line cannot be
assigned both types of coverage.
4.
5.
5-60
In some countries, the procedure code for Group Call Distribution is #205. Check the
Programming and Use guide for the communications system.
Line Coverage Extension (#208) and VMS Cover Rings (#117) are not available on all
systems. Check the Programming and Use guide for the communications system.
Line Coverage
VMS Line Coverage
If you specify VMS Line Coverage (#206, Option 3) for any system lines, you must
assign an owner to the covered lines. Otherwise, the system will transfer callers
who call in on those lines to the receptionist's extension.
This section provides instructions on how to:
■
■
Use Line Ownership (see Figure 5-6) to scan, assign, modify, and delete
current assignments for VMS Line Coverage.
Use Group Call Distribution to specify new lines for VMS Line Coverage.
Programming
Main Menu
(Press 9 )
Line Ownership
(Press 6 )
Scan Line
Ownership
(Press 2 )
Figure 5-4.
Assign Line
Ownership
(Press 4 )
Modify Line
Ownership
(Press 6 )
Delete Line
Ownership
(Press * 3 )
Line Ownership
Scanning Line Ownership
To review the current owners of outside lines:
1. Access the Programming Main Menu:
i777 or the programmed Voice Mail Auto Dial
b. Press 99#.
c. Enter the password and press #.
d. Press 9.
a. Press
button.
The system plays the system programming options.
5-61
System Management
2. Press
6 for line ownership.
The system plays:
To scan line ownership, press 2; to assign line
ownership, press 4; to modify line ownership, press 6.
To delete line ownership, press *D.
3. Press
2.
The system plays:
Please enter the CO line number followed by #, or
press # for the next line owner.
#
, or press
4. Enter a specific outside line number followed by
first outside line number that has been assigned an owner.
The system responds as follows:
If you entered a line number followed by
whether or not an owner is assigned.
#
# for the
#, the system tells you
If you entered , the system tells you the mailbox number of the
owner of the first outside line that has an owner.
# to hear the mailbox number for the next outside line that has an
6. Press *7 to return to the Programming Main Menu or hang up to quit.
5. Press
owner.
Assigning Line Ownership
Update Form 6 for the voice messaging system to show the line number that
requires coverage and the line owner's extension number; then use the updated
form while performing the following procedure. Make sure you also use Group
Call Distribution (#206) later in this section to assign coverage to lines.
To associate an outside line with a specific subscriber's mailbox:
1. Access the Programming Main Menu:
i777 or the programmed Voice Mail Auto Dial
b. Press 99#.
c. Enter the password and press #.
d. Press 9.
a. Press
button.
The system plays the system programming options.
2. Press
6 for line ownership.
The system plays:
To scan line ownership, press 2; to assign line
ownership, press 4; to modify line ownership, press 6.
To delete line ownership, press *D.
5-62
Line Coverage
3. Press
4.
The system plays:
Please enter the CO line number followed by #.
finished, press *#.
If
#
4. Enter the number of the outside line that you want to associate with a
.
specific subscribers mailbox followed by
If the line already has an owner, the system announces the mailbox
number of that owner. Otherwise, the system plays:
CO line X has no owner. Enter the mailbox number of the
new line owner followed by #. If finished,
press *#.
5. Enter the mailbox number followed by
#.
The system plays:
CO Line X owner is mailbox YY.
The system tells you if the mailbox does not exist. See Creating a
Mailbox earlier in this chapter for instructions on creating mailboxes.
6. Repeat Steps 4 and 5 until you assign line ownership for all of the
appropriate lines.
7. Press
*7 to return to the Programming Main Menu or hang up to quit.
5-63
System Management
Modifying Line Ownership
Update Form 6 for the voice messaging system to show modifications to line
ownership; then use the updated form while performing the following procedure.
To change line ownership:
1. Access the Programming Main Menu:
i777 or the programmed Voice Mail Auto Dial
b. Press 99#.
c. Enter the password and press #.
d. Press 9.
a. Press
button.
The system plays the system programming options.
2. Press
6 for line ownership.
The system plays:
To scan line ownership, press 2; to assign line
ownership, press 4; to modify line ownership, press 6.
To delete line ownership, press *D.
3. Press
6.
The system plays:
Please enter the CO line number followed by #.
If finished, press *#.
#
4. Enter the number of the outside line whose ownership you want to modify
.
followed by
The system tells you if the line does not have an owner. Otherwise, the
system plays:
CO line X owner is mailbox YY. Enter the mailbox number
of the new line owner followed by #. If finished, press
*#.
5. Enter the new mailbox number followed by
#.
The system plays:
CO Line X owner is mailbox YY.
If the mailbox does not exist, you are told so. See Creating a Mailbox
earlier in this chapter for instructions on creating mailboxes.
6. Repeat Steps 4 and 5 to modify the line ownership for any other lines.
7. Press
5-64
*7 to return to the Programming Main Menu or hang up to quit.
Line Coverage
Deleting Line Ownership
Update Form 6 for the voice messaging system to show the ownership
assignments you want to delete; then use the updated form while performing the
following procedure.
NOTE:
If you remove line ownership, either use Group Call Distribution (#206) to
remove VMS Line Coverage from the line or assign a new mailbox number
as the owner of the line to prevent the system from transferring callers who
call in on the covered line to the receptionists extension.
To delete an existing line owner assignment:
1. Access the Programming Main Menu:
i777 or the programmed Voice Mail Auto Dial
b. Press 99#.
c. Enter the password and press #.
d. Press 9.
a. Press
button.
The system plays the system programming options.
2. Press
6 for line ownership.
The system plays:
To scan line ownership, press 2; to assign line
ownership, press 4; to modify line ownership, press 6.
To delete line ownership, press *D.
3. Press
*3.
The system plays:
Please enter the CO line number followed by #.
If finished, press *#.
#
4. Enter the number of the outside line whose ownership you want to delete
.
followed by
The system responds as follows:
If the line has an owner, the system tells you the mailbox number of
the owner and asks you to confirm the deletion. Go to Step 5.
If the line has no owner, the system tells you so and asks you to
enter another CO line number. Enter another line number followed
or go to Step 7.
by
#
5-65
System Management
5. Press
9 to confirm that you want to delete the ownership assignment.
The system plays:
Deleted.
6. Repeat Steps 4 and 5 to delete other line ownership assignments.
7. Press
*7 to return to the Programming Main Menu or hang up to quit.
Group Call Distribution (Option 3)
Use this procedure to modify the assignment of outside lines for VMS Line
Coverage.
Update Form A, Page 1, Line Coverage of the System Planner for the
communications system to show modifications to VMS-MAIL lines before you
begin.
To modify VMS-MAIL lines assignments:
1. Press
f00ss.
2. Enter System Password, if required.
3. Press
#206 .
6
4. At the Group: prompt, press
7.
5. At the Line: prompt, enter the first VMS-MAIL line to be programmed as
specified in the Line Coverage column of Form A, Page 1.
D
6. Press
until the display reads 3 VMS Line Cover or 2 Not
Assigned. (Be careful not to choose 1 Assigned because you will
assign Automated Attendant Service coverage rather than ownership to
the line.)
n or p until the appropriate
D until 3 VMS Line Cover or 2
7. To program another line, press
line number displays. Then press
Not Assigned is displayed.
8. Press
6.
5-66
f00 to exit programming.
In some countries, the procedure code for Group Call Distribution is #205. Check the
Programming and Use guide for the communications system.
Line Coverage
Extension Line Coverage
After assigning Extension Line Coverage, make sure VMS coverage is on for the
extension. See Automatic VMS Cover earlier in this chapter or VMS Cover
later in this chapter.
Use this procedure to modify the assignment of outside lines for Extension Line
Coverage.
To assign VMS-MAIL lines specified on Form A, Page 1, Line Coverage, to
specific extensions:
1. Press
f00ss.
2. Enter System Password, if required.
3. Press
#208.
4. At the Line: prompt, enter the first VMS-MAIL line to be programmed
as indicated by the extension number in the Line Coverage column of
Form A, Page 1.
5. At the Data: prompt, enter the number of the extension in the VMS-MAIL
column.
n p until the appropriate
or
6. To program another line, press
line number displays. Then repeat Step 5.
7. Press
f00 to exit programming.
5-67
System Management
Telephone Button Programming
Update Form C of the System Planner for the communications system if you
change button programming for a subscribers extension.
It is recommended that the following features be programmed on buttons on
each subscriber's system phone:
■
■
■
■
■
■
■
VMS Cover allows the subscriber to manually turn on and off voice mail
coverage.
Do Not Disturb allows the subscriber to send callers to his or her mailbox
immediately without first ringing the subscriber's extension.
Voice Mailbox Transfer allows the subscriber to transfer callers directly to
other subscribers' voice mailboxes.
Voice Mail Auto Dial allows the subscriber to access the voice messaging
system for message retrieval with the touch of a button.
Station Lock allows subscribers to secure their telephone when they leave
their desk for an extended period of time.
Record-a-Call allows the subscriber to record a call in progress. You must
also assign the subscriber permission to use this feature. See
Administering Record-a-Call for a Mailbox, earlier in this chapter.
Call Screening allows subscribers to listen while a caller is leaving a
message in their mailbox.
The procedures in this section use Centralized Telephone Programming.
VMS Cover (F15)
To give a subscriber the ability to turn voice mail coverage on and off, you can
program a VMS Cover button on the subscriber's system phone.
To program a VMS Cover button:
1. Press
f00ssc.
2. Enter the number of the extension to be programmed.
3. Press a programmable button with lights.
4. Press
f15 .
7
5. Program another button for this extension or press
programming mode.
f00 to exit
6. Label the button at the users extension.
7.
5-68
In some countries, the feature code for VMS Cover is
Use guide for the communications system.
16. Check the Programming and
Telephone Button Programming
Do Not Disturb (F01)
Used in conjunction with either automatic or manual extension coverage, this
button lets subscribers send callers immediately to their voice mailbox.
To program a Do Not Disturb button:
1. Press
f00ssc.
2. Enter the number of the extension to be programmed.
3. Press a programmable button with lights.
4. Press
f01.
5. Program another button for this extension, or press
programming mode.
f00 to exit
6. Label the button at the users extension.
Voice Mailbox Transfer (F14)
A Voice Mailbox Transfer button lets any system user transfer calls directly to
another subscriber's mailbox (including a Guest Mailbox), without ringing the
extension. If, for example, a caller wants to talk to a subscriber who is on
vacation, the receptionist can transfer the call directly to the subscriber's mailbox
by pressing this button and entering the subscriber's extension number (or
pressing an Auto Dial button). The voice messaging system answers the call, the
caller hears the subscriber's personal greeting (if recorded), and the caller can
then leave a message for the subscriber.
To program a Voice Mailbox Transfer button:
1. Press
f00ssc.
2. Enter the number of the extension to be programmed.
3. Press a programmable button.
4. Press
f14 .
8
5. Program another button for this extension or press
programming mode.
f00 to exit
6. Label the button at the users extension.
8.
In some countries, the feature code for Voice Mailbox Transfer is
Programming and Use guide for the communications system.
15. Check the
5-69
System Management
Voice Mail Auto Dial
This intercom Auto Dial button allows the subscriber to access the voice
messaging system with one touch of a button.
To program a Voice Mail Auto Dial button:
1. Press
f00ssc.
2. Enter the number of the extension to be programmed.
3. Press a programmable button.
4. Press left
i777.
5. Program another button for this extension or press
programming mode.
f00 to exit
6. Label the button at the users extension.
Station Lock (F21)
The Station Lock feature is available only to subscribers with the PARTNER
Advanced Communications System Release 3.0 or later and a system or
standard touch-tone telephone. This button allows subscribers to lock their
telephones when they leave their desks for an extended period of time. To lock
the telephone, the subscriber presses the programmed Station Lock button and
enters a four-digit code. To unlock the telephone, the subscriber re-enters the
code. It is recommended that the button programmed for this purpose have
lights.
To program a Station Lock button:
1. Press
f00ssc.
2. Enter the number of the extension to be programmed.
3. Press a programmable button.
4. Press
f21.
5. Program another button for this extension or press
programming mode.
6. Label the button at the users extension.
5-70
f00 to exit
Telephone Button Programming
Record-a-Call (PARTNER ACS Release 3.0
or later) (F24)
The Record-a-Call feature is available only on the PARTNER Advanced
Communications System Release 3.0 or later with a 4-port PARTNER MAIL VS
Release 5.0 configuration and a system telephone. This button allows the
subscriber to begin recording a call in progress with one touch of a button. (If the
system detects 15 seconds of silence after recording has begun, the system
automatically turns off the Record-a-Call feature, and the subscriber must press
the programmed feature button to resume recording the conversation. The
resumed conversation is saved as a separate message.) The recorded
conversation is saved in the subscribers mailbox. The button programmed for
this purpose must have lights.
To program a Record-a-Call button:
1. Press
f00ssc.
2. Enter the number of the extension to be programmed.
3. Press a programmable button with lights.
4. Press
f24.
5. Program another button for this extension or press
programming mode.
f00 to exit
6. Label the button at the users extension.
Call Screening (PARTNER ACS Release 3.0 or
later) (F25)
The Call Screening feature is available only on the PARTNER Advanced
Communications System Release 3.0 or later and a system telephone. This
feature allows a subscriber to listen to a caller leaving a message in the
subscribers mailbox. The subscriber can turn this feature on or off by pressing
the call screening button. The button programmed for this purpose must have
lights.
For information about this feature and how it interacts with other communications
system features, see PARTNER Advanced Communications System
Programming and Use.
To program a Call Screening button:
1. Press
f00ssc.
2. Enter the number of the extension to be programmed.
3. Press a programmable button with lights.
4. Press
f25.
5-71
System Management
5. Program another button for this extension or press
programming mode.
6. Label the button at the users extension.
5-72
f00 to exit
Generating a Configuration Report
Generating a Configuration Report
When you have verified the systems operation, you can generate a Configuration
Report as a convenient reference. This report can be directed to a PC running a
terminal emulation program (see Chapter 2 for instructions on how to connect a
PC to your PARTNER MAIL VS system).
When you generate a Configuration Report in the PARTNER MAIL VS system and
send it to your PC, it is saved in a text file that you can open and print. The
procedures in this section explain how to set up HyperTerminal, the terminal
emulation program, and how to run the report.
The Configuration Report shows the current settings for:
■
System Language Mode and Primary and Secondary Language choices
■
System Administration Prompt Language
■
For each Automated Attendant
All Menu Definitions, including Dial 0/Timeout Extension and
Selector Code assignments
All Automated Attendant line assignments
■
Line Ownership
■
For each mailbox:
Mailbox extension number
Maximum message length and mailbox size parameter
Mailbox language parameter
Outcalling permission
Record-a-Call message length
Personal Operator
Outcalling information, including numbers, schedule, cycles, and
interval
Personal Group Lists
5-73
System Management
Setting Up HyperTerminal
To generate the report, you will use the HyperTerminal application, which is
provided with Windows 95, Windows NT 4.0 or later, and Windows 98. To set up
HyperTerminal:
1. From the Start menu, choose Programs>Accessories>HyperTerminal.
The HyperTerminal window appears.
2. Click on Hyper Terminal.
The Connect Description dialog box appears.
3. In the Name box, type Direct 2400, and then choose the OK button.
The Phone Number dialog box appears.
4. In the Connect using box, choose the COM port on your PC that is
connected to the PMVS serial port (for example, if you are using COM1,
choose Direct to Com1).
5. Choose the OK button.
The COM Properties dialog box appears.
6. In the Bits per second box, choose 2400.
7. In the Data bits box, choose 8.
8. in the Parity box, choose None.
9. In the Stop bits box, choose 1.
10. In the Flow control box, choose Xon/Xoff.
11. Choose the OK button to close the COM Properties dialog box.
12. From the File menu, choose Exit to close HyperTerminal.
A confirmation dialog box appears.
13. Choose the Yes button to save the HyperTerminal session you just
created.
HyperTerminal closes, and an icon for Direct 2400 is displayed. The Direct
2400 file contains the settings required to capture the report on the PC.
14. To run the report, go to Running the Configuration Report.
5-74
Generating a Configuration Report
Running the Configuration Report
To generate a Configuration Report:
1. From the Start menu on your PC, choose
Programs>Accessories>HyperTerminal.
The HyperTerminal window appears.
2. Click on the Direct 2400 icon that was created when you performed the
procedure in Setting Up HyperTerminal.
The HyperTerminal window appears.
3. From the Transfer menu, choose Capture Text.
The Capture Text dialog box appears, displaying the default text file to
which the Configuration Report will be saved. You may change the text file
to which the Configuration Report will be saved. Be sure to note the path
and file name of this text file.
4. Choose the Start button.
5. At your telephone, access the Programming Main Menu. If you are already
at the Programming Main Menu, skip to Step 6.
i777 or the programmed Voice Mail Auto Dial
b. Press 99#.
c. Enter the password and press #.
d. Press 9.
a. Press
button.
The system plays the system programming options.
8 for Reports and Backup/Restore.
7. Press 1 to access the Reports Menu.
8. Press 1 to run the Configuration Report. (Note that the Configuration
6. Press
Report is the only report currently available).
The report is displayed in the HyperTerminal window. This information is
also saved to the text file you specified in Step 3.
9. From the Transfer menu on your PC, choose Capture Text.
A submenu appears.
10. Choose Stop.
11. From the File menu, choose Exit to close HyperTerminal.
You can now open, view, and print the text file that contains the Configuration
Report.
5-75
System Management
Performing a System Backup
You can perform a system backup to save the settings that you have
programmed and prompts that you have recorded for your voice messaging
system. This information is saved on a PC Card, which protects the programmed
configuration data from being lost. You can restore this information to the system
from the PC Card according to the instructions in the next section.
The PARTNER MAIL VS system must be idle when you perform a backup. Any
calls being handled by PARTNER MAIL VS will be disconnected when the
backup procedure begins. PARTNER MAIL VS will not answer calls while the
system backup is being performed.
For most systems, the system backup can be performed in three minutes or less.
If your voice messaging system uses multiple Automated Attendants with all
Announcements recorded at up to four minutes, the system backup can take
approximately 20 minutes to complete. The system backup saves the following
information:
■
System Language Mode and Primary and Secondary Language choices
■
System Administration Prompt Language
■
For each Automated Attendant
All Menu Definitions, including Dial 0/Timeout Extension and
Selector Code assignments
For systems operating in Monolingual Mode, all Automated
Attendant Announcements are saved.
For systems operating in Bilingual Mode, only
Announcements for Automated Attendants 1 and 2 are
saved.
Day and Night Menu Prompts
For systems operating in Monolingual Mode, all menu
prompts are saved.
For systems operating in Bilingual Mode, only menu prompts
for Automated Attendants 1 and 2 are saved.
All Automated Attendant line assignments
Line Ownership
■
For each mailbox:
Mailbox extension number
Maximum message length and mailbox size parameter
Mailbox language parameter
Outcalling permission
Record-a-Call message length
5-76
Performing a System Backup
Personal Operator
Personal Group List
Outcalling information, including numbers, schedule, cycles, and
interval
NOTE:
Personal greetings and messages are not saved.
To perform system backup:
1. Be sure the PC Card is installed (see the area labeled Slot for PC Card in
Figure 2-2).
2. If necessary, access the Programming Main Menu. If you are already at
the Programming Main Menu, skip to Step 3.
i777 or the programmed Voice Mail Auto Dial
b. Press 99#.
c. Enter the password and press #.
d. Press 9.
a. Press
button.
The system plays the system programming options.
8 for Reports and Backup/Restore.
4. Press 8 to perform a system backup. The system prompts:
3. Press
Please wait for backup confirmation. This may take up
to three minutes. Do you want to continue? Press 9 to
confirm or 6 to cancel.
5. Press
9 to confirm that you want to perform the system backup.
Do not hang up until you hear the backup confirmation prompt.
When the backup is complete, the system prompts:
Backup Successful
The system returns you to the Programming Main Menu.
NOTE:
If the system prompts that the backup has failed, call the Technical
Service Center at 1 800 628-2888 (or call your Lucent Technologies
Representative or local Authorized Dealer) and report the error code
that accompanied the failure prompt.
5-77
System Management
Performing a System Restore
You can restore the settings (that is, programming and recorded prompts) that
you have saved to a PC Card after system backup.
The PARTNER MAIL VS system must be idle when you perform a restore
operation. Any calls being handled by PARTNER MAIL VS will be disconnected
when the restore procedure begins. PARTNER MAIL VS will not answer calls
while the system restore is being performed. For most systems, the system
restore can be performed in three minutes or less. If your voice messaging
system uses multiple Automated Attendants with all Announcements recorded at
up to four minutes, the system restore can take approximately 20 minutes to
complete.
To restore the system:
1. Be sure the PC Card is installed (see the area labeled Slot for PC Card in
Figure 2-2).
2. If necessary, access the Programming Main Menu. If you are already at
the Programming Main Menu, skip to Step 3.
i777 or the programmed Voice Mail Auto Dial
b. Press 99#.
c. Enter the password and press #.
d. Press 9.
a. Press
button.
The system plays the system programming options.
8 for Reports and Backup/Restore.
4. Press 9 to restore the system. The system plays the backup date saved
3. Press
in the PC Card and prompts:
Warning: This may erase current settings. Do you want
to continue? Press 9 to confirm or 6 to cancel.
5. Press
9 to confirm that you want to restore the system.
Do not hang up until you hear the restore confirmation prompt.
When the system is restored, the system prompts:
Restore Successful
The system restarts automatically, and the new configuration takes effect.
NOTE:
If the system prompts that the restore has failed, call the Technical
Service Center at 1 800 628-2888 (or call your Lucent Technologies
Representative or local Authorized Dealer) and report the error code
that accompanied the failure prompt.
5-78
Troubleshooting
6
When You Need Help
If you have a problem with your system, you may be able to solve it yourself by
following the appropriate troubleshooting procedures described in this chapter.
If not, you can call for help: contact the Lucent Technologies Technical
Service Center at 1 800 628-2888; or call your Lucent Technologies
Representative or local Authorized Dealer.
The following sections describe various difficulties that might occur, possible
causes for the difficulty, and procedures you can follow to try to solve the
problem.
6-1
Troubleshooting
Automated Attendant Service
Outside Callers Hear Ringing, but System Does
Not Answer
Possible Cause 1: This is normal when the PARTNER MAIL VS extensions are
busy.
What to do: There are a number of ways to reduce the amount of time a
PARTNER MAIL VS extension is busy. For example, you can recommend that
users access the Tutor Service feature during non-peak calling hours, you can
reduce the number of options in the Automated Attendant Service menu, or you
can reduce the length of the Automated Attendant Service menu prompt. You
can also limit the use (if any) of the Record-a-Call feature to reduce the amount of
time a PARTNER MAIL VS extension is busy. If you have a 2-port PARTNER MAIL
VS configuration, you may consider upgrading to the 4-port configuration to
correct this problem.
Possible Cause 2: The PARTNER MAIL VS module may not be installed correctly.
What to do: Check the PARTNER MAIL VS module to make sure it is securely
mounted in the control unit. Also check the module's LEDs: the Power LED
should be steady green and the Status LED should not be lit.
If the Power LED is lit, perform the System Save Reset All procedure by
entering 989-RESET (989-73738) after you log in as the System Manager.
If the Power LED is not lit, power down the control unit, reseat the PARTNER
MAIL VS module, and power up the control unit.
6-2
■
If the module is working properly after one minute, the problem is solved.
■
If the module still does not work properly, it is damaged.
Automated Attendant Service
Possible Cause 3: The PARTNER MAIL VS may not be programmed correctly.
What to do: Verify that lines are correctly assigned to each Automated Attendant
and that lines and extensions are correctly assigned to Hunt Group 7.
■
■
Refer to VMS Planning Form 3: Menu Definition and follow the procedure
in Playing the Automated Attendant Line Assignments in Chapter 5 to
determine the lines assigned to each Automated Attendant. (In particular,
if you have deleted a line from one Automated Attendant, be sure you
have reassigned the line to another Automated Attendant.) Follow the
steps in Verifying System Operation in Chapter 4 to test Automated
Attendant Service.
Refer to Line Coverage column on Form A, Page 1 of the System Planner
for the communications system to determine the lines to which Automated
Attendant Service should be assigned. Then use Group Call Distribution
(#206) to verify that the VMS-AA lines are assigned to Hunt Group 7.
If Hunt Group 7 does not have the correct VMS-AA lines, assign the
correct lines.
If Hunt Group 7 has the correct VMS-AA lines, go to the next step.
■
Refer to Figure 2-1 in Chapter 2 and the figures in Appendix D to
determine the extension numbers that are associated with the PARTNER
MAIL VS module. Then use Hunt Group Extensions (#505) to verify that the
VMS extensions are assigned to Hunt Group 7.
If Hunt Group 7 does not have the correct VMS extensions, assign the
correct extension numbers.
If Hunt Group 7 has the correct VMS extensions, call 1 800 628-2888 for
help, or call your Lucent Technologies Representative or Authorized
Dealer.
Outside Callers Hear Silence, Tones, or Ringing
During Transfer
Possible Cause: Music On Hold is not set up for the system.
What to do: See Music On Hold (#602) in the Programming and Use guide for the
communications system.
6-3
Troubleshooting
System Does Not Answer Immediately
Possible Cause 1: Automated Attendant Service is programmed for Delayed call
handling.
What to do: If you do not want Delayed call handling, program the
communications system's VMS Hunt Delay feature for Immediate call handling.
(On PARTNER Advanced Communications System Release 3.0 or later, this
problem may indicate that the VMS Hunt Delay feature needs to be reset to two
or fewer rings.)
Possible Cause 2: The PARTNER MAIL VS extensions may be busy.
What to do: There are a number of ways to reduce the amount of time a
PARTNER MAIL VS extension is busy. For example, you can recommend that
users access the Tutor Service feature during non-peak calling hours, you can
reduce the number of options in the Automated Attendant Service menu, or you
can reduce the length of the Automated Attendant Service menu prompt. You
can also limit the use (if any) of the Record-a-Call feature to reduce the amount of
time a PARTNER MAIL VS extension is busy. If you have a 2-port PARTNER MAIL
VS configuration, you may consider upgrading to the 4-port configuration to
correct this problem.
Possible Cause 3: The PARTNER MAIL VS system is a 4-port configuration but
only two voice messaging system extensions have been identified in
Hunt Group 7.
What to do: Verify that the extensions are correctly assigned to Hunt Group 7.
■
Refer to Figure 2-1 in Chapter 2 and the figures in Appendix D to
determine the extension numbers that are associated with the PARTNER
MAIL VS module. Then use Hunt Group Extensions (#505) to verify that the
VMS extensions are assigned to Hunt Group 7.
If Hunt Group 7 does not have the correct VMS extensions, assign the
correct extension numbers.
If Hunt Group 7 has the correct VMS extensions, call 1 800 628-2888 for
help, or call your Lucent Technologies Representative or Authorized
Dealer.
6-4
Automated Attendant Service
System Cuts Off Part of Greeting
Possible Cause 1: You may have begun recording the greeting too soon.
What to do: Re-record the greeting. After the prompt to record the greeting,
pause a moment before speaking.
Possible Cause 2: A touch-tone signal may have been recorded accidentally
with the greeting.
What to do: Re-record the greeting.
System Transfers Call to Receptionist Before
Playing the Menu Prompt
Possible Cause: The extensions associated with the PARTNER MAIL VS module
were not assigned to Hunt Group 7.
What to do: Refer to Figure 2-1 in Chapter 2 and the figures in Appendix D to
determine the extension numbers that are associated with the PARTNER MAIL VS
module. Then use Hunt Group Extensions (#505) to verify that the VMS
extensions are assigned to Hunt Group 7.
System Does Not Transfer Calls Properly
Possible Cause 1: If this occurs when the Automated Attendant Service answers
calls, the Menu Definition may be programmed incorrectly.
What to do: Follow the steps for Verifying System Operation in Chapter 4 to test
Automated Attendant Service.
■
■
If outside calls are not transferred to the correct extension or group, follow
the instructions for Menu Definition and Day Menu Prompt as
appropriate for Monolingual or Bilingual Mode in Chapter 4 to reprogram
the Menu Definition.
If outside calls are transferred to the correct extension or group, go to
Possible Cause 2.
Possible Cause 2: A valid destination was not entered by the caller.
What to do: Make sure a valid destination was entered. Check the Programming
and Use guide for your communications system to determine valid extension and
group numbers.
6-5
Troubleshooting
System Does Not Respond to Entered Digits
Possible Cause 1: System is not receiving touchtones.
What to do: The voice messaging system may not be able to interpret touchtones
while a greeting plays. Wait until the greeting finishes before entering the
touchtones. If you are using a speakerphone, turn off the microphone.
Possible Cause 2: If this occurs when the Automated Attendant Service answers
calls, the Menu Definition may be programmed incorrectly.
What to do: Follow the steps for Verifying System Operation in Chapter 4 to test
Automated Attendant Service.
■
■
If outside calls are not transferred to the correct extension or group, follow
the instructions for Menu Definition and Day Menu Prompt as
appropriate for Monolingual or Bilingual Mode in Chapter 4 to reprogram
the Menu Definition.
If outside calls are transferred to the correct extension or group, go to
Possible Cause 3.
Possible Cause 3: The line is too noisy.
What to do: Call your local telephone company.
Unanswered Transferred Calls Ring Continually
Possible Cause: In some countries, the telephone company does not always
provide a far-end disconnect signal. This causes the line to remain open even
after the caller hangs up.
What to do: Assign voice mail coverage to all extensions in the system; this is
especially important for extension 10. Also, make sure voice mail coverage is on
at extension 10 at night when no one is around to manually disconnect calls. The
voice messaging system will disconnect any call to an extension that has voice
mail coverage after 15 seconds of silence.
6-6
Call Answer Service
Call Answer Service
Call Answer Service Takes Too Long to Answer
Calls
Possible Cause: VMS Cover Ring (#117) is factory set to ring four times at a
subscriber's extension to give the subscriber a chance to answer the call. (On
PARTNER Advanced Communications Systems Release 3.0 or later, this feature
(#321) is factory set at 3 rings, but it allows you to specify up to 9 rings on a per
line basis.)
What to do: Recommend that subscribers program a Do Not Disturb button on
their system phones. They should turn on the feature when they leave their desks
or whenever they are too busy to answer calls. Calls to extensions with Do Not
Disturb on are answered immediately.
Call Answer Service Terminates Message While
Caller Is Recording
Possible Cause: The caller's recording time exceeded the mailbox's message
time limit. The time limit for recording a message is four minutes (the factory
setting) or the administered length.
*8
What to do: Let the caller know the recording time limit. Also let the caller know
and the appropriate extension number to transfer
that he or she can press
to the extension againthis avoids making another outside callto finish the
message if necessary.
Messages Cannot Be Deposited in Mailbox
Possible Cause 1: The mailbox or system is full.
What to do: Old messages must be deleted regularly from mailboxes. When a
subscriber's mailbox is full, the caller cannot leave a message in that mailbox but
is given the option of transferring to another extension. For all subscribers,
mailboxes can store up to 180 minutes of recorded messages (or 120 messages,
whichever is reached first). The factory-set storage space for these mailboxes is
20 minutes. The receptionist's mailbox at extension 10 is factory-set to store 60
minutes of recorded messages (or 120 messages). You can change this setting
to 180 minutes.
6-7
Troubleshooting
Possible Cause 2: An Outcalling number is incorrectly programmed, forwarding
Outcalling notification to an internal telephone associated with this mailbox. Each
time a new message is received while Outcalling is in effect, the system will send
the notification to this mailbox according to the specified number of Outcalling
cycles and intervals.
What to do: Verify that Outcalling numbers are correctly entered.
6-8
Voice Mail Service
Voice Mail Service
Subscriber Unable to Log In to Voice Mail
Possible Cause 1: A subscriber entered the number of a mailbox that does not
exist.
What to do: Make sure the subscriber enters an existing mailbox number. Use
Playing a Mailbox's Status in Chapter 5 to check the status of existing
mailboxes.
■
If the subscriber tries again and succeeds, the problem is solved.
■
If the subscriber still cannot log in, go to Possible Cause 2.
Possible Cause 2: The subscriber forgot his or her password or entered it
incorrectly.
What to do: The subscriber should try entering the password again.
■
■
If the subscriber can log in, the problem is solved.
If the subscriber still cannot log in, re-initialize the password as described
in Chapter 5. (If you forget the password for login 99, you must call 1 800
628-2888 for help, or call your Lucent Technologies Representative or
Authorized Dealer.)
Date or Time in Message Headers Is Incorrect
Possible Cause: The day, date, or time programmed for the communications
system is incorrect or the PARTNER MAIL VS system was not updated with the
correct time.
What to do: Refer to System Date (#101), System Day (#102), or System Time
(#103) in the Programming and Use guide for the communications system to
check the day, date, or time settings. If the day, date, and time are correct,
choose one of these procedures and re-enter the correct value. After one minute,
this updates the day, date, and time on the voice messaging system. If message
headers for new messages are still incorrect, call for help.
6-9
Troubleshooting
Subscriber Cannot Forward Messages to Another
Subscriber
Possible Cause 1: The system is full or does not have enough space remaining
to accommodate the message.
What to do: Old messages must be deleted regularly from mailboxes. When a
subscriber's mailbox is full, the caller cannot leave a message in that mailbox but
is given the option of transferring to another extension. The sender cannot resend
the forwarded message until the system has more message space. For all
subscribers, mailboxes have storage space factory-set at 20 minutes, but
mailboxes can be programmed to store up to 180 minutes of recorded messages
(or 120 messages, whichever comes first). The receptionist's mailbox at
extension 10 is factory-set to store up to 60 minutes of recorded messages (or
120 messages, whichever comes first). You can program a mailbox to store up to
180 minutes of messages.
Possible Cause 2: The message has been forwarded the maximum of 13 times.
What to do: Verify the number of times the message has been forwarded.
Possible Cause 3: An Outcalling number is incorrectly programmed, forwarding
Outcalling notification to an internal telephone associated with this mailbox. Each
time a new message is received while Outcalling is in effect, the system will send
the notification to this mailbox according to the specified number of Outcalling
cycles and intervals.
What to do: Verify that Outcalling numbers are correctly entered.
Subscribers Hear Busy Signal When Calling In to
Voice Mail
Possible Cause 1: This is normal when the PARTNER MAIL VS extensions are
busy.
What to do: There are a number of ways to reduce the amount of time a
PARTNER MAIL VS extension is busy. For example, you can recommend that
users access the Tutor Service feature during non-peak calling hours, you can
reduce the number options in the Automated Attendant Service menu, you can
reduce the use (if any) of the Record-a-Call feature, or you can reduce the length
of the Automated Attendant Service menu prompt. If you have a 2-port system,
you may want to consider upgrading to a 4-port system.
6-10
Voice Mail Service
Possible Cause 2: The PARTNER MAIL VS module may not be installed correctly.
What to do: Check the PARTNER MAIL VS module to make sure it is securely
mounted in the control unit. Also check the module's LEDs: the Power LED
should be steady green and the Status LED should not be lit.
If the Power LED is lit, perform the System Save Reset All procedure by
entering 989-RESET (989-73738) after you log in as the System Manager.
If the Power LED is not lit, power down the control unit, reseat the PARTNER
MAIL VS module, and power up the control unit.
■
If the module is working properly after one minute, the problem is solved.
■
If the module still does not work properly, it is damaged.
Possible Cause 3: The PARTNER MAIL VS may not be programmed correctly.
What to do: Refer to Figure 2-1 in Chapter 2 and the figures in Appendix D to
determine the extension numbers that are associated with the PARTNER MAIL VS
module. Then use Hunt Group Extensions (#505) to verify that the VMS
extensions are assigned to Hunt Group 7.
■
■
If Hunt Group 7 does not have the correct VMS extensions, assign the
correct extension numbers.
If Hunt Group 7 has the correct VMS extensions, call 1 800 628-2888 for
help, or call your Lucent Technologies Representative or Authorized
Dealer.
Message Light Does Not Turn Off
Possible Cause: There are messages in the mailbox. The message light stays on
if there are any new (unretrieved) messages in the mailbox.
What to do: Retrieve or delete all new messages from the mailbox.
6-11
Troubleshooting
Outcalling Is Delayed
Possible Cause 1: There is heavy call traffic and Outcalling volume on the mail
system. The Outcalling port is also used in call handling. If your system performs
heavy Outcalling or has heavy call volume, the port may frequently be
unavailable for Outcalling.
What to do: You may need more ports (if you have a 2-port system), or you may
need to reduce the number of subscribers who have Outcalling or Record-a-Call
privileges.
Possible Cause 2: A line may not be available to place a call.
What to do: If all lines are in use when the system attempts to outcall, the outcall
does not go through. The system counts the attempt toward the total number of
attempts to be made during the specified time interval.
If the subscribers Outcalling Schedule end time occurs before the remaining
attempts, these attempts will not be made by the system. You may need to obtain
more lines if the problem occurs frequently.
Outcalling to a Digital Pager Is Not Working
Possible Cause 1: The Outcalling number is not properly programmed.
What to do: Check that the Outcalling number is correct. If not, reprogram the
number.
Possible Cause 2: Insufficient number of pauses in Outcalling number.
What to do: It is important to include a sufficient number of pauses between the
pager number and the Personal Identification Number (PIN), or between the
pager number and the callback number. Leave several pauses after the pager
number. You must allow enough time for the paging system to answer before the
PIN and/or callback number is dialed.
In addition, a pause should follow the 9 dialed to get an outside line. And if the
communications system is set to rotary (rather than touchtone) service, pauses
may need to be included after every digit in the Outcalling number.
Possible Cause 3: A line may not be available to place a call.
What to do: If all lines are in use when the system attempts to outcall, the outcall
does not go through. The system counts the attempt toward the total number of
attempts to be made during the specified time interval.
If the subscribers Outcalling Schedule end time occurs before the remaining
attempts, these attempts will not be made by the system. You may need to obtain
more lines if the problem occurs frequently.
6-12
Voice Mail Service
Possible Cause 4: The message was received outside the hours programmed in
the subscribers Outcalling Schedule, or the Outcalling period was ended.
What to do: This is standard operation. Outcalling is performed only during the
hours specified by the subscribers Outcalling Schedule. Outcalling will be done
only for messages received during the Outcalling period.
Possible Cause 5: Outcalling may not be turned on.
What to do: Have the mailbox owner verify that Outcalling is turned on. The
System Manager should also verify that the Outcalling privilege is assigned.
Possible Cause 6: The number may be on the Disallowed Number List.
What to do: Check call restrictions and Allowed and Disallowed Number Lists.
Outcalling to a Telephone Is Not Working
Possible Cause 1: The Outcalling number is not properly programmed.
What to do: Check that the Outcalling number is correct. In particular, verify that
the Outcalling number is not a telephone number that is forwarded to an internal
telephone number with voice mail coverage. If necessary, reprogram the number.
Possible Cause 2: A line may not be available to place a call.
What to do: If all lines are in use when the system attempts to outcall, the outcall
does not go through. The system counts the attempt toward the total number of
attempts to be made during the specified time interval. If the subscribers
Outcalling Schedule end time occurs before the additional attempts, these
attempts will not be made by the system. You may need to obtain more lines if the
problem occurs frequently.
Possible Cause 3: The message was received outside the hours programmed in
the subscribers Outcalling Schedule, or the Outcalling period was ended.
What to do: This is standard operation. Outcalling is performed only during the
hours specified by the subscribers Outcalling Schedule. Outcalling will be done
only for messages received during the Outcalling period.
Possible Cause 4: Outcalling may not be turned on.
What to do: Have the mailbox owner verify that Outcalling is turned on. The
System Manager should also verify that the Outcalling privilege is assigned.
Possible Cause 5: The number may be on the Disallowed Number List.
What to do: Check call restrictions and Allowed and Disallowed Number Lists.
6-13
Troubleshooting
Language
Cannot Switch Between Primary and Secondary
Languages
Possible Cause: The system is set for Monolingual Mode.
What to do: Refer to Modifying the Language Mode in Chapter 5 to determine
the system's Language Mode.
Cannot Understand Language Prompts
Possible Cause: Either a language you do not understand was inadvertently
chosen while programming, or you do not understand the factory-set language.
Note that the language for the programming prompts can differ from the system
language.
What to do: To change the language to one you understand, do one of the
following:
■
If the System Administration Language needs to be changed:
i777 or the programmed Voice Mail Auto Dial
b. Press 99#.
a. Press
button.
c. Enter the password.
d. Press
1 to change the programming prompt language.
e. Select the appropriate language.
f. Press
■
*7 to return to the Main Menu, or hang up to quit.
If the system is set for Monolingual Mode and the System Language
needs to be changed:
i777.
b. Press 99#.
a. Press
c. Enter the password.
d. Press
9126.
e. Press the number corresponding to the desired language.
f. Press
6-14
9.
Error Messages
■
If the system is set for Bilingual Mode and the Primary Language needs to
be changed:
i777.
b. Press 99#.
a. Press
c. Enter the password.
d. Press
91216.
e. Press the number corresponding to the desired language.
f. Press
9.
Error Messages
If the system prompts you that an operation, such as system backup or system
restore, has failed, this prompt will include an error code. Be sure to record the
error code. When you call 1 800 628-2888 for help (or contact your Lucent
Technologies Representative or Authorized Dealer), report the error code.
6-15
Specifications
Capacities
A
●
Mailboxes:
—Default Mailbox Capacity: Ext. 10, 60 minutes (120 messages);
subscriber, 20 minutes (120 messages)
—Mailbox Size Range: 5 to 180 minutes
—Default Message Length: 4 minutes
—Message Length Range: 2 to 60 minutes
—Personal Greeting Length: 1 second to 4 minutes
—Record-A-Call Default Setting: 0 minutes (Off)
—Record-A-Call Range: 1 minute to 60 minutes
●
●
Messages can be forwarded a maximum of 13 times.
Automated Attendant:
—Default: All lines assigned to Automated Attendant 1
—Default Setting for Selector Codes 1 to 8: Direct Extension Transfer
—Default Setting for Selector Code 9: Mailbox Transfer (to receptionist’s Ext. 10)
—Receptionist’s Extension (Dial 0): Extension 10
—Dial 0/Timeout Action (day and night): Transfer to receptionist
—Menu Levels: 1
—Menu Options: 9 allowed (5 recommended)
A-1
Specifications
System Capacities
●
●
●
Communications
Systems
●
With 2-Port PC Card: 2 voice channels (ports), 48 mailboxes, 100 hours of voice
storage maximum
With 4-Port PC Card: 4 voice channels (ports), 48 mailboxes, 100 hours of voice
storage maximum
Total Number of Calls Supported During Peak Usage Hour:
Call Connect Time1
Calls
2-port
4-port
0.5 minutes
25
122
1 minute
12
61
1.5 minutes
8
40
The PARTNER MAIL VS system is supported on the following PARTNER Plus,
PARTNER II, PARTNER Advanced, and PARTNER Endeavor communications
systems:
—In most countries: Release 3.1 or later of PARTNER Plus and PARTNER II, and
Release 1.0 or later of PARTNER Endeavor and PARTNER Advanced
Communications System
—In United Kingdom: Release 2.0 or later of PARTNER Plus
Languages
Supported
●
●
●
U. S. English
Latin American Spanish
Canadian French
—Default Mode: Monolingual
—Default Languages: Monolingual Mode - U.S. English; Bilingual Mode - U.S.
English (primary)/Latin American Spanish (secondary)
Dimensions and
Weights (approx.)
●
●
●
Electrical
Specifications
●
●
●
Processor Module
Specifications
●
●
●
●
●
1.
A-2
PARTNER MAIL VS: 11"(D) x 17" (H) x 1.5" (W) or 27.9 x 43.2 x 3.8 cm; 4.3 lbs or 2.0 kgs
Expansion Card: 3.4"(D) x 2.1" (H) x 0.2" (W) or 8.6 x 5.3 x 0.5 cm; .07 lbs or 32 grams
PC Card: 3.4"(D) x 2.1" (H) x 0.2" (W) or 8.6 x 5.3 x 0.5 cm; .07 lbs or 32 grams
15 Watts (52 BTUs/hr.) per ACS processor module during normal and maximum
power consumption
Maximum current 0.13 Amps
Battery Backup Compatible
68000EC processor
512Kbyte RAM
1MB FLASH ROM
Voice Encoding Method: Regular Pulse Excitation-Long Term Prediciton (RPE-LTP)
Linear Predictive Coder
Digital Signal Processor (DSP), 16 bit
Call connect time is an average for all calls to the PARTNER MAIL VS system including Tutor, Automated
Attendant Service, Call Answer Service, and Voice Mail Service. This information assumes a 2% probability
of system blockage.
Environmental
RequirementsControl Unit
●
●
●
●
●
Mount on a wall at least 2 feet (0.6 meters) from the floor (wall mounting required)
Locate within 5 feet (1.5 meters) of the network interface jacks and a properly
grounded electrical outlet not controlled by a switch, using supplied 7-foot
(2.1-meter) cords
Operating temperature 32° to + 104°F (0° to + 40°C), not in direct sunlight
Humidity 15%-90%, noncondensing
For proper ventilation and easy replacement of modules, provide the following
minimum clearance around the control unit:
— 5-Slot carrier: 1 foot (0.3 meter) clearance at the top and sides and 2 feet (0.6
meter) at the front and bottom
— 2-Slot carrier or Standalone ACS processor module: 1 foot (0.3 meter) clearance
at the front, top and right side, and 2 feet (0.6 meter) at the bottom and left side
Electrical
RequirementsControl Unit
●
Locate in an area free of excess moisture, corrosive gases, dust, and chemicals
●
U.S. and Canada: 90-130 VAC, 50-60 Hz, 3-prong outlet separate ground,
separately fused at 15 Amps
Other countries: 180-264 VAC, 50-60 Hz (fused at 10 Amps)
Outlet must not be controlled by an on/off switch
Grounding to comply with Underwriters Laboratories (UL) 1459:
●
●
●
A. An insulated grounding conductor that is not smaller in size and equivalent in
insulation material and thickness to the grounded and ungrounded branch circuit
supply conductors, except that it is green with or without one or more yellow
stripes, is to be installed as part of the circuit that supplies the product or system
B. The grounding conductor mentioned in item A is to be connected to ground at
the service equipment
C. The attachment-plug receptacles in the vicinity of the product or system are all
to be of a grounding type, and the grounding conductors serving these
receptacles are to be connected to earth ground at the service equipment
Safety Requirements
Government
Approvals and Local
Phone Company
Information
●
U.S.: Meets UL 1459 Issue 2 and Class 2 UL 1012, UL 1310, UL 1585
Canada: Meets CSA C22.2, 225
●
U.S.: FCC Part 68
●
FCC Registration Number: AS5USA-61630-KF-E
FCC Part 15 Class A
REN (outside line jack): 0.9A per line jack
Jack type: RJ11C
Loop start lines
●
Canada: IC CP01, Issue 7
IC Registration Number (Canada): 230 3756A
IC CS03, Issues 6 & 7
Load Number = 7
Loop start lines
A-3
FCC Information
B
Federal Communications Commission
(FCC) Interference Information
This equipment has been tested and found to comply with the limits for a Class A
digital device, pursuant to Part 15 of FCC rules. These limits are designed to
provide reasonable protection against harmful interference when the equipment
is operated in a commercial environment. This equipment generates, uses, and
can radiate radio frequency energy and, if not installed and used in accordance
with the instruction manuals, may cause harmful interference to radio
communications. Operation of this equipment in a residential area is likely to
cause harmful interference, in which case the user will have to correct the
interference at his or her own expense.
NOTE:
References to FCC regulations are not applicable outside of the U.S.
B-1
FCC Information
FCC Notification and Repair Information
This equipment is registered with the FCC in accordance with Part 68 of its rules.
In compliance with those rules, you are advised of the following:
■
■
■
Means of Connection: Connection to the telephone network shall be
through a standard network interface jack USOC RJ11C. These USOCs
must be ordered from your local telephone company.
This equipment may not be used with party lines or coin telephone lines.
Notification to the Telephone Companies: Before connecting this
equipment, you or your equipment supplier must notify your local
telephone company's business office of the following:
The telephone number(s) you will be using with this equipment.
The appropriate registration number and ringer equivalence
number (REN), which can be found on the right hand side of the
primary carrier.
You must also notify your local telephone company if and when this
equipment is permanently disconnected from the line(s).
■
■
Repair Instructions: If you experience trouble because your equipment
is malfunctioning, the FCC requires that you disconnect the equipment
from the network and not use it until the problem has been corrected.
Repairs to this equipment can only be made by the manufacturer, its
authorized agents, or by others who may be authorized by the FCC. In the
event repairs are needed on this equipment, please contact the Lucent
Technologies Technical Service Center at 1 800 628-2888. For warranty
information, see Appendix C.
Rights of the Local Telephone Company: If this equipment causes
harm to the telephone network, the local telephone company may
discontinue your service temporarily. If possible, they will notify you in
advance. But if advance notice is not practical, you will be notified as soon
as possible. You will also be advised of your right to file a complaint with
the FCC.
Your local telephone company may make changes in its facilities,
equipment, operations, or procedures that affect the proper functioning of
this equipment. If they do, you will be notified in advance to give you an
opportunity to maintain uninterrupted telephone service.
B-2
IC Notification and Repair Information
IC Notification and Repair
Information
The Industry Canada (IC) label identifies certified equipment. This certification
means that the equipment meets certain telecommunications network protective,
operational, and safety requirements. The IC does not guarantee the equipment
will operate to the user's satisfaction.
Before installing the equipment, users should ensure that it is permissible to
connect it to the facilities of the local telecommunications company. The
equipment must also be installed using an acceptable method of connection. In
some cases, the company's inside wiring for single-line individual service may
be extended by means of a certified connector assembly (telephone extension
cord). The customer should be aware that compliance with the above conditions
may not prevent degradation of service in some situations.
Repairs to certified equipment should be made by an authorized Canadian
maintenance facility designated by the supplier. Any repairs or alterations made
by the user to this equipment, or any equipment malfunctions, may give the
telecommunications company cause to request the user to disconnect the
equipment.
Users should ensure for their own protection that the electrical ground
connections of the power utility, telephone lines, and internal metallic water pipe
system, if present, are connected. This precaution may be particularly important
in rural areas.
! CAUTION:
Users should not attempt to make such connections themselves, but should
contact the appropriate electrical inspection authority or electrician, as
appropriate.
To prevent overloading, the Load Number (LN) assigned to each terminal device
denotes the percentage of the total load to be connected to a telephone loop
used by the device. The termination on a loop may consist of any combination of
devices subject only to the requirement that the total of the Load Numbers of all
the devices does not exceed 100.
IC Certification No.: 230 3756A
CSA Certification No.: LR 60486
Load No.: 7
B-3
FCC Information
Renseignements sur la notification du ministére
des Communications du Canada et la réparation
L'étiquette du Ministère des Communications du Canada identifie le matériel
homologué. Cette étiquette certifie que le matériel est conforme à certaines
normes de protection, d'exploitation et de sécurité des réseaux de
télécommunications. Le Ministère n'assure toutefois pas que le matériel
fonctionnera à la satisfaction de l'utilisateur.
Avant d'installer ce matériel, l'utilisateur doit s'assurer qu'il est permis de le
raccorder aux installations de l'entreprise locale de télécommunication. Le
matériel doit également être installé en suivant une méthode acceptée de
raccordement. Dans certains cas, les fils intérieurs de l'enterprise utilisés pour
un service individuel à ligne unique peuvent être prolongés au moyen d'un
dispositif homologué de raccordement (cordon prolongateur téléphonique
interne). L'abonné ne doit pas oublier qu'il est possible que la conformité aux
conditions énoncées ci-dessus n'empêchent pas la dégradation du service dans
certaines situations. Actuellement, les entreprises de télécommunication ne
permettent pas que l'on raccorde leur matériel à des jacks d'abonné, sauf dans
les cas précis prévus pas les tarifs particuliers de ces entreprises.
Les réparations de matériel homologué doivent être effectuées par un centre
d'entretien canadien autorisé désigné par le foumisseur. La compagnie de
télécommunications peut demander à l'utilisateur de débrancher un appareil à la
suite de réparations ou de modifications effectuées par l'utilisateur ou à cause de
mauvais fonctionnement.
Pour sa propre protection, l'utilisateur doit s'assurer que tous les fils de mise à la
terre de la source d'énergie électrique, des lignes téléphoniques et des
canalisations d'eau métalliques, s'il y en a, sont raccordés ensemble. Cette
précaution est particuliérement importante dans les régions rurales.
! AVERTISSEMENT:
L'utilisateur ne doit pas tenter de faire ces raccordements lui-même;
il doit avoir racours à un service d'inspection des installations
électriques, ou à un électricien, selon le cas.
L'indice de charge (IC) assigné à chaque dispositif terminal indique, pour éviter
toute surcharge, le pourcentage de la charge totale qui peut être raccordée a un
circuit téléphonique boucié utilisé par ce dispositif. La terminaison du circuit
bouclé peut être constituée de n'importe quelle combinaison de dispositifs,
pourvu que la somme des indices de charge de l'ensemble des dispositifs ne
dépasse pas 100.
No d'homolagation: 230 3756A
No de certification CSA: LR 60486
L'indice de charge: 7
B-4
Warranty Information
C
Repair Information
Outside the continental U.S., contact your Lucent Technologies Representative
or local Authorized Dealer for warranty and repair information applicable to your
system.
In-Warranty Repairs
If you purchased or leased your system directly from Lucent Technologies,
Lucent Technologies will repair it free of charge during the one-year warranty
period. Simply call the Lucent Technologies Technical Service Center and ask for
service.
Business-Day service is standard during the warranty period for both the control
unit and system phones. Business-Day service is performed during normal
business hours. However, if you need 24-hour service protection during the
warranty period on the control unit in case there is a major system failure, you
can purchase an Around-the-Clock service contract from your local Lucent
Technologies sales office. (Around-the-Clock service is not available for phones.)
If you purchased or leased your system through a Lucent Technologies
Authorized Dealer, contact your dealer for repairs.
C-1
Warranty Information
Post-Warranty Repairs
If you purchased your system from Lucent Technologies and you have a
post-warranty service contact, Lucent Technologies service is provided under
the terms of that contract.
To significantly reduce unexpected repair costs after the warranty period, you
can purchase a post-warranty service contract from Lucent Technologies. If you
do not have a contract, Lucent Technologies service is provided on a
time-and-materials basis by calling the Lucent Technologies Technical Service
Center. A contract provides you, within the applicable coverage period and
response times, service calls with no charge for parts and labor on covered
repairs. Both Business-Day and Around-the-Clock coverages of varying lengths
are available. To order a post-warranty service contract, call 1 800 247-7000 (in
the continental U.S. only).
If you leased your system from Lucent Technologies, Business-Day service
is included in your lease. To upgrade to Around-the-Clock service, call
1 800 247-7000 (in the continental U.S. only).
If you purchased or leased your system through a Lucent Technologies
Authorized Dealer, contact your dealer for repairs.
C-2
Lucent Technologies Warranty and Limitation of Liability
Lucent Technologies Warranty and
Limitation of Liability
Lucent Technologies warrant you, the customer, that your system will be in good
working order on the date Lucent Technologies or its authorized reseller delivers
or installs the system, whichever is later (Warranty Date). If you notify Lucent
Technologies or its Authorized Dealer within one year of the Warranty Date that
your system is not in good working order, Lucent Technologies will without
charge to you repair or replace, at its option, the system components that are not
in good working order. Repair or replacement parts may be new or refurbished
and will be provided on an exchange basis. If Lucent Technologies determines
that your system cannot be repaired or replaced, Lucent Technologies will
remove the system and, at your option, refund the purchase price of your system
or apply the purchase price towards the purchase of another Lucent
Technologies system.
If you purchased your system directly from Lucent Technologies, Lucent
Technologies will perform warranty repair in accordance with the terms and
conditions of the specific type of Lucent Technologies maintenance coverage
you selected. A written explanation of Lucent Technologies types of
maintenance coverage may be obtained from Lucent Technologies by calling
1 800 247-7000 (in the continental U.S. only). If you purchased your system from
a Lucent Technologies Authorized Dealer, contact your reseller for the details of
the maintenance plan applicable to your system.
This Lucent Technologies limited warranty covers damage to the system caused
by power surges.
Unless otherwise expressly agreed to in a written agreement signed by Lucent
Technologies, Lucent Technologies will not be responsible under this limited
warranty for damages resulting from:
■
■
■
■
■
Failure to follow Lucent Technologies installation, operation, or
maintenance instructions;
Unauthorized system modification, movement, or alteration;
Unauthorized use of common carrier communication services accessed
through the system;
Abuse, misuse, or negligent acts or omissions of the customer and
persons under the customers control; or
Act of third parties and acts of God.
LUCENT TECHNOLOGIES’ OBLIGATION TO REPAIR, REPLACE, OR
REFUND, AS SET FORTH ABOVE, IS YOUR EXCLUSIVE REMEDY.
EXCEPT AS SPECIFICALLY SET FORTH ABOVE, LUCENT TECHNOLOGIES,
ITS AFFILIATES, SUPPLIERS, AND DEALERS MAKE NO WARRANTIES,
EXPRESS OR IMPLIED, AND SPECIFICALLY DISCLAIM ANY WARRANTIES
OF MERCHANTABILITY OR FITNESS FOR A PARTICULAR PURPOSE.
C-3
Warranty Information
Limitation of Liability
Except as provided below, the liability of Lucent Technologies and its affiliates
and suppliers for any claims, losses, damages, or expenses from any cause
whatsoever (including acts or omissions of third parties), regardless of the form
of action, whether in contract, tort, or otherwise, shall not exceed the lesser of: (1)
the direct damages proven; or (2) the repair cost, replacement cost, license fee,
annual rental charge, or purchase price, as the case may be, of the equipment
that directly gives rise to claim. Except as provided below, Lucent Technologies
and its affiliates and suppliers shall not be liable for any incidental, special,
reliance, consequential, or indirect loss or damage incurred in connection with
the equipment. As used in this paragraph, consequential damages include, but
are not limited to, the following: lost profits, lost revenues, and losses arising out
of unauthorized use (or charges for such use) of common carrier
telecommunications services or facilities accessed through or connected to the
equipment. For personal injury caused by Lucent Technologies negligence,
Lucent Technologies liability shall be limited to proven damages to person. No
action or proceeding against Lucent Technologies or its affiliates or suppliers
may be commenced more than twelve (12) months after the cause of action
accrues. THIS PARAGRAPH SHALL SURVIVE FAILURE OF AN EXCLUSIVE
REMEDY.
C-4
Dial Plans
D
This appendix contains a series of figures that illustrate the most common dialing
plans when PARTNER MAIL VS (2-port or 4-port) module is installed with a
PARTNER Advanced Communications System, PARTNER Endeavor, PARTNER II,
or PARTNER Plus system. These figures also indicate which PARTNER MAIL VS
extensions should be assigned to Hunt Group 7 of the communications system.
In addition, see Figure 2-1 in Chapter 2 for an illustration of the dial plan for a
PARTNER ACS with three 308 modules and a voice messaging system module.
Note that the communications system recognizes the voice messaging
system module as a 6-extension module. In other words, the voice
messaging system module resembles a 200, 206, or 400 module to the
communications system, even though the voice messaging system itself
does not have any physical line jacks. Therefore, the shaded modules in the
following illustrations represent either the voice messaging system module
or one of the other 6-extension modules. Note that the bottom two (for
2-port configurations) or four extensions (for 4-port configurations) of the
voice messaging system module will be assigned to Hunt Group 7, as
indicated in the tables corresponding to each illustration.
For example, in Figure D-1, when the voice messaging system module is
installed in slot 4, extensions 38 and 39 are assigned to Hunt Group 7 for a 2-port
system. In this same figure, when the voice messaging system module is
installed in slot 5, extensions 44 and 45 (that is, the bottom two of the six
extensions on the voice messaging system module) are assigned to Hunt Group
7 when a 6-extension module (that is, a 200, 206, or 400 module represented by
the shaded module) is installed in slot 4. If an 8-extension 308 module were
installed in slot 4 instead and the voice messaging system were installed in slot
5, extensions 46 and 47 would be assigned to Hunt Group 7 (as shown in
Figure 2-1).
D-1
Dial Plans
5-Slot Carrier
ACS
Processor
Module
308
308
PFT
PFT
L
L
I
I
N
N
E
E
S
S
Line
Jacks
4
7
1
5
6
8
9
2
3
PFT
18
26
10
19
20
27
28
11
12
21
29
13
22
30
14
23
31
15
24
32
16
25
33
17
PFT
E
E
X
X
T
T
E
E
N
N
S
S
I
I
O
O
N
N
S
S
Extension
Jacks
2-port
Systems
4-port
Systems
Figure D-1.
D-2
If PARTNER MAIL VS
Is Installed In Slot:
4
5
Then Assign These
38, 39 44, 45
Exts. To Hunt Group 7:
If PARTNER MAIL VS
Is Installed In Slot:
4
5
Then Assign These
36, 37, 42, 43
Exts. To Hunt Group 7: 38, 39 44, 45
Dial Plan for PARTNER Advanced Communications System
Release 2.0 or Later
5-Slot Carrier
ACS
Processor
Module
308
PFT
PFT
L
PFT
L
L
I
I
I
N
N
N
E
E
E
S
S
S
Line
Jacks
4
1
5
6
2
3
PFT
PFT
18
19
20
10
E
X
T
11
12
E
N
S
I
13
N
S
22
14
23
15
24
16
25
17
E
X
X
T
T
E
E
N
N
S
O
21
PFT
E
S
I
I
O
O
N
N
S
S
Extension
Jacks
2-port
Systems
4-port
Systems
Figure D-2.
If PARTNER MAIL VS
Is Installed In Slot:
2
4
5
Then Assign These
30, 31 36, 37 42, 43
Exts. To Hunt Group 7:
If PARTNER MAIL VS
Is Installed In Slot:
2
4
5
Then Assign These
28, 29, 34, 35, 40, 41,
Exts. To Hunt Group 7: 30, 31 36, 37 42, 43
Dial Plan for PARTNER Advanced Communications System
Release 2.0 or Later
D-3
Dial Plans
5-Slot Carrier
ACS
Processor
Module
PFT
PFT
L
PFT
L
PFT
L
L
I
I
I
I
N
N
N
N
E
E
E
E
S
S
S
S
Line
Jacks
1
2
3
PFT
PFT
PFT
E
E
X
X
T
T
E
E
N
N
S
S
I
I
O
O
N
N
S
S
10
11
12
PFT
E
E
X
X
T
T
E
E
N
N
S
13
S
I
I
O
O
N
N
S
S
14
15
16
17
Extension
Jacks
2-port
Systems
4-port
Systems
Figure D-3.
D-4
If PARTNER MAIL VS
Is Installed In Slot:
1
2
4
5
Then Assign These
22, 23 28, 29 34, 35 40, 41
Exts. To Hunt Group 7:
If PARTNER MAIL VS
Is Installed In Slot:
1
2
4
5
Then Assign These
20, 21, 26, 27, 32, 33, 38, 39,
Exts. To Hunt Group 7: 22, 23 28, 29 34, 35 40, 41
Dial Plan for PARTNER Endeavor Release 1.0 and PARTNER
Advanced Communications System Release 1.0, 1.1, 2.0 or Later
2-Slot Carrier
ACS
Processor
Module
L
I
N
E
S
Line
Jacks
1
2
3
PFT
10
E
X
T
11
12
Extension
Jacks
E
N
S
I
O
13
N
S
14
15
16
17
2-port
Systems
4-port
Systems
Figure D-4.
If PARTNER MAIL VS
Is Installed In Slot:
2
Then Assign These
22, 23
Exts. To Hunt Group 7:
If PARTNER MAIL VS
Is Installed In Slot:
2
Then Assign These
20, 21,
Exts. To Hunt Group 7: 22, 23
Dial Plan for PARTNER Endeavor Release 1.0 and PARTNER
Advanced Communications System Release 1.0, 1.1, 2.0 or Later
D-5
Dial Plans
PARTNER Plus Control Unit or
PARTNER II Primary Carrier
PARTNER II
Expansion Carrier
PFT
PFT
PFT
PFT
PFT
PFT
PFT
PFT
PAGE
2
SMDR
EXPANSION
MODULE
PROCESSOR
MODULE
PFT
10
VOL
11
12
13
MUSIC
ON
HOLD
14
15
2-port
Systems
4-port
Systems
Figure D-5.
D-6
If PARTNER MAIL VS
Is Installed In Slot:
Then Assign These
Exts. To Hunt Group 7:
If PARTNER MAIL VS
Is Installed In Slot:
2
4
5
1
2
4
5
20, 21 26, 27 32, 33 38, 39 44, 45 50, 51 56, 57
2
4
5
1
2
4
5
Then Assign These
18, 19, 24, 25, 30, 31, 36, 37, 42, 43, 48, 49, 54, 55,
Exts. To Hunt Group 7: 20, 21 26, 27 32, 33 38, 39 44, 45 50, 51 56, 57
Voice Messaging System Extensions for PARTNER Plus and
PARTNER II Communications Systems
Systems with Fax Tone Detect
In general, 308 modules should be installed to the left of any 206 modules.
However, some systems using Fax Tone Detect with older 308 modules (that is,
308 Version 1) may not adhere to this recommendation. The following illustrations
depict the dial plan for these configurations when a voice messaging system is
installed.
NOTE:
While the configurations depicted in the following illustrations may
be necessary for your system, they are not recommended.
D-7
Dial Plans
5-Slot Carrier
ACS
Processor
Module
206 308 V1
PFT
Line
Jacks
4
5
PMVS
PFT
L
I
N
E
E
S
S
6
1
7
8
2
3
PFT
PFT
18
19
20
21
22
23
L
I
N
E
X
T
E
N
S
I
24
10
25
26
11
12
27
13
E
X
T
E
N
S
I
O
N
S
O
28
14
29
15
30
16
31
17
N
S
Extension
Jacks
2-port
Systems
4-port
Systems
Figure D-6.
D-8
If PARTNER MAIL VS
Is Installed In Slot:
4
Then Assign These
36, 37
Exts. To Hunt Group 7:
If PARTNER MAIL VS
Is Installed In Slot:
4
Then Assign These
34, 35,
Exts. To Hunt Group 7: 36, 37
Dial Plan for Systems with Fax Tone Detect and a Voice
Messaging System Module
5-Slot Carrier
ACS
Processor
Module
206 308 V1
PFT
Line
Jacks
4
5
308 PMVS
PFT
L
I
N
E
E
S
S
6
1
9
7
8
2
3
10
11
PFT
PFT
18
19
20
21
22
23
L
I
N
E
X
T
E
N
S
I
24
10
32
25
26
11
12
33
34
27
13
35
E
X
T
E
N
S
I
O
N
S
O
28
14
36
29
15
37
30
16
38
31
17
39
N
S
Extension
Jacks
2-port
Systems
4-port
Systems
Figure D-7.
If PARTNER MAIL VS
Is Installed In Slot:
Then Assign These
Exts. To Hunt Group 7:
5
44, 45
If PARTNER MAIL VS
Is Installed In Slot:
5
Then Assign These
Exts. To Hunt Group 7:
42, 43
44, 45
Dial Plan for Systems with Fax Tone Detect and a Voice
Messaging System Module
D-9
Case Studies
E
Purpose
This appendix contains two case studies based on actual customer
requirements. Each case study defines the call handling requirements of the
business and explains how the planning forms for the communications system
and voice messaging system were filled out. You can use these case studies to
determine how customer requirements were matched to PARTNER MAIL VS
system features.
E-1
Case Studies
Case Study #1
About the Customer
Tennis Land is a sports center that offers tennis enthusiasts six tennis courts and
a large, well-stocked shop for purchasing a variety of tennis paraphernalia
including racquets and tennis wear. In addition, Tennis Land offers lessons and
clinics from staff coaches. When the coaches are not giving lessons or clinics,
hosting tournaments, or traveling with the Tennis Land team in exhibition
matches, they help the sales people in the shop. Stan Williamsthe owner, Sally
Parkerthe manager, and the coaches all have private offices.
Stan purchased a PARTNER Advanced Communications System Release 3.0
and a PARTNER MAIL VS Release 5 Voice Messaging System. He believes that
the systems' features will help his employees provide better service to
customers.
Sally is responsible for managing the systems; she established these facts:
■
■
■
■
■
■
E-2
The system will have two Automated Attendants, six outside lines (two
outside lines are assigned to Automated Attendant 1 and three outside
lines are assigned to Automated Attendant 2), one personal line (that is,
one outside line that is not assigned to an Automated Attendant), and
eight extensions. One Automated Attendant will handle calls to the pro
shop, while the other Automated Attendant will handle calls to the court
area.
The clerk will have a PARTNER-18D phone at extension 10. Sally's
PARTNER-18D phone will be extension 11. Stans PARTNER-18D phone
will be extension 12. The three coaches will have PARTNER-18 phones.
Two MLS-12 phones will be in the shop.
Stan's callers should be able to reach him without having to be transferred
by an employee or the PARTNER MAIL VS system, so Stan will have a
personal line. When Stan is not available, his callers will be sent directly to
his mailbox where they can leave messages.
Stan works late, so hell be using Call Screening to decide whether to pick
up calls on his line after hours.
Stan prefers that customers speak with an employee while the center is
open, so all lines for the pro shop will ring at all phones in that area, and all
lines for the court area will ring at all phones there. Although there is no
receptionist, the clerk and the salespeople will serve the receptionist
function by answering calls when they can.
During business hours, calls will go to the Automated Attendant Service of
the PARTNER MAIL VS system only when the clerk and salespeople are
busy.
Case Study #1
■
■
■
■
■
■
■
All of Tennis Lands customers and employees speak English, so the
PARTNER MAIL VS system will be set for Monolingual Mode with U.S.
English as the System Language.
Potential customers call the Pro Shop frequently to inquire about Tennis
Lands hours and location. Therefore, when the Automated Attendant
Service for this area answers, callers can choose to hear either an
announcement that includes Tennis Lands hours of operation and
directions to the center or another detailing this months specials. When
the Automated Attendant Service answers for the court area, callers can
choose to hear either an announcement that includes Tennis Lands hours
of operation and directions to the center or another detailing upcoming
competitions.
Callers who receive Automated Attendant Service and want to speak to a
person will be able to reach the first available person in either the shop or
court area.
A general mailbox will be set up for each Automated Attendant.
Customers who receive Automated Attendant Service and stay on the line
or press 0 for assistance will be routed to this extension. Customers who
call after business hours will have the option of leaving a message in this
mailbox. The mailbox at extension 10 will be used as the general mailbox
for the pro shops Automated Attendant. The mailbox at extension 11
(Sallys mailbox) will be used as the general mailbox for the court area
Automated Attendant.
All key employees will have a mailbox and Automatic VMS Cover. Callers
will be routed automatically to the appropriate mailbox where they can
leave a message when the person they called is not available.
Stan and Sally will have Outcalling privileges so that when they are moving
around the club or traveling, they can be alerted via their pagers to the
arrival of messages being left in their voice mailboxes.
Sally will also have Record-A-Call privileges to ensure that she doesnt
miss writing down any details while shes arranging tournament schedules
and press releases.
E-3
Case Studies
Filling Out the Planning Forms
This section explains how the System Planner for the PARTNER Advanced
Communications System Release 3.0 and the forms for the PARTNER MAIL VS
Release 5 Voice Messaging System are filled out based on the facts in the Tennis
Land case. For brevity, CS refers to the System Planner forms for the
communications system and VMS refers to the forms for the voice messaging
system.
CS Form A, Page 1 of 3
■
■
■
Write the Telephone Numbers in order customer desires: Telephone
numbers in this column represent Tennis Lands outside lines. Two lines
are assigned to Automated Attendant 1 and three are assigned to
Automated Attendant 2. Stans personal line is Line 03.
VMS-AA: Numbers in this column correspond to the specific PARTNER
MAIL VS Automated Attendant (that is, 1, 2, 3, or 4) that will answer calls
on Lines 01, 02, 04, 05, and 06.
VMS-Mail: Stans extension number, 12, in this column indicates that
the Line Coverage Extension (#208) feature sends unanswered calls on
Line 03 directly to Stans mailbox.
CS Form A, Page 2 of 3
System Settings:
■
■
■
Receptionist answers calls during business hours? The clerk and
salespeople will serve the receptionist function; so Yes appears on
this line.
Ring on Transfer (#119): NA written in the space provided indicates
that music or recorded messages will be played while calls are being
transferred.
Music on Hold (#602): The blank line indicates that a Music on Hold
device is installed.
CS Form A (Addendum), Page 3 of 3
■
■
■
E-4
VMS Hunt Delay (#506)/Day No. of Rings: This setting indicates that on
all lines the Automated Attendant Service acts as a backup, picking up
calls after the fourth ring during the day. A person has a chance to answer
before a call goes to the PARTNER MAIL VS system.
VMS Hunt Delay (#506)/Night No. of Rings: At night when no
receptionist is available, the Automated Attendant Service is set to answer
immediately (that is, 0 rings).
VMS Hunt Schedule (#507): The absence of a D or N indicates that
the Automated Attendant Service picks up unanswered calls during
business hours and after hours. (This setting is the default.)
Case Study #1
CS Form B1, Page 1 of 4
■
■
■
■
Write Name/Description: The names listed for extensions 10 though 17 in
this column identify the extension assignments.
Identify Telephone Attached to this Extension: Check in these columns
specify the type of telephone each person or location has.
VMS in the Write Name/Description column and checks in the PARTNER
MAIL VS column indicate that the PARTNER MAIL VS module is installed
in Slot 1 of the Control Unit. The module uses extensions 22 and 23, the
last two extensions for that slot in this 2-port configuration.
Write Transfer Return Ext. No.: 10 in this column indicates that
when a call transferred by the PARTNER MAIL VS system is unanswered, it
goes to extension 10 where the clerk can answer it.
CS Form B2, Page 1 of 2
■
■
■
Automatic VMS Cover (#310): Checks in this column indicate that
unanswered calls to extensions 10 through 15 automatically are covered
by the Automated Attendant Service.
Hunt Group Extensions 1-6 (#505): 1 in this column indicates that
extensions 16 and 17 make up Hunt Group 1. A call transferred to this
group rings three times at the first non-busy extension. If it is not
answered, it moves to the next non-busy extensions in the group,
continuing until someone answers or the caller hangs up.
VMS Only: column for extensions 22 and 23 satisfy the requirement that
the extensions used by the PARTNER MAIL VS module be assigned to
Hunt Group 7.
CS Form C3, PARTNER-18/18D Phone
■
The first Form C3 identifies the buttons programmed on the
PARTNER-18D phone at extension 10: Night Service, Do Not Disturb,
Voice Mail Messages, and Voice Mailbox Transfer.
The Night Service button allows the user to turn Night Service on and off.
When Night Service is off, the Day Menu prompt plays. When Night
Service is on, the Night Menu Prompt plays.
Subscribers can use the Do Not Disturb button to send callers to their
mailbox without ringing their extension first.
The Voice Mail Auto Dial button allows the user to call Voice Mail Service
with one touch.
The Voice Mailbox Transfer (VMBox) button allows the user to transfer
callers directly to another subscribers mailbox without ringing the
extension first.
E-5
Case Studies
■
The second Form C3 indicates the buttons programmed on the
PARTNER-18 phones at extensions 11, 12, 13, 14, and 15:
Do Not Disturb, Voice Mail Messages, and Voice Mailbox Transfer, as well
as a Record-a-Call (RAC) button on Sallys phone and a Call Screening
button on Stans.
CS Form C7, MLS-12 Phone
■
Form C7 indicates that a Voice Mailbox Transfer button is programmed on
the MLS-12 phones at extensions 16 and 17.
VMS Form 1
■
■
Note that unused mailboxes are crossed off.
The default settings for Language Mode (Monolingual) and System
Language (U.S. English) are used.
VMS Form 2
■
■
■
■
■
■
B (Subscriber Name): In this column, the names assigned to mailboxes
10 though 15 indicate that the clerk, Sally, Stan, and the coaches have
mailboxes.
Mailboxes 16 through 57 are marked for deletion. For system security,
it is advisable to delete unused mailboxes.
D (Outcalling Assigned): Yes in this column indicates that Outcalling
privileges are assigned to Sally and Stan.
E (RAC Assigned): The recording time (in minutes) in this column
indicates that Record-A-Call privileges are assigned to Sally.
F (Message Length): The storage space (in minutes) in this column
indicates that the mailbox size has been increased for Sally, who has
Record-A-Call privileges.
G (Mailbox Size): The message length (in minutes) in this column
indicates that the mailbox size has been increased for Sally.
VMS Form 3 for Automated Attendant 1
■
■
■
E-6
Lines assigned: The lines assigned to Automated Attendant 1 are
indicated in this area,
Description: In this column, Direct Extension Transfer for Selector Code
1 indicates that when callers get the Automated Attendant Service, they
can transfer to any extension (10 to 19) by entering the extension number.
Shop in the Description column and 771 in the Number/Range of
Numbers column for Selector Code 4 indicate that when callers get the
Automated Attendant Service, they can press 4 to transfer to Hunt Group 1
(which is defined on CS Form B2 as extensions 16 and 17 in the shop).
Case Study #1
■
■
■
Announcement in the Description column, 3 in the Selector Code
Action column, and the numbers (1 and 2) in the Number/Range of
Numbers column indicate that when callers get the Automated Attendant
Service they can choose to hear one of two Announcements.
Transfer to Sallys mailbox in the Description column for Selector Code 9
indicates when callers get the Automated Attendant Service, they can
press 9 to transfer to Sallys mailbox (mailbox 11).
Dial 0/Timeout Extension: This is the extension to which calls are
transferred if callers press 0 or do not choose a menu option.
VMS Form 3 for Automated Attendant 2
■
■
■
■
■
Lines assigned: The lines assigned to Automated Attendant 2 are
indicated in this area,
Description: In this column, Direct Extension Transfer for Selector Code
1 and 5 in the Selector Code Action column indicate that when callers
get the Automated Attendant Service, they can transfer to any extension
(10 to 19) by entering the extension number.
Announcement in the Description column and the numbers (1 and 2) in
the Number/Range of Numbers column indicate that when callers get the
Automated Attendant Service they can choose to hear one of two
Announcements.
Transfer to clerks mailbox in the Description column for Selector Code
9 indicates when callers get the Automated Attendant Service, they can
press 9 to transfer to the clerks mailbox (mailbox 10).
Dial 0/Timeout Extension: This is the extension to which calls are
transferred if the caller presses 0 or does not choose a menu option.
VMS Form 3A for Automated Attendant 1
■
When an unanswered call goes to the Automated Attendant Service and
the caller chooses to hear an Announcement, the caller hears one of the
Announcements on Form 3A.
VMS Form 3A for Automated Attendant 2
■
When an unanswered call goes to the Automated Attendant Service and
the caller chooses to hear an Announcement, the caller hears one of the
Announcements on Form 3A.
VMS Form 4 for Automated Attendant 1
■
When Night Service is off and an unanswered call goes to the Automated
Attendant Service, the caller hears the Day Menu Prompt on Form 4.
E-7
Case Studies
VMS Form 4 for Automated Attendant 2
■
When Night Service is off and an unanswered call goes to the Automated
Attendant Service, the caller hears the Day Menu Prompt on Form 4.
VMS Form 5 for Automated Attendant 1
■
When Night Service is on and an unanswered call goes to the Automated
Attendant Service, the caller hears the Night Menu Prompt on Form 5.
VMS Form 5 for Automated Attendant 2
■
When Night Service is on and an unanswered call goes to the Automated
Attendant Service, the caller hears the Night Menu Prompt on Form 5.
Post-Installation Recommendations
■
■
■
E-8
Stan, Sally, and the coaches should record a personal greeting and
change the factory set password for their mailboxes.
Stan and Sally should turn on Outcalling and enter an Outcalling number
and schedule.
The clerk should record a general business greeting for the mailbox at
extension 10 on Automated Attendant 1 (because this is the general
mailbox for Automated Attendant 1) and change the factory-set password
for that mailbox. Sally should record a greeting (appropriate for the Pro
Shop) for mailbox 11, which is used as the general mailbox for the Pro
Shop, on Automated Attendant 2.
Form A: System Configuration
PAGE
1 of 3
Required for PARTNER Advanced Communications System.
For additional instructions, see pages 2 and 3.
1. Customer Billing Name
Tennis Land
2. Installation Address
4 Clay Court, Anytown, NJ
3. Contact Name
Sally Parker
4. Person to be Trained
5. Sold by
Phone
(XXX)
XXX – 4567
XXX
908 555
Sally Parker
✓ Lucent Technologies Sales Force
■
■
6. Administer system for Hybrid Mode (PARTNER ACS Release
2.0 or later only):
✓ Yes ■ If yes, call local telephone company—
No ■
MF Mode and FCC # AS5 USA-21312-MF-E
Alternate Trainee’s Name
Salesperson’s Name
Marisol Colon
Dealer:
Phone
(XXX) XXX – XXX
Phone
(XXX) XXX – XXX
Phone
(XXX)
XXX – 1718
XXX
908 555
7. Features customer is most interested in (most important first):
PARTNER MAIL VS
8 . System Lines
Line Write the Telephone
Jack Numbers in order
No. customer desires
(list personal and
dedicated lines last)
01
02
03
04
05
06
07
08
09
10
11
12
13
14
15
16
17
18
19
555-4567
555-4568
555-4569
555-4570
555-4571
555-4572
Write
R if
Rotary
(Dial
Pulse)
Line
{#201}
Hybrid Mode
Only:
Write auxiliary *
pool 881, 882,
883 or No Pool
{#207}
Line Coverage—You can select one per line
2
3
4
5
6
AA
DXD * VMS- * ASA * Hunt
VMSGroup
AA
Mail
{#607} {#205} {#206} {#204} (write no.) {#206}
{#206}
Only one of these
types per system
1
7
Write
Ext. No.
for Call
Cover
{#208}
Write User’s Name for
Personal or Owned Line
or Identify Equipment for
Dedicated Line
Check
if
Caller
ID
Service
Identify other Local
Telephone Company
Subscription Services
(e.g., Repeat Call)
1
1
12
Stan Williams
2
2
2
1. Check if desired. Also see Form B1, AA Extension {#607} column.
2. Check if desired. Also see Form A, Item 10—DXD, and Form C, Direct Extension Dial Button {#113}.
3. Check if desired. Also see Form A, Item 10—VMS-AA, and Form B1, PARTNER MAIL, PARTNER MAIL VS, or
PARTNER Voice Messaging column. For PARTNER MAIL VS 5.0 or PARTNER MAIL 3.0, specify which of the
multiple Automated Attendants should be used. For previous releases, which support only one Automated
Attendant, just check the box.
4. Check if desired. Also see Form A, Item 10—ASA, and Form C, Automatic System Answer Button {#111}.
5. Write group number (1–6) covering this line. Also see Form B2, Hunt Group Extensions {#505} 1–6.
6. Check desired line for #206. Also see Form B1, PARTNER MAIL, PARTNER MAIL VS, or PARTNER Voice
Messaging PC CARD column.
7. Write extension number of line owner eligible for Line Coverage (could include VMS coverage). Also write line
owner’s name in next column.
* Available with PARTNER ACS R2.0 or later only.
Form A: System Configuration
PAGE
2 of 3
Required for PARTNER Advanced Communications System. For
additional instructions, see pages 3 and 4.
9. System Settings: Write response on line for each item.
Yes
• Receptionist answers calls during business hours? Write “Yes” or “No” ______.
• Number of Lines {#104}—By default, 3 lines per PARTNER ACS processor module or
308EC module, 2 lines per 206 module, and 4 lines per 400 module are assigned to each
extension (or to pool 880 in Hybrid mode). Write number if different from default ______.
• Transfer Return Rings {#105}—By default, a transferred call rings 4 times before going to
the transfer return extension. Write number (0-9, 0 = no return) if different from
default ______.
• Outside Conference Denial {#109}—By default, a conference call can include 2 outside
parties. Write “No” if 2 outside parties are not allowed ______.
• Ring on Transfer {#119}—By default, the caller hears ringing when the call is transferred.
N/A
Write “NA” if music on hold or silence is desired ______.
• Toll Call Prefix {#402}—By default, 0 or 1 must be dialed before the area code for a long
distance call. Write “No” if 0 or 1 is not required ______.
• System Password {#403}—By default, no password is programmed to override dialing
restrictions and to turn Night Service on and off. Write 4 digits if password is
desired __ __ __ __.
• Star Code Dial {#410}—By default, the system inserts a 0-second delay after a valid
Central Office star code when it autodials. Write number (1–5) of seconds if a longer delay
is desired or “NO” if this feature should not be active ______.
• Music on Hold {#602}—By default, the Music on Hold jack on the processor module
isactive. Write “No” if the jack is deactivated ______.
• Automatic Daylight/Standard Time {#126} (Release 3.0 or later)—By default, the system
automatically calculates Daylight Savings Time. Write “No” to turn off this feature ______.
10. Line Coverage: Complete items based on Line Coverage selection on Form A, Item 8.
DXD: (PARTNER ACS Release 2.0 or later only) If DXD is checked, specify the following:
Direct Extension Dial Delay {#112}—By default, a call rings 2 times before it is
answered by the system. Write number (0-9) if different from default _____.
Direct Extension Dial Record/Playback {I 892}—message of up to 20 seconds that
caller hears when call is answered with the Direct Extension Dial feature.
Write message below and record from extension 10 or 11:
VMS-AA: (PARTNER ACS Release 3.0 or later only)
If VMS-AA is checked, you can specify a different Hunt Schedule and Hunt Delay for
each line.
VMS-AA Hunt Schedule {#507} — The Hunt Schedule specifies when your VMS
answers your calls. Your three options are Always, Night Only or Day Only. The
default is “Always.” With the default option, VMS will always answer your calls after
the number of rings established in “VMS-Hunt Delay.” On Form A Addendum, write
“D” if Day Only is desired or “N” if Night Only is desired.
VMS-AA Hunt Delay {#506} — The Hunt Delay specifies how many rings are
allowed before your VMS answers your incoming calls. You can establish a different
delay schedule for day and night calls. For Day, Night or Always, the ring delay can
be set to 0 through 6 rings. The default setting is 2 rings. To change the delay
schedule for the daytime, on Form A Addendum, under “VMS Hunt Delay/Day,”
enter the number of daytime rings desired. To change the delay schedule for the
nighttime, on Form A Addendum, under “VMS Hunt Delay/Night,” enter the number
of nighttime rings desired.
(PARTNER ACS Release 2.0 or earlier)
Follow instructions as indicated above. However, the designated Hunt Schedule
and Hunt Delay will be established system-wide. Different schedules and delays
cannot be established for each line.
ASA:
(PARTNER ACS Release 2.0 or later only)
If ASA is checked, specify the following:
Automatic System Answer Delay {#110}—By default, a call rings 2 times before it
is answered by the system. Write number (0-9) if different from default _____.
Automatic System Answer Mode {#121}—By default, ASA calls are put on hold
after the greeting plays. Check if calls should continue to ring or be disconnected:
Ring
Disconnect
ASA Record/Playback {I 891}—message of up to 10 seconds that caller hears
when the call is answered by the Automatic System Answer feature. Write
message below and record from extension 10 or 11:
Form A: System Configuration
PAGE
3 of 3
Required for PARTNER Advanced Communications System. For
additional instructions, see page 4.
Form A: Addendum (Additional information for Release 3.0 and later)
11. Auxiliary Equipment (System). Check if applicable:
Battery Backup
Caller ID Devices
Loudspeaker Paging: Number of zones ______________
Magic-on-Hold (Music-on-Hold {#602} must be active.)
Uninterruptible Power Supply
SMDR If checked, specify the following if appropriate:
• SMDR Record Type {#608}—By default, all calls are included on call reports.
Write “Out” if only outgoing calls are reported _________.
• SMDR Output Format {#610}—By default, up to 15 digits are printed for dialed
numbers in the Number field of the call report. Write “24” if a maximum of 24 digits
is desired _________.
• SMDR Talk Time {#611}—By default, a Talk field is not included on the call report.
Write “Active” if the Talk field is desired_________.
PARTNER Contact Closure Adjunct. If checked, write in the number (1–4) below
to specify Operation Type for each Contact Closure as appropriate:
Line
Jack
No.
VMS
Hunt
Schedule
{#507}
VMS Hunt Delay {#506}
Day
No. of Rings
01
02
Night
No. of Rings
4
4
0
0
4
4
0
0
Unique
Line
Ringing1
{#209}
03
04
05
06
07
OperationType
{#613}
Contact
Closure 1
Contact
Closure 1
08
1 = 1 second on
2 = 3 seconds on (✓)
3 = 5 seconds on
4 = Toggle
09
ASA/DXD PC Card
PARTNER Voice Messaging PC Card
12
10
11
12. Notes: Write any additional information that you want to communicate to the installer.
13
14
15
16
17
18
19
1. For a ring pattern other than the standard one, enter valid values 2 – 8.
13. Installation Date
14. Order Nos.
15. Sales Support Representative’s Name
Telephone No.
Form B1: System Extensions
PAGE
1 of 4
10
11
12
13
14
15
16
17
18
19
20
21
22
23
24
25
26
27
28
29
Clerk
Sally
Stan
Pat (Coach)
Ivan (Coach)
Carol (Coach)
Shop
Shop
Alert Extensions {#606}
for Doorphone 2
AA Extension {#607} 9 *
Contact Closure Group {#612}
Identify Auxiliary Equipment
Attached to this Extension
Call Waiting {#316}
External Hotline {#311} 4 *
Hotline {#603} 5 *
Alert Extension
for Hotline
PARTNER MAIL 6 *
PARTNER MAIL VS 6
PARTNER Voice Messaging 6 10
Answering Machine
Extra Alert
IROB
Modem 7
PassageWay
FAX Machine Extension {#601}7
Doorphone 1 {#604} 8 *
Alert Extensions {#606}
for Doorphone 1
Doorphone 2 {#605} 8 *
18-Button Display 2
18-Button 2
12-Button Display 2
12-Button 2
6-Button 2
Cordless/Wireless
Standard 3
Write Name/Description
Identify Telephone
Attached to this Extension
34-Button Display 2
Intercom Autodialer
Ext.
Jack
No.
Check if Ext. Name Display {CTP} 1
Required for PARTNER Advanced Communications System. For additional instructions, see pages 5 and 6.
Write in
Other
Equipment
Write
Transfer
Return
Ext. No.
{#306}
✓
✓
✓
✓
✓
✓
✓
✓
VMS
VMS
✓
✓
10
10
IMPORTANT: A system display phone is required for programming at extension 10 or 11. Extension 10 typically is the receptionist’s extension.
Extension 11 is recommended as a second programming extension (typically the System Manager’s extension).
* WARNING: Customers should keep extension 10, 11, or the first two extensions of any 308EC or 206 module, available for power failure use.
1.
2.
3.
4.
If checked, see Form B1, Page 3 of 4.
If there is a mix of PARTNER-model and MLS-model phones, write “P” for PARTNER, and “M” for MLS.
Write “T” for touch-tone or “R” for rotary.
Must be standard phone. If immediate dialing is required, use a dedicated line.
Do not assign restrictions that prevent dialing the outside number, Forced Account Code Entry {#307}, or
groups. Also see Form D, External Hotline {#311}.
5. Standard phone is recommended. Write extension number of corresponding alert extension or “70” for
loudspeaker paging system in next column.
6. Also write Transfer Return Ext. No. {#306} in the last column on this form (usually extension 10).
Also see Form B2, Identify Group Assignments, VMS Only.
7. To prevent other extensions from interrupting calls, assign Automatic Extension Privacy {#304} on Form B2.
8. Check corresponding alert extensions in next column. To prevent outside calls at the doorphone, remove all
outside lines—see Lines/Pools Not Assigned on Form B2.
9. Also write Transfer Return Ext. No. {#306} on this form.
10. Extensions 78 and 79 should be assigned to the two voice ports on PARTNER Voice Messaging.
Extensions 78 and 79 must be assigned to Hunt Group 7 and any previous assignments for Hunt Group 7
should be erased.
Form B2: Customized Extension Settings
PAGE
1 of 2
Required if you want to change extension settings from defaults. For additional instructions, see pages 7 and 8.
10
11
12
13
14
15
16
17
18
19
20
21
22
23
24
25
26
27
28
29
30
✓
✓
✓
✓
✓
✓
K
Immediate
No Ring * Lines/Pools5 *
✔ lines Delayed ✔ pools Not Assigned
4.
5.
6.
Outgoing
only
Incoming
only
No Access
VMS Only12 **
Night Service
Group Extensions {#504}
Allowed List 8
Assignment {#408}
NR✔
1–4 1–4 1–4 1–4 1–6 7
NA✔
NA✔
NA✔
NA✔
Pickup Group 9
Extensions {#501}
Calling Group 10
Extensions {#502}
Hunt Group 11
Extensions {#505}
No Restriction ✔
ALL
1
1
✓
✓
** WARNING: Do not connect to extension 10, 11, or the first two extensions of any 206 or 308EC module.
1.
2.
3.
Write line numbers or pool access codes
for Line Access Restriction {#302} or
Pool Access Restriction {#315}*
Disallowed List 7
Assignment {#405}
NA✔
Write line numbers or pool access codes*
in each column to show desired
Line Ringing options
Outgoing Call
Restriction {#401} 6
List individual lines
{#301} for Pooled
Extensions *
Call Coverage Rings {#321}4
Call Coverage Rings {#320}3
E✔ NA✔ A✔ NA✔ A✔ NA✔ NA✔ P✔ 2✔ 3✔
Hybrid Mode
Only:
Identify
Group Assignments
Identify Restrictions/Permissions
If Different than Defaults
Identify Line Ringing {CTP} Option
If Different than Default
Line Access Mode {#313} 2
Voice Interrupt
On Busy {#312}
Automatic VMS
Cover {#310}
Distinctive Ring {#308}
Forced Account
Code Entry {#307}
Abbreviated Ringing {#305}
Automatic Extension
Privacy {#304}
Display Language {#303}1
Ext. Jack No.
Identify Extension Settings
if Different than Default
Write S for Spanish or F for French.
In Hybrid mode only, write K for Key extension. Extension 10 always operates as a Key extension.
Specify number of rings (1-9) desired before an incoming call is sent to the covering extension.
The default setting is 2 rings. For PARTNER ACS Release 3.0 or later, this can be specified on an
individual extension basis.
Specify number of rings (1-9) desired before an incoming call is sent to a user’s voice mailbox. The
default setting is 3 rings. For PARTNER ACS Release 3.0 or later, this can be specified on an individual
extension basis.
In Key mode, use Line Assignment {#301} to remove lines from or assign lines to extensions. In Hybrid
mode, use Pool Extension Assignment {#314} to remove pools from or assign pools to extensions.
Write IN for Inside Only or LOC for Local Only to indicate restrictions for all outgoing calls on all lines.
Assignments
Write list number (1–4). Also see Form D, Disallowed Phone Number Lists {#404}.
✔ = Default
Write list number (1–4). Also see Form D, Allowed Phone Number Lists {#407}.
A
= Assigned or Active
Write group number (1–4).
E
= English
Write group number (1–4). If a loudspeaker is connected and Simultaneous Paging desired, NA = Not Assigned or
put appropriate extensions in Calling Group 1. Also see Form C, Simultaneous Paging.
Not Active
11. Write group number (1–6).
NR = No Restriction
12. Check off the same PARTNER MAIL or PARTNER MAIL VS extensions indicated on Form B1.
P
= Pooled
For the PARTNER Voice Messaging PC Card, extensions 78 and 79 must be assigned to
{CTP} = Centralized Telephone
Hunt Group 7.
Programming
* Pooling available only for ACS R2.0 or later.
7.
8.
9.
10.
Form C3: PARTNER-18/18D Phone
Check Desired Button Features (write in extension or group number)
✓
(Out, In, or No) from Form B2
Available with ACS R2.0 or later only.
}
Night
✓
✓
Privacy (F 07)
Priv
RAC
Record-a-Call (F 24) 7
VMS Cover (F 15)
VMSCover
Voice Interrupt on Busy Talk-Back (F 18)
VIOB
Account Code Entry (F 12) 2
ACE
Background Music (F 19) 2
Music
Cover-XX XX
Call Coverage (F 20 XX XX) 2, 4, 6
Call Forwarding/Call Follow-Me (F 11 XX XX) 2, 4 CF-XX XX
Call Park (I XX) 3
Park
Call Pickup (I 6 XX)
Pickup-XX
Conference Drop (F 06)
Drop
Contact Closure 1 (F 41) 2
CC1
Contact Closure 2 (F 42) 2
CC2
DLPA
Direct Line Pickup-Active Line (I 68)
Direct Line Pickup-Idle Line (I 8)
DLPI
Exclusive Hold (F 02)
ExHold
Fax Management (I XX) 2
FAX-XX
Group Calling-Ring/Page (I 7 G or I *7 G)
GCall-g
Group Hunt-Ring/Signal (I 77 G or I *77 G)
Hunt-g
P/U Grp-g
Group Pickup (I 66 G)
Intercom Autodial (I XX or I *XX) 2
Ext-XX
LNR
Last Number Redial (F 05)
Loudspeaker Paging (I 70)
Loudspk
MS-XX
Manual Signaling (F 13 XX or F 13 *XX) 2
MsgOff-XX
Message Light Off (F 10 XX) 5
Message Light On (F 09 XX) 5
MsgOn-XX
Recall (F 03)
Recall
SNR
Save Number Redial (F 04)
Simultaneous Paging (I * 70)
SPage
Station Lock (F 21) 2
Lock
Touch-Tone Enable (F 08)
TT-EN
Voice Mail Messages (I 777)
VMMsgs-777
Voice Mailbox Transfer (F 14)
VMBox
PARTNER-18D only
VMS
SVC
DND
IMM
05
IMM
06
IMM
01
IMM
02
Intercom
✓
Call Screening (F 25) 7
Caller ID Call Log (F 23) 6
Caller ID Inspect (F 17)
Caller ID Name Display (F 16)
Do Not Disturb (F 01)
Auto Dial
VM Box
IMM
03
IMM
04
Intercom
Ext.
* In Hybrid mode only, if pool 880 is assigned, these two buttons are associated with this pool.
(ACS R2.0 or later only)
Specify Automatic Line Selection: ________________________________________________________________
Identify extensions programmed as shown: 10
___________________________________________________
SCREEN
Calls
ID-Inspect
ID-Name
DND
Required
04
DEL
IN
• If desired, write in line number, pool access code , dial code feature, or auto dial number
• If desired, write in Line Ringing (Imm, Del, or No) from Form B2
• If desired, write in Line Access Restriction or Pool Access Restriction†
†
ASA
DXD
NightSvc
OCR
Wake
LED
SAMPLE
Template Instructions
Automatic System Answer {#111} 6
Direct Extension Dial {#113} 6
Night Service {#503}
Outgoing Call Restriction {#114} 1
Wake Up Service {#115}
Ext. 10 Only
Make as many copies as you need. Use template and/or checklist.
For additional instructions, see pages 9 through 14.
†
PAGE
3 of 8
1. Requires Auto Dial button
for each extension.
2. Button with lights is
recommended, but not
required.
3. Extension number can be
programmed as Auto Dial
button.
4. You can program the
origination extension only
or both the origination and
destination extension.
5. You can program the
extension number.
6. Available with ACS R2.0
or later only.
7. Available with ACS R3.0
or later.
F = Feature button
G = Group
I = Left Intercom
button
XX = Extension
Form C3: PARTNER-18/18D Phone
Check Desired Button Features (write in extension or group number)
SAMPLE
Template Instructions
(Out, In, or No) from Form B2
Available with ACS R2.0 or later only.
}
✓
✓
PARTNER-18D only
VMS
DND
Auto Dial
IMM
05
IMM
06
IMM
01
IMM
02
Intercom
VM Box
IMM
03
IMM
04
Intercom
Ext.
* In Hybrid mode only, if pool 880 is assigned, these two buttons are associated with this pool.
(ACS R2.0 or later only)
Specify Automatic Line Selection: ________________________________________________________________
Identify extensions programmed as shown: 11
___________________________________________________
✓
✓
Call Screening (F 25) 7
Caller ID Call Log (F 23) 6
Caller ID Inspect (F 17)
Caller ID Name Display (F 16)
Do Not Disturb (F 01)
SCREEN
Calls
ID-Inspect
ID-Name
DND
Privacy (F 07)
Priv
RAC
Record-a-Call (F 24) 7
VMS Cover (F 15)
VMSCover
Voice Interrupt on Busy Talk-Back (F 18)
VIOB
Account Code Entry (F 12) 2
ACE
Background Music (F 19) 2
Music
Cover-XX XX
Call Coverage (F 20 XX XX) 2, 4, 6
Call Forwarding/Call Follow-Me (F 11 XX XX) 2, 4 CF-XX XX
Call Park (I XX) 3
Park
Call Pickup (I 6 XX)
Pickup-XX
Conference Drop (F 06)
Drop
Contact Closure 1 (F 41) 2
CC1
Contact Closure 2 (F 42) 2
CC2
DLPA
Direct Line Pickup-Active Line (I 68)
Direct Line Pickup-Idle Line (I 8)
DLPI
Exclusive Hold (F 02)
ExHold
Fax Management (I XX) 2
FAX-XX
Group Calling-Ring/Page (I 7 G or I *7 G)
GCall-g
Group Hunt-Ring/Signal (I 77 G or I *77 G)
Hunt-g
P/U Grp-g
Group Pickup (I 66 G)
Intercom Autodial (I XX or I *XX) 2
Ext-XX
LNR
Last Number Redial (F 05)
Loudspeaker Paging (I 70)
Loudspk
MS-XX
Manual Signaling (F 13 XX or F 13 *XX) 2
MsgOff-XX
Message Light Off (F 10 XX) 5
Message Light On (F 09 XX) 5
MsgOn-XX
Recall (F 03)
Recall
SNR
Save Number Redial (F 04)
Simultaneous Paging (I * 70)
SPage
Station Lock (F 21) 2
Lock
Touch-Tone Enable (F 08)
TT-EN
Voice Mail Messages (I 777)
VMMsgs-777
Voice Mailbox Transfer (F 14)
VMBox
Required
04
DEL
IN
• If desired, write in line number, pool access code , dial code feature, or auto dial number
• If desired, write in Line Ringing (Imm, Del, or No) from Form B2
• If desired, write in Line Access Restriction or Pool Access Restriction†
†
ASA
DXD
NightSvc
OCR
Wake
LED
Automatic System Answer {#111} 6
Direct Extension Dial {#113} 6
Night Service {#503}
Outgoing Call Restriction {#114} 1
Wake Up Service {#115}
Ext. 10 Only
Make as many copies as you need. Use template and/or checklist.
For additional instructions, see pages 9 through 14.
†
PAGE
3 of 8
1. Requires Auto Dial button
for each extension.
2. Button with lights is
recommended, but not
required.
3. Extension number can be
programmed as Auto Dial
button.
4. You can program the
origination extension only
or both the origination and
destination extension.
5. You can program the
extension number.
6. Available with ACS R2.0
or later only.
7. Available with ACS R3.0
or later.
F = Feature button
G = Group
I = Left Intercom
button
XX = Extension
Form C3: PARTNER-18/18D Phone
Check Desired Button Features (write in extension or group number)
SAMPLE
Template Instructions
(Out, In, or No) from Form B2
Available with ACS R2.0 or later only.
}
✓
✓
Call Screening (F 25) 7
Caller ID Call Log (F 23) 6
Caller ID Inspect (F 17)
Caller ID Name Display (F 16)
Do Not Disturb (F 01)
✓
✓
Privacy (F 07)
Priv
RAC
Record-a-Call (F 24) 7
VMS Cover (F 15)
VMSCover
Voice Interrupt on Busy Talk-Back (F 18)
VIOB
Account Code Entry (F 12) 2
ACE
Background Music (F 19) 2
Music
Cover-XX XX
Call Coverage (F 20 XX XX) 2, 4, 6
Call Forwarding/Call Follow-Me (F 11 XX XX) 2, 4 CF-XX XX
Call Park (I XX) 3
Park
Call Pickup (I 6 XX)
Pickup-XX
Conference Drop (F 06)
Drop
Contact Closure 1 (F 41) 2
CC1
Contact Closure 2 (F 42) 2
CC2
DLPA
Direct Line Pickup-Active Line (I 68)
Direct Line Pickup-Idle Line (I 8)
DLPI
Exclusive Hold (F 02)
ExHold
Fax Management (I XX) 2
FAX-XX
Group Calling-Ring/Page (I 7 G or I *7 G)
GCall-g
Group Hunt-Ring/Signal (I 77 G or I *77 G)
Hunt-g
P/U Grp-g
Group Pickup (I 66 G)
Intercom Autodial (I XX or I *XX) 2
Ext-XX
LNR
Last Number Redial (F 05)
Loudspeaker Paging (I 70)
Loudspk
MS-XX
Manual Signaling (F 13 XX or F 13 *XX) 2
MsgOff-XX
Message Light Off (F 10 XX) 5
Message Light On (F 09 XX) 5
MsgOn-XX
Recall (F 03)
Recall
SNR
Save Number Redial (F 04)
Simultaneous Paging (I * 70)
SPage
Station Lock (F 21) 2
Lock
Touch-Tone Enable (F 08)
TT-EN
Voice Mail Messages (I 777)
VMMsgs-777
Voice Mailbox Transfer (F 14)
VMBox
PARTNER-18D only
VMS
DND
Auto Dial
IMM
05
IMM
06
IMM
01
IMM
02
Intercom
VM Box
IMM
03
IMM
04
Intercom
Ext.
* In Hybrid mode only, if pool 880 is assigned, these two buttons are associated with this pool.
(ACS R2.0 or later only)
Specify Automatic Line Selection: ________________________________________________________________
Identify extensions programmed as shown: 12
___________________________________________________
SCREEN
Calls
ID-Inspect
ID-Name
DND
Required
04
DEL
IN
• If desired, write in line number, pool access code , dial code feature, or auto dial number
• If desired, write in Line Ringing (Imm, Del, or No) from Form B2
• If desired, write in Line Access Restriction or Pool Access Restriction†
†
ASA
DXD
NightSvc
OCR
Wake
LED
Automatic System Answer {#111} 6
Direct Extension Dial {#113} 6
Night Service {#503}
Outgoing Call Restriction {#114} 1
Wake Up Service {#115}
Ext. 10 Only
Make as many copies as you need. Use template and/or checklist.
For additional instructions, see pages 9 through 14.
†
PAGE
3 of 8
1. Requires Auto Dial button
for each extension.
2. Button with lights is
recommended, but not
required.
3. Extension number can be
programmed as Auto Dial
button.
4. You can program the
origination extension only
or both the origination and
destination extension.
5. You can program the
extension number.
6. Available with ACS R2.0
or later only.
7. Available with ACS R3.0
or later.
F = Feature button
G = Group
I = Left Intercom
button
XX = Extension
Form C3: PARTNER-18/18D Phone
Check Desired Button Features (write in extension or group number)
SAMPLE
Template Instructions
(Out, In, or No) from Form B2
Available with ACS R2.0 or later only.
}
✓
Call Screening (F 25) 7
Caller ID Call Log (F 23) 6
Caller ID Inspect (F 17)
Caller ID Name Display (F 16)
Do Not Disturb (F 01)
✓
✓
Privacy (F 07)
Priv
RAC
Record-a-Call (F 24) 7
VMS Cover (F 15)
VMSCover
Voice Interrupt on Busy Talk-Back (F 18)
VIOB
Account Code Entry (F 12) 2
ACE
Background Music (F 19) 2
Music
Cover-XX XX
Call Coverage (F 20 XX XX) 2, 4, 6
Call Forwarding/Call Follow-Me (F 11 XX XX) 2, 4 CF-XX XX
Call Park (I XX) 3
Park
Call Pickup (I 6 XX)
Pickup-XX
Conference Drop (F 06)
Drop
Contact Closure 1 (F 41) 2
CC1
Contact Closure 2 (F 42) 2
CC2
DLPA
Direct Line Pickup-Active Line (I 68)
Direct Line Pickup-Idle Line (I 8)
DLPI
Exclusive Hold (F 02)
ExHold
Fax Management (I XX) 2
FAX-XX
Group Calling-Ring/Page (I 7 G or I *7 G)
GCall-g
Group Hunt-Ring/Signal (I 77 G or I *77 G)
Hunt-g
P/U Grp-g
Group Pickup (I 66 G)
Intercom Autodial (I XX or I *XX) 2
Ext-XX
LNR
Last Number Redial (F 05)
Loudspeaker Paging (I 70)
Loudspk
MS-XX
Manual Signaling (F 13 XX or F 13 *XX) 2
MsgOff-XX
Message Light Off (F 10 XX) 5
Message Light On (F 09 XX) 5
MsgOn-XX
Recall (F 03)
Recall
SNR
Save Number Redial (F 04)
Simultaneous Paging (I * 70)
SPage
Station Lock (F 21) 2
Lock
Touch-Tone Enable (F 08)
TT-EN
Voice Mail Messages (I 777)
VMMsgs-777
Voice Mailbox Transfer (F 14)
VMBox
PARTNER-18D only
VMS
DND
Auto Dial
IMM
05
IMM
06
IMM
01
IMM
02
Intercom
VM Box
IMM
03
IMM
04
Intercom
Ext.
* In Hybrid mode only, if pool 880 is assigned, these two buttons are associated with this pool.
(ACS R2.0 or later only)
Specify Automatic Line Selection: ________________________________________________________________
14, 15
Identify extensions programmed as shown: 13,
___________________________________________________
SCREEN
Calls
ID-Inspect
ID-Name
DND
Required
04
DEL
IN
• If desired, write in line number, pool access code , dial code feature, or auto dial number
• If desired, write in Line Ringing (Imm, Del, or No) from Form B2
• If desired, write in Line Access Restriction or Pool Access Restriction†
†
ASA
DXD
NightSvc
OCR
Wake
LED
Automatic System Answer {#111} 6
Direct Extension Dial {#113} 6
Night Service {#503}
Outgoing Call Restriction {#114} 1
Wake Up Service {#115}
Ext. 10 Only
Make as many copies as you need. Use template and/or checklist.
For additional instructions, see pages 9 through 14.
†
PAGE
3 of 8
1. Requires Auto Dial button
for each extension.
2. Button with lights is
recommended, but not
required.
3. Extension number can be
programmed as Auto Dial
button.
4. You can program the
origination extension only
or both the origination and
destination extension.
5. You can program the
extension number.
6. Available with ACS R2.0
or later only.
7. Available with ACS R3.0
or later.
F = Feature button
G = Group
I = Left Intercom
button
XX = Extension
PAGE
Form C7: MLS-12/12D Phone
7 of 8
Check Desired Button Features (write in extension or group number)
†
(Out, In, or No) from Form B2
Available with ACS R2.0 or later only.
04
DEL
IN
Call Screening (F 25) 7
Caller ID Call Log (F 23) 6
Caller ID Inspect (F 17)
Caller ID Name Display (F 16)
Do Not Disturb (F 01)
VM Box
IMM
05
IMM
01
Intercom
IMM
06
IMM
02
Intercom
IMM
03
IMM
04
Ext.
* In Hybrid mode only, if pool 880 is assigned, these two buttons are associated with this pool.
(ACS R2.0 or later only)
Specify Automatic Line Selection: ________________________________________________________________
17
Identify extensions programmed as shown: 16,
___________________________________________________
✓
SCREEN
Calls
ID-Inspect
ID-Name
DND
Privacy (F 07)
Priv
RAC
Record-a-Call (F 24) 7
VMS Cover (F 15)
VMSCover
Voice Interrupt on Busy Talk-Back (F 18)
VIOB
Account Code Entry (F 12) 2
ACE
Background Music (F 19) 2
Music
Cover-XX XX
Call Coverage (F 20 XX XX) 2, 4, 6
Call Forwarding/Call Follow-Me (F 11 XX XX) 2, 4 CF-XX XX
Call Park (I XX) 3
Park
Call Pickup (I 6 XX)
Pickup-XX
Conference Drop (F 06)
Drop
Contact Closure 1 (F 41) 2
CC1
Contact Closure 2 (F 42) 2
CC2
DLPA
Direct Line Pickup-Active Line (I 68)
Direct Line Pickup-Idle Line (I 8)
DLPI
Exclusive Hold (F 02)
ExHold
Fax Management (I XX) 2
FAX-XX
Group Calling-Ring/Page (I 7 G or I *7 G)
GCall-g
Group Hunt-Ring/Signal (I 77 G or I *77 G)
Hunt-g
P/U Grp-g
Group Pickup (I 66 G)
Intercom Autodial (I XX or I *XX) 2
Ext-XX
LNR
Last Number Redial (F 05)
Loudspeaker Paging (I 70)
Loudspk
MS-XX
Manual Signaling (F 13 XX or F 13 *XX) 2
MsgOff-XX
Message Light Off (F 10 XX) 5
Message Light On (F 09 XX) 5
MsgOn-XX
Recall (F 03)
Recall
SNR
Save Number Redial (F 04)
Simultaneous Paging (I * 70)
SPage
Station Lock (F 21) 2
Lock
Touch-Tone Enable (F 08)
TT-EN
Voice Mail Messages (I 777)
VMMsgs-777
Voice Mailbox Transfer (F 14)
VMBox
Required
• If desired, write in line number, pool access code , dial code feature, or auto dial number
• If desired, write in Line Ringing (Imm, Del, or No) from Form B2
• If desired, write in Line Access Restriction or Pool Access Restriction†
†
LED
SAMPLE
Template Instructions
ASA
DXD
NightSvc
OCR
Wake
Ext. 10 Only
Automatic System Answer {#111} 6
Direct Extension Dial {#113} 6
Night Service {#503}
Outgoing Call Restriction {#114} 1
Wake Up Service {#115}
Make as many copies as you need. Use template and/or checklist.
For additional instructions, see pages 9 through 14.
1. Requires Auto Dial button
for each extension.
2. Button with lights is
recommended, but not
required.
3. Extension number can be
programmed as Auto Dial
button.
4. You can program the
origination extension only
or both the origination and
destination extension.
5. You can program the
extension number.
6. Available with ACS R2.0
or later only.
7. Available with ACS R3.0
or later.
F = Feature button
G = Group
I = Left Intercom
button
XX = Extension
Form 1: Language
Language Mode:
✓ Monolingual ✓
Bilingual
Monolingual Mode–System Language:
✓ U.S. English ✓
Latin American Spanish
Canadian French
Bilingual Mode–Primary Language:
U.S. English ✓
Latin American Spanish
Canadian French
Bilingual Mode–Secondary Language:
U.S. English
Latin American Spanish ✓
Canadian French
General Information
■
■
Completing this Form
Factory defaults are identified by the ✓ symbol.
Language Mode Check “Bilingual” if the Language Mode
should be set to Bilingual. If you check Bilingual, also see
below; if not, see .
If the system is set for Bilingual Mode, make sure you record the
Automated Attendant Day Menu Prompts and Night Menu Prompts
and Announcements (if any) in both the Primary and Secondary
Languages. Also, subscribers can record two personal
greetings—one in the Primary Language and another in the
Secondary Language.
■
Subscribers can have a Mailbox Language different from the
languages selected here. Mailbox Language is specified on Form
2.
■
You can specify a language for programming prompts that is
different from the system language specified in or above. If
you change the System Administration Language (that is, the
language in which programming prompts are played), specify the
language here
.
Monolingual Mode—System Language Check the Primary
language desired if different from the default.
Bilingual Mode—Primary Language Check the Primary
Language desired if different from the default.
Bilingual Mode—Secondary Language Check the Secondary
Language desired if different from the default.
Programming Language
■
To program the Language Mode, as well as the System Language
in Monolingual Mode or the Primary and Secondary Languages in
Bilingual Mode, dial 1 from the Programming Main Menu.
■
To program the System Administration Language, call the Voice
Mail Service and enter the login and password. Then dial 0.
Automated Attendant: ✓1 ✓ 2
Form 2: Mailbox Assignments
3
4
(Copy this form for each Automated Attendant. Save the original blank form for future use.
(Check a number to indicate for which Automated Attendant this form is used.)
10 ✓
Clerk
(11
✓)
Sally
Yes
(12
✓)
Stan
Yes
(13
✓)
(14
(34
✓)
(35
✓)
(36
✓)
Pat
(37
✓)
✓)
Ivan
(38
✓)
(15
✓)
Carol
(39
✓)
(16
✓)
(40
✓)
(17
✓)
(41
✓)
(18
✓)
(42
✓)
(19
✓)
(43
✓)
(20
✓)
(44
✓)
(21
✓)
(45
✓)
(22
✓)
(46
✓)
(23
✓)
(47
✓)
(24
✓)
(48
✓)
(25
✓)
(49
✓)
(26
✓)
(50
✓)
(27
✓)
(51
✓)
(28
✓)
(52
✓)
(29
✓)
(53
✓)
(30
✓)
(54
✓)
(31
✓)
(56
✓)
(32
✓)
(57
✓)
(33
✓)
Mailbox
Subscriber Name
Mailbox Language
Outcalling Assigned
RAC Assigned
Message Length
Mailbox Size
60
60
180
Automated Attendant: ✓1
Form 3: Menu Definition
2
3
4
(Copy this form for each Automated Attendant. Save the original blank form for future use.
(Check a number to indicate for which Automated Attendant this form is used.)
01, 02
Lines assigned: ____________________________________________________________________________________________
Required for Automated Attendant Service
Description
Selector
Code
Selector
Code Action*
1
(5 ✓)
2
(5 ✓)
3
(5 ✓)
Shop
4
(5 ✓)
1
771
Announcement
5
(5 ✓)
3
Ann. #1
Announcement
6
3
Ann #2
Direct Extension Transfer
Number/Range
of Numbers
(5 ✓)
7
8
Transfer to Sallys Mailbox
* Selector Code Action Key
1 Selector Code Transfer
(6 ✓)
9
Mailbox 11 (Mailbox 10 ✓)
Dial 0/Timeout Extension: 11
Specify the extension to which calls are transferred if the caller dials
“0” or does not enter a Selector Code.
3 Announcement
5 Direct Extension Transfer
6 Mailbox Transfer
7 Centrex Transfer
General Information
■
■
Factory defaults are identified by the ✓ symbol.
■
This Menu Definition applies to both the Day and Night Menu
prompts.
If you use the Centrex Transfer option, all lines assigned to this
Automated Attendant must be Centrex lines.
■
If you use the Mailbox Transfer option, Selector Codes 1–9
represent a mailbox number that you specify to which the call is
transferred.
■
The Selector Code 9 factory setting lets callers transfer directly to
mailbox 10 (receptionist’s mailbox) where they can leave a message.
■
The Description and Selector Code number from this form will be
used to complete the Day and Night Menu Prompts (Forms 4, 4A,
5, and 5A).
■
Announcement entries in Description, Selector Code, and
Number/Range of Numbers of this form will be used to complete
Forms 3A and 3B.
■
The Lines Assigned: area is reserved for you to specify the lines
assigned to this Automated Attendant.
■
The Selector Code is the first digit dialed by the caller in
response to menu prompts.
■
In Direct Extension Transfer, Selector Codes 1-5 and 7
represent the first digit for a range of extensions (see table).
These Selector Codes let callers dial extension numbers directly.
■
In Selector Code Transfer, Selector Codes 1-9 represent a
specific extension, Group Calling number (if available), Hunt
Group number, Centrex number, or guest mailbox number that
you specify, to which the caller is transferred. (See the range of
extensions table.)
Selector Code Transfer lets callers dial a single digit to reach a
single extension or group, such as the VP of Sales at extension 37
or the order processing operators assigned to Hunt Group 774.
PARTNER System
Advanced, R1.0, 1.1
Advanced, R3.0 or later
Endeavor, R1.0 or later
II/Plus
| Range of Extensions
| 10-41, 71-74, or 771-776
| 10-49, 71-74, or 771-776
| 10-49, 71-74, or 771-776
| 10-57, 71-74, or 771-776
Automated Attendant: ✓1
2
3
4
Form 3A: Automated Attendant Announcement—
Form 3A: System Language or Primary Language
(Copy this form for each Automated Attendant. Save the original blank form for future use.
(Check a number to indicate for which Automated Attendant this form is used.)
Required if Selector Code Transfer is set to Announcement
Announcement # ______
:
1
Tennis Land is located at 4 Clay Court, just 5 blocks east of Anytown Shopping Plaza on
Route 66. Our courts are available daily from 6 a.m. to 8 p.m., and our pro shop is open
Monday through Saturday, 10 a.m. to 6 p.m. To return to the Main Menu, press *7.
2
Announcement # ______
:
Welcome to Tennis Lands Calendar of Events. This month we will be hosting the 6th Annual
Anytown Father/Daughter Tennis Tournament on the 12th. Stan will once again be offering his
Killer Serve Clinic on the 19th. And our own Tennis Land team will be travelling to Mayberry
for an exhibition match on the 26th. Be sure to sign up at the Main Desk for these exciting
events. For more information, press 0 now.
General Information
■
An Announcement can be up to four minutes long.
■
In the Announcement, you can offer callers the option of pressing
*4 (to repeat this Announcement), *7 (to return to the Main Menu),
*8 (to transfer to an extension), or 0 (to transfer to the
programmed Dial 0/Timeout Extension). After playing the
Announcement, the system waits five seconds to allow the caller
to press one of these digit. If the caller does not press a digit, the
system hangs up.
■
If the system is set for Bilingual Mode, let callers know they can
switch the language they hear while listening to the
Announcement. For example, “Para español, marque *1.”
■
Announcements can supply frequently requested information so
that your staff is free to assist customers or to perform other
tasks more efficiently.
Completing this Form
Write the Announcement and its number in the space provided.
Recording the Announcement(s)
■
To record the Announcement, dial 3 from the Programming Main
Menu.
Automated Attendant: ✓1
2
3
4
Form 4: Day Menu Prompt—
Form 4: System Language or Primary Language
(Copy this form for each Automated Attendant. Save the original blank form for future use.
(Check a number to indicate for which Automated Attendant this form is used.)
Required if VMS Hunt Schedule is set to Day Only or Always
Thank you for calling Tennis Land.
If you know the extension of the person you want to reach, dial it now.
To speak to someone in the pro shop, press 4.
To get information about our location and hours, press 5.
To get information about tournaments and special events, press 6.
If you would like to hear this message again, press *4.
If you require assistance please stay on the line.
General Information
■
The Day Menu Prompt plays to callers when the VMS Hunt
Schedule is set to Always or Day Only and Night Service is off.
The Day Menu Prompt and the Night Menu Prompt use the same
Menu Definition.
■
The Day Menu Prompt should contain a welcome and a list of
menu options.
■
The welcome should introduce the company. For example, “Thank
you for calling the Any Travel Agency.”
■
If the system is set for Bilingual Mode, let callers know they can
switch the language they hear while on the call. For example,
“Para español, marque * 1.”
Completing this Form
Write the message that you want callers to hear when they call during
normal business hours, including the instructions to the caller for
selecting menu options.
Suggested options include:
■
“Remain on the line for assistance.”
■
“Dial 0 for assistance.”
■
“To hear this menu again, dial * 4.”
Recording the Day Menu Prompt
■
■
The menu options should contain instructions that correspond to
the Menu Definition set up on Form 3.
– If callers can dial extension numbers (Direct Extension
Transfer), the prompt should instruct callers to dial the
extension number. For example, “If you know the extension of
the person you want to reach, dial it now.”
– If callers can dial a single digit to transfer to an extension or
group (Selector Code Transfer), to a mailbox (Mailbox
Transfer), or to a Centrex number (Centrex) Transfer), the
prompt should provide instructions such as “To speak to
someone in sales, press 6.”
– If callers can can choose an Announcement, include that
information. For example, “For directions to our office, press 4.”
To record the Day Menu Prompt, dial 3 from the Programming
Main Menu.
Automated Attendant: ✓1
2
3
4
Form 5: Night Menu Prompt—
Form 5: System Language or Primary Language
(Copy this form for each Automated Attendant. Save the original blank form for future use.
(Check a number to indicate for which Automated Attendant this form is used.)
Required if VMS Hunt Schedule is set to Night Only or Always
Thank you for calling Tennis Land. We are currently closed.
To get information about our location and hours, press 5.
To get information about tournaments and special events, press 6.
To leave a message for one of our staff, please dial that extension now. Otherwise, press 9,
or stay on the line to leave a message at the Main Desk, and we will return your call when
we re-open.
General Information
■
The Night Menu Prompt plays to callers when the VMS Hunt
Schedule is set to Always or Night Only and Night Service is on.
The Night Menu Prompt and the Day Menu Prompt use the same
Menu Definition.
■
The Night Menu Prompt should contain a welcome and a list of
menu options.
■
The welcome should introduce the company. For example,
“You have reached the Any Travel Agency. Our hours are 9 AM to
5 PM, Monday through Friday.”
■
If the system is set for Bilingual Mode, let callers know they can
switch the language they hear while on the call. For example,
“Para español, marque * 1.”
■
The menu options should contain instructions that correspond to
the Menu Definition set up on Form 3.
– If callers can dial extension numbers (Direct Extension
Transfer), the prompt should instruct callers to dial the
extension number. For example, “If you know the extension of
the person you want to reach, dial it now and leave a
message.”
– If callers can dial a single digit to transfer to an extension or
group (Selector Code Transfer), to a mailbox (Mailbox
Transfer), or to a Centrex number (Centrex) Transfer), the
prompt should provide instructions such as “To leave a
message for Pat, press 6.” Keep in mind that there are no
group mailboxes.
– If Selector Code 9 is left as the default, the prompt should
instruct callers to press 9 to leave a message with the
receptionist.
Completing this Form
Write the message that you want callers to hear when they call after
normal business hours, including instructions to the caller for
selecting menu options.
Suggested options include:
■
“Dial 9 or remain on the line to leave a message.”
■
“To hear this menu again, dial * 4.”
Recording the Night Menu Prompt
■
To record the Night Menu Prompt, dial 3 from the Programming
Main Menu.
✓2
Automated Attendant:
1
Form 3: Menu Definition
3
4
(Copy this form for each Automated Attendant. Save the original blank form for future use.
(Check a number to indicate for which Automated Attendant this form is used.)
04, 05, 06
Lines assigned: ____________________________________________________________________________________________
Required for Automated Attendant Service
Description
Selector
Code
Selector
Code Action*
1
(5 ✓)
2
(5 ✓)
3
(5 ✓)
4
(5 ✓)
Announcement
5
(5 ✓)
Announcement
6
Direct Extension Transfer
Number/Range
of Numbers
3
Ann. #1
3
Ann #2
(5 ✓)
7
8
Transfer to clerks mailbox
* Selector Code Action Key
1 Selector Code Transfer
(6 ✓)
9
(Mailbox 10 ✓)
Dial 0/Timeout Extension: 10
Specify the extension to which calls are transferred if the caller dials
“0” or does not enter a Selector Code.
3 Announcement
5 Direct Extension Transfer
6 Mailbox Transfer
7 Centrex Transfer
General Information
■
■
Factory defaults are identified by the ✓ symbol.
■
This Menu Definition applies to both the Day and Night Menu
prompts.
If you use the Centrex Transfer option, all lines assigned to this
Automated Attendant must be Centrex lines.
■
If you use the Mailbox Transfer option, Selector Codes 1–9
represent a mailbox number that you specify to which the call is
transferred.
■
The Selector Code 9 factory setting lets callers transfer directly to
mailbox 10 (receptionist’s mailbox) where they can leave a message.
■
The Description and Selector Code number from this form will be
used to complete the Day and Night Menu Prompts (Forms 4, 4A,
5, and 5A).
■
Announcement entries in Description, Selector Code, and
Number/Range of Numbers of this form will be used to complete
Forms 3A and 3B.
■
The Lines Assigned: area is reserved for you to specify the lines
assigned to this Automated Attendant.
■
The Selector Code is the first digit dialed by the caller in
response to menu prompts.
■
In Direct Extension Transfer, Selector Codes 1-5 and 7
represent the first digit for a range of extensions (see table).
These Selector Codes let callers dial extension numbers directly.
■
In Selector Code Transfer, Selector Codes 1-9 represent a
specific extension, Group Calling number (if available), Hunt
Group number, Centrex number, or guest mailbox number that
you specify, to which the caller is transferred. (See the range of
extensions table.)
Selector Code Transfer lets callers dial a single digit to reach a
single extension or group, such as the VP of Sales at extension 37
or the order processing operators assigned to Hunt Group 774.
PARTNER System
Advanced, R1.0, 1.1
Advanced, R3.0 or later
Endeavor, R1.0 or later
II/Plus
| Range of Extensions
| 10-41, 71-74, or 771-776
| 10-49, 71-74, or 771-776
| 10-49, 71-74, or 771-776
| 10-57, 71-74, or 771-776
Automated Attendant:
1 ✓2
3
4
Form 3A: Automated Attendant Announcement—
Form 3A: System Language or Primary Language
(Copy this form for each Automated Attendant. Save the original blank form for future use.
(Check a number to indicate for which Automated Attendant this form is used.)
Required if Selector Code Transfer is set to Announcement
Announcement # ______
:
1
Tennis Land is located at 4 Clay Court, just 5 blocks east of Anytown Shopping Plaza on
Route 66. Our pro shop is open Monday through Saturday from 10 a.m. to 6 p.m., and our
courts are available daily from 6 a.m. to 8 p.m. To return to the Main Menu, press *7.
2
Announcement # ______
:
Welcome to Tennis Lands Pro Shop. This month all tennis skirts in stock are on sale at 20% off.
Hurry in for the best selection. And ask about special rates on racket restringing. For more
information, press 0 now.
General Information
■
An Announcement can be up to four minutes long.
■
In the Announcement, you can offer callers the option of pressing
*4 (to repeat this Announcement), *7 (to return to the Main Menu),
*8 (to transfer to an extension), or 0 (to transfer to the
programmed Dial 0/Timeout Extension). After playing the
Announcement, the system waits five seconds to allow the caller
to press one of these digit. If the caller does not press a digit, the
system hangs up.
■
If the system is set for Bilingual Mode, let callers know they can
switch the language they hear while listening to the
Announcement. For example, “Para español, marque *1.”
■
Announcements can supply frequently requested information so
that your staff is free to assist customers or to perform other
tasks more efficiently.
Completing this Form
Write the Announcement and its number in the space provided.
Recording the Announcement(s)
■
To record the Announcement, dial 3 from the Programming Main
Menu.
Automated Attendant:
1 ✓2
3
4
Form 4: Day Menu Prompt—
Form 4: System Language or Primary Language
(Copy this form for each Automated Attendant. Save the original blank form for future use.
(Check a number to indicate for which Automated Attendant this form is used.)
Required if VMS Hunt Schedule is set to Day Only or Always
Thank you for calling Tennis Land.
If you know the extension of the person you want to reach, dial it now.
To get information about our location and hours, press 5.
To get information about this months special offers, press 6.
If you would like to hear this message again, press *4.
If you require assistance, please stay on the line.
General Information
■
The Day Menu Prompt plays to callers when the VMS Hunt
Schedule is set to Always or Day Only and Night Service is off.
The Day Menu Prompt and the Night Menu Prompt use the same
Menu Definition.
■
The Day Menu Prompt should contain a welcome and a list of
menu options.
■
The welcome should introduce the company. For example, “Thank
you for calling the Any Travel Agency.”
■
If the system is set for Bilingual Mode, let callers know they can
switch the language they hear while on the call. For example,
“Para español, marque * 1.”
Completing this Form
Write the message that you want callers to hear when they call during
normal business hours, including the instructions to the caller for
selecting menu options.
Suggested options include:
■
“Remain on the line for assistance.”
■
“Dial 0 for assistance.”
■
“To hear this menu again, dial * 4.”
Recording the Day Menu Prompt
■
■
The menu options should contain instructions that correspond to
the Menu Definition set up on Form 3.
– If callers can dial extension numbers (Direct Extension
Transfer), the prompt should instruct callers to dial the
extension number. For example, “If you know the extension of
the person you want to reach, dial it now.”
– If callers can dial a single digit to transfer to an extension or
group (Selector Code Transfer), to a mailbox (Mailbox
Transfer), or to a Centrex number (Centrex) Transfer), the
prompt should provide instructions such as “To speak to
someone in sales, press 6.”
– If callers can can choose an Announcement, include that
information. For example, “For directions to our office, press 4.”
To record the Day Menu Prompt, dial 3 from the Programming
Main Menu.
Automated Attendant:
1 ✓2
3
4
Form 5: Night Menu Prompt—
Form 5: System Language or Primary Language
(Copy this form for each Automated Attendant. Save the original blank form for future use.
(Check a number to indicate for which Automated Attendant this form is used.)
Required if VMS Hunt Schedule is set to Night Only or Always
Thank you for calling Tennis Lands Pro Shop. We are currently closed.
To get information about our location and hours, press 5.
To get information about this months special offers, press 6.
To leave a message for our sales staff, press 9, or stay on the line, and we will return your call
when we re-open.
General Information
■
The Night Menu Prompt plays to callers when the VMS Hunt
Schedule is set to Always or Night Only and Night Service is on.
The Night Menu Prompt and the Day Menu Prompt use the same
Menu Definition.
■
The Night Menu Prompt should contain a welcome and a list of
menu options.
■
The welcome should introduce the company. For example,
“You have reached the Any Travel Agency. Our hours are 9 AM to
5 PM, Monday through Friday.”
■
If the system is set for Bilingual Mode, let callers know they can
switch the language they hear while on the call. For example,
“Para español, marque * 1.”
■
The menu options should contain instructions that correspond to
the Menu Definition set up on Form 3.
– If callers can dial extension numbers (Direct Extension
Transfer), the prompt should instruct callers to dial the
extension number. For example, “If you know the extension of
the person you want to reach, dial it now and leave a
message.”
– If callers can dial a single digit to transfer to an extension or
group (Selector Code Transfer), to a mailbox (Mailbox
Transfer), or to a Centrex number (Centrex) Transfer), the
prompt should provide instructions such as “To leave a
message for Pat, press 6.” Keep in mind that there are no
group mailboxes.
– If Selector Code 9 is left as the default, the prompt should
instruct callers to press 9 to leave a message with the
receptionist.
Completing this Form
Write the message that you want callers to hear when they call after
normal business hours, including instructions to the caller for
selecting menu options.
Suggested options include:
■
“Dial 9 or remain on the line to leave a message.”
■
“To hear this menu again, dial * 4.”
Recording the Night Menu Prompt
■
To record the Night Menu Prompt, dial 3 from the Programming
Main Menu.
Case Study #2
Case Study #2
About the Customer
Software Mexico is a small company that develops PC-based software in Tijuana,
Mexico. The company prides itself on personalized service and customer
satisfaction. The owner, Jose Ramirez, employs a staff of nine including a
receptionist, a system administrator, five programmers, a customer service
representative, and a bookkeeper. Jose and his employees speak both English
and Spanish. Sixty percent of Software Mexico's customers speak Spanish; the
other 40 percent speak English.
Jose has a PARTNER Advanced Communications System Release 3.0. He
purchased a PARTNER MAIL VS Release 5 Voice Messaging System because
the integrated system can answer outside calls and offer callers the option of
listening to prompts and transferring to extensions in either English or Spanish.
Juan, one of the employees at Software Mexico, is responsible for managing the
systems; he established these facts:
■
■
■
■
■
■
■
The system will have four outside lines and 12 extensions.
Jose, Juan, and Vera will have PARTNER-34D phones; the other
employees will have PARTNER-18D phones. In addition, two standard
phones will be installed in the waiting room so customers can make
local calls.
Jose prefers that Vera help with various office tasks, so all lines will ring
delayed at extension 10, and the PARTNER MAIL VS system will answer
them. Vera will act as backup; she will answer calls from customers who
press 0 or stay on the line for assistance, as well as transfer returned calls.
Also, Vera will be responsible for checking the messages in the mailbox at
extension 10 and forwarding them to the appropriate people.
Calls will go to the Automated Attendant Service of the PARTNER
MAIL VS system during the day and at night.
The majority of Software Mexicos callers have questions about their
software or inquiries about bills. Therefore, callers who receive Automated
Attendant Service and want to speak to the customer service
representative or the bookkeeper can do so easily by pressing a single
digit as explained in the Automated Attendant Service prompt.
Since the majority of Software Mexicos customers speak Spanish, the
system should answer outside calls and play messages and prompts in
Spanish. Callers will have the option of listening to the prompts and
messages in English.
Each employee will have a mailbox and Automatic VMS Cover assigned to
his or her extension. This arrangement allows callers to leave personal
messages when the employee is unable to answer a call.
E-29
Case Studies
Filling Out the Planning Forms
This section explains how the System Planner for the PARTNER ACS
Release 3.0 and the forms for the PARTNER MAIL VS Release 5 Voice Messaging
System are filled out based on the facts in the Software Mexico case. For brevity,
CS refers to the System Planner forms for the communications system and
VMS refers to the forms for the voice messaging system.
CS Form A, Page 1 of 3
■
■
Write the Telephone Numbers in order customer desires: Telephone
numbers in this column represent Software Mexicos four lines.
VMS-AA: In this column, checks for Lines 01, 02, 03, and 04 indicate that
unanswered calls on those lines go to the Automated Attendant Service
(that is, Automated Attendant 1) of the PARTNER MAIL VS system.
CS Form A, Page 2 of 3
System Settings:
■
■
■
Receptionist answers calls during business hours? No on this line
indicates that Vera will backup the voice messaging system.
Ring on Transfer (#119): NA written in the space provided indicates
that music or recorded messages will be played while calls are being
transferred.
Music on Hold (#602): The blank line indicates that a Music on Hold
device is installed.
Line Coverage:
■
■
E-30
VMS Hunt Schedule (#507): The company will accept the default setting
(that is, Always) that has the Automated Attendant Service pick up
unanswered calls during business hours and after hours.
VMS Hunt Delay (#506): The company will accept the default setting that
has the Automated Attendant Service answers outside calls immediately
(that is, after two rings).
Case Study #2
CS Form B1, Page 1 of 4
■
■
Write Name/Description: In this column, the names listed for extensions
10 through 19 and 22 and 23 identify the extension assignments.
Identify Telephone Attached to this Extension: Checks in these
columns specify the type of telephone each person or location has.
CS Form B1, Page 2 of 4
■
■
VMS in the Write Name/Description column and checks in the
PARTNER MAIL VS column indicate that the PARTNER MAIL VS module
is installed in Slot 4 of the Control Unit. The module uses extensions 30
and 31, the last two extensions for that slot.
10 in the Write Transfer Return Ext. No. column indicates that when a
call transferred by the PARTNER MAIL VS system is unanswered, it goes
to extension 10 where Vera can answer it.
CS Form B2, Page 1 of 2
■
■
■
■
Automatic VMS Cover: Checks in this column indicate that unanswered
calls to extensions 10 through 19 automatically are covered by the Call
Answer Service.
Hunt Group Extensions VMS Only: In this column, check marks for
extensions 30 and 31 satisfy the requirement that the extensions used by
the PARTNER MAIL VS module be assigned to Hunt Group 7.
Automatic Extension Privacy: In this column, check marks for the
extensions used by the PARTNER MAIL VS module indicate that
Automatic Extension Privacy is assigned to these extensions. This feature
prevents subscribers from accidentally picking up calls that are being
answered by the voice mail system.
VMS Only: In this column on Page 1, the check mark indicates that
extension 30 is reserved for the voice messaging system. On Page 2, the
check mark in this column indicates that extension 31 is reserved for the
voice messaging system.
CS Form C1, PARTNER-34D Phone
■
The first Form C1 identifies the buttons programmed on the
PARTNER-34D phone at extension 10: Night Service, Do Not Disturb,
Voice Mail Messages, and Voice Mailbox Transfer.
The Night Service button allows Vera to turn Night Service on and off.
When Night Service is off, the Day Menu Prompt plays. When Night
Service is on, the Night Menu Prompt plays.
Vera can use the Do Not Disturb button to send callers to the general
mailbox without ringing the extension first.
E-31
Case Studies
The Voice Mail Auto Dial button allows Vera to call Voice Mail Service with
one touch.
The Voice Mailbox Transfer (VMBox) button allows Vera to transfer callers
directly to another subscribers mailbox without ringing the extension first.
■
The second Form C1 indicates the buttons programmed on the phones at
extensions 11 and 12: Do Not Disturb, Voice Mail Messages, and Voice
Mailbox Transfer. In addition, both forms indicate that Vera, Jose, and
Juan have delayed (DEL) ringing set for their extensions.
CS Form C3, PARTNER-18 Phone
■
Form C3 identifies the buttons programmed on the PARTNER-18 phones
at extensions 13, 14, 15, 16, 17, 18, and 19: Voice Mail Messages and
Voice Mailbox Transfer.
VMS Form 1
■
■
Language Mode: The check mark in the Bilingual box indicates that the
system allows outside callers to choose between two languages.
Primary Language: The check mark in the Latin American Spanish box
indicates that the system answers outside calls in Spanish. The check
mark in the U.S. English box for Secondary Language indicates that
the system can play messages and prompts in English when callers press
.
*1
■
English is indicated as the language chosen for the System Administration
Prompt Language.
VMS Form 2
■
■
■
■
E-32
A: Note that unused mailboxes are crossed off.
B (Subscriber Name): In this column, the names listed for mailboxes 10
through 19 indicate that all employees have mailboxes.
Eng. in column C (Mailbox Language) for extensions 12, 13, and 16
indicates the subscribers at those extensions prefer to listen to prompts
and messages in English when retrieving messages, recording personal
greetings, and accessing other Voice Mail Services. The rest of the
subscribers prefer prompts and messages in Spanish, the systems
Primary Language.
D (Outcalling Assigned): Yes in this column for Juan, the system
administrator, and the customer service representative indicates that they
have Outcalling privileges, so that they can be notified of new voice mail
while they are away from their offices.
Case Study #2
VMS Form 3
■
■
■
■
Description: In this column, Direct Extension Transfer for Selector Code
1 and 2 indicates that when callers get the Automated Attendant Service
they can transfer to any extension (10 to 29) by entering the extension
number.
Customer Service in the Description column and 18 in the
Number/Range of Numbers column for Selector Code 4 indicate that
when callers get the Automated Attendant Service, they can press 4 to
transfer to extension 18 (the Customer Service representative). The 1 in
the Selector Code Action column indicates that this action is a Selector
Code Transfer.
Customer Service in the Description column and 19 in the
Number/Range of Numbers column for Selector Code 5 indicate that
when callers get the Automated Attendant Service, they can press 5 to
transfer to extension 19 (the Bookkeeper). The 1 in the Selector Code
Action column indicates that this action is a Selector Code Transfer.
Transfer to Veras mailbox in the Description column for Selector Code 9
indicates when callers get the Automated Attendant Service, they can
press 9 to transfer to Veras mailbox (mailbox 10).
VMS Form 4
■
When Night Service is off and a call goes to the Automated Attendant
Service, the caller hears the prompt on Form 4 in Spanish (the Primary
Language).
VMS Form 4A
■
When Night Service is off and a call goes to the Automated Attendant
Service, the caller hears the prompt on Form 4A in English (the Secondary
.
Language) when he or she presses
*1
VMS Form 5
■
When Night Service is on and a call goes to the Automated Attendant
Service, the caller hears the prompt on Form 5 in Spanish (the Primary
Language).
VMS Form 5A
■
When Night Service is on and a call goes to the Automated Attendant
Service, the caller hears the prompt on Form 5A in English (the Secondary
.
Language) when he or she presses
*1
E-33
Case Studies
Post-Installation Recommendations
■
Since callers can leave a message in the mailbox at extension 10, Vera
should record a general business greeting for this extension in both
Spanish and English. The greetings should instruct callers to press
to switch to the other language.
*1
■
E-34
*1
All employees should record a personal greeting in both Spanish and
to switch to
English. The greetings should instruct callers to press
the other language. In addition, employees change the factory-set
password for their mailboxes.
Form A: System Configuration
PAGE
1 of 3
Required for PARTNER Advanced Communications System.
For additional instructions, see pages 2 and 3.
1. Customer Billing Name
Software México
2. Installation Address
1111 Tijuana Plaza, Juarez
3. Contact Name
Vera Gonzalez
4. Person to be Trained
5. Sold by
Phone
(XXX) XXX – XXX
Vera Gonzalez
✓ Lucent Technologies Sales Force
■
■
6. Administer system for Hybrid Mode (PARTNER ACS Release
2.0 or later only):
✓ Yes ■ If yes, call local telephone company—
No ■
MF Mode and FCC # AS5 USA-21312-MF-E
Alternate Trainee’s Name
Salesperson’s Name
Colleen Rivera
Dealer:
Phone
(XXX)
XXX – 1234
XXX
52 555
Phone
(XXX) XXX – XXX
Phone
(XXX)
XXX – 6812
XXX
52 555
7. Features customer is most interested in (most important first):
PARTNER MAIL VS
8 . System Lines
Line Write the Telephone
Jack Numbers in order
No. customer desires
(list personal and
dedicated lines last)
01
02
03
04
05
06
07
08
09
10
11
12
13
14
15
16
17
18
19
555-1234
555-1235
555-1236
555-1237
Write
R if
Rotary
(Dial
Pulse)
Line
{#201}
Hybrid Mode
Only:
Write auxiliary *
pool 881, 882,
883 or No Pool
{#207}
Line Coverage—You can select one per line
2
3
4
5
6
AA
DXD * VMS- * ASA * Hunt
VMSGroup
AA
Mail
{#607} {#205} {#206} {#204} (write no.) {#206}
{#206}
Only one of these
types per system
1
7
Write
Ext. No.
for Call
Cover
{#208}
Write User’s Name for
Personal or Owned Line
or Identify Equipment for
Dedicated Line
Check
if
Caller
ID
Service
Identify other Local
Telephone Company
Subscription Services
(e.g., Repeat Call)
✓
✓
✓
✓
1. Check if desired. Also see Form B1, AA Extension {#607} column.
2. Check if desired. Also see Form A, Item 10—DXD, and Form C, Direct Extension Dial Button {#113}.
3. Check if desired. Also see Form A, Item 10—VMS-AA, and Form B1, PARTNER MAIL, PARTNER MAIL VS, or
PARTNER Voice Messaging column. For PARTNER MAIL VS 5.0 or PARTNER MAIL 3.0, specify which of the
multiple Automated Attendants should be used. For previous releases, which support only one Automated
Attendant, just check the box.
4. Check if desired. Also see Form A, Item 10—ASA, and Form C, Automatic System Answer Button {#111}.
5. Write group number (1–6) covering this line. Also see Form B2, Hunt Group Extensions {#505} 1–6.
6. Check desired line for #206. Also see Form B1, PARTNER MAIL, PARTNER MAIL VS, or PARTNER Voice
Messaging PC CARD column.
7. Write extension number of line owner eligible for Line Coverage (could include VMS coverage). Also write line
owner’s name in next column.
* Available with PARTNER ACS R2.0 or later only.
Form A: System Configuration
PAGE
2 of 3
Required for PARTNER Advanced Communications System. For
additional instructions, see pages 3 and 4.
9. System Settings: Write response on line for each item.
No
• Receptionist answers calls during business hours? Write “Yes” or “No” ______.
• Number of Lines {#104}—By default, 3 lines per PARTNER ACS processor module or
308EC module, 2 lines per 206 module, and 4 lines per 400 module are assigned to each
extension (or to pool 880 in Hybrid mode). Write number if different from default ______.
• Transfer Return Rings {#105}—By default, a transferred call rings 4 times before going to
the transfer return extension. Write number (0-9, 0 = no return) if different from
default ______.
• Outside Conference Denial {#109}—By default, a conference call can include 2 outside
parties. Write “No” if 2 outside parties are not allowed ______.
• Ring on Transfer {#119}—By default, the caller hears ringing when the call is transferred.
N/A
Write “NA” if music on hold or silence is desired ______.
• Toll Call Prefix {#402}—By default, 0 or 1 must be dialed before the area code for a long
distance call. Write “No” if 0 or 1 is not required ______.
• System Password {#403}—By default, no password is programmed to override dialing
restrictions and to turn Night Service on and off. Write 4 digits if password is
desired __ __ __ __.
• Star Code Dial {#410}—By default, the system inserts a 0-second delay after a valid
Central Office star code when it autodials. Write number (1–5) of seconds if a longer delay
is desired or “NO” if this feature should not be active ______.
• Music on Hold {#602}—By default, the Music on Hold jack on the processor module
isactive. Write “No” if the jack is deactivated ______.
• Automatic Daylight/Standard Time {#126} (Release 3.0 or later)—By default, the system
automatically calculates Daylight Savings Time. Write “No” to turn off this feature ______.
10. Line Coverage: Complete items based on Line Coverage selection on Form A, Item 8.
DXD: (PARTNER ACS Release 2.0 or later only) If DXD is checked, specify the following:
Direct Extension Dial Delay {#112}—By default, a call rings 2 times before it is
answered by the system. Write number (0-9) if different from default _____.
Direct Extension Dial Record/Playback {I 892}—message of up to 20 seconds that
caller hears when call is answered with the Direct Extension Dial feature.
Write message below and record from extension 10 or 11:
VMS-AA: (PARTNER ACS Release 3.0 or later only)
If VMS-AA is checked, you can specify a different Hunt Schedule and Hunt Delay for
each line.
VMS-AA Hunt Schedule {#507} — The Hunt Schedule specifies when your VMS
answers your calls. Your three options are Always, Night Only or Day Only. The
default is “Always.” With the default option, VMS will always answer your calls after
the number of rings established in “VMS-Hunt Delay.” On Form A Addendum, write
“D” if Day Only is desired or “N” if Night Only is desired.
VMS-AA Hunt Delay {#506} — The Hunt Delay specifies how many rings are
allowed before your VMS answers your incoming calls. You can establish a different
delay schedule for day and night calls. For Day, Night or Always, the ring delay can
be set to 0 through 6 rings. The default setting is 2 rings. To change the delay
schedule for the daytime, on Form A Addendum, under “VMS Hunt Delay/Day,”
enter the number of daytime rings desired. To change the delay schedule for the
nighttime, on Form A Addendum, under “VMS Hunt Delay/Night,” enter the number
of nighttime rings desired.
(PARTNER ACS Release 2.0 or earlier)
Follow instructions as indicated above. However, the designated Hunt Schedule
and Hunt Delay will be established system-wide. Different schedules and delays
cannot be established for each line.
ASA:
(PARTNER ACS Release 2.0 or later only)
If ASA is checked, specify the following:
Automatic System Answer Delay {#110}—By default, a call rings 2 times before it
is answered by the system. Write number (0-9) if different from default _____.
Automatic System Answer Mode {#121}—By default, ASA calls are put on hold
after the greeting plays. Check if calls should continue to ring or be disconnected:
Ring
Disconnect
ASA Record/Playback {I 891}—message of up to 10 seconds that caller hears
when the call is answered by the Automatic System Answer feature. Write
message below and record from extension 10 or 11:
Form B1: System Extensions
PAGE
1 of 4
10
11
12
13
14
15
16
17
18
19
20
21
22
23
24
25
26
27
28
29
Vera Gonzalez
Jose Ramirez
Juan (SA)
Programmer 1
Programmer 2
Programmer 3
Programmer 4
Programmer 5
Felipe (CS Rep)
Rosa (Bookkeeper)
Waiting Room
Waiting Room
Alert Extensions {#606}
for Doorphone 2
AA Extension {#607} 9 *
Contact Closure Group {#612}
Call Waiting {#316}
External Hotline {#311} 4 *
Hotline {#603} 5 *
Alert Extension
for Hotline
PARTNER MAIL 6 *
PARTNER MAIL VS 6
PARTNER Voice Messaging 6 10
Answering Machine
Extra Alert
IROB
Modem 7
PassageWay
FAX Machine Extension {#601}7
Doorphone 1 {#604} 8 *
Alert Extensions {#606}
for Doorphone 1
Doorphone 2 {#605} 8 *
Identify Auxiliary Equipment
Attached to this Extension
18-Button Display 2
18-Button 2
12-Button Display 2
12-Button 2
6-Button 2
Cordless/Wireless
Standard 3
Write Name/Description
Identify Telephone
Attached to this Extension
34-Button Display 2
Intercom Autodialer
Ext.
Jack
No.
Check if Ext. Name Display {CTP} 1
Required for PARTNER Advanced Communications System. For additional instructions, see pages 5 and 6.
Write in
Other
Equipment
Write
Transfer
Return
Ext. No.
{#306}
✓
✓
✓
✓
✓
✓
✓
✓
✓
✓
✓
✓
IMPORTANT: A system display phone is required for programming at extension 10 or 11. Extension 10 typically is the receptionist’s extension.
Extension 11 is recommended as a second programming extension (typically the System Manager’s extension).
* WARNING: Customers should keep extension 10, 11, or the first two extensions of any 308EC or 206 module, available for power failure use.
1.
2.
3.
4.
If checked, see Form B1, Page 3 of 4.
If there is a mix of PARTNER-model and MLS-model phones, write “P” for PARTNER, and “M” for MLS.
Write “T” for touch-tone or “R” for rotary.
Must be standard phone. If immediate dialing is required, use a dedicated line.
Do not assign restrictions that prevent dialing the outside number, Forced Account Code Entry {#307}, or
groups. Also see Form D, External Hotline {#311}.
5. Standard phone is recommended. Write extension number of corresponding alert extension or “70” for
loudspeaker paging system in next column.
6. Also write Transfer Return Ext. No. {#306} in the last column on this form (usually extension 10).
Also see Form B2, Identify Group Assignments, VMS Only.
7. To prevent other extensions from interrupting calls, assign Automatic Extension Privacy {#304} on Form B2.
8. Check corresponding alert extensions in next column. To prevent outside calls at the doorphone, remove all
outside lines—see Lines/Pools Not Assigned on Form B2.
9. Also write Transfer Return Ext. No. {#306} on this form.
10. Extensions 78 and 79 should be assigned to the two voice ports on PARTNER Voice Messaging.
Extensions 78 and 79 must be assigned to Hunt Group 7 and any previous assignments for Hunt Group 7
should be erased.
Form B1: System Extensions
PAGE
2 of 4
30
31
32
33
34
35
36
37
38
39
40
41
42 10
43 10
44 10
45 10
46 10
47 10
48 10
49 10
78 11
79 11
VMS
VMS
✓
✓
Alert Extensions {#606}
for Doorphone 2
AA Extension {#607} 9 *
Contact Closure Group {#612}
Identify Auxiliary Equipment
Attached to this Extension
Call Waiting {#316}
External Hotline {#311} 4 *
Hotline {#603} 5 *
Alert Extension
for Hotline
PARTNER MAIL 6 *
PARTNER MAIL VS 6
PARTNER Voice Messaging 6 10
Answering Machine
Extra Alert
IROB
Modem 7
PassageWay
FAX Machine Extension {#601}7
Doorphone 1 {#604} 8 *
Alert Extensions {#606}
for Doorphone 1
Doorphone 2 {#605} 8 *
Write Name/Description
Identify Telephone
Attached to this Extension
34-Button Display 2
Intercom Autodialer
18-Button Display 2
18-Button 2
12-Button Display 2
12-Button 2
6-Button 2
Cordless/Wireless
Standard 3
Ext.
Jack
No.
Check if Ext. Name Display {CTP} 1
Required for PARTNER Advanced Communications System. For additional instructions, see pages 5 and 6.
Write in
Other
Equipment
Write
Transfer
Return
Ext. No.
{#306}
10
10
✓
✓
* WARNING: Customers should keep extension 10, 11, or the first two extensions of any 308EC or 206 module, available for power failure use.
1.
2.
3.
4.
If checked, see Form B1, Page 4 of 4.
If there is a mix of PARTNER-model and MLS-model phones, write “P” for PARTNER, and “M” for MLS.
Write “T” for touch-tone or “R” for rotary.
Must be standard phone. If immediate dialing is required, use a dedicated line.
Do not assign restrictions that prevent dialing the outside number, Forced Account Code Entry {#307}, or
groups. Also see Form D, External Hotline {#311}.
5. Standard phone is recommended. Write extension number of corresponding alert extension or “70” for
loudspeaker paging system in next column.
6. Also write Transfer Return Ext. No. {#306} in the last column on this form (usually extension 10).
Also see Form B2, Identify Group Assignments, VMS Only.
7. To prevent other extensions from interrupting calls, assign Automatic Extension Privacy {#304} on Form B2.
8. Check corresponding alert extensions in next column. To prevent outside calls at the doorphone, remove all
outside lines—see Lines/Pools Not Assigned on Form B2.
9. Also write Transfer Return Ext. No. {#306} on this form.
10. Extensions 78 and 79 should be assigned to the two voice ports on PARTNER Voice Messaging.
Extensions 78 and 79 must be assigned to Hunt Group 7 and any previous assignments for Hunt Group 7
should be erased.
Form B2: Customized Extension Settings
PAGE
1 of 2
Required if you want to change extension settings from defaults. For additional instructions, see pages 7 and 8.
10
11
12
13
14
15
16
17
18
19
20
21
22
23
24
25
26
27
28
29
30
✓
✓
✓
✓
✓
✓
✓
✓
✓
✓
K
Immediate
No Ring * Lines/Pools5 *
✔ lines Delayed ✔ pools Not Assigned
4.
5.
6.
Outgoing
only
Incoming
only
No Access
VMS Only12 **
Night Service
Group Extensions {#504}
Allowed List 8
Assignment {#408}
NR✔
1–4 1–4 1–4 1–4 1–6 7
NA✔
NA✔
NA✔
NA✔
Pickup Group 9
Extensions {#501}
Calling Group 10
Extensions {#502}
Hunt Group 11
Extensions {#505}
No Restriction ✔
ALL
✓
✓
** WARNING: Do not connect to extension 10, 11, or the first two extensions of any 206 or 308EC module.
1.
2.
3.
Write line numbers or pool access codes
for Line Access Restriction {#302} or
Pool Access Restriction {#315}*
Disallowed List 7
Assignment {#405}
NA✔
Write line numbers or pool access codes*
in each column to show desired
Line Ringing options
Outgoing Call
Restriction {#401} 6
List individual lines
{#301} for Pooled
Extensions *
Call Coverage Rings {#321}4
Call Coverage Rings {#320}3
E✔ NA✔ A✔ NA✔ A✔ NA✔ NA✔ P✔ 2✔ 3✔
Hybrid Mode
Only:
Identify
Group Assignments
Identify Restrictions/Permissions
If Different than Defaults
Identify Line Ringing {CTP} Option
If Different than Default
Line Access Mode {#313} 2
Voice Interrupt
On Busy {#312}
Automatic VMS
Cover {#310}
Distinctive Ring {#308}
Forced Account
Code Entry {#307}
Abbreviated Ringing {#305}
Automatic Extension
Privacy {#304}
Display Language {#303}1
Ext. Jack No.
Identify Extension Settings
if Different than Default
Write S for Spanish or F for French.
In Hybrid mode only, write K for Key extension. Extension 10 always operates as a Key extension.
Specify number of rings (1-9) desired before an incoming call is sent to the covering extension.
The default setting is 2 rings. For PARTNER ACS Release 3.0 or later, this can be specified on an
individual extension basis.
Specify number of rings (1-9) desired before an incoming call is sent to a user’s voice mailbox. The
default setting is 3 rings. For PARTNER ACS Release 3.0 or later, this can be specified on an individual
extension basis.
In Key mode, use Line Assignment {#301} to remove lines from or assign lines to extensions. In Hybrid
mode, use Pool Extension Assignment {#314} to remove pools from or assign pools to extensions.
Write IN for Inside Only or LOC for Local Only to indicate restrictions for all outgoing calls on all lines.
Assignments
Write list number (1–4). Also see Form D, Disallowed Phone Number Lists {#404}.
✔ = Default
Write list number (1–4). Also see Form D, Allowed Phone Number Lists {#407}.
A
= Assigned or Active
Write group number (1–4).
E
= English
Write group number (1–4). If a loudspeaker is connected and Simultaneous Paging desired, NA = Not Assigned or
put appropriate extensions in Calling Group 1. Also see Form C, Simultaneous Paging.
Not Active
11. Write group number (1–6).
NR = No Restriction
12. Check off the same PARTNER MAIL or PARTNER MAIL VS extensions indicated on Form B1.
P
= Pooled
For the PARTNER Voice Messaging PC Card, extensions 78 and 79 must be assigned to
{CTP} = Centralized Telephone
Hunt Group 7.
Programming
* Pooling available only for ACS R2.0 or later.
7.
8.
9.
10.
Form C1: PARTNER-34D Phone
PAGE
1 of 8
Check Desired Button Features (write in extension or group number)
SAMPLE
Template Instructions
Night
04
DEL
IN
✓
Call Screening (F 25) 7
Caller ID Call Log (F 23) 6
Caller ID Inspect (F 17)
Caller ID Name Display (F 16)
Do Not Disturb (F 01)
✓
✓
Privacy (F 07)
Priv
Record-a-Call (F 24) 7
RAC
VMS Cover (F 15)
VMSCover
Voice Interrupt on Busy Talk-Back (F 18)
VIOB
Account Code Entry (F 12) 2
ACE
Background Music (F 19) 2
Music
Cover-XX XX
Call Coverage (F 20 XX XX) 2, 4, 6
Call Forwarding/Call Follow-Me (F 11 XX XX) 2, 4 CF-XX XX
Call Park (I XX) 3
Park
Call Pickup (I 6 XX)
Pickup-XX
Conference Drop (F 06)
Drop
Contact Closure 1 (F 41) 2
CC1
CC2
Contact Closure 2 (F 42) 2
Direct Line Pickup-Active Line (I 68)
DLPA
Direct Line Pickup-Idle Line (I 8)
DLPI
Exclusive Hold (F 02)
ExHold
Fax Management (I XX) 2
FAX-XX
Group Calling-Ring/Page (I 7 G or I *7 G)
GCall-g
Group Hunt-Ring/Signal (I 77 G or I *77 G)
Hunt-g
Group Pickup (I 66 G)
P/U Grp-g
Intercom Autodial (I XX or I *XX) 2
Ext-XX
Last Number Redial (F 05)
LNR
Loudspeaker Paging (I 70)
Loudspk
Manual Signaling (F 13 XX or F 13 *XX) 2
MS-XX
MsgOff-XX
Message Light Off (F 10 XX) 5
Message Light On (F 09 XX) 5
MsgOn-XX
Recall (F 03)
Recall
Save Number Redial (F 04)
SNR
Simultaneous Paging (I * 70)
SPage
Station Lock (F 21) 2
Lock
Touch-Tone Enable (F 08)
TT-EN
Voice Mail Messages (I 777)
VMMsgs-777
Voice Mailbox Transfer (F 14)
VMBox
VMS
SVC
DND
Auto Dial
VM Box
DEL
01
DEL
02
DEL
03
DEL
04
Intercom
Intercom
Ext.
* In Hybrid mode only, if pool 880 is assigned, these two buttons are associated with this pool.
(ACS R2.0 or later only)
Specify Automatic Line Selection: ________________________________________________________________
10
Identify extensions programmed as shown: ________________________________________________________
SCREEN
Calls
ID-Inspect
ID-Name
DND
Required
(Out, In, or No) from Form B2
†
Available with ACS R2.0 or later only.
✓
ASA
DXD
NightSvc
OCR
Wake
LED
• If desired, write in line number, pool access code , dial code feature, or auto dial number
• If desired, write in Line Ringing (Imm, Del, or No) from Form B2
• If desired, write in Line Access Restriction or Pool Access Restriction†
†
Automatic System Answer {#111} 6
Direct Extension Dial {#113} 6
Night Service {#503}
Outgoing Call Restriction {#114} 1
Wake Up Service {#115}
Ext. 10 Only
Make as many copies as you need. Use template and/or checklist.
For additional instructions, see pages 9 through 14.
1. Requires Auto Dial button
for each extension.
2. Button with lights is
recommended, but not
required.
3. Extension number can be
programmed as Auto Dial
button.
4. You can program the
origination extension only
or both the origination and
destination extension.
5. You can program the
extension number.
6. Available with ACS R2.0
or later only.
7. Available with ACS R3.0
or later.
F = Feature button
G = Group
I = Left Intercom
button
XX = Extension
Form C1: PARTNER-34D Phone
PAGE
1 of 8
Check Desired Button Features (write in extension or group number)
SAMPLE
Template Instructions
• If desired, write in line number, pool access code , dial code feature, or auto dial number
• If desired, write in Line Ringing (Imm, Del, or No) from Form B2
• If desired, write in Line Access Restriction or Pool Access Restriction†
†
✓
Call Screening (F 25) 7
Caller ID Call Log (F 23) 6
Caller ID Inspect (F 17)
Caller ID Name Display (F 16)
Do Not Disturb (F 01)
✓
✓
Privacy (F 07)
Priv
Record-a-Call (F 24) 7
RAC
VMS Cover (F 15)
VMSCover
Voice Interrupt on Busy Talk-Back (F 18)
VIOB
Account Code Entry (F 12) 2
ACE
Background Music (F 19) 2
Music
Cover-XX XX
Call Coverage (F 20 XX XX) 2, 4, 6
Call Forwarding/Call Follow-Me (F 11 XX XX) 2, 4 CF-XX XX
Call Park (I XX) 3
Park
Call Pickup (I 6 XX)
Pickup-XX
Conference Drop (F 06)
Drop
Contact Closure 1 (F 41) 2
CC1
CC2
Contact Closure 2 (F 42) 2
Direct Line Pickup-Active Line (I 68)
DLPA
Direct Line Pickup-Idle Line (I 8)
DLPI
Exclusive Hold (F 02)
ExHold
Fax Management (I XX) 2
FAX-XX
Group Calling-Ring/Page (I 7 G or I *7 G)
GCall-g
Group Hunt-Ring/Signal (I 77 G or I *77 G)
Hunt-g
Group Pickup (I 66 G)
P/U Grp-g
Intercom Autodial (I XX or I *XX) 2
Ext-XX
Last Number Redial (F 05)
LNR
Loudspeaker Paging (I 70)
Loudspk
Manual Signaling (F 13 XX or F 13 *XX) 2
MS-XX
MsgOff-XX
Message Light Off (F 10 XX) 5
Message Light On (F 09 XX) 5
MsgOn-XX
Recall (F 03)
Recall
Save Number Redial (F 04)
SNR
Simultaneous Paging (I * 70)
SPage
Station Lock (F 21) 2
Lock
Touch-Tone Enable (F 08)
TT-EN
Voice Mail Messages (I 777)
VMMsgs-777
Voice Mailbox Transfer (F 14)
VMBox
VMS
DND
Auto Dial
VM Box
DEL
01
DEL
02
DEL
03
Intercom
Intercom
DEL
04
Ext.
* In Hybrid mode only, if pool 880 is assigned, these two buttons are associated with this pool.
(ACS R2.0 or later only)
Specify Automatic Line Selection: ________________________________________________________________
11, 12
Identify extensions programmed as shown: ________________________________________________________
SCREEN
Calls
ID-Inspect
ID-Name
DND
Required
(Out, In, or No) from Form B2
†
Available with ACS R2.0 or later only.
04
DEL
IN
ASA
DXD
NightSvc
OCR
Wake
LED
Automatic System Answer {#111} 6
Direct Extension Dial {#113} 6
Night Service {#503}
Outgoing Call Restriction {#114} 1
Wake Up Service {#115}
Ext. 10 Only
Make as many copies as you need. Use template and/or checklist.
For additional instructions, see pages 9 through 14.
1. Requires Auto Dial button
for each extension.
2. Button with lights is
recommended, but not
required.
3. Extension number can be
programmed as Auto Dial
button.
4. You can program the
origination extension only
or both the origination and
destination extension.
5. You can program the
extension number.
6. Available with ACS R2.0
or later only.
7. Available with ACS R3.0
or later.
F = Feature button
G = Group
I = Left Intercom
button
XX = Extension
Form C3: PARTNER-18/18D Phone
Check Desired Button Features (write in extension or group number)
SAMPLE
Template Instructions
(Out, In, or No) from Form B2
Available with ACS R2.0 or later only.
}
✓
Call Screening (F 25) 7
Caller ID Call Log (F 23) 6
Caller ID Inspect (F 17)
Caller ID Name Display (F 16)
Do Not Disturb (F 01)
✓
✓
Privacy (F 07)
Priv
RAC
Record-a-Call (F 24) 7
VMS Cover (F 15)
VMSCover
Voice Interrupt on Busy Talk-Back (F 18)
VIOB
Account Code Entry (F 12) 2
ACE
Background Music (F 19) 2
Music
Cover-XX XX
Call Coverage (F 20 XX XX) 2, 4, 6
Call Forwarding/Call Follow-Me (F 11 XX XX) 2, 4 CF-XX XX
Call Park (I XX) 3
Park
Call Pickup (I 6 XX)
Pickup-XX
Conference Drop (F 06)
Drop
Contact Closure 1 (F 41) 2
CC1
Contact Closure 2 (F 42) 2
CC2
DLPA
Direct Line Pickup-Active Line (I 68)
Direct Line Pickup-Idle Line (I 8)
DLPI
Exclusive Hold (F 02)
ExHold
Fax Management (I XX) 2
FAX-XX
Group Calling-Ring/Page (I 7 G or I *7 G)
GCall-g
Group Hunt-Ring/Signal (I 77 G or I *77 G)
Hunt-g
P/U Grp-g
Group Pickup (I 66 G)
Intercom Autodial (I XX or I *XX) 2
Ext-XX
LNR
Last Number Redial (F 05)
Loudspeaker Paging (I 70)
Loudspk
MS-XX
Manual Signaling (F 13 XX or F 13 *XX) 2
MsgOff-XX
Message Light Off (F 10 XX) 5
Message Light On (F 09 XX) 5
MsgOn-XX
Recall (F 03)
Recall
SNR
Save Number Redial (F 04)
Simultaneous Paging (I * 70)
SPage
Station Lock (F 21) 2
Lock
Touch-Tone Enable (F 08)
TT-EN
Voice Mail Messages (I 777)
VMMsgs-777
Voice Mailbox Transfer (F 14)
VMBox
PARTNER-18D only
VMS
DND
Auto Dial
VM Box
IMM
01
IMM
02
IMM
03
Intercom
IMM
04
Intercom
Ext.
* In Hybrid mode only, if pool 880 is assigned, these two buttons are associated with this pool.
(ACS R2.0 or later only)
Specify Automatic Line Selection: ________________________________________________________________
14, 15, 16, 17, 18, 19
Identify extensions programmed as shown: 13,
___________________________________________________
SCREEN
Calls
ID-Inspect
ID-Name
DND
Required
04
DEL
IN
• If desired, write in line number, pool access code , dial code feature, or auto dial number
• If desired, write in Line Ringing (Imm, Del, or No) from Form B2
• If desired, write in Line Access Restriction or Pool Access Restriction†
†
ASA
DXD
NightSvc
OCR
Wake
LED
Automatic System Answer {#111} 6
Direct Extension Dial {#113} 6
Night Service {#503}
Outgoing Call Restriction {#114} 1
Wake Up Service {#115}
Ext. 10 Only
Make as many copies as you need. Use template and/or checklist.
For additional instructions, see pages 9 through 14.
†
PAGE
3 of 8
1. Requires Auto Dial button
for each extension.
2. Button with lights is
recommended, but not
required.
3. Extension number can be
programmed as Auto Dial
button.
4. You can program the
origination extension only
or both the origination and
destination extension.
5. You can program the
extension number.
6. Available with ACS R2.0
or later only.
7. Available with ACS R3.0
or later.
F = Feature button
G = Group
I = Left Intercom
button
XX = Extension
Form 1: Language
Language Mode:
Monolingual ✓
✓Bilingual
Monolingual Mode–System Language:
U.S. English ✓
Latin American Spanish
Canadian French
Bilingual Mode–Primary Language:
U.S. English ✓
✓Latin American Spanish
Canadian French
Bilingual Mode–Secondary Language:
✓U.S. English
Latin American Spanish ✓
Canadian French
General Information
■
■
Completing this Form
Factory defaults are identified by the ✓ symbol.
Language Mode Check “Bilingual” if the Language Mode
should be set to Bilingual. If you check Bilingual, also see
below; if not, see .
If the system is set for Bilingual Mode, make sure you record the
Automated Attendant Day Menu Prompts and Night Menu Prompts
and Announcements (if any) in both the Primary and Secondary
Languages. Also, subscribers can record two personal
greetings—one in the Primary Language and another in the
Secondary Language.
■
Subscribers can have a Mailbox Language different from the
languages selected here. Mailbox Language is specified on Form
2.
■
You can specify a language for programming prompts that is
different from the system language specified in or above. If
you change the System Administration Language (that is, the
language in which programming prompts are played), specify the
language here English
.
Monolingual Mode—System Language Check the Primary
language desired if different from the default.
Bilingual Mode—Primary Language Check the Primary
Language desired if different from the default.
Bilingual Mode—Secondary Language Check the Secondary
Language desired if different from the default.
Programming Language
■
To program the Language Mode, as well as the System Language
in Monolingual Mode or the Primary and Secondary Languages in
Bilingual Mode, dial 1 from the Programming Main Menu.
■
To program the System Administration Language, call the Voice
Mail Service and enter the login and password. Then dial 0.
Automated Attendant:
1
Form 2: Mailbox Assignments
2
3
4
(Copy this form for each Automated Attendant. Save the original blank form for future use.
(Check a number to indicate for which Automated Attendant this form is used.)
10 ✓
Vera
Jose
Juan Eng.
Prog. 1 Eng.
Prog. 2
Prog. 3
Prog. 4 Eng.
Prog. 5
Felipe
Rosa
Yes
Yes
(34
✓)
(35
✓)
(36
✓)
(37
✓)
(38
✓)
(39
✓)
(40
✓)
(41
✓)
(42
✓)
(43
✓)
(11
✓)
(12
✓)
(13
✓)
(14
✓)
(15
✓)
(16
✓)
(17
✓)
(18
✓)
(19
✓)
(20
✓)
(44
✓)
(21
✓)
(45
✓)
(22
✓)
(46
✓)
(23
✓)
(47
✓)
(24
✓)
(48
✓)
(25
✓)
(49
✓)
(26
✓)
(50
✓)
(27
✓)
(51
✓)
(28
✓)
(52
✓)
(29
✓)
(53
✓)
(30
✓)
(54
✓)
(31
✓)
(56
✓)
(32
✓)
(57
✓)
(33
✓)
Mailbox
Subscriber Name
Mailbox Language
Outcalling Assigned
RAC Assigned
Message Length
Mailbox Size
Yes
Automated Attendant: ✓1
Form 3: Menu Definition
2
3
4
(Copy this form for each Automated Attendant. Save the original blank form for future use.
(Check a number to indicate for which Automated Attendant this form is used.)
Lines assigned: ____________________________________________________________________________________________
01, 02, 03, 04
Required for Automated Attendant Service
Description
Selector
Code
Selector
Code Action*
1
(5 ✓)
2
(5 ✓)
3
(5 ✓)
4
(5 ✓)
5
(5 ✓)
Direct Extension Transfer
Direct Extension Transfer
Customer Service (Felipe)
Billing Dept. (Rosa)
1
1
Number/Range
of Numbers
18
19
6
(5 ✓)
7
8
Transfer to Vera’s mailbox
* Selector Code Action Key
1 Selector Code Transfer
(6 ✓)
9
(Mailbox 10 ✓)
Dial 0/Timeout Extension:
Specify the extension to which calls are transferred if the caller dials
“0” or does not enter a Selector Code.
3 Announcement
5 Direct Extension Transfer
6 Mailbox Transfer
7 Centrex Transfer
General Information
■
■
Factory defaults are identified by the ✓ symbol.
■
This Menu Definition applies to both the Day and Night Menu
prompts.
If you use the Centrex Transfer option, all lines assigned to this
Automated Attendant must be Centrex lines.
■
If you use the Mailbox Transfer option, Selector Codes 1–9
represent a mailbox number that you specify to which the call is
transferred.
■
The Selector Code 9 factory setting lets callers transfer directly to
mailbox 10 (receptionist’s mailbox) where they can leave a message.
■
The Description and Selector Code number from this form will be
used to complete the Day and Night Menu Prompts (Forms 4, 4A,
5, and 5A).
■
Announcement entries in Description, Selector Code, and
Number/Range of Numbers of this form will be used to complete
Forms 3A and 3B.
■
The Lines Assigned: area is reserved for you to specify the lines
assigned to this Automated Attendant.
■
The Selector Code is the first digit dialed by the caller in
response to menu prompts.
■
In Direct Extension Transfer, Selector Codes 1-5 and 7
represent the first digit for a range of extensions (see table).
These Selector Codes let callers dial extension numbers directly.
■
In Selector Code Transfer, Selector Codes 1-9 represent a
specific extension, Group Calling number (if available), Hunt
Group number, Centrex number, or guest mailbox number that
you specify, to which the caller is transferred. (See the range of
extensions table.)
Selector Code Transfer lets callers dial a single digit to reach a
single extension or group, such as the VP of Sales at extension 37
or the order processing operators assigned to Hunt Group 774.
PARTNER System
Advanced, R1.0, 1.1
Advanced, R3.0 or later
Endeavor, R1.0 or later
II/Plus
| Range of Extensions
| 10-41, 71-74, or 771-776
| 10-49, 71-74, or 771-776
| 10-49, 71-74, or 771-776
| 10-57, 71-74, or 771-776
Automated Attendant: ✓1
2
3
4
Form 4: Day Menu Prompt—
Form 4: System Language or Primary Language
(Copy this form for each Automated Attendant. Save the original blank form for future use.
(Check a number to indicate for which Automated Attendant this form is used.)
Required if VMS Hunt Schedule is set to Day Only or Always
Gracias por llamar a Software Mexico. For English press star one now. Si usted tiene
teléfono de tonos y conoce el número de extensión a la que desea llamar, marquelo ahora.
De lo contrario espere a ser atendido por nuestra operadora. Para servicios al cliente,
marque cuatro; para informacion de facturacion, marque cinco.
General Information
■
The Day Menu Prompt plays to callers when the VMS Hunt
Schedule is set to Always or Day Only and Night Service is off.
The Day Menu Prompt and the Night Menu Prompt use the same
Menu Definition.
■
The Day Menu Prompt should contain a welcome and a list of
menu options.
■
The welcome should introduce the company. For example, “Thank
you for calling the Any Travel Agency.”
■
If the system is set for Bilingual Mode, let callers know they can
switch the language they hear while on the call. For example,
“Para español, marque * 1.”
Completing this Form
Write the message that you want callers to hear when they call during
normal business hours, including the instructions to the caller for
selecting menu options.
Suggested options include:
■
“Remain on the line for assistance.”
■
“Dial 0 for assistance.”
■
“To hear this menu again, dial * 4.”
Recording the Day Menu Prompt
■
■
The menu options should contain instructions that correspond to
the Menu Definition set up on Form 3.
– If callers can dial extension numbers (Direct Extension
Transfer), the prompt should instruct callers to dial the
extension number. For example, “If you know the extension of
the person you want to reach, dial it now.”
– If callers can dial a single digit to transfer to an extension or
group (Selector Code Transfer), to a mailbox (Mailbox
Transfer), or to a Centrex number (Centrex) Transfer), the
prompt should provide instructions such as “To speak to
someone in sales, press 6.”
– If callers can can choose an Announcement, include that
information. For example, “For directions to our office, press 4.”
To record the Day Menu Prompt, dial 3 from the Programming
Main Menu.
Automated Attendant: ✓1
2
3
4
Form 4A: Day Menu Prompt—Secondary Language
(Copy this form for each Automated Attendant. Save the original blank form for future use.
(Check a number to indicate for which Automated Attendant this form is used.)
Required for Bilingual Mode only if VMS Hunt Schedule is set to Day Only or Always
Thank you for calling Software Mexico. If you know the extension number, dial it now. If not
please wait and the receptionist will answer your call. For Customer Service, press 4. For
Billing, press 5.
General Information
■
The Day Menu Prompt plays to callers when the VMS Hunt
Schedule is set to Always or Day Only and Night Service is off.
The Day Menu Prompt and the Night Menu Prompt use the same
Menu Definition.
■
The Day Menu Prompt should contain a welcome and a list of
menu options.
■
The welcome should introduce the company. For example, “Thank
you for calling the Any Travel Agency.”
■
■
Let callers know they can switch back to the Primary Language.
For example, “For English, press * 1.”
The menu options should contain instructions that correspond to
the Menu Definition set up on Form 3.
– If callers can dial extension numbers (Direct Extension
Transfer), the prompt should instruct callers to dial the
extension number. For example, “If you know the extension of
the person you want to reach, dial it now.”
– If callers can dial a single digit to transfer to an extension or
group (Selector Code Transfer), to a mailbox (Mailbox
Transfer), or to a Centrex number (Centrex) Transfer), the
prompt should provide instructions such as “To speak to
someone in sales, press 6.”
– If callers can can choose an Announcement, include that
information. For example, “For directions to our office, press 4.”
Completing this Form
Write the message that you want callers to hear when they call during
normal business hours, including the instructions to the caller for
selecting menu options.
Suggested options include:
■
“Remain on the line for assistance.”
■
“Dial 0 for assistance.”
■
“To hear this menu again, dial * 4.”
Recording the Day Menu Prompt
■
To record the Day Menu Prompt, dial 3 from the Programming
Main Menu.
Automated Attendant: ✓1
2
3
4
Form 5: Night Menu Prompt—
Form 5: System Language or Primary Language
(Copy this form for each Automated Attendant. Save the original blank form for future use.
(Check a number to indicate for which Automated Attendant this form is used.)
Required if VMS Hunt Schedule is set to Night Only or Always
Gracias por llamar a Software México. For English, press star one now. Nuestro horario de
oficina es de 9:00 a 14:30 horas y de 16:00 a 18:00 horas. Si usted tiene teléfono de tonos y
conoce el número de la extensión a la que desea llamar, marquelo ahora. De lo contrario,
espere y deje un mensaje.
General Information
■
The Night Menu Prompt plays to callers when the VMS Hunt
Schedule is set to Always or Night Only and Night Service is on.
The Night Menu Prompt and the Day Menu Prompt use the same
Menu Definition.
■
The Night Menu Prompt should contain a welcome and a list of
menu options.
■
The welcome should introduce the company. For example,
“You have reached the Any Travel Agency. Our hours are 9 AM to
5 PM, Monday through Friday.”
■
If the system is set for Bilingual Mode, let callers know they can
switch the language they hear while on the call. For example,
“Para español, marque * 1.”
■
The menu options should contain instructions that correspond to
the Menu Definition set up on Form 3.
– If callers can dial extension numbers (Direct Extension
Transfer), the prompt should instruct callers to dial the
extension number. For example, “If you know the extension of
the person you want to reach, dial it now and leave a
message.”
– If callers can dial a single digit to transfer to an extension or
group (Selector Code Transfer), to a mailbox (Mailbox
Transfer), or to a Centrex number (Centrex) Transfer), the
prompt should provide instructions such as “To leave a
message for Pat, press 6.” Keep in mind that there are no
group mailboxes.
– If Selector Code 9 is left as the default, the prompt should
instruct callers to press 9 to leave a message with the
receptionist.
Completing this Form
Write the message that you want callers to hear when they call after
normal business hours, including instructions to the caller for
selecting menu options.
Suggested options include:
■
“Dial 9 or remain on the line to leave a message.”
■
“To hear this menu again, dial * 4.”
Recording the Night Menu Prompt
■
To record the Night Menu Prompt, dial 3 from the Programming
Main Menu.
Automated Attendant: ✓1
2
3
4
Form 5A: Night Menu Prompt—Secondary Language
(Copy this form for each Automated Attendant. Save the original blank form for future use.
(Check a number to indicate for which Automated Attendant this form is used.)
Required for Bilingual Mode only if VMS Hunt Schedule is set to Night Only or Always
Good Evening. Thank you for calling Software Mexico. Our business hours are from 9:00 to
2:30 and 4:00 to 6:00. If you know the extension number and you want to leave a message, dial
it now. If not, please wait and leave a message for the attendant.
General Information
■
The Night Menu Prompt plays to callers when the VMS Hunt
Schedule is set to Always or Night Only and Night Service is on.
The Night Menu Prompt and the Day Menu Prompt use the same
Menu Definition.
■
The Night Menu Prompt should contain a welcome and a list of
menu options.
■
The welcome should introduce the company. For example,
“You have reached the Any Travel Agency. Our hours are 9 AM to
5 PM, Monday through Friday.”
■
Let callers know they can switch back to the Primary Language.
For example, “For English, press *1.”
■
The menu options should contain instructions that correspond to
the Menu Definition set up on Form 3.
– If callers can dial extension numbers (Direct Extension
Transfer), the prompt should instruct callers to dial the
extension number. For example, “If you know the extension of
the person you want to reach, dial it now and leave a
message.”
– If callers can dial a single digit to transfer to an extension or
group (Selector Code Transfer), to a mailbox (Mailbox
Transfer), or to a Centrex number (Centrex) Transfer), the
prompt should provide instructions such as “To leave a
message for Pat, press 6.” Keep in mind that there are no
group mailboxes.
– If Selector Code 9 is left as the default, the prompt should
instruct callers to press 9 to leave a message with the
receptionist.
Completing this Form
Write the message that you want callers to hear when they call after
normal business hours, including instructions to the caller for
selecting menu options.
Suggested options include:
■
“Dial 9 or remain on the line to leave a message.”
■
“To hear this menu again, dial * 4.”
Recording the Night Menu Prompt
■
To record the Night Menu Prompt, dial 3 from the Programming
Main Menu.
Glossary
Numerics
206 module
A system module that contains jacks for connecting up to two outside lines and up to six extensions.
308 module
A system module that contains jacks for connecting up to three outside lines and up to eight
extensions.
A
Announcement
An informative message that provides frequently requested information. It is recorded by the System Manager and plays to callers who select it from an Automated Attendant's Menu.
Auto Dial button
A programmable button on a system phone that lets the user dial a series of digits simply by
pressing that button. An Auto Dial button can be used to dial the voice messaging system with
one touch. See also Programmable button.
Automated Attendant Dial 0/Timeout Extension
The specified extension to which calls are routed by the Automated Attendant when the caller
presses 0 or does not choose a menu option within five seconds of playing an announcement.
Automated Attendant Service
A component of the voice messaging system that consists of a menu definition and prompt. It provides outside callers with options enabling them to reach an extension, a Hunt Group, or (for
PARTNER II systems) a Calling Group, by pressing a single digit or by dialing an extension or
group number.
Auxiliary equipment
Telecommunications equipment (other than system phones) that can be connected to the control
unit. Auxiliary equipment includes industry standard devices that can connect directly to the public telephone network (such as doorphones or fax machines) as well as devices that require the
interface provided by the control unit (such as a loudspeaker paging system).
Automatic VMS Cover
A communications system feature that provides voice mail coverage for a subscriber's unanswered transferred and intercom calls.
GL-1
Glossary
B
Bilingual Mode
A Language Mode setting that allows messages and prompts to be played in either of two languages. See also Monolingual Mode.
C
Call Answer Service
A component of the voice messaging system that lets callers leave a message at an unanswered
extension or transfer to another extension.
Calling Group
A group of extensions that can be called simultaneously by dialing a group calling code. This
feature may not be available on your system; check your Programming and Use guide. See also
Hunt Group.
Call Screening
A PARTNER ACS R3.0 feature that allows PARTNER MAIL VS subscribers to listen while a caller is
leaving a message in their voice mailbox.
Centralized Telephone Programming
A method of telephone programming that lets you program individual extensions in the system
from a system display phone at extension 10 (or 11 if available). Centralized Telephone Programming is an alternative to Extension Programming.
Centrex Transfer
A Selector Code Action that directs the Automated Attendant to transfer calls to a specified Centrex number when a caller presses the digit (that is, Selector Code) associated with this action.
Configuration Report
A PARTNER MAIL VS 5.0 feature that allows you to create a record of the systems current settings
and direct the record to a PC.
Control Unit
Hardware that connects lines coming into the building to the extensions in the system and also
provides system features.
Communications system
The control unit and system phones, plus all other telecommunications devices that are connected to the control unit. Certain releases of PARTNER Plus, PARTNER II, PARTNER Endeavor,
and PARTNER Advanced communications systems can be used with the PARTNER MAIL VS system.
GL-2
Glossary
D
Delayed Call Handling
A communications system feature that allows the communications system to send incoming outside calls to the Automated Attendant Service if the receptionist does not answer by the third ring.
See also Immediate Call Handling.
Dial plan
The range of extensions provided for a specific system.
Do Not Disturb
A communications system feature that can be used in conjunction with automatic or manual voice
coverage to send callers immediately to a subscriber's mailbox rather than ringing the extension
first.
E
Extension
An endpoint in the system that connects telephones or standard devices, which can be dialed
using the Intercom button. See also Extension number and Programming extension.
Extension coverage
A feature that allows callers to leave messages or transfer to another extension when the extension called is busy or not answered, and Automatic VMS Cover is on.
Extension jack
The six jacks on the lower half of a 206 module or eight jacks on the lower half of the 308 module
that allow you to connect phones (or other telecommunications devices) to the control unit.
Extension Line Coverage
A voice messaging system feature that lets a subscribers extension (mailbox) be assigned as the
owner of a covered line. When a call comes in on the covered line, the system routes the caller to
the mailbox specified as the line owner if the call is not answered. See also Line Coverage Extension.
Extension number
The number assigned to each extension jack on a 206 module. Extension jack numbers run consecutively from 11 through 41 for the PARTNER ACS R1.0 and 1.1, 11 through 49 for the PARTNER
ACS R3.0 or later and PARTNER Endeavor R1.0 or later, and 10 through 57 for the PARTNER II
and PARTNER Plus systems. They are used for intercom calling.
Extension Programming
A method of telephone programming that lets users program their own extensions from their system phones. See also Centralized Telephone Programming.
GL-3
Glossary
G
Group Call Distribution
A communications system feature that directs incoming calls on specified lines to a Hunt Group
for either Automated Attendant Service or Line Coverage. See also Automated Attendant Service,
Hunt Group, VMS Hunt Group, and VMS Line Coverage.
H
Hunt Group
A group of extensions that takes incoming or transferred calls in round-robin fashion. Calls to the
Hunt Group are directed to the first available extension in the group, with the extension that
answered most recently being the last one in the hunt order. See also Calling Group and VMS
Hunt Group.
I
Immediate Call Handling
A communications system feature that allows the Automated Attendant Service to answer every
incoming outside call on specified lines and play the Automated Attendant Service day or night
menu. See also Delayed Call Handling.
Industry-standard device
A telephone or other telecommunications device that can be connected directly to the public telephone network. See also Standard phone.
Intercom call
A call that is made to another system extension.
L
Language Mode
See Bilingual Mode and Monolingual Mode.
Line Coverage Extension
A communications system feature that directs incoming calls on a specific line to a specific extension.
Line jack
The location on 206, 308, and 400 modules that allows you to connect outside lines to the control
unit.
GL-4
Glossary
Line number
The number assigned to each line jack on a 206, 308, or 400 module. Line jack numbers run consecutively from 01 through 12 (for a PARTNER Plus system), 01 through 15 (for a PARTNER ACS
and PARTNER Endeavor), or from 01 through 24 (for PARTNER II).
Line Ownership
A voice messaging system feature that lets you program VMS Line Coverage. See also Group
Call Distribution and VMS Line Coverage.
M
Mailbox
A storage area for messages associated with a system subscriber.
Mailbox Language
The language assigned to a subscriber's mailbox.
Mailbox Password
A code of up to four digits that subscribers enter to log in to the voice messaging system. A password is used to keep messages confidential.
Mailbox Transfer
A Selector Code Action that directs the Automated Attendant to transfer calls to a specified mailbox number when a caller presses the digit (that is, Selector Code) associated with this action.
Menu Definition
A voice messaging system feature that lets you customize the Automated Attendant Service
transfer options available to outside callers.
Menu Prompt
The customized day or night message that an outside caller hears after the Automated Attendant
Service answers the call.
Message Creation
A voice messaging system feature that allows a subscriber to record a voice message and send it
to one or more voice mailboxes in the system.
Monolingual Mode
A Language Mode setting that allows messages and prompts to be played in one of several available languages. See also Bilingual Mode.
Music On Hold system
Equipment that lets you play recorded music or messages to callers who are placed on hold. A
music-on-hold audio source must be connected to the processor module in the control unit.
N
Night Service
A communications system feature that is used in conjunction with Automated Attendant Service to
activate the Night Menu Prompt.
GL-5
Glossary
O
One-touch Intercom Calling button
See Auto Dial button.
Outcalling (Cascaded)
A voice messaging system feature that, when assigned to a subscriber, allows the subscriber to
have the system call a list of up to five pager or telephone numbers according to a predefined
schedule whenever a new message is received in the subscribers voice mailbox. Subscribers
can define when the system attempts Outcalling, how often it does so during a specified time
interval, as well as how many time the list of Outcalling numbers will be dialed. Note that subscribers must be assigned permission to use this feature.
P
Personal Group List
A voice messaging system feature that allows a subscriber to create and maintain up to 10 personal group lists, each of which can consist of up to 48 mailboxes. When prompted to enter a
mailbox number to send or forward a message, the subscriber can enter a personal group list
instead of entering each mailbox number individually.
Personal Operator
A voice mail system feature that allows subscribers to program a personal operator for their mailbox. if a caller using Call Answer Service presses 0 before, during, or after leaving a message,
the system transfers the caller to the programmed personal operator.
Primary Language
In Bilingual Mode, the language callers initially hear when they call in to the voice messaging system. See also Secondary Language.
Programmable button
A system phone button that does not have a line assigned; it can be set up to dial a number or
access a feature.
Programming extension
An extension from which you can program the communications system. It can be either extension
10 (or 11 if available).
R
Receptionist
The person who primarily is responsible for answering outside calls. This is typically the person at
extension 10.
Record-A-Call
A PARTNER ACS R3.0 feature that works with the 4-port PARTNER MAIL VS allowing subscribers
at an internal extension to record their conversation while active on a call.
GL-6
Glossary
S
Secondary Language
In Bilingual Mode, the language callers have the option of hearing when they call in to the voice
messaging system. See also Primary Language.
Selector Code
A single digit (1-9) used to define transfer options for outside callers on the Automated Attendant
Service menu. See also Menu Definition and Menu Prompt.
Send All Calls
A communications system feature that lets subscribers use Do Not Disturb to send callers immediately to their mailbox (calls do not ring the extension first) provided voice mail coverage is on at
the extension.
Standard phone
An industry-standard touch-tone or rotary phone such as you might have in your home. Some
standard phones include special feature buttons for frequently used calling functions. See also
Industry-standard device.
Subscriber
A user who is assigned a mailbox.
System Backup
A PARTNER MAIL VS Release 5.0 feature that allows you to save the settings that you have programmed and certain prompts that you have recorded for the voice messaging system.
System Language
In Monolingual Mode, the language callers hears when they call in to the voice messaging system.
System Manager
The person responsible for managing both the communications and voice messaging systems.
System phone
A telephone that is specifically designed for use with PARTNER systems. Models include the
PARTNER-34D, PARTNER-18D, PARTNER-18, PARTNER-6, PARTNER Endeavor 34D, PARTNER
Endeavor 18D, PARTNER Endeavor 18, MLS-34D, MLS-18D, MLS-12, MLS-12D, MLS-6, MDC
9000, MDW 9000, MDW9000LC-6, MDW 9010, and MDW 9030P phones.
System programming
Procedures that allow you to customize the communications system settings. System programming requires a system display phone and is done from extension 10 (or 11 if available).
System Restore
A PARTNER MAIL VS Release 5.0 feature that allows you to restore the settings that have been
backed up.
GL-7
Glossary
T
Telephone programming
Customizes extensions to meet the needs of individual users, including the assignment of features to programmable buttons. Telephone Programming can be done either centrally or from the
user's own extension. See also Centralized Telephone Programming and Extension Programming.
Tutor
A voice messaging system feature that lets any communications system user access and listen to
information about their phone and commonly-used communications system features.
V
VMS Cover button
A button on a system phone that allows a subscriber to turn voice mail coverage on and off manually at that extension. See also Automatic VMS Cover.
VMS Hunt Delay
A communications system feature that lets you set the Automated Attendant to handle calls using
either Immediate Call Handling or Delayed Call Handling (or by specifying a particular number of
rings on the PARTNER ACS R3.0 or later). See also Delayed Call Handling and Immediate Call
Handling
VMS Hunt Group
Hunt Group 7, reserved by the communications system to identify extensions associated with the
voice messaging system hardware. See also VMS Hunt Delay and VMS Hunt Schedule.
Volume Control
A voice messaging system feature that allows subscribers to adjust the playback volume while
they are listening to messages.
GL-8
Index
IN
D
A
Allowed Phone Number List, 4-27
Announcement, 4-12, 5-21, 5-31
Announcements, 1-6
Auto Dial button, 4-33
Automated Attendant
deleting lines, 5-25
line assignment, 4-10, 5-23
Automated Attendant Menu Definition, 4-11, 5-29
Automated Attendant Service
Announcements, 1-6
communications system options, 1-8 , 1-10
factory-set messages, 1-7
Music-On-Hold, 1-10
overview, 1-6
Automatic Extension Privacy, 4-24, 5-37
Automatic VMS Cover, 1-12, 5-42, 5-58
B
backup card, 4-41, 5-78
buttons
programming, 4-31, 5-68
C
Call Answer Service
communications system options, 1-11
factory-set message, 1-11
overview, 1-11
Call handling
delayed , 1-9
immediate, 1-9
Call Screening , 5-6
Call Screening button, 4-34, 5-71
Caller ID service, 4-23
Centrex service, 5-17
Centrex Transfer, 4-13, 5-31
Communications system, 1-1
Communications system programming
dial plan for mailboxes, 5-42
initial setup, 4-1
methods of, 3-4
overview, 3-1
planning forms, 3-2
Configuration Report, 4-38, 5-73
Day Menu Prompt
description, 1-6
factory-set prompt, 1-7
default, 4-8, 5-3
Delayed call handling , 1-9
Dial 0/Timeout Extension, 4-12, 5-30
Dial 0/Timeout Extension Transfer, 5-21
dial plan, 5-42, D-1
Direct Extension Transfer, 4-13, 5-20, 5-31
Disallowed Phone Numbers , 4-26
Do Not Disturb, 1-12
Do Not Disturb (DND) button, 4-32
Do Not Disturb button, 5-69
E
error code, 4-42, 5-77, 6-15
Extension coverage
automatic, 1-12
immediate, 1-12
manual, 1-12
overview, 1-12
Extension Line Coverage, 5-67
F
FCC information, B-1
G
Group Call Distribution, 4-22, 5-35, 5-66
overview, 1-8
group lists, xv
Guest Mailboxes, 5-42, 5-58, 5-69
Guest Mailboxes
overview, 1-14
H
Helpline, 6-1
HyperTerminal application, 4-39, 5-74
IN-1
Index
I
Immediate call handling , 1-9
Installation
guidelines, 2-1
voice messaging system module, 2-2
L
Language Mode, 5-1
changing, 5-11
Language, System Administration Prompt, 4-8, 5-3
line assignment, 4-10
Line Coverage, 4-29, 5-60
Line Coverage Extension, 1-12, 5-60
Line Ownership, 4-21
assigning, 5-62
changing, 5-64
checking, 5-61
deleting , 5-65
M
mailbox
creating, 5-46
deleting , 4-16, 5-45
dial plan for, 5-42
message length, 4-18
Outcalling permission, 4-20
Record-a-Call permission, 4-20
reinitializing, 5-49
status, 5-44
Mailbox Language, 5-14
changing, 5-53
mailbox message length
changing, 5-50
mailbox password
reinitializing, 5-48
mailbox size
changing, 5-50
Mailbox Transfer, 4-13, 5-20, 5-31
Mailboxes
for guests, 1-14
Manual VMS Cover, 1-12
Menu definition
description, 5-20
overview, 5-20
Menu Map, xiii
Menu prompt, 5-20
IN-2
message length
changing , 4-18
Record-a-Call, 4-21
Music On Hold, 1-10, 4-26
N
Night Menu Prompt, 4-14, 5-33
description, 1-6
factory-set prompt, 1-8
Night Service
overview, 1-9
Night Service button, 4-25
O
Outcalling
assigning, 4-19
guidelines, 5-4
verfying operation, 5-5
Outcalling permission
changing , 5-54
Outgoing call restriction, 4-7
P
PARTNER MAIL VS
connection to PC , 2-6
supported configurations, 4-2
upgrading, 4-2
Password
for subscribers, 1-13
for the System Manager, 5-2
PC Card , 4-41, 4-43, 5-76, 5-78
Personal greeting , xv, 1-13
personal operator, xv
Planning forms
communications system, 3-2
Problems
solving, 6-1
Programming
communications system, 3-1
Programming Main Menu
accessing the, 3-10
Index
R
V
receptionist
responsibilities , 5-8
Record-a-Call, 5-6
assigning, 4-20
Record-a-Call button, 4-34, 5-71
Record-a-Call permission
changing, 5-56
VMS Cover button, 4-31, 5-68
VMS Cover Rings, 4-30, 5-59
VMS Hunt Delay, 4-23
overview, 1-8
VMS Hunt Delay setting, 4-23, 5-36
VMS Hunt Group
extension assignment, 4-6
VMS Hunt Schedule
overview, 1-9
settings, 1-9
VMS Hunt Schedule setting, 4-24, 4-25, 5-38
VMS Line Coverage, 4-28, 5-61
Voice Mail Auto Dial button, 5-70
Voice mail coverage
for extensions, 1-12
Voice Mail Service
factory-set message, 1-14
overview, 1-13
Voice Mailbox Transfer
description, 1-13
Voice Mailbox Transfer (VMBox) button, 4-32, 5-69
Voice messaging system
features, 1-1
overview, 1-4
Voice messaging system programming
guidelines, 3-11
initial setup, 4-1
volume control, 1-13
S
Security, 1-15
Outcalling feature, 1-15
Security policy, 1-16
Selector Code, 1-7
Selector Code Action, 1-7
Selector Code Transfer, 4-12, 5-20, 5-21, 5-31
Selector codes, 5-20
Station Lock, 5-3
Station Lock button, 4-33, 5-70
Support, 6-1
customer, 6-1
System Administration Prompt Language , 4-8, 5-3
system backup, 4-41, 5-76
System Language, 4-9
System Manager
duties, 5-2
password for, 5-2
system operation
verifying, 4-35
System Programming Reference, xiii
system restore, 4-43, 5-78
system restore failure, 4-42, 5-77
system settings, restore, 5-78
system settings, restoring, 4-43
T
terminal emulation program, 4-38, 5-73
Terminology, xii
Transfer
for Automated Attendant Service callers, 5-20
Transfer Return Extension, 4-7
overview, 1-9
Tutor Service, 1-3, 5-6
menu, 5-6
IN-3
Call Voice Mail Service (Press Intercom 7 7 7 )
Enter Login (Press 9 9 # )
Enter Mailbox Password (Press 1 2 3 4 for factory default and # )
Select Programming Main Menu (Press 9 )
Automated
Attendant
(Press 3 )
Language
(Press 1 )
Line
Ownership
(Press 6 )
Mailboxes
(Press 4 )
Reports &
Backup/Restore
(Press 8 )
Specify AA #
Language
Mode
(Press 1 )
(Press 1 )
Monolingual
Mode
(Press 1 )
Yes
Bilingual
Mode
(Press 2 )
System
Language
(Press 2 )
Yes
Mailbox Number
(Enter Number
+#)
Day Menu
Bilingual
Mode?
No
Play Primary
Day Prompt
(Press 2 1 1 )
Play Day
Prompt
(Press 2 1 )
Play Secondary
Day Prompt
(Press 2 1 2 )
Play Menu
Definition & Annc.
(Press 2 2 1 )
Play Menu
Definition & Annc.
(Press 2 2 )
Modify Menu
Definition and/or
Day Prompt
(Press 6 )
Play Primary
Language
(Press 1 2 )
Play System
Language
(Press 2 )
Modify Menu
Definition and/or
Primary Day Prompt
(Press 6 )
Play Secondary
Language
(Press 2 2 )
Modify System
Language
(Press 6 )
Night Menu
Modify Primary
Language
(Press 1 6 )
Modify Secondary
Language
(Press 2 6 )
No
Bilingual
Mode?
Mailbox
Number
Exists?
Administer
Message Length
& Mailbox size
(Press 2 )
Reinitialize
Password
(Press 3 )
Reinitialize
Mailbox
(Press 4 )
Administer
Outcalling
(Press 5 )
Program Mailbox
Language
(Press 6 )
(Press 2 )
Yes
No
Bilingual
Mode?
Play Primary
Night Prompt
(Press 2 1 1 )
Play
Night Prompt
(Press 2 1 )
Play Secondary
Night Prompt
(Press 2 1 2 )
Modify
Night Prompt
(Press 6 )
Modify Primary
Night Prompt
(Press 6 1 )
Modify Secondary
Night Prompt
(Press 6 2 )
Automated
Attendant Lines
(Press 6 )
Yes
Yes
Lines
Assigned?
Review
Assigned Lines
(Press 1 )
Delete
Assigned Lines
(Press * 3 )
No
Add
Lines
(Press 2 )
Administer
Record-A-Call
(Press 7 )
Delete
Mailbox
(Press * 3 )
No
Create
Mailbox
(Press 4 )
Scan Line
Ownership
(Press 2 )
Run Configuration
Report
(Press 1 1 )
Assign Line
Ownership
(Press 4 )
System
Backup
(Press 8 )
Modify Line
Ownership
(Press 6 )
System
Restore
(Press 9 )
Delete Line
Ownership
(Press * 3 )
System Reset–
Save All
(Press
9 8 9 7 3 7 3 8)
PARTNER MAIL VS® System Programming Reference
To Program the PARTNER MAIL VS System
TO START PROGRAMMING
TO REPLAY A MENU
PRESS i 7 7 7
PRESS 9 9 and #
ENTER your Password
(factory setting is 1234) and #
PRESS 9 to access the Programming
Main Menu
PRESS * 4
TO RETURN TO THE PROGRAMMING
MAIN MENU
PRESS * 7
TO RETURN TO A PREVIOUS MENU
PRESS * #
Language
TO EXIT PROGRAMMING
PRESS * * 9
Automated Attendant
Automated Attendant
REFER to Form 1
PRESS 1 to program Language
REFER to Forms 3, 3A, 4, and 5
PRESS 3 to program Automated
Attendant Service
ENTER Automated Attendant number
REFER to Forms 3, 3A, 4, 4A, 5, and 5A
PRESS 3 to program Automated
Attendant Service
ENTER Automated Attendant number
TO MODIFY THE LANGUAGE MODE
TO MODIFY ASSIGNED LINES
PRESS 1 for Language Mode
PRESS 1 for Monolingual Mode or
2 for Bilingual Mode
PRESS
PRESS
ENTER
PRESS
TO MODIFY DIAL 0/TIMEOUT
EXTENSION—MONOLINGUAL MODE
TO MODIFY THE SYSTEM
LANGUAGE—MONOLINGUAL MODE
PRESS 2 for System Language
PRESS 6 to modify
ENTER the number of the desired System
Language
PRESS 9 to confirm
TO MODIFY THE PRIMARY AND
SECONDARY LANGUAGES—
BILINGUAL MODE
PRESS
PRESS
PRESS
PRESS
PRESS
ENTER
PRESS
PRESS
PRESS
PRESS
TO DELETE ASSIGNED LINES
PRESS
PRESS
ENTER
PRESS
6 for line assignment
*3 to modify
line number and #
9 to confirm
TO CHANGE SELECTOR CODE
ACTION TO DIRECT EXTENSION
TRANSFER—MONOLINGUAL MODE
TO MODIFY THE MENU DEFINITION
AND DAY MENU PROMPT—
MONOLINGUAL MODE
1 for Day Menu
6 to modify
a Selector Code 1 through 9
9 to modify
1 for Selector Code Transfer
an extension, Hunt Group, Calling
Group, mailbox, or Centrex
number and #
To program another Selector Code for
Selector Code Transfer, repeat
PRESS * # to approve
PRESS 1 to record the Day Menu Prompt
PRESS 1 after recording
PRESS * # to approve all changes
PRESS
PRESS
ENTER
PRESS
PRESS
ENTER
TO MODIFY ANNOUNCEMENT—
MONOLINGUAL MODE
ENTER
PRESS
PRESS
PRESS
PRESS
PRESS
1 for Day Menu
6 to modify
a Selector Code 1 through 9
9 to confirm
3 to play the Announcement
recorded for the Selector Code
an Announcement number
1 to rerecord the Announcement
1 after recording
* # to move up a menu level
* # to continue without
programming Selector Codes
# to approve all changes
PRESS 1 for Day Menu
PRESS 6 to modify
ENTER a Selector Code 1 through 9
PRESS 9 to modify
PRESS 5 for Direct Extension Transfer
To program another Selector Code for
Direct Extension Transfer, repeat
PRESS * # to approve
PRESS 1 to record the Day Menu Prompt
PRESS 1 after recording
PRESS * # to approve all changes
TO CHANGE SELECTOR CODE
ACTION TO MAILBOX TRANSFER—
MONOLINGUAL MODE
PRESS 1 for Day Menu
PRESS 6 to modify
ENTER a Selector Code 1 through 9
PRESS 9 to modify
PRESS 6 for Mailbox Transfer
ENTER a mailbox number
To program another Selector Code for
Mailbox Transfer, repeat
PRESS * # to approve
PRESS 1 to record the Day Menu Prompt
PRESS 1 after recording
PRESS * # to approve all changes
▼
PRESS
PRESS
ENTER
PRESS
PRESS
1 for Day Menu
6 to modify
0 for Dial 0/Timeout
9 to modify
an extension number and #
* # to approve
1 to record the Day Menu Prompt
1 after recording
* # to approve all changes
▼
PRESS
PRESS
PRESS
PRESS
ENTER
2 for System Language
1 for Primary Language
6 to modify
the number of the desired System
Language
9 to confirm
*#
2 for Secondary Language
6 to modify
the number of the desired System
Language
9 to confirm
for line assignment
to modify
number and #
to confirm
▼
PRESS
PRESS
PRESS
ENTER
6
2
line
9
PARTNER MAIL VS® System Programming Reference
To Program the PARTNER MAIL VS System
TO START PROGRAMMING
TO REPLAY A MENU
PRESS i 7 7 7
PRESS 9 9 and #
ENTER your Password
(factory setting is 1234) and #
PRESS 9 to access the Programming
Main Menu
PRESS * 4
TO RETURN TO THE PROGRAMMING
MAIN MENU
PRESS * 7
TO RETURN TO A PREVIOUS MENU
PRESS * #
TO EXIT PROGRAMMING
PRESS * * 9
Automated Attendant
Automated Attendant
Automated Attendant
REFER to Forms 3, 3A, 3B, 4, 4A, 5, and 5A
PRESS 3 to program Automated
Attendant Service
ENTER Automated Attendant number
REFER to Forms 3, 3A, 3B, 4, 4A, 5, and 5A
PRESS 3 to program Automated
Attendant Service
ENTER Automated Attendant number
REFER to Forms 3, 3A, 3B, 4, 4A, 5, and 5A
PRESS 3 to program Automated
Attendant Service
ENTER Automated Attendant number
TO CHANGE SELECTOR CODE
ACTION TO ANNOUNCEMENT—
MONOLINGUAL MODE
TO CHANGE SELECTOR CODE
ACTION TO SELECTOR CODE
TRANSFER — MONOLINGUAL MODE
TO MODIFY ANNOUNCEMENT—
BILINGUAL MODE
1 for Day Menu
6 to modify
a Selector Code 1 through 9
9 to modify
3 for Announcement
an Announcement number
1 to record the Announcement
1 after recording
* # to approve
* # to continue without
programming another Selector
Code, or
To program another Selector Code, repeat
PRESS 1 to record the Day Menu Prompt
PRESS 1 after recording
PRESS * # to approve all changes
PRESS 1 for Day Menu
PRESS 6 to modify
ENTER a Selector Code 1 through 9
PRESS 9 to modify
PRESS 1 for Selector Code Transfer
ENTER the extension or group number
To program another Selector Code for
Selector Code Transfer, repeat
PRESS * # to approve
PRESS 1 to record the Day Menu Prompt
PRESS 1 after recording
PRESS * # to approve all changes
▼
PRESS
PRESS
ENTER
PRESS
PRESS
ENTER
PRESS
PRESS
PRESS
PRESS
▼
1 for Day Menu
6 to modify
a Selector Code 1 through 9
9 to modify
7 for CentrexTransfer
a Centrex number and wait for
system to time out
PRESS 1 to continue
PRESS * # to approve
PRESS 9 to confirm
To program another Selector Code for
Centrex Transfer, repeat
PRESS * # to approve
PRESS 1 to record the Day Menu Prompt
PRESS 1 after recording
PRESS * # to approve all changes
PRESS
PRESS
ENTER
PRESS
PRESS
ENTER
1 for Day Menu
6 to modify
a Selector Code 1 through 9
9 to modify
1 for Selector Code Transfer
an extension, Hunt Group,
Calling Group, mailbox, or
Centrex number and #
To program another Selector Code for
Selector Code Transfer, repeat
PRESS * # to approve
PRESS 1 to record the Day Menu Prompt
in the Primary Language
PRESS 1 after recording
PRESS * # to approve
PRESS 2 to record the Day Menu Prompt
in the Secondary Language
PRESS 1 after recording
PRESS * # to approve
PRESS # to approve all changes
PRESS
PRESS
ENTER
PRESS
PRESS
ENTER
ENTER
PRESS
PRESS
PRESS
PRESS
PRESS
PRESS
PRESS
PRESS
PRESS
1 for Day Menu
6 to modify
a Selector Code 1 through 9
9 to confirm
3 to play the Announcement
recorded for the Selector Code
an Announcement number
1 to record the Announcement in
the Primary Language
1 after recording
* # to approve
2 to record the Announcement in
the Secondary Language
1 after recording
* # to approve
* # to move up a menu level
* # to move up another menu
level
# to approve all changes
▼
TO CHANGE SELECTOR CODE
ACTION TO CENTREX TRANSFER—
MONOLINGUAL MODE
TO MODIFY THE MENU DEFINITION
AND DAY MENU PROMPT—
BILINGUAL MODE
PRESS
PRESS
ENTER
PRESS
PRESS
TO MODIFY DIAL 0/TIMEOUT
EXTENSION—BILINGUAL MODE
PRESS
PRESS
PRESS
PRESS
ENTER
PRESS
PRESS
PRESS
PRESS
PRESS
PRESS
PRESS
1 for Day Menu
6 to modify
0 for Dial 0/Timeout
9 to modify
an extension number and #
* # to approve
1 to record the Day Menu Prompt
in the Primary Language
1 after recording
* # to approve
2 to record the Day Menu Prompt
in the Secondary Language
1 after recording
* # to approve all changes
PARTNER MAIL VS® System Programming Reference
To Program the PARTNER MAIL VS System
TO START PROGRAMMING
TO REPLAY A MENU
PRESS i 7 7 7
PRESS 9 9 and #
ENTER your Password
(factory setting is 1234) and #
PRESS 9 to access the Programming
Main Menu
PRESS * 4
TO RETURN TO THE PROGRAMMING
MAIN MENU
PRESS * 7
TO RETURN TO A PREVIOUS MENU
TO EXIT PROGRAMMING
PRESS * #
PRESS * * 9
Automated Attendant
Automated Attendant
Automated Attendant
REFER to Forms 3, 3A, 3B, 4, 4A, 5, and 5A
PRESS 3 to program Automated
Attendant Service
ENTER Automated Attendant number
REFER to Forms 3, 3A, 3B, 4, 4A, 5, and 5A
PRESS 3 to program Automated
Attendant Service
ENTER Automated Attendant number
TO CHANGE SELECTOR CODE
ACTION TO DIRECT EXTENSION
TRANSFER—BILINGUAL MODE
TO CHANGE SELECTOR CODE
ACTION TO ANNOUNCEMENT—
BILINGUAL MODE
TO SELECTOR CODE ACTION TO
SELECTOR CODE TRANSFER —
BILINGUAL MODE
PRESS 1 for Day Menu
PRESS 6 to modify
ENTER a Selector Code 1 through 9
PRESS 9 to modify
PRESS 5 for Direct Extension Transfer
To program another Selector Code for
Direct Extension Transfer, repeat
PRESS * # to approve
PRESS 1 to record the Day Menu Prompt
in the Primary Language
PRESS 1 after recording
PRESS * # to approve
PRESS 2 to record the Day Menu Prompt
in the Secondary Language
PRESS 1 after recording
PRESS * # to approve
PRESS # to approve all changes
PRESS
PRESS
ENTER
PRESS
PRESS
ENTER
PRESS
PRESS
PRESS
PRESS
PRESS
PRESS
PRESS
PRESS
TO CHANGE SELECTOR CODE
ACTION TO CENTREX TRANSFER—
BILINGUAL MODE
▼
PRESS
PRESS
PRESS
PRESS
PRESS
PRESS
PRESS 1 for Day Menu
PRESS 6 to modify
ENTER a Selector Code 1 through 9
PRESS 9 to modify
PRESS 1 for Selector Code Transfer
ENTER the extension or group number
To program another Selector Code for
Selector Code Transfer, repeat
PRESS * # to approve
PRESS 1 to record the Day Menu Prompt
in the Primary Language
PRESS 1 after recording
PRESS * # to approve
PRESS 2 to record the Day Menu Prompt
in the Secondary Language
PRESS 1 after recording
PRESS * # to approve
PRESS # to approve all changes
TO CHANGE SELECTOR CODE
ACTION TO MAILBOX TRANSFER—
BILINGUAL MODE
PRESS 1 for Day Menu
PRESS 6 to modify
ENTER a Selector Code 1 through 9
PRESS 9 to modify
PRESS 7 for Mailbox Transfer
ENTER a mailbox number and #
To program another Selector Code for
Mailbox Transfer, repeat
PRESS * # to approve
PRESS 1 to record the Day Menu Prompt
in the Primary Language
PRESS 1 after recording
PRESS * # to approve
PRESS 2 to record the Day Menu Prompt
in the Secondary Language
PRESS 1 after recording
PRESS * # to approve
PRESS # to approve all changes
▼
1 for Day Menu
6 to modify
a Selector Code 1 through 9
9 to modify
7 for Centrex Transfer
a Centrex number and wait for
system to time out
PRESS 1 to continue
PRESS * # to approve
PRESS 9 to confirm
To program another Selector Code for
Centrex Transfer, repeat
PRESS * # to approve
PRESS 1 to record the Day Menu Prompt
in the Primary Language
PRESS 1 after recording
PRESS * # to approve
PRESS 2 to record the Day Menu Prompt
in the Primary Language
PRESS 1 after recording
PRESS * # to approve
PRESS # to approve all changes
PRESS
PRESS
ENTER
PRESS
PRESS
ENTER
PRESS
1 for Day Menu
6 to modify
a Selector Code 1 through 9
9 to modify
3 for Announcement
an Announcement number
1 to record the Announcement in
the Primary Language
1 after recording
* # to approve
2 to record the Announcement in
the Secondary Language
1 after recording
* # to approve the
Announcements
* # to continue without
programming another Selector
Code, or
* # to program another Selector
Code, repeat
1 to record the Day Menu Prompt
in the Primary Language
1 after recording
* # to approve
2 to record the Day Menu Prompt
in the Secondary Language
1 after recording
* # to approve
# to approve all changes
▼
▼
REFER to Forms 3, 3A, 3B, 4, 4A, 5, and 5A
PRESS 3 to program Automated
Attendant Service
ENTER Automated Attendant number
PARTNER MAIL VS® System Programming Reference
To Program the PARTNER MAIL VS System
TO START PROGRAMMING
TO REPLAY A MENU
PRESS i 7 7 7
PRESS 9 9 and #
ENTER your Password
(factory setting is 1234) and #
PRESS 9 to access the Programming
Main Menu
PRESS * 4
PRESS * 7
TO RETURN TO A PREVIOUS MENU
PRESS * #
Automated Attendant
REFER to Forms 3, 3A, 3B, 4, 4A, 5, and 5A
PRESS 3 to program Automated
Attendant Service
ENTER Automated Attendant number
PRESS 1 for Day Menu
PRESS 2 for playback of the
Day Menu definition
PRESS 2 for playback of the Selector
Codes
PRESS 1 to play the recorded
Announcement assigned to the
Selector Code, or
PRESS # to skip
TO PLAY THE MENU DEFINITIONBILINGUAL MODE
PRESS 1 for Day Menu
PRESS 2 for playback of the
Day Menu definition
PRESS 2 for playback of the Selector
Codes
PRESS 1 to play the Primary Language
Announcement assigned to the
Selector Code, or
PRESS 2 to play the Secondary
Language Announcement
assigned to the Selector Code, or
PRESS # to skip
TO MODIFY THE NIGHT MENU
PROMPT—MONOLINGUAL MODE
PRESS 2 for Night Menu
PRESS 6 to modify
PRESS 1 to record the Night Menu
Prompt
PRESS 1 after recording
PRESS * # to approve
TO MODIFY THE NIGHT MENU
PROMPT—BILINGUAL MODE
PRESS 2 for Night Menu
PRESS 6 to modify
PRESS 1 to record the Night Menu Prompt
in the Primary Language
PRESS 1 after recording
PRESS * # to approve
PRESS 2 to record the Night Menu Prompt in
the Secondary Language
PRESS 1 after recording
PRESS * # to approve
PRESS # to approve all changes
TO EXIT PROGRAMMING
PRESS * * 9
Mailboxes
Mailboxes
REFER to Form 2
PRESS 4 to program Mailboxes
REFER to Form 2
PRESS 4 to program Mailboxes
TO PLAY A MAILBOX’S STATUS
TO ASSIGN/REMOVE OUTCALLING
FOR A MAILBOX
ENTER a mailbox number and #, or
PRESS # for the first mailbox
PRESS # to play the next existing
mailbox’s status
TO DELETE A MAILBOX
ENTER a mailbox number and #
PRESS * 3 to delete the mailbox
PRESS 9 to confirm
TO CREATE A MAILBOX
ENTER the new mailbox number and #
PRESS 4 to create the new mailbox
TO REINITIALIZE A PASSWORD
ENTER a mailbox number and #
PRESS 3 to reset the password to 1234
TO REINITIALIZE A MAILBOX
ENTER the mailbox number and #
PRESS 4 to reinitialize the mailbox
PRESS 9 to confirm
TO MODIFY MAILBOX MESSAGE
LENGTH AND SIZE
ENTER the mailbox number and #
PRESS 2 to administer mailbox message
length and size
PRESS 1 to confirm
ENTER the message length (2 to 60
minutes) and #
ENTER mailbox size (5 to 180 minutes)
and #
PRESS * # to accept
TO MODIFY A MAILBOX’S LANGUAGE
the mailbox number and #
6 to program Language
6 to modify
the number of the desired
language
PRESS 9 to confirm
ENTER
PRESS
PRESS
ENTER
ENTER the mailbox number and #
PRESS 5 to administer Outcalling
PRESS 9 to assign Outcalling, or
PRESS 6 to remove Outcalling
To assign/remove Outcalling for another
mailbox, repeat
▼
TO PLAY THE MENU DEFINITIONMONOLINGUAL MODE
TO RETURN TO THE PROGRAMMING
MAIN MENU
TO ASSIGN/REMOVE RECORD-ACALL FOR A MAILBOX
ENTER the mailbox number and #
PRESS 7 to administer Record-a-Call
ENTER a value from 1 to 60 minutes and
# assign Record-a-Call, or
PRESS 0 # to remove Record-a-Call
To assign/remove Record-a-Call for
another mailbox, repeat
Line Ownership
REFER to Form 6
PRESS 6 to program Line Ownership
TO SCAN LINE OWNERSHIP
PRESS 2 to scan
ENTER the line number and #, or PRESS
# to scan the first line number
that has an owner
LISTEN to the line owner’s name and
mailbox number
PRESS # to scan the next line
TO ASSIGN LINE OWNERSHIP
PRESS 4 to assign
ENTER the line number and #
ENTER the mailbox number and #
TO MODIFY LINE OWNERSHIP
PRESS 6 to modify
ENTER the line number and #
ENTER the new owner’s mailbox number
and #
TO DELETE LINE OWNERSHIP
PRESS * 3 to delete
ENTER the line number and #
PRESS 9 to confirm
PARTNER MAIL VS® System Programming Reference
To Program the Communications System for PARTNER MAIL VS
Place the Programming Overlay on the dial pad of the system display phone at extension 10*
TO START SYSTEM PROGRAMMING
PRESS
PRESS
PRESS
ENTER
f00
sg
sg
System Password if required
TO END SYSTEM PROGRAMMING
TO USE A SPECIFIC PROCEDURE
DIAL
# and three-digit procedure code
Example: # 5 0 5 for Hunt Group
Extensions
TO CYCLE THROUGH SYSTEM
PROGRAMMING PROCEDURES
TO CYCLE THROUGH AVAILABLE
SETTINGS
PRESS nd or pd
TO RETURN TO FACTORY SETTINGS
PRESS r
PRESS no or po
PRESS f 0 0
HUNT GROUP EXTENSIONS
GROUP CALL DISTRIBUTION
AUTOMATIC VMS COVER
DIAL
PRESS
DIAL
DIAL
#505
7 for the VMS Hunt Group
the extension number
1 = Assigned to group
2 = Not assigned to group ✓
PRESS nm to program the next
extension
DIAL
PRESS
DIAL
DIAL
#206††
7 for the VMS Hunt Group
a line number
1 = Assigned
2 = Not Assigned
3 = VMS Line Cover ✓
PRESS nm to program another line
DIAL
DIAL
DIAL
TRANSFER RETURN EXTENSION
LINE COVERAGE EXTENSION
DIAL
DIAL
DIAL
PRESS
#306†
the extension number
10 (the receptionist’s extension)
nm to program the next
extension
DIAL
DIAL
DIAL
PRESS
PRESS
#208**
a line number
an extension number
nm to program another line
r to unassign ownership
VMS HUNT DELAY—
PARTNER ACS 3.0 OR LATER
DIAL
#506
PRESS 1 or 2 for Mode
ENTER the line number
ENTER value from (0 to 6)
VMS HUNT DELAY—
ALL OTHER PARTNER SYSTEMS
DIAL
DIAL
#506
1 = Immediate ✓
2 = Delayed
#310
an extension number
1 = Assigned
2 = Not Assigned ✓
PRESS nm to program another
extension
VMS COVER RINGS—
PARTNER ACS 3.0 OR LATER
DIAL
#321
ENTER the extension number
ENTER value from (1 to 9)
VMS COVER RINGS—
ALL OTHER PARTNER SYSTEMS
DIAL
DIAL
NIGHT SERVICE BUTTON +
DIAL
DIAL
VMS HUNT SCHEDULE—
PARTNER ACS 3.0 OR LATER
DIAL
PRESS
ENTER
ENTER
#507
1 or 2 for Mode
the line number
value from (1 to 3)
VMS HUNT SCHEDULE
✓ = Factory Setting
+ = Button with Lights Required
DIAL
DIAL
#507
1 = Always ✓
2 = Day Only
3 = Night Only
#117**
one digit (1-9) for the number of
rings before the call is sent to the
voice messaging system)
✓ = 3 rings
#503
1 = Assigned
2 = Not Assigned ✓
3 = Select button** then PRESS a
programmable button (to assign
Night Service to that button)
If you use option 3 after a Night
Service button has been assigned,
the Night Service button moves
from the old button to the new
button you select.
AUTOMATIC EXTENSION PRIVACY
DIAL
DIAL
DIAL
#304
the extension number
1 = Assigned
2 = Not Assigned ✓
PRESS nm to program another
extension
*
Some systems allow programming from extension 11. Check the Programming and Use guide for the communications system.
†
In some countries, the procedure code for Transfer Return Extension is #309. Check the Programming and Use guide for the communications
system.
††
In some countries, the procedure code for Group Call Distribution is #205. Check the Programming and Use guide for the communications system.
** Line Coverage Extension (#208), VMS Cover Rings (#117), and option 3 of the Night Service Button (#503) procedure may not be available on your
system. Check the Programming and Use guide for the communications system.
PARTNER MAIL VS® System Programming Reference
To Program the Communications System for PARTNER MAIL VS
Place the Programming Overlay on the dial pad of the system display phone at extension 10*
TO START CENTRALIZED
TELEPHONE PROGRAMMING
TO PROGRAM ANOTHER FEATURE
AT THE SAME EXTENSION
TO ERASE A FEATURE OR AUTO
DIAL BUTTON
f00
sg sg
cg
the extension number to be
programmed
Buttons on which lines are assigned for the
extension light up to show the current Line
Ringing setting; remaining buttons can be
programmed with Auto Dial numbers or
features.
After you program one feature, continue
with the instructions in the box for the next
feature.
PRESS the programmed button
PRESS k
VMS COVER +
VOICE MAILBOX TRANSFER
VOICE MAIL AUTO DIAL BUTTON
PRESS a programmable button with lights
PRESS f 1 5†
PRESS a programmable button
PRESS f 1 4††
PRESS a programmable button
PRESS left i
DIAL
777
DO NOT DISTURB +
RECORD-A-CALL—
PARTNER ACS 3.0 OR LATER
PRESS
PRESS
PRESS
DIAL
PRESS a programmable button with lights
PRESS f 0 1
TO CHANGE SETTINGS FOR
ANOTHER EXTENSION
PRESS c g
DIAL
the new extension’s number
TO END CENTRALIZED TELEPHONE
PROGRAMMING
PRESS f 0 0
PRESS a programmable button with lights
PRESS f 2 4
CALL SCREENING—
PARTNER ACS 3.0 OR LATER
PRESS a programmable button lights
PRESS f 2 5
+ = Button with Lights Required
*
Some systems allow programming from extension 11. Check the Programming and Use guide for the communications system.
†
In some countries, the procedure code for Transfer Return Extension is #309. Check the Programming and Use guide for the communications
system.
††
In some countries, the procedure code for Group Call Distribution is #205. Check the Programming and Use guide for the communications system.