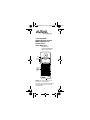
1
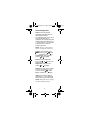
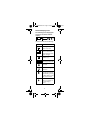
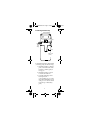
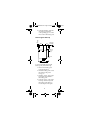
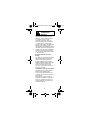
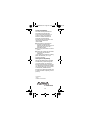
QkRef2Source.fm Page 1 Friday, April 13, 2001 1:14 PM
TransTalk®9000
Digital Wireless System
MDW 9040 Wireless
Pocket Phone
Quick Reference
503-801-191
Comcode 700060437
Issue 2, Feb. 2001
Mute
Volume
Control
Display
Softkeys/Column Buttons
Feature/
Program
(Exit for
9040 DCP
only)
Redial
Menu
1
2 ABC
3 DEF
Conf
4 GHI
5 JKL
6 MNO
Trans
7PQRS
8 TUV
9WXYZ
*
0OPER
#
Feat/P
Hold
9040
Headset Jack
NOTE: For more details on any
information in this Quick
Reference, please refer to the MDW
9040 Installation and Use manual
(503-801-190).
1
QkRef2Source.fm Page 2 Friday, April 13, 2001 1:14 PM
Handset Registration
STEP 1: Press the Handset
Registration activation button on
the Dual Radio Module
corresponding to the Line (1 or 2) to
which the handset will be
registered. The corresponding radio
module LED (Power LED for Line 1,
or Control LED for Line 2) will flash
to indicate that it is ready for
handset registration.
NOTE: There is a 5 minute time
limit to complete the registration.
STEP 2: At the handset, press
Menu and then press
until
the arrow appears to the right of
Configuration, then press the
Softkey (
) below Sel.
STEP 3: At the Configuration
menu, press
until the arrow
appears to the right of
Registration, then press the
Softkey (
) below Sel.
STEP 4: For single zone operation,
move the arrow to Zone 1, then
press the Softkey (
) below
Reg to complete the registration.
STEP 5: For dual zone operation,
repeat Steps 1 - 3, then register the
handset to the Zone 2 radio module.
NOTE: When registration is complete,
the LED should stop flashing.
2
QkRef2Source.fm Page 3 Friday, April 13, 2001 1:14 PM
Handset Display Icons
The following icons may appear
on the top line of the handset
display.
These icons indicate the following:
Icon
Indicates...
A message has been
left in voice mail.
Divided into four bars,
this icon shows the
Radio Frequency (RF)
signal strength.
Handset or headset is
off-hook (on).
This icon shows the
remaining battery life.
The vibrator has been
activated.
The alerter (ringer) is
turned on.
The handset
microphone has been
turned off by pressing
the Mute button on the
side of the handset.
There are more
options available on
the next display
screen.
3
QkRef2Source.fm Page 4 Friday, April 13, 2001 1:14 PM
Using the Handset for
Call-Handling
How To:
■
Turn the handset on and off
1. To place the handset off-hook
(on), press
.
2. To place the handset on-hook
(off), press
again.
■
Mute the handset or headset
— While on a call, press the
Mute button on the side of
the handset.
■
Unmute the handset
1. Ensure that the Mute icon is
displayed.
2. Press
(or hang up).
■
Adjust the Earpiece Volume
— Press
or, while on a
call, press and hold either the
up-volume control button
(^) or down-volume control
button (v) until you hear the
desired volume level.
■
Adjust the Ringer and
Warning/Notification Tones
— While you are not on a call,
press and hold either the
up-volume control button
(^) or the down-volume
control button (v) until you
hear the desired volume
level.
■
Place a Call
1. Press
.
4
QkRef2Source.fm Page 5 Friday, April 13, 2001 1:14 PM
2. Press
and (
)
until a triangle ( ) or square
( ) appears beside the line
you want to use.
3. Dial the call.
■
Answer a Call
— Press
when the call
rings on your handset.
NOTE: A triangle ( ) or a square
( ) appears beside the line to
which you are connected.
■
End a Call
— Press
■
.
Redial a Call
— Press
to take the
phone off-hook, then press
Redial .
Using the Handset Display
How To:
■
Select an Option on the
Handset Display
1. Ensure that the handset is
on-hook. If it is not, press
.
2. Press Menu .
3. Press the Softkey (
)
below Sel, then press
until the arrow is to the right
of the row on which the
selected option is located.
4. When the selected option is
flashing, press the Softkey
(
) below Sel.
5. Press Exit or Menu after your
selection is completed.
5
QkRef2Source.fm Page 6 Friday, April 13, 2001 1:14 PM
Display Menu Screens
Press Menu to enter Menu Mode.
Then press
until the arrow
is to the right of the selected option.
Press the Softkey below Sel.
Configuration Menus
SCREEN ONE: Registration
For Registration, choose Zone 1 or
Zone 2.
Button Mapping
For Button Map, Choose Partner or
Merlin/Partner, Merlin or Merlin
(410/820), or Merlin Magix or
Definity.
SCREEN TWO: Display
For the length of the Display,
choose 1 line or 2 lines.
Options Mode
SCREEN ONE: Ringer/Vibrator
For Ringer and Vibrator, choose
ON or OFF.
SCREEN TWO: Backlighting and
Pre-Select
For Backlighting and Line
Pre-Select, choose ON or OFF.
If you turn ON Backlighting, choose
the amount of time it will remain on
(7 or 15 or 30 seconds).
SCREEN THREE: Key Clicks
For Key Clicks, choose ON or OFF.
If you turn ON Key Clicks, choose
the volume: High or Med. or Low.
Test Mode
SCREEN ONE: Local or Wireless
Test Mode.
6
QkRef2Source.fm Page 7 Friday, April 13, 2001 1:14 PM
Fastening the Belt Clip
Back of Handset
(Latch...)
(...then
push
and
snap)
Belt Clip
Battery Pack
(outside)
To fasten the belt clip to the handset
(or battery pack), do the following:
1. Hold the handset (or battery
pack) so that the back of the
handset (or battery pack) is
facing you.
2. Hold the belt clip so that it
looks like the letter “T.”
3. Latch the right edge of the
belt clip into the
corresponding groove on the
inner side of the battery pack.
(The groove is about 1/4 inch
from the top of the battery
pack.)
7
QkRef2Source.fm Page 8 Friday, April 13, 2001 1:14 PM
4. Push the left edge of the belt
clip and snap it into the
corresponding groove on the
inner side of the battery pack.
Removing the Belt Clip
Belt
Clip
Edge
(Push out
to detach)
Belt Clip
“Larger”
Edge
Battery Pack
(inside)
To remove the belt clip from the
battery pack, do the following:
1. Remove the battery pack
from the telephone.
2. Hold the battery pack so that
the inside of the pack is
facing you.
3. Find the “larger” edge of the
belt clip that is fastened to
the battery pack.
4. Push the “larger” edge of the
belt clip out and away from
the battery pack until you
free the clip from the pack.
8
QkRef2Source.fm Page 9 Friday, April 13, 2001 1:14 PM
!
ELECTROMAGNETIC
COMPATIBILITY
WARNING
For safe and efficient operation of your
MDW 9040 Pocket Phone (wireless
telephone), observe these guidelines.
Your wireless phone is a radio
transmitter and receiver. When the
battery is installed, and the handset is
on, it receives and sends out radio
frequency (RF) energy. The MDW 9040
operates in the frequency range of
902-928 MHz. Your wireless phone uses
the digital Time Division Multiple Access
(TDMA) mode; the power is transmitted
in bursts at a 100 Hz-pulsed repetition
rate. The peak envelope transmit power
is 100 mW or less.
Exposure to Radio Frequency
Energy
The design of your MDW 9040 complies
with the latest safety levels from the
Institute of Electrical and Electronic
Engineers (IEEE) and the American
National Standards Institute (ANSI) with
respect to human exposure to RF
energy. To limit RF exposure even
further, you may choose to control the
duration of your calls.
FCC Radio Frequency Requirement
The base antenna on the Dual Radio
Module must be installed with a
minimum separation distance of 7.88
inches (20 cm) from the end user or any
nearby person.
Most electronic equipment, such as
equipment in hospitals, is shielded from
RF energy. However, RF energy from
wireless telephones may affect some
electronic equipment.
9
QkRef2Source.fm Page 10 Friday, April 13, 2001 1:14 PM
Cardiac Pacemakers
The Health Industry Manufacturers
Association recommends that a
minimum separation distance of six
inches (15.24 cm) be maintained
between a wireless handset and a
pacemaker to avoid potential
interference with the pacemaker. Also,
the following guidelines are
recommended.
■ Ensure there is ample distance
between the digital wireless
telephone and the pacemaker by not
placing the phone next to the
pacemaker implant.
■ Do not carry the handset in a breast
pocket.
■ Use the ear opposite the pacemaker
to minimize the potential for
interference.
If you suspect that interference is taking
place, take the battery out of your
handset immediately.
Hearing Aid Compatibility
Although the MDW 9040 is compatible
with inductively coupled hearing aids,
you should consult your physician or
hearing aid manufacturer to determine if
your hearing aid is adequately shielded
from external RF energy. The operation
of inadequately shielded medical
devices may be adversely affected when
a wireless handset is operating in close
proximity.
Prepared by
Avaya
Holmdel, NJ 07733-0330
10