1
Quadrus Ingest Machine
User’s Guide
Release 7.8
Revision #090401B
Copyright and Disclaimer
Product specifications are subject to change without notice and do not represent a
commitment on the part of Quadrus Technology Limited.
The software described in this document is furnished under a license agreement. You can
obtain a copy of that license by visiting Quadrus's Web site at www.quadrus.tv The terms of
that license are also available in the product in the same directory as the software. The
software may not be reverse assembled and may be used or copied only in accordance with
the terms of the license agreement. It is against the law to copy the software on any
medium except as specifically allowed in the license agreement.
This document is protected under copyright law. An authorized licensee of Quadrus Ingest
Machine may reproduce this publication for the licensee’s own use in learning how to use
the software. This document may not be reproduced or distributed, in whole or in part, for
commercial purposes, such as selling copies of this document or providing support or
educational services to others. This document is supplied as a guide for Quadrus Ingest
Machine. Reasonable care has been taken in preparing the information it contains.
However, this document may contain omissions, technical inaccuracies, or typographical
errors. Quadrus Technology Limited does not accept responsibility of any kind for
customers’ losses due to the use of this document. Product specifications are subject to
change without notice.
© 2009 Quadrus Technology Limited and its licensors. All rights reserved.
US patents under pending.
Avid, Avid Unity, Avid Interplay, Avid DNxHD, Avid DNxchange are either registered
trademarks or trademarks of Avid Technology, Inc. in the United States and/or other
countries. Apple and QuickTime are registered trademarks of Apple Computer Inc. All other
trademarks are contained herein are the property of their respective owners.
2
Contents
Using This Guide ....................................................................................................................... 6
Getting Started ......................................................................................................................... 7
On-line Help ......................................................................................................................... 8
Hardware and Software Requirements ............................................................................... 9
DNxchange HD Option ................................................................................................... 10
Storage ............................................................................................................................... 11
Connecting a DV Device ..................................................................................................... 12
Changing the Power Scheme ............................................................................................. 13
Starting Your Quadrus Ingest Machine Application ........................................................... 14
Quitting Your Quadrus Ingest Machine Application .......................................................... 14
Turning Off Your Equipment After Quitting ....................................................................... 15
User Interface ......................................................................................................................... 16
Channel Window ................................................................................................................ 17
Control Buttons .............................................................................................................. 19
Track selection................................................................................................................ 20
Clip name and extra fields .............................................................................................. 21
Output definition............................................................................................................ 24
Deck Control ................................................................................................................... 26
Log Window........................................................................................................................ 30
Output Mixer ...................................................................................................................... 31
Capturing ................................................................................................................................ 32
Capturing and Logging at the Same Time .......................................................................... 33
Capturing by Setting Both Marks ................................................................................... 33
3
Capturing by Setting Only One Mark .............................................................................. 34
Capturing On-the-Fly ...................................................................................................... 35
Capturing in Quick Record Mode ................................................................................... 37
Capturing with Time-of-Day Timecode........................................................................... 38
Scheduled Capturing........................................................................................................... 39
Scheduled Capturing from Deck ..................................................................................... 39
Working with Schedule List ............................................................................................ 40
Capturing in Satellite Mode or No Device Control ............................................................. 43
Using timecode from audio track ................................................................................... 44
Setting the Schedule Capture ......................................................................................... 45
Synchronous Recoding ....................................................................................................... 46
Logging .................................................................................................................................... 48
Logging with Quadrus Controlled Decks............................................................................. 49
Pausing the Deck While Logging ......................................................................................... 52
Working with the Avid Interplay ............................................................................................ 53
Connecting to the Avid Interplay ........................................................................................ 53
Selecting the Interplay Folder ............................................................................................ 54
Advanced Input....................................................................................................................... 55
Vertical Blanking Information ............................................................................................. 55
Vertical Blanking Interval Line Ranges............................................................................ 55
Displaying and Preserving Vertical Blanking Information .............................................. 56
Effects of Preserving Vertical Blanking Information on Compressed Video Quality ...... 56
Resolutions and Storage Requirements ................................................................................. 58
Compression and Ingest Machine application ................................................................... 59
Monitor Display Resolutions .............................................................................................. 60
Compression and Resolutions ............................................................................................ 60
4
Resolution Specifications ............................................................................................... 60
Resolution Specifications: SD Uncompressed ................................................................ 61
Resolution Specifications: Digital Video (DV) ................................................................. 61
Resolution Specifications: MPEG ................................................................................... 62
Storage Requirements........................................................................................................ 62
Estimating Drive Space Requirements ........................................................................... 62
Estimated Storage Requirements: SD Uncompressed ................................................... 64
Estimated Storage Requirements: DV ............................................................................ 64
Estimated Storage Requirements: MPEG....................................................................... 64
Maximizing Drive Space ..................................................................................................... 66
Application Settings................................................................................................................ 67
Global Settings ................................................................................................................... 67
Channel settings ................................................................................................................. 69
Appendix A. Installation Instructions ..................................................................................... 71
Downloading a software .................................................................................................... 71
Installation.......................................................................................................................... 72
5
Using This Guide
This guide contains the task-oriented instructions and conceptual information you need to
use features of your Quadrus Ingest Machine application.
This guide is intended for all users, from beginning to advanced.
The material in this document applies to the “Windows® XP SP2 Professional English”
operating system.
The documentation describes the features of all models. Therefore, your system might not
contain certain features and hardware that are covered in the documentation.
This document assumes that the system administrator has already installed the Quadrus
Ingest Machine software on the computer.
You can visit our web site www.quadrus.tv for information about the updates and to
contact us for support.
6
Getting Started
This chapter provides background information about the Quadrus Ingest Machine software.
The following topics are discussed:
On-line Help
Hardware and Software Requirements
Storage
Connecting a DV Device
Changing the Power Scheme
Starting Your Quadrus Ingest Machine Application
Quitting Your Quadrus Ingest Machine Application
Turning Off Your Equipment After Quitting
Quadrus Ingest Machine is powerful digital video/audio recording software designed to
work seamlessly in Avid environments. Ingest Machine offers the ability to simultaneously
recording a several channels into an Avid MXF format, but with that movie available
immediately for editorial as soon as recording begins.
7
On-line Help
On-line help is always available while you are working in Quadrus Ingest Machine.
On-line help: Click the Help>Contents and Index menu if you want to search for a
specific topic or command.
Tool tips: To find out what a button or other Ingest Machine control does, pause
your mouse pointer over it and a “tool tip” appears explaining its function.
8
Hardware and Software Requirements
Your Ingest Machine application requires specific hardware and software components
The following hardware platforms are supported:
Dell Precision R5400 Rack- Workstation
o Two Intel Quad-Core Xeon E5450
o 4GB RAM
o NVIDIA Quadro NVS 290
o Windows XP SP2 Professional English
Video Interface Boards
o Deltacast DETLA-sdi-e 40 (up to 2 boards)
o DekTec DTA-1241
Optional applications and hardware includes:
Avid Unity Client Software for the Fibre Channel and Ethernet connections2
ATTO Celerity FC-41XS/ES Fibre Channel Adapter
Avid DNxchange (seeDNxchange HD Option)
The only supported application, installed in addition to the Quadrus Ingest Machine is the
Avid Unity Client Software 5.1.1. Please make sure that no other application interferes with
the Quadrus software
1
2
DekTec DTA-124 is supported in older installations
Verified on Avid MN 5.1.1 client version
9
DNxchange HD Option
The Avid DNxchange™ is transcoder interface that converts high-definition (HD) media from
HD-SDI devices to Avid DNxHD media encoded in a Serial Digital Transport Interface (SDTI)
stream. The Avid DNxchange also transports 8 channels of embedded audio, longitudinal
timecode (LTC), and other ancillary data embedded in the HD SDI input stream.
Using this option the Ingest Machine can record the HD media using the existing standarddefinition (SD) serial digital interface. The Avid DNxchange is a rack-mounted I/O device
which can be populated with two encoder channels. For more information on features and
connections, see the “Avid DNxchange Installation and User’s Guide”.
10
Storage
The recorded files may be stored on:
Ethernet attached storage, any NAS, e.g. the Avid Unity storage device
Fibre Channel storage, any SAN, e.g. Avid Unity with FC option
Direct attached storage, e.g. the SCSI disk array
The used storage must provide sufficient bandwidth for writing multiple recording streams
in real-time. To calculate the necessary bandwidth in megabits, use the following formula:
(channel-count X (channel-resolution-speed + 1.2 (Mb/s) X channel-audio-count)) X 1.3
To obtain the channel resolution speed, see Storage Requirements
If storage is not able to keep up with the recording speed, the Ingest Machine will stop the
recording with the error message: Unable to write to media drive: not enough bandwidth
The Ingest Machine workstation may be equipped with internal media drives. These drives
may be used as a buffer for incoming media and loopback recording. These internal media
drives should be configured in a RAID 0 stripe.
11
Connecting a DV Device
You can capture DV25 or DV50 media directly from a DV camera or deck (a DV device). To
use a DV device, you must connect it to your system correctly. You can connect and use up
to 16 DV devices simultaneously.
To use your DV device in the Ingest Machine application:
1. Close the Ingest Machine (see Quitting Your Quadrus Ingest Machine Application)
2. Connect a DV device to 1394 port on your computer
When a DV device is connected to the 1394 port, and turned on, the Windows
operating system will detect the device and install any necessary drivers.
3. Start the Ingest Machine (see Starting Your Quadrus Ingest Machine Application)
The signal of the DV channel(s) should appear in the Ingest Machine channel
window
Please make sure Windows operating system recognizes the external DV devices before you
start the Quadrus Ingest Machine application
12
Changing the Power Scheme
When you run the Ingest Machine application, an Incompatible Power Scheme warning
window might appear. Some of the Windows standard power schemes available might
affect the performance of the capturing functions. Quadrus recommends you use the
Always On power scheme.
Always On
13
Starting Your Quadrus Ingest Machine Application
Your Quadrus Ingest Machine application is located by default in the following folder:
{Target Drive}\Program Files\Quadrus Technology\Quadrus Ingest Machine 7.8
The installation process adds a desktop icon and a pointer to your Quadrus Ingest Machine
application in the Start menu. For most users, these provide the easiest way to start the
application.
Your Quadrus Ingest Machine application does not start properly if the application file is
moved from the Quadrus Ingest Machine application folder.
The Quadrus Ingest Machine can only be operated from the full privileged Administrator
account
Quitting Your Quadrus Ingest Machine Application
When you end a work session on your Quadrus Ingest Machine application, you must first
quit the application, and then turn off your equipment. For more information on turning off
your equipment, see Turning Off Your Equipment After Quitting
To quit your Quadrus Ingest Machine application and leave the application immediately:
Click the Close button at the far right for the main window’s title bar. A confirmation
message box opens.
14
Turning Off Your Equipment After Quitting
When you finish using your system and want to turn it off completely, follow these steps to
avoid damaging your system or media storage drives.
Quit your Quadrus Ingest Machine application before turning off your equipment. For more
information, see Quitting Your Quadrus Ingest Machine Application
To turn off your equipment:
1. Turn off the system by doing the following:
Select Start menu>Shut Down. The Shut Down Windows dialog box opens
2. Turn off peripheral devices (such as monitors and speakers)
3. Turn off external storage devices
4. Turn off all other hardware
Never remove media drives from your Quadrus system when it is turned on. Shut down the
computer, and then remove the drives.
15
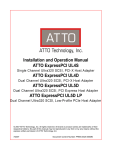
User Interface
When the Ingest Machine is starting, the main application window will have three different
window types: The Channel window(s), The Log window and the Audio Mixer. Each window
can be hidden by pressing the close button in the right-top window’s corner. Hidden
windows can be restored from the main application window Tools menu. The Channel
window(s) can be restored by pressing the Channel Activation button in the main
application window.
In this chapter the following topics are discussed:
Channel Window
Log Window
Output Mixer
Channel Window
Channel Activation
Button
Output Mixer
Bu
Log Window
16
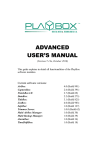
Channel Window
The Channel window is a central location for important information and for management of
your ingest channel. The following topics provide basic information about the Channel
window.
The Channel window provides controls for cueing, marking, and logging footage, and
specifies capturing parameters such as source and target locations.
Channel window is organized in panes:
Audio Monitor
Video Monitor
Control Buttons
Track Selection
Clip name
and extra fields
Output definition
Deck Control
17
The following table describes the panes available in the Channel window:
Pane
Function
Video Monitor
Displaying the incoming video stream in half resolution. The
viewing mode can be set as 4:3 mode or 16:9 for widescreen
monitoring. See the Application Settings for details. While
recording the banner REC is shown on the screen in the righttop corner.
Audio Monitors
Audio VU/peak levels (conforming IEC 60268-18) can be
monitored and corrected accordingly. Clicking on the peak
level value will reset it.
Control Buttons
Provides basic management functions such as Record/Stop,
Reset and Settings.
Track selection
Allows selecting the tracks for recording.
Clip name and extra fields
Provides the clip name and optional information
Output definition
Selects the video resolution and other output parameters
Deck Control
Deck settings and deck management
18
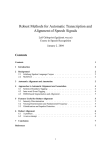
Control Buttons
The following illustration shows the Control Buttons:
Record
Capture/Log
Trash
Mode
Settings
Reset
Toggle Source
The Record button starts and stops the recording.
The Trash button stops the recording and deletes the currently recorded clip after
confirmation.
The Capture/Log Mode button switches the Channel window for logging, otherwise the
Channel window works in capture mode. Logging can be done only when a deck is available.
See Logging for details.
The Toggle Source button switches the Channel window between deck and satellite mode.
The satellite mode is used for signals that need no control from the Ingest Machine. See
Capturing in Satellite Mode or No Device Control for satellite control pane description.
The Channel Settings button displays the Channel settings dialog. See Channel settings for
details.
The RESET button is used to restart channel if the signal is lost. The condition of the lost
signal is indicated by NO SIGNAL banner in the video monitor pane. The reset button
eliminates the banner and restarts the source acquisition. This button is disabled during
recording mode on that channel.
19
Track selection
Each channel can record the video track, up to 8 audio tracks and timecode track from the
source signal. The track selection buttons selects the appropriate video, audio and
timecode tracks for recording. The track will be recorded if the track button is selected and
the signal on that track is present.
Channel Selection Buttons
To perform the track selection click the Channel Selection buttons
The video signal must be always present for recording. You cannot record audio only in this
version of the Ingest Machine
When you use a deck, the TC (timecode) track is selected by default, and the system
captures the timecode from the source tape. If you deselect the TC button, the system
captures with time-of-day timecode. For more information, see Capturing with Time-of-Day
Timecode
20
Clip name and extra fields
Clips can be named and extra fields added by typing the appropriate information into this
pane. This information can be added any time before or during the recording. If no name is
supplied, the Clip will have default name “Unknown Name.X”, where X is an increasing
number.
Extra Field Selection Button
To name a clip before or during capturing:
1. Click the arrow in the Channel window to display the Name box
2. Type a name for the clip
Adding Extra Text Fields
In addition to the Name field, more fields can be added to the clip.
When you click the Extra Fields Selection button in this pane, the Field Selection dialog box
opens. The Field Selection list includes any extra fields already created, in addition to any
user-defined fields. Three fields are pre-created: Comments, Project and Tape. The fields
you select in the Field Selection list will appear in the Channel window below the Name
field if activated.
Up to 10 extra fields can be shown in the Channel window
21
To add the extra fields:
1. Click the Extra Field Selection button
The Field Selection dialog box opens
2. Click the New Field button
The New Field Name dialog box opens
3. In the Field Name text box, type the name you want to appear as a field in the
Channel window
4. Click OK in the New Field Name dialog box
The Field Selection list opens with your new text field selected
5. Click OK in the Field Selection dialog box
The new text field appears in the Channel window
22
To display or hide extra fields:
1. Click the Extra Field Selection button
The Field Selection dialog box opens
2. Check the box for fields that you want to display in the Channel window
3. Uncheck the box for fields that you want to hide in the Channel window
4. Click OK.
Only the selected fields appear in the Channel window.
To delete extra fields:
1. Click the Extra Field Selection button
The Field Selection dialog box opens
2. Select the field that you want to delete with the left mouse button
3. Click the right-mouse button on the selected field and choose Delete from pop-up
menu
4. Click OK in the Field Selection dialog box
The three pre-created extra fields Project, Tape and Comments cannot be deleted
23
Output definition
This pane allows setting of the video resolution, target drive and the destination Interplay
folder.
Interplay Folder
Target Drive
Video Resolution
Time-remaining display
Video Resolution
Video resolution refers to the dimensions and the amount of compression in a video media
file. The Ingest Machine application offers for selection list of possible resolutions
depending on such factors as the version of your Ingest Machine application, your input
interface, and the video signal standard.
For 25-fps and 30-fps projects, the Video Resolution list can show the two-field interlaced
resolutions
For 25p projects, the list shows progressive, full-frame resolutions.
For more information about resolutions, see Resolution Specifications.
To select the video resolution, click on the Video Resolution button and select from the list
of available resolutions.
For SDTI and FireWire inputs, the application automatically selects the correct resolution.
Target Drive
You select target drive as the destination for audio and video media files created when you
capture from the list of available drives. When drive is selected, the time-remaining display
shows the number of hours, minutes, seconds, and frames that are available for the
resolution you selected.
24
You can store your media files in two places simultaneously for redundancy (Mirror Mode).
Files will be placed in the following directory:
{Target Drive}\Avid MediaFiles\MXF\{Hostname}.X
where X is an increasing number. The Ingest Machine will automatically change the folder,
when 5000 files per folder limit is reached
To use the Mirror Mode:
1. Open the Channel Options dialog by pressing the Options button in the selected
Channel window
2. Check the Mirror mode option
3. Close the Options dialog by pressing the OK button
The second drive selector with its time-remaining display will appear
Mirror drive selector
Mirror time-remaining display
selector
Interplay Folder
The Interplay Folder dialog box allows you to set the Interplay database location. The Ingest
Machine will check in the assets to the Interplay Engine automatically after the recording is
finished. See Working with the Avid Interplay for more information
25
Deck Control
This pane allows you to select a deck from a list of decks connected to your system. If decks
are controlled from a RS-422 interface, deck to control can be chosen freely. It is advised to
select the deck with video connected to present channel.
For control of the 1394 decks connected to this channel, you should select the HOST1394
menu item in the Deck Selection dialog.
Deck selection
To control the deck you can push the buttons associated to the deck function, like Play,
Stop, Pause etc.
Selecting a Deck
The Deck Selection button allows you to select decks you want to control
Before selecting, deck must be properly connected to the system.
You have two interface options for control of your deck:
RS-422 interface which supports the Sony 9-pin protocol
IEEE 1394 AVC interface
The RS-422 interface is supported by the Quadrus RS-422 VTR controller
For decks connected to the Ingest Machine by 1394 interface the control and timecode will
be automatically supplied.
26
For decks connected to the Ingest Machine by SDI interface, the SDI embedded timecode
signal D-VITC or RP 188 must be used. This function must be already activated when you
connect the deck. Most decks support this function activation from the menu.
To select the deck:
1. Click the Deck Selection button. The Deck Selection dialog box will appear
2. Select the deck location (source port). You will see the deck’s vendor and model if
the deck is properly connected to the system
3. Press OK button. The deck controller will be activated in the Channel window
For use the D-VITC signal:
Turn on the D-VITC in the deck menu
Select the lines to insert the D-VITC. You must insert the D-VITC signal in two lines
The D-VITC signal must be in 19 and 21 lines for 50i or 16 and 18 lines for 59.94i
If the D-VITC signal is not appear in the output signal, some decks require to set the
blanking lines to the “THROU” mode
27
Check the D-VITC or RP 188 timecode:
1. Click the Toggle Source button until the Satellite Mode icon appears
2. Click the TC Source button, and select the VITC or LTC timecode
3. The timecode value displayed by Ingest Machine must be equal to the timecode
value displayed by the deck
Using a Memory Mark
You can add a memory mark associated to a particular location on a tape. You can then use
the Go to Memory button to move through the tape to the marked location. You can add
one mark only.
Clear
Timecode value
Mark
Go to
To use a memory mark:
Click the Mark Memory button in the Channel window to mark the location.
Click the Go to Memory button to move through the tape to the marked location.
Click the Clear Memory button to clear the memory mark.
Using the Tape Position Marks
These controls are used for Logging and specific recording modes. See Logging and
Capturing and Logging at the Same Time for more information. The usage of tape position
buttons is similar to the memory mark buttons.
The duration field is automatically calculated from the timecode in the IN and OUT fields. If
this value is entered manually, the OUT timecode will be adjusted accordingly.
Timecode IN value
Mark IN
Mark OUT
Timecode OUT value
Timecode Duration
28
Goto IN Clear IN
Clear OUT
Goto OUT
Selecting a Custom Preroll
The Custom Preroll option and menu in the Channel window allow you to select how many
seconds the tape rolls before the capturing starts.
Custom Preroll option
Custom Preroll menu
To use a Custom Preroll:
1. Check the Custom Preroll option
2. Select the preroll value from the menu
To disable a Custom Preroll:
1. Uncheck the Custom Preroll option
The default preroll value (5 sec) will be used
29
Log Window
The Log window lists the information about the recorded files, such as source channel,
name, duration etc… The information as added to the log window list when recording is
finished successfully.
It is possible to export the AAF composition file for the selected clip from the list.
For export AAF file:
Click the right-mouse button on the selected clip and choose Export from pop-up
menu
Select the destination file name and folder, and click the Save button in the Export
dialog box.
30
Output Mixer
The Output Mixer window allows managing the sources for audio monitoring. You can
monitor (listen) two audio tracks simultaneously. Both tracks should come from the same
channel.
Channel selection
Track selection
Mute
Peak Level Value
Audio Level Indicator
You need to configure your audio output device before you can interact with the Output
Mixer. See Global Settings for details.
The Channel selection button selects the source channel
The Track selection buttons selects the source audio track for monitoring.
The Mute button allows to enable/disable the selected track for audio monitoring
The Audio Level Indicators display the audio level and peak value in dB. Clicking on the
peak level value will reset it.
31
Capturing
Capturing is the process of creating digital media from video and audio input. When you
capture, you convert source material into media files that contain the digital audio and
video. The basic procedures you need to capture media are described in the following
topics:
Capturing and Logging at the Same Time
Scheduled Capturing
Capturing in Satellite Mode or No Device Control
Synchronous Recoding
The capture can happen only if the source signal is present. The Ingest Machine gives
indication on the presence of the source signal. If the signal is lost, the banner NO SIGNAL
appears in the video monitor pane. The channel can be restarted with the RESET button.
See Track selection for more information.
If the signal is lost during recording, the Ingest Machine takes the same action as if the Stop
button is pressed: the current media recording is stopped and stored; the schedule list is
terminated.
32
Capturing and Logging at the Same Time
There are several ways to capture and log at the same time:
Capturing from a mark IN to a mark OUT: This method lets you specify the exact
timecode location to begin and end capturing. You can specify both marks;
alternatively you can set only one mark and let your Ingest Machine application
enter the other mark on-the-fly.
These procedures are described in Capturing by Setting Both Marks and Capturing
by Setting Only One Mark.
Use this method in the following circumstances:
o If logs exist in written or printout form but not in the proper format for
quick import into the system
o If the IN and OUT points are rough and need to be double-checked for
accuracy
o If you are familiar enough with the source material to estimate the
timecode for the mark IN, the mark OUT, or both, quickly and accurately
Capturing on-the-fly: This method is easier than setting marks, but it is less precise.
It involves using the deck controls in the lower left corner of the Channel window to
cue, play, and stop the source footage manually while capturing. These procedures
are described in Capturing On-the-Fly
Two additional techniques you can use when capturing and logging at the same time are
described in Capturing with Time-of-Day Timecode and Capturing in Satellite Mode or No
Device Control
Capturing by Setting Both Marks
To capture by specifying a mark IN and a mark OUT:
1. Select the proper Capture settings as described in this chapter
2. (Optional) Provide the clip name and the extra-fields.
See Clip name and extra fields
3. (Optional) Select the Interplay Folder (see Working with the Avid Interplay)
4. Set either a mark IN or a mark OUT for the clip you want to capture, using one of
the following methods:
33
Use the deck controls in the Channel window. Cue your source tape to where you
want to start or end the clip, and click the Mark IN or Mark OUT button.
If the material starts at a known IN point or ends at a known OUT point, you can
type the timecode in the display area next to the mark. Press Enter to enter the
mark.
To double-check the accuracy of the IN or OUT point, click the Go to IN button. The
system cues the tape and pauses the deck at the mark. You can play the tape and
reset the mark, if necessary.
5. Finish logging the clip, using either of the following methods:
Set the corresponding IN or OUT point.
Type a timecode for the clip’s duration in the text box next to the Duration
mark (below the mark OUT) in the format HH:MM:SS:FF.
The system automatically calculates the appropriate timecode for the corresponding mark
IN, mark OUT, or duration.
6. Click the Record button in the Channel window
The Channel window automatically rewinds the tape to the preroll point before the
IN point of the clip, and the tape begins to play. The Record button becomes a
bright green Stop button.
When the tape reaches the clip’s OUT point, capturing stops and the system creates
a new clip. It also enters basic log information for each clip, consisting of the mark
IN, the mark OUT, the duration, and any other information typed in during the
capture procedure.
Capturing by Setting Only One Mark
To set only one mark and enter the other mark on-the-fly:
Mark an IN point and click the Record button to begin capturing. Then, click the
Record button again to stop capturing on-the-fly and mark an OUT point.
This method is useful if you do not need a precise OUT point. You save time
because you do not have to shuttle to locate the OUT point before capturing
34
Mark an OUT point only, then move to a position on the tape that is a few seconds
before where you want to start capturing. Play the tape and then immediately click
the Record button to begin capturing on-the-fly.
When the tape reaches the clip’s OUT point, capturing stops.
This method is useful if you do not need a precise IN point, but do need to stop at a
precise OUT point, for example, just before a timecode break.
Capturing On-the-Fly
Use the capturing on-the-fly method in any of the following circumstances:
If you need to begin editing immediately and no adequate logs exist for importing
into the system or setting marks
If your source tape does not have timecode
If you are capturing from a live source, such as a satellite feed, or an in-house
router
If you are capturing from a source deck that cannot be controlled by the Channel
window
There is a slight delay of several frames after you manually select a spot to either start or to
stop capturing. Therefore, use this method when you do not need precise beginning and end
points in your clip.
To capture on-the-fly:
1.
2.
3.
4.
Select the proper capture settings
(Optional) Provide the clip name and the extra-fields. See Clip name and extra fields
(Optional) Select the Interplay Folder. See Working with the Avid Interplay
Use the deck controls in the bottom left corner of the Channel window to locate
the position on the tape where you want to start capturing.
35
5. To begin capturing, play the deck; when it gets up to speed, click the Record
button.
Make sure you have cleared any previous marks so the deck does not begin cueing to the
previous location.
Capturing begins within a few frames, and the timecode for the clip’s IN point
appears.
6. Click the Pause button at any time to pause play.
You can also abort the capture procedure by clicking the Trash button. The clip is
discarded.
7. To stop capturing and enter the OUT point of the clip, click the Stop button.
The system creates a new clip. It also enters basic log information for each clip,
consisting of the mark IN, the mark OUT, the duration, and any other information
typed in during the capture procedure.
36
Capturing in Quick Record Mode
Quick Record mode allows the deck to control the capturing of media into Ingest Machine
application. When Quick Record mode is enabled, the Ingest Machine application starts
capturing automatically whenever the servo-lock signal is detected from the deck.
When Servo Lock mode is detected (the deck is playing), capturing begins and continues
until play is stopped, at which point it will wait for the next servo-lock signal.
To use Quick Record mode, you must connect a deck that supports servo-lock signals to the
system. For information about the cable connection, see Selecting a Deck
To use Quick Record mode:
1. Click the Toggle Source button until the Deck Capture icon appears.
2. Click the Select Deck button, and select your deck.
See Selecting a Deck for more information.
3. Check the Servo Lock Mode option
4. A check mark appears in the button and the Toggle Source button changes to the
Quick Record Mode icon.
5. Press the deck’s Play button.
6. The system starts capturing when the deck is in servo lock and stops capturing
when the deck is not in servo lock (for example; stopped, rewinding, or shuttling).
During Quick Record mode, the timecode display for the deck shows the timecode followed
by “* LOCAL”; for example: 00;01;05;14 * LOCAL.
The following table lists messages that might appear in the message area if the appropriate
conditions for the Quick Record mode are not present. The second column recommends
what you can do to be ready for the Quick Record mode.
37
Quick Record Condition Messages:
Message
No deck
No tape in deck
No source tape selected
Selected deck will not Servo Lock
Cause or Action Required
A deck is not selected in the Channel window or the system does not detect
a deck. Make sure the deck is connected, turned on, and selected in the
Channel window.
The system does not detect a tape in the deck. Make sure a tape is in the
deck.
Give the source tape a name in the Channel window. Click the Source Tape
Display button and name the tape.
Some deck models do not generate a servo-lock signal. This is defined in the
deck’s template.
If this message appears, make sure you have the correct deck selected in the
Deck Selection menu. If the message continues, you cannot use the deck with
Quick Record mode.
Deck not in Local mode
Quick Record mode requires the deck to be in Local mode.
Capturing with Time-of-Day Timecode
When you capture with a Quadrus-controlled deck, you can capture your footage with
time-of-day timecode rather than source timecode.
To capture with time-of-day timecode:
1. Select the proper Capture settings
2. When selecting tracks, deselect the TC button
3. Capture by using any of the techniques described in Capturing and Logging at the
Same Time
38
Scheduled Capturing
Unlimited amount of clips from various tapes can be captured in a single session, sorted by
tape ID and ascending timecode. Once the capture session is initiated, the only operator
assistance needed will be to change tapes when prompted.
Content coming from live sources such as satellite feeds can be automatically captured
based on a schedule loaded from the ALE formatted file.
The schedule list contains entries with: clip name, start/end and duration timecodes. Tape
name and video resolution can optionally be specified for each clip. If tape name is not
given, the default tape name “New Name” is used. If resolution name is not given, the
current video resolution is used.
After you have loaded a schedule (see the Working with Schedule List) or have manually
logged a group of clips into a schedule (see the Logging), you can automate the capture
process by using your Ingest Machine application’s schedule-capturing capabilities. When
you schedule capture, you open a schedule, select the clips you want to capture, and press
Record button. After the clip is recorded, it is deselected from the schedule list.
The following topics provide more information about schedule capturing from logged clips:
Scheduled Capturing from Deck
Working with Schedule List
Scheduled Capturing from Deck
Before starting scheduled capturing from a deck, the deck must be properly connected and
configured. See Selecting a Deck for details.
Your Ingest Machine application automatically finds the start and end timecode for each
clip and captures it. To schedule capture, source tapes must have timecode that matches
the timecode for the selected clips. Before the capture starts, the system requests
acknowledgment for the loaded tape.
39
Working with Schedule List
Schedule list can be loaded from an ALE file, entries may be marked for recording or
deleted, parameters can be changed and resulting schedule saved to an ALE file.
Scheduled Record button
The Scheduled Capture button opens the Scheduled Capture dialog box for working with
schedule list.
40
The following table lists the elements in the scheduled capture dialog box:
Element
Scheduled Capture mode option
Schedule list
Select All/None buttons
Load/Save buttons
Description
Enables and disables the scheduled capturing session.
Contains a list of scheduled satellite feed capture sessions. Each item in the list
contains:
Name to give the created clip
When to start capturing (timecode)
When to end capturing (timecode)
How long to continue capturing (timecode)
Tape name (optional)
Video resolution (optional)
Select/Deselect clips for capturing
A schedule list can be saved as an Avid ALE file with the Save button and later
recalled with the Load button.
To load and to prepare a schedule list:
1. Open a Scheduled Capture window in a selected Channel window by pressing the
Scheduled Record button
2. Select the Scheduled Capture Mode option to activate the schedule mode. The controls
to work with schedule become available
3. Press the Load… button
4. Select the source Avid ALE file from the list and click the Open button
5. Uncheck or delete some clip entries to exclude from capture session if necessary
6. Change the video resolutions for selected clips by double clicking on the video
resolution entry. Default resolution corresponds to the currently selected video
resolution. See Video Resolution for details.
If the loaded schedule contains incorrect (impossible) video resolution specification it is
replaced by current video resolution. See Video Resolution for details
7. Click the OK button. The Capture Schedule button changes to green and the Toggle
Source button displays the icon with a clock.
You can save a schedule as an Avid ALE file and load it at a later date
41
To disable a scheduled capture:
1. Click the Toggle Source button until the Satellite Mode icon appears.
2. Click the Capture Schedule button.
The Scheduled Capture dialog box opens.
3. Uncheck the Scheduled Capture Mode option
4. Click the OK button. The Capture Schedule button changes to gray and the clock
disappears from the Toggle Source button.
42
Capturing in Satellite Mode or No Device Control
Satellite mode using external timecode is especially useful for live events, dramatic
multicamera shows.
If you are taking a feed from a source based on a time-of-day timecode generator, setting
IN and OUT points are especially useful. When the time of the external timecode source
matches the IN point, your Quadrus system begins to capture. Capturing stops when the
external timecode matches the OUT point.
TC Source
To prepare for capturing with external timecode:
1.
2.
3.
4.
5.
Click the Toggle Source button until the Satellite icon appears.
Select the audio and video tracks. See Track selection
Select the destination media drive. See Target Drive
(Optional) Select the Interplay Folder. See Working with the Avid Interplay
(Optional) Provide the clip name and the extra-fields. See Clip name and extra fields
43
6. Click the TC Source menu, and select the timecode source
The menu contains following choices:
Internal: Uses internal system timecode.
Audio 1 - Audio 8: Deembedding timecode from the selected audio track
VITC or LTC: Detects timecode over a SDI (D-VITC or RP 188) or 1394 interface.
When using D-VITC, the D-VITC signal must be in 19 and 21 lines for 50i or 16 and 18
lines for 59.94i
7. Click the Record button to start and stop capturing of each clip
Using timecode from audio track
The Quadrus Ingest Machine can extract the SMPTE 12M (LTC) timecode from the source
audio track. This audio track can be selected from the TC source menu in the Satellite
mode. This is used when the timecode is not mixed into the source stream as D-VITC or RP
188. The extracted timecode may be used for synchronization of several sources in
simultaneous recording, like a multi-cam shooting.
To use the audio timecode option, the signal level must be -20db +-5db
44
Setting the Schedule Capture
When Satellite mode is enabled, the Schedule Capture option allows you to schedule a
capturing session for upcoming live satellite feeds
When Scheduled Capture mode is enabled, the Satellite Mode icon includes a clock,
the Scheduled Capture button changes to green.
To enable a scheduled capture:
1. Load the schedule list file. See the Working with Schedule List
2. To make sure that the Scheduled Capture Mode option in the Schedule window is
enabled and active.
To disable a scheduled capture:
1. Click the Toggle Source button until the Satellite Mode icon appears.
2. Click the Capture Schedule button.
The Scheduled Capture dialog box opens.
3. Uncheck the Scheduled Capture Mode option
4. Click the OK button
45
Synchronous Recoding
Your Quadrus Ingest Machine application allows you to record several channels
synchronously, using the single timecode for synchronization. The clips after recording will
have the same start timecode. You can simultaneously control several channels on the
single or multiple stations. You should have the Ethernet connection between multiple
machines for this to work.
To use the synchronous recording process:
1. Run the Ingest Machine application on all stations
2. On all machines, one by one, set all channels to the Satellite mode and prepare
them for the Satellite recording. For more information, see the Capturing in
Satellite Mode or No Device Control
3. In the Channel settings, specify the clip name suffix or prefix to make a channelspecific name. Otherwise, all channels will have the same clip name.
4. Select one station as master control machine by opening the Quadrus SyncTool on
that machine by clicking the Tools>SyncTool menu. The SyncTool application
window will appear.
5. Click the Add Server button to enter the network machine names. The local
machine name may be entered as a single dot “.”. The list of participating machines
will appear with status of available channels
46
6. You can exclude some channels from the synchronous recording by unchecking
selected channels
7. Enter the clip name
8. Click the Record button for the start of record
9. Clip Stop button for the stop record
47
Logging
Logging is the process of entering information about source material into a schedule at the
beginning of the capturing. Logging can be done only when a deck is available.
You can get schedule list into your application either by loading an Avid ALE file or by
entering the information directly. Logging can be done automatically or manually, before
capturing or at the same time as capturing.
When you load an Avid ALE files or log directly into an application, you provide your Ingest
Machine application with frame-accurate clip information (such as starting and ending
timecodes). Your application uses this information to capture the source footage.
You can load any shot log created or converted to meet Avid log specifications. You can also
combine or merge events while importing a log so that fewer master tapes require
capturing. The system imports any additional information logged with each clip. For more
information, see “Understanding Avid Log Specifications” in the Avid Help.
48
Logging with Quadrus Controlled Decks
When you log with a compatible tape deck controlled from within your Ingest Machine
application, you can automate part of the logging process by using buttons to enter frame
accurate timecode information from the deck.
Log Button
For information about connecting a compatible deck to your system, see Selecting a Deck
To log clips from a Quadrus-controlled deck:
1. Make sure the deck is properly connected and turned on.
2. Select the Channel, where you want to store the clips.
3. If the Channel is not currently in Log mode, click the Capture/Log Mode button until
the LOG icon appears.
4. Click Deck Selection button, and select a deck
5. Insert your tape into the deck
49
6. Set either an IN point or an OUT point for the clip you want to log using one of the
following methods:
If you want to keep the deck running while you log: Start the deck. At the
point where you want to start the clip, click a Mark IN button (you can use
either the Mark IN button in the upper left of the Channel window or the
Mark IN button in the lower right). The deck continues to play.
If you want to pause the deck while you enter a clip name and comments, see
Pausing the Deck While Logging
If you want to cue your source tape to the start or end point: Use the deck
controls in the Channel window to cue your source tape to the start or end
point. Click a Mark IN button or the Mark OUT button in the lower right of
the Channel window.
If you want to log using timecode: If the footage starts at a known IN point
or ends at a known OUT point, type the timecode in the text box next to
the Mark IN button or the Mark OUT button. Then enter the mark by
pressing the Go to IN button or the Go to OUT button, which scans the
tape forward to the mark, or by pressing Enter.
After you set the mark, the Mark IN button changes to the Mark OUT/Log
button or the Mark IN/Log button, depending on the first mark you set.
7. (Optional) Provide the clip name. See Clip name and extra fields
50
8. To finish logging the clip, do one of the following:
If the deck is running: Click the Mark OUT/Log button. The clip is logged
into the bin and the deck continues to play.
If you want to cue the remaining start or end point: Use the deck controls
to locate the start or end point. Set the remaining IN point or OUT point
either by clicking the Mark OUT/Log button or the Mark IN/Log button.
The clip is being logged into the bin.
If you want to log using timecode: Type a timecode for the clip’s IN point,
OUT point, or duration in the timecode text boxes next to the
corresponding icon. Then enter the mark by pressing the Go to IN button or
the Go to OUT button, which scans the tape forward to the mark, or by
pressing Enter. To log the clip, click the Log Clip button in the upper left of
the Channel window.
9. Repeat these steps until you have logged all your clips.
While viewing the footage, you can continuously update your marks on-the-fly by
clicking the Mark IN button or the Mark OUT button repeatedly before entering the
second mark.
51
Pausing the Deck While Logging
If the deck is playing while you log clips, you can direct your Ingest Machine application to
automatically pause the deck after you set an IN point and an OUT point. While the deck is
paused, you can enter the name and comment for the clip you want to log.
To pause the deck while logging:
1. In the General tab of the Settings dialog box, select the “Pause deck while logging”
option.
2. Set up your deck and the Channel window as described in Logging with Quadrus
Controlled Decks
3. When you reach the point where you want to start the clip, click the Mark IN
button in the upper left of the Channel tool. The Mark IN button changes to the
Mark OUT button and the deck continues to play.
4. When you reach the point where you want to end the clip, click the Mark OUT
button in the upper left of the Channel tool. The Mark OUT button changes to the
Log button, and the deck pauses.
5. Type a clip name and comment in the corresponding text boxes in the Channel
window.
6. Click the Log button.
Your Quadrus application logs the clip, and the deck starts playing again.
52
Working with the Avid Interplay
The Avid Interplay support provides the capabilities to capture media to a folder in the
Interplay database. To use this option you must have the Avid Interplay Web Services
Server in the same network with the Quadrus Ingest Machine and configure your Ingest
Machine application. For more information, see the “Avid Interplay Installation Guide”.
Connecting to the Avid Interplay
You need to configure your Ingest Machine application before you can interact with the
Avid Interplay.
You must specify the Avid Interplay Web Server location to let your Ingest Machine
application know where to look for the Interplay Engine on the network. After you specify
the network settings, you can check in clips into Interplay database.
To setup the connection with the Interplay Web Services Server:
1. Open the global settings dialog by click the Tools>Options. The settings dialog will
appear.
2. Open the Avid Interplay tab
53
3. Enter the Avid Interplay Web Services Server name, user name and password
4. Close the settings dialog by pressing the OK button
If you enter the right parameters, the Interplay Folder button in the Channel(s) window will
be activated automatically.
Selecting the Interplay Folder
The directory defined in your Interplay Folder dialog identifies the Interplay folder location
to which you check in media objects.
To select the Interplay Folder:
1. Press the Interplay Folder button in the selected Channel window. The Interplay
Folder dialog box will appear
2. Select the destination folder. Create the new folder if necessary by pressing the
Make New Folder button. To select the root folder as destination folder is not
allowed.
3. Close the dialog by pressing Select button.
54
Advanced Input
Vertical Blanking Information
Quadrus Ingest Machine application using input hardware let you work with vertical
blanking information in some SD material. You can choose whether to display 5 lines above
each field in NTSC and 8 lines above each field for PAL and whether to preserve the lines
when you perform a digital cut. These lines can be used to store additional encoded
information such as closed captioning, edge codes or key numbers for film projects, or
various interactive or enhanced TV codes. This section describes when it is useful to
preserve the information and describes the limitations involved when preserving these
lines.
You can preserve VBI information for uncompressed, and MPEG IMX resolutions. You cannot
preserve VBI information for DV resolutions.
Vertical Blanking Interval Line Ranges
Your Quadrus Ingest Machine application can capture 248 lines per field in NTSC or 296
lines per field in PAL. For NTSC, only 243 of these lines are in RP-187’s production aperture.
For PAL, the number is 288. The additional lines in each field are located immediately above
the active part of each of the two fields. These lines (5 per field in NTSC and 8 per field in
PAL) can be used for carrying additional data.
The following table lists the extra vertical blanking lines for both NTSC and PAL:
Field
Video Raster Line Number Ranges
Field 1
Field 2
NTSC (5 Lines/Field)
16-20
278-282
PAL (8 Lines/Field)
15-22
328-335
55
Displaying and Preserving Vertical Blanking Information
Ingest Machine application using input hardware automatically preserves the extra lines of
vertical blanking information when you capture footage. You can choose whether to display
the lines and whether to retain the lines when you output your sequence as a digital cut.
You might want to preserve the following vertical blanking information:
Edge code or key number information for a film project
You might want to preserve edge code information to easily identify the source film
reel for a clip. In this case, the edge code information would have been originally
inserted during the telecine process.
Closed-captioning information
If you are repurposing a finished sequence for another market, you might want to retain
closed-captioning codes that were added after the tape was output from the Quadrus
system. This would allow you to perform some basic editing on the recaptured sequence
and not to have to reapply the closed-captioning codes afterward.
Your Ingest Machine application does not interpret the vertical blanking information (the
encoded data). It treats the coded values simply as pixels in the video frame. If you want to
read the vertical blanking information during editing, you must connect an external vertical
blanking information reader to the Quadrus system.
Effects of Preserving Vertical Blanking Information on Compressed Video Quality
For resolutions other than 1:1, preserving vertical blanking information when you capture
can affect the video quality in the rest of the frame. For example, depending on the
compression ratio, a video frame might look blockier with vertical blanking information
included.
Your Ingest Machine application performs the following operations when capturing a
frame:
56
1. It captures the entire frame (including the 5 or 8 extra lines per field) as an
uncompressed frame.
2. It compresses the frame if compression is selected.
The following problems may occur:
If the frame contains vertical blanking information, the picture quality of the entire
frame might be slightly degraded due to the added entropy or complexity from the
vertical blanking lines.
The higher the compression ratio, the greater the number of the artifacts that
might be visible.
Depending on the compression ratio, the vertical blanking information itself may be
distorted.
If you want to preserve vertical blanking information, either use the 1:1 (uncompressed)
resolution or experiment with different compression ratios to make sure the captured
footage or the vertical blanking information is not unacceptably affected by the
compression.
57
Resolutions and Storage Requirements
This section describes the different resolutions available in your Quadrus Ingest Machine
application and lists their specifications. It also explains how to estimate the drive space
you will require to store your captured media. This section includes the following topics:
Compression and Ingest Machine application
Monitor Display Resolutions
Compression and Resolutions
Storage Requirements
Maximizing Drive Space
The resolutions available in your Ingest Machine application depend on its model and
options.
58
Compression and Ingest Machine application
Ingest Machine application support both compressed and uncompressed resolutions.
When an Ingest Machine application captures and stores video at a compressed resolution,
it employs compression techniques that affect the size of the resulting files and the
resolution of the images they contain. The less the data is compressed, the higher the
image resolution and the more drive space the file requires.
Large media files at high resolutions can use very large amounts of drive space. When you
are choosing an image resolution for your project, you need to balance your requirements
in terms of image quality with your available drive resources.
You can use lower resolutions when your work does not require very high image quality (for
example, in offline work, or in CD-ROM or Web authoring projects), and higher resolutions
when you need excellent image quality. You can also mix different resolutions within the
same schedule list.
Ingest Machine application also supports the capture and storage of video that is not
processed by a data compression scheme:
Uncompressed video (1:1) is available as standard definition (conforming to the
ITU-R 601 standard). The image quality of uncompressed video is very high, but
uncompressed files require very large amounts of drive space.
DV (digital video) is a compressed media format. When capturing through a SDTI or
1394 connection, your Ingest Machine application records DV media in its native
format, and does not compress it further.
When capturing through a SDTI connection, your Ingest Machine application
records media in its native format, and does not compress it further.
59
Monitor Display Resolutions
The resolution in your Ingest Machine application varies depending on the video format, as
described in the following table.
Video Format
NTSC 1:1 (Uncompressed)
NTSC MPEG IMX
Active video displayed (in pixels)
720 x 486 non-square
NTSC DV 25 and DV 50
PAL 1:1 (Uncompressed)
PAL MPEG IMX
PAL DV 25 and DV 50
720 x 480 non-square
720 x 576 non-square
720 x 576 non-square
Stored video not displayed
10 lines of blanking or varietal interval
timecode (VITC) per frame (5 lines per
field)
None
16 lines of blanking or VITC per frame
(8 lines per field)
None
For more information on blanking or VITC, see Vertical Blanking Information
Compression and Resolutions
Ingest Machine application provides you with a range of resolutions, both compressed and
uncompressed, that you can use at various stages of your project. You can also mix certain
resolutions within a sequence. You should plan the use of drive volumes in advance,
especially when you capture numerous reels or tapes
Resolution Specifications
The following tables provide information about SD Uncompressed resolutions, DV
resolutions and MPEG resolutions:
Estimated Storage Requirements: SD Uncompressed
Resolution Specifications: Digital Video (DV)
Estimated Storage Requirements: MPEG
The resolutions available on your Ingest Machine editing application might vary from this
list, depending on the model and the hardware used in your system.
60
Resolution Specifications: SD Uncompressed
The following table provides information about the Ingest Machine resolutions for
uncompressed media. Frame size does not include blanking or VITC lines.
Resolution
1:1 interlaced
1:1 progressive
Field Size
(Visible Pixels)
720 x 486 (NTSC)
720 x 576 (PAL)
720 x 486 (NTSC)
720 x 576 (PAL)
Fields Per Frame
Quality
2
Online uncompressed — provides the highest
8-bit image quality
Online uncompressed — provides the highest
8-bit image quality
1
Resolution Specifications: Digital Video (DV)
Digital video (DV) is an international standard created by a consortium of 10 companies to
serve as a consumer digital video format. Ingest Machine application support two DV
resolutions: DV 25 and DV 50
DV, originally known as DVC (Digital Video Cassette), uses a 1/4-inch tape to record very
high quality digital video. The video is sampled at the same rate as D1, D5, or Digital
Betacam video (720 pixels per scan line). The color information in DV 25 is sampled at the
D1 rate of 4:1:1 in 525-line (NTSC) and 4:2:0 in 625-line (PAL) formats. DV 50 is defined as
720 x 480, 50-megabit-per-second (Mb/s) 4:2:2 DV.
The following table provides DV resolution specifications.
Resolution
Frame Size
Color Sampling
DV 25 411 interlaced
720 x 480 (NTSC)
720 x 576 (PAL)
720 x 480 (NTSC)
720 x 576 (PAL)
720 x 576 (PAL)
720 x 480 (NTSC)
720 x 576 (PAL)
720 x 480 (NTSC)
720 x 576 (PAL)
4:1:1
Megabits per second
(Mb/sec)
25
4:1:1
25
4:2:0
4:2:2
25
50
4:2:2
50
DV 25p 411 progressive
DV 25 420 interlaced
DV 50 interlaced
DV 50p progressive
61
Resolution Specifications: MPEG
MPEG resolutions are resolutions specifically intended to support the SMPTE Type D-10 bit
stream produced and recorded by devices such as Sony MPEG IMX VTRs. It uses 4:2:2
sampling.
The following table provides MPEG resolution specifications. Frame size does not include
blanking or VITC lines.
Resolution
MPEG 30
MPEG 40
MPEG 50
Frame Size
(Visible pixels)
720 x 480 (NTSC)
720 x 576 (PAL)
720 x 480 (NTSC)
720 x 576 (PAL)
720 x 480 (NTSC)
720 x 576 (PAL)
Megabits per second (Mb/sec)
30
40
50
Storage Requirements
You should plan the use of drive volumes in advance, especially when you capture
numerous reels or tapes.
Estimating Drive Space Requirements contains recommendations for achieving efficient
storage for your digital media. It explains how playback performance can be affected by the
way you set up the storage drives and target them when you capture.
The tables in the remaining topics in this section show estimated drive space requirements
for each resolution, including uncompressed. They show figures for estimated minutes per
gigabyte and also figures for the drive space required for certain amounts of material.
Estimating Drive Space Requirements
You need to select a resolution that provides adequate picture quality for your project.
However, you might be limited by the amount of media drive space available. Before you
capture, estimate your media drive space requirements.
To estimate media drive space requirements:
1. Use the appropriate resolution specifications table.
62
2.
3.
4.
5.
See Resolution Specifications, and the information in your media drive documentation
to select a resolution that is compatible with the drive and striping capacity on your
system.
Open the Channel window, select a resolution and target drive or drives, and note the
time remaining on the selected drives.
See Video Resolution in the Help
Get a total duration for all the clips to be captured.
Use the appropriate estimated storage requirements table to estimate your drive space
requirements based on the resolution and the number of audio tracks.
See the following topics. To get an estimate of the number of gigabytes needed, do one
of the following:
Calculate by dividing the duration of your material (number of minutes) by the
estimated minutes per gigabyte.
Calculate by combining storage figures from the “Drive Space Needed for x Minutes
of Media” columns as necessary to match the number of minutes of material you
have.
Compare the gigabytes available on your drives with the result of step 4.
If your needs are greater than your drive space, select a lower resolution and recalculate.
The information in the storage tables is approximate, so it’s a good idea to slightly
overestimate the amount of drive space you require.
63
Estimated Storage Requirements: SD Uncompressed
The following table provides information to help you estimate the storage requirements for
SD Uncompressed media.
Before using this table, read the information in Estimating Drive Space Requirements
This table does not include estimated storage requirements for audio.
Resolution
(NTSC and PAL)
Minutes Per
Gigabyte
Drive Space
Needed for 1
Minute of Media
(GB)
Drive Space
Needed for 10
Minutes of Media
(GB)
Drive Space
Needed for 30
Minutes of Media
(GB)
1:1
0.8
1.3 GB
13.0 GB
39.0 GB
Estimated Storage Requirements: DV
The following table provides information to help you estimate the storage requirements for
DV media.
Before using this table, read the information in Estimating Drive Space Requirements
This table does not include estimated storage requirements for audio.
Resolution
(NTSC and PAL)
Minutes Per
Gigabyte
Drive Space
Needed for 1
Minute of Media
(GB)
Drive Space
Needed for 10
Minutes of Media
(GB)
Drive Space
Needed for 30
Minutes of Media
(GB)
DV 25
5.0
200 MB
2.0 GB
6.0 GB
DV 50
2.5
400 MB
4.0 GB
12.0 GB
Estimated Storage Requirements: MPEG
The following table provides information to help you estimate the storage requirements for
MPEG media.
Before using this table, read the information in Estimating Drive Space Requirements
64
This table does not include estimated storage requirements for audio.
Resolution
(NTSC and PAL)
Minutes Per
Gigabyte
Drive Space
Needed for 1
Minute of Media
(GB)
Drive Space
Needed for 10
Minutes of Media
(GB)
Drive Space
Needed for 30
Minutes of Media
(GB)
MPEG 30
4.7
210 MB
2.1 GB
6.3 GB
MPEG 40
3.6
280 MB
2.8 GB
8.4 GB
MPEG 50
2.9
350 MB
3.5 GB
10.5 GB
65
Maximizing Drive Space
If your media drive space is limited or you are capturing a large amount of source material,
follow these suggestions to maximize your usage of the media drive space:
Capture only the audio channels required for the edit.
Log in advance. Schedule capture only the footage required for the edit.
Capture at a lower resolution for editing. Recapture only the clips included in the
final cut at a higher resolution.
For more information on schedule capturing and recapturing, see Scheduled Capturing
66
Application Settings
There are two application settings type available: global settings for application and
Channel settings for each channel individually. The Global settings dialog is displayed by
clicking Tools>Settings menu in the application window. The Channel setting dialog is
available by clicking on the Settings icon in the selected Channel window.
Global Settings
To open the global settings dialog, click the Tools>Settings menu.
The global setting dialog has a few tabs. The description of each parameter is below:
General Tab:
Ask before discarding a canceled clip
Select this option if you want to display a confirmation dialog
when you press the Trash button during the recording
process.
Avid Interplay Tab:
You need to configure your Ingest Machine application before you can interact with the
Avid Interplay. The Interplay tab defines user and login preferences for using the Avid
Interplay. For more information, see the Avid Interplay Installation Guide.
Interplay Web Services Host
Allows you to enter the computer name of your Avid
Interplay Web Services Server
Interplay User Name
Allows you to enter a user name. This name must be a known
workgroup user
Interplay User Password
Allows you to enter a password
67
If all the Interplay parameters are entered correctly, the “Select Interplay Folder” button in
the Channel window(s) will be activated automatically
Audio Tab:
This tab contains several settings for audio monitoring
Output Device
This list contains the audio devices for audio monitoring.
Select No Audio for disable audio monitoring
Sync Mode
Audio monitoring synchronization method Currenly disabled.
Automatic setting is used instead
Audio Monitoring Mix Mode:
Select the mixing method for internal audio mixer. In the
Stereo mode you can listen to the two channels
independently. In the Mono mode both output channels
have the same mono-mixed signal
68
Channel settings
To open the global settings dialog, click the Channel Settings button in the selected
Channel window.
The Channel setting dialog has a few tabs. The description of each parameter is below:
General Tab:
Use Mirror Mode
Enable to select the second media drive for the redundant copy. See
Target Drive for details
Capture Across Timecode Breaks
When you select this option, your Ingest Machine application ignores
the timecode breaks on the tape. Deselect this option if you want to
stop capturing when timecode breaks is detected.
SyncRecord Clip Name Add-on
The clip name prefix or suffix used in the Quadrus Sync Tool application.
Allows you to make a channel-depended clip name. The set prefix or
suffix will be added to the clip name set in the Channel window. For
additional information, see Clip name and extra fields
Stop any paused deck when quitting
Stops any attached decks when quitting the Ingest Machine application.
See Quitting Your Quadrus Ingest Machine Application for details
View Tab:
16:9 Monitor
Enable the widescreen video monitoring
Audio Channels
Select how many audio inputs per channel will be monitored
simultaneously: 4 or 8
Deck Tab:
Deck Mode
Select the Deck action after the Schedule capturing – Stop or
Pause
Pause deck while logging
See Pausing the Deck While Logging for details
69
Audio Tab:
Sample Rate
Select the destination audio sample rate. Currently, the
48kHz only is supported
Audio File Format
Allows to select the audio media format. Currently the Avid
MXF format only is supported
Sample Bit Depth
Select the destination audio bit depth: 16 Bit or 24 Bit
DV audio pattern
Select how to extract and use the audio information from the
DV sources (applicable to the 1394 or SDTI signals). Currently
disabled. Automatic selection is used.
LowRez Tab:
Resolution
Allows to select the LowRez video resolution for the Avid
Interplay environment. The LowRez video is created
simultaneously during the recording process and
automatically checked-in to the Interplay database.
MediaType Tab:
Video File Format
70
Allows to select the video media format. Currently, the Avid
MXF format only is supported.
Appendix A. Installation Instructions
To install from the Quadrus Ingest Machine CD, simply insert the CD into the drive. If setup
does not begin automatically, you will need to run QuadrusIngestMachine78.exe from the
CD’s root directory.
You must have administrator privileges on your PC
Downloading a software
To install the downloaded version (recommended, as it will be the most up-to-date), first
download the installer from the Quadrus website:
www.quadrus.tv/download.html
Click on the latest Ingest Machine installer version, you will see a window similar to this:
Copy & Paste the username and password sent to you in your license email. (Highlight the
text, press ‘Ctrl + C’ to copy and ‘Ctrl + V’ to paste into the required fields)
Click OK and you’ll see a window similar to this:
71
Click ‘Save’ button to save the download
Installation
Click on the downloaded file. You will see the window similar to this:
Press ‘Next’ button to continue
72
Please, read the Software License Agreement carefully, select the ‘I accept the agreement’
and press the ‘Next’ button to continue
Select the installation directory and press ‘Next’ button to continue.
We do not recommend changing the directory proposed by default.
73
Press ‘Next’ button to continue
Now, you are ready to install. Press ‘Install’ button to continue
During installation, the following window may appear.
Press the ‘Continue Anyway’ button
74
The installation is complete. Press the ‘Finish’ button when prompted
75