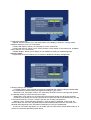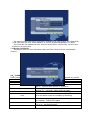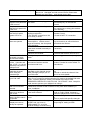
1
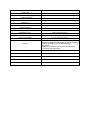
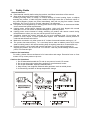
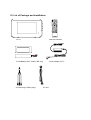
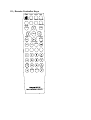
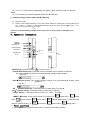
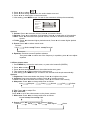
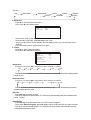
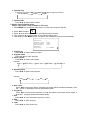
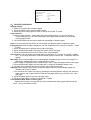
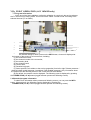
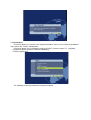
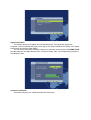
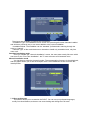
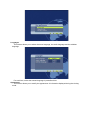
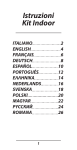
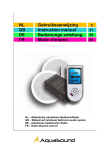
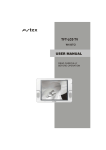
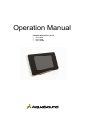
Operation Manual
Portable Waterproof LCD TV
• ASV1026N
• ASV1026B
• ASV1026BD
Statement: AquaSound has right to correct Typographical errors in the manual anytime, to revise or
change inaccurate information stated in the manual and to upgrade software or change elements used
in product without prior notice. But, all update will be compiled in our latest instructional manual. The
All rights reserved.
Catalogue
I.
II.
III.
IV.
V.
VI.
VII.
VIII.
Specification
Safety Guide
List of Package and Installation
Remote Controller Keys
Operation Instruction
Teletext Operation
DVB-T Operation
Troubleshooting And Advice
www.aquasound.nl
De Run 6720
[email protected]
5504 DV Veldhoven
tel. 040-2534205
fax 040-2541645
I.
Specification
Power note:
Connect AC adapter to specified power source specification marked on product symbol, to ensure
correct connection, such as avoiding damage, pressure. Make sure to use correct socket for plug,
and to install the product by competent electrician.
Do not use any other power source besides power adapter for TV. The rest power adapter or
source can not live up to equivalent safety performance provided by Genuine Parts.
Rechargeable Battery:
1. Before using the TV at first time, recommend charge the battery fully. A charged battery unused will
still gradually lose its power over time. Charging the battery in the ambient temperature from
+5℃(+41℉)to +45℃(+113℉)Using it with a Non-AquaSound battery charger or product may
result in malfunction or accidents. for the cases, AquaSound can not be held liable.
2. Battery working time depends on different working condition and ambient temperature. In general, a
fully charged battery working time is 3 hour.
3. Turn off TV before taking out battery. Do not let battery contact metal directly, otherwise, it might
short circuit. Use the battery under its design uses.
Charging indication:
1. At TV closed condition, it takes about 3 or 4 hour to recharge battery fully. During 1. charge, red
charge lamp blinks, when recharge level is up to 90% or higher, red lamp lights on. When battery
is recharged, please detach battery and unplug the charger from power outlet within 30 minutes
after the red is on. If disconnect charger from power outlet within 30 minutes, battery working time
might be extended about 5% or up to 10%.
2. Charge battery when TV is on, at the case, power will be provided by charger, meanwhile, charger
charge battery. As TV consume much current, the charging time might be extended several times
than charging battery when TV is off.
LED indication:
1. TV in the closed state, connecting charger start charging. During charging, red lamp blinks,
when battery is fully charged, red lamp lights on.
2. TV in on state, blinking green lamp stand for standby. Lighting on green lamp stand for working.
Quick alternating blinking between red lamp and green lamp stand for lower voltage of battery..
Note: press “power” on the remote controller while the machine’s on will make it into state of standby, and
the green light indicator flashes. At this state the remote controller can start the machine but machine will
consume some energy. If press “power” on the control panel while the machine’s on, all power will be shut
off. At this state the remote controller can not start the machine and machine will consume no energy so the
battery energy can be saved a long time. Make sure after you use the machine, make it at a state of poweroff.
Model
ASV1026 N / B / BD
Screen size
10.2Inch
Aspect ratio
16:9
Screen brightness
Contrast ratio:
Pixel H x V:
Response time:
≥385cd/ m²
400:1
800(RGB)*480
8ms
Speaker (built-in)
3W*2 frequency range 400~20KHz
Waterproof grade:
IPX6
Dimension: (mm)
360mm*200mm*48mm
Visiua/window: (mm)
222mm(H)*132mm(V)
Power consumption
AC 110~240V-DC12V 2A
Audio system
-No X ray radiation, environmental
-Waterproof grade IPX6(Dust-tight and protected from
moisture challenges up to powerful water jet
-Wall-mount
-Touch key control on main set with aluminous key
-Full function remote control
D/K、B/G、I、L/L’
Video system
PAL/NTSC
TV system
PAL/SECAM
AV in
AV , TV ,DVB-T
Gross weight
2500g
Features
II.
Safety Guide
General Cautions:
z Read manual carefully before using the product, and follow instructions of the manual.
z Stop using the product when cases of following occur:
Smoking, burning smell, no image, no sound, damage of outer housing, liquor or objects
entering into product, or other irregular condition that might cause fire or electronic shock. If
any above happens, please cut power immediately, then pull out plug from socket. Contact
distributor. Do not try to fix it by yourself, otherwise, it is dangerous.
z Use power source supplied by us. Wrong power source may cause fire or electrocuted. Make
sure it meets local power requirements.
z Unplug power socket before cleaning the product. Using soft cloth dipped with neutral
detergent. Do not use coarse or abrasive detergent to clear the product.
z Unplug power source instead of simply switching off product with remote control during
thunderstorms or when you may not use the product for a long time.
z Ventilation around the product well and do not cover ventilation hole. Do not place the
product on sofa, carpet, or other upholstered objects. Poor ventilation causes product to
overheat and shortens service life.
z
z
z
Make wire connection only when power is off. At least 3 seconds between turning on / off.
The product has state memory, i.e. it can keep former state at sudden power-off.(If former
state is working state, it will resume working keep its working state when it comes back on)
Product is heavy, so be careful with product transport. Try to use original package for
shipping the product. Do not turn over TV to move it. That may cause damage to the screen
panel, or fluorescent light.
Cautions On Installation:
For safety, please follow manufacturer’s for instructions and usage. Excessive force on front
screen or may cause product to tip over.
Cautions On Operations
1. Do not dismantle/remodel the TV and do not press or knock LCD screen.
2. Do not put the product under direct sunlight or near heat tank, heater.
3. Do not put flammable, explosive material near it.
4. Keep it away from magnetic field and radio generator such as mobile phone.
5. Avoid working condition of abrupt temperature change.
III. List of Package and Installation:
POWER TV/ AV
DI SPLAY TEXT
MUTE
SLEEP
SOUND PI CTURE
NI CAM
I NCRED. MODE
D. OK
D. MUNE
MUNE
SUBPAGE
RECALL
D. EXIT
CANCEL
EPG
FAV
LANG
HOLD
SI ZE
REVEAL
I NFO
VOL
CH
TV/ RD
SUBTI TLE
Remote controller
TV Set
正
空
检测线
空
负
LI-ION Battery (ASV 1026 B / BD only)
S-Video plug to 3RCA plugs
AV wire
Power adaptor for TV
IV、Remote Controller Keys
MUTE
POWER TV/AV SLEEP
DISPLAY TEXT
SOUND PICTURE
NICAM
INCRED. MODE
D. OK
D.MENU
MENU
RECALL
SUBPAGE
CANCEL
D. EXIT
EPG
FAV
LANG
HOLD
SIZE
REVEAL
INFO
VOL
CH
TV/RD
SUBTITLE
4、1 Remote control instructions in TV mode
1、MUTE: Press to mute the sound. Press again or press VOL+ to unmated.
2、POWER: Switch on LCD TV when at standby mode or vice versa.
3、PICTURE: Press repeatedly to cycle through the available video picture modes: Personal–
Movie–Sport–Weak signal-Game
4、SOUND: Press to cycle through the different sound settings: PERSONAL -VOICEMUSIC-THEATER.
5、Number Buttons Press 0-9: to select a TV channel directly when you are watching TV,If
you select 0-9, The channel change after 2 seconds; To enter page number in TELETEXT
mode,
6、MENU: Brings up the main menu to the screen.
7、THUMB STICK (▲/ ▼/ ◄ / ►): Allows you to navigate the on-screen menus and adjust the
system settings to your preference.
When watching a channel, changes the channel, or moves to the next higher or lower item
in the menu.
8、TV/AV: Press to cycle through the input source in following: TV–DVB– AV, and press ►
enter mode
9、SLEEP: Lets you select amount of time before your TV turn itself off automatically.
10、NICAM: Press to search the NICAM modes.
11、RECALL: Return to the previous channel viewed.
12、DISPLAY: Press to display the source and channel’s information.
13、▲/ ▼(VOL): Press to increase / decrease the sound level.
14、▲/ ▼/(CH) :Press to scan through channels.
4、2 Remote control instructions in TELETEXT mode
16、TEXT: Switch On or Off the TELETEXT mode.
17、 MIX: TV and TXT pictures are mixed together (transparent background)
18、 SUBTITLE To display subtitle in TV mode
19、 HOLD: Freeze the current page
20 、INDEX :Request Index page when index link is valid
21 、REVEAL: Reveal or hidden the hidden words.
22 、SIZE: Toggles the display between half top page, half bottom page and normal page.
23 、CANCEL: TELETEXT CANCEL
24、 SUBPAGE: TELETEXT Subpage
25、COLOR BUTTONS: Select 4 Preferred TELETEXT page
4、3 Remote control instructions in DVB-T mode (ASV 1026 B / BD only)
1、TV/RD: When watching a channel, allows you to switch between TV and Radio modes
2、SUBTITLE: Shows the list of subtitle languages available for the current channel
3、INFO: Shows information about the current channel
4、EPG: Launches the EPG (Electronic Program Guide)
5、LANGUAGE: Shows the list of audio languages available for the current channel
6、D.EXIT: Exists from the menu or sub-menu and cancels the function in progress (if
applicable)
7、D.MENU: Shows the menu or sub-menu and cancels the function in progress (if applicable)
8、THUMB STICK (▲/ ▼): When watching a channel, changes the channel, or moves to the
next higher or lower item in the menu
9、THUMB STICK (◄ / ►): When watching a channel, decreases/increases the volume level,
or changes the setting values in the selected menu item
10、D.OK: When watching a channel, displays the channel list according to TV/Radio mode or
activates the highlighted menu item
11、CH(+,-): When watching a channel, changes the channel
12、A, B, C, D: Color buttons (respectively red, green, yellow and blue) used in a few submenus
13、FAV: Allows you to switch between default and favorite lists
4、4 Battery Usage Caution (ASV 1026 B / BD only)
a) Open the cover
b) Lithium Cell CR2025 batteries, Put in the Lithium batteries, make sure correct polarities as
per “+” and “-” marks on the batteries and put back the cover pointing at “open”, Turn
the cover to lock pointing at “close”
Cautions: Prevent battery leakage which may result in body injury or damage to the
remote
V、Operation Instruction
ON/OFF
ON/OFF
Channel up
Channel down
Sound up
Sound down
MUNE
Earphone
OUT
AV IN
Power IN
TV/AV
ON/OFF Key: press this button “ ” to turn on or off TV.
“ VOL-”Sound down key: Press the button to decrease sound volume to minimum.
The screen displays volume icon and percentage change under operation.
Volume
“
”
“VOL+”Sound up key: The screen displays volume icon and percentage change under
operation.
Volume
“
”
“CH-” Channel down key: Press the button to chase down TV channel.
“CH+” Channel up key: Press the button to chase up TV channel.
“TV/AV” Switch. : Press the button to convert TV、DVB、 AV signal.
“MENU” Menu key: There are five menu in TV mode ( i.e.
menu
overview menu
menu in DVB/AV mode, ( i.e.
sound menu,
picture
setting menu
channel setting menu), There are three
sound menu,
picture menu
5.1 Enter sound menu
1. Press MENU key to open the main menu, or press color buttons A (RED).
setting menu
2. Press ◄ / ► to select:
3. Press ▼ enter setting sound menu, the outline border turns red.
4. Press ▲/ ▼ to select option in the sound menu
5. After setting, press MENU to quit. Or wait for few seconds it will be quit automatically.
Vo l u m e
Balance
Bass
Treb le
AV L
On
Equalizer
Options:
1. Volume: Press ◄to decrease volume, Press ► to increase volume
2. Balance: Press ◄ to emphasize of left speaker. Press ► to emphasize of right speaker.
3. Bass: Press ◄to decrease lower-pitched sounds, Press ► to increase lower-pitched
sounds
4. Treble: Press ◄to decrease higher-pitched sounds, Press ► to increase higher-pitched
sounds
5. Preset: Press ◄/► to select sound mode
Remark:
Voice
Music
Theatre
Personal
6. Equalizer: Press ► to enter Equalizer submenu
Then press ◄/► to select one of the frequency In equalizer, press ▲/ ▼ to adjust
equalizer
5.2 Enter picture menu
1. Press MENU key to open the main menu, or press color buttons B (GREEN)
2. Press ◄/► to select:
3. Press ▼ enter setting picture menu, the outline border turns green.
4. Then press ▲/ ▼ to select options in the picture menu
5. After setting, press MENU to quit. Or wait for few seconds it will be quit automatically.
Options:
1. Brightness: Press ◄ to darken the picture. Press ► to brighten the picture.
2. Contrast: Press ◄ to decrease contrast, Press ► to increase contrast
3. Color: Press ◄ to decrease color intensity, Press ► to increase color intensity
4. Sharpness: Press ◄/► to change white tone as follows:
Auto
Sharpest
Sharp
Normal
Soft
Softest
5. Tint: Press ◄/► to adjust Tint
6. Dyn. skin tone:
Press ◄/► to on/off the enhancement on the picture contrast.
7. White tone: Press ◄/► to change white tone as follows:
Normal
Warm
Cold
8. Preset: Press ◄/► to change picture mode as follows:
Personal
Movie
Sport
Weak Signal
Game
Brig htn ess
Contrast
Colour
Sharpness
Tint
Dyn.skin tone Off
5.3 Enter Overview menu
1. Press MENU key to open the main menu, or press color buttons C (YELLOW)
2. Press ◄/► to select:
3. Press ▼enter overview menu, the outline border turns yellow.
4. Then press ▲/ ▼ to select options in the overview menu
5. After setting, press MENU to quit. Or wait for few seconds it will be quit automatically.
Press ▲/ ▼ and ◄/► button to highlight the item that you want to edit.
Press the green button to move a channel, and red button to delete a channel. Press
MENU to quit.
Move
Delete
5.4 Enter Setting menu
1. Press MENU key to open the main menu,
2. Press ◄/► to select:
3. Press ▼to enter the setting menu.
4. Then press ▲/ ▼ to select option in the setting menu
5. After setting, press MENU to quit. Or wait for few seconds it will be quit automatically.
Show indica to r
Language
Country
Child lock
Timer s
Te l e t e x t l a n g
Te l e t e x t E / W
Option description:
1. Show indicator
Press ◄/► to off/on the Channel No.
2. Language
Press ◄/► to select language.
Remark:
English
Francais
Deutsch
Hungarg
Norway
Slovenian
Danish
3.
Country
Press ► to enter Country.
On
English
Ita ly
Greek
Eas t
Español
Croation
Greek
Portogués
Svenska
Holand
Italy
Remark:
Italy
Netherlands
Switzerland
France
Turkey
Austria
Gr.Britain
Belgium
Germany
4. Child lock.
Press ► to enter Child lock submenu.
Then press ▲/ ▼ to select option.
Lock
Lock code
Off
0000
At first select Lock, press ◄/► to turn on the child lock.
Second select Lock code, press No. key to set code.
As long as the lock is on (see Lock in channel setting menu), you cannot enter move
channel
menu and setting menu until the lock is off again.
5. Timers
Press ► to enter Timers submenu.
Then press ▲/ ▼ to select function.
Clock
Sleep timer
Reminder timer
Off timer
Switch timer
Switch program
01:28
Off
Off
--:---:-0
-Sleep timer
Each time you press ◄/►, the period of time changes as follows:
Off
15
30
45
…
105
120
The timer will be activated and the TV will stand-by automatically after the predetermined
period of time.
-Reminder timer
Each time you press ◄/►, the period of time changes as follows:
Off
5
10
15
…
115
120
The timer will be activated and a symbol will show on the screen automatically after the
predetermined period of time.
-Off timer
Press No. key to set the off time.
The timer will be activated and the TV will turn off automatically after the predetermined
period of time.
-Switch timer
Press No. key to set the time when you want to switch program
Then select Switch program, press No. key to set the channel which you want to switch.
The timer will be activated and the TV will switch to the program automatically after the
predetermined period of time
6. Teletext lang.
Each time you press ◄/►, the teletext language changes as follows:
Pan European
Cyrillic
Greek
7. Teletext E/W
Press ◄/► to select West or East.
5.5 Enter channel Setting menu
Notice: This menu is only available in TV mode.
1. Press MENU key to open the main menu, or press color buttons D (BLUE)
2. Press ◄/► to select:
3. Press ▼ enter other setting menu, the outline border turns blue.
4. Then press ▲/ ▼ to select option in the channel setting menu
5. After setting, press MENU to quit. Or wait for few seconds it will be quit automatically.
P r o g r a m n r.
Pro gram name
Colour system
Sound sys te m
Autostore
Frequency
1. Program nr.
Press ◄/► to select channel number.
2. Program name
Press no. key to name program
3. Color system
Press ◄/► to select color system
Remark:
Auto
NTSC-443
PAL-443
1
CH01
Auto
Auto
77 3.5 0Mhz
SECAM
SECAM L/L
4. Sound system
Press ◄/► to select sound system
Remark:
Auto
BG
I
DK
L/L
5. Auto store
Press ◄/► to start auto search, all working channels will be saved automatically. After
the search, it will display the first searched program.
6. Frequency
Press ◄/► to fine tune the frequency, or hold V-/+ button until manual search begin, a
searched program will be saved automatically
7. AFC
Press ◄/► to on/off automatic frequency control
8. Skip
Press ◄/► to off/on skip AD.
9. Lock
Press ◄/► to off/on menu lock
Sound sys te m
Autostore
Frequency
AFC
Skip
Lock
Au to
773.50Mhz
On
Off
Off
VI、TELETEXT OPERATION
Display teletext.
1. Select a TV station with a teletext signal.
2. Press the TEXT button to enter teletext signal.
3. Press the TEXT button again to return or exit to the normal TV mode.
Page selection
1. Enter the page number (three digit) using the number buttons. If you press a wrong
number during input, you must complete the three digit number and then re-enter the
correct page number.
2. The PGUP/PGDN can be used to select the preceding or following page.
Hold: You can press the Hold button to hold a page, and press it again to release the page.
Enlarging Text: When a page is displayed, you can double the size of the text to make it easier
to read.
1. Press the size button to enlarge the top half of the page.
2. Press the size button again to enlarge the bottom half of the page.
3. Press the size button once more to return to the normal display.
Reveal mode: You can display concealed teletext information (e.g. Answer to puzzles or riddles
etc.) by pressing this button. Press this button again to remove the information from the
display.
Mix mode: This function enables you to superimpose the teletext page over the TV program, or
allocate the teletext page and TV program side by side.
1. When a page is displayed, press the Mix button. The TV page will appear with the text page.
2. Press the Mix button again, the text page and TV program will allocate side by side.
3. The third time, press the Mix button to return to the normal text mode.
Subpage: Some teletext may contain several sub-pages which are automatically paged in a
certain cycle by the TV station.
1. Yon can enter to a certain sub page by pressing the Sub page button directly and select the
page number with number buttons. Enter the sub page number (e.g. 0003) for the third
sub page.
2. Press the button again to exit the sub page mode.
3. Press the Text button to return to the normal TV mode
Color buttons (Red, Green, Yellow, Cyan):
Press these buttons to access directly to the corresponding color pages displayed at the
lower part of the teletext screen.
VII、DVB-T OPERATION (ASV 1026 BD only)
7.1 Program information
At the end of the first installation or after the validation of a service in the service selector,
the TV set turns into viewing mode. This mode is also called “TV/radio mode” according to the
selected channel (TV or Radio).
4
1
5
2
8
3
6
7
After each channel change of after a press on the INFO button, a banner is displayed at
the bottom of the screen for a few seconds, including:
(1) the channel list name,
(2) the channel number in the current list,
(3) the maturity level,
(4) the channel name,
(5) Current time,
(6) Duration bar graph,
(7) Some specific icons relative to the service properties (from left to right Teletext presence /
channel locked / audio language / scrambled / DVB-Subtitle presence). Only information about
the present and the following events of the current service are available
(8).By default, the present event is displayed. The following event is displayed by pressing
the THUMB STICK (▲/ ▼)buttons (toggle between present and following events).
7.2 Extended program information
To obtain more information about present and following events, you can press the INFO
button. Like previously, the following event is displayed by pressing the
THUMB STICK (◄ / ►) buttons (toggle between present and following events):
7.3 TV / Radio switching
In viewing mode, a press on the TV/Radio button swaps between the current TV channel
and the current radio channel.
7.4 Teletext
The Teletext must be activated from the TV Set using the remote control of the TV Set (VBI
Teletext).
7.5 Subtitle
By pressing the Subtitle button while in viewing mode, a pop-up appears and allows you to
select the requested language for subtitles. In this pop-up, only a selection of a new language
amongst the list of available ones changes the language of the subtitles for the current channel:
Note : (HH) is the indication for Hard of Hearing (for hearing impaired people).
7.6 Electronic Program Guide (EPG)
By pressing the EPG button while in viewing mode, a screen appears on which are
Displayed the events of the current channel. The first day of the schedule events is the current
day, and you can consult the events over seven days.
The information presented for the selected event are:
• Start time
•Title
•Short description.
A press on the THUMB STICK (▲/ ▼) buttons allows you to consult all event pages for the
days, a press on the DOWN button when last event of the list is highlighted displays the next
event page.
A press on the THUMB STICK (◄ / ►) buttons allows you to change to previous/next day of
event presentation.
7.7 Language
If the current channel has several audio tracks, the Language button allows you to choose
between them. Selecting a new one amongst the list of available languages changes the audio
language for the current channel. If a Dolby Digital track is available, it will be indicated with
(dd) after the name of the language.
This mode also allows you to select the mode used for the audio track (default / mono /
stereo / left / right).
7.8 Channel selector
The Channel selector is activated by a press on the D.OK button while in viewing mode.
This screen presents the channels of the current default/favorite lists. When selecting a
channel of this list with the D.OK button, the DTV changes the video background accordingly.
When you press the D.OK button on the selected service, the TV Set switches to viewing mode
and changes the selected channel accordingly. The channel list is displayed and is
automatically removed from the screen after few seconds. The screen bellow corresponds to
the TV list.
You can toggle from TV lists to Radio lists using the TV/RADIO button.
From everywhere, a press on the D.MENU button displays the main menu:
From this menu, a few main categories of settings are available (management of TV and
Radio favorites lists, different settings about the configuration of the DTV, installation of the
antenna and channels, a few settings for user convenience and information about the model
and version of the TV Set).
7.9 Favorites lists
The Favorite lists menu allows you to create, modify and delete your own favorite lists but not
the two default service lists (TV, Radio). Four TV favorite lists and four radio favorite lists can be
created.
Creating a favorite List
This screen allows you to create a new favorite channels list with selection criteria.
The name of the list is set to “FAV x” for TV services and “RFAV x” for Radio.
This type of list setting is done with the second item of the list (Channels), and the third is
used to select the encoding mode (available values are All, Scrambled or Free-To-Air).
Once you have validated these parameters, the favorite list modification screen is
automatically displayed (see description below). By default all channels are skipped.
Modifying a Favorite List
This screen allows you to modify a favorite list. The current favorite list name is displayed on
the top of the screen.
All the channels matching the criteria selected at the creation of the favorite list are listed.
Each favorite list has its own channel numbering.
In case of a favorite list, you can lock or unlock a channel, skip or add some channels or all
channels. You can also sort the channels by alphabetical order, by providers or manually. All
these action are performed using screen color buttons (A, B, C, D).
If the list is the default TV and Radio lists, only the “Lock/Unlock” option is available.
At the top of the list, the favorite list name and type, the provider name are displayed.
The last viewed service is displayed in the video window.
Warning : The only modification you can make in the two default TV and Radio
lists is to lock or unlock a channel.
Default TV/Radio lists
On these lists, only the “Lock/unlock” option is available: a press on the red button (A) will
lock the highlighted channel if unlock and vice-versa (toggle behavior).
TV/Radio favorite lists
For all these lists, a few actions are available:
• Add/Skip: toggle behavior on the Green button (B), in front of the channel list a color icon
indicates the status (white for skipped, blue for added)
• Lock/Unlock: toggle behavior on the Red button (A), in front of the channel list a color icon
indicate the status (red for locked, blue for unlock), this option is only available if channel is
added
• Sort/Move: accessed by a press on the Yellow button (C).
• Sort can be made in a few different ways, by alphabetical or by provider. In this screen, the
selected services will be sorted and placed at the beginning of the list, and the other (not
selected) will be sorted and placed at the end of the list.
• Move actions consist in highlighting the channel to move, pressing the D.OK button to select
it, moving the cursor to the destination item and pressing the D.OK button to finalize the move
operation.
• Add All/Skip All: accessed by a press on the Blue button (C). Allows you to generalize the
Add or Skip operations to all channels.
Delete a favorite list
This screen allows you to delete a favorite list:
This pop-up allows you to confirm or not the deletion of a favorite list:
7.10 Setup
The “Setup” menu allows you to configure the DVB-T, in particular: the TV set configuration,
the time settings and the reset to default factory settings.
Time Settings
This screen allows you to set the local time. Two modes are available to set the local time:
• Automatic one which is based on time received from signal
• Manual one which allows you to set manually local time
Automatic mode
In this mode, date and time are automatically set by data received from signal:
There are still two parameters to be set:
• Local Time Offset: allows you to set the offset from local time to GMT
• Summer Time: used to set the summer offset (if any) By default, the summer time is set of
OFF.
Manual mode
This mode allows you to set manually date and time:
Two items are available:
• Local Date: use digit buttons to set current date
• Local Time: use digit buttons to set current time
Factory settings
This acknowledge pop-up allows you to erase all the custom parameters. If it is confirmed, all
services lists and user preferences are deleted and the DVB-T restarts as for a “First Time
installation”:
7.11 New channels
If some new channels have been detected during the standby of the DVB-T, a popup is
displayed when the user wake up the DVB-T:
To see the new channels, go in the menu “New Channels”:
7.12 Installation
This menu allows you to enter to the “Signal information” menu, to the “Channels installation”
menu and to the “Timers” management.
This menu allows you to completely install your DVB-T in order to watch TV regarding:
• Program reception (antenna / channels installation)
• Timers programming
The following screen is presented for Program reception :
Signal Information
This screen allows you to adjust your terrestrial antenna. Two signal bar graphs are
proposed. The first indicates the power of the signal, the second indicates the quality of the signal
measured by the Bit Error Rate (BER).
You can check the quality of different channels by selecting new one with the THUMB STICK
(◄ / ►) buttons or the digits buttons of the “Channel number” item. The corresponding frequency
is displayed in KHz.
Channels installation
This screen allows you to install channels with few criteria.
Three items are available to configure the channel list:
• Installation Type: The installation can be a new one (removing all current channels installed
and all timers previously set) or can be an addition to the current installation.
• Installation Mode: The installation can be “standard” (full automatic scanning through the
tuner) or “manual”.
• Channel Type: A filter could be done on channels to install only scrambled ones, only free
ones or all.
Standard installation mode
Once you validate the “channels installation” screen, the scan starts exactly like once which
was done for the “First-Time Installation”: the TV tuner executes a full automatic scan.
Manual installation mode
You just have to select the channel number. The corresponding frequency is then displayed,
and bar-graphs allows you to see the reception level. Then validate the screen to launch the
install process.
7.13 User preferences
This screen allows you to customize the DVB-T. You can set your preferred languages,
modify few visual features, activate or not some locking and change the PIN code.
Languages
This screen allows you to select the menu language, the audio language and the subtitles
language.
For each item, select the wanted language in predefined lists.
Appearance
This screen allows you to modify the appearance of information displayed during the viewing
mode.
Configurable values are:
• Banner Timeout: Allows you to set the duration of the display of banner in viewing mode,
available values are from 3 to 10 seconds.
• Volume bar display: Allows you to display or not the volume bar
• Volume bar timeout: Allows you to set the duration of the display of the volume bar, available
values are from 3 to 10 seconds.
• Subtitle display: Allows you to display or not subtitles according to subtitle language.
Access Control
The parental control item allows you to enable or disable the locking management.
Following settings are available:
• Parental Control: If the parental control item is disabled then all the locking are deactivated,
If it is enabled then all the locking are applied according to your choice.
• Receiver Lock: If this item is set to Yes, each time the DVBT turns to running mode (leaves
the standby mode), the PIN code has to be input.
• Setup Menu Lock: allows you to protect the menu screen access and all its sub-screens.
• Channel Lock: allows you to lock a specific service (the PIN code is requested when you zap
to the locked services). To lock / unlock a service, see “modify a favorite list”).
• Maturity Level: A parental rating (between 1 and 18 years) is available. In this case, all
services which are not in the age limits become inaccessible unless enter the PIN code. This
parental rating depends of the information forwarded or not by the broadcaster.
A press on red button (A) allows you to modify the PIN code which will be asked when try to
access to a protected part defined just above.
The menu to modify PIN code is protected by requesting PIN code access. The default DVBT PIN code (after the “First Time Installation” or “Factory System Reinstallation”) is “0000”.
Then enter the new wanted PIN code, enter it a second time in Confirm item, just to be sure
that there is no typing fault.
7.14 System Information
This screen gives you some information about the DVB-T (Device Version and Software
Version)
VIII、TROUBLESHOOTING AND ADVICE
Before calling our customer service centre, please check if you can solve the problem by yourself.
Troubleshooting
Control
No signal
Please check that all cables are correctly plugged in.
No color shades
Adjust the contrast, the color and the brightness
Stain show on the screen.
May be the result of an electrical signal from car motor, neon
light or other electrical devices or appliances.
Double or multiple display image May be the result of an electrical wave disturbance from
another TV, Computer, Game players or Radio.
Snow on the screen
The cables of the antenna are not correctly plugged in.
The remote control does not
Please check the batteries order and alignment. Check that the
work
IR of the remote control is not hidden by something.
"Zip" made noise on TV
No sound
No DVD
cover
Even if the display image is correct, the noise may come from
an unsteady fixation of the panel.
Make sure that you have not pressed the MUTE button on the
T.V or on the remote control.
Make sure the TV Set has been switched to DVD mode
DVD player not working
properly
Ensure disc is correctly inserted into the player. Ensure the
disc is not damaged and with correct format. Please wait
patiently as some discs need longer time to play.
Problem
No picture, no sound
and the front panel red
LED is not on.
No picture, no sound,
but the front panel red
LED is on.
No picture, no sound,
but the front panel
green LED is on.
Possible cause
Your Receiver is not plugged into
the mains.
The remote Control
does not operate.
• A timer is running, the receiver is
locked (all the remote control
keys are inactive), the front panel
LED is blinking.
• The Remote Control batteries
have been inserted incorrectly or
are dead.
• You are not aiming you Remote
Control at the receiver.
The signal to your aerial may be
weak.
You cannot find all the
channels you think
should be available.
You cannot select all
of the channels and
the <P+/P-> or <Arrow
down/up> keys do not
always work.
You cannot access a
particular channel,
even using the
number keys.
You have forgotten
your PIN code.
I set the timer but it
did not record what
wanted.
I set the timer but
there is no audio on
the record.
Each time I set a
timer, the PIN code is
requested
The on-screen
displays are not as
sharp as expected.
Your receiver is in standby mode.
• You are viewing standard
analogue television.
• The SCART connection to the
TV is faulty or loose.
Some channels have been
selected as favorites and the
favorites mode is on.
Action
Check mains connection and press
the Standby key on the Remote
Control.
Press either <P+> or <P->, Menu or
any number key to bring your receiver
out of standby.
• Press the <TV/STB> key on the
Remote Control.
• Check SCART TV connection.
• Press the <timer> key and the <0>
key successively to cancel the timer
and unlock the receiver.
• Check the batteries and replace if
necessary.
• Make sure you aim the Remote
Control at the receiver and not at TV
Try retuning your receiver (see §6.4).
Use the <All channels> key to select
another Favorite list or the default TV
channels list.
The parental lock has been
Enter your parental code to access
activated on this channel and an
the
OSD message prompts you for
channel or unlock the channel. See
your PIN code.
§6.5.3 for more details.
When prompted for your PIN code, enter the Master PIN code. This will
allow you to proceed as well as reset the PIN code to the default PIN code
of the receiver (default is “0000”).The Master PIN code is “RED
REDGREEN GREEN YELLOW YELLOW BLUE BLUE”. Note : keep this
code secret to prevent your children from using it.
• Make sure the time of your VCR is set to the same time as your receiver.
• Make sure the timer is still on the list. It may have been deleted by a
“new” installation.
The Dolby Digital audio may
To record a video, do not set the
have been selected.
audio to “Dolby Digital” because it
cannot be played on the VCR SCART.
The maturity level access control
Set the maturity level access control
is set
to
None or prefer lock specific channels.
• If you have connected using
• Refer to §6.2.1 and modify the “TV
SCART and you have an
Output signal” setting to RGB.
RGB-capable TV, on of the
receiver settings could be wrong.
• You have connected the
receiver TV SCART to a
SCART socket of your TV set
which is not RGB-capable.
The picture on some
channels seems to
have been stretched
or squashed.
The broadcast is probably in
widescreen and the receiver
settings may be not correct.
www.aquasound.nl
De Run 6720
[email protected]
5504 DV Veldhoven
tel. 040-2534205
fax 040-2541645
• Check if the TV SCART socket of
the TV is RGB-capable. If not, refer
to the user manual of your TV to
change the SCART connection to
your TV.
Check the receiver “TV format” option
setting, following the information in
§6.2.1. If you have a widescreen TV,
you may also need to check the
settings on your TV.