1
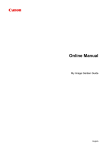
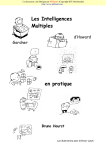
A
P
P
L
E
I
P
H
O
T
O
5
5. When you select a book theme, you can see an example
of it in the window to the right of the themes list. If you
want to go to the iPhoto website to see detailed book
descriptions and pricing, click the Options + Prices button.
6. If you chose a hardcover book and want photos to be
printed on only one side of your book pages, deselect the
"Double-sided pages" checkbox.
7. Click Choose Theme.
8. Do one of the following:
If you want iPhoto to automatically design your book
by arranging the selected photos on each page for
you, click Automatically.
If you want to drag the selected photos into the book
yourself, click Manually.
Figure 27: Export Photos - File Export
5. In the File Export pane, change the desired options:
Format: Choose a file format for your exported images from the pull-down menu (e.g., Original, JPG,
TIFF, or PNG)
Size: If necessary, scale the images to a specific size
by specifying a maximum width and height.
iPhoto switches to book view, and your new book
appears in the Source list.
If you want, type a new name for your book in the
Source list.
9. Once you create a book, you can change the order of
pages or photos, add and change the appearance of text,
and even customize the design of individual pages.
Name: Choose whether to export photos with their
filenames, iPhoto titles, or album name.
10. For more information on specific settings and features of
creating a photo book, please refer to the Help menu in
iPhoto and type in the search word “book”.
Extension: Choose whether to add the file format
extensions (such as .jpg or .tiff) to the end of the photos’ filenames, titles, or album names.
Sending a Photo Through Email
6. Click the Export button.
7. Navigate to the new folder you created previously on your
Desktop (i.e., Photos Export) and then click the OK button to save the files in their new format to the folder.
Creating a Photo Book
You can also send photos from your iPhoto Library or from
photo albums directly from iPhoto with the help of your email
program.
1. Select the photo or photos you want to mail. (Note: You
can't email photos from a slideshow or book.)
2. Choose Share > Email or click on the Email icon at the
bottom of the iPhoto window.
You can choose from a variety of book sizes and designs to
create photo albums for any occasion.
1. Select an album or group of photos you want in your
book.
2. Choose File > New Book.
3. Choose a hardcover or softcover book size from the
Book Type pop-up menu. (Note: Softcover books are a
new feature in iPhoto 5.)
4. Select a design for your book from the scrolling themes
list.
14"
Figure 28: Mail Photo Dialog Box
Apple iPhoto 5 Tutorial - Dr. Luanne Fose