1
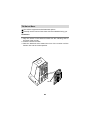
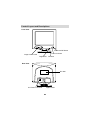
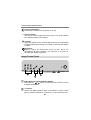
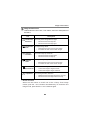
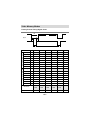
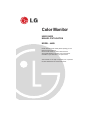
Color Monitor
USER GUIDE
MANUEL D'UTILISATION
MODEL : 440Si
Please read this manual carefully before operating your set.
Retain it for future reference.
Record model number and serial number of the set.
See the label attached on the back cover and quote this
information to your dealer when you require service.
Avant d’utiliser ou de régler cet appareil pour la première
fois, lisez attentivement ce manuel d’instructions.
AGENCY REGULATORY NOTICE
FCC
Compliance
Statement
This equipment has been tested and found to
comply with the limits for a Class B digital device
pursuant to Part 15 of the FCC Rules. These limits
are designed to provide reasonable protection
against harmful interference in a residential
installation.
This equipment generates, uses, and can radiate
radio frequency energy and if not installed and used
in accordance with the instructions, may cause
harmful interference to radio communications.
However, there is no guarantee that interference will
not occur in a particular installation.
If this equipment does cause harmful interference to
radio or television reception (which can be
determined by turning the equipment off and on),
the user is encouraged to try to correct the
interference by using one or more of the following
measures:
- Reorient or relocate the receiving antenna.
- Increase the separation between the equipment
and the receiver.
- Connect the equipment into an outlet on a circuit
different from that to which the receiver is
connected.
- Consult the dealer or an experienced radio/TV
technician for help.
Caution: Changes or modifications not expressly
approved by LG Electronics Inc. for compliance
could void the user's (or your) authority to operate
the equipment. Only peripherals (digital input/output
devices, terminals, printers, etc.) certified to comply
with the Class B limits may be attached to this
monitor. Operation with non-certified peripherals is
likely to result in interference to radio and TV
reception.
Only shielded Signal Cables may be used with this
System.
i
Canadian
D. O. C.
Notice
This Class B digital apparatus meets all
requirements of the Canadian Interference-Causing
Equipment Regulations.
Cet appareil numérique de la classe B respecte
toutes les exigences du Règlement sur le matériel
brouilleur du Canada.
CE
Conformity
Notice
Products with the “CE” Marking comply with the
EMC Directive(89/336/EEC) and LOW VOLTAGE
Directive (73/23/EEC) issued by the Commission of
the European Community.
Compiance with these directives implies conformity
to the following European Norms :
EN 55022
EN 50082-1:1992
EN 60555-2
EN 60555-3
EN 60950
ii
; Radio Frequency Interference
; Electromagnetic Immunity
; Power Line Harmonics
; Voltage Fluctuations
; Product Safety
Table of Contents
Monitor Registration
Notice.......................................................................................................A1
Trademark Acknowledgments..................................................................A1
Important Precautions
On safety..................................................................................................A2
On installation ..........................................................................................A3
On cleaning..............................................................................................A3
On repacking............................................................................................A3
Tilt/Swivel Base
Installation................................................................................................A4
Installation
Connections .............................................................................................A5
Control Layout and Descriptions
Front View ................................................................................................A6
Rear View ................................................................................................A6
Image Control Panel ................................................................................A7
Power Management System, MPR II and DDC
Power Management System....................................................................A9
Low Radiation Compliance (MPR II)........................................................A9
DDC (Display Data Channel) ...................................................................A9
General Operation ..................................................................................A10
Video Memory Modes
Factory Preset Timing Signal Chart .......................................................A11
Troubleshooting and Service
Troubleshooting .....................................................................................A12
Service ...................................................................................................A13
Specifications..........................................................................................A14
Monitor Limited Warranty for the United States and Canada ....A16
iii
Monitor Registration
The model and serial numbers are found on the rear of this unit.
These numbers are unique to this unit and not available to others.
You should record requested information here and retain this guide
as a permanent record of your purchase. Staple your receipt here.
Date of Purchase
Dealer Purchased From
Dealer Address
Dealer Phone No.
Model No.
Serial No.
:
:
:
:
:
:
Notice
All rights reserved. Reproduction in any manner, in whole or in part, is
strictly prohibited without the written permission of LG Electronics Inc.
Trademark Acknowledgments
LG is a trademark of LG Electronics Inc.
IBM is a registered trademark and VGA is a trademark of
International Business Machines Corporation.
WARNING : To reduce the risk of fire or electric shock, do not
expose this appliance to rain or moisture.
AVERTISSEMENT : Ne pas placer cet appareil dans un endroit humide.
Cela peut entraîner un incendie ou une décharge électrique.
A1
Important Precautions
This unit has been engineered and manufactured to assure your
personal safety, but improper use can result in potential electrical
shock or fire hazard. In order not to defeat the safeguards
incorporated in this monitor, observe the following basic rules for its
installation, use, and servicing. Also follow all warnings and
instructions marked directly on your monitor.
On safety
1. Use only the power cord supplied with the unit. In case you use
another power cord, make sure that it is certified by the applicable
standards (UL/CSA or VDE) if not being provided by the supplier.
2. Operate the monitor only from a power source indicated in the
specifications of this manual or listed on the monitor. If you are not
sure what type of power supply you have in your home, consult
with your dealer.
3. Overloaded AC outlets and extension cords are dangerous. So are
frayed power cords and broken plugs. They may result in a shock
or fire hazard. Call your service technician for replacement.
4. DO NOT OPEN THE MONITOR. There are no user serviceable
components inside. There are Dangerous High Voltages inside,
even when the power is OFF. Contact your dealer if the monitor is
not operating properly.
5. To avoid personal injury :
Do not place the monitor on a sloping shelf unless properly
secured.
Use only a stand recommended by the manufacturer.
Do not try to roll a stand with small casters across thresholds or
deep pile carpets.
6. To prevent Fire or Hazards:
Always turn the monitor OFF if you leave the room for more than
a short period of time. Never leave the monitor ON when leaving
the house.
A2
Important Precautions
Keep children from dropping or pushing objects into the monitor's
cabinet openings. Some internal parts carry hazardous voltages.
Do not add accessories that have not been designed for this
monitor.
During a lightning storm or when the monitor is to be left
unattended for an extended period of time, unplug it from the wall
outlet.
Do not bring magnetic devices such as magnets or motors near
the picture tube.
On installation
1. Do not allow anything to rest upon or roll over the power cord, and
do not place the monitor where the power cord is subject to damage.
2. Do not use this monitor near water such as near a bathtub,
washbowl, kitchen sink, laundry tub, in a wet basement, or near a
swimming pool.
3. Monitors are provided with ventilation openings in the cabinet to
allow the release of heat generated during operation. If these
openings are blocked, built-up heat can cause failures which may
result in a fire hazard. Therefore, NEVER:
Block the bottom ventilation slots by placing the monitor on a
bed, sofa, rug, etc.
Place the monitor in a built-in enclosure unless proper ventilation
is provided.
Cover the openings with cloth or other material.
Place the monitor near or over a radiator or heat source.
On cleaning
Unplug the monitor before cleaning the face of the picture tube.
Use a slightly damp (not wet) cloth. Do not use an aerosol
directly on the picture tube because overspray may cause
electrical shock.
On repacking
Do not throw away the carton and packing materials. They make
an ideal container in which to transport the unit. When shipping
the unit to another location, repack it in its original material.
A3
Tilt/Swivel Base
Turn Off the equipment and all attached options.
Carefully set the monitor face-down with the underside facing you.
Installation
1. Align the hooks on the tilt/swivel stand with the matching slots in
the base of the monitor.
2. Insert the hooks into slots.
3. Slide the tilt/swivel stand toward the front of the monitor until the
latches click into the locked position.
Hooks
A4
Installation
The supply voltage is marked on the ID label located on the rear
panel of the monitor. If your local voltage is different, do not use the
monitor and contact your supplier before using the display.
Connections
To connect your monitor after the video adapter is properly installed:
1. Turn OFF the power to your computer and all its attached options.
2. Position the monitor and the computer so that you can easily
get to the back panel of each.
3. Connect the signal cable with D-sub connector to the graphics
board on your PC as described in your PC Owner's Manual.
4. Tighten the screws on the video cable connectors to keep them
from coming loose and to prevent radio and TV interference.
5. Connect the power cord to the AC receptacle on the back of the
monitor. Plug the other end of the power cord into a properly
grounded electrical outlet.
6. The socket-outlet should be installed near the equipment and
should be easily accessible.
A5
Control Layout and Descriptions
Front View
Power On/Off Button
Power Indicator
Image Control Panel
Brightness
Contrast
Rear View
ID Label
AC Power Connector
Signal Cable
A6
Control Layout and Description
Power On/Off Button
This Button is used to turn the power On or Off.
Power Indicator
The power indicator lights when the power is On, and indicates
the operating status of the display.
Contrast
Adjust the display to the contrast desired. Move the thumbwheel
located beneath this indicator to increase or decrease the display
contrast.
Brightness
Used to adjust the brightness of the screen. Move the
thumbwheel located beneath this indicator to increase or
decrease the display brightness.
Image Control Panel
3
2
1
Image Selection and Adjustment buttons
Use either the
or
button to select the icons which you wish
to adjust and display.
-/+ buttons
Used to set digital values for each of the select on screen control
item by pressing + button for increment or - button for decrement.
A7
Image Control Panel
Image Control Icons
Listed below are the icons, icon names, and icon descriptions of
the items.
icon
Description
Horizontal
Position
To move picture image left and right.
Horizontal
Size
To adjust image width.
Vertical
Position
To move image up and down.
Vertical
Size
To adjust image height.
- Moves the screen image left.
+ Moves the screen image right.
- Decreases the size of the screen image.
+ Increases the size of the screen image.
- Moves the screen image down.
+ Moves the screen image up.
- Decreases the size of the screen image.
+ Increases the size of the screen image.
To correct the bowing in and out of the image.
Side
Pincushion
- Curves the image's edges inwards.
+ Curves the image's edges outwards.
Trapezoid
To correct geometric distortion.
- Makes the screen image narrower at the top.
+ Moves the screen image wider at the top.
* Recall Function
When the user wants to recall one of the 5 fatory fixed image
modes, push the - and + buttons simultaneously. To recall the next
image mode, press both the - and + buttons again.
A8
Power Management System
When used in conjunction with a PC having power saving circuitry, or
a PC running screen blanking software this monitor automatically
reduces its power consumption when the computer is not in use.The
monitor has power-saving states, indicated by the light-emitting diode
(LED) on the front panel.These power-saving states exceed the
Environmental Protection Agency (EPA) Energy Star requirements
using the methodology for Display Power Management Signals(DPMS).
Developed by the Video Electronics Standards Association(VESA).
Low Radiation Compliance (MPR II)
This monitor meets one of the strictest guidelines available today for
low radiation emissions, offering the user extra shielding and an antistatic screen coating. These guidelines, set forth by a government
agency in Sweden, limits the amount of emission allowed in the
Extremely Low Frequency (ELF) and Very Low Frequency (VLF)
electromagnetic range.
DDC (Display Data Channel)
DDC is a communication channel over which the monitor
automatically informs the host system(PC) about its capabilities.This
monitor has three DDC function; DDC2B carry out uni-directional
communication between PC and monitor. Under these situations, the
PC sends display data to the monitor but not commands to control the
monitor servings.
NOTE :
PC must support DDC functions to do this.
Some older computer systems are not compatible with the
DDC standard. If your monitor is displaying a monochrome
image or the wrong resolution, need to change with a DDC
compatible VGA card.
A9
General Operation
After following the installation instructions and getting familiar with the
controls, you are ready to operate the monitor.
1. Turn on the monitor, PC and other peripherals you plan to use.
2. After the PC has booted (powered up and finished self-testing),
enter a software application that uses the full screen display.
3. While looking at the image on the screen, adjust the controls for
the image size, centering, brightness and contrast levels you
prefer.
4. This monitor is an auto scanning monitor, capable of synchronizing
with a variety of video standards automatically. The Scanning
Mode Table below indicates the resolution, as well as the horizontal
and vertical refresh rates, of some of the modes that this monitor
can match to the output of your PC's graphics card.
Other resolutions and standards can also be synchronized and
displays on this monitor as long as they are within the horizontal
and vertical frequency range of this monitor. See the specifications
for this information.
A10
Video Memory Modes
Factory Preset Timing Signal Chart
Video
Sync
B
A
C
F
D
H
O
R
I
Z
O
N
T
A
L
V
E
R
T
I
C
A
L
Polarity
E
Mode1
Mode2
Mode3
Mode4
Mode5
-
-
-
+
-
Symbol
Frequency
kHz
31.47
31.469
37.5
46.875
48.36
Total Period
uS
31.78
31.778
26.667
21.333
20.677
E
Data Period
uS
25.420
25.422
20.317
16.162
15.754
A
Blanking
uS
6.360
6.356
6.35
5.171
4.923
B
Front Porch
uS
0.640
0.636
0.508
0.323
0.369
C
Pulse Width
uS
3.810
3.813
2.032
1.616
2.092
D
Back Porch
uS
1.910
1.907
3.81
3.232
2.462
F
+
-
-
+
-
Hz
70.08
59.940
75.0
75.0
60.0
Polarity
Frequency
Total Period
mS
14.268
16.683
13.333
13.333
16.666
E
Data Period
mS
12.711
15.253
12.80
12.80
15.880
A
Blanking
mS
1.557
1.430
0.533
0.533
0.786
B
Front Porch mS
0.413
0.318
0.026
0.021
0.062
C
Pulse Width mS
0.064
0.064
0.08
0.064
0.124
D
Back Porch
1.08
1.048
0.427
0.448
0.060
F
Resolution
Recall
mS
720
640
640
800
1024
x 400
x 480
x 480
x 600
x 768
YES
YES
YES
YES
YES
A11
Troubleshooting
Symptom: The power LED is amber
Possible causes:
Display power management mode.
These is no sync signal.
The signal cable is not fastened securely.
Check the computer power and graphics adapters configuration.
The frequency of the sync input is outside the operating range of
the monitor.
HORZ: 30kHz-48kHz
VERT: 50Hz-90Hz
Symptom: The image on the SCREEN is not centered, or too small
or not a rectangle shape.
Possible Causes: Image adjustment not been done yet in the current
operating mode. Use the SELECT and +/- buttons to set the image to
your liking.
Symptom:The monitor doesn't enter the power saving off mode
(Amber led).
Possible Causes:Computer video signal is not VESA DPMS
standard. Enter the PC or the video controller card is not using the
VESA DPMS power management function.
A12
Service
1. Unplug the monitor from the wall outlet and refer servicing to alified
service personnel when :
The power cord or plug is damaged or frayed.
Liquid has been spilled into the monitor.
The monitor has been exposed to rain or water.
The monitor does not operate normally following the operating
instructions. Adjust only those controls that are covered in the
operating instructions. An improper adjustment of other controls
may result in damage and often requires extensive work by a
qualified technician to restore the monitor to normal operation.
The monitor has been dropped or the cabinet has been damaged.
The monitor exhibits a distinct change in performance.
Snapping or popping from the monitor is continuous or frequent
while the monitor is operating. It is normal for some monitors to
make occasional sounds when being turned on or off, or
switching video modes.
2. Do not attempt to service the monitor yourself, as opening or
removing covers may expose you to dangerous voltage or other
hazards. Refer all servicing to qualified service personnel.
3. When replacement parts are required, have the service technician
verify in writing that the replacements used have the same safety
characteristics as the original parts. Use of manufacture specified
replacements can prevent fire, shock and other hazards.
4. Upon completion of any service or repairs to the monitor, ask the
service technician to perform the safety check described in the
manufacturer's service manual.
5. When a video monitor reaches the end of its useful life, improper
disposal could result in a picture tube implosion. Ask a qualified
service technician to dispose of the monitor.
A13
Specifications
Sync Signal type
Type
H. sync
V. sync
Separate sync
H. sync
V. sync
Signal Connector Pin Assignment
Pin
1
Separate Sync
5
6
11
10
15
1
2
3
4
5
6
7
8
9
10
11
12
13
14
15
A14
Red
Green
Blue
Ground
Self-Test
Red Ground
Green Ground
Blue Ground
NC
Ground
Ground
SDA
Horiz.Sync
Vert.Sync
SCL
Specifications
Picture tube
: 14 inch (13.2 inches viewable), Tinted,
90 degree deflection
0.28 mm, Non-Glare screen
Horizontal Frequency : 30 ~ 48 kHz
Vertical Frequency
: 50 ~ 90 Hz
Display Area
: 260 x 190 mm (H x V)
Video Bandwidth
: 65 MHz
Resolution
: 1024 x 768 Non Interlace, 60Hz Refresh Rate
Signal connector
: 15 pin D-Sub type
Power input
: 100-240VAC, 50/60Hz, 1.5A
Power Consumption Table
MODE
H.sync V.sync Video
Normal
Stand-by
Suspend
Off
On
Off
On
Off
On
On
Off
Off
On
Off
Off
Off
Power
Consumption
85W
15W
15W
8W
LED Color
Green
Amber
Amber
Amber
Dimensions
: 352 x 397.1 x 307.5 mm (With Tilt/Swivel Stand))
(WXDXH)
Weight (net)
13.9 x 15.6 x 12.1 inch
: 10.5 kg (23.15 lbs
Information in this document is subject to change without notice and does
not represent a commitment on the part of LG Electronics Inc.
A15
Monitor Limited Warranty
for the United States and Canada
LG Electronics U.S.A., Inc. will repair or at its option replace, without charge, your product which proves
to be defective in material or workmanship under normal use, during the warranty period listed below from
the date of original purchase. This warranty is good only to the original purchaser of the product
during the warranty period as long as it is in the U.S. including Alaska, Hawaii, U.S. Territories and
all Canadian Provinces.
WARRANTY PERIOD
MODEL #
LABOR
3 YEARS
PARTS
3 YEARS
CRT
3 YEARS
HOW SERVICE IS HANDLED
Call 1-800-243-0000, 24 hrs a day, 7 days per week,
please have your product type (Monitor, TV, VCR) and
ZIP code ready.
No other express warranty is applicable to this product. THE DURATION OF ANY IMPLIED
WARRANTIES, INCLUDING THE IMPLIED WARRANTY OF MERCHANTABILITY, IS
LIMITED TO THE DURATION OF THE EXPRESS WARRANTY HEREIN. LG ELECTRONICS
U.S.A., INC. SHALL NOT BE LIABLE FOR THE LOSS OF THE USE OF THE PRODUCT,
INCONVENIENCE, LOSS OR ANY OTHER DAMAGES, DIRECT OR CONSEQUENTIAL,
ARISING OUT OF THE USE OF, OR INABILITY TO USE, THIS PRODUCT OR FOR ANY
BREACH OF ANY EXPRESS OR IMPLIED WARRANTY, INCLUDING THE IMPLIED
WARRANTY OF MERCHANTABILITY APPLICABLE TO THIS PRODUCT.
Some states do not allow the exclusion or limitation of incidental or consequential damages or limitations
on how long an implied warranty lasts, so these limitations or exclusions may not apply to you. This
warranty gives you specific legal rights and you may also have other rights which vary from state to state.
THE ABOVE WARRANTY DOES NOT APPLY:
To damages or problems which result from delivery or improper installation.
To damages or problems which result from misuse, abuse, accident, alteration, or incorrect electrical
current or voltage.
To service calls, which do not involve defective workmanship or material, such as head cleaning and
expaining the operation of the unit.
Therefore these costs are paid by the consumer.
CUSTOMER ASSISTANCE NUMBERS:
To Prove Warranty Coverage:
Retain your Sales Receipt to prove date of purchase.
Copy of your Sales Receipt must be submitted at the
time warranty service is provided.
To Obtain Product or Customer
Assistance:
Call 1-800-243-0000 (Mon-Fri 8am-5pm CST)
Push Appropriate Menu Code.
For Your Nearest Authorized
Service Center:
Call 1-800-243-0000, 24 hrs a day, 7 days per week, please
have your product type (Monitor, TV, VCR) and ZIP code ready.
Or see website at http://www.LGEservice.com
or send e-mail to [email protected]
All Customers In Canada
Please Call
(905)-670-0650
A16