1
User’s Guide
EasyCoder E4
Bar Code Label
Printer
Information in this manual is subject to change without prior notice and does not represent a
commitment on the part of Intermec Printer AB.
© Copyright Intermec Printer AB, 2002. All rights reserved. Published in Sweden.
EasyCoder, EasyLAN, Fingerprint, and LabelShop are registered trademarks of Intermec Technologies Corp. The word Intermec, the Intermec logo, InterDriver, PrintSet, and Duratherm are
trademarks of Intermec Technologies Corp.
Centronics is a registered trademark of Genicom Corporation.
Kimdura is a registered trademark of Kimberly Clark.
Microsoft is a registered trademark of Microsoft Corporation.
Torx is a registered trademark of Camcar Division of Textron Inc.
Windows is a trademark of Microsoft Corporation.
Preface
Contents
Preface
Contents .......................................................................................1
FCC Notice (United States of America) ......................................3
DOC Notice (Canada) ................................................................3
EU Standard EN 55022 (The Europan Union)..........................3
Declaration of Conformity (CE) .................................................4
1. Introduction
Introduction .................................................................................5
Safety Requirements.....................................................................6
Product Labeling ..........................................................................6
2. Installation
Unpacking ....................................................................................7
Main Parts ....................................................................................8
• Standard Model .....................................................................8
• LinerLess Model ....................................................................9
Connections ...............................................................................10
• Power ...................................................................................10
• Computer ............................................................................10
Controls and Indicators..............................................................11
• Power LED ..........................................................................11
• Feed Button .........................................................................11
3. Operation
Media Load – Tear-Off (Straight-through)................................12
Media Load – Peel-Off (Self-strip).............................................15
Media Load – External Supply (Fan-fold) .................................18
Media Load – Cut-Off (option).................................................19
Ribbon Load...............................................................................20
Printing Test Labels ....................................................................23
Printing a Label ..........................................................................25
• Intermec InterDriver............................................................25
• Intermec LabelShop.............................................................25
• E4 Direct Protocol ..............................................................25
4. Printer Setup
Setup Methods ...........................................................................26
Communication Setup...............................................................27
Print Location Setup ..................................................................30
Media Setup ...............................................................................33
Print Setup..................................................................................34
Testfeed.......................................................................................35
Intermec EasyCoder E4 – User’s Guide
1
Preface
Contents, cont.
5. Troubleshooting
Checklist.....................................................................................36
6. Maintenance
Cleaning the Case.......................................................................37
Cleaning the Printhead...............................................................39
Cleaning the Platen Roller .........................................................42
Replacing the Printhead .............................................................44
Adjusting Printhead Pressure......................................................46
Appendix 1
Technical Data............................................................................47
• Standard Model ...................................................................47
• LinerLess Model ..................................................................48
Appendix 2
Media Specifications...................................................................49
Media Roll Size...........................................................................49
Media..........................................................................................50
• Non-Adhesive Strip .............................................................50
• Self-Adhesive Strip ...............................................................51
• Self-Adhesive Labels.............................................................52
• Tickets with Gap .................................................................53
• Tickets with Black Mark......................................................55
Transfer Ribbons ........................................................................55
• Ribbon Roll Size ..................................................................55
New Supplies and Paper Type settings .......................................56
Appendix 3
Interfaces.....................................................................................58
Parallel Interface..........................................................................58
Serial Interface ............................................................................59
2
Intermec EasyCoder E4 – User’s Guide
Preface
FCC Notice (United States of America)
WARNING
This equipment generates, uses, and can radiate radio frequency energy and if not installed and
used in accordance with the instructions manual, may cause interference to radio communications.
It has been tested and found to comply with the limits for a Class A computing device pursuant
to Subpart J of Part 15 of FCC Rules, which are designed to provide reasonable protection against
such interference when operated in a commercial environment. Operation of this equipment in
a residential area is likely to cause interference in which case the user at his own expense will be
required to take whatever measures may be required to correct the interference.
DOC Notice (Canada)
Canadian Dept. of Communication
REGULATIONS COMPLIANCE (DOC-A)
This digital apparatus does not exceed the class A limits for radio noise emissions from a digital
apparatus as set out in the radio interference regulations of the Canadian Department of Communication.
Ministère des Communications du Canada
CONFORMITE DE REGLEMENTS (DOC-A)
Le présent appareil numérique n’émet pas de bruits radio-électriques dépassant les limites applicables
aux appareils numériques de classe A prescrites dans le règlement sur brouillage radioélectrique édicté
par le Ministère des Communications du Canada.
GS Notice (Germany)
ALLGEMEINE VORSCHRIFT
Reparaturen oder sonstige Eingriffe, die sich nicht auf normale Bedienung der Maschine beziehen,
dürfen ausschließlich nur von einem ausgebildeten, zuständigen Fachmann vorgenommen werden.
EU Standard EN 55022 (The European Union)
WARNING
This is a Class A ITE product. In a domestic environment this product may cause radio interference
in which case the user may be required to take adequate measures.
Intermec EasyCoder E4 – User’s Guide
3
Preface
Declaration of Conformity (CE)
We,
Intermec Printer AB
Idrottsvägen 10
Box 123
S-431 22 Mölndal
Sweden
declare under our sole responsibility1 that the product
EasyCoder E4
to which this declaration relates is in conformity with the following standards
Electrical Safety:
EN 60 950
EMC Emissions:
EN 50 081-1:1992
(EN 55 022:1994, class A
EN 61 000-3-2:1995, class A)
EMC Susceptibility:
EN 50 082:1992
(IEC 801-2:1984
IEC 801-3:1984,
IEC 801-4:1988)
following the provisions of Directives
89/336/EEC and 73/23/EEC
Mölndal 1999-09-01
...................................................................
Mats Gunnarsson
President
1
/. Intermec assumes no responsibility regarding the CE Directive if the
printer is handled, modified, or installed in other manners than those described in
Intermec’s manuals.
4
Intermec EasyCoder E4 – User’s Guide
Chapter 1
Introduction
EasyCoder E4
The EasyCoder E4 printer is a combined thermal transfer and
direct thermal printer. It also comes in a LinerLess version, without any thermal transfer ribbon mechanism but with special
coating on parts in contact with the LinerLess media. It is simple
to operate, and is designed to work with any computing device
capable of ASCII output.
The EasyCoder E4 can print labels, tickets, or tags in three ways:
• Tear-off (Straight-through), where the media must be torn off
manually against the tear bar. Self-adhesive labels will remain
attached to the liner (backing paper) and must be removed
by hand.
• Peel-Off (Self-strip), where each self-adhesive label is printed,
automatically removed from its liner (backing paper), and
presented to the operator. Each subsequent label is held until
the Label Taken Sensor shows the previous label has been
removed. The liner is wound up on a hub inside the media
compartment.
• Cut-off, where continuous stock is automatically cut into tickets or tags using an optional paper cutter (not for LinerLess
media). The cutter can also cut through the liner between
labels.
The EasyCoder E4 printer is fitted with an 8 dots/mm (203.2
dots-per-inch) printhead.
The EasyCoder E4 is provided with its own version of the Intermec Direct Protocol (see Intermec EasyCoder E4 Direct Protocol,
Programmer’s Reference Manual). It is also supported by a series a
standard Windows application software packages from Intermec:
• Intermec InterDriver with ActiveX controls allows printing
from most programs.
• Intermec LabelShop is a label-formatting program available in
a number of versions.
• Intermec PrintSet is a software for setting up EasyCoder printers and printing test labels..
You can connect the host computer to the EasyCoder E4 via the
serial RS-232 port or the parallel Centronics port. A PCMCIA
port is also provided so that you can fit extra memory cards or
a font cards.
Intermec EasyCoder E4 – User’s Guide
5
Chapter 1
Introduction
Safety
Intermec assumes no responsibility regarding the CE Directive if
the printer is handled, modified, or installed in any way other
than that described in Intermec’s manuals.
Caution
• Read this manual carefully before connecting the printer.
• Moving parts are exposed when the side door is open, so
ensure that the door is closed before you operate the printer.
• Do not put your fingers inside the print mechanism when
the power is on.
• Place the printer on an even surface which can support its
weight of approximately 4.7 kg (10.3 pounds) plus supplies.
• Do not spray the printer with water. If you are using a hose
to clean the premises in an industrial environment, remove the
printer or protect it carefully from spray and moisture.
• Carefully read the warning text on the envelope before using
a cleaning card.
• Do not transport the printer wihout first removing any supplies.
Product Labeling
6
The machine label is attached to the bottom of the printer and
contains information on type, model, and serial number as well
as AC voltage. It also contains various signs of approval.
Intermec EasyCoder E4 – User’s Guide
Chapter 2
Installation
Unpacking
Before you install the printer, examine the package for possible
damage or missing parts:
• Open the box and lift the printer out.
• Check that the printer has not been visibly damaged during
transportation. Keep the packing materials in case you need to
move or reship the printer.
• Check the label on the printer’s rear plate, which gives the
voltage, the part number, and the serial number.
• Check that any options you ordered are included.
• Check that all the accessories are included. As standard, the
box contains:
- Intermec EasyCoder E4 printer
- Power cord
- Parallel interface cable
- Quality check card
- Cleaning card
- Starter pack of labels
- Starter pack of thermal transfer ribbon (not LinerLess
model)
- Set of manuals
- Supporting software and product information on CD.
• Check that the power cord is appropriate for the local standard.
European-type
230 VAC plug
US/Canadian-type
115 VAC plug
GB-type
230 VAC plug
If the printer has been damaged in any way during transportation, complain to the carrier immediately.
If the delivery is incorrect or any parts are missing, report it
immediately to the distributor.
Intermec EasyCoder E4 – User’s Guide
7
Chapter 2
Installation
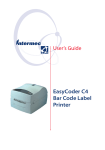
Main Parts – Standard Model
Side Cover Release
Front Cover Release
Transfer Ribbon
Supply Hub
Media Supply Roll Post
with Edge Guide
Transfer Ribbon
Rewind Hub
Label Taken Sensor
Cutter Interface
Bar Code Wand Interface
(not used)
Thermal Printhead
Tear Bar
Liner Takeup Hub
Printhead Lift Lever
Guide Shafts
The left side of the case is not designed to be opened by the
operator.
In this manual, the standard direct thermal/thermal transfer model
is illustrated.
8
Intermec EasyCoder E4 – User’s Guide
Chapter 2
Installation
Main Parts – LinerLess Model
Side Cover Release
Media Supply Roll Post
with Edge Guide
Front Cover Release
Bar Code Wand Interface
(not used)
Thermal Printhead
Tear Bar
Printhead Lift Lever
Guide Shaft
The left side of the case is not designed to be opened by the
operator.
Intermec EasyCoder E4 – User’s Guide
9
Chapter 2
Installation
Connections
Power
1 Place the printer on a level surface, near an AC outlet. You
should be able to easily access the printer to load media, to
load ribbon, and to remove the printout.
2 Check that the printer is switched off.
3 Connect the power cord to the receptacle on the rear plate and
to an electrical outlet (110-120 or 220-240 VAC.)
Computer
The EasyCoder E4 is fitted with a 36pin female Centronics
connector for the parallel interface port and a DB-9pin female
connector for the RS-232 serial interface port.
• Centronics Parallel Interface: Use the parallel interface with the
Intermec InterDriver (for Windows) because it is faster than
the serial interface.
• RS-232 Serial Interface: Use the serial interface with the Direct
Protocol because you can receive error messages from your
printer. This is not available when using the parallel interface.
Switch off both the PC and the EasyCoder E4 before connecting
them together.
The EasyCoder E4 is also fitted with a Type 3 PCMCIA slot,
which can hold up to two Type 1 or Type 2 PCMCIA cards (5V.)
These can be Memory cards or Font cards and are optional.
PCMCIA card ejection buttons
PCMCIA card slot
RS-232 serial interface
ON/OFF switch
AC power cord receptacle
Centronics parallel interface
10
Intermec EasyCoder E4 – User’s Guide
Chapter 2
Installation
Controls and Indicators
The EasyCoder E4 has one control (the Feed button) and one
indicator (the Power LED.) The Power LED is tri-colored and
indicates the status of the printer.
Power LED
LED shows
Meaning
No light:
Power off
Green:
• Steady
• Flashing
Power on
Busy (executing or receiving data)
Amber:
• Momentarily
During power on
Red:
• Steady
Error condition, for example...
- Printhead lifted
- Out of media
- Out of ribbon
- Media jam in cutter
Power LED
Feed button
Feed Button
Press Feed to feed out a blank label, if no label design has been
downloaded to the printer.
Press Feed to print a label after a label design has been downloaded to the printer and the Feed button has been set up to
work as a Print button (see Chapter 3, “Operation/Printing a
Label”). You can also use Feed to print a test label (see Chapter 3,
“Operation/Printing Test Labels”).
Intermec EasyCoder E4 – User’s Guide
11
Chapter 3
Operation
Media Load – Tear-Off (Straight-through)
The same loading principles apply to thermal transfer receiving
media as well as direct thermal or LinerLess media. All kinds
of media can be used. However, LinerLess media requires an
EasyCoder E4 LinerLess printer.
Caution!
Before shipping the printer, always remove any roll from the
media supply roll post.
HINT!
To facilitate media and ribbon load, you can remove the side cover
by opening it halfway (45°) and lift the hinges out of their pockets
in the bottom moulding.
1
2
1
2
Open the side and front covers.
12
Turn the printhead lift lever counterclockwise to
raise the printhead.
Intermec EasyCoder E4 – User’s Guide
Chapter 3
Operation
Media Load – Tear-Off, cont.
3
4
Check that the media supply roll post is in the
correct position for the size of the media roll. The
Remove any empty core from the media
post is easier to move if first rotated 1/4 of a turn.
supply roll post. It is not necessary to remove the Push the new roll as far in as it will go and adjust
edge guide.
the edge guide.
5
6
Route the media between the guide rollers, between Push the media as far in as it will go and adjust
the two parts of the ribbon/media sensor, over the the edge guide ring according to the width of the
platen roller, and out through the feed-out slot.
media.
Intermec EasyCoder E4 – User’s Guide
13
Chapter 3 Operation
Media Load – Tear-Off, cont.
7
8
2
1
Turn the printhead lift lever clockwise to engage
the printhead.
9
Close the front and side covers.
10
2 x Feed
E4 LinerLess
E4 Standard
Print out two blank copies by pressing Feed twice. If
loading media for the first time or when switching To tear off the media, pull it downwards against
to a new type or brand of media, instead print a test the tear bar on standard printers and upwards on
label as described at the end of this chapter.
LinerLess printers.
14
Intermec EasyCoder E4 – User’s Guide
Chapter 3
Operation
Media Load – Peel-Off (Self-strip)
This section describes the case when self-adhesive labels are separated from the liner immediately after printing. The liner is then
wound up on an integral liner takeup hub. This is also known
as “Self-strip” operation. It cannot be with on the EasyCoder E4
LinerLess printer
Caution!
Before shipping the printer, always remove any roll from the
media supply roll post.
HINT!
To facilitate media and ribbon load, you can remove the side cover
by opening it halfway (45°) and lift the hinges out of their pockets
in the bottom moulding.
2
1
1
2
Open the side and front covers.
Intermec EasyCoder E4 – User’s Guide
Turn the printhead lift lever counterclockwise to
raise the printhead.
15
Chapter 3 Operation
Media Load – Peel-Off, cont.
4
3
2
1
Remove any empty core from the media
Pull out the clip on the liner takeup hub, then supply roll post. It is not necessary to remove the
edge guide.
remove any liner.
5
6
40 cm (15 inches)
Check that the media supply roll post is in the
correct position for the size of the media roll. The
post is easier to move if first rotated 1/4 of a turn.
Push the new roll as far in as it will go and adjust Remove labels from the first 40 cm (15 inches) of the
the edge guide.
liner. Lower the printhead.
16
Intermec EasyCoder E4 – User’s Guide
Chapter 3
Operation
Media Load – Peel-Off, cont.
7
8
2
1
Route the liner around the tear bar and the liner Wind up the liner on the takeup hub and secure
drive roller and back under the print mechanism it with the clip. Wind up the liner so the media
and the lower (rear) guide shaft.
becomes tight
9
10
2 x Feed
1
2
Close the covers.
Intermec EasyCoder E4 – User’s Guide
Print out two blank copies by pressing Feed twice. If
loading media for the first time or when switching
to a new type or brand of media, instead print a test
label as described at the end of this chapter.
17
Chapter 3 Operation
Media Load – External Supply (Fan-fold)
The EasyCoder E4 can print on various types of media placed
externally behind the printer, for examples boxes of fan-folded
tickets. LinerLess media cannot be placed externally.
For smooth operation, ensure that the external media supply is
placed lower than the printer’s intake slot.
When using an external media supply, take care to protect the
media from dust, dirt or other foreign particles, that can impair
the printout quality or cause unnecessary wear to the printhead.
Depending on brand and quality, all direct thermal media are
more or less sensitive to heat, direct sunlight, moisture, oil,
plasticizers, fat, and other substances. You should protect them
accordingly.
1
This diagram shows the media path from an external supply.
18
Intermec EasyCoder E4 – User’s Guide
Chapter 3
Operation
Media Load – Cut-Off (option)
The standard model of EasyCoder E4 can as an option be fitted
with a paper cutter that can cut of paper strip or liner between
labels. The thickness of the media to be cut should be within
78-175µm (equal to a paper weight between 78 and 175 g/m2).
Minimum practical copy length is 38.1 mm (1.5 inches).
The cutter cannot be used to cut through any adhesive such as
labels on liner. It cannot be used with LinerLess media.
The cutter is controlled by CUT or CUT ON instructions in the
EasyCoder E4 Direct Protocol.
The cutter can be tilted forward to facilitate cleaning and media
load. A microswitch prfevents the cutter from running when in
open position.
The built-in label taken sensor of the standard EasyCoder E4
does not work when a cutter is installed.
Media load follows the same principles as Tear-Off (Straightthrough) operation, see earlier in this chapter, but route the
media through the cutter as illustrated below.
1
Load media according to the instructions for tear-off operation, but route the media through the
cutter like this.
Intermec EasyCoder E4 – User’s Guide
19
Chapter 3 Operation
The EasyCoder E4 can print on labels, tickets, tags, and continuous stock using either direct thermal printing on special
heat-sensitive media or thermal transfer printing using a special
ink-coated ribbon. The EasCoder E4 LinerLess printer is not
fitted with any transfer ribbon mechanism.
Ribbon Load
Thermal transfer printing makes it possible to use a wide range
of receiving face materials. Make sure to select a type of ribbon
that matches the type of receiving face material (see Appendix
2, “Media Specification”) and to set up the printer properly (see
Chapter 4, “Printer Setup”).
Most transfer ribbons do not smear at room temperature.
1
2
2
1
2
1
Open the side and front covers.
20
Raise the pinthead and remove any used ribbon and
the empty ribbon core. Keep the empty core for used
with the next ribbon load.
Intermec EasyCoder E4 – User’s Guide
Chapter 3
Operation
Ribbon Load, cont.
3
4
20 cm (8 inches)
Press the ribbon roll onto the ribbon supply spool and
route the ribbon under the printhead with the inkUnpack a roll of original Intermec thermal transfer coated side facing down. Pull out approx. 20 cm (8
inches) of ribbon and lower the printhead.
ribbon.
5
6
1
2
3
Press an empty core onto the ribbon rewind hub
(1.) Tape the transparent ribbon leader to the
core (2) and raise the printhead (3.)
Intermec EasyCoder E4 – User’s Guide
Both ribbon cores must rotate counterclockwize.
21
Chapter 3 Operation
Ribbon Load, cont.
7
8
1
2
1
2
Close the front and side covers.
22
Intermec EasyCoder E4 – User’s Guide
Chapter 3
Operation
Printing Test Labels
The EasyCoder E4 prints a test label containing the printer’s
current setup and other useful information. It also contains a test
bar and a crosshatch pattern that allow you to check that the
printhead is performing correctly.
Another important function is that the label stop sensor is automatically adjusted for characteristics of the type of media loaded
when the test label is printed (testfeed.) Always print a test label
when you have changed to another type or brand of media. This
is especially important with self-adhesive labels so the sensor can
be adjusted for the transparency of the liner
To print the test label:
1 Switch off the printer.
2 Press and hold the Feed button while switching the printer
on.
3 When the green LED flashes, release the Feed button.
4 The printer carries out a TESTFEED and sets the printhead
resistance.
5 After a delay, the test label is printed as illustrated on next
page.
6 The printer now enters the Dump Mode, in which all ASCII
characters received from the host on any port will printed
on labels.
7 To exit the Dump Mode, briefly tap the Feed button. (If you
press the Feed button for three seconds or more, the printer
will be reset to facory default.)
Test labels are designed to be printed on continuous stock. If the
printer is loaded with labels, some lines of the test label may be
positioned in the gaps between the labels.
Test labels can be printed on either direct thermal or thermal
transfer media. If the printer has been loaded with the wrong
media (for example when it is set up for direct thermal printing
and thermal transfer ribbon is loaded), the LED turns red when
you attempt to print a test label. Correct the fault, then press
Feed to cancel the error status and the test label is printed. If
transfer ribbon is not loaded when it is required, the label will
be blank.
When you change the printer’s setup, the new settings are saved
and will remain in operation until you reset or change them, even
after the printer has been switched off.
Intermec EasyCoder E4 – User’s Guide
23
Chapter 3 Operation
Printing Test Labels, cont.
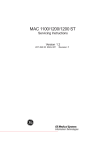
Example of a test label:
Mode of
Operation
Press Feed to exit
Now in DUMP mode:
Crosshatch pattern
Setup parameters
LSS ADJUST,20
STOPADJ,0
STARTADJ,0
XSTART,0
WIDTH,832
LENGTH,1200
MEDIA TYPE,LABEL (w GAPS)
HEAD RESISTANCE:651
THERMAL TRANSFER
PERFORMANCE,NORMAL
CONTRAST,5
UART1,BAUDRATE,9600
UART1,PARITY,NONE
UART1,CHAR LENGTH,8
UART1,STOPBITS,1
Firmware version number
UART1,FLOW CONTROL,RTS/CTS,DISABLE
UART1,FLOWCONTROL,XON/XOFF,DATA FROM HOST,DISABLE
UART1,FLOWCONTROL,XON/XOFF,DATA TO HOST,DISABLE
UART1,NEW LINE,CR/LF
Label size (in dots)1
Serial port setup
Total length of media printed
since last font upgrading
Test bar
V2.10
Page: 832x1200
SERCOM:9600N81
Km of labels: 0.000
1
/. The label size given on
the test label is the size for
which the printer has been
set up. Thus, it is not necessarily the actual size of the
labels loaded into the printer.
24
Intermec EasyCoder E4 – User’s Guide
Chapter 3
Operation
Printing a Label
You can print labels using the Intermec InterDriver, Intermec
LabelShop, or the EasyCoder E4 Direct Protocol programming
language.
Intermec InterDriver
If you are using the Intermec InterDriver for the EasyCoder E4:
• Design a label in, for example, MS Office or Intermec
LabelShop.
• Enter the number of copies required in the InterDriver application.
• Send the label to print.
Intermec LabelShop
If you are using some version of Intermec LabelShop:
• Follow the instructions in the manual for the version of
LabelShop installed in your PC.
E4 Direct Protocol
If you are using EasyCoder E4 Direct Protocol, there are two
ways to prepare and print a label. These methods allow the
EasyCoder E4 also to be used with other operating systems than
the various versions of Microsoft Windows.
• Type instructions in the Direct Protocol programming language into a terminal program, which sends them to the
printer one instruction at a time. To print a label, send a
PRINTFEED command.
• Type instructions in the Direct Protocol programming language into a text editor and send the resulting text file to
the printer using DOS Copy or a terminal program. If you
include a PRINTFEED command in your file, the printer will
print the label immediately.
You can tell the printer how many copies you want by adding
a number to the PRINTFEED command, for example PRINTFEED 22.
When you have sent a label to the printer, it will be printed
out whenever you send a PRINTFEED command. If you switch
off the printer or send any command starting a new label, the
previous label format will be lost.
If you have enabled the Feed button to work as a print button
using a PRINT KEY ON command, a new copy of the label
presently stored in the image buffer will be printed each time you
press the Feed button.
See the EasyCoder E4 Direct Protocol, Programmer’s Reference
Manual for further information.
Intermec EasyCoder E4 – User’s Guide
25
Chapter 4
Printer Setup
Setup Methods
There is a number of methods you can use to set up the printer
for the desired type of serial communication and control the
printing according to type and size of media and in regard of
print speed.
The printer is always provided with the EasyCoder E4 Direct
Protocol. This chapter mainly explains how to set up the printer
using the Direct Protocol.
There is also a number of supporting software packages from
Intermec that can send setup data to the printer in a form
that the Direct Protocol understands. Thus, you do not have to
type intricate commands but only have to click an option or
enter some data in menus presented in a Windows-compatible
environment.
The following software allows you to set up the printer:
• Intermec PrintSet v2.1 or later
• Intermec InterDriver with or without ActiveX controls
• Intermec LabelShop (various versions)
The number of setup options may vary according to type of
software. Please refer to the manual or the on-line help that came
with the software in question.
Even if you use a software package to set up the printer, you may
find this chapter instructive as it explains what the various options
stand for and what choices you have. For a full description, please
refer to the EasyCoder E4 Direct Protocol, Programmer’s Reference
Manual.
26
Intermec EasyCoder E4 – User’s Guide
Chapter 4
Printer Setup
Communication Setup
The EasyCoder E4 can receive data on both the parallel and serial
port, so there is no need to specify which port is to be used:
• Either compose a text file containing the required setup commands and send it to the printer via the parallel port,
• or establish two-way serial communication between printer
and host computer as described below.
How to set up two-way serial communication with the EasyCoder E4:
1 Print out a test label to check the printer’s RS-232 serial port
setting (see Chapter 3, “Operation; Printing Test Labels”).
2 Configure the serial port on your host computer to match the
printer’s settings.
3 Use the SYSVAR(18)=n command to set what kind of
information will be passed back from the printer (called the
Verbosity Level), see below
4 Use the SETUP command to configure the serial port settings.
SYSVAR Verbosity Level settings:
-1
All levels enabled (Default)
0
No verbosity
1
Echo received characters
2
“OK” after correct command lines
4
Echo input characters from communication port
8
Error after failed line
Bits can be combined so for example SYSVAR(18)=3 means
both “Echo received characters” and “OK after correct command
lines”.
Once the printer and computer can communicate using the
default serial port settings, you can change the settings to whatever communications settings you require, first on the printer and
then on the computer.
Once you have established a working serial communication both
ways between printer and host, you can use the command to
configure the printer as described on the following pages.
Intermec EasyCoder E4 – User’s Guide
27
Chapter 4 Printer Setup
Communication Setup, cont.
By default, the serial port is set for 9600 baud, no parity, 8 data
bits, 1 stop bit, XON/XOFF disabled both ways. Note that as
soon as a parameter is changed, you must change the setup of the
host the same way, or the communication will be lost.
• Baud Rate
This setting controls the speed of the serial communication
between printer and host (1 baud = 1 data bit per second.)
There are 8 options:
300 600 1200 2400 4800 9600 19200 38400
Setup string, example:
SETUP "SER-COM,UART1,BAUDRATE,9600" ↵
• Parity
This setting controls how the software will check for errors in
the serial communication. There are 5 options:
None Even Odd Mark Space
Setup string, example:
SETUP "SER-COM,UART1,PARITY,NONE" ↵
• Character Length
This setting controls how many bits are used to specify a
character in the serial communication. There are two options:
7
Characters ASCII 0-127 dec. can be transmitted
8
Characters ASCII 0-256 dec. can be transmitted
Setup string, example:
SETUP "SER-COM,UART1,CHAR↔LENGTH,7" ↵
• Stop Bits
This setting controls how many bits are used to specify a stop
character in the serial communication. There are two options:
1 or 2
In the setup string examples,
a double-headed arrow (as in
“CHAR↔LENGTH”) indicates a
mandatory space characters in the
command line.
Setup string, example:
SETUP "SER-COM,UART1,STOPBITS,1" ↵
Quotation marks (" ") are ASCII
34 dec.
28
Intermec EasyCoder E4 – User’s Guide
Chapter 4
Printer Setup
Communication Setup, cont.
• Data Flow Control
Data flow control determines serial communication between
printer and host. It prevents characters being lost when data
is transferred between printer and host at high speeds over the
RS-232 serial port. It is important that the printer and host
have the same configuration.
There are three recommended settings for controlling data
flow between printer and host.
- No flow control
RTS/CTS is disabled
XON/XOFF, Data from Host is disabled.
XON/XOFF, Data to Host is disabled
Note:
It is not recommended that you
enable XON/XOFF, Data to
Host.
- RTS/CTS
This protocol controls communication by handshake signals through separate wires in the cable.
RTS/CTS is enabled
XON/XOFF, Data from Host is disabled.
XON/XOFF, Data to Host is disabled
- XON/XOFF, Data from Host
This protocol controls communication using the special
characters XON (ASCII 17 dec.) and XOFF (ASCII 19
dec.) which are transmitted on the same wires as the data.
RTS/CTS is disabled
XON/XOFF, Data from Host is enabled
XON/XOFF, Data to Host is disabled
Setup strings, examples:
SETUP "SER-COM,UART1,FLOWCONTROL,RTS/CTS,DISABLE" ↵
SETUP "SER-COM,UART1,FLOWCONTROL,XON/XOFF,DATA↔TO↔HOST,DISABLE" ↵
SETUP "SER-COM,UART1,FLOWCONTROL,XON/OFF,DATA↔FROM↔HOST,ENABLE" ↵
In the setup string examples,
a double-headed arrow (as in
“CHAR↔LENGTH”) indicates a
mandatory space characters in the
command line.
• New Line Character
This setting specifies the character(s) transmitted from printer
to host to initiate switching to a new line:
- CR
(ASCII 13 dec.)
- LF
(ASCII 10 dec.)
- CR/LF
(ASCII 13 + ASCII 10 dec.)
Quotation marks (" ") are ASCII
34 dec.
Intermec EasyCoder E4 – User’s Guide
29
Chapter 4 Printer Setup
Print Location Setup
Recommended Adjustments:
Peel-Off (Label w gaps):
Start Adjust :
-119
Stop Adjust:
-33
Tear-Off (Ticket w mark):
Start Adjust:
-152
Stop Adjust:
0
Tear-Off (Label w gap):
Start Adjust:
-152
Stop Adjust:
0
Tear-Off (Var. Length Strip):
Start Adjust:
-136
Stop Adjust:
+75
• Media Feed Adjustments
There are two settings that control the amount of blank
media to be fed before the actual printing starts and after it
is completed:
- Start Adjustment
This setting feeds out or pulls back a specified length of
media before the printing of a label, ticket, or portion
of continuous stock starts. The value is entered as dots,
where a positive value (no leading minus sign) feeds out
the media and a negative value (leading minus sign) pulls
it back.
- Stop Adjustment
This setting works the same way as the Start Adjustment,
but is executed after the printing of a label etc. is completed.
Tear-Off (Fix Length Strip):
Start Adjust:
-136
Stop Adjust:
+150
Using these two settings, you can, for example, control the media
feed so the printing starts at the top of the label and the media still
can be torn off in the gap between two labels.
Cut-Off (Strip):
Start Adjust:
Stop Adjust:
SETUP "DETECTION,FEEDADJ,STARTADJ,-136" ↵
SETUP "DETECTION,FEEDADJ,STOPADJ,75" ↵
Setup strings, examples:
-250
+180
Cut-Off (between labels):
Start Adjust:
-250
Stop Adjust:
+100
In the setup string examples,
a double-headed arrow (as in
“CHAR↔LENGTH”) indicates a
mandatory space characters in the
command line.
Quotation marks (" ") are ASCII
34 dec.
30
Intermec EasyCoder E4 – User’s Guide
Chapter 4
Printer Setup
Print Location Setup, cont.
• Print Window
The area on the media which can be used for printing (print
window), is specified by means of three parameters, which are
all given as a positive number of dots. It is important to set
the print window so no printing can occur outside the media
or ribbon, which may shorten the life of the printhead due
to overheating.
- X-Start
Specifies an offset from the innermost dot on the printhead. When the X-Start value is set to 0, the print area
starts 1 mm (0.04 inches) from the edge of the media, that
is closest to the printer’s center section. By increasing the
X-Start value, you can move the origin (X=0) outwards,
making the inner margin wider.
- Width
Specifies the width of the print area, starting from the
position of the origin as defined by the X-Start value. The
sum of the X-Start and Width values must not exceed the
width of the printhead (832 dots.)
- Length
Specifies the length of the printable area from the origin
and along the Y-axis. This value decides the maximum
amount of media feed when using any media type except
“Var. length strip” (see Media Type below.) In case of labels,
tickets, tags, or fixed portions of strip, enter the exact
length.
Setup strings, examples:
SETUP "SERVICE,MEDIA↔SIZE,XSTART,30" ↵
SETUP "SERVICE,MEDIA↔SIZE,WIDTH,600" ↵
SETUP "SERVICE,MEDIA↔SIZE,LENGTH,800" ↵
In the setup string examples,
a double-headed arrow (as in
“CHAR↔LENGTH”) indicates a
mandatory space characters in the
command line.
Quotation marks (" ") are ASCII
34 dec.
Intermec EasyCoder E4 – User’s Guide
31
Chapter 4 Printer Setup
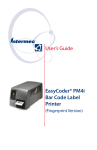
Print Location Setup, cont.
Print Window
FROM
MEDIA SUPPLY
1 mm
(0.04 inches)
9 mm
(0.35 inches)
Length (y-dimension)
104 mm (4.1 inches)
PRINT
WINDOW
Origin
(x=0; y=0)
Dot-line on
printhead
X-start
Width (x-dimension)
Dot 0
Path of
12 mm Label Stop Sensor &
(0.47 Label Taken Sensor
inches)
FEED
DIRECTION
Dot 831
max. 114 mm (4.49 inches)
32
Intermec EasyCoder E4 – User’s Guide
Chapter 4
Media Setup
Printer Setup
• Media Type
The EasyCoder E4 can be set to handle five different types of
direct thermal media or receiving face material:
- Label with gaps
- Ticket with marks
- Ticket with gaps
- Fixed length strip
- Variable length strip
Refer to Appendix 2 for illustrations and specifications of the
various types. It is important to specify the correct type, so
the media feed will work correctly and the label stop sensor
can detect the front edges of labels, tickets, and tags as well as
out-of-paper conditions.
Setup strings, examples:
SETUP
SETUP
SETUP
SETUP
SETUP
"SERVICE,MEDIA↔TYPE,LABEL↔(w↔GAPS)" ↵
"SERVICE,MEDIA↔TYPE,TICKET↔(w↔MARK)" ↵
"SERVICE,MEDIA↔TYPE,TICKET↔(w↔GAPS)" ↵
"SERVICE,MEDIA↔TYPE,FIX↔LENGTH↔STRIP" ↵
"SERVICE,MEDIA↔TYPE,VAR↔LENGTH↔STRIP" ↵
• Paper Type
In order to be compatible with previous Intermec printers, the
EasyCoder E4 is preset to use a number of standard media
and ribbon qualities. Select the appropriate “Paper Type” setting among those listed in Appendix 2.
More preferred ways of setting up the printer for different
ribbons and receiving face materials are described in “New
Supplies” below and in Appendix 5, “Printer Setup with the
Bar Code Wand.”
Setup string, example:
SETUP "SERVICE,PRINT↔DEFS,PAPER↔TYPE,UBI↔HP↔07" ↵
In the setup string examples,
a double-headed arrow (as in
“CHAR↔LENGTH”) indicates a
mandatory space characters in the
command line.
• New Supplies
When using direct thermal media and transfer ribbons, you
can send a text string to the printer to indicate the supply type.
See Appendix 2 for recommended “New Supplies” settings.
This method of setting up the printer is preferred to obtain
the best print quality and printhead lifetime.
Quotation marks (" ") are ASCII
34 dec.
Intermec EasyCoder E4 – User’s Guide
33
Chapter 4 Printer Setup
Media Setup, cont.
Always use ribbons and labels from Intermec. These have
been carefully matched with the printhead. Other ribbons and
labels may shorten the life of the printhead.
Setup string, examples:
Direct thermal printing (Economy grade)
SETUP "SERVICE,PRINT↔DEFS,NEW↔SUPPLIES,GQ90" ↵
When setting the printer for thermal transfer printing, two “New
Supplies” setup strings have to be used; one for the transfer ribbon
and another for the receiving face material, for example:
HP07 ribbon:
SETUP "SERVICE,PRINT↔DEFS,NEW↔SUPPLIES,GF100" ↵
Matt coated face stock:
SETUP "SERVICE,PRINT↔DEFS,NEW↔SUPPLIES,GZ0" ↵
Print Setup
• Performance
This setting controls the print speed:
- Normal
Nominal speed 100 mm/sec.
- High
Nominal speed 150 mm/sec.
(4 inches/sec.)
(6 inches/sec.)
Normal print speed gives the best printout quality for
demanding layouts, containing for example ladder style bar
codes or fine-detailed images. However, high speed gives an
acceptable quality for most applications.
Setup strings, examples:
SETUP "SERVICE,PERFORMANCE,NORMAL" ↵
SETUP "SERVICE,PERFORMANCE,HIGH" ↵
•
Contrast
This setting controls the darkness of the printing on the paper.
The range is 0-10, where 0 is the lightest and 10 is the darkest.
To obtain the best printout quality, the contrast should be
set to 5 (default) when using “New Supplies” setup stringsfor
setting up the printer in regard of ribbon and labels.
Setup string, example:
In the setup string examples,
a double-headed arrow (as in
“CHAR↔LENGTH”) indicates a
mandatory space characters in the
command line.
SETUP "CONTRAST,5" ↵
Quotation marks (" ") are ASCII
34 dec.
34
Intermec EasyCoder E4 – User’s Guide
Chapter 4
Testfeed
Printer Setup
The label length is defined as the distance between gaps, detection slots, or black marks. Measure the actual distance from the
rear end of a gap or slot to the start of next gap or slot. In
case of black marks, measure the distance between the forward
edges of two adjacent marks and subtract the value expressed in
dots by 16.
By using a TESTFEED command, a blank label is fed out
while the label length is automatically measured and stored in
the printer’s flash memory, and the sensitivity of the label stop
sensor is adjusted according to the characteristics of the presently
loaded media.
It is recommended to send a TESTFEED command every time
you change to a new label/ticket length or media type!
When using labels/tickets with a length exceeding 24 cm (9.5
inches), the TESTFEED command does not work, so the label
length must be set manually using both of the two following
setup commands.
SETUP "SERVICE,TESTFEED,LENGTH,<length in dots>" ↵
SETUP "SERVICE,MEDIA↔SIZE,LENGTH,<length in dots>" ↵
The default value is 1200 dots (150 mm/5.9 inches)
In the setup string examples,
a double-headed arrow (as in
“CHAR↔LENGTH”) indicates a
mandatory space characters in the
command line.
Quotation marks (" ") are ASCII
34 dec.
Intermec EasyCoder E4 – User’s Guide
35
Chapter 5
Troubleshooting
Checklist
Symptom
Overall weak printout
The list below is intended to help you to correct possible printout
troubles or flaws in printout quality, and to decide when assistance from the Service dept. of the nearest Intermec distributor is
required. Note that most problems are due to operating errors or
normal wear of the printhead.
Possible Cause
Wrong Paper Type parameter
Low Contrast parameter value
Printhead pressure too low
Worn printhead
Wrong printhead voltage
Printout weaker on one side
Uneven printhead pressure
Weak spots
Foreign particles on media/ribbon
Media/ribbon don’t match
Poor media or ribbon quality
Worn printhead
Worn platen roller
Overall dark printout
Wrong Paper Type parameter
Too high Contrast parameter value
Printhead pressure too high
Wrong printhead voltage
Excessive bleeding
Wrong Paper Type parameter
Contrast parameter value too high
Printhead pressure too high
Faulty energy control
Transfer ribbon breaks
Wrong Paper Type parameter
Ribbon supply unit stuck
Bad energy control
White areas in transfer printing
Transfer ribbon wrinkled
Transfer ribbon wrinkles
Incorrect edge guide adjustment
Too strong printhead pressure
Dark lines along feed direction
Foreign objects on printhead
White lines along feed direction Printhead dirty
Missing dots on printhead
Large part of dot line missing
Wrong X-start or Width parameter
Failing printhead
Failing strobe signal
Printout missing along inner edge Bad media alignment
X-start parameter value too low
36
Remedy
Refer to
Change parameter
Change parameter
Adjust printhead pressure
Replace printhead
Replace CPU board
Adjust pressure
Clean media/ribbon
Change media or ribbon
Change media or ribbon
Replace printhead
Check/replace
Change parameter
Change parameter
Adjust both knobs
Replace CPU board
Change parameter
Change parameter
Adjust both knobs
Replace CPU board
Change parameter
Adjust
Check CPU board
Adjust
Adjust
Adjust both knobs
Clean printhead
Clean printhead
Replace printhead
Change parameter
Replace printhead
Check CPU-board
Adjust
Increase
Chapter 4
Chapter 4
Chapter 6
Chapter 6
☎ Call Service
Chapter 6
n.a.
Chapter 3
Chapter 3
Chapter 6
☎ Call Service
Chapter 4
Chapter 4
Chapter 6
☎ Call Service
Chapter 4
Chapter 4
Chapter 6
☎ Call Service
Chapters 4
☎ Call Service
☎ Call Service
See below
Chapter 3
Chapter 6
Chapter 6
Chapter 6
Chapter 6
Chapter 4
Chapter 6
☎ Call Service
Chapter 3
Chapter 4
Intermec EasyCoder E4 – User’s Guide
Chapter 6
Maintenance
Cleaning the Case
When you clean the case of the printer, use a soft cloth dampened
with water. If necessary, use a mild detergent.
Caution!
Do not use abrasive cleaners or solvents as they may damage the
surface of the printer.
1
2
1
2
Always disconnect the power cord before cleaning.
Intermec EasyCoder E4 – User’s Guide
Wipe external surfaces with a soft damp cloth and,
if necessary, a mild detergent.
37
Chapter 6
Maintenance
Cleaning the Case, cont.
3
Protect the printer from liquids at all times.
38
4
Do not use any sharp tools to remove stuck labels. The
printhead and platen roller are easily damaged.
Intermec EasyCoder E4 – User’s Guide
Chapter 6
Maintenance
Cleaning the Printhead
It is important to clean the printhead regularly, preferably each
time you load a new roll of media.
Use the special cleaning card to clean the printhead. Always
dispose of the used cleaning card properly.
Warning!
Isopropyl alcohol [(CH3)2CHOH; CAS 67-63-0] is a highly
flammable, moderately toxic, and mildly irritating substance.
1
2
1
2
Open the side and front covers.
Intermec EasyCoder E4 – User’s Guide
Raise the printhead.
39
Chapter 6
Maintenance
Cleaning the Printhead, cont.
3
4
Remove the media and any transfer ribbon.
Open the cleaning card. The cleaning card contains
isopropyl alcohol, see "Warning!" notice on the
previous page.
6
5
1
1
2
2
Insert most of the cleaning card under the printhead Pull the cleaning card out (1) and raise the printhead
(1), then lower the printhead (2.)
(2.)
40
Intermec EasyCoder E4 – User’s Guide
Chapter 6
Maintenance
Cleaning the Printhead, cont.
7
8
1
2
Insert most of the cleaning card under the printhead
(1), then lower the printhead (2.)
Wait 30 seconds.
9
10
1
2
Allow the cleaned printhead to dry for a couple
Pull the cleaning card out (1) and raise the printhead of minutes before reloading media and possible
(2.)
transfer ribbon.
Intermec EasyCoder E4 – User’s Guide
41
Chapter 6
Maintenance
Cleaning the Platen Roller
When you clean the printhead with a cleaning card, the platen
roller is cleaned at the same time. However, if the platen roller
becomes heavily contaminated, it may be necessary to clean it
separately.
Clean the platen roller with a soft cloth moistened with isopropyl
alcohol.
Clean the tear bar and the ribbon guides at the same time as
the platen roller.
Warning!
Isopropyl alcohol [(CH3)2CHOH; CAS 67-63-0] is a highly
flammable, moderately toxic, and mildly irritating substance.
1
2
1
2
Open the side and front covers.
42
Raise the printhead.
Intermec EasyCoder E4 – User’s Guide
Chapter 6
Maintenance
Cleaning the Platen Roller, cont.
3
4
1
2
Remove the media and any transfer ribbon.
5
Clean the tear bar and the ribbon guides (if any).
Intermec EasyCoder E4 – User’s Guide
Clean the exposed face of the platen roller while
rotating it manually.
6
Reload the media and possible transfer ribbon.
43
Chapter 6
Maintenance
Replacing the Printhead
When the printhead becomes worn or damaged, it can easily
be changed. The series of pictures below describes how to fit a
replacement printhead.
IMPORTANT!
After completing the physical installation, it is important that the
printer is instructed to measure the resistance of the new printhead
and adjust itself accordingly. This can be done by sending the following instruction:
PRINT HEAD(-1)
Another method is to start up the printer in the Test Mode, see
“Printing Test Labels” at the end of Chapter 3, “Operation.”
Failure to adjust the printer to the printhead resistance may result in
inferior printout quality or premature wear-out of the printhead.
1
2
1
2
Open the side and front covers.
44
Remove the media and any transfer ribbon.
Intermec EasyCoder E4 – User’s Guide
Chapter 6
Maintenance
Replacing the Printhead, cont.
3
4
1
2
3
Raise the printhead.
5
Unhook the spring (1), pull the printhead forward
(2), and disconnect the cable (3.)
6
3
2
1
Slide in the new printhead (1), connect the printhead
cable (2), and hook the spring into position (3.)
Intermec EasyCoder E4 – User’s Guide
Reload the media and possible transfer ribbon.
45
Chapter 6
Maintenance
Adjusting Printhead Pressure
When you print, the thermal printhead must be pressed against
the platen roller so that heat can be transferred from the printhead to the transfer ribbon or media. The pressure should also
provide sufficient friction to drive the media past the printhead.
Too little pressure gives a weak printout quality, while too much
pressure can cause ribbon wrinkling and unnecessary printhead
wear.
The printer’s factory-set for full width, thermal transfer printing
or LinerLess print, depending on model. If you change the media
to thicker, thinner, or narrower, it may be necessary to adjust the
printhead pressure, using trial and error.
Do not use any more pressure than is necessary to obtain the
desired print quality.
Full width media:
Equal pressure on both sides
Push the media towards the
center section
Narrow media:
Reduce pressure on the outside edge so that the printhead
remains level
Push the media towards the
center section
46
Intermec EasyCoder E4 – User’s Guide
Appendix 1
Technical Data (Standard model)
Print Technique
Print Resolution
Quick-mount Printhead
Maximum Print Width
Maximum Media Width
Smooth Fonts
Print Directions
Maximum Internal Media Roll Diameter
Maximum Ribbon Length
Dimensions (W x D x H)
Weight (excluding media, ribbon, & options)
Ambient Operating Temperature
Humidity
Sound Emission Level
Microprocessor
Firmware
Label and Ribbon End Sensors
AC Input Voltage
PFC Regulation
Maximum Power Consumption
Communications Interface Standard
Print Speed (tear-off/cut-off)
Print Speed (peel-off/roll Ø 152 mm)
Print Speed (LTS enabled)
Bar Code Generators
On-board Flash EPROMs
On-Board RAM Memory
RS-232 Cable
Centronics Parallel Cable
Real Time Clock (RTC)
Label Taken Sensor
Scaleable Fonts
Memory Card Slot
Paper Cutter
Direct Thermal/Thermal Transfer
8 dots/mm (203.2 dots/inch)
Yes
104 mm (4.09 inches)
114 mm (4.5 inches)
Yes
4
152 mm (6 inches)
~200 metres (656 feet)
236 x 350 x 170 mm (9.3 x 13.78 x 6.7 inches)
4.7 kgs (10.3 pounds)
+5°C to +40°C (+41°F to +104°F)
20 to 80% non-condensing
< 60 dB (A)
32 bit
Intermec EasyCoder E4 Direct Protocol v2.10
Yes
110 to 120/220 to 240 VAC, 4/2A, 60/50Hz
Build option
IEC 61000-3-2
Stand-by 30W; Typical label 70W; Maximum 250W
1 x RS-232 Serial and 1 x Centronics Parallel
100 or 150 mm/sec (4 or 6 inches/sec)
100 mm/sec. (4 inches/sec)
Rec.
100 mm/sec. (4 inches/sec)
38
2 x 512K
512K
Optional
Standard
Optional
Fitted
Built-in
1 PCMCIA 5V Type 3, or 2 PCMCIA 5V Type 1 or 2
Optional
Intermec EasyCoder E4 – User’s Guide
47
Appendix 1 Technical Data
Technical Data (LinerLess model)
Print Technique
Print Resolution
Quick-mount Printhead
Maximum Print Width
Maximum Media Width
Smooth Fonts
Print Directions
Maximum Internal Media Roll Diameter
Dimensions (W x D x H)
Weight (excluding media & options)
Ambient Operating Temperature
Humidity
Sound Emission Level
Microprocessor
Firmware
Label End Sensor
AC Input Voltage
PFC Regulation
Maximum Power Consumption
Communications Interface Standard
Print Speed
Bar Code Generators
On-board Flash EPROMs
On-Board RAM Memory
RS-232 Cable
Centronics Parallel Cable
Real Time Clock (RTC)
Label Taken Sensor
Scaleable Fonts
Memory Card Slot
48
Direct Thermal and LinerLess
8 dots/mm (203.2 dots/inch)
Yes
104 mm (4.09 inches)
114 mm (4.5 inches)
Yes
4
152 mm (6 inches)
236 x 350 x 170 mm (9.3 x 13.78 x 6.7 inches)
4.3 kgs (9.4 pounds)
+5°C to +40°C (+41°F to +104°F)
20 to 80% non-condensing
< 60 dB (A)
32 bit
Intermec EasyCoder E4 Direct Protocol v2.10
Yes
110 to 120/220 to 240 VAC, 4/2A, 60/50Hz
Build option
IEC 61000-3-2
Stand-by 30W; Typical label 70W; Maximum 250W
1 x RS-232 Serial and 1 x Centronics Parallel
100 or 150 mm/sec (4 or 6 inches/sec)
38
2 x 512K
512K
Optional
Standard
Optional
Not fitted
Built-in
1 PCMCIA 5V Type 3, or 2 PCMCIA 5V Type 1 or 2
Intermec EasyCoder E4 – User’s Guide
Appendix 2
Media Specifications
Media Roll Size
The following restrictions apply to media rolls fitted inside the
printer. Only the width and web thickness restrictions apply to
external media supplies.
Core
Diameters:
Width:
38 mm (1.5 inches) bottom position
76.2 mm (3 inches)
top position
Must not protrude outside the media.
The media must not be attached to the core in such a way
that the printer cannot pull the end free. Otherwise the thermal
transfer ribbon may be damaged.
Roll
Max. diameter:
Max. width:
Min. width:
Max. web thickness:
152 mm
114 mm
25.4 mm
175µm
(6 inches)
(4.5 inches)
(1 inches)
(0.007 inches)
The maximum recommended media thickness is 175µm.
Thicker media may be used, but print quality will be reduced.
Media stiffness is also important and must be balanced against
thickness to maintain print quality.
Media rolls fitted inside the printer should be wound with the
printable side facing outwards.
An external media supply must be protected from dust, sand,
grit, etc. Any hard particles, even small ones, can damage the
printhead.
Intermec EasyCoder E4 – User’s Guide
49
Appendix 2 Media Specifications
Media
Non-Adhesive Strip
⇐ a ⇒ Media Width:
Maximum:
Minimum:
114.0 mm
25.4 mm
(4.5 inches)
(1.00 inches)
Media type setup:
• Fix length strip
• Var length strip
Non-Adhesive
Strip
50
Intermec EasyCoder E4 – User’s Guide
Appendix 2 Media Specifications
Media, cont.
Self-Adhesive Strip
⇐ a ⇒ Media Width (including liner):
Maximum:
114.0 mm
Minimum:
25.4 mm
(4.5 inches)
(1.00 inches)
⇐ b ⇒ Liner
The liner must not extend more than a total of 1.6 mm (0.06
inches) outside the face material and should protrude equally on
both sides.
⇐ c ⇒ Media Width (excluding liner):
Maximum:
112.4 mm
Minimum:
23.8 mm
Self-Adhesive
Strip
(4.44 inches)
(0.94 inches)
Media Type Setup:
• Fix length strip
• Var length strip
Intermec EasyCoder E4 – User’s Guide
51
Appendix 2 Media Specifications
Media, cont.
Self-Adhesive Labels
⇐ a ⇒ Media Width (including liner):
Maximum:
114.0 mm
Minimum
25.4 mm
(4.5 inches)
(1.00 inches)
⇐ b ⇒ Liner
The liner must not extend more than a total of 1.6 mm (0.06
inches) outside the labels and should protrude equally on both
side. Recommended min. transparency: 40% (DIN 53147).
Self-Adhesive
Labels
Label Stop
Sensor
position
⇐ c ⇒ Label Width (excluding liner):
Maximum:
112.4 mm
Minimum:
23.8 mm
(4.44 inches)
(0.94 inches)
⇐ d ⇒ Label Length:
Minimum:
10.0 mm
(0.39 inches)
⇐ e ⇒ Label Gap:
Maximum:
Recommended:
Minimum:
10.0 mm
1.6 mm
1.2 mm
(0.39 inches)
(0.06 inches)
(0.05 inches)
The Label Stop Sensor must be able to detect the extreme front
and rear edges of the label. It is positioned 12 mm (0.47 inches)
from the inner edge of the media, so do not use labels with a
larger inner corner radius.
Media Type Setup:
• Label (w gaps)
Feed
Direction
12 mm
(0.47 inches)
52
Intermec EasyCoder E4 – User’s Guide
Appendix 2 Media Specifications
Media, cont.
Tickets with Gap
⇐ a ⇒ Media Width:
Maximum:
Minimum (standard):
⇐ b ⇒ Copy Length:
Min. length between slots:
114.0 mm
25.4 mm
(4.5 inches)
(1.00 inches)
10.0 mm
(0.39 inches)
⇐ c ⇒ Detection Slit Start:
The distance between the inner edge of the media and the start of
the detection gap (excl. corner radii) must be:
Minimum:
6 mm (0.24 inches)
Maximum:
9 mm (0.35 inches)
⇐ c ⇒ Detection Slit End:
The distance between the inner edge of the media and the end of
the detection gap (excl. corner radii) must be:
Minimum:
15 mm (0.59 inches)
Tickets & Tags
⇐ e ⇒ Detection Slit Height:
Maximum:
Recommended:
Minimum:
10.0 mm
1.6 mm
1.2 mm
(0.39 inches)
(0.06 inches)
(0.05 inches)
Media Type Setup:
• Ticket (w gaps)
Label Stop
Sensor
position
Do not allow any perforation to break the edge of the media, as
this may cause the media to split and jam the printer.
Feed
12 mm
(0.47 inches) Direction
Intermec EasyCoder E4 – User’s Guide
53
Appendix 2 Media Specifications
Media, cont.
Tickets with Black Mark
⇐ a ⇒ Media Width:
Maximum:
Minimum:
114.0 mm
25.4 mm
(4.5 inches)
(1.00 inches)
⇐ b ⇒ Copy Length:
Minimum:
20.0 mm
(0.8 inches)
⇐ c ⇒ Black Mark Offset:
The distance between the inner edge of the media and the inner
edge of the black mark must be:
Maximum:
9.5 mm (0.37 inches)
Minimum:
No restriction
Tickets with
Black Marks
⇐ d ⇒ Black Mark End:
The distance between the inner edge of the media and the outer
edge of the black mark must be:
Maximum:
No restriction
Minimum:
25.4 mm (1.0 inches)
⇐ e ⇒ Black Mark Height:
Common:
Minimum:
Label Stop
Sensor
position
12 mm
Feed
(0.47 inches) Direction
12.5 mm
5.0 mm
(0.5 inches)
(0.2 inches)
⇐ f ⇒ Black Mark Y-Position:
The black mark should be as close to the front edge of the ticket
as possible. Use a negative stopadjust value to control the media
feed, so that the tickets can be properly torn or cut off.
The black mark should be non-reflective carbon black on a
whitish background.
Media type setup:
• Ticket (w mark)
Do not allow any perforations to break the edge of the media, as
this may cause the media to split and jam the printer.
54
Intermec EasyCoder E4 – User’s Guide
Appendix 2 Media Specifications
Transfer Ribbons
Intermec offers three types of thermal transfer ribbons optimized
for different purposes:
• General Purpose (GP/TMX 1100. TMX 1500) transfer
ribbons allow high speed printing and give a good printout,
but are somewhat sensitive to smearing,They may be the best
choice for uncoated and coated papers.
• High Performance (HP/TMX 2500) transfer ribbons allow
high speed printing and give a highly readable and defined
printout on most face materials with smooth surfaces. They
have good “smear resistance” and are most suitable for
intricate logotypes and images on matte-coated papers and
synthetic face materials.
• High Resistance (HR/TMX 3200) transfer ribbons give an
extremely durable printout, which is resistant to most chemical agents and high temperatures. However, such transfer
ribbons set high demands on the receiving face material,
which must be very smooth, such as polyesters.
The use of HR/TMX 3200 ribbons requires the print speed
and the energy supplied by the printhead to be controlled
with great accuracy according to the receiving face material.
Custom-made setup options adapted for special applications
can also be created. Consult your distributor.
Ribbon Roll Size
Core
Diameter:
25.4 mm (1 inch)
The printer must be able to pull the end of the used ribbon
easily free of the core.
Ribbon Roll
Maximum diameter:
60 mm (2.36 inches)
The ink is on the side or the ribbon that faces the media.
Max. 110 mm (4.
33
Min. 27 mm (1.06 inches)
inches)
60 mm (2.36 inches)
25.4 mm (1 inch)
Ribbon wound up
with ink on inner side
Intermec EasyCoder E4 – User’s Guide
55
Appendix 2 Media Specifications
New Supplies and Paper Type Settings
THERMAL TRANSFER PRINTING (Europe)
Ribbon Name
Face Material
GP02
Matte Coated
Vellum
Matte Coated
Transfer Premium
Polyethylene Matte
Polyethylene Gloss
Premium Tag
Matte Coated
Transfer Premium
High Gloss White
Polyethylene Matte
Polyethylene Gloss
Premium Tag
Polyester Gloss
HP05
HP07
HR03
New Supplies:
Ribbon
GB78
GB78
GF85
GF85
GF85
GF85
GF85
GF100
GF100
GF100
GF100
GF100
GF100
GJ118
New Supplies:
Face material
GZ0
GZ6
GZ0
GZ-10
GZ-10
GZ-5
GZ5
GZ0
GZ-10
GZ-7
GZ-10
GZ-5
GZ5
GZ-10
Paper Type
setting
UBI GP 11
UBI GP 10
UBI GP 10
–
–
–
–
UBI HP 20
–
UBI HP 21
–
UBI HP 20
–
UBI HR 31
Max. print speed:
DIR 1 & 3 DIR 2 & 4
High
Normal
High
Normal
High
Normal
High
Normal
High
Normal
Normal Normal
Normal Normal
High
Normal
High
Normal
High
Normal
High
Normal
Normal Normal
Normal Normal
High
Normal
New Supplies:
Ribbon
GC70
GC70
GC70
GC70
GC70
GC70
GG65
GG65
GG65
GG65
GJ105
New Supplies:
Face material
GZ-2
GZ8
GZ0
GZ1
GZ3
GZ5
GZ0
GZ1
GZ3
GZ5
GZ0
Paper Type
setting
–
–
–
–
–
–
–
–
–
–
–
Max. print speed:
DIR 1 & 3 DIR 2 & 4
Normal Normal
Normal Normal
Normal Normal
Normal Normal
Normal Normal
Normal Normal
High
Normal
High
Normal
High
High
High
High
Normal Normal
THERMAL TRANSFER PRINTING (U.S.A.)
Ribbon name
Face material
TMX 1100/1500 Duratran I
Duratran VG
Duratran II
Duratran II Tag
Kimdura
Kimdura Tag
TMX 2500
Duratran II
Duratran II Tag
Kimdura
Kimdura Tag
TMX 3200
Polyester
56
Intermec EasyCoder E4 – User’s Guide
Appendix 2 Media Specifications
New Supplies and Paper Type Settings, cont.
DIRECT THERMAL PRINTING (Europe)
Media Name
Economy
Eco Board
Premium
Top Board
UBI DT 110 +10%
UBI DT 110 +15%
UBI DT 110 +30%
New Supplies
setting
GQ90
GY90
GS100
GS105
GS110
GS115
GS120
Paper Type
setting
–
–
UBI DT 110
–
UBI DT 120
UBI DT 110+
UBI DT 110++
Max. print speed:
DIR 1 & 3 DIR 2 & 4
High
Normal
Normal Normal
High
Normal
Normal Normal
Normal Normal
Normal Normal
Normal Normal
New Supplies
setting
GT120
GT98
GT85
GT110
Paper Type
setting
–
–
–
–
Max. print speed:
DIR 1 & 3 DIR 2 & 4
Normal Normal
Normal Normal
Normal Normal
Normal Normal
DIRECT THERMAL PRINTING (U.S.A.)
Media Name
Duratherm II
Duratherm Ltg
Duratherm IR
Duratherm II Tag
LINERLESS PRINTING (Europe and U.S.A.)
Media Name
New Supplies Paper Type
Max. print speed:
setting
setting
DIR 1 & 3 DIR 2 & 4
Intermec LinerLess
GS103
see note
Normal Normal
Note: The new supplies setting GS103 approximately corresponds to the paper type setting UBI DT 110.
Intermec EasyCoder E4 – User’s Guide
57
Appendix 3
Interfaces
Parallel Interface
The EasyCoder E4 has two interfaces: Parallel Centronics and
Serial RS-232.
Standard
IEEE 1284-I compliant
Interface Cable
Computer end:
Printer end:
Pin
1
2-9
10
11
12
13
14
15
16
17
18
19-30
31
32
33-35
36
58
Depends on type of host computer.
IBM-PC: DB-25pin male connector.
36pin female Centronics connector.
Function
/Strobe
Data 0-7
Ack
Busy
Error
Select
Autofd
N/C
Signal ground
Chassis ground
Logic high
Signal ground
/Init
/Fault
N/C
/Selectin
Transmitter
Host
Host
Printer
Printer
Printer
Printer
Host
Printer
Host
Printer
Host
Intermec EasyCoder E4 – User’s Guide
Appendix 3 Interfaces
Serial Interface
The EasyCoder E4 has two interfaces: Parallel Centronics and
Serial RS-232.
Protocol
9600 baud, No parity, 8 data bits, 1 stop bit (default).
To change the serial interface settings, use the SETUP command.
Interface Cable
Computer end:
Printer end:
Signal
RXD
TXD
DTR
GND
DSR
RTS
CTS
Host
DB-9
2
3
4
5
6
7
8
DB-9pin or DB-25pin female connector
depending on type of computer
DB-9pin male connector.
DB-9
Printer
Signal
DB-9
1
2
3
4
5
6
7
8
9
+5V DC*
TXD
RXD
–
GND
RDY
CTS
RTS
–
1
2
3
4
5
6
7
8
9
Host
DB-25 Signal
3
2
20
7
6
4
5
RXD
TXD
DTR
GND
DSR
RTS
CTS
*/. Max. 150 mA. Short-circuit protected.
Intermec EasyCoder E4 – User’s Guide
59
Notes
60
Intermec EasyCoder E4 – User’s Guide
Intermec Printer AB
Idrottsvägen 10, P.O. Box 123
S-431 22 Mölndal, Sweden
tel +46 31 869500
fax +46 31 869595
www.intermec.com
EasyCoder E4 User’s Guide
*1-960565-00*
*1-960565-00*