1
Programmer’s Guide
P/N 1-960366-01
Edition 2
September 1998
Intermec Fingerprint
6.13
Intermec Fingerprint 6.13 – Programmer's Guide
1. INTRODUCTION
1. Contents
1. INTRODUCTION
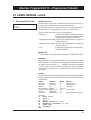
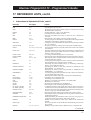
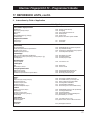
1. Contents ................................................................................................ 1
2. Preface .................................................................................................. 6
3. News in Fingerprint 6.13 ...................................................................... 7
2. GETTING STARTED
1. Computer Connection ........................................................................... 9
2 Check Paper Supply .............................................................................. 9
3. Turn On the Printer ............................................................................. 10
4. Shell Startup Program ......................................................................... 10
5. Stand-Alone Program .......................................................................... 10
6. No Startup Program ............................................................................ 11
7. Custom-Made Startup Program ........................................................... 11
8. Breaking a Startup Program ................................................................ 11
9. Bypassing a Startup Program .............................................................. 12
10. Communication Test ........................................................................... 13
3. CREATING A SIMPLE LABEL
1. Introduction ........................................................................................ 14
2. Printing a Box ..................................................................................... 14
3. Printing a Image .................................................................................. 15
4. Printing a Bar Code ............................................................................. 15
5. Printing Human Readables .................................................................. 15
6. Printing Text ....................................................................................... 16
7. Listing the Program ............................................................................ 16
8. Changing a Program Line ................................................................... 16
9. Saving the Program ............................................................................. 17
10. Error Handling .................................................................................... 17
11. Renumbering Lines ............................................................................. 17
12. Merging Programs .............................................................................. 18
13. Using the Print Key ............................................................................. 18
4. TERMINOLOGY AND SYNTAX
1.
2.
3.
4.
5.
6.
7.
8.
9.
Intermec Fingerprint 6.13
Programmer's Guide
Edition 2, September 1998
Part No. 1-960366-01
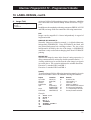
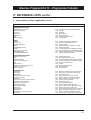
Lines ................................................................................................... 19
Statements .......................................................................................... 19
Functions ............................................................................................ 20
Other Instructions ............................................................................... 20
Expressions ......................................................................................... 20
Constants ............................................................................................ 21
Variables ............................................................................................. 21
Keyword List ...................................................................................... 22
Operators ............................................................................................ 23
• Arithmetic Operators ....................................................................... 23
• Relational Operators ........................................................................ 23
• Logical Operators ............................................................................ 23
10. Devices ............................................................................................... 25
Continued!
1
Intermec Fingerprint 6.13 – Programmer's Guide
1. INTRODUCTION, cont'd.
1. Contents, cont'd.
5. FINGERPRINT PROGRAMMING
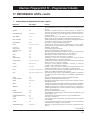
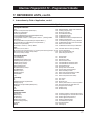
1. Introduction ........................................................................................ 26
2. Editing Methods: ................................................................................ 26
• Line-by Line Method (non-intelligent terminal) ............................... 26
• Copy & Paste Method (Windows; Notepad/Terminal) ..................... 27
• Send Text Method (Windows; Text file via Terminal) ...................... 27
3. Immediate Mode ................................................................................. 27
4. Programming Mode ............................................................................ 29
• Programming with Line Numbers .................................................... 30
• Programming without Line Numbers ............................................... 31
• Programming Instructions ............................................................... 32
5. Conditional Instructions ...................................................................... 33
6. Unconditional Branching .................................................................... 34
7. Branching to Subroutines .................................................................... 35
8. Conditional Branching ........................................................................ 36
9. Loops .................................................................................................. 40
10. Program Structure ............................................................................... 42
11. Execution ............................................................................................ 43
12. Breaking Execution ............................................................................. 44
13. Saving the Program ............................................................................. 46
• Saving in Printer ("ram:" and "card1:") ............................................ 46
• Naming the Program ....................................................................... 46
• Protecting the Program .................................................................... 47
• Saving Without Line Numbers ........................................................ 47
• Making Changes .............................................................................. 47
• Making a Copy ................................................................................ 47
• Renaming a Program ....................................................................... 48
• Saving in EPROM and Non DOS-formatted Memory Cards ........... 48
• Creating a Startup Program .............................................................. 48
14. Rebooting the Printer .......................................................................... 49
6. FILE SYSTEM
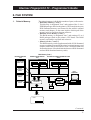
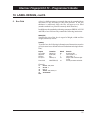
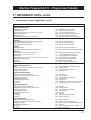
1. Printer's Memory ................................................................................ 51
• ROM Memory ("rom:") ................................................................... 51
• RAM Memory ("ram:") ................................................................... 52
• DOS-formatted Memory Cards ("card1:") ....................................... 53
• Current Directory ............................................................................ 53
• Checking Free Memory ................................................................... 53
• Providing More Free Memory ......................................................... 53
• Formatting Memory Cards or RAM Memory .................................. 53
2. Files .................................................................................................... 54
• File Types ........................................................................................ 54
• File Names ...................................................................................... 54
• Listing Files ..................................................................................... 54
3. Program Files ...................................................................................... 55
• Program File Types ......................................................................... 55
• Instructions ...................................................................................... 55
4. Data Files ............................................................................................ 56
• Data File Types ............................................................................... 56
• Instructions ...................................................................................... 56
5. Image Files ......................................................................................... 57
6. Outline Font Files ............................................................................... 57
7. Transferring Text Files ........................................................................ 57
8. Transferring Binary Files using Kermit ............................................... 58
9. Transferring Files Between Printers .................................................... 59
10. Arrays ................................................................................................. 60
Continued!
2
Intermec Fingerprint 6.13 – Programmer's Guide
1. INTRODUCTION, cont'd.
1. Contents, cont'd.
7. INPUT TO FINGERPRINT
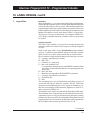
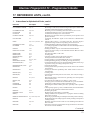
Standard I/O Channel .......................................................................... 63
Input From Host (std IN channel only) ................................................ 63
Input From Host (any channel) ............................................................ 63
Input From a Sequential File ............................................................... 64
Input From a Random File .................................................................. 67
Input From Printer's Keyboard ............................................................ 69
Communication Control ...................................................................... 71
Background Communication .............................................................. 73
RS 422/485 Communication ............................................................... 78
• RS 422 ............................................................................................ 78
• RS 485 ............................................................................................ 79
• Protocols ......................................................................................... 81
10. External Equipment ............................................................................ 82
• Industrial Interface Board ................................................................ 82
8. OUTPUT FROM FINGERPRINT
1.
2.
3.
4.
5.
6.
Output to Std Out Channel .................................................................. 83
Redirecting Output from Std Out Channel to File ................................ 85
Output and Append to Sequential Files ............................................... 86
Output to Random Files ...................................................................... 87
Output to Communication Channels ................................................... 92
Output to Display ................................................................................ 92
9. DATA HANDLING
1.
2.
3.
4.
Preprocessing Input Data .................................................................... 93
Input Data Conversion ........................................................................ 95
Time and Date .................................................................................... 98
Random Number Generation ............................................................ 101
10. LABEL DESIGN
1. Creating a Layout ............................................................................. 102
• Field Types .................................................................................... 102
• Origin ............................................................................................ 103
• Coordinates ................................................................................... 103
• Units of Measure ........................................................................... 103
• Insertion Point ............................................................................... 103
• Alignment ..................................................................................... 104
• Directions ...................................................................................... 105
• Layout Files ................................................................................... 106
• Checking Current Position ............................................................. 106
2. Text Field ......................................................................................... 107
3. Bar Code Field .................................................................................. 109
4. Image Field ....................................................................................... 111
5. Box Field .......................................................................................... 112
6. Line Field ......................................................................................... 113
7. Layout Files ...................................................................................... 114
• Introduction ................................................................................... 114
• Creating a Layout File ................................................................... 114
• Creating a Logotype Name File ..................................................... 117
• Creating a Data File or Array ......................................................... 118
• Creating an Error File and Array .................................................... 119
• Using the Files in a LAYOUT statement ....................................... 120
11. PRINTING CONTROL
1.
2.
3.
4.
5.
1.
2.
3.
4.
5.
6.
7.
8.
9.
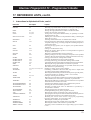
Paper Feed ........................................................................................ 121
Preparing the Printing ....................................................................... 123
Printing ............................................................................................. 123
Length of Last Feed Operation .......................................................... 125
Batch Printing ................................................................................... 125
Continued!
3
Intermec Fingerprint 6.13 – Programmer's Guide
1. INTRODUCTION, cont'd.
1. Contents, cont'd.
12. FONTS
1.
2.
3.
4.
5.
6.
13. BAR CODES
1. Standard Bar Codes .......................................................................... 131
2. Special Bar Codes ............................................................................. 132
14. IMAGES
1.
2.
3.
4.
15. PRINTER FUNCTION CONTROL
1. Keyboard .......................................................................................... 135
• Controlling the Printer in the Setup, Test, and Immediate Modes ... 135
• Enabling the Keys ......................................................................... 135
• Key Id. Numbers ........................................................................... 136
• Key-initiated Branching ................................................................. 137
• Audible Key Response .................................................................. 137
• Input from Printer's Keyboard ........................................................ 137
• Remapping the Keyboard .............................................................. 138
2. Display ............................................................................................. 141
• Output to Display .......................................................................... 141
• Cursor Control ............................................................................... 142
3. LED Control Lamps ......................................................................... 144
4. Buzzer .............................................................................................. 145
5. Clock/Calendar ................................................................................. 146
6. Printer Setup ..................................................................................... 147
• Reading the Current Setup ............................................................. 147
• Creating a Setup File ..................................................................... 148
• Changing the Setup using a Setup File ........................................... 148
• Changing the Setup using a Setup String ....................................... 148
• PRSETUP.PRG Utility Program ................................................... 149
• DISPSET2.PRG Utility Program ................................................... 150
7. System Variables .............................................................................. 154
8. Printhead ........................................................................................... 156
9. Transfer Ribbon ................................................................................ 158
10. Memory Test .................................................................................... 159
11. Version Check .................................................................................. 160
16. ERROR HANDLING
1. Standard Error-Handling ................................................................... 161
• Error Messages .............................................................................. 161
2. Tracing Programming Errors ............................................................ 162
3. Creating an Error-Handling Routine .................................................. 163
4. Error-handling program .................................................................... 164
• ERRHAND.PRG Utility Program ................................................. 164
• Listing of ERRHAND.PRG Utility Program ................................. 166
• Extensions to ERRHAND.PRG Utility Program ........................... 169
17. REFERENCE LISTS
1. Instructions in alphabetical order ....................................................... 170
2. Instructions by Field of Application .................................................. 175
Bitmap Fonts .................................................................................... 128
Converting Outline Fonts via Toolbox ............................................... 129
Converting Outline Fonts via Scalable Fonts Kit ............................... 129
Concerting .ATF fonts ...................................................................... 129
Listing Fonts ..................................................................................... 130
Special Fonts .................................................................................... 130
Images vs Image Files ....................................................................... 133
Standard Images ............................................................................... 133
Downloading Image Files ................................................................. 133
Listing and Removing Images ........................................................... 134
4
Intermec Fingerprint 6.13 – Programmer's Guide
1. INTRODUCTION, cont'd.
Information in this manual is subject to change without prior notice and does not represent a commitment
on the part of Intermec Printer AB.
© Copyright Intermec PTC AB, 1998. All rights reserved. Published in Sweden.
EasyCoder, Fingerprint, and LabelShop are trademarks of Intermec Technologies Corp..
Apple is a registered trademark of Apple Computer, Inc.
Bitstream is a registered trademark of Bitstream, Inc.
Centronics is a registered trademark of Centronics Data Computer Corp.
Crosstalk and DCA are registered trademarks of Digital Communications Associates, Inc.
IBM is a registered trademark of International Business Machines Corporation.
Intel is a registered trademark of Intel Corporation.
Microsoft, MS, and MS-DOS are registered trademarks of Microsoft Corporation.
Speedo is a trademark of Bitstream, Inc.
TrueType is a registered trademark of Apple Computer, Inc.
Unix is a registered trademark of Novell-USG.
Windows is a trademark of Microsoft Corporation.
5
Intermec Fingerprint 6.13 – Programmer's Guide
1. INTRODUCTION, cont'd.
2. Preface
Intermec Fingerprint is a Basic-inspired, printerresident programming language that has been developed for use with computer-controlled direct
thermal and thermal transfer printers manufactured
by Intermec Technologies Corp.
The Intermec Fingerprint firmware is an easy-touse intelligent programming tool for label formatting and printer customizing, which allows you to
design your own label formats and write your own
printer application software.
You may easily create a printer program by yourself that exactly fulfils your own unique requirements. Improvements or changes due to new demands can be implemented quickly and without
vast expenses.
This version (6.13) of the Intermec Fingerprint
programming language has been further enhanced
by a number of new program instructions. It also
includes the Intermec Direct Protocol for combining variable input data from a host with predefined
label layouts, but is still compatible with all its
forerunners. A concise list of new features is found
on next page.
This tutorial manual describes how to start up
Intermec Fingerprint programming and how to use
the various instructions in their proper context.
Programming instructions are explained only
briefly. The Intermec Direct Protocol is described
in a separate Programmer's Guide.
The Intermec Fingerprint Reference Manual contains detailed information on all programming instructions in the Intermec Fingerprint programming language in alphabetical order. It also contains other types of program-related information
that are common for all Intermec Fingerprintcompatible printer models from Intermec.
All information needed by the operator, like how to
run the printer, how to load the paper supply and
how to maintain the printer, can be found in the
Operator's Guide and User's Manual for the printer
model in question and in the software manuals, e.g.
Intermec Shell or Intermec Stand-Alone Concept.
The Technical Manual for each printer model
provides information on installation, setup, density, paper specifications, positioning, and other
technical data, which are specific for the printer
model in question. It also includes information on
optional equipment like interface boards, sensors,
cutters, and memory cards.
Intermec Fingerprint 6.13 supports:
• Intermec Shell 4.01 Enhanced & Standard
Startup program for EasyCoder printers with or
without a built-in keyboard
• Intermec Stand-Alone Concept
Startup program for EasyCoder Stand-Alone
printers, i.e. for printers without permanent
computer connection.
• Intermec LabelShop
A series of label-editing program for varrious
versions of MS Windows.
• Intermec Windows Drivers
For using an EasyCoder printer with most
programs run under various versions of MS
Windows.
For the sake of brevity, in this manual, the Intermec
brand will be implied in the names such as Intermec
Fingerprint, Intermec Shell, Intermec LabelShop,
Intermec EasyCoder etc.
6
Intermec Fingerprint 6.13 – Programmer's Guide
1. INTRODUCTION, cont'd.
3.
News in Fingerprint 6.13
Compared to the last published version of Fingerprint Programmer's Guide, i.e. Fingerprint 6.0, this new version contains the
following improvements and enhancements:
• General Fingerprint enhancements:
New setup option for high resistance transfer ribbon (UBI HR
31) for EasyCoder 501 with 11.81 dots/mm printhead density.
A paper cutter can now be fitted on all models of EasyCoder 501.
• Corrections and improvements of RS 422/485 interface:
Previously, to decide between RS 422 and RS 485, the XON/
XOFF option “Data to host” was used. This has been changed
to look at “Data from host” instead, so as to allow the host to send
binary data on RS 422 to the printer with XON/XOFF flow
control.
RS 422 (4-wire):
PROT_ADDR=DISABLE; XON/XOFF,DATA FROM HOST=ENABLE
RS 485 (2-wire) point-to-point:
PROT_ADDR=DISABLE; XON/XOFF,DATA FROM HOST=DISABLE
RS 485 (2-wire) multidrop loop:
PROT_ADDR=ENABLE; XON/XOFF,DATA FROM HOST=DISABLE
Not used:
PROT_ADDR=ENABLE; XON/XOFF,DATA FROM HOST=ENABLE
Previously, when
PROT_ADDR=DISABLE; XON/XOFF,DATA FROM HOST=DISABLE
was selected, the printer was erroneously put into send mode.
The only way around this was to send a character to the port.
Now, the interface is set to reception mode and the dummy write
is no longer necessary.
• Improvements of RS 485 interface:
After the port has been set for transmission, a delay for at least
10 ms is inserted before writing the data. This is done to take care
of a hardware deficiency, which states that a stabilization time
is needed after the loop has been turned.
A possible break character is taken care of if PROT_ADDR=ENABLE
and break handling for the RS 485 channel is enabled.
Previously, it was not possible to use addressees over 9, when the
printer was appointed “master”. Now, it is possible to use
addresses 0 – 31.
Continued!
7
Intermec Fingerprint 6.13 – Programmer's Guide
1. INTRODUCTION, cont'd.
3.
News in Fingerprint
6.13, cont'd.
• Extended Instructions:
ERROR
This statement now can set a specified error, in addition to
enabling error-handling and creating error messages in the
Direct Protocol.
FILE& LOAD
An optional leading parameter has been added that specifies the
number of characters to ignore before the real data. This makes
it possible to use the instruction as an MS/DOS command (CR/
LF problem). The instruction is compatible with Fingerprint
6.0.
IMAGE LOAD
An optional leading parameter has been added that specifies the
number of characters to ignore before the real data. This makes
it possible to use the instruction as an MS/DOS command (CR/
LF problem). The instruction is compatible with Fingerprint
6.0.
LAYOUT
Two layout types have been added:
E = Bar code extended field, sets up complex bar code in regard
of:
- Security
- Aspect height
- Aspect width
- Rows in bar code
- Column in bar code
- Truncation
This corresponds to the 6 last parameters in the BARSET
statement.
J = Baradjust (adjust left or adjust right)
This corresponds to the BARADJUST statement.
SYSVAR
New parameter. SYSVAR (25). Not intended for public use.
VERSION$
Supports EasyCoder 401 Linerless and CPU board 1-04070030.
• New Instruction:
FONT LOAD
This instruction downloads and converts .ATF fonts to the
printer's internal font format.
• Remaining bugs and limitations:
Please refer to Intermec Fingerprint 6.13 Reference Manual.
8
Intermec Fingerprint 6.13 – Programmer's Guide
2. GETTING STARTED
1.
Computer Connection
The Fingerprint firmware is stored in two EPROM packages fitted
on the printer's CPU board at delivery (IC-1 & IC-2 in EasyCoder
201 II, IC-100 & IC-101 in EasyCoder 401/501/601). No floppy
disks or operative system, like e.g. MS-DOS, is required. The
printer only needs to be connected to a mains supply.
Unless the printer is fitted with a program that allows it to be used
independently (“stand-alone”), you must also connect it to some
kind of device, which can transmit characters in ASCII format. It
can be anything from a non-intelligent terminal to a mainframe
computer system.
For programming the printer, you need a computer with a screen
and an alphanumeric keyboard, that provides two-way serial communication, preferably using RS 232C, (e.g. a personal computer
with Microsoft Windows 3.111). Use e.g. Windows Notepad or
Write for writing programs and Windows Terminal for communication with the printer.
1
/. Although most examples in this manual
assumes a host running MS Windows
3.11, other operative systems can also be
used, e.g. Windows 95, Windows NT,
DOS, Mac OS, OS-2 etc, as long you have
a terminal program that can communicate
with the printer and some kind of word
processing program.
☞ Communication Setup
Also see:
• Chapter 15.6
• Technical Manual
2.
Check Paper Supply
☞ Paper and Ribbon Load
Also see:
• Operator's Guide
• User's Manual
Connect the printer and host as described in the Technical Manual
for the printer model in question. If the printer has several communication ports, it is recommended to use the serial port "uart1:" for
programming, which by default is set up for RS 232C. Other serial
communication ports could also be used, see the Technical Manual
for the printer model in question.
It is possible to set up the printer's communication protocol to fit the
host computer. However, until you have become familiar with the
Fingerprint concept, it may be easier to adapt the host to the printer's
default setup parameters:
Default communication setup on "uart1:"
• Baud rate:
9600
• Parity:
None
• Character length:
7
• No. of stop bits:
2
• Flow control:
XON/XOFF to and from host
• New line:
CR/LF (Carriage Return + Line Feed)
Check that the printer has an ample supply of paper or other
receiving material and, when applicable, of thermal transfer ribbon.
Refer to the Operator's Guide or the User's Manual for loading
instructions.
9
Intermec Fingerprint 6.13 – Programmer's Guide
2. GETTING STARTED, cont'd.
3.
Turn On the Printer
Check that the printhead is lowered. Turn on the main switch, which
usually is fitted on the printer's rear plate and check that the “Power”
control lamp comes on. Then watch the display window. What
happens next depends on what kind of startup file there is in the
printer.
WARNING!
Make sure that any paper cutter is locked in closed position.
The cutter may be activated when the power is turned on!
4.
Shell Startup Program
After a short while, when the printer has performed certain selfdiagnostic tests and loaded the startup program, a countdown menu
will usually be displayed:
ENTER=SHELL
5 sec.
v.4.01
☞ Shell Startup Programs
Also see:
• Intermec Shell Startup manuals
or
PRINT=SHELL
5. sec.
v.4.01
These menus indicate that the printer is fitted with one of the Shell
startup programs (standard or enhanced). Wait until the 5 seconds
countdown is completed. Then, by default, this menu will be
displayed:
Fingerprint
6.13
This or similar messages indicates that the printer has entered the
immediate mode of Fingerprint, where you can start your programming. Please proceed at chapter 2.10.
If the Shell countdown menus are shown, but are followed by any
other message than “Intermec Fingerprint 6.xx”, some other
application has already been selected in Shell. Refer to the Intermec
Shell Startup Manuals for information on how to select the Fingerprint option.
5.
Stand-Alone Program
☞ Stand -Alone Program
Also see:
• Intermec Stand-Alone Concept,
Operating Instructions
If the following menu is displayed after power-up, the printer is
fitted with the Stand-Alone program (also indicated by the special
keyboard on the printer):
Select Mode
1:Run 2:Set
You can break the Stand-Alone program and enter the immediate
mode of Fingerprint by pressing the <C> + <Pause> keys (EasyCoder 201 IISA), or <Shift> + <Pause> keys (EasyCoder 501 SA),
and then enter the password 1138. The printer will enter the
immediate mode with the communication parameters reset to
default values. Proceed at chapter 2.10.
Continued!
10
Intermec Fingerprint 6.13 – Programmer's Guide
2. GETTING STARTED, cont'd.
6.
No Startup Program
If the printer is not fitted with any startup program at all, the display
window should show the following message directly after powerup:
Fingerprint
6.13
This means that the printer has entered Fingerprint's immediate
mode. Proceed at chapter 2.10.
7.
Custom-Made
Startup Program
If any other kind of message is displayed than those illustrated
above, the printer is provided with some kind of custom-made
startup program, which you must break before you can start
programming.
• If the printer is equipped with a keyboard, or if the way of breaking
the program is known, go on to chapter 2.8, “Breaking a Startup
Program”.
• If the printer is not equipped with a keyboard and the method of
breaking the program is not known (or is missing), go on to
chapter 2.9, “Bypassing a Startup Program”.
8.
Breaking a Startup
Program
The following method requires that the printer is either fitted with
a keyboard or that the way of breaking the program is known.
Default Method (break from keyboard)
• Press the <C> key and keep it pressed down while also pressing
the <Pause> key.
Other Methods
☞ Breaking a Program
Also see:
• Chapter 5.12
• The program may be provided with other means for breaking the
program, e.g. by sending a certain character from the host or by
pressing another key or combination of keys. Break from keyboard
may also be disabled completely.
When a break interrupt has been executed and you have entered the
immediate mode, there will be no change in the printer's display, but
a message should appear on the screen of the host, provided you
have a working two-way communication:
User break in line XXXX
How to go on
• If you cannot break the program from the keyboard and do not
know how to break the program from the host, go on to chapter
2.9.
• If you have succeeded in breaking the program, proceed at chapter
2.10.
11
Intermec Fingerprint 6.13 – Programmer's Guide
2. GETTING STARTED, cont'd.
9.
Bypassing a Startup
Program
The following methods are only recommended as a last resort,
when there is no other way of breaking a startup program.
By default, there is no facility for breaking a startup file in a printer
without a keyboard. Although a break interrupt can be issued from
the host, this option is disabled by default. Thus, the startup file
should always be provided with some facility for issuing a break
interrupt from the host. Refer to the instructions for the program in
question.
☞ Test Mode
Also see:
• Service Manual
If such a facility still is missing, or you do not have the required
information, you may use the Test Mode to bypass the startup
program, provided your printer is fitted with a keyboard:
• Turn off the printer.
• Lift the printhead.
• Press the <Print> key and keep pressing it while you turn on the
power. Do not release the <Print> key yet.
• After half a minute or less, the printer will enter the Test Mode,
which is indicated by this message:
TESTMODE:
TESTPRINT
• Now you can release the <Print> key. The Test Mode is primarily
intended for factory and service tests (see the Service Manual),
but it also contains another facility which is very convenient in
this situation.
• Press the <Setup> or <Save> key. A new message is displayed:
Fingerprint
6.13
The printer has now entered Fingerprint's immediate mode, ignoring the startup file. The communication parameters have been reset
to their default values and the standard IN/OUT channel has been
set to "uart1:".
If nothing else works, you may need to
remove the configuration EPROM's or
memory card containing the startup
program.
Furthermore, if the startup program
resides in the RAM memory, you may be
forced to erase the entire RAM memory
by removing all RAM packages from the
CPU-board, wait for a few minutes and
then reinstall the RAM packages. Finally
restart the printer. Note that this may
cause valuable data to be lost!
Note that this does only apply until you restart the printer without
entering the Test Mode. Then the startup file with its original setup
and choice of communication channel will become effective again.
However, after entering Fingerprint via the Test Mode you can
KILL the startup program and – if so desired – recreate it later, see
chapter 5.13 “Creating a Startup Program”.
Proceed at chapter 2.10.
12
Intermec Fingerprint 6.13 – Programmer's Guide
10. Communications Test
☞ Version Check
Also see:
• Chapter 15.11
Check that you have entered the immediate mode and have a
working two-way serial communication by sending a simple
instruction from the host to the printer. On the keyboard of the host,
type:
? VERSION$ ↵
(↵ = Carriage Return key)
The printer should respond immediately by returning the version of
the installed Fingerprint firmware to the screen of the host, e.g.:
Fingerprint 6.13
Ok
☞ Communication Setup
Also see:
• Chapter 15.6
• Technical Manual
☞ Verbosity
Also see:
• Chapter 7.7
• Chapter 15.7
☞ Intermec Shell
Also see:
• Intermec Shell Startup manuals
This indicates that the communication is working both ways.
If the communication does not work, turn off the printer and check
the connection cable and CPU board straps. Also check if the
communication setup in the host corresponds to the printer's setup
and if the connection is made between the correct ports. Check the
verbosity level. Then try the communication test again.
Another possible cause of error may be that another communication
channel than "uart1:" has been selected for Fingerprint in Shell.
Reselect the Fingerprint application for "uart1:" as described in the
Shell startup manuals.
Once you know that the communication is working, you may go on
and send a line of text to make sure that characters transmitted from
the terminal are interpreted as expected by the printer's firmware:
☞ Text Field Printing
Also see:
• Chapter 10.2
FONT "SW030RSN" ↵
PRTXT "ABCDEFGHIJKLM" ↵
PRINTFEED ↵
Each line will be acknowledged by “Ok” on the screen, provided
that it has been entered correctly, that there is a working two-way
serial communication, and that the verbosity is on. When you press
the “Carriage Return” key the third time, the printer will feed out a
label, ticket, tag or piece of strip with the text printed near the lower
left corner of the printable area.
ABCDEFGHIJKLM
☞ Character Sets
Also see:
• Chapter 9.1
• Intermec Fingerprint Reference
Manual
Try using other characters between the quotation marks in the third
line, especially typical national characters like ÅÄÖÜ¿¢¥ç etc.
Should any unexpected characters be printed, you may need to
select another character set, see NASC statement in chapter 9.1, or
switch from 7-bit to 8-bit communication.
13
Intermec Fingerprint 6.13 – Programmer's Guide
3. CREATING A SIMPLE LABEL
1.
Introduction
☞ Carriage Return Character
Also see:
• Chapter 4.1
To get a quick impression of how Fingerprint works, start by
creating a simple label following the step-by-step instructions
below. Later in this manual, the various functions will be explained
in greater detail. You can also look up the instructions in the
Intermec Fingerprint 6.13 Reference Manual.
Use a word processing program, e.g. Windows Notepad, to enter the
program lines. Use a space character to separate the line number
from the instruction that follows. Finish each line with a carriage
return character, indicated by ↵ below.
When you have entered a batch of program lines, copy the lines and
paste them into a communication program, e.g. Windows Terminal,
which is connected to the printer (see chapter 2.11).
The printer will not execute the program until you have entered
RUN + Carriage Return.
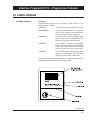
Printing a Box
☞ Box Field Printing
Also see:
• Chapter 10.5
Let us start by printing a box 400 dots high and 300 dots wide with
a line thickness of 10 dots. The box is inserted at position X=10,
Y=10:
NEW
10
PRPOS 10, 10 ↵
20
PRBOX 400,300,10 ↵
200 PRINTFEED ↵
300 END ↵
RUN ↵
Note: The printer does not execute the program until you have typed
RUN ↵.
Y
PAPER FEED
2.
X
Note:
This example is designed to be run on any present Fingerprint 6.13-compatible
EasyCoder printer connected to a terminal or computer and loaded with a paper
web (preferably labels) according to the following specifications.
Label size:
Width:
≥ 52.8 mm
(2.08")
Length:
≥ 70 mm
(2.75")
Continued!
14
Intermec Fingerprint 6.13 – Programmer's Guide
3. CREATING A SIMPLE LABEL, cont'd.
3.
Printing an Image
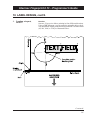
Now we add the image "GLOBE.1" after changing the position
coordinates to X=25,Y=25.
☞ Image Field Printing
Also see:
• Chapter 10.4
30
PRPOS 25,25 ↵
40
PRIMAGE "GLOBE.1" ↵
RUN ↵
4.
Before you print a bar code, you need to choose a bar code type. We
will use Code 39, which allows alphanumeric input. Note there is
no blank space in the bar code name in the BARTYPE instruction.
Printing a Bar Code
☞ Bar Code Field Printing
Also see:
• Chapter 10.3
5.
Printing Human
Readables
50
PRPOS 75,250 ↵
60
BARTYPE "CODE39" ↵
70
PRBAR "ABC" ↵
RUN ↵
To get the bar code input data printed as human readable text under
the bar code, add these lines:
1
BARFONT ON ↵
2
BARFONT "SW030RSN" ↵
RUN ↵
Continued!
15
Intermec Fingerprint 6.13 – Programmer's Guide
3. CREATING A SIMPLE LABEL, cont'd.
6.
Printing Text
Add a line of text at position X=25,Y=200:
☞ Text Field Printing
Also see:
• Chapter 10.2
80
PRPOS 25,200 ↵
90
FONT "SW030RSN" ↵
100 PRTXT "My FIRST Label" ↵
RUN ↵
7.
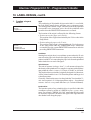
To view the whole program, type:
Listing the Program
LIST ↵
☞ Program Editing and Listing
Also see:
• Chapter 5.4
The program lines will be listed in ascending order on your
terminal's screen:
8.
If you want to change a program line, simply rewrite the line using
the same line number. For example, move the text to the right by
rewriting line number 80 with new coordinates:
Changing a Program
Line
1 BARFONT ON
2 BARFONT "SW030RSN"
10 PRPOS 10,10
20 PRBOX 400,300,10
30 PRPOS 25,25
40 PRIMAGE "GLOBE.1"
50 PRPOS 75,250
60 BARTYPE "CODE39"
70 PRBAR "ABC"
80 PRPOS 25,200
90 FONT "SW030RSN"
100 PRTXT "My FIRST label"
200 PRINTFEED
300 END
ok
80
PRPOS 75,200 ↵
RUN ↵
Continued!
16
Intermec Fingerprint 6.13 – Programmer's Guide
3. CREATING A SIMPLE LABEL, cont'd.
9.
Saving the Program
☞ Saving
Also see:
• Chapter 5.13
10. Error Handling
☞ ERRHAND.PRG
Also see:
• Chapter 16.4
If you want to save your first attempt, issue the following instruction:
SAVE "LABEL1" ↵
Your program will be saved in the printer's memory under the name:
LABEL1.PRG
The program above is very simple and there is a very small risk of
encountering any errors. When writing more complex programs,
you might find use for an errorhandler. For that purpose we have
installed a program called ERRHAND.PRG in the standard Configuration EPROM's. Should your printer not contain any errorhandling program, you will find ERRHAND.PRG listed in chapter
16.4.
ERRHAND.PRG contains subroutines that e.g. displays the type of
error on the printer's LCD display (e.g. "OUT OF PAPER" or
"HEAD LIFTED"), prints the error number on your screen, and
assigns subroutines to some of the keys on the keyboard (if any).
There is also a subroutine that performs a PRINTFEED with errorchecking. The ERRHAND.PRG occupies lines 10, 20 and 100000–
1900000.
11. Renumbering Lines
☞ Renumbering Program Lines
Also see:
• Chapter 5.4
If ERRHAND.PRG is merged with the program you just wrote,
lines 10 and 20 in your program will be replaced with lines 10 and
20 from ERRHAND.PRG. Therefore you have to renumber your
program, so that your program begins with an unoccupied number,
e.g. 50, before ERRHAND.PRG is merged:
RENUM 50,1,10 ↵
Ok
LIST ↵
50 BARFONT ON
60 BARFONT "SW030RSN"
70 PRPOS 10,10
80 PRBOX 400,300,10
90 PRPOS 25,25
100 PRIMAGE "GLOBE.1"
110 PRPOS 75,250
120 BARTYPE "CODE39"
130 PRBAR "ABC"
140 PRPOS 25,200
150 FONT "SW030RSN"
160 PRTXT "My FIRST label"
170 PRINTFEED
180 END
ok
Continued!
17
Intermec Fingerprint 6.13 – Programmer's Guide
3. CREATING A SIMPLE LABEL, cont'd.
12. Merging Programs
☞ Merging programs
Also see:
• Chapter 6.3
Now your label-printing program LABEL1.PRG will not interfere
with ERRHAND.PRG and you can merge the two programs into
a single program. In fact, you will create a copy of ERRHAND.PRG
which is merged into LABEL1.PRG. Thus the original
ERRHAND.PRG can be merged into more programs later:
MERGE "rom:ERRHAND.PRG" ↵
13. Using the Print Key
☞ Branching and Loops
Also see:
• Chapter 5.6 (GOTO)
• Chapter 5.7 (GOSUB)
Note:
The designations of the keys and buttons
in ERRHAND.PRG refer to the standard
type of keyboard of the “Enhanced”
models.
Instead of using a PRINTFEED statement, we will use a subroutine
in ERRHAND.PRG. Because ERRHAND.PRG assigns functions
to e.g. the PRINT key, you can create a loop in the program so you
will get a label every time you press the PRINT key.
160 GOSUB 500000 ↵
170 GOTO 170 ↵
RUN ↵
If your printer is fitted with a membrane keyboard, try pressing
different buttons on the printer's keyboard. Only those, to which
functions been assigned in ERRHAND.PRG (i.e. the <Pause>,
<Print>, <Setup> and <Feed> keys), will work.
You can break the program by simultaneously pressing the <C>
and <Pause> keys.
Save the program again using the same name as before:
SAVE "LABEL1"
The previously saved program "LABEL1.PRG" will be replaced
by the new version.
With this example, we hope you have got a general impression of
the basic methods for Intermec Fingerprint programming and that
you also see the advantages of using ERRHAND.PRG or a similar
program for errorhandling and initiation.
ERRHAND.PRG can easily be modified to fit into more complex
programs and we recommend that you use it when writing your
programs until you feel ready to create errorhandling programs
yourself (see chapter 16 “Error Handling”).
18
Intermec Fingerprint 6.13 – Programmer's Guide
4. TERMINOLOGY AND SYNTAX
1.
Lines
Note:
If you enter a carriage return on your
terminal, the printer will, by default,
echo back a Carriage Return + a Line
Feed (ASCII 13 + 10 decimal). Using
the setup option “New Line", you may
restrict the printer only to echo back
either a Carriage Return (ASCII 13 dec.)
or a Line Feed (ASCII 10 dec.).
☞ Programming Mode
Also see:
• Chapter 5.4
You will always use one or several lines to give the instructions to
the printer, regardless whether you work in the immediate mode, in
the programming mode, or in the Direct Protocol. The difference
is that in the programming mode, the lines are always numbered
(visibly or invisibly), whereas in the immediate mode and the
Direct Protocol, they must not be numbered.
A line may contain up to 300 characters. A line must always be
terminated by a Carriage Return character (ASCII 13 decimal), see
note. When the line reaches the right edge of the screen of the host,
it will usually wrap to the next screen line.
Theoretically, line numbers up to > 2 billion can be used. If you
choose to enter the line numbers manually, start by numbering the
lines from 10 and upwards with an increment of 10, i.e. 10, 20, 30,
40 etc. That makes it possible to insert additional lines (e.g.
11,12,13...etc.), when the need arises. However, the line numbers
are your own decision, since you must type them yourself.
You can also omit line numbers at edition and let the software
number the lines automatically. Such line numbers will not be
visible before the program is listed.
After having typed the line number, use a blank space to separate
it from the statement or function that follows. That makes it easier
to read the program without having to list it.
Several instruction may be issued on the same line, provided they
are separated by colons (:), e.g.:
☞ Immediate Mode
Also see:
• Chapter 5.3
☞ Intermec Direct Protocol
Also see:
• Intermec Direct Protocol,
Programmer's Guide
2.
Statements
☞ Keywords
Also see:
• Chapters 4.7 and 4.8
100
FONT "SW030RSN":PRTXT "HELLO"
This is especially useful in the immediate mode (see chapter 5.3)
and in the Direct Protocol, where you can send a complete set of
instructions as a single line, e.g.:
PP100,250:FT"SW050BSN":PT"Text 1":PF ↵
It is not possible to alter a line after it has been transmitted to the
printer. If you want to change such a line, you must send the whole
line again using the same line number, or delete it using a DELETE
statement (see chapter 5.4).
A statement is an instruction, which specifies an operation. It consists of a keyword (e.g. PRTXT), usually followed by one or several
parameters, flags, or input data, which further define the statement.
The keyword can be entered as uppercase or lowercase letters but
will always appear as uppercase letters, when the program is listed
on the screen of the host. Some keywords can be used in an
abbreviated form, e.g. PRTXT may also be entered as PT.
Continued!
19
Intermec Fingerprint 6.13 – Programmer's Guide
4. TERMINOLOGY AND SYNTAX, cont'd.
2.
Statements, cont'd.
You may use a blank space to separate the keyword from the rest of
the statement, which must be entered exactly according to the
specified syntax. Note that in some cases, a space character is a
compulsory part of the keyword, e.g. LINE↔INPUT. When such is
the case, it is indicated by the syntax description in the Fingerprint
Reference Manual.
3.
Functions
A function is a procedure, which returns a value. A function consists
of a keyword combined with values, flags, and/or operators. The
keyword can be entered as uppercase or lowercase letters, but it will
always appear as uppercase letters, when the program is listed on the
screen. Values, flags, and operators must be enclosed by parentheses ( ). The operators will be explained later on.
☞ Keywords
Also see:
• Chapter 4.7 amd 4.8
☞ Operators
Also see:
• Chapter 4.9
Examples:
CHR$(65)
TIME$("F")
ABS (20*5)
IF(PRSTAT AND 1)...
☞ Conditional Instructions
Also see:
• Chapter 5.5
Keyword with parameter
Keyword with flag
Keyword with arithmetic operator (*) and
values
Keywords, logical operator (AND) and
value
A function can be entered inside a statement or on a line containing
other instructions. They are often used in connection with conditional statements, e.g.:
320
IF (PRSTAT AND 1) THEN GOTO 1000
Blank spaces may be inserted to separate the function from other
instructions and also to separate the keyword from the rest of the
statement.
4.
Other Instructions
In addition to statements and functions, there are a few other types
of specialized instructions such as the DATE$ and TIME$ variables, the SYSVAR system array and the PCX2BMP external
command, which do not fit into the above-mentioned categories.
5.
Expressions
In the descriptions of the syntax for the various instructions, the
word “Expression” is used to cover both constants and variables.
Expressions are of two kinds:
• String expressions are carriers of alphanumeric text, i.e. string
constants and string variables. Numbers are treated as text, not as
values.
• Numeric expressions contain numeric values and operators, i.e.
numeric constants and numeric variables.
Continued!
20
Intermec Fingerprint 6.13 – Programmer's Guide
4. TERMINOLOGY AND SYNTAX, cont'd.
6.
Constants
Constants are fixed text or values. There are two kinds:
• String constants are sequences of characters, i.e. text. If digits or
operators are included, they will be considered as text and will not
be processed. String constants must always be started and
terminated by double quotation marks ("..."), for example
"LABEL1.PRG".
• Numeric constants are fixed numeric values. Only decimal
integers are allowed, i.e. 1, 2, 3, 4, 5 etc. Decimal points (e.g.
1.56890765) are not supported. Values may be positive or
negative. Positive number may optionally be indicated by a
leading plus sign (+), whereas negative numbers always must be
indicated by a leading minus sign (-).
Note that certain characters, e.g. digits, can be either string
constants (text) or numeric constants (numbers). To allow the
firmware to detect that difference, string constants must always be
enclosed by double quotation marks (" ....."), as opposed to numeric
constants.
7.
Variables
Variables are value holders. There are two main types:
• String variables are used to store strings entered as string constants
or produced by Fingerprint instructions. Max. size is 64 kbytes.
String variables are indicated by a trailing $ sign.
Examples:
A$ = "EASYCODER PRINTER"
B$ = TIME$
LET C$ = DATE$
• Numeric variables are used to store numbers, entered as numeric
constants, or produced by Fingerprint instructions or operations.
Numeric variables are indicated by a trailing % sign.
Examples:
A% = 150
B% = DATEDIFF ("981001","981130")
LET C% = 2^2
The name of a variable may consist of letters, numbers and decimal
points. The first character must always be a letter. No keywords or
keyword abbreviations must be used. However, completely embedded keywords are allowed.
Examples:
LOC
CLOCK$ = "ABC"
LOC$ = "ABC"
LOCK$ = "ABC"
is a keyword
is OK
causes an error
causes an error.
Continued!
21
Intermec Fingerprint 6.13 – Programmer's Guide
4. TERMINOLOGY AND SYNTAX, cont'd.
8.
Keyword List
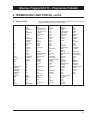
#
'
(
)
*
+
,
/
:
;
<
<=
<>
=
=<
=>
>
><
>=
?
ABS
ACTLEN
ALIGN
AN
AND
AS
ASC
BARADJUST
BARFONT
BARHEIGHT
BARMAG
BARRATIO
BARSET
BARTYPE
BEEP
BF
BH
BM
BR
BREAK
BT
BUSY
CHDIR
CHECKSUM
CHR$
CLEANFEED
CLEAR
CLL
CLOSE
COM ERROR
COMBUF$
COMSET
COMSTAT
CONT
COPY
COUNT&
CSRLIN
CSUM
CUT
DATA
DATE$
DATEADD$
DATEDIFF
DELETE
DEVICES
DIM
DIR
ELSE
END
EOF
EQV
ERL
ERR
FF
FIELD
FIELDNO
FILE&
FILES
FIX
FONT
FONTNAME$
The presently used keywords and keywords reserved for future
program enhancement are listed below.
FONTS
FOR
FOR APPEND AS
FOR INPUT AS
FOR OUTPUT AS
FORMAT
FORMFEED
FRE
FT
FUNCTEST
GET
GOSUB
GOTO
HEAD
HEX$
HOLIDAY$
IF
II
IMAGE
IMAGENAME$
IMAGES
IMMEDIATE
IMP
INKEY$
INPUT
INPUT$
INSTR
INT
INVIMAGE
IP
KEY
KEYBMAP$
KILL
LAYOUT
LBLCOND
LED
LEFT$
LEN
LET
LINE INPUT
LIST
LOAD
LOC
LOCATE
LOF
LSET
LTS&
MAG
MAP
MERGE
MID$
MOD
NAME
NASC
NEW
NEXT
NI
NORIMAGE
NOT
OFF
OFF LINE
ON
ON BREAK
ON COMSET
ON ERROR GOTO
ON KEY
ON LINE
OPEN
OPT
OPTIMIZE
OR
PB
PEC2DATA
PEC2LAY
PECTAB
PF
PL
PLAY
PM
PORTIN
PORTOUT
PP
PRBAR
PRBOX
PRIMAGE
PRINT
PRINT USING
PRINTFEED
PRINTONE
PRLINE
PRPOS
PRSTAT
PRTXT
PT
PUT
PX
RANDOM
RANDOMIZE
READ
READY
REBOOT
REDIRECT OUT
REM
REMOVE
RENUM
RESET
RESTORE
RESUME
RESUME NEXT
RETURN
RIBBON
RIGHT$
RND
RSET
RUN
SAVE
SET FAULTY DOT
SETSTDIO
SETUP
SGN
SORT
SOUND
SPACE$
SPC
SPLIT
STEP
STOP
STORE
STR$
STRING$
SWAP
SYSTEM
SYSVAR
TAB
TESTFEED
THEN
TICKS
TIME$
TIMEADD$
TIMEDIFF
TO
TRANSFER
TRANSFER$
TRANSFERSET
TROFF
TRON
VAL
VERBOFF
VERBON
VERSION$
WEEKDAY
WEEKNUMBER
WEND
WHILE
WRITE
XOR
XYZZY
\
^
22
Intermec Fingerprint 6.13 – Programmer's Guide
4. TERMINOLOGY AND SYNTAX, cont'd.
9.
Operators
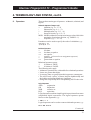
There are three main types of operators – arithmetic, relational, and
logical:
Arithmetic Operators (integers only)
+
*
\
MOD
^
Addition (e.g. 2 + 2 = 4)
Subtraction (e.g. 4 - 1 = 3)
Multiplication (e.g. 2 * 3 = 6)
Integer division (e.g. 6 \ 2 = 3)
Modulo arithmetic (results in an integer value which is the
remainder of an integer division, e.g. 5MOD2 = 1)
Exponent (e.g. 5 ^ 2 = 25)
Parentheses can be used to specify the order of calculation, e.g.:
7+5^2\8 = 10
(7+5^2)\8 = 4
Relational Operators
<
<=
<>
=
>
>=
less than
less than or equal to
not equal to
equal to (also used as an assignment operator)
greater than
greater than or equal to
Relational operators return:
-1
if relation is TRUE.
0
if relation is FALSE.
The following rules apply:
• Arithmetic operations are evaluated before relational operations.
• Letters are greater than digits.
• Lowercase letter are greater than their uppercase counterparts.
• The ASCII code “values” of letters increase alphabetically and
the leading and trailing blanks are significant.
• Strings are compared by their corresponding ASCII code value.
Logical Operators
AND
OR
XOR
EQV
conjunction
disjunction
exclusive or
equivalent
Logical operators combine simple logical expressions to form more
complicated logical expressions. The logical operators operate
bitwise on the arguments, e.g.:
1 AND 2 = 0
Logical operators can be used to connect relational operators, e.g.:
A%10 AND A%<100
Continued!
23
Intermec Fingerprint 6.13 – Programmer's Guide
4. TERMINOLOGY AND SYNTAX, cont'd.
9.
Operators, cont'd.
Logical operators can also be used to mask bits, e.g.:
A%=A% AND 128
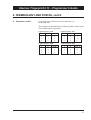
The principles are illustrated by the following tables, where A and
B are simple logical expressions.
Logical operator: AND
A
B
A AND B
1
1
1
1
0
0
0
1
0
0
0
0
Logical operator: OR
A
B
A OR B
1
1
1
1
0
1
0
1
1
0
0
0
Logical operator: XOR
A
B
A XOR B
1
1
0
1
0
1
0
1
1
0
0
0
Logical operator: EQV
A
B
A EQV B
1
1
1
1
0
0
0
1
0
0
0
1
24
Intermec Fingerprint 6.13 – Programmer's Guide
4. TERMINOLOGY AND SYNTAX, cont'd.
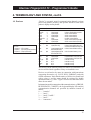
10. Devices
“Device” is a generic term for communication channels, various
parts of the printer's memory, and operator interfaces such as the
printer's display and keyboard.
Name
☞ Files
Also see:
• Chapter 6 (File system)
• Chapter 7 (Input, Append, Random)
• Chapter 8 (Output, Random)
No.
Can be OPENed for...
Remarks
Communication:
console:
0
uart1:
1
uart2:
2
uart3:
3
centronics: 4
rs485:
2
prel:
N/A
Input/Output
Input/Output
Input/Output
Input/Output
Input
Input/Output
Input/Output
Printer's display/keyboard unit
Serial communication
Serial communication
Serial communication
Parallel communication
Serial communication (RS 485)
Serial communication (RS 485)
Memory:
rom:
N/A
Input (files only)
ram:
N/A
card1:
N/A
Input/Output/Append/
Random (files only)
Input/Output/Append/
Random (files only)
Printer's internal EPROMs plus
non DOS-formatted memory card
Printer's internal RAM memory
Special:
msg:
par:
bscrypt:
null:
cutter:
ind:
N/A
N/A
N/A
N/A
N/A
N/A
Input/Output
Input/Output
N/A
N/A
N/A
N/A
DOS-formatted memory card
Implementation of SITA/CUTE 2
Implementation of SITA/CUTE 2
Internal use only
Internal use only
Internal use only
Internal use only
The devices can be listed by means of a DEVICES statement. All
devices will be listed regardless if they are installed or not.
Devices are referred to by name in connection with instructions
concerning directories (e.g. SAVE, KILL, FORMAT) and with
OPEN statements. Note that the names of all devices should end
with a colon (:) and the name should be enclosed by double
quotation marks, e.g. "ram:". Upper- or lowercase characters in the
name do not matter.
In instructions used in connection with communication (e.g. BREAK,
BUSY/READY, COMSET), the keyboard/display unit and the
communication channels are specified by numbers instead of
names:
0 = "console:"
1 = "uart1:"
2 = "uart2:"/"rs485:"
3 = "uart3:"
4 = "centronics:"
25
Intermec Fingerprint 6.13 – Programmer's Guide
5. FINGERPRINT PROGRAMMING
1.
Introduction
The Fingerprint firmware works in two main modes, the “Immediate Mode” and the “Programming Mode”. A special case is the
Direct Protocol, which is described in a separate Programmer's
Guide and will not be explained any further in this manual.
Immediate Mode implies that the instructions are executed at once
as soon as a carriage return is received. Most instructions can be
used, but the instructions cannot be saved after execution.
Programming Mode is used to enter instructions in the form of
program lines. The lines can be manually provided with visible line
numbers at editing, or be automatically provided with invisible line
numbers by the printer's firmware. No execution is performed until
a RUN statement is issued in the Immediate Mode, i.e. on a line
without number. The program can be saved in the printer's memory
and used again.
2.
Editing Methods
☞ Computer Connection
Also see:
• Chapter 2.1
To be able to program a printer, you need a terminal or host
computer with a screen and a keyboard and a working two-way
serial communication between printer and host, preferably RS
232C on communication channel "uart1:". The host must be able to
transmit and receive ASCII characters, e.g. by means of a communication program like Windows Terminal.
There are three main methods of writing and transmitting a program
to the printer:
• Line-by-Line Method
If you have an “non-intelligent” terminal that just can transmit and
receive ASCII characters, you must write and send each line
separately.
☞ Verbosity
Also see:
• Chapter 7.7
• Chapter 15.7
Each line will be checked for possible syntax errors as soon as the
printer receives it and the printer will return either “Ok” or an error
message to the screen of the host, provided verbosity is on.
☞ Error Messages
Also see:
• Chapter 16.1
If you need to correct a mistake, you must rewrite the complete
line using the same line number. Thus, this method is not suited
for the programming without line numbers.
Note that even if most examples of computer connection in this
manual assumes a PC running under MS Windows 3.11, Fingerprint is by no means restricted to such computers. Other personal
computers and operating systems, such as DOS, Windows 95,
Windows NT, Mac OS, OS-2, Unix etc., as well as larger computer
systems, can be used following the same principles.
Continued!
26
Intermec Fingerprint 6.13 – Programmer's Guide
5. FINGERPRINT PROGRAMMING, cont'd.
2.
Editing Methods, cont'd.
☞ Verbosity
Also see:
• Chapter 7.7
• Chapter 15.7
☞ Error Messages
Also see:
• Chapter 16.1
• Copy-and-Paste Method
If the host computer is fitted with both a communication program
(e.g. Windows Terminal) and a word-processing program (e.g.
Windows Write or Windows Notepad), you can write the program,
partly or completely, in the word processor and then Copy and
Paste it into the communication program.
Each line will be checked for possible syntax errors as soon as the
printer receives it and the printer will return an error message after
each line where an error has been detected, provided verbosity is
on.
If you need to correct a mistake, you can make the correction in
the word processor and then copy and paste the line into the
communication program. If you do not use line numbers, you
must Copy and Paste the complete corrected program back to the
communication program.
• Send Text Method
If the host computer is fitted with both a communication program
(e.g. Windows Terminal) and a word-processing program (e.g.
Windows Write or Windows Notepad), you can write the program,
partly or completely, in the word processor and send the whole
text file to the printer by means of the communication program
(e.g. “Transfers; Send Text File” in Windows Terminal).
Each line will be checked for possible syntax errors as soon as the
printer receives it and the printer will return an error message after
each line where an error has been detected, provided verbosity is
on.
If you need to correct a mistake, you can make the correction in
the word processing program and then send the complete program
again via the communication program.
3.
Immediate Mode
The Immediate Mode can be used for four main purposes:
• Printing of labels that you will never need to print again.
• Printing of labels, which have been edited and saved in the host
computer and are downloaded as text strings to the printer.
• Editing of programs to be executed in the programming mode.
• Issuing of instructions outside the execution of programs in the
programming mode, e.g. DELETE, LOAD, MERGE, NEW,
REBOOT or RUN.
Rather than creating programs in the Programming Mode, in some
cases you may want to edit the label in your host computer and
transmit the printing instructions and data to the printer in the form
of text strings.
Continued!
27
Intermec Fingerprint 6.13 – Programmer's Guide
5. FINGERPRINT PROGRAMMING, cont'd.
3.
Immediate Mode,
cont'd.
To make the strings shorter, use the Fingerprint abbreviations.
Several statements can be issued on the same line separated by
colons (:), or on separate lines.
Examples:
A line of text can be defined and printed this way....
PP160,250:DIR3:AN4:FT"SW030RSN":PT"Hello":PF ↵
or this way...
PP160,250 ↵
DIR3 ↵
AN4 ↵
FT"SW030RSN" ↵
PT"Hello" ↵
PF ↵
☞ Standard Error-Handling
Also see:
• Chapter 16.1
(print start position)
(print direction)
(alignment)
(font select)
(text input data)
(print one copy)
As soon as a carriage return is received, the firmware checks the
instructions for syntax errors. Provided there is a working two-way
communication and the verbosity is on, the printer will either return
an error message or “Ok” to the host.
This type of communication works well and is easy to learn, but it
does not take full advantage of the flexibility and computing
capacity offered by the Fingerprint printers. For example, you
cannot save the labels in the printer but must download each new
label, and all error-handling must be taken care of by the host.
☞ Intermec Direct Protocol
Also see:
• Intermec Direct Protocol,
Programmer's Guide
Rather than using the Immediate Mode, the Direct Protocol is
usually to prefer, since it allows variable input data to be combined
with predefined layouts, handles counters and contains a flexible
error-handler.
Beside printing text, bar codes and graphics, you can perform other
tasks in the Immediate Mode as well, e.g. calculation. Try typing
this instruction on the keyboard of the host:
? ((5^2+5)\3)*5 ↵
(↵ = Carriage Return key)
The calculation will be performed immediately and the result will
be returned to the screen of the host:
50
Ok
Important:
To send an instruction from the terminal to the printer, press the
Carriage Return key. In the programming examples later on in
this manual, this character will be omitted, but you must not forget
to enter it via the keyboard of the host.
Continued!
28
Intermec Fingerprint 6.13 – Programmer's Guide
5. FINGERPRINT PROGRAMMING, cont'd.
3.
Immediate Mode,
cont'd.
Three keys are enabled in the Immediate Mode, obviously provided that the printer is fitted with the key(s) in question:
• The <Print> key or button produces a FORMFEED operation.
• The <Feed> key produces a FORMFEED operation.
• The <Setup> key gives access to the Setup Mode.
When the printhead is lowered and the <Print> or <Feed> keys are
pressed, three possible error conditions can cause an error message
in English to be displayed:
• “Error 1005 -Press any key!-”
(Out of paper)
• “Error 1031 -Press any key!-”
(Next label not found)
• “Error 1027 -Press any key!-”
(Out of ribbon)
After the error has been attended to, the error message can be cleared
by pressing any of the above-mentioned keys.
When the printhead is lifted, the <Print> and <Feed> keys will run
the printers mechanism in order to facilitate cleaning of the print
roller, i.e. the rubber-coated roller that drives the paper forward
under the printhead. The motor(s) will stop automatically when the
print roller has completed a few rotations.
4.
Programming Mode
The Programming Mode is used to execute instructions entered in
the form of program lines. The firmware assumes input to the
Programming Mode in two cases:
• When a line starts with a number.
• After an IMMEDIATE OFF statement has been executed. (See
“Programming without Line Numbers” later in this chapter).
One or several lines make up a program, which can executed as
many times as you wish. A program can also be saved, closed,
copied, loaded, listed, merged, and killed, see chapter 6.3. All lines
have line numbers, that are either manually entered when the
program is edited, or provided automatically and invisibly by the
firmware when an IMMEDIATE ON statement has been executed.
Each time the printer receives a program line followed by a Carriage
Return character, the firmware checks the line for possible syntax
errors. If an error is encountered, an error message will be returned
to the host, provided there is a working two-way communication
and the verbosity is on.
The program is executed in ascending line number order when a
RUN statement is issued in the Immediate Mode, i.e. on a line
without any line number. However, various types of branching and
loops can be created in the program that makes the execution
deviate from a strict ascending order.
Continued!
29
Intermec Fingerprint 6.13 – Programmer's Guide
5. FINGERPRINT PROGRAMMING, cont'd.
4.
Programming Mode,
cont'd.
☞ Autoexec-files (startup files)
Also see:
• Chapter 5.13
Note that the editing of the program takes place in the Immediate
Mode, while the execution is performed in the Programming Mode.
Often, programs are made as an autoexec (startup) file that starts up
automatically when the printer is turned on, and keeps on running
infinitely.
Important:
To send an instruction from the terminal to the printer, press the
Carriage Return key. In the programming examples later on in
this manual, this character will be omitted, but you must not forget
to enter it via the keyboard of the host.
Programming with Line Numbers
In this case you will start each line by manually entering a line
number. We recommend that you start with line number 10 and use
an increment of 10 between lines to allow additional lines to be
inserted later. To make the program easier to read, you can use a
space character between the line number and the instruction. If not,
the firmware will insert a space character automatically, that will
appear when the program is LISTed. Let us use the calculation
example from the Immediate Mode. It would look like this in the
Programming Mode:
10 ? ((5^2+5)\3)*5 ↵
RUN ↵
yields:
15
Ok
Let us have a look at the lines:
• The first line consists of a line number (10) followed by an
optional space character and the instruction ? ((5^2+5)\3)*5.
? is a shorthand form for the statement PRINT, which returns the
result of the calculation to the screen of the host). The line is
terminated by a Carriage Return character.
• Next line has no line number, and contains the statement RUN,
which orders the printer to execute all preceding numbered lines
in consecutive ascending order according to their line numbers.
• The result (15) will be displayed on the terminal's screen followed
by “Ok” to indicate that execution was successful.
In this manual, the programming examples will generally have line
numbers in order to make them easier to understand. For more
complex programs, programming without line numbers, as explained on next page, may be both easier and quicker.
Continued!
30
Intermec Fingerprint 6.13 – Programmer's Guide
5. FINGERPRINT PROGRAMMING, cont'd.
4.
Programming Mode,
cont'd.
Programming without Line Numbers
You can choose to omit entering line numbers manually when
writing a program. This is a special case of the Programming Mode,
but in order to make the printer understand what you want to do, you
must turn off the Immediate Mode by means of an IMMEDIATE
OFF statement. (Normally, the firmware interprets the lack of line
numbers as Immediate Mode).
Then you can write the program line by line without having to type
a line number at the start of each line. In other respects, you can
generally work just as in the normal programming mode.
☞ Branching the Program Execution
Also see:
• Chapter 5.6 – 5.8
However, a major difference is when you want to make the
execution branch to a certain line, e.g. by a GOTO statement. You
cannot use line numbers to specify the line in question. Instead,
there is a feature called “line labels”. The line you want to refer to
must start with a line label, i.e. a number of characters appended by
a colon (:). The line label must not start with a digit or interfere with
any keyword (see chapter 4.8).
When you want to refer to a line marked with a line label, just enter
the line label (without any colon), where you otherwise would have
put the line number.
Finish the program by issuing an IMMEDIATE ON statement
before you RUN it. The lines will automatically be numbered 1020-30-40-50 etc., but the line numbers will not be visible until you
LIST the program. Line labels will not be replaced by line numbers.
Two simple examples show the difference between using line
numbers and line labels:
Line Numbers
10
20
1000
1010
GOSUB 1000
END
SOUND 440,50
RETURN
RUN
LIST
10
20
1000
1010
GOSUB 1000
END
SOUND 440,50
RETURN
Line Labels
IMMEDIATE OFF
GOSUB Q123
END
Q123:SOUND 440,50
RETURN
IMMEDIATE ON
RUN
LIST
10 GOSUB Q123
20 END
30 Q123: SOUND 440,50
40 RETURN
Continued!
31
Intermec Fingerprint 6.13 – Programmer's Guide
5. FINGERPRINT PROGRAMMING, cont'd.
4.
Programming Mode,
cont'd.
Programming Instructions
There are a number of instructions that are used in connection with
the editing of programs in the Programming Mode:
NEW
Before you enter the first program line, always issue a NEW
statement in the Immediate Mode to clear the printer's working
memory, close all files and clear all variables.
Warning!
If there already is a program in the working memory, it will be
deleted and cannot be restored unless it has been SAVEd.
IMMEDIATE OFF
If you want to write the program without entering line numbers
manually, this statement should be issued in the Immediate Mode
before the first line is entered.
REM (')
To make the program easier to understand, you can enter remarks
and explanations on separate lines or in lines containing other
instructions. Any characters preceded by REM, or its shorthand
version ' (single quotation mark), will not be regarded as part of the
program and will not be executed. REM statements can also be used
at the end of lines, if they are preceded by a colon (:).
END
Usually, subroutines are entered on lines with higher numbers than
the main program. It is a good programming habit to finish the main
program with an END statement in order to separate it from the
subroutines. When an END statement is encountered, the execution
is terminated and all OPENed files and devices are CLOSEd.
IMMEDIATE ON
If you have issued an IMMEDIATE OFF statement before you
started to write the program, you must turn on the Immediate Mode
again by means of an IMMEDIATE ON statement before you can
start the execution, i.e. issue a RUN statement.
LIST
You can LIST the entire program, i.e. make the printer return the
lines to the screen of the host. You can also choose to list part of the
program or variables only. If you have edited the program without
line numbers, the numbers automatically assigned to the lines at
execution will now appear. LIST is usually issued in the Immediate
Mode.
Continued!
32
Intermec Fingerprint 6.13 – Programmer's Guide
5. FINGERPRINT PROGRAMMING, cont'd.
4.
Programming Mode,
cont'd.
DELETE
Program lines can be removed using the DELETE statement in the
Immediate Mode. Both single lines and ranges of lines in consecutive order can be deleted.
RENUM
The program lines can be renumbered, e.g. to provide space for new
program lines, to change the order of execution, or to make it
possible to MERGE to programs. Line references for GOSUB,
GOTO and RETURN statements will be renumbered accordingly
(see chapter 5.6 – 5.8 ).
5.
Conditional Instructions
☞ TRUE and FALSE
Also see:
• Chapter 4.9 (Relational Operators)
Conditional instructions control the execution according to whether
a numeric expression is true or false. Fingerprint has one conditional instruction, which can be used in two different ways:
• IF...THEN...[ELSE]
• IF...THEN...[ELSE]...ENDIF
IF...THEN...[ELSE]
If a numeric expression is TRUE, then a certain statement should
be executed, but if the numeric expression is FALSE, optionally
another statement should be executed.
This example allows you to compare two values entered from the
keyboard of the host.
10
20
30
40
50
60
RUN
INPUT "Enter first value ", A%
INPUT "Enter second value ", B%
C$="1:st value > 2:nd value"
D$="1:st value ≤ 2:nd value"
IF A%>B% THEN PRINT C$ ELSE PRINT D$
END
Another way to compare the two values in the example above is to
use three IF...THEN statements:
10
20
30
40
50
60
70
80
90
RUN
INPUT "Enter first value ", A%
INPUT "Enter second value ", B%
C$="First value is larger than second value"
D$="First value is less than second value"
E$="First value and second value are equal"
IF A%>B% THEN PRINT C$
IF A%<B% THEN PRINT D$
IF A%=B% THEN PRINT E$
END
33
Intermec Fingerprint 6.13 – Programmer's Guide
5. Intermec FINGERPRINT PROGRAMMING, cont'd.
5.
Conditional Instructions,
cont'd.
IF...THEN...[ELSE]...ENDIF
It is possible to execute multiple THEN and ELSE statements. Each
statement must be entered on a separate line and the end of the
instruction must be indicated by ENDIF on a separate line, e.g.:
10
20
30
40
50
60
70
80
90
RUN
TIME$ = "121500":FORMAT TIME$ "HH:MM"
A%=VAL(TIME$)
IF A%>120000 THEN
PRINT "TIME IS ";TIME$("F"); ". ";
PRINT "GO TO LUNCH!"
ELSE
PRINT "CARRY ON - ";
PRINT "THERE'S MORE WORK TO DO!"
ENDIF
yields e.g.:
TIME IS 12:15. GO TO LUNCH!
6.
Unconditional
Branching
☞ Keyboard Control
Also see:
• Chapter 15.1
GOTO
The most simple type of unconditional branching is the “waiting
loop”. This means that a program line branches the execution back
to itself, waiting for something to happen, for example a key being
pressed or a communication buffer becoming full.
This example shows how the program waits for the key F1 to be
pressed (line 30). Then a signal is emitted by the printer's buzzer:
10
20
30
40
1000
1010
RUN
ON KEY (10) GOSUB 1000
KEY (10) ON
GOTO 30
END
SOUND 880,100
END
It is also possible to branch to a different line. This is useful when
you want create a waiting loop containing a number of lines, e.g.:
10
20
30
40
100
110
200
210
RUN
INPUT "Enter a number:", A%
IF A%<0 THEN GOTO 100 ELSE GOTO 200
GOTO 10
END
PRINT "NEGATIVE VALUE"
GOTO 40
PRINT "POSITIVE VALUE"
GOTO 40
GOTO in line 30 diverts the execution back to line 10 over and over
again until you type a value on the host (waiting loop). Depending
on whether the value is less than 0 or not, the execution branches
to one of two alternative lines (100 or 200), which print different
messages to the screen. In both cases, the execution branches to line
40, where the program ends. Line 20 is an example of conditional
branching, which is explained in chapter 5.8.
34
Intermec Fingerprint 6.13 – Programmer's Guide
5. FINGERPRINT PROGRAMMING, cont'd.
7.
Branching to
Subroutines
GOSUB and RETURN
A subroutine is a number of program lines intended to perform a
specific task, separately from the main program execution. Branching to subroutine can e.g. take place when:
• An error condition occurs.
• A condition is fulfilled, such as a certain key being pressed or a
variable obtaining a certain value.
• A break instruction is received.
• Background communication is interrupted.
Another application of subroutines is branching to one and the same
routine from different places in the same program. Thereby, you do
not need to write the routine more than once and can make the
program more compact.
The main instruction for branching to subroutines is the GOSUB
statement. There are also a number of instructions for conditional
branching to subroutines, which will be explained later in this
chapter.
After branching, the subroutine will be executed line by line until
a RETURN statement is encountered.
The same subroutine can be branched to as many times as you need
from different lines in the main program. GOSUB remembers
where the last branching took place, which makes it possible to
return to the correct line in the main program after the subroutine has
been executed. Subroutines may be nested, i.e. a subroutine may
contain a GOSUB statement for branching to a secondary subroutine etc.
Subroutines should be placed on lines with higher numbers than the
main program. The main program should be appended by an END
statement to avoid unintentional execution of subroutines.
Example illustrating nested subroutines:
10
20
30
40
1000
1010
1020
1030
2000
2010
2020
2030
3000
3010
3020
RUN
PRINT "This is the main program"
GOSUB 1000
PRINT "You're back in the main program"
END
PRINT "This is subroutine 1"
GOSUB 2000
PRINT "You're back from subroutine 2 to 1"
RETURN
PRINT "This is subroutine 2"
GOSUB 3000
PRINT "You're back from subroutine 3 to 2"
RETURN
PRINT "This is subroutine 3"
PRINT "You're leaving subroutine 3"
RETURN
35
Intermec Fingerprint 6.13 – Programmer's Guide
5. FINGERPRINT PROGRAMMING, cont'd.
8.
Conditional Branching
As the name implies, conditional branching means that the program
execution branches to a certain line or subroutine when a specified
condition is fulfilled. The following instructions are used for
conditional branching:
IF...THEN GOTO...ELSE
☞ Relational Operators
Also see:
• Chapter 4.9
If a specified condition is TRUE, the program branches to a certain
line, but if the condition is FALSE, something else will be done.
Example:
10
20
30
40
100
110
RUN
INPUT "Enter a value: ",A%
INPUT "Enter another value: ",B%
IF A%=B% THEN GOTO 100 ELSE PRINT "NOT EQUAL"
END
PRINT "EQUAL"
GOTO 40
ON...GOSUB
Depending on the value of a numeric expression, the execution will
branch to one of several subroutines. If the value is 1, the program
will branch to the first subroutine in the instruction, if the value is
2 it will branch to the second subroutine and so on.
Example:
10
20
30
1000
2000
3000
RUN
INPUT
ON A%
END
PRINT
PRINT
PRINT
"Press key 1, 2, or 3 on host: ", A%
GOSUB 1000, 2000, 3000
"You have pressed key 1": RETURN
"You have pressed key 2": RETURN
"You have pressed key 3": RETURN
ON...GOTO
This instruction is similar to ON...GOSUB, but the program will
branch to specified lines instead of subroutines. This implies that
you cannot use RETURN statements to go back to the main
program.
Example:
10
20
30
1000
2000
3000
RUN
INPUT
ON A%
END
PRINT
PRINT
PRINT
"Press key 1, 2, or 3 on host: ", A%
GOTO 1000, 2000, 3000
"You have pressed key 1": GOTO 30
"You have pressed key 2": GOTO 30
"You have pressed key 3": GOTO 30
Continued!
36
Intermec Fingerprint 6.13 – Programmer's Guide
5. FINGERPRINT PROGRAMMING, cont'd.
8.
Conditional Branching,
cont'd.
☞ Breaking the Execution
Also see:
• Chapter 5.12
ON BREAK...GOSUB
When a BREAK condition occurs on a specified device, the
execution will be interrupted and branched to a specified subroutine. There, you can e.g. let the printer emit a sound signal or display
a message before the program is terminated. You can also let the
program execution continue along a different path.
This example shows how the program is interrupted when the <C>
and <Pause> keys on the printer's keyboard are pressed. The
execution branches to a subroutine, which emits a siren-sounding
signal three times. Then the execution returns to the main program,
which is indicated by a long shrill signal. If the printer is not fitted
with a keyboard, you can isue a break interrupt by transmitting the
character “#" from the host on the communication channel "uart1:".
10
20
30
40
50
60
70
1000
1010
1020
1030
1040
RUN
BREAK 1,35
BREAK 1 ON
ON BREAK 0 GOSUB 1000:REM Break from keyboard
ON BREAK 1 GOSUB 1000:REM Break from host (#)
GOTO 40
SOUND 800,100
BREAK 1 OFF: END
FOR A%=1 TO 3
SOUND 440,50
SOUND 349,50
NEXT A%
GOTO 60
ON COMSET...GOSUB
☞ Background Communication
Also see:
• Chapter 7.8
When one of several specified conditions interrupts the background
communication on a certain communication channel, the program
branches to a subroutine, e.g. for reading the buffer. The interrupt
conditions (end character, attention string and/or max. number of
characters) are specified by a COMSET statement .
Example:
1
10
20
30
40
50
...
...
1000
2000
2010
2020
2030
REM Exit program with #STOP&
COMSET1,"#","&","XYZ","=",50
ON COMSET 1 GOSUB 2000
COMSET 1 ON
IF A$ <> "STOP" THEN GOTO 40
COMSET 1 OFF
END
A$=COMBUF$(1)
PRINT A$
COMSET 1 ON
RETURN
Continued!
37
Intermec Fingerprint 6.13 – Programmer's Guide
5. FINGERPRINT PROGRAMMING, cont'd.
8.
Conditional Branching,
cont'd.
Two instructions are used to branch to and from an error-handling
subroutine when an error occurs:
ON ERROR GOTO
☞ Branching at Errors
Also see:
• Chapter 16.3
This statement branches the execution to a specified line when any
kind of error occurs, ignoring the standard error-trapping routine. If
line number is specified as 0, the standard error-trapping routine
will be used.
RESUME
The RESUME statement is used to resume the program execution
after an error-handling subroutine has been executed. RESUME is
only used in connection with ON ERROR GOTO statements and
can be used in five different ways:
RESUME
RESUME 0
RESUME NEXT
RESUME <ncon>
RESUME <line label>
Execution is resumed at the statement where the error occurred.
Same as RESUME.
Execution is resumed at the statement immediately following the
one that caused the error.
Execution is resumed at the specified line.
Execution is resumed at the specified line label.
This example shows branching to a subroutine when an error has
occurred. The subroutine determines the type of error and takes the
appropriate action. In this example only one error; “1019 Invalid
font” is checked. After the error is cleared by substituting the
missing font, the execution will be resumed.
10
20
30
40
1000
1010
1020
1030
1040
1050
1060
2000
2010
RUN
ON ERROR GOTO 1000
PRTXT "HELLO"
PRINTFEED
END
IF ERR=1019 THEN FONT "SW030RSN" ELSE GOTO 2000
PRINT "Substitutes missing font"
FOR A%=1 TO 3
SOUND 440,50
SOUND 359,50
NEXT A%
RESUME
PRINT "Undefined error, execution terminated"
END
Continued!
38
Intermec Fingerprint 6.13 – Programmer's Guide
5. FINGERPRINT PROGRAMMING, cont'd.
8.
Conditional Branching,
cont'd.
☞ Keyboard Control and Key Id. No:s
Also see:
• Chapter 15.1
ON KEY...GOSUB
Many Fingerprint-compatible EasyCoder printer models are provided with a built-in keyboard. However, unless there is a program
running in the printer, e.g. the Stand-Alone program or Shell, the
keys have no purpose (with the exception of <Print>, <Feed>, and
<Setup/Save> keys, which work in the Immediate Mode). To make
use of the keyboard, each key must be enabled individually by
means of a KEY ON statement and then be assigned to a subroutine
using an ON KEY GOSUB statement. The subroutine should
contain the instructions you want to be performed when the key is
pressed.
In the statements KEY (<id.>), ON KEY (<id.>) OFF, and ON
KEY (<id.>) GOSUB..., the keys are specified by id. numbers
enclosed by parentheses, see chapter 15.1.
Note that ON KEY...GOSUB excludes input from the printer's
keyboard (see chapter 7.6) and vice versa.
This example shows how the two keys <F1> (id. No. 10) and <F2>
(id. No. 11) are used to change the printer's setup in regard of
printout contrast.
10
20
30
40
50
60
70
80
90
100
110
120
1000
1010
1020
2000
2010
2030
RUN
PRPOS 100,500
PRLINE 100,100
FONT "SW030RSN"
PRPOS 100,300
MAG 4,4
PRTXT "SAMPLE"
KEY (10) ON : KEY (11) ON
ON KEY (10) GOSUB 1000
ON KEY (11) GOSUB 2000
GOTO 70
PRINTFEED
END
SETUP "CONTRAST,0"
PRPOS 100,100 : PRTXT "Weak Print"
RETURN 110
SETUP "CONTRAST,10"
PRPOS 100,100 : PRTXT "Dark Print"
RETURN 110
39
Intermec Fingerprint 6.13 – Programmer's Guide
5. FINGERPRINT PROGRAMMING, cont'd.
9.
Loops
GOTO
One type of loop has already been described in connection with the
GOTO statement in chapter 5.6, where GOTO was used to refer to
the same line or a previous line. There are also two more advanced
type of loops:
FOR...NEXT
These statements are to used create loops, where a counter is
incremented or decremented until a specified value is reached. The
counter is defined by a FOR statement with the following syntax:
FOR<numeric variable>=<start value>TO<final value>[STEP<±interval>]
All program lines following the FOR statement will be executed
until a NEXT statement is encountered. Then the counter will be
updated according to the optional STEP value, or by the default
value +1, and the loop will be executed again. This will be repeated
until the final value, as specified by TO <final value>, is reached.
Then the loop is terminated and the execution proceeds from the
statement following the NEXT statement.
FOR...NEXT loops can be nested, i.e. a loop can contain another
loop etc. Each loop must have a unique counter designation in the
form of a numeric variable. The NEXT statement will make the
execution loop back to the most recent FOR statement. If you want
to loop back to a different FOR statement, the corresponding NEXT
statement must include the same counter designation as the FOR
statement.
This example shows how five lines of text entered from the keyboard
of the host can be printed with an even spacing:
10
20
30
40
50
60
70
80
RUN
FONT "SW030RSN"
FOR Y%=220 TO 100 STEP -30
LINE INPUT "Type text: ";TEXT$
PRPOS 100, Y%
PRTXT TEXT$
NEXT
PRINTFEED
END
Here is an example of two nested FOR...NEXT loops:
10
20
30
40
RUN
FOR A%=20 TO 40 STEP 20
FOR B%=1 TO 2
PRINT A%,B%
NEXT : NEXT A%
Yields:
20
20
40
40
1
2
1
2
Continued!
40
Intermec Fingerprint 6.13 – Programmer's Guide
5. FINGERPRINT PROGRAMMING, cont'd.
9.
Loops, cont'd.
FOR...NEXT, cont'd.
This example shows how an incremental counter can be made:
10
20
30
40
50
60
70
80
90
100
110
120
130
140
RUN
INPUT "Start Value: ", A%
INPUT "Number of labels: ", B%
INPUT "Increment: ", C%
X%=B%*C%
FOR D%=1 TO X% STEP C%
FONT "SW030RSN"
MAG 2,2
PRPOS 100,200
PRTXT "TEST LABEL"
PRPOS 100,100
PRTXT "COUNTER: "; A%
PRINTFEED
A%=A%+C%
NEXT D%
WHILE...WEND
These statements are used to create loops where series of statements
are executed provided a given condition is TRUE.
☞ Relational Operators
Also see:
• Chapter 4.9
WHILE is supplemented by a numeric expression, that can be either
TRUE (-1) or FALSE (0). If the condition is TRUE, all subsequent
program lines will be executed until a WEND statement is encountered. The execution then loops back to the WHILE statement and
the process is repeated, provided the WHILE condition still is
TRUE. If the WHILE condition is FALSE, the execution bypasses
the loop and resumes at the statement following the WEND
statement.
WHILE...WEND statements can be nested. Each WEND statement matches the most recent WHILE statement.
This example shows a program that keeps running in a loop (line
20–50) until you press the Y key on the host (ASCII 89 dec.), i.e. the
WHILE condition becomes true.
10
20
30
40
50
60
70
80
RUN
B%=0
WHILE B%<>89
INPUT "Want to exit? Press Y=Yes or N=No",A$
B%=ASC(A$)
WEND
PRINT "The answer is Yes"
PRINT "You will exit the program"
END
41
Intermec Fingerprint 6.13 – Programmer's Guide
5. FINGERPRINT PROGRAMMING, cont'd.
10. Program Structure
Although Fingerprint gives the programmer a lot of freedom in
how to compose his programs, based on experience we recommend
that the structure below is more or less implemented, with the
obvious exception of such facilities that are not needed.
❑ Program Information
• Program information, e.g. program type, version, release date
and byline (REM).
❑ Initiation
Decides how printer will work and branch to subroutines.
• References to subroutines using e.g. ON BREAK GOSUB,
ON COMSET GOSUB, ON ERROR GOSUB, ON KEY
GOSUB.
• Printer setup using e.g. SETUP, RIBBON SAVE ON/OFF,
OPTIMIZE ON/OFF, LTS& ON/OFF, CUT ON/OFF, FORMAT DATE$, FORMAT TIME$, NAME DATE$, NAME
WEEKDAY$, SYSVAR).
• Character set and map tables (NASC, MAP).
• Enabling keyboard (KEY ON, KEYBEEP, KEYBMAP$).
• Initial LED setting (LED ON/OFF).
• Open "console:" for output (OPEN)
• Assign string variables for each line in the display (PRINT#).
• Select current directory (CHDIR).
• Select standard I/O channel (SETSTDIO).
• Open communication channels (OPEN).
• Open files (OPEN).
• Define arrays (DIM).
❑ Main Loop
Executes the program and keeps it running in a loop.
• Reception of input data (INPUT, INPUT#, INPUT$, LINE
INPUT#).
• Printing routine (FORMFEED, PRINTFEED, CUT).
• Looping instructions (GOTO).
❑ Subroutines
• Break subroutines (BREAK ON/OFF, BREAK).
• Background communication subroutines (COM ERROR ON/
OFF, COMSET, COMSET ON/OFF, COMBUF$,
COMSTAT).
• Subroutines for key-initiated actions.
• Subroutines for display messages.
• Error handling subroutines (ERR, ERL, PRSTAT).
• Label layouts subroutines.
42
Intermec Fingerprint 6.13 – Programmer's Guide
5. FINGERPRINT PROGRAMMING, cont'd.
11. Execution
To start the execution of the program currently residing in the
printer's working memory, issue a RUN statement in the Immediate
Mode, i.e. without a preceding line number. By default, the program
will be executed in ascending line number order – with the
exception of possible loops and branches – starting from the line
with the lowest number, but you can optionally start the execution
at a specified line.
You can also execute a program that is not LOADed.
If a program has been written without line numbers, the lines will
be numbered 10-20-30-40-50.... etc.
☞ Standard Error-Handling
Also see:
• Chapter 16.1
1
/. For a working two-way communication, three conditions must be fulfilled:
• Serial communication
• Std IN channel = Std OUT channel
• Verbosity on
Note:
For program instructions you can usually
use upper- or lowercase characters at
will , i.e. “NEW” and “new” will work the
same way.
The first program or hardware error that stops the execution will
cause an error message to be returned to the screen of the host,
provided there is a working two-way communication1. In case of
program errors, the number of the line where the error occurred will
also be reported by default, e.g. “Field out of label in line 110”.
After the error has been corrected, the execution must be restarted
by means of a new RUN statement, unless a routine for dealing with
the error in question is included in the program.
For demonstration purposes, we will now:
• write a short program without line numbers,
• execute it,
• and finally list it.
NEW
Ok
IMMEDIATE OFF
Ok
REM This is a demonstration program
PRINT "This is the main program"
GOSUB sub1
END
sub1: PRINT "This is a subroutine":' Line label
RETURN
IMMEDIATE ON
Ok
RUN
yields:
This is the main program
This is a subroutine
Ok
LIST
10
20
30
40
50
60
yields:
REM This is a demonstration program
PRINT "This is the main program"
GOSUB SUB1
END
SUB1: PRINT "This is a subroutine" : ' Line label
RETURN
43
Intermec Fingerprint 6.13 – Programmer's Guide
5. FINGERPRINT PROGRAMMING, cont'd.
12. Breaking Execution
In chapter 2 “Getting Started” at the beginning of this manual, the
methods of breaking a startup program was briefly explained.
Startup programs (autoexec files) start up automatically when the
printer is turned on and continues to run infinitely by means of some
kind of loop.
In printer models provided with a keyboard, you can – by default –
break a program by pressing the <C> key and keep it pressed while
you also press down the <Pause> key. There is no such default
facility in printers without keyboard! Unless the startup program
contains facilities for breaking the execution or the printer is
provided with a keyboard, it will be impossible to make the printer
do something else but keep on running the same program. It will
also be difficult to check the printer if some kind of error occurs.
The only remaining way to stop a startup program, which contains
no break facilities, is to physically remove the part of the memory
where the program resides, i.e. the configuration EPROM packages, the RAM packages or a memory card. Therefore, it is strongly
recommended always to include break facilities in startup programs, especially when the program is to be used in a printer without
keyboard.
Four instructions can be used for providing a program with a break
interrupt facility:
BREAK
Specifies an interrupt character.
BREAK...ON
Enables break interrupt.
BREAK...OFF
Disables break interrupt.
ON BREAK...GOSUB...
Branches the execution to a subroutine when a break interrupt is
executed.
In all break-related instructions, the serial communication channels
and the keyboard are referred to by numbers:
0 = "console:" (i.e. the printer's keyboard)
1 = "uart1:"
2 = "uart2:"/"rs485:"
3 = "uart3:"
BREAK does not work on the parallel Centronics channel.
Continued!
44
Intermec Fingerprint 6.13 – Programmer's Guide
5. FINGERPRINT PROGRAMMING, cont'd.
12. Breaking Execution,
cont'd.
Note:
A break interrupt character is saved in the
no-save area of the RAM memory, and
will not be removed before the printer is
restarted, unless you specifically delete it
by a BREAK...OFF statement for the
device in question.
BREAK
The BREAK statement specifies an interrupt character by its
decimal ASCII value. BREAK can be separately specified for each
serial communication channel and for the printer's built-in keyboard.
The interrupt character for all serial channels is by default ASCII 03
dec. (ETX). Also see BREAK...ON.
The interrupt character from the printer's keyboard is by default
ASCII 158 dec. (<C> + <Pause> keys). Also see BREAK...ON.
BREAK...ON
Break interrupt for all serial communication channels is disabled
by default, but can be enabled by means of a BREAK ON statement
for the channel in question.
Break interrupt from the keyboard is enabled by default.
BREAK... OFF
The BREAK OFF statement revokes BREAK ON for the specified
device and deletes the specified break character from RAM.
ON BREAK ...GOSUB...
This instruction is not necessary for issuing a break interrupt, but is
useful for making the printer perform a certain task when a break
occurs, e.g. branch the execution to another part of the program,
show a message in the display, emit a warning signal, ask for a
password etc. ON BREAK... GOSUB... can be specified separately
for each serial communication channel and for the keyboard.
This example shows how a break interrupt will occur when you
press the X-key on the host connected to "uart1:". A signal is emitted
and a message appears in the printer's display.
10
20
30
40
50
60
70
80
90
100
1000
1010
1020
1030
1040
RUN
BREAK 1,88
BREAK 1 ON
OPEN "console:" FOR OUTPUT AS 1
PRINT #1 : PRINT #1
PRINT #1, "Press X"
PRINT #1, "to break program";
ON BREAK 1 GOSUB 1000
GOTO 80
BREAK 1 OFF
END
SOUND 880,50
PRINT #1 : PRINT #1
PRINT #1, "PROGRAM"
PRINT #1, "INTERRUPTED";
RETURN 90
45
Intermec Fingerprint 6.13 – Programmer's Guide
5. FINGERPRINT PROGRAMMING, cont'd.
13. Saving the Program
Saving in Printer
When you are satisfied with the program, you can SAVE it in the
printer's RAM memory ("ram:") or in an optional DOS-formatted
memory card ("card1:"), see chapter 6.1. It is also recommended to
LIST the program back to the host and make backup copy, e.g. on
a floppy disk.
Naming the Program
When you save a program for the first time, you must give it a name
consisting of up to 30 characters including possible extension. If
you omit the extension, the software will add the extension “.PRG”
automatically. When naming the program, consider conventions
and restrictions imposed by the operating system of the host, e.g.
MS-DOS.
The following names are used for standard Fingerprint programs
and should not be used:
• AUTOEXEC.BAT
• DISPSET2.PRG
• ERRHAND.PRG
• FILELIST.PRG
• LBLSHTXT.PRG
• LSHOPDEF.SUP
• MKAUTO.PRG
• PRSETUP.PRG
• SHELLEHD.PRG
• SHELLSTD.PRG
• UBIDEF.SUP
• WIN1.PRG
(Startup program)
(Setup for printers w/o keyboard)
(Standard error-handler)
(Lists content of a file)
(Used for Intermec LabelShop)
(Default Setup for Intermec LabelShop)
(Creates startup programs)
(Prints current setup)
(Intermec Shell for Enhanced printers)
(Intermec Shell for printers w/o keyboard)
(Fingerprint default setup)
(Used for Intermec Windows Driver)
Examples:
☞ Current Directory
Also see:
• Chapter 6.1
SAVE "PROGRAM1"
saves the program as PROGRAM1.PRG in the current directory
(by default "ram:").
SAVE "card1:PROGRAM1.TXT"
saves the program as PROGRAM1.TXT in a DOS-formatted
memory card inserted in the printer's optional memory card
adapter.
Continued!
46
Intermec Fingerprint 6.13 – Programmer's Guide
5. FINGERPRINT PROGRAMMING, cont'd.
13. Saving the Program,
cont'd.
Protecting the Program
When a program is SAVEd, it can optionally be protected, i.e. it
cannot be listed after being loaded and program lines cannot be
changed, added or deleted. Once a program has been protected, it
cannot be deprotected. Thus, make an unprotected backup copy as
a safety measure, should you need to make any changes later.
Example (saves and protects the program as PROGRAM1.PRG in
the current directory (by default "ram:"):
SAVE "PROGRAM1.PRG",P
Saving Without Line Numbers
A program can also be SAVEd without line numbers to make it
easier to MERGE it with another program without risking that the
line numbers interfere. Both programs should make use of line
labels for referring to other lines, e.g. in connection with loops and
branching instructions.
Example (saves the program as PROGRAM1.PRG without line
numbers in the current directory (by default "ram:"):
SAVE "PROGRAM1.PRG",L
Making Changes
If you LOAD a program, possibly make some changes and then
SAVE the program under the original name and in the original
directory, the original program will be replaced.
Example (changes the value of a variable in a program and
replaces the original version with the changed version):
LOAD "PROGRAM1.PRG"
50 A%=300
SAVE "PROGRAM1.PRG"
Making a Copy
The easiest way to copy a program is to use a COPY statement. You
can optionally include directory references in the statement.
Example (copies a program from the ROM memory to the RAM
memory and gives the copy a new name):
COPY "rom:FILELIST.PRG","ram:COPYTEST.PRG"
By LOADing a program and then SAVE it under a new name and/
or in another directory, you will create a copy of the original
program.
Example (creates a copy of the program LABEL1.PRG and gives
the copy the name LABEL2.PRG):
LOAD "LABEL1.PRG"
SAVE "LABEL2.PRG"
Continued!
47
Intermec Fingerprint 6.13 – Programmer's Guide
5. FINGERPRINT PROGRAMMING, cont'd.
13. Saving the Program,
cont'd.
Renaming a Program
To rename a program, LOAD it, SAVE it under a new name, and
finally KILL the original program.
Example (renames LABEL1.PRG with the name LABEL2.PRG):
LOAD "LABEL1.PRG"
SAVE "LABEL2.PRG"
KILL "LABEL1.PRG"
Note: The same general principles also apply to files!
Saving in EPROM:s and Non DOS-formatted Memory Cards
Saving a program or file in the printer's read-only memory ("rom:"),
i.e. EPROM's, or non DOS-formatted memory cards requires
special equipment such as a PROM programmer and special
software (Toolbox).
You can edit and test the program in the printer's working memory
as described earlier in this chapter. When it works properly, LIST
it back to the host computer. Save the file in the host and convert it
to a format suitable for the PROM programmer or the memory card
programming device.
Creating a Startup Program
The MKAUTO.PRG program is used to create so called startup
programs or autoexec-files, i.e. programs that will be LOADed and
RUN automatically as soon as the power to the printer is turned on.
Usually, a startup program contains some kind of loop which makes
it run infinitely, awaiting some input or action from the operator.
“Autoexec” programs are very useful for applications when one
single program is to be run all the time.
The MKAUTO.PRG program is included in all Fingerprint
EPROMs.
1
/. There must not be more than one startup
program in each part of the memory, i.e.:
• DOS-formatted memory cards:
Max. one startup program per card.
• Printer's RAM memory:
Max. one startup program.
• Non DOS-formatted memory cards:
Max. one startup program per card.
• Printer's RAM memory:
Max. one startup program.
Startup files can be stored in RAM, ROM or in optional memory
cards. Each part of the memory can hold one startup file1. If there
are more than one startup file in the printer's entire memory, they
will be used with the following priority:
1. Inserted DOS-formatted memory card
2. Printer's RAM memory
3. Inserted Non DOS-formatted memory card
4. Printer's ROM memory
("card1:")
("ram:")
("rom:")
("rom:")
The MKAUTO.PRG program consists of the following lines:
10
20
30
40
OPEN "AUTOEXEC.BAT" FOR OUTPUT AS 1
INPUT "Startup file name:",S$
PRINT#1,"RUN";CHR$(34);S$;CHR$(34)
CLOSE1
Continued!
48
Intermec Fingerprint 6.13 – Programmer's Guide
5. FINGERPRINT PROGRAMMING, cont'd.
13. Saving the Program,
cont'd.
Creating a Startup Program, cont'd.
A startup program can easily be created from an ordinary program
using the following method:
• After having written and tested the program, SAVE it.
• Enter the following statement:
RUN "rom:MKAUTO"
• The following prompt will be displayed on the screen:
STARTUP FILE NAME?
☞ Current Directory
Also see:
• Chapter 6.1
• Type the name of the program you just SAVEd (with or without
the extension .PRG) and press the Carriage Return key.
• “Ok” on the screen indicates that the operation is ready.
• The startup program will be stored in the printer's current directory
(by default "ram:", i.e. the printer's RAM memory).
• When you restart the printer, the new startup program will start
running, provided there is no other startup program with higher
priority (see previous page).
To undo the operation, use the statement:
KILL "AUTOEXEC.BAT"
This will not erase the original program, but it will no longer be used
as a startup program. Note that you cannot KILL startup programs
stored in EPROM:s or Non DOS-formatted memory cards.
In most cases startup programs are stored in EPROM's, which
requires special equipment, such as an EPROM programming
device and the Toolbox software.
14. Rebooting the Printer
Rebooting the printer has the same consequences as turning off and
then on the power.
REBOOT
The REBOOT statement allows you to reboot the printer from the
host or as a part of the program execution. A typical example of the
use of REBOOT in a program is found in Intermec Shell, where the
printer is automatically rebooted when a new application has been
selected.
When the printer is rebooted, or the power to the printer is turned
on, a number of things happens (refer to the Fingerprint 6.13
Reference Manual, REBOOT statement for a complete list):
• The printer's working memory is erased, i.e. any program not
already SAVEd will be irrevocably lost, all buffers will be
emptied, all files will be closed, all date- and time-related formats
will be lost, all arrays will be lost and all variables will be set to
zero. Fonts and images stored in the no-save area of the printer's
RAM memory will be erased.
Continued!
49
Intermec Fingerprint 6.13 – Programmer's Guide
5. FINGERPRINT PROGRAMMING, cont'd.
14. Rebooting the Printer,
cont'd.
• All parameters in Fingerprint instructions will be reset to default.
• The printer performs a number of self-diagnostic tests, e.g.
printhead resistance check (certain models only) and memory
checksum calculations.
• The printer checks for possible optional devices like interface
boards, memory card adapter or cutter.
• The various parts of the printer's memory are searched for
possible startup programs in the following order:
1. Inserted DOS-formatted memory card ("card1:").
2. Printer's RAM memory ("ram:").
3. Inserted Non DOS-formatted memory card ("rom:")
4. Printer's ROM memory ("rom:")
The first startup program encountered will be executed.
Note that rebooting does not change the printer's setup, unless any
physical changes has been done to the printer during the power-off
period, such as a change of printhead density or installation or
removal of an interface board.
50
Intermec Fingerprint 6.13 – Programmer's Guide
6. FILE SYSTEM
1.
The printer's memory is divided in a number of parts, or directories:
• Read-Only Memory ("rom:")
This directory is designated "rom:" and consists of the 2, 4 or 6
EPROM packages fitted on the printer's CPU board plus any non
DOS-formatted memory card inserted in the printer's optional
memory card adapter. As the name implies can this part of the
memory only be read from, but not written to.
• Random Access Memory ("ram:")
The RAM memory is designated "ram:" and consists of 2 or 4
RAM packages fitted on the printer's CPU board. The RAM
memory can both be read from and written to.
• Memory Cards: ("card1:")
The RAM memory can be supplemented with a DOS-formatted
memory card that is inserted in the printer's optional memory card
adapter. Such a card is referred to as "card1:" and can be both read
from and written to. (Note the distinction between DOS-formatted
and non DOS-formatted memory cards).
Printer's Memory
ROM Memory ("rom:")
READ-ONLY MEMORY
"rom:"
RANDOM ACCESS MEMORY
"ram:"
OPTIONAL DOS-FORMATTED MEMORY CARD
"card1:"
STORAGE MEMORY
STORAGE MEMORY
Optional
Non DOS-formatted
MEMORY CARD
PROGRAMS
Optional
ROM-Expansion
EPROMs
FILES
PROGRAMS
FILES
WORKING MEMORY
HOST
COMPUTER
CURRENT PROGRAM
Configuration
EPROMs
Transmit
buffer
FINGERPRINT
firmware
Serial interface
uart1:
PROCESSING
Receive
buffer
Comm.
buffer
IMAGE BUFFER
PRINTOUT
LABEL
Continued!
51
Intermec Fingerprint 6.13 – Programmer's Guide
6. FILE SYSTEM, cont'd.
1.
Printer's Memory,
cont'd.
The Read-Only Memory in your printer consists of up to four parts:
• Two EPROM packages containing the Fingerprint firmware,
which controls how the printer works. These EPROM:s are
common for all Fingerprint 6.xx-compatible printers.
• Two Configuration EPROM's, which may contain fonts, images,
and certain programs and files, such as e.g. Shell. Custom-made
versions can be ordered, containing e.g. application programs,
additional fonts and bar codes.
• Optionally, two ROM expansion EPROM's can be fitted in some
models. They may contain the same type of files as the configuration
EPROM's, object files (e.g. two-dimensional bar codes), and/or
an optional Scalable Fonts Kit.
• If the printer is fitted with a memory card adapter, a non DOSformatted, preprogrammed memory card can be inserted to
supplement the ROM memory.
There is no way you can affect the content of the Read-Only
Memory (rom:), other than changing the EPROM packages, or
optionally fitting another memory card. However, programs in
"rom:" can be copied to "ram:", where modifications can be
performed. The EPROM's require no current to retain their content.
RAM Memory ("ram:")
The Random Access Memory in your printer has two main parts:
• The storage memory, where you store the programs and other
files that you create or download. Part of the storage memory is
a “no-save area”, the content of which is erased at power-up.
• The working memory, which contains the program you currently
are using. Part of the working memory must also be set aside for
various types of buffers:
– Image buffer: Used to level out differences of speed between the processing of the print image and the actual printing. Its size is decided by the setup.
– Receive/Transmit buffers: Each serial communication channel must have
one buffer of each kind. The size of each buffer is decided separately by the
setup.
– Communication buffers: In a program, you may set up one communication
buffer for each communication channel. This makes it possible to receive
data simultaneously from several sources to be fetched at the appropriate
moment during the execution of the program.
There is no fixed division between the working memory and the
storage memory, i.e. the more data in the storage memory, the less
working memory is left.
The RAM packages are battery backed-up in order to retain their
content when the power to the printer is off.
Continued!
52
Intermec Fingerprint 6.13 – Programmer's Guide
6. FILE SYSTEM, cont'd.
1.
Printer's Memory,
cont'd.
DOS-Formatted Memory Cards ("card1:")
A special case of the RAM memory is the DOS-formatted memory
card, which can be both read from and written to, just like RAM, but
is referred to as a special device ("card1:"). In order to retain its
content when the power to the printer is off, each SRAM memory
card is fitted with an internal battery.
Current Directory
“Current directory” means the directory the Fingerprint firmware
will use unless you specifically instruct it to use another directory.
By default, the current directory is "ram:".
To appoint another directory as current directory, use a CHDIR
statement.
Example:
Changing directory from the default directory ("ram:") to "rom:"
and back.
10
CHDIR "rom:"
. . . . .
90
CHDIR "ram:"
Checking Free Memory
You can check the size of the RAM memory and see how much free
memory space there is by issuing a FILES, FONTS, or IMAGES
statement in the immediate mode.
Another way is to use the FRE function to making a small
instruction, that returns the number of free bytes, for example:
? FRE(1)
391248
yields e.g.:
Providing More Free Memory
In order to free more memory space in RAM, you can use a CLEAR
statement to empty all strings, set all variables to zero and reset all
arrays to default. If even more memory is required, you will have
to consider either to KILL some programs or files, or to REMOVE
some fonts or images stored in RAM. If the printer is not fitted with
a maximum size RAM memory, you could also fit more or larger
RAM packages after having made backup copies on the host.
Formatting Memory Cards or RAM Memory
A RAM-type memory card, inserted in the printer's optional
memory card adapter, can be formatted to MS-DOS format by
means of a FORMAT statement. FORMAT can also be used to
format the printer's RAM memory, i.e. erase all files in the storage
part of the RAM memory. No other data will be affected.
53
Intermec Fingerprint 6.13 – Programmer's Guide
6. FILE SYSTEM, cont'd.
2.
Files
☞ Fonts, Bar Codes and Images
Also see:
• Chapter 12 (Fonts)
• Chapter 13 (Bar codes)
• Chapter 14 (Images)
File Types
A number of different types of files can be stored in the various parts
of the printer's memory. They can be divided into four main groups:
• Program Files
• Data Files
• Image Files
• Outline Font Files
Object files, fonts, bar codes and images are not treated as files by
the Fingerprint firmware.
File Names
The name of a file may consist of up to 30 characters including
extension, but possible restrictions imposed by the operating system of the host should be considered if the file is to be transferred.
Refer to chapter 5.13 for a list of file names reserved for Intermec
Fingerprint utilities.
Listing Files
☞ Current Directory
Also see:
• Chapter 6.1
The files stored in the printer's memory can be listed by means of
the FILES statement. By default, the files stored in the current
directory will be listed. Optionally, another directory can be selected by adding a reference to the FILES statement:
FILES
lists all files in the current directory.
FILES "rom:"
lists all files stored in EPROM and in any
inserted non DOS-formatted memory card.
FILES "ram:"
lists all files stored in the printer's RAM
packages.
FILES "card1:"
lists all files stored in any inserted DOSformatted memory card.
You can COPY a file to the standard OUT channel, where it will be
printed on the screen of the host, e.g.:
COPY "[device]filename", "uart1:"
Note:
The FILELIST.PRG program is included
in all Intermec Fingerprint EPROMs.
☞ Standard OUT channel
Also see:
• Chapter 7.1
The FILELIST.PRG program also LISTs a line-orientated file to
the standard OUT channel:
• On your terminal, enter:
RUN "rom:FILELIST.PRG "
• The printer will respond by prompting you to enter the name of
the file to be listed:
Filename?
• Enter the filename, possibly preceded by a directory reference,
e.g.:
"rom:*.*".
54
Intermec Fingerprint 6.13 – Programmer's Guide
6. FILE SYSTEM, cont'd.
3.
Program Files
Program File Types
Program files are used to run and control the printer and to produce
labels or other printouts. A program file is always composed of
numbered lines, although the numbers may be invisible during the
editing process (see chapter 5.4).
A special case of program files is startup files, i.e. files that
automatically start running when the printer is turned on (also called
“autoexec-files”). Startup files were explained in chapter 5.13
“Creating a Startup Program”.
Instructions
☞ Standard OUT Channel
Also see:
• Chapter 7.1
☞ Creating, Saving, Copying, Killing
and Executing Program Files
Also see:
• Chapter 5.11 and 5.13
The following instructions are used for creating and handling
program files:
LOAD
Copies a specified program file to the
printer's working memory.
LIST
Lists the program file in the working
memory to the standard OUT channel,
usually the screen of the host.
MERGE
Adds copy of a specified program file to
the program file currently residing in the
printer's working memory.
RUN
Executes the instruction in the program
file. RUN must be issued in the Immediate Mode, i.e. not in a numbered line.
SAVE
Saves a copy of the program file in the
working memory to the printer's RAM
memory ("ram:") or, optionally, to a non
DOS-formatted memory card ("card1:").
If a file with the same name already exists
the that directory, it will be replaced by the
new file.
NEW
Clears the working memory to allow a
new program file to be created.
COPY
Copies a file to another name and/or directory.
KILL
Deletes a file from the RAM memory or
from a DOS-formatted memory card.
55
Intermec Fingerprint 6.13 – Programmer's Guide
6. FILE SYSTEM, cont'd.
4.
Data Files
Data File Types
Data files are used by the program files for storing various types of
data and can be divided into several subcategories:
• Sequential Input Files
See chapter 7.4
• Sequential Output Files
See chapter 8.3
• Sequential Append Files
See chapter 8.3
• Random Access Files
See chapters 7.5 and 8.4
Instructions
The following instructions are used in connection with the creation
and handling of data files:
OPEN
Creates and/or opens a file for a specified
mode of access and optionally specifies
the record size in bytes.
CLOSE
Closes an OPENed file.
REDIRECT OUT
Creates a file to which the output data will
be redirected (see chapter 8.2).
TRANSFERSET
Sets up the transfer of data between two
files.
TRANSFER$
Executes the transfer of data between two
files according to TRANSFERSET.
COPY
Copies a file to another name and/or directory.
KILL
Deletes a file.
LOC
Returns the position in an OPENed file.
LOF
Returns the length in bytes of an OPENed
file.
56
Intermec Fingerprint 6.13 – Programmer's Guide
6. FILE SYSTEM, cont'd.
5.
Image Files
☞ Images
Also see:
• Chapter 14
Image files in .PCX format can be downloaded to the printer's RAM
memory and at the same time be converted to images in Fingerprint's internal bitmap format by means of the statement IMAGE
LOAD.
Image files in .PCX format that have been downloaded to the
printer's RAM memory using Kermit file transfer protocol (see
chapter 6.8) or stored in a DOS-formatted memory card cannot be
used to produce a printable image before they have been converted
to Fingerprint's internal bitmap format by means of the following
instruction:
RUN "pcx2bmp <name of .PCX file> <name of image>"
Image files in Intelhex format, or the formats UBI00, UBI01,
UBI02, UBI03 or UBI10, can be downloaded and converted to
images using the STORE IMAGE and STORE INPUT statements.
Images files can be listed by means of a FILES statements.
6.
Outline Font Files
Outline font files are files in Speedo (*.SPD) or TrueType (*.TTF)
format containing scalable outline fonts. Such files can be downloaded to the printer's RAM memory using Kermit file transfer
protocol (see chapter 6.8) or the FILE& LOAD instruction, or be
stored in a DOS-formatted memory card.
☞ Fonts and Font Conversion
Also see:
• Chapter 12
They can be used in some printer models (e.g. EasyCoder 401/501/
601) to produce customized bitmap fonts. This requires special
software (“Scalable Fonts Kit”) and a CPU board with 6 EPROM
sockets.
The Scalable Fonts Kit also allows fonts in *.ATF format to be
downloaded using the FONT LOAD statement.
The Configuration program in the Toolbox allows outline font files
to be transferred to EPROM:s or non DOS-formatted memory
cards.
Outline font files can be listed by means of a FILES statements.
7.
Transferring Text Files
Text files, e.g. program files and data files in ASCII format, can be
downloaded via a communication program in the host, e.g. Windows Terminal (“Transfers; Send Text File”).
Text files can be transferred back to the host, e.g. for backup
purposes, by LOADing the file and LISTing it to a communication
program in the host.
57
Intermec Fingerprint 6.13 – Programmer's Guide
6. FILE SYSTEM, cont'd.
8.
Transferring Binary
Files using Kermit
Outline font files and some image files come in binary format and
can be downloaded from the host to the printer or vice versa using
the Kermit file transfer protocol, which is commonly used for
binary transfer of data and is included in many communication
programs, e.g. DCA Crosstalk, MS Windows Terminal, and MS
Works.
Warning! Tests have shown that MS Windows Terminal versions
3.0 and 3.1 are unable to receive a file from the printer, even if they
are capable of sending a file to the printer.
More information on the Kermit protocol can be found in the
manual of the communication program or in the reference volume
“Kermit – A File Transfer Protocol” by Frank da Cruz (Digital
Press 1987, ISBN 0-932376-88-6).
☞ Standard IN and OUT Channels
Also see:
• Chapter 7.1
Note that there is a 30 sec. timeout
between issuing the TRANSFER
KERMIT "R" statement and the start of
the transmission.
TRANSFER KERMIT
The TRANSFER KERMIT statement allows you to specify direction (Send or Receive), file name, input device and output device.
By default, a file name designated "KERMIT.FILE" will be
transferred on the standard IN or OUT channel.
Example:
The printer is set up to receive a file on the standard IN channel.
TRANSFER KERMIT "R"
TRANSFER STATUS
☞ Arrays
Also see:
• Chapter 6.10
After a file have been transferred by means of a TRANSFER
KERMIT statement, the transfer can be checked using the TRANSFER STATUS statement. The statement will place the result of the
check into two one-dimensional arrays:
5-element numeric array (requires a DIM stmt)
Element 0 returns:
Number of packets
Element 1 returns:
Number of NAKs
Element 2 returns:
ASCII value of last character
Element 3 returns:
Last error
Element 4 returns:
Block check type used
2-element string array (requires no DIM stmt)
Element 0 returns:
Type of protocol, i.e. "KERMIT"
Element 1 returns:
Last file name received
Example:
10
20
30
40
50
RUN
TRANSFER KERMIT "R"
DIM A%(4)
TRANSFER STATUS A%,B$
PRINT A%(0), A%(1), A%(2), A%(4), A%(4)
PRINT B$(0), B$(1)
58
Intermec Fingerprint 6.13 – Programmer's Guide
6. FILE SYSTEM, cont'd.
9.
Transferring Files
Between Printers
If you want to transfer a file from one printer to another printer, start
by transferring the file to the host. Then disconnect the first printer
and download the file to the second printer (or have the two printers
connected to separate serial ports). After the transfer of programs
between two connected printers is completed, you can check if the
transfer was successful by means of a CHECKSUM function.
CHECKSUM
Note:
Do not confuse CHECKSUM with CSUM,
see chapter 6.10 “Arrays”.
The CHECKSUM function uses an advanced algorithm on parts of
the printer's internal code. Thus, calculate the CHECKSUM on the
program in the transmitting printer before the transfer. After the
transfer is completed, LOAD the program in the receiving printer
and perform the same calculation. If the checksums are identical,
the transfer was successful.
Note that the algorithm was changed in Fingerprint 4.0. Thus, the
CHECKSUM function will return other checksums in printers
using earlier versions of Fingerprint than 4.0 compared to printers
using 4.0 or later versions. If possible, use the same Fingerprint
version in both printers.
Example:
This example calculates the checksum in the lines 10–90000 in the
program "DEMO.PRG".
LOAD "DEMO.PRG"
PRINT CHECKSUM (10,90000)
59
Intermec Fingerprint 6.13 – Programmer's Guide
6. FILE SYSTEM, cont'd.
10. Arrays
Variables containing related data may be organized in arrays. Each
value in an array is called an element. The position of each element
is specified by a subscript, one for each dimension (max 10). Each
array variable consists of a name and a number of subscripts
separated by commas and enclosed by parentheses, for example
ARRAY$(3,3,3).
The number of subscripts in an array variable, the first time
(regardless of line number) it is referred to, decides its number of
dimensions. The number of elements in each dimension is by
default restricted to four (No. 0–3).
Four instructions are specifically used in connection with arrays:
DIM
Specifies the size of an array in regard of
elements and dimensions.
SORT
Sorts the elements in a one-dimensional
array in ascending or descending order.
SPLIT
Splits a string into an array.
CSUM
Returns the checksum for a string array.
DIM
If more than 4 elements are needed, or if you want to limit the size
of the array, a DIM statement can be used to specify the size of the
array in regard of the number of dimensions as well as the number
of elements in each dimension. In most cases, one- or twodimensional arrays will suffice.
This example shows how three 1-dimensional, 5-element arrays
can be used to return 125 possible combinations of text strings:
10
20
30
40
50
60
70
80
90
100
110
120
130
140
150
160
170
180
190
200
RUN
DIM TYPE$(4),COLOUR$(4),SIZE$(4)
TYPE$(0)="SHIRT"
TYPE$(1)="BLOUSE"
TYPE$(2)="TROUSERS"
TYPE$(3)="SKIRT"
TYPE$(4)="JACKET"
COLOUR$(0)="RED"
COLOUR$(1)="GREEN"
COLOUR$(2)="BLUE"
COLOUR$(3)="RED"
COLOUR$(4)="WHITE"
SIZE$(0)="EXTRA SMALL"
SIZE$(1)="SMALL"
SIZE$(2)="MEDIUM"
SIZE$(3)="LARGE"
SIZE$(4)="EXTRA LARGE"
INPUT"Select Type (0-4): ", A%
INPUT"Select Colour (0-4): ", B%
INPUT"Select Size (0-4): ", C%
PRINT TYPE$(A%)+", "+COLOUR$(B%)+", "+SIZE$(C%)
Continued!
60
Intermec Fingerprint 6.13 – Programmer's Guide
6. FILE SYSTEM, cont'd.
10. Arrays, cont'd.
SORT
The SORT statement is used to sort a one-dimensional array in
ascending or descending order according the character's ASCII
values in the Roman 8 character set. You can also choose between
sorting the complete array or a specified interval. For string arrays,
you can select by which character position the sorting will be
performed.
This example shows how one numeric array is sorted in ascending
order and one string array is sorted in descending order according
to the fifth character in each element:
10
20
30
40
50
60
70
80
90
RUN
FOR Q%=0 TO 3
A$=STR$(Q%)
ARRAY%(Q%)=1000+Q%:ARRAY$(Q%)="No. "+A$
NEXT Q%
SORT ARRAY%,0,3,1
SORT ARRAY$,0,3,-5
FOR I%=0 TO 3
PRINT ARRAY%(I%), ARRAY$(I%)
NEXT I%
Yields:
1000
1001
1002
1003
No.
No.
No.
No.
3
2
1
0
SPLIT
The SPLIT function is used to split a string expression into elements
in an array and to return the number of elements. A specified
character indicates where the string will be split.
In this example a string expression is divided into six parts by the
separator character “/” (ASCII 47 dec.) and arranged in a six
element array:
10
20
30
40
50
60
70
RUN
A$="ONE/TWO/THREE/FOUR/FIVE/SIX"
X$="ARRAY$"
DIM ARRAY$(6)
B%=SPLIT(A$,X$,47)
FOR C%=0 TO (B%-1)
PRINT ARRAY$(C%)
NEXT
Yields:
ONE
TWO
THREE
FOUR
FIVE
SIX
Continued!
61
Intermec Fingerprint 6.13 – Programmer's Guide
6. FILE SYSTEM, cont'd.
10. Arrays, cont'd.
CSUM
Note!
Do not confuse CSUM with CHECKSUM,
see chapter 6.9.
The checksum for string arrays can be calculated according to one
of two different algorithms (LRC or DRC) and returned by means
of the CSUM statement.
In this example, the checksum of a string array is calculated
according both to the LRC (Logitudinal Redundancy Check) and
the DRC (Diagonal Redundancy Check) algorithms:
10
20
30
40
50
60
RUN
FOR Q%=0 TO 3
A$=STR$(Q%)
ARRAY$(Q%)="Element No. "+A$
NEXT
CSUM 1,ARRAY$,B%:PRINT "LRC checksum: ";B%
CSUM 2,ARRAY$,C%:PRINT "DRC checksum: ";C%
Yields:
LRC checksum: 0
DRC checksum: 197
62
Intermec Fingerprint 6.13 – Programmer's Guide
7. INPUT TO FINGERPRINT
1.
Standard I/O Channel
☞ Output from Intermec Fingerprint
See:
• Chapter 8
1
/. Do not select "console:" as both std in
and out channel, since it would only make
characters entered on the printer's keyboard appear in the display.
2
/. The parallel communication channel
"centronics:" can only be used for input
(one-way communication only).
2.
Input from Host
(Std IN Channel only)
The standard IN and standard OUT channels are the default
channels for input to the printer or output from the printer respectively (in both cases "uart1:" by default). In most instructions, you
can override the standard IN or OUT channel by specifying another
channel. Usually, the same channel is used for both input and
output, but different channels can be specified.
SETSTDIO
You can appoint any of the following communication channels as
standard IN and/or standard OUT channel by means of the
SETSTDIO statement:
Standard IN channel
0 = "console:"1
1 = "uart1:" (default)
2 = "uart2:"/"rs485:"
3 = "uart3:"
4 = "centronics:"2
Standard OUT channel
0 = "console:"1
1 = "uart1:" (default)
2 = "uart2:"/"rs485:"
3 = "uart3:"
The std IN channel is used for sending instructions and data from
the host to the printer in order to control the printer in the immediate
mode, to write programs in the programming mode, to download
program files and to transmit input data.
Some instructions receives data on the std IN channel only:
INKEY$
Reads the 1:st character in the receive
buffer.
INPUT
Receives input data during execution of a
program.
LINE INPUT
Assigns an entire line to a string variable.
3.
Input from Host
(Any Channel)
The following instructions are used to receive input from any
communication channel (incl. the std IN channel). The same
instructions are also used to read sequential files, see chapter 7.4:
OPEN
Opens a channel for sequential INPUT.
INPUT#
Receives input data during execution of a
program on the specified channel.
INPUT$
Reads a string of data from the specified
channel.
LINE INPUT#
Assigns an entire line from the specified
channel to a string variable.
CLOSE
Closes the channel.
63
Intermec Fingerprint 6.13 – Programmer's Guide
7. INPUT TO FINGERPRINT, cont'd.
4.
Input from a Sequential
File
Refer to chapter 7.3 for a summary of instructions used for reading
sequential files.
OPEN
Before any data can be read from a sequential file (or a communication channel other than the std IN channel), it must be OPENed
for INPUT and assigned a number, which is used when referred to
in other instructions. The number mark (#) is optional. Up to 10 files
and devices can be open at the same time.
Example: The file "ADDRESSES" is opened for input as number 1:
OPEN "ADDRESSES" FOR INPUT AS #1
After a file or device has been OPENed for INPUT, you can use the
following instructions for reading the data stored in it:
INPUT#
Reads a string of data to a variable. Commas can be used to assign
portions of the input to different variables. When reading from a
sequential file, the records can be read one after the other by
repeated INPUT# statements. The records are separated by commas in the string. Once a record has been read, it cannot be read
again until the file has been CLOSEd and then OPENed again.
Example (reads six records in a file and places the data into six
string variables):
10
20
30
40
50
60
70
80
90
100
110
120
130
140
150
160
170
180
RUN
OPEN "QFILE" FOR OUTPUT AS #1
PRINT #1, "Record A","a","b","c"
PRINT #1, "Record B",1,2,3
PRINT #1, "Record C","x";"y";"z"
PRINT #1, "Record D,Record E,Record F"
CLOSE #1
OPEN "QFILE" FOR INPUT AS #1
INPUT #1, A$
INPUT #1, B$
INPUT #1, C$
INPUT #1, D$,E$,F$
PRINT A$
PRINT B$
PRINT C$
PRINT D$
PRINT E$
PRINT F$
CLOSE #1
Yields:
Record
Record
Record
Record
Record
Record
A
B
C
D
E
F
a
1
xyz
b
2
c
3
Continued!
64
Intermec Fingerprint 6.13 – Programmer's Guide
7. INPUT TO FINGERPRINT, cont'd.
4.
Input from a Sequential
File, cont'd.
INPUT$
Reads a specified number of characters from the specified sequential file or channel. (If no file or channel is specified, the data on the
standard IN channel will be read). The execution is held up waiting
for the specified number of characters to be received. If a file does
not contain as many characters as specified in the INPUT$ statement, the execution will be resumed as soon as all available
characters in the file have been received.
Sequential files are read from the start and once a number of
characters have been read, they cannot be read again until the file
is CLOSEd and OPENed again. Subsequent INPUT$ statements
will start with the first of the remaining available characters.
Example (reads portions of characters from a file OPENed as #1):
10
20
30
40
50
60
70
80
90
100
110
RUN
OPEN "QFILE" FOR OUTPUT AS #1
PRINT #1, "ABCDEFGHIJKLMNOPQRSTUVWXYZ"
CLOSE #1
OPEN "QFILE" FOR INPUT AS #1
A$=INPUT$(10,1)
B$=INPUT$(5,1)
C$=INPUT$(100,1)
PRINT "Record 1:",A$
PRINT "Record 2:",B$
PRINT "Record 3:",C$
CLOSE #1
Yields:
Record1:
Record2:
Record3:
ABCDEFGHIJ
KLMNO
PQRTSUVWXYZ
LINE INPUT#
Works similar to INPUT#, but reads an entire line including all
punctuation marks to a string variable instead of reading just one
record. Note that commas inside a string will be regarded as
punctuation marks and will not divide the string into records
(compare with INPUT#).
Example (reads a complete line in a file and places the data into a
single string variable):
10
20
30
40
50
60
70
RUN
OPEN "QFILE" FOR OUTPUT AS #1
PRINT #1, "Record A,Record B,Record C"
CLOSE #1
OPEN "QFILE" FOR INPUT AS #1
LINE INPUT #1, A$
PRINT A$
CLOSE #1
Yields:
Record A,Record B,Record C
Continued!
65
Intermec Fingerprint 6.13 – Programmer's Guide
7. INPUT TO FINGERPRINT, cont'd.
4.
Input from a Sequential
File, cont'd.
CLOSE
When a file is no longer used, it can be closed by means of a CLOSE
statement containing the same reference number as the corresponding OPEN statement. An END statement also closes all open files.
A few instructions facilitate the use of files for sequential input:
EOF (End of File)
☞ Relational Operators
Also see:
• Chapter 4.9
The EOF function can connection with the statements INPUT#,
LINE INPUT# and INPUT$ to avoid the error condition "Input past
end". When the EOF function encounters the end of a file, it returns
the value -1 (TRUE). If not, it returns the value 0 (FALSE).
Example:
10
20
30
40
50
60
70
80
90
100
110
120
RUN
DIM A%(10)
OPEN "DATA" FOR OUTPUT AS #1
FOR I%=1 TO 10
PRINT #1, I%*1123
NEXT I%
CLOSE #1
OPEN "DATA" FOR INPUT AS #2
I%=0
WHILE NOT EOF(2)
INPUT #2, A%(I%):PRINT A%(I%)
I%=1+1:WEND
IF EOF(2) THEN PRINT "End of File"
LOC (Location)
The LOC function returns the number of 128-byte blocks, that have
been read or written since the file was OPENed.
This example closes the file "ADDRESSES" when record No. 100
has been read from the file:
10
OPEN "ADDRESSES" FOR INPUT AS #1
.....
.....
.....
200 IF LOC(1)=100 THEN CLOSE #1
.....
.....
LOF (Length-of-File)
The LOF function returns the length in bytes of an OPENed file.
The example illustrates how the length of the file "Pricelist" is
returned:
10
OPEN "PRICELIST" AS #5
20
PRINT LOF(5)
.....
.....
66
Intermec Fingerprint 6.13 – Programmer's Guide
7. INPUT TO FINGERPRINT, cont'd.
5.
Input from a Random
File
The following instructions are used in connection with input from
random files:
OPEN
Creates and/or opens a file for RANDOM
access and optionally specifies the record
length in bytes.
FIELD
Creates a random buffer, divides it into
fields and assigns a variable to each field.
GET
Reads a record from the buffer to the file.
CLOSE
Closes an OPENed file.
LOC
Returns the number of the last record read
by the use of a GET statements in the
specified file.
LOF
Returns the length in bytes of the specified file.
OPEN
To read the data stored in a random file, you must OPEN it.
The example in this chapter uses the random file created in chapter
8.4, which can be graphically illustrated like this:
10
OPEN "ZFILE" AS #1 LEN=14
The appending “LEN=14” refers to the length of each record which
is 14 bytes (4 + 4 + 6). Do not confuse the “LEN” parameter in the
OPEN statement with the LEN function, see chapter 9.2.
FIELD
Then enter the same field definitions as when the data was put into
the file:
20
FIELD#1, 4 AS F1$, 4 AS F2$, 6 AS F3$
GET
Use a GET statement to copy the desired record from the file. Note
that you can select whatever record you want, as opposed to
sequential files, where you reads the records one after the other. In
this case, we will copy record No. 1 (compare with the illustration
above).
30
GET #1,1
If you like, you can copy data from other records in the same file by
issuing additional GET statements with references to the records in
question.
Continued!
67
Intermec Fingerprint 6.13 – Programmer's Guide
7. INPUT TO FINGERPRINT, cont'd.
5.
Input from a Random
File, cont'd.
☞ VAL function
Also see:
• Chapter 9.2
Now you can use the variables assigned to the fields in the record
by means of the FIELD statement to handle the data. Possible
numeric expressions converted to string format before being put
into the record can now be converted back to numeric format using
VAL functions. In our example, we will simply print the data on the
screen:
40
PRINT F1$,F2$,F3$
CLOSE
Finally, close the file and execute:
50
RUN
CLOSE #1
ABC
DEF
Yields:
123456
Two instructions facilitate the use of random files:
LOC (Location)
The LOC function returns the number of the last record read by the
use of GET statement.
This example closes the file "ADDRESSES" when record No. 100
has been read from the file:
10
OPEN "ADDRESSES" AS #1
.....
.....
.....
200 IF LOC(1)=100 THEN CLOSE #1
.....
.....
LOF (Length-of-File)
The LOF function returns the length in bytes of an OPENed file.
The example illustrates how the length of the file "Pricelist" is
returned:
10
OPEN "PRICELIST" AS #5
20
PRINT LOF(5)
. . . .
. . . .
68
Intermec Fingerprint 6.13 – Programmer's Guide
7. INPUT TO FINGERPRINT, cont'd.
6.
Input from Printer's
Keyboard
1
/. Input from an external alphanumeric
keyboard is a case of ASCII input on a
communication channel, see chapter 7.13.
All Fingerprint-compatible EasyCoder printers are provided with
at least one key or button. Enhanced models have a set of numeric
keys supplemented with a number of function keys. This also
applies to the EasyCoder 201 II SA (Stand-Alone). EasyCoder 501
SA (Stand-Alone) has a full QWERTY keyboard, like a typewriter.
There are also separate alphanumeric keyboards available as options1.
Note that input from the printer's keyboard excludes the use of ON
KEY...GOSUB statements (see chapter 5.8) and vice versa.
The following instructions are used in connection with input from
the printer's keyboard:
OPEN
Opens the device "console:" for sequential INPUT.
INPUT#
Reads a string of data to a variable.
INPUT$
Reads a limited number of characters to a
variable.
LINE INPUT#
Reads an entire line to a variable
CLOSE
Closes the device.
The table below shows which ASCII characters the various keys
will produce in unshifted and shifted position, and which key will
work as Shift key by default. However, the keyboard can be
remapped (see later in this chapter).
Default ASCII decimal values for Enhanced Printers
Key
1
/. Some keys will not produce any ASCII
values in Shifted position depending on
printer model and choice of Shift key. Test
using the programming example at the
end of this chapter!
F1
F2
F3
F4
F5
C
Enter
Feed
Setup
Pause
Print
.
0
1
2
3
4
5
6
7
8
9
Unshifted Shifted1
1
2
3
4
5
8
13
28
29
30
31
46
48
49
50
51
52
53
54
55
56
57
129
130
131
132
133
N/A
141
156
157
158
159
174
176
177
178
179
180
181
182
183
184
185
Notes
Shift key by default
Unshifted Enter = Carriage Return
C+Pause is by default “Break from keyboard“
Continued!
69
Intermec Fingerprint 6.13 – Programmer's Guide
7. INPUT TO FINGERPRINT, cont'd.
6.
Input from Printer's
Keyboard, cont'd.
The printable characters actually generated by the respective ASCII
value depend on the selected character set (NASC) and possible
MAP statements, see chapter 9.1.
In case of INPUT# and LINE INPUT#, the input will not be
accepted until a carriage return (< Enter >) is issued.
This example demonstrates how the printable character and decimal ASCII value of various keys on the printer's keyboard can be
printed to the screen of the host. You can break the program by
holding down the <C> key and pressing <Pause>.
10
20
30
40
50
60
70
RUN
PRINT "Character", "ASCII value"
OPEN "console:" FOR INPUT AS 1
A$=INPUT$(1,1)
B%=ASC(A$)
PRINT A$, B%
GOTO 30
CLOSE 1
70
Intermec Fingerprint 6.13 – Programmer's Guide
7. INPUT TO FINGERPRINT, cont'd.
7.
Communication Control
☞ Communication
Also see:
• Technical Manual, Setup Parameters
The following instruction are used to control the communication
between the printer and the host or other connected devices:
BUSY/READY
Transmits a busy or ready signal on the
specified communication channel.
ON LINE/OFF LINE
Controls the SELECT signal on the parallel communication channel ("centronics:").
VERBON/VERBOFF
Turns printer's verbosity on/off.
SYSVAR(18)
Selects the printer's verbosity level.
BUSY/READY
By means of these two statements, you can let the program
execution turn a selected communication channel on or off. There
is a difference between serial and parallel communication.
• Serial communication
The type of busy/ready signal is decided in the Setup Mode (SerCom; Flowcontrol), see the Technical Manual.
- When a BUSY statement is executed, the printer sends a busy
signal , e.g. XOFF or RTS/CTS low.
- When a READY statement is executed, the printer sends a
ready signal , e.g. XON or RTS/CTS high.
• Parallel communication
The parallel Centronics communication channel uses the BUSY/
READY statements to control the PE (paper end) signal on pin 12:
- BUSY = PE high
- READY
= PE low
The status of the PE signal can be read by a PRSTAT statement,
for example:
IF (PRSTAT AND 4) GOTO.....ELSE GOTO.....
Note that issuing a READY statement is no guarantee that the
printer will receive data, since there may be other conditions that
hold up the reception, e.g. a full receive buffer.
ON LINE/OFF LINE
These two statements is only used for the parallel Centronics
communication channel and controls the SELECT signal (pin 13 on
the parallel interface board):
- ON LINE 4
sets the SELECT signal high (default)
- OFF LINE 4 sets the SELECT signal low
Continued!
71
Intermec Fingerprint 6.13 – Programmer's Guide
7. INPUT TO FINGERPRINT, cont'd.
7.
Communication
Control, cont'd.
☞ Standard IN/OUT Channel
Also see:
• Chapter 7.1
VERBON/VERBOFF
These two statements control the printer's verbosity, i.e. the response from the printer on the standard OUT channel to instructions
received on the standard IN channel. Both can be substituted by
SYSVAR (18), see below.
By default, verbosity is on (VERBON). The verbosity level is
controlled by the system variable SYSVAR(18).
All responses will be turned suppressed when a VERBOFF statement is issued. However, VERBOFF does not suppress question
marks and prompts displayed as a result of e.g. an INPUT statement.
Instructions like DEVICES, FILES, FONTS, IMAGES, LIST and
PRINT will also work normally.
Important:
RS 485 with “Prot addr enable” requires the verbosity to be turned
off (VERBOFF), see chapter 7.9 “RS 422/485 Communication”.
SYSVAR
The system variable SYSVAR is used for many purposes, one of
which is to control the verbosity level.
The verbosity level can be selected or read by specifying bits in
SYSVAR(18):
All levels enabled
-1
No verbosity
0
Echo received characters
1
"Ok" after correct command lines
2
Echo INPUT characters from communication port
4
Error after failed lines
8
The levels can be combined, so e.g. 3 means both “Echo received
characters” and “Ok after correct command line”.
By default, all levels are enabled, i.e. SYSVAR(18) = -1.
VERBON statement enables all levels, i.e. SYSVAR(18) = -1.
VERBOFF statement disables all levels, i.e. SYSVAR(18) = 0.
When the printer receives a character, e.g. from the keyboard of the
host, by default the same character is echoed back on the standard
OUT channel, i.e. usually to the screen of the host. When an
instruction has been checked for syntax errors and accepted, the
printer returns “Ok”. Else an error message is returned.
This example demonstrates how the printer is set to only return
“Ok” after correct lines (2) or error messages after failed lines (8):
SYSVAR(18) = 10
72
Intermec Fingerprint 6.13 – Programmer's Guide
7. INPUT TO FINGERPRINT, cont'd.
8.
Background
Communication
☞ Memory and Buffers
Also see:
• Chapter 6.1
Background communication means that the printer receives data on
an IN channel while the program runs in a loop. The data are stored
in a buffer, that can be emptied at an appropriate moment by the
running program, which then can use the data. Note that background communication buffers are not the same as the receive
buffers. Any input received on a communication channel is first
stored in the channel's receive buffer, awaiting being processed.
After processing, the data may be stored in the background communication buffer.
The following instructions are used in connection with background
communication:
COMSET
Decides how the background reception will
work in regard of:
- Communication channel.
- Start character(s) of message string.
- End character(s) of message string.
- Characters to be ignored.
- Attention string that interrupt reception.
- Max. number of characters to be received.
ON COMSET GOSUB
Branches the program execution to a subroutine when background reception on a specified channel is interrupted.
COMSET ON
Empties the buffer and turns on background
reception on the specified channel.
COMSET OFF
Turns off background reception on the specified channel and empties the buffer.
COM ERROR ON
Enables error handling on a channel.
COM ERROR OFF
Disables error handling on a specified channel (default).
COMSTAT
Reads the status of the buffer of a channel.
COMBUF$
Reads data in the buffer of a channel.
LOC
Returns the status of the buffers in a
channel.
LOF
Returns the status of the buffers in a
channel.
To set up the printer for background communication, proceed as
follows:
• Start by enabling the error handling for background communication
using a COM ERROR ON statement and specifying the communication channel you intend to use:
0 = "console:"
1 = "uart1:"
2 = "uart2:"/"rs485:"
3 = "uart3:"
4 = "centronics:"
Continued!
73
Intermec Fingerprint 6.13 – Programmer's Guide
7. INPUT TO FINGERPRINT, cont'd.
8.
Background
Communication, cont'd.
• It may be useful to create a few messages indicating what have
caused the interruption.
Example:
Error handling is enabled for communication channel "uart1:"
and messages will be printed to the standard out channel for all
conditions that can be detected by a COMSTAT function.
10
20
30
40
50
COM ERROR 1 ON
A$="Max. number of characters"
B$="End char. received"
C$="Communication error"
D$="Attention string received"
• Continue with a COMSET statement specifying:
- Which communication channel will be used (0–4, see above).
- Which character, or string of characters, will be used to tell the
printer to start receiving data?
- Which character, or string of characters, will be used to tell the
printer to stop receiving data?
- Which character or characters should be ignored, i.e. filtered out
from the received data?
- Which character, or string of characters, should be used as an
attention string, i.e. to interrupt the reception.
☞ CHR$ Function
Also see:
• Chapter 9.2
Start, stop, ignore and attention characters are selected
according to the protocol of the computing device that transmits
the data. Non printable characters, e.g. STX (Start of Text;
ASCII 02 dec.) and ETX (End of Text; ASCII 03 dec.) can be
selected by means of a CHR$ function. To specify no character,
use an empty string, i.e. "".
- How many characters should be received before the transmission is interrupted? This parameter also decides the size of the
buffer, i.e. how much of the RAM memory will be allocated.
Example (designed to make the example easy to run rather than
to illustrate a realistic application):
Background reception on the serial channel "uart1:".
Start character: A
End character: CHR$ (90) i.e. the character “Z”.
Characters to be ignored: #
Attention string: BREAK
Max. number of characters in buffer: 20
60
COMSET 1,"A",CHR$(90),"#","BREAK",20
Continued!
74
Intermec Fingerprint 6.13 – Programmer's Guide
7. INPUT TO FINGERPRINT, cont'd.
8.
Background
Communication, cont'd.
• Decide what will happen, when the reception is interrupted, by
specifying a subroutine to which the execution will branch, using
an ON COMSET GOSUB statement.
Interruption will occur when any of the following conditions is
fulfilled:
- an end character is received.
- an attention string is received.
- the maximum number of characters have been received.
Example:
When the reception of data on communication channel 1 ("uart1:")
is interrupted, the execution will branch to a subroutine starting
on line number 1000.
70
ON COMSET 1 GOSUB 1000
• After returning from the subroutine, use a COMSET ON statement
to empty the buffer and turn on background reception again. e.g.:
80
COMSET 1 ON
• When the reception has been interrupted, it is time to see what the
buffer contains. You can read the content of the buffer, e.g. to a
string variable, using a COMBUF$ function:
1000 QDATA$=COMBUF$(1)
• The COMSTAT function can be used to detect what has caused
the interruption. Use the logical operator AND to detect the
following four reason of interruption as specified by COMSET:
- Max. number of characters received (2).
- End character received (4).
- Attention string received (8).
- Communication error (32).
Example:
The various cases of interruption makes different messages to be
printed to the standard OUT channel.
1010
1020
1030
1040
IF
IF
IF
IF
COMSTAT(1)
COMSTAT(1)
COMSTAT(1)
COMSTAT(1)
AND
AND
AND
AND
2 THEN PRINT A$
4 THEN PRINT B$
8 THEN PRINT C$
32 THEN PRINT D$
• If you want to temporarily turn off background reception during
some part of the program execution, you can issue a COMSET
OFF statement and then turn off the background reception again
using a new COMSET ON statement. Remember that the
COMSET ON/OFF statements empties the buffer and the content
will be lost if you do not read it first, using a COMBUF$ function.
Continued!
75
Intermec Fingerprint 6.13 – Programmer's Guide
7. INPUT TO FINGERPRINT, cont'd.
8.
Background
Communication, cont'd.
• After adding a few lines to print the content of the buffer (line
1050) and to create a loop that waits from input from the host (line
90), the entire example will look like this. You can run the
example by typing RUN and pressing Enter on the keyboard of
the host. Then enter different characters and see what happens,
comparing with the start character, stop character, ignore character,
attention string, and max. number of characters parameters in the
COMSET statement.
NEW
10
20
30
40
50
60
70
80
90
100
1000
1010
1020
1030
1040
1050
1060
RUN
COM ERROR 1 ON
A$="Max. number of char. received"
B$="End char. received"
C$="Attn. string received"
D$="Communication error"
COMSET 1, "A",CHR$(90),"#","BREAK",20
ON COMSET 1 GOSUB 1000
COMSET 1 ON
IF QDATA$="" THEN GOTO 90
END
QDATA$=COMBUF$(1)
IF COMSTAT(1) AND 2 THEN PRINT A$
IF COMSTAT(1) AND 4 THEN PRINT B$
IF COMSTAT(1) AND 8 THEN PRINT C$
IF COMSTAT(1) AND 32 THEN PRINT D$
PRINT QDATA$
RETURN
Two instructions facilitate the use of background communication:
LOC (Locate)
The LOC function returns the status of the receive or transmitter
buffers in an OPENed communication channel:
- If the channel is OPENed for INPUT, the remaining number of
characters (bytes) to be read from the receive buffer is returned.
- If the channel is OPENed for OUTPUT, the remaining free space
(bytes) in the transmitter buffer is returned.
The number of bytes includes characters that will be MAPped as
NULL.
This example reads the number of bytes which remains to be
received from the receiver buffer of "uart2:":
10
20
30
...
...
OPEN "uart2:" FOR INPUT AS #2
A%=LOC(2)
PRINT A%
Continued!
76
Intermec Fingerprint 6.13 – Programmer's Guide
7. INPUT TO FINGERPRINT, cont'd.
8.
Background
Communication, cont'd.
LOF (Length-of-File)
The LOF function returns the status of the buffers in an OPENed
communication channel:
- If a channel is OPENed for INPUT, the remaining free space
(bytes) in the receive buffer is returned.
- If a channel is OPENed for OUTPUT, the remaining number of
characters to be transmitted from the transmitter buffer is returned.
The example shows how the number of free bytes in the receive
buffer of communication channel "uart2:" is calculated:
10
20
30
...
...
80
90
100
1000
1010
1020
1030
1040
1050
1060
RUN
OPEN "uart2:" FOR INPUT AS #2
A%=LOF(2)
PRINT A%
COMSET 1 ON
IF QDATA$="" THEN
END
QDATA$=COMBUF$(1)
IF COMSTAT(1) AND
IF COMSTAT(1) AND
IF COMSTAT(1) AND
IF COMSTAT(1) AND
PRINT QDATA$
RETURN
GOTO 90
2 THEN PRINT A$
4 THEN PRINT B$
8 THEN PRINT C$
32 THEN PRINT D$
77
Intermec Fingerprint 6.13 – Programmer's Guide
7. INPUT TO FINGERPRINT, cont'd.
9.
RS 422/485
Communication
☞ RS 422/485 Interface
Also see:
• Technical Manual
As an option, some EasyCoder printers can be fitted with an
interface board that provides either RS 422 or RS 485 on "uart2:".
Some models also have a built-in provision for RS 422 on "uart1:"
on the CPU board.
In neither of these protocols, there are any lines for hardware
handshake (RTS/CTS). Thus, in the printer's setup, the option
“RTS/CTS Enable/Disable” for "uart2:" has been replaced by the
option "Prot Addr Enable/Disable”, which is only intended for RS
485, see below.
The strap on the RS 422/485 interface board, that selects 2- or 4 wire
communication, only controls the hardware, but the firmware
cannot read this strap. Instead, 2- or 4-wire communication is
determined by the printer's setup on "uart2:" in regard of “XON/
XOFF, Data from Host, Enable/Disable” and “Prot. Addr. Enable/
Disable”
RS 422
RS 422 is a point-to-point four-line screened cable connection
between a host computer and a printer, or between two printers.
Two lines transmit data and the other two receive data. No hardware
handshake can be used (4 lines only), but XON/XOFF or ENQ/
ACK can be used if so desired.
• RS 422 on "uart1:" (EasyCoder 401/501/601)
Optional driver circuit fitted on CPU board.
Either the standard IN/OUT channel should be set to 1 (default),
or the device "uart1:" should be OPENed for INPUT, e.g.:
OPEN "uart1:" for INPUT AS #1
• RS 422 on "uart2:" (optional RS 422/485 interface board)
Two voltage reference straps and two terminator straps must be
fitted on the interface board.
Set the printer's flowcontrol setup parameters as follows:
RTS/CTS:
Always Disable
ENQ/ACK:
Enable or Disable
XON/XOFF, Data from host: Always Enable
XON/XOFF, Data to host: Enable or Disable
Prot. addr:
Always Disable
Either the standard IN/OUT channel should be set to 2, or the
device "rs485:" should be OPENed for INPUT, e.g.:
OPEN "rs485:" for INPUT AS #1
Continued!
78
Intermec Fingerprint 6.13 – Programmer's Guide
7. INPUT TO FINGERPRINT, cont'd.
9.
RS 422/485
Communication, cont'd.
RS 485
RS 485 is only available on the optional RS 422/485 interface board
(communication port "uart2:"). It is a 2-line screen cable point-topoint or multidrop loop connection, where the two lines switch
between transmitting and receiving data according to instructions
from the software. By default, the port is set to receive data. Before
transmission of data, the port is switched to transmit. After the last
character has been transmitted, the port is switched back to receive.
• Point-to-Point
For a point-to-point RS 485 communication between a host
computer and a printer, or between two printers, no special
protocol is required. No handshake can be used, but communication
control must be taken care of by the application software.
Set the printer's flowcontrol setup parameters as follows:
RTS/CTS:
Always Disable
ENQ/ACK:
Always Disable
XON/XOFF, Data from host: Always Disable
XON/XOFF, Data to host: Always Disable
Prot. addr:
Disable
☞ Verbosity
Also see:
• Chapter 7.7
Either the standard IN/OUT channel should be set to 2, or the
device "rs485:" should be OPENed for INPUT, e.g.:
OPEN "rs485:" for INPUT AS #1
• Multidrop Loop
This type of communication is intended for sending packets of
data from a master unit (usually some kind of computer) to any
of a number of connected printers ("slaves"), according to a
destination address included in message. The addresses of the
printers are specified by straps on their RS 422/485 interface
boards.
Transmissions should consist of packets of data with a maximum
size of 255 bytes. Longer records must be divided into two packets
or more.
When a printer is set up for “Prot addr. enable”, it will
automatically use a special protocol described later in this chapter,
but a connected host computer must be provided with some
application software that composes its transmissions accordingly.
No handshake can be used, but communication control must be
taken care of by the application software.
79
Intermec Fingerprint 6.13 – Programmer's Guide
7. INPUT TO FINGERPRINT, cont'd.
9.
RS 422/485
Communication, cont'd.
• Multidrop Loop, cont'd.
Set the printer's flowcontrol setup parameters as follows:
RTS/CTS:
Always Disable
ENQ/ACK:
Always Disable
XON/XOFF, Data from host: Always Disable
XON/XOFF, Data to host: Always Disable
Prot. addr:
Enable
Set verbosity to off using a VERBOFF statement or a SYSVAR(18)=0 instruction.
Master Unit
The master unit controls the data flow in the loop and must always
have address 0.
In case of using a computer as master, refer to the computer's
manual for information on how to appoint the computer master
and how to set its address to 0.
In case of using a printer as master (e.g. in a printers-only loop),
the address 0 must be strapped and two voltage reference straps
must be fitted on the printer's RS 422/485 interface board.
Example showing communication between master and a slave
with the address 8:
OPEN "rs485:8"
OPEN "rs485:8"
PRINT #1,"SEND
LINE INPUT #2,
.....
FOR OUTPUT AS #1
FOR INPUT AS #2
STATUS" (a status request is sent to Slave No. 8)
A$
(message is read from Slave No. 8)
Slave Units
Commonly, the master in a loop is a computer and the slaves are
printers, each with an individual address (1–31).
The computer controls the data flow by sending data to a specified
printer, or by sending a request to check if the master needs any
data from the printer. An application program must be created that
defines a protocol within the data record, which defines when a
slave is allowed to send data.
In the program of the slave printer, rs485 is OPENed for both input
and output. No destination address is required in the OPEN
statement, since address 0 (i.e. master) is automatically assumed.
When a complete packet of data is available, the application
program is able to read the data record sent from the master. If the
data is a status request, the printer can send data back to the master.
The header record will automatically be added to the packet.
Example showing communication between slave and master:
OPEN "rs485:" FOR INPUT AS #1
OPEN "rs485:" FOR OUTPUT AS #2
LINE INPUT #1,A$
(data from master are read)
PRINT #2, "DATA TO MASTER"
(data are sent to master)
.....
Continued!
80
Intermec Fingerprint 6.13 – Programmer's Guide
7. INPUT TO FINGERPRINT, cont'd.
9.
RS 422/485
Communication, cont'd.
Protocols
All packets of data must be preceded by a header record, in which
all data are binary:
START DST SRC LEN PROTO CRC <Data record/Request >
Header record: 5 bytes
Note:
Do not confuse this ESC character with
the ASCII ESCape character = ASCII
27 decimal).
If a byte somewhere in the packet should
be the same code as the START or ESC
characters, it must be substituted by a
two-byte sequence:
If a byte = START,
send ESC+ASCII 220 dec.
If a byte = ESC,
send ESC+ASCII 221 dec.
START
indicates the start of the header record. Either of the
following two characters can be used as start character:
START ASCII 192 decimal, or
ESC
ASCII 219 decimal, see note!
DST
is the destination address 0–31 (1 byte).
SRC
is the source address 0–31 (1 byte).
LEN
is the size in bytes of the data record, max. 249 characters
(1 byte).
PROTO
specifies type of protocols 0 or 1 (1 byte), see below.
CRC
is the checksum of the header record (1 byte), i.e. the
inverted sum of DST+SRC+LEN+PROTO bytes.
• PROTO = 0
This protocol is used for transfer of data. The syntax is:
START DST SRC LEN PROTO=0 CRC <Data record>
• PROTO = 1
This protocol is used for communication check from a host
computer (cannot be sent from a printer!). Instead of a data record,
a REQUEST byte (0 or 1) appends the header record. Any printer
in the loop can be checked if it is on-line (REQUEST = 0), or
inquired for the number of seconds that have passed since its last
startup or reboot (REQUEST = 1). If the printer is on-line, it will
answer by returning the corresponding REQUEST byte, in the
latter case followed by the time expressed as a 10-digit value with
leading zeros.
Example 1. The host computer sends:
START DST SRC LEN PROTO =1 CRC REQUEST=0
The printer replies:
START DST SRC LEN PROTO=1 CRC REQUEST=0
Example 2. The host computer sends:
START DST SRC LEN PROTO =1 CRC REQUEST=1
The printer replies:
START DST SRC LEN PROTO=1 CRC REQUEST =1+time (nnnnnnnnnn)
81
Intermec Fingerprint 6.13 – Programmer's Guide
7. INPUT TO FINGERPRINT, cont'd.
10. External Equipment
Industrial Interface
The Fingerprint firmware not only allows you to control the printer,
but various types of external equipment, like conveyor belts, gates,
turnstiles, control lamps etc. can be controlled as well by the
program execution. Likewise, the status of various external devices
can be used to control both the printer and other equipment. The
computing capacity of the Fingerprint printer can thus be used to
independently control workstations without the requirement of an
on-line connection to a host computer.
What makes this possible is the Industrial Interface Board, which
is available as an option for most Fingerprint-compatible EasyCoder printer models. The board contains a female DB-15 connector with 4 IN ports and 4 OUT ports.
The IN ports are connected to optocouplers that allows the Fingerprint firmware to read their status, i.e. to detect whether a current
through the port is on or off.
The OUT ports are connected to four relays that can switch a current
on or off. The status of the relays can also be read.
There are two instruction solely used in connection with the
Industrial Interface Board:
PORTOUT ON/OFF
This statement sets one of the four relays to either Open or Closed,
depending on how the Industrial Interface Board is strapped.
PORTIN
This function returns the status of a specified IN or OUT port:
IN ports (101, 102, 103, or 104)
-1 (true) indicates that the optocoupler detects a current.
0 (false) indicates that the optocoupler detects no current.
OUT ports (201, 202, 203, or 204)
-1 (true) indicates that PORTOUT ON is selected.
0 (false) indicates that PORTOUT OFF is selected.
Example:
The relay on OUT port 201 will be activated when a switch
connected to IN port 101 is turned on.
10
20
1000
1010
PORTOUT 201 OFF
IF PORTIN (101) THEN GOTO 1000 ELSE GOTO 10
PORTOUT 201 ON
GOTO 20
82
Intermec Fingerprint 6.13 – Programmer's Guide
8. OUTPUT FROM FINGERPRINT
1.
Output to Std OUT
Channel
☞ Input to Fingerprint
See:
• Chapter 7
☞ Standard Error-Handling
Also see:
• Chapter 16.1
☞ Verbosity
Also see:
• Chapter 7.7
The std. OUT channel is used for returning the printer's responses
to instructions received from the host. That is why the same device
usually is selected both standard IN and OUT channel (see
SETSTDIO statement in chapter 7.1). By default, "uart1:" is std
OUT channel.
After every instruction received on the std IN channel, the printer
will either return “Ok” or an error message (e.g. “Feature not
implemented” or “Syntax Error”) on the std. OUT channel. If the
std OUT channel is connected to the host computer, this message
will appear on the screen.
The response can be turned off/on by means of VERBOFF/
VERBON statements, the verbosity level can be selected by
SYSVAR(18), and the type of error message can be selected by
SYSVAR(19).
Some instructions return data on the std OUT channel only:
DEVICES
Lists all devices, regardless if they are
installed or not (also see chapter 4.10).
FILES
Lists all files in the current directory or
another specified directory (also see chapter 6.2).
FONTS
Lists all bitmap fonts in the printer's entire
memory (also see chapter 12.5).
IMAGES
Lists all images in the printer's entire
memory (also see chapter 14.4).
LIST
Lists the current program in its entity or
within a specified range of lines (also see
chapter 5.4.
PRINT
Prints the content of numeric or string
expressions and the result of functions
and calculations (see below).
PRINTONE
Prints characters entered as ASCII values
(see below).
PRINT (or ?)
The PRINT statement prints a line on the std OUT channel, i.e.
usually the screen of the host. The PRINT statement can be
followed by one or several expressions (string and/or numeric).
If the PRINT statement contains several expressions, these must be
separated by either commas (,) semicolons (;), or plus signs (+, only
between string expressions):
• A comma places the expression that follows at the start of next
tabulating zone (each zone is 10 characters long).
Example:
PRINT "Price","$10"
Price
$10
Yields:
Continued!
83
Intermec Fingerprint 6.13 – Programmer's Guide
8. OUTPUT FROM FINGERPRINT, cont'd.
1.
Output to Std OUT
Channel, cont'd.
PRINT (or ?), cont'd.
• A semicolon places the expression that follows immediately
adjacent to the preceding expression.
Example:
PRINT "Price_";"$10"
Price_$10
Yields:
• A plus sign places the string expression that follows immediately
adjacent to the preceding string expression (plus signs can only be
used between two string expressions).
Example:
PRINT "Price_"+"$10"
Price_$10
Yields:
• Each line is terminated by a carriage return, as to make the next
PRINT statement being started on a new line. However, if a
PRINT statement is appended by a semicolon, the carriage return
will be suppressed and next PRINT statement will be printed
adjacently to the preceding one.
Example:
10 PRINT "Price_";"$10";
20 PRINT "_per_dozen"
RUN
Price_$10_per_dozen
Yields:
• A PRINT statement can also be used to return the result of a
calculation or a function.
Example:
PRINT 25+25:PRINT CHR$ (65)
50
A
Yields:
• If the PRINT statement is not followed by any expression, a blank
line will be produced.
PRINTONE
The PRINTONE statement prints the alphanumeric representation
of one or several characters specified by their respective ASCII
values (according to the currently selected character set, see NASC
statement in chapter 9.1) to the standard OUT channel.
The PRINTONE statement is useful e.g. when a certain character
cannot be produced from the keyboard of the host.
PRINTONE is very similar to the PRINT statement and follows the
same rules regarding separating characters, i.e. commas and semicolons).
Example:
PRINTONE 80;114;105;99;101,36;32;49;48
Price
$_10
Yields:
84
Intermec Fingerprint 6.13 – Programmer's Guide
8. OUTPUT FROM FINGERPRINT, cont'd.
2.
Redirecting Output
from Std Out Channel
to File
As described in chapter 8.1, by default some instructions return data
on the standard OUT channel. However, it is possible to redirect
such output to a file using the REDIRECT OUT statement, as
described below.
REDIRECT OUT
This statement can be issued with or without an appending string
expression:
• REDIRECT OUT <sexp>
The string expression specifies the name of a sequential file that
will be created and in which the output will be stored. Obviously,
in this case no data will be echoed back to the host.
• REDIRECT OUT
When no file name appends the statement, the output will be
directed back to the std. OUT channel.
Example:
The output is redirected to the file "IMAGES.DAT". Then the
images in the printer's memory is read to the file after which the
output is redirected back to the standard OUT channel. Then the file
is copied to the communication channel "uart1:" and printed on the
screen of the host.
10 REDIRECT OUT "IMAGES.DAT"
20 IMAGES
30 REDIRECT OUT
RUN
Ok
COPY "IMAGES.DAT","uart1:"
Yields e.g.:
CHESS2X2.1
DIAMONDS.1
391084 bytes free
Ok
CHESS4X4.1
GLOBE.1
1352 bytes used
85
Intermec Fingerprint 6.13 – Programmer's Guide
8. OUTPUT FROM FINGERPRINT, cont'd.
3.
Output and Append to
Sequential Files
The following instructions are used in connection with output to
sequential files:
OPEN
Creates and/or opens a file for sequential
OUTPUT or APPEND and optionally
specifies the record length in bytes.
PRINT#
Prints data entered as numeric or string
expressions to the specified file.
PRINTONE#
Prints data entered as ASCII values to the
specified file.
CLOSE
Closes an OPENed file.
LOC
Returns the number of 128-byte blocks,
that have been written since the file was
OPENed.
LOF
Returns the length in bytes of the specified file.
To print data to a sequential file, proceed as follows:
OPEN
Before any data can be written to a sequential file, it must be opened.
Use the OPEN statement to specify the name of the file and the
mode of access (OUTPUT or APPEND).
• OUTPUT means that existing data will be replaced.
• APPEND means that new data will be appended to existing data.
In the OPEN statement you must also assign a number to the
OPENed file, which is used when the file is referred to in other
instructions. The number mark (#) is optional. Optionally, the
length of the record can also be changed (default 128 bytes). Up to
10 files and devices can be open at the same time.
Examples:
The file "ADDRESSES" is opened for output and given the reference number 1:
OPEN "ADDRESSES FOR OUTPUT AS #1
The file "PRICELIST" is opened for append and is given the
reference number 5:
OPEN "PRICELIST" FOR APPEND AS #2
Continued!
86
Intermec Fingerprint 6.13 – Programmer's Guide
8. OUTPUT FROM FINGERPRINT, cont'd.
3.
Output and Append to
Sequential Files, cont'd.
After a file or device has been OPENed for OUTPUT or APPEND,
you can use the following instructions for writing data to it:
PRINT#
Prints data entered as string or numeric expressions to a sequential
file. Expressions can be separated by commas or semicolons:
• Commas prints the expression in separate zones.
• Semicolons prints expressions adjacently.
There are two ways to divide the file into records:
• Each PRINT# statement creates a new record (see line 20-40 in
the example below).
• Commas inside a string divides the string into records (see line 50
in the example below).
Example:
10
20
30
40
50
OPEN "QFILE" FOR OUTPUT AS #1
PRINT #1, "Record A", "a", "b", "c"
PRINT #1, "Record B", 1, 2, 3
PRINT #1, "Record C", "x"; "y"; "z"
PRINT #1, "Record D,Record E,Record F"
PRINTONE#
Prints characters entered as decimal ASCII values according to the
selected character set to the selected file or device. This statement
is e.g. useful when the host cannot produce certain characters. Apart
from using ASCII values instead of string or numeric expressions,
the PRINTONE# works in the same way as the PRINT# statement.
Example (prints two records ”Hello” and “Goodbye” to "file1"):
10
20
30
OPEN "file1" FOR OUTPUT AS 55
PRINTONE#55,72;101;108;108;111
PRINTONE#55,71;111;111;100;98;121;101
CLOSE
After having written all the data you need to the file, CLOSE it using
the same reference number as when it was OPENed, e.g.:
10
20
30
40
OPEN "file1" FOR OUTPUT AS 55
PRINTONE#55,72;101;108;108;111
PRINTONE#55,71;111;111;100;98;121;101
CLOSE 55
LOC (Location)
The LOC function returns the number of 128-byte blocks, that have
been written since the file was OPENed.
This example closes the file "ADDRESSES" when record No. 100
has been read from the file:
10
OPEN "ADDRESSES" FOR OUTPUT AS #1
.....
200 IF LOC(1)=100 THEN CLOSE #1
.....
Continued!
87
Intermec Fingerprint 6.13 – Programmer's Guide
8. OUTPUT FROM FINGERPRINT, cont'd.
3.
Output and Append to
Sequential Files, cont'd.
LOF (Length-of-File)
The LOF function returns the length in bytes of an OPENed file.
The example illustrates how the length of the file "Pricelist" is
returned:
10
OPEN "PRICELIST" FOR OUTPUT AS #5
20
PRINT LOF(5)
. . . .
. . . .
88
Intermec Fingerprint 6.13 – Programmer's Guide
8. OUTPUT FROM FINGERPRINT, cont'd.
4.
Output to Random Files
The following instructions are used in connection with output to
random files:
OPEN
Creates and/or opens a file for RANDOM
access and optionally specifies the record
length in bytes.
FIELD
Creates a random buffer, divides it into
fields and assigns a variable to each field.
LSET/RSET
Places data left- or right-justified into the
buffer.
PUT
Writes a record from the buffer to the file.
CLOSE
Closes an OPENed file.
LOC
Returns the number of the last record
written by the use of a PUT statement in
the specified file.
LOF
Returns the length in bytes of the specified file.
To write data to a random file, proceed as follows:
OPEN
Start by OPENing a file for random input/output. Since random
access is selected by default, the mode of access can be omitted from
the statement, e.g.:
10
OPEN "ZFILE" AS #1
Optionally, the length of each record in the file can be specified in
number of bytes (default 128 bytes):
10
OPEN "ZFILE" AS #1 LEN=14
FIELD
Next action to take is to create a buffer by means of a FIELD
statement. The buffer is given a reference number and divided into
a number of fields with individual length in regard of number of
characters. To each field, a string variable is assigned.
The buffer specifies the format of each record in the file. The sum
of the length of the different fields in a record must not exceed the
record length specified in the OPEN statement.
In the example below, 4 bytes are allocated to field 1, 4 bytes to field
2 and 6 bytes to field 3. The fields are assigned to the string variables
A1$, A2$ and A3$ respectively.
20
FIELD#1, 4 AS F1$, 4 AS F2$, 6 AS F3$
Graphically illustrated, the record produced in the line above will
look like this:
Continued!
89
Intermec Fingerprint 6.13 – Programmer's Guide
8. OUTPUT FROM FINGERPRINT, cont'd.
4.
Output to Random
Files, cont'd.
The file can consist of many records, all with the same format. (To
produces files with different record lengths, the file must be
OPENed more than once and with different reference numbers).
Now it is time to write some data to the file. Usually the data comes
from e.g. the host or from the printer's keyboard. In this example,
we will type the data directly on the host and assign the data to string
variables:
30
40
50
☞ STR$ Function
Also see:
• Chapter 9.2
QDATA1$="ABC"
QDATA2$="DEF"
QDATA3$="12345678"
Note that only string variables can be used. Possible numeric
expressions must therefore be converted to strings by means of
STR$ functions.
LSET/RSET
There are two instructions for placing data into a random file buffer:
• LSET
places the data left-justified.
• RSET
places the data right-justified.
In other words, if the input data consist of less bytes that the field into
which it is placed, it will either be placed to the left (LSET) or to the
right (RSET).
If the length of the input data exceeds the size of the field, the data
will be truncated from the end in case of LSET, and from the start
in case of RSET.
60
70
80
LSET F1$=QDATA1$
RSET F2$=QDATA2$
LSET F3$=QDATA3$
Using the graphic illustration from previous page, the result is
meant to be like this:
Note that the first field is left-justified, the second field is rightjustified, and the third field is left-justified and truncated at the end
(digits 7 and 8 are omitted since the field is only six bytes long; if
the field had been right-justified, digits 1 and 2 had been omitted
instead).
PUT
Next step is to transfer the record to the file. For this purpose we use
the PUT statement. PUT is always followed by the number assigned
to the file when it was OPENed, and the number of the record in
which you want to place the data (1 or larger).
Continued!
90
Intermec Fingerprint 6.13 – Programmer's Guide
8. OUTPUT FROM FINGERPRINT, cont'd.
4.
Output to Random
Files, cont'd.
PUT, cont'd.
In our example, the file ZFILE was OPENed as #1 and we want to
place the data in the first record. Note that you can place data in
whatever record you like. The order is of no consequence.
90
PUT #1,1
If you want, you can continue and place data into other records using
additional sets of LSET, RSET and PUT statements. Below is a
graphic example of a three-record file:
CLOSE
When you are finished, close the file:
100
CLOSE #1
Nothing will actually happen before you execute the program using
a RUN statement. Then the data will be placed into the fields and
records as specified by the program, e.g.:
10
20
30
40
50
60
70
80
90
100
RUN
OPEN "ZFILE" AS #1 LEN=14
FIELD#1, 4 AS F1$, 4 AS F2$, 6 AS F3$
QDATA1$="ABC"
QDATA2$="DEF"
QDATA3$="12345678"
LSET F1$=QDATA1$
RSET F2$=QDATA2$
LSET F3$=QDATA3$
PUT #1,1
CLOSE #1
LOC (Locate)
The LOC function returns the number of the last record read or
written by the use of GET or PUT statements respectively in an
OPENed file.
This example closes the file "ADDRESSES" when record No. 100
has been read from the file:
10 OPEN "ADDRESSES" AS #1
.....
200 IF LOC(1)=100 THEN CLOSE #1
.....
LOF (Length-of-File)
The LOF function returns the length in bytes of an OPENed file.
The example illustrates how the length of the file "Pricelist" is
returned:
10 OPEN "PRICELIST" AS #5
20 PRINT LOF(5)
.....
91
Intermec Fingerprint 6.13 – Programmer's Guide
8. OUTPUT FROM FINGERPRINT, cont'd.
5.
Output to
Communication
Channels
Output from a Fingerprint program can be directed to any serial
communication channel OPENed for sequential OUTPUT following the same principles as for output to files (see chapter 8.3).
Note that in this case, the parallel communication channel
"centronics:" cannot be used (one-way communication only).
The communication channels are specified by name as follows:
• "uart1:" • "uart2:" • "uart3:"
A special case is communication via the RS 422/485 interface
board, where the communication channel "uart2:" is specified as
"rs485:[n]" or "prel:[n;]rs485:" (also see chapter 7.9).
The following instructions are used in connection with output to a
communication channel:
OPEN
Opens a serial communication channel
for sequential output.
PRINT#
Prints data entered as numeric or string
expressions to the selected channel.
PRINTONE#
Prints data entered as ASCII values to the
selected channel.
CLOSE
Closes an OPENed channel.
LOC
Returns the remaining number of free
bytes in the transmitter buffer of the selected communication channel.
LOF
Returns the remaining numbers of characters to be transmitted from the transmitter buffer is returned.
COPY
Copies a file to a communication channel.
Example 1 (prints the records “Record 1” and “Record 2” to the
serial communication channel "uart3:"):
10
20
30
OPEN "uart3:" for OUTPUT AS #1
PRINT #1, "Record 1"
PRINTONE #1, 82;101;99;111;114;100;32;50
40
CLOSE #1
Example (prints the file "datafile" in a DOS-formatted memory
card to the serial communication channel "uart2:"):
COPY "card1:datafile","uart2:"
6.
Output to Display
The only device, other than the serial communication channels, that
can be OPENed to receive output from a Fingerprint program, is the
printer's LCD display ("console:"). This is explained in chapter 15.2
together with other methods for controlling the display.
92
Intermec Fingerprint 6.13 – Programmer's Guide
9. DATA HANDLING
1.
Preprocessing Input
Data
☞ COMSET statement
Also see:
• Chapter 7.8
☞ ON KEY...GOSUB statement
Also see:
• Chapter 15.1
All input data to the printer come in binary form via the various
communication channels. Text files are transmitted in ASCII
format, which upon reception will be preprocessed by the printer's
software according to two instructions as to provide full compatibility between the printer and the host:
MAP
Remaps the selected character set.
NASC
Selects a suitable character set
A character received by the printer on a communication channel
will first be processed in regard of possible MAP statements. Then
the character will be checked for any COMSET or ON KEY...
GOSUB conditions. When a character is to be printed, it will be
processed into a bitmap pattern that makes up a certain character
according to the character set selected by means of a NASC
statement.
MAP
The MAP statement is used to modify a character set or to filter out
undesired characters on a specified communication channel by
mapping them as Null (ASCII 0 dec).
If no character set meets your requirements completely (see NASC
below), select the set that comes closest and modify it using MAP
statements. Do not map any characters to ASCII values occupied by
characters used in Fingerprint instructions, e.g. keywords, operators, %, $, #, and certain punctuation marks. Mapped characters will
be reset to normal at power-up or reboot.
☞ Character Sets
Also see:
• Intermec Fingerprint Reference
Manual for complete character set
tables.
Example. You may want to use the German character set (49) and
7 bits communication protocol. However, you need to print £
characters, but have no need for the & character. Then remap the
£ character (ASCII 187 dec.) to the value of the & character (ASCII
38 dec.) . Type a series of & characters on the keyboard of the host
and finish with a carriage return:
10
NASC 49
20
MAP 38,187
30
FONT "SW030RSN"
40
PRPOS 100,100
50
INPUT "Enter character";A$
60
PRTXT A$
70
PRINTFEED
RUN
Enter character?
(see note!)
Note!
If you use 7 bit communication, the printer cannot echo back the
correct character to the host if its ASCII value exceeds 127, hence
“;” characters will appear on the screen. Nevertheless, the desired
“£” characters will be printed on the label.
Continued!
93
Intermec Fingerprint 6.13 – Programmer's Guide
9. DATA HANDLING, cont'd.
1.
Preprocessing Input
Data, cont'd.
NASC
The NASC statement is used to select a character set that decides
how the various ASCII characters transmitted from the host1 will be
printed. This instruction makes it possible to adapt the printer to
various national standards. By default, ASCII characters will be
printed according to the Roman 8 character set.
Suppose you order the printer to print the character ASCII 124 dec.
If you check the character set tables at the end of the Fingerprint
6.13 Reference Manual, you will see that ASCII 124 will generate
the character “|” according to the Roman 8 character set, “ù”
according to the French character set and ñ according to the Spanish
set etc. The same applies to a number of special national characters,
whereas digits 0–9 and characters A–Z, a–z plus most punctuation
marks are the same in all sets. Select the set that best matches your
data equipment and printout requirements.
If none of the sets matches your requirements exactly, select the one
that comes closest. Then, you can make final corrections by means
of MAP statements, see above.
A NASC statement will have the following consequences:
• Text printing
Text on labels etc. will be printed according to the selected
character set. However, instructions that already has been processed
before the NASC statement is executed, will not be affected. This
implies that labels may be multilingual.
• LCD display
New messages in the display will be affected by a preceding
NASC statement. However, a message that is already displayed
will not be updated automatically. The display is able to show
most printable characters.
• Communication
Data transmitted from the printer via any of the communication
channels will not be affected, as the data is defined by ASCII
values, not as alphanumeric characters. The active character set
of the receiving unit will decide the graphic presentation of the
input data, e.g. on the screen of the host.
1
/. We will not concern ourselves with how
your computer and its keyboard are
mapped. Refer to their respective manuals.
• Bar code printing
The pattern of the bars reflects the ASCII values of the input data
and is not affected by a NASC statement. The bar code interpretation
(i.e. the human readable characters below the bar pattern) is
affected by a NASC statement. However, the interpretation of bar
codes, that have been processed and are stored in the print buffer,
before the NASC statement is executed, will not be affected.
This example selects the Italian character set:
NASC 39
94
Intermec Fingerprint 6.13 – Programmer's Guide
9. DATA HANDLING, cont'd.
2.
Input Data Conversion
There are a number of instruction for converting data in numeric or
string expressions. You will find them used in many examples in
this volume. The instructions will only be described in short terms.
For full information, please refer to the Fingerprint 6.13 Reference
Manual.
ABS
The ABS function returns the absolute value of a numeric expression. Absolute value means that the value is either positive or zero.
Example:
PRINT ABS (10–15)
5
Yields:
ASC
The ASC function returns the decimal ASCII value of the first
character in a string expression.
Example:
PRINT ASC("HELLO")
72
Yields:
CHR$
The CHR$ function returns the readable character from a decimal
ASCII value. This function is useful when you cannot produce a
certain character from the keyboard of the host.
Example:
PRINT CHR$(72)
H
Yields:
INSTR
The INSTR function searches a string expression for a certain
character, or sequence of characters, and returns the position.
Example:
PRINT INSTR ("Intermec","NT")
2
Yields:
LEFT$
The LEFT$ function returns a certain number of characters from the
left side of a string expression, i.e. from the start. The complementary instruction is RIGHT$.
Example:
PRINT LEFT$("INTERMEC PRINTER",8)
INTERMEC
Yields:
Continued!
95
Intermec Fingerprint 6.13 – Programmer's Guide
9. DATA HANDLING, cont'd.
2.
Input Data Conversion,
cont'd.
LEN
The LEN function returns the number of characters including space
characters in a string expression.
Example:
PRINT LEN ("INTERMEC TECHNOLOGIES CORP.")
27
Yields:
MID$
The MID$ function returns a part of a string expression. You can
specify start position and, optionally, the number of characters to be
returned.
Example:
PRINT MID$ ("INTERMEC PRINTER",10,2)
PR
Yields:
RIGHT$
The RIGHT$ function returns a certain number of characters from
the right side of a string expression, i.e. from the end. The complementary instruction is LEFT$.
Example:
PRINT RIGHT$("INTERMEC PRINTER",7)
PRINTER
Yields:
SGN
The SGN function returns the sign (1 = positive, -1 = negative or 0
= zero) of a numeric expression.
Example:
PRINT SGN(5-10)
-1
Yields:
SPACE$
The SPACE$ function returns a specified number of space characters and is e.g. useful for creating tables with monospace characters.
Example:
Note:
When entering the price in the example
for SPACE$, make sure to use a period
character (.) to indicate the decimal point.
10
20
30
40
50
60
70
80
90
100
110
FONT "MS050RMN"
X%=100 : Y%=300
FOR Q%=1 TO 5
INPUT "Commodity: ", A$
INPUT "Price $:", B$
C$=SPACE$(15-LEN(A$))
PRPOS X%,Y%
PRTXT A$+C$+"$ "+B$
Y%=Y%-40
NEXT
PRINTFEED
Continued!
96
Intermec Fingerprint 6.13 – Programmer's Guide
9. DATA HANDLING, cont'd.
2.
Input Data Conversion,
cont'd.
STR$
The STR$ function returns the string representation of a numeric
expression. The complementary instruction is VAL.
Example:
10
A%=123
20
A$=STR$(A%)
30
PRINT A%+A%
40
PRINT A$+A$
RUN
246
123123
Yields:
STRING$
The STRING$ function returns a specified number of a single
character specified either by its ASCII value or by being the first
character in a string expression.
Example:
10
A$="*THE END*"
20
FIRST$=STRING$(4,42)
30
LAST$=STRING$(4,A$)
40
PRINT FIRST$+A$+LAST$
RUN
*****THE END*****
Yields:
VAL
The VAL function returns the numeric representation of a string
expression. The complementary instruction is STR$.
VAL is for example used in connection with random files, which
only accept strings (see chapters 7.5 and 8.4). Thus numeric
expressions must be converted to string format using STR$ before
they are PUT in a random file and be converted back to numeric
values using VAL after you GET them back from the file.
Another application is when you want to calculate using data in a
string expression, e.g. when reading the printer's clock (also see
chapter 9.3).
Example of using the priner as an alarm clock (requires either a
real-time clock or that the time has been set manually):
10
20
30
40
RUN
INPUT "Set Alarm"; A%
B%=VAL(TIME$)
IF B%>=A% THEN GOTO 40 ELSE GOTO 20
SOUND 880,100: END
97
Intermec Fingerprint 6.13 – Programmer's Guide
9. DATA HANDLING, cont'd.
3.
Date and Time
The printer's CPU board is provided with an internal clock/calendar
without battery backup, i.e. the setting will be lost when the printer
is turned off.
Fingerprint-compatible EasyCoder printers may also be fitted with
a real-time clock circuit (RTC) in a socket on the CPU board. The
RTC is battery backed-up and will keep on running even when the
printer is turned off.
If no RTC is installed and you try the read the date or time before
the internal clock has been set, an error will occur (error 1010
“Hardware Error”). Once either time or date has been set, the
internal clock will work until next power off or reboot. If only time
has been set, by default the current date will be Jan 01 1980 and if
only date has been set, by default the clock will start running at
00:00:00.
The built-in calendar runs from 1980 through 2048 and corrects
illegal values automatically, e.g. 981232 will be corrected to
990101.
Please refer to chapter 15.5 for information on how to set the
printer's clock/calendar.
The standard formats for date and time are:
Date:
YYMMDD, where...
YY are the two last digits of the year
MM are two digits representing the month (01–12)
DD are two digits representing the day (01–28|29|30|31)
Time:
HHMMSS where...
HH are two digits representing the hour (00-23)
MM are two digits representing the minute (00-59)
SS are two digits representing the second (00-59)
In addition to the standard formats, other formats for date and time
can be specified by the following instructions:
FORMAT DATE$
Specifies the format of date strings returned by DATE$ and DATEADD$ instructions.
FORMAT TIME$
Specifies the format of date strings returned by TIME$ and TIMEADD$ instructions.
NAME DATE$
Specifies the names of the months.
NAME WEEKDAY$
Specifies the names of the weekdays.
Continued!
98
Intermec Fingerprint 6.13 – Programmer's Guide
9. DATA HANDLING, cont'd.
3.
Date and Time, cont'd.
The following instructions are used to read the clock/calendar:
<svar> = DATE$
Returns the current date in standard format to a string variable.
<svar> = DATE$("F") Returns the current date in the format
specified by FORMAT DATE$ to a string
variable.
<svar> = TIME$
Returns the current time in standard format to a string variable.
<svar> = TIME$("F") Returns the current time in the format
specified by FORMAT TIME$ to a string
variable.
DATEADD$
Adds or subtracts a number of days to/
from the current date or a specified date
and returns it in standard format, or the
format specified by FORMAT DATE$.
TIMEADD$
Adds or subtracts a number of seconds to/
from the current time or a specified moment of time and returns it in standard
format, or the format specified by FORMAT TIME$.
DATEDIFF
Calculates the difference in days between
two specified dates.
TIMEDIFF
Calculates the difference in seconds between two specified moments of time.
WEEKDAY
Returns the weekday of a specified date as
a numeric constant (1–7).
WEEKDAY$
Returns the name of the weekday of a
specified date in plain text according to
the weekday names specified by NAME
WEEKDAY$, or – if such a name is
missing – the full name in English.
WEEKNUMBER
Returns the week number of a specified
date.
TICKS
Returns the time passed since last startup
in 1/100 seconds.
Note that in most instructions, you can specify the current date or
time by means of DATE$ or TIME$ respectively, e.g.:
WEEKDAY$ (DATE$)
TIMEDIFF (TIME$, "120000")
Continued!
99
Intermec Fingerprint 6.13 – Programmer's Guide
9. DATA HANDLING, cont'd.
3.
Date and Time, cont'd.
This example shows how the date and time is set in the immediate
mode (not required if the printer has an RTC). The date and time
formats are set and a table of the names of months is created.
Finally, a number of date and time parameters are read and printed
to the standard OUT channel after being provided with some
explanatory text:
DATE$ = "980609"
TIME$ = "080000"
10
20
30
40
50
60
70
80
90
100
110
120
130
140
150
160
170
180
(Setting the date)
(Setting the time)
FORMAT DATE$ "MMM/DD/YYYY"
FORMAT TIME$ "hh.mm pp"
NAME DATE$ 1, "Jan":NAME DATE$ 2, "Feb"
NAME DATE$ 3, "Mar":NAME DATE$ 4, "Apr"
NAME DATE$ 5, "May":NAME DATE$ 6, "Jun"
NAME DATE$ 7, "Jul":NAME DATE$ 8, "Aug"
NAME DATE$ 9, "Sep":NAME DATE$ 10, "Oct"
NAME DATE$ 11, "Nov":NAME DATE$ 12, "Dec"
A%=WEEKDAY(DATE$)
PRINT WEEKDAY$(DATE$)+" "+ DATE$("F")+" "
+TIME$("F")
PRINT "Date:",DATE$("F")
PRINT "Time:",TIME$("F")
PRINT "Weekday:", WEEKDAY$(DATE$)
PRINT "Week No.:",WEEKNUMBER (DATE$)
PRINT "Day No.:", DATEDIFF ("950101",DATE$)
PRINT "Run time:", TICKS\6000;" minutes"
IF A%<6 THEN PRINT "This is ";WEEKDAY$(DATE$);
". Go to work!"
IF A%>5 THEN PRINT "This is ";WEEKDAY$(DATE$);
". Stay home!"
RUN
Yields e.g.:
Friday Jun/09/1998 08.00 am
Date:
Jun/09/1998
Time:
08.00 am
Weekday: Friday
Week No.: 23
Day No.: 159
Run time: 1 minutes
This is Friday. Go to work!
This example shows how the TICKS function is used to delay the
execution for a specified period of time:
10
20
30
40
1000
1010
1020
RUN
INPUT "Enter delay in sec's: ", A%
B%=TICKS+(A%*100)
GOSUB 1000
END
SOUND 440,50
(Start signal)
IF B%<=TICKS THEN SOUND 880,100 ELSE GOTO 1010
RETURN
100
Intermec Fingerprint 6.13 – Programmer's Guide
9. DATA HANDLING, cont'd.
4.
Random Number
Generation
The Fingerprint firmware provides two instructions for generating
random numbers, e.g. for use in test programs.
RANDOM
The RANDOM function generates a random integer within a
specified interval.
This example tests a random dot on the printhead of a 8 dots/mm
EasyCoder 501 printer:
10
20
30
40
50
60
70
80
90
RUN
MIN%=HEAD(-7)*85\100: MAX%=HEAD(-7)*115\100
DOTNO%=RANDOM(0,832)
IF HEAD(DOTNO%)<MIN% OR HEAD(DOTNO%)>MAX% THEN
BEEP
PRINT "ERROR IN DOT "; DOTNO%
ELSE
BEEP
PRINT "HEADTEST: OK!"
END IF
RANDOMIZE
To obtain a higher degree of randomization, the random number
generator can be reseeded using the RANDOMIZE statement. You
can either include an integer in the statement with which the
generator will be reseeded, or a prompt will appear asking you to do
so.
This example prints a random pattern of dots after the random
number generator has been reseeded:
10
20
30
40
50
60
70
80
RUN
RANDOMIZE
FOR Q%=1 TO 100
X%=RANDOM(50,400)
Y%=RANDOM(50,400)
PRPOS X%,Y%
PRLINE 5,5
NEXT
PRINTFEED
Random Number Seed (0 to 99999999) ?
Yields:
(prompt)
Very high degree of randomization is obtained in the random
integer generator is reseeded using e.g. TICKS:
10
20
RUN
RANDOMIZE TICKS
PRINT RANDOM (1,100)
101
Intermec Fingerprint 6.13 – Programmer's Guide
10. LABEL DESIGN
1.
Creating a Layout
Field Types
A label layout is made up of a number of fields. There are five
different types of fields:
• Text Field
A text field consists of a single line of text.
• Bar Code Field
A bar code field consists of a single bar
code, with or without a bar code interpretation in human readable characters.
• Image Field
An image field is a picture, drawing, logotype or other type of illustration in the
internal Fingerprint bitmap format.
• Box Field
A box field is a square or rectangular
paper-coloured area surrounded by a black
border line. If the border is sufficiently
thick, the whole area may appear black.
• Line Field
A line field is a black line that goes either
along or across the paper web. A short but
thick line can look like a black box.
There are no restrictions, other than the size of the printer's memory,
regarding the number of fields on a single label.
Continued!
102
Intermec Fingerprint 6.13 – Programmer's Guide
10. LABEL DESIGN, cont'd.
1.
Creating a Layout,
cont'd.
☞ PRINTFEED Statement
Also see:
• Chapter 11.3
Origin
The positioning of all printable objects on the label, i.e. text fields,
bar code fields, images, boxes, and lines, uses a common system.
The starting point is called “origin” and is the point on the paper that
corresponds to the innermost active dot on the printhead at the
moment when the PRINTFEED statement is executed.
The location of the origin is affected by the following factors:
• Position across the paper web (X-axis):
The position of the origin is determined by the X-Start value in the
Setup Mode.
☞ Printer Setup
Also see:
• Chapter 15.6
• Technical Manual
• Position along the paper web (Y-axis):
The position of the origin is determined by the Feed adjustment
in the Setup Mode and any FORMFEED<nexp> statements
executed before the current PRINTFEED statement or after the
preceding PRINTFEED statement.
Coordinates
Starting from origin, there is a coordinate system where the X-axis
runs across the paper web from left to right (as seen when facing the
printer) and the Y-axis runs along the paper web from the printhead
and towards the rear end of the paper.
Units of Measure
The unit of measure is always “dots”, i.e. all measures depend on
the density of the printhead. For example, in a printer with an 8 dots/
mm printhead, a dot is 1/8 mm = 0.125 mm = 0.00492" or 4.92 mils.
This implies that a certain label, originally designed for 8 dots/mm,
will be printed smaller in an 11.81 dots/mm printer and larger in a
6 dots/mm printer.
Generally, a dot has the same size along both the X-axis and the Yaxis. An exception is 11.81 dots/mm printers, where – for technical
reasons – there is a very small difference (see Technical Manual).
Insertion Point
The insertion point of any printable object is specified within this
coordinate system by means of a PRPOS<x-pos>,<y-pos> statement. For example, “PRPOS 100, 200” means that the object will
be inserted at a position 100 dots to the right of the origin and 200
dots further back along the paper.
Continued!
103
Intermec Fingerprint 6.13 – Programmer's Guide
10. LABEL DESIGN, cont'd.
1.
Creating a Layout,
cont'd.
Alignment
Once the insertion point is specified, you must also decided which
part of the object should match the insertion point. For example, a
text field forms a rectangle. There are 8 anchor points along the
borders and one in the centre. The anchor points are numbered 1–
9 and specified by means of an ALIGN statement. By specifying
e.g. ALIGN 1, you will place the lower left corner of the text field
at the insertion point specified by PRPOS.
The illustration below shows the anchor points for the various types
of fields. Refer to the Intermec Fingerprint 6.13 Reference Manual,
ALIGN statement for detailed information on the anchor points of
such bar codes, where the interpretation is an integrated part of the
bar code pattern, e.g. EAN and UPC codes.
7
4
8
9
Abcfg
5
1
7
2
8
01C39
1
baseline
3
9
6
5
4
6
2
3
1, 4 or 7
2, 5 or 8
3, 6 or 9
1, 4 or 7
2, 5 or 8
3, 6 or 9
Continued!
104
Intermec Fingerprint 6.13 – Programmer's Guide
10. LABEL DESIGN, cont'd.
1.
Creating a Layout,
cont'd.
Directions
Intermec Fingerprint allows printing in four different directions.
Using a DIR statement, you can rotate the printable object clockwise around the anchor point/insertion point with a 90° increment
(0°, 90°, 180°, or 270°), as illustrated below:
Continued!
105
Intermec Fingerprint 6.13 – Programmer's Guide
10. LABEL DESIGN, cont'd.
1.
Creating a Layout,
cont'd.
Layout Files
In addition to the method described above, there is an alternative
method using files for specifying the various fields and their input
data separately (see chapter 10.7). However, the various parameters
of the layout file are based on the same principles as described in
chapters 10.1 – 10.6.
Checking Current Position
After having positioned and specified an object, you can find out the
current position of the insertion point by means of a PRSTAT
function. This implies that after having e.g. entered a line of text,
you can find out how long it will be and where any new object will
be placed unless a new position is specified.
• In print direction 1 or 3, PRSTAT (1) returns the absolute value
of the insertion point along the X-axis, whereas PRSTAT (2)
returns the Y-value of the last executed PRPOS statement.
• In print direction 2 or 4, PRSTAT (2) returns the absolute value
of the insertion point along the Y-axis, whereas PRSTAT (1)
returns the X-value of the last executed PRPOS statement.
Example:
An unknown number of logotypes will be printed with 10 dots
spacing across the paper web. The size of the logotype is not known.
To avoid an “field out of label” error, a limitation in regard of
paper width is included (line 80, change if necessary).
10
20
30
40
50
60
70
80
90
100
110
RUN
PRPOS 0,50
PRIMAGE "GLOBE.1"
X%=PRSTAT(1)
FOR A%=1 TO 10
Z%=PRSTAT(1)
PRPOS Z%+10,50
PRIMAGE "GLOBE.1"
IF Z%>550 THEN GOTO 100
NEXT
PRINTFEED
END
Note:
The PRSTAT function can also be used for checking the printer's
status in regard of a number of conditions, see chapter 16.3.
106
Intermec Fingerprint 6.13 – Programmer's Guide
10. LABEL DESIGN, cont'd.
2.
Text Field
A text field consists of one or several alphanumeric characters on
the same line (max 300 characters). Intermec Fingerprint cannot
wrap text to a new line, but each line must be specified as a separate
text field.
In addition to the standard positioning statements PRPOS, ALIGN
and DIR, a text field can contain the following instructions:
☞ Fonts
Also see:
• Chapter 12
FONT (FT)
Specifies the bitmap font to be printed. There is no default font.
Therefore, a font must always be specified or an error condition will
occur. Once a font has been specified, it will be used in all text fields
until a new FONT statement is executed.
Optionally, the extension can be included in the font name. If so, the
extension of the selected font must match the print direction:
Extension .1 matches DIR 1 and DIR 3
Extension .2 matches DIR 2 and DIR 4
If no extension is specified in the font name, the software automatically selects the font according to the selected direction.
In some EasyCoder printers, outline fonts in Speedo and TrueType
format can be scaled and converted to bitmap fonts.
MAG
Bitmap fonts can be magnified 1-4 times independently in regard
of height and width. Scalable fonts can be scaled to a suitable size
when the bitmap font is generated.
NORIMAGE
INVIMAGE
NORIMAGE (NI) / INVIMAGE (II)
Normally, text is printed in black on a paper-coloured background
(NORIMAGE). Using INVIMAGE the printing can be inversed so
the paper gives the colour of the characters, whereas the background will be black. The size of the background is decided by the
character cell. A NORIMAGE statement is only needed when
changing back from INVIMAGE printing.
PRTXT (PT)
Text can be entered in the form of numeric expressions and/or string
expressions. Two or more expression can be combined using
semicolons (;) or, in case of string expressions, by plus signs (+).
String constants must be enclosed by double quotation marks ("...").
Variables are useful for printing e.g. time, date or various counters,
and when the same information is to appear in several places, e.g.
both as plain text and as bar code input data.
Continued!
107
Intermec Fingerprint 6.13 – Programmer's Guide
10. LABEL DESIGN, cont'd.
2.
Text Field, cont'd.
Summary:
To print a text field, the following information and instructions must
be given (in most cases default values will substitute missing
parameters):
Purpose
X/Y Position
Alignment
Direction
Typeface
Magnification
Style
Text
Print a label
Instruction
PRPOS (PP)
ALIGN (AN)
DIR
FONT (FT)
MAG
INVIMAGE (II)
NORIMAGE (NI)
PRTXT (PT)
PRINTFEED (PF)
Default
0/0
1
1
n.a.
1,1
no
yes
n.a.
n.a.
Remarks
Number of dots
Select ALIGN 1 – 9
Select DIR 1 – 4
e.g. "SW030RSN"
Height 1–4, Width 1–4
White on black print
Black print (revokes INVIMAGE)
Resets parameters to default
Example:
10
20
30
40
50
60
70
80
RUN
PRPOS 100,200
ALIGN 7
DIR 2
FONT "SW030RSN"
MAG 2,2
INVIMAGE
PRTXT "HELLO"
PRINTFEED
108
Intermec Fingerprint 6.13 – Programmer's Guide
10. LABEL DESIGN, cont'd.
3.
Bar Code Field
☞ Bar Codes
Also see:
• Chapter 13
As standard, Intermec Fingerprint supports more than 30 of the
most common bar code symbologies. Other two-dimensional bar
codes and dot codes like PDF417, USD5, MaxiCode, and LEB are
available as options. Each bar code (optionally including its human
readable interpretation) makes up a bar code field.
In addition to the standard positioning statements PRPOS, ALIGN
and DIR, a bar code field can contain the following instructions:
BARSET
This statement species the type of bar code and how it will be printed
and can, if so desired, replace the following statements:
BARHEIGHT (BH)
Height of the bars in the code
BARRATIO (BR)
Ratio between wide and narrow bars
BARTYPE (BT)
Bar code type
BARMAG (BM)
Enlargement
The BARSET statement contains optional parameters for specifying
complex 2-dimensional bar or dot codes, e.g. PDF417 (see Intermec Fingerprint Reference Manual).
For common one-dimensional bar codes the following parameters
should be included in the statement:
• Bar code type
Name must be given according to list in
chapter Appendix A.1 and be enclosed by
double quotation marks ("...").
Default: "INT2OF5"
• Ratio (wide bars)
Default: 3
• Ratio (narrow bars) Default: 1
• Enlargement
Affects the bar pattern but not the interpretation, unless the bar font is an integrated part of the code, e.g. EAN/UPC.
Default: 2
• Height
Height of the bars in dots.
Default: 100.
BARFONT...ON
Specifies the bitmap font or fonts to be used for the bar code
interpretation (human readables). You can e.g. specify one barfont
for printing across the web (DIR 1 & 3) and another for printing
along the web (DIR 2 & 4).
Optionally, the extension can be included in the barfont name. If so,
the extension of the selected barfont must match the print direction:
Extension .1 matches DIR 1 and DIR 3
Extension .2 matches DIR 2 and DIR 4
If no extension is specified in the font name, the firmware automatically selects the barfont according to the selected direction.
Continued!
109
Intermec Fingerprint 6.13 – Programmer's Guide
10. LABEL DESIGN, cont'd.
3.
Bar Code Field, cont'd.
☞ Fonts
Also see:
• Chapter 12
BARFONT...ON, cont'd.
In some EasyCoder printers, outline fonts in Speedo and TrueType
format can be scaled and converted to bitmap fonts.
By default, no barfont is selected. However, in some bar codes the
interpretation is an integrated part of the code, EAN/UPC.
The bar font(s) can also be specified in regard of:
• Distance
Specifies the distance in dots between the
bottom of the bar pattern and the top of the
interpretation characters. Default: 6.
• Magnification (height) Specifies the magnification in regard of
height. Default: 1
• Magnification (width) Specifies the magnification in regard of
width. Default: 1
• ON
Enables the printing of the interpretation.
Default: Disabled
BARFONT OFF
To disable bar code interpretation printing, use BARFONT OFF.
PRBAR (PB)
Input data to be used to generate the bar code can be entered in the
form of a numeric or expressions. String constants must be enclosed
by double quotation marks ("..."). Variables are useful for printing
e.g. time, date or various counters, and when the same information
is to appear in several places, e.g. both as plain text and as bar code
input data.
Summary
To print a bar code field, the following information and instructions
be must given (in most cases default values will substitute missing
information):
Purpose
X/Y Position
Alignment
Direction
Bar Code Select
Human Readables
Input Data
Print a label
Instruction
PRPOS (PP)
ALIGN (AN)
DIR
BARSET
BARFONT...ON
PRBAR (PB)
PRINTFEED (PF)
Default
0/0
1
1
see above
Off
n.a.
n.a.
Remarks
Number of dots
Select ALIGN 1 – 9
Select DIR 1 – 4
Can be omitted
Resets parameters to default
Example:
10
20
30
40
50
60
70
RUN
PRPOS 50,500
ALIGN 7
DIR 4
BARSET "CODE39",2,1,3,120
BARFONT #2,"SW030RSN",5,1,1 ON
PRBAR "ABC"
PRINTFEED
110
Intermec Fingerprint 6.13 – Programmer's Guide
10. LABEL DESIGN, cont'd.
4.
Image Field
☞ Image Downloading
Also see:
• Chapter 14
An image field is a field containing a picture or logotype, which has
been converted to the internal bitmap format of Intermec Fingerprint.
In addition to the standard positioning statements PRPOS, ALIGN
and DIR, an image field can contain the following instructions:
MAG
Images can be magnified 1-4 times independently in regard of
height and width.
NORIMAGE (NI) / INVIMAGE (II)
Normally, images are printed as created, i.e. in black without any
background (NORIMAGE). Using INVIMAGE the black and
non-printed background can exchange colours. The size of the
background is decided by the size of the image. A NORIMAGE
statement is only needed when changing back from INVIMAGE
printing.
PRIMAGE (PM)
Specifies the image by name in the form of a string expression. A
string constant must be enclosed by double quotation marks ("...").
A string variable may be useful when the same image is to appear
in several places. The extension indicates the suitable directions:
Extension .1 matches DIR 1 and DIR 3
Extension .2 matches DIR 2 and DIR 4
Summary
To print an image field, the following instructions must be given (in
most cases default values will substitute missing information):
Purpose
X/Y Position
Alignment
Direction
Magnification
Style
Image
Print a label
Instruction
PRPOS (PP)
ALIGN (AN)
DIR
MAG
INVIMAGE (II)
NORIMAGE (NI)
PRIMAGE (PM)
PRINTFEED (PF)
Default
0/0
1
1
1,1
no
yes
n.a.
n.a.
Remarks
Number of dots
Select ALIGN 1 – 9
Select DIR 1 – 4
Height 1–4, Width 1–4
Black and white parts switched
Normal (revokes INVIMAGE)
.1 or .2 depending on direction
Resets parameters to default
Example:
10
20
30
40
50
60
70
RUN
PRPOS 50,50
ALIGN 9
DIR 3
MAG 2,2
INVIMAGE
PRIMAGE "GLOBE.1"
PRINTFEED
111
Intermec Fingerprint 6.13 – Programmer's Guide
10. LABEL DESIGN, cont'd.
5.
Box Field
A box is a hollow square or rectangle that can be rotated with an
increment of 90° according to the print direction. If the line
thickness is sufficiently large, the box will appear to be filled
(another method is to print an extremely thick short line).
In addition to the standard positioning statements PRPOS, ALIGN
and DIR, a box field can only contain the following instruction:
PRBOX (PX)
Specifies the size of the box in regard of height, width and line
weight (thickness) in dots.
Summary
To print a box, the following information and instructions must be
given (in some cases default values will substitute missing information):
Purpose
X/Y Position
Alignment
Direction
Box spec:s
Instruction
PRPOS (PP)
ALIGN (AN)
DIR
PRBOX (PX)
Default
0/0
1
1
n.a.
Print a label
PRINTFEED (PF)
n.a.
Remarks
Number of dots
Select ALIGN 1 – 9
Select DIR 1 – 4
Height, width and line weight
in dots
Resets parameters to default
Example:
10
20
30
40
50
RUN
PRPOS 250,250
ALIGN 1
DIR 3
PRBOX 200,200,10
PRINTFEED
112
Intermec Fingerprint 6.13 – Programmer's Guide
10. LABEL DESIGN, cont'd.
6.
Line Field
A line can be printed in right angles along or across the paper
according to the print direction.
In addition to the standard positioning statements PRPOS, ALIGN
and DIR, a line field can only contain the following instruction:
PRLINE (PL)
Specifies the size of the line in regard of length and line weight
(thickness) in dots.
Summary
To print a line, the following information and instructions must be
given (in some cases default values will substitute missing information):
Purpose
X/Y Position
Alignment
Direction
Line spec:s
Print a label
Instruction
PRPOS (PP)
ALIGN (AN)
DIR
PRLINE (PL)
PRINTFEED (PF)
Default
0/0
1
1
n.a.
n.a.
Remarks
Number of dots
Select ALIGN 1 – 9
Select DIR 1 – 4
Length and thickness in dots
Resets parameters to default
Example:
10
20
30
40
50
RUN
PRPOS 100,100
ALIGN 1
DIR 4
PRLINE 200,10
PRINTFEED
113
Intermec Fingerprint 6.13 – Programmer's Guide
10. LABEL DESIGN, cont'd.
7.
Layout Files
Introduction
Many application, e.g. in connection with booking and ticketing,
require the label layout as well as variable input data and logotypes
to be sent to the printer as files or arrays. This method requires less
programming in the printer and less data to be transferred between
printer and host, but some kind of overhead program in the host, that
handles file transfers as well as the input of data, is of great help.
The Intermec Fingerprint instruction is a statement called LAYOUT. Before using this statement, a number of files or arrays must
be created.
Creating a Layout File
The basis of the method is a layout file in random format, that
contains a number of records of various types, each with a length of
52 bytes.
Each record starts with a 2-byte hexadecimal element number
(bytes 0–1) which is used to link the layout record with a variable
input record or a record in a layout name file as explained later.
Byte 2 contains a single character that specifies the type of record:
A = Logotype (specified by its name)
B = Bar Code
C = Character (i.e. plain text)
E = Bar code extended field
Corresponds to 6 last parameters in BARSET statement. Must
have lower element number than the corresponding barcode
record (B).
H = Bar Code Font
J = Baradjust (corresponds to BARADJUST statement)
L = Logotype (specified by its number)
S = Separation line
X = Box
The remaining bytes are used differently depending on type of
record and may specify direction, position, font etc. Each such
instruction corresponds to an Intermec Fingerprint instruction, e.g.
direction corresponds to DIR statement, alignment to ALIGN, xand y-positions to PRPOS etc.
Text and bar code records can contain both fixed and variable data.
The fixed data (max. 20 characters) are entered in the layout record.
A parameter (bytes 43–44) specifies how many characters (starting
from the first character) of the fixed data that will be printed or used
to generate the bar code. Possible variable data will be appended to
the fixed data at the position specified in bytes 43–44.
Continued!
114
Intermec Fingerprint 6.13 – Programmer's Guide
10. LABEL DESIGN, cont'd.
7.
Layout Files, cont'd.
Creating a Layout File, cont'd.
LOGOTYPE RECORD (by name):
Element No. (00–FF hex)
Type of record
Direction (1–4)
Alignment (1–9)
X-Position (0–9999)
Y-Position (0–9999)
Logotype name (10 char)
Example
Not used
Normal (blank) or
Inverse printing (I_)
Vertical mag.
Horizontal mag.
Not used
Not used
01A13300 800 GLOBE.1
11
Byte No. 0 1 2 3 4 5 6 7 8 9 10 11 12 13 14 15 16 17 18 19 20 21 22 23 24 25 26 27 28 29 30 31 32 33 34 35 36 37 38 39 40 41 42 43 44 45 46 47 48 49 50 51
BAR CODE RECORD:
Element No. (00–FF hex)
Type of record
Direction (1–4)
Alignment (1–9)
X-Position (0–9999)
Y-Position (0–9999)
Barcode name (10 char.)
Example
01B17100 300 CODE39
Char. to be printed
in byte 23-42
Fixed Data (max. 20 char.)
Wide/narrow bar
ratio
Magnification
Not used
Height
ABCDEFGHIJKLMNOPQRST3 311 100
Byte No. 0 1 2 3 4 5 6 7 8 9 10 11 12 13 14 15 16 17 18 19 20 21 22 23 24 25 26 27 28 29 30 31 32 33 34 35 36 37 38 39 40 41 42 43 44 45 46 47 48 49 50 51
TEXT RECORD:
Element No. (00–FF hex)
Type of record
Direction (1–4)
Alignment (1–9)
X-Position (0–9999)
Y-Position (0–9999)
Font name (10 char.)
Example
Char. to be printed
in byte 23-42
Fixed Text (max. 20 char.)
01C11130 450 SW030RSN.1Fixed Text
Normal (blank) or
Inverse printing (I_)
Vertical mag.
Horizontal mag.
Not used
0 I 11
Byte No. 0 1 2 3 4 5 6 7 8 9 10 11 12 13 14 15 16 17 18 19 20 21 22 23 24 25 26 27 28 29 30 31 32 33 34 35 36 37 38 39 40 41 42 43 44 45 46 47 48 49 50 51
BAR CODE EXTENDED FIELD RECORD:
Element No. (00–FF hex)
Type of record
Security (0-9)
Aspect height ratio (0-9)
Aspect width ratio (0-9)
Rows (0-99)
Columns (0-99)
Truncate (0-9)
Example
01E212
0
Not used
Not used
Not used
Not used
Not used
Not used
0 0
Byte No. 0 1 2 3 4 5 6 7 8 9 10 11 12 13 14 15 16 17 18 19 20 21 22 23 24 25 26 27 28 29 30 31 32 33 34 35 36 37 38 39 40 41 42 43 44 45 46 47 48 49 50 51
Continued!
115
Intermec Fingerprint 6.13 – Programmer's Guide
10. LABEL DESIGN, cont'd.
7.
Layout Files, cont'd.
Creating a Layout File, cont'd.
BAR CODE INTERPRETATION RECORD:
Element No. (00–FF hex)
Type of record
Barfont on/off
0=Off
1=On
Not used
Not used
Example
Not used
01H1
Barfont name (10 char.)
Not used
Not used
Not used
Not used
Not used
Not used
SW050RSN.1
Byte No. 0 1 2 3 4 5 6 7 8 9 10 11 12 13 14 15 16 17 18 19 20 21 22 23 24 25 26 27 28 29 30 31 32 33 34 35 36 37 38 39 40 41 42 43 44 45 46 47 48 49 50 51
BARADJUST RECORD:
Element No. (00–FF hex)
Type of record
Not used
Not used
Baradjust left (0-9999)
Baradjusr right (0–9999)
Not used
Example
01J
50
Not used
Not used
Not used
Not used
Not used
Not used
50
Byte No. 0 1 2 3 4 5 6 7 8 9 10 11 12 13 14 15 16 17 18 19 20 21 22 23 24 25 26 27 28 29 30 31 32 33 34 35 36 37 38 39 40 41 42 43 44 45 46 47 48 49 50 51
LOGOTYPE RECORD (by number):
Element No. (00–FF hex)
Type of record
Direction (1–4)
Alignment (1–9)
X-Position (0–9999)
Y-Position (0–9999)
Not used
Example
01L13300 800
Not used
Normal (blank) or
Inverse printing (I_)
Vertical mag.
Horizontal mag.
Not used
Logotype Number (0-99)
1
11
Byte No. 0 1 2 3 4 5 6 7 8 9 10 11 12 13 14 15 16 17 18 19 20 21 22 23 24 25 26 27 28 29 30 31 32 33 34 35 36 37 38 39 40 41 42 43 44 45 46 47 48 49 50 51
LINE RECORD:
Element No. (00–FF hex)
Type of record
Direction (1–4)
Alignment (1–9)
X-Position (0–9999)
Y-Position (0–9999)
Line length (0-6000)
Example
01S11100 100 300
Not used
Line thickness (0-6000)
Not used
Not used
Not used
Not used
10
Byte No. 0 1 2 3 4 5 6 7 8 9 10 11 12 13 14 15 16 17 18 19 20 21 22 23 24 25 26 27 28 29 30 31 32 33 34 35 36 37 38 39 40 41 42 43 44 45 46 47 48 49 50 51
BOX RECORD:
Element No. (00–FF hex)
Type of record
Direction (1–4)
Alignment (1–9)
X-Position (0–9999)
Y-Position (0–9999)
Box Width (0–6000)
Example
05X11100 440 300
Not used
Not used
Not used
Not used
Line thickness
(0-999)
Box height (0-6000)
100
5
Byte No. 0 1 2 3 4 5 6 7 8 9 10 11 12 13 14 15 16 17 18 19 20 21 22 23 24 25 26 27 28 29 30 31 32 33 34 35 36 37 38 39 40 41 42 43 44 45 46 47 48 49 50 51
Continued!
116
Intermec Fingerprint 6.13 – Programmer's Guide
10. LABEL DESIGN, cont'd.
7.
Layout Files, cont'd.
Creating a Layout File, cont'd.
This example shows how a small layout file can be composed:
10
20
30
40
50
60
70
80
90
OPEN "LAYOUT.DAT" FOR OUTPUT AS 2
PRINT #2, "01H1
SW030RSN.1
PRINT #2, "02C11100 650 SW030RSN.1Fixed Text
PRINT #2, "02C11130 450 SW030RSN.1Fixed Text
PRINT #2, "03B17100 300 CODE39
ABC
PRINT #2, "04A12300 800 GLOBE.1
PRINT #2, "05X11100 440 300
100
PRINT #2, "06S11100 100 300
10
CLOSE 2
";
11I 22
";
0
11
";
3 311 100";
11
";
5 ";
";
Open random file
Barfont record
Text record
Text record
Bar code record
Logotype record
Box record
Line record
Close file
There are certain rules that should be observed:
• Each record must be exactly 52 bytes long and be appended by a
semicolon (;).
• It is essential that the different types of data are entered exactly in
the correct positions. Any input in unused bytes will be ignored.
• The records are executed in the order they are entered. The
reference number at the start of each record does not affect the
order of execution. This implies that a barfont record will affect
all following bar code records, but not those already entered.
• When using bar code interpretation, do not enter a bar code record
directly after a record with inverse printing, since the bar code
interpretation will be inversed as well. A text or logotype record
without inverse printing between the bar code record and the
inversed record will reset printing to normal.
Creating a Logotype Name File
Next step is to create a logotype name file. This is a necessary step
even if you are not going to use any logotype in your layout (in this
case the file can be empty). In the layout file, you can set a logotype
record to use logotypes specified either by name or by number.
• If you specify logotype-by-name (record type A), the printer's
entire memory will be searched for an image with the specified
name. A logotype-by-name file is composed by a number of
records with a length of 10 bytes each that contain the image
names, e.g.:
10
20
30
40
50
60
OPEN "LOGNAME.DAT" FOR OUTPUT AS 1
PRINT#1, "GLOBE.1
"
PRINT#1, "GLOBE.2
"
PRINT#1, "DIAMONDS.1"
PRINT#1, "DIAMONDS.2";
CLOSE 1
Note that the last record in a sequential file must be appended by
a semicolon (;).
Continued!
117
Intermec Fingerprint 6.13 – Programmer's Guide
10. LABEL DESIGN, cont'd.
7.
Layout Files, cont'd.
Creating a Logotype Name File, cont'd.
• If you specify logotype-by-number (record type L), you must
have a logotype name file. A logotype-by-number file is composed
by a number of records with a length of 13 bytes each. The first
2 bytes is a reference number (0–99), the third byte is always a
colon (:) and the following 10 bytes are used for the image name:
10
20
30
40
50
60
OPEN "LOGNAME.DAT" FOR OUTPUT AS 1
PRINT#1, "0 :GLOBE.1
"
PRINT#1, "1 :GLOBE.2
"
PRINT#1, "2 :DIAMONDS.1"
PRINT#1, "3 :DIAMONDS.2";
CLOSE 1
Note that the last record in a sequential file must be appended by
a semicolon (;).
Creating a Data File or Array
IMPORTANT!
The LAYOUT statement requires that you
use the same format (either files or arrays)
for both data and errors.
You will also need a data file or data array. This file or array contains
variable data that will be placed in the position specified by the
layout. Each data record starts with a hexadecimal element number
(00-FF hex) that links the data to the layout record or records that
start with the same element number. Thus you can e.g. use a single
data record to generate a number of text fields with various locations
and appearances as well as to generate a bar code.
If you for some reason do not use variable data, you will still need
to create either an empty data file or an empty data array.
☞ Arrays
Also see:
• Chapter 6.10
• Create a data array like this:
10
20
30
40
50
60
70
80
DIM LAYDATA$(7)
LAYDATA$(0)="01Mincemeat"
LAYDATA$(1)="0AVeal"
LAYDATA$(2)="17Roast Beef"
LAYDATA$(3)="3FSausages"
LAYDATA$(4)="02Venison"
LAYDATA$(5)="06Lamb Chops"
LAYDATA$(6)="7CPork Chops"
• You can create a data file with the same content in a similar way:
10
20
30
40
50
60
70
80
90
OPEN "LAYDATA.DAT" FOR OUTPUT AS 1
PRINT#1,"01Mincemeat"
PRINT#1,"0AVeal"
PRINT#1,"17Roast Beef"
PRINT#1,"3FSausages"
PRINT#1,"02Venison"
PRINT#1,"06Lamb Chops"
PRINT#1,"7CPork Chops";
CLOSE 1
Note that the last record in a sequential file must be appended by
a semicolon (;).
Continued!
118
Intermec Fingerprint 6.13 – Programmer's Guide
10. LABEL DESIGN, cont'd.
7.
Layout Files, cont'd.
Creating an Error File or Array
The last requirement is an error file or array that can store any errors
that may occur. If you use a data array, you must use an error array,
and if you use a data file, you must use an error file. The following
errors will be stored and presented in said order:
1 If an error occurs in a layout record, the number of the record
(1...nn) and the error number is placed in the error array or file.
2 If a data record cannot be used in a layout record, an the index of
the unused data record (0...nn) plus the error code -1 is placed in
the error array or file.
☞ Arrays
Also see:
• Chapter 6.10
• Error arrays must be large enough to accommodate all possible
errors. Thus, use a DIM statement to specify a one-dimensional
array with a number of elements that is twice the sum of all layout
records plus twice the sum of all data records. You should also
include some routine that reads the array, e.g.:
10 DIM QERR%(28)
20 QERR%(0)=0
.....
190 IF QERR%(1)=0 THEN GOTO 260
200 PRINT "-ERROR- LAYOUT 1"
210 I%=0
220 IF QERR%(I%)=0 THEN GOTO 260
230 PRINT "ERROR ";QERR%(I%+1);" in record ";QERR%(I%)
240 I%=I%+2
250 GOTO 220
260 PRINTFEED
• Error files require a little more programming to handle the error
message, e.g.:
220
230
240
250
260
270
280
OPEN "ERRORS.DAT" FOR INPUT AS 10
IF EOF(10) THEN GOTO 280 ELSE GOTO 240
FOR A%=1 TO 28
INPUT #10, A$
PRINT A$
NEXT A%
PRINTFEED
Note that the loop in line 240 must be large enough to accommodate
all possible errors.
Continued!
119
Intermec Fingerprint 6.13 – Programmer's Guide
10. LABEL DESIGN, cont'd.
7.
Layout Files, cont'd.
Using the Files in a LAYOUT Statement
Now, you have all the files you need to issue a LAYOUT statement.
This statement combines the layout file, the logotype file, the data
file/array, and the error file/array into a printable image. Depending
on whether you have selected to use data and error files or arrays,
the statement will have a somewhat different syntax:
Files:
LAYOUT F, <layout file>, <logotype file>,<data file>,<error file>
Arrays:
LAYOUT <layout file>,<logotype file>,<data array>,<error array>
Note that you cannot omit any file or array, since the syntax requires
a file name or array designation in each position. If you, for
example, do not require any logotype, you must still create an empty
logotype file.
Example:
The example below shows a simple layout created using the layout
statement in combination with data and error arrays:
10 DIM QERR%(28)
20 LAYDATA$(0)="02Var. input"
30 LAYDATA$(1)="03 PRINTER"
40 QERR%(0)=0
50 OPEN "LOGNAME.DAT" FOR OUTPUT AS 1
60 PRINT #1, "Intermec.1";
70 CLOSE 1
80 REM:LAYOUT FILE
90 OPEN "LAYOUT.DAT" FOR OUTPUT AS 2
100 PRINT #2, "01H1
SW030RSN.1
";
110 PRINT #2, "02C11100 650 SW030RSN.1Fixed Text
11I 22
";
120 PRINT #2, "02C11130 450 SW030RSN.1Fixed Text
0
11
";
130 PRINT #2, "03B17100 300 CODE39
ABC
3 311 100";
140 PRINT #2, "04A12300 800 GLOBE.1
11
";
150 PRINT #2, "05X11100 440 300
100
5 ";
160 PRINT #2, "06S11100 100 300
10
";
170 CLOSE 2
180 LAYOUT "LAYOUT.DAT","LOGNAME.DAT",LAYDATA$,QERR%
190 IF QERR%(1)=0 THEN GOTO 260
200 PRINT "-ERROR- LAYOUT 1"
210 I%=0
220 IF QERR%(I%)=0 THEN GOTO 260
230 PRINT "
ERROR
"; QERR%(I%+1); " in record "; QERR%(I%)
240 I%=I%+2
250 GOTO 220
260 PRINTFEED
RUN
120
Intermec Fingerprint 6.13 – Programmer's Guide
11. PRINTING CONTROL
1.
Paper Feed
In order to provide maximum flexibility, there are a number of
instructions for controlling the paper feed without actually printing
any labels:
CLEANFEED
Runs the printer's paper feed mechanism in
order to facilitate cleaning of the print roller.
FORMFEED
Feeds out a blank label or optionally feeds
out or pulls back a certain amount of paper
without printing.
TESTFEED
Feeds out a blank label while adjusting the
label stop sensor or black mark sensor.
LBLCOND
Overrides the paper feed setup.
The paper is feed past the printhead by a rubber-coated roller driven
by a stepper motor controlled by the firmware. The movement of
the paper is detected by the label stop sensor (LSS) or black mark
sensor (BMS), except when various types of paper strip are used.
The printer's setup in regard of Service; Media Size; Length and
Service; Media Type is essential for how the paper feed will work.
There are four or five different types of Media Type options (also
see Technical Manual):
• Label (w gaps)
• Ticket (w mark)
(some printer models only)
• Ticket (w gaps)
• Fix length strip
• Var length strip
When a FORMFEED, TESTFEED or PRINTFEED statement is
executed, the photoelectrical label stop sensor detects the front edge
of each new label or the front edge of each detection gap (or the
alternative black mark sensor detects the front edge of each black
mark), as the paper is moved past the sensor in question.
By performing a couple of FORMFEED or TESTFEED operations
after loading a new supply of paper, the firmware is able to measure
the distance between the front edges of two consecutive labels,
thereby determining the label length, and can adjust the paper feed
accordingly. The same principle applies to tickets or tags with
detection gaps and tickets with black marks.
In case of paper strip, the LSS will only detect possible out-of-paper
conditions, and the amount of paper feed is decided in two different
ways:
• Fixed length strip
The amount of paper feed for each FORMFEED, TESTFEED
and PRINTFEED operation is decided by the Service; Media
Size; Length setup.
Continued!
121
Intermec Fingerprint 6.13 – Programmer's Guide
11. PRINTING CONTROL, cont'd.
1.
Paper Feed, cont'd.
• Variable length strip
At the execution of a PRINTFEED, the firmware will add a
sufficient amount of paper feed after the last printable object to
allow the paper to be torn off. Note that e.g. a blank space character
or a “white” part of an image is also regarded as a printable object.
The length of TESTFEED and FORMFEED operations is decided
by the Service; Media Size; Length setup.
The Detection; Feedadjust setup allows you to perform two global
adjustments to the paper feed described above:
• Start Adjust
• Stop Adjust
By default, both are set to 0, which allows for proper tear-off
operation when there is no requirement of printing immediately at
the front edge of the label (or equivalent media).
• Start Adjust decides how much paper will be fed out or pulled
back before the FORMFEED, TESTFEED or PRINTFEED is
executed. Usually, there is a small distance between the dispenser
shaft or tear off edge and the printhead. Thus, if you want to start
printing directly at the front edge of the label, you must pull back
the paper before printing by means of a negative start adjust value.
• Stop Adjust decides how much extra or less paper will be fed out
after the FORMFEED, TESTFEED or PRINTFEED is executed.
Note that so far we have only discussed how the paper feed will
work regardless which program is run or what labels are printed.
There are several ways to let the program control the paper feed
without changing the setup:
• FORMFEED
As already mentioned, if the FORMFEED statement is issued
without any specification of the feed length, it will feed out a
complete blank label (or the equivalent). But if the FORMFEED
statement is specified as a positive or negative number of dots, it
can be used to substitute or modify the global Start Adjust and
Stop Adjust setup as a part of the program execution. It is
important whether the FORMFEED statement is executed before
or after the PRINTFEED statement:
- FORMFEED before PRINTFEED corresponds to Start Adjust.
- FORMFEED after PRINTFEED corresponds to Stop Adjust.
• LBLCOND
The LBLCOND statement can be used to override the values for
the Start Adjust and/or Stop Adjust set in the Setup Mode. It can
also be used to disable the LSS/BMS for a specified length of
paper feed, e.g. to avoid text or pictures on the backside of a ticket
being mistakenly detected as black marks, or when using irregularly
shaped labels.
Continued!
122
Intermec Fingerprint 6.13 – Programmer's Guide
11. PRINTING CONTROL, cont'd.
1.
Paper Feed, cont'd.
The relation between paper and printhead when the PRINTFEED
statement is executed decides all positioning along the Y-axis, i.e.
along the paper web. Likewise, the relation between the paper and
the cutting edge when a CUT statement is executed decides where
the paper will be cut off.
2.
Preparing the Printing
In some applications, it is essential that the printout is delivered
immediately after the printing has been triggered, e.g. by an external
device, see chapter 7.10. The PRINTFEED NOT statement is used
for such purposes.
PRINTFEED NOT
This statement does not produce any printout, but prepares the
printer by preprocessing as much of the label layout as the size of
image buffer allows. Thus the printing can start as soon as a
PRINTFEED statement is executed. The larger the image buffer,
the more processing time is saved.
3.
Printing
The following instructions are used in connection with the actual
printing:
CUT
Activates the optional paper cutter.
CUT ON/OFF
Enables/disables automatic cut-off operation in connection with each PRINTFEED
statement.
LTS& ON/OFF
Enables/disables the label-taken sensor.
PRINT KEY ON/OFF Enables/disables PRINTFEED execution by
means of the <Print> key.
PRINTFEED
Prints a single label, ticket, tag or piece of
strip, or a batch of labels, tickets etc.
CUT
Activates the optional paper cutter. As opposed to the CUT ON/
OFF statement (see below), this statement allows you to control the
cutter independently from the PRINTFEED statements. Since
there is a longer distance from the printhead to the cutting edge than
to the tear-off edge, the paper feed will need to be adjusted by means
of the Start- and Stopadjust setup or FORMFEED statements.
CUT ON/OFF
Enables/disables automatic cut-off initiated by each PRINTFEED
statement and also allows you to decide the distance in dots by
which the paper will be fed out before cutting and pulled back
afterwards.
Continued!
123
Intermec Fingerprint 6.13 – Programmer's Guide
11. PRINTING CONTROL, cont'd.
3.
Printing, cont'd.
LTS& ON/OFF
These statements enables or disables the label-taken sensor, which
is an photoelectrical sensor that detects when a label has not been
removed from the printer's outfeed slot, and holds the printing until
the label has been removed.
PRINT KEY ON|OFF
These two instructions can only be issued in the Immediate Mode
and in the Intermec Direct Protocol and enables/disables a single
PRINTFEED operation to be automatically executed each time the
<Print> key is pressed.
PRINTFEED (PF)
At the execution of a PRINTFEED statement, the firmware processes all previously entered text fields, bar code fields, image fields,
box fields and line fields (see chapter 10) into a bitmap pattern. The
bitmap pattern controls the heating of the printhead dots and the
stepper motor that feeds the paper past the printhead. By default,
each PRINTFEED statement produces one single copy, but the size
of a batch of labels (or the equivalent) can optionally be specified.
The execution of a PRINTFEED statement (as opposed to
PRINTFEED NOT) resets these statements to their respective
default values:
ALIGN
BARHEIGHT
BARTYPE
BARSET
BARFONT
BARMAG
DIR
BARFONT ON/OFF INVIMAGE
BARRATIO
MAG
FONT
PRPOS
This does only affect new statements executed after the PRINTFEED
statement, but not already executed statements. The amount of
paper fed out at the execution of a PRINTFEED statements under
various conditions was discussed in chapter 11.1.
Example (printing five identical labels):
10
20
30
40
RUN
PRPOS 100, 100
FONT "SW030RSN"
PRTXT "TEST LABEL"
PRINTFEED 5
Example (printing five copies of the same label layout with consecutive numbering):
10
20
30
40
50
60
RUN
FOR A%=1 TO 5
PRPOS 100, 100
FONT "SW030RSN"
PRTXT "LABEL ";A%
PRINTFEED
NEXT A%
Continued!
124
Intermec Fingerprint 6.13 – Programmer's Guide
11. PRINTING CONTROL, cont'd.
4.
Length of Last Feed
Operation
ACTLEN
This function returns the approximate length in dots of most
recently executed paper feed operation. It can for example be used
to determine the length of the labels before printing a list, so the list
can be divided into portions that fit the labels.
Example:
10
20
RUN
5.
Batch Printing
FORMFEED
PRINT ACTLEN
The term “Batch Printing” means the process of printing several
labels without stopping the paper feed motor between labels. The
labels may be exact copies or differ more or less in appearance.
For batch printing, the most critical factor is the time required to
process the print image, as specified by the program, into a bitmap
pattern and store it in the image buffer. The image buffer compensates for differences between processing time and printing time. If
the label layout is too large as to be stored in its entity in the image
buffer, the layout will be divided into a number of segments across
the paper feed direction, that will be processed one after the other
and downloaded to the image buffer. As the buffer is emptied by
printing, a new segment can be processed and downloaded.
A large image buffer takes more time to process and fill, which may
delay the start of the printing, whereas a small image buffer may be
emptied before a new segment has been processed and downloaded. The print speed is also important. Obviously, the faster a
label is printed, the faster next segment or label must be processed.
There are a number of instructions that facilitate batch printing:
FIELDNO
Divides the program into portions that can be
cleared individually.
CLL
Clears part or all of the image buffer.
OPTIMIZE ON
Enables optimizing. Three optimizing strategies are available.
OPTIMIZE OFF
Disables optimizing.
When using batch printing, consider this:
• The program must be written as to allow batch printing.
• In case of small differences between labels, make use of CLL and
FIELDNO instructions and write the program so the variable data
are processed last.
• Always use the OPTIMIZE "BATCH" ON strategy.
• Increase or decrease the size of the image buffer as to obtain a
smooth flow of data to the printhead.
Continued!
125
Intermec Fingerprint 6.13 – Programmer's Guide
11. PRINTING CONTROL, cont'd.
5.
Batch Printing, cont'd.
Should any problems arise, e.g. the printer stops between labels, the
image buffer is probably too small. Increase the image buffer in the
Setup Mode, lower the print speed, or make the print image easier
to process. Vertical printing (DIR 2 & 4) is more demanding for text
in regard of buffer size and processing time. If possible, design the
label so most of the text is printed horizontally (DIR 1 & 3). The
print direction does not matter so much for bar codes, lines, boxes
and images. However, ladder style bar codes (DIR 2 & 4) generally
lowers the print speed.
CLL & FIELDNO
The image buffer stores the bitmap pattern of the label layout
between processing and printing. The size of the image buffer is
decided in the Setup Mode. The image buffer can be cleared
partially or completely by means of a CLL statement.
• Complete clearing is obtained by a CLL statement without any
reference to a field (see below) and is useful to avoid printing a
faulty label after certain errors have occurred.
• Partial clearing is used in connection with print repetition when
only part of the label should be modified between the copies. In
this case, the CLL statement must include a reference to a field,
specified by a FIELDNO function. When a CLL statement is
executed, the image buffer will be cleared from the specified field
to the end of the program.
In this example, the text “Month” is kept in the image buffer,
whereas the names of the months are cleared from the image buffer
as soon as they are printed, one after the other:
10
20
30
40
50
70
80
90
100
110
120
130
140
150
RUN
FONT "SW030RSN"
MAG 2,2
PRPOS 100,300
PRTXT "MONTH:"
PRPOS 100,200
A%=FIELDNO
PRTXT "JANUARY":PRINTFEED
CLL A%
PRPOS 100,200
PRTXT "FEBRUARY":PRINTFEED
CLL A%
PRPOS 100,200
PRTXT "MARCH":PRINTFEED
CLL A%
Continued!
126
Intermec Fingerprint 6.13 – Programmer's Guide
11. PRINTING CONTROL, cont'd.
5.
Batch Printing, cont'd.
OPTIMIZE ON/OFF
The OPTIMIZE ON statement is used to speed up batch printing.
There are three optimizing strategies:
The processing, which is performed before the printing starts, is minimized on the basis of an analysis of the
preceding label's appearance.
"STRING" All printable strings are converted to bitmap format,
which makes the printing faster, provided the strings
are not altered between copies. However, this requires
more RAM memory. Should any difficulties be encountered during printing, disable the "STRING"
optimizing strategy and try again.
"BATCH"
The program execution will not wait for the label to be
printed, but proceeds as soon as the print image has
been transferred to the image buffer.
"PRINT"
If no strategy is specified in the OPTIMIZE ON statement, both
"PRINT" and "STRING" optimizing strategies will be enabled at
the same time.
In case of batch printing with LTS& OFF and CUT OFF, the
"BATCH" optimizing strategy is automatically enabled.
OPTIMIZE OFF revokes OPTIMIZE ON.
Continued!
127
Intermec Fingerprint 6.13 – Programmer's Guide
12. FONTS
1.
Bitmap Fonts
Fonts in Intermec Fingerprint come in bitmap format and are
derived from scalable outline fonts in Speedo or TrueType format.
Usually, each font comes in two versions, one has the extension “.1”
and is used for printing across the paper web (DIR 1 & 3), and
another with the extension “.2” for printing along the paper web
(DIR 2 & 4). Fonts can be used both for printing plain text and bar
code interpretations in human readable characters (barfonts).
Note that there is no default font. Before a text or bar code interpretation can be printed, a font must be specified using a FONT or
BARFONT statement. An exception is such bar codes where the
interpretation is an integrated part of the code, e.g. EAN and UPC.
If no extension is included in the name of the font or barfont, the
firmware will automatically select the version that fits the current
print direction.
The Intermec Fingerprint EPROMs fitted in the first pair of sockets
on the CPU board always contain the fonts "SW030RSN.1" and
"SW030RSN.2.". The other EPROMs may contain additional
fonts.
The Intermec Fingerprint font designation system is made up by 10
characters providing information on the characteristics of the font:
Height of the character cell
Print directions and fontname
extensions.
VVnnnXYZ.d, where....
VV is a two-character abbreviation of the font name, e.g. SW for
Swiss, MS for Monospaced, or PS for Prestige.
nnn is the height of the font matrix cell in dots incl. ascenders and
descenders.
X
is the style:
R = Regular (Roman)
I = Italic
B = Bold
O = Bold Italic
Y
is the letter spacing:
S = Proportionally spaced.
M = Monospaced
Z
is the character width: N = Normal
C = Compressed
E = Extended
.
is a separating period character between name and extension.
d
is the extension, which specifies in which print directions the
font can be used:
1 = DIR 1 & DIR 3
2 = DIR 2 & DIR 4
Example:
SW030RSN.1 means “Swiss, 030 dots high, Regular, Proportionally spaced, Normal width, Direction 1 & 3”.
Continued!
128
Intermec Fingerprint 6.13 – Programmer's Guide
12. FONTS, cont'd.
2.
Converting Outline Font
Files via Toolbox
Outline font files in Speedo format can be converted to the Intermec
Fingerprint *.ATF format using the Toolbox Fonts program. The
*.ATF fonts can then be specified in regard of direction and range
of characters and be converted to binary files in Toolbox Configuration, after which they are either stored as fonts in EPROM's or
memory cards, or downloaded to the printer's RAM memory, e.g.
using the Kermit protocol (see chapter 6.8) or the FILE& LOAD
statement.
Fonts can be deleted from the RAM memory using a REMOVE
FONT statement.
3.
Converting Outline Font
Files via Scalable Fonts
Kit
Some printer models have a CPU board with a third pair of EPROM
sockets, e.g. EasyCoder 401/501/601. Such printers can be fitted
with a “Scalable Fonts Kit” which allows standard outline font files
in Speedo and TrueType formats to be converted to bitmap fonts in
sizes and appearances decided by a FONT statement.
Fonts converted from outline font files by means of a FONT
statement can be given any name, but it is recommended to follow
the Intermec Fingerprint convention regarding extensions.
Intermec Shell Enhanced provides an even easier way of converting
outline font files to bitmap fonts, provided the printer is fitted with
both a “Scalable Fonts Kit” and a keyboard. The operator is
prompted by messages in the display to specify the various parameters via the printer's keyboard (see the Technical Manual).
Fonts converted from Intermec Shell are automatically given a
name based on the name of the original outline font file.
After conversion, the bitmap fonts will be stored in the printer's
RAM memory, either permanently or until next power up. Fonts
can be deleted from the RAM memory using a REMOVE FONT
statement.
4.
Converting .ATF Fonts
In printers fitted with the two extra EPROMs of the scalable fonts
kit, it is possible to use the statement FONT LOAD to download and
convert fonts in .ATF format to the printer's memory, where they
can be saved either permanently or until next power-up. Fonts can
be deleted from the RAM memory using a REMOVE FONT
statement.
Continued!
129
Intermec Fingerprint 6.13 – Programmer's Guide
12. FONTS, cont'd.
5.
Listing Fonts
Regardless in which parts of the memory the different bitmap fonts
are stored, they can all be listed to the standard OUT channel by a
single statement, namely FONTS. This statement does not list
dedicated bar code fonts.
Another method of listing bitmap fonts is to use a FONTNAME$
function, which also will list dedicated barcode fonts.
Font files can be listed to the standard OUT channel by means of the
FILES statement.
This example shows how all fonts can be listed:
10
20
30
40
50
A$ = FONTNAME$(0)
IF A$ ="" THEN END
PRINT A$
A$ = FONTNAME$(-1)
GOTO 20
RUN
5.
Special Fonts
If you have special requests regarding fonts, these can be solved in
different ways:
• Order a set of configuration EPROM:s or a memory card containing
the font(s) you require directly from your local Intermec distributor.
• Use Toolbox to convert an outline font file to bitmap format and
download it to the desired part of the printer's memory (EPROM's,
RAM memory or memory card).
• Use the optional “Scalable Fonts Kit” to convert an outline font
file to a bitmap font (certain printer models only).
• Use the FONT LOAD statement to download fonts in .ATF
format (certain printer models only).
Outline font files can be bought directly from Intermec.
For more information on the conversion of fonts, please refer to:
- Intermec Fingerprint 6.13 Reference Manual, FONT and FONT
LOAD statements.
- Technical Manual; Scalable Fonts Kit (some printer models only)
- Toolbox 4.0, Programmer's Manual (only available in UBI version).
130
Intermec Fingerprint 6.13 – Programmer's Guide
13. BAR CODES
1.
Standard Bar Codes
A large number of commonly used bar code symbologies are
included in the Intermec Fingerprint EPROMs fitted in the first pair
of sockets on the CPU board. As an option, Configuration and
ROM-expansion EPROMs may contain additional bar codes according to the customer's request. Bar codes cannot be downloaded
to the printer, but must be ordered from Intermec and “burned” into
EPROMs using e.g. the Toolbox Configuration program.
Some bar codes require special barcode fonts, e.g. UPC and EAN
bar codes.
Bar codes cannot be listed by means of any Intermec Fingerprint
instruction. As standard, Intermec Fingerprint 6.13 contains the
following bar codes.
Bar Code Type
Codabar
Code 11
Code 39
Code 39 full ASCII
Code 39 w. checksum
Code 93
Code 128
DUN-14/16
EAN-8
EAN-13
EAN-128
Five-Character Supplemental Code
Industrial 2 of 5
Industrial 2 of 5 w. checksum
Interleaved 2 of 5
Interleaved 2 of 5 w. checksum
Interleaved 2 of 5 A
Matrix 2 of 5
MSI (modified Plessey)
Plessey
Straight 2 of 5
Two-Character Supplemental Code
UCC-128 Serial Shipping Container Code
UPC-5 digits Add-On Code
UPC-A
UPC-D1
UPC-D2
UPC-D3
UPC-D4
UPC-D5
UPC-E
UPC Shipping Container Code
Designation
"CODABAR"
"CODE11"
"CODE39"
"CODE39A"
"CODE39C"
"CODE93"
"CODE128"
"DUN"
"EAN8"
"EAN13"
"EAN128"
"ADDON5"
"C2OF5IND"
"C2OF5INDC"
"INT2OF5"
"I2OF5C"
"I2OF5A"
"C2OF5MAT"
"MSI"
"PLESSEY"
"C2OF5"
"ADDON2"
"UCC128"
"SCCADDON"
"UPCA"
"UPCD1"
"UPCD2"
"UPCD3"
"UPCD4"
"UPCD5"
"UPCE"
"UPCSCC"
Continued!
131
Intermec Fingerprint 6.13 – Programmer's Guide
13. BAR CODES, cont'd.
2.
Special Bar Codes
Special bar codes, such as PDF417, USD-5, MaxiCode and LEB
code, can be ordered from Intermec, either in the form of readymade configuration EPROM:s, or as “object files” that can be
burned into EPROM:s by means of the program Toolbox Configuration and a EPROM programming device.
At the moment of the publishing of this manual, the following
optional bar codes were available:
Bar Codes
Designation
Code 16K ........................................................................................... "CODE16K"
Code 49 ............................................................................................. "CODE49"
LEB .................................................................................................... "LEB"
MaxiCode ......................................................................................... "MAXICODE"
PDF 417 ............................................................................................. "PDF417"
Philips ............................................................................................... "PHILIPS"
Philips (alternative designation) .................................................... "DOT CODE A"
USD5 ................................................................................................. "USD5"
132
Intermec Fingerprint 6.13 – Programmer's Guide
14. IMAGES
1.
Images vs Images Files
There is a similar distinction between “Images” and “Image
Files”as with “Fonts” and “Font Files” (see chapter 12):
• “Image” is a generic term for all kinds of printable pictures, e.g.
symbols, logotypes or other illustrations, in the internal bitmap
format of Intermec Fingerprint.
• “Image Files” are files in various bitmap formats that can be
converted to “Images” in the internal bitmap format of Intermec
Fingerprint. Images files can be stored in the printer's memory,
but cannot be used for printing before they have been converted
to “Images”.
2.
Standard Images
As standard, the Intermec Fingerprint EPROMs fitted in the first
pair of sockets on the CPU board contain the GLOBE.1 image for
training purposes and a few other images used for printing test
labels. Other images may be included in the Configuration EPROMs
depending on application program or according to the customers
request. Such images can converted from images files in .PCX or
.PCC format by the Toolbox Configuration program and can be
“burned” into the configuration EPROMs.
3.
Downloading Image
Files
Image files in .PCX format can be downloaded to the printer's RAM
memory using the Kermit protocol and then converted to Intermec's
internal image format by means of the instruction RUN "pcx2bmp"
(see chapter 6.5) .
☞ Downloading via Kermit
Also see:
• Chapter 6.8
Image files in .PCX format can also be both downloaded and
converted to images by means of the IMAGE LOAD statement.
The program Toolbox Image can be used to convert and download
image files in .PCC or .PCX format to images and store them in the
printer's RAM memory.
☞ Image Transfer Protocols
Also see:
• Intermec Fingerprint Reference
Manual
Image files in Intel hex formats, or formats according to Intermec
Fingerprint file transfer protocols UBI00, UBI01, UBI02, UBI03,
or UBI10, can be downloaded to the printer's RAM memory using
the instructions STORE (obsolete), STORE IMAGE, STORE
INPUT and STORE OFF, e.g.:
10
20
30
40
50
60
70
80
RUN
STORE
INPUT
INPUT
INPUT
INPUT
STORE
STORE
STORE
OFF
"Name:", N$
"Width:", W%
"Height:", H%
"Protocol:", P$
IMAGE N$, W%, H%, P$
INPUT 100
OFF
Continued!
133
Intermec Fingerprint 6.13 – Programmer's Guide
14. IMAGES, cont'd.
3.
Downloading Image
Files, cont'd.
The system variable SYSVAR allows you to check the result of an
image download by means of STORE or STORE INPUT:
• SYSVAR (16) reads the number of bytes received.
• SYSVAR (17) reads the number of frames received.
Both values are reset when a new STORE IMAGE statement is
executed.
4.
Listing and Removing
Images
The names of all images stored in the various parts of the printer's
memory can be listed to the std. OUT channel by means of an
IMAGES statement or a program using the IMAGENAME$
function.
Image files can be listed to the std. OUT channel by means of a
FILES statement.
Images can be removed from the RAM memory using a REMOVE
IMAGE statement.
134
Intermec Fingerprint 6.13 – Programmer's Guide
15. PRINTER FUNCTION CONTROL
1.
Keyboard
Note:
An external keyboard does not work in the
Setup and Test Modes.
All Intermec Fingerprint-compatible EasyCoder printers are provided with at least one key or button. Enhanced models have a set
of numeric keys supplemented with a number of function keys. This
also applies to EasyCoder 201 IISA (Stand-Alone). EasyCoder 501
SA (Stand-Alone) has a full QWERTY keyboard, like a typewriter,
supplemented by numeric and function keys. Separate alphanumeric keyboards are available as options.
The keys have three purposes:
• To control the printer in the Setup and Test Modes, and to some
extent also in the Immediate Mode.
• To enter input data in the form of ASCII characters.
• To make the program execution branch to subroutines according
to ON KEY...GOSUB statements.
Note that input from the printer's keyboard (see chapter 7.6)
excludes the use of ON KEY...GOSUB statements (see chapter
5.8) and vice versa.
Controlling the Printer in the Setup, Test, and Immediate Modes
• The use of the keyboard in the Setup Mode is described in the
Technical Manual for the printer model in question.
• The use of the keyboard in the Test Mode is described in the
Service Manual for the printer model in question.
• In a printer running in the Immediate Mode, only three keys are
working:
- The <Print> key or button produces a FORMFEED operation,
or – if the printhead is lifted – runs the printer's print roller a
number of rotations in order to facilitate cleaning
(CLEANFEED).
- The <Feed> key works the same way as the <Print> button.
- The <Setup> or <Save> key gives access to the Setup Mode.
• In the Immediate Mode, the printing of labels by means of the
print key can be enabled or disabled using a PRINT KEY ON/
OFF statement, also see chapter 11.3.
Enabling the Keys
Before a key can be used to make the execution branch to a
subroutine using an ON KEY...GOSUB statement, the key must be
enabled using a KEY...ON statement. Enabled keys can also be
disabled again using KEY...OFF statements.
However, the keyboard can also be used to enter input data
(provided "console:" is OPENed for INPUT), and also be used in
the Setup and Test Modes, regardless if the keys are enabled or not.
Continued!
135
Intermec Fingerprint 6.13 – Programmer's Guide
15. PRINTER FUNCTION CONTROL, cont'd.
1.
Keyboard, cont'd.
Key Id. Numbers
The keys are specified by identification numbers in connections
with the following statements:
KEY...ON
Enables the specified key.
KEY...OFF
Disables the specified key.
ON KEY...GOSUB... Branches the program execution to a subroutine when the specified key is pressed.
Each key has two id. numbers, one for its unshifted position and
another for its shifted position1. By default, the <C> key works as
Shift key (compare with the shift key of a typewriter).
To select the shifted position of a certain key, keep the Shift key
(<C>) depressed while you press the desired key. The id. number
of the shifted key is equal to its unshifted id. number + 100. For
example, the <F1> key has id. number 10 in unshifted position, but
id. number 110 in shifted position.
1
/. Due to technical restrictions in the
keyboard decoding, some keys will not
work in Shifted position depending on the
combination of printer model and selected
Shift key.
The illustration below shows the default id. numbers of the keyboards of the Enhanced models of EasyCoder 201 II and 501/601.
The id. number of the <Print> button or key also applies to printers
models without keyboard, such as Easycoder 201 IIS, EasyCoder
401, Easycoder 501S, and EasyCoder 601S.
If the keyboard is remapped (see later in this chapter), the id.
numbers will be affected.
Power
Ready
Error
EasyCoder 201 IIE
Continued!
136
Intermec Fingerprint 6.13 – Programmer's Guide
15. PRINTER FUNCTION CONTROL, cont'd.
1.
Keyboard, cont'd.
Key-initiated Branching
What will happen when an enabled key is pressed is decided by an
ON KEY...GOSUB statement, that branches the program execution to a subroutine, where additional instructions specify the action
to be taken. Refer to chapter 5.8 for further information and
additional program example.
Here is an example of how two keys (<F1> and <F2>) are enabled
and used to branch to different subroutines. The keys are specified
by their id. numbers (10 and 11 respectively):
10
20
30
40
50
1000
1010
2000
2010
RUN
KEY (10) ON: KEY (11) ON
ON KEY (10) GOSUB 1000
ON KEY (11) GOSUB 2000
GOTO 40
END
PRINT "You have pressed F1"
RETURN 50
PRINT "You have pressed F2"
RETURN 50
Audible Key Response
Each time a key is pressed, the printer's beeper will, by default, emit
a short signal (1200 Hz for 0.03 sec). The frequency and duration
of the signal can be globally changed for all keys by means of a KEY
BEEP statement. Obviously, setting the frequency or duration to 0
will turn off the signal for all keys.
Input from Printer's Keyboard
Provided "console:" is OPENed for sequential INPUT, the keys can
be used to enter ASCII characters to the program using the
following instructions:
INPUT#
reads a string of data to a variable.
INPUT$
reads a limited number of characters to a
variable.
LINE INPUT#
reads an entire line to a variable.
Refer to chapter 7.6 for a table showing the ASCII values that the
various keys generate and for a program example. Note that input
from keyboard does not require any keys to be enabled.
Continued!
137
Intermec Fingerprint 6.13 – Programmer's Guide
15. PRINTER FUNCTION CONTROL, cont'd.
1.
Keyboard, cont'd.
Remapping the Keyboard
The keyboards of the various printer models are fully remappable1,
as to allow the printer to be adapted to special applications or
national standards. Thus you can decide which two ASCII characters each key will produce, with and without the Shift key being
activated, and which key will work as Shift key. The mapping also
decides the id. numbers for the keys.
1
/. There is one exception:
The single <Print> key on the EasyCoder 401/501 cannot be remapped.
The basis of the remapping process is the position number of each
key. The numbers vary between different types of keyboards, as
illustrated below.
Note the distinction between id. numbers and position numbers!
Ready
Power
Error
EasyCoder 201 IIE
1
6
11
16
21
34
44
33
32
31
49
54
43
48
53
42
47
52
41
46
51
56
1
6
11
16
21
30
35
40
45
50
55
60
64
29
34
39
44
49
54
59
63
23
28
33
38
43
48
53
58
62
17
22
27
32
37
42
47
52
57
16
21
26
31
36
41
46
51
34
44
49
54
33
43
48
53
3
8
13
18
32
42
47
52
2
7
12
31
41
46
51
1
6
11
56
61
56
The present keyboard mapping can be read to a string variable using
the KEYBMAP$ instruction with the following syntax:
<string variable>=KEYBMAP$(n)
where....
n = 0 reads the unshifted characters.
n = 1 reads the shifted characters.
n = 2 reads the position of the Shift key.
This example reads the unshifted characters on the keyboard of an
EasyCoder 501 E. Non existing key positions get ASCII value 0:
10
20
30
40
50
60
70
RUN
PRINT "Pos","ASCII","Char."
A$=KEYBMAP$(0)
FOR B%=1 TO 64
C$=MID$(A$,B%,1)
E%=ASC(C$)
PRINT B%,E%,C$
NEXT
Continued!
138
Intermec Fingerprint 6.13 – Programmer's Guide
15. PRINTER FUNCTION CONTROL, cont'd.
1.
Keyboard, cont'd.
Remapping the Keyboard, cont'd.
You can also use the KEYBMAP$ instruction to remap the
keyboard, using the following syntax:
KEYBMAP$(n) = <string>
where...
n = 0 maps the unshifted characters in ascending pos. No. order.
n = 1 maps the shifted characters in ascending pos. No. order.
n = 2 maps the position of the Shift key.
The string that contains the desired keyboard map should contain
the desired character for each of 64 key positions (in ascending
order) regardless if the keyboard contains that many keys.
Characters, that cannot be produced by the keyboard of the host, can
be substituted by CHR$ functions, where the character is specified
by its ASCII decimal value according to the selected character set
(see NASC statement). The same applies to special characters. See
table below.
Non-existing key positions are mapped as Null, i.e. CHR$(0).
The key appointed as <Shift> key is specified by its keyboard
position number in a separate string.
The single <Print> key of EasyCoder 401/501 cannot be remapped.
ASCII decimal values for Special Keys
Special key Unshifted Shifted
F1
1
129
F2
2
130
F3
3
131
F4
4
132
F5
5
133
C (Clear)
8
136
Enter
13
141
Alt
14
142
Save
15
143
Caps
17
145
Special key Unshifted Shifted
Ins
18
146
⇐
19
147
⇒
20
148
Feed
28
156
Setup
29
157
Pause
30
158
Print
31
159
Del
127
255
Shift
144
In this example, the unshifted keyboard map is read back to the host.
The string is modified (<F1> is replaced by <Feed>) and used to
change the keyboard map.
10
20
30
40
A$ = KEYBMAP$(0)
B$ = CHR$(28) + MID$(A$,2)
KEYBMAP(0)=B$
END
Continued!
139
Intermec Fingerprint 6.13 – Programmer's Guide
15. PRINTER FUNCTION CONTROL, cont'd.
1.
Keyboard, cont'd.
Remapping the Keyboard, cont'd.
The following example illustrates the mapping of the keyboard for
an EasyCoder 201 IIE (unshifted keys only). Note the limit of max.
300 characters per program line that makes it necessary to divide
the string between two lines:
10 A$=CHR$(1)+CHR$(0)+CHR$(0)+CHR$(0)
+CHR$(0)+CHR$(2)+CHR$(0)+CHR$(0)+CHR$(0)
+CHR$(0)+CHR$(3)+CHR$(0)+CHR$(0)+CHR$(0)
+CHR$(0)+CHR$(4)+CHR$(0)+CHR$(0)+CHR$(0)
+CHR$(0)+CHR$(5)+CHR$(0)+CHR$(0)+CHR$(0)
+CHR$(0)+CHR$(0)+CHR$(0)+CHR$(0)+CHR$(0)
+CHR$(0)+CHR$(13)
20 A$=A$+CHR$(28)+CHR$(29)+CHR$(30)+CHR$(0)
+CHR$(0)+CHR$(0)+CHR$(0)+CHR$(0)+CHR$(0)
+"."+"1"+"4"+"7"+CHR$(0)+"0"+"2"+"5"+"8"
+CHR$(0)+CHR$(8)+"3"+"6"+"9"+CHR$(0)
+CHR$(31)+CHR$(0)+CHR$(0)+CHR$(0)+CHR$(0)
+CHR$(0)+CHR$(0)+CHR$(0)+CHR$(0)
30 KEYBMAP$(0)= A$
40 END
140
Intermec Fingerprint 6.13 – Programmer's Guide
15. PRINTER FUNCTION CONTROL, cont'd.
2.
Display
All present Intermec Fingerprint-compatible printers from Intermec have a 2 lines × 16 characters LCD (Liquid Crystal Display).
The Intermec Fingerprint firmware uses it to show a number of
standardized messages, e.g. in the Setup and Test Modes, but it can
also be controlled by programming instructions (see “Output to
Display” below). The display is provided with a controllable
cursor, as described later in this chapter (“Cursor Control”).
Output to Display
☞ Clearing the Display
Also see:
• “Cursor Control: Clearing the Display”
later in this chapter.
Before you can print any text to the display, it must be opened for
sequential output, e.g.:
10
OPEN "console:" FOR OUTPUT AS 1
Then you should clear any previously displayed message by
sending two empty PRINT# or PRINTONE# statements:
20
PRINT#1:PRINT#1
Now you can send a string to each of the two lines. Note the
appending semicolon on the second line:
30
40
RUN
PRINT#1, "Upper line"
PRINT#1, "Lower line";
This will result in the following message being displayed:
Upper line
Lower line
As a alternative to sending two separate lines, you can also send a
single line consisting of max. 33 characters, where:
• Character 1–16 specifies the upper line
• Character No. 17 is not displayed at all
• Character No. 18–33 specifies the lower line
• The line should be appended by a semicolon (;).
Using this method, the example above would look like this (underscore characters indicate space characters):
10
20
30
RUN
OPEN "console:" FOR OUTPUT AS 1
PRINT#1:PRINT#1
PRINT#1,"Upper–line–––––––Lower–line";
141
Intermec Fingerprint 6.13 – Programmer's Guide
15. PRINTER FUNCTION CONTROL, cont'd.
2.
Display, cont'd.
Cursor Control
The cursor control instructions can be used for four purposes:
• To clear the display from messages (as an alternative to the double
PRINT# statement on line 20 in the example above).
• To enable or disable the cursor.
• To select cursor type (underscore or block/blink)
• To place the cursor at a specified position or to move it.
The cursor is either a black line under a character position in the
display, or a blinking block that intermittently blacks out the
character position:
Cursor
Each cursor control command should start with the character CSI
(Control Sequence Introducer) = ASCII 155 decimal, or (in case of
7-bit communication) with the characters “ESC” + “[” (ASCII 27
+ 91 decimal).
Clearing the Display
Syntax:
where:
<CSI> + <<0|1|2>J>
CSI = ASCII 155 dec.
0 = From active position to end, inclusive (default)
1 = From start to active position, inclusive
2 = All of the display
J = Must always append the string
Example (clears all of the display):
10
20
OPEN "console:" FOR OUTPUT AS 1
PRINT#1, CHR$(155) + "2J";
Selecting Cursor Type
Syntax:
where:
<CSI> + <4p|5p>
CSI = ASCII 155 dec.
4p = Underscore
5p = Block/Blink (default)
Example (selects underscore-type cursor):
10
20
OPEN "console:" FOR OUTPUT AS 1
PRINT#1, CHR$(155) + "4p";
Continued!
142
Intermec Fingerprint 6.13 – Programmer's Guide
15. PRINTER FUNCTION CONTROL, cont'd.
2.
Display, cont'd.
Cursor Control, cont'd.
Enabling/Disabling the Cursor
Syntax:
where:
<CSI> + <2p|3p>
CSI = ASCII 155 dec.
2p = Cursor On
3p = Cursor Off (default)
Example (enables the cursor):
10
20
OPEN "console:" FOR OUTPUT AS 1
PRINT#1, CHR$(155) + "2p";
Note that a semicolon should append the PRINT# instructions in
order to avoid interfering with existing messages in the display.
Setting the Absolute Cursor Position
Syntax:
where:
<CSI> + <<v>;<h>H>
CSI = ASCII 155 dec.
v = Is the line (1 = Upper; 2 = Lower)
h = Is the position in the line (1–16)
H = Must always append the string
If v, h or both are missing, the default value is 1.
Example (setting the cursor in upper left position):
10
20
OPEN "console:" FOR OUTPUT AS 1
PRINT#1, CHR$(155) + "H";
Example (setting the cursor in lower right position):
10
20
OPEN "console:" FOR OUTPUT AS 1
PRINT#1, CHR$(155) + "2;16H";
Move the Cursor Relative to Current Position
Syntax:
where:
<CSI><n>A | B | C | D
CSI = ASCII 155 dec.
n = Is number of steps relative to current position
(default = 1).
A-D= Is the direction, where A = Up, B = Down,
C = Forward, D = Backward
The relative movement must not place the cursor
outside the display area (2 × 16 positions) or the
instruction will be ignored.
Example (moving the cursor from the first position in the upper line
to the last position in the lower line):
10
20
30
OPEN "console:" FOR OUTPUT AS 1
PRINT#1, CHR$(155) + "1B";
PRINT#1, CHR$(155) + "15C";
143
Intermec Fingerprint 6.13 – Programmer's Guide
15. PRINTER FUNCTION CONTROL, cont'd.
3.
LED Control Lamps
Beside showing messages in the printer's display window (see
chapter 15.2, the program can use two of the three LED's (Light
Emitting Diodes) on the printer's front panel to notify the operator
by means of the following two statements:
LED...ON
Turns the specified LED on.
LED...OFF
Turns the specified LED off.
The printer's front panel contains three LED's labelled ”Power”,
”Ready” (0), and ”Error” (1):
• The “Power” LED is connected to the printer's power supply and
is lit when the power is on. It cannot be controlled by the program.
• The two other LED's (“Ready” and “Error”) can be programmed
at will using LED ON and LED OFF statements, even though the
printed text on the keyboard imposes certain restrictions.
Example:
In this example, the “Ready” LED (0) is lit until an error occur.
Then the “Error” LED (1) is lit instead. The “Error” LED remains
lit until the error is cleared. A suitable error can be generated by
running the program with the printhead lifted.
10
20
30
40
50
60
70
80
90
100
110
1000
1010
1020
RUN
LED 0 ON
LED 1 OFF
ON ERROR GOTO 1000
PRPOS 100,100
FONT "SW030RSN"
MAG 3,3
PRTXT "OK!"
PRINTFEED
LED 0 ON
LED 1 OFF
END
LED 0 OFF
LED 1 ON
RESUME
144
Intermec Fingerprint 6.13 – Programmer's Guide
15. PRINTER FUNCTION CONTROL, cont'd.
4.
Buzzer
In addition to the visual signals given by means of the display and
the LED control lamps (see chapter 15.2 and 15.3), audible signals
can also be initiated by the program execution in order to notify the
operator.
The following instructions can be used:
BEEP
Initiates a short signal of fixed frequency
and duration.
SOUND
Initiates a signal vith variable frequency
and duration.
The printer is provided with a buzzer fitted on the CPU board. The
buzzer can be controlled by either a BEEP statement, which gives
a short shrill signal (≈800 Hz for 0.25 sec.), or by a SOUND
statement, which allows you to vary both the frequency and
duration. You can even compose your own melodies, if your
musical ear is not too sensitive!
In this example, a warning signal is emitted from the buzzer e.g.
when the error “printhead lifted” occurs and keeps sounding until
the error is cleared. A short beep indicates that the printer is OK.
10
20
30
40
50
60
70
1000
1010
RUN
ON ERROR GOTO 1000
PRPOS 100,100
FONT "SW030RSN"
MAG 3,3
PRTXT "OK!"
PRINTFEED : BEEP
END
SOUND 880,25 : SOUND 988,25 : SOUND 30000,10
RESUME
145
Intermec Fingerprint 6.13 – Programmer's Guide
15. PRINTER FUNCTION CONTROL, cont'd.
5.
Clock/Calendar
The printer's CPU board is provided with an internal clock/calendar
without battery backup, i.e. the setting will be lost when the printer
is turned off.
Intermec Fingerprint-compatible printers may be fitted with a realtime clock circuit (RTC) in a socket on the CPU board. The RTC
is battery backed-up and will keep running even when the printer is
turned off.
If no RTC is installed and you try the read the date or time before
the internal clock has been set, an error will occur (error 1010
“Hardware Error”). Once either time or date has been set, the
internal clock will work until next power off or reboot. If only time
has been set, by default the current date will be Jan 01 1980 and if
only date has been set, by default the clock will start running at
00:00:00.
Please refer to chapter 9.3 for information on how to read the
printer's clock/calendar, and on the standard formats for date and
time.
The following instructions are to set the clock/calendar:
DATE$ = <sexp>
Sets the date (YYMMDD format)
TIME$ = <sexp>
Sets the time (HHMMSS format)
Example (setting the clock/calendar to 08.11.30 September 1,
1998):
DATE$ = "980901"
TIME$ = "081130"
Note that the values must always be entered as string expressions.
Possible numeric expressions can be converted to string format
using STR$ functions (see chapter 9.2).
146
Intermec Fingerprint 6.13 – Programmer's Guide
15. PRINTER FUNCTION CONTROL, cont'd.
6.
Printer Setup
☞ Intermec Shell Startup Programs
Also see:
• Intermec Shell Standard Startup
Manual
• Intermec Shell Enhanced Startup
Manual
The printer's setup can be changed manually if the printer is
provided with a built-in keyboard (Enhanced and Stand-Alone
models). Printers without a keyboard (Standard models) are often
delivered with some kind of startup program (e.g. Intermec Shell)
that allows setup parameters to be changed manually. The Intermec
Shell startup programs also allows the setup to be read or changed
from a connected terminal. This was discussed more thoroughly in
chapter 2.
Detailed information on the methods of manual setup and the
various setup parameters can be found in the “Technical Manual”
manual for the printer model in question.
If the printer has no built-in keyboard1, or if you want to change
some setup parameter either by remote control or as a part of the
program execution, you can use the SETUP statement.
SETUP
The SETUP statement can be used in four different ways:
SETUP
Makes the printer enter the Setup Mode.
SETUP WRITE
SETUP<file name>
SETUP<string>
Never use this statement in a printer
without keyboard as you can neither leave
the Setup Mode nor do anything else without any keys!
Creates a copy of the printer's current
setup and saves it as a file in RAM under
a specified name or returns the current
setup to the specified communication
channel.
Changes one, several, or all of the setup
parameters in the printer's current setup
according to a setup file.
Changes a single setup parameter
Reading the Current Setup
The easiest way to read the printer's current setup is to use a SETUP
WRITE statement to return the setup to the serial communication
channel used for output to the host (usually "uart1:").
Example:
SETUP WRITE "uart1:"
1
/. An external keyboard cannot be used in
the Setup Mode.
Continued!
147
Intermec Fingerprint 6.13 – Programmer's Guide
15. PRINTER FUNCTION CONTROL, cont'd.
6.
Printer Setup,
cont'd.
Creating a Setup File
There are two ways of creating a setup file:
• Create a setup file using Intermec Fingerprint instructions:
- OPEN a file for sequential OUTPUT. See chapter 8.3.
- Use a PRINT# statement to enter each parameters you want so
change. The input must follow the stipulated syntax exactly (see
the Intermec Fingerprint 6.13 Reference Manual, SETUP
statement).
- CLOSE the file.
• Use the Toolbox Setup program to create the file.
Changing the Setup using a Setup File
Use a SETUP<filename> statement to change the printer's setup. If
the setup file is stored in another part of the printer's memory than
the current directory, the file name should contain a reference to the
device in question.
In the following example, we will first save the current setup under
a new file name and then make a setup file that changes the size of
the transmit buffer on "uart1:" just a little. Finally, we use the setup
file to change the printer's setup.
10 SETUP WRITE "SETUP1.SYS"
20 OPEN "SETUPTEST.SYS" FOR OUTPUT AS #1
30 PRINT#1,"SERVICE,MEMORY ALLOC,TRANS BUF UART1,310"
40 CLOSE #1
50 SETUP "SETUPTEST.SYS"
RUN
Changing the Setup using a Setup String
A single setup parameter can be changed without creating any file.
The SETUP statement should be followed by a string following
exactly the same syntax as the corresponding parameter in a Setup
file, but without any leading PRINT# statement.
The same change as in the example above would look this way when
using a setup string:
SETUP "SERVICE,MEMORY ALLOC,TRANS BUF UART1,310"
Continued!
148
Intermec Fingerprint 6.13 – Programmer's Guide
15. PRINTER FUNCTION CONTROL, cont'd.
6.
Printer Setup,
cont'd.
PRSETUP.PRG Utility Program
The program PRSETUP.PRG is included in some Configuration
EPROM:s and allows you to print the current setup values both on
the screen of your terminal/computer and on paper in your Intermec
Fingerprint printer. For best result, labels or tickets should have a
length of at least 70 mm (≈ 23/4").
1
5
6
7
10
20
30
40
50
60
65
70
80
85
90
91
95
96
97
100
110
120
130
140
199
500
510
RUN
'Prsetup.prg ver 1.2 92-06-26 (ew)
ON ERROR GOTO 500
F$="SW020BSN.2":FONT F$
IF EFLAG%<>0 THEN F$="SW030RSN.2"
SETUP WRITE "qzqw"
OPEN "qzqw" FOR INPUT AS # 1
FONT F$ : DIR 4
X% = 50 : Y% = 10
LINE INPUT # 1 , A$
PRINT A$
EFLAG%=0
PRPOS X% , Y%
IF EFLAG%<>0 THEN PRINTFEED:FONT F$ :
X% = 50: Y% = 10: DIR 4:GOTO 65
A%=SPLIT(A$,"B",44)
IF B$(0)="SER-COM" THEN PRTXT
B$(1)+","+B$(A%-2)+","+B$(A%-1):GOTO 95
PRTXT B$(A%-2)+","+B$(A%-1)
FOR I%=0 TO A%
B$(I%)=""
NEXT I%
X% = X% + 30
IF EOF ( 1 ) = 0 THEN GOTO 50
IF X% > 50 THEN PRINTFEED
CLOSE # 1
KILL "qzqw"
END
EFLAG%=ERR
RESUME NEXT
Continued!
149
Intermec Fingerprint 6.13 – Programmer's Guide
15. PRINTER FUNCTION CONTROL, cont'd.
6.
Printer Setup,
cont'd.
Note:
Printer model 910 is no longer produced.
DISPSET2.PRG Utility Program
DISPSET2.PRG is included in many Configuration EPROM:s and
can be used for setting up such printers that are fitted with a display
but not a keyboard, e.g. EasyCoder 201 IIS, EasyCoder 401,
EasyCoder 501 S and EasyCoder 601 S. DISPSET2.PRG allows
the label stop sensor (LSS) to be adjusted and – when necessary –
the printhead resistance to be set. It also provides the possibility of
reading the present value of all other setup parameters in the display.
DISPSET2.PRG is a part of the Intermec Shell Standard startup
program for printers without keyboard. It also illustrates how to
solve the setup programming for printers with custom-made programs and no keyboard. Also refer to the Technical Manual of the
printer model in question.
1000
1010
1100
1110
1115
1117
1120
1130
1140
1150
1151
1153
1154
1155
1160
1170
1199
2000
2010
2030
2990
2999
3000
3005
3010
3020
3030
3040
3050
3060
3070
'Display setup in slave printer 201/910
'930301 GI New LSS for 501
on error goto 9500:dim S$(9)
open "CONSOLE:" for input as #11
open "CONSOLE:" for output as #10
print #10,"Print=Setup":print #10,T$
DUMMY$=input$(loc(11),11):close #11
QSTEP$="FALSE":X$="S"
on key(17) gosub 2000: key(17) on:'Print
T1%=TICKS:OT$=""
T$="0"+str$(500-(ticks-T1%))
T$=right$(T$,3):T$=left$(T$,1)
if OT$=T$ then goto 1160
print #10:print #10,"Print=Setup":
print #10,T$+" Sec. left";:OT$=T$
if (TICKS-T1%)<400 then goto 1151
gosub 4800
END
setup write "SETUP0.SYS"
on key(17) gosub 9200: key(17) on:'Print
if (prstat and 1) then gosub 3000
else gosub 4000
RETURN
'Setup - - - - - - - - - 'Head up - LSS adj., HEAD RESISTANCE.
setup write "XSETUP0X.SYS"
open "XSETUP0X.SYS" for input as #5
open "XSETUP1X.SYS" for output as #6
gosub 9100: 'Read setup file
if T$=”EOF” then close #5:close #6:goto 3500
S%=SPLIT(T$,X$,44)
if S$(2)="HEAD RESIST" then gosub 3200
else goto 3030
print #6,T$:close #5:close #6:goto 3500:
'Copy to file #6.
Continued!
150
Intermec Fingerprint 6.13 – Programmer's Guide
15. PRINTER FUNCTION CONTROL, cont'd.
6.
Printer Setup,
cont'd.
DISPSET2.PRG Utility Program, cont'd.
3200 D1$="HEAD RESISTANCE":D2$=S$(3)
3210 gosub 9000: 'Display
3220 if (prstat and 1) then gosub 3300
3299 RETURN
3300 'Change resistance
3310 QRES%=head(-8): 'Min
3315 D2$=str$(QRES%):
T$=S$(0)+","+S$(1)+","+S$(2)+","+D2$
3320 gosub 9000: 'Display
3330 if (prstat and 1) then goto 3340 else RETURN
3340 QRES%=QRES%+10:QRES$=str$(QRES%)
3345 if (QRES%>head(-8) and right$(QRES$,1)<>"0")
then QRES$=left$(QRES$,2)+”0"
3346 QRES%=val(QRES$)
3370 if QRES%>head(-9) then QRES%=head(-8)
3380 goto 3315
3499 RETURN
3500 'LSS- Adjust
3505 setup "XSETUP1X.SYS" : kill "XSETUP1X.SYS"
3510 D1$="LSS ADJUST":D2$="":gosub 9000
3520 D1$="LABEL
<>
GAP":QLSS%=SYSVAR(8)
3555 LASTF$="YES":gosub 3600
3560 if (prstat and 1)=0 then goto 3585
3565 if VERSION$(1)<>"501" then gosub 3800
else gosub 3900
3585 gosub 4000: 'Show par.
3590 RETURN
3600 'Display LSS receiver
3615 POS%=sysvar(1)\16:X1$=" "
3617 LASTPOS%=POS%
3620 D2$=string$(pos%,X1$)+chr$(255)
3623 QLSS$=right$("00"+str$(QLSS%),3)
3625 D1$="LABEL <"+QLSS$+"> GAP"
3630 print#10:print#10,left$(D1$,16)
3640 print#10,left$(D2$,16);
3641 POS%=sysvar(1)\16
3643 if (prstat and 1) then LASTF$="NO" :goto 3645
3644 if (LASTF$<>”YES”) then TESTFEED:LASTF$="YES"
3645 if LASTPOS%<>POS% then goto 3617
3650 if QSTEP$<>"TRUE" then goto 3641
3660 QSTEP$="FALSE"
3690 RETURN
3800 'Change LSS , 101, 201 printer. lss = 0 - 3
3810 QLSS%=0
3820 if QLSS%>3 then QLSS%=0
3840 SYSVAR(8)=QLSS%
3850 gosub 3600
3855 QLSS%=QLSS%+1
3860 if (prstat and 1) then goto 3820 else RETURN
Continued!
151
Intermec Fingerprint 6.13 – Programmer's Guide
15. PRINTER FUNCTION CONTROL, cont'd.
6.
Printer Setup,
cont'd.
DISPSET2.PRG Utility Program, cont'd.
3900 'Change LSS ,501 printer lss = 0-7-127
3910 QLSS%=0
3920 if QLSS%=8 then QLSS%=7
3930 if QLSS%>127 then QLSS%=0
3940 SYSVAR(8)=QLSS%
3950 gosub 3600
3955 QLSS%=QLSS%+8
3960 if (prstat and 1) then goto 3920 else RETURN
3990 RETURN
3999 'Head down - show parameters
4000 'CONTRAST
4005 open "SETUP0.SYS" for input as #5
4010 gosub 9100:'Read setup file
4025 S%=SPLIT(T$,X$,44)
4030 D1$=S$(0):D2$=S$(1)
4040 gosub 9000
4050 if (prstat and 1) then goto 4800
4100 'SER-COM
4110 gosub 9100:'Read setup file
4122 if left$(T$,7)<>"SER-COM" then goto 4210
4125 S%=SPLIT(T$,X$,44)
4130 if S$(2)<>"FLOWCONTROL" then goto 4138
4135 if S$(3)<>"XON/XOFF" then goto 4137
4136 D1$="U"+right$(S$(1),1)+",XO,"+mid$(S$(4),6):
D2$=S$(5):goto 4140
4137 D1$=S$(1)+","+S$(3):D2$=S$(4):goto 4140
4138 if S$(2)="CHAR LENGTH" then S$(2)="CHAR-LEN"
4139 D1$=S$(1)+","+S$(2):D2$=S$(3)
4140 gosub 9000
4150 if (prstat and 1) then goto 4800 else goto 4110
4200 ‘FEEDADJ
4210 gosub 9100:’Read setup file, ignore LSS
4222 S%=SPLIT(T$,X$,44)
4225 if S$(1)<>"FEEDADJ" then goto 4322
4230 D1$=S$(2):D2$=S$(3)
4240 gosub 9000
4250 if (prstat and 1) then goto 4800 else goto 4210
4300 'MEDIA SIZE
4310 gosub 9100:'Read setup file
4322 S%=SPLIT(T$,X$,44)
4325 if S$(1)<>"MEDIA SIZE" then goto 4422
4330 D1$=S$(2):D2$=S$(3)
4340 gosub 9000
4350 if (prstat and 1) then goto 4800 else goto 4310
4400 'MEDIA TYPE
4410 gosub 9100:’Read setup file
4422 S%=SPLIT(T$,X$,44)
4430 D1$=S$(1):D2$=S$(2)
4440 gosub 9000
4450 if (prstat and 1) then goto 4800
Continued!
152
Intermec Fingerprint 6.13 – Programmer's Guide
15. PRINTER FUNCTION CONTROL, cont'd.
6.
Printer Setup,
cont'd.
DISPSET2.PRG Utility Program, cont'd.
4500 'PAPER TYPE
4510 gosub 9100:gosub 9100:
'Read setup file, ignore head res.
4522 S%=SPLIT(T$,X$,44)
4530 D1$=S$(2):D2$=S$(3)
4540 gosub 9000
4550 if (prstat and 1) then goto 4800
4600 'PERFORMANCE
4610 gosub 9100:'Read setup file
4622 S%=SPLIT(T$,X$,44)
4630 D1$=S$(1):D2$=S$(2)
4640 gosub 9000
4650 if (prstat and 1) then goto 4800
4700 'MEMORY ALLOC
4710 gosub 9100:'Read setup file
4720 if T$="EOF" then close #5:goto 4000
4722 S%=SPLIT(T$,X$,44)
4725 if S$(1)<>"MEMORY ALLOC" then goto 4710
4730 D1$=S$(2):D2$=S$(3)
4740 gosub 9000
4750 if (prstat and 1) then goto 4800 else goto 4710
4800 print#10
4805 print #10:print #10,version$;
4810 close:kill "SETUP0.SYS":key(17) off
4999 RETURN
9000 'Display
9010 print#10:print#10,left$(D1$,16)
9020 print#10,left$(D2$,16);
9030 if QSTEP$<>"TRUE" then goto 9030
9040 QSTEP$="FALSE"
9050 RETURN
9100 'Read setup file
9110 if EOF(5) then T$="EOF":RETURN
9120 line input #5,T$
9150 RETURN
9200 'Print key, step to next setup parameter
9210 QSTEP$="TRUE"
9299 RETURN
9500 'error rut.
9599 RESUME NEXT
153
Intermec Fingerprint 6.13 – Programmer's Guide
15. PRINTER FUNCTION CONTROL, cont'd.
7.
System Variables
Some sensors and other conditions can be read or set by means of
the SYSVAR system variable.
SYSVAR
The following SYSVAR parameters are released for public use:
SYSVAR(1)
returns the value of the LSS/BMS receiver.
SYSVAR(8)
returns or sets the level of the LSS/BMS emitter.
SYSVAR(12)
returns the value of the paper counter (requires
an optional sensor, some printer models only).
SYSVAR(13)
returns the value of the ribbon counter (requires
an optional sensor, some printer models only).
SYSVAR(14)
returns the number of errors since last power on.
SYSVAR(15)
returns the number of errors since the previously
executed SYSVAR(15) instruction.
SYSVAR(16)
returns the number of bytes received at the
execution of a STORE or STORE INPUT statement.
SYSVAR(17)
returns the number of frames received at the
execution of a STORE or STORE INPUT statement.
SYSVAR(18)
returns or sets the verbosity level.
SYSVAR(19)
returns or sets the type of error messages transmitted by the printer.
SYSVAR(20)
returns 0 if the printer is set up for direct thermal
or 1 if set up for thermal transfer printing.
SYSVAR(21)
returns the printhead density in dots/mm.
SYSVAR(22)
returns the number of dots in the printhead.
SYSVAR(23)
returns 1 if a transfer ribbon is detected, else 0.
SYSVAR(24)
returns 1 if a power-up has been performed since
last SYSVAR(24), else 0.
Parameters 1 and 8 can be used to control the LSS/BMS (label stop
sensor or black mark sensor), either automatically as a part of the
program execution, or remotely. They are also useful for setting up
printers with neither a keyboard nor a standard startup program.
However, if the printer either has a keyboard and/or is provided with
Intermec Shell startup program, it is easier to do this in the Setup
Mode.
Parameters 12 and 13 are intended for use with the optional sensor
kit available for some EasyCoder printers.
Parameters 14 and 15 are primarily intended for service purposes.
Parameters 16 and 17 are used in connection with transfer of images
from the host to the printer and are explained in chapter 14.3.
Parameter 18 is used for returning or setting the printer's verbosity
level, i.e. the printer's response to received instructions as explained
in chapter 7.7.
Continued!
154
Intermec Fingerprint 6.13 – Programmer's Guide
15. PRINTER FUNCTION CONTROL, cont'd.
7.
System Variables,
cont'd.
Parameter 19 is used for returning or selecting one of four types of
error messages, see chapter 16.1.
Parameter 20 checks if the printer is printer is set up for direct
thermal printing or thermal transfer printing, which depends on the
choice of paper type in the Setup Mode, see the Technical Manual.
Parameters 21 and 22 are used to check the printhead in regard of
printhead density and number of dots respectively. Together with
parameter 20 and the VERSION$ function, see chapter 15.11, these
parameters allows the program to identify different printer models.
Thereby it is possible to design programs that will work in all
EasyCoder printers.
Parameter 23 checks the status of the ribbon end sensor in thermal
transfer printers.
Parameter 24 is useful, when certain data, e.g. date and time
formats, are not generated as a part of the program execution. Since
such data are stored in the no-save area of the RAM memory, they
will be lost at power-up or reboot. Using SYSVAR(24), the printer
can be polled for power-ups, so lost data can be renewed.
For detailed explanations, please refer to the Intermec Fingerprint
6.13 Reference Manual.
Example showing how the error type is set from the host and the new
setting is read back:
10
20
30
40
RUN
INPUT "Error type: ", A%
SYSVAR(19)=A%
(sets error type)
B%=SYSVAR(19)
(reads error type)
PRINT "The error type is set to: "; B%
Yields e.g.
Error type: 2
The error type is set to: 2
155
Intermec Fingerprint 6.13 – Programmer's Guide
15. PRINTER FUNCTION CONTROL, cont'd.
8.
Printhead
In addition to the setup, four instructions can be used to check and
control the thermal printhead.
SYSVAR
Two parameters in the system variable SYSVAR allows you to
check the printhead, also see chapter 15.7:
SYSVAR(20)
returns if the printer is set up for direct thermal
or transfer printing.
SYSVAR(21)
returns the printhead density in dots/mm.
HEAD
The HEAD function requires a CPU board that supports dot sensing
and allows you to:
• Identify possible faulty dots by means of abnormal resistance
values. This application is closely connected to the SET FAULTY
DOT and BARADJUST statements, see below. Note that some
printhead errors, e.g. deglazed, cracked or dirty dots, will not be
detected by this function, since only the resistance is measured.
• Read the mean resistance value of the printhead, e.g. in order to
make a program that sets up the printhead resistance automatically
(this features is standard in some printer models).
SET FAULTY DOT
This statement is used to mark specified dots on the printhead as
faulty, either manually or automatically in connection with a
HEAD function. Then, using a BARADJUST statement (see
below), you can adjust the location of picket fence bar codes so the
dots marked as faulty will not affect the printing, i.e. the faulty dot(s)
will be situated between the bars.
You can also revoke all previous SET FAULTY DOT statements
by marking all dots as correct.
BARADJUST
This statement enables automatic horizontal relocation of picket
fence bar codes within specified limits. The firmware will keep
record of all dots marked as faulty (see SET FAULTY DOT above)
and relocate the bar code as to place the spaces between the bars in
line with the faulty dot(s). Thereby, it will be possible to use the
printer pending printhead replacement.
Note that the BARADJUST statement cannot be used for ladder bar
codes, stacked bar codes (e.g. Code 16K), bar codes with horizontal
lines (e.g. DUN-14) and EAN/UPC bar codes.
Continued!
156
Intermec Fingerprint 6.13 – Programmer's Guide
15. PRINTER FUNCTION CONTROL, cont'd.
8.
Printhead, cont'd.
This example shows how a program can be made that checks the
printhead for faulty dots and warns the operator when a faulty dot
is encountered. Pending printhead replacement, the bar code is
repositioned to ensure continued readability. Such a program takes
a few seconds to execute (there may be more than a thousand dots
to check), so it is advisable either to restrict the dot check to the part
of the printhead that corresponds to the location of the bar code, or
to perform the test at startup only.
10
20
30
40
50
60
1000
1010
1020
1030
1040
1050
1060
1070
1080
1090
1100
2000
2010
2020
9000
9010
9020
9030
9040
9050
9060
OPEN "console:" FOR OUTPUT AS 10
IF HEAD(-1)<>0 THEN GOTO 9000
BEEP:D1$="Printhead Error!":D2$="":GOSUB 2000
GOSUB 1000
BARADJUST 20,20
GOTO 9000
FUNCTEST "HEAD",TMP$
A$=":" : TMP%=INSTR(TMP$,A$)+1
RETURN
SET FAULTY DOT -1
QMEAN%=HEAD(-7)
QMIN%=QMEAN%*85\100
QMAX%=QMEAN%*115\100
FOR I%=0 TO WHEAD%-1
QHEAD%=HEAD(I%)
IF QHEAD%>QMAX% OR QHEAD%<QMIN% THEN SET FAULTY
DOT I%
NEXT
PRINT #10 : PRINT #10, LEFT$(D1$,16)
PRINT #10, LEFT$(D2$,16);
RETURN
PRPOS 200,20
BARTYPE "CODE39"
BARRATIO 2,1 : BARMAG 2
BARHEIGHT 150
PRBAR "1234567890"
PRINTFEED
END
157
Intermec Fingerprint 6.13 – Programmer's Guide
15. PRINTER FUNCTION CONTROL, cont'd.
9.
Transfer Ribbon
SYSVAR
A number of parameters in the system variable SYSVAR can be
used to check the transfer ribbon, also see chapter 15.7:
SYSVAR(13)
returns the value of the optional ribbon counter
(some models only).
SYSVAR(20)
returns if the printer is set up for direct thermal
or transfer printing.
SYSVAR(23)
returns if a transfer ribbon is fitted or not.
RIBBON SAVE ON/OFF
Some thermal transfer printers can be provided with a “Ribbon
Save Device”, i.e. a mechanism that stops feeding the ribbon while
blank parts of the labels are fed out, thereby reducing the consumption of transfer ribbon. By default, ribbon save is enabled whenever
a ribbon save device is fitted in the printer. Using the statements
RIBBON SAVE OFF and RIBBON SAVE ON, you can disable
and enable this function at will.
Important:
Due to the increased risk of ribbon wrinkling, avoid using RIBBON
SAVE OFF in connection with negative start values or negative
FORMFEED statements, i.e. instructions that makes the printer
pull back the paper.
158
Intermec Fingerprint 6.13 – Programmer's Guide
15. PRINTER FUNCTION CONTROL, cont'd.
10. Memory Test
FUNCTEST
The FUNCTEST statement is used to perform the following tests
and place the result in a string variable:
• Test of the internal RAM memory
• Test of a specified EPROM package
• Test of a memory card (DOS-formatted or non DOS-formatted).
• Test of the printhead in regard of number of dots, head lifted or
possible errors.
Example using an EasyCoder 501 with 6 EPROM:s. The program
takes a few seconds to execute:
10
20
30
40
50
60
70
80
90
100
110
120
130
140
150
160
RUN
FUNCTEST "RAM",A$
FUNCTEST "ROM1",B$
FUNCTEST "ROM2",C$
FUNCTEST "ROM3",D$
FUNCTEST "ROM4",E$
FUNCTEST "ROM5",F$
FUNCTEST "ROM6",G$
FUNCTEST "HEAD",H$
PRINT "RAM Test:","", A$
PRINT "Checksum IC-100:",
PRINT "Checksum IC-101:",
PRINT "Checksum IC-102:",
PRINT "Checksum IC-103:",
PRINT "Checksum IC-104:",
PRINT "Checksum IC-105:",
PRINT "Printhead Test:",
B$
C$
D$
E$
F$
G$
H$
Yields e.g.:
RAM Test:
Checksum IC-100:
Checksum IC-101:
Checksum IC-102:
Checksum IC-103:
Checksum IC-104:
Checksum IC-105:
Printhead Test:
RAM OK
9825
C08A
28A3
06B2
87D5
C1ED
HEAD OK,SIZE:832 DOTS
FUNCTEST$
The FUNCTEST$ function is very similar to the FUNCTEST
statement and is used for the same purposes. Due to the different
syntax, programming is more simple:
10
20
30
40
50
60
70
80
RUN
PRINT
PRINT
PRINT
PRINT
PRINT
PRINT
PRINT
PRINT
"RAM Test:","", FUNCTEST$ ("RAM")
"Checksum IC-100:", FUNCTEST$ ("ROM1")
"Checksum IC-101:", FUNCTEST$ ("ROM2")
"Checksum IC-102:", FUNCTEST$ ("ROM3")
"Checksum IC-103:", FUNCTEST$ ("ROM4")
"Checksum IC-104:", FUNCTEST$ ("ROM5")
"Checksum IC-105:", FUNCTEST$ ("ROM6")
"Printhead Test:", FUNCTEST$ ("HEAD")
159
Intermec Fingerprint 6.13 – Programmer's Guide
15. PRINTER FUNCTION CONTROL, cont'd.
11. Version Check
VERSION$
The VERSION$ function returns one of three characteristics of the
printer:
VERSION$(0)
returns the firmware version (e.g. “Intermec Fingerprint 6.13”)
VERSION$(1)
returns the printer family (e.g. “501”).
VERSION$(2)
returns the CPU board generation (e.g.
“hardware version #4”).
This instruction allows you to create programs that will work with
several different printer models. For example, you may use the
VERSION$ function to determine the type of printer and select the
appropriate one of several different sets of setup parameters.
Example (sets the setup according to the type of printer):
10
A$=VERSION$(1)
20
IF A$="101" THEN GOTO
30
IF A$="201" THEN GOTO
40
IF A$="401" THEN GOTO
50
IF A$="501" THEN GOTO
60
IF A$="601" THEN GOTO
70 .....
80 .....
1000 SETUP "SETUP101.SYS"
1010 GOTO 70
2000 SETUP "SETUP201.SYS"
2010 GOTO 70
3000 SETUP "SETUP401.SYS"
3010 GOTO 70
4000 SETUP "SETUP501.SYS"
4010 GOTO 70
5000 SETUP "SETUP601.SYS"
5010 GOTO 70
1000
2000
3000
4000
5000
160
Intermec Fingerprint 6.13 – Programmer's Guide
16. ERROR-HANDLING
1.
Standard
Error-Handling
Intermec Fingerprint is intended to be as flexible as possible. Thus,
there are very few fixed error-handling facilities, but instead there
are a number of tools for designing error-handling routines according to the demands of each application.
The following error-handling facilities are always available:
• Out-of-Media Detection
Provided the printhead is lowered, the software will check for
three possible errors when either the < Print > or < Feed > key on
the printer is pressed. If an error is detected, a message will appear
in the display:
- Error 1005 (Out of paper)
- Error 1031 (Next label not found)
- Error 1027 (Out of ribbon – thermal transfer printers only)
After the error has been attended to, the error message can be
cleared by pressing any of the keys.
• Syntax Check
Each program line or instruction that is received on the standard
IN channel will be checked for possible syntax errors before it is
accepted. Provided there is a working two-way communication1,
possible syntax errors will be transmitted to the host on the
standard OUT channel, e.g. “Feature not implemented” or “Font
not found".
• Execution Check
Any program or hardware error that stops the execution will be
reported on the standard OUT channel, provided there is a working
two-way communication1. In case of program errors, the number
of the line where the error occurred will also be reported, e.g.
“Field out of label in line 110”. After the error has been corrected,
the execution must be restarted by means of a new RUN statement,
unless there is a routine for dealing with the error condition
included in the program.
Error Messages
By means of the system variable SYSVAR(19), see chapter 15.7,
you can choose between four types of error messages as illustrated
by the following examples using error #19:
1. “Invalid font in line 10”
(default)
2. “Error 19 in line 10: Invalid font”
3. “E19”
4. “Error 19 in line 10”
1
/. For a working two-way communication,
three conditions must be fulfilled:
• Serial communication
• Std IN channel = Std OUT channel
• Verbosity enabled.
161
Intermec Fingerprint 6.13 – Programmer's Guide
16. ERROR-HANDLING, cont'd.
2.
Tracing Programming
Errors
TRON/TROFF
Large program can be difficult to grasp. If the program does not
work as expected, it may depend on some programming error that
prevents the program from being executed in the intended order.
The TRON (Trace On) statement allows you to trace the execution.
When the program is run, each line number will be returned on the
standard OUT channel in the order of execution, provided you have
a working two-way communication1.
TROFF (Trace Off) disables TRON.
3.
Creating an ErrorHandling Routine
In most application programs, it is useful to include some kind of
error-handler. Obviously, how comprehensive the error-handler
needs to be depends on the application and how independent from
the host the printer will work. In this chapter, we will explain the
general principles and the related instructions, and in chapter 16.4
you will find an example on how an error-handling program can be
composed.
ON ERROR GOTO...
This statement is described in more detail in the chapter 5.8. It is
used to branch the execution to a subroutine if any kind of error
occurs when a program is run. The major benefit is that the program
will not stop, but the error can be identified and dealt with. The
execution can then be resumed at an appropriate program line.
ERR
The ERR function returns the reference number of an error that has
occurred. The actual meaning of the numbers can be found in the
chapter “Error Messages” in the Intermec Fingerprint 6.13 Reference Manual.
ERL
The ERL function returns the number of the line on which an error
has occurred.
RESUME
This statement is used resume the execution after the error has been
taken care of in a subroutine. The execution can be resumed at the
statement where the error occurred, at the statement immediately
following the one where the error occurred, or at any other specified
line. Also see the chapter 5.8.
1
/. For a working two-way communication,
three conditions must be fulfilled:
• Serial communication
• Std IN channel = Std OUT channel
• Verbosity enabled.
Continued!
162
Intermec Fingerprint 6.13 – Programmer's Guide
16. ERROR-HANDLING, cont'd.
3.
Creating an ErrorHandling Routine,
cont'd.
Example:
The four instructions described above can be used to branch to a
subroutine, identify the error, branch to a secondary subroutine
where the error is cleared and resume the execution. In the example
only one error condition 1019 “Invalid Font” is taken care of, but
the same principles can be used for more errors. You can test the
example by either adding a valid font name or lifting the printhead
before running the program.
10
20
30
40
50
60
70
80
90
100
1000
1010
1020
2000
2010
2020
2030
2040
3000
3010
3020
3030
OPEN "console:" FOR OUTPUT AS 1
ON ERROR GOTO 1000
PRPOS 50,100
PRTXT "HELLO"
PRINTFEED
A%=TICKS+400
B%=TICKS
IF B%<A% THEN GOTO 70 ELSE GOTO 90
PRINT #1 : PRINT #1
END
SOUND 880,50
EFLAG%=ERR : ELINE%=ERL
IF EFLAG%=1019 THEN GOTO 2000 ELSE GOTO 3000
PRINT #1 : PRINT #1
PRINT #1, "Font missing"
PRINT #1, "in line ", ELINE%;
FONT "SW030RSN" : MAG 2,2 : INVIMAGE
RESUME
PRINT #1 : PRINT #1
PRINT #1, "Undefined error"
PRINT #1, "Program Stops!";
RESUME NEXT
PRSTAT
☞ Logical Operators
Also see:
• Chapter 4.9
Another instruction that can be used in connection with errorhandling is the PRSTAT function. In addition to returning the
current position of the insertion point (see chapter 10.1), it can also
return the printer's status in regard several conditions, using a
logical operator:
IF PRSTAT (AND 0)
Ok
IF PRSTAT (AND 1)
Printhead lifted
IF PRSTAT (AND 2)
Label not removed (LTS only)
IF PRSTAT (AND 4)
Printer out of paper
IF PRSTAT (AND 8)
Printer out of transfer ribbon
IF PRSTAT (AND 16)
Printhead voltage too high
IF PRSTAT (AND 32)
Printer is feeding
Multiple simultaneous errors are indicated by the sum of the values
for each error, e.g. if both the printhead is lifted (1) and the printer
is out paper (4) and ribbon (8), it can be detected by:
IF PRSTAT (AND 13)
163
Intermec Fingerprint 6.13 – Programmer's Guide
16. ERROR-HANDLING, cont'd.
4.
Error-Handling Program
ERRHAND.PRG Utility Program
The "ERRHAND.PRG" is primarily intended for use with printer
models fitted with a display and possible also a membrane keyboard
and is included in many Configuration EPROM:s. The program
contains routines for handling errors, managing the keyboard and
display, and for printing. Use ERRHAND.PRG to quickly get
started with your programming.
By merging ERRHAND.PRG with your program, the latter can
gain access to ERRHAND's subroutines. Do not use the lines 10–
20 and 100000–1900200 in your program, since those line numbers
are used by ERRHAND.PRG.
Example:
NEW
LOAD "XXX.PRG"
MERGE "ROM:ERRHAND.PRG"
RUN
If you have more than one application program that requires errorhandling in your printer, you will save valuable memory space by
keeping ERRHAND.PRG stored separately and merging it with
the current program directly after loading, compared with saving
ERRHAND.PRG merged with each program. The approximate
size of ERRHAND.PRG is 4 kilobyte.
Variables and subroutines in ERRHAND.PRG that your program
can use, or which you can modify, are:
Variables
• NORDIS1$ and NORDIS2$ at line 10 contain the main display
texts. You may replace them with your own text.
• DISP1$ and DISP2$ contain the actual text that will appear on the
printer's display on line 1 and 2 respectively.
Subroutines
• At line 160,000
The errors which normally may occur during printing are taken
care of:
Error 1005
Out of paper
Error 1006
No field to print
Error 1022
Head lifted
Error 1027
Out of transfer ribbon
Error 1031
Next label not found
The subroutine shows the last error that occurred, if any, and the
line number where the error was detected. The information is
directed to your terminal. Called by the statement GOSUB
160000.
Continued!
164
Intermec Fingerprint 6.13 – Programmer's Guide
16. ERROR-HANDLING, cont'd.
4.
Error-Handling
Program, cont'd.
ERRHAND.PRG Utility Program, cont'd.
• At line 200,000
Error-handling routines, which can be called from routines where
error may occur, e.g.:
IF EFLAG% < > 0 THEN GOSUB 200000
The error-handling routine can be modified to handle other errors
than those previously mentioned.
• At line 400,000
The FEED-routine executes a FORMFEED with error-checking.
Called by the statement GOSUB 400000.
• At line 500,000
The PRINT-routine executes a PRINTFEED with error-checking.
Called by the statement GOSUB 500000.
• At line 600,000
This subroutine clears the printer's display and makes the display
texts stored in the variables DISP1$ and DISP2$ appear on the
first and second line respectively in the display. Called by the
statement GOSUB 600000.
• At line 700,000
The Init routine initiates error-checking, opens the console for
output and displays the main display texts (NORDIS1$ and
NORDIS2$). It also sets up the some of the keys on the keyboard
(if any) and assigns subroutines to each key. Called by the
statement GOSUB 700000.
• At line 1,500,000
The <Pause> key (key No. 15) interrupts the program until the
same key is pressed a second time. Called by the statement
GOSUB 1500000.
• At line 1,700,000
Routine for the <Print> key (key No. 17), that calls subroutine
500,000. Called by the statement GOSUB 1700000.
• At line 1,800,000
Routine for the <Setup> key (key No. 18). Enters the Setup Mode
of the printer. Not suited for printers without a keyboard! Called
by the statement GOSUB 1800000.
• At line 1,900,000
Routine for the <Feed> key (key No. 19), that calls subroutine
400,000. Called by the statement GOSUB 1900000.
For more information, refer to the complete listing that follows.
Continued!
165
Intermec Fingerprint 6.13 – Programmer's Guide
16. ERROR-HANDLING, cont'd.
4.
Error-Handling
Program, cont'd.
Listing of ERRHAND.PRG Utility Program
10
PROGNO$ = "Ver. 1.2 92-01-10"
15
NORDIS1$ = "TEST PROGRAM" :
NORDIS2$ = "VERSION 1.2"
20
GOSUB 700000 : 'Initiate
100000 'Error routine
100010 EFLAG% = ERR
100050 'PRINT EFLAG%:'Activate for debug
100060 LASTERROR% = EFLAG%
100200 RESUME NEXT
160000 'PRINT "Last error = ";LASTERROR%:
'Activate for debug
160050 'IF LASTERROR% <> 0 THEN PRINT "At line ";ERL
160100 LASTERROR% = 0
160200 RETURN
200000 'Error handling routine
200010 IF EFLAG% = 1006 THEN GOTO 200040:
'Formfeed instead of print
200020 LED (1) ON : LED (0) OFF : BUSY
200030 SOUND 400, 10
200040 IF EFLAG% = 1031 THEN GOSUB 300000
200050 IF EFLAG% = 1005 THEN GOSUB 310000
200060 IF EFLAG% = 1006 THEN GOSUB 320000
200070 IF EFLAG% = 1022 THEN GOSUB 330000
200080 IF EFLAG% = 1027 THEN GOSUB 340000
200090 DISP1$ = NORDIS1$ : DISP2$ = NORDIS2$
200100 GOSUB 600000
200110 LED (1) OFF : LED (0) ON : READY
200400 RETURN
300000 'Error 1031 Next label not found
300010 DISP1$ = "LABEL NOT FOUND"
300020 DISP2$ = "ERR NO. " + STR$ (ERR)
300030 GOSUB 600000
300040 EFLAG% = 0
300050 FORMFEED
300060 IF EFLAG% = 1031 THEN GOTO 300040
300200 RETURN
310000 'Error 1005 Out of paper
310010 DISP1$ = "OUT OF PAPER"
310020 DISP2$ = "ERR NO. " + STR$ (ERR)
310030 GOSUB 600000
310040 IF (PRSTAT AND 1)=0 THEN GOTO 310040:
'Wait until head lifted
310050 EFLAG% = 0
310060 IF (PRSTAT AND 1) = 0 THEN FORMFEED
ELSE GOTO 310060
310070 IF EFLAG% = 1005 THEN GOTO 310040
310080 IF EFLAG% = 1031 THEN GOSUB 300000
310200 RETURN
320000 'Error 1006 No field to print
320010 GOSUB 400000
320200 RETURN
Continued!
166
Intermec Fingerprint 6.13 – Programmer's Guide
16. ERROR-HANDLING, cont'd.
4.
Error-Handling
Program, cont'd.
Listing of ERRHAND.PRG Utility Program, cont'd.
330000 'Error 1022 Head lifted
330010 DISP1$ = "HEAD LIFTED"
330020 DISP2$ = "ERR NO. " + STR$ (ERR)
330030 GOSUB 600000
330040 IF (PRSTAT AND 1) THEN GOTO 330040
330050 FORMFEED
330060 IF PCOMMAND% THEN GOSUB 500000
330200 RETURN
340000 'Error 1027 Out of transfer ribbon
340010 DISP1$ = "OUT OF RIBBON"
340020 DISP2$ = "ERR NO. " + STR$ (ERR)
340030 GOSUB 600000
340040 IF (PRSTAT AND 8) THEN GOTO 340040
340050 GOSUB 1500000
340200 IF PCOMMAND% THEN GOSUB 500000
349000 RETURN
400000 'Feed routine
400010 EFLAG% = 0
400020 FORMFEED
400200 IF EFLAG% <> 0 THEN GOSUB 200000
400300 RETURN
500000 'Print routine
500010 EFLAG% = 0
500020 PCOMMAND% = 1
500030 PRINTFEED
500040 IF EFLAG% <> 0 THEN GOSUB 200000
500100 PCOMMAND% = 0
500300 RETURN
600000 'Display handler
600010 PRINT # 10
600020 PRINT # 10
600030 PRINT # 10, DISP1$
600040 PRINT # 10, DISP2$;
600200 RETURN
700000 'Init routine
700010 ON ERROR GOTO 100000
700020 OPEN "console:" FOR OUTPUT AS # 10
700030 DISP1$ = NORDIS1$ : DISP2$ = NORDIS2$
700040 GOSUB 600000
700100 ON KEY (15) GOSUB 1500000 : 'PAUSE
700110 ON KEY (17) GOSUB 1700000 : 'PRINT
700120 ON KEY (18) GOSUB 1800000 : 'SETUP
700130 ON KEY (19) GOSUB 1900000 : 'FEED
700140 KEY (15) ON
700150 KEY (17) ON
700160 KEY (18) ON
700170 KEY (19) ON
700230 LED (0) ON
700240 LED (1) OFF
Continued!
167
Intermec Fingerprint 6.13 – Programmer's Guide
16. ERROR-HANDLING, cont'd.
4.
Error-Handling
Program, cont'd.
Listing of ERRHAND.PRG Utility Program, cont'd.
700300 PAUSE% = 0
700500 RETURN
1500000 'Pause function
1500010 KEY (15) ON
1500020 PAUSE% = PAUSE% XOR 1
1500030 BUSY : LED (0) OFF
1500040 DISP1$ = "Press <PAUSE>" :
DISP2$ = "to continue"
1500050 GOSUB 600000
1500060 IF PAUSE% = 0 THEN GOTO 1500100
1500070 SOUND 131, 2
1500080 SOUND 30000, 20
1500090 IF PAUSE% THEN GOTO 1500070
1500100 READY : LED (0) ON
1500110 DISP1$ = NORDIS1$ : DISP2$ = NORDIS2$
1500120 GOSUB 600000
1502000 RETURN
1700000 'Printkey
1700010 KEY (17) OFF
1700020 GOSUB 500000
1700030 KEY (17) ON
1700200 RETURN
1800000 'Setup key
1800010 KEY (18) OFF
1800020 LED (0) OFF
1800030 BUSY
1800040 SETUP
1800050 READY
1800060 LED (0) ON
1800080 KEY (18) ON
1800090 DISP1$ = NORDIS1$ : DISP2$ = NORDIS2$
1800100 GOSUB 600000
1800200 RETURN
1900000 'Feed key
1900010 KEY (19) OFF
1900020 GOSUB 400000
1900030 KEY (19) ON
1900200 RETURN
Continued!
168
Intermec Fingerprint 6.13 – Programmer's Guide
16. ERROR-HANDLING, cont'd.
4.
Error-Handling
Program, cont'd.
Extensions to ERRHAND.PRG Utility Program
The following subroutines are not included in ERRHAND.PRG,
but may be added manually to stop new input via the printer's
keyboard while a subroutine is executed:
• Turn off all keys before entering a subroutine by issuing the
statement GOSUB 900000.
• Turn on all keys after having completed a subroutine by issuing
the statement GOSUB 800000.
800000
800010
800020
800030
800040
800050
800060
'Turn all keys on
I% = 0
IF I% > 21 THEN GOTO 800060
KEY (I%) ON
I% = I% + 1
GOTO 800020
RETURN
900000
900010
900020
900030
900040
900050
900060
'Turn all keys off
I% = 0
IF I% > 21 THEN GOTO 900060
KEY (I%) OFF
I% = I% + 1
GOTO 900020
RETURN
169
Intermec Fingerprint 6.13 – Programmer's Guide
17. REFERENCE LISTS
1.
Instructions in Alphabetical Order
Instruction
ABS
ACTLEN
See chapter
9.2
11.4
ALIGN (AN)
10.1
ASC
9.2
BARADJUST
15.8
BARFONT (BF)
BARFONT (BF) ON/OFF
BARHEIGHT (BH)
BARMAG (BM)
BARRATIO (BR)
BARSET
10.3, 12.1
10.3
10.3
10.3
10.3
10.3
BARTYPE (BT)
BEEP
BREAK
10.3
15.4
5.12
BREAK ON/OFF
5.12
BUSY
7.7
CHDIR
CHECKSUM
6.1
6.9
CHR$
CLEANFEED
CLEAR
CLL
CLOSE
COM ERROR ON/OFF
9.2
11.1
6.1
11.5
6.4, 7.3-7.6, 8.3-8.5
7.8
COMBUF$
COMSET
7.8
7.8
COMSET OFF
7.8
COMSET ON
7.8
COMSTAT
COPY
CSUM
CUT
CUT ON/OFF
7.8
5.13, 6.2-6.4, 8.5
6.10
11.3
11.3
DATE$
DATEADD$
9.3, 15.5
9.3
DATEDIFF
DELETE
9.3
5.4
DEVICES
4.10, 8.1
Purpose
Returning the absolute value of a numeric expression.
Returning the length of the most recently executed PRINTFEED,
FORMFEED or TESTFEED statement.
Specifying which part (anchor point) of a text, bar code field, image
field, line or box will be positioned at the insertion point.
Returning the decimal ASCII value of the first character in a string
expression.
Enabling/disabling automatic adjustment of bar code position in order
to avoid faulty printhead dots.
Specifying fonts for the printing of bar code interpretation.
Enabling/disabling the printing of bar code interpretation.
Specifying the height of a bar code.
Specifying the magnification in regard of width of the bars in a bar code.
Specifying the ratio between the wide and the narrow bars in a bar code.
Specifying a bar code and setting additional parameters to complex bar
codes.
Specifying the type of bar code.
Ordering the printer to emit a beep.
Specifying a break interrupt character separately for the keyboard and
each serial communication channel.
Enabling/disabling break interrupt separately for the keyboard and each
serial communication channel.
Ordering a busy signal, e.g. XOFF, CTS/RTS or PE, to be transmitted
from the printer on the specified communication channel.
Specifying the current directory.
Calculating the checksum of a range of program lines in connection with
the transfer of programs.
Returning the readable character from a decimal ASCII code.
Running the printer's feed mechanism.
Clearing strings, variables and arrays to free memory space.
Partial or complete clearing of the print image buffer.
Closing one or several files and/or devices for input/output.
Enabling/disabling error handling on the specified communication
channel.
Reading the data in the buffer of the specified communication channel.
Setting the parameters for background reception of data to the buffer of
a specified communication channel.
Turning off background data reception and emptying the buffer of the
specified communication channel.
Emptying the buffer and turning on background data reception on the
specified communication channel.
Reading the status of the buffer of the specified communication channel.
Copying files.
Calculating the checksum of an array of strings.
Activating an optional paper cutting device.
Enabling/disabling automatic cutting after PRINTFEED execution and
optionally adjusting the paper feed before and after the cutting.
Setting or returning the current date.
Returning a new date after a number of days have been added to, or
subtracted from, the current date or optionally a specified date.
Returning the difference between two dates as a number of days.
Deleting one or several consecutive program lines from the printer's
working memory.
Returning the names of all devices to the standard OUT channel.
Continued!
170
Intermec Fingerprint 6.13 – Programmer's Guide
17. REFERENCE LISTS, cont'd.
1.
Instructions in Alphabetical Order, cont'd.
Instruction
DIM
DIR
END
See chapter
6.10
10.1
5.4
ENDIF
EOF
ERL
5.5
7.4
16.3
ERR
FIELD
16.3
7.5, 8.4
FIELDNO
11.5
FILE& LOAD
FILES
6.6, 12.2
6.1, 6.2, 8.1, 12.5, 14.4
FONT (FT)
10.2, 12.1
FONT LOAD
FONTNAME$
FONTS
6.6, 12.4
12.5
6.1, 8.1, 12.5
FOR
5.9
FORMAT
6.1
FORMAT DATE$
9.3
FORMAT TIME$
9.3
FORMFEED
11.1
FRE
FUNCTEST
FUNCTEST$
GET
GOSUB
GOTO
HEAD
IF..GOTO...[ELSE]
IF..THEN...[ELSE]
IMAGE LOAD
6.1
15.10
15.10
7.5
5.7
5.6
15.8
5.8
5.5
6.5, 14.3
IMAGENAME$
IMAGES
14.4
6,1, 8.1
IMMEDIATE ON/OFF
5.4
INKEY$
7.2
INPUT (IP)
7.2
INPUT#
7.3, 7.4, 7.6, 15.1
Purpose
Specifying the dimensions of an array.
Specifying the print direction.
Ending the execution of the current program or subroutine and closing
all OPENed files and devices.
Ending multiple IF...THEN...ELSE statements.
Checking for an end-of-file condition.
Returning the number of the line on which an error condition has
occurred.
Returning the code number of an error that has occurred.
Creating a single-record buffer for a random file and dividing the buffer
into fields to which string variables are assigned.
Getting the current field number for partial clearing of the print buffer
by a CLL statement.
Reception and storing of binary files in the printer's RAM memory
Listing the files stored in one of the printer's directories to the standard
OUT channel.
Selecting a font for the printing of the subsequent PRTXT statements, and
optionally generating a bitmap font from a scalable outline font in
Speedo or TrueType format.
Converting and downloading fonts in .ATF format.
Returning the names of the bitmap fonts stored in the printer's memory.
Returning the names of all bitmap fonts stored in the printer's memory
to the standard OUT channel.
Creating a loop in the program execution, where a counter is incremented
or decremented until a specified value is reached.
Formatting the printer's RAM memory, or formatting a RAM-type
memory card to MS-DOS format.
Specifying the format of the string returned by DATE$("F") and
DATEADD$(...,"F") instructions.
Specifying the format of the string returned by TIME$("F") and
TIMEADD$(...,"F") instructions.
Activating the paper feed mechanism in order to feed out or pull back
a certain length of the paper web.
Returning the number of free bytes in the printer's RAM memory.
Performing various hardware tests.
Performing various hardware tests.
Reading a record from a random file to a random buffer.
Branching to a subroutine.
Branching unconditionally to a specified line.
Returning the result of a thermal printhead check.
Conditional branching controlled by the result of a numeric expression.
Conditional execution controlled by the result of a numeric expression.
Reception and conversion of image files in .PCX format to images in the
Intermec Fingerprint internal bitmap format.
Returning the names of the images stored in the printer's memory.
Returning the names of all images stored in the printer's memory to the
standard OUT channel.
Enabling/disabling the immediate mode of Intermec Fingerprint in
connection with program editing without line numbers.
Reading the first character in the receive buffer of the standard IN
channel.
Receiving input data via the standard IN channel during the execution
of a program.
Reading a string of data from an OPENed device or sequential file.
Continued!
171
Intermec Fingerprint 6.13 – Programmer's Guide
17. REFERENCE LISTS, cont'd.
1.
Instructions in Alphabetical Order, cont'd.
Instruction
INPUT$
See chapter
7.2-7.6, 15.1
INSTR
9.2
INVIMAGE (II)
10.2, 10.4
KEY BEEP
15.1
KEY ON/OFF
15.1
KEYBMAP$
KILL
15.1
5.13, 6.1, 6.3-6.4
LAYOUT
LBLCOND
LED ON/OFF
LEFT$
10.7
11.1
15.3
9.2
LEN
LET
LINE INPUT
9.2
4.7
7.2
LINE INPUT#
7.2, 7.4, 7.6, 15.1
LIST
5.4, 6.3, 8.1
LOAD
5.13, 6.3
LOC
6.4, 7.4-7.5, 7.8, 8.3-8.5
LOF
6.4, 7.4-7.5, 7.8, 8.3-8.5
LSET
LTS& ON/OFF
MAG
8.4
11.3
10.2, 10.4
MAP
9.1
MERGE
6.3
MID$
NAME DATE$
9.2
9.3
NAME WEEKDAY$
NASC
NEW
9.3
9.1
5.4, 6.3
NEXT
5.9
NORIMAGE (NI)
10.2, 10.4
Purpose
Returning a string of data, limited in regard of number of characters,
from the standard IN channel, or optionally from an OPENed file or
device.
Searching a specified string for a certain character, or sequence of
characters, and returning its position in relation to the start of the string.
Inversing the printing of text and images from “black-on-white” to
“white-on-black.
Resetting the frequency and duration of the sound produced by the
beeper, when any key on the printer's keyboard is pressed down.
Enabling/disabling a specified key on the printer's front panel to be used
in connection with an ON KEY...GOSUB statement.
Returning or setting the keyboard map table.
Deleting a file from the printer's RAM memory or from a DOSformatted memory card inserted in an optional memory card adapter.
Handling of layout files.
Overriding the paper feed setup.
Turning a specified LED control lamp on or off.
Returning a specified number of characters from a given string starting
from the extreme left side of the string, i.e. from the start.
Returning the number of character positions in a string.
Assigning the value of an expression to a variable.
Assigning an entire line, including punctuation marks, from the
standard IN channel to a single string variable.
Assigning an entire line, including punctuation marks, from a sequential
file or a device to a single string variable.
Listing the current program completely or partially, or listing all
variables, to the standard OUT channel.
Loading a copy of a program, residing in the current directory or in
another specified directory, into the printer's working memory.
Returning the current position in an OPENed file or the status of the
buffers in an OPENed communication channel.
Returning the length in bytes of an OPENed sequential or random file
or returning the status of the buffers in an OPENed communication
channel.
Placing data left-justified into a field in a random file buffer.
Enabling or disabling the label taken sensor.
Magnifying a font, barfont or image up to four times separately in regard
of height and width.
Changing the ASCII value of a character when received on the standard IN
channel, or optionally on another specified communication channel.
Merging a program in the printer's current directory, or optionally in
another specified directory, with the program currently residing in the
printer's working memory.
Returning a specified part of a string.
Formatting the month parameter in return strings of DATE$("F") and
DATEADD$(...,"F").
Formatting the day parameter in return strings of WEEKDAY$.
Selecting a character set.
Clearing the printer's working memory in order to allow a new program
to be created.
Creating a loop in the program execution, where a counter is incremented
or decremented according to a FOR statement.
Returning to normal printing after an INVIMAGE statement has been
issued.
Continued!
172
Intermec Fingerprint 6.13 – Programmer's Guide
17. REFERENCE LISTS, cont'd.
1.
Instructions in Alphabetical Order, cont'd.
Instruction
ON BREAK GOSUB
ON COMSET GOSUB
See chapter
5.8, 5.12
5.8, 7.8
ON ERROR GOTO
ON GOSUB
ON GOTO
ON KEY GOSUB
5.8, 16.3
5.8
5.8
5.8, 15.1
ON/OFF LINE
7.7
OPEN
6.4, 7.3-7.6, 8.3-8.5, 15.2
OPTIMIZE ON/OFF
PCX2BMP
11.5
6.5, 14.3
PORTIN
PORTOUT ON/OFF
7.10
7.10
PRBAR (PB)
PRBOX (PX)
PRIMAGE (PM)
PRINT (?)
PRINT#
PRINT KEY ON/OFF
PRINTFEED (PF)
10.3
10.5
10.4
8.1
8.3, 8.5, 15.2
11.3
11.3
PRINTFEED (PF) NOT
PRINTONE
11.2
8.1
PRINTONE#
8.3, 8.5
PRLINE (PL)
PRPOS (PP)
10.6
10.1
PRSTAT
10.1, 16.3
PRTXT (PT)
PUT
RANDOM
RANDOMIZE
10.2
8.4
9.4
9.4
READY
7.7
REBOOT
REDIRECT OUT
REM (')
5.14
6.4, 8.2
REMOVE IMAGE/FONT 6.1, 12.2-12.4, 14.4
RENUM
5.4
RESUME
5.8, 16.3
RETURN
5.7
Purpose
Branching to a subroutine, when a break interrupt instruction is received.
Branching to a subroutine, when the background reception of data on the
specified communication channel is interrupted.
Branching to an error-handling subroutine when an error occurs.
Conditional branching to one or several subroutines.
Conditional branching to one of several lines.
Branching to a subroutine when a specified key on the printer's front
panel is activated.
Controlling the SELECT signal on the Centronics communication
channel.
Opening a file or device – or creating a new file – for input, output or
append, allocating a buffer and specifying the mode of access.
Enabling/disabling optimizing strategies for batch printing.
Converting image files in .PCX format to the internal bitmap format of
Intermec Fingerprint.
Reading the status of a port on the Industrial Interface Board.
Setting one of four relays on the Industrial Interface Board to either
Open or Closed.
Providing input data to a bar code.
Creating a box.
Selecting an image stored in the printer's memory.
Printing of data to the standard OUT channel.
Printing of data to a specified OPENed device or sequential file.
Enabling/disabling printing of a label by pressing the Print key.
Printing and feeding out one or a specified number of labels, tickets, tags
or portions of strip, according to the printer's setup.
Preparing the printing.
Printing of characters specified by their ASCII values to the standard
OUT channel.
Printing of characters specified by their ASCII values to a device or
sequential file.
Creating a line.
Specifying the insertion point for a line of text, a bar code, an image, a
box or a line.
Returning the printer's current status or, optionally, the current position
of the insertion point.
Providing the input data for a text field, i.e. a line of text.
Writing a given record from the random buffer to a given random file.
Generating a random integer within a specified interval.
Reseeding the random number generator, optionally with a specified
value.
Ordering ready signal, e.g. XON, CTS/RTS or PE, to be transmitted fro
the printer on the specified communication channel.
Restarting the printer.
Redirecting the output data to a created file.
Adding headlines and explanations to a program without including
them in the execution.
Removing a specified image or bitmap font from the printer's memory.
Renumbering the lines of the program currently residing in the printer's
working memory.
Resuming program execution after an error-handling subroutine has
been executed.
Returning to the main program after having branched to a subroutine
because of a GOSUB statement.
Continued!
173
Intermec Fingerprint 6.13 – Programmer's Guide
17. REFERENCE LISTS, cont'd.
1.
Instructions in Alphabetical Order, cont'd.
Instruction
RIBBON SAVE ON/OFF
RIGHT$
See chapter
15.9
9.2
RSET
RUN
SAVE
8.4
5.11, 6.3
5.13, 6.3
SET FAULTY DOT
15.8
SETSTDIO
SETUP
7.1
15.6
SGN
9.2
SORT
SOUND
6.10
15.4
SPACE$
SPLIT
9.2
6.10
STORE
STORE IMAGE
STORE INPUT
STORE OFF
STR$
STRING$
14.3
14.3
14.3
14.3
9.2
9.2
SYSVAR
TESTFEED
7.7, 14.3, 15.7-15.9, 16.1
11.1
TICKS
9.3
TIME$
TIMEADD$
9.3, 15.5
9.3
TIMEDIFF
9.3
TRANSFER KERMIT
TRANSFER STATUS
TRANSFER$
6.8
6.8
6.4
TRANSFERSET
TRON/TROFF
VAL
VERBON/VERBOFF
6.4
16.2
9.2
7.7
VERSION$
15.11
WEEKDAY
WEEKDAY$
WEEKNUMBER
WHILE...WEND
9.3
9.3
9.3
5.9
Purpose
Enabling/disabling the optional Ribbon Save mechanism.
Returning a specified number of characters from a given string starting
from the extreme right side of the string, i.e. from the end.
Placing data right-justified into a field in a random file buffer.
Starting the execution of a program.
Saving a file in the printer's RAM memory or optionally in a DOSformatted memory card.
Marking one or several dots on the printhead as faulty, or marking all
faulty dots as correct.
Selecting standard IN and OUT communication channel.
Entering the printer's Setup Mode, changing the setup by means of a
setup file or setup string, or creating a setup file containing the printer's
current setup values.
Returning the sign (positive, zero or negative) of a specified numeric
expression.
Sorting a one-dimensional array.
Making the printer's beeper produce a sound specified in regard of
frequency and duration.
Returning a specified number of space characters.
Splitting a string into an array according to the position of a specified
separator character and returning the number of elements in the array.
Storing protocol frames of image data in RAM.
Setting up parameters for storing an image in RAM.
Receiving and storing protocol frames of image data in RAM.
Terminating the storing of an image and resetting the storing parameters.
Returning the string representation of a numeric expression.
Repeatedly returning the character of a specified ASCII value, or the
first character in a specified string
Reading or setting various system variables.
Performing a formfeed to allow the label stop sensor to adjust itself
according to the presently loaded paper web.
Returning the time that has passed since the last power-up in the printer,
expressed in number of “TICKS” (1 TICK = 0.01 seconds).
Setting or returning the current time.
Returning a new time after a number of seconds have been added to, or
subtracted from, the current time or optionally a specified time.
Returning the difference in number of seconds between two specified
moments of time in number of seconds.
Transferring of data files using Kermit communication protocol.
Checking last TRANSFER KERMIT operation.
Executing a transfer from source to destination as specified by a
TRANSFERSET statement.
Entering setup for the TRANSFER$ function.
Enabling/disabling tracing of the program execution.
Returning the numeric representation of a string expression.
Specifying the verbosity level of the communication from the printer on
the standard OUT channel (serial communication only).
Returning the version of the Intermec Fingerprint programming
language, printer family, or type of CPU board
Returning the weekday of a specified date.
Returning the name of the weekday from a specified date.
Returning the number of the week for a specified date.
Executing a series of statements in a loop providing a given condition
is true.
174
Intermec Fingerprint 6.13 – Programmer's Guide
17. REFERENCE LISTS, cont'd.
2.
Instructions by Field of Application
Instruction
Abbr. Type Purpose
SETUP AND PREFERENCES
General Intermec Fingerprint Control:
CHDIR<scon>
MAP[<nexp>,]<nexp>,<nexp>
NASC<nexp>
REBOOT
SETUP [[WRITE<sexp>] | [<sexp>]]
SYSVAR(<nexp>)
Stmt
Stmt
Stmt
Stmt
Stmt
Array
Change current directory
Remapping
Select national character set
Restart printer
Printer setup
Read or set various system variables
Setting the Clock/Calendar:
DATE$=<sexp>
TIME$=<sexp>
Var
Var
Set the date
Set the time
OPERATOR INTERFACE
Keyboard Setup:
KEY(<nexp>)ON|OFF
ON KEY(<nexp>)GOSUB<ncon>|<line label>
KEY BEEP<nexp>,<nexp>
KEYBMAP$(<nexp>)=<sexp>
Stmt
Stmt
Stmt
Var
Enable/disable key on printer's keyboard
Key-initiated branching
Set frequency and duration of key response
Set the keyboard map table
Output to Display:
OPEN "console:" FOR OUTPUT AS[#]<nexp>
PRINT#<nexp>[,<<nexp>|<sexp>>[<,|;><<nexp|<sexp>>...][;]]
CLOSE [#]<nexp>
Stmt Open display for output
Stmt Print data to display
Stmt Close display for output
LED Control Lamps:
LED<nexp>ON|OFF
Stmt Turn LED on or off
Audible Signals:
BEEP
SOUND<nexp>,<nexp>
Stmt Emit a beep
Stmt Produce sound
Breaking Program Execution:
BREAK<nexp>,<nexp>
BREAK <nexp> ON|OFF
ON BREAK<nexp>GOSUB<ncon>|<line label>
Stmt Specify break interrupt character
Stmt Enable/disable break interrupt
Stmt Branching at break interrupt
PRINTER CHECKOUT AND CONTROL
Memory :
CLEAR
FORMAT<sexp>[,<nexp>[,<nexp>]]
FRE(<<nexp>|<sexp>>)
FUNCTEST <sexp>,<svar>
FUNCTEST$ (<sexp>)
REMOVE IMAGE|FONT<sexp>
Stmt
Stmt
Func
Stmt
Func
Stmt
Clear strings, variables and arrays
Format RAM memory or memory card
Return number of free bytes in RAM
Checking RAM:s and ROM:s
Checking RAM:s and ROM:s
Remove image or font from RAM memory
Printhead:
BARADJUST<nexp>,<nexp>
HEAD(<nexp>)
FUNCTEST <sexp>,<svar>
SET FAULTY DOT<nexp>[,<nexp>...]
SYSVAR(21|22)
Stmt
Func
Stmt
Stmt
Array
Enable/disable auto bar code repositioning
Checking printhead dots
Checking printhead
Marking dots as faulty for BARADJUST
Read density or no. of dots
Transfer Ribbon:
RIBBON SAVE ON|OFF
SYSVAR(13|20|23)
Stmt Turn ribbon save on or off
Array Read counter, mode or ribbon end sensor
Paper Supply:
SYSVAR(12)
Array Read paper end sensor
175
Intermec Fingerprint 6.13 – Programmer's Guide
17. REFERENCE LISTS, cont'd.
2.
Instructions by Field of Application, cont'd.
Instruction
Abbr. Type Purpose
PROGRAMMING:
Managing Programs and Files:
CHECKSUM(<nexp>,<nexp>)
COPY<sexp>[,<sexp>]
KILL<sexp>
LOAD<scon>
MERGE<scon>
NEW
SAVE<scon>[,P|L]
Func
Stmt
Stmt
Stmt
Stmt
Stm
Stmt
Calculate checksum at program transfer
Copy file
Delete file
Load program
Merge programs
Clear the working memory
Save program
Listings:
DEVICES
FILES[<scon>]
FONTNAME$(<nexp>)
FONTS
IMAGENAME$(<nexp>)
IMAGES
LIST[[<ncon>[- <ncon>]]|,V]
VERSION$[(<nexp>)]
<svar>=KEYBMAP$(<nexp>)
Stmt
Stmt
Func
Stmt
Func
Stmt
Stmt
Func
Var
List devices to standard I/O channel
List files to standard I/O channel
Return font name
List all fontnames to standard I/O channel
Return image name
List all imagenames to standard I/O channel
List current program or all variables to std I/O
Returns S/W or H/W version or printer model
Read the keyboard map table
Program Editing and Execution:
DELETE<ncon>[-<ncon>]
END
IMMEDIATE ON|OFF
LIST[[<ncon>[- <ncon>]]|,V]
NEW
REM|’<remark>
RENUM[<ncon>][,[<ncon>][,<ncon>]]
RUN[<<scon>|<ncon>>]
SAVE<scon>[,P|L]
Stmt
Stmt
Stmt
Stmt
Stmt
Stmt
Stmt
Stmt
Stmt
Delete program lines
Terminate program execution
Start/stop writing program w/o line numbers
List current program or all variables to std I/O
Clear the working memory
Remark
Renumber program lines
Execute program
Save program
Data Manipulation:
ABS(<nexp>)
ASC(<sexp>)
CHR$(<nexp>)
INSTR([<nexp>,]<sexp>,<sexp>]
LEFT$(<sexp>,<nexp>)
LEN(<sexp>)
[LET]<<nvar>=<nexp>>|<<svar>=<sexp>>
MID$(<sexp>,<nexp>[,<nexp>])
RANDOM (<nexp>,<nexp>)
RANDOMIZE [<nexp>]
RIGHT$(<sexp>,<nexp>)
SGN(<nexp>)
SPACE$(<nexp>)
STR$(<nexp>)
STRING$(<nexp>,<<nexp>|<sexp>>)
VAL(<sexp>)
Func
Func
Func
Func
Func
Func
Stmt
Func
Func
Stmt
Func
Func
Func
Func
Func
Func
Return the absolute value of an expression
Return ASCII code for 1:st char. in string
Convert ASCII code
Return position of character in string
Return characters from left side of string
Return number of characters in string
Assign a value to a variable
Return part of string
Generate a random integer
Reseed random number generator
Return characters from right side of string
Return sign of numeric expression
Return specified number of space characters
Return string representation of num. expr.
Return a number of repeated characters
Return numeric representation of string expr.
176
Intermec Fingerprint 6.13 – Programmer's Guide
17. REFERENCE LISTS, cont'd.
2.
Instructions by Field of Application, cont'd.
Instruction
Abbr. Type Purpose
PROGRAMMING, cont'd:
Branching and Conditionals:
END IF
FOR<nvar>=<nexp>TO<nexp>[STEP<nexp>)
GOSUB<ncon>|<line label>
GOTO<ncon>|<line label>
IF<nexp>[,][THEN]GOTO<ncon>|<line label>[ELSE<stmt>]
IF<nexp>[,]THEN<stmt>[ELSE<stmt>
IF<nexp>[,]THEN↵ <stmt>↵ ...[<stmt]↵ [ELSE↵ <stmt>↵ ...[<stmt>]]↵ ENDIF
NEXT[<nvar>]
ON <nexp>GOSUB<ncon>|<line label>[,<ncon>|<line label>...]
ON <nexp>GOTO<ncon>|<line label>[,<ncon>|<line label>...]
RETURN[<ncon>|<line label>]
WHILE<nexp>↵ <stmt>↵ [...<stmt>]↵ WEND
Stmt
Stmt
Stmt
Stmt
Stmt
Stmt
Stmt
Stmt
Stmt
Stmt
Stmt
Stmt
Ending multiple IF...THEN...ELSE statements
Creating a program loop
Branch to subroutine
Unconditional branching
Conditional branching
Conditional execution
Conditional execution of multiple statements
Creating a program loop
Cond. branching to one of many subroutines
Conditional branching to one of several lines
Return from subroutine
Conditional execution of loop of statements
Arrays:
CSUM<ncon>,<svar>,<nvar>
DIM<<nvar>|<svar>>(<nexp>[,<nexp>...])...[,<<nvar>|<svar>>(nexp>[,<nexp>...])]
SORT<<nvar>|<svar>>,<nexp>,<nexp>,<nexp>
SPLIT(<sexp>,<sexp>,<nexp>)
Stmt
Stmt
Stmt
Func
Calculate checksum of array of strings
Set array dimensions
Sort a one-dimensional array
Split a string into an array
Clock/Calendar Facilities:
<svar>=DATE$[("F")]
<svar>=TIME$[("F")]
DATEADD$[(<sexp>,]<nexp>[,"F"])
TIMEADD$[(<sexp>,]<nexp>[,"F"])
DATEDIFF(<sexp>,<sexp>)
TIMEDIFF(<sexp>,<sexp>)
FORMAT DATE$<sexp>
FORMAT TIME$<sexp>
NAME DATE$<nexp>,<sexp>
NAME WEEKDAY$
WEEKDAY(<sexp>)
WEEKDAY$(<sexp>)
WEEKNUMBER
TICKS
Var
Var
Func
Func
Func
Func
Stmt
Stmt
Stmt
Stmt
Func
func
Func
Func
Read the date
Read the time
Add days to a date
Add seconds to a time
Calculate difference between dates
Calculate difference between times
Specify date format
Specify time format
Specify names of the months
Specify names of the weekdays
Return weekday of a date
Return name of the weekday for a date
Return weeknumber for a date
Return time passed since startup
Error-handling:
ERL
ERR
ON ERROR GOTO<ncon>|<line label>
PRSTAT[(<nexp>)]
RESUME[<<ncon>|<line label>|<NEXT>|<0>>]
SYSVAR(19)
TRON
TROFF
Func
Func
Stmt
Func
Stmt
Array
Stmt
Stmt
Error on line
Error code
Branch at error
Returns printer status or current X/Y position
Resume program execution after error
Set type of error message
Enable tracing
Disable tracing
COMMUNICATION:
Communication Control:
BUSY[<nexp>]
READY[<nexp>]
ON LINE<nexp>
OFF LINE<nexp>
REDIRECT OUT[<sexp>]
SETSTDIO<nexp>[,<nexp>]
SYSVAR(18)
VERBON
VERBOFF
Stmt
Stmt
Stmt
Stmt
Stmt
Stmt
Array
Stmt
Stmt
Send busy signal on communication channel
Send ready signal on communication channel
SELECT signal high (Centronics)
SELECT signal low (Centronics)
Redirect output data to file
Set standard I/O channels
Set verbosity level
Verbosity on
Verbosity off
177
Intermec Fingerprint 6.13 – Programmer's Guide
17. REFERENCE LISTS, cont'd.
2.
Instructions by Field of Application, cont'd.
Instruction
Abbr. Type Purpose
COMMUNICATION, cont'd.
Background Communication:
COM ERROR<nexp>ON|OFF
COMBUF$(<nexp>)
COMSET<nexp>,<sexp>,<sexp>,<sexp>,<sexp>,<nexp>
COMSET<nexp>ON|OFF
COMSTAT(<nexp>)
ON COMSET<nexp>GOSUB<nexp>|<line label>
Stmt
Func
Stmt
Stmt
Func
Stmt
FILE TRANSFER:
Binary Files:
TRANSFER K[ERMIT]<sexp>[,<sexp>[,<sexp>[,<sexp>]]]
TRANSFER S[TATUS]<nvar>,<svar>
FILE& LOAD<sexp>,<nexp>[,<nexp>]
Stmt Data transfer using KERMIT
Stmt Check last KERMIT transfer
Stmt Receive and store binary files
Data Files:
TRANSFER$(<nexp>)
TRANSFERSET[#]<nexp>,[#]<nexp>,<sexp>[,<nexp>]
Func Execute transfer and set time-out
Stmt Enter setup for file transfer using TRANSFER$
Image Files:
IMAGE LOAD<sexp>,<nexp>,<sexp>[,<nexp>]
RUN "pcx2bmp [-i][-v] <scon> [<scon>]"
STORE<sexp>
STORE IMAGE[RLL][KILL]<sexp>,<nexp>,<nexp>,[<nexp>],<sexp>
STORE INPUT<nexp>[,<nexp>]
STORE OFF
SYSVAR(16|17)
Stmt
–
Stmt
Stmt
Stmt
Stmt
Array
Receive and convert .PCX files to images
Convert image files in .PCX format
Store Intelhex frames of image data
Set up image storage parameters
Receiving and storing image data
End storing of image data
Read no. of bytes/frames received
Func
Stmt
Func
Stmt
Read 1:st character from std IN channel
Input to variables
Input, limited no. of characters
Input, entire line
Input from Host on Any Channel:
OPEN<sexp>FOR INPUT AS[#]<nexp>
INPUT#<nexp>,<<nvar>|<svar>>[,<<nvar>|<svar>...]
INPUT$(<nexp>[,<nexp>])
LINE INPUT#<nexp>,<svar>
CLOSE[[#]<nexp>[,[#]<nexp>...]]
LOC(<nexp>)
LOF(<nexp>)
Stmt
Stmt
Func
Stmt
Stmt
Func
Func
Open device
Input to variables
Input, limited no. of characters
Input, entire line
Close device
Remaining no. of characters in receive buffer
Remaining free space in receive buffer
Input from Sequential File:
OPEN<sexp>FOR INPUT AS[#]<nexp>
INPUT#<nexp>,<<nvar>|<svar>>[,<<nvar>|<svar>...]
INPUT$(<nexp>[,<nexp>])
LINE INPUT#<nexp>,<svar>
CLOSE[[#]<nexp>[,[#]<nexp>...]]
EOF(<nexp>)
LOC(<nexp>)
LOF(<nexp>)
Stmt
Stmt
Func
Stmt
Stmt
Func
Func
Func
Open file
Input to variables
Input, limited no. of characters
Input, entire line
Close file
End of file
Return current position in file
Return length of file
Input from Random File:
OPEN<sexp>AS[#]<nexp>[LEN=<nexp>]
FIELD[#]<nexp>,<nexp>AS<svar>[,<nexp>AS<svar>...]
GET[#]<nexp>,<nexp>
CLOSE[[#]<nexp>[,[#]<nexp>...]]
LOC(<nexp>)
LOF(<nexp>)
Stmt
Stmt
Stmt
Stmt
Func
Func
Open a random file
Create a buffer for a random file
Read rec. from random file to random buffer
Close file
Return current position in file or buffer
Return length of file
INPUT TO FINGERPRINT
Input from Standard IN Channel:
INKEY$
INPUT[<scon><;|,>]<<nvar>|<svar>>[,<<nvar>|<svar>>...]
INPUT$(<nexp>[,<nexp>])
LINE INPUT[<scon>;]<svar>
IP
Enable/disable error handling
Read communication buffer
Set communication parameters
Turn on/off background data reception
Read communication buffer status
Branch at background comm. interrupt
178
Intermec Fingerprint 6.13 – Programmer's Guide
17. REFERENCE LISTS, cont'd.
2.
Instructions by Field of Application, cont'd.
Instruction
Abbr. Type Purpose
INPUT TO FINGERPRINT, cont'd.
Input from Printer's Keyboard
OPEN"console:" FOR INPUT AS[#]<nexp>
INPUT#<nexp>,<<nvar>|<svar>>[,<<nvar>|<svar>...]
INPUT$(<nexp>[,<nexp>])
LINE INPUT#<nexp>,<svar>
CLOSE [#]<nexp>
Stmt
Stmt
Func
Stmt
Stmt
Industrial Interface:
PORTIN(<nexp>)
PORTOUT(<nexp>)ON|OFF
Func Reading status of a specified port
Stmt Set the relay on a specified port
OUTPUT FROM Intermec FINGERPRINT
Output to Standard OUT Channel :
PRINT[<<nexp>|<sexp>>[<,|;><<nexp>|<sexp>>...][;]]
PRINTONE[<nexp>[<,|;><nexp>...][;]]
?
Open keyboard for input or append
Input to variables
Input, limited no. of characters
Input , entire line
Close keyboard for input
Stmt Print data to standard I/O channel
Stmt Print ASCII characters to std I/O channel
Output to Any Communication Channel:
OPEN<sexp>[FOR <OUTPUT|APPEND> ]AS[#]<nexp>
PRINT#<nexp>[,<<nexp>|<sexp>>[<,|;><<nexp|<sexp>>...][;]]
PRINTONE#<nexp>[,<nexp>[<,|;><nexp>...][;]]
CLOSE[[#]<nexp>[,[#]<nexp>...]]
LOC(<nexp>)
LOF(<nexp>)
Stmt
Stmt
Stmt
Stmt
Func
Func
Open device
Print data to device
Print ASCII characters to device
Close device
Remaining free bytes in transmitter buffer
Remaining no. of char. in transmitter buffer
Output to a Sequential File:
OPEN<sexp>[FOR <INPUT|OUTPUT|APPEND> ]AS[#]<nexp>
PRINT#<nexp>[,<<nexp>|<sexp>>[<,|;><<nexp|<sexp>>...][;]]
PRINTONE#<nexp>[,<nexp>[<,|;><nexp>...][;]]
CLOSE[[#]<nexp>[,[#]<nexp>...]]
LOC(<nexp>)
LOF(<nexp>)
Stmt
Stmt
Stmt
Stmt
Func
Func
Open file
Print data to sequential file
Print ASCII characters to sequential file
Close file
Current position in file
Length of file
Output to Random File:
OPEN<sexp>AS[#]<nexp>[LEN=<nexp>]
FIELD[#]<nexp>,<nexp>AS<svar>[,<nexp>AS<svar>...]
LSET<svar>=<sexp>
RSET<svar>=<sexp>
PUT[#]<nexp>,<nexp>
CLOSE[[#]<nexp>[,[#]<nexp>...]]
LOC(<nexp>)
LOF(<nexp>)
Stmt
Stmt
Stmt
Stmt
Stmt
Stmt
Func
Func
Open a random file
Create a buffer for a random file
Place data in random file buffer (left justified)
Place data in random file buffer (right justified)
Write rec. from random buffer to random file
Close file
Current position in file
Length of file
Stmt
Stmt
Stmt
Stmt
Alignment
Select print direction
Set coordinates for insertion point
Creating and using layout files
NI
FT
Stmt
Stmt
Stmt
Stmt
Inverse image printing
Magnification of font
Return to normal image printing
Select bitmap font
FT
Stmt Scale outline font (range of ASCII values)
FT
PT
Stmt Scale outline font (string of characters)
Stmt Input data to text field
FORMATTING AND PRINTING
General Formatting Instructions:
ALIGN<nexp>
DIR<nexp>
PRPOS<nexp>,<nexp>
LAYOUT [F,]<sexp>,<sexp>,<svar>,<nvar>
Text Printing:
INVIMAGE
MAG<nexp>,<nexp>
NORIMAGE
FONT<sexp>
FONT<sexp>[,<sexp>[,<nexp>[,<nexp>[,<nexp>[,<nexp>[,<sexp>
[,<nexp>[,<nexp>[,<sexp>]]]]]]]]]
FONT<sexp>[,<sexp>[,<nexp>[,<sexp>[,<nexp>[,<sexp>[,<nexp>
[,<nexp>[,<sexp>]]]]]]]]
PRTXT<<nexp>|<sexp>>[;<<nexp>|<sexp>>...][;]
AN
PP
II
Continued!
179
Intermec Fingerprint 6.13 – Programmer's Guide
17. REFERENCE LISTS, cont'd.
2.
Instructions by Field of Application, cont'd.
Instruction
FORMATTING AND PRINTING, cont'd.
Bar Code Printing:
BARFONT[#<ncon>,]<sexp>[,sexp>[,<nexp>[,nexp>[,nexp]]]][ON]
BARFONT ON
BARFONT OFF
BARHEIGHT<nexp>
BARMAG<nexp>
BARRATIO<nexp>,<nexp>
BARSET[#<ncon>,][<sexp>[,<nexp>[,<nexp>[,<nexp>[,<nexp>[,<nexp>
[,<nexp>[,<nexp>[,<nexp>[,<nexp>[,<nexp>]]]]]]]]]]]
BARTYPE<sexp>
MAG<nexp>,<nexp>
PRBAR<<sexp>|<nexp>>
Abbr. Type Purpose
BF
BF ON
BF OFF
BH
BM
BR
BT
PB
Stmt
Stmt
Stmt
Stmt
Stmt
Stmt
Specify bar code interpretation fonts
Enable bar code Interpretation
Disable bar code interpretation
Bar code height
Bar code magnification
Wide/narrow bar ratio
Stmt
Stmt
Stmt
Stmt
Specifying complex bar codes
Bar code type
Magnification of barfont
Input data to bar code field
Stmt
Stmt
Stmt
Stmt
Stmt
Stmt
Inverse image printing
Magnification of image
Return to normal image printing
Create a box
Select a preprogrammed image
Create a line
Image and Graphics Printing:
INVIMAGE
MAG<nexp>,<nexp>
NORIMAGE
PRBOX<nexp>,<nexp>,<nexp>
PRIMAGE<sexp>
PRLINE<nexp>,<nexp>
NI
PX
PM
PL
Printing and Paper Feed Control:
ACTLEN
CLEANFEED<nexp>
CLL[<nexp>]
CUT
CUT <nexp> ON|OFF
FIELDNO
FORMFEED[<nexp>]
LBLCOND<nexp>,<nexp>
LTS& ON|OFF
OPTIMIZE[<sexp>] ON|OFF
PRINT KEY ON|OFF
PRINTFEED<nexp>
PRINTFEED NOT
TESTFEED
Func
Stmt
Stmt
Stmt
Stmt
Func
FF
Stmt
Stmt
Stmt
Stmt
Stmt
PF
Stmt
PF NOT Stmt
Stmt
II
Read length of last paper feed
Running the printer's feed mechanism
Clear print buffer
Activate optional cutting device
Enable/disable automatic cut-off
Get current field number for CLL
Paper feed
Overriding paper feed setup
Enable/disable label taken sensor
Enable/disable optimizing for batch printing
Enable/disable PRINTFEED using Print key
Print and feed out label or batch of labels
Prepare printing
Auto adjustment of label stop sensor
180