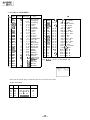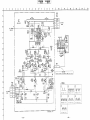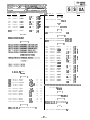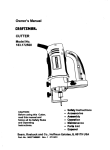
1
KY-20V50
RM-Y117
SERVICEMANUAL
US Model
Chassis No. SCC-F78F-A
Canadian Model
Chassis No. SCC-F79E-A
BA-1
RM-Y117
CHASSIS
MODELS OF THE SAME SERIES
KV-20V50
KV-20TR23/2160WR/215OR
KV-13TR28/13TR29
KV-1430Rf1440WR
KV-20TS29/20TS32
KV-21STR2/2170RS
SPECIFICATIONS
Television system
American TV standards
Channel coverage
VHF: 2-13
U H F : 14-69
Speaker output
Speaker size
Audio frequency
response
Power requirements
CABLE TV: 1-125
Picture tube
Hi-Black Trinitrona tube
20-inch picture measured diagonally
Antenna
21-inch picture tube measured diagonally
75 ohm external antenna
S VIDEO IN (S terminal)
Y: 1 Vp-p, 75-ohms unbalanced,
sync negative
C: 0.286 Vp-p (Burst signal)
75-ohms
Video (phono jacks) :
1
Vp-p, 75-ohms
unbalanced, sync negative
mm
(213/a X 183/8 X 185/s inches)
24.0 kg (52 Ibs 15 oz)
Weight
VIDEO AND S VIDEO
Full range 80 mm (31/4 in.)X2 units
50Hz-20kHz
120 V AC, 60Hz
Power consumption 120W
Standby mode
4w
Dimensions (w/h/d) 550X464.7X471.3
terminal for VHF/UHF
Input
3WX2 (4 ohms)
Supplied accessories Remote Commander RM-Y117
with 1 size AA (R6)
Recommended
accessories
(1)
EVEREADY batteries
U/V mixer EAC-66
Connecting cable
VMC-810S/820S,
YC-15V/3OV,
VMC-720M
RK-74A
Audio (phono jacks) :
500 mVrms
(100% modulation)
Design and specifications are subject to change without notice.
Impedance : 47 kilo-ohms
TRINITRONdOLOR TV
SONY@
TABLE OF CONTENTS
Section
u
i?aQe
1.
GENERAL
l-l.
1-2.
l-3.
l-4.
l-5.
l-6.
l-7.
1-8.
l-9.
l-1 0.
lntroducting the Sony TrinitronsColor TV ..........................
Locating t h e Controls .........................................................
Using the ON-SCREEN Menus .........................................
Connecting Other Equipment ............................................
Watching T V Programs ......................................................
Using Convenient Features ...............................................
Using Closed Caption ........................................................
A d j u s t i n g Picture and S o u n d Quality .................................
Using the Timer-Activated Functions .................................
Customizing t h e Screen D i s p l a y ........................................
4
4
6
7
8
9
9
10
13
16
l-l 1. Using the Pre-Programmed Remote Commander ............
l-1 2. Troubleshooting .................................................................
4.
SAFETY RELATED ADJUSTMENTS ..................... 2 7
5.
CIRCUITADJUSTMENTS
5-l.
5-2.
Electrical Adjustment by Remote Commander ..................
A Board Adjustments .........................................................
6.
6-i.
DIAGRAMS
6-4.
B l o c k Diagram ....................................................................
Circuit Boards Location ......................................................
Printed Wiring Boards and Schematic Diagrams ..............
A B o a r d ............................................................................
G Board.. ..........................................................................
U A B o a r d .........................................................................
S B o a r d ............................................................................
C Board.. ..........................................................................
Semiconductors .................................................................
7.
EXPLODED VIEWS
7-1.
7-2.
Chassis ..............................................................................
Picture T u b e .......................................................................
57
58
6.
ELECTRICAL PARTS LIST ....................................
69
6-2.
6-3.
l
18
20
l
l
l
2.
DISASSEMBLY
2-1.
2-2.
2-3.
Rear Cover R e m o v a l .........................................................
Service P o s i t i o n .................................................................
Picture T u b e R e m o v a l .......................................................
l
21
21
22
3.
SET-UP ADJUSTMENTS
3-l.
3-2.
3-3.
3-4.
3-5.
3-6.
B e a m Landing ....................................................................
Convergence ......................................................................
Focus .................................................................................
Screen ( G 2 ) .......................................................................
Method of Setting the Service Adjustment Mode ..............
23
24
26
26
26
White Balance Adjustments ...............................................
26
WARNING!!
AN ISOLATIONTRANSFORMER SHOULD BE USED DURING ANY
SERVICE TO AVOID POSSIBLE SHOCK HAZARD, -BECAUSE OF
LIVE CHASSIS.
THE CHASSIS OF THIS RECEIVER IS DIRECTLY CONNECTED TO
THE AC POWER LINE.
COMPONENT
WARNING
35
39
39
40
47
50
51
53
56
ATTENTION!!
AFIN D’EVITER TOUT RISQUE D’ELECTROCUTION PROVENANT
D ’ U N C H A S S I S SOUS TENSION, UN TRANSFORMATEUR
D’ISOLEMENT DOIT ETRE UTlLlSi LORS DETOUT DlkPANNAGE.
LE CHkSlS DECE RlkCEPTEUR ESTDlRECTEMENTRACCORDtl.
A L’ALIMENTATION SECTEUR.
ATTENTION
SAFETY-RELATED
29
31
!!
AUX
COMPOSANTS
RELATIFS
AL A
SfkCURITk+!!
COMPONENTS IDENTIFIED BY SHADING AND MARK A ON THE
SCHEMATIC DIAGRAMS, EXPLODED VIEWS AND IN THE PARTS
LIST ARE CRITICAL TO SAFE OPERATION. REPLACE THESE
COMPONENTS WITH SONY PARTS WHOSE PART NUMBERS
APPEAR AS SHOWN IN THIS MANUAL OR IN SUPPLEMENTS
PUBLISHED BY SONY. CIRCUIT ADJUSTMENTS THAT ARE
CRITICAL TO SAFE OPERATION ARE IDENTIFIED IN THIS
MANUAL. FOLLOW THESE PROCEDURES WHENEVER CRITICAL COMPONENTS ARE REPLACED OR IMPROPER OPERATION IS SUSPECTED.
LES COMPOSANTS IDENTlFliS PAR UNE TRAME ET PAR UNE
MAPQUE
SUR LES SCHkMAS DE PRINCIPE, LES VUES
EXPLOSiES
ET LES LISTES DE PIECES CONT D’UNE
I M P O R T A N C E C R I T I Q U E P O U R L A SiCURITk
DU
FONCTIONNEMENT. NE LES REMPLACER QUE PAR DES
COMPOSANTSSONY DONT LE NUMkRO DE PIkE EST INDlQlJi
DANS LE PRiSENT MANUEL OU DANS DES SUPPLiMENTS
PUBLIeS PAR SONY. LES ReGLAGES DE CIRCUIT DONT
L’IMPORTANCE EST CRITIQUE POUR LA SIkURITk
DU
FONCTIONNEMENT SONT IDENTIFIES DANS LE PR&ENT
M A N U E L . SUIVRE C E S PROCiDURES
LORS DE CHAQUE
REMPLACEMENT DE COMPOSANTS CRITIQUES, OU
LORSQU’UN MAUVAIS FONCTIONNEMENT EST SUSPECTi.
-2-
A
SAFETY CHECK-OUT
(US Model only)
LEAKAGE
Aftercorrectingtheoriginal
serviceproblem,performthefollowing
safety checks before releasing the set to the customer:
1.
Check the area of your repair for unsoldered or poorly-soldered
connections. Check the entire board surface for solder splashes
and bridges.
2.
Check the interboard wiring to ensure that no wires are “pinched”
or contact high-wattage resistors.
3.
Check that all control knobs, shields, covers, ground straps, and
mounting hardware have been replaced. Be absolutely certain that
you have replaced all the insulators.
4.
Look for unauthorizedreplacement parts, particularly transistors,
that were installed during a previous repair Point them out to the
customer and recommend their replacement.
5.
Look for parts which, though functioning, show obvious signs of
deterioration. Point them out to the customer and recommend
their replacement.
6.
Check the line cord for cracks and abrasion. Recommend the
replacement of any such line cord to the customer.
The AC leakage from any exposed metal part to earth ground and
from all exposed metal parts to any exposed metal part having a return
to chassis, must not exceed 0.5 mA (500 microampers). Leakage
current can be measured by any one of three methods.
1.
A commercial leakage tester, such as the Simpson 229 or RCA
WT-540A. Follow the manufacturers’ instructions to use these
instruments.
2.
A battery-operated AC milliammeter. The Data Precision 245
digital multimeter is suitable for this job.
3.
Measuring the voltage drop across a resistor by means of a VOM
or battery-operated AC voltmeter. The “limit” indication is 0.75
V, so analog meters must have an accurate low-voltage scale. The
Simpson 250 and Sanwa SH-63Trd are examples of a passive
VOM that is suitable. Nearly all battery operated digital multimeters
that have a 2V AC range are suitable. (See Fig. A)
HOW TO FIND A GOOD EARTH GROUND
7.
Check the condition of the monopole antenna (if any).
Make sure the end is not broken off, and has the plastic cap on it.
Point out the danger of impalement on a broken antenna to the
customer, and recommend the antenna’s replacement.
8.
Check the B+ and HV to see they are at the values specified. Make
sure your instruments are accurate; be suspicious of your HV
meter if sets always have low HV.
9.
Check the antenna terminals, metal trim, “metallized” knobs,
screws, and all other exposed metal parts for AC leakage. Check
leakage as described below.
A cold-water pipe is guaranteed earth ground; the cover-plate
retaining screw on most AC outlet boxes is also at earth ground. If the
retaining screw is to be used as your earth-ground, verify that it is at
ground by measuring the resistance between it and a coldwater pipe
with an ohmmeter. The reading should be zero ohms. If a cold-water
pipe is not accessible, connect a 60- 100 watts trouble light (not a neon
lamp) between the hot side of the receptacle and the retaining screw.
Try both slots, if necessary, to locate the hot side of the line, the lamp
should light at normal brilliance if the screw is at ground potential. (See
Fig. B)
To Exposed Metal
Parts on Set
Trouble Light
0.15pF
1.5kQ
d-3
AC
voltmeter
(0.75V)
Cold-water Pipe
I-
= Earth Ground
Fig. A. Using an AC voltmeter to check AC leakage.
Fig. B. Checking for earth ground.
-3-
SECTION 1
GENERAL
l-l.
INTRODUCTING
THE SONY TRINKRON@‘COLOR
KW20V50
\
TV
1-2.
The operating instructions mentioned here are partial abstracts from
the Operating Instruction Manual. The page numbers of the Operating
Instruction Manual remein as in the manual.
LOCATING THE CONTROLS
For details, see Ihe pages indicated by Ihe numbered black circles 0.
,
Channel number display
Main picture input mode
SLEEP, MUTING displays @I
CHANNEL
CAPTION
display
a-0,
MTS mode (MAIN, SAP or
MONO) @
;c
Bar display for volume,
plclure or sound adjustmen
@@ -Q
CURRENT TIME displq
@@
I
P
a
.I_ J-.+
AV input jack door
I
* Bullon~ wilh the same funclion are
also localed on the Remote
Commander (pp. 9 - 11).
S VIDEO IN jack
cks
VIDEO 1 IN jacks
VHF/UHF
antenna terminal
VIDEO 3 IN jacks
AUDIO OUT jacks
1-3.
USING THE ON-SCREEN MENUS
The following ltow chart shows the dilferenl levels of on-screen menus that you can use to make various adjustments and
settings. See Ihe indicated pages for
using each feature.
tnstructtok on
MUTING button @ -
-POWER
TVNIDEO butIon’-
-CABLE POWER button
- 0
- 9
button’
CH GUIDE butlon @JUMP button @CODE SET bulton @(Pre-PrograTmed
Iunction)
men” (DO. 32-33,
GUtDE
-ENTER
button
Adjustment bar
@
J
b u t t o n s
-CHANNEL
DISPLAY button 0 @D-----
For picture quality adjustment
VtDEO
Main menu
@ @ 6) @
directory
keys
-
-
-
l
@
@ @
C H ( c h a n n e l ) +I- s c a n b u t t o n ’
QOO
- V O L ( v o l u m e ) +I- b u t t o n * @
-CABLEBOX-TV selector @
Video operating buttons a
For sound quality adjustment
hwn menu
AUDIO menu (pp. 34-37)
Adjustment
For time-related settings
MaIn menu
TtME menu
CURRENT TIME SET .%,N” (pp. 44-45)
bar
+Fj
Use
l
ONlOFF
Eultons wilh the same function are
also located on Ihe TV (p. 7).
+
: @j@ Extlm
TIMER screen
(pp. 4b-47)
l
EVERY SUN-SAT
12:OOAY
-h CH--I
u s e : &$I Exit@
I t h e CABLEBOX-N selector is set lo
CABLEBOX. the Remote Commander is
able to COnlrOl a connecled cable box. not
the TV. Set Ihe seleclor to N lo conhot Ihe
TV set wlh the Remole Commander (You
can “SC POWER bullon a, any case).
C H A N N E L B L O C K screen
b
PEVERY
12:OOAY
IUse
( p p . 48-49)
SUN-SAT
-h CH.-e
: m Exit@@
I
14. CONNECTING OTHER EQUIPMENT
For presetting and other functions
SET UP me””
Main menu
C A B L E OWOFF semen
(p. 17)
AUTO PROGRAM screen
(P. 181
MaIn menu
r VIDEO
b
AUTO
PROGRAM
AUDIO
TIME
SET UP
rCLOSED CAPTION
C H A N N E L ERASEJADD
screen (pp. 14-21)
+
Select
I
the
channel
CHANNEL CAPTtONlGUlDE
screen
(PP. 50-511
CH CAPTION/GUIDE
Romoto Commander
U s e : @i@
S V I D E O OtUOFF
To display the main menu
Press MENU.
To return to the previous me””
Press At or V-to select ‘3 MENU.”
Then press RETURN.
To return to the main menu
Repeat the above, until you reach the main menu.
Exit@
s c r e e n (p. 28)
SET UP
CABLE: ON
AUTO PROGRAM
CH ERASE/ADD
CH CAPTION/GUIDE
WS VIDEO: ON
VIDEO LABEL
WENU
LABEL SCIH” (pp. 52-54)
bVIDEO1: VIDEO1
VIDE02: V I D E O 2
VIDEOJ: V I D E O 3
To ret” n to tho normal screen
P r e s s IA ENU on tlw Remote Commander.
Tim me”“* dirappenr
automallcally
I you do “01 press a bUttO”
withln SO s e c o n d s .
T h e m e n u you canno, select appears I” black.
Chapter
1: Salllnp
up
, !j
l-5.
WATCHING TV PROGRAMS
75 “d + gc-+ -=J F
~Use this lealure to set S VIDEO lo ON or OFF depending on Ihe kind 01
video equipment you have connecled to the N. For inslruclions
on
connecting video equipment, see pp. 22-25.
m
1
Press POWER on the TV or the Remote Commander lo turn the TV on.
The TIMER/ST,4ND BY rndicalor blinks until Ihe prclure appears,
POWER
r---j
u
II Ihe N is in TV. VIDEO 2 or VIDEO 3 mode. the S VIDEO display appears in black
end cr,nnol be selected.
Press T”NlDEO lo change lo “,DEO 1 mode.
- - - Press MENU.
The main menu I-ppears.
2
1
or
b
POWER
-
Turn the cable mode on or off lo select Ihe type of channel you want to
watch. VHF/UHF or cable N.
(Follow the steps in ‘Turning Ihe Cable Mode On or ON.” p. 17.)
II ‘VIDEO’ or 3 VIDEO’ is displayed an the screen. press the TV or TVNDEO
b”,,O” so ,/la, Ihe channel “umber appsars.
MENU
CLOSED
3
CAPTION
Selects channel in one of lhe following two ways:
To scan Ihe preset channels* in numerical sequence
Press CH +I-.
2
Press A+ or V-to select SET UP
h (R)
v
- (L)
Q
b
I
VIDEO
AUDIO
TIME
rSET UP
CLOSED CAPTION
I
* For more lnlormalion on preselling channels. see pp: 18-21.
To select a channel directly
Press 0 - 9 and ENTER.
For example, lo select channel 14, press 1,4 and ENTER.
Press
RETURN.
The SET UP men” appears.
RETURN
SET UP
@CABLE: ON
AUTO PROGRAM
CH ERASE/ADD
CH
CAPTION/GUIDE
S VIDEO: ON
” IDE0 LABEL
3MENU
%
SET UP
CABLE: ON
AUTO PROGRAM
CH ERASE/ADD
CH
CAPTION/GUIDE
rS VIDEO: ON
VIDEO LABEL
3MENU
To relurn to lhe normal screen
Press MENU.
4
Press VOL c/-lo adjus! the volume.
VOL
RM-Yl 17
Press A+ or V- to selecl ON or OFF allernalely
Press + to nxrease Ihe volume.
Press - lo decrease the volume.
To turn off the N
Press POWER on Ihe TV or the Remote Commander again.
II you set S VIDEO IO Oh Ihe T V
aulomalkally
recelves S video signals
whenever a VCR with S video is connecled
Press
RETURN.
me selling is compleled.
1-6.
USING CONVENIENT FEATURES
1-7. USING CLOSED CAPTION
Press MUTING.
The display “MUTING’ wi// appear on the screen.
1
MUTING
Press MENU.
The main menu appears.
MENU
CLOSED CAPTION
To restore the sound
Press MUTING again. or press VOL +.
U s e : @j@
Erllm
Press a+ or V-lo select CLOSED CAPTION.
To display the channel
Press DISPLAY.
All fhe exbfing displays appeac channel nvrnber, channel cap/ion
(iI sef), MTS mode (TAP” onlyJ. window prclure inpul mode and
Ihe cwenl rime (‘AM’ or ‘PM’ disappears alter aboul three
seconds).
DISPLAY
To cancel the display
Press DISPLAY again.
The channel display will disappear.
The sleep timer turnsoff the TV automatically after the amount 01 time you
select.
71
Press SLEEP.
Each lime you press SLEEP, Ihe lime incremena 30: ‘60: 71
PO-and WFF‘mode appear In sequence.
/--xq
SLEEP
The SLEEP display appears oboul one minule
the TV lums od
belore
3
Press A+ or V- lo select closed caption mode.
2
64)
v
- (L)
8
b
Select CC1 or CC2 to view Captions.
A Caption is a printed version 01 Ihe
dialogue or sound eflecls of a
program. (The mode should be set to
CC1 for most programs.)
Select TEXT1 or TEXT2 lo view Texl.
Text is information lhal is presented
using the hall to lull televiiion screen.
It is usually not related lo the program.
To cancel the setllng
Press SLEEP until “OFF’mode appears.
The “SLEEP OFF’display appears /or aboul ,h,ee seco”ds.
OR
Turn Ihe TV off.
The sleep timer selling is cancelled.
Select CCfrEXT OFF il you do nol want
lo use the CLOSED CAPTION mode.
Press JUMP once to recall the channel
you were watching previously. Press
JUMP again IO switch back. Use Ihisfeature lo keep track of Iwo programs
alternately.
JUMP
Press RETURN.
The selling is compleled.
8
RETURN
CLOSED CAPTION
~/TEXT O F F
~EJl
aa
TEXT1
TEXT2
3MENU
Use : @i@ ExllW
CLOSED CAPTION
EzTEXT
OFF
a212
*TEXT1
TEXT2
3MENU
U s e : m Exll&#
‘-1
CLOSED CAPTION
‘EcTEXT
OFL
I?32
TEXT1
TEXT2
>MENU
U s e : @&I Exll@@
l-8.
ADJUSTING PICTURE AND SOUND QUALITY
4
Press At or V-lo make the adjustment.
Press MENU.
To restore the laclory (mid-level) selling
Go to the VIDEO menu and press RESET.
All Ihe seltings excepl lor PICTURE will be
restored lo the mid-level setting.
+ (RI
You can adjust the picture (and sound. pp. 34-37) for each input mode
(TV.VIDEO 1, VIDEO 2. VIDEO 3) by pressing NNIDEO on the N or on the
Remote Commander to select the input mode before making the adjustmenls.
These adjustments are retained in memory even when you turn elf the TV until
you change Ihe adjustmenls again.
v
@3
---I
BRIGHTNESS
Imm1
1
Brighter Press MENU.
The main menu appears. and ,he cursorpoin,s
10 ‘WOEO:
2 (RI
I
MENU
v
-
cVlDE0
“TYK”
9
SET UP
CLOSED
Use :
2
CAPTION
@ii@
Exll@l
,
Press
RETURN.
T h e n e w sening a p p e a r s i n the V I D E O m e n u .
Press
RETURN.
The VIDEO men” appears.
RETURN
(LI
COLOR DwRIw-BRIGHT WIIW”.-”
S H A R P BWW--”
1
RETURN
VIDEO
,PICTURE
HUE
73
%:iT =
S H A R P poIm-->MENU
Use : @Iikl ExllGW
L
W
-
I
-
To adjust other items
Repeal steps 3-4.
3
2 (R)
v
- (L)
8
b
RM-Y117
: .,.,::.,:.:..:.
Press A+ or V- to select the item you want to adjust.
For example. lo adjust the plclure brightness, select BRIGHT.
Press
RETURN.
The edjwhnen, bar appears.
RETURN
PICTURE
1
HUE
COLOR
BRIGHTNESS
SHARPNESS
‘,:
,,,,, “‘,,p,essv:,,o:~.
‘-,
decrease piclure contrast with
SOll color
make skin tones
become purplish
decrease color intensily
darken lhe picture
sollen the piclure
;::
‘., :.“_ : p,essA+,,J: “.:‘,.8Pd-’
Increase piclure contrast wilh
vivid color
make skin Iones become
greenish
lncreasw color intensity
brighten the piclure
sharpen Ihe picture
J
4
TO res,ore ule iactory (mid-le”el) settings
Go lo tho AUDIO men” and ,,re$s RESET,
The settings lor MTS and SPEAKER will no, be
alh?ClCd (PP. 36-37).
Press A+ or V-to make the adjuslmenl.
To relurn to Ihe “~,,,a, ecreen
Pwss MENU.
CLOSED
I
CAPTION
Press A+ or V- lo select AUDIO.
I
I
I
VIDEO
bAUDI
TIME
SET UP
CLOSED
CAPTION
u s e : W Ex,,~
I
I
-
T O increase
bass response
To decrease bass res,wnse
Press
RETURN,
The new selling will appear in Ihe AUDIO menu.
AUDIO
TREBLE WiW8@-*BASS
lmwBALANCE -la.SURROUND:OFF
MTS:
MAIN
SPEAKER: ON
3MENU
RETURN
8
J
Press RETURN.
The AUDIO me”” appears.
To adjust othe’r items
Repeat steps 3-4.
RETURN
BALANCE -I--*
SURROUNO:OFF
3
Press A+ or V-lo select the sound quality (TREBLE, BASS or BALANCE)
that you want to adjust. For example. to adjust the bass response, selecl
BASS.
AUDIO
*SASS
TREsLE
EL=
BALANCE -+.mw.SURROUND:OFF
MTS:
MAIN
;;EPE;ER: ON
surround
SURROUND gives sound repmduclion with the
etmxphere 01 a mwie theater ore concert hall.
Listening
to
sound-SURROUND
l-2
(Follow steps 1-Z in ‘Adjusting the Sound”. p. 34.)
Press
RETURN.
The adjusfmenf bar appears.
RETURN
73
Press A+ or V- lo selecl
ON or OFF modes
4;;mT
p&iiq
Receiving Multichannel TV Sound programs-MTS
Turning the
12
Use lhls feature lo Urn Ihe TV speaker off when you connect an audio
syslcm (p. 26-27).
(Follow steps
I
1-2 in “Adjusling the Sound.” p. 34.)
1-2
speaker on or off
(Follow steps l-2 in ‘Adjusting the Sound,” p. 34.)
Press A+ or V- 10 s&cl
SPEAKER.
3$gyg
4
Press A+ or V- lo select MAIN, SAP or MONO modes allemalely.
Select lhe MAIN mode to lislen to STEREO sound.
The STEREO lndicalor on Ihe TV wiN hghf up whenever a slereo broildcasl
is received.
4
Press A+ or V- ID select
ON or OFF modes allernalely.
AUDIO
T R E B L E uoI&W-B A S S WtiiBIBALANCE -ISURROUND:OFF
MTS :
MAIN
z;FW&E”: O N
AUDIO
;;FigLE
;~I-8ALANCE o--l”-SURROUND:OFF
MTS:
MAIN
S;;&‘;ER: O N
Select the SAP mode to lislen
+ (RI
A
v
- IL)
0
lo Second Audio Programs.
If vou select ON mode:
The setting is complefed.
AUDIO
;;‘iLE
rsWM=:
BALANCE --1SUAt?OUND:OFF
MTS:
SAP
;&;W;ER: O N
b
I
If you
1
select OFF mode: (except for KV-13V50)
Press RETURN.
The AUDIO OUT men” ap,wars.
AUDIO OUT
cVARlAQLE
FIXED
3MENU
RETURN
During SAP mode. !he sound 01 non.SAP
programs will be muled.
Select the MONO mode to eliminate excessive n o i s e during stereo
broadcasls, caused by a weak signal.
AUDIO
T R E B L E IMIIIliIUII~~-IIBIUIU--SASS
BALANCE -++-$ROUND:OFF
MONO
&ER: O N
5
p!&iiq
Press RETURN.
The mode is seleck?d.
RETURN
73
2
Press A+ or V-lo select
Uss
: @&j
VARIABLE or FIXED.
VARIABLE: Sound output varies accord/rig
to the
TV volume.
FIXED
: Sound output is always invariable.
+ (RI
Q
A
v
- IL)
b
Exll!$@
AUDIO OUT
VARIABLE
FIXED
3MENU
1
1-9.
USING THE TIMER-ACTIVATED FUNCTIONS
To reset the lime
Press RESET while in the CURRENT TIME
s c r e e n . a n d r e p e a l steps 4-i’.
Follow these instructions to set the currenl time. The correct time must be set in
order lo use the timer-aclivaled functions (ON/OFF TIMER, CHANNEL BLOCK).
To display Ihe lime
Press DISPLAY.
EXAMPLE: Set the lime 10 3:lS PM, Monday.
1
To return lo the normal screen
Press MENU.
Press MENU.
The main menu appears.
JCURRENT
S
E
1
T
- The inlemal clock 01 this TV operates on a 12.
h o u r c y c l e . I I a 24.hour c y c l e n u m b e r (lor
instance. 13~00) i s e n t e r e d , il will be cleared
w h e n you p r e s s R E T U R N .
RETURN
CLOSED CAPTION
2
TIME
MENiJ
Sal the time.
U s e : I@@ Exll@fl
75
Press A+ or V- lo select TIME.
12:00 AM stands lor m i d n i g h t .
12:OO PM stands lo, noon.
* A l l the s e t t i n g s i n c l u d i n g C U R R E N T T I M E
S E T w i l l b e e r a s e d i f y o u u n p l u g Ihe T V o r a
p o w e r f a i l u r e o c c u r s . Reset t h e current l i m e
by lollowing steps 1-7.
CLOSED CAPTION
U s e : m Exit!B@
Press RETURN.
I
2
I
Press RETURN.
*CURRENT
TIME SET
ON/OFF TIMER
RETURN
CURRENT TIME SET
M O N 3 : 0 0 ?Y
3MENU
RETURN
___
75
--:--
Iy
Set the (Ime.
U s e : @@I Exll&@
use 0 @@j@ Exll@ijJ
E
3
Press RETURN.
The CURRENT TIME SETscreen
RETURN
ap,oea,s.
c--- --:-- AJ
>MENU
U s e : m ExII@B
RM-Y117
7
CURRENT TIME SET
L
-
J
Press A+ or V-lo sel Ihe minules.
E a c h l i m e you p r e s s A + or V -, Ihe minules change
Press RETURN.
T h e s e l l i n g i s compleled,
I;
CURRENT TIME SET
SUN 12:00 IY
3MENU
S e l the d a y .
U s e : @@I Exlll$@
CURRENT TIME SET
+ CR)
A
v
- (L)
8
b
M O N 3:15 IY
3MENU
Set Ihe t i m e .
U s e : &(@I Exll@l
and fhe clock slatis.
CURRENT TIME SET
RETURN
75
. fdd;Nu3:15
PJ
I
With this function you can set your favorite program to appear on the screen at
the time that you set.
5
To clear the ON/OFF TIMER setttng
Press A+ or V- lo set the day.
Press RESET white in the ON/OFF TtMER
Each me you press A + or V-, ,he days ol lhe week change as shown in Fig. 1.
sc,een,
Then press RETURN.
SC, Ihe bme. -apperrs on Ihe screen.
T O return to the normal screen
71
Press MENU.
EXAMPLE: Sel the timer to turn on Ihe TV every Monday through Friday al 3:15
PM lo, 2 hours, on channel 21,
6
Press A+ or V-to sel Ihe hour lhat you want the TIMER lo start.
E a c h l i m e y o u p r e s s A + w V -, Ihe h o u r c h a n g e s i n s e q u e n c e .
Then press RETURN.
EVERY YON-FRI
3:OOlY -h CH-->MENU
I;:: :“&il”:;tlal 1
CHANNEL
BLOCK
7
M O N 3:15 IY
Press A+ or V- to set Ihe minutes.
E a c h l i m e y o u p r e s s D. + o r V-, Ihe minures c h a n g e
in sequence.
Then press RETURN.
“Se1 t h e doralion. ” a p p e a r s o n the s c r e e n .
Fig. 1
Selecting Ihe day(s) 01 Ihs week
When you press AC. Ihe days of the week
appear in the following order.
EVERY MON-FRt
3:lW -h CH--Set the durslton.
3
Press A+ or V- to select ON/OFF TIMER.
Then press RETURN.
T h e O N / O F F T&W, s c r e e n appeers.
* While the TIMER is set, the TIMER indicator
on the TV is on.
l One minute belore
Ihe timer goes 011. the ‘TV
will turn #display will appear on the screen.
* All the settings including ON/OFF TIMER will
be erased il you unplug the TV or a power
laikxe occurs. Reset the ON/OFF TIMER by
lollowing steps 1.9.
. If you have not set ,h.e clock correc,ty, Ihe ON,
OFF TIMER wilt not operate at the proper
lime. To set the clock. see ‘Setting the ClmkCURRENT TIME SET’. pp. 44-45.
IEVERY
SUN- SAT]
r-G&q
ON/OFF
TIMER
*EVERY SUN-SAT
12:OOAY -h CH--..
3MENU
8
Press A+ or V- to set the duration of time.
E a c h l i m e y o u p r e s s A + o r V -, Ihe durafion c h a n g e s
p&-j
“Selec,
[--i&-j
Ihe channel’appears
on the screer,.
riGkii-1
If the ON/OFF TtMER display appears in black. the current time has not
bee” se, and you canmt select ON/OFF TIMER. To set Ihe clock. se8
*Setting the Clock-CURRENT TIME SET. pp, 44-45.
4
Press RETURN again.
“Se! the day.‘appoars
on Ihe screen.
RETURN
ON/OFF
9
Press A+ or V-to set the channel that you want the TV to tune in.
E a c h r i m e y o u p r e s s A + o r 0 -, the c h a n n e l
n u m b e r c h a n g e s from I l o 125 i n s e q u e n c e .
ON/OFF
TIMER
EVERY SUN-SAT
12:OOAY -h CH--3MENU
Sol lhs dsy.
U s e : @@@I Exll&@l
i
TIMER
EVERY MON-FRt
3:19Y 2h CH 21
Selecl the channel
Press RETURN.
The se/ring IS compleled, and Ihe TIMER indicalor
Ihe front ol Ihe TV lights up.
on
ION/OFF TIMER
p&q
THURSDAY
phi-1
pi&i-j
FRIDAY
Es
c
[r-izk-j
(V-: reverse order)
5
Use this function lo block e channel from appearing on the screen during the
time you specify. You can use lhis (unction to prevenl children from walching
undesirable programs.
I, you se&, B channel which has been blocked.
Iha message 01 ‘BLOCKED’ appears.
Press A+ or V-lo set the day.
Each time you press A + or V-. Ihe days 01 the week change 82 shown h
Se, fhe ,,me.‘aopears
38
on Ihe screen.
BLOCKED
EXAMPLE: Set CHANNEL BLOCK every Sunday al 8:45 PM for one hour. on
channel 38.
1
Press MENU.
The main me”” appears.
6
MENU
CLOSED
CAPTION
Press A+ or V: lo set lhe hour.
Each rime you press b + or V-. the hour changes in sequence.
Then press RETURN.
CHANNEL
BLOCK
SUNDAY
0:001Y -h CH--3MENU
Set Ihe l i m e .
U s e : m Exitm
TIME
*CURRENT TIME SET
ON/OFF TIMER
CHANNEL BLOCK
3MENU
7
Press A+ or V- lo set Ihe minutes.
Each lime you press A + or V-. Ihe minules
Then press RETURN.
S,T, Ihe d”ra,ion.‘a~~ears
on fhe screen.
8:45?Y
3MENU
CHAN NEL
BLOCK
I
Use : &iB
Press A+ or V-lo set Ihe duralion of lime lhal you want the W remain
blocked.
Each time you press B + or V-. lhe durafion changes lrom I lo 6 h sequence.
Then pre& RETURN.
CHANNEL BLOCK
‘Selec, Ihe channeragwxs on fhe Screen.
9
Press A+ or V- lo sel the channel lhal you wanI to block.
Each t/me you press n+ orp-, the channel number
CHANNEL BLOCK
chmoes horn I lo 125 in seeuence.
SUNDAY
8:45PY
lh CH 38
>MENU
Exll@
If the CHANNEL BLOCK display appears in black, the current
time has not been set and you cannot selecl CHANNEL
BLOCK,. To se, lhe clock. 688 “Selling the Clock-CURRENT
TIME SW, pp. 44-45.
RETURN
lCHANNEL-1
EVERY
12:OOAY
%
-h CH---
8
*EVERY SUN-SAT
12:OOAU -h CH--3MENU
Press RETURN again.
5e’sel fhe day.‘aPpears on lhe screen.
BLOCK
S o l Ihe duration.
U s e : @&@ Exllm
Press A+ or V- lo select CHANNEL BLOCK.
Then press RETURN.
The CHANNEL BLOCK screen endears.
I
4
CHANNEL
SUNDAY
M O N 3:15 ?Y
Use : W ExltfB
3
change in sequence.
SUN-SAT
-h CH---
Select the channel
U s e : @i@ Exilm
Press
RETURN.
The smng is compleled.
RETURN
CHANNEL
8:45N
BLOCK
Ih CH 30
U s e : @@9 ExilW
To clear the BLOCK setting
Press RESET while in the CHANNEL BLOCK
SC,**“.
T O return lo Ihe normal screen
Press MENU.
. If you set a new CHANNEL BLOCK by
lollowing steps l-9, Ihe original selling will be
erased.
. II you have not se, the clock correclly.
CHANNEL BLOCK will not -rate al Ihe
proper time. To se1 the clcck. see ‘Selling the
Clock-CURRENT TIME SET. pp. 44-45.
l-10. CUSTOMIZING THE SCREEN DISPLAY
Use this feature to caption up to 12 channel number displays with the matching
channel call letters.
5
Press A+ or V- to select a caption position number.
Each lime you press d + or V-. Ihe caplion pailion number is marked h sequence.
‘Select fhe channel’appears
To erase unneeded captions
Call Iho caption setting swoon by lollowing
on lhe sween.
EXAMPLE: Caplion channel 20 with ESPN at the caption position number 4.
1
Press MENU.
The main menu appears.
MENU
CLOSED
CAPTION
6
Press A+ or V- to select the channel you want to caption.
Each time you press a+ or V-. the channel number changes /mm 1 10 125.
Then press RETURN.
5elecl fhe leller..‘appears on Ihe screen.
CH
CAPTION/GUIDE
fi Press A+ or V- to select SET UP.
SET UP
bCABLE: ON
AUTO PROGRAM
CH ERASE/ADD
CH CAPTtONlGUlDE
S VIDEO
VIDEO LABEL
3MENU
3
Press A+ or V- to select CH CAPTION/GUIDE.
Then press RETURN.
me cfi CAPTIOWGUIDE
sween ~ppee~.
CH
CAPTION/GUIDE
8
Repeat step 7 to select each remaining letter.
(For a J-letter caption, leave a space by pressing RETURN only.)
tCH CAPTION/GUIDE 1
II the CH CAPTtON display appears in black, the TV is In video
mode and you canMt select CH CAPTION/GUIDE. Press T V 0,
TVNIDEO to change to TV mode.
4
Press RETURN again.
‘Select a posirlon. ’ appears on lhe screen.
CH CAPTION/GUIDE 1
RETURN
9
Press
RETURN.
The se,,,“g is compleled.
CH
CAPTION/GUIDE
RETURN
?!I
ala
a posItIon.
U s e : m Exlt&iI#
3
To caption other channels
Repeat steps 4;9.
Chqmr 3: “ring Advanced Fealumr
51
Use this feature to display the captions you se!, end to select e channel directory
for viewing.
1
EXAMPLE: Label VIDEO 1 IN as VHS.
Press CH GUIDE.
A dlrecby appears, c o r r e s p o n d i n g l o Ihs direclay
Commander.
k e y s o n the RemOle
CHANNEL GUIDE
QAEC-QDIS-QCNN@ESPNQ----Q--w
Q _--- Q ___- @I ---@ _ _ _ _ @ _ _ _ _ @J __-i
To cancel the CHANNEL GUIDE screen
Press CH GUIDE again.
2
Use lhis leature tq label each inpul mode in order lo identify the eqUipment
connecled lo each inpul terminal.
Press the directory key of the channel you want to watch.
1
Press MENU.
T h e main m e n u a p p e a r s .
I
‘K%
TIME
MENU
SET UP
CLOSED CAPTION
?!i
2
Press
A+
or V- 10 select SET UP.
CLOSED CAPTION
Press RETURN.
The SETUP menu appeers.
RETURN
AUTO PROGRAM
CH ERASE/ADD
CH CAPTION/GUIDE
VIDEO LABEL
3
Press A+ or V- lo select VIDEO LABEL.
AUTO PROGRAM
CH ERASE/ADD
CH CAPTION/GUIDE
S VIDEO: ON
RM-Y117
Press RETURN.
tVIDEO1:
VIDEO?:
VIDEOJ:
VIDEOi
VIDEO2
VIDEO3
1-11.
4
USING THE PRE-PROGRAMMED REMOTE COMMANDER
You can operate your video equipment and cable convelter box lhal has an
infrared remote detector with this supplied preprogrammed Remole
Commander.
Press A+ or V- lo select Iha inpul mode you want to label
VIDEO
LABEL
1
rVlDEO1: VIDEO1
VIDEOZ: VIDEO2
VIDEOJ:
VIDEO3
MENU
Press
With the supplied Remote Commander, you can operate a Sony video cassetla
recorder (Seta. 6 mm, VHS) or a mulli disc player as well as most non-Sony
video equipmenl connecled to your TV by following the steps below.
RETURN
1
RETURN
8
5
CODE
Press A+ 0, V-to select VHS
Fit.6Y117
8+88
VIDEOI: VIDEO1
VIDEOZ: VIDEO2
VIDEOl: VIDEO3
3MENU
VIDEO 3
VIDE03+EETA -t6mm+VHS-+LD
T
(V-: rewrse order)
Press
RETURN.
RETURN
To label other input modes
Repeat steps 4-5.
2
cVIDEO1: VHS
VIDEOZ: VIDEO2
VIDEO): VIDEOS
E!!Y
Use Ihe video operating buttons on the Remote Commander to operate the
video equipment.
operating a VCR
To turn on or oil
To change channels
(when watching TV
programs through the
VCR’s tuner)
To record
To play
To slop
To fast forward
To rewina the tape
To pause
To search the piclure
forward and backward
VIDEO 1
VIDEO I-+ S VIDEO+ BETA +a m m -+ VHS -+ LD
t
VIDEO 2
VIDEO P-BETA -, 8 mm -+“HS -+ LD
T
To return to the normal screen
Press MENU.
While pressing CODE SET, press 0 - 9 to enter the
manulacturer’s code number (see chari on P. 56). For
EXampIe. IO Operate a SOny 6 mm VCR, p&s 0; 2
and ENTER.
Press (VIDEO) POWER.
Press CH +I-.
Press l (2 buttons simultaneously).
press b.
Press 1.
Press bb.
Press 44.
Press II.
Press bb or 44 during playback.
Operating a Video Disc Player
To play
press w.
To slop
Press M.
To pause
Press II.
t
T O rasune nom~l,~layback. press again.
* This function is efleclive onlv for CAV fslandard.
play disc). With CLV (exten&d-play disc), the TV
will go into Ihe standby mode if II is pressed.
To search lhe picture
Keep pressing bt or 44 during playback.
forward and backward
To mswne nomal~layback,
release Ihe buffon.
Manulaclures
and Code Numbers (VCR/video disc player)
‘Code number
I
;o”
SONY
CANON
EMERSON
FISHER
FUNAI
GENERAL ELECTRIC
GOLDSTAR
HITACHI
JVC
MAGkAVOX
MITSUBISHI
MULTITECH
NEC
PANASONIC
PHILCO
PHILIPS
OUASAR
RCA
SAMSUNG
SANYO
SCOTT
SHARP
SHINTOM
SYLVANIA
SYMPHONIC
TEKNIKA
TOSHIBA
TOTE VISION
ZENfTH
01.02.03.04
05
22.30. 33
10. II. 12.15
29
05.06
25
07.06
16
05. 06.09
16, 19. 26.27
29
16.23.31
05. 05
05.06
05.06.09
05.06
07.06
24.32
Il.15
21
13.14
34
05.06.09
26.29
20.21
25
- II more lhan one code number 6 listed lor
manulaclurers other than Sony, try entering
them one by one. until you come lo Ihe
correct code Ior your equipmen!.
* II the video equipment does not have a
cerlain Iunction. Ihe corresponding button on
Illis Remote Commander will not aperare.
. In some rare cases. you may no, be able to
operabe your nonZiony video equipment wilh
lhc supplied Remole Commander. This is
because your cquipmenl may use a code
lhal IS not provided with lhis Remole
Commandor. In this cane. pk!asc ux lhc
equipmenl’s own remok control unit.
Follow these inslruclions lo set Ihe manufaclure~s code which will enable you to
operate a connected cable converter box with the pre-programmed Remote
Commander.
When you remove the balleries horn the
Remole Commander. 41 Ihc selltngs will reverl
10 the Sony Bela selling. Roe~l Ihe code5 by
loliowing the steps on p. 55.
- If more than one code number is listed. hy entering them one by one until you come lo
Ihe correct code lor your equipment.
. II you enter e new code number. the code number you previously entered et that setting is
erased.
. In some rare cases. your equipment may use e code that is not provided with lhis
Remote Commander and you may not be able lo operate your cable converter box with
Ihe supplied Remote Commander. In this case. use the equipment’s own remote control
unit.
EXAMPLE: Operate a connected Zenith cable converter box.
I
I
2
Set the CABLEBOX-TV selector to CABLEBOX.
While pressing CODE SET, press 6 and 8 (Zenith’s code number -see
chart below) and ENTER.
17
I
The code numbers lor Sony equipment are assigned as follows:
01 ......... Bela, ED Bela VCR
02 ........ .tl mm V C R
03 ......... V H S VCR
04 ......... Video disc player
Manufacturer end
Msnufsclurer
JERROLD
Code
Numbers
(cable
Code
box)
number
60.61.62.63.64.65
m
II you press a wrong code or il the code
slep 2 lo se, the code.
‘t
has nol
been se,. low short beeps sound. Repeat
1-12.
3
TROUBLESHOOTING
:.
Use CABLE POWER and Ihe TV c~nlrol buttons (0 - 9. ENTER, JUMP and
CH +/-) lo operate the cable converter box.
..“‘:....Symp~om’.,.’
...
,:. ” : Possible causes and remedies ‘. .,......;
1. . -~~+%:..
:,:.
P Oor or no picture: (screen no1 lit). good sound
Adjusl PICTURE.
. Adjust BRIGHTNESS.
9 Check antenna/cable connections.
GC sod piclure.
. Press VOLUME + on the Nor VOL + on the Remote Commande
. Press MUTING on the Remole Commander.
. Check lhailhe MTS sellina Is set ~~rreclk.
. Check that the l~NIDEO~ullon Is set cdrreclly.
l Check lha! SPEAKER is set IO ON.
l
CABLE
POWER
To operate Ihe TV
Set the CABLEBOX-TV selector lo TV, the” “se the TV conlrol buttons lo control
the N.
no sound
For more details on operating the cable box
Reler lo the operating inslruclions
lhal come with Ihe cable box.
Is POWER switched on 7
a Check the power cord connection.
. Check Ihal lhe N/VIDEO button is set correctly.
. Check that S VIDEO is set lo ON.
l
N Cn picture (screen not lil). no sound
Is it a color program 7
. Adjust COLOR,
l
NC 1 Color
a Is it an active or the correct channel 7
l Check Ihe CABLE selling.
. Check antennalcable connections.
S” low and noise only
Dolled lines or sltipes
This is ollen caused by local interference. (e.g. cars, neon signs,
hairdryers etc.) Adjust the anlenna for minimum inlerlerence.
Double images or ghosls
Relleclions lrom nearby mounlains or buildings c&en cause this
pm~lem. A highly direclional &door antenna or a CAN cable may
improve the picture.
Try another chs tel. II could be station Irouble.
II the problem persists. conlacl your nearesl
service lacilily.
.
SECTION 2
DISASSEMBLY
2-1. REAR COVER REMOVAL
@ Two screws (BVTP4 X 16)
2-2. SERVICE POSITION
2-3. PICTURE TUBE REMOVAL
@ Coil band
on spring
@ Chassis assy
4X16
@ Two P tapping screws
@ Speaker
I
\
0
d
\
@
Deflection
AM
0 Two P tapping s c r e w s
/ 4X16
Cushion
-VI=/
l
REMOVAL OF ANODE-CAP
NOTE : Short circuit the anode of the picture tube and the anode cap to the metal chassis, CRT chield or carbon
painted on the CRT, after removing the anode.
l
REMOVING PROCEDURES
’ Anode
0 Turn up one side of the rubber cap in the
direction indicated by the arrow @.
l
HOW TO HANDLE AN ANODE-CAP
0
Don’t hurt the surface of anode-caps with
sharp shaped material!
@
Don’t press the rubber hardly not to hurt
inside of anode-caps!
@I
Using a thumb pull up the rubber cap
firmly in the direction indicated by the
@I When one side of the rubber cap is
separated from the anode button, the
anode-cap can be removed by turning up
the rubber cap and pulling up it in the
direction of the arrow 0.
a r r o w @.
A material fitting called as shatter-hook
@
button
terminal is built in the rubber.
Don’t turn the foot of rubber over hardly!
The shatter-hook terminal will stick out or
hurt the rubber.
-22-
SECTION 3
SET-UP ADJUSTMENTS
0 The following adjustments should be made when
Perform the adjustments i; order as follows:
a complete realignment is required or a new
1. Beam Landing
picture tube is installed.
2. Convergence
0 These adjustments should be performed with
3.
rated power supply voltage unless otherwise noted.
Focus
4. Screen (G 2) and White Balance
Note:
Test Equipment Required.
The controls and switch should be set as follows unless
1. Color bar Pattern Generator
otherwise noted :
2. Degausser
PICTURE control--..-....-.....
normal
3. DC Power Supply
BRIGHTNESS control. -. normal
4. Digital multimeter
Preparation:
purity
0 Feed in the white pattern signal.
l Before starting, degauss the
3-l. BEAM LANDING
control
\?I
entire screen.
1. Input a raster signal with the pattern generator.
2. Loosen the deflection yoke mounting screw, and
set the purity control to the center as shown in
Fig.2
3. Turn the raster signal of the pattern generator
Fig.2
to green.
4. Move the deflection yoke backward, and adjust
with the purity control so that green is in the
center and red and blue are at the sides evenly.
(Fig.3)
5. Move the deflection yoke forward, and adjust so
that the entire screen becomes green. (Fig.1)
Fig.3
G. Switch over the raster signal to red and blue and
Purity control
corrects this area.
I
confirm the condition.
7. When the position of the deflection yoke is
determined, tighten it with the deflection yoke
mounting screw.
8. When landing at the corner is not right, adjust
by using the disk magnets. (Fig.4)
Fig.1
I /
- 2 3 -
p
4
,’
Fig.4
Disk magnets or
rotatable disk
3-2. CONVERGENCE
4.When the V.STAT magnet is moved in the
Preparation:
direction of arrow @ and @$,. red, green and blue dots
0 Before starting, perform FOCUS, HSIZE, V.LIN
move as shown below.
and V.SIZE adjustments.
l
Set BRIGHTNESS control to minimum.
(1)
@
@
u3
0 Feed in dot pattern.
(1) Horizontal and Vertical Static Convergence
/J
Fig.5
Iv
RV 701
1. Adjust HSTAT VR to converge red, green and blue
If the blue dot does not converge with red and green
dots the in center of the screen.(Horizontal move-
dots, perform following steps.
ment)
Move BMC magnet (a) to correct insufficient H.static
2. Adjust V. STAT magnet to converge red, green and
blue dots in the center of the screen. (Vertical movement)
convergence.
Rotate BMC magnet (b) t0 correct insufficient V.static
convergence.
3. If the red, green and blue dots do not converge on
In either case, repeat Beam Landing Adjustment.
the center of screen with H.STAT VR, perform
horizontal convergence adjustment using H.STAT
BMC magnet
VR and V.STAT magnet as shown below. (In this
case, H.STAT VR and V.STAT magnet effect each
other.)
0 Tilt the V.STAT magnet and adjust static convergence to open or close the V.STAT magnet.
L(b) w
Fig.6
-24-
(3) Screenlcorner
Convergence
Purity
Fig.7
Fig.9
+
(2)Dynamic Convergence Adjustment
Affix a Permalloy ass’y corresponding
to the misconverged areas
Preparation:
0 Before starting perform Horizontal and Vertical static
convergence
Adjustment.
1. Slightly loosen deflection yoke screw.
.
b
2. Remove deflection yoke spacers.
3. Move the deflection yoke for best convergence as shown below.
4. Tighten the deflection yoke screw.
5. Install the deflection yoke spacers.
C
I
Fig.8
-25-
Permalloy
assembly
SERVICE
3-3. FOCUS
ADJUSTMENT
Adjust FOCUS control for best picture.
LODE
IN
Item
Disp.
( k e r n ) data
3. The CRT displays the item Being adjusted.
4. Press i or m on the Remote Commander to select
the item.
5. Press /3J or 0
6 on the Remote Commander to
change the data.
FOCUS
6. Press -1 then -1 to write into
memory.
SERVICE ADJUSTMENT MODE MEMORY
Fig.10
3-4. SCREEN(G 2)
1. Input a dots pattarn.
2. Set the PIC, BRT controls at minimum and COLOR
control at normal.
3. Adjust BKG VRs
I
so that voltages on the red, green
I
7. Turn set off and on to exit.
and blue cathodes are 170 V dc with an oscilloscope
as shown in Fig.11.
4. Observe the screen and adjust SCREEN (G 2)RV
702 to obtain the faintly visible background of dot
3-6. WHITE BALANCE ADJUSTMENTS
1. Input an entire white signal.
signal.
2. Set to service adjustment mode.
3. Set the PICTURE and BRIGHT to minimum.
4. Adjust with SBRT if necessary.
5. Select G CUT and B CUT withmandB.
17O.V d c
GND
pedestal
6. Adjust withBandHfor
I
the best white balance.
7. Set the PICTURE and BRIGHT to maximum.
8. Select GAMP and BAMP withHand@
Fig.11
9. Adjust withflandwfor
the best white balance.
10. Write into the memory by pressingmlthen
lENTERl.
3-5. METHOD OF SETTING THE SERVICE
ADJUSTMENT MODE
SERVICE MODE PROCEDURE
1. Standby mode.(Power off)
Remote Commander. (Press each button within a
second.)
-26-
SECTION 4
SAFETY RELATED ADJUSTMENTS
A BOARD
A BOARD
q
R511
E R537 CONFIRMATION METHOD (HV HOLDDOWN CONFIRMATION) AND READJUSTMENTS
DOWN
The following adjustments should always be performed when replacing the following components
(marked with 0 on the schematic diagram).
IC602, C524, R511, R534, R549, R637, PM501
The following adjustments should always be performed when replacing the following components
(marked with 0 on the schematic diagram).
IC602, D511, C523, C524, R534, R535, R537, R549,
R637, PM501, T504, DY
0
1. Hold-Down Operation Voltage (B+)
a
1. Preparation before confirmation
1) Turn the POWER switch ON, and receive
entirely white signal and set the PICTURE and
BRIGHT controls to maximum.
2) Confirm that the voltage of the check terminal of
TP85 is more than 1OOVDC when the set is
operating normaly with 120.0 f 2.OVAC supply.
2. Hold-down operation confirmation (HV)
1) Connect the currentmeter between the 7th pin of
FBT (T504)and the land of it with connect
polarity.
2) Receive White Signal and adjust the ABL
current to follows with the PICTURE and the
BRIGHT controls.
1 4 5 0 zh lOOpA
3) Connect the Digital Voltmeter to pin8 of PM501
then read the voltage as A.
4) Connect the Digital Voltmeter and DC power
Supply via 1SS 119 to TP-85.
5) Increase the DC power voltage gradually until
the Picture just blanks out.
6) Read the digital voltmeter indication.
7) Turn DC power Source off immediatery.
STANDARD
Less or equal to A + 16.5 VDC
8) Receive Dot Signal and adjust the ABL current
to follows, with the PIX and the BRT controls.
150 + 100 PA
9) Repeat steps from (3) to (7).
STANDARD
Less or equal to A + 16.5 VDC
3. Hold-down readjustment
1) Connect the currentmeter between the 7th pin of
FBT (T504)and the land of it with connect
polarity.
2) Receive White Signal and adjust the ABL
current to follows with the PICTURE and the
BRIGHT controls.
1 4 5 0 + lOOpA
3) Connect the Digital Voltmeter and DC power
Supply via 1SS 119 to pin8 of PM501.
4) Increase the DC power voltage gradually until
the Picture just blanks out.
5) Read the digital voltmeter indication.
6) Turn DC power Source off immediatery.
STANDARD
Less or equal to 130.0 VDC
7) Receive Dot Signal and adjust the ABL current
to follows, with the PICTURE and the BRIGHT
controls.
150 -t 100 PA
8) Repeat steps from (4) to (6).
STANDARD
Less or equal to 132.5 VDC
2. Hold-down readjustment
When step 2 is not satisfied, readjustment should be
performed by altering the resistance value of R511 (a
component marked with 8).
G BOARD
[B+
VOLTAGE
CONFIRMATION]
The following adjustments should always be performed when replacing IC602 or R637.
1) Supply 130+200V AC to with variable autotransformer.
2) Input an entirely monoscope signal.
3) Set the PICTURE control and the BRIGHT
controls in to initial reset.
4) Confirm the voltage of A BOARD 0 pin CN651
connecter is less than 116.5V DC.
5) If step 4) is not satisfied, replace IC602 and R637
repeat above steps.
When step 2 is not satisfied, readjustment should
be performed by altering the resistance value of
R537 (a component marked with E).
EEL
CONFIRMATION METHOD (B+ HOLDCONFIRMATION) AND READJUSTMENTS
- 2 7
digital
multimeter
ES119
_
laoI
w--h+
digital
multimeter
Pl
-228-
I
digital
multimeter
SECTION 5
CIRCUIT ADJUSTMENTS
5-l. ELECTRICAL ADJUSTMENT BY REMOTE COMMANDER
Use of Remote Commander (RM-Y117) can be
2. MEMORY WRITE CdNFlRMATlON METHOD
performed circuit adjustments about this model.
1. After adjustment, pull out the plug from AC
outlet, and next place, plug in AC outlet again.
2. Turn the power switch ON and set to Service
NOTE : Test Equipment Required.
Mode.
1. Pattern Generator
3. Call the adjusted items again, confirm they were
2. Frequency counter
adjusted.
3. Digital multimeter
4. Audio OSC
1. METHOD OF SETTING THE SERVICE
ADJUSTMENT MODE
3. ADJUST BUTTONS AND INDICATOR
/
SERVICE MODE PROCEDURE
\
,pGiiGiq
piiiEq,
1. Standby mode.(Power off)
Write the rnemor
2.(DISPLAYI--+~--+(VOL(+)1-+~l
Service
on the
mode
Remote Commander. (Press each button within a
second.)
Item up jiJ --.--
-B Data up
Item down H -
-m Data down
SERVICE ADJUSTMENT MODE IN
Item
.Disp.
( I t e m ) data
\
SERVICE
1000
\
\
AFC
’ B Service mode
0
’ ljj Initialize
3. The CRT displays the item Being adjusted.
4. Press M or @ on the Remote Commander to select
Service
mode
CODE SET
0
the item.
5. Press m or @ on the Remote Commander to
6. Press -1 then IENTER]
to write into
memory.
SERVICE ADJUSTMENT MODE MEMORY
El
PJRITE
TlGreen
1000
(ENTER]
Red
7. Press k/ then ~ on the Remote
Comrkder
SERVICE
1000
t
o
RESET
1
e
.
Carry out step 7) when adjusting IDS 0 to 4
and when replacing and adjusting IClO2.
Factory original setting
8. Turn set off and on to exit.
CABLEBOX
-29-
TV
a
RM-Y117
change the data.
SERVICE
Write
IvoL(+)IN
into
memory
4. AN ITEM OF ADJUSTMENTS
10.
Disp.
1
4ve. data
AFC
HFRE
VFRE
VPOS
VSIZ
VLIN
vsco
HPOS
HSIZ
PAMP
CPIN
PPHA
VCOM
GAMP
BAMP
GCUT
BCUT
CROM
SPIX
SHUE
SCOL
SBRT
RGBP
SHAP
VSMO
REF
ROFF
GOFF
BOFF
ABLM
2
3
4
5
6
7
8
9
10
11
12
13
14
15
16
17
18
19
20
21
22
23
24
25
26
27
28
29
30
L
Data range
*0
78
15
20
31
8
6
6
16
23
4
7
*2
21
16
6
7
26
32
25
30
34
* 18
*7
*0
*2
o-3
O-127
o-31
o-31
O-63
O-15
O-15
O-15
o-31
o-31
o-7
O-15
o-7
o-31
o-31
O-15
O-15
O-63
O-63
O-63
O-63
O-63
O-63
O-15
0.1
o-3
O,l
0, 1
0, 1
0, 1
1
1
1
*0
.
Item
AFC Loop Gain
H. Frequency
V. Frequency
V. Center
V. Size
V. Linearity
V. Correction
H. Center
H. Size
Pin Amp
Corner Pin
Pin Phase
V. Compensation
Green Amp
Blue Amp
Green Cut Off
Blue Cut Off
Chroma Trap
Sub Contrast
Sub Hue
Sub Color
Sub Bright
RGB Picture
Sharpness
V Pull in Range
Refference l i n e
Red Out
Green Out
Blue Out
ABL Mode
31 NOTC
32 DRGB
33 VANG
3 4 DISP
3 5 SVOL
36 SBAL
37 BASS
38 TRE
39 UYBO
40 LYBO
41 HAMP
4 2 HTIL
43 UCBO
4 4 UTIL
45 LCBO
4 6 LTIL
47 DCSH
48 PHPO
49 PHUE
50 ID-O
51 ID-1
52 ID-2
53 ID-3
54 ID-4
Note : No.from
*0
*0
not use
40
*0
7
not use
not use
not use
not use
not use
not use
not use
not use
not use
not use
not use
not use
not use
* 120
* 127
* 72
*0
* 16
1 to 54 is to show adjustment order.
* : Set-up value
Please adjust the function values as shown below when IC 102 on A board was replaced.
KV-20V 50 (US/CND)
No.
50
51
52
53
54
Disp.
ID-O
ID-l
ID-2
ID-3
ID-4
Disp.
Data
1 1 1 1 0 0 0
1 1 1 1 1 1 1
1 0 0 1 0 0 0
120
0 0 0 0 0 0 0
0 0 I o o o 0
0
16
127
72
-3o-
0.1 Notch On/Off
0, 1 OSD intensity
O-63 V. Angle
O-63 Display Position
O-7 Sub Volume
O-7 Sub Balance
O-15 Sub Bass
O-15 Sub Treble
O-63 Upper Y. Bow
O-63 Lower Y. Bow
O-63 H. Amp
O-63 H. Tilt
O-63 Upper C. Bow
O-63 Upper Tilt
O-63 Lower C. Bow
O-63 Lower Tilt
O-63 DC. Shift
O-127 PinP H Position
O - 6 3 PinP Hue
O-127 Model ID
O-127 Model ID
O-127 Model ID
O-127 Model ID
O-127 Model ID
5-2. A BOARD ADJUSTMENTS
/iUS CONTRAST ADJUSTMENT (SPIX)I
1. Input a color-bar signal.
/RF AGC ADJUSTMENT(IF BLOCK VR)l
2. Set to Service adjustment Mode.
1. Input a color-bar signal.
3. Set the conditions as follows.
2. Adjust AGC VR of TU 101 so that snow noise and
cross-modulation disappear from the picture.
PICTURE
3. Confirm them at every channel.
IH.FREQUENC~
ADJUSTMENT (HFRE)~
COLOR
.-*.-*.** MAX
. . . . . . . . . ,,,,,N
BRIGHT
. . . . . . . . . ,,,,,N
R OFF
G OFF
......... ON (1)
......... OFF (0)
B OFF
......... OFF (0)
1 . Input a color-bar signal.
2 . Set to Service adjustment Mode.
3 . Connect a frequency counter to base of Q550 (TP86 H.DRIVE).
4 . Call the item of AFC, set to 3 level (free run).
5 . Select HFRE withmand@.
6 . Adjust with@andHfor
l-----l
1000
7 . Call the item of AFC again, adjust the level“ 0 “.
8 . Write into the memory by pressing (MUTINGlthen
ADJUSTMENT
0:OFF
J
I
-1.
IV.FREQUENCY
//.---l:ON
SERVICE ROFF 1
the 15734+ 60Hz.
4. Connect an oscilloscope to CN703 Pin0
(VFRE)~
(R
OUT) of C board and ground.
1. Select video 1 with no connecting the signal.
5. Select SPIX withIandH.
2. Set to Service adjustment Mode.
6. Adjust withmandHfor the 2.01tO.O5Vp-p.
3. Connect the frequency counter across connector
VDY (+) (CN501) connector and ground.
4. Select VFRE withmand1.
5. Adjust withHandHfor
the 55 f0.5Hz.
6. Write the memory by pressingmlthen
lE@Eq
.
ICROMA
TRAP
AD JU STMENT
(CROM)~
1. Connect * “ y+c cable”to Y input of S Video,
* Must prepare “ y+c cable”by connecting C to Y in
7. Write the memory by pressingmlthell
the middle.
m.
Note : Set CROM average data at 26 if S-video input
8. Return the following back to normal after
is impossible.
adjustment.
2. Set to Service adjustment Mode.
PICTURE
BRIGHT
3. Connect an oscilloscope CN703 Pin0 (R OUT) of
C board ground.
4. Select CROM withIandm.
5. Adjust withmandBor
Element
R-OUT
of
I
the 0 level.
sub-carrier
6. Write the memory by pressingIMUTING]then
pTi?EE.
-3l-
......... MAX
COLOR
......... CENTER
......... CENTER
R OFF
......... ON
G OFF
......... ON
B OFF
......... ON
[DISPLAY
pos1T10N
ADJUSTMENT
[V.SIZE ADJUSTMENT (VSIZ)/
(DISP)~
1. Input a color-bar signal.
1. Input a cross-hatch signal.
2. Set to service adjustment Mode.
2. Set to service adjustment Mode.
3. Select DISP withiandm.
3. Select VSIZ withIandi.
4. Adjust withdandmfor the bar center.
4. Adjust withmandmfor the best vertical size.
5. Write the memory by pressing IMUTINGlthen
5. Write into the memory by pressing -1 then
V. SIZE (VSIZ)
IH.SIZE ADJUSTMENT (HSIZ)]
ISUB BRIGHT ADJUSTMENT (SBRT)I
1. Input a cross-hatch signal.
1. Input a cross-hatch signal.
2. Set to service adjustment mode.
2. Set to service adjustment Mode.
3. Set the PICTURE and BRIGHT to minimum.
3. Select HSIZ withmand1.
4. Select SBRT withMand@.
4. Adjust withmandflfor best horizontal size.
5. Adjust withBand@f or obtain a faintly visible cross-
5. Write into the memory by pressing /m then
hatch.
6. Write into the memory by pressing m then
H. SIZE (HSIZ)
p?EEq.
i=l-lol-0
ISUB BALANCE ADJUSTMENT (SBAL)]
1. Input a stereo signal.
2. Set to service adjustment mode.
3. Select SBAL withmandB.
LV.CENTER ADJUSTMENT (VPOS)l
4. Adjust with@andmfor the best sound balance.
1. Input a cross-hatch signal.
5. Write into the memory by pressing 1-1 then
2. Set to service adjustment Mode.
3. Select VPOS withwand@.
4. Adjust withmandHfor
the best vertical senter.
5. Write into the memory by pressing (MUTING] then
(SUB HUE, SUB COLOR ADJUSTMENT (SHUE, SCOL)(
.
IENTER/
1. Input a color-bar signal.
2. Set to service adjustment Mode.
3. Connect an oscilloscope to CN703 Pin@ (B OUT) of
C board.
4. Select SHUE and SCOL withmandm.
5. Adjust with@andHfor the Vl=V4 (SCOR) and V2
=V3 (SHUE).
m
v2
v3
v4
6. Write into the memory by pressing -1
then- .
-32-
V. CENTER (VPOS)
[H.CENTER
ADJUSTMENT (H POS)J
Note: Perform this adjustment after H.FREQUENCY
ADJUSTMENT (HFRE) .
1. Input a cross-hatch signal.
2. Set the Service adjustment mode.
3. Select HPOS withO andH .
4. Adjust withHandmto the best horizontal center.
5. Write into the memory by pressing IMUTING]
pm%q
then
.
H. CENTER (HPOS)
V LINEARITY(VLIN). VS CORRECTION(VSCO),
PIN AMP(PAMP), CORNER PIN(CPIN),
PIN PHASEtPPHAj
AND
ADJUSTMENTS
1. Input a cross-hatch signal.
2. Set to Service adjustment Mode.
3. Select VLIN, VSCO, PAMP, CPIN, and PPHA withM
andw.
4. Adjust with@andHfor
the best picture.
5. Write the memory bypressing -1 then
pizq.
V LINEARITY (VLIN)
VS CORRECTION (VSCO)
PIN AMP (PAMP)
PIN PHASE (PPHA)
-33-
MEMO
.
.........................................................................................................................................................................................................
.........................................................................................................................................................................................................
.........................................................................................................................................................................................................
. . . . . . . . . . . . . . . . . . . . . . . . . . . . . . . . . . . . . . . . . . . . . . . . . . . . . . . . . . . . . . . . . . . . . . . . . . . . . . . . . . . . . . . . . . . . . . . . . . . . . . . . . . . . . . . . . . . . . . . . .................................................................................
.........................................................................................................................................................................................................
.........................................................................................................................................................................................................
.........................................................................................................................................................................................................
. . . . .._......._..........................................................................................................................................................................................
-334-
KW20V50
RM-Y117
6-2.
CIRCUIT BOARDS LOCATfON
Adjustment ( q )
Part replaced ( 0 )
;2&R511,
R534, R549,
B+ HOLD-DOWN
(R511)
D511, C523, C524, R534,
R535, R537, R549, PM501,
D BOARD
HOLD-DOWN
(R537)
G BOARD
DY
All voltages are in V.
Voltage are dc with respect to ground unless otherwise noted
Readings are taken with a IO MO digital multimeter.
Readings are taken with a color-bar signaLinput.
0 Voltage variations may be noted due to normal production
tolerance.
Circled numbers are waveform references
. Lcyl : B+ line.
0 p- : B-line.
++$@, : signal path.
Reference information
RESISTOR : RN
METAL FILM
:RC
SOLID
: FPRD
NONFLAMMABLE
CARBON
: FUSE
NONFLAMMABLE
FUSIBLE
NONFLAMMABLE WIREWOUND
:RW
NONFLAMMABLE METAL OXIDE
: RS
NONFLAMMABLE
CEMENT
: RB
:
LF-8L
MICRO
INDUCTOR
COIL
CAPACITOR : TA
TANTALUM
: PS
STYROL
: PP
POLYPROPYLENE
: PT
MYLAR
: MPS
METALIZED
POLYESTER
: MPP
METALIZED POLYPROPYLENE
: ALB
BIPOLAR
: ALT
HIGH TEMPERATURE
HIGH RIPPLE
: ALR
l
*
0
l
l
6-3.
PRINTED WIRING BOARDS AND
SCHEMATIC DIAGRAMS
Note:
. All capacitors are in uF unless otherwise noted.
pF: upF 50WV or less are not indicated except for electrolytic
and tantalums.
. All electrolytics are in 50V unless otherwise specified.
. Indication of resistance, which does not have one for rating
electrical power, is as follows.
-1
.
.
.
.
.
.
.
.
.
.
Chips resistors are l/l OW.
All resistors are in ohms.
ka=lOOOQ MD=1 OOOKD
m: nonflammable resistor.
B : fusible resistor.
A: internal component.
0: panel designation, and adjustment for repair.
All variable and adjustable resistors have characteristic curve
B, unless otherwise noted.
The components identified by 0 in this manual have been
carefully factory-selected for each set in order to satisfy
regulations regarding X-ray radiation.
Should replacement be required, replace only with the value
originally used.
When replacing components identified by 0 , make the
necessary adjustments indicated. If results do not meet the
specified value, change the component identified by q and
repeat the adjustment until the specified value is achieved.
(Refer to R511 and R537 on page 27,28)
When replacing the part in below table be sure to parform the
related adjustment.
l
# Note:The symbol -EB- display is on the component side.
8;
:: :: .:;
The components identified by shading and mark A
z::1.:::‘<::
are critical for safety. Replace only with part number
:: $: :f
: .: :
specified.
$g
*:g
@j
The symbol e indicate fast operating fuse.
$:$
Replace only with fuse of same rating as marked.
.~.:::c:~:..*..~......N..
:.:.:.:.:::.:,n:~,:~:;:~~::~~:~~~,~~~~:~~~~~~.~~~~~~:~~~.~~~,~:~~,~.:~~~;:;~:~~:~~~~~;~~::~~~;*.~~~~;~~:.I,.
:~~,~~,:~:~.,:. I. .
.
:.
.,A.,
.,.,:.~:,:,:.,:.~:~,~:~:.:.:.:::.:::::::::~~
~,,~ ,:. ;:.~,) :,~.~,~,:~,r.,
#
gj
#
#
:: :: ::
:: :: ::;
gig
8;
$$
~:
# Note:Les composants identifies par un trame et une 8
9:: .
marque A sont critiques pour la securite. Ne les !$$
<:*::<(
$$i
remplacer que par une piece portant le numero g
.:.:.:
$$
specific.
:: ::.>:.
1::;:
g$
Le symbole -E31- indique une fusible a action rapide. !#
z::
$2
Doit etre remplacee par une fusible de meme yaleur, g
$$
3;$:s;g
comme maque.
:::
:m
....:..:..~...::..:.::.:;:.:.::.::.:.,.,....,.....
::::::~:i:wa:i:::::~~:..,.........
::~~:~:~~~~~:~,.:~.~~:~,:~:~,:~~:~~~:~.:~~~:~~~;~~~~~:~~~:~;~:~:~~?::~~:~~~:~~~::~.:~:~:~:~~:~~
g:::.,:
39-
G
cl
[POWER
SUPPLY,
DEGAUSSING
CIRCUIT]
- G Board -
I
]
2
Is
I4
!
- G Board IC
IC601
IC602
B-3
c-5
TRANSISTOR
Q602
E-4
Q603
G-l
Q604
F-2
Q605
E-6
Q606
c-5
Q607
E-5
DIODE
D604
D605
D606
D607
D606
D609
D610
D61 I
D612
D613
D614
D615
D616
0617
D616
D619
0620
D621
D622
0624
D625
D627
D629
D630
D632
i
.:
,i
~)
NOTE:
The circuit indicated as left contains high voltage of over
600 Vp-p. Care must be paid to prevent an electric shock in
inspection or repairing.
:yyy;s ‘-y ;‘ ;--/_
z
- 4 9 -
’ G-5
B-4
D-2
G-l
G-l
E-l
E-l
G-4
H-5
H-6
G-6
G-6
F-6
F-7
F-6
F-6
G-6
G-6
H-5
E-4
c-5
D-6
H-5
H-4
E-4
1
I
2
A
B
IVIDEO
I
3
I
4
1
IVIBEO
I
5
I
I
6
3 INI
r
-1I
-
I
C
Nl-l-
0
2
KW
TO A SOARD
[AV TERMINAL]
CN402
TO A BOARB
CN401
:
_--------- I
I
kL+
- UA Board -
I
7
cNB;o'
WHT-L
:S-MICRO
<AV
UA
TERMINAL>
B-SS4399<U..>-UA.
[R.G.B.
OUT]
- C Board -
NOTE:
The circuit indicated as left contains high voltage of over
600 Vp-p. Care must be paid to prevent an electric shock in
inspection or repairing.
-55-
KV-20V50
ml-Y117
6-4.
SEMICONDUCTORS
f
CXA 1465AS
MS2470AP
ME12470 P
-
22
I
CXP8024-sv4397
b4
nw VIEI)
33
PM-35
1
crop VIEW
2SAl0910
2SAl091-0
tI4SBbOL
2SAl175
2SAl309A
2SC2785
2SC331 1 A
2stl2394
31
.bh +m
ERC06-155
LA7830
CATHOQE
250788
SBXl618-51
AlmE
i
2SB1370
LM7812CT
MC781 2CT
MC7809CT
1 T33
0
B
ST24C02ABl
II’ E
B c
hhnR
2SB709A
2S060lA
c
L78LROS’J-MA
62
B
TflA2009A
E
2SC3209LK
MM1 114XFF
RC4558PS
TflA0424
2SC3271 F
E
M51 132L
Z8612812PSC
fllNS4
tIlNS6
01 NS20R
RB13ESB2
RB30ESB2
Rf130ESB4
R03.9ESBl
Rf)S. lESB1
RDS. 6ESB3
R’J9.1 ESB3
lSSll9
lSS1 19Tf)
2SC4833MNP
f-----T
-56-
ill NLZO
EGP20G
ELlE
ELlE-VI
GPO80
RGP02-17
RGP02- 17PKG23
RGP 1 OGPKG3
RGP 1 SGPKG23
/ KV-E!g7:
SECTION 7
EXPLODED VIEWS
NOTE:
l
Items with no part number and no
description are not stocked because
they are seldom required for routine
service.
l
The construction parts of an assembled
part are indicated with a collation
number in the remark column.
.
. Items marked ” * ” are not stocked
since they are seldom required for
routine service. Some delay should be
anticipated when ordering these items.
5 The components identified by shading and ?
s:..::.:. mark A are critical for safety.
.: .:
3 Les mmposants identifies
par une trame et $
$j une marque A sont critiques pour la securite.
5 Ne les remplacer que par une piece portant
fi:le numero specific.
e<z. ,r.:~:<~~$~:‘i.:*:.. .> )I.’ ‘~~~~~~:~.::~~~:,:,~.:,
: ~..: .:~.~~~:.:~,l.:“:. j /;;;..~~.~._i
$:
?;
“...;..
7 - 1 . CHASSIS
. : BVTP3 x 1 2
0 : BVTP3 X 1 2
n : BVTP4 x 1 8
Ref.
No. Part No.:.
3
7-685-648-79 (BLACK)
7-685-648-71
7-685-663-79 (BLACK)
Description
4-394-072-01 EMBLEM (NO. 8). SONY
4-384-096-01 SCREW (4X16), TAPPING, +P
l-504-304-11 SPEAKER (KM)
Remark Ref.
No. Part
No.
i
10
t;
;i
-57-
Description
Remark
*A-1316-146-A
G BOARD, COMPLETE
*l-647-061-11 UA BOARD
4-039-851-01 TERMINAL BOARD, ANTENNA
4-040-348-01 LABEL,
l-573-657-11
~~-~6~~~~11
4-640-352-01
TERMINAL
*@fm
eI , ~
7-2. PICTURE TUBE
a.:.:.>..:.>.
,.x.x.,... >..:..: :.~~~.~.~~.~.:.:.:.~.:.~~~:.:.~.:.:~.~.:.:.:.:.:.:.:.:.:.:...:~:.:.:.:.:.~.~.:.:...: ..::.: :.:...:.......” ..,...y..< ,....................
f The components identified b y shading and $$
1
$ mark A are critical for safety.
g.
::..m
.
f Replace only with part number specified.
,..I..; _ . ..::........:..:..:.
- -,,.,, .&:.$. :.*. <a
.~:.:.:~I-:.:.~~.~~~~.: . . . . . . . . . . . . x....~.:-~_.~.,,~~-.-.,.
:. .,:
<gy -./ .y .x:<
~-~~~~~~~?~~~~~:~?~:~.~~.~~~~:~~:~~~~~~~~:~~::~:.~~.~...
,. ...................
!$ Les composants identifies par une trame et $$
$$ une marque A sont critiques pour la securite. 5
f Ne les remplacer que par une piece portant E
:::ii
:.:::
!j*.
$ le numero specific.
“~:.~:~:~~..~~.: : :~: : ~~~~~~~;~~~~:~~~~~~..~,:~~,:~~~~:?: ~:.~:
:;w :.::~~~::~::~:.~~,i:~~~ c
-Ref. No. Part No.51
zi
z:
56
ii
Et!
61
Description
4-040-346-01 PANEL, CONTROL
4-040-345-01 BUTTON, MULTI
4-040-347-01 DOOR, CONTROL
3-703-035-11 SHAFT, LID
$4-031-413-01
GUIDE, LIGHT
*4-389-517-01
GUIDE (R), LIGHT
X-4031-130-1 CABINET ASSYIgITH
BEZEL ASSY)
4-385-725-01
8~736-764~06
4-365-888-01
l-452-277-00
MAGNET,
BMC
Remark [ Ref. No. Part
No.
~
62
Description
*3-704-372-01
HOLDER, HV CABLE
3-704-495-01
*A-1331-246-A
84-375-394-01
SPRING, TENSION
70
4-308-870-00 CLIP, LEAD WIRE
l-452-032-00 MAGNET, DISC; 1OMMd
ii
l-452-094-00 MAGNET, ROTATABLE DISK; 15MMd
X-4308-815-0 PERMALLDY
ASSY. CONVERGENCE
-58-
Remark
SECTION 8
ELECTRICAL PARTS LIST
;;:; The components rdentrfred by $.:
are seldom required for routine service. Some
1 shading and mark A are critical $$j
&
delay
should be anticipated when ordering
“1 for safety.
$ Replace only
with
g specified.
=::::m;.:. *:.
pati
number
these items.
$
All variable and adjustable resistors have
characteristic curve B, unless otherwise noted.
RESISTORS
$ Les composants
identifies
par $$$
2~ une trame et une marque m g l All resistors are in ohms
:$. : . sont critiques pour la securite. 1;: l F : n o n f l a m m a b l e
~2 Ne les remplacer que par une g
f piece portant le numero specific. $
‘5:?::.*~$~::.:<:.>>.: .1 .:. :. . :..:. ..I<... ^--15~~~~~~~~~~~.
... . . ... . . ... . . ... .~.:..:1: ” . . ::. .xc.<. . . k.‘.<$.S .
Ref.
No.
-
..~.:<;z:.,l
Part No.
-
$$
_
.”
.._
), . ,.~. ;. . . . ..,.:. .
l
Description
Remark
*A-1297-080-A A BOARD, COMPLETE
*****************
4-382-854-11 SCREW @3X10), P, SW (+)
< CAPACITOR >
l-163-809-11 CERAMIC
l-163-125-00 CERAMIC
l-124-903-11 ELECT
l-163-009-11 CERAMIC
l-163-009-11 CERAMIC
CHIP
CHIP
co13
co14
co15
CO16
co17
l-163-009-11
l-163-009-11
l-163-009-11
l-163-009-11
l-163-009-11
CO18
co19
co20
co30
co39
l-163-009-11
l-163-009-11
l-163-009-11
l-163-125-00
l-163-125-00
When indicating parts by reference
number, please include the board name.
CHIP
CHIP
0.047uF
220PF
1uF
0. OOluF
0. OOluF
10%
5%
20%
10%
10%
25v
5ov
SOY
5ov
5ov
CERAMIC
CERAMIC
CERAMIC
CERAMIC
CERAMIC
CHIP
CHIP
CHIP
CHIP
CHIP
0. OOluF
0. OOluF
0.001uF
0.001uF
0. OOluF
10%
10%
10%
10%
10%
5ov
5ov
5ov
5ov
5ov
CERAMIC
CERAMIC
CERAMIC
CERAMIC
CERAMIC
CHIP
CHIP
CHIP
CHIP
CHIP
0.001uF
0. OOluF
0. OOluF
220PF
220PF
10%
10%
10%
5%
5%
5ov
5ov
5ov
5ov
5ov
co40
co41
co43
co45
CO46
l-163-125-00 CERAMIC
l-163-009-11 CERAMIC
l-163-159-00 CERAMIC
l-126-103-11 ELECT
l-163-017-00 CERAMIC
CHIP
CHIP
CHIP
CHIP
220PF
0. OOluF
12PF
470uF
0.0047uF
5%
10%
2%
20%
5%
5ov
5ov
5ov
16V
5ov
co47
co49
co50
co51
CO52
l-104-896-91
l-163-125-00
l-163-109-00
l-163-125-00
l-163-125-00
CERAMIC
CERAMIC
CERAMIC
CERAMIC
CERAMIC
CHIP
CHIP
CHIP
CHIP
CHIP
24PF
220PF
47PF
220PF
220PF
2%
5%
5%
5%
5%
5ov
5ov
5ov
5ov
5ov
co53
co54
co55
CO56
co57
l-163-121-00
1-163-253-11
l-163-125-00
l-163-125-00
l-163-125-00
CERAMIC
CERAMIC
CERAMIC
CERAMIC
CERAMIC
CHIP
CHIP
CHIP
CHIP
CHIP
150PF
120PF
220PF
220PF
220PF
5%
5%
5%
5%
5%
5ov
5ov
5ov
5ov
5ov
CO58
co59
CO60
CO62
CO66
l-163-037-11 CERAMIC
l-163-125-00 CERAMIC
l-124-903-11 ELECT
l-124-907-11 ELECT
l-124-903-11 ELECT
CHIP
CHIP
0.022uF
220PF
1UF
1ouF
1uF
10%
5%
20%
20%
20%
25V
5ov
5ov
5ov
5ov
Cl01
c201
c202
l-249-409-11 CAREON
l-124-120-11 ELECT
l-124-907-11 ELECT
220 5%
220uF
1OuF
1/4w
20%
20%
F
25V
5ov
!ef. No.
l
The components identified by q in this manual
have been carefully factory-selected for each
set in order to satisfy regulations regarding
X-ray radiation.
Should reolacement be reauired. replace only
with the value orginally used.
Part No.
Description
C203
C204
1-124-477-11 ELECT
l-126-101-11 ELECT
C206
C251
C254
C255
C256
l-163-009-11 CERAMIC
1-124-925-11 ELECT
l-126-101-11 ELECT
1-124-916-11 ELECT
l-126-101-11 ELECT
C257
C258
c259
C260
C261
1-124-925-11
l-136-169-00
l-136-173-00
l-124-907-11
l-124-360-00
C262
C263
C270
C271
C272
1-124-925-11
l-136-169-00
l-124-907-11
l-124-907-11
l-124-360-00
C273
c301
c304
c305
C306
l-124-360-00 ELECT
l-163-113-00 CERAMIC
l-124-907-11 ELECT
l-124-903-11 ELECT
l-163-035-00 CERAMIC
c307
C308
c309
c310
c311
l-163-125-00 CERAMIC
l-124-902-00 ELECT
l-163-099-00 CERAMIC
1-124-916-11 ELECT
1-137-399-11 FILM
C312
c313
c314
c315
C318
1-137-399-11 FILM
1-137-399-11 FILM
l-163-037-11 CERAMIC
l-124-120-11 ELECT
l-163-117-00 CERAMIC
c319
C320
C321
C322
C323
l-124-902-00 ELECT
l-163-017-00 CERAMIC
l-163-005-11 CERAMIC
l-163-011-11 CERAMIC
l-163-007-11 CERAMIC
Remark
47uF
1OOuF
20%
20%
25V
16V
0. O O l u F
2.2uF
1OOuF
22uF
1OOuF
10%
20%
20%
20%
20%
5ov
1oov
16V
63V
16V
ELECT
FILM
FILM
ELECT
ELECT
2.2uF
0.22uF
0.47uF
1OuF
1OOOuF
20%
5%
5%
20%
20%
1oov
5ov
5ov
5ov
16V
ELECT
FILM
ELECT
ELECT
ELECT
2 . 2uF
0.22uF
1OuF
1ouF
1OOOuF
20%
5%
20%
20%
20%
1oov
5ov
5ov
5ov
16V
1OOOuF
68PF
1OuF
1uF
0.047uF
20%
5%
20%
20%
16V
5ov
5ov
5ov
5ov
CHIP
220PF
0.47uF
18PF
22uF
0 . 1uF
5%
20%
5%
20%
5%
5ov
5ov
5ov
63V
5ov
CHIP
CHIP
0 . 1uF
0 . 1uF
0.022uF
220uF
1OOPF
5%
5%
10%
20%
5%
5ov
5ov
25V
25V
5ov
CHIP
CHIP
CHIP
CHIP
0.47uF
0.0047uF
470PF
0.0015uF
68OPF
20%
5%
10%
10%
10%
5ov
5ov
5ov
5ov
5ov
C324
C325
C326
C327
C328
l-124-903-11 ELECT
1-164-232-11 CERAMIC CHIP
l-124-903-11 ELECT
l-102-244-00
CERAMIC
l-124-902-00 ELECT
1uF
0 . OluF
1uF
220PF
0.47uF
20%
20%
10%
20%
5ov
5ov
5ov
5oov
SOY
c329
1-124-925-11 ELECT
2.2uF
20%
1oov
-59-
CHIP
CHIP
CHIP
CHIP
‘j~~~~:~~;~~..
-...~......~~~~:...~~
xx__ . . . . . . . . . . . ~
r”.<<>w
w:(
.:...
_
~.:~~~~~~~~~~~~~~
3s:. ~ :::*.>zy?*
g Les composants identifies par 7;; g The components identified by 3
$ une trame et une marque A j$ :$ shading and mark A are critical 3
.z
fj E for s&&y.
3 sont critiques pour la securiie.
;.:
:$ Ne les remplacer que par une g $$ Replace only with part number 9
:p(B:
2 piece portant le numero specific. g $j specified.
:m: : ;<.* **:$.: :wR.y
. . . . . . . . :. ::~.. . . .~.~~:.
. . . .:.::.. .:..,_
.:.::.. .::,. .:..:..~. ~.._. .~.~.:.~~,:.~.:.:.:.:.:.:.
S$ .x*>. . ..., .. .. .^.. ... .. .*. .:.:,. : : : :. _. . . . . . .: .: : s.: :.: :.:. .._: i I.:::::::::::::::::.
.: m.:.:<
:.:;~~~~;~.
p :. : :,:;I
A
I
Ref.
No.
Part No.
Remark
Description
c330
C332
c333
c334
l-163-007-11
l-136-169-00
l-136-169-00
l-163-037-11
CERAMIC
FILM
FILM
CERAMIC
c335
C336
c340
c341
C342
l-124-903-11 ELECT
l-124-907-11 ELECT
l-126-101-11 ELECT
l-124-903-11 ELECT
l-163-033-00 CERAMIC
c345
c341
c401
C402
c403
1-124-477-11 ELECT
l-126-101-11 ELECT
l-163-031-11 CERAMIC
l-124-907-11 ELECT
l-124-907-11 ELECT
c404
c405
C406
c407
C408
CHIP
1ef.
No. Part No.-
Remark
CHIP
680PF
0.22uF
0.22uF
0.022uF
10%
5%
5%
10%
5ov
5ov
5ov
25v
C504
C505
C506
C507
MYLAR
CERAMIC
ELECT
CERAMIC
0.033uF
33PF
22uF
0. OOluF
5%
5%
20%
5ov
5ov
63V
20%
20%
20%
20%
5ov
5ov
16V
5ov
5ov
C508 l-102-038-00 CERAMIC
C509 1-124-122-11 ELECT
C510 l-137-421-91 FILM
CHIP
1UF
1OuF
1oouF
1uF
0.022uF
C512 l-164-096-11 CERAMIC
0. 0O:uF
1OOuF
0. Q68uF
0.01~~
0. OluF
20%
10%
5%
5ov
1OQV
26OV
508
47uF
1oouF
0 . OluF
1ouF
1ouF
20%
20%
20%
20%
25v
16V
5ov
5ov
5ov
C513
C515
C516
C517
C518
l-124-903-11
l-124-480-11
l-102-244-00
l-162-114-00
l-124-480-11
ELECT
ELECT
CERAMIC
CERAMIC
ELECT
1uF
470uF
22OPF
0.0047uF
47OuF
20%
20%
10%
5ov
25V
5oov
2KV
25V
l-124-903-11 ELECT
l-124-903-11 ELECT
l-124-902-00 ELECT
l-124-902-00 ELECT
l-124-907-11 ELECT
1uF
1uF
0.4luF
0.47uF
1ouF
20%
20%
20%
20%
20%
5ov
5ov
5ov
5ov
5ov
C519
C520
C521
C522
C523
l-102-244-00
l-124-046-00
l-102-244-00
l-123-024-21
l-123-932-00
CERAMIC
ELECT
CERAMIC
ELECT
ELECT
220PF
1ouF
220PF
33uF
4. 7uF
10%
20%
10%
20%
5oov
160V
5oov
160V
160V
c409
c410
C412
c413
c414
l-124-903-11
l-124-903-11
l-124-907-11
l-124-907-11
l-124-907-11
1uF
1uF
1OuF
1OuF
1ouF
20%
20%
20%
20%
20%
5ov
5ov
5ov
5ov
5ov
C524 1-124-477-11 ELECT
C525 l-106-387-00 MYLAR
C526 1-124-916-11 ELECT
C528 l-124-046-00 ELECT
C553 l-102-228-00 CERAMIC
4hF
0.068llF
22uF
1ouF
470PF
20%
5%
20%
20%
10%
25V
zoov
63V
160V
5oov
c415
C416
c417
C418
c419
l-124-907-11 ELECT
l-163-017-00 CERAMIC
l-163-017-00 CERAMIC
l-124-903-11 ELECT
l-124-903-11 ELECT
1ouF
0.0047uF
0.0047uF
1UF
1uF
20%
5%
5%
20%
20%
5ov
5ov
5ov
5ov
5ov
C558
l-137-417-91 FILM
0.015uF
10%
1oov
C420
C421
C424
C425
C426
l-124-907-11
l-124-907-11
1-124-925-11
1-124-925-11
1-124-92’7-11
1OuF
1OuF
2. 2uF
2.2uF
4.7uF
20%
20%
20%
20%
20%
5ov
5ov
1oov
1oov
1oov
c559
C562
C564
C568
c571
l-162-116-00
CERAMIC
l-102-228-00
CERAMIC
l-136-111-00 FILM
1-124-634-11 ELECT
1-124-927-11 ELECT
68OPF
470PF
1uF
1uF
4.7uF
10%
10%
5%
20%
20%
2KV
5oov
2oov
250V
1oov
C421
C428
c429
c430
c431
1-124-927-11 ELECT
1-124-925-11 ELECT
1-124-925-11 ELECT
1-163-989-11 CERAMIC
1-163-989-11 CERAMIC
4.7uF
2.2uF
2.2uF
0.033uF
0.033uF
20%
20%
20%
10%
10%
1oov
1oov
1oov
25V
25V
c574
c575
c590
C682
C683
1-136-569-11 FILM
l-106-371-00
MYLAR
l-163-009-11 CERAMIC
1-124-477-11 ELECT
1-124-478-11 ELECT
1. 2uF
0.015uF
0. OOluF
47uF
1OOuF
5%
5%
10%
20%
20%
zoov
2oov
5ov
25V
25V
C432
c433
c434
c435
C436
l-126-101-11
l-126-101-11
l-124-903-11
l-124-903-11
l-124-903-11
ELECT
ELECT
ELECT
ELECT
ELECT
1OOuF
1OOuF
1uF
1uF
1uF
20%
20%
20%
20%
20%
16V
16V
5ov
5ov
5ov
C684
C686
C690
C691
C692
1-124-477-11 ELECT
1-124-477-11 ELECT
l-124-902-00 ELECT
l-124-120-11 ELECT
1-124-477-11 ELECT
4i’uF
4’luF
0.47uF
22ouF
4luF
20%
20%
20%
20%
20%
25V
25V
5ov
25V
25V
c431
c440
c441
C442
c501
l-124-907-11
l-126-101-11
1-124-477-11
l-124-903-11
l-124-902-00
ELECT
ELECT
ELECT
ELECT
ELECT
1ouF
1OOuF
47uF
1uF
0.4luF
20%
20%
20%
20%
20%
5ov
16V
25V
5ov
5ov
C502
1-124-916-11 ELECT
22uF
20%
63V
CHIP
ELECT
ELECT
ELECT
ELECT
ELECT
CHIP
CHIP
ELECT
ELECT
ELECT
ELECT
ELECT
CHIP
CHIP
l-130-489-00
l-164-058-11
1-124-916-11
l-102-038-00
Description
CHIP
20%
< COMB FILTER >
1-466-912-11 FILTER BLOCK, COMB
< CONNECTOR >
CNlOl *l-573-978-11 CONNECTOR, BOARD TO BOARD 11P
-60-
-Ref. No. Part No.-
Description
Remark
CNIOZ
CN201
CN202
CN203
*l-560-124-00 PLUG, CONNECTOR
*l-564-505-11 PLUG, CONNECTOR
*l-564-505-11 PLUG, CONNECTOR
*l-560-123-00 PLUG, CONNECTOR
(2.5MM) 4P
2P
2P
(2.5MM) 3P
CN301
CN401
CN402
CN501
CN502
*l-564-509-11 PLUG, CONNECTOR 6P
*l-564-511-11 P L U G , C O N N E C T O R 8P
*l-564-509-11 PLUG, CONNECTOR 6P
*l-580-798-11 CONNECTOR PIN (DY) 6P
*l-508-768-00 PIN, CONNECTOR (5MM PITCH) 6P
CN651 *l-691-135-11 PIN, CONNECTOR (PC BOARD) 4P
CN652 *l-564-510-11 PLUG, CONNECTOR 7P
ief.
No. Part No.-
Description
Remark
IC102 g - 7 5 9 - 0 4 3 - 8 6 I C ST24CO2ABl
IC103 8-741-100-62
I C
SBX1618-51
-~~9~~~~-~~ IC TM
9a
7a5’
IC301 g - 7 5 2 - 0 5 9 - 6 7 IC CXA1465AS
IC401
IC402
IC403
IC405
IC406
8 - 7 5 9 - 6 3 4 - 6 9 I C M52470P
8 - 7 5 9 - 0 8 8 - 0 0 I C MMlll4XFF
8 - 7 5 9 - 0 8 8 - 0 0 I C MMlll4XFF
8-759-090-21
IC TDA8424
8 - 7 5 9 - 9 9 6 - 4 3 I C RC4558PS
IC501 8-759-801-98
IC LA7830
< DIODE >
DO02
DO03
DO04
DO05
DO06
8-719-911-19
8-719-911-19
8-719-911-19
g-713-300-57
8-719-911-19
DIODE
DIODE
DIODE
DIODE
DIODE
lSS119
lSS119
lSS119
lT33
lSS119
DlOl l-810-039-11 LED UNIT
D201 g-719-110-72 DIODE RD30BS-B2
D251 8-719-911-19 DIODE lSS119
D252 8-719-911-19 DIODE lSS119
D302 8-719-109-84
DIODE RD5. lES-Bl
D401
D402
D403
D404
D405
g-719-110-36
g-719-110-36
g-719-110-36
g-719-110-36
g-719-110-36
DIODE
DIODE
DIODE
DIODE
DIODE
RD13ES-B2
RD13F.S-B2
RD13ES-B2
RD13ES-B2
RD13BS-B2
D406
D407
D408
D409
D410
8-719-110-36
g-719-110-36
g-719-110-36
g-719-110-36
8-719-110-36
DIODE
DIODE
DIODE
DIODE
DIODE
RD13ES-B2
RD13ES-B2
RD13ES-B2
RD13ES-B2
RD13FS-B2
D412
D413
D414
D415
D483
8-719-109-88
DIODE RD5. GES-Bl
g-719-110-36 DIODE RD13FS-B2
g-719-110-36 DIODE RD13ES-B2
g-719-110-36 DIODE RD13ES-B2
g-719-109-66 DIODE RD3.3ES-B2
D502 8-719-936-82
D504 8-719-936-84
D509 8-?19-936-84
E%a ~~-~~~~~~~~
D512 8-719-936-84
DIODE
DIODE
DIODE
B
DIODE
GP08DPKG3
RGPlOGPKG3
RGPlOGPKG3
z&p
RGPlOGPKG3
D513
D551
D552
D681
DIODE
DIODE
DIODE
DIODE
RGPO2-17PKG23
EGPZOG
ERCO6-15s
RD5.6ES-B3
g-719-028-72
8-719-979-85
g-719-945-80
8-719-109-90
< IC >
IClOl 8 - 7 5 2 - 8 4 1 - 1 6 I C
CXP80424-065s
< JACK >
5251 l-750-264-11 JACK
5403
l-750-267-11 JACK BLOCK, PIN (L TYPE) 3P
< COIL >
LOO1 l-410-470-11 INDUCTOR
LOO2 l-410-476-11 INDUCTOR
LOO3 l-410-470-11 INDUCTOR
L201 l-410-645-31 INDUCTOR
L202 l-408-408-00 INDUCTOR
1ouH
33uH
1OuH
1oouH
8. 2uH
L502 l - 4 1 0 - 6 6 9 - 3 1 INDUCTDR
~4~~-~~~~~~ I
-412-533~6I
INDUCTOR
33uH
L557 1-412-553-61 INDUCTOR
3.3mH
< PROTECTOR MODULE >
PM501 l-810-040-11 PROTECTOR MODULE PM-35
< IC LINK >
< TRANSISTOR >
QOOl
4004
Q005
Q007
Q261
8-729-422-36
8-729-422-36
8-729-422-27
8-729-422-27
8-729-422-36
TRANSISTOR
TRANSISTOR
TRANSISTOR
TRANSISTOR
TRANSISTOR
2SB709A-Q
2SB709A-Q
2SD601A-Q
2SD601A-Q
2SB709A-Q
Q262
Q301
4309
Q310
8-729-422-27
8-729-422-36
8-729-422-27
8-729-422-27
TRANSISTOR
TRANSISTOR
TRANSISTOR
TRANSISTOR
2SD601A-Q
2SB709A-Q
2SD601A-Q
2SD601A-Q
-6l-
”
# Les composants identifies par # $ The components identified by $
:; une trame et une marque m 8 $ shading and mark A are critical s
>g
:; g for safgQ(
3 sont critiques pour la sectirite.
Z>$
# Ne les remplacer que par une f 8 Replace only with part number 3
hc
;$ piece portant le numero specific. %:* E*:*.specified.
.......
...................................................
....................................
:I ::~~.~~~~~~~~~~~~~~~~~~~,
..................
:........
:.:.:.:.:.:mMxs$f*:
.... ::.~~~.~~~~~
)’
Ref. No.
Part No.
Description
Remark
‘ef.
- No. Part No.-
Description
Remark
8311
8-729-422-27 TRANSISTOR 2SD601A-Q
R045 l-216-065-00 METAL
CHIP
4.7K 5 %
l/low
8401
Q402
Q403
Q404
9550
8-729-422-36
8-729-422-36
8-729-422-27
8-729-422-27
8-729-140-96
R046 l-216-065-00 METAL
R047 l-216-049-00 METAL
R048 l-216-073-00 METAL
R049 l-216-025-00 METAL
R050 l-216-049-00 MBTAL
CHIP
CHIP
CHIP
CHIP
CHIP
4.7K 5 %
1K
5%
10K
5%
100
5%
1K
5%
l/101
l/low
l/low
l/101
l/101
4551
8-729-821-87 TRANSISTOR 2SD1878CA
R051
R052
R054
R056
R057
METAL
METAL
METAL
METAL
METAL
CHIP
CHIP
CHIP
CHIP
CHIP
10K
5%
4.7K 5 %
1K
5%
4.7K 5 %
4.7K 5 %
l/low
l/lOW
l/101
l/low
l/low
CHIP
CHIP
CHIP
CHIP
CHIP
4.7K 5 %
220
5%
4.7K 5 %
4.7K 5 %
0
5%
l/low
l/101
l/10%
l/low
l/lOW
0
820
1K
10K
10K
5%
5%
5%
5%
5%
l/101
wow
l/101
1/4w
l/low
TRANSISTOR
TRANSISTOR
TRANSISTOR
TRANSISTOR
TRANSISTOR
2SB709A-Q
2SB709A-Q
2SD601A-Q
2SD601A-Q
2SD774-34
< RESISTOR >
l-216-073-00
l-216-065-00
l-216-049-00
l-216-065-00
l-216-065-00
ROOl
R003
R004
R005
R006
l-216-073-00 METAL CHIP
l-216-045-00 METAL CHIP
l-216-033-00 METAL CHIP
l-216-033-00 METAL CHIP
l-216-073-00 METAL CHIP
10K
680
220
220
10K
5%
5%
5%
5%
5%
wow
l/101
wow
l/101
l/low
R059 l-216-065-00 METAL
R060 l-216-033-00 METAL
R064 l-216-065-00 METAL
R065 I-216-065-00 METAL
R066 l-216-295-00 METAL
R008
R009
ROlO
Roll
R012
l-216-033-00 METAL CHIP
l-216-057-00 METAL CHIP
l-216-033-00 METAL CHIP
l-216-033-00 METAL CHIP
l-216-033-00 METAL CHIP
220
5%
2.2K 5 %
220
5%
220
5%
220
5%
l/low
wow
l/101
l/low
l/low
R067
R071
R074
R078
R081
R013
R016
R017
R018
R019
l-216-049-00 METAL CHIP
l-216-033-00 METAL CHIP
l-216-033-00 METAL CHIP
l-216-033-00 METAL CHIP
l-216-061-00 METAL CHIP
1K
5%
220
5%
220
5%
220
5%
3.3K 5 %
wow
l/low
l/low
l/low
l/low
R082 l-216-055-00 METAL CHIP
R083 1-249-437-11 CARBON
R085 l-216-065-00 METAL CHIP
R086 l-216-295-00 METAL CHIP
R088 l-216-089-00 MBTAL CHIP
1.8K
47K
4.7K
0
47K
5%
5%
5%
5%
5%
l/low
1/4w
l/lOW
wow
l/lOW
R020
R021
R022
R023
R025
l-216-073-00 METAL CHIP
l-216-073-00 MBTAL CHIP
l-216-073-00 METAL CHIP
l-216-033-00 METAL CHIP
l-216-039-00 METAL CHIP
10K
10K
10K
220
390
5%
5%
5%
5%
5%
l/101
l/lOW
l/low
wow
l/low
R089
l-216-041-00 METAL
R091 l-216-089-00 METAL
R092 l-216-073-00 METAL
R095 l-216-033-00 METAL
R096 l-216-033-00 METAL
CHIP
CHIP
CHIP
CHIP
CHIP
470
5%
47K 5%
10K
5%
220
5%
220
5%
l/lOW
l/101
l/101
l/lOW
l/lOW
R026
R027
R028
R029
R030
l-216-097-00
l-216-121-00
l-216-073-00
l-216-065-00
l-216-073-00
CHIP
CHIP
CHIP
CHIP
CHIP
1OOK
1M
10K
4.7K
10K
5%
5%
5%
5%
5%
l/101
l/lOW
wow
l/101
l/101
R097 l-216-033-00 METAL
R102 l-216-039-00 METAL
f@% &&a
8-91
R206 1-216-689-11 METAL
R207
l-216-083-00 METAL
CHIP
CHIP
~~~
CHIP
CHIP
R031
R032
R033
R034
R035
l-216-033-00 METAL
l-216-033-00 MBTAL
l-216-033-00 t&TAL
l-216-033-00 METAL
l-216-041-00 METAL
CHIP
CHIP
CHIP
CHIP
CHIP
220
220
220
220
470
5%
5%
5%
5%
5%
l/101
l/low
l/low
l/low
l/low
R251
R252
R253
R254
R256
l-216-059-00 METAL CHIP
l-216-059-00 METAL CHIP
l-216-061-00 METAL CHIP
l-216-015-00 METAL CHIP
l-216-015-00 METAL CHIP
2.7K 5 %
2.7K 5 %
3.3K 5 %
39
5%
39
5%
wow
l/101
l/lOW
wow
wow
R036
R037
R038
R039
R040
l-216-033-00 METAL CHIP
l-216-033-00 METAL CHIP
l-216-033-00 METAL CHIP
l-216-049-00 METAL CHIP
l-216-033-00 METAL CHIP
220
220
220
1K
220
5%
5%
5%
5%
5%
l/low
l/101
l/low
l/low
l/low
R257
R258
R259
R262
R263
l-216-061-00 METAL CHIP
l-216-051-00 METAL CHIP
l-216-051-00 METAL CHIP
l-216-075-00 METAL CHIP
l-216-075-00 METAL CHIP
3.3K
1.2K
1.2K
12K
12K
5%
5%
5%
5%
5%
l/101
l/low
l/101
l/101
wow
R041
R042
R043
R044
l-216-033-00 METAL CHIP
l-216-295-00 METAL CHIP
l-216-295-00 METAL CHIP
l-216-065-00 METAL CHIP
220
5%
0
5%
0
5%
4.7K 5 %
l/101
l/lOW
l/10111
l/low
R264
R265
R.266
R267
l-216-041-00 METAL CHIP
l-216-085-00 METAL CHIP
l-216-085-00 METAL CHIP
l-216-089-00 METAL CHIP
470
5%
33K 5%
33K 5%
47K 5%
l/low
wow
l/108
l/low
METAL
METAL
METAL
METAL
METAL
62-
l-216-295-00 METAL CHIP
l-216-047-00 METAL CHIP
l-216-049-00 METAL CHIP
1-249-429-11 CARBON
l-216-073-00 METAL CHIP
220
5%
wow
390 5%
IAOW
:&&/
6%
“:,2w .F
39K 0.5% mow
27K 5%
l/101
g The components identified by $2 ?$ Les composants identifies par @
f shading and mark h are critical Z$ $3 une trame et une marque m 8
g $ sent critiques pour la secudte.
C
2 for safety.
”;s.G Replace only with part number $$ .$ Ne les remplacer que par une 8
3 f piece pottant le numero specz~!~z~~~,~
s specified.
:.:.::::::;::;::::~::~:~:i”
:~~~~~~~;;;~::::::~;::~~~~;
.A.<.A. ......~~....~.~..:.%.:.~~~.
>. :< ~..:::::::~::~:::::::::::.
. . . . . . . . . . . .~.~~~~:,
:.;I:‘::
. ,~~~~~;::~~;
.
. . . . . . I:.x.: . . .. ..A :.:.:.:.:.:.:.:.:.:.~~:: ~~~~::~&~;: ~; :_: : .
.::
_ ,,..:. . .p.<.%.>-.; -“--r~~.~~.:::~~
.;;.::. .< . .<.
Ref.No.
-
Part No.-
Description
R268 l-216-065-00 METAL CHIP
Remark
4.7K 5 %
5%
5%
R lef. No.
Part No.
Description
Remark
l/101
R412
l-216-113-00
METAL
CHIP
4’lOK
5%
l/low
1/4w
1/4w
R413
R414
R415
R417
R418
l-216-295-00
l-216-041-00
l-216-041-00
l-216-033-00
l-216-045-00
METAL
METAL
METAL
METAL
METAL
CHIP
CHIP
CHIP
CHIP
CHIP
0
470
470
220
680
5%
5%
5%
5%
5%
l/low
l/low
l/low
l/101
l/low
l/41 F
l/low
wow
l/10%
l/lOW
R420
R421
R422
R423
R424
l-216-043-00
l-216-043-00
l-216-045-00
l-216-295-00
l-216-025-00
METAL
METAL
METAL
METAL
METAL
CHIP
CHIP
CHIP
CHIP
CHIP
560
560
680
0
100
5%
5%
5%
5%
5%
l/101
l/low
l/101
l/low
l/101
R272
R273
1-249-411-11
CARBON
1-249-411-11 CARBON
330
330
R216
R301
R302
R311
R312
1-249-417-11 CARBON
l-216-065-00 METAL CHIP
l-216-057-00 METAL CHIP
1-216-678-11 METAL CHIP
l-216-079-00 METAL CHIP
1K
4. ‘7K
2.2K
13K
18K
R313
R314
R315
R319
R320
1-216-653-11 METAL CHIP
l-216-117-00 METAL CHIP
l-216-051-00 METAL CHIP
l-216-295-00 METAL CHIP
l-216-295-00 METAL CHIP
1.2K 0 . 5 %
680K 5%
1.2K 5 %
0
5%
0
5%
l/101
l/101
l/low
MOW
l/low
R425
R426
R427
R428
R429
l-216-033-00 METAL CHIP
l-216-065-00 METAL CHIP
l-216-085-00 METAL CHIP
l-216-065-00 METAL CHIP
l-216-295-00 METAL CHIP
220
4. IK
33K
4. ‘lK
0
5%
5%
5%
5%
5%
l/low
l/101
l/low
l/101
l/10111
R321
R322
R323
R324
R326
l-216-295-00
l-216-295-00
l-216-121-00
l-216-025-00
l-216-025-00
METAL
METAL
METAL
METAL
METAL
CHIP
CHIP
CHIP
CHIP
CHIP
0
0
1M
100
100
5%
5%
5%
5%
5%
wow
l/101
l/low
l/101
l/101
R430
R431
R432
R433
R434
l-216-295-00
l-216-083-00
l-216-085-00
l-216-097-00
l-216-083-00
METAL
METAL
METAL
METAL
METAL
CHIP
CHIP
CHIP
CHIP
CHIP
0
ZIK
33K
1OOK
2’lK
5%
5%
5%
5%
5%
l/101
l/101
l/low
l/101
wow
R327
R328
R329
R330
R331
l-216-077-00
l-216-025-00
l-216-073-00
l-216-067-00
l-216-093-00
METAL
METAL
METAL
METAL
METAL
CHIP
CHIP
CHIP
CHIP
CHIP
15K
100
10K
5.6K
68K
5%
5%
5%
5%
5%
l/101
l/low
l/low
l/101
l/low
R436
R431
R438
R440
R441
l-216-097-00
l-216-097-00
l-216-097-00
l-216-049-00
l-216-073-00
METAL
METAL
METAL
METAL
METAL
CHIP
CHIP
CHIP
CHIP
CHIP
1OOK
1OOK
1OOK
1K
10K
5%
5%
5%
5%
5%
l/low
MOW
l/low
l/101
l/low
R335
R336
R338
R339
R341
l-216-049-00 METAL
l-216-121-00 METAL
l-216-049-00 METAL
l-216-045-00 METAL
1-216-687-11 METAL
CHIP
CHIP
CHIP
CHIP
CHIP
1K
1M
1K
680
33K
5%
5%
5%
5%
0.5%
l/low
l/low
l/low
l/10%
l/low
R442
R443
R444
R445
R446
l-216-049-00 METAL CHIP
l-216-073-00 METAL CHIP
l-216-049-00 METAL CHIP
l-216-049-00 METAL CHIP
1-249-417-11 CARBON
1K
10K
1K
1K
1K
5%
5%
5%
5%
5%
l/10%
l/101
l/low
l/101
1/4W F
R343
R345
R346
R341
R351
l-216-071-00 METAL CHIP
1-249-429-11 CARBON
1-249-421-11 CARBON
l-216-025-00 METAL CHIP
l-216-085-00 METAL CHIP
8.2K
10K
2.2K
100
33K
5%
5%
5%
5%
5%
l/101
1/4w
l/41 F
l/low
l/101
R44’7
R448
R449
R450
R451
l-216-049-00 METAL CHIP
1-249-417-11
CARBON
l-216-049-00 METAL CHIP
l-216-025-00 METAL CHIP
l-216-049-00 METAL CHIP
1K
1K
1K
100
1K
5%
5%
5%
5%
5%
l/101
1/4W F
l/101
l/101
l/101
R356
R357
R358
R360
R361
l-216-049-00
l-216-089-00
l-216-091-00
l-216-041-00
l-216-025-00
METAL
METAL
METAL
METAL
METAL
CHIP
CHIP
CHIP
CHIP
CHIP
1K
5%
47K
5%
56K 5%
470
5%
100
5%
l/101
l/low
l/low
l/101
l/low
R452
R453
R454
R455
R466
1-249-417-11
CARBON
l-216-049-00 METAL CHIP
l-216-049-00 METAL CHIP
l-216-295-00 b!ETAL CHIP
l-216-061-00 METAL CHIP
1K
5%
1K
5%
1K
5%
0
5%
3.3K 5 %
1/4W F
l/101
l/low
l/101
l/101
R362
R363
R364
R365
R367
l-216-295-00
l-216-295-00
l-216-295-00
l-216-049-00
l-216-109-00
METAL
METAL
METAL
METAL
METAL
CHIP
CHIP
CHIP
CHIP
CHIP
0
0
0
1K
330K
5%
5%
5%
5%
5%
l/low
l/low
l/low
l/101
wow
R412
R473
R476
R477,
R418
l-216-049-00 METAL CHIP
l-216-025-00 METAL CHIP
1-249-429-11 CARBON
l-216-073-00 METAL CHIP
l-216-061-00 METAL CHIP
1K
100
10K
10K
3.3K
5%
5%
5%
5%
5%
l/low
l/101
l/41
l/low
l/low
R404
R409
R410
R411
l-216-295-00
l-216-295-00
l-216-022-00
l-216-113-00
METAL
METAL
METAL
METAL
CHIP
CHIP
CHIP
CHIP
0
0
75
470K
5%
5%
5%
5%
l/101
l/low
l/101
l/low
R479
R480
R481
R482
l-216-295-00
l-216-295-00
l-216-061-00
l-216-061-00
0
5%
0
5%
3.3K 5 %
3.3K 5 %
l/low
l/101
l/lOW
wow
5%
5%
5%
0.5%
5%
METAL
METAL
METAL
METAL
CHIP
CHIP
CHIP
CHIP
KV-20V50
Ref.No.
-
1
. The mm ponents identified by E in this ~~~~:“~~~~~~~~~:~~~~~~~~~:~~~:~~~~~~~~~
~~~~~~~~~:~-:,~~~.~.:~~~~~~:.~~~~<.,~~.,.~~~~~~~~,.$I:
manual
have
been
carefully g Les composants identifies par @ #The components identified by ;z
factory-selected for each set in order to $2 une trame et une marque m $j g shading and mark A are critical g
:g
g # for safety.
satisfy
regulations regarding
X-ray # sont critiques pour la securite.
radiation.
3 Ne les remplacer que par une $$ 5;; Replace only with part number g
Should replacement be required, replace *:$ piece portant le numero specific. z$ ?$ specified.
:.r:.
(‘::~::‘~.~~~~~~~~~,‘.:~~~~~~~:~~:~~;~;~~~~~~~~.:
.
Y?:
,...........
:z
:s%,n~~~~:., ~~~~~~~~~~:.~.:.~. ~. .::. ~.:.:.:.:.:.:.:.::.~.~ :.,
:.~ :...x:m.x:w~s
only with the value orginally used.
P a r t No.-
Remark
Description
R483 l-216-049-00 METAL CHIP
1K
5%
l/low
R484 l-216-097-00 METAL CHIP
l-216-049-00 METAL CHIP
R485
R486 l-216-097-00 METAL CHIP
REX%
R6~6
1OOK 5 %
1K
5%
1OOK 5 %
l/low
l/101
l/low
:ef.
- No. Part No.SO02
SO03
SO04
SO05
Description
Remark
1-571-532-21 SWITCH, TACTIL
1-571-532-21 SWITCH, TACTIL
1-571-532-21 SWITCH, TACTIL
1-571-532-21 SWITCH, TACTIL
SO06 1-571-532-21 SWITCH, TACTIL
< TRANSFORMER >
R507 l-247-887-00 CARBON
220K
R508 l-216-049-00 METAL CHIP 1K
150K
R509 l-216-101-00 METAL CHIP
1.8K
R510 I-216-055-00 METAL CHIP
~R$~l
5%
5%
5%
5%
R512
l-215-445-00 METAL
R513 1-216-645-11 METAL CHIP
R515 1-216-673-11 METAL CHIP
R517
1-216-699-11 METAL CHIP
R518 l-215-431-00 METAL
10K
560
8.2K
1OOK
2.7K
1%
0.5%
0.5%
0.5%
1%
R519 l-215-427-00 METAL
l-216-073-00 METAL CHIP
R520
R530 1-249-419-11 CARBON
31
32
1.8K 1%
10K
5%
1.5K 5 %
1/4w
l/101
l/low
wow
Xf4
< TUNER >
1/6W
l/lOW
l/low
l/101
l/61
< VIBRATOR >
X001 1-579-917-21 VIBRATOR, CRYSTAL
X001 1-579-917-41 VIBRATOR, CRYSTAL
x301
l-567-505-11 OSCILLATOR, CRYSTAL
l/61
l/101
l/41 F
$********$*********$******************************************
*A-1331-246-A C BOARD, COMPLETE
*****************
< CAPACITOR >
R541
l-249-418-11
CARBON
f&2
~~~~~~~
BE
-2~6~3~9
R649
OXI
R554 1-216-061-00
?&MI, C H I P
ES5
1. 2K
1/4w
3.3K 5%
l/1019
680 5%
1/2w
R566 1-249-417-11 CARBON
R588 l-216-105-00 METAL CHIP
R590 l-216-063-00 METAL CHIP
1K
5%
220K 5%
3.9K 5 %
lf4W F
l/low
l/101
R591
R592
R593
R594
R595
3.3K
10K
1K
39K
10K
l/101
wow
l/101
l/low
l/low
R558 l-260-326-71 CARBON
F
$$
F
OX1
l-216-061-00 METAL
l-216-073-00 METAL
l-216-049-00 METAL
1-216-689-11 METAL
l-216-073-00 METAL
CHIP
CHIP
CHIP
CHIP
CHIP
5%
5%
5%
0.5%
5%
C701 l-136-601-11 FILM
C704 l-162-116-00 CERAMIC
C706 1-124-916-11 ELECT
C707 l-164-085-11 CERAMIC
C711 l-164-083-11 CERAMIC
0. OluF
68OPF
22uF
0. OOluF
680PF
10%
10%
20%
10%
10%
630V
2KV
63V
508
5ov
C712
C731
C732
C751
C752
CERAMIC
CERAMIC
CERAMIC
CERAMIC
CERAMIC
560PF
68OPF
470PF
680PF
560PF
10%
10%
10%
10%
10%
5ov
SOY
5ov
5ov
5ov
C771 l-164-083-11 CERAMIC
C772 l-164-083-11 CERAMIC
C773 l-164-083-11 CERAMIC
68OPF
68OPF
680PF
10%
10%
10%
SOY
5ov
5ov
l-164-082-11
l-164-083-11
l-164-081-11
l-164-083-11
l-164-082-11
< CONNECTOR >
CN701
CN702
CN703
1-695-915-11 TAB (CONTACT)
*l-508-768-00 PIN, CONNECTOR (5MM PITCH) 6P
*l-564-509-11 PLUG, CONNECTOR 6P
< DIODE >
< SWITCH >
1-571-532-21
SWITCH,
D711
D731
D751
D770
D771
TACTIL
-&I--
8-719-911-19
8-719-911-19
8-719-911-19
8-719-911-19
8-719-911-19
DIODE
DIODE
DIODE
DIODE
DIODE
lSS119
lSS119
lSS119
lSS119
lSS119
>>.:*<<<<y<.>.”
‘.~~~:~~.~~.~~:~~~.:~~.~L.:..:
.
.~~~~~~:~~~~~
.
.
,..~-“,,
,.
.
.
.
..“~
,-..
”
,,,.,,,
,,
.&,
,..,..
.,....
A.<*:%%..
$ The components identified by @ $ Les composants identifies par 2
<.:_ shading and mark A are critical !; $: une trame et une marque A %
:.::2
.$j $ sent critiques pour la securite.
s for safety.
;; Replace only with part number AC .: Ne les remplacer que par une jj
z: SJ piece portant le numero specific. $$
f specified.
...
:. . ,. .~ ,. ..:, . . . . . . . . .: . . . . . . . . . .
_:.:.:.:..;
:.:::.~::.:.:~.: : :.,
Ref.
No. Part
No.
D772
D773
D777
D790
D791
8-719-911-19
8-719-911-19
8-719-109-71
8-719-911-19
8-719-911-19
Description
Remark
DIODE lsS119
DIODE lsS119
bIODE RD3. SES-Bl
DIODE lSS119
DIODE lSS119
D792 8-719-911-19 DIODE lsS119
L701 l-410-671-31 INDUCTOR
ef.No.
Part No.-
Remark
220 5%
1/4W
R774 1-249-437-11 CARBON
R775 1-249-417-11 CARBON
R776 l-249-409-11 CARBON
R790 1-249-417-11 CARBON
R791
1-249-413-11 CARBON
47K
1K
220
1K
470
1/4w
1/4W F
1/4W F
1/4W F
l/41 F
5%
5%
5%
5%
5%
*A-1316-146-A G BOARD, COMPLETE
*****************
TRANSISTOR
TRANSISTOR
TRANSISTOR
TRANSISTOR
TRANSISTOR
1-533-223-11 CLIP, FUSE
4-382-854-11 SCREW (M3XlO), P, SW (+)
/
< CAPACITOR >
2SC2785-HFE
2SA1175-HFE
2SA1091-0
2SA1091-0
2SA1091-0
“,“,@g&f
< RESISTOR >
R700
R701
R702
l-202-549-00 SOLID
l-202-846-00 SOLID
l-202-844-00 SOLID
R706 l-202-842-11 SOLID
R710 l-202-824-00 SOLID
R711
l-249-405-11, CARBON
R716
l-249-411-11
CAR&N
R717 1-249-393-11 CARBON
R730 l-202-824-00 SOLID
F
47uH
Q711 8-729-926-73 TRANSISTOR ZSC3271F-N
Q712 8-729-119-78 TRANSISTOR ZSC2785-HFE
8731
8-729-926-73 T R A N S I S T O R
ZSC3271F-N
Q732
8-729-119-78 T R A N S I S T O R
2SC2785-HFE
2SC3271F-N
8751
8-729-926-73 T R A N S I S T O R
8-729-119-78
8-729-119-76
8-729-200-17
8-729-200-17
8-729-200-17
’
R773 l-249-409-11 CARBON
< TRANSISTOR >
8752
8770
8771
8772
8773
Description
100 20% l/21
4 7 0 K 2 0 % l/21
3 3 0 K 2 0 % 1/2W
2 2 0 K 2 0 % 1/2W
3.3K 2 0 % 1/2W
100 5%
1/4w F
II i,s/ / g”;
I// 2
330”
5%
lf4W
10
3.3K
5%
1/4W F
2 0 % 1/2W
R737 1-249-393-11 CARBON
R750 l-202-824-00 SOLID
R751 l-249-405-11 CARBON
~~~~~~2~5-~~~~~
R756 1-249-411-11 CARBON
10 5%
1/4W F
3.3K 2 0 % l/2%
R757
1-249-393-11 CARBON
R770 1-249-433-11 CARBON
R771
l-249-409-11
CARBON
R772
l-249-409-11
CARBON
10
5%
22K 5%
220 5%
220 5%
l/41
1/4w
l/41
l/41
F
F
F
y I :; :”
C613 l - 1 0 4 - 7 5 9 - 1 1 ELm
C614
l-104-759-11 ELECT
C615
1-164-625-11
CERAMIC
C616
l-136-169-00 FILM
47OUF
47ouF
68OPF
0.22uF
C617
C618
C619
C620
C621
l-136-169-00 FILM
1-164-625-11
CERAMIC
1-164-625-11
CERAMIC
l-136-601-11 FILM
1-129-744-91 FiLM
0.22uF
680PF
68OPF
0. OluF
0.027uF
5%
10%
10%
10%
10%
5ov
5oov
5oov
630V
4oov
C622
C623
C624
C626
C627
1-124-478-11
l-124-360-00
1-124-557-11
l-123-024-21
l-136-601-11
ELECT
ELECT
ELECT
ELECT
FILM
1OOuF
1OOOuF
1OOOuF
33uF
0. OluF
20%
20%
20%
10%
25V
16V
25V
160V
630V
C629
C630
C631
l-106-355-12
MYLAR
l-124-907-11 ELECT
l-136-169-00 FILM
3300PF
1OuF
0.22uF
C635 l-106-365-00 MYLAR
C636 1-162-318-11 CERAMIC
C637 1-164-735-11 CAP, CERAMIC
C638 l-164-735-11 CAP, CERAMIC
0.0082uF
0. OOluF
1500PF
1500PF
10%
10%
1oov
5oov
C639 1-164-735-11 CAP, CERAMIC
1500PF
-65-
2 0 %
2: Les composants identifies par F :< The components identified by .‘.
:.e une trame et une marque A $ $$ shading and mark A are critical ;
g;.$
:.;.:
$j 8 for saffity.
J sont critiques pour la sekite.
$2 Ne les remplacer que par une J $; Replace only with part number z
.:. .
.;; piece portant le numero specific. $ $ specified.
7:
:.~
: ~.: .:~.:
,:. . . . . . . . . . .
.:. . . <.: ./.
.............^ ......... ..y
., :.;
G
cl
Ref.
No. Part No.-
Description
Remark
C640 1-164-735-11 CAP, CERAMIC
ief.
No. Part
No.
-
Description?
1500PF
Remark
< IC >
< CONNECTOR >
CN601
CN602
CN603
CN604
CN605
*l-580-843-11 PIN, CONNECTOR (POWER)
*l-508-786-00 PIN, CONNECTOR (5MM PITCH) 2P
*l-508-765-00 PIN, CONNECTOR (5MM PITCH) 3P
*l-564-510-11 PLUG, CONNECTOR 7P
*l-691-135-11 PIN, CONNECTOR (PC BOARD) 4P
CN606
*l-564-505-11 PLUG, CONNECTOR 2P
L601 1-412-533-61 INDUCTOR
< TRANSISTOR >
Q602 8-729-119-78 TRANSISTOR 2SC2785HFE
4603
8-729-016-15
TRANSISTOR
2SC4833MNP
8604
8-729-016-15 T R A N S I S T O R
2SC4833MNP
Q605 8-729-924-90 TRANSISTOR 2SB1370-EF
Q606 8-729-119-78 TRANSISTOR 2SC2785HFE
< DIODE >
DBD4
8-719-911-19
DIGDE
47uH
lSSl19
I;
D607 8-719-510-48 DIODE DlN26R
D608
8-719-510-48 DIODE DINZOR
D609
8-719-510-48 DIODE DlN2OR
Q607 8-729-924-90
TRANSISTOR 2SB1370-EF
D610
D611
D612
D613
D614
8-719-510-48 DIODE DlNZOR
8-719-032-13 DIODE DlNSG-TA2
8-719-510-02 DIODE DlNS4
8-719-510-02 DIODE DINS4
8-719-510-02 DIODE DlNS4
R602 1-249-421-11 CARBON
R604 1-249-421-11 CARBON
R608 1-247-893-11 CARBON
R609 l-247-893-11 CARBON
‘~6~0 ~~~2~2~~3~-61
2.2K 5 %
2.2K 5 %
390K 5%
390K 5%,
8.1”
1
D615
D616
D617
D618
D619
8-719-510-02
8-719-510-26
8-719-510-26
8-719-510-26
8-719-510-26
DIODE
DIODE
DIODE
DIODE
DIODE
D620
D621
D622
D624
D625
8-719-510-02
8-719-510-02
8-719-510-48
8-719-911-19
8-719-911-19
DIODE DINS4
DIODE DlNS4
DIODE DlNZOR
DIODE lSS119
DIODE lSS119
D626
D627
D629
D633
8-719-110-14
8-719-911-19
8-719-911-19
8-719-510-48
R636 1-249-421-11 CARBON
R637 l-249-407-11 CON
2.2K 5 %
150 5%
4, %I
560
2.2K 5 %
< RESISTOR >
1/4W F
l/41 F
l/41
I/41
xrti F f
DlNS4
DlNL20
DlNL20
DlNL20
DlNL20
DIODE
DIODE
DIODE
DIODE
RD9.1ESB3
lSS119
lSS119
DlNZOR
< FUSE >
FB601 1-412-911-11 INDUCTOR, FERRITE BEAD
FB602
1-412-911-11 INDUCTOR, FERRITE BEAD
FB603
l-412-911-11 INDUCTOR, FERRITE BEAD
FB604 1-412-911-11 INDUCTOR, FERRITE BEAD
FB605 l-410-396-41 FERRITE BEAD INDUCTOR 0.45UH
R642 1-249-421-11 CARBON
FB606 l-410-396-41 FERRITE BEAD
FB607 l-410-396-41 FERRITE BEAD
FB608
l-410-396-41 FERRITE BEAD
FB609
l-410-396-41 FERRITE BEAD
INDUCTOR
INDUCTOR
INDUCTOR
INDUCTOR
0.45UH
0.45UH
0.45UH
0.45UH
I
RE43~~~~~~~-g~~~~
~-~I~-422-7~
~~~~6-42~~
-66-
x
0x1~~
~~1~~
430
5%
4.2
5%’
18
6%
I’ 56 ’ $34
1/4W
1/4w
mw
1/4W
1/4W
PW
fMl
1
1
F
F
F
F
F
.\
F
I a:>;
1: The components identified by $4 ;j; Les composants identifies par 1
g shading and mark A are critical g ;; une trame et une marque m J
Gg tf sent critiques pour la security.
:;:. ~
$ for safety.
f Replace only with part number F$ f Ne les remplacer que par une g
% specified
ss g piece portant le numero specific. 7;
:........
.~~:.i~,:~~~~~
%
: ..E .:~~~~~::~~~,~:~,:.~~:~~~~~~:~‘:.:..~
. . .., .,:q 2.
:.::~ :~~~:~~~~.~~::~~:~~~~
-,,,-,,, ~.~.~.~.~.~.~.~~~~~~:~.~~~~~~:l?rrrrr*~~:~~~~~
;~~ ~,.
I .......................... . . ..... . ............(......> . . d .... . . .. ..........
....~.~~;~~~~;~~~~~~~.~~;~~
* . .>.. ... ... “ . . : . . ~ , ; . . ~ ~ ~ ~ ~ ~ ~ ~ ~ ~ ~ ~
:$>~~fi:,r~
~
;;
I
Lss#Me...
Ref. No.
Part No.
Description
R648
R649
1-249-421-11
1-249-417-11
CARBON
CARBON
R650
R651
R652
R653
R654
Remark
2.2K 5 %
1K
5%
1/4W
1/4W
F
F
1-249-417-11
CARBON
1-249-425-11
CARBON
1-249-411-11
CARBON
1-249-417-11 CARBON
1-249-414-11
CARBON
1K
4.7K
330
1K
560
5%
5%
5%
5%
5%
1/4W
1/4w
1/4W
1/4W
1/4w
F
1-249-411-11
1OOK 5 %
l/41
lef.
No. Part No.
-~
Description
Remark
< DIODE >
D800 8-719-911-19 DIODE lSS119
< IC >
F
F
IC801 8 - 7 5 9 - 0 8 4 - 0 9 I C Z8612812PSC
< COIL >
CARBON
L801 l-410-470-11 INDUCTOR
1OuH
< RELAY >
< TRANSISTOR >
(/
RY602 1-515-684-31 RELAY
Q801 8-729-119-78 TRANSISTOR 2SC2785-HFE
Q802 8-729-119-78 TRANSISTOR 2.X2785-HFE
< TRANSFORMER >
< RESISTOR >
R801
R802
R803
R804
R805
1-249-416-11
CARBON
1-249-416-11
CARBON
1-249-416-11 CAREON
1-249-425-11
CARBON
1-249-425-11
CARBON
820
5%
820
5%
820
5%
4.7K 5 %
4.7K 5 %
1/4W
1/4W
1/4W
1/4W
l/41
F
F
F
F
F
R806
R807
R808
R809
R810
1-249-423-11
CARBON
1-249-425-11
CARBON
1-249-417-11
CARBON
1-249-441-11
CARBON
1-249-437-11 CARBON
3.3K
4.7K
1K
1OOK
47K
5%
5%
5%
5%
5%
1/4W
1/4W
l/4111
1/4w
1/4w
F
F
F
R812
R813
R814
R815
R816
1-249-417-11 CARBON
1-249-417-11
CARBON
1-249-413-11
CARBON
1-249-427-11
CARBON
1-249-429-11
CARBON
1K
5%
1K
5%
470
5%
6.8K 5 %
10K
5%
1/4W
l/41
l/41
1/4W
1/4w
F
F
F
F
R817
R818
R820
R821
R822
1-249-433-11
1-249-417-11
1-249-433-11
1-249-433-11
1-249-429-11
22K
1K
22K
22K
10K
l/41
1/4W
l/41
1/4w
l/41
< THERMISTOR(PDSITIVE) >
*l-646-641-11 S BOARD
*w****
< CAPACITOR )
C805 l-124-903-11 ELECT
C806 1-137-399-11 FILM
C807 l-102-157-00 CERAMIC
C809 1-137-367-11 FILM
C810 1-137-399-11 FILM
1uF
0. 1uF
56OPF
0.0033uF
0. 1uF
20%
5%
10%
5%
5%
5ov
5ov
5oov
5ov
5ov
C811
C812
C813
C814
C815
0. 1uF
0.068uF
1ouF
1ouF
1ouF
5%
5%
20%
20%
20%
5ov
5ov
5ov
5ov
5ov
1ouF
1OuF
1OOPF
20%
20%
5%
5ov
5ov
5ov
1-137-399-11 FILM
1-137-375-11 FILM
l-124-907-11 ELECT
l-124-907-11 ELECT
l-124-907-11 ELECT
C816 l-124-907-11 ELECT
C817 l-124-907-11 ELECT
C819 l-164-070-11 CERAMIC
CARBON
CARBON
CARBON
CARBON
CARBON
c*~***s*s****s*****s*$***$**$*$*~***$*$**$*************$****~*
*l-647-061-11 UA B O A R D
********
< DIODE >
Cl403 8-719-109-88 DIODE RD5.
GFS-Bl
< CONNECTOR >
CN1401*1-564-523-11
CN1402*1-564-521-11
PLUG, CONNECTOR 8P
PLUG, CONNECTOR 6P
< CONNECTOR >
< JACK >
CN801
5%
5%
5%
5%
5%
*l-573-979-11 CONNECTOR, BOARD TO BOARD 11P
51401 l-750-515-11 TERMINAL BLOCK, S 3P
-67-
F
KW20V50
RM-Y117
E
UA
~~~,~~~~~~~~~~~
mqTsgt2.
:, :, : . . . . . F %%.>.
II(
.~~~~~.~~~~.~~~~~~~~
8
$?
3
1
#j
l
Ref.
No. Part
No.
-
Description
Les composants identifies par # # The components identified by $
une trame et une marque m g d shading and mark A are critical #
;&:?*
sont critiques pour la securite.
E 4 for safety.
Ne les remplacer que par une $j $$ Replace only with part number 3
;s
piece portant le numero specific. $ 3 specified
Remarlil
51402 l-750-698-11 JACK BLOCK, PIN 3P
51403 l-750-516-11 JACK BLXK, PIN 2P
< RESISTOR >
RI401
R1402
R1403
R1404
R1405
l-247-804-11
l-247-804-11
l-247-804-11
l-247-895-00
l-247-895-00
CARBON
CARBON
CARBON
CARBON
CARBON
75 5%
75 5%
75 5%
470K 5%
470K 5%
l/41
l/41
l/41
1/4w
1/4w
R1409
R1410
R1411
R1412
R1413
l-247-895-00
l-247-895-00
I-247-804-11
l-247-895-00
l-247-895-00
CARBON
CARBON
CARBON
CARBON
CARBON
470K 5%
470K 5%
75 5%
470K 5%
470K 5%
1/4w
l/41
l/41
l/41
l/41
R1414
I-249-409-11
CARBON
220 5%
l/41 F
$~$$$$$$$$$$$$$$~$~$~~~~~~~~~~~~~~~~~~~~~~~~~~~~~~~~~~~~~~~~~
MISCELLANE0US
********w*$*
l-452-094-00 MAGNET, ROTATABLE DISK: 15MM$
l-452-277-00 MAGNET. BMC
3-756-904-21 MANUAL INSTRACTION (ENGLISH)
3-756-904-31
MANUAL INSTRACTION (FRENCH)
3-756-904-41 MANUAL INSTRACTION (SPANISH)
*4-039-442-01
CUSHION (UPPER) (ASSY)
*4-039-443-01
CUSHION (L0WER) (ASSY)
t4-039-550-01 INDIVIDUAL CARTON
4-380-340-01 BAG, PROTECTION
REMOTE C0MMANDER
l-467-060-11 REMOTE COMMANDER (RM-Y117)
g-903-826-01 COVER BATTERY (RM-Y117)
Sony Corporation
TV Group
9-964-941-01
-68-
English
93DJ0947-1
Printed in Japan
0 1993.4