1
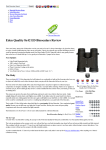
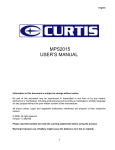
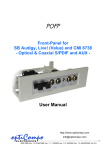
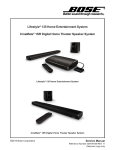
Table of Contents
Welcome ………………………………………………………………………... P.2
Features ………………………………………………………………………… P.2
Specifications …………………………………………………………………... P.2
Minimum System Requirement ………………………………………………... P.3
Driver Installation ……………………………………………………………… P.3
Getting Started …………………………………………………………………. P.4
Product Illustration …………………………………………………………. P.4
Operation ……………………………………………………………………….. P.5
EQ Mode …………………………………………………………………… P.5
Play Mode ………………………………………………………………….. P.6
One Touch Voice Recording ……………………………………………….. P.6
Playback Voice Recorded Files …………………………………………….. P.6
Record Set ………………………………………………………………….. P.7
FM Radio Mode ……………………………………………………………. P.7
Contrast ……………………………………………………………………... P.8
Backlight ……………………………………………………………………. P.8
Power Set …………………………………………………………………… P.9
Language …………………………………………………………………….P.9
Backlight Color …………………………………………………………….. P.10
Delete Mode …………………………………………………………………P.10
About Mode ………………………………………………………………… P.10
Trouble Shooting ……………………………………………………………….. P.11
Precautions ……………………………………………………………………… P.12
Technical Support ………………………………………………………………. P.12
Disclaimer ………………………………………………………………………. P.12
P.1
Welcome
Thank you for purchasing Zling U2 MP3 digital player. This User's Manual
provides detailed instructions and illustrations to help you enjoy this mini portable
digital audio device. Please read the manual carefully before you start to operate it.
Have fun with your new MP3 digital player now!
Features
- Support MP3 and WMA audio files
- One Touch Recording Button
- Support FM Radio listening/recording**
- Support Line-IN recording in WAV files
- 25 levels of digital volume control
- Equalizer with 5 Presets
- USB 2.0 Interface (Full speed)
- Driverless for Windows ® ME / 2000 / XP
Specifications
Music Format
Bit Rate
Equalizer
Play Mode
Recording
: MP3, WMA
: 8kbps – 320kbps
: Normal/Pop/Classic/Jazz/Rock
: Normal/Repeat One/Repeat All/Shuffle/Shuffle &Repeat
: High-quality recording through Line-IN jack
FM Radio recording**
Voice recording – 10 hours on 128MB of high quality
FM Radio
: 27 preset FM channels**
Display
: 7 Color LCD back light
Audio Input
: Internal Microphone / Line-IN
PC Interface
: USB 2.0(Full Speed)
Power Supply
: 10 hours continuous play with one AAA battery
Earphone
: Stereo headphones
Signal to Noise Ratio
: >90dB
Power Output
: 5mW + 5mW
Frequency Range
: 20Hz - 20KHz
Dimensions
: 84mm (L) x 32mm (W) x 17mm (H)
Weight
: 40g (without battery)
Language
: Multi-Language
Operating System
: Win98SE/ME/2000/XP/Mac OS 8.6+
All specifications are subject to change without notice.
** Optional feature
P.2
Minimum System Requirement
- Windows 98SE, Windows ME, Windows 2000 and Windows XP
- One available USB Port
- CD ROM drive required for driver installation (Windows 98SE only)
Driver Installation
Installation Procedure for Windows 98SE
Do not connect Zling U2 MP3 to computer before software installation.
Insert CD ROM driver and run “Setup.exe” from “Zling_U2/Application” folder.
Connect Zling U2 MP3 to the computer with provided USB cable.
After installation, you will see "Removable Disk" icon in "My Computer".
Installation Procedure for Windows ME / 2000 / XP
Windows ME / 2000 / XP already has driver built -in.
Connect Zling U2 MP3 to the computer with provided USB cable and power on.
The computer will automatically detect Zling U2 MP3 and install the necessary
driver.
After installation, you will see "Removable Disk" icon in "My Computer".
P.3
Getting Started
Product Illustration
Zling U2 MP3
1. Retractable USB Jack
2. LCD Display
3. a) Volume Control ( - )
b) Volume Control ( + )
4. Backward Button
5. Forward Button
6. Power / Play / Stop Button
7. Earphone / Line-IN Jack
8. Menu Button
9. Voice Recording Button
10. Microphone
11. Hold Switch
P.4
Operation
- Press and hold PLAY to turn on the player. Press PLAY again to play music.
- To turn off player, press and hold PLAY again.
EQ Mode
During Music player, you can select EQ by pressing express key REC for 2 seconds
each time to cycle through ROCK, JAZZ, CLASSIC, POP and NORMAL.
Or you can set EQ by entering menu. Press MENU to access the Main Menu. And
press >> to Setting mode. Press MENU to enter.
In the setting mode, select EQ set and press MENU to enter.
Press >> cycle through ROCK, JAZZ, CLASSIC, POP and NORMAL. And press
MENU to confirm.
P.5
Play Mode
While the player is in stop mode, you can select Play Mode by pressing express key
REC to cycle through NORMAL, REPEAT ALL, REPEAT ONE, RANDOM and
RANDOM ALL.
Or you can set Play Mode by entering menu. Press MENU to access the Main
Menu. Press >> to Setting mode and press MENU to enter.
In the Setting mode, select PlayMode and press MENU to enter.
Press << or >> cycle through NORMAL, REPEAT ALL, REPEAT ONE,
RANDOM and RANDOM ALL. And press MENU to confirm.
One Touch Voice Recording
While the player is in stop mode, press the REC button to voice recording mode.
Press REC again to start recording. Press PLAY button if to pause the recording.
Press REC again to stop recording. And recorded file will be saved automatically.
Playback Recorded Voice Files
Press MENU to access the Main Menu. Press >> to Voice mode and press MENU
to enter.
Press PLAY to playback recorded voice files. Press << or >> to select file to play.
P.6
Record Set
Press MENU to access the Main Menu. Press >> to setting mode and press MENU
to enter.
In the Setting mode, select Record set and press MENU to enter.
Press >> cycle through your recording format:
Source : LINE-IN / MIC
ENC : IMADPCM / MSADPCM / ADPCM
Channel : Mono / Stereo
Mode : Song / Album
Sample : 8000HZ -- 48000HZ
FM Radio Mode
Press MENU to access the Main Menu. Press >> to Setting mode and press MENU
to enter.
In the Setting mode, select FM Tuner and press MENU to enter.
Press MENU to cycle through RADIO, SCAN, STORE and EXIT.
To scan, select SCAN mode and press << and >> once to scan in each 0.1MHz or
long press to perform automatic scan.
To store, select STORE mode and press PLAY to confirm.
Once all stations are scanned and stored, select RADIO to listen.
P.7
Contrast
Press MENU to access the Main Menu. Press >> to Setting mode and press MENU
to enter.
In the Setting mode, select Contrast and press MENU to enter.
Press << and >> to select your desired LCD contrast level.
Backlight
Press MENU to access the Main Menu. Press >> to Setting mode and press MENU
to enter.
In the Setting mode, select Backlight and press MENU to enter.
Press << and >> to set the time for which the backlight is turned on.
P.8
Power Set
Press MENU to access the Main Menu. Press >> to Setting mode and press MENU
to enter.
In the Setting mode, select Powerset and press MENU to enter.
Press << or >> to disable the auto-off timer or select the time duration before it
performs auto power off.
Language
Press MENU to access the Main Menu. Press >> to Setting mode and press MENU
to enter.
In the Setting mode, select Language and press MENU to enter.
Press << or >> to select menu language
P.9
Backlight Color
Press MENU to access the Main Menu. Press >> to Setting mode and press MENU
to enter.
In the Setting mode, select Backlight Color and press MENU to enter.
Press << or >> to select backlight color.
Delete Mode
Press MENU to access the Main Menu. Press >> to Delete mode and press MENU
to enter.
Press << or >> to select Delete music files or voice files
Press << or >> to select file to delete. Press MENU to select
. And press PLAY to delete. Once deletion finishes, the message
will appear.
About Mode
It displays information on the firmware version, and used/total memory capacity.
P.10
Trouble Shooting
P.11
Precautions
1. The MP3 player does not support NTFS and FAT32. It only supports FAT16.
2. When battery level is too low, it will power off automatically. You have to
replace a new battery.
3. The USB Disk can be hot unplugged if no write action is being performed.
However, if data has been moved to the USB Disk, then Eject or Safe removal
action is needed to prevent the data loss. Eject can be used to ensure the data
integrity. Under Windows, select the disk icon and click the right button of the
mouse, then select “eject”. This will empty the write cache.
4. Below shows the file size that is required for each minute of CD audio converted
to MP3 format. The higher the bit rate, the higher the file size is needed.
Bit rate
File size (approximately)
32kbps
236KB/min
64kbps
471KB/min
128kbps
940KB/min
192kbps
1.37MB/min
256kbps
1.83MB/min
320kbps
2.29MB/min
Technical Support
Access latest driver update and software enhancement via our web site: www.zcyber.net
This manual only provides information that may help you operate the player more
efficiently. If you are not able to find answers from the troubleshooting above, you
can contact us via email at [email protected]
Disclaimer
Our company bears no responsibility for any damage arising from improper
operation, software, product maintenance, battery change, incidental loss of
personal data, or any claim made by any third party. We also reserve the right to
make any modification in this manual at any time without prior notice.
P.12