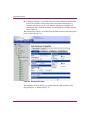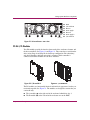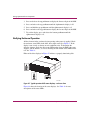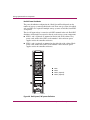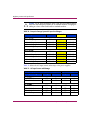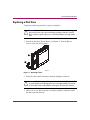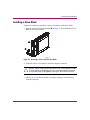
1
User Guide HP StorageWorks Enterprise Virtual Array 3000 Product Version: 3.0 Second Edition (October 2003) Part Number: EK-EVA30-UG. B01 *EK-EVA30-UG. B01* This user guide contains procedural and conceptual information about the HP StorageWorks Enterprise Virtual Array 3000 storage system and its online management software. © Copyright 2003 Hewlett-Packard Development Company, L.P. Hewlett-Packard Company makes no warranty of any kind with regard to this material, including, but not limited to, the implied warranties of merchantability and fitness for a particular purpose. Hewlett-Packard shall not be liable for errors contained herein or for incidental or consequential damages in connection with the furnishing, performance, or use of this material. This document contains proprietary information, which is protected by copyright. No part of this document may be photocopied, reproduced, or translated into another language without the prior written consent of Hewlett-Packard. The information contained in this document is subject to change without notice. Microsoft®, Windows®, and Windows NT® are U.S. registered trademarks of Microsoft Corporation. UNIX® is a registered trademark of The Open Group. Hewlett-Packard Company shall not be liable for technical or editorial errors or omissions contained herein. The information is provided “as is” without warranty of any kind and is subject to change without notice. The warranties for Hewlett-Packard Company products are set forth in the express limited warranty statements for such products. Nothing herein should be construed as constituting an additional warranty. Printed in the U.S.A. Enterprise Virtual Array 3000 User Guide Second Edition (October 2003) Part Number: EK-EVA30-UG. B01 contents Contents About this Guide. . . . . . . . . . . . . . . . . . . . . . . . . . . . . . . . . . . . . . . . . . . . . . . . . . .11 Intended Audience . . . . . . . . . . . . . . . . . . . . . . . . . . . . . . . . . . . . . . . . . . . . . . . . . . . . . . . . . 12 Related Documentation . . . . . . . . . . . . . . . . . . . . . . . . . . . . . . . . . . . . . . . . . . . . . . . . . . . . . 12 Conventions . . . . . . . . . . . . . . . . . . . . . . . . . . . . . . . . . . . . . . . . . . . . . . . . . . . . . . . . . . . . . . 13 Document Conventions . . . . . . . . . . . . . . . . . . . . . . . . . . . . . . . . . . . . . . . . . . . . . . . . . . 13 Text Symbols . . . . . . . . . . . . . . . . . . . . . . . . . . . . . . . . . . . . . . . . . . . . . . . . . . . . . . . . . . 13 Equipment Symbols . . . . . . . . . . . . . . . . . . . . . . . . . . . . . . . . . . . . . . . . . . . . . . . . . . . . . 14 Rack Stability . . . . . . . . . . . . . . . . . . . . . . . . . . . . . . . . . . . . . . . . . . . . . . . . . . . . . . . . . . . . . 16 Getting Help . . . . . . . . . . . . . . . . . . . . . . . . . . . . . . . . . . . . . . . . . . . . . . . . . . . . . . . . . . . . . . 17 HP Technical Support . . . . . . . . . . . . . . . . . . . . . . . . . . . . . . . . . . . . . . . . . . . . . . . . . . . 17 HP Storage Website . . . . . . . . . . . . . . . . . . . . . . . . . . . . . . . . . . . . . . . . . . . . . . . . . . . . . 17 HP Authorized Reseller . . . . . . . . . . . . . . . . . . . . . . . . . . . . . . . . . . . . . . . . . . . . . . . . . . 18 1 Storage System Description . . . . . . . . . . . . . . . . . . . . . . . . . . . . . . . . . . . . . . . . . . .19 Introduction. . . . . . . . . . . . . . . . . . . . . . . . . . . . . . . . . . . . . . . . . . . . . . . . . . . . . . . . . . . . . . . 20 Key Features and Benefits . . . . . . . . . . . . . . . . . . . . . . . . . . . . . . . . . . . . . . . . . . . . . . . . . . . 22 Storage System Components . . . . . . . . . . . . . . . . . . . . . . . . . . . . . . . . . . . . . . . . . . . . . . . . . 24 Command View EVA . . . . . . . . . . . . . . . . . . . . . . . . . . . . . . . . . . . . . . . . . . . . . . . . . . . 25 Virtual Controller Software . . . . . . . . . . . . . . . . . . . . . . . . . . . . . . . . . . . . . . . . . . . . . . . 26 Hardware . . . . . . . . . . . . . . . . . . . . . . . . . . . . . . . . . . . . . . . . . . . . . . . . . . . . . . . . . . . . . 27 Operating Tips and Information . . . . . . . . . . . . . . . . . . . . . . . . . . . . . . . . . . . . . . . . . . . . . . . 32 Minimum Disk Group Sizes. . . . . . . . . . . . . . . . . . . . . . . . . . . . . . . . . . . . . . . . . . . . . . . 32 Operating an HSV100 Controller at or Near Storage Limit . . . . . . . . . . . . . . . . . . . . . . 32 Secure Path Version . . . . . . . . . . . . . . . . . . . . . . . . . . . . . . . . . . . . . . . . . . . . . . . . . . . . . 32 Dynamic Volume Expansion . . . . . . . . . . . . . . . . . . . . . . . . . . . . . . . . . . . . . . . . . . . . . . 32 Disk Resource Pending Timeout for Large Configurations. . . . . . . . . . . . . . . . . . . . . . . 33 Failover/Failback . . . . . . . . . . . . . . . . . . . . . . . . . . . . . . . . . . . . . . . . . . . . . . . . . . . . . . . 33 2 Storage System Startup . . . . . . . . . . . . . . . . . . . . . . . . . . . . . . . . . . . . . . . . . . . . . .37 Storage System Connections . . . . . . . . . . . . . . . . . . . . . . . . . . . . . . . . . . . . . . . . . . . . . . . . . 38 Enterprise Virtual Array 3000 User Guide 3 Contents Procedures for Getting Started . . . . . . . . . . . . . . . . . . . . . . . . . . . . . . . . . . . . . . . . . . . . . . . . Gathering Information . . . . . . . . . . . . . . . . . . . . . . . . . . . . . . . . . . . . . . . . . . . . . . . . . . . Entering Data Using the OCP . . . . . . . . . . . . . . . . . . . . . . . . . . . . . . . . . . . . . . . . . . . . . Installing Command View EVA . . . . . . . . . . . . . . . . . . . . . . . . . . . . . . . . . . . . . . . . . . . Installing Optional EVA Software Licenses . . . . . . . . . . . . . . . . . . . . . . . . . . . . . . . . . . Cable Requirements . . . . . . . . . . . . . . . . . . . . . . . . . . . . . . . . . . . . . . . . . . . . . . . . . . . . . 39 39 40 46 46 46 3 Command View EVA. . . . . . . . . . . . . . . . . . . . . . . . . . . . . . . . . . . . . . . . . . . . . . . .49 Introduction to Command View EVA . . . . . . . . . . . . . . . . . . . . . . . . . . . . . . . . . . . . . . . . . . 50 Launching Command View EVA. . . . . . . . . . . . . . . . . . . . . . . . . . . . . . . . . . . . . . . . . . . . . . 51 Organization of the Interface Window . . . . . . . . . . . . . . . . . . . . . . . . . . . . . . . . . . . . . . . . . . 53 The Session Pane . . . . . . . . . . . . . . . . . . . . . . . . . . . . . . . . . . . . . . . . . . . . . . . . . . . . . . . 54 The Navigation Pane . . . . . . . . . . . . . . . . . . . . . . . . . . . . . . . . . . . . . . . . . . . . . . . . . . . . 54 The Content Pane . . . . . . . . . . . . . . . . . . . . . . . . . . . . . . . . . . . . . . . . . . . . . . . . . . . . . . . 55 Setting Storage Management Agent Options . . . . . . . . . . . . . . . . . . . . . . . . . . . . . . . . . . . . . 57 Setting System Options. . . . . . . . . . . . . . . . . . . . . . . . . . . . . . . . . . . . . . . . . . . . . . . . . . . . . . 58 Storage System Managed by Another Management Agent . . . . . . . . . . . . . . . . . . . . . . . . . . 59 Controlling and Monitoring Storage System Components. . . . . . . . . . . . . . . . . . . . . . . . . . . 60 Virtual Disks . . . . . . . . . . . . . . . . . . . . . . . . . . . . . . . . . . . . . . . . . . . . . . . . . . . . . . . . . . 60 Hosts. . . . . . . . . . . . . . . . . . . . . . . . . . . . . . . . . . . . . . . . . . . . . . . . . . . . . . . . . . . . . . . . . 62 Disk Groups . . . . . . . . . . . . . . . . . . . . . . . . . . . . . . . . . . . . . . . . . . . . . . . . . . . . . . . . . . . 65 Data Replication. . . . . . . . . . . . . . . . . . . . . . . . . . . . . . . . . . . . . . . . . . . . . . . . . . . . . . . . 67 Hardware . . . . . . . . . . . . . . . . . . . . . . . . . . . . . . . . . . . . . . . . . . . . . . . . . . . . . . . . . . . . . 68 4 Storage System Hardware Components . . . . . . . . . . . . . . . . . . . . . . . . . . . . . . . . . .75 Fibre Channel Drive Enclosures. . . . . . . . . . . . . . . . . . . . . . . . . . . . . . . . . . . . . . . . . . . . . . . 76 Enclosure Layout . . . . . . . . . . . . . . . . . . . . . . . . . . . . . . . . . . . . . . . . . . . . . . . . . . . . . . . 76 FC-AL I/O Modules. . . . . . . . . . . . . . . . . . . . . . . . . . . . . . . . . . . . . . . . . . . . . . . . . . . . . 77 Copper Fibre Channel Cables . . . . . . . . . . . . . . . . . . . . . . . . . . . . . . . . . . . . . . . . . . . . . 81 Fibre Channel Disk Drives. . . . . . . . . . . . . . . . . . . . . . . . . . . . . . . . . . . . . . . . . . . . . . . . 81 Power and Cooling Components . . . . . . . . . . . . . . . . . . . . . . . . . . . . . . . . . . . . . . . . . . . 86 Drive Enclosure EMU . . . . . . . . . . . . . . . . . . . . . . . . . . . . . . . . . . . . . . . . . . . . . . . . . . . 88 Verifying Enclosure Operation . . . . . . . . . . . . . . . . . . . . . . . . . . . . . . . . . . . . . . . . . . . 108 Status Monitoring and Display. . . . . . . . . . . . . . . . . . . . . . . . . . . . . . . . . . . . . . . . . . . . 109 HSV100 Controllers . . . . . . . . . . . . . . . . . . . . . . . . . . . . . . . . . . . . . . . . . . . . . . . . . . . . . . . 111 Storage System Racks. . . . . . . . . . . . . . . . . . . . . . . . . . . . . . . . . . . . . . . . . . . . . . . . . . . . . . 128 Power Distribution . . . . . . . . . . . . . . . . . . . . . . . . . . . . . . . . . . . . . . . . . . . . . . . . . . . . . 128 Moving and Stabilizing a Rack . . . . . . . . . . . . . . . . . . . . . . . . . . . . . . . . . . . . . . . . . . . 135 4 Enterprise Virtual Array 3000 User Guide Contents A Regulatory Notices and Specifications . . . . . . . . . . . . . . . . . . . . . . . . . . . . . . . . . .139 Country-Specific Certifications . . . . . . . . . . . . . . . . . . . . . . . . . . . . . . . . . . . . . . . . . . . . . . 140 Federal Communications Commission Notice . . . . . . . . . . . . . . . . . . . . . . . . . . . . . . . . . . . 141 Class A Equipment. . . . . . . . . . . . . . . . . . . . . . . . . . . . . . . . . . . . . . . . . . . . . . . . . . . . . 141 Class B Equipment. . . . . . . . . . . . . . . . . . . . . . . . . . . . . . . . . . . . . . . . . . . . . . . . . . . . . 141 Declaration of Conformity for Products Marked with the FCC Logo . . . . . . . . . . . . . . 142 Modifications . . . . . . . . . . . . . . . . . . . . . . . . . . . . . . . . . . . . . . . . . . . . . . . . . . . . . . . . . 142 Cables. . . . . . . . . . . . . . . . . . . . . . . . . . . . . . . . . . . . . . . . . . . . . . . . . . . . . . . . . . . . . . . 142 Laser Device . . . . . . . . . . . . . . . . . . . . . . . . . . . . . . . . . . . . . . . . . . . . . . . . . . . . . . . . . . . . . 143 Laser Safety Warnings . . . . . . . . . . . . . . . . . . . . . . . . . . . . . . . . . . . . . . . . . . . . . . . . . . 143 Compliance with CDRH Regulations . . . . . . . . . . . . . . . . . . . . . . . . . . . . . . . . . . . . . . 143 Certification and Classification Information . . . . . . . . . . . . . . . . . . . . . . . . . . . . . . . . . . . . 144 Canadian Notice (Avis Canadien) . . . . . . . . . . . . . . . . . . . . . . . . . . . . . . . . . . . . . . . . . . . . 145 Class A Equipment. . . . . . . . . . . . . . . . . . . . . . . . . . . . . . . . . . . . . . . . . . . . . . . . . . . . . 145 Class B Equipment. . . . . . . . . . . . . . . . . . . . . . . . . . . . . . . . . . . . . . . . . . . . . . . . . . . . . 145 European Union Notice . . . . . . . . . . . . . . . . . . . . . . . . . . . . . . . . . . . . . . . . . . . . . . . . . . . . 146 Notice for France . . . . . . . . . . . . . . . . . . . . . . . . . . . . . . . . . . . . . . . . . . . . . . . . . . . . . . . . . 146 Germany Noise Declaration . . . . . . . . . . . . . . . . . . . . . . . . . . . . . . . . . . . . . . . . . . . . . . . . . 146 Japanese Notice . . . . . . . . . . . . . . . . . . . . . . . . . . . . . . . . . . . . . . . . . . . . . . . . . . . . . . . . . . 147 Harmonics Conformance (Japan). . . . . . . . . . . . . . . . . . . . . . . . . . . . . . . . . . . . . . . . . . 148 Taiwanese Notice . . . . . . . . . . . . . . . . . . . . . . . . . . . . . . . . . . . . . . . . . . . . . . . . . . . . . . . . . 148 Fibre Channel Drive Enclosure Specifications. . . . . . . . . . . . . . . . . . . . . . . . . . . . . . . . . . . 149 Physical Specifications. . . . . . . . . . . . . . . . . . . . . . . . . . . . . . . . . . . . . . . . . . . . . . . . . . 149 Environmental Specifications . . . . . . . . . . . . . . . . . . . . . . . . . . . . . . . . . . . . . . . . . . . . 151 Power Specifications . . . . . . . . . . . . . . . . . . . . . . . . . . . . . . . . . . . . . . . . . . . . . . . . . . . 151 HSV100 Controller Specifications . . . . . . . . . . . . . . . . . . . . . . . . . . . . . . . . . . . . . . . . . . . . 154 Physical Specifications. . . . . . . . . . . . . . . . . . . . . . . . . . . . . . . . . . . . . . . . . . . . . . . . . . 154 Power Specifications . . . . . . . . . . . . . . . . . . . . . . . . . . . . . . . . . . . . . . . . . . . . . . . . . . . 155 Environmental Specifications . . . . . . . . . . . . . . . . . . . . . . . . . . . . . . . . . . . . . . . . . . . . 156 Storage System Racks. . . . . . . . . . . . . . . . . . . . . . . . . . . . . . . . . . . . . . . . . . . . . . . . . . . . . . 157 Physical Specifications. . . . . . . . . . . . . . . . . . . . . . . . . . . . . . . . . . . . . . . . . . . . . . . . . . 157 Environmental Specifications . . . . . . . . . . . . . . . . . . . . . . . . . . . . . . . . . . . . . . . . . . . . 158 Power Specifications . . . . . . . . . . . . . . . . . . . . . . . . . . . . . . . . . . . . . . . . . . . . . . . . . . . 159 B EMU Generated Condition Reports. . . . . . . . . . . . . . . . . . . . . . . . . . . . . . . . . . . . .161 Condition Report Format . . . . . . . . . . . . . . . . . . . . . . . . . . . . . . . . . . . . . . . . . . . . . . . . . . . 162 Correcting Errors . . . . . . . . . . . . . . . . . . . . . . . . . . . . . . . . . . . . . . . . . . . . . . . . . . . . . . . . . 163 Drive Conditions . . . . . . . . . . . . . . . . . . . . . . . . . . . . . . . . . . . . . . . . . . . . . . . . . . . . . . 163 Power Supply Conditions. . . . . . . . . . . . . . . . . . . . . . . . . . . . . . . . . . . . . . . . . . . . . . . . 167 Enterprise Virtual Array 3000 User Guide 5 Contents Blower Conditions . . . . . . . . . . . . . . . . . . . . . . . . . . . . . . . . . . . . . . . . . . . . . . . . . . . . . Temperature Conditions. . . . . . . . . . . . . . . . . . . . . . . . . . . . . . . . . . . . . . . . . . . . . . . . . EMU Conditions . . . . . . . . . . . . . . . . . . . . . . . . . . . . . . . . . . . . . . . . . . . . . . . . . . . . . . Transceiver Conditions . . . . . . . . . . . . . . . . . . . . . . . . . . . . . . . . . . . . . . . . . . . . . . . . . Voltage Sensor and Current Sensor Conditions. . . . . . . . . . . . . . . . . . . . . . . . . . . . . . . Backplane Conditions . . . . . . . . . . . . . . . . . . . . . . . . . . . . . . . . . . . . . . . . . . . . . . . . . . I/O Module Conditions . . . . . . . . . . . . . . . . . . . . . . . . . . . . . . . . . . . . . . . . . . . . . . . . . Host Conditions . . . . . . . . . . . . . . . . . . . . . . . . . . . . . . . . . . . . . . . . . . . . . . . . . . . . . . . C 169 172 175 181 182 184 185 187 HSV Controller Fault Management . . . . . . . . . . . . . . . . . . . . . . . . . . . . . . . . . . . . .189 Using Command View EVA . . . . . . . . . . . . . . . . . . . . . . . . . . . . . . . . . . . . . . . . . . . . . . . . 190 GUI Termination Event Display . . . . . . . . . . . . . . . . . . . . . . . . . . . . . . . . . . . . . . . . . . 190 GUI Event Display. . . . . . . . . . . . . . . . . . . . . . . . . . . . . . . . . . . . . . . . . . . . . . . . . . . . . 191 Fault Management Displays . . . . . . . . . . . . . . . . . . . . . . . . . . . . . . . . . . . . . . . . . . . . . . . . . 192 D Customer Replaceable Units . . . . . . . . . . . . . . . . . . . . . . . . . . . . . . . . . . . . . . . . .195 ESD Protection . . . . . . . . . . . . . . . . . . . . . . . . . . . . . . . . . . . . . . . . . . . . . . . . . . . . . . . . . . . 196 Common Replacement Procedures. . . . . . . . . . . . . . . . . . . . . . . . . . . . . . . . . . . . . . . . . . . . 197 Determining CRU Part Numbers . . . . . . . . . . . . . . . . . . . . . . . . . . . . . . . . . . . . . . . . . . . . . 198 Replacing a Disk Drive. . . . . . . . . . . . . . . . . . . . . . . . . . . . . . . . . . . . . . . . . . . . . . . . . . . . . 199 Inserting Disk Drives into an Operating Storage System . . . . . . . . . . . . . . . . . . . . . . . 200 Installing a Drive Blank . . . . . . . . . . . . . . . . . . . . . . . . . . . . . . . . . . . . . . . . . . . . . . . . . . . . 201 Removing a Drive Blank . . . . . . . . . . . . . . . . . . . . . . . . . . . . . . . . . . . . . . . . . . . . . . . . . . . 202 Protecting Fiber Optic Connections . . . . . . . . . . . . . . . . . . . . . . . . . . . . . . . . . . . . . . . . . . . 203 Glossary. . . . . . . . . . . . . . . . . . . . . . . . . . . . . . . . . . . . . . . . . . . . . . . . . . . . . . . .205 Index . . . . . . . . . . . . . . . . . . . . . . . . . . . . . . . . . . . . . . . . . . . . . . . . . . . . . . . . . .233 Figures 1 Enterprise Virtual Array 3000 in a 42U rack . . . . . . . . . . . . . . . . . . . . . . . . . . . . . . . . . . 2 Enterprise Virtual Array 3000 storage solution . . . . . . . . . . . . . . . . . . . . . . . . . . . . . . . . 3 Enterprise Virtual Array 3000 components . . . . . . . . . . . . . . . . . . . . . . . . . . . . . . . . . . . 4 Fibre Channel drive enclosure . . . . . . . . . . . . . . . . . . . . . . . . . . . . . . . . . . . . . . . . . . . . . 5 HSV100 controller—front and rear views . . . . . . . . . . . . . . . . . . . . . . . . . . . . . . . . . . . . 6 Enterprise Virtual Array 3000 system connections . . . . . . . . . . . . . . . . . . . . . . . . . . . . . 7 Sample Node WWN label . . . . . . . . . . . . . . . . . . . . . . . . . . . . . . . . . . . . . . . . . . . . . . . . 8 Location of the World Wide Name labels . . . . . . . . . . . . . . . . . . . . . . . . . . . . . . . . . . . . 9 OpenView Storage Management Appliance Home page. . . . . . . . . . . . . . . . . . . . . . . . . 6 21 25 28 29 30 38 41 41 51 Enterprise Virtual Array 3000 User Guide Contents 10 11 12 13 14 15 16 17 18 19 20 21 22 23 24 25 26 27 28 29 30 31 32 33 34 35 36 37 38 39 40 41 42 43 44 45 46 47 HSV Storage Network Properties page . . . . . . . . . . . . . . . . . . . . . . . . . . . . . . . . . . . . . . 52 The three panes of the interface window . . . . . . . . . . . . . . . . . . . . . . . . . . . . . . . . . . . . . 53 Session pane . . . . . . . . . . . . . . . . . . . . . . . . . . . . . . . . . . . . . . . . . . . . . . . . . . . . . . . . . . . 54 Navigation pane . . . . . . . . . . . . . . . . . . . . . . . . . . . . . . . . . . . . . . . . . . . . . . . . . . . . . . . . 55 Content pane. . . . . . . . . . . . . . . . . . . . . . . . . . . . . . . . . . . . . . . . . . . . . . . . . . . . . . . . . . . 56 Agent Options button on the Session pane . . . . . . . . . . . . . . . . . . . . . . . . . . . . . . . . . . . 57 Options buttons on the System Options page . . . . . . . . . . . . . . . . . . . . . . . . . . . . . . . . . 58 Storage System Managed by Another Agent . . . . . . . . . . . . . . . . . . . . . . . . . . . . . . . . . . 59 Storage system components . . . . . . . . . . . . . . . . . . . . . . . . . . . . . . . . . . . . . . . . . . . . . . . 60 Virtual Disk folder . . . . . . . . . . . . . . . . . . . . . . . . . . . . . . . . . . . . . . . . . . . . . . . . . . . . . . 62 Host folder . . . . . . . . . . . . . . . . . . . . . . . . . . . . . . . . . . . . . . . . . . . . . . . . . . . . . . . . . . . . 63 Host Properties page . . . . . . . . . . . . . . . . . . . . . . . . . . . . . . . . . . . . . . . . . . . . . . . . . . . . 63 Top level disk group. . . . . . . . . . . . . . . . . . . . . . . . . . . . . . . . . . . . . . . . . . . . . . . . . . . . . 65 Disk Group Properties page . . . . . . . . . . . . . . . . . . . . . . . . . . . . . . . . . . . . . . . . . . . . . . . 66 Data Replication folder . . . . . . . . . . . . . . . . . . . . . . . . . . . . . . . . . . . . . . . . . . . . . . . . . . 68 Hardware folder . . . . . . . . . . . . . . . . . . . . . . . . . . . . . . . . . . . . . . . . . . . . . . . . . . . . . . . . 69 Rack container . . . . . . . . . . . . . . . . . . . . . . . . . . . . . . . . . . . . . . . . . . . . . . . . . . . . . . . . . 69 Controller folder. . . . . . . . . . . . . . . . . . . . . . . . . . . . . . . . . . . . . . . . . . . . . . . . . . . . . . . . 71 Disk enclosure folder . . . . . . . . . . . . . . . . . . . . . . . . . . . . . . . . . . . . . . . . . . . . . . . . . . . . 72 Controller Enclosure Properties page. . . . . . . . . . . . . . . . . . . . . . . . . . . . . . . . . . . . . . . . 73 Drive enclosure—front view . . . . . . . . . . . . . . . . . . . . . . . . . . . . . . . . . . . . . . . . . . . . . . 76 Drive enclosure—rear view . . . . . . . . . . . . . . . . . . . . . . . . . . . . . . . . . . . . . . . . . . . . . . 77 I/O module B . . . . . . . . . . . . . . . . . . . . . . . . . . . . . . . . . . . . . . . . . . . . . . . . . . . . . . . . . . 77 I/O module A . . . . . . . . . . . . . . . . . . . . . . . . . . . . . . . . . . . . . . . . . . . . . . . . . . . . . . . . . . 77 Input and output ports . . . . . . . . . . . . . . . . . . . . . . . . . . . . . . . . . . . . . . . . . . . . . . . . . . . 78 I/O module status LEDs . . . . . . . . . . . . . . . . . . . . . . . . . . . . . . . . . . . . . . . . . . . . . . . . . . 78 Fibre Channel disk drive . . . . . . . . . . . . . . . . . . . . . . . . . . . . . . . . . . . . . . . . . . . . . . . . . 82 Disk drive status icons location . . . . . . . . . . . . . . . . . . . . . . . . . . . . . . . . . . . . . . . . . . . . 83 Drive blank. . . . . . . . . . . . . . . . . . . . . . . . . . . . . . . . . . . . . . . . . . . . . . . . . . . . . . . . . . . . 85 Power supply and blower assembly components. . . . . . . . . . . . . . . . . . . . . . . . . . . . . . . 86 EMU location . . . . . . . . . . . . . . . . . . . . . . . . . . . . . . . . . . . . . . . . . . . . . . . . . . . . . . . . . . 89 EMU controls and displays . . . . . . . . . . . . . . . . . . . . . . . . . . . . . . . . . . . . . . . . . . . . . . . 89 EMU Status LEDs . . . . . . . . . . . . . . . . . . . . . . . . . . . . . . . . . . . . . . . . . . . . . . . . . . . . . . 92 Alphanumeric display and controls . . . . . . . . . . . . . . . . . . . . . . . . . . . . . . . . . . . . . . . . . 94 Enterprise Virtual Array 3000 enclosure address bus components . . . . . . . . . . . . . . . . 100 Enterprise Virtual Array 3000 enclosure numbering . . . . . . . . . . . . . . . . . . . . . . . . . . . 101 Displaying error condition values . . . . . . . . . . . . . . . . . . . . . . . . . . . . . . . . . . . . . . . . . 106 Typical operational LED status displays—enclosure front . . . . . . . . . . . . . . . . . . . . . . 108 Enterprise Virtual Array 3000 User Guide 7 Contents 48 49 50 51 52 53 54 55 56 57 58 59 60 61 62 63 64 65 66 67 68 69 70 71 72 73 Location of LED status displays—enclosure rear . . . . . . . . . . . . . . . . . . . . . . . . . . . . . HSV100 controller . . . . . . . . . . . . . . . . . . . . . . . . . . . . . . . . . . . . . . . . . . . . . . . . . . . . . Controller OCP. . . . . . . . . . . . . . . . . . . . . . . . . . . . . . . . . . . . . . . . . . . . . . . . . . . . . . . . Navigation pushbutton icons . . . . . . . . . . . . . . . . . . . . . . . . . . . . . . . . . . . . . . . . . . . . . Sample Default LCD display . . . . . . . . . . . . . . . . . . . . . . . . . . . . . . . . . . . . . . . . . . . . . OCP menu tree . . . . . . . . . . . . . . . . . . . . . . . . . . . . . . . . . . . . . . . . . . . . . . . . . . . . . . . . HSV100 controller connectors—rear view . . . . . . . . . . . . . . . . . . . . . . . . . . . . . . . . . . 60-Hz and 50-Hz wall receptacles . . . . . . . . . . . . . . . . . . . . . . . . . . . . . . . . . . . . . . . . . Enterprise Rack Dual PDU assembly—top view. . . . . . . . . . . . . . . . . . . . . . . . . . . . . . Enterprise Rack Dual PDU assembly major components . . . . . . . . . . . . . . . . . . . . . . . Enterprise Rack PDM . . . . . . . . . . . . . . . . . . . . . . . . . . . . . . . . . . . . . . . . . . . . . . . . . . Enterprise Rack AC power distribution . . . . . . . . . . . . . . . . . . . . . . . . . . . . . . . . . . . . . Rack System/E AC power distribution . . . . . . . . . . . . . . . . . . . . . . . . . . . . . . . . . . . . . Rack floor space requirements (single-piece rear door) . . . . . . . . . . . . . . . . . . . . . . . . Rack floor space requirements (split rear door). . . . . . . . . . . . . . . . . . . . . . . . . . . . . . . Raising a leveler foot . . . . . . . . . . . . . . . . . . . . . . . . . . . . . . . . . . . . . . . . . . . . . . . . . . . Typical enclosure certification label . . . . . . . . . . . . . . . . . . . . . . . . . . . . . . . . . . . . . . . Power supply element numbering . . . . . . . . . . . . . . . . . . . . . . . . . . . . . . . . . . . . . . . . . Blower element numbering . . . . . . . . . . . . . . . . . . . . . . . . . . . . . . . . . . . . . . . . . . . . . . Disconnecting AC power . . . . . . . . . . . . . . . . . . . . . . . . . . . . . . . . . . . . . . . . . . . . . . . . Transceiver element numbering. . . . . . . . . . . . . . . . . . . . . . . . . . . . . . . . . . . . . . . . . . . I/O module element numbering . . . . . . . . . . . . . . . . . . . . . . . . . . . . . . . . . . . . . . . . . . . Typical HP product label . . . . . . . . . . . . . . . . . . . . . . . . . . . . . . . . . . . . . . . . . . . . . . . . Removing a drive . . . . . . . . . . . . . . . . . . . . . . . . . . . . . . . . . . . . . . . . . . . . . . . . . . . . . . Removing a drive to install a drive blank . . . . . . . . . . . . . . . . . . . . . . . . . . . . . . . . . . . Installing and removing a drive blank . . . . . . . . . . . . . . . . . . . . . . . . . . . . . . . . . . . . . . 109 111 112 113 114 115 127 128 130 130 131 133 134 136 136 137 140 167 169 180 181 185 198 199 201 202 Tables 1 Document Conventions . . . . . . . . . . . . . . . . . . . . . . . . . . . . . . . . . . . . . . . . . . . . . . . . . . 2 Failback Preference Settings . . . . . . . . . . . . . . . . . . . . . . . . . . . . . . . . . . . . . . . . . . . . . . 3 Failback Settings by Operating System . . . . . . . . . . . . . . . . . . . . . . . . . . . . . . . . . . . . . . 4 OCP WWN Pushbutton Functions. . . . . . . . . . . . . . . . . . . . . . . . . . . . . . . . . . . . . . . . . . 5 OCP Password Pushbutton Functions . . . . . . . . . . . . . . . . . . . . . . . . . . . . . . . . . . . . . . . 6 LC-SC cables . . . . . . . . . . . . . . . . . . . . . . . . . . . . . . . . . . . . . . . . . . . . . . . . . . . . . . . . . . 7 LC-LC Cables . . . . . . . . . . . . . . . . . . . . . . . . . . . . . . . . . . . . . . . . . . . . . . . . . . . . . . . . . 8 Agent Options . . . . . . . . . . . . . . . . . . . . . . . . . . . . . . . . . . . . . . . . . . . . . . . . . . . . . . . . . 9 System Options . . . . . . . . . . . . . . . . . . . . . . . . . . . . . . . . . . . . . . . . . . . . . . . . . . . . . . . . 10 Operational I/O Module LED Descriptions and Status Displays. . . . . . . . . . . . . . . . . . . 8 13 33 35 42 44 46 47 57 58 79 Enterprise Virtual Array 3000 User Guide Contents 11 12 13 14 15 16 17 18 19 20 21 22 23 24 25 26 27 28 29 30 31 32 33 34 35 36 37 38 39 40 41 42 43 44 45 46 Nonoperational I/O Module LED Descriptions and Status Displays. . . . . . . . . . . . . . . . 80 Disk Drive Status Icon Descriptions . . . . . . . . . . . . . . . . . . . . . . . . . . . . . . . . . . . . . . . . 83 Operational Drive Status Displays . . . . . . . . . . . . . . . . . . . . . . . . . . . . . . . . . . . . . . . . . . 84 Nonoperational Drive Status Displays . . . . . . . . . . . . . . . . . . . . . . . . . . . . . . . . . . . . . . . 84 Power Supply and Blower Status LED Display. . . . . . . . . . . . . . . . . . . . . . . . . . . . . . . . 88 EMU Monitoring Functions. . . . . . . . . . . . . . . . . . . . . . . . . . . . . . . . . . . . . . . . . . . . . . . 90 EMU Status Indicators . . . . . . . . . . . . . . . . . . . . . . . . . . . . . . . . . . . . . . . . . . . . . . . . . . 91 EMU LED Displays . . . . . . . . . . . . . . . . . . . . . . . . . . . . . . . . . . . . . . . . . . . . . . . . . . . . 93 EMU Display Groups. . . . . . . . . . . . . . . . . . . . . . . . . . . . . . . . . . . . . . . . . . . . . . . . . . . . 95 Audible Alarm Sound Patterns. . . . . . . . . . . . . . . . . . . . . . . . . . . . . . . . . . . . . . . . . . . . . 96 LED Status Displays . . . . . . . . . . . . . . . . . . . . . . . . . . . . . . . . . . . . . . . . . . . . . . . . . . . 109 Enclosure Status Icon Displays . . . . . . . . . . . . . . . . . . . . . . . . . . . . . . . . . . . . . . . . . . . 110 Controller Status Icons and LEDs . . . . . . . . . . . . . . . . . . . . . . . . . . . . . . . . . . . . . . . . . 113 System Information pushbutton functions . . . . . . . . . . . . . . . . . . . . . . . . . . . . . . . . . . . 117 Shutdown Procedures. . . . . . . . . . . . . . . . . . . . . . . . . . . . . . . . . . . . . . . . . . . . . . . . . . . 120 Drive Enclosure Physical Specifications . . . . . . . . . . . . . . . . . . . . . . . . . . . . . . . . . . . . 149 Drive Enclosure Elements Physical Specifications . . . . . . . . . . . . . . . . . . . . . . . . . . . . 150 Environmental Operating Specifications . . . . . . . . . . . . . . . . . . . . . . . . . . . . . . . . . . . . 151 Environmental Shipping or Short-Term Storage Specifications . . . . . . . . . . . . . . . . . . 151 Enterprise Storage System AC Input Line Voltages . . . . . . . . . . . . . . . . . . . . . . . . . . . 152 AC Input Current and Wattage . . . . . . . . . . . . . . . . . . . . . . . . . . . . . . . . . . . . . . . . . . . 152 Output Voltage and Current Specifications . . . . . . . . . . . . . . . . . . . . . . . . . . . . . . . . . . 153 Dual Power Supply Configuration Power Specifications . . . . . . . . . . . . . . . . . . . . . . . 153 HSV Controller Physical Specifications . . . . . . . . . . . . . . . . . . . . . . . . . . . . . . . . . . . . 154 Controller Power Supply AC Power Requirements. . . . . . . . . . . . . . . . . . . . . . . . . . . . 155 AC Input Current and Wattage . . . . . . . . . . . . . . . . . . . . . . . . . . . . . . . . . . . . . . . . . . . 155 Controller Power Supply Output Specifications . . . . . . . . . . . . . . . . . . . . . . . . . . . . . . 156 Storage System Racks Physical Dimensions and Weight . . . . . . . . . . . . . . . . . . . . . . . 157 Storage System Racks Shipping Dimensions and Weight. . . . . . . . . . . . . . . . . . . . . . . 158 Environmental Operating Specifications . . . . . . . . . . . . . . . . . . . . . . . . . . . . . . . . . . . . 158 Environmental Shipping or Short Term Storage Specifications . . . . . . . . . . . . . . . . . . 159 Enterprise Storage System AC Power Specifications . . . . . . . . . . . . . . . . . . . . . . . . . . 159 Assigned Element Type Codes . . . . . . . . . . . . . . . . . . . . . . . . . . . . . . . . . . . . . . . . . . . 163 Temperature Sensor Element Numbering . . . . . . . . . . . . . . . . . . . . . . . . . . . . . . . . . . . 172 Voltage and Current Sensor Locations . . . . . . . . . . . . . . . . . . . . . . . . . . . . . . . . . . . . . 182 Controller Event Text Description File . . . . . . . . . . . . . . . . . . . . . . . . . . . . . . . . . . . . . 194 Enterprise Virtual Array 3000 User Guide 9 Contents 10 Enterprise Virtual Array 3000 User Guide About This Guide About this Guide This user guide provides information to help you: ■ Learn about the HP StorageWorks About this GuideEnterprise Virtual Array 3000 and its components. ■ Start-up your storage system. ■ Operate your storage system. ■ Understand Command View EVA and its role in managing the storage system. ■ Understand regulations and specifications. ■ Understand EMU generated error condition reports. ■ Understand HSV fault management concepts. ■ Install customer replaceable units. About this Guide topics include: ■ Intended Audience, page 12 ■ Related Documentation, page 12 ■ Conventions, page 13 ■ Rack Stability, page 16 ■ Getting Help, page 17 Enterprise Virtual Array 3000 User Guide 11 About this Guide Intended Audience This book is intended for use by Enterprise Virtual Array 3000 customers who are experienced with the following: ■ SANs and storage systems ■ Networking and virtual storage concepts ■ Enterprise Virtual Array products Related Documentation In addition to this guide, the following sources provide more information on operating and managing the Enterprise Virtual Array 3000. Most of these documents can be downloaded from the following web site: http://www.hp.com/go/eva3000 12 ■ HP StorageWorks Enterprise Virtual Array 3000 Release Notes. ■ HP StorageWorks Enterprise Virtual Array 3000 Read Me First. ■ HP StorageWorks Enterprise Virtual Array 3000 World Wide Name Label. ■ HP StorageWorks Enterprise Virtual Array 3000 Hardware Configuration Guide. ■ HP StorageWorks System Software for Enterprise Virtual Array 3000 Installation Card. ■ HP StorageWorks Enterprise Virtual Array 3000 Platform Kit Compatibility Notice. ■ HP StorageWorks Command View EVA Interactive Help. Enterprise Virtual Array 3000 User Guide About this Guide Conventions This section describes the various conventions used throughout this guide. Document Conventions The document conventions included in Table 1 apply in most cases. Table 1: Document Conventions Element Convention Cross-reference links Blue text: Figure 1 Key and field names, menu items, buttons, and dialog box titles Bold File names, application names, and text emphasis Italics User input, command and directory names, and system responses (output and messages) Monospace font COMMAND NAMES are uppercase monospace font unless they are case sensitive Variables <monospace, italic font> Website addresses Blue, underlined sans serif font text: http://www.hp.com Text Symbols The following symbols are used in this guide. They have the following meanings. WARNING: Text set off in this manner indicates that failure to follow directions in the warning could result in bodily harm or death. Caution: Text set off in this manner indicates that failure to follow directions could result in damage to equipment or data. Enterprise Virtual Array 3000 User Guide 13 About this Guide Note: Text set off in this manner presents commentary, sidelights, or interesting points of information. Equipment Symbols The following equipment symbols may be found on hardware for which this guide pertains. They have the following meanings. Any enclosed surface or area of the equipment marked with these symbols indicates the presence of electrical shock hazards. Enclosed area contains no operator serviceable parts. WARNING: To reduce the risk of personal safety from electrical shock hazards, do not open this enclosure. Any RJ-45 receptacle marked with these symbols indicates a network interface connection. WARNING: To reduce the risk of electrical shock, fire, or damage to the equipment, do not plug telephone or telecommunications connectors into this receptacle. Any surface or area of the equipment marked with these symbols indicates the presence of a hot surface or hot component. Contact with this surface could result in injury. WARNING: To reduce the risk of personal safety from a hot component, allow the surface to cool before touching. 14 Enterprise Virtual Array 3000 User Guide About this Guide Power supplies or systems marked with these symbols indicate the presence of multiple sources of power. WARNING: To reduce the risk of personal safety from electrical shock, disconnect all power cords from the power supplies and systems. Any product or assembly marked with these symbols indicates that the component exceeds the recommended weight for one individual to handle safely. WARNING: To reduce the risk of personal safety or damage to the equipment, observe local occupational health and safety requirements and guidelines for manually handling material. Enterprise Virtual Array 3000 User Guide 15 About this Guide Rack Stability Rack stability ensures protection for personnel and equipment. WARNING: To reduce the risk of personal safety or damage to the equipment, be sure that: ■ The leveling feet are extended to the floor. ■ The full weight of the rack rests on the leveling feet. ■ In single rack installations, the stabilizing feet are attached to the rack. ■ In multiple rack installations, the racks are coupled. ■ Only one rack component is extended at any time. A rack may become unstable if more than one rack component is extended. 16 Enterprise Virtual Array 3000 User Guide About this Guide Getting Help If you still have a question after reading this guide, contact an HP authorized service representative or access our website: http://www.hp.com/country/us/eng/contact_us.html HP Technical Support In North America, call technical support at 1-800-652-6672, available 24 hours a day, 7 days a week. Note: For continuous quality improvement, calls may be recorded or monitored. Outside North America, call technical support at the nearest location. Telephone numbers for worldwide technical support are listed on the following HP website: http://www.hp.com/support Be sure to have the following information available before calling: ■ Technical support registration number (if applicable) ■ Product serial numbers ■ Product model names and numbers ■ Applicable error messages ■ Operating system type and revision level ■ Detailed, specific questions HP Storage Website The HP storage website has the latest information on this product, as well as the latest drivers. Access storage at: http://thenew.hp.com/country/us/eng/prodserv/ storage.html. From this website, select the appropriate product or solution. Enterprise Virtual Array 3000 User Guide 17 About this Guide HP Authorized Reseller For the name of your nearest HP authorized reseller: 18 ■ In the United States, call 1-800-345-1518. ■ In Canada, call 1-800-263-5868. ■ Elsewhere, see the HP website for locations and telephone numbers: http://www.hp.com. Enterprise Virtual Array 3000 User Guide Storage System Description 1 This chapter provides an overview of the HP StorageWorks Enterprise Virtual Array 3000 and its components. The following topics are included in this chapter: ■ Introduction, page 20 ■ Key Features and Benefits, page 22 ■ Storage System Components, page 24 ■ Operating Tips and Information, page 32 Enterprise Virtual Array 3000 User Guide 19 Storage System Description Introduction The HP StorageWorks Enterprise Virtual Array 3000 is a high performance, scaled capacity on demand, “virtual” RAID storage solution. A complement of the current Modular Array (MA) family of StorageWorks solutions (MA8000 / EMA12000 / EMA16000), it can co-exist in the same Fibre Channel SAN, while providing 2-Gbps end-to-end Fibre Channel technology readiness. The Enterprise Virtual Array 3000 is designed for the data center where improved storage use and scalability is critical. It meets application-specific demands for consistently high transaction I/O and data rate performance, and provides seamless capacity expansion, instantaneous replication, and simplified storage administration. The Enterprise Virtual Array 3000 is available as a single, scalable configuration installed in a variety of racks. Each configuration is optimized for general-purpose commercial environments and high-performance technical computing environments. The solutions include support for multivendor operating system platforms and stringent data center availability enhancements, such as multipathing and clustering. Figure 1 shows a 2C2D configuration in the 42U rack. 20 Enterprise Virtual Array 3000 User Guide Storage System Description CXO8231A Figure 1: Enterprise Virtual Array 3000 in a 42U rack Enterprise Virtual Array 3000 User Guide 21 Storage System Description Key Features and Benefits The Enterprise Virtual Array 3000 provides the following features: ■ Outstanding self-tuning performance: — New virtualization technology, Vraid, enables data to be distributed from 8 to 56 disks to increase disk spindle count far beyond traditional RAID sets. This virtualization method also optimizes storage for the best performance of a specific configuration and application. The Enterprise Virtual Array 3000 eliminates tedious management functions to provide the best performance possible. ■ State-of-the-art controller software: — Improves performance, increases capacity, and allows for easy dynamic storage expansion. ■ High-density packaging and support of more disks per controller pair: — Up to 8 TB using 56 disks per controller pair. — Up to 22 TB of storage in a single 42U rack. ■ Easy-to-Order: — Complete integrated configurations with a single part number, includes disk drives, VCS, and system platform software kits. ■ Easy-to-use storage management tools: — Software tools that allow you to manage larger SAN configurations with more servers and more storage solutions. The following features are provided by the optional Business Copy EVA software: ■ Vsnap — Virtually Capacity-Free Snapshot: — Replicate data instantly by taking a picture of the data within seconds without reserving an equal amount of capacity. This process saves significant disk space and improves disk efficiency. ■ Virtually Instantaneous Snapclone: — Makes a complete copy of your data, which is accessible before the copy completes. The copied data can be used as a test platform for application changes and additional performance benchmarking, as well as for mounting tape backups. 22 Enterprise Virtual Array 3000 User Guide Storage System Description The following features are provided by the optional Continuous Access EVA software: ■ Provides disaster tolerant replication across a Fibre Channel SAN. ■ Performs real-time replication between Enterprise Virtual Array 3000 storage systems. ■ Provides the highest level of FC SAN data protection to meet disaster tolerant business continuity implementation goals. Enterprise Virtual Array 3000 User Guide 23 Storage System Description Storage System Components The Enterprise Virtual Array 3000 consists of three main components: ■ Hardware—the physical pieces that comprise the Enterprise Virtual Array 3000, such as drives, enclosures, rack, and all associated cabling. These pieces are combined in a rack and are connected to the SAN. ■ Command View EVA—the management software used to control, manage, and monitor the Enterprise Virtual Array 3000. Command View EVA also manages Enterprise Virtual Array storage systems that use HSV110 controllers. Management is done using a standard web browser. ■ VCS—the controller-resident software that manages all aspects of storage system operation, including communication with Command View EVA. These components work together to create an entire storage system solution for reliably storing your data. Figure 2 shows the complete Enterprise Virtual Array 3000 storage solution. 24 Enterprise Virtual Array 3000 User Guide Storage System Description Host Data Command View EVA Control and Monitor Commands Host Data Host Data Fabric Control Input Monitoring Output Browser VCS Administrator Storage System CXO8058A Figure 2: Enterprise Virtual Array 3000 storage solution Command View EVA The user interface to the Enterprise Virtual Array 3000, Command View EVA performs all storage system administration tasks, which include: ■ Creating virtual disk families, including selection of Vraid level, cache policy, and host presentation. ■ Managing the presentation of virtual disks to hosts. ■ Managing storage system hardware. ■ Creating snapclones and snapshots of virtual disks. ■ Managing data replication across two or more Enterprise Virtual Arrays. An online help system is available, including page-level help. See “Command View EVA” on page 49 for more information. Enterprise Virtual Array 3000 User Guide 25 Storage System Description Virtual Controller Software HP StorageWorks Virtual Controller Software (VCS) manages all aspects of storage system operation. VCS provides scalable capacity on-demand, improves performance, increases disk utilization efficiency, and allows for easy dynamic storage expansion. VCS is preinstalled on the storage system and is also included in the VCS for HSV100 software kit. VCS Benefits, Features, and Functionality 26 ■ High-density packaging and support of more disks per controller pair ■ Simplified storage management such as server independent storage management, automatic load balancing, and on-the-fly storage expansion to multiply management efficiency up to 15 times ■ Support for up to 56 disk drives per controller pair ■ Management of up to 512 virtual disks per disk pool ranging in size from 1 GB to 2 TB per virtual disk ■ Distributed sparing of disk capacity ■ Dual redundant controller operation for increased fault tolerance ■ Multiple path failover support ■ Battery back-up for cache memory ■ Asynchronous disk swap (hot swap) ■ Clustered server support ■ Mirrored write-back cache support ■ Read-ahead and adaptive read caching support ■ Virtual RAID arrays (Vraid0, Vraid1, Vraid5) ■ Non-disruptive software upgrade capability ■ Supports connection of up to 256 hosts ■ Multivendor platform support ■ Controller password protection for configuration control ■ Selective storage presentation ■ SAN-based data zoning ■ Graphical User Interface (GUI) for management and monitoring Enterprise Virtual Array 3000 User Guide Storage System Description Optional Software Licensing Business Copy EVA and Continuous Access EVA require a separate license for each HSV100 controller pair. Instructions for obtaining a license are included with the software documentation. Additional information about HP StorageWorks Virtual Controller Software can be found online at http://h18006.www1.hp.com/storage/software.html. Hardware The Enterprise Virtual Array 3000 consists of the following hardware components: ■ Fibre Channel drive enclosures—contains disk drives, power supplies, blowers, Input/Output (I/O) modules, transceivers and Environmental Monitoring Units (EMUs). ■ HSV100 controller—manages all aspects of storage system operation, including communications between host systems and other devices. A pair of HSV controllers is included in the Enterprise Virtual Array 3000. ■ Storage system rack—a variety of floor-standing racks are available for the storage system. Enterprise Virtual Array 3000 User Guide 27 Storage System Description Physical Layout of the Storage System The Enterprise Virtual Array 3000 consists of a pair of HSV100 controllers and up to four disk enclosures. The physical components are shown in Figure 3. The disk drives are installed in the drive enclosures, which are connected directly to the controller enclosures. 1 2 HSV100 controller pair Drive enclosures 1 2 CXO8056A Figure 3: Enterprise Virtual Array 3000 components The following sections provide an overview of each hardware component. For more detailed information, see “Storage System Hardware Components” on page 75. 28 Enterprise Virtual Array 3000 User Guide Storage System Description Fibre Channel Drive Enclosure Each Fibre Channel drive enclosure includes the following features: ■ 3U enclosure ■ Dual-redundant, active-to-active, 2-Gbps FC loops ■ Fourteen bays for 1-inch FC disks ■ Environmental Monitor Unit (EMU) ■ Dual 2-Gbps FC I/O modules ■ Dual-redundant 500-W power supplies ■ Dual-redundant blowers For ease of management, the disk drives are referred to by their physical location, the drive bay number. Figure 4 shows the front view of the drive enclosure and the location of each drive bay. 1 to r Drive bays t Enclosure status icons 1 3 2 5 4 6 7 8 9 10 11 12 13 14 15 CXO7942A Figure 4: Fibre Channel drive enclosure Enterprise Virtual Array 3000 User Guide 29 Storage System Description HSV100 Controllers Two high-performance HSV100 controllers are included in each storage system. Each controller is installed in a separate enclosure and provides the following features: ■ High-performance, PowerPC microprocessor ■ An Operator Control Panel (OCP) for easy operation ■ 3U cabinet space required for both controller enclosures ■ Two 2-Gbps, FC-Switch Fabric host ports ■ Two 2-Gbps, FC-AL device ports — Arranged as a single redundant pair — Data load/performance is balanced across a pair — Support up to 56 disks ■ 1-GB cache per controller, mirrored, with battery backup ■ 2-Gbps, FC cache mirroring port with device port backups The HSV100 controllers serve as the interface between the storage system hardware and the SAN. All host I/Os and all Command View EVA management commands are processed by the controllers. Up to four drive enclosures are supported by each HSV100 controller pair. Figure 5 shows the controllers. Front Rear CXO8054B Figure 5: HSV100 controller—front and rear views 30 Enterprise Virtual Array 3000 User Guide Storage System Description Storage System Rack The available storage system racks are designed for mounting standard 483 mm (19 in) wide components. The following racks are available with the Enterprise Virtual Array 3000: ■ Enterprise 42U Rack—available in graphite. ■ Enterprise 36U Rack—available in graphite. ■ Enterprise 22U Rack—available in graphite. ■ Rack System/E 41U Rack—available in quartz and graphite. ■ Rack System/E 33U Rack—available in quartz and graphite. ■ Rack System/E 25U Rack—available in quartz. For more information, see “Storage System Racks” on page 128. Note: Racks and rack-mountable components are typically described using “U” measurements, which define the height of the hardware. The supported racks provide the following: ■ Unique Frame and Rail Design. Allows fast assembly, easy mounting and outstanding structural integrity. ■ Dual-redundant power configurations. ■ Thermal Integrity. Front to back natural convection cooling is greatly enhanced by the innovative multiangled design of the front door. ■ Security Provisions. The front and rear door are lockable, which prevents unauthorized entry. ■ Flexibility. Provides easy access to hardware components for operation monitoring. ■ Custom Expandability. Several options allow for quick and easy expansion of the racks to create a custom solution. Enterprise Virtual Array 3000 User Guide 31 Storage System Description Operating Tips and Information This section contains general information on operating the Enterprise Virtual Array 3000. You should familiarize yourself with these topics before operating the storage system. Understanding these topics and following the recommended procedures will contribute to the successful and trouble-free operation of your storage system. Minimum Disk Group Sizes A disk group must contain no fewer than eight disks. The Command View EVA default is four disks. Do not use this default. You must specify a minimum of eight disks. If you remove disks and the result is a disk group with fewer than eight disks, reduced functionality could result. If you discover a disk group with fewer than eight disks, restore the disks necessary so that the disk group has eight disks. Contact your HP authorized service representative for assistance, if necessary. Operating an HSV100 Controller at or Near Storage Limit When operating the HSV100 controller at or near its available storage limit, use the high water threshold warnings to alert you when more storage must be added to the system. Secure Path Version The Enterprise Virtual Array 3000 should always be operated with the supported version of Secure Path. Supported versions of Secure Path are listed in the Enterprise Virtual Array 3000 Release Notes. Dynamic Volume Expansion If you need to increase the capacity of an existing virtual disk, use dynamic volume expansion to increase the capacity. The host operating system must support dynamic volume expansion. 32 Enterprise Virtual Array 3000 User Guide Storage System Description Disk Resource Pending Timeout for Large Configurations In order to ensure continuous operation of disk resources across SAN configurations with disk resource counts greater than eight, it is recommended the Pending Timeout parameter for each disk resource be increased from 180 seconds to 360 seconds. To view and set the Pending Timeout parameter: 1. Open the Microsoft Cluster Administrator. 2. Select a Disk Group resource in the left pane. 3. Right click Each Disk Resource in right pane, one at a time, and select Properties. 4. Select the Advanced tab from the Properties menu. 5. Locate the Pending Timeout value and change it to 360. 6. Click OK. Failover/Failback Failback Preference Setting for HSV100 Controllers Table 2 describes the failback preference mode for each of the operating systems supported with HSV100 controllers and Command View EVA. Table 2: Failback Preference Settings Setting Point in Time No Preference At initial presentation The units are alternately brought online to Controller A or to Controller B. On dual boot or controller resynch If cache data for a LUN exists on a particular controller, the unit will be brought online there. Otherwise, the units are alternately brought online to Controller A or to Controller B. On controller failover All LUNs are brought online to the surviving controller. On controller failback All LUNs remain on the surviving controller. There is no failback except if a host moves the LUN using SCSI commands. Enterprise Virtual Array 3000 User Guide Behavior 33 Storage System Description Table 2: Failback Preference Settings (Continued) Setting Path A - Failover Only Path B - Failover Only Path A Failover/Failback 34 Point in Time Behavior At initial presentation The units are brought online to Controller A. On dual boot or controller resynch If cache data for a LUN exists on a particular controller, the unit will be brought online there. Otherwise, the units are brought online to Controller A. On controller failover All LUNs are brought online to the surviving controller. On controller failback All LUNs remain on the surviving controller. There is no failback except if a host moves the LUN using SCSI commands. At initial presentation The units are brought online to Controller B. On dual boot or controller resynch If cache data for a LUN exists on a particular controller, the unit will be brought online there. Otherwise, the units are brought online to Controller B. On controller failover All LUNs are brought online to the surviving controller. On controller failback All LUNs remain on the surviving controller. There is no failback except if a host moves the LUN using SCSI commands. At initial presentation The units are brought online to Controller A. On dual boot or controller resynch If cache data for a LUN exists on a particular controller, the unit will be brought online there. Otherwise, the units are brought online to Controller A. On controller failover All LUNs are brought online to the surviving controller. On controller failback All LUNs remain on the surviving controller. After controller restoration, the units that are online to Controller B and set to Path A are brought online to Controller A. This is a one time occurrence. If the host then moves the LUN using SCSI commands, the LUN will remain where moved. Enterprise Virtual Array 3000 User Guide Storage System Description Table 2: Failback Preference Settings (Continued) Setting Point in Time Path B Failover/Failback Behavior At initial presentation The units are brought online to Controller B. On dual boot or controller resynch If cache data for a LUN exists on a particular controller, the unit will be brought online there. Otherwise, the units are brought online to Controller B. On controller failover All LUNs are brought online to the surviving controller. On controller failback All LUNs remain on the surviving controller. After controller restoration, the units that are online to Controller A and set to Path B are brought online to Controller B. This is a one time occurrence. If the host then moves the LUN using SCSI commands, the LUN will remain where moved. Table 3 describes the failback default behavior and settings allowed for each operating system. The table indicates when Secure Path is used in conjunction with the operating system. Table 3: Failback Settings by Operating System Operating System ® Default Behavior Settings Allowed Windows Secure Path Autoback done by the host No Preference, Path A/B Failover Only. Sun UNIX® Secure Path Autoback done by the host No Preference, Path A/B Failover Only. HP Secure Path Autoback done by the host No Preference, Path A/B Failover Only. IBM AIX Secure Path Autoback done by the host No Preference, Path A/B Failover Only. Tru64 UNIX Host follows the unit All settings allowed. Recommended setting: Path A/B - Failover/Failback. VMS (7.3 and below) Attempts to move the unit to the first path discovered No Preference, Path A/B Failover Only. VMS (7.3-1 and greater) Host follows the unit All settings allowed. Recommended setting: Path A/B - Failover/Failback. Enterprise Virtual Array 3000 User Guide 35 Storage System Description 36 Enterprise Virtual Array 3000 User Guide Storage System Startup 2 This chapter provides the procedures necessary to complete the installation and begin using your Enterprise Virtual Array 3000. Note: Installation of the Enterprise Virtual Array 3000 should only be done by an HP authorized service representative. The information in this chapter is only intended to provide an overview of the steps involved in the installation and configuration of the storage system. The following topics are included in this chapter: ■ Storage System Connections, page 38 ■ Procedures for Getting Started, page 39 . Enterprise Virtual Array 3000 User Guide 37 Storage System Startup Storage System Connections Figure 6 shows a typical Enterprise Virtual Array 3000 SAN topology: ■ The HSV controllers connect via ports FP1 and FP2 to two Fibre Channel fabrics. The hosts that will access the storage system are connected to the same fabrics. Note that FP1 on each controller is connected to a different fabric to balance the I/O load. ■ Command View EVA, which runs on the storage management appliance, also connects to both fabrics. ■ The controllers connect through two FC loops to the drive enclosures. The loop pair consists of two independent loops, each capable of managing all the disks should one loop fail. Network Interconnection Browser Browser Non-Host Host Z Host X FCA Management Appliance FCA FCA FCA Command View EVA Fabric 2 Fabric 1 FP1 FP2 FP1 Cache Mirror Port Controller A Loop Pair 1 B FP2 Controller B Loop Pair 1 B Drive Enclosures A A FP = Fibre (Host) Port FCA = Fibre Channel Adapter CXO8055B Figure 6: Enterprise Virtual Array 3000 system connections 38 Enterprise Virtual Array 3000 User Guide Storage System Startup Procedures for Getting Started Follow the process below to guide you through the installation of the storage system: 1. Gather information and all related storage system documentation. 2. Contact an HP authorized service representative for hardware configuration. 3. Set up the HSV100 controllers using the OCP. 4. Configure Command View EVA. 5. Prepare the hosts. 6. Configure the storage system using Command View EVA. 7. Make virtual disks available to the hosts. Gathering Information The following items should be available when installing and initializing the Enterprise Virtual Array 3000. They provide information necessary to set up the storage system successfully. ■ HP StorageWorks Enterprise Virtual Array 3000 Release Notes, which is included in the VCS kit. ■ HP StorageWorks Enterprise Virtual Array 3000 Read Me First, which is included in the VCS kit. ■ HP StorageWorks Enterprise Virtual Array 3000 World Wide Name Label, which is included with the storage system hardware. ■ If you purchased Business Copy EVA or Continuous Access EVA, you will need the License Key Retrieval Instruction Sheet included with the software kit. This document contains the Authorization ID required to obtain the software license. ■ HP OpenView Storage Management Appliance Software v2.1. Refer to the EVA3000 Release Notes to determine if there is a newer version of this software. ■ HP StorageWorks Command View EVA v3.1. Refer to the EVA3000 Release Notes to determine if there is a newer version of this software. ■ The kit for the operating system of each host computer. If there are hosts running different operating systems, you will need a boxed kit for each operating system. This kit ships separately from the storage system. Enterprise Virtual Array 3000 User Guide 39 Storage System Startup ■ The kit that contains the hardware documentation and ships with the storage system. That is the box that this manual came in. Host Information Make a list of information for each host (computer) that will be accessing the storage system. You will need the following information for each host: ■ The LAN name of the host ■ A list of World Wide Names of the Fibre Channel adapters, also called host bus adapters, through which the host will connect to the fabric to access the storage system ■ IP address of each host ■ Operating system type ■ Available LUN numbers Entering Data Using the OCP During installation of the storage system, two values are entered using the OCP on one of the controllers: ■ WWN—Mandatory to complete setup. ■ Storage system password—An optional security measure, a password allows only specific instances of the Command View EVA management agent to access the storage system. Setting Up the HSV100 Controllers Using the OCP Fibre Channel protocol requires that each controller pair have a unique Node WWN. A 16-character hexadecimal WWN is assigned to each storage system prior to shipment. Note: A WWN is unique to a storage system and cannot be used for any other storage system or device on the network. Once a WWN is assigned to a controller, you cannot change the WWN while the controller is part of the same storage system. A replacement controller will inherit the WWN assigned to the storage system. 40 Enterprise Virtual Array 3000 User Guide Storage System Startup The Enterprise Virtual Array 3000 World Wide Name Label sheet identifies the WWN for each storage system. The Node WWN labels, similar to the one shown in Figure 7, identify the storage system WWN and checksum. During installation of the storage system, two of the WWN labels are attached to the rack on both sides of the controller enclosures. Figure 8 shows the location of the WWN labels. CXO7545A Figure 7: Sample Node WWN label WWN Labels CXO7601C Figure 8: Location of the World Wide Name labels Enterprise Virtual Array 3000 User Guide 41 Storage System Startup Entering the WWN Table 4 defines the pushbutton functions when entering the WWN or the WWN checksum. This procedure requires use of the OCP. For more information, see “Operator Control Panel” on page 112. Table 4: OCP WWN Pushbutton Functions Button Function S Select a WWN or checksum character by scrolling up through the character list one character at a time. T Select a WWN or checksum character by scrolling down through the character list one character at a time. Accept the current character and select the next character. X If you accept an incorrect character, you can move through all 16 characters, one character at a time, until you display the incorrect character. You can then change the character. W Accept all the WWN or checksum characters. Complete the following procedure to assign the WWN to each pair of controllers. The information needs to be input to one controller only. Either controller can be used. In this sample procedure, the WWN 5000-1FE1-0000-0000 is entered. Note: Applying power to the rack when the controller power switches are on can prevent proper controller initialization. 1. Place the power switches on both controllers to the Off position. 2. Apply power to the rack. 3. On both controllers, place the power switch to On. HSV100 Startup Note: This display may not occur for up to two minutes. ******************** 42 Enterprise Virtual Array 3000 User Guide Storage System Startup 4. The WWN entry display appears with a 0 in each of the 16 positions. Enter WorldWide Name 0000-0000-0000-0000 5. On either controller, press S or T until the first character display is 5. Press X to accept this character and select the next. 6. Repeat Step 5 to enter the remaining characters 000-1FE1-0000-0000. Enter WorldWide Name 5000-0000-0000-0000 Enter WorldWide Name 5000-1FE1-0000-0000 7. Press W to enter the WWN and select the checksum entry mode. Enter WWN Checksum 00 Continue with “Entering the WWN Checksum”. Entering the WWN Checksum The second part of the WWN entry procedure is to enter the 2-character checksum. In this sample procedure, the checksum HS is entered. 1. The initial WWN checksum entry display appears with a 0 in both positions. Enter WWN Checksum 2. Press S or Tuntil the first character is H. Press X to accept H and select the second character. Enter WWN Checksum 3. Press S or Tuntil the second character is S. Press W to accept the checksum and exit. Enter WWN Checksum 00 H0 HS 4. The default display appears indicating that all data entered is valid. Enterprise Virtual Array 3000 User Guide 43 Storage System Startup If you enter an incorrect WWN or checksum, the data will be rejected and you must repeat the procedure. Note: An active (Flashing) display, an error condition, or a user entry (pressing a pushbutton) overrides the default display. When none of these conditions exist, the default display appears after approximately 15 seconds. Setting the Storage System Password The eight-character, alphanumeric storage system password feature enables you to restrict certain functions to selected Command View EVA management agents. Table 5 describes the pushbutton functions when using the password feature. Table 5: OCP Password Pushbutton Functions Button Function S Select a password character by scrolling up through the character list one character at a time. T Select a password character by scrolling down through the character list one character at a time. X ■ W Accept all the password characters. Move from the default display to the system menu tree. ■ Move from the system password display to the password entry display. ■ Accept the current character and select the next character. If you accept an incorrect character, you can loop through the display, one position at time, to select the character to be changed. Complete the following procedure to set the password. In this sample procedure, the password JWMFZJJP is entered. 44 Enterprise Virtual Array 3000 User Guide Storage System Startup 1. Select a unique, eight-character password using uppercase or lowercase letters A through Z. 2. From the default menu display (Storage System Name or Node World Wide Name), press any pushbutton to display the menu tree. 3. Press T to scroll through the menu options until System Password is active (Flashing). Press X to select the system password option. 4. Press X to select change password. Shutdown System System Password Change Clear The Enter Password function displays the default password, AAAAAAAA. Enter Password AAAAAAAA 5. Select the first character of the new password by pressing S or T until J appears. 6. Press X to accept this character and select the next character. 7. Repeat the process to enter the remaining password characters, WMFZJJP. Enter Password JWMFZJJP 8. Press W twice to enter the password and return to the default menu display. The controller pair setup is complete. Note: After the WWN and password have been input to the controllers, the storage system must be initialized using Command View EVA. See the Command View EVA Getting Started Guide for information on initializing the storage system. Enterprise Virtual Array 3000 User Guide 45 Storage System Startup Installing Command View EVA Command View EVA is installed on the OpenView storage management appliance and runs in the OpenView environment. Installation may be skipped if the latest version of Command View EVA is running on the storage management appliance. For information on the latest version of Command View EVA, see the following website: http://h18006.www1.hp.com/storage/software.html To install a new version, locate the management appliance update CD-ROM and the associated documentation that was shipped with the storage system. Follow the instructions in the HP OpenView Storage Management Appliance Update Installation Card to install the new software. Installing Optional EVA Software Licenses If you purchased optional EVA software, it will be necessary to install the license. Optional software available for the Enterprise Virtual Array 3000 includes Business Copy EVA and Continuous Access EVA. Refer to the documentation included with the software for instructions on installing the license. Cable Requirements When an Enterprise Virtual Array is installed, an SC–to–LC (1-Gb to 2-Gb) cable is required for host connectivity. Table 6 and Table 7 provide a listing of available cables. Table 6: LC-SC cables Length 46 Description HP Part Number 2.0 m CA ASSY, LC-SC, Optical 2M 187891-002 5.0 m CA ASSY, LC-SC, Optical 5M 187891-005 15.0 m CA ASSY, LC-SC, Optical 15M 187891-015 30.0 m CA-ASSY, LC-SC, Optical 30M 187891-030 50.0 m CA-ASSY, LC-SC, Optical 50M 187891-050 Enterprise Virtual Array 3000 User Guide Storage System Startup Table 7: LC-LC Cables Length Description HP Part Number 2.0 m 2-meter LC-LC Multi-Mode Fibre Cable 221692-B21 5.0 m 5-meter LC-LC Multi-Mode Fibre Cable 221692-B22 15.0 m 15-meter LC-LC Multi-Mode Fibre Cable 221692-B23 30.0 m 30-meter LC-LC Multi-Mode Fibre Cable 221692-B26 50.0 m 50-meter LC-LC Multi-Mode Fibre Cable 221692-B27 Enterprise Virtual Array 3000 User Guide 47 Storage System Startup 48 Enterprise Virtual Array 3000 User Guide Command View EVA 3 This chapter provides an overview of Command View EVA — the management software for the Enterprise Virtual Array 3000. For more information about Command View EVA, refer to the HP StorageWorks Command View EVA Getting Started Guide, which can be downloaded from the following web site: http://h18006.www1.hp.com/products/sanworks/managementappliance/document ation.html The following topics are included in this chapter: ■ Introduction to Command View EVA, page 50 ■ Launching Command View EVA, page 51 ■ Organization of the Interface Window, page 53 ■ Setting Storage Management Agent Options, page 57 ■ Setting System Options, page 58 ■ Storage System Managed by Another Management Agent, page 59 ■ Controlling and Monitoring Storage System Components, page 60 Enterprise Virtual Array 3000 User Guide 49 Command View EVA Introduction to Command View EVA Command View EVA is the user interface through which you communicate with and manage an Enterprise Virtual Array 3000. The Command View EVA software is installed on an HP OpenView Storage Management Appliance and runs in the environment provided by the HP OpenView Storage Management Appliance Software. When installed on the management appliance, the Command View EVA software creates a management agent, which communicates with the storage system. The client of the management agent is a standard web browser. The relationship of Command View EVA and a storage system is shown in Figure 2 on page 25. Command View EVA is launched from the Storage Management Appliance Software interface. 50 Enterprise Virtual Array 3000 User Guide Command View EVA Launching Command View EVA To access Command View EVA, browse to the Storage Management Appliance and log in. The Storage Management Appliance Home page displays, as shown in Figure 9. Figure 9: OpenView Storage Management Appliance Home page To launch Command View EVA, use one of the following methods: ■ Select Devices from the list of options in the Content pane (see Figure 9). The Devices page displays. Select command view eva. ■ From the menu bar of the Home page, select Devices > command view eva. Command View EVA launches in a new window as shown in Figure 10. Enterprise Virtual Array 3000 User Guide 51 Command View EVA Figure 10: HSV Storage Network Properties page Note: If an uninitialized storage system is selected in the Navigation pane, a View Events button appears to the right of the Discover button in the Content pane of the HSV Storage Network Properties display. 52 Enterprise Virtual Array 3000 User Guide Command View EVA Organization of the Interface Window The Command View EVA user interface is organized like the Storage Management Appliance interface. There are three panes in the window, as shown in Figure 11: ■ Session pane ■ Navigation pane ■ Content pane Figure 11: The three panes of the interface window Note: The Basic license for VCS software is no longer required, however, it is still reflected in the Initialized Storage System Properties window and is always shown as YES. Enterprise Virtual Array 3000 User Guide 53 Command View EVA The Session Pane The Session pane, shown in Figure 12, displays information about the specific management agent you are using: ■ The StorageWorks software component you are using (Command View EVA). ■ The name and IP address of the Storage Management Appliance that is running the management agent you are using. ■ Buttons that control management agent operations. They are: — Root View–displays the HSV Storage Network Properties page — Agent Options–selects interface and agent options — Help–displays online help in a new window Figure 12: Session pane The Navigation Pane The Navigation pane, shown in Figure 13, is a hierarchy of folders that organize components that represent the logical structure of the storage system. These logical structures, which are examined further in “Controlling and Monitoring Storage System Components” on page 60, are: ■ Virtual disks ■ Hosts ■ Disk Groups ■ Data Replication ■ Hardware Note: Multiple storage systems can be controlled and displayed under the HSV Storage Network. 54 Enterprise Virtual Array 3000 User Guide Command View EVA Figure 13: Navigation pane Adding a Folder The initial folder structure is simple, but you can add layers of subfolders to customize the organization of Vdisks and hosts. For example, to group a number of hosts into a category, click on the top level host folder and add a subfolder in which to group those hosts. Then move your hosts into the subfolder. Note: Folders may be created only within the virtual disks and hosts folders. Navigating Through Folders You can “drill down” into any folder for more specific information. For example, to locate information on a specific virtual disk, start at the top-level virtual disk folder and click on the subfolders until you locate the virtual disk in question. Note: Click a folder’s + symbol to expand it without updating the Content pane for quicker access to subcomponents. The Content Pane The Content pane, shown in Figure 14, displays information on the object you selected in the Navigation pane and presents control actions you can perform. Enterprise Virtual Array 3000 User Guide 55 Command View EVA The ? button, which is in the upper right corner of the Content pane, displays help for that page. Additional ? buttons also exist within the Content pane, that provide field-level help. Figure 14: Content pane 56 Enterprise Virtual Array 3000 User Guide Command View EVA Setting Storage Management Agent Options Command View EVA is a storage management agent. Management agent options are settings that affect the actions, attributes, and appearance of the management agent. To access the option pages, click the Agent Options button on the Session pane, as shown in Figure 15. The agent options available are shown in Table 8. Figure 15: Agent Options button on the Session pane Table 8: Agent Options Options Description Discover storage systems Instructs the management agent to look for new storage systems on the fabric. Storage system password access Establishes a password interlock between the management agent and individual storage systems. Remote access password options Displays the Remote Access Password Options page. Allows the user to view and manage access information so applications on the Storage Management Appliance can communicate with applications on remote systems. Licensing options Adds or displays software license keys. User interface options Establishes how the interface displays and operates. Page footer message options Set a message that will appear at the bottom of each Content pane page. Enterprise Virtual Array 3000 User Guide 57 Command View EVA For more information on a specific option, log in to Command View EVA and click the ? button on the page for that option. Setting System Options Command View EVA allows you to configure the management agent system options from the System Options page (see Figure 16). To access the System Options page, click an initialized storage system in the Navigation pane, then click Set Options on the Initialized Storage System Properties page. The options available to the user on the System Options page are described in Table 9 Figure 16: Options buttons on the System Options page Table 9: System Options Options Description Configure event notification Configures which events generate SNMP trap notifications. Configure host notification Allows user to modify or add new host entries to which the SNMP trap notifications will be sent. Set system operational policies Provides option to set policy for the disk drives to be added to a disk group manually or automatic. Set time options Provides options for setting storage system time. For more information on a system option, log in to Command View EVA and click the ? button on the System Options page. 58 Enterprise Virtual Array 3000 User Guide Command View EVA Storage System Managed by Another Management Agent A management agent can control multiple storage systems and multiple management agents can also control a single storage system. However, only one agent is allowed to manage a storage system at a time. Password protection controls management agent access to storage systems. When multiple management agents reside on the same fabric, without password protection, any management agent on the fabric could access any storage systems on the fabric. The display shown in Figure 17, appears if another management agent is detected. Follow the instructions displayed. Figure 17: Storage System Managed by Another Agent Enterprise Virtual Array 3000 User Guide 59 Command View EVA Controlling and Monitoring Storage System Components This section discusses controlling and monitoring storage system components. The components controlled using Command View EVA are: ■ Virtual Disks ■ Hosts ■ Disk Groups ■ Data Replication Groups ■ Hardware All of these components are accessible using the folders in the Navigation pane, as shown in Figure 18. Figure 18: Storage system components Virtual Disks A virtual disk (Vdisk) is a virtualized disk drive created by the controllers as storage for one or more hosts. Virtual disk characteristics provide a specific combination of capacity, availability, performance, and accessibility. The controller pair manages virtual disk characteristics within the disk group specified for the virtual disk. The host computer sees the virtual disk exactly like it would see a physical disk with the same characteristics. 60 Enterprise Virtual Array 3000 User Guide Command View EVA Note: The maximum number of virtual disks is 512. One virtual disk can be presented to multiple hosts. The maximum size of a virtual disk is 2047 GB. The maximum number of presentations is 8192. There are three types of virtual disks: ■ Active member of a virtual disk family—a virtual disk that is accessed by one or more hosts for storage. An active member of a virtual disk family is automatically created whenever a new virtual disk family is created. An active virtual disk member and its snapshot(s), if one or more exist, constitute a virtual disk family. ■ Snapshot virtual disk—a virtual disk that reflects the contents of another virtual disk at a particular point in time. A snapshot operation can be done only to an active member of a virtual disk family. The active virtual disk member and its snapshots constitute a virtual disk family. A snapshot is intended to be temporary. Note: A maximum of seven snapshots per virtual disk can exist at one time. Business Copy EVA must be installed to enable the snapshot and Snapclone features of the storage system. ■ Virtual disk Snapclone—a Virtually Instantaneous Snapclone is a virtual disk that is an exact copy of another virtual disk at a particular point in time. Only an active member of a virtual disk family can be snapcloned. The snapclone, like a snapshot, reflects the contents of the source virtual disk at a particular point in time. Unlike the snapshot, the snapclone is an actual clone of the source virtual disk and becomes an independent active virtual disk member of its own disk family when all the data is replicated. A snapclone can be presented to hosts and used for storage while the data is replicating. Within the Virtual Disks folder in the Navigation pane are Vdisk families. You can click on any one of the Vdisk families within the virtual disk folder to see the properties page for a specific Vdisk family. The Virtual Disks folder is accessible using the folder structure in the Navigation pane, as shown in Figure 19. Enterprise Virtual Array 3000 User Guide 61 Command View EVA Figure 19: Virtual Disk folder Presenting a Host A host can be selected for presentation (that is, a virtual disk made available to a host). Two choices exist: ■ Select a host for presentation—indicates that the host can use the virtual disk for data storage. The host will see the virtual disk at the next available LUN. ■ Select a host and LUN for presentation—indicates that the host can use this virtual disk for data storage. The host will see the virtual disk at the specified LUN. Hosts A host is a computer that operates applications relative to a storage system. A host uses one or more virtual disks created and presented by the controller pair. Each host connects to the fabric through one or more Fibre Channel adapters (FCAs). An FCA is a hardware and firmware device that enables a host computer to use the Fibre Channel transmission protocol. Each Fibre Channel port on a host adapter has a World Wide Name (WWN). Typically, the host operating system reports the WWNs of all FCA ports in the host. The WWN also appears on a sticker on the FCA board. The Host folder is accessible using the folder structure in the Navigation pane, as shown in Figure 20. 62 Enterprise Virtual Array 3000 User Guide Command View EVA Figure 20: Host folder Properties of individual hosts are accessed by selecting a specific host within the hosts folder. Selecting a host displays the Host Properties window, as shown in Figure 21. Figure 21: Host Properties page Enterprise Virtual Array 3000 User Guide 63 Command View EVA Adding a Host Before a host can use the storage system's virtual disks, the host must be known to the storage system. This process is called “adding a host.” Adding a host creates a path from the storage system to one host FCA port. Additional host FCA ports can be specified as a modification to the host properties. Deleting a Host Deleting a host removes it from the list of hosts that the storage system maintains. You cannot delete a host if there are any virtual disks presented to it. Modifying a Host The following actions are available on the Host Properties page General tab: ■ Change the node name ■ Change the IP address ■ Change the operating system type ■ Move the host from its current folder to a different one ■ Enable or disable direct eventing ■ Delete a host Note: The only changes that you can perform on an existing host are shown above. To specify any other property characteristics, you must delete the host, then add it again. Using the Presentation Tab Selecting the Presentation tab generates a display showing the Vdisks that have been presented to the selected host. Working with Ports The options available from the Host Properties page Ports tab let you add or delete adapter ports. To add a port: 1. Click Add Port on the Ports tab. 2. Select a World Wide Name from the drop-down list on the Add a Host Port page or enter the host port WWID manually. 3. Click Add Port. 64 Enterprise Virtual Array 3000 User Guide Command View EVA Disk Groups A disk group is the set or pool of physical disk drives in which a virtual disk is created. The physical disk is a disk drive that plugs into a drive bay and communicates to the controllers through the device-side Fibre Channel loops. Only the controllers can communicate directly with the physical disks. Collectively, the physical disks are called the array and constitute the storage pool from which the controllers create virtual disks. One controller pair can support up to 56 physical disks. The following information is true about disk groups: ■ Each physical disk drive belongs to only one disk group. ■ Multiple virtual disks can be created in one disk group, up to the disk group's capacity. ■ Each virtual disk exists entirely within one disk group. ■ A disk group can contain all the physical disk drives in a controller pair's array or it may contain a subset of the array. ■ The minimum number of disks in a disk group is eight. One disk group (the Default Disk Group) is created when the system is initialized. Disk groups can be added, as needed, up to a maximum of 16. The Default Disk Group is accessible using the folder structure in the Navigation pane, as shown in Figure 22. Figure 22: Top level disk group Enterprise Virtual Array 3000 User Guide 65 Command View EVA Selecting a disk group within the disk groups folder in the Navigation pane displays the Disk Group Properties page, as shown in Figure 23. Figure 23: Disk Group Properties page Working with Disk Groups The following operations can be performed on a disk group: 66 ■ Creating a disk group—combines physical disk drives into one disk group. The system automatically selects drives based on their physical locations. ■ Modifying a disk group—changes disk group properties, including the disk failure protection level, occupancy alarm level, disk group name, or comments. ■ Adding a new disk to a disk group—adds a new physical disk to a disk group. ■ Deleting a disk group—frees all physical drives contained in that disk group. Enterprise Virtual Array 3000 User Guide Command View EVA ■ Locating a disk group—causes an LED to light up allowing you to identify the physical drives that make up the disk group. ■ Ungrouping a disk—removes a disk from a disk group. Note: The disk is not deleted from the disk group but is actually ungrouped. If the disk is to be removed from the rack, use the locate function so that it can be physically identified in the rack before it is ungrouped. You cannot delete the only disk group (such as the default disk group). The Delete button is not visible if only one disk group is present. For more information about disk drives, see “Fibre Channel Disk Drives” on page 81. Data Replication If Continuous Access EVA is installed, Command View EVA provides host-independent data replication across two or more Enterprise Virtual Arrays. The storage systems can be located at the same physical site or different physical sites. When the storage systems are located at different sites, Command View EVA provides a disaster tolerant storage and data replication solution. Command View EVA manages data replication functions by organizing Vdisks into data replication (DR) groups. DR groups allow you to manage the replication of a set of Vdisks. The Data Replication folder is accessible using the folder structure in the Navigation pane, as shown in Figure 24. You can perform the following data replication tasks: ■ Add a Vdisk to a DR group—add the selected destination Vdisk family to the DR group. ■ Create a DR group—create up to 64 DR groups in a storage system. ■ Fail over a DR group—when a failure occurs in your source storage system, data fails over to the destination storage system to allow continued access. ■ Modify a DR group—modify the name and failsafe properties of a DR group. ■ Delete a DR group—delete a DR group from a source storage system. For detailed information on the use of Command View EVA data replication functions, refer to Command View EVA online help. Enterprise Virtual Array 3000 User Guide 67 Command View EVA Figure 24: Data Replication folder Hardware The hardware folders provide a view into the operation of various physical components of the storage system: ■ Rack—a floor-standing structure primarily designed for, and capable of, holding and supporting storage system equipment. ■ Controller—a hardware and firmware device that manages communications between host systems and other devices. ■ Enclosures — Drive enclosure—contains up to 14 physical disk drives and their supporting structures. — Controller enclosure—holds one or more controllers, power supplies, blowers, cache batteries, transceivers, and connectors. ■ Physical Disk Drive—a disk drive that plugs into a drive enclosure bay and communicates with the controllers through device-side Fibre Channel loops. Note: The FC loop switches are not displayed by Command View EVA. 68 Enterprise Virtual Array 3000 User Guide Command View EVA The Hardware folder is accessible using the folder structure in the Navigation pane, as shown in Figure 25. Figure 25: Hardware folder Racks The rack container is located within the Hardware folder and is accessible using the folder structure in the Navigation pane, as shown in Figure 26. Each container displays the objects located in that rack. One rack container exists for each rack connected to the storage environment. Figure 26: Rack container Enterprise Virtual Array 3000 User Guide 69 Command View EVA For more information about racks, see “Storage System Racks” on page 128. Controllers Each storage system has a pair of controllers. The controller properties can be viewed by expanding the controller enclosure icon, then selecting the desired controller. The following properties are available for each controller: ■ General—identifies the general properties of the controller. These properties include identification, condition and state, cache memory, and location information. ■ Host Ports—identifies the WWN, operational state, speed, and switch connection for each host port. ■ Device Ports—identifies the WWN, loop ID, and operational state for each loop pair. ■ Enclosure—identifies the location, blowers, power, temperature and cache battery system information. The controller enclosure and controller objects are accessible using the folder structure in the Navigation pane, as shown in Figure 27. 70 Enterprise Virtual Array 3000 User Guide Command View EVA Figure 27: Controller folder For more information about controllers, see “HSV100 Controllers” on page 111. Enclosures Two types of hardware enclosures exist for the Enterprise Virtual Array, disk enclosures and controller enclosures. ■ Disk enclosure—a disk enclosure contains up to 14 physical disk drives and their supporting structures. Each of the vertical positions in the enclosure where the disk drive is located is called a bay. The bays are numbered sequentially in decimal numbers, starting at the left when you are facing the front of the rack. Enterprise Virtual Array 3000 User Guide 71 Command View EVA ■ Controller enclosure—a controller enclosure is the mechanical enclosure that protects the controller circuit board and its associated components for a controller pair. Except for the cache batteries and blower assemblies, all components in the controller enclosure are considered one assembly and must not be separated. The disk enclosure object is accessible using the folder structure in the Navigation pane, as shown in Figure 28. Figure 28: Disk enclosure folder The controller enclosure object is accessible using the folder structure in the Navigation pane, as shown in Figure 29. 72 Enterprise Virtual Array 3000 User Guide Command View EVA Figure 29: Controller Enclosure Properties page For more information about enclosures, see “Fibre Channel Drive Enclosures” on page 76 and “HSV100 Controllers” on page 111. Enterprise Virtual Array 3000 User Guide 73 Command View EVA 74 Enterprise Virtual Array 3000 User Guide Storage System Hardware Components 4 This chapter describes the HP StorageWorks Enterprise Virtual Array 3000 hardware components. The following topics are included in this chapter: ■ Fibre Channel Drive Enclosures, page 76 ■ HSV100 Controllers, page 111 ■ Storage System Racks, page 128 Enterprise Virtual Array 3000 User Guide 75 Storage System Hardware Components Fibre Channel Drive Enclosures The major enclosure components are: ■ 2.125-Gb, dual loop, 14-drive enclosure. ■ Dual-loop, FC-AL I/O modules and cable components that are the interface between the drives and the host controllers. ■ Copper Fibre Channel cables ■ Fibre Channel disk drives and drive blanks. ■ Power and cooling components that include power supplies, cords, and blowers. ■ EMU that monitors the operation of the enclosure and the elements while displaying element status. When the EMU detects a condition that could affect operation, it generates a local alarm and reports the condition to the controller. Enclosure Layout The disk drives mount in the bays in the front of the enclosure. See Figure 30. These bays are numbered from the left (bay 1) to the right. A drive is referred to by the bay number. The drive in bay 1 is drive 1, the drive in bay 8 is drive 8. The enclosure status icons are located in the lower-right, front corner t. 1 to r Drive bays t Enclosure status icons 1 3 2 5 4 6 7 8 9 10 11 12 13 14 15 CXO7942A Figure 30: Drive enclosure—front view Figure 31 shows the rear view of the Fibre Channel drive enclosure. 76 Enterprise Virtual Array 3000 User Guide Storage System Hardware Components 1 2 3 4 5 6 7 1 2 3 4 5 6 7 EMU I/O module B Blower 1 Power supply 1 Blower 2 Power supply 2 I/O module A CXO7950A Figure 31: Drive enclosure—rear view FC-AL I/O Modules Two I/O modules provide the interface between the drive enclosure elements and the host controllers. See Figure 32 and Figure 33. They route data to and from the drives using Loop A and Loop B, the dual-loop configuration. For redundancy, only dual-controller, dual-loop operation is supported. Each controller is connected to both I/O modules in each drive enclosure. CXO7421A Figure 32: I/O module B CXO7420A Figure 33: I/O module A The I/O modules are functionally identical and similar in appearance, but they are not interchangeable. See Figure 31. The modules are designed to ensure that you can install only: ■ The A module (7) at the right end of the enclosure behind drive bay 1. ■ The B module (2) at the left end of the enclosure next to the EMU. Enterprise Virtual Array 3000 User Guide 77 Storage System Hardware Components The I/O modules are major components in the Fibre Channel loop. Each module has two ports that can both transmit and receive data for bidirectional operation. Activating a port requires connecting a transceiver to the port via Fibre Channel cables. The port function depends upon the loop. See Figure 34. 4 2 1 2 3 4 3 Loop A bottom port Loop A top port Loop B bottom port Loop B top port 1 CXO7954A Figure 34: Input and output ports I/O Module Status Displays Three green LEDs on the I/O modules display the status. See Figure 35. The LED status displays for an operational I/O module are shown in Table 10. The status displays for a nonoperational I/O module are shown in Table 11. \ 1 2 3 Top port status LED Power status LED Bottom port status LED 1 2 3 CXO7488A Figure 35: I/O module status LEDs 78 Enterprise Virtual Array 3000 User Guide Storage System Hardware Components Table 10: Operational I/O Module LED Descriptions and Status Displays Top LED Power LED Bottom LED Off On Off I/O Module is operational On Flashing, then On On Top Port—FC-AL signal detected. Power—Flashes for about 90 seconds. The LED is On constantly; ■ Bottom Port—FC-AL signal detected. This display can occur during the first minute after initial power application. On On On Descriptions ■ ■ Top Port—FC-AL signal detected. Power—Present. ■ Bottom Port—FC-AL signal detected. ■ ■ This display can occur one minute after the initial application of power. Flashing Flashing Flashing Enterprise Virtual Array 3000 User Guide When the locate function is active all three LEDs flash in synchronization. The locate function overrides all other LED functions. Therefore, an error may exist when this function is active. 79 Storage System Hardware Components Table 11: Nonoperational I/O Module LED Descriptions and Status Displays Top LED Power LED Bottom LED On On Off Descriptions Top Port—FC-AL signal detected. Power—Present (After one minute the power LED will be On constantly). ■ Bottom Port—No FC-AL signal detected. Check transceiver and fiber cable connections. ■ ■ Note: This status is also displayed when connected to a FC Loop switch. Off On On ■ Flashing On On ■ On On Flashing Top Port—FC-AL signal detected. Power—Present. Bottom Port—EMU detected possible transceiver problem. Check transceiver and fiber cable connections. Top Port—No FC-AL signal detected. Check transceiver and fiber cable connections. ■ Power—Present. ■ Bottom Port—FC-AL signal detected. Top Port—EMU detected possible transceiver problem. Check transceiver and fiber cable connections. ■ Power—Present. ■ Bottom Port—FC-AL signal detected. Note: The EMU will not blink the bottom LED on its own. It will only blink in response to a locate command. You can blink each of the lights independently for a locate and, if so, they may not be in unison. Off Off Off No I/O module power. I/O module is nonoperational. ■ Check power supplies. If power supplies are operational, replace I/O module. ■ ■ 80 Enterprise Virtual Array 3000 User Guide Storage System Hardware Components I/O Module Power The I/O module +5 VDC power sensing device protects the modules against overcurrent conditions. If the +5 VDC current exceeds 2.5 A rms (nominal), the sensor opens, removing the +5 VDC input from the I/O module, thereby disabling the module until: ■ The defective I/O module is replaced. ■ The overcurrent condition no longer exists. Note: A disabled I/O module cannot transfer data and disconnects all the drives in the enclosure from the loop. Copper Fibre Channel Cables Copper Fibre Channel cables are used to connect the drive enclosures to each other, and to the controller enclosures. The cables are available in 0.6-meter and 2.0-meter lengths. Copper cables provide performance comparable to fiber optic cables. Fibre Channel Disk Drives HP disk drives are hot-pluggable and include the following features: ■ Dual-ported 2 Gbps FC-AL interface that allows up to 120 drives to be supported per FC-AL pair. Only 56 drives are supported on the Enterprise Virtual Array 3000. ■ A variety of capacities and spindle speeds: — 36 GB, 10K and 15K rpm — 72 GB, 10K and 15K rpm — 146 GB, 10K rpm ■ Compact, direct-connect design for maximum storage density and increased reliability and signal integrity. ■ Improved drive cooling essential for high performance. ■ Better vibration damping for improved performance. ■ Greater component commonality throughout the Enterprise Virtual Array 3000. Enterprise Virtual Array 3000 User Guide 81 Storage System Hardware Components Up to 14 disk drives can be installed in a Fibre Channel Drive Enclosure. Figure 36 shows the front view of a Fibre Channel disk drive. CXO6695A Figure 36: Fibre Channel disk drive The HP supplied disk drives conform to the enclosure initiated Enclosure Services Interface (ESI). Caution: Controlling air flow within the enclosure requires installing a drive or a drive blank in each drive bay. To avoid overheating, never remove more than one drive or drive blank from an operating enclosure at the same time. To prevent overheating and ensure proper operation, HP recommends installing a drive of equal or greater capacity, or a drive blank, as soon as possible. Drive Status Reporting The three status icons on the front of each drive define the drive operational status. See Figure 37. The LEDs that illuminate these icons are located on the enclosure backplane. To determine the drive status, you must observe the icons described in the following sections. 82 Enterprise Virtual Array 3000 User Guide Storage System Hardware Components Status icons CXO7167A Figure 37: Disk drive status icons location The following sections describe the purpose of each of the icons. Table 12 describes each icon. Table 12: Disk Drive Status Icon Descriptions Icon Description Drive Ready This green LED is a “drive ready” indicator and is On when the drive is idle. Drive On-line The green LED for this icon is controlled by the disk drive. The LED may be Off when: ■ There is no controller on the bus. ■ +5.1 VDC is not available. ■ The drive is not properly installed in the enclosure. Drive Failure The amber LED flashes in synchronization with the other two LEDs in response to the EMU locate command. Depending on the host controller, the LED for this icon can flash when the controller detects an error condition. Enterprise Virtual Array 3000 User Guide 83 Storage System Hardware Components Drive Status Displays When displaying status, the LEDs are either On, Off, or Flashing. In some configurations, the host controller can control the status LEDs. The operational drive LED status displays are shown in Table 13. See Table 14 for the nonoperational drive status LED displays. Table 13: Operational Drive Status Displays Drive Ready Drive On-line Drive Failure Description Flashing (medium speed) On Off Initial startup. On On Off The operational drive is not being accessed. Flashing (high speed) Flashing (medium speed) On The drive is being located. Flashing On Off The drive is operational and active. Note: The drive is configured as part of an array. DO NOT replace an active drive. Table 14: Nonoperational Drive Status Displays Drive Ready Drive On-line Drive Failure On On On Description Indicates no connection or the controllers are offline. Recommended corrective actions: 1. Check power supplies for proper operation. 2. If defective, replace drive. On Off Flashing Indicates drive error/not active. Recommended corrective actions: 1. Verify drive loop continuity. 2. Replace drive. 84 Enterprise Virtual Array 3000 User Guide Storage System Hardware Components Drive Power The drive voltage backplane sensors (+5.1 VDC and +12.1 VDC) can detect a drive overcurrent condition. When a drive overcurrent condition exists, the sensor disconnects the voltage from the drive to prevent writing data to the drive. The drive is disabled until one of the following conditions occurs: ■ The defective drive is replaced. ■ The overcurrent condition no longer exists. Drive Blank To maintain the proper enclosure air flow, you must have a drive or a drive blank in each drive bay. The function of the drive blanks is to control air flow within a bay. See Figure 38. CXO6824A Figure 38: Drive blank Replacing a Disk Drive or Drive Blank To replace a disk, you must complete the procedures outlined in “Customer Replaceable Units” on page 195. The disk replacement kit contains detailed replacement instructions. Enterprise Virtual Array 3000 User Guide 85 Storage System Hardware Components Caution: Never remove more than one drive at a time, as this process can cause the enclosure to overheat. To prevent overheating and ensure proper operation, install a drive of equal or greater capacity, or a drive blank, as soon as possible. Power and Cooling Components This section describes the function and general operation of the enclosure power supplies and blowers. Figure 39 identifies the major power supply assembly components. \ 1 5 6 1 2 3 4 5 6 Power supply assembly Power supply and blower status LED AC Input connector with bail Module latch (port-wine colored) Blower tabs (port-wine colored) Blower element 2 3 4 5 CXO7489A Figure 39: Power supply and blower assembly components Enclosure Power The two power supplies mount in the rear of the enclosure. The supplies are auto-ranging and operate on a country-specific AC input voltage of 202 to 240 VAC ±10%, 50 to 60 Hz, ±5%, (188 to 264 VAC, 47 to 63 Hz). The DC outputs of this power supply are: 86 ■ +5.1 VDC for the EMU, I/O module, backplane, and drives ■ +12.1 VDC for the drives ■ +12.5 VDC for the blower Enterprise Virtual Array 3000 User Guide Storage System Hardware Components The nominal output of each power supply is 499 W, with a peak output of 681 W. A single power supply can support an enclosure with a full complement of disks, blowers, EMU, and I/O module. The power supply circuitry provides protection against: ■ Overloads ■ Short circuits ■ Overheating Power supply status and diagnostic information is reported to the EMU with voltage, current, and temperature signals. See “Regulatory Notices and Specifications” on page 139 for the enclosure power specifications. Temperature Sensing The power supply temperature sensor provides a temperature range signal to the EMU. The EMU uses this signal to set the blower speed. The power supply internal temperature can also set the speed of the blower. The higher the power supply temperature, the faster the speed of the blower. Should the power supply temperature exceed a preset value, the power supply automatically shuts down. Blowers The blower mounts on the rear of the power supply. A power supply connector is the interface between the blower and the enclosure for: ■ Speed control to the blower ■ Blower speed to the EMU through the power supply ■ Power supply high speed enable ■ Blower operating voltage The power-supply-mounted blowers cool the enclosure by circulating air through the enclosure and the elements. The rate at which air moves (the air flow) determines the amount of cooling and is a function of blower speed (rpm). These blowers, under the control of the EMU or the associated power supply, can operate at multiple speeds. This ensures that when the enclosure temperature changes the blowers can automatically adjust the air flow. Enterprise Virtual Array 3000 User Guide 87 Storage System Hardware Components Should a blower be operating too slowly or stopped (a “blower failure”), internal circuitry automatically causes the remaining operational blower to operate at a higher speed. Simultaneously, the error condition is reported in several ways, including the power supply LED, the audible alarm, the enclosure fault LEDs, and the EMU alphanumeric display. Should both blowers fail, the power supplies automatically shutdown. Note: The failure of a power supply +12.5 VDC circuit disables the associated blower. Power Supply and Blower Status Reporting The green status LED on the blower displays the status of both the power supply and the blower. See Table 15 for definitions of the LED displays. Table 15: Power Supply and Blower Status LED Display Blower Status LED Description On Both the power supply and the blower are operational. Flashing The power supply or the blower locate function is active. Off The power supply or the blower is nonoperational. When there is a blower problem, the other blower runs at a higher speed. Recommended corrective actions: 1. Check blower for proper operation. Replace if defective. 2. Check power supplies for proper operation. Replace if defective. Drive Enclosure EMU The EMU provides increased protection against catastrophic failures. The EMU communicates with the HSV Controller to detect conditions such as failed power supplies, failed blowers, elevated temperatures, and external air sense faults. The EMU for Fibre Channel-Arbitrated Loop (FC-AL) drive enclosures is fully compliant with SCSI-3 Enclosure Services (SES), and mounts in the left rear bay of a drive enclosure. See 1, Figure 40. 88 Enterprise Virtual Array 3000 User Guide Storage System Hardware Components 1 EMU 1 Figure 40: EMU location Controls and Displays Figure 41 identifies the location and function of the EMU displays, controls, and connectors. Status LEDs These 3 LEDs are visual indications of the EMU and enclosure status. 2 Alphanumeric display A 2-character, 7-segment alphanumeric display of the enclosure functions and status. 3 Function Select (“top”) pushbutton The primary function of this pushbutton is to select a display group function. The LED is On when an error condition exists. 4 Display Group Select (“bottom”) pushbutton The primary functions of this pushbutton are: ■ View display groups. ■ Control the audible alarm. The LED is On when the audible alarm is muted or disabled. 1 1 2 3 4 5 6 7 CXO6709A 5 6 7 RS232 ONLY—A keyed, RJ45-type connector for use by HP authorized service representative. LCD ONLY—An unused RJ45-type connector. CAB ONLY—A keyed, RJ45-type enclosure address bus connector. WARNING: To reduce the risk of electrical shock, fire, or damage to the equipment, do not plug telephone or telecommunications connectors into the “RS232 ONLY” receptacle. Figure 41: EMU controls and displays Enterprise Virtual Array 3000 User Guide 89 Storage System Hardware Components EMU Functions The primary functions of the EMU include: ■ Using the Enclosure Services Processor (ESP) to control the Enclosure Services Interface (ESI) and communicate with the controllers. ■ Assigning the Enclosure Number (En), based upon the cabinet address bus feature. ■ Displaying the bay 1 loop ID. ■ Monitoring enclosure operation. ■ Detecting, reporting, recording, and displaying conditions. ■ Displaying EMU, enclosure, and element status. ■ Implementing automatic corrective actions for some conditions. ■ Providing enclosure status data to the controllers. ■ Reporting the WWN and the logical address of all drives. Note: Although the EMU can determine the logical address of a drive, the EMU can neither display nor change this information. Command View EVA can display the addresses from the EMU-supplied status information. EMU Monitoring Functions The internal EMU circuitry monitors the enclosure and element functions listed in Table 16. Table 16: EMU Monitoring Functions . Element Blowers Monitored Functions ■ ■ Drives ■ ■ ■ EMU ■ ■ 90 Installation Removal ■ Installation Removal Bypass status ■ Temperature Operation ■ ■ ■ ■ ■ Type Speed (rpm) Loop ID Temperature Drive fault Type Revision level Enterprise Virtual Array 3000 User Guide Storage System Hardware Components Table 16: EMU Monitoring Functions (Continued) Element Enclosure Monitored Functions Enclosure power Enclosure fault ■ Installation Removal Status ■ ■ ■ Installation Removal Status Type Revision level ■ +5 V DC voltage and current +12 V DC voltage and current Total power Temperature ■ Type ■ Link status ■ ■ I/O Module ■ ■ ■ Power Supplies ■ ■ ■ ■ Transceiver ■ ■ ■ ■ Backplane type Backplane revision level Type Revision Level EMU Displays The EMU uses a combination of LEDs, icons, the two-character alphanumeric display, and an audible alarm to indicate the operational status of the enclosure and the enclosure elements. See Table 17. Table 17: EMU Status Indicators Indicator Function Audible Alarm1 2 Any EMU detected condition causes the alarm to sound. Alphanumeric Display3 The 2-character, 7-segment display can display alphanumeric characters. EMU Icons 1. 2. 3. The EMU LEDs above the icons display the enclosure and EMU status. For information about the audible alarm, see “Error Condition Reporting” on page 101. For a description of the LED functions, see “EMU LED Displays” on page 92. For a description of the alphanumeric display functions, see “Using the Alphanumeric Display” on page 93. Enterprise Virtual Array 3000 User Guide 91 Storage System Hardware Components EMU LED Displays The EMU status LEDs are located above the alphanumeric display. See Figure 42. These icons are the same as those on the front, lower right corner of the enclosure. When the EMU and the enclosure are operational, the LEDs, from left to right, are Flashing, On, and Off. 1 1 EMU Status LED This Flashing green LED is the “heartbeat” for an operational EMU. 2 3 2 Enclosure Power Status LED This green LED is On when both the +5 V DC and +12 V DC are correct. 3 Enclosure Fault LED This amber LED is normally Off. The LED is On when an enclosure error condition exits. CXO6819A Figure 42: EMU Status LEDs You can determine the EMU and enclosure status by analyzing the EMU LED displays in Table 18. 92 Enterprise Virtual Array 3000 User Guide Storage System Hardware Components Table 18: EMU LED Displays EMU LED Power LED Fault LED Green Green Amber Status and Recommended Actions Flashing Flashing Flashing The EMU locate function is active. This display has precedence over all others. Fault conditions cannot be displayed when the locate function is active. Flashing On Off The EMU is operational. The enclosure power (both +5 V DC and +12 V DC) is present and correct. There are NO enclosure faults. Flashing On On The EMU is operational. There is an enclosure fault. Check the alphanumeric display error code for detailed information about the problem. Flashing Off Off The EMU is operational. This display may be present when power is initially applied to the enclosure. Note: When the +5 VDC is incorrect, all the LEDs are Off. On On Off There is an EMU fault There is no enclosure fault. Off On Off There is an EMU fault There is no enclosure fault. Off Off Off There is an enclosure fault. Either +5 VDC is incorrect, or both +5 VDC and +12 VDC are incorrect. Other error conditions may exist. Using the Alphanumeric Display The two-character alphanumeric display is located at the top of the EMU. See 1, Figure 43. This 7-segment display provides information about multiple enclosure functions. The pushbuttons control the data displayed or entered. Enterprise Virtual Array 3000 User Guide 93 Storage System Hardware Components 1 2 3 1 2 3 Alphanumeric display Function select (top pushbutton) Display Group select (bottom pushbutton) CXO7373A Figure 43: Alphanumeric display and controls Note: 7-segment display limitations preclude displaying uppercase characters B, K, M, N, Q, R, S, T, V, W, X, Y, or Z, or the lowercase characters a, e, f, g, j, k, l, m, p, q, s, t, v, w, x, y, or z. The lowercase characters b, c, d, h, i, o, r, and u displays are similar to the actual characters. Alphanumeric Display Description The top-level, two-character alphanumeric display (En, Li, rG, Au, and Er), is the display group. The function of the other displays is display-group dependent. The default display is the En, a decimal number in the range 00 through 14. The pushbuttons allow you to select the alphanumeric display or to enter data. ■ The bottom pushbutton enables you to sequentially move between groups and to select a display group. See 3, Figure 43. See Table 19 for a description of these display groups. ■ The top pushbutton enables you to move between the levels within a display group. See 2, Figure 43. Display Groups When you press and release the bottom pushbutton, the alphanumeric display selects a different display group. Table 19 describes the display groups. 94 Enterprise Virtual Array 3000 User Guide Storage System Hardware Components Table 19: EMU Display Groups Display Display Group Description En Enclosure Number The enclosure number is the default display and is a decimal number in the range 00 through 14. See “Using the Enclosure Number Feature,” on page 99 for detailed information. Li Bay 1 Loop ID This display group has a single sublevel display that defines the enclosure bay 1 loop ID. Valid loop IDs are in the range 00 through 7F. rG Reporting Group This display group has two, 2-digit displays that define the reporting group number in the range 0000 through 4095. Au Audible Alarm This display group provides control over the audible alarm or horn. The sublevel displays are audible alarm enabled (on) or audible alarm disabled (oF). See ”Error Condition Reporting,” on page 101 for detailed information. Er Error Condition This display group reads Er when there is an error condition. See ”Error Condition Reporting,” on page 101 for detailed information. Note: Anytime you press and release the bottom pushbutton, the display will change to En, Li, rG, Au, or Er. See 3, Figure 43. A flashing alphanumeric display indicates that you can edit an address, state, or view a condition report. EMU Pushbutton LEDs The pushbutton LEDs define error conditions and the state of the audible alarm. ■ When an error condition exists, the top pushbutton LED is On. — For a single error condition, the LED is On until it is viewed — For multiple errors, the LED is On until the most recent error condition is viewed. ■ The bottom pushbutton LED is On only when the alarm is muted or disabled. Enterprise Virtual Array 3000 User Guide 95 Storage System Hardware Components Audible Alarm Operations Whenever an error condition exists, the audible alarm automatically sounds until all errors are corrected. You have the option of either muting or disabling the alarm. These options establish the following conditions: ■ Disabling the audible alarm prevents it from sounding for any error condition. ■ Muting the alarm silences it for the existing condition, but any new condition causes the alarm to sound. Audible Alarm Patterns The audible alarm sound pattern differs depending on the type of error condition. Table 20 illustrates the duration and the approximate relationship of the alarm patterns. The most severe, active error condition controls the alarm pattern. Table 20: Audible Alarm Sound Patterns Condition Type Cycle 1 Cycle 2 UNRECOVERABLE CRITICAL NONCRITICAL INFORMATION Legend Alarm On Alarm Off Controlling the Audible Alarm You can control the alarm with the pushbuttons. This process includes muting, enabling, and disabling the alarm. When an error condition exists and the alarm sounds, you can silence it in the following ways: 96 ■ Correct all errors, silencing the alarm until a new error occurs. ■ Mute the alarm by pressing and holding the bottom pushbutton. The alarm remains off until another error occurs, or until you enable (“unmute”) the alarm. When a new error occurs, the alarm sounds and the pushbutton LED is Off. Enterprise Virtual Array 3000 User Guide Storage System Hardware Components Using the mute feature ensures that you are aware of more severe errors and provides you with the capability of correcting them promptly. ■ Disable the alarm to prevent any error condition from sounding the alarm. Note: Disabling the alarm does not prevent the EMU alphanumeric display from displaying Er. Nor does it prevent Command View EVA from displaying the error condition report. When the alarm is enabled (on), the bottom pushbutton LED is Off. Enabling the Audible Alarm Complete the following procedure to enable the alarm. 1. Press and release the bottom pushbutton until the alphanumeric display is Au. 2. Press and hold the top pushbutton until the alphanumeric display is a Flashing oF (Audible Alarm Off). Note: When the alarm display is flashing, pressing and holding the top pushbutton causes the display to rapidly change between on and oF. Pressing and releasing the top pushbutton causes the display to select the next state. 3. Press and release the top pushbutton to change the display to a Flashing on (Audible Alarm On). 4. Press and release the bottom pushbutton enable the alarm and to display Au. The bottom pushbutton LED is now Off. Muting or Unmuting the Audible Alarm When there is an error condition, determine one of the following: ■ The error does not require immediate corrective action. ■ You cannot correct the error at this time. For example, the error may require a replacement element. Enterprise Virtual Array 3000 User Guide 97 Storage System Hardware Components You can mute the audible alarm by completing the following procedure. Note: Er will be displayed in the alphanumeric display when an error condition is present. 1. Press and hold the bottom pushbutton until the LED is On. A muted alarm will remain off until a new error condition occurs. 2. To unmute the alarm, press and hold the bottom pushbutton until the LED is Off. When a new error condition occurs, the alarm will sound. Disabling the Audible Alarm Disabling the audible alarm affects only the alarm on the disk enclosure. It does not affect condition report displays on the EMU alphanumeric display or detection of errors by Command View EVA. Complete the following procedure to disable the alarm: 1. Press and release the bottom pushbutton until the alphanumeric display is Au. 2. Press and hold the top pushbutton until the alphanumeric display is a Flashing on (Audible Alarm On). Note: When the alarm display is flashing, pressing and holding the top pushbutton causes the display to rapidly change between on and oF. Pressing and releasing the top pushbutton causes the display to select the next state. 3. Press and release the top pushbutton to change the display to a Flashing oF (Audible Alarm Off). 4. Press and release the bottom pushbutton to disable the alarm and display Au. The bottom pushbutton LED is now On. Note: A disabled audible alarm cannot sound for any error condition. To ensure that you are immediately alerted to error conditions, it is recommended that the alarm mute function be used rather than the alarm disable function. If you must use the disable function, remember to re-enable the audible alarm as soon as possible to ensure that you are alerted to errors. 98 Enterprise Virtual Array 3000 User Guide Storage System Hardware Components Using the Enclosure Number Feature This section provides a general description of the purpose, function, and operation of the EMU enclosure number (En) feature. En Description In a single rack configuration, the En is a decimal number in the range 00 through 14, which is automatically assigned by the enclosure address bus. By default, the two-character alphanumeric display shows this number. Pressing the bottom pushbutton changes the display to En, the En display mode. When the display is En, pressing and releasing the top pushbutton displays the En. A display of 00 indicates that the enclosure is not connected to the enclosure address bus. When this condition exists, there is no EMU-to-EMU communication over the enclosure address bus. A display of 01 through 14 indicates that the enclosure is physically connected to the enclosure address bus and can exchange information with other enclosures on the enclosure address bus. The decimal number indicates the physical position of the enclosure in relation to the bottom of the rack. ■ 01 is the address of the enclosure connected to the bottom connector in the first (bottom) junction box (JB). ■ 14 is the address of the enclosure closest to end of the bus, the top connector in the last (upper) JB. Note: The enclosure address bus connection determines the En. For a single rack, the display is a decimal number in the range 01 through 14. You can only display, never change the En value. Unless there is an error condition, the display automatically returns to the En (01 through 14) one minute after a pushbutton was last pressed. Enclosure Address Bus The enclosure address bus is composed of cables and junctions boxes (JBs) that interconnect the drive enclosures and controller enclosures to provide a means for managing and reporting status and environmental conditions within the cabinet. Each EMU collects data for its associated enclosure. The various address bus components are shown in Figure 44. Enterprise Virtual Array 3000 User Guide 99 Storage System Hardware Components Connecting the enclosures to the cabinet JBs establishes the enclosure address bus. The enclosures are automatically numbered, based on their physical distance from the bottom terminator. The drive enclosure numbers are always assigned by the enclosure address bus. Connecting the EMU CAB ONLY connector to a enclosure address bus JB automatically establishes an En of 01 through 14. Any drive enclosure not connected to the enclosure address bus is assigned an En of 00. Figure 45 shows the enclosure numbering for a four disk enclosure configuration. Junction Boxes (JB) 1 2 3 JB 1–Enclosures 1 and 2 JB 2–Enclosure 3 JB 3–Enclosures 4 and 5 Components 4 5 5 7 3 6 7 4 JB-to-JB cable 210 mm (8.25 in), 1 of 2 cables JB-to-Enclosure cable 381 mm (15 in), 1 of 5 cables Bottom terminator Top terminator 2 1 6 CXO8060B Figure 44: Enterprise Virtual Array 3000 enclosure address bus components 100 Enterprise Virtual Array 3000 User Guide Storage System Hardware Components . 1–5 Enclosures 1 through 5 5 4 3 2 1 CXO8061B Figure 45: Enterprise Virtual Array 3000 enclosure numbering Error Condition Reporting The EMU constantly monitors enclosure and element operation and notifies you of conditions that could affect operation. When an error condition is detected, the following action is taken: ■ The EMU alphanumeric display is changed to Er. A condition report has precedence over all other displays. ■ The audible alarm sounds (if it is not disabled). ■ The error is stored in the error queue. ■ The error is passed to the controllers for processing and display by Command View EVA. Enterprise Virtual Array 3000 User Guide 101 Storage System Hardware Components Note: An error always generates a condition report. Not all condition reports are generated by errors. The condition types, condition reports, and the interaction between conditions are defined in the following sections. See “EMU Generated Condition Reports” on page 161 for definitions of individual condition reports. Error Condition Types Each error condition is assigned to a category based on its impact on the disk enclosure operation. The error condition types include the following: ■ Unrecoverable condition ■ Critical condition ■ Noncritical condition ■ Information condition UNRECOVERABLE Condition This is the most severe condition. The condition occurs when one or more enclosure elements have failed and have disabled some enclosure functions. The enclosure may be incapable of correcting, or bypassing the failure, and requires repairs to correct the error. Note: To maintain data integrity, corrective action should be implemented immediately for an UNRECOVERABLE condition. Reporting Characteristics ■ An UNREVCOVERABLE condition has precedence over all other condition. ■ The audible alarm is on continuously, as shown in Table 20 on page 96. CRITICAL Condition A CRITICAL condition is less severe than an UNRECOVERABLE condition. This condition occurs when one or more elements inside the enclosure have failed or are operating outside of their specifications. The failure of the element makes continued normal operation of at least some elements in the enclosure impossible. Other elements within the enclosure may be able to continue normal operations. 102 Enterprise Virtual Array 3000 User Guide Storage System Hardware Components Prompt corrective action should be taken to prevent system degradation. Reporting Characteristics ■ An UNRECOVERABLE condition has precedence over a CRITICAL condition. ■ A CRITICAL condition has precedence over NONCRITICAL and INFORMATION conditions. ■ When a CRITICAL condition is the most severe active condition, the audible alarm sounds three times per alarm cycle, as shown in Table 20 on page 96. NONCRITICAL Condition A NONCRITICAL condition is less severe than an UNRECOVERABLE condition or a CRITICAL condition. This condition occurs when one or more elements inside the enclosure have failed or are operating outside of their specifications. The failure of these elements do not affect continued normal operation of the enclosure. All devices in the enclosure continue to operate according to their specifications. The ability of the devices to operate correctly may be reduced should other errors occur. Prompt corrective action should be taken to prevent system degradation. Reporting Characteristics ■ UNRECOVERABLE and CRITICAL conditions have precedence over a NONCRITICAL condition. ■ A NONCRITICAL condition has precedence over INFORMATION condition. ■ When a NONCRITICAL condition is the most severe error active, the audible alarm sounds two times per alarm cycle, as shown in Table 20 on page 96. INFORMATION Condition This condition indicates a condition exists that does not reduce the capability of an element. However, the condition can become an error and require corrective action. In effect, an INFORMATION condition provides an early warning, which enables you to prepare to implement corrective action before an element fails. Correction of the reported problem may be delayed. Enterprise Virtual Array 3000 User Guide 103 Storage System Hardware Components Reporting Characteristics ■ An INFORMATION condition is the least severe of all the condition reports. ■ When only an INFORMATION condition is active, the audible alarm sounds once per alarm cycle as shown in Table 20 on page 96. Error Queue The EMU maintains an internal error queue for storing error conditions. Each error condition remains in the error queue until the problem is corrected, or for at least 15 seconds after the error is reported. This ensures that when there are multiple errors or a recurring error, each can be displayed. Each entry in the error queue can be displayed using a combination of the top and bottom pushbuttons. Each error entry in the queue contains the element type, the element number, and the error code. Correcting the error removes the associated condition from the error queue. Replacing the EMU will also clear the error conditions. The order in which the EMU displays the error queue information is based on two factors: ■ The severity of the error ■ The time the error occurred The most severe error in the queue always has precedence, regardless of how long less severe errors have been in the queue. This ensures that the most severe errors are displayed immediately. Note: When viewing an error, the occurrence of a more severe error takes precedence and the display changes to the most severe error. The earliest reported condition within an error type has precedence over errors reported later. For example, if errors at all levels have occurred, the EMU displays them as follows: 1. UNRECOVERABLE errors in the sequence they occurred. 2. CRITICAL errors in the sequence they occurred. 3. NONCRITICAL errors in the sequence they occurred. 4. INFORMATION conditions in the sequence they occurred. 104 Enterprise Virtual Array 3000 User Guide Storage System Hardware Components Error Condition Report Format Each EMU detected condition generates a condition report containing three pieces of information. ■ Element Type The first two-digit hexadecimal display defines the element type reporting the problem. The format for this display is e.t. with a period after each character. 0.1. through F.F. are valid element types. ■ Element Number The second display is a two-digit decimal number that defines the specific element reporting the problem. The format for this display is en. with a period after the second character. ■ Error Code The third display is a two-digit decimal number that defines the specific error code. The format for this display is ec without any periods. For detailed information about each condition report, including recommended corrective actions, see “EMU Generated Condition Reports” on page 161. Navigating the Error Condition Display When an error condition occurs, the alphanumeric display changes to Er and the error menu is active. The pushbuttons are used to display the error condition values. Perform the following procedure to display error conditions. Figure 46 illustrates the sequence for displaying error conditions. 1. With Er in the display, press and hold the top pushbutton until the first element type is displayed. The most severe error in the queue will be displayed. 2. Release the top pushbutton when the element type is displayed. The element type has both decimal points lit. 3. Press and release the top pushbutton to display the element number. This display has only the right decimal point lit. 4. Press and release the top pushbutton again to display the error code. This display has no decimal points lit. Repeated press/release operations will cycle through these three values. 5. Press and hold the top pushbutton from any of the three display states to move to the element type for the next error condition in the queue. 6. Use the top pushbutton to display the values for the error condition. Enterprise Virtual Array 3000 User Guide 105 Storage System Hardware Components 7. When all error conditions have been displayed, press and release the bottom pushbutton to return to the Er display. 2 1 2 4 2 en. e.t. Er 3 ec 3 3 2 e.t. 2 en. ec CXO8233A 1 2 3 4 Press & hold top pushbutton to view first error in queue. Press & release top pushbutton. Press & hold top pushbutton to view next error. Press and release the bottom pushbutton at any time to return to the Er display. e.t. = element type, en. = element number, ec = error code Figure 46: Displaying error condition values Analyzing Condition Reports Analyzing each error condition report involves three steps: 1. Identifying the element. 2. Determining the major problem. 3. Defining additional problem information. See “EMU Generated Condition Reports” on page 161 for details on performing these tasks. 106 Enterprise Virtual Array 3000 User Guide Storage System Hardware Components Reporting Group Feature Another function of the enclosure address bus is to establish reporting groups. Because multiple storage systems can be connected to the same enclosure address bus, reporting groups are used to isolate the communication between storage systems. A component can only communicate with other components within its reporting group. A reporting group (rG) is an HSV100 controller pair and the associated drive enclosures. The controller pair automatically assigns a unique (decimal) four-digit Reporting Group Number (RGN) to each EMU on an FC-AL. Each of the drive enclosures on a loop pair are in one reporting group. All of the drive enclosures on loop pair 1, both loop 1A and loop 1B, share a common reporting group number. Each EMU collects environmental information from its disk enclosure and broadcasts the information to reporting group members using the enclosure address bus. Information from enclosures in other reporting groups is ignored. Reporting Group Numbers The reporting group number (RGN) range is decimal values 0000 through 4099: ■ 0000 is reserved for enclosures that are not part of any reporting group, a JBOD configuration. ■ 0001 through 0015 are RGNs reserved for use by the EMU. When you enter them, they default to 0000. ■ 0016 through 4095 are valid RGNs. ■ 4096 through 4099 are invalid RGNs. When you enter them, they default to 4095. The reporting group numbers are displayed on the EMU alphanumeric display as a pair of two-digit displays. These two displays are identified as rH and rL. ■ Valid rH displays are in the range 00 through 40, and represent the high-order (most significant) two-digits of the RGN. ■ Valid rL displays are in the range 00 through 99, and represent the low-order (least significant) two-digits of the RGN. Viewing Reporting Group Number Perform the following procedure to view a reporting group number: 1. Press and release the bottom pushbutton until the alphanumeric display is rG. 2. Press and hold the top pushbutton unit the display is rH. Enterprise Virtual Array 3000 User Guide 107 Storage System Hardware Components 3. Press and release the top pushbutton to display the first two-digits of the RGN. 4. Press and release the top pushbutton until the alphanumeric display is rH. 5. Press and hold the top pushbutton until the alphanumeric display is rL. 6. Press and release the top pushbutton to display the last two digits of the RGN. 7. To exit the display, press and release the bottom pushbutton until the alphanumeric display is rG. Verifying Enclosure Operation All the elements in the enclosure begin operating when power is applied. Check the enclosure status LEDs in the front, lower right corner. See Figure 47. If the display is not exactly as shown, an error condition exists. To determine the defective element, check the drive status LEDs on the front, the EMU, the power supplies, and the blowers, as well as checking the I/O module status LEDs on the rear. See Table 21. Either of the drive displays in Figure 47 indicates a properly functioning disk. CXO7958A Figure 47: Typical operational LED status displays—enclosure front Figure 48 shows the location of the status displays. See Table 21 for state descriptions of the status LEDs. 108 Enterprise Virtual Array 3000 User Guide Storage System Hardware Components CXO7959A Figure 48: Location of LED status displays—enclosure rear Table 21: LED Status Displays EMU LEDs and Icons The enclosure power (both the +5 VDC and +12 VDC) is present and correct. There are NO enclosure faults. I/O Module A and I/O Module B LEDs For information about I/O Module LED status displays, see “I/O Module Status Displays” on page 78. Power Supply and Blower LEDs Both the power supply and the blower are operational. Status Monitoring and Display The major status monitoring capabilities of these enclosures include: ■ Displaying the enclosure status on the enclosure icons ■ Displaying the blower, power supply, EMU, drive, and I/O module status on the element LEDs ■ Detecting the installation of blowers, power supplies, drives, or I/O modules ■ Detecting the removal of blowers, power supplies, drives, or I/O modules ■ Sensing enclosure internal temperatures ■ Sensing power supply voltage, current, and total power Enterprise Virtual Array 3000 User Guide 109 Storage System Hardware Components ■ Sensing ambient temperature Note: The ambient temperature is the temperature at the enclosure air intake, or the room temperature. Enclosure Status Icons The enclosure status LEDs are located on the enclosure backplane. These LEDs illuminate the status icons in the front, lower-right corner of the enclosures. See Figure 47 on page 108. See Table 22 for a description of the status icons. Table 22: Enclosure Status Icon Displays Icon Off On Flashing EMU “Heartbeat” Icon (green LED) Power Icon (green LED) Enclosure Status Icon (orange LED) 110 Enterprise Virtual Array 3000 User Guide Storage System Hardware Components HSV100 Controllers This section describes the major features and function of the HSV100 controllers. See Figure 49. Each Enterprise Storage System includes a pair of HSV100 controllers. Front Rear CXO8054B Figure 49: HSV100 controller High Availability Features Two interconnected HSV100 controllers ensure that the failure of a controller element (such as transceiver, cable, Fibre Channel port, and so forth) does not disable the system. The complete data redundancy includes two Loop A data paths. A single controller can fully support an entire system until the defective controller, or controller element, is repaired. If a blower or power supply fails, it can be replaced without shutting down the system. Each controller has two lead-acid cache battery assemblies that provide power to the cache memory dual in-line memory modules (DIMMs). Each battery assembly has three lead-acid, nonspillable cells. When both battery assemblies are fully charged, they can provide power to the DIMMs for up to 96 hours. Enterprise Virtual Array 3000 User Guide 111 Storage System Hardware Components Operator Control Panel The operator control panel (OCP) provides a direct interface to each controller. From the OCP you can display storage system status and configuration information, shut down the storage system, and manage the password. The OCP includes a 40-character LCD alphanumeric display, four pushbuttons, and status LEDs. See Figure 50. Command View EVA is the tool you will typically use to display storage system status and configuration information or perform the tasks available from the OCP. However, if Command View EVA is not available, the OCP can be used to perform these tasks. 1 2 1 3 2 3 CXO7638A Status LEDs (see “Status LEDs” on page 112) 40-character LCD alphanumeric display (see “Alphanumeric LCD” on page 114) Pushbuttons (see “Displaying the OCP Menu Tree” on page 114) Figure 50: Controller OCP Status LEDs The status LEDs indicate the operating status of the controller, as described in Table 23. During initial setup, the status LEDs may not be fully operational. 112 Enterprise Virtual Array 3000 User Guide Storage System Hardware Components Table 23: Controller Status Icons and LEDs Icon Description Fault LED When the amber LED to the right of this icon is On or Flashing, there is a controller problem. Check either the Command View EVA GUI or the LCD Fault Management displays for a definition of the problem and recommended corrective action. Host Link LED When the green LED next to this icon is On, there is a link between the storage system and a host. When the red LED next to this icon is On, there is no link between the storage system and a host. Controller LED When the green LED next to this icon is Flashing slowly, a heartbeat, the controller is operating normally. When this LED is not Flashing, there is a problem. Cache Battery Assembly LED When the red LED next to this icon is Off, the battery assembly is charged. When this LED is On, the battery assembly is discharged. Navigation Pushbuttons The OCP includes four pushbuttons used to navigate the menu trees and input data. The operation of the pushbuttons depends on the task being performed. To simplify presentation and avoid confusion, the pushbutton reference names, regardless of labels, are left, right, top, and bottom. See Figure 51. Top Pushbutton Left Pushbutton Right Pushbutton Bottom Pushbutton Figure 51: Navigation pushbutton icons Enterprise Virtual Array 3000 User Guide 113 Storage System Hardware Components Alphanumeric LCD The alphanumeric LCD is a two-row display, with each row capable of displaying up to 20 alphanumeric characters. During normal operation, the LCD alternates between displaying the Storage System Name and the Node WorldWide Name. See Figure 52. Note: An active (Flashing) display, an error condition message, or a user entry (pressing a pushbutton) overrides the default display. When none of these conditions exist, the default display is active after approximately 15 seconds. . Storage System Name: SCELL22MAY200111543 Node WorldWide Name: 5000-1FE1-0000-0000 Figure 52: Sample Default LCD display Displaying the OCP Menu Tree The OCP menu tree provides options for viewing status and configuration information, and performing the available tasks. To display the menu tree, press any pushbutton when either of the default displays is active. ■ The System Information and Fault Management menus are used to display information only. You cannot change any operating parameters from these menus. Information about the Fault Management menu is included in “HSV Controller Fault Management” on page 189. ■ The Shutdown System menu lets you implement the procedure for shutting down the storage system in a logical, sequential manner. Using the Shutdown System procedure maintains data integrity. ■ The System Password menu lets you create a system password to ensure that only authorized personnel can manage the storage system from Command View EVA. The OCP menu tree options are shown in Figure 53. 114 Enterprise Virtual Array 3000 User Guide Storage System Hardware Components Node Worldwide Name Storage System Name : XXXXXXXXXXXX System Information Fault Management Shutdown System System Password VCS Version Last Fault Restart Change Password OCP Version Detail View Power Off Clear Password Address Bus PIC Version Uninitialize System Battery PIC Version PowerPC Processor Version Quasar Version glue FPGA Version surge Version CXO8232A Figure 53: OCP menu tree Enterprise Virtual Array 3000 User Guide 115 Storage System Hardware Components Use the following procedure to select and navigate the OCP menu tree. 1. The default display alternates between the Storage System Name display and the Node WorldWide Name display. Storage System Name: Press any pushbutton to display the menu tree. Node WorldWide Name: SCELL22MAY200111543 5000-1FE1-0000-0000 2. System Information is the default active display. System Information Press T to sequence down through the menu options. Fault Management Press S to sequence up through the menu options. Press X to select the active option. System Information Press W to return to the default display. Fault Management Shutdown System System Password Note: When there is no activity for approximately 15 seconds, the display automatically returns to the default display. Activity is either an active error report or pressing a pushbutton. 116 Enterprise Virtual Array 3000 User Guide Storage System Hardware Components Displaying System Information Note: This information is intended to assist an HP authorized service representative when servicing the storage system. The System Information menu displays configuration information including the VCS version, the OCP firmware and application programming interface (API) versions, and the enclosure address bus programmable integrated circuit (PIC) configuration. You can only view this information—you cannot change it. Table 24 defines the pushbutton functions in the system information menu. Table 24: System Information pushbutton functions Button T Function ■ ■ S ■ ■ X ■ ■ ■ ■ W ■ ■ ■ ■ ■ Moves from the Versions VCS display to the Versions OCP display Moves from the Versions OCP display to the Versions Address Bus PIC display Moves from the Versions OCP display to the Versions VCS display Moves from the Versions PIC display to the Versions OCP display Moves from the System Information display to the Versions VCS display Moves from the Versions VCS display to the VCS detail display Moves from the Versions OCP display to the OCP detail display Moves from the Versions PIC display to the detailed PIC display Moves from the System Information display to the default display Moves from the Versions display to the System Information display Moves from VCS detail display to the Versions VCS display Moves from the OCP detail display to the Versions OCP display Moves from the PIC detail display to the Versions PIC display Displaying Versions System Information When you press T, the active display is Versions. From the Versions display you can determine the: ■ VCS revision level ■ OCP firmware revision level Enterprise Virtual Array 3000 User Guide 117 Storage System Hardware Components ■ PIC (programmable integrated circuit) firmware revision level for: — Address Bus PIC — Battery PIC — PowerPC Processor — Quasar — glue FPGA (field programmable gate array) PIC — Surge Note: The PIC terms PowerPC Processor, Quasar, glue FPGA, and Surge are for development purposes and have no significance for normal operation. If the requested version information is not available, the display is always <NOT AVAILABLE>. Use the following procedure to select and display system information. Note: When viewing the software or firmware version information, pressing W displays the versions menu tree. 1. From the default display, press any pushbutton to display the OCP menu tree. Storage System Name: SCELL22MAY200111543 Node WorldWide Name: 5000-1FE1-0000-0000 2. Press X to select System Information. System Information Fault Management 118 Enterprise Virtual Array 3000 User Guide Storage System Hardware Components 3. Press T or S until the desired Versions Menu option is selected. Versions Menu VCS 4. Press X to display the version information for the selected option. Versions Menu OCP Shutting Down the Storage System Caution: To power off the storage system for more than 96 hours, use Command View EVA. Command View EVA posts any data in write cache to disk before shutting down the storage system, thereby avoiding data loss if the batteries discharge. The Shutdown System menu is used to perform the following procedures: ■ Restarting the storage system. See “Restarting the Storage System” on page 121. ■ Turning Off the power. See “Powering Off the Storage System” on page 122. ■ Uninitializing the storage system. See “Uninitializing the Storage System” on page 123. Note: To ensure that you do not inadvertently activate a shutdown procedure, you will be prompted to confirm your selection. Enterprise Virtual Array 3000 User Guide 119 Storage System Hardware Components Table 25: Shutdown Procedures LCD Prompt RESTART 120 Description This procedure establishes communications between the storage system and Command View EVA. This procedure is used to restore the controller to an operational state where it can communicate with Command View EVA. POWER OFF This procedure initiates the sequential removal of controller power. This ensures no data is lost. The reasons for implementing this procedure include replacing a disk drive enclosure. SYSTEM UNINITIALIZE This procedure will cause the loss of all data. For a detailed discussion of this procedure, see “Uninitializing the Storage System” on page 123. Enterprise Virtual Array 3000 User Guide Storage System Hardware Components Restarting the Storage System To restore a controller to an operational state, use the following procedure to restart the system. 1. From the OCP menu tree, select Shutdown System. Shutdown System System Password 2. Press X to select Restart. Restart Power Off 3. Press T and go to step 4. Press W to accept NO and return to step 1. 4. Press W to accept YES and initiate the restart. RESTART SYSTEM NO RESTART SYSTEM YES 5. The storage system performs the startup procedure. HSV100 Startup ******************** 6. The system automatically loads the Storage System name and Node WorldWide Name information from the operational controller. Storage System Name: SCELL22MAY200111543 Node WorldWide Name: 5000-1FE1-0000-0000 Enterprise Virtual Array 3000 User Guide 121 Storage System Hardware Components Powering Off the Storage System Use the following procedure to remove power from the storage system. All data in cache is saved to disk before power is removed. Because the storage system is powered off, it can no longer communicate with Command View EVA. Note: Implementing this procedure removes power from the controller pair and all associated drive enclosures. To restore power to the controller system, you must cycle both PDU breakers in the enclosure. 1. From the OCP menu tree, select Shutdown System. Shutdown System System Password 2. Press T to make Power Off the active display. Restart Power Off 3. Press X to select Power Off. Restart Power Off 4. Press T and go to step 5. Press W to accept NO and return to Step 3 5. Press W to accept YES and initiate the power off sequence. POWER OFF SYSTEM NO POWER OFF SYSTEM YES 122 Enterprise Virtual Array 3000 User Guide Storage System Hardware Components Uninitializing the Storage System Uninitializing is another way to shut down the storage system. This action will cause the loss of all storage system data. After uninitializing the storage system, it will be necessary to reinitialize the storage system using Command View EVA. Caution: Uninitializing the storage system destroys all user data. Any data stored on the system will be permanently destroyed. If the controllers remain powered On until you reintialize the storage system, you will not have to reenter the WWN. If the controllers are powered Off, the WWN will be lost and it will be necessary to reenter it using the OCP. The password will be lost. Use the following procedure to initialize the storage system. 1. From the OCP menu tree, select Shutdown System. Shutdown System System Password 2. Press T twice to make Uninitialize System the active display. Power Off Uninitialize System 3. Press X to select Uninitialize System. Power Off Uninitialize System 4. Press T and go to Step 5. Press W to accept NO and return to step 3. 5. Press W to accept YES. UNINITIALIZE SYSTEM NO UNINITIALIZE SYSTEM YES Enterprise Virtual Array 3000 User Guide 123 Storage System Hardware Components 6. Press T and go to step 7. REALLY UNINIT SYSTEM? Press W to accept NO and return to step 5. 7. Press W to accept YES. NO REALLY UNINIT SYSTEM? YES 8. Press T and go to step 9. DATA WILL BE LOST Press W to accept NO and return to step 7. 9. Press W to accept YES. PROCEED? NO DATA WILL BE LOST PROCEED? 10. The storage system uninitialization begins. YES SYSTEM UNINIT IN PROCESS Password Options A password is typically defined during installation of the storage system to restrict access from Command View EVA. See “Setting the Storage System Password” on page 44. From the OCP System Password menu you can change or clear the storage system password. Changing a Password For security reasons, you may need to change a storage system password. First you must choose a new, unique, eight-character password, using the uppercase letters A through Z and the lowercase letters a through z. After choosing the new password, use the following procedure to change the password. 124 Enterprise Virtual Array 3000 User Guide Storage System Hardware Components Note: After changing the storage system password using the OCP, it will be necessary to change the password on any Command View EVA management agents with access to the storage system. 1. From the OCP menu tree, select System Password. Shutdown System System Password 2. Press X to select Change Password. Change Password Clear Password 3. Press T and go to step 4. Press W to accept NO and return to step 2. 4. Press W to accept YES. CHANGE PASSWORD? NO CHANGE PASSWORD? YES 5. To enter the first character, press S or T to select the desired character. 6. Enter Password Press X to accept a character and select the next password character. The character display changes to an asterisk. *AAAAAAA Repeat step 5 for the remaining seven characters. Enter Password Press W to accept the password. ******** 7. Press W to accept YES. CHANGE PASSWORD? YES Enterprise Virtual Array 3000 User Guide 125 Storage System Hardware Components Clearing a Password Use the following procedure to remove password protection from the storage system. 1. From the OCP menu tree, select System Password. Shutdown System System Password 2. Press Tto make Clear Password the active display. Change Password Clear Password 3. Press Xto select Clear Password. Change Password Clear Password 4. Press T to go to step 5 Press W to accept NO and return to step 3. 5. Press W to clear the password. CLEAR PASSWORD? NO CLEAR PASSWORD? YES 126 Enterprise Virtual Array 3000 User Guide Storage System Hardware Components HSV100 Controller Cabling On the rear of the controller are the data and power connections. The data connections are the interface to the disk drive enclosures, the other controller, and the fabric (host) or Command View EVA. All data cables and power cables attach to the rear of the HSV controller. See Figure 54. Adjacent to each data connector (see 4, 5, 6, 7, 8, 9, and -) is a two-colored LED that defines the link status. ■ When the green LED is On, the link can communicate. ■ When the amber LED is On, the link cannot communicate. Note: These LEDs do not indicate whether there is communication on the link, only whether the link can transmit and receive data. Note: The connectors are identified by the label printed on the controller. The information in the parentheses defines the connector function. 9 3 10 1 2 4 5 6 7 8 CXO8163A 1 2 3 4 5 CAB (enclosure address bus) UART (not used) UART (not used) FP 1 (fabric port 1) FP 2 (fabric port 2) 6 7 8 9 - MP (mirror port) 1B (loop 1B) 1A (loop 1A) AC power switch AC power connectors Figure 54: HSV100 controller connectors—rear view Enterprise Virtual Array 3000 User Guide 127 Storage System Hardware Components Storage System Racks All Enterprise Virtual Array 3000 components are mounted in the storage system rack. The available racks are the Enterprise Racks and the Rack System/E racks. The rack configuration is determined by the number of disk enclosures being used. Multiple storage systems can be installed in a single rack. For more information about storage system racks and configuration information, including expansion and interconnection, refer to the HP StorageWorks Enterprise Virtual Array Hardware Configuration Guide. Power Distribution The power distribution components differ between the Enterprise racks and the Rack System/E racks. See “Enterprise Racks Power Distribution Components” on page 129 or “Rack System/E Power Distribution Components” on page 133. For either rack, the characteristics of the full redundant rack power configuration are as follows: ■ Each PDU is connected to a separate circuit-breaker-protected, 30-A AC site power source (220–240 VAC ±10%, 50 or 60 Hz, ±5%). Figure 55 illustrates the compatible 60-Hz and 50-Hz wall receptacles. CXO7549A NEMA L6-30R receptacle, 3-wire, 30-A, 60-Hz CXO5409B IEC 309 receptacle, 3-wire, 30-A, 50-Hz Figure 55: 60-Hz and 50-Hz wall receptacles Note: If local regulations forbid use of these receptacles, you must change the connectors on the PDU power cords. ■ The standard power configuration for the storage system rack is a fully redundant configuration. Implementing this configuration requires: — Separate circuit-breaker-protected, 30-A site power sources with a compatible wall receptacle. See Figure 55. 128 Enterprise Virtual Array 3000 User Guide Storage System Hardware Components — The rack PDUs are connected to different wall receptacles. — The drive enclosure power supplies on the left (PS 1) connect to a power source (PDM or PDU) on the left with a gray power cord. — The drive enclosure power supplies on the right (PS 2) connect to a power source on the right with a black power cord. — Each controller enclosure connects to a power source on the left with a gray power cord and to a power source on the right with a black power cord. The configuration provides complete power redundancy and eliminates all single points of failure for both the AC and DC power distribution. Enterprise Racks Power Distribution Components AC power is distributed to an Enterprise rack through a dual Power Distribution Unit (PDU) assembly mounted at the bottom rear of the rack. Each Enterprise rack has either a 50- or 60-Hz, dual PDU mounted at the bottom rear of the rack. Note: The major difference between the two PDU types is the cable power connector. ■ The standard 50-Hz PDU cable has an IEC 309, 3-wire, 30-A, 50-Hz connector. ■ The standard 60-Hz PDU cable has a NEMA L6-30P, 3-wire, 30-A, 60-Hz connector. If these connectors are not compatible with the site power distribution, you must replace the PDU power cord cable connector. Each of the PDU power cables has an AC power source specific connector. The circuit-breaker-controlled PDU outputs are routed to a group of four AC receptacles. See Figure 56. The voltages are then routed to PDMs, sometimes referred to as AC power strips, mounted on the two vertical rails in the rear of the rack Enterprise Virtual Array 3000 User Guide 129 Storage System Hardware Components 1 4 2 3 6 5 CXO7570A 1 2 3 PDU 1 PDU 1 AC receptacles PDU 1 circuit breaker PDU 2 PDU 2 AC receptacles PDU 2 circuit breaker 4 5 6 Figure 56: Enterprise Rack Dual PDU assembly—top view PDU Assembly The dual PDU assembly mounts in the lower rear of the rack. See Figure 57. This assembly contains two PDUs: PDU 1 1 and PDU 2 7. Each PDU has a 250-VAC, 30-A circuit breaker (6 and w) and four IEC 320-C13 AC output power receptacles (2 through 5, and 8 through q). The circuit breakers and AC receptacles are accessible when the PDU assembly is in the upright position. 1 2 3 7 4 5 6 12 8 9 10 11 CXO7571A 1 2 3 4 5 6 PDU 1 PDU 1 receptacle A PDU 1 receptacle B PDU 1 receptacle C PDU 1 receptacle D PDU 1 circuit breaker 7 8 9 q w PDU 2 PDU 2 receptacle A PDU 2 receptacle B PDU 2 receptacle C PDU 2 receptacle D PDU 2 circuit breaker Figure 57: Enterprise Rack Dual PDU assembly major components During normal operation, the hinged PDU assembly is in the upright position and the rear door is closed. 130 Enterprise Virtual Array 3000 User Guide Storage System Hardware Components PDMs There are eight PDMs mounted in the rear of each rack: ■ Four mounted on the left vertical rail connect to PDU 1. ■ Four mounted on the right vertical rail connected to PDU 2. Each PDM has six AC receptacles and two thermal circuit breakers. See Figure 58. The PDMs distribute the AC power from the PDUs to the enclosures. Two power sources exist for each controller pair and drive enclosure. If a PDU fails, the system will remain operational. Caution: The AC power distribution within a rack ensures a balanced load to each PDU and reduces the possibility of an overload condition. Changing the cabling to or from a PDM could cause an overload condition. HP supports only the AC power distributions defined in this user guide. 1 1 2 3 Power receptacles Thermal circuit breakers IEC309 AC power connector 2 3 CXO7568B Figure 58: Enterprise Rack PDM Enterprise Virtual Array 3000 User Guide 131 Storage System Hardware Components Rack AC Power Distribution The power distribution in an Enterprise rack is the same for all configurations. The site AC input voltage is routed to the dual PDU assembly mounted in the rack lower rear. Each PDU distributes AC to a maximum of four PDMs mounted on the left and right vertical rails. See Figure 59. ■ PDMs 1 through 4 connect to receptacles A through D on PDU 1. Grey power cords connect these PDMs to the number 1 drive enclosure power supplies and to the controller enclosures. ■ PDMs 5 through 8 connect to receptacles A through D on PDU 2. Black power cords connect these PDMs to the number 2 drive enclosure power supplies and to the controller enclosures. PDU 1 connects to AC power distribution source 1. A PDU 1 failure: ■ ■ ■ ■ Disables the power distribution circuit Removes power from PDMs 1, 2, 3, and 4 Disables PS 1 in the drive enclosures Disables one of the controller power supplies PDU 2 connects to AC power distribution source 2. A PDU 2 failure: ■ ■ ■ ■ 132 Disables the power distribution circuit Removes power from PDMs 5, 6, 7, and 8 Disables PS 2 in the drive enclosures Disables one of the controller power supplies Enterprise Virtual Array 3000 User Guide Storage System Hardware Components 1 6 2 7 3 8 4 9 5 10 1 2 3 4 5 6 7 8 9 - PDM 4 PDM 3 PDM 2 PDM 1 PDU 1 PDM 8 PDM 7 PDM 6 PDM 5 PDU 2 CXO7965A Figure 59: Enterprise Rack AC power distribution Rack System/E Power Distribution Components AC power is distributed to the Rack System/E rack through Power Distribution Units (PDU) mounted on the two vertical rails in the rear of the rack. Up to four PDUs can be mounted in the rack—two mounted on the right side of the cabinet and two mounted on the left side. The PDU locations are shown in Figure 60. Each of the PDU power cables has an AC power source specific connector. The circuit-breaker-controlled PDU outputs are routed to a group of ten AC receptacles. The storage system components plug directly into the PDUs. Enterprise Virtual Array 3000 User Guide 133 Storage System Hardware Components Rack AC Power Distribution The power distribution configuration in a Rack System/E rack depends on the number of storage systems installed in the rack. If one storage system is installed, only two PDUs are required. If multiple storage systems are installed, four PDUs are required. The site AC input voltage is routed to each PDU mounted in the rack. Each PDU distributes AC through ten receptacles directly to the storage system components. ■ PDUs 1 and 3 (optional) are mounted on the left side of the cabinet. Grey power cords connect these PDUs to the number 1 drive enclosure power supplies and to the controller enclosures. ■ PDUs 2 and 4 (optional) are mounted on the right side of the cabinet. Black power cords connect these PDUs to the number 2 drive enclosure power supplies and to the controller enclosures. 3 4 1 2 3 4 1 PDU 1 PDU 2 PDU 3 (Optional) PDU 4 (Optional) 2 CXO8243A Figure 60: Rack System/E AC power distribution 134 Enterprise Virtual Array 3000 User Guide Storage System Hardware Components Moving and Stabilizing a Rack WARNING: The physical size and weight of the rack requires a minimum of two people to move. If one person tries to move the rack, injury may occur. To ensure stability of the rack, always push on the lower half of the rack. Be especially careful when moving the rack over any bump (for example: door sills, ramp edges, carpet edges, or elevator openings). When the rack is moved over a bump, there is a potential for it to tip over. Moving the rack requires a clear, uncarpeted pathway that is at least 80 mm (30 in) wide for the 60.3 cm (23.7 in) wide, 42U rack. A vertical clearance of 203.2 cm (80 in) should ensure sufficient clearance for the 200 cm (78.7 in) high, 42U rack. Caution: Ensure that no vertical or horizontal restrictions exist that would prevent rack movement without damaging the rack. Make sure that all four leveler feet are in the fully raised position. This process will ensure that the casters support the rack weight and the feet do not impede movement. The floor space requirements for a rack with a single-piece rear door are shown in Figure 61. The floor space requirements for a rack with a split rear door are shown in Figure 62. The split rear door is available on Enterprise Racks. Each storage system rack has four feet and four casters. Raising the adjustable feet places the rack weight on the casters, so you can easily move the rack. Lowering the feet places the rack weight on the feet and prevents the rack from moving. The removable front and rear doors, and the removable side panels provide easy access to the rack interior. Enterprise Virtual Array 3000 User Guide 135 Storage System Hardware Components . 4 3 2 5 6 8 1 2 3 4 5 6 7 8 Front door Rear door Rack width 600 mm Service area width 1206 mm Rear service area depth 600 mm Rack depth 909 mm Front service area depth 600 mm Total rack depth 2109 mm 1 7 CXO7593A Figure 61: Rack floor space requirements (single-piece rear door) 4 3 2 2 5 6 8 1 1 2 3 4 5 6 7 8 Front door Rear door Rack width 600 mm Service area width 1206 mm Rear service area depth 300 mm Rack depth 909 mm Front service area depth 603 mm Total rack depth 1812 mm 7 CXO8238A Figure 62: Rack floor space requirements (split rear door) 136 Enterprise Virtual Array 3000 User Guide Storage System Hardware Components If the feet are not fully raised, complete the following procedure: 1. Raise one foot by turning the leveler feet hex nut counterclockwise until the weight of the rack is fully on the casters. See Figure 63. 2. Repeat step 1 for the other feet. 1 2 Hex nut Leveler foot 1 2 Figure 63: Raising a leveler foot 3. Carefully move the rack to the installation area and position it to provide the necessary service areas. See Figure 61 or Figure 62. To stabilize the rack when it is in the final installation location: 1. Use a wrench to lower the feet by turning the leveler feet hex nut clockwise until the caster does not touch the floor 2. Repeat step 1 for the other feet. 3. After lowering the feet, check the rack to ensure it is stable and level. 4. Adjust the feet as necessary to ensure the rack is stable and level. Enterprise Virtual Array 3000 User Guide 137 Storage System Hardware Components 138 Enterprise Virtual Array 3000 User Guide Regulatory Notices and Specifications A This appendix includes regulatory notices and product specifications for the HP StorageWorks Enterprise Virtual Array 3000. The following topics are included in this appendix: ■ Country-Specific Certifications, page 140 ■ Federal Communications Commission Notice, page 141 ■ Laser Device, page 143 ■ Certification and Classification Information, page 144 ■ Canadian Notice (Avis Canadien), page 145 ■ European Union Notice, page 146 ■ Notice for France, page 146 ■ Germany Noise Declaration, page 146 ■ Japanese Notice, page 147 ■ Taiwanese Notice, page 148 ■ Fibre Channel Drive Enclosure Specifications, page 149 ■ HSV100 Controller Specifications, page 154 ■ Storage System Racks, page 157 Enterprise Virtual Array 3000 User Guide 139 Regulatory Notices and Specifications CountrySpecific Certifications HP tests electronic products for compliance with country-specific regulatory requirements, as an individual item or as part of an assembly. The product label specifies the regulations with which the product complies. A typical label is shown in Figure 64. Note: Elements without an individual product certification label are qualified as part of the next higher assembly (for example, enclosure, rack, or tower). . CXO8156A Figure 64: Typical enclosure certification label Note: The certification symbols on the label depend upon the certification level. For example, the FCC Class A certification symbol is not the same as the FCC Class B certification symbol. 140 Enterprise Virtual Array 3000 User Guide Regulatory Notices and Specifications Federal Communications Commission Notice Part 15 of the Federal Communications Commission (FCC) Rules and Regulations has established Radio Frequency (RF) emission limits to provide an interference-free radio frequency spectrum. Many electronic devices, including computers, generate RF energy incidental to their intended function and are, therefore, covered by these rules. These rules place computers and related peripheral devices into two classes, A and B, depending upon their intended installation. Class A devices are those that may reasonably be expected to be installed in a business or commercial environment. Class B devices are those that may reasonably be expected to be installed in a residential environment (for example, personal computers). The FCC requires devices in both classes to bear a label indicating the interference potential of the device as well as additional operating instructions for the user. The rating label on the device shows the classification (A or B) of the equipment. Class B devices have an FCC logo or FCC ID on the label. Class A devices do not have an FCC logo or FCC ID on the label. After the Class of the device is determined, refer to the corresponding statement in the following sections. Class A Equipment This equipment has been tested and found to comply with the limits for a Class A digital device, pursuant to Part 15 of the FCC Rules. These limits are designed to provide reasonable protection against harmful interference when the equipment is operated in a commercial environment. This equipment generates, uses, and can radiate radio frequency energy and, if not installed and used in accordance with the instructions, may cause harmful interference to radio communications. Operation of this equipment in a residential area is likely to cause harmful interference, in which case the user will be required to correct the interference at personal expense. Class B Equipment This equipment has been tested and found to comply with the limits for a Class B digital device, pursuant to Part 15 of the FCC Rules. These limits are designed to provide reasonable protection against harmful interference in a residential installation. This equipment generates, uses, and can radiate radio frequency energy and, if not installed and used in accordance with the instructions, may cause harmful interference to radio communications. However, there is no guarantee that interference will not occur in a particular installation. If this Enterprise Virtual Array 3000 User Guide 141 Regulatory Notices and Specifications equipment does cause harmful interference to radio or television reception, which can be determined by turning the equipment off and on, the user is encouraged to try to correct the interference by one or more of the following measures: ■ Reorient or relocate the receiving antenna ■ Increase the separation between the equipment and receiver ■ Connect the equipment into an outlet on a circuit that is different from that to which the receiver is connected ■ Consult the dealer or an experienced radio or television technician for help Declaration of Conformity for Products Marked with the FCC Logo, United States Only This device complies with Part 15 of the FCC Rules. Operation is subject to the following two conditions: (1) this device may not cause harmful interference, and (2) this device must accept any interference received, including interference that may cause undesired operation. For questions regarding your product, refer to http://thenew.hp.com: For questions regarding this FCC declaration, contact: ■ Hewlett-Packard Company Product Regulations Manager 3000 Hanover St. Palo Alto, CA 94304 ■ Or call 1-650-857-1501 To identify this product, refer to the part, series, or model number found on the product. Modifications The FCC requires the user to be notified that any changes or modifications made to this device that are not expressly approved by Hewlett-Packard Company may void the user's authority to operate the equipment. Cables Connections to this device must be made with shielded cables with metallic RFI/EMI connector hoods in order to maintain compliance with FCC Rules and Regulations. 142 Enterprise Virtual Array 3000 User Guide Regulatory Notices and Specifications Laser Device All Hewlett-Packard systems equipped with a laser device comply with safety standards, including International Electrotechnical Commission (IEC) 825. With specific regard to the laser, the equipment complies with laser product performance standards set by government agencies as a Class 1 laser product. The product does not emit hazardous light; the beam is totally enclosed during all modes of customer operation and maintenance. Laser Safety Warnings Heed the following Warning: WARNING: To reduce the risk of exposure to hazardous radiation: ■ Do not try to open the laser device enclosure. There are no user-serviceable components inside. ■ Do not operate controls, make adjustments, or perform procedures to the laser device other than those specified herein. ■ Allow only HP authorized service technicians to repair the laser device. Compliance with CDRH Regulations The Center for Devices and Radiological Health (CDRH) of the U.S. Food and Drug Administration implemented regulations for laser products on August 2, 1976. These regulations apply to laser products manufactured from August 1, 1976. Compliance is mandatory for products marketed in the United States. Enterprise Virtual Array 3000 User Guide 143 Regulatory Notices and Specifications Certification and Classification Information This product contains a laser internal to the Optical Link Module (OLM) for connection to the Fibre communications port. In the USA, the OLM is certified as a Class 1 laser product conforming to the requirements contained in the Department of Health and Human Services (DHHS) regulation 21 CFR, Subchapter J. The certification is indicated by a label on the plastic OLM housing. Outside the USA, the OLM is certified as a Class 1 laser product conforming to the requirements contained in IEC 825-1:1993 and EN 60825-1:1994, including Amendment 11:1996. The OLM includes the following certifications: 144 ■ UL Recognized Component (USA) ■ CSA Certified Component (Canada) ■ TUV Certified Component (European Union) ■ CB Certificate (Worldwide) Enterprise Virtual Array 3000 User Guide Regulatory Notices and Specifications Canadian Notice (Avis Canadien) Class A Equipment This Class A digital apparatus meets all requirements of the Canadian Interference-Causing Equipment Regulations Cet appareil numérique de la classe A respecte toutes les exigences du Règlement sur le matériel brouilleur du Canada. Class B Equipment This Class B digital apparatus meets all requirements of the Canadian Interference-Causing Equipment Regulations Cet appareil numérique de la classe B respecte toutes les exigences du Règlement sur le matériel brouilleur du Canada. Enterprise Virtual Array 3000 User Guide 145 Regulatory Notices and Specifications European Union Notice Products with the CE Marking comply with both the EMC Directive (89/336/EEC) and the Low Voltage Directive (73/23/EEC) issued by the Commission of the European Community. Compliance with these directives implies conformity to the following European Norms (the equivalent international standards are in parenthesis): ■ EN55022 (CISPR 22) - Electromagnetic Interference ■ EN55024 (IEC61000-4-2, 3, 4, 5, 6, 8, 11) - Electromagnetic Immunity ■ EN61000-3-2 (IEC61000-3-2) - Power Line Harmonics ■ EN61000-3-3 (IEC61000-3-3) - Power Line Flicker ■ EN60950 (IEC950) - Product Safety Notice for France DECLARATION D'INSTALLATION ET DE MISE EN EXPLOITATION d'un matériel de traitement de l'information (ATI), classé A en fonction des niveaux de perturbations radioélectriques émis, définis dans la norme européenne EN 55022 concernant la Compatibilité Electromagnétique. Germany Noise Declaration Schalldruckpegel Lp = 70 dB(A) Am Arbeitsplatz (operator position) Normaler Betrieb (normal operation) Nach ISO 7779:1999 (Typprüfung) 146 Enterprise Virtual Array 3000 User Guide Regulatory Notices and Specifications Japanese Notice Enterprise Virtual Array 3000 User Guide 147 Regulatory Notices and Specifications Harmonics Conformance (Japan) Taiwanese Notice 148 Enterprise Virtual Array 3000 User Guide Regulatory Notices and Specifications Fibre Channel Drive Enclosure Specifications This appendix defines the physical, environmental, and power specifications of the Fibre Channel disk drive enclosure and the elements. Physical Specifications This section describes the physical specifications of the drive enclosure and elements. WARNING: An assembled enclosure (all elements installed) weighs more than 65 lb (29.5 kg) and requires a minimum of two individuals to move. Table 26 defines the dimensions and weights of the enclosure. Table 26: Drive Enclosure Physical Specifications Shipping Empty Installed Carton Carton & Pallet Note: Metric dimensions are expressed in whole numbers. For example, 10.795 cm is expressed as 108 mm. Millimeter dimensions are always expressed in whole numbers. Height 131 mm (5.16 in) 131 mm (5.16 in) 641 mm (25.25 in) 768 mm (30.25 in) Width 505 mm (19.875 in) 505 mm (19.875 in) 318 mm (12.5 in) 610 mm (24 in) Depth 448 mm (17.625 in) 448 mm (17.625 in) 597 mm (23.5 in) 1016 mm (40 in) Weight 10.9 kg (24 lb) 30.9 kg (68 lb) 43.6 kg (96 lb) 49 kg (108 lb) Table 27 defines the dimensions of the elements (that is, EMU, blowers, I/O module, drives, and power supply). Enterprise Virtual Array 3000 User Guide 149 Regulatory Notices and Specifications Table 27: Drive Enclosure Elements Physical Specifications Specification Installed Shipping Carton Note: Metric dimensions are expressed in whole numbers. For example, 10.795 cm is expressed as 108 mm. Millimeter dimensions are always expressed in whole numbers. Environmental Monitoring Unit (EMU) Height 114 mm (4.5 in) 210 mm (8.25 in) Width 241 mm (9.5 in) 330 mm (13.5 in) Depth 35 mm (1.375 in) 108 mm (4.25 in) Weight 0.6 kg (1.3 lb) 0.91 kg (2.0 lb) Height 140 mm (5.5 in) 191 mm (7.5 in) Width 159 mm (6.25 in) 203 mm (8.0 in) Depth 83 mm (3.25 in) 229 mm (9.0 in) Weight 0.45 kg (1.0 lb) 0.91 kg (2.0 lb) Height 114 mm (4.5 in) 210 mm (8.25 in) Width 41 mm (1.625 in) 108 mm (4.25 in) Depth 241 mm (9.5 in) 330 mm (13.0 in) Weight 0.59 kg (1.3 lb) 0.77 kg (1.7 lb) Height 114 mm (4.5 in) 216 mm (8.5 in) Width 26 mm (1.025 in) 114 mm (4.5 in) Depth 241 mm (9.5 in) 330 mm (13.0 in) Weight 0.59 kg (1.3 lb) 1.0 kg (2.3 lb) Height 114 mm (4.5 in) 286 mm (11.25 in) Width 159 mm (6.25 in) 330 mm (13.0 in) Depth 241 mm (9.5 in) 419 mm (16.5 in) Weight 1.82 kg (4.0 lb) 3.86 kg (8.5 lb) Blower I/O Module Disk Drive Power Supply (without blower) 150 Enterprise Virtual Array 3000 User Guide Regulatory Notices and Specifications Environmental Specifications To ensure optimum product operation you must maintain the operational environmental specifications listed in Table 28. The ambient temperature, that is the enclosure air intake or room temperature, is especially critical. Table 28: Environmental Operating Specifications Ambient temperature: +10 °C to +35 °C (+50 °F to +95 °F) with an average rate of change of 1 °C/hour maximum and a step change of 3 °C or less. Maintaining the optimum ambient temperature within the specified range ensures that the internal operating temperatures support the drive manufacturer’s MTBF specifications. Relative humidity: 40% to 60% (noncondensing) with a step change of 10% or less (noncondensing) Air quality: Not to exceed a maximum of 500,000 particles, 0.5 micron or larger, per cubic foot of air. Heat dissipation: 1600 BTUs per hour When shipping, or placing this product in short term storage, HP recommends maintaining the environmental conditions listed in Table 29. Table 29: Environmental Shipping or Short-Term Storage Specifications Ambient temperature: –40 °C to +66 °C (–40 °F to +151 °F) Relative humidity: 10% to 80% noncondensing Altitude: 15,240 m (50,000 ft) Power Specifications The input voltage to the drive enclosure power supplies is a function of the country-specific input voltage to Enterprise Storage System rack power distribution units (PDUs). Table 30 defines the AC input power available to the drive enclosure power supplies. Enterprise Virtual Array 3000 User Guide 151 Regulatory Notices and Specifications Caution: The AC power distribution within a rack ensures a balanced load to each PDU and reduces the possibility of an overload condition. Changing the cabling to or from a PDM could cause an overload condition. Table 30: Enterprise Storage System AC Input Line Voltages Specification Minimal Nominal Maximum 57 Hz 60 Hz 63 Hz AC Line Voltage–Japan 180 VAC 202 VAC 220 VAC AC Line Voltage–North America 180 VAC 208 VAC 220 VAC AC Line Voltage–Europe 208 VAC 240 VAC 254 VAC 47 Hz 50 Hz 53 Hz AC Line Voltage–Japan 180 VAC 202 VAC 220 VAC AC Line Voltage–North America 190 VAC 220 VAC 235 VAC AC Line Voltage–North America 200 VAC 230 VAC 244 VAC AC Line Voltage–Europe 208 VAC 240 VAC 254 VAC 60 Hz Service AC Line Frequency 50 Hz Service AC Line Frequency Table 31 defines the AC input current and wattage to the power supplies. Table 31: AC Input Current and Wattage Nominal Input Voltage Maximum Amps Watts Amps Watts 100 VAC–JBOD 4.35 436 6.41 641 208 VAC–North America 2.03 419 2.94 609 120 VAC–JBOD 3.59 419 5.27 633 220 VAC–North America 1.92 418 2.78 608 230 VAC–North America 1.92 418 2.78 608 240 VAC–Europe 1.76 416 2.55 607 60-Hz Input 50-Hz Input 152 Enterprise Virtual Array 3000 User Guide Regulatory Notices and Specifications Table 32 and Table 33 define the output voltage and current specifications of the power supply. Table 32: Output Voltage and Current Specifications Range Specification Minimum Nominal Maximum +5.13 VDC 1.0 A +5.18 VDC N/A +5.23 VDC 26.0 A +12.13 VDC 1.0 A +12.25 VDC N/A +12.37 VDC 26.0 A +12.25 VDC 0.0 A +12.50 VDC N/A +12.75 VDC 2.0 A +5.1 VDC Initial Voltage Steady state current +12.2 VDC (Disk Drive Voltage) Initial Voltage Steady state current +12.5 VDC (Blower Voltage) Initial Voltage Steady state current Table 33: Dual Power Supply Configuration Power Specifications Voltage Current (A) Power (W) 26.0 A 28.0 A 2.0 A 132 W 342.0 W 25.0 W Maximum Continuous Current +5.1 VDC (with a minimum +12.2 VDC load of 0 A) +12.2 VDC (with a minimum +5 VDC load of 4 A) +12.5 VDC Total 499.0 W Maximum Peak Current (Simultaneous Seek Activity) +5.1 VDC +12.2 VDC +12.5 VDC 26.0 A 43.0 A 2.0 A Total Enterprise Virtual Array 3000 User Guide 132.0 W 524.0 W 25.0 W 681.0 W 153 Regulatory Notices and Specifications HSV100 Controller Specifications This section defines the physical, power, and environmental specifications of the HSV controller enclosure. Physical Specifications Table 34 defines the dimensions of the controller and replaceable units. Table 34: HSV Controller Physical Specifications Specification Installed Shipping Note: Metric dimensions are expressed in whole numbers. For example, 10.795 cm is expressed as 108 mm. HSV Controller Enclosure Height Width Depth Weight 62 mm (2.45 in) 502 mm (19.75 in) 444 (17.49 in) 10.4 kg (23 lb) 267 mm (10.5 in) 762 mm (30 in) 762 mm (30 in) 12.7 kg (28 lb) Height Width Depth Weight 57 mm (2.25 in) 184 mm (7.25 in) 83 mm (3.25 in) 1.3 kg (2.8 lb) 108 mm (4.25 in) 324 mm (12.75 in) 162 mm (6.375 in) 1.5 kg (3.4 lb) Height Width Depth Weight 55 mm (2.125 in) 116 mm (4.625 in) 105 mm (4.125 in) 0.4 kg (0.8 lb) 165 mm (6.5 in) 216 mm (8.5 in) 216 mm (8.5 in) 0.92 kg (2 lb) Cache Battery Assembly Blower 154 Enterprise Virtual Array 3000 User Guide Regulatory Notices and Specifications Power Specifications Table 35 defines the HSV Controller power supply input power requirements. Table 35: Controller Power Supply AC Power Requirements AC Input Voltage Frequency Minimum Nominal Maximum Minimum Nominal Maximum 180 VAC 202 VAC 220 VAC 47 Hz 50 Hz 53 Hz 57 Hz 60 Hz 63 Hz 208 VAC 208 VAC 240 VAC 254 VAC Table 36 defines the AC input current and wattage to the controller power supplies. Table 36: AC Input Current and Wattage Nominal Input Voltage Maximum Amps Watts Amps Watts 100 VAC 0.928 94 1.53 150 120 VAC 0.788 94 1.25 148 208 VAC 0.576 97 0.73 146 220 VAC 0.616 102 0.69 146 240 VAC 0.573 100 0.64 147 60-Hz Input 50-Hz Input Enterprise Virtual Array 3000 User Guide 155 Regulatory Notices and Specifications Table 37 defines the HSV Controller power supply output power specifications Table 37: Controller Power Supply Output Specifications Voltage Specification Minimum Nominal Maximum 3.23 VDC 3.30 VDC 3.36 VDC 20 A1 66.0 W 4.80 VDC 5.00 VDC 5.25 VDC 5.0 A 25.5 W Total Current Total Power 24 A 105.5 W2 +3.3 VDC Output Voltage Steady state current Power +5.1 VDC Output Voltage Steady state current Power 1. +3.3 VDC steady state current requires a minimum 5.0 V load of 1 A. 2. Total power includes 14.0 watts for the internal blower. Environmental Specifications There are no HSV Controller environmental specifications. See the ““Storage System Racks” on page 157” for system environmental specifications. 156 Enterprise Virtual Array 3000 User Guide Regulatory Notices and Specifications Storage System Racks Physical Specifications WARNING: The weight of the rack with the enclosures installed always requires at least two individuals to move. HP recommends using a fork lift or a hand truck to move an enclosure in the shipping container. Table 38 and Table 39 define the dimensions and weights of the storage system racks. The specifications reflect the standard 2C2D configuration. Table 38: Storage System Racks Physical Dimensions and Weight Ta Rack (2C/2D) Height cm / in Width cm / in Depth cm / in Max Wt kg / lbs Enterprise Racks 42U 2000/78.7 60.9/24 100.8/39.7 302/666 36U 174.2/68.6 60.9/24 100.8/39.7 287/631 22U 109.2/43 60.9/24 100.8/39.7 266/585 Rack System/E Racks 41U 196.1/77.2 59.6/23.5 99.6/39.2 227/500 33U 160.5/63.2 59.6/23.5 99.6/39.2 215/474 25U 125/49.2 59.6/23.5 99.6/39.2 205/451 Enterprise Virtual Array 3000 User Guide 157 Regulatory Notices and Specifications Table 39: Storage System Racks Shipping Dimensions and Weight Rack (2C/2D) Height cm / in Width cm / in Depth cm / in Max Wt kg /lbs Enterprise Racks 42U 218/86 81.2/32 122/48 316/696 36U 191.1/75.2 81.2/32 122/48 300/661 22U 132.7/52.2 81.2/32 122/48 278/612 Rack System/E Racks 41U 220/86.5 102/40 122/48 297/655 33U 184/72.5 102/40 122/48 284/626 25U 148/58.5 102/40 122/48 273/601 Environmental Specifications To ensure optimum product operation, you must maintain the operational environmental specifications listed in Table 40. The ambient temperature (the enclosure air intake or room temperature) is especially critical. Table 40: Environmental Operating Specifications . Ambient temperature: +10 °C to +35 °C (+50 °F to +95 °F) with an average rate of change of 1 °C/hour maximum and a step change of 3 °C or less. Maintaining the optimum ambient temperature within the specified range ensures that the internal operating temperatures support the drive manufacturer’s MTBF specifications. Relative humidity: 40% to 60% (noncondensing) with a step change of 10% or less (noncondensing). Air quality: Not to exceed a maximum of 500,000 particles, 0.5 micron or larger, per cubic foot of air. Heat dissipation: 12,708 BTUs per hour. When shipping, or placing this product in short term storage, HP recommends maintaining the environmental conditions listed in Table 41. 158 Enterprise Virtual Array 3000 User Guide Regulatory Notices and Specifications Table 41: Environmental Shipping or Short Term Storage Specifications Ambient temperature: –40 °C to +66 °C (–40 °F to +151 °F) Relative humidity: 10% to 80% (noncondensing) Altitude: 15,240 m (50,000 ft) Power Specifications Table 42 defines the AC power specifications for the storage system rack PDUs and PDMs, drive enclosure power supplies, and controller enclosure power supplies. Table 42: Enterprise Storage System AC Power Specifications Nominal Input Voltage Specifications 60-Hz Service 202 VAC Voltage Range Power Receptacle Japan 180-220 VAC, 57-63Hz, 32 A, Single Phase 3-wire, 2-pole, IEC 309 208 VAC Voltage Range Power Receptacle North America 180-220 VAC, 57-63Hz, 32 A, Single Phase 3-wire, 2-pole, NEMA L6-30 240 VAC Voltage Range Power Receptacle Europe 208-254 VAC, 57-63 Hz, 32 A, Single Phase 3-wire, 2-pole, IEC 309 50-Hz Service 202 VAC Voltage Range Power Receptacle Japan 180-220 VAC, 47-63Hz, 32 A, Single Phase 3-wire, 2-pole, IEC 309 220 VAC Voltage Range Power Receptacle North America 190-235 VAC, 47-63Hz, 32 A, Single Phase 3-wire, 2-pole, NEMA L6-30 230 VAC Voltage Range Power Receptacle North America 200-244 VAC, 47-63Hz, 32 A, Single Phase 3-wire, 2-pole, NEMA L6-30 240 VAC Voltage Range Power Receptacle Europe 208-254 VAC, 57-63 Hz, 32 A, Single Phase 3-wire, 2-pole, IEC 309 Enterprise Virtual Array 3000 User Guide 159 Regulatory Notices and Specifications 160 Enterprise Virtual Array 3000 User Guide EMU Generated Condition Reports B This appendix provides a description of the EMU generated condition reports that contain the following information: ■ Element type (et), a hexadecimal number in the range 01 through FF. ■ Element number (en), a decimal number in the range 00 through 99 that defines a probable cause of the problem. ■ Error code (ec), a decimal number in the range 00 through 99. ■ The recommended corrective action. The following topics are included in this appendix: ■ Condition Report Format, page 162 ■ Correcting Errors, page 163 Note: The conventions used to differentiate between the elements of the condition report are: ■ The element type has a period after each character. ■ The element number has a period after the second character. ■ The error code has no periods. The EMU can send error messages to the controller for transmission to the Command View EVA graphical user interface (GUI). The messages displayed are specific to Command View EVA and are not within the scope of this publication. This appendix explains the condition report format, correcting problems, and how to identify element types. The error codes are arranged in element type sequence (that is, 0.1., 0.2., 0.3., etc.). Enterprise Virtual Array 3000 User Guide 161 EMU Generated Condition Reports Condition Report Format When the EMU alphanumeric display is Er, there are additional displays that identify the element type, the specific element, and the error code, which defines the possible cause of the problem. 162 ■ The first-level display defines the type of element affected with two alphanumeric characters separated by periods such as 0.1., 0.2., 1.3., F.F., and so forth. A disk drive problem would display an element type number of 0.1. ■ The second-level display defines the element affected with a two-digit, decimal number followed by a period. For example, when a bay 6 drive error occurs, the element number display is 06.; a display of 14. indicates a bay 14 problem. ■ The third-level display defines a specific problem, the error code with a two-digit, decimal number. For example, should the problem be either the installation of an incorrectly configured drive or one that cannot operate at the loop link rate, the display is 01. Enterprise Virtual Array 3000 User Guide EMU Generated Condition Reports Correcting Errors Correcting an error may require you to perform a specific set of actions. In some cases, the only available corrective action is to replace the element. Table 43 lists the element type codes assigned to the drive enclosure elements. Elements that do not have an active condition report are shaded. Table 43: Assigned Element Type Codes Code Element 0.1. Disk Drives (see ““Drive Conditions” on page 163) 0.2. Power Supplies (see Figure 65 on page 167) 0.3. Blowers (see Figure 66 on page 169) 0.4. Temperature Sensors (see Table 44 on page 172) 0.6. Audible Alarm1 0.7. EMU 0.C. Controller OCP LCD1 0.F. Transceivers (see Figure 68 on page 181) 1.0. Language1 1.1. Communication Port1 1.2. Voltage Sensors (see Table 45 on page 182) 1.3. Current Sensors (see Table 45 on page 182) 8.0. Drive Enclosure1 8.2. Drive Enclosure Backplane 8.7. I/O Modules (see Figure 69 on page 185) F.F. Host 1. A shaded element does not generate a condition report. However, for any error, you should record the error code. Then, implement the recommended corrective action. Drive Conditions The format of a disk drive condition report is 0.1.en.ec, where: ■ 0.1. is the disk drive element type number ■ en. is the two-character disk drive element Enterprise Virtual Array 3000 User Guide 163 EMU Generated Condition Reports ■ ec is the error code A direct correlation exists between the disk drive element number and the bay number. However, no direct correlation exists between the disk drive bay number and the device FC-AL physical address. The FC-AL physical address is assigned by negotiation during system initialization. The following sections define the disk drive error codes. 0.1.en.01 CRITICAL Condition—Drive Configuration, or Drive Link Rate As each drive spins up and comes on-line, the EMU determines if the drive is Fibre Channel compatible and can operate at the link rate (1 Gbps or 2 Gbps) established by the I/O module. If either of these conditions are not met, the EMU issues the condition report 0.1.en.01. The corrective actions for these conditions are: ■ When the drive is not Fibre-Channel-compatible you must install a Fibre Channel compatible drive or a drive blank. ■ When the drive is Fibre-Channel-compatible, the EMU compares the drive link rate with the I/O module link rate, the loop link rate. If the EMU cannot determine the drive link rate, the EMU activates the drive bypass function for 1 minute. During this time the EMU continually checks the drive to determine the link rate. ■ If the EMU determines the drive cannot operate at the Fibre Channel link rate set by the I/O module, the drive bypass function ends and the drive is placed on the loop. This does not generate a condition report. ■ The EMU issues the condition report 0.1.en.01 when the drive link rate is incompatible with Fibre Channel link rate. ■ When the EMU cannot determine drive link rate during the 1-minute drive bypass time, the EMU places the drive on the loop. This process allows the drive to negotiate for an address. — If negotiation indicates the link rates are compatible, the EMU rechecks the drive link rate to verify compatibility. — If negotiation indicates the link rates are incompatible, an error condition exists and drive loop data transfers stop. This condition report remains active until the problem is corrected. The problem affects disk drive en. Therefore, correction to prevent the possible failure of other elements is not required. 164 Enterprise Virtual Array 3000 User Guide EMU Generated Condition Reports Complete the following procedure to correct this problem: 1. Record all six characters of the condition report. 2. Replace the defective drive with: ■ A Fibre-Channel-compatible drive. ■ A Fibre Channel drive capable of operating at a link rate supported by I/O modules and transceivers. 3. Observe the EMU to ensure the error is corrected. 4. If unable to correct the problem, contact your HP authorized service representative. 0.1.en.02 INFORMATION Condition—Drive Missing The drive is improperly installed or missing. Either option could affect the enclosure air flow and cause an overtemperature condition for another element. ■ This error remains active for 1 minute, or until the problem is corrected, whichever occurs first. ■ Immediate correction is not required. However, correction cannot be delayed indefinitely. Complete the following procedure to correct this problem. 1. Record all six characters of the condition report. 2. Remove and install the drive to ensure that it is properly installed. 3. Observe the EMU to ensure the error is corrected. 4. If removing and installing the drive did not correct the problem, install a replacement drive or a drive blank. 5. Observe the EMU to ensure the error is corrected. 6. If unable to correct the problem, contact your HP authorized service representative. 0.1.en.03 INFORMATION Condition—Drive Software Lock Active Some enclosures have a software-activated lock that prevents physically removing a drive while this feature is active. This feature can be activated even when an enclosure does not have a physical lock. Removing a drive when this feature is active generates a condition report. This error remains active for 15 seconds. No action is required to correct this condition. Enterprise Virtual Array 3000 User Guide 165 EMU Generated Condition Reports 0.1.en.04 CRITICAL Condition—Loop A Drive Link Rate Incorrect The drive is capable of operating at the loop link rate, but is running at a different rate. For example, the drive is operating at 1 Gbps, and the loop is operating at 2 Gbps. Only when the drive is operating at the Fibre Channel link rate established by the I/O module can this drive transfer data. This error remains active until the problem is corrected. Complete the following procedure to correct this problem: 1. Record all six characters of the condition report. 2. Remove and replace the drive in the enclosure. 3. Observe the drive status LEDs to ensure the drive is operational. 4. Observe the EMU to ensure the error is corrected. 5. If removing and replacing the drive did not correct the problem, replace the drive. 6. Observe the drive status LEDs to ensure the drive is operational. 7. Observe the EMU to ensure the error is corrected. 8. If unable to correct the problem, contact your HP authorized service representative. 0.1.en.05 CRITICAL Condition—Loop B Drive Link Rate Incorrect The drive is capable of operating at the loop link rate but is running at a different rate. For example, the drive is operating at 1 Gbps, and the loop is operating at 2 Gbps. Only when the drive is operating at the Fibre Channel link rate established by the I/O module can this drive transfer data. This error remains active until the problem is corrected. Complete the following procedure to correct this problem: 1. Record all six characters of the condition report. 2. Remove and replace the drive in the enclosure. 3. Observe the drive status LEDs to ensure the drive is operational. 4. Observe the EMU to ensure the error is corrected. 5. If removing and replacing the drive did not correct the problem, replace the drive. 6. Observe the drive status LEDs to ensure the drive is operational. 166 Enterprise Virtual Array 3000 User Guide EMU Generated Condition Reports 7. Observe the EMU to ensure the error is corrected. 8. If unable to correct the problem, contact your HP authorized service representative. Power Supply Conditions The format of a power supply condition report is 0.2.en.ec, where: ■ 0.2. is the power supply element type number ■ en. is the two-character power supply element number ■ ec is the error code Figure 65 shows the location of power supply 1 1, and power supply 2 2. 1 2 CXO7952A Figure 65: Power supply element numbering The following sections define the power supply condition reports. 0.2.en.01 NONCRITICAL Condition—Power Supply AC Input Missing The loss of the AC input to a power supply makes the remaining supply a single point of failure. This condition report remains active until AC power is applied to the power supply. Complete the following procedure to correct this problem: 1. Record all six characters of the condition report. 2. Ensure that there is AC power to the rack PDU, and from the PDU to the PDMs and that the PDU and PDM circuit breakers are not reset. If there is no AC power to the PDU, contact building facilities management. Verify that the power supply AC power cord is properly connected. Enterprise Virtual Array 3000 User Guide 167 EMU Generated Condition Reports 3. If AC is present, and the rack power distribution circuitry is functioning properly, the power supply LED should be on. 4. Observe the EMU to ensure the error is corrected. 5. If unable to correct the problem, contact your HP authorized service representative. 0.2.en.02 UNRECOVERABLE Condition—Power Supply Missing This condition report indicates a power supply is not installed or installed incorrectly. Both of these conditions affect air flow within the enclosure and can cause an overtemperature condition. Enclosure shutdown is imminent. The operational power supply will automatically shut down after 7 minutes, thereby disabling the enclosure. This condition report remains active until either the problem is corrected, or the operational power supply shuts down, whichever occurs first. To correct this problem, record all six characters of the condition report, then contact your HP authorized service representative. Caution: Removing power from an enclosure may cause the loss or corruption of data. To avoid this condition, shut down the system using Command View EVA. 0.2.en.03 CRITICAL Condition—Power Supply Load Unbalanced This condition report indicates that a component within a power supply may have failed. This can make the remaining power supply a single point of failure. This condition report remains active until corrected. Complete the following procedure to correct this problem: 1. Record all six characters of the condition report. 2. Ensure that the blower on the power supply is functioning properly. If not, correct the blower condition and wait one minute. 3. If unable to correct the problem, contact your HP authorized service representative. 168 Enterprise Virtual Array 3000 User Guide EMU Generated Condition Reports Blower Conditions The format of a blower condition report is 0.3.en.ec, where: ■ 0.3. is the blower element type number ■ en. is the two-character blower element number ■ ec is the error code As shown in Figure 66, blower 1 is in location 1 and blower 2 is in location 2. 1 2 CXO7953A Figure 66: Blower element numbering Caution: A single blower operating at high speed can provide sufficient air flow to cool an enclosure and the elements for up to 100 hours. However, operating an enclosure at temperatures approaching an overheating threshold can damage elements and may reduce the MTBF of a specific element. Immediate replacement of the defective blower is required. The following sections define the power supply condition reports. 0.3.en.01 NONCRITICAL Condition—Blower Speed A blower is operating a speed outside of the EMU specified range, possibly because of a bearing problem. This can affect enclosure cooling and cause an element to fail. This condition report remains active until the problem is corrected. This error does not normally require immediate correction. However, an error of this type could contribute to an element overheating. HP recommends replacing the blower as soon as possible. To correct this problem, record all six characters of the condition report, then contact your HP authorized service representative. Enterprise Virtual Array 3000 User Guide 169 EMU Generated Condition Reports 0.3.en.02 CRITICAL Condition—Blower Speed A blower is operating at a speed that is significantly outside the EMU specified range, possibly because of a bearing problem. This can cause the loss of cooling and cause an element to fail. The error remains active until the problem is corrected. HP recommends replacing the blower as soon as possible. To correct this problem, record all six characters of the condition report, then contact your HP authorized service representative. 0.3.en.03 UNRECOVERABLE Condition—Blower Failure A blower has stopped. The operational blower now operates at high speed and is a single point of failure. This condition report remains active until the problem is corrected. To correct this problem, record all six characters of the condition report, then contact your HP authorized service representative. 0.3.en.04 UNRECOVERABLE Condition—Blower Internal A power supply reported an internal blower error that could affect enclosure cooling and cause an element to fail. HP recommends correcting the problem before the blower fails. This condition report remains active until the problem is corrected. To correct this problem, record all six characters of the condition report, then contact your HP authorized service representative. 0.3.en.05 NONCRITICAL Condition—Blower Missing A blower has been removed or is improperly installed. Even though the blower flaps close to maintain the proper air flow, the reduced cooling capability can cause overheating, causing an element to fail. This condition report remains active until the problem is corrected. To correct this problem, record all six characters of the condition report, then contact your HP authorized service representative. 170 Enterprise Virtual Array 3000 User Guide EMU Generated Condition Reports 0.3.en.06 UNRECOVERABLE Condition—No Blowers Installed Note: When this condition exists there will be two error messages. The first message will be 0.3.en.05 and will identify the first blower. The second message will be 0.3.en.06 and will identify the second blower. The EMU cannot detect any installed blowers. Shutdown is imminent! The EMU will shut down the enclosure in 7 minutes unless you correct the problem. This condition report remains active until you correct the problem or the EMU shuts down the power supplies, whichever occurs first. Complete the following procedure to correct this problem. 1. Record all six characters of the condition report. 2. Use the controller shutdown procedure to shut down the controllers. 3. Contact your HP authorized service representative. Enterprise Virtual Array 3000 User Guide 171 EMU Generated Condition Reports Temperature Conditions The format of a temperature condition report is 0.4.en.ec, where: ■ 0.4. is temperature sensor element type ■ en. is the two-character temperature sensor element ■ ec is the error code Refer to Table 44 to determine the location of each temperature sensor. Table 44: Temperature Sensor Element Numbering Sensor Sensor Location Sensor Sensor Location 01. Power Supply 1 Exhaust 10. Drive Bay 7 02. Power Supply 2 Exhaust 11. Drive Bay 8 03. EMU 12. Drive Bay 9 04. Drive Bay 1 13. Drive Bay - 05. Drive Bay 2 14. Drive Bay q 06. Drive Bay 3 15. drive Bay w 07. Drive Bay 4 16. Drive Bay e 08. Drive Bay 5 17. Drive Bay r 09. Drive Bay 6 The following sections list the temperature condition reports and the default temperature thresholds. Use Command View EVA to view the temperature sensor ranges for the disk drives, EMU, and power supplies. 0.4.en.01 NONCRITICAL Condition—High Temperature This condition report indicates that an element temperature is approaching, but has not reached, the high temperature CRITICAL threshold. Continued operation under these conditions may result in a CRITICAL condition. This condition report remains active until the problem is corrected. Complete the following procedure to correct this problem. 1. Record all six characters of the condition report. 2. Ensure that all elements are properly installed to maintain proper air flow. 3. Ensure that nothing is obstructing the air flow at either the front of the enclosure or the rear of the blower. 172 Enterprise Virtual Array 3000 User Guide EMU Generated Condition Reports 4. Ensure that both blowers are operating properly (the LEDs are on) and neither blower is operating at high speed. 5. Verify that the ambient temperature range is +10 °C to +35 °C (+50 °F to +95 °F). Adjust as necessary. 6. Observe the EMU to ensure the error is corrected. 7. If unable to correct the problem, contact your HP authorized service representative. 0.4.en.02 CRITICAL Condition—High Temperature This condition report indicates that an element temperature is above the high temperature CRITICAL threshold. Continued operation under these conditions may result in element failure and may reduce an element MTBF. This condition report remains active until the problem is corrected. Complete the following procedure to correct this problem. 1. Record all six characters of the condition report. 2. Ensure that all elements are properly installed to maintain proper air flow. 3. Ensure that nothing is obstructing the air flow at either the front of the enclosure or the rear of the blower. 4. Ensure that both blowers are operating properly (the LEDs are on) and neither blower is operating at high speed. 5. Verify that the ambient temperature range is +10 °C to +35 °C (+50 °F to +95 °F). Adjust as necessary. 6. Observe the EMU to ensure the error is corrected. 7. If unable to correct the problem, contact your HP authorized service representative. 0.4.en.03 NONCRITICAL Condition—Low Temperature This condition report indicates that an element temperature is approaching, but has not reached, the low temperature CRITICAL threshold. Continued operation under these conditions may result in a CRITICAL condition. This condition report remains active until the problem is corrected. Complete the following procedure to correct this problem. 1. Record all six characters of the condition report. 2. Verify that the ambient temperature range is +10 °C to +35 °C (+50 °F to +95 °F). Adjust as necessary. Enterprise Virtual Array 3000 User Guide 173 EMU Generated Condition Reports 3. Observe the EMU to ensure the error is corrected. 4. If the ambient temperature is correct and the problem persists, contact your HP authorized service representative. 0.4.en.04 CRITICAL Condition—Low Temperature This condition report indicates that an element temperature has reached the low temperature CRITICAL threshold. HP recommends correcting this error to prevent affecting other elements. This condition report remains active until the problem is corrected. Complete the following procedure to correct this problem. 1. Record all six characters of the condition report. 2. Verify that the ambient temperature range is +10 °C to +35 °C (+50 °F to +95 °F). Adjust as necessary. 3. Observe the EMU to ensure the error is corrected. 4. If the ambient temperature is correct and the problem persists, contact your HP authorized service representative. 0.4.en.05 UNRECOVERABLE Condition—High Temperature This condition report indicates that the EMU has evaluated the temperature of the three temperature groups (EMU, disk drives, and power supplies), and determined that the average temperature of two of the three groups exceeds the critical level (use Command View EVA to view the temperature thresholds). Under these conditions the EMU starts a timer that will automatically shut down the enclosure in 7 minutes unless you correct the problem. Enclosure shutdown is imminent! Complete the following procedure to correct this problem. 1. Ensure that all disk drives, I/O modules, and power supply elements are fully seated. 2. Ensure that all blowers are operating properly. 3. Verify that the ambient temperature range is +10 °C to +35 °C (+50 °F to +95 °F). Adjust as necessary. 4. If Steps 1, 2 or 3 did not reveal a problem, use Command View EVA to request the HSV controller to shut down the drive enclosure. Completing this action will halt the drive enclosure data transfers. 5. Contact your HP authorized service representative and request assistance. 174 Enterprise Virtual Array 3000 User Guide EMU Generated Condition Reports EMU Conditions The format of an EMU condition report is 0.7.01.ec, where: ■ 0.7. is the EMU element type number ■ 01. is the two-character EMU element number ■ ec is the error code Note: There is only one EMU in a drive enclosure. Therefore, the element number is always 01. Resetting the EMU In some cases, the only corrective action for an EMU error is to replace the EMU. Call your HP authorized service representative if this action is required. Another option is to reset the EMU using the following procedure. 1. Firmly grasp the EMU mounting handle and pull the EMU partially out of the enclosure. Note: You do not need to remove the EMU from the enclosure or disconnect the cables. Avoid putting any strain on the cables or connectors. 2. Wait 30 seconds, and then push the EMU in and fully seat the element in the backplane. The EMU should display any enclosure condition report within two minutes. 07.01.01 CRITICAL Condition—EMU Internal Clock There is an internal EMU clock error that will remain active until the problem is corrected. Complete the following procedure to correct this problem. 1. Record all six characters of the condition report. 2. Reset the EMU. 3. If resetting the EMU did not correct the problem, replace the EMU. 4. Observe the EMU to ensure the error is corrected. Enterprise Virtual Array 3000 User Guide 175 EMU Generated Condition Reports 5. If unable to correct the problem, contact your HP authorized service representative. 07.01.02 UNRECOVERABLE Condition—EMU Interrupted The Inter-IC (I2C) bus is not processing data and the EMU is unable to monitor or report the status of the elements or enclosures. IMMEDIATE corrective action is required to ensure proper enclosure operation. This condition report remains active until the problem is corrected. Complete the following procedure NOW to correct this problem. 1. Record all six characters of the condition report. 2. Reset the EMU. 3. Observe the EMU to ensure the error is corrected. 4. If resetting the EMU did not correct the problem, replace the EMU. 5. If unable to correct the problem, contact your HP authorized service representative. 0.7.01.03 UNRECOVERABLE Condition—Power Supply Shutdown This message only appears on the Command View EVA GUI to report a power supply has already shut down. This message can be the result of the controller shutdown command or an EMU or power supply initiated power shutdown. This message cannot be displayed until after restoration of power. Therefore, there is no corrective action required. 0.7.01.04 INFORMATION Condition—EMU Internal Data The EMU is unable to collect data for the SCSI-3 Engineering Services (SES) page. This condition report remains active for 15 seconds. The condition report affects only internal EMU operations. There is no degradation of enclosure operations. The EMU initiates automatic recovery procedures. If the problem is not automatically corrected after one minute, contact your HP authorized service representative. 176 Enterprise Virtual Array 3000 User Guide EMU Generated Condition Reports 0.7.01.05 UNRECOVERABLE Condition—Backplane NVRAM Note: Backplane NVRAM errors usually occur during manufacture. At this time they are identified and corrected. They rarely occur during normal operation. When a backplane NVRAM is not programmed or cannot be read by the EMU, there is no communication with the disk drives. This condition report remains active until the problem is corrected. Complete the following procedure to correct this problem. 1. Record all six characters of the condition report. 2. Reset the EMU. 3. Observe the EMU to ensure the error is corrected. 4. If resetting the EMU did not correct the problem, contact your HP authorized service representative. 0.7.01.10 NONCRITICAL Condition—NVRAM Invalid Read Data The data read from the EMU NVRAM is invalid. This error initiates an automatic recovery process. This condition report remains active until the problem is corrected. If the automatic recovery process does not correct the problem, complete the following procedure. 1. Record all six characters of the condition report. 2. Reset the EMU. 3. Observe the EMU to ensure the error is corrected. 4. If resetting the EMU did not correct the problem, initialize the enclosure by: a. Removing power from the enclosure. b. Applying power to the enclosure. 5. Observe the EMU to ensure the error is corrected. 6. If initializing the enclosure did not correct the problem, contact your HP authorized service representative. Enterprise Virtual Array 3000 User Guide 177 EMU Generated Condition Reports 0.7.01.11 NONCRITICAL Condition—EMU NVRAM Write Failure The EMU cannot write data to the NVRAM. This condition report remains active until the problem is corrected. Complete the following procedure to correct this problem: 1. Record all six characters of the condition report. 2. Reset the EMU. 3. Observe the EMU to ensure the error is corrected. 4. If resetting the EMU did not correct the problem, initialize the enclosure by: a. Removing power from the enclosure. b. Applying power to the enclosure. 5. Observe the EMU to ensure the error is corrected. 6. If initializing the enclosure did not correct the problem, contact your HP authorized service representative. 0.7.01.12 NONCRITICAL Condition—EMU Cannot Read NVRAM Data The EMU is unable to read data from the NVRAM. This condition report remains active until the problem is corrected. Complete the following procedure to correct this problem: 1. Record all six characters of the condition report. 2. Reset the EMU. 3. Observe the EMU to ensure the error is corrected. 4. If resetting the EMU did not correct the problem, initialize the enclosure by: a. Removing power from the enclosure. b. Applying power to the enclosure. 5. Observe the EMU to ensure the error is corrected. 6. If initializing the enclosure did not correct the problem, contact your HP authorized service representative. 0.7.01.13 UNRECOVERABLE Condition—EMU Load Failure The EMU Field Programmable Gate Array (FPGA) that controls the ESI bus failed to load information required for EMU operation. This condition report remains active until the problem is corrected. 178 Enterprise Virtual Array 3000 User Guide EMU Generated Condition Reports Complete the following procedure to correct this problem: 1. Record all six characters of the condition report. 2. Reset the EMU, then observe the EMU to ensure the error is corrected. 3. If resetting the EMU did not correct the problem, initialize the enclosure by: a. Removing power from the enclosure. b. Applying power to the enclosure. 4. Observe the EMU to ensure the error is corrected. 5. If initializing the enclosure did not correct the problem, contact your HP authorized service representative. 0.7.01.14 NONCRITICAL Condition—EMU Enclosure Address Either the enclosure address is incorrect or the enclosure has no address. Possible causes include a defective enclosure address bus cable, an incorrectly connected cable, or a defective enclosure address bus JB. This condition report remains active until the problem is corrected. Complete the following procedure to correct this problem: 1. Record all six characters of the condition report. 2. Remove and reconnect the cable between the address bus JB and the EMU. Note: The EMU display may not display a change in condition for up to 30 seconds. 3. Observe the EMU to ensure the error is corrected. 4. If the problem is not corrected, remove and reinstall the bottom and top terminators, and all the JB-to-JB cables. 5. Observe the EMU to ensure the error is corrected. 6. Reset the EMU, then observe the EMU to ensure the error is corrected. 7. If resetting the EMU did not correct the problem, contact your HP authorized service representative. Enterprise Virtual Array 3000 User Guide 179 EMU Generated Condition Reports 0.7.01.15 UNRECOVERABLE Condition—EMU Hardware Failure The EMU is inoperative and must be replaced NOW! This condition report remains active until the problem is corrected. To correct this problem, record all six characters of the condition report, then contact your HP authorized service representative. 0.7.01.16 INFORMATION Condition—EMU Internal ESI Data Corrupted The EMU ESI data is corrupted. This condition does not affect any other element and no action is required. 0.7.01.17 UNRECOVERABLE Condition—Power Shutdown Failure The power supply did not respond to a controller, EMU, or power supply shut down command. Shutting down the supply is required to prevent overheating. Complete the following procedure to correct the problem: 1. Record all six characters of the condition report. 2. Move the power cord bail lock 1, Figure 67, to the left. 3. Disconnect the AC power cord 2 from the supply. 1 4 2 3 CXO7490A Figure 67: Disconnecting AC power 180 Enterprise Virtual Array 3000 User Guide EMU Generated Condition Reports Transceiver Conditions The format of a transceiver condition report is 0.F.en.ec, where: ■ 0.F. is the transceiver element type number ■ en. is the two-character transceiver element number (see Figure 68) ■ ec is the error code 4 2 1 2 3 4 3 Transceiver 01 Transceiver 02 Transceiver 03 Transceiver 04 1 CXO7954A Figure 68: Transceiver element numbering 0.F.en.01 CRITICAL Condition—Transceiver Incompatibility The transceiver on this link are not the same type or they are incompatible with the I/O module. This error prevents the controller from establishing a link with the enclosure drives and eliminates the enclosure dual-loop capability. This error remains active until the problem is corrected. To correct this problem, record all six characters of the condition report, then contact your HP authorized service representative. 0.F.en.02 CRITICAL Condition—Transceiver Data Signal Lost This symptom can occur when a controller has been powered Off or a cable has been removed from the transceiver. The transceiver can no longer detect a data signal. This error prevents the controller from transferring data on a loop and eliminates the enclosure dual-loop capability. This error remains active until the problem is fixed. To correct this problem, record all six characters of the condition report, then contact your HP authorized service representative. Enterprise Virtual Array 3000 User Guide 181 EMU Generated Condition Reports 0.F.en.03 CRITICAL Condition—Transceiver FC-AL Bus Fault The system has detected an FC-AL bus fault involving a transceiver. This error prevents the controller from transferring data on a loop and eliminates the enclosure dual-loop capability Complete the following procedure to correct this problem: 1. Record all six characters of the condition report. 2. Check all the transceivers and cables to ensure they are properly connected. 3. Check all the transceivers on the loop to ensure they are compatible with the I/O module. 4. Contact your HP authorized service representative. Voltage Sensor and Current Sensor Conditions The format of these sensor condition reports is 1.2.en.ec for a voltage sensor, and 1.3.en.ec for a current sensor, where: ■ 1.2. is the voltage sensor element type ■ 1.3. is the current sensor element type number ■ en. is the sensor element number ■ ec is the error code Table 45 lists the location of the power supply voltage and current sensors. Table 45: Voltage and Current Sensor Locations Sensor Sensor Element Location 01. Power Supply 1 +5 VDC 02. Power Supply 1 +12 VDC 03. Power Supply 2 +5 VDC 04. Power Supply 2 +12 VDC Use Command View EVA to view the voltage and current error thresholds for both +5 VDC and +12 VDC power supplies. 182 Enterprise Virtual Array 3000 User Guide EMU Generated Condition Reports 1.2.en.01 NONCRITICAL Condition—High Voltage This condition report indicates that an element voltage is approaching, but has not reached, the high voltage CRITICAL threshold. Continued operation under these conditions may result in a CRITICAL condition. This condition report remains active until the problem is corrected. To correct this problem, record all six characters of the condition report, then contact your HP authorized service representative. 1.2.en.02 CRITICAL Condition—High Voltage This condition report indicates that an element voltage has reached the high voltage CRITICAL threshold. This report remains active until the problem is corrected. To correct this problem, record all six characters of the condition report, then contact your HP authorized service representative. 1.2.en.03 NONCRITICAL Condition—Low Voltage This condition report indicates that an element voltage is approaching, but has not reached, the low voltage CRITICAL threshold. Continued operation under these conditions may result in a CRITICAL condition. This condition report remains active until the problem is corrected. To correct this problem, record all six characters of the condition report, then contact your HP authorized service representative. 1.2.en.04 CRITICAL Condition—Low Voltage This condition report indicates that an element voltage has reached the low voltage CRITICAL threshold. This condition report remains active until the problem is corrected. To correct this problem, record all six characters of the condition report, then contact your HP authorized service representative. 1.3.en.01 NONCRITICAL Condition—High Current This condition report indicates that an element current is approaching, but has not reached, the high current CRITICAL threshold. Continued operation under these conditions may result in a CRITICAL condition. This condition report remains active until the problem is corrected. To correct this problem, record all six characters of the condition report, then contact your HP authorized service representative. Enterprise Virtual Array 3000 User Guide 183 EMU Generated Condition Reports 1.3.en.02 CRITICAL Condition—High Current This condition report indicates that an element current has reached the high current CRITICAL threshold. This condition report remains active until the problem is corrected. To correct this problem, record all six characters of the condition report, then contact your HP authorized service representative. Backplane Conditions Note: Backplane NVRAM errors usually occur during manufacture. At this time they are identified and corrected. They rarely occur during normal operation. The format of a backplane condition report is 8.2.01.ec, where: ■ 8.2. is the backplane element type number ■ 01. is the two-character backplane element number ■ ec is the error code The only corrective action available for this error is to replace the drive enclosure. 8.2.01.10 NONCRITICAL Condition—Backplane NVRAM Read An invalid NVRAM read occurred and an automatic recovery process has begun. This condition report is active for 15 seconds. If the automatic recovery process does not correct the problem, record all six characters of the condition report, then contact your HP authorized service representative. 8.2.01.11 NONCRITICAL Condition—Backplane NVRAM Write Failure The system is unable to write data to the NVRAM. This problem prevents communication between elements in the enclosure. This condition report is active for 15 seconds. To correct this problem, record all six characters of the condition report, then contact your HP authorized service representative. 184 Enterprise Virtual Array 3000 User Guide EMU Generated Condition Reports 8.2.01.12 NONCRITICAL Condition—Backplane NVRAM Read Failure The system is unable to read data from the NVRAM. This problem prevents communication between elements in the enclosure. This condition report is active for 15 seconds. To correct this problem, record all six characters of the condition report, then contact your HP authorized service representative. 8.2.01.13 NONCRITICAL Condition—Backplane WWN Is Blank The system is unable to read valid data from the NVRAM. This report is active until corrected. This condition can result in incorrect device location data being displayed. To correct this problem, record all six characters of the condition report, then contact your HP authorized service representative. I/O Module Conditions The format of an I/O module condition report is 8.7.en.ec, where: ■ 8.7. is the I/O module element type number ■ en. is the two-character I/O module element number. See Figure 69. ■ ec is the error code 1 2 2 I/O Module A (01) I/O Module B (02) 1 CXO7951A Figure 69: I/O module element numbering Correction of an I/O module problem normally requires replacing the module. The following sections define the I/O module problem by I/O module location. Enterprise Virtual Array 3000 User Guide 185 EMU Generated Condition Reports 8.7.en.01 CRITICAL Condition—I/O Module Unsupported The I/O module Fibre Channel link speed is not supported by the backplane. This error prevents the controller from establishing a link with enclosure drives and eliminates the enclosure dual-loop capability. This condition report remains active until the problem is corrected. To correct this problem, record all six characters of the condition report, then contact your HP authorized service representative. 8.7.en.02 CRITICAL Condition—I/O Module Communication The I/O module is unable to communicate with the EMU. Complete the following procedure to correct this problem: 1. Record all six characters of the condition report. 2. Contact your HP authorized service representative. Note: Multiple erroneous error messages indicating I2C bus errors, such as NVRAM errors, blowers missing, and so forth, could indicate an EMU problem. 8.7.en.10 NONCRITICAL Condition—I/O Module NVRAM Read An invalid NVRAM read occurred and automatic recover was initiated. Complete the following procedure to correct this problem: 1. Record all six characters of the condition report. 2. Observe the I/O module status LEDs for an operational display. 3. Contact your HP authorized service representative. 8.7.en.11 NONCRITICAL Condition—I/O Module NVRAM Write The system is unable to write data to the I/O module NVRAM. Complete the following procedure to correct this problem: 1. Record all six characters of the condition report. 2. Observe the I/O module status LEDs for an operational display. 3. Contact your HP authorized service representative. 186 Enterprise Virtual Array 3000 User Guide EMU Generated Condition Reports 8.7.en.12 NONCRITICAL Condition—I/O Module NVRAM Read Failure The system is unable to read data from the I/O module NVRAM. Complete the following procedure to correct this problem: 1. Record all six characters of the condition report. 2. Contact your HP authorized service representative. Host Conditions The EMU has the capability of displaying host controller defined condition reports on the EMU alphanumeric display. The format of a host condition report is F.F.en.ec, where: ■ F.F. is the host element type number ■ en. is the two-character host element number ■ ec is the error code The host controller can display host controller defined error codes on the EMU alphanumeric display F.F.en.01 INFORMATION Condition—Host Generated The host controller (HSV) defines the error type and the affected elements. These messages may be displays on the Command View EVA GUI. The proper corrective action depends on the element and error. Enterprise Virtual Array 3000 User Guide 187 EMU Generated Condition Reports 188 Enterprise Virtual Array 3000 User Guide HSV Controller Fault Management C This appendix describes how the storage system controller displays events and termination event information. Termination Event information is displayed on the OCP LCD. Command View EVA also detects and displays controller events. This appendix also discusses how to identify and correct problems. Once the initial setup of the storage system is complete, an error condition message has priority over other controller displays. Command View EVA provides detailed descriptions of the storage system error conditions, or faults. The Fault Management displays provide similar information on the LCD, but in less detail. Whenever possible, use Command View EVA for fault information. The following topics are included in this appendix: ■ Using Command View EVA, page 190 ■ GUI Termination Event Display, page 190 Enterprise Virtual Array 3000 User Guide 189 HSV Controller Fault Management Using Command View EVA Command View EVA provides detailed information about each event affecting system operation in either a Termination Event display or an Event display. These displays are similar, but not identical. GUI Termination Event Display A problem that generates the Termination Event display prevents the system from performing a specific function or process. You can use the information in this display to diagnose and correct the problem. Note: The major differences between the Termination Event display and the Event Display are: ■ The Termination Event display includes a Code Flag field; it does not include the EIP Type field. ■ The Event display includes an EIP type field; it does not include a Code Flag field. ■ The Event display includes a Corrective Action Code field. The Termination Event display has the following format: Date 190 Time SWCID Evt No Code Flag Description ■ Date—The date the event occurred. ■ Time—The time the event occurred. ■ SWCID—Software Identification Code. A hexadecimal number in the range 0–FF that identifies the controller software component reporting the event. ■ Evt No—Event Number. A hexadecimal number in the range 0–FF that is the software component identification number. ■ Code Flag—An internal code that includes a combination of other flags. ■ Description—The condition that generated the event. This field may contain information about an individual field’s content and validity. Enterprise Virtual Array 3000 User Guide HSV Controller Fault Management GUI Event Display A problem that generates the Event display reduces the system capabilities. You can use the information in this display to diagnose and correct problems. Note: The major differences between the Event Display and the Termination Event display are: ■ The Event display includes an EIP type field; it does not include a Code Flag field. ■ The Event display includes a Corrective Action Code (CAC) field. ■ The Termination Event display includes a Code Flag field; it does not include the EIP Type field. The Event display has the following format: Date Time SWCID Evt No CAC EIP Type Description ■ Date—The date the event occurred. ■ Time—The time the event occurred. ■ SWCID—Software Identification Code. A number in the range 1–256 that identifies the internal firmware module affected. ■ Evt No—Event Number. A hexadecimal number in the range 0–FF that is the software component identification number. ■ CAC—Corrective Action Code. A specific action to correct the problem. ■ EIP Type—Event Information Packet Type. A hexadecimal character that defines the event information format. ■ Description—The problem that generated the event. Enterprise Virtual Array 3000 User Guide 191 HSV Controller Fault Management Fault Management Displays When you do not have access to Command View EVA, you can display and analyze termination codes (TCs) on the OCP LCD display. You can then use the event text code document, as described in “Interpreting Fault Management Information” on page 193 to determine and implement corrective action. You can also provide this information to the HP authorized service representative should you require additional support. This lets the service provider identify the tools and components required to correct the condition in the shortest possible time. When the Fault Management display is active (Flashing), you can either display the last fault or display detailed information about the last 32 faults reported. Displaying Last Fault Information Complete the following procedure to display Last Fault information: 1. When the Fault Management display is active (Flashing), press X to select the Last Fault menu. 2. Press X to display the last fault information. Last Fault Detail View TC: 0406017F IDX: 00 Param 0: 55555555 The first line of the TC display contains the eight-character TC error code and the two-character IDX (index) code. The IDX is a reference to the location in the TC array that contains this error. The second line of the TC display identifies the affected parameter with a two-character parameter number (0–30), the eight-character parameter code affected, and the parameter code number. 3. Press W to return to the Last Fault menu. 192 Enterprise Virtual Array 3000 User Guide HSV Controller Fault Management Displaying Detailed Information The Detail View menu lets you examine detailed fault information stored in the Last Termination Event Array (LTEA). This array stores information for the last 32 termination events. Complete the following procedure to display the LTEA information about any of the last 32 termination events: 1. When the Fault Management display is active (Flashing), press T to select the Detail View menu. The LTEA selection menu is active (LTEA 0 is displayed). Last Fault Detail View DONE LTEA [0] 2. Press T or S to increment to a specific error, LTEA N, in this example. LTEA [N] 3. Press X to observe data about the selected error, LTEA N, in this example. TC: XXXXXXXX IDX: xx Param [N]: nnnnnnnn Interpreting Fault Management Information Each version of Command View EVA includes an ASCII text file that defines all the codes that an HP authorized service representative can view either in Command View EVA or on the OCP. Note: This information is for the exclusive use of an HP authorized service representative. The file name identifies the file type and the revision date. For example, the file name hsv100_event_w010605_t100.txt provides the following information: ■ hsv100—the Network Storage Controller (NSC) model number string, that is the controller model number Enterprise Virtual Array 3000 User Guide 193 HSV Controller Fault Management ■ event_—the type information in the file ■ w010605_—the NSC base level build string, that is, the file creation date — 01—creation year — 06—creation month — 05—creation date ■ t100—the NSC software version number string Table 46 describes types of information available in this file. Table 46: Controller Event Text Description File Information Type 194 Description Event Code This hexadecimal code identifies the reported event type. Termination Code (TC) The hexadecimal code specifies the condition that generated the termination code. It may also define either a system or user initiated corrective action. Coupled Crash Control Codes These single digit, decimal characters define the requirement for the other controller to initiate a coupled crash control 0. Other controller SHOULD NOT complete a coupled crash. 1. Other controller SHOULD complete a coupled crash. Dump/Restart Control Codes This single decimal character (0, 1, 3) defines the requirements to: 0. Perform a crash dump and then restart the controller. 1. DO NOT perform a crash dump; just restart the controller. 3. DO NOT perform a crash dump; DO NOT restart the controller. Corrective Action Codes (CAC) These hexadecimal codes supplement the Termination Code information to identify the faulty element and the recommended corrective action. Software Component ID Codes (SWID) These decimal codes identify software associated with the event. Event Information Packets (EIP) These codes specify the packet organization for specific type event. Enterprise Virtual Array 3000 User Guide Customer Replaceable Units D This appendix describes the procedures for replacing Customer Replaceable Units (CRUs). The following topics are included in this appendix: ■ ESD Protection, page 196 ■ Common Replacement Procedures, page 197 ■ Determining CRU Part Numbers, page 198 ■ Replacing a Disk Drive, page 199 ■ Installing a Drive Blank, page 201 ■ Removing a Drive Blank, page 202 ■ Protecting Fiber Optic Connections, page 203 Enterprise Virtual Array 3000 User Guide 195 Customer Replaceable Units ESD Protection When replacing a CRU, you must take precautions to prevent the possibility of electrostatic discharge (ESD) damaging sensitive electronic components. 1. Always transport and store CRUs in a static-free container. 2. Do not remove the CRU from the static-free container until you are ready to install the CRU. 3. Avoid touching the CRU connector pins, leads, or circuitry. 196 Enterprise Virtual Array 3000 User Guide Customer Replaceable Units Common Replacement Procedures The following procedures are common to all CRU replacement procedures. Note: The hotpluggable power supplies, blowers, and drives DO NOT require halting Fibre Channel data transfers. Replacing a pluggable I/O module, transceiver, or a cable always interrupts data transfers on the Fibre Channel loop. Review the controller documentation to determine if replacing an I/O module, transceiver or cable requires removing power. 1. Always implement all the ESD protection procedures. 2. Remove the defective CRU from the enclosure. 3. Remove the replacement CRU from the static-free container. Check the label to ensure that the CRU is a compatible replacement. See Figure 70. 4. Align the CRU with the enclosure guide slots. 5. Slide the CRU into the enclosure until the CRU is against the backplane connector. 6. Fully seat the CRU in the enclosure and verify that the CRU is operating properly. 7. Place the defective CRU in the static-free container for shipment. Enterprise Virtual Array 3000 User Guide 197 Customer Replaceable Units Determining CRU Part Numbers All CRUs have an HP 6–3 spare part number on the product label. See Figure 70. This nine-character number appears immediately below the REPLACE WITH HEWLETT-PACKARD SPARE statement. The first six characters (123479) identify the CRU. The last three characters (–002) identify the revision level. The revision level must be the same as, or greater than, the number on the CRU being replaced. The higher the revision level, the later the revision. Figure 70: Typical HP product label 198 Enterprise Virtual Array 3000 User Guide Customer Replaceable Units Replacing a Disk Drive Complete the following procedure to replace a disk drive. Caution: Remove only one drive at a time from the enclosure. Removing more than one drive may may cause overheating resulting in data loss. Install a drive of equal or greater capacity or a drive blank before removing another drive. 1. Push in the disk drive Ejector Button, 1 in Figure 71. Pivot the Release Lever 2 to the full, open position. 1 2 CXO6826A Figure 71: Removing a drive 2. Pull on the drive until it disconnects from the backplane connector. Caution: Rapidly rotating media can make the disk module difficult to handle. To avoid dropping and damaging the drive, wait approximately 30 seconds for the media to stop rotating before removing the drive from the enclosure. 3. When you are sure that the media is no longer spinning, completely remove the drive from the enclosure. Enterprise Virtual Array 3000 User Guide 199 Customer Replaceable Units 4. Insert the replacement drive into the enclosure until the drive is against the backplane connector. 5. Push in the replacement drive while pivoting the Release Lever 2 to the full upright position. 6. Push in the Release Lever until the lever engages the Ejector Button 1, and the drive fully seats in the backplane connector. 7. Observe the drive status LEDs to ensure the replacement drive is functioning properly. See Table 12 on page 83 for more details. Inserting Disk Drives into an Operating Storage System Note: The following restriction applies to all currently available versions of VCS. Drive insertion refers to physically inserting drives into drive enclosure slots. It is not synonymous with drive addition to a disk group. When inserting more than four disk drives into an operating storage system, the disk drives must be inserted in sets of four or fewer drives using the following procedure. This procedure must be followed to avoid unexpected storage system behavior. 1. Insert one to four disk drives into the storage system drive enclosure(s). Ensure that each drive is fully seated and the locking mechanism is fully engaged. 2. Wait until the activity light (down arrow) on each drive inserted in Step1 displays the solid green indication and remains in that state for 10 seconds. Note: If one or more of the disk drives inserted does not display the solid green indication after 70 seconds, remove the drive(s) and check for damaged connectors on the disk drive and drive enclosure. If no damage is found, repeat Steps 1 and 2. After two attempts, replace drives that do not display the solid green indication. 3. When all of the inserted disk drives successfully display the solid green indication, repeat this procedure for the next set of one to four disk drives until all the disk drives have been inserted. 200 Enterprise Virtual Array 3000 User Guide Customer Replaceable Units Installing a Drive Blank Complete the following procedure to replace a disk drive with a drive blank. 1. Push in the disk drive Ejector Button, 1 in Figure 72. Pivot the Release Lever 2 to the full, open position. 1 2 CXO6826A Figure 72: Removing a drive to install a drive blank 2. Pull on the drive to disconnect it from the backplane connector. Caution: Rapidly rotating media can make the disk module difficult to handle. To avoid dropping and damaging the drive, wait approximately 30 seconds for the media to stop rotating before removing the drive from the enclosure. 3. When you are sure that the media is no longer spinning, remove the drive from the enclosure. Enterprise Virtual Array 3000 User Guide 201 Customer Replaceable Units 4. Insert the drive blank into the enclosure bay until locking tabs 1 and 2 engage the enclosure. See Figure 73. 2 1 CXO7359A˚ Figure 73: Installing and removing a drive blank Removing a Drive Blank Complete the following procedure to remove a drive blank. 1. Grasp the drive blank by the two tabs, 1 and 2 in Figure 73. 2. Lift up on the bottom tab 1 and pull the blank out of the enclosure. 202 Enterprise Virtual Array 3000 User Guide Customer Replaceable Units Protecting Fiber Optic Connections This section describes the procedures and processes for protecting and cleaning fiber optic connectors. Fiber optic cabling is used to connect the storage system to the host or fabric. Contamination of the fiber optic connectors on either a transceiver or a cable connector can impede the transmission of data. Therefore, protecting the connector tips against contamination or damage is imperative. The tips can be contaminated by touching them, by dust, or by debris. They can be damaged when dropped. To protect the connectors against contamination or damage, use the dust covers or dust caps provided by the manufacturer. These covers are removed during installation, and are installed whenever the transceiver or cables are disconnected. Cleaning the connectors should remove contamination. The transceiver dust caps protect the transceivers from contamination. The transceivers protect the I/O modules from contamination. Caution: To avoid damage to the connectors, always install the dust covers or dust caps whenever a transceiver or a fiber cable is disconnected. Remove, but do not discard, the dust covers or dust caps from transceiver or fiber cable connectors only when they are connected. To minimize the risk of contamination or damage, implement the following guidelines: ■ Dust Covers Remove and retain the dust covers and dust caps when installing an I/O module, a transceiver or a cable. Install the dust covers when disconnecting a transceiver or cable. ■ When to Clean Any time you think a connector may be contaminated, or if a connector has not been protected by a dust cover for an extended period of time, clean the connector. ■ How to Clean a. Wipe the connector with a lint-free tissue soaked with 100% isopropyl alcohol. b. Wipe the connector with a dry, lint-free tissue. c. Dry the connector with moisture-free compressed air. Enterprise Virtual Array 3000 User Guide 203 Customer Replaceable Units One of the many sources for cleaning equipment specifically designed for fiber optic connectors is: Alcoa Fujikura Ltd. 1-888-385-4587 (North America) 011-1-770-956-7200 (International) 204 Enterprise Virtual Array 3000 User Guide glossary Glossary Glossary This glossary defines Enterprise Virtual Array terms used in this publication or related to this product and is not a comprehensive glossary of computer terms. µm A symbol for micrometer; one millionth of a meter. For example, 50 µm is equivalent to 0.000050 m. 3U A unit of measurement representing three “U” spaces. “U” spacing is used to designate panel or enclosure heights. Three “U” spaces is equivalent to 5.25 inches (133 mm). See also rack-mounting unit. active member of a virtual disk family An active member of a virtual disk family is a simulated disk drive created by the controllers as storage for one or more hosts. An active member of a virtual disk family is accessible by one or more hosts for normal storage. An active virtual disk member and its snapshot, if one exists, constitute a virtual disk family. An active member of a virtual disk family is the only necessary member of a virtual disk family. See also virtual disk, virtual disk copy, virtual disk family, and snapshot. adapter See controller. AL_PA Arbitrated Loop Physical Address. A 1-byte value the arbitrated loop topology uses to identify the loop ports. This value becomes the last byte of the address identifier for each public port on the loop. Enterprise Virtual Array 3000 User Guide 205 Glossary allocation policy Storage system rules that govern how virtual disks are created. Allocate Completely and Allocate on Demand are the two rules used in creating virtual disks. ■ Allocate Completely—The space a virtual disk requires on the physical disks is reserved, even if the virtual disk is not currently using the space. ■ Allocate on Demand—The space a virtual disk requires on the physical disks is not reserved until needed. ambient temperature The air temperature in the area where a system is installed. Also called intake temperature or room temperature. ANSI American National Standards Institute. A non-governmental organization that develops standards (such as SCSI I/O interface standards and Fibre Channel interface standards) used voluntarily by many manufacturers within the United States. arbitrated loop A Fibre Channel topology that links multiple ports (up to 126) together on a single shared simplex media. Transmissions can only occur between a single pair of nodes at any given time. Arbitration is the scheme that determines which node has control of the loop at any given moment. arbitrated loop physical address See AL_PA. arbitrated loop topology See arbitrated loop. array All the physical disk drives in a storage system that are known to and under the control of a controller pair. array controller See controller. asynchronous Events scheduled as the result of a signal requesting the event or that which is without any specified time relation. audible alarm The environmental monitoring unit (EMU) alarm that sounds when there is a disk drive enclosure element condition report. The audible alarm can be muted or disabled. 206 Enterprise Virtual Array 3000 User Guide Glossary backplane An electronic printed circuit board that distributes data, control, power, and other signals to element connectors. bad block A data block that contains a physical defect. bad block replacement A replacement routine that substitutes defect-free disk blocks for those found to have defects. This process takes place in the controller and is transparent to the host. bail lock Part of the power supply AC receptacle that engages the AC power cord connector to ensure that the cord cannot be accidentally disconnected. baud The maximum rate of signal state changes per second on a communication circuit. If each signal state change corresponds to a code bit, then the baud rate and the bit rate are the same. It is also possible for signal state changes to correspond to more than one code bit so the baud rate may be lower than the code bit rate. bay The physical location of an element, such as a drive, I/O module, EMU or power supply in a drive enclosure. Each bay is numbered to define its location. bidirectional Also called Bi-Di. The movement of optical signals in opposite directions through a common fiber cable such as the data flow path typically on a parallel printer port. A parallel port can provide two-way data flow for disk drives, scanning devices, FAX operations and even parallel modems. block Also called a sector. The smallest collection of consecutive bytes addressable on a disk drive. In integrated storage elements, a block contains 512 bytes of data, error codes, flags, and the block address header. blower A variable speed airflow device that pulls air into an enclosure or element. It usually pulls air in from the front and exhausts the heated air out the rear. cabinet An alternate term used for a rack. Enterprise Virtual Array 3000 User Guide 207 Glossary cable assembly A fiber optic cable that has connectors installed on one or both ends. General use of these cable assemblies includes the interconnection of multimode fiber optic cable assemblies with either LC or SC type connectors. ■ When there is a connector on only one end of the cable, the cable assembly is referred to as a pigtail. ■ When there is a connector on both ends of the cable, the cable assembly is referred to as a jumper. CAC Corrective Action Code. An Command View EVA graphical user interface (GUI) display component that defines the action required to correct a problem. cache High-speed memory that sets aside data as an intermediate data buffer between a host and the storage media. The purpose of cache is to improve performance. See also read cache, write cache, and mirrored cache. cache battery A rechargeable unit mounted within a controller enclosure that supplies back-up power to the cache module in case of primary power shortage. cache battery LED 1.An orange light emitting diode (LED) that illuminates on the controller operator control panel (OCP) to define the status of the HSV Controller cache batteries. 2.An amber status LED that illuminates on a cache battery. When illuminated, it indicates that one or more cache battery cells have failed and the battery must be replaced with a new battery. carrier A drive-enclosure-compatible assembly containing a disk drive or other storage devices. client A software program that uses the services of another software program. The Command View EVA client is a standard internet browser. clone See Virtual Disk Copy 208 Enterprise Virtual Array 3000 User Guide Glossary Command View EVA GUI The graphical user interface (GUI) through which a user can control and monitor a storage system. The Command View EVA software can be installed on more than one management appliance in a fabric. Each installation of the Command View EVA software is a management agent. The client for the agent is a standard browser. communication logical unit number (LUN) See console LUN. condition report A three-element code generated by the EMU in the form where e.t. is the element type (a hexadecimal number), en. is the element number (a decimal number), and ec is the condition code (a decimal number). console LUN A SCSI-3 virtual object that makes a controller pair accessible by the host before any virtual disks are created. Also called a communication LUN. console LUN ID The ID that can be assigned when a host operating system requires a unique ID. The console LUN ID is assigned by the user, usually when the storage system is initialized. See also console LUN. controller A hardware/firmware device that manages communications between host systems and other devices. Controllers typically differ by the type of interface to the host and provide functions beyond those the devices support. controller enclosure A unit that holds one controller, power supplies, blowers, cache batteries, transceivers, and connectors. controller event A significant occurrence involving any storage system hardware or software component reported by the controller to Command View EVA. controller fault LED An amber fault LED that illuminates on the controller OCP to indicate when there is an HSV Controller fault. controller heartbeat LED A green LED that flashes on the controller OCP to indicate that the HSV controller is operational. Enterprise Virtual Array 3000 User Guide 209 Glossary controller pair Two interconnected controller modules which together control a physical disk array. A controller pair and the disk array together constitute a storage system. corrective action code See CAC. CRITICAL Condition A disk drive enclosure EMU condition that occurs when one or more disk drive enclosure elements have failed or are operating outside of their specifications. The failure of the element makes continued normal operation of at least some elements in the enclosure impossible. Some enclosure elements may be able to continue normal operations. Only an UNRECOVERABLE condition has precedence. This condition has precedence over NONCRITICAL errors and INFORMATION condition. CRU Customer Replaceable Unit. A storage system element that a user can replace without using special tools or techniques, or special training. customer replaceable unit See CRU. data entry mode The state in which controller information can be displayed or controller configuration data can be entered. On the Enterprise Storage System, the controller mode is active when the LCD on the HSV Controller OCP is Flashing. default disk group The first disk group created at the time the system is initialized. The default disk group can contain the entire set of physical disks in the array or just a few of the disks. See also disk group. Detailed Fault View An HSV Controller OCP display that permits a user to view detailed information about a controller fault. device channel A channel used to connect storage devices to a host I/O bus adapter or intelligent controller. device ports Controller pair device ports connected to the storage system’s physical disk drive array through the FC-AL. Also called a device-side port. 210 Enterprise Virtual Array 3000 User Guide Glossary device-side ports See device ports. DIMM Dual Inline Memory Module. A small circuit board holding memory chips. dirty data The write-back cached data that has not been written to storage media even though the host operation processing the data has completed. disk drive A carrier-mounted storage device supporting random access to fixed size blocks of data. disk drive blank A carrier that replaces a disk drive to control airflow within a drive enclosure whenever there is less than a full complement of storage devices. disk drive enclosure A unit that holds storage system devices such as disk drives, power supplies, blowers, I/O modules, transceivers or EMUs. disk drive enclosure event A significant operational occurrence involving a hardware or software component in the disk drive enclosure. The disk drive enclosure EMU reports these events to the controller for processing. disk failure protection A method by which a controller pair reserves drive capacity to take over the functionality of a failed or failing physical disk. For each disk group, the controllers reserve space in the physical disk pool equivalent to the selected number of physical disk drives. disk group A physical disk drive set or pool in which a virtual disk is created. A disk group may contain all the physical disk drives in a controller pair array or a subset of the array. disk migration state A physical disk drive operating state. A physical disk drive can be in a stable or migration state: ■ Stable—The state in which the physical disk drive has no failure nor is a failure predicted. ■ Migration—The state in which the disk drive is failing, or failure is predicted to be imminent. Data is then moved off the disk onto other disk drives in the same disk group. Enterprise Virtual Array 3000 User Guide 211 Glossary disk replacement delay The time that elapses between a drive failure and when the controller starts searching for spare disk space. Drive replacement seldom starts immediately in case the “failure” was a glitch or temporary condition. drive blank See disk drive blank. drive enclosure See disk drive enclosure. dual-loop A configuration where each drive is connected to a pair of controllers through two loops. These two Fibre Channel loops constitute a loop pair. dual power supply configuration See redundant power configuration. EIA Electronic Industries Alliance. A standards organization specializing in the electrical and functional characteristics of interface equipment. EIP Event Information Packet. The event information packet is an HSV element hexadecimal character display that defines how an event was detected. Also called the EIP type. electromagnetic interference See EMI. electrostatic discharge See ESD. element 1. In a disk drive enclosure, a device such as an EMU, power supply, disk, blower, or I/O module. The object can be controlled, interrogated, or described by the enclosure services process. 2. In the Storage Management Appliance Software, a controllable object, such as the Enterprise Storage System. EMI Electromagnetic Interference. The impairment of a signal by an electromagnetic disturbance. 212 Enterprise Virtual Array 3000 User Guide Glossary EMU Environmental Monitoring Unit. An element which monitors the status of an enclosure, including the power, air temperature, and blower status. The EMU detects problems and displays and reports these conditions to a user and the controller. In some cases, the EMU implements corrective action. enclosure A unit used to hold various storage system devices such as disk drives, controllers, power supplies, blowers, an EMU, I/O modules, or blowers. enclosure address bus An Enterprise Storage System bus that interconnects and identifies controller enclosures and disk drive enclosures by their physical location. Enclosures within a reporting group can exchange environmental data. This bus uses junction boxes and cables to assign enclosure numbers to each enclosure. Communications over this bus do not involve the FC-AL bus and are, therefore, classified as out-of-band communications. enclosure number (En) One of the vertical rack-mounting positions where the enclosure is located. The positions are numbered sequentially in decimal numbers starting from the bottom of the cabinet. Each disk enclosure has its own enclosure number. A controller pair shares a single enclosure number. If the system has an expansion rack, the enclosures in the expansion rack are numbered from 15 to 24, starting at the bottom. enclosure services Those services that establish the mechanical environmental, electrical environmental, and external indicators and controls for the proper operation and maintenance of devices with an enclosure as described in the SES SCSI-3 Enclosure Services Command Set (SES), Rev 8b, American National Standard for Information Services. Enclosure Services Interface See ESI. Enclosure Services Processor See ESP. Enterprise Virtual Array The Enterprise Virtual Array is a product that consists of one or more storage systems. Each storage system consists of a pair of HSV controllers and the disk drives they manage. A storage system within the Enterprise Virtual Array can be formally referred to as an Enterprise Storage System, or generically referred to as the storage system. Enterprise Virtual Array 3000 User Guide 213 Glossary Enterprise Virtual Array rack A unit that holds controller enclosures, disk drive enclosures, power distribution supplies, and enclosure address buses that, combined, comprise an Enterprise Storage System solution. Also called the Enterprise Storage System rack. See also rack. environmental monitoring unit See EMU. error code The portion of an EMU condition report that defines a problem. ESD Electrostatic Discharge. The emission of a potentially harmful static electric voltage as a result of improper grounding. ESI Enclosure Services Interface. The SCSI-3 engineering services interface implementation developed for StorageWorks products. A bus that connects the EMU to the drives. ESP Enclosure Services Processor. An EMU that implements an enclosure’s services process. event Any significant change in the state of the Enterprise Storage System hardware or software component reported by the controller to Command View EVA. See also controller event, disk drive enclosure event, management agent event, and termination event. Event Information Packet See EIP. Event Number See Evt No. Evt No. Event Number. A sequential number assigned to each Software Code Identification (SWCID) event. It is a decimal number in the range 0-255. exabyte A unit of storage capacity that is the equivalent of 260 bytes or 1,152,921,504,606,846,976 bytes. One exabyte is equivalent to 1,024 petabytes. 214 Enterprise Virtual Array 3000 User Guide Glossary fabric A Fibre Channel fabric switch or two or more interconnected Fibre Channel switches allowing data transmission. fabric port A port which is capable of supporting an attached arbitrated loop. This port on a loop will have the AL_PA hexadecimal address 00 (loop ID 7E), giving the fabric the highest priority access to the loop. A loop port is the gateway to the fabric for the node ports on a loop. failover The process that takes place when one controller assumes the workload of a failed companion controller. Failover continues until the failed controller is operational. fan The variable speed airflow device that cools an enclosure or element by forcing ambient air into an enclosure or element and forcing heated air out the other side. See also blower. Fault Management Code See FMC. FC-AL Fibre Channel Arbitrated Loop. The American National Standards Institute’s (ANSI) document which specifies arbitrated loop topology operation. FC HBA Fibre Channel Host Bus Adapter. An interchangeable term for Fibre Channel adapter. See also FCA. FCA Fibre Channel Adapter. An adapter used to connect the host server to the fabric. Also called a Host Bus Adapter (HBA) or a Fibre Channel Host Bus Adapter (FC HBA). See also FC HBA. FCC Federal Communications Commission. The federal agency responsible for establishing standards and approving electronic devices within the United States. FCP Fibre Channel Protocol. The mapping of SCSI-3 operations to Fibre Channel. fiber The optical media used to implement Fibre Channel. Enterprise Virtual Array 3000 User Guide 215 Glossary fiber optics The technology where light is transmitted through glass or plastic (optical) threads (fibers) for data communication or signaling purposes. fiber optic cable A transmission medium designed to transmit digital signals in the form of pulses of light. Fiber optic cable is noted for its properties of electrical isolation and resistance to electrostatic contamination. fibre The international spelling that refers to the Fibre Channel standards for optical media. Fibre Channel A data transfer architecture designed for mass storage devices and other peripheral devices that require very high bandwidth. Fibre Channel adapter See FCA. Fibre Channel Loop Switch An enclosure that provides twelve-port central interconnect for Fibre Channel Arbitrated Loops following the ANSI FC-AL standard. field replaceable unit See FRU. flush The act of writing dirty data from cache to a storage media. FMC Fault Management Code. Command View EVA display of the Enterprise Storage System error condition information. form factor A storage industry dimensional standard for 3.5-inch (89 mm) and 5.25-inch (133 mm) high storage devices. Device heights are specified as low-profile (1-inch or 25.4 mm), half-height (1.6-inch or 41 mm), and full-height (5.25-inch or 133 mm). FPGA Field Programmable Gate Array. A programmable device with an internal array of logic blocks surrounded by a ring of programmable I/O blocks connected together through a programmable interconnect. 216 Enterprise Virtual Array 3000 User Guide Glossary frequency The number of cycles that occur in one second expressed in Hertz (Hz). Thus, 1 Hz is equivalent to one cycle per second. FRU Field Replaceable Unit. A hardware element that can be replaced in the field. This type of replacement can require special training, tools, or techniques. Therefore, FRU procedures are usually performed only by an authorized service representative. Gb Gigabit. A measurement of the rate at which the transfer of bits of data occurs. Sometimes referred to as Gbps. Nominally, a Gb is a transfer rate of 1,000,000,000 (109) bits per second. For Fibre Channel transceivers or FC loops the Gb transfer rates are: — 1 Gb is a transmission rate of 1,062,500,000 bits per second. — 2 Gb is a transmission rate of 2,125,000,000 bits per second. GB Gigabyte. A unit of measurement defining either: ■ A storage or memory capacity of 1,073,741,824 (230) bytes. ■ A data transfer rate. See also GBps GBIC Gigabit Interface Converter. See transceiver. Gbps Gigabits per second. A measurement of the rate at which the transfer of bits of data occurs. Nominally, a Gb is a transfer rate of 1,000,000,000 (109) bits per second. See also Gb. GBps Gigabytes per second. A measurement of the rate at which the transfer of bytes of data occurs. A GBps is a transfer rate of 1,000,000,000 (109) bits per second. See also GB. Giga (G) The notation to represent 109 or 1 billion (1,000,000,000). Enterprise Virtual Array 3000 User Guide 217 Glossary gigabaud An encoded bit transmission rate of one billion (109) bits per second. gigabit See Gb. gigabit per second See Gbps. graphical user interface See GUI. GUI Graphical User Interface. Software that displays the status of a storage system and allows its user to control the storage system. HBA Host Bus Adapter. See FCA. host A computer that runs user applications and uses (or can potentially use) one or more virtual disks created and presented by the controller pair. Host Bus Adapter See FCA. host computer See host. host link LED The HSV Controller display that indicates the status of the storage system Fibre Channel links. host ports A connection point to one or more hosts through a Fibre Channel fabric. A host is a computer that runs user applications and that uses (or can potentially use) one or more of the virtual disks that are created and presented by the controller pair. host-side ports See host ports. hot-pluggable A method of element replacement whereby the complete system remains operational during element removal or insertion. Replacement does not interrupt data transfers to other elements. 218 Enterprise Virtual Array 3000 User Guide Glossary hub A communications infrastructure device to which nodes on a multi-point bus or loop are physically connected. It is used to improve the manageability of physical cables. I/O module Input/Output module. The enclosure element that is the FC-AL interface to the host or controller. I/O modules are bus speed specific; either 1 Gb or 2 Gb. IDX A 2-digit decimal number portion of the HSV controller termination code display that defines one of 32 locations in the Termination Code array that contains information about a specific event. See also param and TC. in-band communication The method of communication between the EMU and controller that utilizes the FC-AL bus. See also out-of-band communication. INFORMATION condition A disk drive enclosure EMU condition report that may require action. This condition is for information only and does not indicate the failure of an element. All condition reports have precedence over an INFORMATION condition. initialization A process that prepares a storage system for use. Specifically, the system binds controllers together as an operational pair and establishes preliminary data structures on the disk array. Initialization also sets up the first disk group, called the default disk group. input/output module See I/O module. intake temperature See ambient temperature. interface A set of protocols used between components such as cables, connectors, and signal levels. JBOD Just a Bunch of Disks. A number of disks connected to one or more controllers. just a bunch of disks See JBOD. Enterprise Virtual Array 3000 User Guide 219 Glossary K Kilo. A scientific notation denoting a multiplier of one thousand (1,000). KB Kilobyte. A unit of measurement defining either storage or memory capacity. — For storage, a KB is a capacity of 1,000 (103) bytes of data. — For memory, a KB is a capacity of 1,024 (210) bytes of data. LAN Local area network. A group of computers and associated devices that share a common communications line and typically share the resources of a single processor or server within a small geographic area. laser A device that amplifies light waves and concentrates them in a narrow, very intense beam. Last Fault View An HSV Controller display defining the last reported fault condition. Last Termination Error Array See LTEA. LCD Liquid Crystal Display. The indicator on a panel that is associated with an element. The LCD is usually located on the front of an element. LED Light Emitting Diode. A semiconductor diode, used in an electronic display, that emits light when a voltage is applied to it. License Key A WWN-encoded sequence that is obtained from the HP license key fulfillment website. light emitting diode See LED. link A connection between ports on Fibre Channel devices. The link is a full duplex connection to a fabric or a simplex connection between loop devices. logon Also called login, it is a procedure whereby a user or network connection is identified as being an authorized network user or participant. 220 Enterprise Virtual Array 3000 User Guide Glossary loop See arbitrated loop. loop ID Seven-bit values numbered contiguously from 0 to 126 decimal and represent the 127 valid AL_PA values on a loop (not all 256 hexadecimal values are allowed as AL_PA values per FC–AL). loop pair A Fibre Channel attachment between a controller and physical disk drives. Physical disk drives connect to controllers through paired Fibre Channel arbitrated loops. There is a single loop pair, designated loop pair 1. Each loop pair consists of two loops (called loop A and loop B) that operate independently during normal operation, but provide mutual backup in case one loop fails. LTEA Last Termination Event Array. A two-digit HSV Controller number that identifies a specific event that terminated an operation. Valid numbers range from 00 to 31. LUN Logical Unit Number. A SCSI convention used to identify elements. The host sees a virtual disk as a LUN. The LUN address a user assigns to a virtual disk for a particular host will be the LUN at which that host will see the virtual disk. management agent The Command View EVA software that controls and monitors the Enterprise Storage System. The software can exist on more than one management appliance in a fabric. Each installation of the Command View EVA software is a management agent. management agent event Significant occurrence to or within the management agent software, or an initialized storage cell controlled or monitored by the management agent. Mb Megabit. A term defining a data transfer rate. See also Mbps. MB Megabtye. A term defining either: ■ A measure of either storage or memory capacity of 1,048,576 (220) bytes. ■ A data transfer rate. See also MBps. Enterprise Virtual Array 3000 User Guide 221 Glossary Mbps Megabits per second. A measure of bandwidth or data transfers occurring at a rate of 1,000,000 (106) bits per second. MBps Megabytes per second. A measure of bandwidth or data transfers occurring at a rate of 1,000,000 (106) bytes per second. mean time between failures See MTBF. Mega A notation denoting a multiplier of 1 million (1,000,000). metadata Information that a controller pair writes on the disk array. This information is used to control and monitor the array and is not readable by the host. micro meter See µm. mirrored caching A process in which half of each controller’s write cache mirrors the companion controller’s write cache. The total memory available for cached write data is reduced by half, but the level of protection is greater. mirroring The act of creating an exact copy or image of data. MTBF Mean Time Between Failures. The average time from start of use to first failure in a large population of identical systems, components, or devices. multi-mode fiber A fiber optic cable with a diameter large enough (50 microns or more) to allow multiple streams of light to travel different paths from the transmitter to the receiver. This transmission mode enables bidirectional transmissions. Network Storage Controller See NSC. 222 Enterprise Virtual Array 3000 User Guide Glossary NONCRITICAL Condition A disk drive enclosure EMU condition report that occurs when one or more elements inside the enclosure have failed or are operating outside of their specifications. The failure does not affect continued normal operation of the enclosure. All devices in the enclosure continue to operate according to their specifications. The ability of the devices to operate correctly may be reduced if additional failures occur. UNRECOVERABLE and CRITICAL errors have precedence over this condition. This condition has precedence over INFORMATION condition. Early correction can prevent the loss of data. node port A device port that can operate on the arbitrated loop topology. non-OFC (Open Fibre Control) A laser transceiver whose lower-intensity output does not require special open Fibre Channel mechanisms for eye protection. The Enterprise Storage System transceivers are non-OFC compatible. NSC Network Storage Controller. The HSV Controllers used by the Enterprise Storage System. NVRAM Nonvolatile Random Access Memory. Memory whose contents are not lost when a system is turned Off or if there is a power failure. This is achieved through the use of UPS batteries or implementation technology such as flash memory. NVRAM is commonly used to store important configuration parameters. occupancy alarm level A percentage of the total disk group capacity in blocks. When the number of blocks in the disk group that contain user data reaches this level, an event code is generated. The alarm level is specified by the user. OCP Operator Control Panel. The element that displays the controller’s status using LEDs and an LCD. Information selection and data entry is controlled by the OCP pushbuttons. operator control panel See OCP. Enterprise Virtual Array 3000 User Guide 223 Glossary param That portion of the HSV controller termination code display that defines: ■ The 2-character parameter identifier that is a decimal number in the 0 through 30 range. ■ The 8-character parameter code that is a hexadecimal number. See also IDX and TC. password A security interlock where the purpose is to allow: ■ A management agent control only certain storage systems ■ Only certain management agents control a storage system PDM Power Distribution Module. A thermal circuit breaker equipped power strip that distribute power from a PDU to Enterprise Storage System elements. PDU Power Distribution Unit. The rack device that distributes conditioned AC or DC power within a rack. petabyte A unit of storage capacity that is the equivalent of 250, 1,125,899,906,842,624 bytes or 1,024 terabytes. physical disk A disk drive mounted in a disk drive enclosure that communicates with a controller pair through the device-side Fibre Channel loops. A physical disk is hardware with embedded software, as opposed to a virtual disk, which is constructed by the controllers. Only the controllers can communicate directly with the physical disks. The physical disks, in aggregate, are called the array and constitute the storage pool from which the controllers create virtual disks. physical disk array See array. port A Fibre Channel connector on a Fibre Channel device. port_name A 64-bit unique identifier assigned to each Fibre Channel port. The port_name is communicated during the login and port discovery processes. 224 Enterprise Virtual Array 3000 User Guide Glossary port-wine colored An HP convention of applying the color of port wine to a CRU tab, lever, or handle to identify the unit as hot-pluggable. power distribution module See PDM. power distribution unit See PDU. power supply An element that develops DC voltages for operating the storage system elements from either an AC or DC source. preferred address An AL_PA which a node port attempts to acquire during loop initialization. preferred path A preference for which controller of the controller pair manages the virtual disk. This preference is set by the user through the element manager when creating the virtual disk. A host can change the preferred path of a virtual disk at any time. The primary purpose of preferring a path is load balancing. protocol The conventions or rules for the format and timing of messages sent and received. pushbutton A switch that is engaged or disengaged when it is pressed. quiesce The act of rendering bus activity inactive or dormant. For example, “quiesce the SCSI bus operations during a device warm-swap.” rack A floor-standing structure primarily designed for, and capable of, holding and supporting storage system equipment. All racks provide for the mounting of panels per Electronic Industries Alliance (EIA) Standard RS-310-C. rack-mounting unit A measurement for rack heights based upon a repeating hole pattern. It is expressed as “U” spacing or panel heights. Repeating hole pattern are spaced every 1.75 inches (44.45 mm) and based on EIA’s Standard RS-310-C. For example, a 3U unit is 5.25-inches (133.35 mm) high, and a 4U unit is 7.0-inches (177.79 mm) high. Enterprise Virtual Array 3000 User Guide 225 Glossary read caching A cache method used to decrease subsystem response times to a read request by allowing the controller to satisfy the request from the cache memory rather than from the disk drives. Reading data from cache memory is faster than reading data from a disk. The read cache is specified as either On or Off for each virtual disk. The default state is on. read ahead caching A cache management method used to decrease the subsystem response time to a read request by allowing the controller to satisfy the request from the cache memory rather than from the disk drives. reconstruction The process of regenerating the contents of a failed member data. The reconstruction process writes the data to a spare set disk and incorporates the spare set disk into the mirrorset, striped mirrorset or RAID set from which the failed member came. redundancy 1. Element Redundancy—The degree to which logical or physical elements are protected by having another element that can take over in case of failure. For example, each loop of a device-side loop pair normally works independently but can take over for the other in case of failure. 2. Data Redundancy—The level to which user data is protected. Redundancy is directly proportional to cost in terms of storage usage; the greater the level of data protection, the more storage space is required. redundant power configuration A capability of the Enterprise Storage System racks and enclosures to allow continuous system operation by preventing single points of power failure. ■ For a rack, two AC power sources and two power conditioning units distribute primary and redundant AC power to enclosure power supplies. ■ For a controller or disk drive enclosure, two power supplies ensure that the DC power is available even when there is a failure of one supply, one AC source, or one power conditioning unit. Implementing the redundant power configuration provides protection against the loss or corruption of data. reporting group An Enterprise Storage System controller pair and the associated disk drive enclosures. The Enterprise Storage System controller assigns a unique decimal reporting group number to each EMU on its loops. Each EMU collects disk drive environmental information from its own sub-enclosure and broadcasts the data over the enclosure address bus to all members of the reporting group. Information from enclosures in other reporting groups is ignored. 226 Enterprise Virtual Array 3000 User Guide Glossary room temperature See ambient temperature. SCSI — Small Computer System Interface. An American National Standards Institute (ANSI) interface which defines the physical and electrical parameters of a parallel I/O bus used to connect computers and a maximum of 16 bus elements. — The communication protocol used between a controller pair and the hosts. Specifically, the protocol is FC-AL or SCSI on a Fibre Channel. SCSI is the higher command-level protocol and Fibre Channel is the low-level transmission protocol. The controllers have full support for SCSI-2; additionally, they support some elements of SCSI-3. SCSI-3 The ANSI standard that defines the operation and function of Fibre Channel systems. SCSI-3 Enclosure Services See SES. selective presentation The process whereby a controller presents a virtual disk only to the host computer authorized access. serial transmission A method of transmission in which each bit of information is sent sequentially on a single channel rather than simultaneously as in parallel transmission. SES SCSI-3 Enclosures Services. Those services that establish the mechanical environment, electrical environment, and external indicators and controls for the proper operation and maintenance of devices within an enclosure. small computer system interface See SCSI. Snapclone A virtual disk that can be manipulated while the data is being copied. Only an Active member of a virtual disk family can be snapcloned. The Snapclone, like a snapshot, reflects the contents of the source virtual disk at a particular point in time. Unlike the snapshot, the Snapclone is an actual clone of the source virtual disk and immediately becomes an independent Active member of its own virtual disk family. Enterprise Virtual Array 3000 User Guide 227 Glossary snapshot A temporary virtual disk (VD) that reflects the contents of another virtual disk at a particular point in time. A snapshot operation is only done on an active virtual disk. Only one snapshot of an active virtual disk can exist at any point. The active disk and its snapshot constitute a virtual family. See also active virtual disk, virtual disk copy, and virtual disk family. SSN Storage System Name. A Command View EVA-assigned, unique 20-character name that identifies a specific storage system. StorageWorks by HP The HP trademarked name used to describe the set of rack-mounted enclosures containing controllers, transceivers, I/O modules, EMUs, disk drives, cables, blowers, and power supplies used to design and configure a solution-specific storage system. storage carrier See carrier. Storage Management Appliance Software A centralized, appliance-based monitoring and management interface that supports multiple applications, operating systems, hardware platforms, storage systems, tape libraries and SAN-related interconnect devices. It is included and resides on the HP OpenView Storage Management Appliance, a single aggregation point for data management. storage pool The aggregated blocks of available storage in the total physical disk array. storage system The controllers, storage devices, enclosures, cables, and power supplies and their software. Storage System Name See SSN. switch An electro-mechanical device that initiates an action or completes a circuit. TB Terabyte. A term defining either: ■ A measure of either storage or memory capacity of 1,099,5111,627,776 (240) bytes. ■ A data transfer rate. See also TBps. 228 Enterprise Virtual Array 3000 User Guide Glossary TBps Terabytes per second. A data transfer rate of 1,000,000,000,000 (1012) bytes per second. TC Termination Code. An Enterprise Storage System controller 8-character hexadecimal display that defines a problem causing controller operations to halt. See also IDX and param. Termination Code See TC. termination event Occurrences that cause the storage system to cease operation. terminator Interconnected elements that form the ends of the transmission lines in the enclosure address bus. topology An interconnection scheme that allows multiple Fibre Channel ports to communicate. Point-to-point, arbitrated loop, and switched fabric are all Fibre Channel topologies. transceiver The device that converts electrical signals to optical signals at the point where the fiber cables connect to the FC elements such as hubs, controllers, or adapters. Also called a Gigabit Interface Converter (GBIC). uninitialized system A state in which the storage system is not ready for use. See also initialization. units See rack-mounting units. UNRECOVERABLE Condition A disk drive enclosure EMU condition report that occurs when one or more elements inside the enclosure have failed and have disabled the enclosure. The enclosure may be incapable of recovering or bypassing the failure and will require repairs to correct the condition. This is the highest level condition and has precedence over all other errors and requires immediate corrective action. Enterprise Virtual Array 3000 User Guide 229 Glossary unwritten cached data Also called unflushed data. See also dirty data. UPS Uninterruptible Power Supply. A battery-operated power supply guaranteed to provide power to an electrical device in the event of an unexpected interruption to the primary power supply. Uninterruptible power supplies are usually rated by the amount of voltage supplied and the length of time the voltage is supplied. VCS Virtual Controller Software. Provides storage controller software capability for the HSV Controller. VD Virtual Disk. A simulated disk drive created by the controllers as storage for one or more hosts. The virtual disk characteristics, chosen by the storage administrator, provide a specific combination of capacity, availability, performance, and accessibility. A controller pair simulates the characteristics of the virtual disk by deploying the disk group from which the virtual disk was created. The host computer sees the virtual disk as “real,” with the characteristics of an identical physical disk. See also active virtual disk, virtual disk copy, virtual disk family, and virtual disk snapshot virtual disk See VD. virtual disk copy A clone or exact replica of another virtual disk at a particular point in time. Only an active virtual disk can be copied. A copy immediately becomes the active disk of its own virtual disk family. See also active virtual disk, virtual disk family, and virtual disk snapshot virtual disk family A virtual disk and its snapshot, if a snapshot exists, constitute a family. The original virtual disk is called the active disk. When you first create a virtual disk family, the only member is the active disk. See also active virtual disk, virtual disk copy, and virtual disk snapshot. 230 Enterprise Virtual Array 3000 User Guide Glossary virtual disk snapshot See snapshot. Vraid0 A virtualization technique that provides no data protection. Host data is broken down into chunks and distributed on the disks comprising the disk group from which the virtual disk was created. Reading and writing to a Vraid0 virtual disk is very fast and makes the fullest use of the available storage, but there is no data protection (redundancy) unless there is parity. Vraid1 A virtualization technique that provides the highest level of data protection. All data blocks are mirrored or written twice on separate physical disks. For read requests, the block can be read from either disk, which can increase performance. Mirroring takes the most storage space because twice the storage capacity must be allocated for a given amount of data. Vraid5 A virtualization technique that uses parity striping to provide moderate data protection. Parity is a data protection mechanism for a striped virtual disk. A striped virtual disk is one where the data to and from the host is broken down into chunks and distributed on the physical disks comprising the disk group in which the virtual disk was created. If the striped virtual disk has parity, another chunk (a parity chunk) is calculated from the set of data chunks and written to the physical disks. If one of the data chunks becomes corrupted, the data can be reconstructed from the parity chunk and the remaining data chunks. World Wide Name See WWN. write back caching A controller process that notifies the host that the write operation is complete when the data is written to the cache. This occurs before transferring the data to the disk. Write back caching improves response time since the write operation completes as soon as the data reaches the cache. As soon as possible after caching the data, the controller then writes the data to the disk drives. write caching A process when the host sends a write request to the controller, and the controller places the data in the controller cache module. As soon as possible, the controller transfers the data to the physical disk drives. WWN World Wide Name. A unique Fibre Channel identifier consisting of a 16-character hexadecimal number. A WWN is required for each Fibre Channel communication port. Enterprise Virtual Array 3000 User Guide 231 Glossary 232 Enterprise Virtual Array 3000 User Guide index sensing 110 shipping 151, 159 short term storage 151, 159 storing short term 159 ASCII, error codes definitions 193 asynchronous disk swap 26 audible alarm disabling 98 enabling 97 indicating conditions 96 muting 97 selecting display group 95 sound patterns 96 unmuting 97 authorized reseller, HP 18 +12.5 VDC 86 +5.1 VDC 86 14-drive enclosure bay numbering 76 2C2D configuration 20 Enterprise Virtual Array 3000 User Guide Index AC input missing 167 AC power distributing 129, 132, 133 frequency 86 specifications 152, 155 voltage 86 active virtual disk 61 addition to disk group 66 address bus, PIC 118 agent options 57 air flow affecting temperature 86, 87 CAUTIONs 86 air quality environmental specifications 151 operating specifications 158 alarm code cycles 96 alphanumeric display controlling 94 description 89, 91, 94 display groups 94 altitude shipping 151, 159 short term storage 151 ambient temperature environmental specifications 151 operating 158 Index A B backplane NONCRITICAL conditions 184, 185 NVRAM conditions 177, 185 backplane connector 199, 201 backplane overcurrent sensors 85 basic replacement procedures 197 to 204 battery 118 bays locating 76 numbering 76 benefits 22 bidirectional operation 78 blank disk drives 85 blowers +12.5 VDC 86 cooling enclosures 87 233 Index CRITICAL conditions 170 DC power 86 display 109 failure 170 missing 170, 171 monitored functions 90 NONCRITICAL conditions 169, 170 physical specifications 150 power supply interface 87 replacement 111 reporting status 88 speed 170 status displays 109 status LEDs 88 UNRECOVERABLE conditions 170, 171 browser interface 50 BTU specifications 151, 158 C CA EVA 23 CAB ONLY connector 89 cables FCC compliance statement 142 cabling controller 127 CAC 190, 194 cache battery assembly LED 113 CAUTIONs air flow 82, 86 disk drives 82, 86 drive blank 86 overheating 82, 86 replacement time, disk drives 82 uninitializing the system 123 CDRH (Center for Devices and Radiological Health), compliance regulations. See CDRH 143 Center for Devices and Radiological Health. See CDRH 143 certification product labels 140 changing passwords 124 checksum entering in OCP 43 234 example 41 Class A equipment, Canadian compliance statement 145 Class B equipment, Canadian compliance statement 145 cleaning fiber optic connectors 203 clearing passwords 126 Command View EVA defined 25 displaying events 191 displaying termination events 190 introduction 50 navigating interface 55 commercial environments, use in 20 components, storage system 24 computing environments, use in 20 condition report format 105, 162 condition report terminology 102 condition reporting analysis 106 backplane 184 correcting errors 163 CRITICAL conditions, defined 102 current sensors 182 drive bay numbering 164 drives 163 element types 105, 163 EMU 175 error code 105 error queue 104 format 105, 162 hosts 187 I/O modules 185 INFORMATION conditions, defined 103 NONCRITICAL conditions, defined 103 power supplies 167 temperature 172 transceivers 181 UNRECOVERABLE conditions, defined 102 voltage sensor 182 conditions, EMU detection of 90 configuration Enterprise Virtual Array 3000 User Guide Index physical layout 28 connectors controller 127 enclosure address bus 89 LCD only 89 power IEC 309 receptacle 128 power NEMA L6-30R 128 protecting 203 RJ-45 89 content pane 55 Continuous Access EVA 23 controller cabling 127 cache size 30 connecting to 38 connectors 127 defined 27, 30, 68 information 112 location in rack 30 managing 70 status LEDs 113, 127 controller enclosure 68, 72 controller pair storage capacity 22 controller properties 70 controls 89 conventions document 13 equipment symbols 14 text symbols 13 cooling blowers 86 enclosures 87 power supplies 87 Corrective Action Codes See CAC country-specific certifications 140 coupled crash control codes 194 CRITICAL conditions audible alarm 96 blowers speed 170 defined 102 drive link rate 164, 166 Enterprise Virtual Array 3000 User Guide drives configuration 164 EMU internal clock 175 high current 184 high temperature 173 high voltage 183 I/O modules communication 186 I/O modules unsupported 186 low temperature 174 low voltage 183 transceivers 181, 182 CRUs detecting presence 109 replacing 197 current sensing 109 current sensors 182 D data center, use in 20 data integrity 109 DC power +12.5 VDC 86 +5.1 VDC 86 blowers 86 DC power specifications 152, 155 default disk group 65 default display 114 deleting disk groups 66 hosts 64 detail view 193 detail view menu 193 detecting CRU presence 109 device ports 30, 70 diagnostic information 87 DIMMs 111 disabling the audible alarm 98 disk drives affecting air flow 86 CAUTIONs about 82, 86 connecting to backplane 201 defined 68, 81 disconnecting from backplane 199 235 Index displaying status 109 hot swapping 26 MTBF specifications 151, 158 overcurrent sensors 85 overheating 82 power usage 86 removing 201 replacing 82, 199, 201 reporting status 82 spinning down 201 supported 81 using blanks 85 disk groups creating default 65 defined 65 minimum size 32 monitoring 60 display groups audible alarm, Au 95 enclosure number, En 95 error code, Er 95 loop ID, Li 95 reporting group, rG 95 selecting 89 display refresh 57 displaying errors 90 displays audible alarm 91, 95 blowers 109 disk drives 109 EMU status 91, 109 enclosure status 91 I/O modules 109 power supplies 109 document conventions 13 prerequisites 12 related documentation 12 drive blank CAUTIONs about 86 removing 201 using 85 236 drive enclosures defined 27, 71 front view 76 rear view 77 drives detecting configuration error 164 detecting drive link error 166 detecting link rate error 164 locked by software 165 missing 165 monitoring functions 90 reporting conditions 163 Dual In-line Memory Modules See DIMMs dual-loop operation 77 dump/restart control codes 194 dust covers, using 203 dynamic volume expansion 32 E EIP 191, 194 ejector button, disk drives 201 element condition reporting 163 element conditions 102 element numbering 164 EMU alphanumeric display 91 conditions 175 connectors 89 controls 89 CRITICAL conditions 175 displaying status 89, 92, 109 INFORMATION conditions 176, 180 locating 29 NONCRITICAL conditions 177, 178, 179 resetting 175 status icons 91, 92 status indicators 91 UNRECOVERABLE conditions 176, 178, 180 EMU LED displays 92 EMU monitoring functions 90 EMU status 92 Enterprise Virtual Array 3000 User Guide Index En description 99 enabling the audible alarm 97 enclosure address bus addressing configurations 99 connectors 89 defined 99 detecting errors with 179 enclosure certification label 140 enclosure conditions 102 enclosure fault LED 92 enclosure functions 91 enclosure number description 99 enclosure number display group 95 Enclosure Services Interface See ESI Enclosure Services Processor See ESP enclosures adjusting temperature 87 bays 76 cooling 86, 87 managing air flow 87 monitoring internal temperature 109 physical specifications 149 power components 86 sensing temperature 87, 109 status LEDs 110 environmental specifications air quality 151, 158 altitude 151 ambient temperature operating specifications 158 shipping 159 short term storage 159 controllers 156 drive enclosure 151 heat dissipation 158 relative humidity 151, 158 relative humidity shipping specifications relative humidity 159 shipping 151, 159 short term storage 159 short term storage specifications 151 equipment symbols 14 Enterprise Virtual Array 3000 User Guide error code selecting display group 95 error codes, defined 193 error condition display 105 error condition report format 105 error messages 90 error queue 104 error report storage 105 errors automatic corrective action 90 displaying 90 ESD protection 196 ESI 82, 90 ESP 90 event code, defined 194 event display 191 Event Information Packets See EIP F fabric connections 38 failback preference settings 33 failure 185 fan redundancy 29 fault management details 193 display 114 displays 192 fault tolerance 26 FC loops 38, 65, 78 FCA 62 FC-AL drive enclosures 88 FCC (Federal Communications Commission) Class A Equipment, compliance notice 141 Class B Equipment, compliance notice 141 Declaration of Conformity 142 modifications 142 notice 141 features defined 22 high availability 111 Federal Communications Commission (FCC) notice 141 237 Index Federal Communications Commission. See FCC 141 fiber optics cleaning cable connectors 203 protecting cable connectors 203 Fibre Channel Adapters See FCA. Fibre Channel Drive Enclosure defined 27, 29 disk capacity 29 field programmable array See FPGA file name, error code definitions 193 firmware version display 117 floor space requirements 135 folders, adding 55 fork lift, using 157 FPGA 118 function select pushbutton 89 functions monitoring 90 G general controller properties 70 getting help 17 glue FPGA 118 H hand truck, using 157 hardware components 27 hardware folder 69 hardware navigation 54 help button (?) 56 help, obtaining 17 high availability data integrity 109 high current conditions 183, 184 high density packaging 22 high temperature conditions 172, 173, 174 high voltage conditions 183 host bus adapters 40 host folder 62 host generated condition 187 host ports 30, 70 238 host presentation 62 hosts addng 64 defined 62 monitoring 60 navigating to 54 required information 40 hot swap 26 HP authorized reseller 18 storage website 17 technical support 17 HP OpenView Storage Management Appliance Software 50 HSV Controllers connecting to 38 defined 27, 30 managing 70 physical dimensions 154 power requirements 155, 156 I I/O modules bidirectional 78 CRITICAL conditions 186 defined 77 displaying status 109 element numbering 185 monitored functions 91 NONCRITICAL conditions 186, 187 power 81 icons battery status 113 pushbuttons 113 IDX code display 192 INFORMATION conditions 103 audible alarm 96 defined 103 drive missing 165 drive software lock active 165 EMU 176, 180 host generated 187 Enterprise Virtual Array 3000 User Guide Index initializing the storage system 45 input and output ports 78 input ports 78 installation lowering a leveling foot 137 moving a rack 135 raising a leveling foot 137 software 39 stabilizing the rack 137 intake temperature See ambient temperature internal clock 175 Li power supplies 88 pushbuttons 95 status displays 93 kits, boxed 39 display group 95 licensing options 57 Loop ID display group 95 low temperature CRITICAL conditions 174 NONCRITICAL conditions 173 low voltage CRITICAL conditions 183 NONCRITICAL conditions 183 lower a leveling foot 137 LTEA 193 LUN numbers 40 L M J JBOD configurations, enclosure addressing 99 K labels enclosure certification 140 locating World Wide Name 41 product certification 140 laser device regulatory compliance notice 143 lasers radiation, warning 143 last fault information 192 last fault information displays 192 Last Termination Event Array See LTEA LCD default display 114 OCP display 112, 114 LCD connector 89 LED displays, using 92 LEDs 92 battery status 113 blowers 88 EMU displays 92 OCP 112 power status 92 Enterprise Virtual Array 3000 User Guide major elements 111 management agent 57 minimum disk group size 32 missing AC input 167 power supplies 168 modification of disk groups 66 monitored functions blowers 90 I/O module 91 power supply 91 move a rack 135 moving around the error display 105 moving enclosure WARNING 157 MTBF 151, 158 multiple configurations, enclosure addressing 99 multivendor platform support 26 N navigating the error condition display 105 navigation pane 54 239 Index Network Storage Controller See NSC node WWN labels 41 NONCRITICAL conditions 103 audible alarm 96 backplane 184 blowers internal 170 missing 170 speed 169 defined 103 EMU cannot read NVRAM data 178 enclosure address 179 NVRAM invalid read data 177 NVRAM write failure 178 enclosure address 179 high current 183 high temperature 172 high voltage 183 I/O modules 186 low temperature 173 low voltage 183 NVRAM invalid read data 177 NVRAM read 184 NVRAM read failure 185 NVRAM write failure 178 power supplies 167 not installed power supplies 168 NSC 193 NVRAM read failure 187 NVRAM write failure 178 O OCP description 112 fault management displays 192 firmware version 117 LCD 112, 114 LEDs 112 location 30 pushbuttons 112 240 status LEDs 112 using 40 operating system kit 39 operating tips 32 operational displays, enclosure front 108, 109 Operator Control Panel See OCP options pages 57 output ports 78 overcurrent sensors backplane 85 disk drives 85 overheating CAUTIONs 82, 86 disk drives 86 drive blank 86 preventing 82 P parameter code 192 parameter code number 192 password changing 124 clearing 124, 126 entering 44, 124 removing 124 passwords 57 PDM 130, 131 PDU 129, 130 Pending Timeout, setting 33 performance 22 physical configuration 28 physical disk drives, defined 68 physical disks, defined 65 physical specifications blowers 150 enclosures 149 PIC 118 ports activating 78 power configuration options 87 power connectors IEC 309 receptacle 128 Enterprise Virtual Array 3000 User Guide Index NEMA L6-30R 128 power distribution 128 AC power overview 132 Power Distribution Modules See PDM. Power Distribution Unit. See PDU. power options 87 power PC processor 118 power specifications 151 AC 152, 155 controller 155 DC 152, 155 drive enclosure 151 power supplies AC frequency 86 AC input missing 167 AC voltage 86 blower interface 87 cooling 87 current signals 87 DC outputs 86 diagnostic information 87 missing 168 monitored functions 91 NONCRITICAL conditions 167 not installed 168 overload 87 protection 87 sensing temperature 87 short circuit 87 status 87 status displays 109 status LEDs 88 thermal protection 87 UNRECOVERABLE conditions 176, 180 voltage signals 87 power supply and blower status reporting 88 power supply redundancy 29 powering off the system 122 prerequisites 12 presentation, hosts 62 preventing overheating 82 product certification 140 Enterprise Virtual Array 3000 User Guide programmable integrated circuit See PIC protecting fiber optic connectors cleaning supplies 204 dust covers 203 how to clean 203 protecting, power supplies 87 pushbuttons definition 113 display groups select 89 EMU 95 function select 89 icons 113 navigating with 113 OCP 112 Q Quasar 118 R rack AC power distribution 132 component locations 28 defined 27, 31, 68 environmental specifications 158 floor space requirements 135 PDMs 131 physical layout 28 power specifications 159 rack stability, warning 16 racks supported 31 raise a leveling foot 137 regulatory compliance notices cables 142 Class A 141 Class B 141 European Union 146 Japan 147 laser devices 143 modifications 142 Taiwan 148 241 Index related documentation 12 relative humidity drive enclosure 151 operating 158 shipping 151, 158 short term storage 151, 158 release lever, disk drive 201 removing disk drives 201 removing hosts 64 replacement procedures common 197 CRUs 197 replacement time, disk drives 82 replacing disk drives 199, 201 reporting group display group 95 numbers 107 resetting EMU 175 restarting the system 119, 121 rG display group 95 numbers 107 RGN 107 rH displays 107 RJ-45 connector 89 rL displays 107 room temperature See ambient temperature rpm, disk drives 81 RS232 89 S SAN Management Appliance 54 sensing current 109 enclosure temperature 109 power supply temperature 87 total power 109 voltage 109 sensors overcurrent 85 SES compliance 88 session options 57 session pane 54, 57 242 setting password 44 setting Pending Timeout 33 shipping container, moving 157 shipping specifications 151, 159 short term storage specifications 159 shutdown failure 180 shutdown system 114 shutting down the system 119 signals, diagnostic 87 slots See enclosures, bays Snapclone defined 22, 61 Snapshot defined 22, 61 snapshot virtual disk 61 Software Component ID Codes See SWCID software installation 39 software version display 117 space requirements 136 specifications disk drive, MTBF 151, 158 enclosure 154 environmental 158 heat dissipation 151 operating 158 physical 149, 154 power 151, 155 shipping 158 short term storage 158 speed conditions, blower 169, 170 spin down 201 stabilize the rack 137 status 92 status displays blowers 109 disk drives 109 EMU 109 I/O modules 109 power supplies 109 status LEDs blowers 108 EMU 92 Enterprise Virtual Array 3000 User Guide Index enclosure fault 92 I/O modules 108 OCP 112 power 92 power supplies 88, 108 status monitoring and display 109 status reporting 88 status, disk drives 82 Storage Management Appliance 50 Storage Management Appliance, Command View EVA 38 storage pool 65 storage rack 68 storage system initializing 45 logical presentation 54 physical layout 28 powering off 122 restarting 121 shutting down 119 space requirements 136 uninitializing 123 storage system access 57 storage system components 24, 60 storage system menu tree fault management 114 system information 114 Storage System Name 114 storage system rack defined 27 physical layout 28 storage system racks supported 31 storage system racks, defined 31 Surge 118 SWCID 191, 194 symbols in text 13 symbols on equipment 14 system information display 114 firmware version 117 software version 117 Enterprise Virtual Array 3000 User Guide versions 117 system menu tree shut down system 114 system password 114 system password 114 T TC display 192 TC error code 192 technical support, HP 17 temperature condition reports 172 effect of air flow 87 sensing 87, 109 sensors 172 Termination Code See TC termination event display 190 text symbols 13 thermal protection, power supplies 87 total power sensing 109 transceivers CRITICAL conditions 181, 182 element numbering 181 monitored functions 91 turning off power 119 U ungrouping disk groups 67 uninitializing the storage system 123 UNRECOVERABLE conditions audible alarm 96 backplane NVRAM 177 blowers failure 170 no blowers installed 171 defined 102 EMU communications interrupted 176 hardware failure 180 load failure 178 high temperature 174 243 Index power supplies missing 168 shutdown 176 shutdown failure 180 shutdown 176 user interface 25 user interface options 57 using fork lifts 157 using hand trucks 157 using LED displays 92 using the OCP 40 V VCS defined 24 verifying operation 88, 108 version information displaying 117 firmware 117 OCP firmware 117 software 117 VCS 117 viewing reporting group number 107 virtual disk folder 61 virtual disk Snapclone 61 virtual disk, limit 61 virtual disks 244 defined 60 disk groups 65 hosts 62 monitoring 60 navigating to 54 virtual RAID 20 virtualization 22 Virtually Instantaneous Snapclone 61 voltage sensing 109 voltage sensors 182 Vraid 22, 25 Vsnap 22 W warning rack stability 16 symbols on equipment 14 warnings lasers, radiation 143 WARNINGs, enclosure moving 157 websites HP storage 17 World Wide Name label, location of 41 World Wide Name See WWN WWN entering 42 on hosts 62 Enterprise Virtual Array 3000 User Guide