1
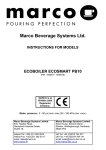
AromaSoloFinalTOC.fm Page i Thursday, January 27, 2005 4:30 PM
Table of Contents
Getting Started
Introduction
1-2
Description of Parts
1-4
Safety Information
1-5
Cleaning the Coffee Maker the First Time
1-8
Seasoning the Coffee Maker
1-8
Setting the Clock
1 - 11
Resetting the Clock
1 - 12
Making Coffee
The Four Fundamentals
2-2
How to Brew Coffee
2-3
Programming the Automatic Timer
2-6
Troubleshooting
2-7
Care and Maintenance
Cleaning the Coffee Maker
3-2
Descaling the Machine
3-3
Warranty and Contact Information
Warranty Information
4-2
Contact Information
4-5
Starbucks Barista Aroma SoloTM Thermal Coffee Maker
i
AromaSoloFinalTOC.fm Page ii Thursday, January 27, 2005 4:30 PM
Is it blank? Yes.
ii
Starbucks Barista Aroma SoloTM Thermal Coffee Maker
Section1AromaSolo.fm Page 1 Thursday, January 27, 2005 3:38 PM
SECTION 1
Getting Started
In this section:
Introduction
1-2
Description of Parts
1-4
Safety Information
1-5
Cleaning the Coffee Maker the First time 1 - 8
Seasoning the Coffee Maker
1-8
Setting the Clock
1 - 12
Resetting the Clock
1 - 13
Starbucks Barista Aroma SoloTM Thermal Coffee Maker
1-1
Section1AromaSolo.fm Page 2 Thursday, January 27, 2005 3:38 PM
Introduction
Your new Starbucks Barista Aroma SoloTM Thermal Coffee Maker
Your new Starbucks Barista Aroma SoloTM Thermal Coffee Maker is designed to give you years of
use and enjoyment. The precision brewing system heats water to an ideal temperature for brewing
exceptional coffee and the thermal tumbler allows you to keep it hot for hours.
Before using your machine
Before using your coffee machine for the first time:
• Verify that you have all of the parts listed in the Description of Parts table, page 1-4.
• Read all safety information and warnings in this manual, page 1-5.
• Wash all removable parts of your machine (4,5,6 & 7) with warm water.
Caution: Do not wash these parts in the dishwasher. Temperatures in a dishwasher vary
and can permanently alter the structure of the removable parts.
• Season the coffee maker.
• Set the clock.
References: See the topics Seasoning the Coffee Maker, page 1-8, and Setting the Clock,
page 1-12, for detailed information.
1-2
Starbucks Barista Aroma SoloTM Thermal Coffee Maker
Section1AromaSolo.fm Page 3 Thursday, January 27, 2005 3:38 PM
1+2
3
5
8
4
7
6
9+10
15
16
17
18
14
13
12
11
Starbucks Barista Aroma SoloTM Thermal Coffee Maker
1-3
Section1AromaSolo.fm Page 4 Thursday, January 27, 2005 3:38 PM
Description of Parts
Table of Starbucks Barista Aroma SoloTM Thermal Coffee Maker parts
The table below shows the parts of the Starbucks Barista Aroma SoloTM Thermal Coffee Maker.
Each part corresponds to the images on page 1-3.
Part
Number
Description
1
Water reservoir lid
2
16 oz. Water Reservoir
3
Filter basket lid
4
Removable internal Filter Basket
5
Long lasting mesh filter
6
Starbucks stainless steel double walled, vacuum sealed thermal
tumbler
7
Aroma Savor brew-through spout tumbler cover with splash proof lid
8
Control button area
9
Power cord (see photograph)
10
Power cord storage
Control button area:
11
On/Off button
12
On/Off light
13
Auto-on button
1-4
Starbucks Barista Aroma SoloTM Thermal Coffee Maker
Section1AromaSolo.fm Page 5 Thursday, January 27, 2005 3:38 PM
Part
Number
Description
14
Auto-on light
15
Digital clock timer display
16
Hour program button
17
Minute program button
18
Program button
WARNING
Safety Information
When using electrical appliances, always follow basic safety precautions to reduce the risk
of fire, electric shock, and/or injury to persons.
Intended use
This machine was designed for household use, to process normal household quantities only. Do not
use the machine for other than its intended use.
Unintended use
This machine is NOT intended for the following types of use:
• commercial
• industrial
• outdoor
Starbucks Barista Aroma SoloTM Thermal Coffee Maker
1-5
Section1AromaSolo.fm Page 6 Thursday, January 27, 2005 3:38 PM
Supervision required
Close supervision is necessary when any appliance is used near children.
Avoiding burns
CAUTION
To avoid injury from burns:
• Use handles to avoid touching hot surfaces.
• Allow filter to cool before removing.
• Allow coffee maker to thoroughly cool before putting on or taking off parts and before
cleaning appliance.
• Keep your hands and the cord away from the hot parts of the appliance during
operation.
Avoiding electric shock
WARNING
To avoid injury from electric shock:
• Do not put coffee maker base, cord or plug in water or any other liquid.
• Do not operate this appliance if the cord or plug is damaged or after the appliance
malfunctions or has been damaged.
• Turn the coffee maker off and unplug from outlet when not in use and before cleaning.
• Do not let cord hang over edge of table or counter or touch hot surfaces, including the
stove.
• Do not place appliance or thermal tumbler on or near a hot gas or electric burner or in a
heated oven.
• Always grasp the plug to remove it from the wall outlet —never pull on the cord.
• Do not remove any service covers.
• Do not run water or any other liquid over the body of the machine.
1-6
Starbucks Barista Aroma SoloTM Thermal Coffee Maker
Section1AromaSolo.fm Page 7 Thursday, January 27, 2005 3:38 PM
Avoiding overflow
CAUTION
To prevent risk of overflow:
• Twist tumbler cover tightly to close it prior to brewing coffee, and
• Verify that the thermal tumbler lid is locked into the open position prior to brewing.
Avoiding other injuries
CAUTION
• Keep your coffee maker out of the reach of children.
• Keep coffee maker from direct contact with steam.
• Do not use the Starbucks Barista Aroma SoloTM Thermal Coffee Maker without water.
• Do not use the Starbucks Barista Aroma SoloTM Thermal Coffee Maker if it is leaking.
• Do not operate in the presence of explosive and/or flammable fumes.
• Do not use thermal tumbler if it has a loose or weakened handle.
• Do not use attachments or parts that are not included or approved for use with this
machine as they may cause fire, electrical shock or other injury.
Avoiding damage to the machine
Do not operate the coffee machine without water, and never operate the coffee machine with
anything but cold water in the water reservoir. Doing so will permanently damage the machine.
Starbucks Barista Aroma SoloTM Thermal Coffee Maker
1-7
Section1AromaSolo.fm Page 8 Thursday, January 27, 2005 3:38 PM
Using an extension cord
CAUTION
A short power supply cord is provided to reduce your risk of tripping over or otherwise becoming
entangled with a longer cord. Longer extension cords are available, and may be used if care is
taken. When using an extension cord with your Starbucks Barista Aroma SoloTM Thermal Coffee
Maker:
• The marked electrical rating of the extension cord should be at least as great as the
electrical rating of the appliance.
• The longer cord should be arranged so that it will not hang over the counter or table,
where it may be pulled by children or accidently tripped over.
Cleaning the Coffee Maker the First Time
Procedure
The first time you clean the coffee maker, wash all removable parts (4,5,6 and 7) by hand with
warm water.
Caution: Do not wash any of the removable parts in the dishwasher. Temperatures in the
dishwasher may vary and can permanently alter the structure of removable parts.
Seasoning the Coffee Maker
Purpose
We recommend that you season your coffee maker to remove any odors or residues the machine
may have retained from the factory.
1-8
Starbucks Barista Aroma SoloTM Thermal Coffee Maker
Section1AromaSolo.fm Page 9 Thursday, January 27, 2005 3:38 PM
What you will need
You can use any one of the following to clean the machine:
• One (1) cup coffee maker cleaner descaler
• One (1) cup solution of 1/2 cup non-pulp lemon juice concentrate and 1/2 cup water
• Two (2) cup solution of one (1) cup white vinegar and one (1) cup cold water
Steps
To season the coffee maker, follow the steps below.
Step
1
Action
Fill the water reservoir (2) with one of the following:
• One (1) cup coffee maker cleaner descaler
• One cup solution of 1/2 cup non-pulp lemon juice concentrate
and 1/2 cup water, or
• Two (2) cup solution of one (1) cup white vinegar and one (1) cup
cold water.
2
Flip open the splash proof lid on tumbler cover (7) and lock into “open”
position.
3
Push thermal tumbler (6) into brewing area of the coffee maker.
Starbucks Barista Aroma SoloTM Thermal Coffee Maker
1-9
Section1AromaSolo.fm Page 10 Thursday, January 27, 2005 3:38 PM
Step
4
Action
Plug in coffee maker:
• Locate cord storage area (10) on back of machine
• Unwind and straighten cord thoroughly to remove kinks
• Wind excess cord back into cord storage area.
• Plug into outlet.
Caution: The cord has a polarized plug (one blade is wider than the
other). If plug does not fit fully in outlet, reverse plug. If plug still does
not fit, contact a qualified electrician to check outlet.
Result:
• The blue backlite, On/Off light and Auto-On Light illuminates for
two seconds,
• A tone sounds.
5
Press the On/Off button (11) and let approximately half of the solution
run through the machine.
Results:
• The blue backlite, On/Off light and Auto-On Light illuminates for
two seconds,
• A tone sounds.
6
Press the On/Off button (11) again and allow the remaining solution to
sit in the water reservoir for 15 to 30 minutes.
7
Press the On/Off button (11) again and allow the remaining solution to
run through the machine.
8
Discard the solution and allow the machine to cool for at least 15
minutes.
9
Hand wash and rinse the water reservoir (2) and thermal carafe (6) with
warm water.
1-10
Starbucks Barista Aroma SoloTM Thermal Coffee Maker
Section1AromaSolo.fm Page 11 Thursday, January 27, 2005 3:38 PM
Step
Action
10
Refill the reservoir (2) with fresh cold water and repeat steps 2 through
7.
Note: Do not use any cleaners during this cycle.
11
Repeat step 9 until there is no vinegar or lemon smell from the water
brewed in the machine.
Note: It will normally take 2 or 3 “rinse” brews through your machine
before all scents are gone. You should discard the first batch of coffee
you brew after seasoning the coffee maker.
Starbucks Barista Aroma SoloTM Thermal Coffee Maker
1-11
Section1AromaSolo.fm Page 12 Thursday, January 27, 2005 3:38 PM
Setting the Clock
Procedure
Follow the steps in the table below to set the clock.
Step
1
Action
Plug in the machine.
Result: The clock flashes to indicate that it has not been set.
2
Note: After completing this step, you will have five (5) seconds to begin
the next step or you will need to repeat this step.
Press and hold the H (hour) or M (minute) button for approximately
three (3) seconds until the clock flashes and you hear two beeps.
3
Press and hold the H button (16) to set the hour, then press and hold
the M (17) button to set the minutes.
Result: Five seconds after you release either button, the time stops
flashing and is set.
Note: AM or PM is indicated at the top left of the clock display (15).
1-12
Starbucks Barista Aroma SoloTM Thermal Coffee Maker
Section1AromaSolo.fm Page 13 Thursday, January 27, 2005 3:38 PM
Resetting the Clock
Procedure
Follow the steps in the table below to reset the clock.
Step
1
Action
Note: After completing this step, you will have five (5) seconds to
begin the next step or you will need to repeat this step.
Press and hold the H (16) or M (17) button for approximately three (3)
seconds until the clock flashes and you hear two beeps.
2
Press and hold the H button to set the hour, then press and hold the M
button to set the minute.
Result: Five seconds after you release either button, the time stops
flashing and is set.
Starbucks Barista Aroma SoloTM Thermal Coffee Maker
1-13
Section1AromaSolo.fm Page 14 Thursday, January 27, 2005 3:38 PM
Is it blank? Yes.
1-14
Starbucks Barista Aroma SoloTM Thermal Coffee Maker
Section2AromaSolo.fm Page 1 Thursday, January 27, 2005 3:06 PM
SECTION 2
Making Coffee
In this section:
The Four Fundamentals
2-2
How to Brew Coffee
2-3
Programming the Automatic Timer
2-6
Troubleshooting
2-7
Starbucks Barista Aroma SoloTM Thermal Coffee Maker
2-1
Section2AromaSolo.fm Page 2 Thursday, January 27, 2005 3:06 PM
The Four Fundamentals
Four Fundamentals
The starting point for making great coffee at home is to think of it as a form of cooking. To be
successful, you need to follow a proven recipe and use the best ingredients you can find.
No matter what kind of coffee you are making, to make the best possible cup of coffee, you’ll need
what we call The Four Fundamentals:
• Fresh coffee beans
• Proper grind
• Good water quality
• Correct proportion of coffee to water
Fresh coffee beans
Start with freshly roasted beans. Keep the beans whole and grind them as needed to help preserve
freshness. To keep coffee fresh, store it in an airtight container at room temperature. Coffee’s
enemies are oxygen and moisture, so proper storage will keep coffee fresh.
Proper grind
It is important to use the proper grind because that impacts the amount of time the coffee and
water spend together which affects flavor. Too finely ground coffee slows the water down too much,
allowing it to take with it unpleasant flavor elements. Too coarsely ground coffee allows water to
rush through the grinds, leaving the coffee weak and under-extracted.
Water quality
Always start with fresh, cold water. A cup of coffee is 98% water. The water used to make coffee
should taste clean, fresh and free of impurities. Avoid water from a water softener, city water that
tastes like chlorine, or well water that tastes or smells like iron or sulfur. If you local tap water tastes
good then it is likely to make a good cup of coffee. The Starbucks Barista Aroma SoloTM Thermal
Coffee Maker will heat water to just off a boil (195OF/90OC to 205OF/96OC). Water heated to just off
a boil is perfect for extracting coffee’s full range of flavors.
2-2
Starbucks Barista Aroma SoloTM Thermal Coffee Maker
Section2AromaSolo.fm Page 3 Thursday, January 27, 2005 3:06 PM
Proportions
The most important thing is to use the right proportion of coffee to water. The hot water interacts
with the coffee to extract, or pull out, the desirable flavor components. Too much water or too little
coffee results in over-extracted coffee.
How to Brew Coffee
Choosing the right coffee bean
The best coffee begins with using top quality Arabic beans. We recommend Starbucks coffees,
roasted to perfection and ground for the Starbucks Barista Aroma SoloTM Thermal Coffee Maker.
Whole bean coffee should be ground for a drip coffee filter at a medium grind.
Grinding your own beans
To achieve a medium grind coffee at home, run the coffee beans through your blade grinder for
approximately 15 seconds.
Questions about grinding coffee?
If you have questions about the grind size or your home blade grinding equipment, please visit any
Starbucks Coffee store, or call the warranty hotline at 1-800-334-5553.
Starbucks Barista Aroma SoloTM Thermal Coffee Maker
2-3
Section2AromaSolo.fm Page 4 Thursday, January 27, 2005 3:06 PM
Procedure
Follow the steps in the table below to brew coffee.
Step
Action
1
Plug in the coffee maker.
2
Open the filter basket top.
Note: Be sure the removable Internal Filter Basket holder (4) is in
place. If you choose to use a paper filter instead of the internal filter
(5), use filter cone #2.
3
Refer to the following table and place the appropriate amount of ground
coffee into the filter to make one full tumbler of coffee (16oz/500ml).
US Measurements
Coffee
Water (ounces)
5 1/3 Tbsp.
16 oz.
Metric Measurements
Coffee (grams)
Water (milliliters)
28g
500ml
4
Close the filter basket top (3).
5
Fill the water reservoir (2) with the amount of water recommended in
step 3.
6
Twist the tumbler cover (7) on the thermal tumbler (6) and snap into
the locked position.
7
Flip open the splash proof lid (7) on the thermal tumbler (6) and snap
into the open position.
2-4
Starbucks Barista Aroma SoloTM Thermal Coffee Maker
Section2AromaSolo.fm Page 5 Thursday, January 27, 2005 3:06 PM
Step
8
Action
Place the thermal tumbler (6) into the coffee maker.
Note: The splash proof lid must be locked in the open position before
brewing. Tumbler will not fit into coffee maker if lid is closed.
9
Press the On/Off button (11) and the coffee will begin to brew.
Result: The blue On/Off light will illuminate.
10
Remove tumbler when the machine does the following to indicate the
brewing process is complete:
• The coffee maker automatically shuts off.
• The On/Off light turns off.
• The beeper sounds twice ten (10) seconds after the brewing
process ends.
• The “time since brewed mode” begins counting from the brewed
time for five (5) hours.
Time since brewed mode
When finished brewing, the timer display will begin a “Time Since Brewed” clock on the digital
clock timer display (15) to indicate how long the coffee has been sitting. It will count up to 5 hours
from the brewed time.
Note: The coffee cup icon in the clock timer display indicates that the machine is in “Time Since
Brewed” mode.
Starbucks Barista Aroma SoloTM Thermal Coffee Maker
2-5
Section2AromaSolo.fm Page 6 Thursday, January 27, 2005 3:06 PM
Programming the Automatic Timer
Overview
Your Starbucks Barista Aroma SoloTM Thermal Coffee Maker programming feature allows you to
program a brew cycle up to 24 hours in advance.
Before you begin
Before you begin be sure you:
• Prepare the machine to brew coffee by following steps 1 through 8 in the preceding topic,
“How to Brew Coffee”, on page 2-3.
• Set the clock to the present time. See page 1-12.
Procedure
Follow the steps in the table below to program the automatic timer.
Step
Action
1
Note: After completing this step, you will have five (5) seconds to begin
the next step or you will need to repeat this step.
Press and hold the Program button (18) until the time flashes and you
hear two beeps.
Result: The autotimer clock and the Auto-on light will flash.
2
Press the H and M buttons (16 & 17) until the display indicates the time
you want the coffee maker to begin to brew.
Result: Five seconds after you release either button, the time will stop
flashing and the display (15) will return to the current programmed
time.
2-6
Starbucks Barista Aroma SoloTM Thermal Coffee Maker
Section2AromaSolo.fm Page 7 Thursday, January 27, 2005 3:06 PM
Step
3
Action
Press the Auto On button (13).
Results:
• The Auto On light (14) will illuminate.
• When brewing begins, the blue brewing indicator will illuminate.
Troubleshooting
Problems and Solutions
The following tables contain common problems and possible solutions.
If the solution provided does not solve your problem and you need further assistance to correct the
problem, contact our Starbucks warranty services team at (800) 334-5553.
Problem
Cause
Solution
Power
Machine does not
work
Coffee maker is not
plugged in.
Plug the coffee maker in, and/or turn it
on.
The power source
fuse in the outlet
may not be
functioning.
Check outlet to make sure it is
functioning.
Starbucks Barista Aroma SoloTM Thermal Coffee Maker
2-7
Section2AromaSolo.fm Page 8 Thursday, January 27, 2005 3:06 PM
Problem
Cause
Solution
Automatic Brewing
Machine does not
brew coffee
automatically
Thermal tumbler is
not properly placed
so that it triggers
the insertion stop
valve.
Reposition the tumbler so that it triggers
insertion stop valve.
Machine overflows.
• Remove Filter Basket holder (4)
and thoroughly clean by hand.
Leaking
The machine leaks
• Remove any loose coffee grounds
that may be blocking the channel.
• Ensure thermal tumbler is properly
inserted into the machine.
Pulling the thermal
tumbler from the
machine, too
much water stayed
in the brewing
chamber and
spilled over the
top.
2-8
• Insert thermal tumbler into coffee
maker.
• Complete brewing cycle.
Starbucks Barista Aroma SoloTM Thermal Coffee Maker
Section2AromaSolo.fm Page 9 Thursday, January 27, 2005 3:06 PM
Problem
Cause
Solution
Coffee temperature
Coffee is not hot
enough.
Ground coffee
used to brew
coffee was below
room temperature.
Desired coffee
temperature is not
hot enough
Use ground coffee at room temperature
to brew coffee.
Reference: See the topic “The Four
Fundamentals of Good Coffee” for
additional information on page 2-2.
Preheat the thermal tumbler with hot
water:
• Rinse the thermal tumbler with hot
water.
• Fill the tumbler with the
appropriate amount of hot water for
brewing.
Minerals in the
internal plumbing
of machine are
affecting the
heating process
Descale the machine.
Reference: See the topic “Descaling the
Coffee Machine” on page 3-3 for
instructions on removing minerals and
impurities from the machine.
Starbucks Barista Aroma SoloTM Thermal Coffee Maker
2-9
Section2AromaSolo.fm Page 10 Thursday, January 27, 2005 3:06 PM
Problem
Cause
Solution
Brewed coffee has coffee grinds
There are coffee
grounds in the
brewed coffee.
Coffee grind is too
fine.
For this machine, Starbucks
recommends a medium grind.
Use the table below to obtain a medium
grind coffee.
IF you are...
There is too much
coffee in the filter
basket
The tumbler is not
fully inserted.
The filter basket
needs to be
cleaned.
2-10
THEN...
Purchasing your
coffee in whole
bean form and do
not have a grinder
Have the coffee
ground for a drip
coffee filter.
Using a home
blade grinder
Grind for
approximately 15
seconds
Adjust the amount of coffee you add to
the filter.
Reference: See the topic “The Four
Fundamentals of Coffee” for additional
information on page 2-2.
Insert the tumbler in the coffee maker so
that it triggers the insertion stop valve.
• Clean the filter basket by hand in
warm, sudsy water.
• Rinse thoroughly and dry.
Starbucks Barista Aroma SoloTM Thermal Coffee Maker
Section2AromaSolo.fm Page 11 Thursday, January 27, 2005 3:06 PM
Problem
Cause
Solution
Odor
Tumbler lid,
tumbler or
machine has odd
odor
Coffee machine
needs to be
cleaned
Clean the tumbler and machine.
References: See the topics “Cleaning the
Coffee Maker” on page 3-2, and
“Descaling the Machine” on page 3-3 for
additional information.
Control buttons
Control buttons do
not work
Control buttons or
timer doesn’t work
and/or no lights
come on when
coffee maker is
turned on.
If the control buttons have water around
them, this may cause a temporary delay
in the functioning of the coffee machine
until the control buttons dry out.
• Unplug the machine and let dry for
several hours
• Plug in machine when completely
dry and test buttons.
Machine parts
Broken parts
One of the parts is
broken
Contact Starbucks Warranty Services at
(800) 334-5553
Starbucks Barista Aroma SoloTM Thermal Coffee Maker
2-11
Section2AromaSolo.fm Page 12 Thursday, January 27, 2005 3:06 PM
Is it blank? Yes.
2-12
Starbucks Barista Aroma SoloTM Thermal Coffee Maker
Section3AromaSolo.fm Page 1 Thursday, January 27, 2005 3:08 PM
SECTION 3
Care and
Maintenance
In this section:
Cleaning the Coffee Maker
3-2
Descaling the Machine
3-3
Starbucks Barista Aroma SoloTM Thermal Coffee Maker
3-1
Section3AromaSolo.fm Page 2 Thursday, January 27, 2005 3:08 PM
Cleaning the Coffee Maker
Materials to use
To clean the coffee maker, wipe the exterior of both the thermal tumbler and the coffee maker with
a damp cloth, then dry thoroughly.
Caution: Never use harsh cleaning agents, especially those containing alcohol, solvents, or abrasive
materials on your Starbucks Barista Aroma SoloTM Thermal Coffee Maker.
WARNING
To avoid serious injury and electrical shock, it is essential to turn off and
unplug your Starbucks Barista Aroma SoloTM Coffee Maker and allow it to
thoroughly cool before cleaning.
Steps
Follow these steps to clean each part of the machine.
Part
When to
clean
Exterior
After each
use
How to clean
• Wipe the exterior of both the thermal tumbler and
coffee maker with a damp cloth.
• Dry thoroughly with a drying cloth.
Interior of
thermal
tumbler
After each
use
• Wash by hand using warm, sudsy water.
• Rinse thoroughly.
• Dry with drying cloth.
• Caution: Do not wash tumbler in dishwasher.
3-2
Starbucks Barista Aroma SoloTM Thermal Coffee Maker
Section3AromaSolo.fm Page 3 Thursday, January 27, 2005 3:08 PM
Part
Removable
parts
When to
clean
After each
use
How to clean
• Wash by hand using warm, sudsy water.
• Rinse thoroughly.
• Dry with drying cloth.
Caution: Do not wash tumbler in dishwasher.
Temperatures in a dishwasher vary and can
permanently alter the structure of the removable
parts.
Filter
After each
use
• Wash by hand using warm, sudsy water.
• Rinse thoroughly
Note: This filter will last for 3 to 12 months,
depending on use.
Internal
machine
parts
3-6 mos.
See the next topic “Descaling the Machine” for detailed
information on page 3-3.
Descaling the Machine
Why you need to descale your machine
Water carries minerals and impurities that can clog the internal plumbing and effect the:
• Heating time
• Heating process
• Machine performance
• Overall taste of coffee
Starbucks Barista Aroma SoloTM Thermal Coffee Maker
3-3
Section3AromaSolo.fm Page 4 Thursday, January 27, 2005 3:08 PM
Descaling (also called decalcifying) your machine helps to remove the build-up and keep your
machine running smoothly.
Note: No coffee is to be used during this descaling process.
When
Use this procedure to descale your machine every 3-6 months. If you live in a region with high
levels of minerals in the water supply you may need to descale your machine more often.
Materials
You can use any ONE of the following solutions to descale the machine:
• One (1) cup coffee maker cleaner descaler
• One (1) cup solution made up of 1/2 cup non-pulp lemon juice concentrate and 1/2 cup
water
• Two (2) cup solution of one (1) cup white vinegar and one (1) cup cold water.
Steps
Descale the machine using the following steps:
Step
1
Action
Fill the water reservoir (2) with one of the following solutions:
• One (1) cup coffee maker cleaner descaler
• One (1) cup solution made up of 1/2 cup non-pulp lemon juice
concentrate and 1/2 cup water
• Two (2) cup solution of one (1) cup white vinegar and one (1) cup
cold water.
2
Flip open the splash proof lid on tumbler cover (7) and lock in place.
3
Push thermal tumbler (6) into brewing area of coffee machine.
3-4
Starbucks Barista Aroma SoloTM Thermal Coffee Maker
Section3AromaSolo.fm Page 5 Thursday, January 27, 2005 3:08 PM
Step
4
Action
Plug in coffee maker.
Result: When you plug in the machine, the following lights will illuminate
for two seconds:
• Blue backlight
• On/Off light (12)
• Auto-on light (14)
You will also hear a tone.
5
Press the On/Off button (11).
Result: The blue light beside the On/Off button will illuminate and the
solution will begin to brew into the thermal tumbler.
6
After approximately half of the solution has run through, press the On/
Off button (11).
Result: Machine turns off.
7
Leave the remaining solution to soak in the water reservoir for 15 to 30
minutes.
8
Press the On/Off button (11) again and allow the remaining solution to
run through the machine.
9
Discard the solution and allow the machine to cool for at least 15
minutes.
10
Hand wash and rinse the water reservoir (2) and thermal tumbler (6)
with warm water.
Caution: Do not put in dishwasher.
11
Refill the water reservoir with fresh cold water. Repeat steps 2 through
7.
Caution: Do not use any cleaners during this brewing cycle.
Starbucks Barista Aroma SoloTM Thermal Coffee Maker
3-5
Section3AromaSolo.fm Page 6 Thursday, January 27, 2005 3:08 PM
Step
Action
12
Discard the water in the water reservoir and allow the machine to cool
for at least 15 minutes.
13
Repeat step 10 until there is no vinegar or lemon smell from the water
brewed through your machine.
Note: It will normally take two or three “rinse brews through your
machine until there is no vinegar or lemon smell from the water.
14
3-6
Your machine is now fully descaled and ready for use.
Starbucks Barista Aroma SoloTM Thermal Coffee Maker
Section4AromaSolo.fm Page 1 Thursday, January 27, 2005 3:08 PM
SECTION 4
Warranty and
Contact
Information
In this section:
Warranty Information
4-2
Contact Information
4-5
Starbucks Barista Aroma SoloTM
4-1
Section4AromaSolo.fm Page 2 Thursday, January 27, 2005 3:08 PM
Warranty Information
About this warranty
The Limited Warranty supersedes any other warranties and is governed by the laws of the State of
Washington. This warranty gives you specific legal rights, and you may also have other rights, which
vary from state to state.
Limited warranty
This product is warranted to the original consumer purchaser by Starbucks Coffee Company for two
(2) years from the date of purchase from a Starbucks retail store or other authorized Starbucks
retail location against defects in workmanship and materials. During the warranty period, a
defective part of product will be replaced wither with a new or reconditioned part or product,
depending on the availability at the time of replacement. To validate this product’s two (2) year
warranty, you must provide us with proof of the purchase date. Such proof can be made only by
presenting to Starbucks Coffee Company one of the following:
• The original receipt
• The cancelled check used to purchase the product
• The billing statement from the credit card company used to purchase the product, or
• The order confirmation form or packing slip for the product if received by mail.
If a proof-of-purchase is not provided, the warranty is void. It is not the responsibility of Starbucks
Coffee Company to provide or obtain the proof-of-purchase date.
The warranty covers normal consumer usage.
4-2
Starbucks Barista Aroma SoloTM
Section4AromaSolo.fm Page 3 Thursday, January 27, 2005 3:08 PM
What this warranty will not cover
This warranty will not cover:
• Damage that occurs from shipment
• Problems related to the lack of cleaning and maintenance, including descaling
• Repairs made by the consumer that caused the machine to malfunction or otherwise be
dangerous
• Damage that results from unauthorized repairs
• Failure that results from commercial use, improper installation and maintenance, alteration,
accident, misuse, abuse, vandalism, or neglect
• Any products that have been used in violation of written instructions, or
• Any products that have been altered or modified.
Validity outside of the U.S and Canada
This product is intended for sale in the U.S. and Canada only. If you reside outside the U.S. or
Canada, Starbucks provides this product “as is” without warranty of any kind.
Disclaimer of other warranties
This limited warranty is in lieu of all other express or implied warranties and no person, including
agents and employees of Starbucks, us authorized to give any further representation or warranty or
assume any further obligation on behalf of Starbucks, whether orally or in writing. Some states do
not allow limitations on how long an implied warranty lasts, so the above limitation may not apply to
you.
Limitation of liability
Starbucks entire liability with respect to this product shall be limited to the price of the product. In
no event shall Starbucks, its agents or employees, be liable for any direct, indirect, special,
consequential or incidental damages arising out of the use of, or inability to use, this product, or
arising out of any defect in the product, even if Starbucks has been advised of the possibility of
such damages. Some states do not allow the exclusion or limitation of liability for consequential or
incidental damages, so the above limitation or exclusion may not apply to you.
Starbucks Barista Aroma SoloTM
4-3
Section4AromaSolo.fm Page 4 Thursday, January 27, 2005 3:08 PM
Warranty service
This product has been carefully engineered for optimum performance. Do NOT attempt to repair
this product yourself. Attempts to repair this appliance yourself may render it dangerous to use.
Should you attempt to open the housing and repair the appliance, your warranty will be voided.
Should the appliance malfunction, first call us at (800) 334-5553 and ask for Warranty Services.
State that you are a customer having a problem with your appliance. A Warranty Service
Representative will assist you to identify the possible problems and solutions. After directing you
through the necessary diagnostic steps, provided that the terms of this warranty have been met,
Starbucks Coffee Company will provide any of the following services, as it deems appropriate, at no
cost to you:
• Ship replacement parts
• Repair the product
• Ship a replacement product, or
• Refund the full purchase price
Your information
Keep this information for your records:
Type of electrical product purchased:
Espresso machine
Coffee maker
Blade grinder
Burr grinder
Other
Model Name / Color: ________________________ SKU ___________________
Store # __________________ Date of Purchase ___________________________
4-4
Starbucks Barista Aroma SoloTM
Section4AromaSolo.fm Page 5 Thursday, January 27, 2005 3:08 PM
Contact Information
Advice and assistance available
Trained and knowledgeable Starbucks representatives are available to answer your questions and
provide helpful advice. Call Starbucks Coffee Company at (800) 334-5553 to speak with
one.Additional contacts
The following are additional resources.
Department
Contact Information
Warranty Services
(800) 334-5553
Corporate Offices
By mail at 2401 Utah Avenue South,
Seattle, Washington 98134
Or
Visit the Brewing Information Page at
www.Starbucks.com
Starbucks Barista Aroma SoloTM
4-5