1
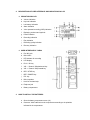
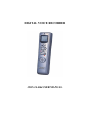
DIGITAL VOICE RECORDER JWIN JX-R86 USER MANUAL TABLE OF CONTENTS 1. Warnings and instructions 2. Descriptions of the user interface and indications on LCD 3. How to install batteries 4. How to use recording function 5. How to change recording quality (SP, LP) 6. How to change recording sensitivity 7. How to set voice-operated recording (VOR) function 8. How to switch directory to directory 9. How to play a recorded message 10. How to record with other devices (CD / Cassette players) 11. How to record your conversation from a phone call 12. How to check the memory capacity on the recorder 13. How to delete one of the recorded messages 14. How to delete all recorded messages 15. How to set the time and date 16. How to set the alarm function 17. How to set the time-recording function 18. How to use the repeat function 19. How to use the bookmark function 20. How to use the comparison function 21. Additional functions 22. Specification 1. WARNINGS AND INSTRUCTIONS a. Please do not drop on the floor or put the unit where it can be exposed to high force impact. This will damage the unit beyond its repairable capacity. b. Please do not keep this unit in places with extreme heat or cold. Any direct exposure to extreme temperatures will permanently damage the unit c. High pressure on the surface of the LCD screen will result in damaging the message indicators of the screen. 2. DESCRIPTIONS OF USER INTERFACE AND INDICATIONS ON LCD INDICATIONS ON LCD a. Volume indication b. Key-lock indication c. Low battery indication d. Alarm indication e. Voice-operated recording (VOR) indication f. Displaying numbers and symbols g. Pause indication h. Recording indication i. Play indication j. Recording quality indication k. Directory indication USER INTERFACE OF JX-R86 a. Ext. MIC jack b. Built-in MIC c. LED indicator for recording d. LCD display e. PLAY / OK key f. VOL – / Search / Skip backward key g. VOL + / Search / Skip forward key h. REC / STOP key i. REP / POWER key j. FOL key k. Built-in speaker l. Hook for the hand strip m. Earphone jack n. Battery compartment 3. HOW TO INSTALL THE BATTERIES a. Open the battery compartment cover (14). b. Insert two “AAA” batteries into the compartment according to the polarities indicated in the compartment. Note: Old batteries or weakened batteries may cause quality failure in recording. 4. HOW TO USE RECORDING FUNCTION a. Press and hold the REC/STOP key for about 2 seconds to enter the recording mode. You will see the record indication on the LCD display. b. Press the PLAY/OK key to pause recording while in the recording process. c. Press the PLAY/OK key again if wish to continue recording while in the pause mode. d. Press the REC/STOP key to stop recording. Note: The total number of the recorded voice message indicator will increase automatically by 1 5. HOW TO CHANGE THE RECORDING QUALITY (SP, LP) a. Press and hold the PLAY/OK key for about 2 seconds to enter the setup mode. b. Use the VOL + or VOL – key to locate the “SEL COdEC” menu. c. Press the PLAY/OK key to enter the “SEL COdEC” setup page. d. Use the VOL + or VOL – key to switch from “SP” to “LP” or from “LP” to “SP”. e. Press the PLAY/OK key to confirm your choice on the quality selection. f. Press the REC/STOP key to exit the setup mode completely. Note: The SP is used for the high record quality, and the LP is used for the lower record quality with longer recording time option. 6. HOW TO CHANGE THE RECORDING SENSITIVITY a. Press and hold the PLAY/OK key for about 2 seconds to enter the setup mode. b. Use the VOL + or VOL – key to locate the “rEC SENSE” menu. c. Press the PLAY/OK key to enter the “rEC SENSE” setup page. d. Use the VOL + or VOL – key to select one of the options, “1” through “5”. e. Press the PLAY/OK key to confirm your choice on the recording sensitivity. f. Press the REC/STOP key to exit the setup mode completely. Note: The higher number indicates higher sensitivity. With the higher sensitivity setting, the voice-operated recording function (VOR) will respond to the voices or noises more sensitively. 7. HOW TO SET THE VOICE-OPERATING RECORD (VOR) FUNCTION a. Press and hold the PLAY/OK key for about 2 seconds to enter the setup mode. b. Use the VOL + or VOL – key to locate the “UOr MOdE” menu. c. Press the PLAY/OK key to enter the “UOr MOdE” setup page. d. Use the VOL + or VOL – key to select “ON” if you want to set the VOR function on or to select “OFF” if you want to set the VOR function off.. e. Press the PLAY/OK key to confirm your choice. f. Press the REC/STOP key to exit the setup mode completely. Note: If your recording function is ON with the VOR function also ON, the unit will record a message automatically whenever it hears or senses a voice. While the unit is in VOR mode and there are no noises or voice present, it will automatically pause the recording until it noise or voice reactivates the VOR. 8. HOW TO SWITCH FROM DIRECTORY TO DIRECTORY a. Press and hold the PLAY/OK key for about 2 seconds to enter the setup mode. b. Use the VOL + or VOL – key to locate the “SEL dir” menu. c. Press the PLAY/OK key to enter the “SEL dir” setup page. d. Use the VOL + or VOL – key to select one of the directories from “a” through “c”. e. Press the PLAY/OK key to confirm your choice on the directory selection. f. Press the REC/STOP key to exit the setup mode completely. Note: The directories are used to separate recorded files. For example, if you record a message in the directory “b”, that particular message can only be reproduced from directory “b”. 9. HOW TO PLAY PREVIOUSLY RECORDED MESSAGE a. Turn on the recorder. b. Switch to the directory which contains a recorded message you want to play. c. Use the VOL + or VOL – key to select the message. The file number and recording time for each message will be displayed on LCD while browsing the messages in the directory. d. Select the message and press the PLAY/OK key to play it. e. Press the PLAY/OK key if you want to pause. f. Press the VOL + or VOL – key if you want to adjust the volume level. g. Press and hold the VOL + or VOL – key if you want to search the content of the recorded file forward or backward in fast speed. h. Press the REC/STOP key if you want to stop playing the message. 10. HOW TO RECORD WITH OTHER DEVICES (CD/CASSETTE PLAYERS) a. Adjust the volume control of the source device. At the first try, it is recommended to set the volume low. b. Connect one end of the line cable, which is included with the recorder, to the MIC jack of the recorder. c. Connect the other end of the line cable to the earphone jack of the source device. d. Press the REC/STOP key to start recording. e. Play the source device. f. Press the REC/STOP key to stop recording. 11. HOW TO RECORD YOUR CONVERSATION FROM A PHONE CALL a. Connect the telephone connector, which is included with the recorder, to the telephone jack. b. Connect the telephone connector to the telephone line jack on the wall. c. Connect one end of the line cable, which is included with the recorder, to the jack on the back of the telephone connector. d. Connect the other end of the line cable to the MIC jack on the recorder. e. Press the REC/STOP button to start recording. Once all the connections are set it will record the conversation from phone call either is an incoming or outgoing call. f. Press the REC/STOP button to stop recording. 12. HOW TO CHECK THE MEMORY CAPACITY ON THE RECORDER a. Press and hold the PLAY/OK key for about 2 seconds to enter the setup mode. b. Use the VOL + or VOL – key to locate the “SEE LEFt” menu. c. Press the PLAY/OK key to see the memory left in the recorder. d. Press the REC/STOP key twice to exit the setup mode. Note: The LCD display will show the memory left according to current setting of the record quality. If the recorder is currently in the SP mode, it will show the memory left for the SP quality. If the recorder is currently in the LP mode, it will show the memory left for the LP quality. 13. HOW TO DELETE ONE OF THE RECORDED MESSAGES a. Press and hold the PLAY/OK key for about 2 seconds to enter the setup mode. b. Use the VOL + or VOL – key to locate the “dEL ONE” menu. c. Press the PLAY/OK key to enter the “dEL ONE” setup page. d. Use the VOL + or VOL – key to select a message which you want to delete. e. Press the PLAY/OK key to delete the selected message. The LCD will show the “dEL ONE” menu automatically after deleting it, and the total number of the recorded message will be decreased by 1. f. Press the REC/STOP key to exit the setup mode. Note: The message number is not permanent. It is rather relative. For example, if you have the total 5 recorded messages in a directory and if you delete the number 3 message, you can still find the message numbered as 3 in the directory. However, the message is not the one which you just deleted. It is the one which was numbered as 4 previously. In other words, it will reduce all the message numbers by 1 after the deleted one. 14. HOW TO DELETE ALL THE RECORDED MESSAGES a. Press and hold the PLAY/OK key for about 2 seconds to enter the setup mode. b. Use the VOL + or VOL – key to locate the “dEL ALL” menu. c. Press the PLAY/OK key to enter the “dEL ALL” setup page. d. Use the VOL + or VOL – key to select the “dEL dir” or “dEL FLASH” option. Select the “dEL dir” option to erase all the messages in the current directory or select the “dEL FLASH” option to erase all the recorded messages in the whole memory. e. Press the PLAY/OK key to confirm your choice. The LCD will show the “dEL ALL” menu automatically after deleting all the messages in the directory or in the whole memory. f. Press the REC/STOP key to exit the setup mode. Note: Please ensure whether or not the recorder is in the right directory when you are trying to delete all the messages in a certain directory. If you enter the setup mode in the “a” directory and choose the “dEL dir” option to delete all the messages in the “b” directory, it will not erase the messages in the “b” directory. It rather erases all the recorded messages in the “a” directory. If you want to delete all the recorded messages in the “b” directory, you must change from the “a” directory to the “b” directory, and then call the setup mode to delete all the messages in the “b” directory. 15. HOW TO SET TIME AND DATE a. Press and hold the PLAY/OK key for about 2 seconds to enter the setup mode. b. Use the VOL + or VOL – key to locate the “SEt tIME” menu. c. Press the PLAY/OK key to enter the “SEt tIME” setup page. You will see the blinking position and steady number positions on the LCD display. The positions are in order of Year-Month-Day-Hour-Minute respectively. d. Use the VOL + or VOL – key to change the year. e. Press the PLAY/OK key to confirm the chosen year. After pressing the key, the next position for month will be flickering automatically. f. Use the VOL + or VOL – key to change the month. g. Press the PLAY/OK key to confirm the chosen month. After pressing the key, the next position for the day will be flickering automatically. h. Repeat the steps above until you set the minute. After you press the PLAY/OK key to confirm the chosen minute, the LCD display will show the “SEt tIME” menu automatically. i. Press the REC/STOP key to exit the setup mode. Note: This unit only displays time in 24hr mode. 16. HOW TO SET THE ALARM FUNCTION a. Press and hold the PLAY/OK key for about 2 seconds to enter the setup mode. b. Use the VOL + or VOL – key to locate the “SAY HELLO” menu. c. Press the PLAY/OK key to enter the “SAY HELLO” setup page. You will see the blinking position and steady number positions on the LCD display. The positions are in order of Hour-Minute respectively. d. Use the VOL + or VOL – key to change the hour. e. Press the PLAY/OK key to confirm the chosen hour. After pressing the key, the next position for minute will be flickering automatically. f. Use the VOL + or VOL – key to change the minute. g. Press the PLAY/OK key to confirm the chosen minute. After pressing the key, it will go to the “SAY ON/OFF” setup page automatically. h. Use the VOL + or VOL – key to select the “ON” or “OFF” option. Choose the “ON” option if you want to turn on the alarm function. Choose the “OFF” option if you want to turn off the alarm function. i. Press the PLAY/OK key to confirm your choice. The LCD display will show the “SAY HELLO” setup menu and the alarm indicator if you turn on the alarm function. j. Press the REC/STOP key to exit the setup mode. Note: When the alarm function is activated, the recorder will ring for 80 seconds. To end the alarm sound, press any key. 17. HOW TO SET THE TIME-RECORDING FUNCTION a. Press and hold the PLAY/OK key for about 2 seconds to enter the setup mode. b. Use the VOL + or VOL – key to locate the “SEL t-r” menu. c. Press the PLAY/OK key to enter the “SEL t-r” setup page. You will see the blinking position and steady number positions on the LCD display. The positions are in order of Hour-Minute respectively. d. Use the VOL + or VOL – key to change the hour. e. Press the PLAY/OK key to confirm the chosen hour. After pressing the key, the next position for minute will be flickering automatically. f. Use the VOL + or VOL – key to change the minute. g. Press the PLAY/OK key to confirm the chosen minute. After pressing the key, you will see the blinking 3-digit number and this is used to set the length of the time recording. h. Use the VOL + or VOL – key to change the minute for the length of the time recording. i. Press the PLAY/OK key to confirm the chosen minute. After pressing the key, it will go to the “ON/OFF” setup page automatically. j. Use the VOL + or VOL – key to select the “ON” or “OFF” option. Choose the “ON” option if you want to turn on the time-recording function. Choose the “OFF” option if you want to turn off the time-recording function. k. Press the PLAY/OK key to confirm your choice. The LCD display will show the “SEL t-r” setup menu. l. Press the REC/STOP key to exit the setup mode. 18. HOW TO USE REPEAT FUNCTION a. Press the REP key while replaying a recorded message. It will repeat the interval from the beginning of the recorded message to the point at which you press the REP key. b. Press the REP key to end repeating and to continue to play the rest of the recorded message. c. Press the REP key to repeat the interval from the end of the last repeating interval to the new point at which you press the REP key again. d. Press the REC/STOP key to stop replaying the message. 19. HOW TO USE THE BOOKMARK FUNCTION a. Under the stop or standby mode, press the FOL key to continue to play a recorded message from the end of the last repeating interval. (It will only work if you tried the repeating function at least once before using this function.) b. Press the FOL key to set the bookmark and to reset the beginning of the repeat interval while under the replaying mode. (When you set the bookmark, you will see the “INt” indication on the LCD display. This bookmark will be used to continue to play a message from the bookmarked point when you press the FOL key in the stop mode next time.) 20. HOW TO USE THE COMPARISON FUNCTION a. Under the repeat mode, press the FOL key to record your comparison voice. (This recorded voice is used to compare the repeating interval of the original recorded message, and it will be saved in the memory temperately. If you end the comparison, it will automatically be erased.) b. Press the FOL key to finish the comparison voice recording and to hear it. c. Press the REP key to hear the original message. You could compare them by pressing the FOL key and REP key repeatedly. 21. ADDITIONAL FUNCTIONS a. To lock the keys, press and hold both VOL + and VOL – keys simultaneously in the stop or standby mode. You will see the lock indication on the LCD display. When this is activated, any key on the case will not work at all. To unlock them, press and hold both VOL + and VOL – keys simultaneously. b. Battery power reminder: When the battery power is insufficient, the recorder will make ticking sounds and simultaneously display a lower battery indication on the LCD display. In the recording or playing mode, it will only show the indication on the LCD display. c. When there is no memory space left while recording, it will stop recording automatically. Once it reaches its maximum of the memory capacity, it will show the “NO SPACE” indication and make a warning sound when you try to record. 22. SPECIFICATION OF DVR Recording Time SP mode 45 minutes LP mode 230 minutes Unit Dimension 26 (W) x 126 (L) x 16 (T) mm Unit Weight About 33 grams (Batteries are excluded.) Battery Type 2 of Alkaline “AAA” batteries Memory Media Flash memory type The maximum number of Up to 127 messages can be recorded in each messages for each directory directory Output power (MAX) 80mW (THD 10%, 32ohms) Frequency range of recording / replaying Microphone Input 500Hz ~ 3000Hz Built-in capacitor microphone Built-in microphone or external microphone below 3kohm impedance Output Two-channel earphone Speaker Diameter 20mm Operating Temperature 0 ~ 40 °C Accessories Telephone connector, Phone line, Stereo Earphone, Manual, Two-plug audio line