1
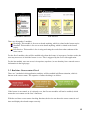
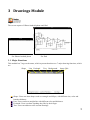
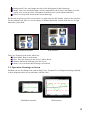
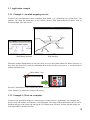
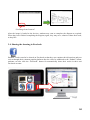
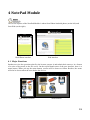
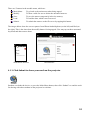
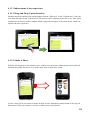
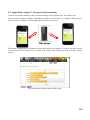
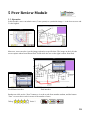
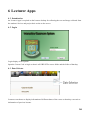
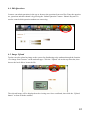
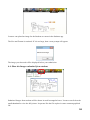
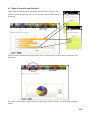
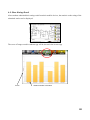
1
iClass Mobile
Interactive Class Response System
User Manual
Table of Contents
1
INTRODUCTION........................................................................................................................3
1.1
1.2
1.3
2
STUDENTS APPS........................................................................................................................5
2.1
2.2
3
COMPONENTS .........................................................................................................................3
SYSTEM FLOW .........................................................................................................................4
SYSTEM REQUIREMENTS .........................................................................................................4
OVERVIEW ..............................................................................................................................5
REAL-TIME COURSE-STATUS CHECK .......................................................................................6
DRAWINGS MODULE...............................................................................................................7
3.1
MAJOR FUNCTIONS .................................................................................................................7
3.2
OPERATION: DRAWINGS ON SCREEN .......................................................................................8
3.3
APPLICATION EXAMPLE ...........................................................................................................9
3.3.1 Example 1: An mind-mapping exercise..............................................................................9
3.3.2 Example 2: Work on a template .........................................................................................9
3.4
SHARING THE DRAWING IN FACEBOOK ..................................................................................10
4
NOTEPAD MODULE ............................................................................................................... 11
4.1
MAJOR FUNCTIONS ............................................................................................................... 11
4.1.1 Click Submit to share your work on the projector ...........................................................12
4.1.2 Enhancement of user experience .....................................................................................13
4.2
APPLICATION EXAMPLE 3: KEYWORDS BRAIN-STORMING .....................................................14
5
PEER REVIEW MODULE ......................................................................................................15
5.1
6
LECTURER APPS.....................................................................................................................16
6.1
6.2
6.3
6.4
6.5
6.6
6.7
6.8
7
OPERATION ...........................................................................................................................15
INTRODUCTION .....................................................................................................................16
LOGIN ...................................................................................................................................16
DATE SELECTOR....................................................................................................................16
EDIT QUESTIONS ...................................................................................................................17
IMAGE UPLOAD.....................................................................................................................17
SHOW THE IMAGES SUBMITTED FROM STUDENTS ..................................................................18
SHOW KEYWORDS AND STATISTICS .......................................................................................19
SHOW RATING RESULT ..........................................................................................................20
ABOUT THE PROJECT ..........................................................................................................21
2
1 Introduction
The Classroom Response System can provide a convenient, secure, user-friendly, efficient and
effective way to enable interactivity in an ordinary lecture course. Students can use their mobile
devices, such as a web-based laptop application, iPhone, iPad or an Android phone, to access the
iClass Mobile system and submit their feedbacks in class. The feedbacks can be in text or graphic
formats and be shared with their classmate immediate through the classroom projector or common
social networking applications like the Facebook. This system can facilitate interactive class and
encourage more students to participate proactively in lessons. In the past, class discussions were
conducted on paper. Nowadays, interactive classes are conducted via mobile devices.
iClass mobile for Teaching
iClass mobile for group discussion
1.1 Components
There are 3 components:
Students Apps (iPhone, iPad, Android devices)
o An iPhone Apps to be installed in the iPhone/iPod touch/ iPad
Lecturer Apps (Window application runs in the existing classroom PC)
o An Window Apps to be installed in the classroom PC
Apps server/File Server
3
These apps can be downloaded from the project web-site: www.eee.hku.hk/~iclass
1.2 System flow
(i)
(ii)
(iii)
(iv)
(v)
(vi)
Lecturer starts the lecture and opens the Lecturer’s Application.
Students can start to login to the system via iPhone/iPod Touch/iPad.
Lecturer can raise questions and upload image to the file server via the Internet.
Student can get the questions/image from the file server via the wireless network, which is
connected to the Internet.
Students can upload their work to the file server through the wireless network, which is
connected to the Internet.
Lecturer can also view the work which is submitted by the students from the Lecturer’s
Application through the file server, which is connected to the Internet.
1.3 System requirements
Students Apps
iPhone 3/ iPhone 4/ iPad/ iPod touch
Android 2.0 or above
Lecturer Apps
CPU: Pentium IV or above
Speed: 1GHz or above
1G free space on Harddisk
1G RAM
OS: Window XP/ Window 7 or above
4
2 Students Apps
2.1 Overview
For student side, they can use either one of the following devices:
iPhone: 2G, 3G, 3GS, 4 (with iOS 3.0 or above)
iPod Touch: 1G, 2G, 3G, 4G (with iOS 3.0 or above)
iPad (with iOS 3.2 or above)
For smart phone
For iPad
After the application is installed in the devices, they can now run the application and enter the main
screen as shown above. Notice that the devices must be connected to the Internet, (either using the
WiFi connection or the 3G connection). If not, the application cannot be started successfully.
In the login screen, you can see that there are 3 text-fields for user input, which are:
Course Code
Student ID
Group number/nickname
After the 3 text fields are entered correctly, they can now enter the main menu of iClassroom.
5
iPod/iPhone interface
iPad interface
There are all together 3 modules:
Drawings: This module is for user to sketch anything, which is related to the lecture topics.
NotePad: This module is for user to write down anything, which is related to the lecture
topics.
Peer Review: This module is for viewing and rating the works from other students of the
same course.
For the first 2 modules, they will be enabled only when the lecture is in progress. In other words, the
user may not access it when the lecture is over. This is triggered by the server-side application.
For the last module, user can access it in anytime, anywhere, in case that they have entered correct
information in the login page.
2.2 Real-time Course-status Check
There are 3 modules in this application, and they will be enabled in different situation, which is
known as the course-status. The sequence of status checking is as follow:
If the lecture is not started, or it is already over, the first two modules will not be enabled, which
means the user cannot use the first 2 functions.
With the real-time course-status checking function, the device can detect the course-status in real
time and display the related output correctly.
6
3 Drawings Module
The screen capture of iPhone/Android phone and iPad
For iPhone/Android phone
For iPad
3.1 Major Functions
This module has 7 tags on the menu, which represent that there are 7 major drawing functions, which
are:
Shape
Line Freehand
Text Background Image Edit
Shape: Users can draw shapes such as rectangle and ellipse, with different size, color and
boarder thickness.
Line: Users can draw straight line with different color and thickness.
Freehand: Users can draw anything they like by their finger.
Text: Users can add text to the current drawings.
7
Background: Users can change the color of the background of their drawings.
Image: Users can download image, which is uploaded by the lecturer, and display it on the
screen. Also, users may also select photo from the device’s photo album and edit it.
Edit: Users may undo and clear the current drawings.
Besides the menu on top of the screen, there is a main menu for this module, which is shown below.
On the left hand side, there is a screen capture of iPhone/iPod touch version while the one in right
hand side is from iPad.
iPhone/Android interface
iPad interface
There are 4 buttons in the menu, which are:
Main Menu: Back to main menu
Save: Save the drawing to the device’s photo album.
Submit: Submit the drawing to the file server.
Share: Users can share their drawing via facebook.
3.2 Operation: Drawings on Screen
Students can use the editing tools such as shape, Line, Freehand, Text, Background, Image and Edit
to draw diagrams on the screen and share with the class.
iPod/iPhone interface
iPad interface
8
3.3 Application example
3.3.1 Example 1: An mind-mapping exercise
Lecturers may ask students to draw something from blank, e,,g. a mind-map on a certain topic. The
students can draw the mind-map on the mobile devices with aforementioned features such as
freehand, shape, line and text etc.
iPod/iPhone interface
iPad interface
When the students finished their works, they may save it to their photo album for future reference; or
they may also share their works by submitting them on the lecture room screen, or via facebook for
sharing and discussion.
“Main Menu” icon
Press the “Main Menu” icon or shake the device to for the option menu
Click “Submit” to submit the works to the screen.
3.3.2 Example 2: Work on a template
Lecturers may upload an image on a certain topics via the lecturer’s application. For example, the
lecturer may ask students to complete a circuit diagram. The image is then uploaded to the file server.
Students may go to the image tag and tap the “Get Image from Lecturer” button, and the image can
be downloaded to students’ devices.
9
“Get Image from Lecturer”
After the image is loaded to the devices, students may start to complete the diagram as required.
When they have finished completing the diagram, again, they may save, submit or share their work,
as they like.
3.4 Sharing the drawing in Facebook
Students’ works can also be shared on Facebook so that they can continue their discussion and peer
review through their common popular platform after the class. In additional to the “Submit” button,
students can also click the “Facebook” button for automatically share their works in their own
Facebook account.
10
4 NotePad Module
The screen captures of the NotePad Module is taken from iPhone/Android phone (on the left) and
from iPad (on the right).
iPod/iPhone interface
iPad interface
4.1 Major Functions
Student can view the questions asked by the lecturer, answer it and submit their answers, in a format
of a series of keywords, to the file server. On the top left hand corner of the user interface, there is a
menu button. When you tap the menu button, a menu will be shown as follow. Besides, the menu
will also be shown when the user shakes the devices.
iPod/iPhone interface
iPad interface
11
There are 5 buttons in the module menu, which are:
Main Menu:
To go back to the main menu when being tapped.
Modify:
To show a table for user to delete the unwanted answers.
Save:
To save the answer temperately in device memory.
Load:
To load the data, which it was last saved.
Submit:
To submit the answers to the file server by tapping this button.
The images below show the screen captures from iPhone/Android phone (on the left) and iPad (on
the right). This is the time when the modify button is being tapped. User may tap on those unwanted
keywords and then remove them.
iPod/iPhone interface
iPad interface
4.1.1 Click Submit to share your work on the projector
Students can shake the device, or press the Main Menu button, then click “Submit” to send the work
for sharing with other students on the projector in real-time.
12
4.1.2 Enhancement of user experience
4.1.2.1 Drag-and-Drop Upload Function
Students may drag-and-drop the notepad paper from the “Edit Area” to the “Upload Area”. Once the
user drags the paper to the “Upload Area”, the answer will be uploaded to the file server. This action
simulates the real action when a student submit a physical note paper to the white board, which can
enhance the user experience.
4.1.2.2 Shake to Share
With the accelerometer in the smart devices, another user experience enhancement can be achieved.
Students may shake the device to go to the main menu to share their works.
In case it may not be convenient to shake an iPad, we also implement a menu button on the top left
hand corner of the user interface, in order to make it more user-friendly.
13
4.2 Application example 3: Keywords brain-storming
Lecturer may ask the students to have a brain-storming activity during class. For instance, the
lecturer may ask students to think of something related to a certain topic, for example “What are your
favorite cities?” Students can then submit the keywords to the server.
The lecture’s application will connect the data and prepare the statistics. It will be projected on the
screen in form of bar charts and pie charts. The lecturer may analyze the data to decide further
actions.
Keywords statistic shown on the teacher apps
14
5 Peer Review Module
5.1 Operation
In this module, users can submit votes (5-star system) to a particular image. 1 is the lowest score and
5 is the highest.
iPod/iPhone interface
iPad interface
Moreover, users can also view the images upload at a specific date. The image on the left is the
screen capture taken from iPhone/iPod Touch while the one on the right is taken from iPad.
iPod/iPhone interface
iPad interface
Student can click on the “Next” button to view the works from another student, and the button
“Vote” to score their works in terms of the number of stars.
15
6 Lecturer Apps
6.1 Introduction
An Lecturer Apps is required on the lecturer desktop for collecting the text and image collected from
the students’ devices and project their works on the screen.
6.2 Login
Login display of the System
Input the Course Code to login so that it will CREATE a course folder and the folder of that day.
6.3 Date Selector
Lecturers can choose to display information of different dates of the course so that they can retrieve
information of previous lessons.
16
6.4 Edit Questions
Lecturer can submit questions in the app or browser the questions from text files. Enter the question
no., questions and then submit it by pressing the “Submit Question” button. ‘Submit Keyword’ is
used to control which question students are answering.
6.5 Image Upload
Teacher can also upload an image to the system for distributing to the students through the function
“Get image from Lecturer” on the students apps. Click the “Upload” tab on the top menu bar, then
browse the local disk to locate the file.
The selected image will be displayed on the viewing area. Once confirmed, then click the “Upload
button” to share with the students.
17
Lecturer can upload an image for the Students to extract in the Students app
The Size and Format is restricted. If it is too large, then a error prompt will appear.
The image your browsed will be displayed before your submission.
6.6 Show the Images submitted from students
Submitted Images from students will be shown in small rectangular boxes. Lecturer can click on the
small thumbnail to view the full picture. It operates like the file explore in some common graphical
OS.
18
6.7 Show Keywords and Statistics
After students submitted the keywords from their mobile devices, the
statistic on their submission in form of a bar chart and pie chart can be
displayed.
The keywords submitted from each mobile device will be posted on the screen to facilitate class
discussion.
Pie Chart is used to show the Percentage of the Result while bar charts are showing the absolute
values.
19
6.8 Show Rating Result
After students submitted their rating result from their mobile devices, the statistic on the rating of the
submitted works can be displayed.
The score of Images rated in students app will be shown in the lecture app.
Score
Student number/ nick name
20
7 About the project
This is a project supported by the Teaching Development Grant of the University of Hong Kong.
Principal Investigator
Dr. Wilton Fok
Co-Investigators
Dr. K.S. Lui
Dr. Vincent Tam
Dr. Cecilia Chan
Dr. Allen Yuen
Dr. Hayden So
Development Team
Mr. Au Yeung Hoi Hang
Mr. Law Kam Yuen
Mr. Wong Wai Ming
Project web-site and Apps download: www.eee.hku.hk/~iclass
Enquiries: Dr. Wilton Fok, E-mail [email protected], Tel: (852) 2857 8490
Collaborated by:
Department of Electrical and Electronic Engineering
Centre for the Enhancement of Teaching and Learning
Centre for Information Technology in Education
The University of Hong Kong
Acknowledgement:
Teaching Development Grant, University of Hong Kong
21