1
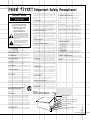
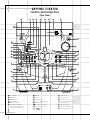
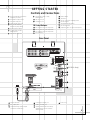
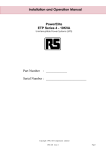
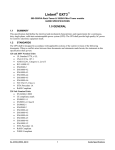
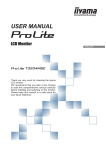
OWNER’S GUIDE PRODUCT LINE: MODEL NUMBER: PRO SOUND COMES HOME™ JBL Soundgear™ Series SG 2020 , SG 3030 D E S I G N G O A L : Bring the live sound of the concert hall into the home S Y S T E M T Y P E : Complete bookshelf sound system JBL Consumer Products 250 Crossways Park Drive, Woodbury, NY 11797 8500 Balboa Boulevard, Northridge, CA 91329 800-336-4JBL (4525) (USA only) www.jbl.com S P E A K E R D E S I G N : 2-Way (SG2020) or 3-Way (SG3030) Bass Reflex ©2000 JBL, Incorporated. JBL is a registered trademark of JBL, Incorporated. S O U R C E U N I T : AM/FM Radio with 3-CD Changer and Dual Full Logic Decks Part No. 3828RCD029A P R O F E S S I O N A L R E F E R E N C E : Live concert sound reinforcement systems X + 0 + Y2 0 M HZ X + 0 + Y 2 0 M HZ” X + 0 + Y2 0 OWNER’S GUIDE PRODUCT LINE: MODEL NUMBER: JBL Soundgear™ Series SG 2020 , SG 3030 D E S I G N G O A L : Bring the live sound of the concert hall into the home S Y S T E M T Y P E : Complete bookshelf sound system S P E A K E R D E S I G N : 2-Way (SG2020) or 3-Way (SG3030) Bass Reflex S O U R C E U N I T : AM/FM Radio with 3-CD Changer and Dual Full Logic Decks P R O F E S S I O N A L R E F E R E N C E : Live concert sound reinforcement systems 3 SAFETY INFORMATION 4 GETTING STARTED 4 Controls and Connections 4 Front Panel 5 Rear Panel 6 Display 7 Remote Control 8 Remote Control Operation 8 Batteries 8 Using the Remote Control 9 Connections 9 External Sources 9 Digital Outputs 9 Loudspeakers 10 Headphones 10 Antenna 10 Setting the Clock 11 Basic Operation 11 Auto Function Select System 11 Volume Adjustment 11 Tone Adjustments 11 Boost 11 EQ (Equalization) 11 Mute 11 Display Mode 11 Demo Mode 11 FM Stereo/ANR (AM Noise Reduction) 11 VMAx 12 ENJOYING JBL SOUNDGEAR 12 Listening to the Radio 12 Automatic Tuning 12 Manual Tuning 12 Programming Preset Stations 12 RDS (Radio Data System) Reception 13 Playing CDs 13 Basic Operation 13 Stopping Play 13 Pause 13 Skipping Discs 13 Direct Disc Access 13 Removing Discs 13 Changing Discs During Play 13 Important Notes 13 Searching Within a Track 13 Reverse Search 13 Forward Search 13 Track Skipping 13 Time Display 14 Repeating Tracks 14 Random Play 14 Programmed Play 14 Reviewing the Contents of the Play List 14 Clearing the Programmed Play List 14 Adding Tracks to a Previously Programmed Play List 14 Making Changes to the Play List 15 Using External (Auxiliary) Sources 15 Playing Tapes 15 Playback 15 Tape Counter 16 Recording Tapes 16 CD Sync Recording 16 Recording From Tape to Tape (Dubbing) 17 ADVANCED FEATURES 17 Dual Alarms and Timer Recording 17 Alarm and Timer Setting 17 To Cancel or Check the Timer 17 Alarm and Timer Notes 17 Setting the Sleep Timer 18 TROUBLESHOOTING 19 SPECIFICATIONS Thank You for Choosing JBL For more than 50 years, JBL has been involved in every aspect of music and film recording and reproduction, from live performances to the recordings you play in your home, car or office. We’re confident that the JBL system you have chosen will provide every note of enjoyment that you expected – and that when you think about purchasing additional audio equipment for your home, car or office, you will once again choose JBL. 2 Please take a moment to complete the enclosed profile card. It enables us to keep you posted on our latest advancements, and helps us to better understand our customers and build products that meet their needs and expectations. JBL Consumer Products Please read this manual carefully before operating your JBL Soundgear system, and retain it for future reference. re a d f i rs t ! CAUTION RISK OF ELECTRIC SHOCK DO NOT OPEN CAUTION: To prevent electric shock, do not use this (polarized) plug with an extension cord, receptacle or other outlet unless the blades can be fully inserted to prevent blade exposure. The lightning flash with arrowhead symbol, within an equilateral triangle, is intended to alert the user to the presence of uninsulated “dangerous voltage” within the product’s enclosure that may be of sufficient magnitude to constitute a risk of electric shock to persons. The exclamation point within an equilateral triangle is intended to alert the user to the presence of important operating and maintenance (servicing) instructions in the literature accompanying the appliance. 1. Read Instructions. All the safety and operating instructions should be read before the product is operated. 2. Retain Instructions. The safety and operating instructions should be retained for future reference. 3. Heed Warnings. All warnings on the product and in the operating instructions should be adhered to. 4. Follow Instructions. All operating and use instructions should be followed. 5. Cleaning. Unplug this product from the wall outlet before cleaning. Do not use liquid cleaners or aerosol cleaners. Use a damp cloth for cleaning. 6. Attachments. Do not use attachments not recommended by the product manufacturer, as they may cause hazards. 7. Water and Moisture. Do not use this product near water–for example, near a bathtub, wash bowl, kitchen sink or laundry tub; in a wet basement; near a swimming pool; or the like. 8. Accessories. Do not place this product on an unstable cart, stand, tripod, bracket or table. The product may fall, causing serious injury to a child or adult, and serious damage to the product. Use only with a cart, stand, tripod, bracket or table recommended by the manufacturer, or sold with the product. Any mounting of the product should follow the manufacturer’s instructions, and should use a mounting accessory recommended by the manufacturer. 9. A Product and Cart Combination Should Be Moved with Care. Quick stops, excessive force and uneven surfaces may cause the product and cart combination to overturn. 10. Ventilation. Slots and openings in the cabinet are provided for ventilation and to ensure reliable operation of the product and to protect it from overheating, and these openings must not be blocked or covered. The openings should never be blocked by placing the product on a bed, sofa, rug or other similar surface. This product should not be placed in a built-in installation, such as a bookcase or rack, unless proper ventilation is provided or the manufacturer’s instructions have been adhered to. 11. Power Sources. This product should be operated only from the type of power source indicated on the Important Safety Precautions! marking label. If you are not sure of the type of power supply to your home, consult your product dealer or local power company. For products intended to operate from battery power, or other sources, refer to the operating instructions. 12. Polarization. This product may be equipped with a polarized alternating-current-line plug (a plug having one blade wider than the other). This plug will fit into the power outlet only one way. This is a safety feature. If you are unable to insert the plug fully into the outlet, try reversing the plug. If the plug should still fail to fit, contact your electrician to replace your obsolete outlet. Do not defeat the safety purpose of the polarized plug. 13. Power-Cord Protection. Power-supply cords should be routed so that they are not likely to be walked on or pinched by items placed upon or against them, paying particular attention to cords at plugs, convenience receptacles, and the point where they exit from the product. 14. Nonuse Periods. The power cord of the product should be unplugged from the outlet when left unused for long periods of time. 15. Outdoor Antenna Grounding. If an outside antenna or cable system is connected to the product, be sure the antenna or cable system is grounded so as to provide some protection against voltage surges and builtup static charges. Article 810 of the National Electrical Code, ANSI/NFPA 70, provides information with regard to proper grounding of the mast and supporting structure, grounding of the lead-in wire to an antenna discharge unit, size of grounding conductors, location of antennadischarge unit, connection to grounding electrodes, and requirements for the grounding electrode. See Figure A. 16. Lightning. For added protection for this product during a lightning storm, or when it is left unattended and unused for long periods of time, unplug it from the wall outlet and disconnect the antenna or cable system. This will prevent damage to the product due to lightning and power-line surges. 17. Power Lines. An outside antenna system should not be located in the vicinity of overhead power lines or other electric light or power circuits, or where it can fall into such power lines or circuits. When installing an outside antenna system, extreme care should be taken to keep from touching such power lines or circuits, as contact with them might be fatal. 18. Overloading. Do not overload wall outlets, extension cords, or integral convenience receptacles, as this can result in a risk of fire or electric shock. 19. Object and Liquid Entry. Never push objects of any kind into this product through openings, as they may touch dangerous voltage points or short-out parts that could result in a fire or electric shock. Never spill liquid of any kind on the product. 20. Servicing. Do not attempt to service this product yourself, as opening or removing covers may expose you to dangerous voltage or other hazards. Refer all servicing to qualified service personnel. 21. Damage Requiring Service. Unplug this product from the wall outlet and refer servicing to qualified service personnel under the following conditions: a. The power-supply cord or the plug has been damaged; or b. Objects have fallen onto, or liquid has been spilled into, the product; or c. The product has been exposed to rain or water; or d. The product does not operate normally when following the operating instructions. Adjust only those controls that are covered by the operating instructions, as an improper adjustment of other controls may result in damage and will often require extensive work by a qualified technician to restore the product to its normal operation; or e. The product has been dropped or damaged in any way; or f. The product exhibits a distinct change in performance; this indicates a need for service. 22. Replacement Parts. When replacement parts are required, be sure the service technician has used replacement parts specified by the manufacturer or that have the same characteristics as the original part. Unauthorized substitutions may result in fire, electric shock or other hazards. 23. Safety Check. Upon completion of any service or repairs to this product, ask the service technician to perform safety checks to determine that the product is in proper operating condition. 24. Wall or Ceiling Mounting. The product should be mounted to a wall or ceiling only as recommended by the manufacturer. 25. Heat. The product should be situated away from heat sources such as radiators, heat registers, stoves or other products (including amplifiers) that produce heat. Figure A. Example of Antenna Grounding as per National Electrical Code ANSI/NFPA 70 Antenna Lead-In Wire Ground Clamp Antenna Discharge Unit (NEC Section 810-20) Grounding Conductors (NEC Section 810-21) Electric Service Equipment Ground Clamps Power Service Grounding Electrode System (NEC Art 250, Part H) 3 GETTING STARTED Controls and Connections Front Panel ¡ ™ £ ¢ ∞ § ¶ • ª 43 ‚ 42 41 ⁄ 40 39 38 37 36 34 ‹ ¤ › 35 fi 33 fl ‡ 32 ° · 31 k a j b i h c d g f ¡ ™ £ ¢ ∞ § 4 Power button Clock button Alarm 1 button Alarm 2 button Set/Station button Tune Down/Up (AM/FM), Fast Forward/Rewind (Tape), Skip/Search (CD) button e ¶ • ª ‚ ⁄ ¤ ‹ › Display CD Tray Remote Sensor CD Tray Open/Close button Volume knob Tape A/B Select button Aux 1/2 Select button button fi fl ‡ ° Boost button EQ Select button Counter Reset button FM Stereo/ANR (AM Noise Reduction) button · Tape Deck B Eject a Tape Deck B (Rec/Play) Door b CD/Tuner Program button GETTING STARTED Controls and Connections c Preset Up (AM/FM)/Forward Play (Tape)/Play (CD) button d Record/Pause (Tape) button e Aux 1/MP3 Input jacks f Optical Digital Output jack g Preset Down (AM/FM)/ Reverse Play (Tape) button h Play Mode/Demo button i Hi-Speed (Tape to Tape) Dubbing button j Tape Deck A (Play) Door k Normal Speed (Tape to Tape) Dubbing button 31 Tape Deck A Eject 32 Headphones jack 37 38 39 40 41 CD Control Buttons: 42 33 43 34 35 36 Disc 1 button: Disc Direct Play button Disc 2 button: Disc Direct Play button Disc 3 button: Disc Direct Play button Disc Skip button Random button Time button CD Sync (CD Synchro Dubbing) button CD Pause button Tuner/Band (AM/FM) button CD Function button Stop/Reset (Tape, CD, Tuner Presets) button Rear Panel 44 45 2 46 (SG3030 Only) SPEAKER CONNECTOR 1 47 48 49 50 SPEAKER CONNECTOR 2 44 45 46 Antenna terminals Aux 2 Input jacks Tweeter/Midrange Speaker Output jacks (Model SG3030 only) 47 48 49 Coaxial Digital Output jack Subwoofer Output jack Speaker Terminals (Model SG2020)/ Speaker Woofer Section terminals (Model SG3030) 50 Power Cord 5 GETTING STARTED Controls and Connections Display a b c e fg h i d j klm n o 1 2 31 30 a Volume Level b Disc Number indicators c Information Display for Level, Function, Clock, Frequency, Tape Counter, CD Time, Programmed Play List d CD Track Numbers Remaining e CD Play Over indicator f CD Sync Recording indicator g CD Play/Pause indicator h Tape Direction indicators i Record indicator 6 y ` 29 28 j Rewind indicator k Play Mode indicators (Used only for Deck B) l Hi-Speed Dubbing indicator m Fast Forward indicator n Tape A/B indicator o CD Program indicator p CD Repeat indicators q CD Remaining Time indicator r Mute indicator s Sleep indicator t Super Boost indicator z p q r s t u v w x u v w x y z ` 28 29 30 31 Treble Boost indicator PowerBass™ indicator Alarm 1/2 indicator Timer Recording indicator CD Random Play indicator RDS indicator ANR (AM Noise Reduction) indicator FM Stereo indicator FM Mono indicator Memory indicator VMAx® indicator GETTING STARTED Controls and Connections Remote Control 1 2 3 4 5 Power button Mute button Tuner/Band (AM/FM) button Tuner Preset ¤/ ⁄ buttons Aux 1/2 button Power mute 1 2 tuner Tape Functions 6 Stop button ■ 7 Forward Play button › 8 Record/Record Pause button Î ■ ■ 9 Fast Forward button ›› ) Tape A button ! Tape B button @ Reverse Play button ‹ # Rewind button ‹‹ preset 3 4 tape a tape b 5 ) ! 6 @ 7 8 # $ Sleep button repeat CD/Tuner Functions % Repeat button ^ Play/Pause button ›■ ■ & Reverse Skip or Search (CD)/ Tune Down (AM/FM) button ■‹‹ ‹‹ * Stop/Clear button ■ ( Forward Skip or Search (CD)/ Tune Up (AM/FM) button ›› ››■ Ó Program (CD) button Ô Disc Skip button (CD) Ò Ú Û Ù Display Mode button VMAx button EQ Select button Boost Select button Volume Control ⁄ / ¤ buttons aux % ^ 9 sleep $ cd tune tune ( & * 21 disc skip 20 program 22 display 23 EQ 26 24 volume boost 25 7 GETTING STARTED Remote Control Operation Batteries Using the Remote Control Before using the remote control for the first time, insert two AAA (UM-4, IEC R03)-type highquality batteries, as shown in the diagrams below. Be sure to observe correct battery polarity (+ and –), as installing the batteries incorrectly may damage the remote. Do not use different types of batteries together, and do not mix old ones with new ones. Open the battery cover Approx. 23 ft. (7m) Insert two AAA batteries AAA PO WER TE MU TUNE MU TE R AAA TAPE WER PO PRES ET PRES ET A TAPE AUX R B AUX TUNE TAPE A TAPE B REPE / AT CD / IN REMA / REMA IN AT REPE PROG RA M CD / DIS SKIPC C DIS IP SK SEEP VMAX VOLU ME SEEP VMAX RAM PROG TT EQ.PA EQ.PA TT PLAY DIS DIS PLAY • When you are not going to use your JBL Soundgear system for an extended period of time, such as when you go on vacation, remove the batteries to prevent possible electrolyte leakage. • After a period of time, when the remote control fails to operate accurately at maximum distance from the unit (23 feet, or 7 meters), replace the dead batteries with new ones. 8 ME VOLU Control Range The remote control device is designed for a maximum range of 23 feet (7 meters). NOTE: Strong light or obstacles between the remote control device and the main unit may interfere with the operation of the remote control. GETTING STARTED Connections External Sources Two RCA-type jacks marked AUX 1 and AUX 2 are provided. The front input jacks (AUX 1/MP3) should be used for temporary connections, such as an MP3 player, MiniDisc (MD) player, video camera or video game. The rear input jacks (AUX 2) should be used for longer-term connections, such as a VCR or CD Recorder. Front DIGITAL OUT DIGITAL OUT L-AUX1/ MP3-R In these instructions, the “right speaker” and “left speaker” refer to the speakers as viewed from the listening position. Speakers and electronics have corresponding (+) and (–) terminals. JBL has used red to denote the (+) terminal and speaker wire, and black for the (–) terminal and speaker wire. It is important to connect both speakers identically: (+) on the speaker to (+) on the main unit, and (–) on the speaker to (–) on the main unit. Wiring “out of phase” results in thin sound, weak bass and a poor stereo image. R L DIGITAL INPUT AUDIO OUT MD recorder, MP3 player etc. Figure 1 To use the Optical Digital Output, remove the dust protection cap from the connector and firmly connect an optical digital cable (not supplied) so that the shapes of both the cable and the connector match. Keep the dust protection cap in a safe place, and always re-attach the cap when not using the connector to prevent dust from entering the connector. Loudspeakers Be sure to turn Power ¡ 1 off before connecting the loudspeakers. The main unit and the loudspeakers are designed to work best together. JBL does not recommend the use of any other speakers with the main unit, or the use of JBL Soundgear speakers with a product other than this specific JBL Soundgear source unit. Speaker Connector 1 SUBWOOFER Subwoofer L R Insert the bare end of the red (+) wire of the right speaker into the red (+) terminal on the main unit that is marked R 49 . Insert the bare end of the black (–) wire of the right speaker into the black (–) terminal on the main unit that is marked R 49 . Follow the same procedure to connect the wires from the left speaker to the terminals on the main unit that are marked L 49 . Digital Outputs A front panel Optical f and a rear panel Coaxial 47 Digital Output are provided. The front Optical Digital Output is intended for temporary connection of an MD recorder or any other portable device that has a digital input. The rear Coaxial Output should be used for more permanent hookups, such as a CD recorder, MD recorder, high-end computer sound card with digital inputs or MP3 encoder. Neither optical nor coaxial cables are supplied with this product and, if not included with the connecting unit, should be purchased separately. Main speaker output jacks (high frequency) (SG2020) AUX1/MP3 Optical-fiber cable Insert the bare end of the red (+) wire of the right speaker into the red (+) terminal on the main unit that is marked R 49 . Insert the bare end of the black (–) wire of the right speaker into the black (–) terminal on the main unit that is marked R 49 . Follow the same procedure to connect the wires on the left speaker to the jack and terminals on the back of the main unit that are marked L 46 49 . Subwoofer SUBWOOFER (Optional) Left L Right R WOOFER Speaker Connector 2 Left speaker Right speaker Figure 3 Using JBL Soundgear With an External Powered Subwoofer L R (Optional) Black Red Red Black Left Speaker Right Speaker Figure 2 (SG3030) In order to provide superior definition and clarity, the JBL Soundgear SG3030 speakers use a different method of connection for the tweeter and midrange sections. For proper performance, be sure to connect all three wires from each speaker as described below: Insert the yellow RCA-type plug from the right speaker into the yellow jack on the back of the main unit that is marked R 46 (Speaker Connector 1 in Figure 3). Note: Never insert the yellow plugs into any equipment other than the JBL Soundgear main unit or you may cause damage to the speakers that is not covered by your JBL warranty. Never insert any plugs other than the yellow plugs attached to JBL Soundgear loudspeakers into the yellow jacks on the JBL Soundgear main unit 46 or you will cause damage that is not covered by your JBL warranty. The SG2020 and SG3030 both feature a Subwoofer Output jack 48 that can be used with any JBL powered subwoofer recommended by your JBL dealer. The addition of a powered subwoofer dramatically extends and improves your system’s bass response, and is highly recommended either at the time of initial purchase or as a future upgrade. Using a single RCA cable (not included), connect the subwoofer output to the L or R input of the powered subwoofer (the use of a Y-cable is not necessary but is OK). Set the main unit to a normal listening level, and adjust the level, frequency and phase controls on the powered subwoofer as directed in the subwoofer’s owner’s manual. 9 GETTING STARTED Connections (cont.) Headphones Connecting a headphone 32 automatically disables the loudspeakers in order to provide a private listening session. Antenna Important FM Antenna Connection Unless radio signals are very weak, no external antenna is necessary. Simply connect the supplied FM indoor antenna wire to the terminal marked FM on the back of the unit 44 . AM Antenna Connection Connect the supplied AM loop antenna to the terminal marked AM on the back of the unit 44 . FM external antenna (not supplied) 75 ohms coaxial cable FM indoor antenna Position it for the best reception AM loop antenna (included) AM FM Setting the Clock Setting the clock will be demonstrated with the example of 9:25 AM. Although JBL Soundgear will retain the clock setting when you power it down into the Standby mode, the setting will be lost if the unit is unplugged or the electrical power is interrupted for more than 10 seconds. In that event, the clock setting will be erased, and JBL Soundgear will display a blinking “— : —“. When setting the time, remember that midnight is at 12:00 AM and noon is at 12:00 PM. 1. Press the Clock button ™. (If the clock was previously set, press and hold the Clock button for more than 1.5 seconds.) “12:00 AM” will blink in the Display c, to indicate civilian 12-hour time. Press the Preset Up c or Preset Down g button to display a blinking “0:00”, which denotes 24-hour military time. GND 2. Choose between the 24-hour display or 12hour display by pressing the Preset Up c or the Preset Down g buttons. 3. Press the Set/Station button ∞ to store this setting and proceed to the next step. 4. Set the hour by pressing the Preset Up c or the Preset Down g buttons. 10 5. Press the Set/Station button ∞. 6. Set the minute by pressing the Preset Up c or the Preset Down g buttons. 7. Press the Set/Station button ∞, and the clock will resume normal operation. GETTING STARTED Basic Operation Auto Function Select System JBL Soundgear allows you to automatically switch sources by selecting a function associated with the new source in a single step, without having to press an input or source select button. That is, if, for example, the radio is playing and you wish to switch to playing a CD, you need only press the Disc 1 button 33 , and JBL Soundgear will automatically switch to CD mode, where the various function buttons will affect the CD changer rather than the tuner. (You can open the disc tray to change discs without affecting the tuner operation.) This applies for the following sources and functions: 1. Using the remote control Tuner: Preset ⁄ / ¤ buttons 4 CD: Play/Pause ›■■ button ^ Tape: Forward ‹ and Reverse › Play buttons 7@ 2. On the unit CD: Disc Direct Play buttons (DISC 1, 2, 3) 33 34 35 Volume Adjustment Turn the Volume knob ⁄ clockwise to increase the sound level, or counterclockwise to decrease it. If you turn the volume up above the maximum level, the volume level flashes in the display. This is a warning to lower the volume in order to prevent possible damage to your loudspeakers. You may also adjust the volume by pressing the Volume Up or Down buttons Ù on the remote control. Sound can be deceiving. Over time your hearing “comfort level” adapts to higher volumes of sound. What sounds “normal” can actually be loud and harmful to your hearing. Guard against this by choosing a safe level BEFORE your hearing adapts. To Establish a Safe Level: • Start your volume control at a low setting. • Slowly increase the sound until you can hear it comfortably, clearly and without distortion. Once You Have Established a Comfortable Sound Level: • Do not exceed that level. Taking a moment to do this now will help to prevent hearing damage or loss in the future. After all, we want you listening for a lifetime. Tone Adjustments VMAx® Boost VMAx is JBL’s proprietary technology that creates an ambient, simulated surround-sound stage from a stereo signal or Dolby® Pro Logic®encoded material using only two loudspeakers. It can be used with music and movies to create a more enveloping sound. Press the VMAx button on either the main unit › or the remote Ò to activate or deactivate the VMAx mode. The VMAx indicator on the display 31 will be lit when VMAx is active. In order to maximize the effect, the listener should be approximately 10 feet in front of the imaginary line between the two speakers, facing the speakers. The speakers should be facing the same direction, and should be placed even with each other. If used in a video application, the speakers should be to the right and the left of the screen, following all the other guidelines above. Please note that JBL Soundgear speakers are not shielded, and if placed too close to the screen may cause interference and degradation of the picture. Speaker Placement Each time the Boost button fi is pressed, the tone changes as follows: PowerBass Treble Boost Super Boost • PowerBass: Reinforces low frequencies • Treble Boost: Reinforces high frequencies • Super Boost: Reinforces both bass and treble EQ (Equalization) Press the EQ button fl once to display the current sound mode. Press the EQ button fl repeatedly until the desired sound mode is displayed. • FLAT: No additional equalization • POP: Optimized for Top 40, R & B, Soul and Country music • ROCK: Optimized for Hard Rock and Heavy Metal music • CLASSICAL: Optimized for orchestral music • JAZZ: Optimized for jazz music Mute (On Remote Control) Press the Mute button 2 to mute your unit. The Mute function silences the unit, which is convenient for answering the telephone, etc. The Mute indicator r will appear on the display. Press the Mute button 2 a second time to resume normal play. 10 feet Speaker Placement in a Video Application Display Mode (On Remote Control) For your visual enjoyment, JBL Soundgear offers a spectrum lighting display that “dances” in time to the music. You can select different displays by repeatedly pressing the Display Mode button , or you may turn the lighting display off. 10 feet Standard Stereo Demo Mode With the unit plugged in but turned off, press the Play Mode/Demo button h for a continuous visual display of JBL Soundgear’s features. Press it again to return to a display of the current time. VMAx Virtual Surround FM Stereo/ANR (AM Noise Reduction) When the FM radio signal is too weak to be received in Stereo mode without interference, press the FM Stereo/ANR button ° to switch to Mono mode for improved reception. When recording AM radio transmissions, press this button to reduce unwanted noise. Real Speaker Phantom 11 ENJOYING JBL SOUNDGEAR Listening to the Radio Automatic Tuning 1. Turn on the Power ¡ 1. 2. Press the Tuner/Band button 41 3 repeatedly to choose either AM or FM radio. 3. Press and hold the Tuning Down/Up (Tune ¤/Tune ⁄ ) button §&( for more than 0.5 seconds. The unit will scan and automatically tune in a station of acceptable broadcast strength. Manual Tuning 1. Turn on the Power ¡ 1. 2. Press the Tuner/Band button 41 3 repeatedly to choose either AM or FM radio. 3. Press the Tuning Down/Up (Tune ⁄ /Tune ¤) button §&( briefly and repeatedly, until the desired station is tuned. Programming Preset Stations To Clear All Presets From Memory: 1. While in Tuner mode (that is, the tuner was selected by pressing the Tuner/Band button 41 3), press and hold the CD/Tuner Program button b Ó for more than 1.5 seconds so that RESET flashes in the display. The Memory indicator 30 will appear in the display. 2. While RESET is flashing in the display, press the Stop/Reset button 43 *. Entering a Station Preset Into Memory: 1. Press the Tuner/Band button 41 3 to select either the AM or FM band. 2. Press the Tune ¤/Tune ⁄ buttons §&( to tune in the desired station. 3. To store the station at the next available Preset number, press the CD/Tuner Program button bÓ TWICE. The first press causes the preset number to flash c, and the Memory indicator 30 to appear in the display. The second press stores the station to that preset number. 4. Alternatively, to store the station at a particular preset number of your choice, press the CD/Tuner Program button bÓ ONCE, so that the next available preset number flashes in the display. Press the Preset ⁄ / ¤ buttons cg4 to choose a preset number, then press the CD/Tuner Program button b Ó again, while the preset number is flashing, to store the station at that preset. 12 Tuning in Preset Stations: Press and hold the Preset ⁄ / ¤ buttons cg4 until the desired preset number appears, or press the buttons repeatedly. RDS (Radio Data System) Reception What is RDS? RDS (Radio Data System) is a system gradually being introduced on FM in many countries, whereby an inaudible stream of data is transmitted in addition to the normal radio signal. The data appears as text in the front panel Information Display c. This data can contain various types of information, including station identification, traffic and weather information and a list of alternative frequencies for the radio station being received. 1. Press the Tuner/Band button 41 3 to select FM. RDS is not available on the AM band. 2. Tune in the desired station as described above. At the time of writing of this owner’s manual, a list of stations in the United States that broadcast RDS data is available at the Consumer Electronics Association’s Web site at www.ce.org/market_overview/rds_stations.cfm. 3. When an RDS transmission is received, the display shows the station name and the RDS indicator z lights. 4. To return to a display of the station frequency, press the Set/Station button ∞. Notes: • RDS is only available for FM Reception. • The station name is displayed automatically when an RDS station is received. However, if the signal is not strong enough, it may be possible to receive the audio signal without any RDS data. • When an RDS station is first tuned in, the station name or other RDS information may be garbled for a few seconds while JBL Soundgear processes the signal. This is normal, and the correct information will appear automatically within a few seconds. ENJOYING JBL SOUNDGEAR Playing CDs Your JBL Soundgear system will play discs displaying the Compact Disc Digital Audio logo . It will also play properly finalized CD-R discs. JBL Soundgear is not able to play CD-RW, DVD, Video CD, computer data discs, or any other type of disc except CD or CD-R, as noted above. Stopping Play Press the Stop/Reset button 43 *. Pause Press the CD Pause ›■ ■ button 40 ^. To resume play, press the CD Pause ›■ ■ button 40 ^ again, or press the Play button c^. Skipping Discs Tray for Disc 1 Tray for Disc 2 Basic Operation 1. Press the CD Function button 42 . 2. Press the CD Open/Close button ‚ to open the disc compartment. 3. Load up to three discs with the label side up. Each tray is numbered 1, 2 or 3 going counterclockwise around the carousel: Playing one or two discs Place discs on trays 1 and 2. Playing three discs After placing two discs, press the Disc Skip button 36 Ô to rotate the carousel. Place the next disc in tray 3. To load a 3-in. (8cm) disc, put it in the inner depression of the tray. Never place more than one disc at a time in any of the three tray positions. 4. Press the CD Open/Close button ‚ to close the disc compartment. 5. Press the Play (or ›■ ■ on remote control) button c^ to start play. Play begins with the disc located on the lefthand side of the carousel just before closing the disc compartment, and proceeds counterclockwise around the carousel (in number order). All discs are played once only. During playback, empty trays are skipped, and JBL Soundgear proceeds counterclockwise to the next tray. The numbered indicator of any skipped tray will go out in the display b. The total number of audio tracks available on the disc being played will be displayed at the top of the display d. As each track finishes playing, its corresponding number will go out. When a disc has more than 16 tracks, the “OVER” indicator e will light, and the track number will appear only in the Information Display c. During play or in the Stop mode, press the Disc Skip button 36 Ô to proceed to the next disc in order. If the Disc Skip button 36 Ô is pressed while a disc is playing, JBL Soundgear will skip to the next disc and start playing it. However, if the Disc Skip button 36 Ô is pressed while the unit is stopped, it will rotate the disc tray to the next disc, but it will NOT start playing. Direct Disc Access Press one of the Disc Direct (Disc 1, 2 or 3) buttons 33 34 35 to start playing the disc in that tray. After it plays through that disc, JBL Soundgear will continue to the next disc in order. Removing Discs Press the CD Open/Close button ‚ to open the disc compartment. You can remove two discs at a time. To remove the disc in the back tray, press the Disc Skip button 36 Ô to rotate the disc carousel. Changing Discs During Play JBL Soundgear allows you to exchange two of the discs in the carousel while the third disc is playing. Simply open the disc compartment during play by pressing the CD Open/Close button ‚, and remove or insert discs as described above. The disc located on the left side will be the next disc to be played after you close the disc compartment. This operation is not available during programmed play. Important Notes Do not tilt or move the unit with discs loaded. This may dislodge the discs. Usage under these conditions may damage the discs or the JBL Soundgear unit. • Do not place more than one compact disc in one disc tray at the same time. • If, during CD play, the video image of a nearby television is distorted, or if static is heard from a nearby radio, move JBL Soundgear further away from the affected device. Searching Within a Track You can search for a particular point in a track during play by monitoring the high-speed cueing sound, or by observing the CD counter in the display c. Reverse Search Press and hold the Reverse Search ■‹‹ ‹‹ button §& and release it at the desired point. Forward Search Press and hold the Forward Search ›› ››■ button §( and release it at the desired point. Track Skipping To return to the beginning of the current track, tap the Reverse Search ■‹‹ ‹‹ button §& once. To skip track(s) backward one by one, tap the Reverse Search ■‹‹ ‹‹ button §& repeatedly. To skip track(s) forward one by one, tap the Forward Search ›› ››■ button §( repeatedly. REMEMBER – TAP the button §& to CHANGE tracks; but PRESS and HOLD the ■‹‹ ‹‹ / ›› ››■ button §& to search WITHIN a track. Time Display Press the Time button 38 to show the time remaining on the current disc cq. Press it again to return to a display of the time elapsed c. 13 ENJOYING JBL SOUNDGEAR Playing CDs Basic Operation (cont.) Programmed Play Repeating Tracks You may program a play list of up to 20 tracks anywhere on up to 3 discs. 1. While in Stop mode, press the CD/Tuner Program button bÓ. 2. Press one of the Disc Selector buttons 33 34 35 or the Disc Skip button 36 Ô to select a disc. If the correct disc is already in position, then press the CD Skip/Search ■‹‹ ‹‹ §& or ›› ››■ §( buttons once to select the disc so that it appears in the display c. 3. Use the CD Skip/Search ■‹‹ ‹‹ §& or ›› ››■ §( buttons to select the desired track. For example, to select Track 6, press the CD Skip/Search ■‹‹ ‹‹ §& or ›› ››■ §( buttons repeatedly until track number “06” is displayed c. 4. Press the CD/Tuner Program button bÓ to store the track in the play list. 5. Repeat Steps 2 through 4 to program up to 20 tracks into your play list. If you previously selected the correct disc, you do not need to repeat Step 2 in order to program additional tracks into your play list. 6. Press the Play c^ button (or ›■ ■ on remote control) to start play. 7. If you stop play in the middle of the play list so that the program does not appear in the display, the play list will remain stored in memory, but the next press of the Play button c 7 will cause the entire current disc to play. To resume playing the programmed play list, press the CD/Tuner Program button bÓ, which will bring the program back to the display co. 8. If you program several tracks on the same disc out of order, e.g., Track 8 before Track 7, JBL Soundgear will play the tracks back in the programmed order, even though the Track Number Display d lists the programmed tracks in numbered order. 9. The Disc Skip 36 Ô button does not operate during programmed play. 10. Random play cannot be selected while a programmed play list is playing. The Repeat function is only available using the remote control, and cannot be accessed from the front panel buttons. Once Repeat play has been selected, JBL Soundgear will continue to repeat the selection until you cancel it by pressing the Repeat button % once, so that the Repeat indicator p in the display goes out. Repeat play may be selected either during play or in the Stop mode. If a programmed play list is playing, you may select either one track to repeat, or all discs to repeat the entire play list. Repeat One Track Press the Repeat button % ONCE to display Repeat One p, and press the Play (or ›■ ■ on remote control) button c ^ to start play. Repeat One Disc Press the Repeat button % TWICE to display Repeat One Disc p, and press the Play (or ›■ ■ on remote control) button c ^ to start play. Repeat All Tracks on All Discs Press the Repeat button % THREE times to display Repeat All Disc p, and press the Play (or ›■ ■ on remote control) button c ^ to start play. Repeat Only Selected Tracks Program the desired tracks as described in the next section, and press the Repeat button % while in Programming mode to display Repeat One or Repeat All Disc p. If you program a play list during Repeat Play of an entire disc, the display will change to Repeat All Disc p. Random Play Press the Random button 37 before or during play, and JBL Soundgear will play the tracks on the selected disc in random order. The Random indicator y will light in the display. To return to normal play, press the Random button 37 again. If you tap the Forward Search button §(, JBL Soundgear will randomly select a new track. If you tap the Reverse Search button §& once, it will go to the beginning of the current track. Tap the Reverse Search button §& again, and JBL Soundgear will randomly select a new track. 14 Reviewing the Contents of the Play List While in Stop mode, press the CD/Tuner Program button bÓ to display the disc number, track number, and program number. Continue to press the CD/Tuner Program button bÓ to step through the entire play list. Clearing the Programmed Play List There are three different ways to clear a previously programmed play list: • While in Stop mode, press the CD/Tuner Program button bÓ, and then press the Stop/Reset button 43 *. • Turn off the Power ¡1. • Press the CD Open/Close button ‚. Adding Tracks to a Previously Programmed Play List 1. Press the CD/Tuner Program button bÓ repeatedly to step through the play list until “00” is displayed as the track number c. 2. Select the desired track on the desired disc by pressing the Disc Direct buttons 33 34 35 or Disc Skip button 36 Ô as necessary, and then by pressing the CD Skip/Search ■‹‹ ‹‹ §& or ›› ››■ §( buttons to proceed to the correct track. 3. Press the CD/Tuner Program buttons bÓ. Making Changes to the Play List 1. Press the CD/Tuner Program button bÓ repeatedly until the disc and track number of the selected step is displayed c. This track will be replaced in the play list by the new track you are about to program. 2. Select the desired track on the desired disc by pressing the Disc Direct buttons 33 34 35 or Disc Skip button 36 Ô as necessary, and then by pressing the CD Skip/Search ■‹‹ ‹‹ §& or ›› ››■ §( buttons to proceed to the correct track. 3. Press the CD/Tuner Program button bÓ. It is not possible to delete a single step from the programmed play list. ENJOYING JBL SOUNDGEAR Using External (Auxiliary) Sources Playback 1. Switch on the auxiliary device (TV, VCR or MP3 player) connected to the front or rear AUX 1 or AUX 2 jacks. 2. Select the desired auxiliary device by repeatedly pressing the Aux 1/2 button ‹5. 3. See the Recording section on page 16 for information on tape recording from an auxiliary source. JBL Soundgear can only use normal bias tapes. It is equipped with two cassette decks, “A” and “B”. Deck A is used only for playback, and will stop at the end of each side of the tape. Deck B may be used for either playback or recording, and includes an auto reverse capability which can be controlled with the Play Mode button h. Playing Tapes 1. Switch the unit on ¡1. 2. Open either cassette deck A or B by pressing gently on the door at the Eject position · 31 . Insert the cassette with the tape side to the bottom and the side that you wish to hear facing the front. Gently push the door to close it. 3. Press the Tape A/B button ¤)!. If necessary, press the button again to select the other deck. JBL Soundgear will display which deck has been selected cn. The unit will not select a deck that does not have a tape loaded. 4. Auto reverse (for Deck B only): Press the Play Mode button h repeatedly to select: • One side : Unit plays the side that is facing the listener and stops automatically at the end of that side. • All sides : Unit plays the front and reverse sides and stops automatically at the end of the tape. • Endless loop : Unit plays both sides of tape six times in succession. JBL Soundgear will display the current Play mode k. 5. Press the Play button c7 to begin playback. Press the Reverse Play button g@ to play the reverse side of the tape. The direction of the tape will be indicated in the display h. 6. In either the Stop or Play mode, press the Fast Forward ›› ››■ § ››9 button to fast forward to the desired point, or to the end of the side. The Fast Forward indicator m will light in the display. To rewind, in either the Stop or Play mode, press the Rewind ■‹‹ ‹‹ § ‹‹ # button. The Rewind indicator j will light in the display. 7. To end playback, press the Stop/Reset button 43 6. Alternatively, the unit will stop automatically at the end of the tape. Tape Counter The Tape Counter c will apppear in the Information Display when in Tape mode. During Play or Fast Forward, the Tape Counter c increases and, during rewind, the tape counter decreases. While in Stop mode or while playing, press the Counter Reset button ‡ to reset the counter to zero. This can be convenient for locating the point at which you wish to begin a recording session. Note, however, that JBL Soundgear will automatically rewind the tape to its beginning and it will not stop when the counter reaches zero. 15 ENJOYING JBL SOUNDGEAR Recording Tapes Recording From a CD, Radio or Externally Connected Equipment Recordings can only be made using Deck B. Only normal bias tapes should be used. 1. Power the unit on ¡1, and insert a blank tape into Deck B. Use the Fast Forward §9 or Rewind §# buttons to proceed to the point where you wish the recording to start. Make sure to proceed past the tape leader to avoid missing the beginning of the source signal. 2. Press the Play Mode h button repeatedly to select recording on one side only or to record on both sides in auto reverse mode . We do not recommend that you use the endless loop mode , as it may result in rerecording over desired material that was recorded earlier in the session. 3. Select the source input: Tuner, CD, Aux 1/MP3, Aux 2 41 42 ‹^35. 4. Press the Rec/Pause button d8 to place JBL Soundgear in the Recording Ready mode. The Record indicator i will flash. 5. Press the Play button c7 to begin recording onto the front side of the tape, or the Reverse button g@ to begin recording onto the reverse side of the tape. The direction of the tape will be indicated in the display h. JBL Soundgear will automatically start the input source and the recording session simultaneously. 6. The recording may be interrupted to skip over undesired material by pressing the Rec/Pause button d8. To resume recording, press either the Rec/Pause button d8, or the Play button c7. 7. To end the recording session (but not the input), press the Stop/Reset button 43 6. Alternatively, JBL Soundgear will stop recording automatically when it reaches the end of the tape. 16 CD Sync Recording The CD Sync recording function dubs a complete CD or programmed tracks automatically onto a cassette. 1. Select the CD Function 42 . 2. Open the CD compartment with the CD Open/Close button ‚, insert discs and close the CD compartment again. 3. If desired, program a play list of selected tracks (see Programmed Play section on p. 14). If you wish to record only one track, use the Forward or Reverse Search buttons §&( to select that track. 4. Insert a blank tape into Deck B. Use the Fast Forward §9 or Rewind §# buttons to proceed to the point where you wish the recording to start. Make sure you have enough blank tape available to fully record the CD or programmed play list. 5. Press the Play Mode h button repeatedly to select recording on one side only or to record on both sides in auto reverse mode . We do not recommend that you use the endless loop mode , as it may result in rerecording over desired material that was recorded earlier in the session. If JBL Soundgear is unable to finish recording a track on the first side of the tape, it will record that track completely on the reverse side. 6. Press the CD Sync button 39 to begin recording. JBL Soundgear will play the tape in Mute mode for 7 seconds in order to skip the tape leader; then the CD player will begin playing and JBL Soundgear will begin recording. JBL Soundgear will not allow you to select a different input without stopping the recording session. Recording From Tape to Tape (Dubbing) JBL Soundgear will only dub recorded materials from Deck A to Deck B, since only Deck B is capable of recording. Use only normal bias tape in JBL Soundgear. 1. Insert a previously recorded cassette in Deck A with the side you wish to copy facing toward you. Insert a blank cassette in Deck B with the side you wish to record on facing toward you. 2. Press the Tape A/B button ¤)! to select the tape function, and press it repeatedly to select each deck so that you can rewind each tape to the beginning using the Rewind button §#. 3. Press the Normal Dub button k to automatically start dubbing at normal (regular playback) speed. Alternatively, press the High Dub i button to automatically start dubbing at twice normal playback speed. The quality of the recording may be better if Normal Speed dubbing is used rather than High Speed Dubbing. When dubbing at high speed, turn down the Volume ⁄Ù to prevent possible damage to the loudspeakers by the high-pitched playback of the source tape. 4. During dubbing, the Pause button d8 will have no effect. You cannot change the speed of the dub during a dub. Although the Volume control ⁄Ù will affect the level of playback, it will have no effect on the recording level, which is not adjustable. 5. Press the Stop/Reset button 43 6 to end the dubbing session. Alternatively, the unit will stop automatically at the end of the tape. ADVANCED FEATURES Dual Alarms and Timer Recording Alarm and Timer Setting JBL Soundgear offers a flexible dual alarm and timer capability, which allows you to program the system to either play or record two different sources at two different times, for as long a duration as you choose. 1. Make sure the current time displayed c is correct by pressing the Clock button ™; see the Setting the Clock section of this manual on p. 10 to set the clock correctly. If you plan on selecting the Tuner, make sure that the desired station has been programmed as a preset (see Programming Preset Stations section on p. 12). 2. Press the Alarm 1 £ or Alarm 2 ¢ button to enter the timer setting mode. (If the timer was previously set, press and hold the button for more than 1.5 seconds.) The Alarm/Timer clockface indicator will appear in the display w and the available source selections – TUNER, CD, TAPE – will flash in the display in turn. 3. (a) If you want to select the Tuner, press the Set/Station button ∞ while TUNER appears in the display window c. “Play” and “Rec” will flash in turn. (b) Press the Set/Station button ∞ to select either Play or Rec. • Play: Tuner plays only • Rec: Tuner plays and is recorded by Deck B. Make sure that a blank cassette is loaded in Deck B and rewound to its beginning or desired starting point. (c) Press the Preset Down or Up button cg4 to select a desired radio station. If no Preset stations have been programmed into memory, JBL Soundgear will default to the last tuned station. (d) Press the Set/Station button ∞ to enter the selected preset number. 4. If you wish to select a CD or Tape, press the Set/Station button ∞ while CD or TAPE appears in the display window c. If you have selected CD, or Tape A, “PLAY” and “REC” will flash alternately in the display c. Press the Set/Station button ∞ to select either PLAY or REC. If you choose to make a recording, make sure that a blank cassette is loaded in Deck B and rewound to its beginning or desired starting point. 5. Set the hour by pressing the Preset Down or Up buttons cg4. 6. Press the Set/Station button ∞ to enter the hour the alarm will turn the selected source on. The minutes will flash c. 7. Set the minutes by pressing the Preset Down or Up buttons cg4. 8. Press the Set/Station button ∞ to enter the minutes. “OFF” will flash in the display c, and the menu will now guide you through setting the time the system will turn off. 9. Program the time to turn off in the same way as the time to turn on, by using the Preset Down or Up buttons cg4 to select the hour or minute, and the Set/Station button ∞ to enter the setting. 10. Set the volume level by pressing the Preset Down or Up buttons cg4. 11. Press the Set/Station button ∞ to enter the selected volume level. The clockface and the Alarm number (1 or 2) will remain lit in the display w, and the alarm will be set and armed. 12. When you turn the power off ¡1, JBL Soundgear will automatically turn itself on at the programmed time and play and/or record the selected source for as long as it has been programmed to play. To Cancel or Check the Timer: Each time the Alarm 1 £ or Alarm 2 ¢ button is pressed you can arm or disarm that alarm. If the alarm was previously set, press the button £¢ twice to display the alarm settings. Press it once to disarm the alarm, but retain any settings in memory. When the alarm is armed, the clockface and alarm number (1 or 2) indicators will light in the display w as will the REC indicator x if applicable. When the alarm is disarmed, the indicators will go out. Alarm and Timer Notes 1. The Alarm indicator w will flash when the unit is playing in Alarm mode. Press the Alarm button £¢ to defeat the alarm, which will not shut the unit off. 2. When CD or Tape is selected for playback, if no disc is in the disc drawer or no cassette tape is in the cassette deck, the Tuner function will turn on instead. 3. When CD is selected for playback, Repeat All Disc will be selected automatically. 4. When TAPE is selected for playback, if both cassette decks have cassette tapes; the cassette tape in Deck B will play first. 5. If the unit is turned on manually, it will not shut off automatically at the programmed turnoff time. 6. If both Alarm 1 and Alarm 2 are set, and their times do not overlap – that is, the earlier alarm is programmed to turn off before the later alarm will turn on – then both alarms will turn the unit on and off as programmed. Alarm 1 Alarm 2 ACTUAL TIME JBL SOUNDGEAR PLAYS ACTUAL TIME JBL SOUNDGEAR PLAYS ON TIME (AM 6:00) OFF TIME (AM 7:00) ON TIME (AM 7:10) OFF TIME (AM 8:00) 7. If the settings of the timers overlap, then JBL Soundgear will turn on at the earliest set turn-on time and play continuously until the later turn-off time. It will only play the source that was selected for the earlier timer, and will not play the source that was selected for the later timer. Alarm 2 Alarm 1 ACTUAL TIME JBL SOUNDGEAR PLAYS ON TIME (AM 6:00) OFF TIME (AM 7:10) ON TIME (AM 7:00) OFF TIME (AM 8:00) Setting the Sleep Timer (Available only using the remote control) When the sleep timer is used, the power is automatically turned off after the specified time has elapsed. 1. To specify the time until the power is turned off, press the Sleep button $. “SLEEP 90” will appear in the display c for about 5 seconds. This means that the unit will turn off automatically after 90 minutes. Each time the Sleep button $ is pressed while the SLEEP display appears, the time interval before the unit will turn off is reduced by 10 minutes (e.g., 80...70...). Select the desired time interval before turn-off. 2. To check the remaining time until the power is turned off, while the sleep function is active, press the Sleep button $ briefly. The time remaining until turn-off is displayed for about 5 seconds. Note: If you press the Sleep button $ while the sleep time is displayed, the SLEEP timer will reduce the time until turn-off. 3. To cancel the sleep timer, press the Sleep button $ repeatedly until “10” appears, and then press the SLEEP button once again while “10” is displayed. 17 TROUBLESHOOTING If there is no sound from either of the speakers: • Check that the unit is plugged into an active electrical outlet. • Check that the unit is turned on, and that a source is selected and playing. If Tape or CD was selected, make sure that a cassette or disc has been inserted. • Check that the Mute function has not been selected and, if it has, turn it off using the remote control. • Adjust the Volume Control ⁄. • Check all wires and connections between the main unit and the speakers (see page 9). Make sure all wires are connected, and that none of the speaker wires are frayed, cut or punctured. • If an external (auxiliary) source was selected, make sure that the external unit is either plugged into an active electrical outlet or powered by fully charged batteries. Make sure that the external unit is turned on and playing. Make sure that all wires between the main unit and external unit are connected correctly, and that none of the wires are frayed, cut or punctured. If there is no sound coming from one speaker: • Check all wires and connections between the main unit and the speakers (see page 9). Make sure all wires are connected and that none of the speaker wires are frayed, cut or punctured. If the system plays at low volumes but shuts off as volume is increased: • Check all wires and connections between the main unit and the speakers (see page 9). Make sure all wires are connected, and that none of the speaker wires are frayed, cut or punctured. If there is low (or no) bass output: • Make sure the connections to the left and right speaker inputs 49 have the correct polarity (+ and –). • Consider experimenting with the Boost function fi by selecting either PowerBass or Super Boost. • Consider adding a powered subwoofer to your system. If there is low (or no) treble output: • Check all wires and connections between the main unit and the speakers (see page 9). Make sure all wires are connected, and that none of the speaker wires are frayed, cut or punctured. • For Model SG3030, make sure the yellow plug is connected to the correct Tweeter/Midrange jack 46 on the rear panel of the main unit. 18 • Consider experimenting with the Boost function fi by selecting Treble Boost or Super Boost. • As a preventive measure to avoid damaging your speakers, make sure never to exceed the maximum volume when playing your system. If the unit does not respond to remote control commands: • Make sure the batteries are not weak, and replace them if necessary. • Make sure the remote sensor in the front panel of the main unit is not blocked. • Make sure the remote is no further than 23 feet (7 meters) away from the main unit, and that it is aimed at the sensor head-on and not at too much of an angle (no more than 30 degrees from the center line). • Turn off any fluorescent light in the vicinity of the JBL Soundgear main unit. If the tuner (radio) buzzes or does not play properly: • Make sure you have tuned in to a frequency that is in use in your area. • Check the antenna connection, and adjust the placement of the antenna wires for best reception. If RDS (Radio Data System) information does not appear in the display: • Make sure you have selected the FM band, as RDS is not available on AM. • Make sure the station you have tuned is broadcasting an RDS signal by checking the Web site listed on page 12. • When the station’s signal is weak, the audio signal may come through without the RDS signal. • For the first few seconds, the RDS data will be garbled until the unit fully processes the signal. When attempting to delete a single preset station, all presets are erased: It is not possible to delete a single Preset station, although it can be changed to a different station (see page 12). When attempting to delete a single track from a programmed CD play list, the entire play list was erased: It is not possible to delete a single track from a play list, although the track can be replaced by a different track (see page 14). If no sound is heard when tape is playing: • Make sure tape is not blank. If tape does not record: • Make sure record protection tabs have not been removed from cassette. If they have, you may cover the protection holes with adhesive tape. • Make sure a source is playing. • If dubbing, make sure the tapes are in the correct decks – the source in Deck A, and the blank in Deck B. • Make sure you are not attempting to record onto a tape in Deck A, as that deck is for playback only. If tapes sound distorted: • Make sure to use only normal bias tapes in the unit. • Make sure tape heads are clean and demagnetized. If a tape recording tapes over material recorded earlier in the same session: • Make sure you have selected either One side or All sides, but not Endless loop, using the Play Mode function h. If a tape rewinds past zero: The unit detects the beginning of the tape rather than the counter number and this behavior is normal. If Deck A does not auto-reverse: Deck A is not equipped with this feature, and will always stop at the end of each side. If CD does not play: • Make sure drawer contains disc to play. • Make sure disc is not upside down in tray. • Make sure disc is of type CD or CD-R only. If CD skips or stutters during play: • Make sure disc is not damaged. • Make sure main unit is set securely on a stable surface, free from vibrations. If the unit did not turn on at the programmed alarm time: • Check programmed time – was AM or PM selected correctly? Was 24-hour or 12-hour time display selected as desired? • Make sure the unit was not left turned on. If the unit did not turn on and make a recording at the programmed alarm time: • Make sure time was programmed correctly. • Make sure a blank tape was inserted in Deck B and rewound. Specifications System Output Power Sound Pressure Level Frequency Response Signal-to-Noise Ratio (Aux Input) Dimensions (W x H x D) Main Unit Speakers (each) Net Weight Main Unit Speakers (each) Shipping Weight (system, accessories, packing) Speaker System Type Woofer Midrange Tweeter CD Frequency Response Signal-to-Noise Ratio Tuner FM Tuning Range Intermediate Frequency Signal-to-Noise Ratio (Mono/Stereo, 98MHz) Frequency Response AM Tuning Range Intermediate Frequency Frequency Response Cassette Deck FF, REW Time (C-60) Frequency Response Signal-to-Noise Ratio Channel Separation SG2020 SG3030 150 Watts total 75W + 75W (1% THD, 50Hz – 20kHz) 107dB 45Hz ~ 20kHz 80dBA 200 Watts total (bi-amplified) 30W + 30W (1% THD, 200Hz – 20kHz) 70W + 70W (1% THD, 50Hz – 20kHz) 108dB 40Hz ~ 20kHz 80dBA 10-3/4" x 12-7/8" x 13-1/2" (273mm x 327mm x 343mm) 8-5/8" x 13-1/8" x 9-3/4" (219mm x 333mm x 248mm) 19.2 lb (8.73kg) 10.8 lb (4.91kg) 10-3/4" x 12-7/8" x 13-1/2" (273mm x 327mm x 343mm) 8-5/8" x 14-3/4" x 9-3/4" (219mm x 374mm x 248mm) 22.2 lb (10.1kg) 11.5 lb (5.23kg) 47.3 lb (21.5kg) 52 lb (23.64kg) Ported 2-way 6-1/2" PolyPlas™ with rubber surround N/A 1/2" Titanium-laminate dome with EOS™ waveguide Ported 3-way bi-amplified 6-1/2" PolyPlas with rubber surround 3" PolyPlas with rubber surround 1/2" Titanium-laminate dome with EOS™ waveguide 20Hz ~ 20kHz (+0,–2dB) 70dBA 20Hz ~ 20kHz (+0,–2dB) 70dBA 87.5MHz ~ 108MHz 10.7MHz 61/58dBA 87.5MHz ~ 108MHz 10.7MHz 61/58dBA 30Hz ~ 15kHz 30Hz ~ 15kHz 530kHz ~ 1,720kHz 450kHz 50Hz ~ 2,500Hz 530kHz ~ 1,720kHz 450kHz 50Hz ~ 2,500Hz 120 sec. 20Hz ~ 20kHz (±3dB) 43dBA 50dBA 120 sec. 20Hz ~ 20kHz (±3dB) 43dBA 50dBA NOTE: All features and specifications are subject to change without notice. PowerBass and JBL Soundgear are trademarks of JBL, Inc. VMAx is a registered trademark of Harman International Industries, Inc., and is an implementation of Cooper Bauck Transaural Stereo under patent license. 19