1
Contents
Chapter 1 Welcome
Thank you for buying a Compaq Internet PC . . . . . . . . . . . . . . . . . . . . . . . . . . . . . . . . . . .
Words and Symbols to Watch For . . . . . . . . . . . . . . . . . . . . . . . . . . . . . . . . . . . . . . . . . . . .
Safety Tips . . . . . . . . . . . . . . . . . . . . . . . . . . . . . . . . . . . . . . . . . . . . . . . . . . . . . . . . . . . . . .
Special Text . . . . . . . . . . . . . . . . . . . . . . . . . . . . . . . . . . . . . . . . . . . . . . . . . . . . . . . . . . . . .
Help! . . . . . . . . . . . . . . . . . . . . . . . . . . . . . . . . . . . . . . . . . . . . . . . . . . . . . . . . . . . . . . . . . . .
Glossary. . . . . . . . . . . . . . . . . . . . . . . . . . . . . . . . . . . . . . . . . . . . . . . . . . . . . . . . . . . . .
Index . . . . . . . . . . . . . . . . . . . . . . . . . . . . . . . . . . . . . . . . . . . . . . . . . . . . . . . . . . . . . . .
Windows Help . . . . . . . . . . . . . . . . . . . . . . . . . . . . . . . . . . . . . . . . . . . . . . . . . . . . . . . .
Troubleshooting . . . . . . . . . . . . . . . . . . . . . . . . . . . . . . . . . . . . . . . . . . . . . . . . . . . . . . .
Compaq Service and Support . . . . . . . . . . . . . . . . . . . . . . . . . . . . . . . . . . . . . . . . . . . . .
1-1
1-2
1-2
1-3
1-4
1-4
1-4
1-4
1-4
1-4
Chapter 2 Features of Your Internet PC
The Digital Dashboard. . . . . . . . . . . . . . . . . . . . . . . . . . . . . . . . . . . . . . . . . . . . . . . . . . . . .
E-mail Waiting . . . . . . . . . . . . . . . . . . . . . . . . . . . . . . . . . . . . . . . . . . . . . . . . . . . . . . . .
Internet Alive!. . . . . . . . . . . . . . . . . . . . . . . . . . . . . . . . . . . . . . . . . . . . . . . . . . . . . . . . .
Reset . . . . . . . . . . . . . . . . . . . . . . . . . . . . . . . . . . . . . . . . . . . . . . . . . . . . . . . . . . . . . . .
Power Management. . . . . . . . . . . . . . . . . . . . . . . . . . . . . . . . . . . . . . . . . . . . . . . . . . . . . . .
Putting Your PC to Sleep. . . . . . . . . . . . . . . . . . . . . . . . . . . . . . . . . . . . . . . . . . . . . . . . .
Waking Your PC . . . . . . . . . . . . . . . . . . . . . . . . . . . . . . . . . . . . . . . . . . . . . . . . . . . . . . .
Shutting Down Your PC . . . . . . . . . . . . . . . . . . . . . . . . . . . . . . . . . . . . . . . . . . . . . . . . .
In Case of System Lockup . . . . . . . . . . . . . . . . . . . . . . . . . . . . . . . . . . . . . . . . . . . . . . .
Microsoft Windows Power Management. . . . . . . . . . . . . . . . . . . . . . . . . . . . . . . . . . . . .
Accessing the Microsoft Windows Power Management Settings. . . . . . . . . . . . . . . . . . .
Sleep Mode . . . . . . . . . . . . . . . . . . . . . . . . . . . . . . . . . . . . . . . . . . . . . . . . . . . . . . . . . .
Contents
2-1
2-2
2-2
2-3
2-4
2-4
2-4
2-5
2-5
2-5
2-5
2-7
i
The Compaq USB Internet Keyboard. . . . . . . . . . . . . . . . . . . . . . . . . . . . . . . . . . . . . . . . . . 2-7
The Basics of Keyboarding . . . . . . . . . . . . . . . . . . . . . . . . . . . . . . . . . . . . . . . . . . . . . . . 2-8
Internet Button Suite (US) . . . . . . . . . . . . . . . . . . . . . . . . . . . . . . . . . . . . . . . . . . . . . . . 2-10
Internet Button Suite (Canada) . . . . . . . . . . . . . . . . . . . . . . . . . . . . . . . . . . . . . . . . . . . 2-11
The Special Buttons . . . . . . . . . . . . . . . . . . . . . . . . . . . . . . . . . . . . . . . . . . . . . . . . . . . 2-12
Multimedia Buttons . . . . . . . . . . . . . . . . . . . . . . . . . . . . . . . . . . . . . . . . . . . . . . . . . . . 2-13
Reprogramming the Easy Access Buttons. . . . . . . . . . . . . . . . . . . . . . . . . . . . . . . . . . . 2-14
Disabling and Enabling the Easy Access Buttons . . . . . . . . . . . . . . . . . . . . . . . . . . . . . 2-14
The Compaq USB Scroll Mouse. . . . . . . . . . . . . . . . . . . . . . . . . . . . . . . . . . . . . . . . . . . . . 2-15
Scroll Mouse Functions . . . . . . . . . . . . . . . . . . . . . . . . . . . . . . . . . . . . . . . . . . . . . . . . 2-16
Scrolling and Zooming with the Mouse. . . . . . . . . . . . . . . . . . . . . . . . . . . . . . . . . . . . . 2-17
Choosing Scroll Mouse Options . . . . . . . . . . . . . . . . . . . . . . . . . . . . . . . . . . . . . . . . . . 2-17
Quick Launch with CyberJump and HyperJump . . . . . . . . . . . . . . . . . . . . . . . . . . . . . . 2-18
About Your CD-ReWritable (CD-RW) Drive . . . . . . . . . . . . . . . . . . . . . . . . . . . . . . . . . . . . 2-21
Types of CD Media . . . . . . . . . . . . . . . . . . . . . . . . . . . . . . . . . . . . . . . . . . . . . . . . . . . . 2-21
just!burn CD Assistant . . . . . . . . . . . . . . . . . . . . . . . . . . . . . . . . . . . . . . . . . . . . . . . . . 2-22
PacketCD . . . . . . . . . . . . . . . . . . . . . . . . . . . . . . . . . . . . . . . . . . . . . . . . . . . . . . . . . . . 2-22
just!audio . . . . . . . . . . . . . . . . . . . . . . . . . . . . . . . . . . . . . . . . . . . . . . . . . . . . . . . . . . . 2-22
CD!backup . . . . . . . . . . . . . . . . . . . . . . . . . . . . . . . . . . . . . . . . . . . . . . . . . . . . . . . . . . 2-22
just!data. . . . . . . . . . . . . . . . . . . . . . . . . . . . . . . . . . . . . . . . . . . . . . . . . . . . . . . . . . . . 2-23
Accessing the just!burn User’s Manual. . . . . . . . . . . . . . . . . . . . . . . . . . . . . . . . . . . . . 2-23
Recording Audio CDs . . . . . . . . . . . . . . . . . . . . . . . . . . . . . . . . . . . . . . . . . . . . . . . . . . 2-24
What is Buffer Underrun? . . . . . . . . . . . . . . . . . . . . . . . . . . . . . . . . . . . . . . . . . . . . . . . 2-25
Using the DVD Player (available on select models) . . . . . . . . . . . . . . . . . . . . . . . . . . . . . 2-26
Using a Regionalized DVD . . . . . . . . . . . . . . . . . . . . . . . . . . . . . . . . . . . . . . . . . . . . . . 2-26
Identifying Your Region Setting. . . . . . . . . . . . . . . . . . . . . . . . . . . . . . . . . . . . . . . . . . . 2-27
Changing a Region Setting . . . . . . . . . . . . . . . . . . . . . . . . . . . . . . . . . . . . . . . . . . . . . . 2-27
Play Settings . . . . . . . . . . . . . . . . . . . . . . . . . . . . . . . . . . . . . . . . . . . . . . . . . . . . . . . . 2-27
Display Options . . . . . . . . . . . . . . . . . . . . . . . . . . . . . . . . . . . . . . . . . . . . . . . . . . . . . . 2-28
On-screen Control Buttons . . . . . . . . . . . . . . . . . . . . . . . . . . . . . . . . . . . . . . . . . . . . . . 2-29
Parental Control of DVD Viewing. . . . . . . . . . . . . . . . . . . . . . . . . . . . . . . . . . . . . . . . . . 2-31
ii
Contents
Chapter 3 A Quick Overview of Microsoft Windows
Get Organized: How To Manage Your Files . . . . . . . . . . . . . . . . . . . . . . . . . . . . . . . . . . . . . 3-1
Storage Drives . . . . . . . . . . . . . . . . . . . . . . . . . . . . . . . . . . . . . . . . . . . . . . . . . . . . . . . . 3-2
Searching For Files. . . . . . . . . . . . . . . . . . . . . . . . . . . . . . . . . . . . . . . . . . . . . . . . . . . . . 3-2
Copying Files . . . . . . . . . . . . . . . . . . . . . . . . . . . . . . . . . . . . . . . . . . . . . . . . . . . . . . . . . 3-3
Moving Files. . . . . . . . . . . . . . . . . . . . . . . . . . . . . . . . . . . . . . . . . . . . . . . . . . . . . . . . . . 3-3
Renaming Files . . . . . . . . . . . . . . . . . . . . . . . . . . . . . . . . . . . . . . . . . . . . . . . . . . . . . . . 3-3
Deleting Files . . . . . . . . . . . . . . . . . . . . . . . . . . . . . . . . . . . . . . . . . . . . . . . . . . . . . . . . . 3-3
Restoring Files . . . . . . . . . . . . . . . . . . . . . . . . . . . . . . . . . . . . . . . . . . . . . . . . . . . . . . . . 3-4
Emptying the Recycle Bin. . . . . . . . . . . . . . . . . . . . . . . . . . . . . . . . . . . . . . . . . . . . . . . . 3-4
Creating Folders. . . . . . . . . . . . . . . . . . . . . . . . . . . . . . . . . . . . . . . . . . . . . . . . . . . . . . . 3-4
Deleting Files and Folders . . . . . . . . . . . . . . . . . . . . . . . . . . . . . . . . . . . . . . . . . . . . . . . 3-5
Learning about the Control Panel . . . . . . . . . . . . . . . . . . . . . . . . . . . . . . . . . . . . . . . . . . . . 3-6
Setting Up Display Properties . . . . . . . . . . . . . . . . . . . . . . . . . . . . . . . . . . . . . . . . . . . . . 3-7
Changing the Wallpaper . . . . . . . . . . . . . . . . . . . . . . . . . . . . . . . . . . . . . . . . . . . . . . . . . 3-8
Changing the Screen Saver . . . . . . . . . . . . . . . . . . . . . . . . . . . . . . . . . . . . . . . . . . . . . . 3-9
Shortcuts for the Desktop . . . . . . . . . . . . . . . . . . . . . . . . . . . . . . . . . . . . . . . . . . . . . . . . . 3-10
How Do I Create a Shortcut? . . . . . . . . . . . . . . . . . . . . . . . . . . . . . . . . . . . . . . . . . . . . 3-10
Arranging and Positioning Shortcuts. . . . . . . . . . . . . . . . . . . . . . . . . . . . . . . . . . . . . . . 3-10
Chapter 4 Connecting To The World
Working With Your Modem . . . . . . . . . . . . . . . . . . . . . . . . . . . . . . . . . . . . . . . . . . . . . . . . .
Identifying Your Modem . . . . . . . . . . . . . . . . . . . . . . . . . . . . . . . . . . . . . . . . . . . . . . . . . . .
Compaq Digital DSL/56K Modem (available on select models) . . . . . . . . . . . . . . . . . . . .
Using Your Modem with the 56K ITU V.90 Standard . . . . . . . . . . . . . . . . . . . . . . . . . . . .
Establishing an Account with an Internet Service Provider . . . . . . . . . . . . . . . . . . . . . . .
DSL Benefits . . . . . . . . . . . . . . . . . . . . . . . . . . . . . . . . . . . . . . . . . . . . . . . . . . . . . . . . .
Using Your Modem with DSL Service . . . . . . . . . . . . . . . . . . . . . . . . . . . . . . . . . . . . . . .
Connecting Your Digital DSL/56K Modem . . . . . . . . . . . . . . . . . . . . . . . . . . . . . . . . . . . .
Installing the Digital DSL/56K Modem Upgrade. . . . . . . . . . . . . . . . . . . . . . . . . . . . . . . .
Contents
4-1
4-1
4-1
4-2
4-2
4-2
4-3
4-4
4-4
iii
Networking Your PCs. . . . . . . . . . . . . . . . . . . . . . . . . . . . . . . . . . . . . . . . . . . . . . . . . . . . . . 4-5
Connecting Your Internet PC to an Ethernet Network (available on select models). . . . . . 4-5
Setting Up a Network . . . . . . . . . . . . . . . . . . . . . . . . . . . . . . . . . . . . . . . . . . . . . . . . . . . 4-5
Mapping a Network Drive . . . . . . . . . . . . . . . . . . . . . . . . . . . . . . . . . . . . . . . . . . . . . . . . 4-7
Sharing Folders . . . . . . . . . . . . . . . . . . . . . . . . . . . . . . . . . . . . . . . . . . . . . . . . . . . . . . . 4-8
Sharing Printers . . . . . . . . . . . . . . . . . . . . . . . . . . . . . . . . . . . . . . . . . . . . . . . . . . . . . . 4-10
Let’s Get Digital . . . . . . . . . . . . . . . . . . . . . . . . . . . . . . . . . . . . . . . . . . . . . . . . . . . . . . . . . 4-11
Introducing the Digital Creativity Imaging Center (available on select models). . . . . . . . 4-11
What Is A Digital Interface? . . . . . . . . . . . . . . . . . . . . . . . . . . . . . . . . . . . . . . . . . . . . . 4-11
Chapter 5 Quick and Easy Upgrades
Making A Good Thing Better . . . . . . . . . . . . . . . . . . . . . . . . . . . . . . . . . . . . . . . . . . . . . . . .
Access to the Components . . . . . . . . . . . . . . . . . . . . . . . . . . . . . . . . . . . . . . . . . . . . . . . . .
Removing the Back EZ Access Panel . . . . . . . . . . . . . . . . . . . . . . . . . . . . . . . . . . . . . . .
Installing New Hardware. . . . . . . . . . . . . . . . . . . . . . . . . . . . . . . . . . . . . . . . . . . . . . . . . . .
Removing the Left EZ Access Panel . . . . . . . . . . . . . . . . . . . . . . . . . . . . . . . . . . . . . . . .
Replacing the Modem or Adding a PCI Expansion Card . . . . . . . . . . . . . . . . . . . . . . . . . .
Replacing the Hard Drive . . . . . . . . . . . . . . . . . . . . . . . . . . . . . . . . . . . . . . . . . . . . . . . .
Removing the Right EZ Access Panel . . . . . . . . . . . . . . . . . . . . . . . . . . . . . . . . . . . . . . .
Adding or Replacing Memory Modules . . . . . . . . . . . . . . . . . . . . . . . . . . . . . . . . . . . . . . .
Reinstalling Deleted Drivers . . . . . . . . . . . . . . . . . . . . . . . . . . . . . . . . . . . . . . . . . . . . . . . .
Installing Additional Software . . . . . . . . . . . . . . . . . . . . . . . . . . . . . . . . . . . . . . . . . . . . . .
Installing Software from a CD or Diskette . . . . . . . . . . . . . . . . . . . . . . . . . . . . . . . . . . . .
Installing a Downloaded Program File. . . . . . . . . . . . . . . . . . . . . . . . . . . . . . . . . . . . . . .
5-1
5-2
5-2
5-3
5-4
5-4
5-5
5-6
5-6
5-8
5-8
5-9
5-9
Chapter 6 Troubleshooting
Helpful Hints . . . . . . . . . . . . . . . . . . . . . . . . . . . . . . . . . . . . . . . . . . . . . . . . . . . . . . . . . . . .
Entering BIOS (CMOS) Setup . . . . . . . . . . . . . . . . . . . . . . . . . . . . . . . . . . . . . . . . . . . . . . . .
Troubleshooting Guidelines. . . . . . . . . . . . . . . . . . . . . . . . . . . . . . . . . . . . . . . . . . . . . . . . .
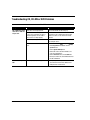
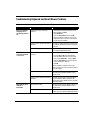
Troubleshooting Audio Problems . . . . . . . . . . . . . . . . . . . . . . . . . . . . . . . . . . . . . . . . . . . .
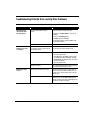
Troubleshooting CD, CD-RW or DVD Problems . . . . . . . . . . . . . . . . . . . . . . . . . . . . . . . . . .
Troubleshooting Diskette Drive and Zip Drive Problems . . . . . . . . . . . . . . . . . . . . . . . . . .
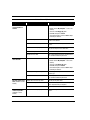
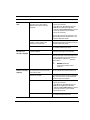
Troubleshooting Display (Monitor) Problems . . . . . . . . . . . . . . . . . . . . . . . . . . . . . . . . . . .
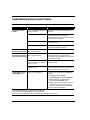
Troubleshooting Fax Modem Problems . . . . . . . . . . . . . . . . . . . . . . . . . . . . . . . . . . . . . . .
Troubleshooting Game Problems . . . . . . . . . . . . . . . . . . . . . . . . . . . . . . . . . . . . . . . . . . . .
Troubleshooting Hard Drive Problems . . . . . . . . . . . . . . . . . . . . . . . . . . . . . . . . . . . . . . . .
iv
6-1
6-1
6-1
6-2
6-4
6-5
6-7
6-8
6-9
6-9
Contents
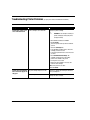
Troubleshooting Internet Access Problems . . . . . . . . . . . . . . . . . . . . . . . . . . . . . . . . . . . 6-10
Troubleshooting Keyboard and Scroll Mouse Problems . . . . . . . . . . . . . . . . . . . . . . . . . 6-11
Troubleshooting Memory Problems . . . . . . . . . . . . . . . . . . . . . . . . . . . . . . . . . . . . . . . . . 6-12
Troubleshooting Power Problems . . . . . . . . . . . . . . . . . . . . . . . . . . . . . . . . . . . . . . . . . . . 6-12
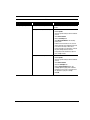
Troubleshooting Printer Problems (see your printer manual for additional Information) 6-14
Contacting Technical Support . . . . . . . . . . . . . . . . . . . . . . . . . . . . . . . . . . . . . . . . . . . . . . 6-17
Chapter 7 Government Approvals
European Union Notice . . . . . . . . . . . . . . . . . . . . . . . . . . . . . . . . . . . . . . . . . . . . . . . . . . . .
Federal Communications Commission Notice . . . . . . . . . . . . . . . . . . . . . . . . . . . . . . . . . .
Modifications . . . . . . . . . . . . . . . . . . . . . . . . . . . . . . . . . . . . . . . . . . . . . . . . . . . . . . . . .
Cables . . . . . . . . . . . . . . . . . . . . . . . . . . . . . . . . . . . . . . . . . . . . . . . . . . . . . . . . . . . . . .
Declaration of Conformity for Products Marked with the FCC Logo (United States Only)
Canadian Notice. . . . . . . . . . . . . . . . . . . . . . . . . . . . . . . . . . . . . . . . . . . . . . . . . . . . . . .
Avis Canadien . . . . . . . . . . . . . . . . . . . . . . . . . . . . . . . . . . . . . . . . . . . . . . . . . . . . . . . .
Telecom Network Approvals . . . . . . . . . . . . . . . . . . . . . . . . . . . . . . . . . . . . . . . . . . . . . . . .
U.S. Regulations Governing the Use of Modems . . . . . . . . . . . . . . . . . . . . . . . . . . . . . . . .
Ringer Equivalence Number (REN) . . . . . . . . . . . . . . . . . . . . . . . . . . . . . . . . . . . . . . . . .
Telephone Consumer Protection Act of 1991 . . . . . . . . . . . . . . . . . . . . . . . . . . . . . . . . . . .
Canadian Regulations Governing the Use of Modems . . . . . . . . . . . . . . . . . . . . . . . . . . . .
U.K. BABT Users Notice . . . . . . . . . . . . . . . . . . . . . . . . . . . . . . . . . . . . . . . . . . . . . . . . . . .
Telephone Network Connection . . . . . . . . . . . . . . . . . . . . . . . . . . . . . . . . . . . . . . . . . . .
Auto Dialing with the Modem . . . . . . . . . . . . . . . . . . . . . . . . . . . . . . . . . . . . . . . . . . . . .
Benutzerhinweise für besondere Bestimmungen in Österreich . . . . . . . . . . . . . . . . . . . .
Hinweis für die Benutzung in osterreich . . . . . . . . . . . . . . . . . . . . . . . . . . . . . . . . . . . . .
Wahlsperre. . . . . . . . . . . . . . . . . . . . . . . . . . . . . . . . . . . . . . . . . . . . . . . . . . . . . . . . . . .
Benutzerhinweise für besondere Bestimmungen in Deutschland . . . . . . . . . . . . . . . . . .
Hinweis für die Benutzung in der Bundesrepublik Deutschland. . . . . . . . . . . . . . . . . . . .
Brugerinstruktioner i overensstemmelse med danske krav . . . . . . . . . . . . . . . . . . . . . . .
Opkaldskoder P og T . . . . . . . . . . . . . . . . . . . . . . . . . . . . . . . . . . . . . . . . . . . . . . . . . . .
Contents
7-1
7-2
7-2
7-2
7-3
7-3
7-3
7-4
7-4
7-4
7-5
7-6
7-7
7-7
7-8
7-9
7-9
7-9
7-9
7-9
7-9
7-9
v
Speciale gebruiksinstructies voor Nederland . . . . . . . . . . . . . . . . . . . . . . . . . . . . . . . . .
Aansluitfactor. . . . . . . . . . . . . . . . . . . . . . . . . . . . . . . . . . . . . . . . . . . . . . . . . . . . . . . .
Wachten op kiestoon . . . . . . . . . . . . . . . . . . . . . . . . . . . . . . . . . . . . . . . . . . . . . . . . . .
Handenvrij bellen . . . . . . . . . . . . . . . . . . . . . . . . . . . . . . . . . . . . . . . . . . . . . . . . . . . . .
Användarinstruktioner i överensstämmelse med svenska krav
Uppringningskod P och T. . . . . . . . . . . . . . . . . . . . . . . . . . . . . . . . . . . . . . . . . . . . . . . . . .
New Zealand Modem Statements . . . . . . . . . . . . . . . . . . . . . . . . . . . . . . . . . . . . . . . . . . .
Safety . . . . . . . . . . . . . . . . . . . . . . . . . . . . . . . . . . . . . . . . . . . . . . . . . . . . . . . . . . . . .
Batteries . . . . . . . . . . . . . . . . . . . . . . . . . . . . . . . . . . . . . . . . . . . . . . . . . . . . . . . . . . .
Using the Computer . . . . . . . . . . . . . . . . . . . . . . . . . . . . . . . . . . . . . . . . . . . . . . . . . . .
Energy Compliance . . . . . . . . . . . . . . . . . . . . . . . . . . . . . . . . . . . . . . . . . . . . . . . . . . .
7-10
7-10
7-10
7-10
7-10
7-11
7-12
7-12
7-13
7-14
Glossary
Index
vi
Contents
Chapter 1
Welcome
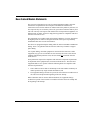
Thank you for buying a Compaq Internet PC
With this purchase, you are a part of the next generation of PC users, people who
demand the latest in PC technology. Whether you use your computer for business or
pleasure, or both, you are sure to hit the ground running with this feature-packed PC.
There are four unique guides provided with your new PC:
1.
Getting Started Guide
2.
Reference Guide
3.
Service and Support Guide
4.
Safety and Comfort Guide
Together, they provide the following:
◆
◆
◆
information about the features of your new PC
hints and tips to make computing easier
information needed to replace or add components to your PC
Please take a few moments to familiarize yourself with the contents of the guides.
Doing so will make it easier to find the necessary information at the turn of a page.
Welcome
1-1
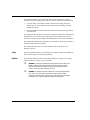
Words and Symbols to Watch For
The following words and symbols have special meaning in this guide:
*
+
`
a
HINT: Helpful hints that will make using your computer easier and faster.
NOTE: Important information concerning the operation of your Internet PC.
CAUTION: Failure to follow directions may result in equipment damage or loss of data.
WARNING: Failure to follow directions may result in bodily harm or loss of life.
Safety Tips
Your safety is important. Before performing any procedures involving the internal
components of your Internet PC, please take a few moments to read the following
Warning and Caution statements. Following the guidelines in these statements will
help to reduce the risk of personal injury or equipment damage.
a
WARNING: To reduce the risk of electric shock and damage to the equipment, do the
following:
◆Do not disable any 3-prong grounding plug. The grounding pin on a 3-prong plug is an
important safety feature. Removal of the grounding pin increases the risk of computer
damage. If you cannot fit the plug into your electrical outlet, contact an electrician for
information on having grounded outlets installed.
◆Use only grounded electrical outlets when plugging in your computer. These outlets should
be easily accessible at all times.
◆When connecting a power cord to a grounded electrical outlet, ensure that nothing rests on
the power cord.
◆Turn the computer off.
◆Unplug the computer power cord.
◆Disconnect the modem line from the telephone jack.
◆Disconnect all network cables.
◆Disconnect all cables and power cords from the computer.
1-2
Welcome
`
+
+
CAUTION: To prevent damage to the computer from electrostatic discharge, you must
become static-free before removing the cover. To become static-free, touch an unpainted
metal surface or one of the screws on the computer cover. As you work, avoid touching
exposed metal on any of the computer circuit boards.
NOTE: If you are expecting an electrical storm to pass through your area, it is a good
idea to ensure that your Internet PC is properly turned off. You should disconnect the
modem line from the telephone wall jack and remove all power cords from their
electrical outlets.
NOTE: The graphics shown in this guide may differ slightly from your Internet PC.
Special Text
The following examples explain the specially formatted text used in this guide:
Welcome
◆
Keyboard key names appear in bold type: Home, End, Backspace, Tab
◆
Keyboard keys that must be pressed at the same time to perform a task appear in
bold type with a plus sign (+) between the key names: Ctrl+Home
◆
Drives appear as capital letters: drive C
◆
Folder names appear with initial capital letters: Favorites
◆
File names appear in italics with an initial capital letter: Setup.exe
◆
Command line statements appear in lowercase bold type: a:\install
◆
Names of icons appear in bold type followed by a picture of the icon:
My Computer G icon
◆
Menu items appear in bold type: Programs, Accessories
◆
Web addresses (URLs) appear in lowercase bold type: www.compaq.com
1-3
Help!
Compaq provides you with several resources to help you learn about your
Internet PC.
Glossary
Computer terms that may be unfamiliar to you are identified in the glossary.
Index
The index in each guide is a comprehensive list of the topics covered in that guide.
Windows Help
Refer to Getting Started and Reference Guide for detailed information about
Windows Help.
Troubleshooting
The Troubleshooting section shows how to fix many common computer-related
issues. Refer to the Troubleshooting section located in the Reference Guide.
Compaq Service
and Support
Your Internet PC is equipped with several helpful programs that will aid you in
identifying and solving common computer problems. You can learn about these
programs in the Service and Support Guide.
If you need further technical support or assistance, visit the Compaq Web site at:
www.compaq.com/mypresario
Compaq technical support telephone numbers are listed in the Certificate of Warranty
included with your Internet PC.
For logging future service calls, please see the Service Diary in the Service and
Support Guide.
1-4
Welcome
Chapter 2
Features of Your Internet PC
This chapter gives you information about many of the exciting, easy-to-use features
of your Presario Internet PC.
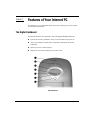
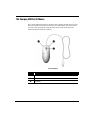
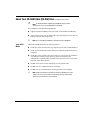
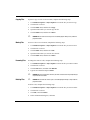
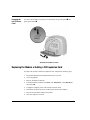
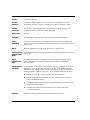
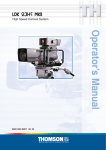
The Digital Dashboard
Your Internet PC has a new, informative tool called Digital Dashboard that will:
◆
Provide the necessary feedback to assist you in the initial setup of your PC.
◆
Alert you to changes in status such as connected or disconnected external
peripherals.
◆
Inform you of new e-mail messages.
◆
Display the exact time according to the Atomic Clock.
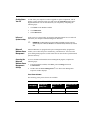
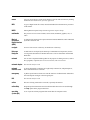
Digital Dashboard
Features of Your Internet PC
2-1
No.
Icon
Component
1
--
2
¤
3
--
LCD Screen
4
¦
Internet Alive Indicator
5
p
Sleep Mode Indicator
6
˜
Awake Indicator
7
--
PC Speaker
E-Mail Waiting Indicator
Start/Reset Button
Disclaimer: Some free Internet Service Providers, such as NetZero and AltaVista, use a unique dialer.
You must manually connect to these ISPs in order to use some features of the Digital Dashboard, such
as Synchronize Time (Atomic Clock) and E-mail Waiting.
Disclaimer: When connecting to the Internet using a Digital Subscriber Line (DSL), cable modem, or
network (LAN, HomePNA), the following Digital Dashboard functions are unavailable: Internet Alive, Email Waiting Indicator, and Clock Synchronization (Atomic Clock). Users of systems with DSL or cable
modems should check the Compaq Presario Web site periodically for updates and details to enable
Clock/Mail applications to work with these communications devices.
E-mail Waiting
Your system will periodically dial out to the Internet using Microsoft Task Scheduler
and see if you have received any new e-mail messages. Digital Dashboard will
display the user ID of the person(s) with new mail awaiting them. For example, the
dashboard may say: JBlack has Mail Waiting, MBlack has Mail Waiting.
However, when your PC is in Sleep mode, Digital Dashboard will not display the
mail-waiting message. Instead, the E-mail Waiting indicator will blink to note a new
mail message.
Disclaimer: The Digital Dashboard E-mail Waiting indicator and the e-mail message on the LCD screen
work with Post Office Protocol (POP) and Post Office Protocol-3 (POP3) e-mail servers. Please check
with your Internet Service Provider or e-mail service provider to verify that your e-mail service uses
one of these protocols. POP3 servers configured in Microsoft Outlook Express or Microsoft Outlook are
ready to be enabled in the Digital Dashboard control panel.
Internet Alive!
2-2
Digital Dashboard will also notify you that you are online. When you are connected,
the ¦ icon will glow.
Features of Your Internet PC
Reset
In the event of a system lockup, pressing the Start/Reset button for 4 seconds will
place your PC in safe mode. Pressing the button again will reactivate the computer.
`
CAUTION: Be sure to save regularly. If you don’t you will lose unsaved information.
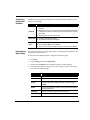
Digital Dashboard Settings
To access the settings of the Digital Dashboard, complete the following steps:
1.
Click Start, then Settings, then Control Panel.
2.
From the Control Panel, double-click Digital Dashboard.
3.
The Digital Dashboard Control Panel screen is displayed.
Digital Dashboard General Settings Tab
The Digital Dashboard Control Panel contains following tabs:
Features of Your Internet PC
❖
General Settings - allows you to enable or disable the Digital Dashboard.
❖
Internet Time - allows you to enable Internet time updates for your PC
clock.
2-3
❖
Device Detective - allows you to enable onscreen and sound notification of
added or deleted devices.
❖
E-Mail Waiting - allows you to configure how you are notified when new
e-mail arrives.
❖
Internet Alive - allows you to configure how your PC indicates that you are
online.
❖
Dial-Up Settings - allows you to select which Dial-up account to use.
Power Management
Your new Internet PC has three states of power: Standby (Sleep), Awake, and
Off (Shut down). Typically, when you finish a computing session, you can place your
PC in Sleep mode. In the event of a system lockup or if you are unplugging your PC
to upgrade components, you will need to shut down completely. The following
sections will walk you through each of these procedures.
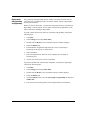
Putting Your PC
to Sleep
To put your computer into the Sleep mode, press the Sleep button 1 on your Compaq
USB Internet Keyboard. The sleep pýindicator on the Digital Dashboard will glow.
Sleep Button
Waking Your PC
2-4
To wake your computer from the Sleep mode, press the Sleep 1 button on your
Compaq USB Internet Keyboard. The Awake ˜indicator on the Digital Dashboard
will glow, indicating that the system is active.
Features of Your Internet PC
Shutting Down
Your PC
In Case of
System Lockup
To shut down your computer in order to upgrade or replace components, such as
memory or PCI expansion cards, press and release the Start/Reset button on the
Digital Dashboard. You can also shut down your computer by completing the
following steps:
1.
Click Start on the Windows taskbar.
2.
Click Shut Down.
3.
Select Shut down.
In the event of a system lockup, pressing the Start/Reset button for 4 seconds will
shut down your computer without shutting down Windows.
`
CAUTION: We recommend that you use this method of shutdown only in the event of a
system lockup since it will cause Windows to run ScanDisk and you will lose any unsaved
data.
Microsoft
Windows Power
Management
Microsoft Windows is equipped with a power management utility program that
enables you to reduce the power consumed by your Internet PC. You can set the
power management properties so that certain devices turn off after a predetermined
period of inactivity.
Accessing the
Microsoft
Windows Power
Management
Settings
To access the Microsoft Windows Power Management program, complete the
following steps:
1.
From the Windows Taskbar, click Start, point to Settings, then click
Control Panel.
2.
Double-click the Power Management æ icon. The Power Management
Properties window displays.
Preset Power Schemes
The following preset power schemes are available:
Microsoft Windows Power Schemes
Preset Option
System goes to
Standby after…
Monitor turns off
after…
Home/Office Desk 20 minutes of no activity 15 minutes of no activity
Always On
Features of Your Internet PC
Never
15 minutes of no activity
Hard disk turns off
after…
30 minutes of no activity
1 hour of no activity
2-5
+
NOTE: If you have your Internet PC connected to a network or have an “ALWAYS ON”
DSL modem, you should set the power scheme to Always On. This will prevent the
Internet PC from going into Sleep mode and breaking the network or DSL connection.
Your Internet PC power scheme is set to Home/Office Desk. Once the specified
amount of time has elapsed, the device enters Sleep mode. Components in Sleep
mode rapidly return to a fully active state once activity is detected.
Creating a Personal Power Scheme
If you find that the preset power management schemes do not fit your work habits,
you can create a personal power scheme.
To create your own personal power scheme, complete the following steps:
1.
From the Windows Taskbar, click Start, point to Settings, and then click
Control Panel.
2.
Double-click the Power Management æ icon.
3.
Complete the following steps in the Power Management Properties window:
a.
b.
c.
d.
Ensure that the Home/OfficeDesk power scheme is selected.
Click the down arrow next to System standby and select the amount of time
that passes before the computer goes into Sleep mode.
Click the down arrow next to Turn off monitor and select the amount of
time that passes before the monitor goes into Sleep mode.
Click the down arrow next to Turn off hard disks and select the amount of
time that passes before the hard drive goes into Sleep mode.
4.
Click Save As, type in a name for your personal power scheme, and click OK..
5.
Click Apply, then click OK.
Your personal power scheme is now activated.
2-6
Features of Your Internet PC
Sleep Mode
The Sleep mode is a low-power standby state that reduces the amount of electrical
power consumed by your Internet PC while you are not actively using it. Microsoft
Windows Power Management will automatically put your Internet PC into the Sleep
mode once the power scheme timers expire. Or, you may choose to activate Sleep
mode immediately by pressing the Sleep button on the keyboard or by completing the
following:
1.
Save all your work and exit all programs.
2.
From the Windows Taskbar, click Start.
3.
Select Shut Down, and then choose Stand by.
4.
Click OK.
The Awake ˜light will go off, and the Sleep pýlight will glow, indicating that
the computer is in Sleep mode.
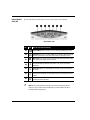
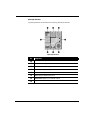
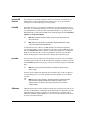
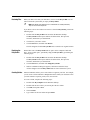
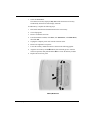
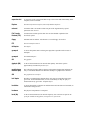
The Compaq USB Internet Keyboard
Your Compaq USB Internet Keyboard offers an assortment of Easy Access buttons
that make accessing the Internet and using your favorite software programs easier
and faster. Along with the standard computer keyboard buttons, the Internet
Keyboard provides the following:
◆
◆
◆
Multimedia buttons
Internet Button Suite
Special purpose buttons
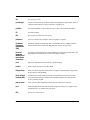
USB Internet Keyboard
Features of Your Internet PC
2-7
No.
Description
1
Multimedia Buttons
2
Internet Button Suite
3
Special Purpose Buttons
The Internet keyboard offers two USB connectors. Typically, your Compaq USB
scroll mouse will be connected to one, leaving the other open for low-powered
devices, such as a joystick or gamepad. High-powered devices or devices requiring
external power, such as cameras and scanners, should be plugged into one of the USB
connectors on the computer instead of the keyboard.
The Basics of
Keyboarding
The standard keyboard has four major types of keys:
◆
◆
◆
◆
main keys (typewriter-style)
function keys (F1 through F12)
arrow keys (← → ↑ ↓)
numeric keys (calculator-style)
Some keys have special functions when used either alone or combined with other
keys. The functions may vary depending on the programs you are using. Refer to
Help to learn how these keys can be used in combination with other keys to develop
shortcuts in your programs.
Key/Button Description
Esc
Esc exits a program, moves back one window, or cancels a command, depending on
the program you are using.
Tab
Tab forwards the cursor a designated distance.
Caps Lock
Caps Lock capitalizes all letters when typed. The Caps Lock light on the keyboard
glows when the key is active.
Shift
Shift is frequently used in combination with other keys. The effect depends on the
program you are using.
Ctrl
Control is normally used in combination with other keys. The effect depends on the
program you are using.
±
2-8
Windows opens the Start menu.
Features of Your Internet PC
Key/Button Description
Alt
Alt is frequently used in combination with other keys. By pressing Alt, the focus
moves from the cursor to the menu bar. The effect depends on the program you are
using.
F1-F12
Function keys are assigned specific tasks, depending on the program you are using.
Some tasks include shortcuts, spelling and grammar checks, and activating the
menu bar. Refer to Help for details on specific key combinations.
Backspace
Backspace moves the cursor left one space and deletes the character in that space.
)
Scroll Lock
Scroll Lock prevents automatic scrolling in some programs and allows scrolling to
be controlled by the arrow keys. The Scroll Lock light on the keyboard glows when
this key is activated. The effect depends on the program you are using.
Pause/
Break
Pause temporarily stops screen scrolling. The effect depends on the program you
are using.
Insert
Insert switches typing between insert and overtype modes. For example, after
pressing this key, new text is either inserted into the current text or replaces it.
Home
Home moves the cursor to the beginning of the text line, table cell, or document.
Home can also be used in combination with other keys.
Page Up/
Page Down
Page Up/Page Down moves the page up or down.
Delete
Delete deletes the character to the right of the cursor and moves the following text
left one space.
End
End moves the cursor to the end of the text line, table cell, or document. It can also
be used in combination with other keys.
ý← →
↑↓
NumLock
Features of Your Internet PC
Windows Application usually has the same effect as a right mouse click.
Arrow moves the cursor left, right, up, and down.
Num Lock indicates that use of the 10-key number pad will produce only numbers.
Pressing the Num Lock key on the keyboard will activate and deactivate this
function.
2-9
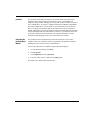
Internet Button
Suite (US)
The Internet buttons provide quick access to selected sites on the Internet.
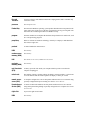
Internet Button Suite
No.
Icon
US (see next table for Canada)
1
¤
Instant E-Mail provides one-touch access for sending and reading your e-mail.
2
-
Community takes you to a predefined Web site that provides a vibrant community
experience featuring live events, discussion boards, chat and unique content.
3
$
My Presario is your instant connection to Compaq for product information, helpful
hints, performance updates, service, and more.
4
¦
Instant Internet provides your daily start point to the Internet. It connects you to a
personalized Web page filled with local weather, news, sports, and financial
information.
5
©
Instant Search accesses a default Web site that helps you locate information on
the Internet.
6
Ÿ
Entertainment Ideas is your online inside scoop on the world of entertainment
featuring music downloads, streaming video, webcasts, entertainment news and
reviews.
7
°
+
2-10
Retail Central provides an instant connection to your computer store and a variety
of leading consumer companies.
NOTE: For the Internet Button Suite to operate, you must be connected to the Internet.
Until you set up your Internet Service Provider (ISP), each Internet button will launch
the Compaq Internet Setup process.
Features of Your Internet PC
Internet Button
Suite (Canada)
No.
Icon
Canada
1
¤
Instant E-Mail provides one-touch access for sending and reading your e-mail.
2
-
Community takes you to a predefined Web site that provides a vibrant community
experience featuring live events, discussion boards, chat and unique content.
3
$
My Presario is your instant connection to Compaq for product information, helpful
hints, performance updates, service, and more.
4
¦
Instant Internet provides your daily start point to the Internet. It connects you to a
personalized Web page filled with local weather, news, sports, and financial
information.
5
©
Instant Search accesses a default Web site that helps you locate information on
the Internet.
6
Ÿ
Instant Answer provides you with a central location to obtain specific information
about your Internet PC.
°
Shopping Online takes you to an electronic shopping experience. Compaq has
partnered with several companies to provide you with the convenience of catalog
shopping at the touch of a button.
7
Features of Your Internet PC
2-11
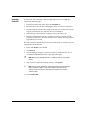
The Special
Buttons
Your Compaq USB Internet Keyboard is equipped with several special purpose
buttons that allow quick and easy access to your favorite locations.
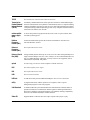
Special Purpose Buttons
No.
2-12
Icon
Component
1
²
Quick Print allows you to quickly print from a web page or a program
application, such as Microsoft Word. This button is programmable.
2
k
Launch starts Built-In Technician (US only). This button launches
Microsoft Works in Canada. This button is programmable.
3
„
Minus allows you to decrease the volume of your PC audio.
4
A
Mute button allows you to temporarily mute your PC audio.
5
…
Plus allows you to increase the volume of your PC audio.
6
p
Sleep places your computer into a low power state, as well as wakes
your computer.
7
5
Scroll Lock prevents automatic scrolling in some programs and allows
scrolling to be controlled by the arrow keys. The Scroll Lock light on the
keyboard glows when this key is activated. The effect depends on the
program you are using.
8
á
Caps Lock capitalizes all letters when typed. The Caps Lock light on the
keyboard glows when the key is active.
9
â
Num Lock indicates that use of the 10-key number pad will produce only
numbers. Pressing the Num Lock key on the keyboard will activate and
deactivate this function.
Features of Your Internet PC
Multimedia
Buttons
The Multimedia buttons allow you to easily control your multimedia devices.
Multimedia Buttons
No.
Features of Your Internet PC
Icon
Component
1
ˆ
2
‹
Rewind/Previous Track skips to the previous track.
3
Œ
Fast Forward/Next Track skips to the next track.
4
‘
Stop ends the CD or DVD playback.
5
’
Eject/Load ejects or loads the CD or DVD.
Play/Pause starts or stops CD or DVD temporarily.
2-13
Reprogramming
the Easy Access
Buttons
You can reprogram the Easy Access buttons to reflect your personal preferences.
The Easy Access Button Support ¸ icon is located on the Windows desktop
Status bar. It can be accessed by clicking Start, pointing to Programs, and choosing
Reprogram Easy Access Buttons.
+
NOTE: The Internet Easy Access buttons can only be reprogrammed to other URLs
(Web sites).
To reprogram your Easy Access buttons, complete the following steps:
1.
From the Status bar, right-click the Easy Access Button Support ¸ icon and
choose Reprogram Easy Access Buttons. The Compaq Easy Access Button
Settings window is displayed.
2.
Click the button you wish to change.
3.
Follow the instructions provided.
After you have reprogrammed the button, move the cursor over each button and your
choices will be displayed by a pop-up menu called Hover Help. Select the choice you
prefer.
Disabling and
Enabling the
Easy Access
Buttons
You can turn off all Easy Access buttons from the Easy Access Button program.
When the buttons are disabled, only the Sleep and Volume Control buttons will
operate. The Easy Access Button Support ¸ icon located on the status bar will
appear with a red X on top when it is disabled. You can still access the button
functions if you click the Easy Access Button Support ¸ icon.
To disable the Easy Access Buttons, complete the following steps:
1.
From the Status bar, right-click the Easy Access Button Support ¸ icon.
2.
Click Disable Easy Access Buttons.
To enable the Easy Access buttons, complete the following steps:
2-14
1.
From the Status bar, right-click the Easy Access Button Support ¸ icon.
2.
Click Enable Easy Access Buttons.
Features of Your Internet PC
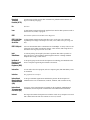
The Compaq USB Scroll Mouse
The Compaq USB scroll mouse is similar to other computer pointing devices except
that it has a small wheel button between the two mouse buttons. This wheel allows
you to save time and steps by rolling the wheel on the scroll mouse forward or
backward instead of using the scroll bar.
-
USB Scroll Mouse
No.
Features of Your Internet PC
Component
1
Left Mouse Button
2
Right Mouse Button
3
Wheel Button
2-15
Scroll Mouse
Functions
The scroll mouse offers standard mouse functions in addition to unique scrolling
functions. Basic mouse techniques that are used with any mouse include the
following:
Key/Button
Description
Click
Press and release the left mouse button once to select or highlight.
Double-click
Press and release the left mouse button twice, quickly. If you double-click too
slowly, the computer will respond as if you single-clicked.
For graphics:
1. Position the cursor over the graphic.
2. Press and hold down the left mouse button while dragging the graphic to the
new location.
3. Release the button.
Drag and drop
For text:
1. Point to the text.
2. Place the cursor inside the selected text.
3. Press and hold down the left mouse button while dragging the text to its new
location.
4. Release the button.
In menus: Point to the menu item and click.
2-16
Select
In most programs: Point to the beginning of your selection, hold down the left
mouse button, and move the cursor to the end of your selection. Release the
mouse button.
Right-click
Click the right mouse button once to produce a context-specific Shortcut menu.
Features of Your Internet PC
Scrolling and
Zooming with
the Mouse
In addition to the typical mouse functions, the scroll mouse has the ability to move
right, left, and diagonal.
Key/Button
Description
1. Open a program and press the center mouse button (wheel) that is assigned to
AutoScroll.
AutoScroll
2. Move the mouse once in the direction you want to scroll (vertically, horizontally,
or diagonally). The farther you move the cursor from the starting point, the faster
the scrolling.
3. To stop AutoScroll, press any mouse button.
Wheel Scroll
1. To scroll up, move the wheel forward.
2. To scroll down, move the wheel backward.
1. Place the mouse cursor in a program.
Zoom
2. Press and hold the Ctrl key on the keyboard.
3. To zoom in, move the wheel forward. To zoom out, move the wheel backward.
Choosing Scroll
Mouse Options
You can choose features for setting up the mouse, choosing button assignments, and
controlling cursor movements.
To access the Scroll Mouse properties, complete the following steps:
1.
Click Start.
2.
Select Settings, then click Control Panel.
3.
Double-click the Mouse icon. The Mouse Properties window displays.
4.
From the Mouse Properties window, select the settings you prefer. The settings
are listed in the following table.
.
Features of Your Internet PC
Setting
Description
Quick Setup
Allows you to reset your mouse properties to the factory defaults.
Pointers
Allows you to select different schemes to use with the pointer.
Buttons
Changes the button and wheel functions. Click the Options button to
change your mouse button assignment options. For more information,
click Help.
Motion
Sets the cursor speed and acceleration. You can also enable Smart Moves
and create a pointer trail.
Orientation
Allows you to change the angle of the mouse movement.
Devices
Allows you to add another pointing device.
2-17
Quick Launch
with CyberJump
and HyperJump
The CyberJump and HyperJump features combine commonly used tasks into one
convenient grid. CyberJump is used in an Internet window, whereas HyperJump is
used in your documents.
Before you can use this feature, you must first assign either function, CyberJump or
HyperJump, to a mouse button. You can make your left button, right button, or the
wheel work with CyberJump or HyperJump.
To assign a mouse button or the wheel to CyberJump or HyperJump, complete the
following steps:
1.
Click Start.
2.
Select Settings, then click Control Panel.
3.
Double-click the Mouse Z icon. The Mouse Properties windows displays.
4.
Select the Buttons tab.
5.
From the Button Assignments drop-down lists, choose CyberJump or
HyperJump for the respective mouse button.
6.
Open a document.
7.
Press the assigned mouse button or wheel to display the CyberJump or
HyperJump grid.
8.
Click an icon on the grid to execute a command.
To perform a double-click with the button assigned to CyberJump or HyperJump,
complete the following steps:
2-18
1.
Click Start.
2.
Select Settings, then click Control Panel.
3.
Double-click the Mouse Z icon. The Mouse Properties window displays.
4.
Select the Buttons tab.
5.
Click the Options button, select the CyberJump or HyperJump tab and select
double-click.
6.
Press and release the button quickly when using the double-click function.
Features of Your Internet PC
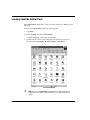
CyberJump Functions
CyberJump functions are defined in the following illustration and table.
CyberJump Functions
Features of Your Internet PC
No.
Component
1
Menu activates the CyberMenu.
2
Go to Bookmark displays the Bookmark window.
3
Add Bookmark adds current page to Bookmark window.
4
Go Back returns to previous page.
5
Vertical Scroll jumps to the vertical scroll bar.
6
Start activates the Windows Start menu.
7
Horizontal Scroll jumps to the horizontal scroll bar.
8
Stop returns to the previous page.
2-19
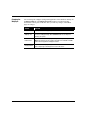
HyperJump Functions
HyperJump functions are defined in the following illustration and table.
HyperJump Functions
2-20
No.
Component
1
Menu activates the HyperMenu.
2
Minimize reduces the size of the window.
3
Close closes the window.
4
Recall returns to the last active window.
5
Vertical Scroll jumps to the vertical scroll bar.
6
Start activates the Windows Start menu.
7
Horizontal Scroll jumps to the horizontal scroll bar.
8
Resize allows you to resize the window.
Features of Your Internet PC
About Your CD-ReWritable (CD-RW) Drive (available on select models)
+
NOTE: For detailed information regarding your CD-RW drive and the just!burn
software, please refer to the CD-RW just!burn Feature Guide.
Your CD-RW drive has the following attributes:
◆
Supports standard CD-ROM, write-once CD-R, and rewritable CD-RW discs.
◆
Can be used to create your own audio CDs, share information, and save data for
backups and other data storage needs.
*
Types of CD
Media
CD-R and CD-RW media have the following features:
◆
CD-R discs can be used on nearly any computer system with a CD-ROM Drive.
◆
CD-R is recommended for creating audio discs or sharing information between
computers.
◆
CD-R discs can be written to only once. However, you can write to CD-R discs
over multiple recording sessions until you choose to finalize the disc.
(Finalization is explained under just!audio in The just!burn CD Assistant in this
section or in the online manual.)
◆
CD-RW can be used to create CD backups of your personal CDs.
◆
CD-RW discs are reusable and can be overwritten.
◆
CD-RW discs are recommended for creating personal system backups.
*
Features of Your Internet PC
HINT: For best compatibility, CD-RW discs should be played on a CD-RW drive.
HINT: Compaq recommends that the media used with your CD-RW drive is of high
quality. If you are unsuccessful with one media brand, please try another (media
quality varies from manufacturer to manufacturer).
2-21
just!burn CD
Assistant
The just!burn CD Assistant will appear whenever a blank disc is inserted into the
CD-RW Drive. From the just!burn CD Assistant screen, you are given options
allowing access to the following tools in the package.
PacketCD
PacketCD stores file to your CD-R or CD-RW disc. Selecting this option creates a
drive letter in your Windows Explorer screen. You can copy individual files and treat
your CD-RW drive just like any other removable media drive (e.g., diskette, Zip).
With PacketCD you can format CD-RW media. Formatting options include Random
CD-RW and Sequential CD-RW.
*
*
HINT: When prompted to format your media, choose the format option that best fits
your specific needs.
HINT: Total disc capacity will not be regained when deleting individual files on CD-R
and on sequentially formatted CD-RW media.
To share data stored on CD-R or CD-RW that has been formatted sequentially,
you must first finalize your disc. Right-click your mouse on the CD-RW drive letter
and select Finalize Disc. When your disc is inserted into another PC’s CD-ROM or
DVD drive for the first time, you will be prompted to install the Universal Disc
Format (UDF) program. You will not need to install UDF on the drive again.
just!audio
You can create your own audio CDs with just!audio. You may record over multiple
recording sessions to fill your CD-R disc. When the CD-R disc is complete, you must
use the Finalize option in order to play your disc in an audio CD player or CD-ROM
drive.
*
HINT: Once you have finalized your CD-R disc in just!audio, you will not be able to
write to it again.
Your disc is not automatically finalized after recording. Once you have completed
your recording session, you will be prompted to choose whether or not to finalize
your disc.
+
CD!backup
2-22
NOTE: To test the system performance, Compaq recommends using the Emulate Only
option (located in the Options window) when recording a new CD-R or using a
computer system for the first time. This allows you to perform a test run before
actually recording.
CD!backup will create personal backups of almost any CD quickly and easily. If you
only have a CD-RW drive, CD!backup will use the hard drive to temporarily store the
information until recording is complete. If your Internet PC is equipped with an
additional CD-ROM or DVD-ROM drive, you can write directly between the drives
to create a personal CD backup.
Features of Your Internet PC
just!data
You can easily create data CDs which can be read on almost any computer and
operating system with just!data. Your Internet PC can use your hard drive for
temporary storage of files, enabling you to copy from one disc to another if you have
only a CD-RW drive. If your PC is equipped with both a CD-ROM or DVD-ROM
drive and a CD-RW drive, you can choose to write data directly between the two
drives. Use these CDs instead of diskettes to transfer files from one computer to
another. Additionally, you can use just!data to back up and share MP3 files and other
compressed digital audio files with other PCs. However, you cannot play these CDs
on an audio CD player (unless audio files were copied in just!audio). For more
information about using these tools, refer to the online user’s manual.
Accessing the
just!burn User’s
Manual
The just!burn software included with your Presario Internet PC comes with a
complete online user’s manual to answer any questions you might have about the
functionality of the software with your CD-RW Drive.
To access the just!burn User’s Manual, complete the following steps:
1.
At your Windows desktop, click Start.
2.
Click Programs.
3.
Click CeQuadrat and select just!burn.
4.
From the toolbar, choose
? and select the Help option.
The online user’s manual opens automatically.
Features of Your Internet PC
2-23
Recording
Audio CDs
To achieve the best performance when recording audio CDs on a CD-RW drive,
complete the following steps:
1.
From the just!audio main menu, select the CD-ROM tab.
2.
Insert the source disc (the disc containing the tracks you want to record from).
3.
Click and drag the desired tracks (songs) to the New CD window. This step will
copy the selected tracks to a temporary file on your hard drive.
4.
When copying to the hard drive is complete, remove the source CD.
5.
Insert the destination disc (the disc you want to record to), and wait until the
content list of the source disc clears from the source window. This step will take
approximately 10 seconds.
The source window will then show previously recorded tracks, or be blank if you are
using the disc for the first time.
6.
Ensure that Declick is not checked.
7.
Click Record.
8.
Once recording is complete, you will be prompted to finalize the disc. If you
would like to add additional tracks, repeat steps 2 through 8.
+
9.
*
NOTE: When you have finalized a CD-R disc, no additional tracks can be recorded on
the disc.
Once you have completed recording your disc, click Options.
HINT: To test the system performance, Compaq recommends using the Emulate Only
option, located on the Options screen, when recording a new CD-R or using a
computer system for the first time. This allows you to perform a test run before
actually recording.
10. Select Finalize Disc.
2-24
Features of Your Internet PC
What is Buffer
Underrun?
A buffer underrun error occurs when the data flow is interrupted. This type of error
can occur on single or dual optical drive systems (CD-ROM, CD-RW, or DVD-ROM
drive).
If you experience a buffer underrun error in the just!burn application, a window will
appear offering multiple options. These options include Repeat Track, Continue
Track, Next Track, Finalize + Cancel, and Cancel. For best fidelity, we recommend
that you select Repeat Track.
+
NOTE: In extreme cases, some errors may render your disc unusable. If this occurs, it
may be necessary to start over with a new disc and then properly dispose of the old
disc.
Tips to help prevent buffer underruns:
Features of Your Internet PC
◆
Close any other open programs before starting to record.
◆
Keep the CDs, the recorder, and your source CD-ROM drive free of dust,
fingerprints, and scratches.
◆
Try a different brand of recordable disc.
2-25
Using the DVD Player (available on select models)
Compaq DVD Player Control Window
To start your DVD Player program, double-click the DVD Player · icon on your
Windows desktop.
Alternatively, you may execute the following steps:
1.
Click Start on the Windows Taskbar.
2.
Point to Programs. Select Compaq DVD Express.
3.
Click Compaq DVD Player.
+
Using a
Regionalized
DVD
NOTE: For the best playback quality, close all other applications in the background
while playing a DVD.
All models have a “regionalized” feature that limits the playback of discs to specific
geographical regions. The region code on your DVD drive must match the region
code on the disc.
Although the computer’s region code is set at the factory, your DVD drive allows you
to change the region code.
a
2-26
WARNING: You can change the region code a limited number of times. The display
will inform you how many you have remaining. The final setting change will become
the permanent region on your player.
Features of Your Internet PC
Identifying Your
Region Setting
Changing a
Region Setting
Play Settings
To identify region settings, complete the following steps:
1.
Insert a DVD into the DVD drive.
2.
Click the DVD Options button on the DVD Player control panel. The DVD
Options window opens. The selected check box under the Select DVD Region
tab indicates your computer’s current region setting.
3.
Click OK if your drive’s region setting matches the disc’s region setting.
To change the drive region, complete the following steps:
1.
Insert a DVD into the DVD drive.
2.
Click the DVD Options button on the DVD Player control panel. The DVD
Options window opens.
3.
Click the Select DVD Region tab.
4.
Select another DVD region from the displayed map or from the radio buttons so
that your drive’s region setting matches the disc’s region. After you make a
change to your drive’s region setting, the remaining number of changes allowed
on your drive is displayed.
5.
Click OK.
The DVD player has two modes or play settings. The DVD mode and the File mode.
Use the DVD mode to play a standard DVD. Use the File mode to play MPEG file
type.
To play content from the File mode, complete the following steps:
1.
Point and click the Open ò icon on the DVD player control panel displayed on
your computer window. The list of files displays.
2.
Select the file you want to view.
3.
Click Open. The content begins playing.
Not all of the following features are available on all DVDs:
Features of Your Internet PC
◆
If the DVD player is in the File mode, the Subtitle button is disabled.
◆
If the DVD player is in the DVD mode and your disc does not have subtitle
language options, the Subtitle button is disabled.
◆
If the DVD player is in the DVD mode and your DVD has subtitle language
options, the Subtitle button is enabled.
2-27
When a DVD is inserted into the DVD drive, the features available on your DVD
player are displayed. When a particular feature is not available, the respective button
does not respond when clicked.
Display Options
You can choose how the controls and DVD content are displayed on your computer.
Viewing and hiding the DVD Player panel
To view the DVD Player panel when the DVD Content Picture window is set to
full-window size, click on the edge of the screen.
To hide the DVD Player panel, click anywhere outside the DVD panel.
Enlarging and reducing the view
To enlarge the DVD Content Picture window to full-window size, press Esc.
To return to a smaller window, press Esc.
Hiding the taskbar
To hide the Windows Taskbar while you view DVD content in full-screen mode,
complete the following steps:
2-28
1.
From the Windows Taskbar click Start.
2.
Point to Settings, then click Taskbar. The Taskbar Options window displays.
3.
To enable an option, click the checkbox. To disable an option, clear the
checkbox.
4.
Deselect the Always on top checkbox.
5.
Check the Auto hide checkbox.
Features of Your Internet PC
On-screen
Control Buttons
The DVD on-screen control buttons are as described in the table below.
Button
Name
Description
.
Open
Displays a list of files for playback.
’
Eject
Opens the DVD drive to load or remove discs.
6
DVD Options
Displays the DVD Options menu for selecting Video
Display and Parental Controls.
Ž
Previous
Moves to the previous track and resumes playback.
Š
Rewind
Rewinds the content. Press Play to resume playback.
•
Stop
Stops content playback and returns to the start of the
content file.
‰
Play
Begins playback of selected content.
¬
Pause
Pauses playback. Press Pause or Play to resume
playback.
Fast Forward
Advances to a selected location. Press Play to resume
playback.
•
Next
Skips to the beginning of the next track.
)
Root Menu/
Resume
Shows what is available on the DVD for playback.
•
D
Change Subtitle Displays or changes subtitles viewed on the window. This
feature is allowed only for DVD content with subtitles. This
feature is available only when the content allows changes
to the audio track.
Change Audio
C
Features of Your Internet PC
Changes the playing audio track to another audio track
located on the DVD. Most commonly used with multilanguage content to change the spoken/heard language.
This feature is available only when the content allows
changes to the audio track.
2-29
Button
Name
Description
\
Title Menu/
Resume
Displays the main title menu to select content.
]
Change Camera Changes the camera angle of content being played. This
feature is allowed only for DVD content created using
Angle
multiple cameras and camera angles.
Karaoke mode
Toggles between left channel, right channel, and stereo
(dual mode). During left or right modes, the program turns
the microphone on. Left mode selects the left channel and
feeds it to both speakers. Right mode behaves in a similar
fashion. The stereo mode enables left and right channels
to be played through left and right speakers, respectively.
3-D Audio
Activates the 3-D Audio feature for virtual surround sound.
Volume
Increases the volume level when the bar is moved up and
decreases the volume level when the bar is moved down.
Mute
Turns off the audio. Press the Mute or Volume Control
button to resume audio.
š
Close Player
Closes the program.
¼
Minimize
Minimizes the size of the Display window of the program.
™
Help
Shows the Help file.
¨
(
õ
ª
2-30
Features of Your Internet PC
Parental Control
of DVD Viewing
In general, the Motion Picture Association of America (MPAA) rating of a DVD
movie (G, PG, PG-13, R, or NC-17) is printed on the DVD cover and documentation.
For DVD titles with parental control, a parental control code is recorded in the DVD
disk to match the MPAA rating; however, manufacturers sometimes record the wrong
parental control code on the DVD disk, which causes a mismatch between the actual
MPAA rating of the movie and that appearing on the DVD disk.
If a mismatch occurs, the DVD player will not be able to enforce the parental control
feature. It is important that DVD movie buyers test the parental control feature of
each disk before purchasing the disk to ensure that the parental control safeguard is
working properly.
The following are examples of issues with DVD disks you may encounter:
◆
◆
◆
The disk will not play if the parental control on the DVD player is set to the
MPAA rating and the parental control code embedded on the disk is higher than
the actual MPAA rating. This defect lies with the DVD movie, not with the DVD
player.
If the parental control code embedded on the DVD disk is lower than the actual
MPAA rating, the DVD player will play movies of a higher MPAA rating than
the parental control setting on the DVD player. This defect also lies with the
DVD movie, not the DVD player.
A DVD disk might not carry a parental control code, either because the movie
does not support parental control or because there is a manufacturing defect. In
general, if a DVD disk has an embedded parental control, the cover or the DVD
disk itself will call attention to this fact. The DVD player will allow titles
without parental control to play, regardless of the parental control setting.
If a DVD will not play at a specific parental control setting, you can turn off the
parental control function on the DVD player to allow the movie to play and turn
parental control on again after viewing.
Parents may wish to move DVDs without parental control encoding, or with a
control code that is lower than the MPAA rating, to a place that is inaccessible to
children.
Features of Your Internet PC
2-31
2-32
Features of Your Internet PC
Chapter 3
A Quick Overview of Microsoft
Windows
This chapter gives you information about many of the easy-to-use features of your
Internet PC and Microsoft Windows.
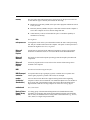
Get Organized: How To Manage Your Files
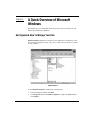
Windows Explorer displays the contents of your computer as an ordered list or tree.
You can use this program to locate, copy, move, or delete files on any drive or folder
in your computer.
Windows Explorer
To open Windows Explorer, complete the following steps:
1.
From the Windows Taskbar, click Start.
2.
Click Programs and choose Windows Explorer or right-click Start and then
click Explore.
A Quick Overview of Microsoft Windows
3-1
Storage Drives
Searching For
Files
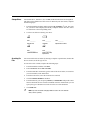
Your diskette drive, hard drive, CD, CD-RW, DVD and other drives are designated
with letters of the alphabet as well as icons. To determine your drive letters, complete
the following steps:
1.
From the Windows desktop, double-click the My Computer G icon. The icons
for your drives will be displayed in the My Computer window. The drive letters
are found next to the corresponding icons.
2.
Use the icons below to identify your drives.
H
Q
Drive ________
Drive ________
Drive ________
Diskette Drive
Hard Drive
Optional External Drive
ž
ž
Drive ________
Drive ________
CD/CD-RW/DVD Drive
Optional Secondary
Optical Drive
You can search for files or folders by entering a complete or partial name, the date the
file was created, or the file type or size.
To search for a file or folder, complete the following steps:
1.
From the Windows Taskbar, click Start.
2.
Point to Find and choose File or Folders.
3.
From the Name & Location tab, type the name of the file or folder, or as much as
you can remember, in the Named box.
4.
From the Look in box, select the location to be searched.
5.
Click the Include subfolders checkbox.
6.
From the Date tab, you can specify All Files, or Find all files and provide a time
frame in which the file was created or modified. From the Advanced tab, you can
specify the type of document to search for or the size of the document.
7.
Click Find Now.
+
3-2
NOTE: If you leave the default setting (C:), Windows searches the entire hard disk
drive (or drive C: partition).
A Quick Overview of Microsoft Windows
Copying Files
To place a copy of a file in a new location, complete the following steps:
1.
Use Windows Explorer or My Computer to locate the file you want to copy.
2.
Click the file to select it.
3.
Click the Edit menu, and then click Copy.
4.
Open the folder where you want to copy the file.
5.
Click the Edit menu, and then click Paste.
`
Moving Files
Renaming Files
CAUTION: Do not move files that are part of an installed program. Doing so may render the
program unusable.
To move a file to a new location, complete the following steps:
1.
Use Windows Explorer or My Computer to locate the file you want to move.
2.
Click the file to select it.
3.
Click the Edit menu, and then click Cut.
4.
Open the folder where you want to move the file.
5.
Click the Edit menu, and then click Paste.
To change the name of a file, complete the following steps:
1.
Use Windows Explorer or My Computer to locate the file you want to rename.
2.
Click the file to select it.
3.
Click the File menu, and then click Rename.
4.
Type the new filename and press Enter.
`
Deleting Files
CAUTION: Do not change filename extension (last three characters after the period). Doing so
may render the file unusable.
`
CAUTION: Do not delete files that are part of an installed program. Doing so may render the
program unusable.
To delete a file, complete the following steps:
1.
Use Windows Explorer or My Computer to locate the file you want to delete.
2.
Click the file to select it.
3.
Click File, and select Delete.
4.
In the confirmation dialog box, click Yes.
A Quick Overview of Microsoft Windows
3-3
Restoring Files
When you delete a file from your hard drive, it moves to the Recycle Bin. It is not
removed from the system until you empty the Recycle Bin.
+
NOTE: Files deleted from a diskette or from a network drive are erased permanently.
They are not sent to the Recycle Bin.
If you delete a file in error and need to retrieve it from the Recycle Bin, perform the
following steps:
1.
Double-click the Recycle Bin icon located on the Windows desktop.
The Recycle Bin window opens and lists all deleted files, their previous
locations, and the date you deleted them.
2.
Click the file you want to restore.
3.
Click the File menu, and then click Restore.
The file disappears from the Recycle Bin and is restored to its original location.
Emptying the
Recycle Bin
Deleted files sent to the Recycle Bin still use space on the computer’s hard-disk
drive. To free up disk space, periodically empty the Recycle Bin by performing the
following steps:
1.
Double-click the Recycle Bin icon located on the Windows desktop.
The Recycle Bin window opens and lists all deleted files, their previous
locations, and the date you deleted them.
2.
Click the File menu, and then click Empty Recycle Bin.
3.
When a confirmation dialog box appears, click Yes to delete the file(s).
All files disappear from the Recycle Bin and are removed from the system.
Creating Folders
Microsoft Windows allows you to create folders to organize your files. For example,
you can create a folder and name it Budget2000. In this folder you could store all of
your files related to expenses, profits, taxes, and so forth.
To create a folder, complete the following steps:
3-4
1.
Double-click My Computer on the Windows desktop.
2.
Double-click the drive where you want to place the new folder.
3.
Click File, then point to New.
4.
Choose Folder.
5.
Type a name for the new folder and press Enter.
A Quick Overview of Microsoft Windows
Deleting Files
and Folders
To delete a file or folder, complete the following steps:
1.
Click the file or folder you want to delete.
2.
Press the Delete key.
A confirmation dialog box is displayed.
3.
Click Yes if you want to delete the file or folder. If you do not want to delete the
file or folder click No or Cancel.
+
A Quick Overview of Microsoft Windows
NOTE: If you delete a folder, all of its contents will also be deleted
3-5
Learning about the Control Panel
The Control Panel contains many of the tools used to change how Windows looks
and works.
To access the Control Panel, perform the following steps:
1.
Click Start.
2.
Point to Settings and choose Control Panel.
A window containing system setup icons appears.
3.
Double-click an icon to see the settings that you can change for that item.
Typical icons include Display, Keyboard, Mouse, and Printers.
Control Panel Window
+
3-6
NOTE: The icons in the Control Panel vary depending on the hardware and software
configuration of your computer system. Click an icon to see a short description of its
settings.
A Quick Overview of Microsoft Windows
Setting Up
Display
Properties
The Display Properties window contains controls for customizing the way Windows
looks on your system. For example, you can change your desktop’s wallpaper
(background) and screen saver.
To access display settings, perform the following steps:
1.
Click Start.
2.
Point to Settings.
3.
Click Control Panel.
4.
Double-click the Display V icon. The Display Properties window opens with
the Background tab selected by default.
Background tab of the Display Properties Window
+
A Quick Overview of Microsoft Windows
NOTE: Depending on your monitor, you may also have fields for other display controls,
such as energy-saving features. For more information, refer to the documentation
that came with your monitor.
3-7
Changing the
Wallpaper
3-8
You can change the wallpaper (background appearance of the Windows desktop) on
the Background tab of the Display Properties window. The following table
describes the various parts of this tab. After you make any changes, click OK to
apply the changes.
Feature
Function
Preview Window
Displays the current wallpaper or pattern.
Wallpaper List
Click the name of the wallpaper you want to display, or click None if you prefer
not to use a wallpaper image. Click the Browse button to use images in a
directory you specify.
Pattern button
Click the Pattern button to display a list of patterns for your desktop, or click
None if you prefer not to use a pattern. This option is not available if the Tile
option has been applied to a wallpaper selection.
Display pulldown
Click Tile to tile a wallpaper image across the entire screen, or click Center to
place a single copy of the image in the center of the screen.
A Quick Overview of Microsoft Windows
Changing the
Screen Saver
Screen savers are programs that prevent a static image from damaging the monitor.
They start automatically after a user-defined period of inactivity.
To change your system’s screen saver, click the Screen Saver tab in the Display
Properties window. After you make any changes, click Apply, then OK to apply
them.
Screen Saver Tab of the Display Properties Window
A Quick Overview of Microsoft Windows
3-9
Shortcuts for the Desktop
Shortcuts are icons that provide quick access to frequently used programs, files,
folders, and drives. By double-clicking a shortcut, you can open its corresponding
folder or file without having to find it first. Shortcuts do not change the location of
files; if you delete a shortcut, the original file is not affected.
How Do I Create
a Shortcut?
To create a shortcut, complete the following steps:
1.
Open the My Computer window or Windows Explorer.
To open the My Computer window, double-click the My Computer G icon on
the Windows desktop. To open Windows Explorer, click Start, select Programs
and then choose Windows Explorer.
Arranging and
Positioning
Shortcuts
2.
Find the item for which you want a shortcut.
3.
Right-click the object and select Create Shortcut.
4.
Click and drag the new shortcut to the desktop.
To individually move shortcuts, position your mouse cursor over the icon, click it,
and drag it to the desired location.
To arrange all your shortcut icons at once, complete the following steps:
1.
Move your mouse cursor to an empty place on the Windows desktop, and click
the right mouse button.
2.
From the pop-up menu, choose Arrange Icons.
Click the options for the icon arrangement you prefer. The icons are automatically
arranged.
3-10
A Quick Overview of Microsoft Windows
Chapter 4
Connecting To The World
Working With Your Modem
Your Internet PC is equipped with a 56K V.90 data/fax modem. Optionally, you may
have a DSL/56K V.90/1 Mbps HomePNA/10-100 Mbps Ethernet adapter card
(available on select models). For information on the 56K V.90/1 Mbps HomePNA/
10-100 Mbps Ethernet adapter card, refer to the Home Networking Feature Guide.
Identifying Your Modem
To learn more about the modem installed on your computer, complete the following
steps:
1.
From the Windows Taskbar, click Start, point to Settings, and then click
Control Panel.
2.
Double-click the Modems I icon.
In the Modems Properties window, the names of the installed modems are displayed.
Compaq Digital
DSL/56K Modem
(available on
select models)
Your Internet PC may be equipped with a Digital DSL/56K Modem
(G.lite/G.dmt/V.90). This modem allows you to use the high-speed broadband
data communications technology known as Digital Subscriber Line (DSL).
DSL uses the bandwidth not used on standard telephone lines for data
communications.
For more information about DSL and information on how to subscribe to DSL
service, visit the following Compaq High-Speed Web site:
www.compaq.com/mypresario/highspeed
+
NOTE: Before establishing a DSL connection to the Internet, you must establish DSL
service with your telecommunications service provider and ISP.
If you choose to continue using analog technology for your Internet connections, the
56K ITU V.90 Standard is supported by your Digital DSL/56K Modem. Connection
speeds vary based on the type of service available from your ISP and on telephone
line conditions.
Connecting To The World
4-1
Using Your
Modem with the
56K ITU V.90
Standard
If DSL service is not yet available in your area, your modem is ready to operate using
the 56K ITU V.90 Standard. You will be able to download files at a rate of up to 56
Kbps over standard telephone lines.
The 56K ITU V.90 Standard enables text, sound, and video files to race to your
computer. The download rate is faster than the upload rate. The maximum download
speed is up to 56 Kbps and the maximum upload speed is up to 33.6 Kbps.
Transmission rates may vary depending on telephone line conditions.
+
NOTE: Although your modem is capable of download speeds of up to 56 Kbps, current
FCC regulations limit download speed to 53 Kbps.
Establishing an
Account with an
Internet Service
Provider
Before you can connect to an ISP using your modem, you must establish an ISP
account. Internet connection service using the 56K ITU V.90 Standard is widely
available. Contact an ISP for information on establishing an ISP account. Refer to the
Getting Started Guide for more information.
DSL Benefits
DSL service makes it possible to download large files in seconds rather than hours
using low-cost high-speed broadband data transfer technology over standard
telephone lines.
+
NOTE: To determine if DSL service is available in your area, contact your
telecommunications service provider and your ISP. If compatible DSL service is
available, you must subscribe to that service.
Additional DSL benefits include the following:
◆
Talk and surf at the same time. You can simultaneously talk on the phone,
surf the Web, and download files using a single telephone line.
◆
Increased download transfer rate. Using the Digital DSL/56K Modem, you
can download files approximately 100 times faster than with a 56K ITU
V.90-compliant modem.
◆
Increased upload transfer rate. Using the Digital DSL/56K Modem,
you can upload files at a significantly faster rate than with a 56K ITU
V.90-compliant modem.
+
4-2
NOTE: To achieve the significant data transfer speeds associated with DSL service,
your telecommunications service provider and ISP must provide the type of DSL
service that is compatible with your modem.
Connecting To The World
◆
+
Using Your
Modem with
DSL Service
Constant Connection. DSL service provides constant Internet access without
the wait of dialing your ISP.
NOTE: DSL connections are designed to be “ALWAYS ON.” Therefore, please refer to
the Power Management section in this guide for information to avoid DSL
disconnections due to default Power Management operation.
If you decide to subscribe to DSL service, you must determine which modem is
installed in your computer, as well as identify the compatible DSL protocol.
Identifying your digital DSL/56K modem
To identify the type of modem that is installed in your Internet PC, complete the
following steps:
1.
From the Windows Taskbar, click Start, select Settings, and then click Control
Panel.
2.
Double-click the Modems I icon. The name of the modem displays in the
Modems Properties window.
Identifying the DSL protocol used by your modem
The Digital DSL/56K Modem supports the G.dmt (G.992.1) and G.lite (G.992.2)
protocols. The maximum download transfer rate is limited to a maximum of up to 6.0
Mbps with the G.dmt (G.992.1) protocol and 1.5 Mbps using the G.lite (G.992.2)
protocol.
Connecting To The World
4-3
Connecting Your
Digital DSL/56K
Modem
You must contact your telecommunications service provider and ISP to determine the
availability of DSL service in your area. You may be required to have an external
telephone line splitter installed at an additional cost by your telecommunications
service provider. In addition, your home telephone wiring may need to be inspected
by your telecommunications service provider (possibly at an additional cost) to
ensure that your home telephone wiring configuration will support DSL service.
Once you subscribe to Digital DSL service, visit the following Compaq Web site for
details on hooking up your modem:
www.compaq.com/mypresario/highspeed
Installing the
Digital DSL/56K
Modem Upgrade
The Digital DSL/56K Modem Setup Wizard CD contains the drivers and software
updates necessary to enable the DSL features on the Digital DSL/56K Modem.
+
NOTE: Before you can complete a DSL connection, you must contact your
telecommunications service provider and ISP for information about establishing DSL
service, as well as e-mail and Web browser settings.
To run the Digital DSL/56K Modem Setup Wizard, insert the CD into the CD drive
and close the drive door. The setup should automatically start. Follow the instructions
shown to complete the setup.
If the CD does not start within 30 seconds, complete the following steps:
1.
From the Windows Taskbar, click Start, then click Run.
2.
In the Run window, type the following: E:\setup.exe (where “E” is the letter
assigned to the CD drive).
3.
Click OK.
To access the latest Digital DSL/56K Modem updates, visit the Compaq Web site at:
www.compaq.com/mypresario/highspeed
4-4
Connecting To The World
Networking Your PCs
Connecting Your
Internet PC
to an Ethernet
Network
(available on
select models)
Your Compaq Internet PC may be equipped with a 10/100 Mbps network interface
adapter and its associated driver. For the exact location of the Ethernet connector,
refer to the Compaq Presario Quick Setup poster that came with your computer.
Setting Up a
Network
You must physically connect the computers, install the network protocols, and enable
file and print sharing.
+
If your Internet PC is equipped with a Home Phoneline network adapter, refer to the
Home Networking Feature Guide for information on setting up a Home Phoneline
network.
Hardware Requirements
To physically connect computers via an Ethernet, you must have the following:
◆
◆
◆
at least two computers with RJ-45 Ethernet connectors
a 10BaseT or 10/100 Ethernet hub
Category 5 Ethernet cable
HINT: The Network Neighborhood K icon will not appear on the Windows desktop
until the network protocols are installed.
`
CAUTION: You should never share your Windows folder or any of its subfolders or files. The
accidental deletion of any Windows file can prevent your computer from operating properly. If
you choose to share your entire hard drive carefully consider the type of access you will
allow.
Hardware Installation
Connect the computers by inserting the cable into the Ethernet connectors on each
computer. Refer to the hub manufacturer documentation for instructions on
connecting the cables to the hub.
Installing the Network Protocols
To install the necessary network protocols, complete the following steps:
Connecting To The World
1.
From the Windows Taskbar, click Start, point to Settings, then click Control
Panel.
2.
Double-click the Network L icon.
3.
When the message Your network is not complete. Do you want to continue?
is displayed, click Yes.
4-5
4.
In the Network window, the Configuration tab is displayed:
a.
b.
c.
d.
e.
f.
5.
In the Select Network Component Type window:
a.
b.
c.
d.
e.
f.
g.
h.
i.
j.
k.
4-6
Click Add.
Select Client and click Add.
Select Microsoft.
Select Client for Microsoft Networks, then click OK.
Select File and Print Sharing…, then click in both boxes to make check
marks appear.
Click OK. In the Network window, the Configuration tab displays. Click
Add.
Click Protocol.
Click Add.
Select Microsoft.
Select IPX/SPX compatible Protocol.
Click OK.
Click Add.
Click Protocol.
Click Add.
Select Microsoft.
Select TCP/IP.
Click OK.
Connecting To The World
6.
Select the Identification Tab in the Network window and complete the
following steps:
a.
b.
c.
7.
Complete the following steps:
a.
b.
c.
d.
Mapping a
Network Drive
Enter a name for the computer. This name must be unique, different from
the name of every other computer in the network. The name may contain a
maximum of 15 letters, numbers, and the following special characters:
! @ # $ % ^ & ( ) - _ ' { } ~
Do not use any blank spaces in the Computer name box.
Enter a Workgroup name. If you would like all computers to have access to
each other, the Workgroup name must be the same for all of the computers
on the network. The name may contain a maximum of 15 letters, numbers,
and the following special characters:
! @ # $ % ^ & ( ) - _ ' { } ~
Do not use any blank spaces in the Workgroup name box.
Click OK. The System Settings Change window displays. Click Yes to
restart your computer. The Microsoft Networking window is displayed.
Enter a User name. Your user name should be easy to remember since you
will use it every time you log onto your network.
Enter a Password. Typing of a password is optional. If you choose not to
type a password, leave the password box blank.
Click OK.
Document your user name and password for future reference.
8.
Close the Control Panel window.
9.
Repeat this procedure to add the next computer to the network.
If you wish to automatically access a shared folder on another computer each time
you turn on your computer and log onto the network, complete the following steps:
1.
Right-click the My Computer G icon.
2.
Click Map Network Drive. The Drive text box automatically contains the next
available drive letter.
3.
Click the down arrow located on the right side of the Path text box. Select the
path statement of the drive you wish to map. Add the exact folder location to
complete the path statement. Your path statement should look similar to the
following:
C:\My Documents\Shared Files
4.
Connecting To The World
Click the Reconnect at logon box. If the folder is password protected, you will
be prompted for the password when you log onto the network.
4-7
Sharing Folders
To prevent others on the network from accessing sensitive files on your computer,
you can set the access level on a folder by adjusting the shared files properties. The
shared properties can be changed to meet your file security needs.
File Security
Microsoft Networking enables file sharing at the folder level; that is, all the files in a
folder must be either shared or not shared. You cannot share some files in a folder and
keep others private at the same time.
If you want to share files on the network, it is recommended that you create a special
folder for these files and share only that folder. This feature provides the flexibility of
allowing file sharing while keeping secure all other programs and sensitive files on
your hard drive.
Creating a Shared Folder
To create a shared folder on the hard drive, complete the following steps:
4-8
1.
Double-click the My Computer G icon.
2.
Double-click C: (or the letter that corresponds to your hard drive).
3.
On the window menu bar, click File, point to New, then click Folder. A New
Folder displays in the window.
4.
Give the folder a name that indicates it is shared, such as Shared Files.
5.
Move the files you wish to share into this folder.
Connecting To The World
Sharing a Folder
To share the folder, complete the following steps:
1.
Locate the folder using Microsoft Windows Explorer.
2.
Right-click the folder name.
3.
Click Sharing.
4.
Click Shared As.
The folder name displays automatically in the Share Name box. If you wish,
you may change the share name.
5.
Type a comment in the Comment text box. Typing a comment is optional.
6.
Click the Access Type you wish to activate:
7.
Connecting To The World
❖
Read-Only - Others will only be able to read the files in the folder. They
will not be able to make changes to any files.
❖
Full - Others on the network will have read and write access to the file or
contents of the folder. They will be able to change or possibly delete all the
files in the shared folder.
❖
Depends on Password - You may designate a Read-Only or a Full Access
password.
Click OK.
4-9
Sharing Printers
One of the advantages of installing a network is the ability to share expensive
resources, such as a printer.
Setting Up Printer Sharing
To share a printer, complete the following steps:
1.
From the Windows Taskbar, click the Start button, point to Settings, then click
Printers.
2.
Right-click the desired printer and select Sharing.
3.
Select Shared As.
You may change the Share name, add Comments, and set a Password, if
desired.
4.
Click OK.
In the Printers window, an open hand holding the printer you shared on the
network displays.
5.
Close the Printers window.
Connecting to a Shared Printer
To connect to a shared network printer, complete the following steps:
4-10
1.
From the Windows Taskbar, click the Start button, point to Settings, and then
click Printers.
2.
Double-click the Add Printerýü icon.
The Add Printer window is displayed.
3.
Select Network Printer, then click Next.
4.
To find the network printer, click Browse.
The Browse for Printer window displays.
5.
Select the printer you want to use, then click OK.
The network printer path statement displays in the Add Printer window.
6.
If you would like to print from MS-DOS based programs, select Yes, then click
Next. If you will not be printing from MS-DOS based programs, select No, then
click Next.
7.
A message appears reminding you to put the printer online before you try
printing. Click Next.
8.
Select the printer manufacturer and model and click Next.
9.
You may either accept or change the default printer name. If you want this to be
the default printer, select Yes then click Finish. If you do not wish this to be the
default printer, select No then click Finish.
Connecting To The World
Let’s Get Digital
Introducing the
Digital Creativity
Imaging Center
(available on
select models)
The Digital Creativity Imaging Center (DCIC) (available on select models) is the
latest in digital interfaces coupled with imaging software. You can use it to perform
the following tasks:
What Is A Digital
Interface?
The DCIC is the connection point for digital equipment such as USB cameras,
camcorders, and other devices. The DCIC is made up of two Universal Serial Bus
(USB) connectors and one IEEE 1394 connector (designed to support rapid transfer
of audio and video signals).
◆
◆
◆
◆
◆
Connect digital video camcorders and videophone cameras
Input, capture, edit, and enhance full-motion video, audio, and photos
Apply special effects to videos and 3-D titling for introductions
Attach your saved files to e-mail or word-processing documents
Create a custom background for your computer desktop
Check the guidelines for your particular digital equipment to determine which
connector is required.
What is USB?
Universal Serial Bus (USB) is a peripheral bus standard that allows you to attach
peripheral devices, such as gamepads, joysticks, scanners, and printers, among many
others, to your computer, usually without having to reboot or reconfigure the system.
This plug and play ability allows for quick and easy changes of your peripheral
devices.
Visit www.compaq.com/mypresario or the USB Web site at www.usb.org for more
information.
What is 1394?
The IEEE 1394 is an easy to use, plug and play, high-speed connector that interfaces
between PCs, peripherals, and consumer electronics products. Some popular IEEE
1394 products are digital cameras, digital camcorders, digital VCRs, and digital
audio players, with many new products constantly in development.
Visit www.compaq.com/mypresario for more information.
Connecting To The World
4-11
.
The Digital Creativity Imaging Center (DCIC)
No.
1
2
4-12
Icon
W
Component
USB port (2)
1394 port (available on select models.)
Connecting To The World
Chapter 5
Quick and Easy Upgrades
Making A Good Thing Better
Your Compaq Internet PC is fully upgradable. It is designed with easy access panels
to allow quick and easy access to install new hardware.
If you would like to replace the system board or microprocessor, please consult a
Compaq Authorized Service Provider. To find the nearest service provider in your
area, visit the Compaq Web site at:
www.compaq.com
+
Quick and Easy Upgrades
NOTE: Your safety is important. Before performing any procedures involving the
installed components of your Internet PC, please take a few moments to read the
Warning and Caution statements in the Welcome section of this guide. Following the
guidelines in these statements will help to reduce the risk of personal injury or
equipment damage.
5-1
Access to the Components
Your Compaq Internet PC has been constructed using EZ Access Panels. This design
makes it simple to access the internal components. The following illustrations
demonstrate how to remove the EZ Access panels.
Removing the
Back EZ Access
Panel
To remove the back EZ Access panel, press the button on top of the panel 1 and
gently pull outward 2.
Removing the Back EZ Access Panel
5-2
Quick and Easy Upgrades
Installing New Hardware
If you add new hardware such as a printer or a gamepad to your computer, you may
be prompted to insert the Windows Installation CD or diskettes. If this prompt occurs,
complete the following steps:
1.
At the Add New Hardware Wizard, click Next to begin installing the drivers and
files necessary to make the new hardware work.
2.
Select the Search for the best driver for your device (Recommended) option
and click Next.
3.
Select the Specify a location option. If C:\WINDOWS\OPTIONS\CABS is
not displayed in the drop-down box, either select it from the drop-down menu or
type it in the box and click Next. The Add New Hardware Wizard will begin
installing the necessary files and drivers for the new hardware.
4.
When the Add New Hardware Wizard completes installing the files and drivers,
click Finish.
You may be prompted to restart your computer so that the new hardware can be
recognized by the system.
Quick and Easy Upgrades
5-3
Removing the
Left EZ Access
Panel
To remove the left EZ Access panel, press the button on top of the panel 1 and
gently pull outward 2.
Removing the Left EZ Access Panel
Replacing the Modem or Adding a PCI Expansion Card
To replace the modem or other PCI expansion card, complete the following steps:
5-4
1.
Read all the manufacturer documentation for the new card.
2.
Close all programs.
3.
Remove all diskettes and CDs.
4.
From the Windows Taskbar, click Start, click Shut Down, select Shut Down,
then click OK.
5.
Unplug the computer power cord from the electrical outlet.
6.
Disconnect all cables and power cords from the back of the computer.
7.
Remove the left and back EZ Access panels.
8.
Place the computer on its side.
Quick and Easy Upgrades
9.
Remove the retaining screw holding the card in place from the back.
10. Remove the modem or PCI card.
11. Carefully align the new modem or other PCI card with the PCI slot and firmly
press it in until it clicks into position.
+
NOTE: The modem should always be in the topmost slot.
12. Replace the retaining screw.
Replacing the Modem or PCI Card
13. Replace the left EZ Access panel
14. Replace the back EZ Access panel.
Replacing the
Hard Drive
Quick and Easy Upgrades
For information about replacing the hard drive, please contact a Compaq Authorized
Service Provider or refer online to the Maintenance and Service Guide.
5-5
Removing the
Right EZ Access
Panel
To remove the right EZ Access panel, press the button on top of the panel 1 and
gently pull outward 2.
Removing the Right EZ Access Panel
Adding or Replacing Memory Modules
Adding memory can improve computer and software performance. Your PC uses
PC100 SDRAM memory. Contact a Compaq Authorized Service Provider if you
need additional information on memory module purchase and installation.
To determine the amount of memory currently located on your Internet PC, perform
the following steps:
5-6
1.
From the Windows Taskbar, click Start, select Settings, and then select Control
Panel.
2.
Double-click the System M icon.
Quick and Easy Upgrades
3.
Select the General tab.
The amount of memory displayed may not include the amount of memory
automatically allocated for video display functions.
To add memory, complete the following steps:
1.
Read all the manufacturer documentation for the new memory.
2.
Close all programs.
3.
Remove all diskettes and CDs.
4.
From the Windows Taskbar, click Start, click Shut Down, select Shut Down,
then click OK.
5.
Unplug the computer power cord from the electrical outlet.
6.
Remove the right EZ Access panel.
7.
Locate the memory module and insert as shown in the following graphic.
8.
Align the new memory module 1 with the slot and firmly press it in until it
clicks into position, then push the latches 2 in to secure the memory module.
9.
Replace the EZ Access panel.
Memory Module Slots
Quick and Easy Upgrades
5-7
Reinstalling Deleted Drivers
If a driver is accidentally deleted or the operating system is reinstalled, the driver
subdirectory allows you to restore individual drivers rather than restore all the
original software. The drivers you can restore are Audio, Video, Display, Modem,
and CD-ROM.
Drivers may be reinstalled by selecting the Selective Restore option from
QuickRestore. Refer to the QuickRestore section in the Service and Support Guide
for more information on how to reinstall drivers using the Selective Restore option.
Installing Additional Software
Once you have become accustomed to using your Internet PC and have explored the
pre-installed software, you may wish to purchase and install additional software.
When selecting software for your Internet PC, make sure it states on the packaging
that it is compatible with your Microsoft Windows operating system.
*
HINT: If the software documentation contains installation instructions, use those
instructions. If not, you can complete the following steps for installing software from a
CD or diskette.
Software can be installed from a CD or a diskette or it can be downloaded from a
Web site. Many software CDs automatically begin the installation process when
placed in the CD drive. If you have a software CD that does not automatically begin
the installation process, you can install the software by using the Microsoft Windows
Add/Remove Programs utility.
5-8
Quick and Easy Upgrades
Installing
Software from a
CD or Diskette
To install software from a diskette or from a CD that does not automatically install,
complete the following steps:
1.
Close all open programs.
2.
From the Windows Taskbar, click Start, point to Settings, and then click
Control Panel.
3.
Double-click the Add/Remove Programs » icon. The Add/Remove Programs
Properties window displays. Click Install.
4.
Insert the CD or diskette into the proper drive and click Next.
Microsoft Windows will find the CD or diskette and begin the installation
process.
Installing a
Downloaded
Program File
If you choose to download software from a Web site, follow the installation
instructions that may be included on the Web page. If installation instructions are not
available, complete the steps below.
To install a program file that you have downloaded from the Internet to your hard
drive, complete the following steps:
Quick and Easy Upgrades
1.
Terminate your Internet connection.
2.
Close all open programs.
3.
From the Windows Taskbar, click Start, point to Settings, and then click
Control Panel.
4.
Double-click the Add/Remove Programs » icon. The Add/Remove Programs
Properties window displays.
5.
Click Install. The Install Program from Floppy Disk or CD-ROM window
displays.
6.
Click Next. The Run Installation Program window displays.
7.
Click Browse.
8.
Locate and select the Setup.exe or Install.exe file for the downloaded software.
9.
Click Open to begin the installation process.
5-9
5-10
Quick and Easy Upgrades
Chapter 6
Troubleshooting
This chapter provides useful information on how to identify and correct common
problems that may occur with your Internet PC.
Helpful Hints
If you encounter minor problems with your Internet PC, monitor, or software, refer to
the following list of general suggestions before taking further action:
◆
Check that the computer and monitor are plugged into a working electrical
outlet.
◆
Check to see that the computer is turned on and the power light ˜ýis on.
◆
Check to see that the monitor is turned on and the power light is on.
◆
Turn up the brightness and contrast controls of the monitor if the monitor is dim.
◆
Check all cable connections for loose or incorrect connections.
◆
Remove the diskette from the diskette drive before turning on your computer.
◆
Run Windows Diagnostics to determine and repair minor problems.
Entering BIOS (CMOS) Setup
If you need to enter the BIOS setup complete the following step:
As the computer powers on, press the F10 key while the cursor is displayed in the
upper right corner with the word COMPAQ displayed in red on a black background
(before Windows starts).
Troubleshooting Guidelines
Information in this Troubleshooting section is divided into three columns: Symptom,
Problem, and Solution. The Symptom column describes the symptom or warning for
the type of problem you are having. The Problem column identifies one or more
reasons why the symptom has occurred, and the Solution column describes what you
should do to try to fix the problem listed.
Troubleshooting
6-1
If a solution does not fix your problem, try all solutions for the symptom or try the
solution a second time.
If a problem persists and you are unable to resolve it yourself, please review the
Service and Support Guide, or contact a Compaq Authorized Service Provider. Refer
to the Certificate of Warranty for details.
+
NOTE: Some of the symptoms listed for certain troubleshooting problems will not
apply to your PC.
Troubleshooting Audio Problems
Audio
Symptom
Problem
Solution
No sound.
Speaker cables are not properly
connected.
Shut down your Internet PC using the normal Windows
shutdown procedure. Reconnect the speakers. Refer to
the Compaq Presario Quick Setup Poster for detailed
instructions.
Volume has been muted.
On the Taskbar, click the Volume ¶ icon and clear the
Mute check box.
Internet PC is in Sleep mode. This is
identified when the power status light
on the front of your Internet PC is not lit.
Press the Power button to wake your Internet PC.
Windows does not detect audio driver.
1. On the Taskbar, click Start and point to Settings.
2. Click Control Panel.
3. Double-click the System M icon.
4. Click the Device Manager tab.
5. Click the µ next to Sound, video and game
controllers, and select the installed audio driver.
6. Click the Remove button, and click OK.
7. Restart your Internet PC, and let Windows detect the
audio driver.
Sound is too low.
6-2
Not using powered speakers.
Use powered speakers
Volume has been set too low.
Click the Volume ¶ icon on the Taskbar, and click the
Volume slider bar and then drag it up, or press the
Volume Up button on your Compaq Internet Keyboard.
Troubleshooting
Audio
Symptom
Problem
Solution
Sound is distorted.
Volume is too high.
Click the Volume ¶ icon on the Taskbar. Click the
Volume slider bar and drag it down, or press the
Volume Down button on your Compaq Internet
keyboard.
Speakers may be damaged.
Call a Compaq Authorized Service Provider. See your
Certificate of Warranty for details.
Audio recordings from
digital video camera
sound is distorted.
DVD is not set up properly.
Change settings in the DVDeck program.
Audio CD or DVD does
not play.
See Troubleshooting CD or DVD Problems in this section.
Volume ¶ icon is
missing from Windows
Taskbar.
Multimedia settings have been
changed.
Troubleshooting
From the Taskbar, click Start.
Click Programs, click DVDeck, then click DVDeck.
Click the Options tab.
Click AVI Interleave Options button.
In the Interleave Factor area, change the default
setting to 4:1.
6. Click OK, and close the window.
1.
2.
3.
4.
5.
1.
2.
3.
4.
On the Taskbar, click Start.
Click Control Panel.
Double-click Multimedia.
Select the Show volume control on taskbar
option, and click OK.
6-3
Troubleshooting CD, CD-RW or DVD Problems
CD or DVD
Symptom
Problem
Solution
CD or DVD drive cannot
read a disc or takes too
long to start.
CD has been inserted upside down.
Reinsert the CD with the label facing up.
The DVD drive will take longer to start
because it has to determine the type of
media being played, such as audio or
video, before it can begin playing.
Wait at least 30 seconds to let the DVD drive
determine the type of media being played. If disc
still does not start, see the solutions for related
problems.
CD or DVD disc is dirty.
Clean CD or DVD with a CD cleaning kit, available in
most computer stores.
Windows does not detect CD or DVD
driver.
1. On the Taskbar, click Start and point to Settings.
2. Click Control Panel and double-click the
System M icon.
3. Click the Device Manager tab.
4. Click the µ next to the CD or DVD disc, and
select the installed driver.
5. Click the Remove button, and click OK twice.
6. Restart your Internet PC, and let Windows detect
the CD or DVD driver.
Wrong or poor quality media type.
1. Verify that you are using CD-R media.
2. Try a different brand of media. Quality varies
widely between manufacturers.
Trouble recording audio
CDs
6-4
Troubleshooting
Troubleshooting Diskette Drive and Zip Drive Problems
Diskette Drive or Zip Drive
Symptom
Problem
Solution
Not reading drive:
“Abort, Retry, Fail?”
message appears.
A non-formatted diskette has been
inserted.
To format the diskette, follow these steps:
“Non-system disk or
disk error” message
is displayed.
Diskette drive light
stays on.
Troubleshooting
1. Double-click the My Computer G icon on the
desktop.
2. Select the 3½ Floppy (A:) drive.
3. Click File, and point to Format.
4. Select desired options, and click Start to begin
formatting the diskette.
Diskette is damaged.
Replace the diskette with a new one.
A diskette that does not contain system
files needed to start your Internet PC has
been inserted in drive.
When drive activity stops, remove the diskette and
press the spacebar. System should start up.
System files have been damaged.
1. Insert a start-up disk in the diskette drive.
2. Restart your Internet PC.
3. At the A:\ prompt, type SYS C: and press enter.
The following message is displayed: SYSTEM
TRANSFERRED. This task will restore the system
files to your hard drive.
4. Restart your Internet PC.
Hard drive has failed.
Call a Compaq Authorized Service Provider. Refer to
your Certificate of Warranty for details.
Diskette has been improperly inserted.
Remove the diskette and reinsert the diskette as
follows: Insert the edge with the sliding cover into
the drive face up, and push all the way in until the
diskette stops.
Diskette is damaged.
Remove the diskette and insert a new diskette. If a
problem persists, run the Windows Maintenance
Wizard to repair the drive. Refer to Maintaining Your
Internet PC in the Reference Guide.
6-5
Diskette Drive or Zip Drive
Symptom
Problem
Solution
Diskette drive cannot
save information to
diskette.
Diskette is not formatted.
To format the diskette, follow these steps:
1. Double-click the My Computer G icon on the
desktop.
2. Select the 3 1/2 Floppy (A:) drive.
3. Click File, and point to Format.
4. Select desired options, and click Start to begin
formatting the diskette.
Diskette is write-protected.
Slide the write-protection tab to the unlocked
position on the diskette.
Diskette is full or file is too big.
Use another diskette or compress the file to reduce
the size.
File save command not properly executed. When saving information to the diskette drive, verify
that you are using the correct drive letter.
Diskette drive cannot
read a diskette.
Zip drive cannot read a
disk. (available on select
models)
Zip drive indicator light
continuously blinks.
(available on select
models)
6-6
Diskette is damaged.
Replace the damaged diskette.
Diskette drive has failed.
Call a Compaq Authorized Service Provider. Refer to
your Certificate of Warranty for details.
Diskette is not formatted.
To format the diskette, follow these steps:
1. Double-click the My Computer G icon on the
desktop.
2. Select the 3 1/2 Floppy (A:) drive.
3. Click File, and point to Format.
4. Select desired options, and click Start to begin
formatting the diskette.
The wrong diskette type is being used.
Check the type of drive you have and use the correct
diskette type.
Diskette drive has failed.
Call a Compaq Authorized Service Provider. Refer to
your Certificate of Warranty for details.
Windows does not detect Zip driver.
Reinstall your Zip drive driver.
Wrong disk is being used.
Verify that the disk you have inserted is a Zip disk
and is compatible with your Zip drive.
Windows is not enabled.
Zip drive cannot be used in DOS mode.
Zip disk is not inserted properly.
Push the Disk Eject button to remove disk, then
reinsert.
Troubleshooting
Troubleshooting Display (Monitor) Problems
Display
Symptom
Problem
Solution
Screen is blank and
monitor power light is
not lit.
Monitor power cable is not connected to
monitor or wall outlet.
Reconnect the monitor’s power plug on rear of
monitor and wall outlet.
Screen is blank.
Monitor is not turned on.
Press the monitor’s Power button.
Monitor connector cable is not properly
connected to rear of Internet PC.
Inspect the monitor’s video connector for bent pins. If
bent pins do not exist, reconnect the monitor
connector cable on rear of Internet PC.
Screen saver is enabled.
Press any key or move mouse to make screen
display.
Internet PC is in Sleep mode. This mode
is identified when the power status light
on the front of your Internet PC is not lit.
Press the Power button to wake your Internet PC.
If you are using a Flat-Panel Monitor
(available on select models), you may
need a Digital Video Interface and
connector.
Call a Compaq Authorized Service Provider. Refer to
your Certificate of Warranty for details.
Display fills only part of
the screen.
If you are using a Flat-Panel Monitor
(available on select models), your
resolution settings are not set properly.
On the Taskbar, click Start and point to Settings.
Click Control Panel.
Double-click Display.
Click the Settings tab.
In the Display area, click the resolution slider for
the Screen and drag it to the right. Repeat this
step for the Desktop resolution slider. Increase
the resolutions to the maximum allowable.
6. Click OK to accept the new settings.
Display is too faint.
Brightness and contrast controls are not
set properly.
Adjust the brightness and contrast controls on your
monitor.
Resolution cannot be
adjusted to desired
setting.
Windows does not detect display driver.
1. On the Taskbar, click Start and point to Settings.
2. Click Control Panel.
Troubleshooting
1.
2.
3.
4.
5.
3. Double-click the System G icon.
4. Click the Device Manager tab.
5. Click the µ next to Display Adapters and select
the installed display adapter.
6. Click the Remove button, and click OK.
7. Restart your Internet PC, and let Windows detect
the display driver.
6-7
Troubleshooting Fax Modem Problems
Fax Modem
Symptom
Problem
Solution
Cannot send or receive
faxes.
Fax modem is not connected properly.
Reconnect the fax modem, verifying the following
connections: Telephone Line to Telephone (for
external phone sets) and Telephone Line to Wall
Jack (from Internet PC to wall).
Connection has failed.
Ten-digit phone number is not properly
entered or number being dialed is not a
fax number.
Verify whether mandatory area code is included in
number being dialed or correct fax number is
being dialed.
Internet PC is turned off or third-party
program is closed.
Some third-party fax software can only be used to
receive faxes when the program is open.
Fax modem has failed.
Call a Compaq Authorized Service Provider. Refer
to your Certificate of Warranty for details.
Line connection failure.
Redial the fax number to resend the fax.
Call waiting enabled on line.
Refer to third-party software for instructions on
how to disable call waiting, or contact your local
telephone company.
Third-party fax software does not detect
the fax modem driver.
Verify that correct fax modem speed and COM port
are selected.
Fax starts to send but quits
before the transmission is
complete.
1. Click Start and point to Settings.
2. Click Control Panel and double-click
Modems.
3. Windows will detect the modem you have
installed. Click the Properties button.
4. Verify that the correct modem port is set and
the maximum speed of your modem is
selected. Reset these settings if necessary,
and click OK.
5. Close the Control Panel window.
6-8
Third-party fax software is conflicting
with another program.
Close all programs except the fax software, and
redial the fax number.
The receiver for another telephone on
the same line was picked up.
Verify that all telephone handsets on the same line
are on the receiver.
Fax machine where call is being placed
has run out of paper.
Call location where the fax is being sent, and ask
if the fax machine has paper.
Internet PC needs repair.
Call a Compaq Authorized Service Provider. Refer
to your Certificate of Warranty for details.
Troubleshooting
Troubleshooting Game Problems
Games
Symptom
Problem
Solution
Game crashes frequently.
Minimum hardware or software
requirements set by game
manufacturer have not been met.
Review the game documentation or packaging for
minimum requirements.
Game was not set up properly when
installed.
Reinstall the program, noting any settings and
default selections that pertain to your Internet PC,
and restart the game.
Incorrect version of game.
Contact game manufacturer for updated version of
game.
Graphic distortion or blank
screen exists during game’s
introduction.
Troubleshooting Hard Drive Problems
Hard Drive
Symptom
Problem
Solution
Internet PC seems to have
locked up.
Program in use has stopped responding
to commands.
Attempt a normal Windows shutdown. If this fails,
restart your Internet PC by pressing the Reset
button for 4 or more seconds to power it off. To
restart your Internet PC, press the Reset button
again.
Hard drive error message is
displayed.
Part of hard drive has failed.
Run the Windows Maintenance Wizard to repair
the drive.
Hard drive fault protection
error message is displayed.
Part of hard drive has potential to fail or
could already have failed.
Call a Compaq Authorized Service Provider. Refer
to your Certificate of Warranty for details.
Troubleshooting
6-9
Troubleshooting Internet Access Problems
Internet
Symptom
Problem
Solution
Cannot connect to the
Internet.
Internet Service Provider (ISP) account
is not set up properly.
Verify Internet settings, or contact your ISP for
assistance.
Modem is not set up properly.
Reconnect the modem, verifying the following
connections: Telephone Line to Telephone
(for external phone sets) and Telephone Line to Wall
Jack (from Internet PC to wall).
Web browser is not set up properly.
Verify that your Web browser is installed and set up
to work with your ISP.
Internet keyboard failed.
Call a Compaq Authorized Service Provider. Refer to
your Certificate of Warranty for details.
You must log in to your ISP before
some programs will start.
Log in to your ISP and launch your desired program.
Cannot automatically
launch Internet programs.
Telephone or modem line connections
Cannot use the Internet
because the fax modem is are not connected properly.
busy or no dial tone found.
Internet takes too long to
download Web sites.
Reconnect the modem, verifying the following
connections:Telephone Line to Telephone (for
external phone sets) and Telephone Line to Wall Jack
(from Internet PC to wall).
If no dial tone is found, another
telephone handset on the same line is
not on the receiver.
Verify that all telephone handsets on the same line
are on the receiver.
Messages have not been cleared from
answering service.
If you use an answering service that modifies your
telephone’s dial tone to inform you of messages,
clear all messages and try your call again.
Modem is not set up properly.
Verify that correct modem speed and COM port are
selected.
1. Click Start and point to Settings.
2. Click Control Panel and double-click Modems.
3. Windows will detect the modem you have
installed. Click the Properties button.
4. Verify that the correct modem port is set and the
maximum speed of your modem is selected.
Reset these settings if necessary, and click OK.
5. Close the Control Panel window.
For Compaq.Net technical support, dial (toll free) 1-888-874-4468
For Compaq.Net billing support, dial (toll free) 1-888-629-6920
When connecting to Compaq.Net with the 1-888 number, you will be billed a fee per minute.
6-10
Troubleshooting
Troubleshooting Keyboard and Scroll Mouse Problems
Keyboard and Scroll Mouse
Symptom
Problem
Solution
Keyboard commands
and typing are not
recognized by Internet
PC.
Keyboard connector is not properly
connected.
1.
2.
3.
4.
5.
Program in use has stopped responding to
commands.
Shut down your Internet PC using your mouse. Refer
to the problem “Keyboard connector is not properly
connected.”
Keyboard needs repair.
Call a Compaq Authorized Service Provider. Refer to
your Certificate of Warranty for details.
Mouse connector is not properly
connected.
Shut down your Internet PC using your keyboard.
Mouse does not
respond to movement
or is too slow.
Shut down your Internet PC using your mouse.
On the Taskbar, click Start.
Click Shut Down...
Select the Shut down option and click OK.
After the shutdown is complete, reconnect the
keyboard connector on the rear of your Internet
PC and restart the computer.
1. Press the Ctrl and Esc keys simultaneously.
2. From the Windows Start menu, use the arrow
keys to select Shut Down..., and press Enter.
3. Select the Shut down option (you may need to
use the arrow keys to select it).
4. Click OK.
After the shutdown is complete, reconnect the
mouse connector on the rear of your Internet PC and
restart the computer.
Mouse will only move
vertically or
horizontally.
Troubleshooting
Mouse roller ball is dirty.
Remove roller ball cover from bottom of mouse and
clean with mouse cleaning kit available in most
computer stores.
Program in use has stopped responding to
commands.
Shut down your Internet PC using your keyboard.
Refer to the problem “Mouse connector is not
properly connected” for details on how to shut down
using your keyboard.
Mouse roller ball is dirty.
Remove roller ball cover from bottom of mouse and
clean with mouse cleaning kit available in most
computer stores.
Mouse needs repair.
Replace mouse. Call a Compaq Authorized Service
Provider. See your Certificate of Warranty for details.
6-11
Troubleshooting Memory Problems
Memory
Symptom
Problem
Solution
Insufficient memory
message is displayed.
All memory in Internet PC is being used by
open programs and memory is needed for
desired task.
To avoid Windows automatically running
unnecessary programs at start up, complete the
following steps:
1.
2.
3.
4.
5.
Click Start.
Select Run.
Type MSCONFIG in the Open: field.
Click OK.
Select the Startup tab and deselect any
unnecessary programs.
Close one or more programs and retry. It may also
be necessary to restart Windows to recover memory
should this fail.
Troubleshooting Power Problems
Power
Symptom
Problem
Internet PC will not
turn on.
Line voltage selection switch is not in the
Set your line voltage selection switch to the correct
proper position for your region (115V/230V). setting for your region, or call a Compaq Authorized
Service Provider for assistance. Refer to your
Certificate of Warranty for details.
Wall outlet is bad.
6-12
Solution
Test the outlet by connecting a different electrical
device to outlet.
Troubleshooting
Power
Internet PC will not
start.
System files may have been damaged. You
will need to insert a start-up disk or
Windows Start-up disk to restart your
Internet PC.
1. Insert a start-up disk in the diskette drive.
2. Restart your Internet PC.
3. At the A:\ prompt, type SYS C: and press the
Enter key. The following message will be
displayed: SYSTEM TRANSFERRED. This task will
restore the system files to your hard drive.
4. Restart your Internet PC.
If this task does not restart your Internet PC, call a
Compaq Authorized Service Provider. Refer to your
Certificate of Warranty for details.
“Illegal Operation has
Occurred” error
message is displayed.
Wrong memory modules were used in
upgrade, or memory modules were
installed in the wrong location.
Verify the installation of memory modules by calling
a Compaq Authorized Service Provider. Refer to your
Certificate of Warranty for details.
Hard drive has been damaged.
Call a Compaq Authorized Service Provider. Refer to
your Certificate of Warranty for details.
Program being used is not Microsoftcertified for Windows.
Verify that program is certified by Microsoft
(see program packaging for this information).
Configuration files are corrupt.
If possible, save all data, close all programs, and
restart your Internet PC. If the error message returns
you may need to back up your personal data and
use the QuickRestore utility. See the Reference
Guide for details.
a
“Non-system disk or
disk error” message is
displayed.
Troubleshooting
WARNING: QuickRestore
reformats your hard drive; all files
will be lost.
A diskette that does not contain system
files needed to start your Internet PC has
been inserted in drive.
When drive activity stops, remove the diskette and
press the spacebar. Your Internet PC will start up.
Disk error has occurred.
Restart your Internet PC by pressing the Start/Reset
button. If the error returns, see the next problem
“System files have been damaged.”
System files have been damaged.
1. Insert a start-up disk in the diskette drive.
2. Restart your Internet PC.
3. At the A:\ prompt, type SYS C: and press the
Enter key. The following message will be
displayed: SYSTEM TRANSFERRED. This task will
restore the system files to your hard drive.
4. Restart your Internet PC.
Hard drive has failed.
Call a Compaq Authorized Service Provider. Refer to
your Certificate of Warranty for details.
6-13
Troubleshooting Printer Problems (see your printer manual for additional Information)
Printer
Symptom
Problem
Solution
Printer prints only in red or
colors other than black.
Printer cartridge is out of black ink.
Replace the printer cartridge.
`
CAUTION: Do not attempt to install your
printer cartridge by moving the printer
carriage manually.
1. On the Windows taskbar, click Start.
2. Click Programs.
3. Select the printer model you have installed on
your PC.
4. Select the Cartridges tab.
5. In the Cartridge pull-down menu, choose the
cartridge you want to install.
6. In the Action pull-down menu, select the action
you want.
7. Click Install/Reinstall Cartridge. The
cartridge carriage moves to the loading
position in the middle of the printer.
8. Lift the printer access door.
9. Remove the old cartridge if necessary and
install the new cartridge.
10.Close the printer access door.
11.Click Continue.
Printer seems to be printing,
but no characters appear on
the paper.
6-14
The print cartridge may be out of ink.
Replace the cartridge by following the directions
in the preceding box.
Print cartridge nozzle may be blocked.
Be sure the tape covering the nozzle of the print
cartridge has been removed.
Troubleshooting
Printer
Symptom
Problem
Solution
Poor print quality.
Cartridge may be running out of ink.
Replace cartridge by following the preceding
directions.
Cartridge nozzles may need cleaning.
1. Click Start.
2. Click Programs.
3. Select the printer model you have installed on
your PC.
4. Select Printer Control.
5. Click the Cartridges tab.
6. Select Clean Print Nozzles. The cleaning
pattern prints.
7. Follow the test instructions on the screen to
obtain satisfactory print quality.You may need
to run the test as many as three times.
8. If the print quality is not satisfactory, reinstall
the print cartridge and rerun the test.
9. If the quality is still unsatisfactory, wipe the
print cartridge nozzles.
Cartridge needs to be aligned.
1. Click Start.
2. Click Programs.
3. Select the printer model you have installed on
your PC.
4. Select Printer Control.
5. Select the Cartridges tab.
6. Click the Align Cartridges button. The
cartridge alignment page prints. Follow the
instructions on the screen to test and correct
the alignment of your print cartridge.
7. Click OK.
Troubleshooting
6-15
Printer
Symptom
Problem
Solution
Poor print quality.
Drivers are improperly installed.
Uninstall and reinstall the printer drivers.
To uninstall the printer drivers, complete the
following steps:
1.
2.
3.
4.
5.
On the Windows taskbar, click Start.
Click Programs.
Select your printer model.
Click Uninstall Drivers.
Follow the instructions on the screen.The
program will uninstall your printer drivers.
To reinstall the printer drivers, insert the Inkjet
Printer Driver CD that came with your printer
into the CD-ROM drive. On some systems the
installation program will run automatically if you
follow the instructions on the screen. To run the
setup program manually, complete the following
steps:
From the Windows taskbar, click Start.
Select Programs.
Select Windows Explorer.
Select the CD-ROM drive that contains the
printer driver CD.
5. Double click the file Setup.exe to run the setup
program.
6. Follow the instructions on the screen.
1.
2.
3.
4.
For troubleshooting assistance on your USB printer or other USB peripherals, please refer to the manufacturer’s
documentation.
We strongly recommend that you not connect your printer until after you have set up the computer, monitor, speakers,
keyboard and mouse and have completed the on-screen registration process which runs when you start the system for the
first time.
When installing USB printers or other USB devices, it is strongly recommended that you follow the manufacturer’s instructions
for loading their software and connecting their device.
6-16
Troubleshooting
Contacting Technical Support
If you were unable to fix your Internet PC using this troubleshooting section, refer to
the Certificate of Warranty, Service and Support Guide or Service and Support Card
that came with your computer for the technical support telephone numbers.
Troubleshooting
6-17
6-18
Troubleshooting
Chapter 7
Government Approvals
European Union Notice
Products with the CE marking complies with Telecommunication Terminal
Equipment and Satellite Earth Station Equipment (TTE & SES) Directive
(98/13/EC), the EMC Directive (89/336/EEC), and the Low Voltage Directive
(73/23/EEC) issued by the European Community.
Compliance with these directives implies conformity to the following European
Norms or Regulations (the equivalent international standards and regulations are in
brackets):
◆
◆
◆
◆
◆
EN55022 (CISPR 22) – Electromagnetic Interference
N50082-1 (IEC801-2, IEC801-3, IEC801-4) – Electromagnetic Immunity
EN60555-2 (IEC 555-2) – Power Line Harmonics
EN60950 (IEC950) – Product Safety
CTR21 (ETSI TBR21) – Attachment requirements for connection to the
analogue PSTNs of terminal equipment *
*Applies to modems contained in portable products only. Modems provided
in desktop and mini-tower computers are approved to National standards.
The equipment has been approved in accordance with Council Decision 98/482/EC
for pan-European single terminal connection to the Public Switched Telephone
Network (PSTN). However, due to differences between the individual PSTNs
provided in different countries, the approval does not, of itself, give an unconditional
assurance of successful operation on every PSTN network termination point. In the
event of problems, you should contact your equipment supplier in the first instance.
The equipment is designed to work with all EU telephone networks. However, the
equipment may have interworking difficulties for some connections on the EU public
networks. Dialing by loop disconnect pulses is not intended to be used on the PSTN.
This feature is only supported in consideration of PBX or other equipment that
requires pulse dialing. Network compatibility is dependent on software switch
settings that are set automatically by the country selection. The user should contact
the equipment supplier in case of difficulty in network settings.
Government Approvals
7-1
Federal Communications Commission Notice
This equipment has been tested and found to comply with the limits for a Class B
digital device pursuant to Part 15 of the FCC Rules. These limits are designed to
provide reasonable protection against harmful interference in a residential
installation. This equipment generates, uses, and can radiate radio frequency energy
and, if not installed and used in accordance with the instructions, may cause harmful
interference to radio communications. However, there is no guarantee that
interference will not occur in a particular installation. If this equipment does cause
harmful interference to radio or television reception (which can be determined by
turning the equipment off and on), the user is encouraged to try to correct the
interference by one or more of the following measures:
◆
Reorient or relocate the receiving antenna.
◆
Increase the separation between the equipment and the receiver.
◆
Connect the equipment into an outlet on a circuit different from that to which the
receiver is connected.
◆
Consult the dealer or an experienced radio or television technician for help.
Modifications
The FCC requires the user to be notified that any changes or modifications made to
this device that are not expressly approved by Compaq Computer Corporation may
void the user's authority to operate the equipment.
Cables
Connections to this device must be made with shielded cables with metallic RFI/EMI
connector hoods in order to maintain compliance with FCC Rules and Regulations.
7-2
Government Approvals
Declaration of Conformity for Products Marked with the FCC Logo
(United States Only)
This device complies with Part 15 of the FCC Rules. Operation is subject to the
following two conditions: (1) this device may not cause harmful interference, and
(2) this device must accept any interference received, including interference that may
cause undesired operation.
For questions regarding your product, call 800-652-6672 (800-OK-COMPAQ) or
contact:
Compaq Computer Corporation
P.O. Box 692000, Mail Stop 530113
Houston, Texas 77269-2000
For questions regarding this FCC declaration, call 281-514-3333 or contact:
Compaq Computer Corporation
P.O. Box 692000, Mail Stop 510101
Houston, Texas 77269-2000
To identify this product, refer to the Part, Series, or Model number found on the
product.
Canadian Notice
This Class B digital apparatus meets all requirements of the Canadian InterferenceCausing Equipment Regulations.
Avis Canadien
Cet appareil numérique de la classe B respecte toutes les exigences du Règlement sur
le matériel brouilleur du Canada.
Government Approvals
7-3
Telecom Network Approvals
These two icons and associated statements may be found on desktop and mini-tower
computers. They are intended to communicate how to access the telecommunications
regulatory approval information for your product.
As an alternative to viewing the approval information on your product, country
approval information may also be found on the Compaq Web site. To view this
approval information, visit www.compaq.com and perform a site search for the
words, “telecom network approvals.” If a selection is available for your product, you
may view and print the approval information.
U.S. Regulations Governing the Use of Modems
This equipment complies with Part 68 of the FCC rules. Located on the bottom of the
portable computers and on the modem in desktop computers is a label that contains,
among other information, the FCC Registration Number and Ringer Equivalence
Number (REN) for this equipment. Upon request, you must provide this information
to your telephone company.
Ringer
Equivalence
Number (REN)
The REN is useful to determine the quantity of devices you may connect to your
telephone line and still have all of the devices ring when your telephone number is
called. In most areas (but not all), the sum of the RENs of all devices connected to
one line should not exceed five (5.0). To be certain of the number of devices you may
connect to your telephone line, as determined by the REN, you should contact your
local telephone company to determine the maximum REN for your calling area.
The REN for the modem contained in this product does not exceed 1.0.
A FCC Compliant 6-position modular plug is provided with this equipment. This
equipment is designed to be connected to the telephone network or premises wiring
using a compatible 6-position modular jack that is FCC Part 68 Compliant.
7-4
Government Approvals
If your telephone equipment causes harm to the telephone network, the telephone
company may discontinue your service temporarily. If possible, they will notify you
in advance. However, if advance notice is not practical, you will be notified as soon
as possible. You will also be informed of your right to file a complaint with the FCC.
Your telephone company may make changes in its facilities, equipment, operations,
or procedures that could affect the proper functioning of your equipment. If they do,
you will be notified in advance to give you an opportunity to maintain uninterrupted
telephone service.
If you experience trouble with this telephone equipment, contact your local telephone
company for information on obtaining service or repairs. Your telephone company
may ask that you disconnect this equipment from the network until the problem has
been corrected or until you are sure that the equipment is not malfunctioning.
This equipment may not be used on coin service provided by the telephone company.
Connection to party lines is subject to state tariffs.
For the Compaq Customer Support Center and your nearest Compaq Authorized
Service Provider in North America, call 800-345-1518 or write:
Compaq Customer Support Center
P.O. Box 692000
Houston, Texas 77269-2000
Telephone Consumer Protection Act of 1991
The Telephone Consumer Protection Act of 1991 makes it unlawful for any person to
use a computer or other electronic device to send any message via a telephone
facsimile machine unless such message clearly contains, in a margin at the top or
bottom of each transmitted page, or on the first page of the transmission, the date and
time it is sent and an identification of the business, or entity, or individual sending the
message and the telephone number of the sending machine or such business, or
entity, or individual.
Government Approvals
7-5
Canadian Regulations Governing the Use of Modems
Notice: The Industry Canada label identifies certified equipment. This certification
means that the equipment meets certain telecommunications network protective,
operational, and safety requirements. The department does not guarantee the
equipment will operate to the user’s satisfaction.
Before installing the equipment, users should ensure that it is permissible to be
connected to the facilities of the local telecommunications company. The equipment
must also be installed using an acceptable method of connection. In some cases, the
company’s inside wiring associated with a single-line individual service may be
extended by means of a certified connector assembly (telephone extension cord). The
customer should be aware that compliance with the above conditions may not prevent
degradation of service in some situations.
Repairs to certified equipment should be made by an authorized Canadian
maintenance facility designated by the supplier. Any repairs or alterations made by
the user to this equipment, or equipment malfunctions, may give the
telecommunications company cause to request the user to disconnect the equipment.
Users should ensure for their own protection that the electrical ground connections of
the power utility, telephone lines, and internal metallic water pipe system, if present,
are connected together. This precaution may be particularly important in rural areas.
a
WARNING: Users should not attempt to make such connections themselves. Contact
the appropriate electric inspection authority or an electrician. Power and telephone
lines must always be properly grounded or physical harm may ensue.
Notice: The Ringer Equivalence Number (REN) assigned to each terminal device
provides an indication of the maximum number of terminals allowed to be connected
to a telephone interface. The termination on an interface may consist of any
combination of devices, subject only to the requirement that the sum of the Ringer
Equivalence Numbers of all the devices does not exceed 5.
The REN for the modem contained in this product does not exceed 1.0.
For the location of the authorized Canadian maintenance facility nearest you, call
800-652-6672 (800-OK-COMPAQ).
Compaq Canada, Inc.
45 Vogell Road
Richmond Hill, Ontario L4B 3P6
7-6
Government Approvals
U.K. BABT Users Notice (SupraExpress 56i Pro Global Modem - Desktop Products Only)
The modem is intended for only use in the Compaq Internet PC. For the purposes of
BABT approval, the modem is classified as a host-independent product.
Telephone
Network
Connection
The modem is suitable for connection to the Public Switched Telephone Network
(PSTN) direct exchange lines and relevant branch systems (PBXs).
A ringer equivalent number (REN) is a value given to all apparatus to be connected to
the PSTN. Its value can be taken and used to calculate the maximum number of
equipment items that can be connected in parallel without impairing the performance
of the standard bell circuit.
1.
REN = 3/n where n is the maximum number of units that may be used in parallel.
2.
The maximum REN of a line is 4; therefore, the total REN of all apparatus
connected to the line (obtained by summing the individual REN values) should
not exceed 4. This value includes any BT provided instrument, each of which is
assumed to have REN value of 1.0 unless otherwise stated. Exceeding the REN
value of 4 may cause your telephone(s) to ring weakly or not ring at all.
3.
Only one modem should be connected to a telephone line. Connecting a modem
in parallel with one or more telephone instruments is not allowed.
4.
The REN for this piece of equipment is 0.8.
5.
The exchange should provide facilities for either loop disconnect (pulse) dialing
or multifrequency (tone) dialing. The modem can be configured to operate with
either system.
6.
During dialing, this apparatus may tinkle the bells of other telephones using the
same line. This is not a fault, and we advise you not to call the Fault Repair
Service.
7.
The modem specified in this guide is for the Compaq Internet PC.
8.
This apparatus has been approved for the following facilities:
❖
❖
❖
❖
❖
❖
❖
Government Approvals
Connection to direct exchange lines providing DTMF signaling
Connection to compatible PBXs providing DTMF signaling
Operation in the absence of proceed indication, selectable by user
Call progress monitoring functions
Data modem functions
Auto-dialing functions
Auto-answering functions
7-7
Any other usage will invalidate the approval of the apparatus, if as a result, it then
ceases to conform to the standards against which approval was granted.
All apparatus connected to this modem, and thereby connected directly or indirectly
to the British Telecom Public Switched Telephone Network, must be approved
apparatus as defined in Section 22 of the British Telecommunications Act of 1984.
Although this equipment can use either loop disconnect or DTMF signaling, only the
performance of the DTMF signaling is subject to regulatory requirements for correct
operation. It is therefore strongly recommended that the equipment is set to use
DTMF signaling for access to public or private emergency services. DTMF signaling
also provides faster call set up.
The modem may not be used on extension wiring that makes use of plug pins 1 and 6.
If in doubt, advice must be obtained from a competent telecommunications engineer.
Difficulties may occasionally be experienced from other apparatus connected to the
BT PSTN via the modem apparatus. Such difficulties may include the following:
◆
◆
difficulty in making calls
problems in telephone conversion being experienced by both parties to the call
Initially, normal operation will be possible. However, changes to or modernization of
the network (taking place in the normal course of events) may result in the apparatus
being connected to a network service with which it was not designed to be
compatible. Failure of the apparatus to work under these circumstances may not be
the responsibility of the network operator.
If these difficulties occur, contact your product supplier or your Compaq Authorized
Reseller in the United Kingdom.
This device is intended for auto-answering of incoming calls. Under normal
conditions, callers will be accustomed to calls being answered within 10 seconds, and
a majority of callers will abandon calls that are not answered within 45 seconds.
Several options are available for auto-answering operation. The default setting is for
two incoming rings. This is the recommended setting for normal operation by most
computer users.
Auto Dialing
with the Modem
7-8
When entering telephone numbers, ensure that the number that appears on the screen
is correct before beginning to dial.
Government Approvals
Benutzerhinweise für besondere Bestimmungen in Österreich
Hinweis für die
Benutzung in
osterreich
Sofern Sie das SupraExpress 56i Pro global modem an einer Nebenstellenanlage
benutzen wollen, erkundigen Sie sich bitte bei Ihrem Fachhändler nach der
Möglichkeit, die Amtsholung einzustellen.
Wahlsperre
Ein Modem darf, beispielsweise im „unbeaufsichtigten Betrieb“, nicht pausenlos
dieselbe Rufnummer anwählen (Wahlsperre).
Nach zwölf erfolglosen Wählversuchen innerhalb einer Stunde gibt das Modem die
Meldung „BLACK-LISTE“ (Wahlsperre) aus. Danach ist jeder weitere Wählversuch
blockiert.
Die Wahlsperre wird wieder aufgehoben, wenn eines der drei folgenden Ereignisse
eintritt:
◆
◆
◆
Sie starten den Computers neu (reboot), oder
Ablauf einer Stunde, oder
Sie erhalten einen Anruf.
Benutzerhinweise für besondere Bestimmungen in Deutschland
Hinweis für die
Benutzung
in der
Bundesrepublik
Deutschland
Dieses Gerät ist mit einem mindestens 4-adrigen Anschlußkabel mit TAE-Stecker
mit Kodierung N ausgestattet und verfügt über weiterführende Sprechadern. Es
kann als einzige Endeinrichtung oder mit weiteren Endeinrichtungen am
Netzanschluß betrieben werden.
Weitere Endeinrichtungen, die sich an dem Telefonanschluß befinden, werden beim
Einstecken des Gerätes nicht von der Leitung getrennt. Der Stecker kann nur in
Nkodierte Anschlußdosen gesteckt werden.
Brugerinstruktioner i overensstemmelse med danske krav
Opkaldskoder
P og T
Government Approvals
Compaq-modemet SupraExpress 56i Pro global modem understøtter ikke
impulssignalering. Både opkaldskode P (impulssignalering) og T (tonesignalering)
tvinger modemet til at anvende tonesignalering.
7-9
Speciale gebruiksinstructies voor Nederland
Aansluitfactor
1.
Het modem is geschikt voor aansluiting op het openbare geschakelde
telefoonnetwerk en op (analoge) telefooncentrales binnen bedrijven en
instellingen.
2.
De aansluitfactor is een waarde die wordt toegekend aan alle apparaten die op
het openbare telefoonnetwerk kunnen worden aangesloten. Met deze waarde kan
worden berekend hoeveel apparaten maximaal parallel kunnen worden
geschakeld. De maximale aansluitfactor van een lijn is 5. De aansluitfactor van
alle apparaten die zijn aangesloten op één lijn mag daarom nooit hoger zijn
dan 5. U berekent de aansluitfactor door de waarden van de afzonderlijke
apparaten op te tellen.
3.
De aansluitfactor voor dit apparaat is 1,0.
Wachten op
kiestoon
Het modem moet altijd eerst een kiestoon ontvangen voordat wordt geprobeerd een
verbinding tot stand te brengen. Deze vereiste kan niet worden uitgeschakeld met de
opdracht ATX<n>.
Handenvrij
bellen
Handenvrij bellen is toegestaan bij gebruik van een apparte (goedgekeurtde) telefoon
set.
Användarinstruktioner i överensstämmelse med svenska krav
Uppringningskod P och T
Modemet till SupraExpress 56i Pro global modem stödjer inte pulssignalering. Både
uppringningskod P (pulssignalering) och T (tonsignalering) är jämförbara och vill
tvinga modemet att använda tonsignalering.
7-10
Government Approvals
New Zealand Modem Statements
The grant of a Telepermit for any item of terminal equipment indicates only that
Telecom has accepted that the item complies with minimum conditions for
connection to its network. It indicates no endorsement of the product by Telecom, nor
does it provide any sort of warranty. Above all, it provides no assurance that any item
will work correctly in all respects with another item of Telepermitted equipment of a
different make or model, nor does it imply that any product is compatible with all of
Telecom’s network services.
This equipment is not capable, under all operating conditions, of correct operation at
the higher speeds for which it is designed. Telecom will accept no responsibility
should difficulties arise in such circumstances.
This device is equipped with pulse dialing while the Telecom standard is DTMF tone
dialing. There is no guarantee that Telecom lines will always continue to support
pulse dialing.
Use of pulse dialing, when this equipment is connected to the same line as other
equipment, may give rise to bell tinkle or noise and may also cause a false answer
condition. Should such problems occur, the user should not contact the Telecom
Faults Service.
Some parameters required for compliance with Telecom’s Telepermit requirements
are dependent on the equipment (PC) associated with this device. The associated
equipment shall be set to operate within the following limits for compliance with
Telecom’s Specifications:
1.
There shall be no more than 10 call attempts to the same number within any 30
minute period for any single manual call initiation, and
2.
The equipment shall go on-hook for a period of not less than 30 seconds between
the end of one attempt and the beginning of the next attempt.
Where automatic calls are made to different numbers, the equipment shall go
on-hook for a period of not less than 5 seconds between the end of one attempt and
the beginning of the attempt.
Government Approvals
7-11
The equipment shall be set to ensure that calls are answered between 3 and 30
seconds of receipt of ringing (S0 set between 2 and 10). This ensures the following:
1.
A person calling your modem will hear a short burst of ringing before the
modem answers. This confirms that the call has been successfully switched
through the network.
2.
Caller identification (which occurs between the first and second ring cadences)
is not destroyed.
This equipment does not fully meet Telecom’s impedance requirements. Performance
limitations may occur when used in conjunction with some parts of the network.
Telecom will accept no responsibility should difficulties arise in such circumstances.
This equipment should not be used under any circumstances which may constitute a
nuisance to other Telecom customers.
This equipment shall not be set to make automatic calls to the Telecom 111
Emergency Service.
Safety
Safety is important when you are operating your computer. Follow the guidelines in
this section to enjoy your computing experience.
Batteries
For information about real-time clock battery replacement, contact your Compaq
Authorized Dealer, reseller, or service provider.
a
a
7-12
WARNING: Your computer is provided with a battery-powered, real-time clock circuit.
Danger of explosion and risk of personal injury exists if the battery is incorrectly
replaced or mistreated. Do not attempt to recharge the battery, disassemble it,
remove it, immerse it in water, or dispose of it in fire.
WARNING: This computer may contain a lithium-ion or nickel-metal-hydride battery
pack. There is a risk of fire and chemical burn if the battery pack is handled
improperly. Do not disassemble, crunch, puncture, or short external contacts, dispose
of in water or fire, or expose to temperatures higher than 140°F (60°C).
Government Approvals
`
a
Using the
Computer
a
a
Government Approvals
CAUTION: Do not dispose of batteries with general household waste. To dispose of them or
recycle them, use the public collection system in accordance with local regulations or return
them to Compaq, an authorized Compaq Partner, or the point-of-sale. In North America,
dispose of nickel-metal-hydride or lithium-ion batteries by taking advantage of the Compaq
battery recycling program. You will be provided with a postage-paid battery pack mailer
pre-addressed to a reclamation facility where the metals are recycled.
WARNING: Only authorized technicians trained by Compaq should attempt to repair
this equipment. All troubleshooting and repair procedures are detailed to allow only
subassembly/module-level repair. Because of the complexity of the individual boards
and subassemblies, no one should attempt to make repairs at the component level or
to make modifications to any printed wiring board. Improper repairs can create a
safety hazard.
WARNING: A very small portion of the population may experience epileptic seizures
when viewing certain kinds of flashing lights or patterns that are commonly present
in our daily environment. These persons may experience seizures while watching
some kinds of television pictures or playing certain games, including games played
on the Internet PC. Players who have not had any previous seizures may nonetheless
have an undetected epileptic condition. Consult your physician if you experience any
of the following symptoms while playing games: altered vision, muscle twitching,
other involuntary movements, loss of awareness of your surroundings, mental
confusion, or convulsions.
WARNING: Some studies have suggested that long periods of typing, improper
workstation setup, incorrect work habits, or problems in your personal health may be
linked to discomfort or serious injuries. Refer to your Safety & Comfort Guide for more
information about choosing a workspace and creating a comfortable work
environment.
7-13
Energy
Compliance
,
Agency labels are on the computer.
Energy Star Compliance
Compaq Internet PC products marked with the Energy Star Logo are compliant with
Energy Star Computers Program 2.0 standard of the U.S. Environmental Protection
Agency (EPA). The EPA Energy Star Logo does not imply endorsement by the EPA.
As an Energy Star Partner, Compaq Computer Corporation has determined that
products marked with the Energy Star Logo meet the Energy Star guidelines for
energy efficiency.
The Energy Star Computers Program was created by the EPA to promote energy
efficiency and reduce air pollution through more energy-efficient equipment in
homes, offices, and factories. Compaq products achieve this standard by reducing
power consumption when not being used. Instructions for using the energy saving
features of your computer are located in the power management section of the
documentation that came with your computer.
The power management feature of your computer is supported when used with the
following operating system: Microsoft Windows Operating System.
The power management feature, when used in conjunction with an external Energy
Star compliant monitor, will support the power-down features of the monitor. The
power management feature allows an external monitor to go into low-power mode
when the screen saver timeout occurs. To take advantage of these energy savings, the
monitor’s power management feature has been preset to power down the monitor
after a period of system inactivity. Refer to the power management section of the
documentation that came with your computer for instructions on modifying or
disabling this feature.
`
`
7-14
CAUTION: Using the Energy Save Monitor feature with non-Energy Star compliant monitors
may cause video distortion when the screen saver timeout occurs.
CAUTION: The power management feature is not compatible with some non-Compaq
bus-mastering ISA devices. Using the power management feature with some of these
devices may cause errors when the system is placed in the low power state.
Government Approvals
Glossary
American
National
Standards
Institute (ANSI)
A private, nonprofit organization that facilitates the development of national
technical standards by establishing consensus among qualified public and private
sector groups.
American
Standard Code
for Information
Interchange
(ASCII)
The code used to represent the conversion of keyboard characters into binary digits
that can be processed by the computer. See American National Standards Institute.
analog
A continuous electronic current of varying frequency. Digital data from a computer
must be converted to an analog signal by a modem before it can be transmitted over
standard telephone lines. Contrast digital.
ANSI
See American National Standards Institute.
anti-virus utility
A program that detects and in many cases repairs the damage caused by harmful
program code. See virus; utility.
application
A software program that facilitates the performance of useful work, such as a word
processing program.
ASCII
See American Standard Code for Information Interchange.
atomic clock
A Web-based service of the National Institute of Standards and Technology
synchronizing your computer-assisted clock with its precise time.
backup
A copy of one or more files for safekeeping.
Basic Input
Output System
(BIOS)
An instruction set stored on the read-only memory chip of a computer that handles
how the hardware reacts to commands from software.
binary
A number system that represents digital data and uses only the symbols 0 and 1.
Glossary
Glossary-1
BIOS
See Basic Input Output System.
bit
A unit of measurement used to describe the smallest possible piece of computer
information, represented as a binary digit. Eight bits is equal to one byte.
See byte, binary digit.
boot
To start up a computer. During the start-up process, information necessary for the
computer to operate is loaded into the memory.
browser
A program used to access and view information. See Web browser.
bug
An error in computer program code.
bulletin board
A computerized meeting and announcement system that can be accessed directly by
dialing the bulletin board system telephone number using a modem or through an ISP
connection and the Internet.
bus
The main communication path used by the components of a computer.
byte
A unit of measurement used to describe a quantity of data, equal to eight bits. A
character is one byte in size. See bit.
CAB files
(CABinet files)
Files in the Windows directory on your hard disk that contain the Microsoft Windows
operating system distribution files. These files are automatically accessed when
necessary.
cable modem
A device that provides constant Internet access through a cable Internet Service
Provider.
cache
A portion of memory where frequently used information is duplicated for the purpose
of instant access. See memory.
CardBus PC card A 32-bit PC card. See PC card.
CD
See compact disc. Compare with digital versatile disc, digital video disc.
CD-ROM
See compact disc.
central
processing unit
(CPU)
Controls the operation of a computer. Arithmetic and logic operations, as well as the
decoding and execution of instructions are performed by the central processing unit.
See chip, microprocessor.
channel
A communication path
Glossary-2
Glossary
Channel Bar
A feature of the Microsoft Windows 98 active desktop that provides single-click
access to featured Web sites.
chip
A tiny silicon wafer that contains miniature transistors and circuits. See central
processing unit, microprocessor.
client
A computer workstation on a network that has access to the data and services of a
central computer known as a server. Contrast server.
compact disc
(CD)
A circular piece of plastic that can store a maximum of 650 MB of digital data on one
side using laser technology. Types of CDs include the following:
❖
❖
CD-ROM (read only memory) contains read-only information.
CD-RW (rewritable) allows information to be saved to the disc using a
rewritable or recordable CD drive.
configure
To set up a computer or change program settings.
connector
A receptacle designed to accept the insertion of a specific cable plug, usually located
on the back of the computer or device. Some connectors are built into the front of
computers for easy access.
CPU
See central processing unit.
Creativity Action
Center
A set of easily accessible connectors situated on the front of select models of Compaq
Internet PCs.
cursor
The symbol on a computer screen that shows where the next typed character will be
displayed.
daisy chain
To add a device to the last one in a chain of IEEE-1394 devices. See IEEE-1394 High
Performance Serial Bus.
database
An organized collection of data designed to facilitate the extraction of useful
information.
DCIC
See Digital Creativity Imaging Center.
debug
To remove errors from computer program code.
dedicated line
A leased communication path that provides constant access to the Internet.
default
An automatic setting that a program uses unless alternative instructions are entered.
Glossary
Glossary-3
desktop
See Windows desktop.
desktop
computer
A personal computer designed to be set up on a desk, as opposed to an easilytransportable notebook computer. Contrast laptop computer, notebook computer.
desktop
publishing
The use of a personal computer with word processing, graphics, or page-layout
programs to produce professional-quality documents.
device driver
See driver.
dialog box
A window that is displayed when information must be entered to continue.
dial-up
networking
A method of accessing a network through a modem and a standard telephone line.
Usually refers to accessing the Internet through an Internet service provider. Contrast
dedicated line.
digital
Electrical signals that carry data in the form of bits. Contrast analog.
Digital Creativity
Imaging Center
(DCIC)
A set of easily accessible connectors situated on the front of select models of Compaq
Internet PCs.
digital
subscriber line
(DSL)
A broadband communication technology that utilizes the bandwidth not used for
voice communications on standard telephone lines for data communications.
See DSL modem.
digital versatile
disc (DVD)
A CD-sized disc (referred to as a video) capable of storing a maximum of 17 GB of
digital audio, video, or data using both sides of the disc. Also capable of storing a
maximum of 135 minutes of video, as well as the associated audio and subtitles in 8
different languages. Contrast compact disc. Types of DVDs include the following:
directory
Glossary-4
❖
DVD-ROM (read only memory) contains read-only information.
❖
DVD-R (rewritable) allows information to be recorded to the disc only once
using a rewritable DVD drive.
❖
DVD-RAM (random access memory) allows information to be saved to the disc
using a rewritable DVD drive.
❖
DVD-RW (rewritable) allows information to be saved to the disc using a
recordable DVD drive.
An area on a disk where the names and locations of files are stored.
Glossary
disc
See compact disc.
diskette
A storage device made of flexible plastic film coated with iron oxide cased in a hard
plastic shell. Also known as a 3.5" or floppy diskette. See floppy.
diskette drive
A device that enables a computer to read data from and write data to diskettes.
Disk Operating
System (DOS)
The generic name for the Microsoft Disk Operating System (MS-DOS).
DOS
See Disk Operating System.
double-click
To press the left mouse button twice in rapid succession.
download
To transfer a copy of a file from a remote computer. Contrast upload.
drive
A device that enables the reading and sometimes writing of data to a storage device.
See CD drive, diskette drive, DVD drive, hard drive, Zip drive.
driver
A program that enables the Microsoft Windows operating system to recognize and
operate devices installed in or attached to a computer, such as a PCI card or a printer.
See Plug and Play.
DSL
See digital subscriber line.
DSL modem
A device used to connect to the Internet using digital subscriber line service through
standard telephone lines. See digital subscriber line.
duplex
Describes a communication channel that is always open in both directions. In
telecommunications, it refers to the ability of both parties to transmit and receive
signals at the same time. Also known as full duplex. Compare half duplex.
DVD
See digital versatile disc.
e-mail
See electronic mail.
electronic mail
A method of sending messages and files across a network or the Internet.
enabling
software
An instruction set that must be installed before the associated hardware device can
function.
Ethernet
A family of data link protocols that specifies how data is transferred over a network.
An category 5 unshielded, twisted pair cable used to connect computers.
Glossary
Glossary-5
expansion slot
A receptacle on the system board that accepts a device that adds functionality to the
computer, such as a modem.
Explorer
See Microsoft Internet Explorer, Microsoft Windows Explorer.
extranet
An intranet that is accessible to those not part of the organization by special
permission. See intranet.
File Transfer
Protocol (FTP)
An instruction set that specifies how files are downloaded or uploaded. See
download, upload.
floppy
Informal term for diskette. Also known as 3.5-inch floppy. See diskette.
FTP
See File Transfer Protocol.
full duplex
See duplex.
gamepad
A device that permits more realistic game play than is possible with a mouse or
touchpad.
gameport
See MIDI/Gameport.
GB
See gigabyte.
gigabyte (GB)
A unit of measurement used to describe data quantity. One GB is equal to
approximately one billion bytes. See byte.
graphical user
interface (GUI)
The collection of images and text shown on the monitor display that facilitates the
entry of commands and data. The Windows desktop is a graphical user interface.
GUI
See graphical user interface.
half duplex
Describes a communication channel that is only open in a single direction at any
given time. In telecommunications, it refers to the ability of only one party to
transmit data at any given time. Compare duplex.
hard drive
A device that enables a computer to read data from and write data to a hard disk, an
internal data storage device.
hardware
The physical components of a computer.
hertz (Hz)
A unit of measurement used to describe frequency rate. One hertz is equal to one
cycle per second. See megahertz, microprocessor, refresh rate.
Glossary-6
Glossary
home
networking
Allows users to connect HPNA-certified peripheral equipment to an HPNA-certified
PC through home telephone lines. See also Home Phoneline Network Alliance
(HPNA).
Home Phoneline
Network
Alliance (HPNA)
The Home Phoneline Networking Alliance is an association of industry-leading
companies working together to ensure adoption of a single, unified phoneline
networking standard and rapidly bring to market a range of interoperable home
networking solutions.
hibernation
Applies to notebook computers only. A state of decreased power consumption. When
the notebook computer enters this state, the contents of the memory are automatically
written to the hard disk for safe storage. Your notebook computer automatically
enters hibernation if any of the following events occur:
❖
The notebook computer has been in the Sleep mode for more than one hour
(while connected to battery power only).
❖
The battery reaches the low charge state.
❖
The power button is pressed briefly while the computer is on.
hotplug
To connect or disconnect equipment, such as a PC card or USB device, without
restarting the computer.
hover help
The information that may be displayed when the mouse pointer is placed on an icon,
button, or toolbar item, such as the name of the button or an explanation of the button
function.
HTML
See Hypertext Markup Language.
HTTP
See Hypertext Transport Protocol.
hub
A switching device used to connect computers to a network.
hyperlink
Colored and underlined hypertext that when clicked provides immediate access to a
file, a specific location within a file, or a Web page. See hypertext, link.
hypertext
Specially formatted words in a document or on a Web page that serves as a link to
another location. See hyperlink, link.
Hypertext
Markup
Language
(HTML)
A standard language used for creating and publishing documents on the World Wide
Web.
Glossary
Glossary-7
Hypertext
Transport
Protocol (HTTP)
An instruction set that specifies how information is published on the Internet. See
Hypertext Markup Language.
Hz
See hertz.
icon
A small picture incorporated into the graphical user interface that represents a link or
shortcut to a file, folder, or program.
IEEE
See Institute of Electrical and Electronics Engineers.
IEEE-1394 High
Performance
Serial Bus
A Plug-and-Play digital interface that allows up to 63 devices to be connected
sequentially into a single external port. See daisy chain, IEEE-1394 port, Plug and
Play.
IEEE-1394 port
A device that transmits data at a maximum rate of 400 Mbps. A variety of devices are
supported, such as IEEE-1394 digital cameras, video cameras, and storage devices.
See IEEE-1394 High Performance Serial Bus.
Intel
VideoPhone
A software package developed by the Intel Corporation that makes it possible to
place and receive video telephone calls through the Internet or through standard
telephone lines using a video camera.
Institute of
Electrical and
Electronics
Engineers (IEEE)
A non-profit group involved in the development of technology and standards in the
areas of computer engineering and consumer electronics.
interactive
A term used to describe a program, such as a computer game, that immediately reacts
to commands.
interface
See graphical user interface.
International
Organization for
Standardization
(ISO)
A non-governmental organization established to promote the development of
standards in the areas of intellectual, scientific, technical, and economic activity.
International
Telecommunica
tion Union (ITU)
An agency of the United Nations responsible for the regulation, standardization,
coordination, and development of international telecommunications standards.
Internet
The largest decentralized computer network in the world. Every computer or network
that is linked to the Internet uses TCP/IP. See network, TCP/IP.
Glossary-8
Glossary
internet
Two or more networks connected together.
Internet
Explorer
See Microsoft Internet Explorer.
Internet
keyboard
A keyboard equipped with special buttons programmed to access the Internet, a
favorite program, or perform other frequently used tasks with a touch of a button.
Internet Service
Provider (ISP)
A business organization that provides Internet access through dial-up networking or
dedicated line access. See dial-up networking, dedicated line.
intranet
An information site usually implemented by businesses, schools, or other large
institutions designed to provide information to members of the organization. An
intranet can be thought of as a smaller, private version of the World Wide Web. See
extranet.
ISO
See International Organization for Standardization.
ISP
See Internet Service Provider.
ITU
See International Telecommunication Union.
joystick
A device that permits more realistic game play than is possible with a mouse or
touchpad.
K56flex
A data communication protocol developed by Lucent Technologies Incorporated and
Rockwell International Corporation designed to transfer data at a maximum rate of
56 Kbps over standard telephone lines using a modem. See modem, V.90 Standard.
KB
See kilobyte.
Kbps
See kilobits per second.
keyboard
The primary device used for entering alphanumeric data.
kilobits per
second (Kbps)
A unit of measurement used to describe the rate of data transfer.
kilobyte (KB)
A unit of measurement used to describe data quantity. One KB is equal to
approximately one thousand bytes. See byte.
LAN
See local area network.
Glossary
Glossary-9
LCD
See liquid crystal display.
LED
See light-emitting diode.
light-emitting
diode (LED)
A device that glows when an electric current passes through it. Status lights on
computers are often LEDs.
link
An item that provides direct access to a file, program, directory, or Web site.
See hyperlink, shortcut.
liquid crystal
display (LCD)
A type of display that uses chemicals, or liquid crystals, that respond to polarized
light and electrical signals.
listserv
See mailing list.
local area
network (LAN)
Two or more computers linked together for the purpose of sharing resources, such as
files, programs, or printers. A local area network is usually contained within a single
building. Contrast wide area network.
log on
To gain authorized access to a network or Internet service provider account by
providing a user name and password.
mailing list
A mail-forwarding service that allows subscribers to send e-mail to a single address
where the message is copied and sent to all subscribers to that particular list.
MB
See megabyte.
Mbps
See megabits per second.
megabits per
second (Mbps)
A unit of measurement used to describe the rate of data transfer.
megabyte (MB)
A unit of measurement used to describe data quantity. One MB is equal to
approximately one million bytes. See byte.
megahertz
(MHz)
A unit of measurement used to describe microprocessor speed. One megahertz is
equal to one million hertz, or one million cycles per second. See hertz.
Glossary-10
Glossary
memory
The place where data and instructions are stored for use by the processor. There are
several different types of memory that include the following:
❖
Random-access memory (RAM) is the space where programs and data are stored
as they are used.
❖
Read-only memory (ROM) is the space where data needed to run the computer is
stored. The computer can access but not change this data.
❖
Virtual memory is the use of hard disk file space to extend the capability of
random-access memory.
MHz
See megahertz.
microprocessor
An integrated circuit on the system board that contains the entire central processing
unit. May be considered the brain of the computer. The speed of a microprocessor is
measured in megahertz. See hertz, megahertz.
Microsoft
Internet
Explorer
A Web browser developed by the Microsoft Corporation; used to view hypertext
documents on intranet web sites as well as documents on the World Wide Web.
Microsoft
Windows
The family of GUI-based computer operating systems developed by the Microsoft
Corporation.
Microsoft
Windows
Explorer
A browser program used to access and view the contents of data storage drives
available to the computer.
MIDI
See Musical Instrument Digital Interface.
MIDI/Gameport
connector
A receptacle that accepts a gamepad, joystick, or similar device to permit more
realistic game play than is possible with a mouse or touchpad.
modem
(modulator/
demodulator)
A device that converts data from a digital to analog format at the originating
computer so that it can be transmitted over standard telephone lines. The modem at
the receiving end of the transmission then converts the data from analog back to
digital format so that the receiving computer can read it. See analog, digital.
motherboard
See system board.
Moving Picture
Experts Group
(MPEG)
A working group of the International Organization for Standardization (ISO),
responsible for generating data compression standards for digital video and audio
data. A family of standards used for coding audio-visual information (e.g., movies,
video, music) in a digital compressed format.
Glossary
Glossary-11
mouse
A device used to move a pointer on the display as well as make selections by clicking
the buttons. See double-click, left-click, right-click.
MP3
A type of digital audio file. Often, music downloaded from the Internet is presented
in this format.
MPEG
Moving Picture Experts Group. See Moving Picture Experts Group.
multimedia
The presence of two or more formats, such as audio, animation, graphics, text, or
video.
Musical
Instrument
Digital Interface
(MIDI)
A computer file format used to represent musical sounds. MIDI files can be identified
by the file extension .mid.
navigate
To move from one site or directory to another site or directory.
Netscape
Navigator
A Web browser developed by the Netscape Communications Corporation; used to
view hypertext documents on intranet Web sites as well as documents on the World
Wide Web.
network
Two or more computers linked together for the purpose of sharing resources, such as
files, programs, or printers. See local area network, wide area network.
network adapter See network interface card.
network
interface card
A device that enables a computer to be physically connected to, and participate in,
data communications on a network.
newsgroup
A public special-interest forum on a network similar to a bulletin board. Subscribers
can read and post messages to the newsgroup site.
NIC
See network interface card.
online
The state of being connected to a network, especially the Internet.
online Help
Program-specific information stored on the hard disk that can be accessed through
the Help option on the program menu bar.
operating
system (OS)
A set of system software programs that control how the computer works.
Glossary-12
Glossary
OS
See operating system.
parallel port
A device that transfers bits of data simultaneously through the eight separate wires in
a parallel cable. Printers are often connected to a parallel port.
partition
To format a hard disk so that it behaves as if it is two or more smaller hard disks.
PC
Personal computer.
PCI
See Peripheral Component Interconnect.
peripheral
A device connected to a computer, such as a monitor or a printer.
Peripheral
Component
Interconnect
(PCI)
A local bus capable of transferring data at a maximum rate of 132 MBps. The PCI
bus was the first bus to incorporate Plug and Play. See bus, Plug and Play.
Personal
Computer
Memory Card
International
Association
An industry group organized to promote standards for credit card-sized memory and
input/output devices that fit into a notebook or laptop computer.
pixel
One of the individual dots that make up a graphical image.
playlist
Tracks chosen for play from a CD or DVD.
Plug and Play
Refers to a device that when connected to a computer is automatically recognized by
the operating system and BIOS.
Point-to-Point
Protocol (PPP)
An instruction set that enables a computer to gain authorized access to a network
using dial-up networking, a modem, and a standard telephone line. Many Internet
service providers use PPP.
pop-up menu
A list of choices that is displayed when an item on a menu bar is selected.
port
A point through which data flows between computers or between a computer and a
peripheral device. See parallel port, serial port.
PPP
See Point-to-Point Protocol.
Glossary
Glossary-13
Presario
Treasures
A link to exclusive deals and discounts from Compaq partners and is available only
to Presario owners.
processor
See microprocessor.
Product Key
The Microsoft Windows operating system product identification code printed on the
lower right corner of the cover of the Microsoft Windows Getting Started guide. You
must enter this code during the Microsoft Windows Setup.
program
Software installed on a computer that facilitates the performance of useful work, such
as a word processing program.
proprietary
Refers to software or hardware technology owned by a company or individual that
has exclusive rights to it.
protocol
A formal standard or instruction set.
RAM
See memory.
random access
memory (RAM)
See memory.
RAS
See remote access server, Remote Access Service.
read-only
memory (ROM)
See memory.
real-time clock
(RTC)
A battery-powered clock inside your computer that keeps time even when the
computer is unplugged.
refresh rate
The number of times a monitor redraws the display, measured in hertz. A refresh rate
of 75 Hz indicates that the monitor updates its display 75 times per second.
remote access
server (RAS)
A computer configured as a server that permits authorized access to a network using
specially configured dial-up networking. See Remote Access Service.
Remote Access
Service (RAS)
A feature of Microsoft Windows NT that permits authorized access to a network
using dial-up networking through a specially configured server computer. See remote
access server.
right-click
To press the right mouse button.
ROM
See memory.
Glossary-14
Glossary
RTC
See real-time clock.
screen saver
A blank screen or a moving image that automatically is displayed after the computer
has not been used for a predetermined amount of time. Screen savers were designed
to prevent damage to the screen. As monitor technologies continue to improve and
damage is no longer a concern, screen savers are now used to provide privacy and
entertainment.
scroll mouse
A device used to move a pointer on the display as well as make selections by clicking
the buttons. The scroll mouse also has a scroll wheel located between the two mouse
buttons that allows automatic scrolling in documents.
serial port
A device that transfers data one bit at a time through a serial cable.
server
A specially configured computer running network software that provides access to
network resources for client workstation computers.
shortcut
An icon on the Windows desktop that provides a direct link to a program, directory,
or file. Shortcuts are identifiable by the small arrow located in the lower left corner of
the icon image.
Sleep mode
A low power consumption state that components of the computer enter after a
predetermined amount of time.
software
Programs that contain computer operation instructions. There are two types of
software: application software and system software. See application, operating
system.
Super Video
Graphics
Adapter (SVGA)
A video card that typically supports resolutions of 1024 x 728 pixels with over
65,000 colors. See pixel.
surf
To browse or navigate through the information on the Internet and the World Wide
Web.
surge protector
A device that protects electrical devices from brief bursts of excessive voltage.
SVGA
See Super Video Graphics Adapter.
system board
The main circuit board inside a computer. Also known as a motherboard.
taskbar
See Windows Taskbar.
Glossary
Glossary-15
TCP/IP
See Transmission Control Protocol/Internet Protocol.
Transmission
Control Protocol/
Internet Protocol
(TCP/IP)
An industry standard instruction set that specifies how data is transmitted through a
network. TCP/IP enables cross-platform communications, that is, a computer running
a Microsoft Windows operating system can access data and information provided by
a computer running a different operating system. Every computer and network that is
connected to the Internet uses TCP/IP.
uninterruptible
power supply
(UPS)
A device that provides surge protection and, in the event of a power failure, shortterm battery backup power.
Uniform
Resource
Locator (URL)
An Internet address that specifies the location of information. Also known as
Universal Resource Locator.
Universal
Resource
Locator (URL)
See Uniform Resource Locator.
Universal Serial
Bus (USB)
A Plug-and-Play bus that allows up to 127 devices to be connected sequentially into a
single external USB port. See daisy chain, USB port. A device that transmits data at a
rate of 12 Mbps through a USB cable. A variety of devices are supported, such as
USB monitors, keyboards, and printers.
upload
To send a copy of a file to a remote computer. Contrast download.
UPS
See uninterruptible power supply.
URL
See Uniform Resource Locator.
USB
See Universal Serial Bus.
USB hub
A USB device that provides additional USB ports. See Universal Serial Bus.
utility
A program that assists with the operation of a computer, such as a power
management program or anti-virus program.
V.90 Standard
A standard endorsed by the International Telecommunication Union that makes it
possible for modems to communicate without regard to technological differences.
The k56flex standard is incorporated into the V.90 standard, ensuring compatibility
between V.90-enabled and K56flex-enabled modems.
Video CD
Supports MPEG1 video that does not require separate video player to play.
Glossary-16
Glossary
videophone
See Intel VideoPhone.
virtual memory
See memory.
virus
A harmful computer program that may cause damage to data or programs. See antivirus utility.
voltage selector
switch
A slide switch on the PC that permits connection to more than one voltage input.
The switch is normally set to the correct voltage when the PC is shipped.
WAN
See wide area network.
Web
See World Wide Web.
Web browser
A program that makes it possible to access and view hypertext documents.
wide area
network
Geographically separated computers linked together for the purpose of sharing
resources, such as data. The Internet is the largest wide area network in the world.
Contrast local area network.
Windows
desktop
The work area shown on the monitor display that contains the Windows Taskbar as
well as icons that represent links to programs or shortcuts to programs and files. See
link, shortcut, Windows Taskbar.
Windows
Taskbar
A thin band that contains the Microsoft Windows Start button, the current time, as
well as icons that provide links to frequently used programs.
wizard
A utility program that automatically presents the steps necessary to complete a task,
such as installing a printer.
World Wide Web
A universal database that provides a consistent means to access large amounts of
information. Web documents facilitate the quick retrieval of information through the
use hypertext links.
www
See World Wide Web.
Zip disk
A storage device with a 100 or 250 MB capacity that is compatible with a Zip drive.
Zip drive
A device that can read and write data to a Zip disk.
Glossary
Glossary-17
Glossary-18
Glossary
Index
Numerics
1394 connector 4-11
56K modem 4-1
A
access
full 4-9
read-only 4-9
types of 4-9
Add New Hardware Wizard 5-3
Add/Remove Programs utility 5-8, 5-9
atomic clock 2-1
audio CDs
recording 2-24
Awake indicator 2-2
B
background
changing 3-8
battery
replacement 7-12
warning 7-12
buffer underrun
error 2-25
preventing 2-25
button
Community 2-11
Instant Answer 2-11
Instant E-Mail 2-11
Instant Internet 2-10
Instant Search 2-10, 2-11
Internet 2-11
Launch 2-12
Multimedia Easy Access 2-14
My Presario 2-10, 2-11
Quick Print 2-12
Retail Central 2-10
Shopping 2-11
Sleep 2-12
sleep 2-4
Start/Reset 2-2
buttons
internet 2-10
multimedia 2-7
special keyboard 2-7
C
CD
troubleshooting 6-4
CD-R 2-21
CD-ROM 2-21
CD-RW 2-21
CD-RW drive 2-21
attributes 2-21
buffer underrun error 2-25
recording audio CDs 2-24
Class B digital device limitations 7-2
Community button 2-11
Compaq Web site 1-4
Index-1
computer
connecting on a network 4-5
connecting to shared printer 4-10
features 2-1
finding files 3-1
naming for networking 4-7
networking 4-5
shutting down 2-5
upgrading 5-1
waking 2-4
connector
IEEE 1394 4-11
USB 4-11
connectors
USB 2-8
Control Panel 3-6
display 3-7
learning about 3-6
creating
folders 3-4
CyberJump 2-18
assigning to a mouse button 2-18
functions and components 2-19
D
data/fax modem 4-1
deleting
files 3-3
files or folders 3-5
desktop
background of 3-8
customizing 3-7
shortcuts 3-10
Digital Creativity Imaging Center
overview 4-11
Index-2
Digital Dashboard
Awake indicator 2-2
defined 2-1
E-Mail Waiting Indicator 2-2
features 2-1
Internet Alive 2-2
Internet Alive indicator 2-2
settings 2-3
Sleep Mode indicator 2-2
digital interface 4-11
defined 4-11
Digital Subscriber Line. See DSL/56K modem
disabling
Multimedia Easy Access buttons 2-14
diskette 6-5
troubleshooting 6-13
display controls 3-7
display options
for DVD Player 2-28
display properties
features 3-8
screen saver 3-9
setting 3-7
wallpaper 3-8
drive
storage 3-2
Zip 3-2
drivers
reinstalling deleted drivers 5-8
reinstalling using Selective Restore 5-8
restoring 5-8
types of 5-8
DSL/56K modem
benefits 4-2
hooking up 4-4
identifying protocols 4-3
identifying type 4-3
installing upgrade 4-4
service 4-2
using with 56K ITU V.90 Standard 4-2
using with DSL service 4-3
DVD Player
changing a drive region 2-27
display options 2-28
enlarging and reducing the view window 2-28
hiding the Taskbar 2-28
identifying region settings 2-27
on-screen control buttons 2-29
parental control of DVD viewing 2-31
play settings 2-27
playing content from File mode 2-27
starting 2-26
troubleshooting 6-4
viewing and hiding display 2-28
DVDs
MPAA rating 2-31
regionalized feature 2-26
E
Easy Access Buttons
disabling 2-14
e-mail
access 2-10
indicator 2-2
message indicator 2-2
notice of new 2-2
E-Mail Waiting Indicator 2-2
emptying trash 3-4
error
buffer underrun 2-25
Ethernet
connectors 4-5
hub 4-5
EZ Access panels
removing left panel 5-4
removing right panel 5-6
removing the back panel 5-2
F
fax
troubleshooting 6-8
fax modem 4-1
FCC notice 7-2
file security
on a network 4-8
files
accessing on a network 4-8
copying 3-3
deleting 3-3, 3-5
lists of 3-1
locating 3-2
managing 3-4
moving 3-3
organizing 3-4
renaming 3-3
restoring 3-4
searching for 3-2
fixing problems 6-1
flat-panel monitor
troubleshooting 6-7
folders
creating 3-4
deleting 3-5
sharing on a network 4-8
full access 4-9
function keys (F1 through F12) 2-8
G
game problems
troubleshooting 6-9
geographical setting
for DVDs 2-26
government approvals 7-1
guidelines
safety 1-2
Index-3
H
hard drive 6-9
sharing 4-5
hardware
for networks 4-5
installation for networking 4-5
installing new 5-3
Help
finding 1-4
helpful hints 6-1
hub
Ethernet 4-5
HyperJump 2-18
assigning to a mouse button 2-18
functions and components 2-20
I
icons
shortcut 3-10
IEEE 1394 connector
defined 4-11
IEEE-1394 connector 4-11
indicator
awake 2-4
e-mail waiting 2-2
online 2-2
sleep 2-4
installing software
from a CD 5-9
from a diskette 5-9
from the Internet 5-9
Instant Answer button 2-11
Instant E-Mail button 2-11
Instant Internet button 2-11
Instant Search button 2-11
Internet Alive indicator 2-2
Internet Button Suite 2-7
Internet keyboard. See keyboard
Internet PC. See computer
Index-4
Internet Service Provider
troubleshooting 6-10
Internet shopping 2-11
Internet software
installing 5-9
ISP
establishing an account 4-2
J
just!burn CD Assistant 2-22
accessing the just!burn User’s Manual 2-23
CD!backup 2-22
just!audio 2-22
just!data 2-23
PacketCD 2-22
K
keyboard 6-11
Community button 2-10, 2-11
connectors 2-8
Easy Access buttons 2-7
function keys (F1 through F12) 2-8
Instant Answer button 2-11
Instant E-Mail 2-10
Instant E-Mail button 2-11
Instant Internet button 2-10, 2-11
Instant Search button 2-10, 2-11
Internet Button Suite 2-10
internet keys 2-10
Launch button 2-12
multimedia buttons 2-7
Multimedia Easy Access buttons 2-13, 2-14
My Presario button 2-10, 2-11
Quick Print button 2-12
Retail Central button 2-10
Shopping button 2-11
Sleep button 2-12
special keys 2-8
special purpose buttons 2-12
USB 2-7
L
Launch button 2-12
LCD Screen 2-2
lockup
system 2-5
M
memory
troubleshooting 6-12
memory modules
adding or replacing 5-6
microprocessor
replacing 5-1
Microsoft Task Scheduler 2-2
Microsoft Windows
Control Panel 3-6
overview 3-1
power management 2-5
modem
connecting 4-4
digital DSL/56K 4-1
installing upgrade 4-4
learning about 4-1
properties 4-1
regulations 7-4
replacing or adding 5-4
troubleshooting 6-8
types of 4-1
using with 56K ITU V.90 Standard 4-2
using with DSL 4-3
using with ISP 4-2
V.90 standard 4-1
working with 4-1
monitor
troubleshooting 6-7
mouse 2-15
assigning CyberJump and HyperJump featues
2-18
basic techniques 2-16
connector 2-8
functions and techniques 2-16
options 2-17
scrolling and zooming 2-17
troubleshooting 6-11
USB connection 2-8
MPAA rating
on DVDs 2-31
multimedia buttons 2-7
Multimedia Easy Access buttons
disabling 2-14
enabling 2-14
My Presario button 2-11
N
name
user 4-7
networking
computer name 4-7
entering user name 4-7
setting password 4-7
workgroup name 4-7
networking PCs 4-5
accessing files 4-8
creating a shared folder 4-8
file security 4-8
hardware installation 4-5
hardware requirements 4-5
installing protocols 4-5
mapping a network drive 4-7
printer sharing 4-10
sharing folders 4-8
networking printers
setting up 4-10
Index-5
O
online indicator 2-2
P
panel
LCD 2-2
parental control
of DVD viewing 2-31
password 4-7
PC Speaker 2-2
PCI expansion card
adding or replacing 5-4
playing DVDs 2-26
from File mode 2-27
port
1394 4-12
USB 4-12
power 6-12
power management 2-4
accessing 2-5
awake mode 2-4
creating personal power scheme 2-6
for Windows 2-5
preset power schemes 2-5
shut down 2-5
sleep mode 2-4, 2-7
power state
Awake 2-4
Off 2-4
Standby 2-4
printers
connecting 4-10
sharing on a network 4-10
troubleshooting 6-14
privileges for access 4-9
problems
solving common 6-1
protocols
IPX/SPX 4-6
network 4-5
TCP/IP 4-6
Index-6
Q
Quick Print button 2-12
R
read-only access 4-9
recording
audio CDs 2-24
Recycle Bin 3-4
emptying 3-4
removing files 3-3
replacement
battery 7-12
reprogramming
Multimedia Easy Access buttons 2-14
Retail Central button 2-10
ringer equivalence number 7-4
S
safety
battery warning 7-12
guidelines 7-12
warnings 1-2
screen
background 3-8
LCD 2-2
look and feel 3-6
properties 3-7
troubleshooting 6-7
screen saver
changing 3-9
scroll mouse. See mouse
searching for files 3-2
security
for networks 4-8
service and support 1-4
setting
DVD Player 2-27
shared folders
creating 4-8
shared printers
connecting 4-10
sharing hard drive 4-5
Shopping button 2-11
shortcuts 3-10
arranging 3-10
creating 3-10
defined 3-10
moving 3-10
shut down
your computer 2-5
Sleep button 2-12
sleep button 2-4
sleep mode
activating 2-4
deactivating 2-4
Sleep Mode indicator 2-2
software
adding 5-8
installing from a Web site 5-9
installing from CD or diskette 5-9
Microsoft Windows compatibility 5-8
sound
troubleshooting 6-2
speaker cable
troubleshooting 6-2
special markers 1-2
Start/Reset Button 2-2
starting
DVD Player 2-26
storage
drives 3-2
symbols
text 1-2
system board
replacing 5-1
system lockup 2-5
T
telecommunications network approvals 7-4
Telephone Consumer Protection Act of 1991 7-5
text conventions 1-3
text symbols 1-2
trash
emptying 3-4
troubleshooting 1-4, 6-1, 6-5, 6-9, 6-11, 6-12
CD 6-4
diskette 6-5, 6-13
DVD 6-4
fax 6-8
flat-panel monitor 6-7
games 6-9
hard drive 6-9
helpful hints 6-1
Internet Service Provider 6-10
keyboard 6-11
memory problems 6-12
modem 6-8
monitor 6-7
mouse 6-11
power 6-12
printer 6-14
screen 6-7
sound 6-2
speaker cable 6-2
volume 6-2, 6-3
Zip disk 6-6
Zip drive 6-6
turning off
your computer 2-5
Index-7
U
Universal Serial Bus. See USB
upgrading your computer 5-1
URL address
Compaq Service and Support 1-4
USB
connectors 4-11
defined 4-11
keyboard 2-7
scroll mouse 2-8
USB Internet keyboard. See keyboard
USB scroll mouse. See mouse
user name 4-7
User’s Manual
for just!burn 2-23
using
mouse 2-16
utility
Add/Remove Programs 5-8
utility program
for power management 2-5
V
viewing
DVD Player panel 2-28
DVD with parental control 2-31
volume
troubleshooting 6-2, 6-3
Index-8
W
waking your computer 2-4
wallpaper
changing 3-8
warning
battery 7-12
Windows
Control Panel 3-6
customizing 3-7
Help 1-4
overview 3-1
power management schemes 2-5
shortcuts 3-10
tools 3-6
Windows Explorer 3-1
opening 3-1
Wizard
for adding hardware 5-3
workgroup name 4-7
Z
Zip disk
troubleshooting 6-6
Zip drive
troubleshooting 6-6