1
Symantec™ Event Collector for
UNIX Operating Systems
Integration Guide
Symantec™ Event Collector for UNIX Operating
Systems Integration Guide
The software described in this book is furnished under a license agreement and may be
used only in accordance with the terms of the agreement.
Documentation version 1.0
Copyright notice
Copyright © 1998–2003 Symantec Corporation.
All Rights Reserved.
Any technical documentation that is made available by Symantec Corporation is the
copyrighted work of Symantec Corporation and is owned by Symantec Corporation.
NO WARRANTY. The technical documentation is being delivered to you AS-IS and
Symantec Corporation makes no warranty as to its accuracy or use. Any use of the
technical documentation or the information contained therein is at the risk of the user.
Documentation may include technical or other inaccuracies or typographical errors.
Symantec reserves the right to make changes without prior notice.
No part of this publication may be copied without the express written permission of
Symantec Corporation, 20330 Stevens Creek Blvd., Cupertino, CA 95014.
Trademarks
Symantec and the Symantec logo are U.S. registered trademarks of Symantec Corporation.
Symantec Enterprise Security Architecture (SESA), Symantec Incident Manager, and
Symantec Security Response are trademarks of Symantec Corporation.
Microsoft, Windows, and Windows NT are trademarks or registered trademarks of
Microsoft Corporation.
Red Hat, Red Hat Network, and all Red Hat-based trademarks and logos are trademarks or
registered trademarks of Red Hat, Inc., in the United States and other countries.
Linux is a registered trademark of Linus Torvalds.
Sun, Sun Microsystems, Java, and Solaris are trademarks or registered trademarks of Sun
Microsystems, Inc., in the United States and other countries. All SPARC trademarks are
used under license and are trademarks or registered trademarks of SPARC International,
Inc., in the United States and other countries. Products bearing SPARC trademarks are
based upon an architecture developed by Sun Microsystems, Inc.
This product includes software that was developed by the Apache Software Foundation.
Other brands and product names that are mentioned in this manual may be trademarks or
registered trademarks of their respective companies and are hereby acknowledged.
Printed in the United States of America.
10 9 8 7 6 5 4 3 2 1
Technical support
As part of Symantec Security Response, the Symantec global Technical Support
group maintains support centers throughout the world. The Technical Support
group’s primary role is to respond to specific questions on product feature/
function, installation, and configuration, as well as to author content for our
Web-accessible Knowledge Base. The Technical Support group works
collaboratively with the other functional areas within Symantec to answer your
questions in a timely fashion. For example, the Technical Support group works
with Product Engineering as well as Symantec Security Response to provide
Alerting Services and Virus Definition Updates for virus outbreaks and security
alerts.
Symantec technical support offerings include:
■
A range of support options that give you the flexibility to select the right
amount of service for any size organization
■
Telephone and Web support components that provide rapid response and
up-to-the-minute information
■
Upgrade insurance that delivers automatic software upgrade protection
■
Content Updates for virus definitions and security signatures that ensure
the highest level of protection
■
Global support from Symantec Security Response experts, which is
available 24 hours a day, 7 days a week worldwide in a variety of languages
for those customers enrolled in the Platinum Support Program
Advanced features, such as the Symantec Alerting Service and Technical
Account Manager role, offer enhanced response and proactive security
support
Please visit our Web site for current information on Support Programs. The
specific features available may vary based on the level of support purchased and
the specific product that you are using.
■
Licensing and registration
If the product that you are implementing requires registration and/or a license
key, the fastest and easiest way to register your service is to access the
Symantec licensing and registration site at www.symantec.com/certificate.
Alternatively, you may go to www.symantec.com/techsupp/ent/enterprise.html,
select the product that you wish to register, and from the Product Home Page,
select the Licensing and Registration link.
Contacting Technical Support
Customers with a current support agreement may contact the Technical
Support group via phone or online at www.symantec.com/techsupp.
Customers with Platinum support agreements may contact Platinum Technical
Support via the Platinum Web site at www-secure.symantec.com/platinum/.
When contacting the Technical Support group, please have the following:
■
Product release level
■
Hardware information
■
Available memory, disk space, NIC information
■
Operating system
■
Version and patch level
■
Network topology
■
Router, gateway, and IP address information
■
Problem description
■
Error messages/log files
■
Troubleshooting performed prior to contacting Symantec
■
Recent software configuration changes and/or network changes
Customer Service
To contact Enterprise Customer Service online, go to www.symantec.com, select
the appropriate Global Site for your country, then choose Service and Support.
Customer Service is available to assist with the following types of issues:
■
Questions regarding product licensing or serialization
■
Product registration updates such as address or name changes
■
General product information (features, language availability, local dealers)
■
Latest information on product updates and upgrades
■
Information on upgrade insurance and maintenance contracts
■
Information on Symantec Value License Program
■
Advice on Symantec's technical support options
■
Nontechnical presales questions
■
Missing or defective CD-ROMs or manuals
Symantec Software License Agreement
Event Collectors
SYMANTEC CORPORATION AND/OR ITS SUBSIDIARIES
(“SYMANTEC”) IS WILLING TO LICENSE THE SOFTWARE TO
YOU AS AN INDIVIDUAL, THE COMPANY, OR THE LEGAL
ENTITY THAT WILL BE UTILIZING THE SOFTWARE
(REFERENCED BELOW AS “YOU” OR “YOUR”) ONLY ON THE
CONDITION THAT YOU ACCEPT ALL OF THE TERMS OF THIS
LICENSE AGREEMENT. READ THE TERMS AND CONDITIONS
OF THIS LICENSE AGREEMENT CAREFULLY BEFORE USING
THE SOFTWARE. THIS IS A LEGAL AND ENFORCEABLE
CONTRACT BETWEEN YOU AND THE LICENSOR. BY
OPENING THIS PACKAGE, BREAKING THE SEAL, CLICKING
THE “AGREE” OR “YES” BUTTON OR OTHERWISE
INDICATING ASSENT ELECTRONICALLY, OR LOADING THE
SOFTWARE, YOU AGREE TO THE TERMS AND CONDITIONS
OF THIS AGREEMENT. IF YOU DO NOT AGREE TO THESE
TERMS AND CONDITIONS, CLICK THE “I DO NOT AGREE” OR
“NO” BUTTON OR OTHERWISE INDICATE REFUSAL AND
MAKE NO FURTHER USE OF THE SOFTWARE.
1. License:
The software and documentation that accompanies this license
(collectively the “Software”) is the proprietary property of
Symantec or its licensors and is protected by copyright law.
While Symantec continues to own the Software, You will have
certain rights to use the Software after Your acceptance of this
license. This license governs any releases, revisions, or
enhancements to the Software that the Licensor may furnish
to You. Except as may be modified by an applicable Symantec
license certificate, license coupon, or license key (each a
“License Module”) that accompanies, precedes, or follows this
license, and as may be further defined in the user
documentation accompanying the Software, Your rights and
obligations with respect to the use of this Software are as
follows.
You may:
A. use the number of copies of the Software as have been
licensed to You by Symantec under a License Module. If the
Software is part of a suite containing multiple Software titles,
the number of copies You may use may not exceed the
aggregate number of copies indicated in the License Module, as
calculated by any combination of licensed Software titles. Your
License Module shall constitute proof of Your right to make
such copies. If no License Module accompanies, precedes, or
follows this license, You may make one copy of the Software
You are authorized to use on a single computer;
B. make one copy of the Software for archival purposes, or copy
the Software onto the hard disk of Your computer and retain
the original for archival purposes;
C. use the Software on a network, provided that You have a
licensed copy of the Software for each computer that can
access the Software over that network;
D. use the Software in accordance with any written agreement
between You and Symantec; and
E. after written consent from Symantec, transfer the Software
on a permanent basis to another person or entity, provided
that You retain no copies of the Software and the transferee
agrees in writing to the terms of this license.
You may not:
A. copy the printed documentation that accompanies the
Software;
B. sublicense, rent, or lease any portion of the Software;
reverse engineer, decompile, disassemble, modify, translate,
make any attempt to discover the source code of the Software,
or create derivative works from the Software;
C. use the Software as part of a facility management,
timesharing, service provider, or service bureau arrangement;
D. use a previous version or copy of the Software after You
have received and installed a disk replacement set or an
upgraded version. Upon upgrading the Software, all copies of
the prior version must be destroyed;
E. use a later version of the Software than is provided herewith
unless You have purchased corresponding maintenance and/or
upgrade insurance or have otherwise separately acquired the
right to use such later version;
F. use, if You received the software distributed on media
containing multiple Symantec products, any Symantec
software on the media for which You have not received
permission in a License Module;
G. use the Software to collect data from a type of technology
other than when using a Symantec Event Manager product or
another Symantec product designed for use with this Software
that corresponds to that type of technology (i.e., antivirus,
firewall, IDS, etc.); nor
H. use the Software in any manner not authorized by this
license.
2. Content Updates:
Certain Software utilize content that is updated from time to
time (including but not limited to the following Software:
antivirus software utilize updated virus definitions; content
filtering software utilize updated URL lists; some firewall
software utilize updated firewall rules; and vulnerability
assessment products utilize updated vulnerability data; these
updates are collectively referred to as “Content Updates”). You
shall have the right to obtain Content Updates for any period
for which You have purchased maintenance, except for those
Content Updates that Symantec elects to make available by
separate paid subscription, or for any period for which You
have otherwise separately acquired the right to obtain Content
Updates. Symantec reserves the right to designate specified
Content Updates as requiring purchase of a separate
subscription at any time and without notice to You; provided,
however, that if You purchase maintenance hereunder that
includes particular Content Updates on the date of purchase,
You will not have to pay an additional fee to continue receiving
such Content Updates through the term of such maintenance
even if Symantec designates such Content Updates as
requiring separate purchase. This License does not otherwise
permit the licensee to obtain and use Content Updates.
3. Limited Warranty:
Symantec warrants that the media on which the Software is
distributed will be free from defects for a period of sixty (60)
days from the date of delivery of the Software to You. Your sole
remedy in the event of a breach of this warranty will be that
Symantec will, at its option, replace any defective media
returned to Symantec within the warranty period or refund the
money You paid for the Software. Symantec does not warrant
that the Software will meet Your requirements or that
operation of the Software will be uninterrupted or that the
Software will be error-free.
TO THE MAXIMUM EXTENT PERMITTED BY APPLICABLE
LAW, THE ABOVE WARRANTY IS EXCLUSIVE AND IN LIEU
OF ALL OTHER WARRANTIES, WHETHER EXPRESS OR
IMPLIED, INCLUDING THE IMPLIED WARRANTIES OF
MERCHANTABILITY, FITNESS FOR A PARTICULAR
PURPOSE, AND NONINFRINGEMENT OF INTELLECTUAL
PROPERTY RIGHTS. THIS WARRANTY GIVES YOU SPECIFIC
LEGAL RIGHTS. YOU MAY HAVE OTHER RIGHTS, WHICH
VARY FROM STATE TO STATE AND COUNTRY TO COUNTRY.
4. Disclaimer of Damages:
SOME STATES AND COUNTRIES, INCLUDING MEMBER
COUNTRIES OF THE EUROPEAN ECONOMIC AREA, DO NOT
ALLOW THE LIMITATION OR EXCLUSION OF LIABILITY FOR
INCIDENTAL OR CONSEQUENTIAL DAMAGES, SO THE
BELOW LIMITATION OR EXCLUSION MAY NOT APPLY TO
YOU.
TO THE MAXIMUM EXTENT PERMITTED BY APPLICABLE
LAW AND REGARDLESS OF WHETHER ANY REMEDY SET
FORTH HEREIN FAILS OF ITS ESSENTIAL PURPOSE, IN NO
EVENT WILL SYMANTEC BE LIABLE TO YOU FOR ANY
SPECIAL, CONSEQUENTIAL, INDIRECT, OR SIMILAR
DAMAGES, INCLUDING ANY LOST PROFITS OR LOST DATA
ARISING OUT OF THE USE OR INABILITY TO USE THE
SOFTWARE EVEN IF SYMANTEC HAS BEEN ADVISED OF THE
POSSIBILITY OF SUCH DAMAGES.
IN NO CASE SHALL SYMANTEC'S LIABILITY EXCEED THE
PURCHASE PRICE FOR THE SOFTWARE. The disclaimers and
limitations set forth above will apply regardless of whether or
not You accept the Software.
5. U.S. Government Restricted Rights:
RESTRICTED RIGHTS LEGEND. All Symantec products and
documentation are commercial in nature. The software and
software documentation are “Commercial Items,” as that term
is defined in 48 C.F.R. section 2.101, consisting of “Commercial
Computer Software” and “Commercial Computer Software
Documentation,” as such terms are defined in 48 C.F.R. section
252.227-7014(a)(5) and 48 C.F.R. section 252.227-7014(a)(1),
and used in 48 C.F.R. section 12.212 and 48 C.F.R. section
227.7202, as applicable. Consistent with 48 C.F.R. section
12.212, 48 C.F.R. section 252.227-7015, 48 C.F.R. section
227.7202 through 227.7202-4, 48 C.F.R. section 52.227-14, and
other relevant sections of the Code of Federal Regulations, as
applicable, Symantec's computer software and computer
software documentation are licensed to United States
Government end users with only those rights as granted to all
other end users, according to the terms and conditions
contained in this license agreement. Manufacturer is Symantec
Corporation, 20330 Stevens Creek Blvd., Cupertino, CA 95014,
United States of America.
6. Export Regulation:
Certain Symantec products are subject to export controls by
the U.S. Department of Commerce (DOC), under the Export
Administration Regulations (EAR) (see www.bxa.doc.gov).
Violation of U.S. law is strictly prohibited. Licensee agrees to
comply with the requirements of the EAR and all applicable
international, national, state, regional, and local laws, and
regulations, including any applicable import and use
restrictions. Symantec products are currently prohibited for
export or re-export to Cuba, North Korea, Iran, Iraq, Libya,
Syria, and Sudan or to any country subject to applicable trade
sanctions. Licensee agrees not to export, or re-export, directly
or indirectly, any product to any country outlined in the EAR,
nor to any person or entity on the DOC Denied Persons,
Entities and Unverified Lists, the U.S. Department of State’s
Debarred List, or on the U.S. Department of Treasury’s lists of
Specially Designated Nationals, Specially Designated Narcotics
Traffickers, or Specially Designated Terrorists. Furthermore,
Licensee agrees not to export, or re-export, Symantec products
to any military entity not approved under the EAR, or to any
other entity for any military purpose, nor will it sell any
Symantec product for use in connection with chemical,
biological, or nuclear weapons or missiles capable of delivering
such weapons.
7. General:
If You are located in North America or Latin America, this
Agreement will be governed by the laws of the State of
California, United States of America. Otherwise, this
Agreement will be governed by the laws of England and Wales.
This Agreement and any related License Module is the entire
agreement between You and Symantec relating to the Software
and: (i) supersedes all prior or contemporaneous oral or
written communications, proposals, and representations with
respect to its subject matter; and (ii) prevails over any
conflicting or additional terms of any quote, order,
acknowledgment, or similar communications between the
parties. This Agreement shall terminate upon Your breach of
any term contained herein and You shall cease use of and
destroy all copies of the Software. The disclaimers of
warranties and damages and limitations on liability shall
survive termination. Software and documentation is delivered
Ex Works California, U.S.A. or Dublin, Ireland respectively (ICC
INCOTERMS 2000). This Agreement may only be modified by a
License Module that accompanies this license or by a written
document that has been signed by both You and Symantec.
Should You have any questions concerning this Agreement, or
if You desire to contact Symantec for any reason, please write
to: (i) Symantec Customer Service, 555 International Way,
Springfield, OR 97477, U.S.A., (ii) Symantec Authorized Service
Center, PO BOX 5689, Dublin 15, Ireland, or (iii) Symantec
Customer Service, 1 Julius Ave, North Ryde, NSW 2113,
Australia.
Contents
Technical support
Chapter 1
Introducing the Symantec Event Collector for
UNIX Operating Systems
About the Symantec Event Collector for UNIX Operating Systems .............. 9
About SESA ................................................................................................... 10
Prior requirements for using the Symantec Event Collector for
UNIX Operating Systems .................................................................... 10
Components of the Symantec Event Collector for UNIX Operating
Systems ......................................................................................................... 11
Server-side component ............................................................................... 11
Client-side components .............................................................................. 12
How the Symantec Event Collector for UNIX Operating
Systems works .............................................................................................. 12
How the Event Collector processes events .............................................. 13
About the Application Event category ..................................................... 14
What you can do with the Symantec Event Collector for UNIX Operating
Systems ......................................................................................................... 14
Chapter 2
Installing the Symantec Event Collector for UNIX
Operating Systems
Before you install the Symantec Event Collector for UNIX Operating
Systems ......................................................................................................... 17
Planning for the Event Collector installation ......................................... 18
System requirements .......................................................................................... 19
Event Collector system requirements ...................................................... 20
SESA Agent requirements .......................................................................... 21
SESA Integration Package requirements ................................................. 21
SESA Manager requirements ..................................................................... 22
SESA DataStore requirements ................................................................... 22
Installing the Symantec Event Collector for UNIX Operating Systems ...... 23
Installing the SESA Integration Package ................................................. 23
Installing the collector component and SESA Agent ............................. 25
Testing the Event Collector installation .................................................. 28
8 Contents
After you install the Symantec Event Collector for UNIX Operating
Systems ......................................................................................................... 32
Running LiveUpdate on the SESA Manager ............................................ 32
Configuring the SESA Manager to increase event throughput ............ 32
Uninstalling the Event Collector ....................................................................... 34
Uninstalling the collector component ...................................................... 34
Uninstalling the SESA Integration Package ............................................ 35
Installing Java LiveUpdate on the SESA Manager ......................................... 37
Chapter 3
Using the Symantec Event Collector for UNIX
Operating Systems
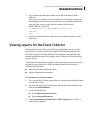
Configuring the Event Collector ........................................................................ 41
Filtering events ............................................................................................ 41
Viewing reports for the Event Collector .......................................................... 43
Creating custom reports ..................................................................................... 44
Integrating with Symantec Incident Manager ................................................ 44
Starting and stopping the Event Collector and SESA Agent daemons ....... 45
Configuring the SESA Agent .............................................................................. 46
Using LiveUpdate technology ............................................................................ 47
Running LiveUpdate for the Event Collector manually ........................ 47
About scheduling LiveUpdate for the Event Collector .......................... 48
Appendix A
Using Java LiveUpdate
Viewing Java LiveUpdate events ....................................................................... 49
About Java LiveUpdate configurations ............................................................ 50
Working with Java LiveUpdate configurations .............................................. 51
Editing Java LiveUpdate configuration properties ........................................ 53
Modifying a Java LiveUpdate configuration ................................................... 53
Distributing a Java LiveUpdate configuration ................................................ 54
Index
Chapter
1
Introducing the Symantec
Event Collector for UNIX
Operating Systems
This chapter includes the following topics:
■
About the Symantec Event Collector for UNIX Operating Systems
■
Components of the Symantec Event Collector for UNIX Operating Systems
■
How the Symantec Event Collector for UNIX Operating Systems works
■
What you can do with the Symantec Event Collector for UNIX Operating
Systems
About the Symantec Event Collector for
UNIX Operating Systems
The Symantec Event Collector for UNIX Operating Systems enables centralized,
cross-tier logging, alerting, and reporting between the Symantec Enterprise
Security Architecture (SESA™) event management system and the UNIX
operating system.
The Symantec Event Collector for UNIX Operating Systems retrieves events that
are generated by the UNIX operating system and forwards these events to SESA.
These events are stored in the SESA DataStore (a database), where you can view
them in reports, use them as the basis for configuring alert notifications and
incident creation, and configure them as raw data for report generation. The
Symantec Event Collector for UNIX Operating Systems retrieves new events
from the UNIX operating system log files. Each supported UNIX operating
10 Introducing the Symantec Event Collector for UNIX Operating Systems
About the Symantec Event Collector for UNIX Operating Systems
system event is mapped to a corresponding SESA event. Each supported event is
also assigned a Standard Event Code for use with Symantec Incident Manager.
After you install the Symantec Event Collector for UNIX Operating Systems, the
UNIX operating system product is integrated with SESA. When a product is
integrated with SESA, you can use the SESA Console to view the events that it
forwards to SESA. The SESA Console provides a central location in which to view
and manage the reporting of event data across multiple SESA-enabled security
products.
About SESA
SESA is an event management system that collects data from events generated
by security products. SESA categorizes events into classes such as antivirus,
content filtering, network security, and systems management. The range of
events varies depending on the security products that integrate with SESA.
The events conform to an extensible family of event classes and types, which are
defined by sets of XML schema. Once collected, event information is stored in
the SESA DataStore for access by SESA management functions through the
SESA Console.
For more information about SESA, see the Symantec Enterprise Security
Architecture Installation Guide and the Symantec Enterprise Security
Architecture Administrator’s Guide.
Prior requirements for using the Symantec Event Collector for UNIX
Operating Systems
The Symantec Event Collector for UNIX Operating Systems integrates your
existing UNIX operating system installation with SESA. You should have prior
knowledge of the UNIX operating system.
You should also be proficient in administering UNIX operating system
platforms. The supported operating systems for the collector component of the
Symantec Event Collector for UNIX Operating Systems are as follows:
■
Red Hat Linux 7.2
■
Sun Solaris 8/9
Introducing the Symantec Event Collector for UNIX Operating Systems
Components of the Symantec Event Collector for UNIX Operating Systems
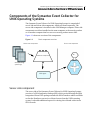
Components of the Symantec Event Collector for
UNIX Operating Systems
The Symantec Event Collector for UNIX Operating Systems is comprised of
server-side and client-side components, which you install separately. The
server-side component is installed on the SESA Manager computer. Client-side
components are either installed on the same computer as the security product
or on another computer that has access to security product source data.
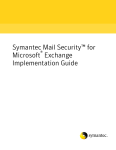
Figure 1-1 shows an overview of the components.
Figure 1-1
Basic component overview
Client-side components
Server-side component
SIP
Collector component
SESA
UNIX operating
system logs
Manager
SESA Agent
Server-side component
The server side of the Symantec Event Collector for UNIX Operating Systems
consists of a SESA Integration Package (SIP), which you install using the SESA
Integration Wizard. This package extends the SESA DataStore tables and fields
so that the DataStore can receive collected events from the UNIX operating
system. It also adds additional reports for viewing the collected events in the
SESA Console.
11
12 Introducing the Symantec Event Collector for UNIX Operating Systems
How the Symantec Event Collector for UNIX Operating Systems works
Client-side components
The client side of the Symantec Event Collector for UNIX Operating Systems
consists of the following components:
■
Collector component
This component is the program that parses the UNIX operating system log
file. The collector component determines which events to forward, and then
formats them for forwarding to the SESA Agent.
The collector component also performs some event aggregation and highlevel attack analysis. In addition, users can configure this component for
some event filtering tasks.
■
SESA Agent
The SESA Agent is responsible for all communication with the SESA
Manager. The collector component passes formatted events to the SESA
Agent for forwarding to the SESA Manager.
The client computer must be able to connect to either a Symantec LiveUpdate
server or a LiveUpdate server on your network to receive the latest event
signatures.
How the Symantec Event Collector for UNIX
Operating Systems works
The collector component obtains data from the UNIX operating system and
composes it into a SESA-compatible format. The collector component may also
perform some event aggregation, analysis, and filtering, as well as assign a
Standard Event Code to the event for correlation processing by Symantec
Incident Manager (if installed). The collector component then passes the event
to the SESA Agent for forwarding to the SESA Manager, which inserts the event
into the SESA DataStore.
A SESA Agent must be installed on the same computer as the Symantec Event
Collector for UNIX Operating Systems. The Symantec Event Collector for UNIX
Operating Systems Installation Wizard will install a SESA Agent if one is not
already present.
When you install the SESA Agent, you provide a small set of initial parameters
(such as the SESA Manager IP address and port). After you install the SESA
Agent, you can change its default parameters using the SESA Manager.
See “Configuring the SESA Agent” on page 46.
Introducing the Symantec Event Collector for UNIX Operating Systems
How the Symantec Event Collector for UNIX Operating Systems works
The SESA Agent logs events that it receives from the Symantec Event Collector
for UNIX Operating Systems to a SESA Manager. When the SESA Manager is
unavailable, the SESA Agent queues messages for later delivery. The default
maximum queue size is 2 MB, but you can change the queue size by using the
SESA Console.
See “Configuring the SESA Agent” on page 46.
How the Event Collector processes events
The Symantec Event Collector for UNIX Operating Systems creates SESA events
based on the event data that it finds within the UNIX operating system log files.
The Event Collector determines how to classify UNIX operating system events
by examining the contents of key fields.
The Symantec Event Collector for UNIX Operating Systems assigns one of the
following categories to each event:
Security
Messages that come from the UNIX operating system log file
Application
Events that are generated by the Symantec Event Collector for
UNIX Operating Systems
The Symantec Event Collector for UNIX Operating Systems also assigns each
event one of the following severities:
5 - Informational
Events that represent expected behavior
4 - Warning
Events that represent suspicious behavior
3 - Minor
Events that could require attention
2 - Major
Events that require attention now
1 - Critical
Events that require attention now with a broad range of application
to the enterprise
In the SESA environment, events that arrive from a SESA Agent are generally
understood to be events that are generated by the system on which the SESA
Agent is installed. However, because the Symantec Event Collector for UNIX
Operating Systems is collecting events from a data source that may receive
events from multiple computers, the event data is structured to preserve the
identity of the originating computer.
13
14 Introducing the Symantec Event Collector for UNIX Operating Systems
What you can do with the Symantec Event Collector for UNIX Operating Systems
Events from the Symantec Event Collector for UNIX Operating Systems are
logged as if they originated from the computer that logged the message.
Therefore, collected events will display the machine name of the computer that
logged the UNIX operating system event, rather than the machine name of the
computer on which the Event Collector resides.
About the Application Event category
In addition to the events that the Symantec Event Collector for UNIX Operating
Systems collects and forwards to the SESA Manager, the Event Collector
generates two events of its own. These are categorized as Application Events.
These events indicate that the Event Collector daemon is starting or stopping, so
that this information might be available at the SESA Console.
Table 1-1 describes the two events generated by the Symantec Event Collector
for UNIX Operating Systems.
Table 1-1
Symantec Event Collector for UNIX Operating Systems events
Event
Category
Severity
Description
Application Start
Application
Informational
The Event Collector is starting.
Application Stop
Application
Informational
The Event Collector is stopping.
What you can do with the Symantec Event Collector
for UNIX Operating Systems
After the Symantec Event Collector for UNIX Operating Systems is installed and
running, your UNIX operating system events will be inserted into the SESA
DataStore. From the SESA Console, you can then view, manage, and create
reports based on the event data.
With the Symantec Event Collector for UNIX Operating Systems, you can do the
following:
■
Collect events for insertion into the SESA DataStore.
See “Installing the Symantec Event Collector for UNIX Operating Systems”
on page 23.
■
View raw data and reports in the SESA Console.
See “Viewing reports for the Event Collector” on page 43.
■
Create custom reports in the SESA Console.
See “Creating custom reports” on page 44.
Introducing the Symantec Event Collector for UNIX Operating Systems
What you can do with the Symantec Event Collector for UNIX Operating Systems
■
Integrate your events for correlation within Symantec Incident Manager (if
Symantec Incident Manager is installed on your SESA Manager).
See “Integrating with Symantec Incident Manager” on page 44.
■
Retrieve updated content and rules as they become available.
See “Using LiveUpdate technology” on page 47.
15
16 Introducing the Symantec Event Collector for UNIX Operating Systems
What you can do with the Symantec Event Collector for UNIX Operating Systems
Chapter
2
Installing the Symantec
Event Collector for UNIX
Operating Systems
This chapter includes the following topics:
■
Before you install the Symantec Event Collector for UNIX Operating
Systems
■
System requirements
■
Installing the Symantec Event Collector for UNIX Operating Systems
■
After you install the Symantec Event Collector for UNIX Operating Systems
■
Uninstalling the Event Collector
■
Installing Java LiveUpdate on the SESA Manager
Before you install the Symantec Event Collector for
UNIX Operating Systems
The Symantec Event Collector for UNIX Operating Systems installs shared and
product-specific components in order to send events to SESA. To enable the
Event Collector to forward events to SESA, you must do the following:
■
Install the server-side (SESA Manager) component using the SESA
Integration Wizard.
■
Install the collector component and SESA Agent.
18 Installing the Symantec Event Collector for UNIX Operating Systems
Before you install the Symantec Event Collector for UNIX Operating Systems
Planning for the Event Collector installation
Before you install the Event Collector, you should plan for the following
installation phases:
■
Installing the SESA Integration Package
■
Installing the collector component and SESA Agent
Planning to install the SESA Integration Package
The first phase of installing the Symantec Event Collector for UNIX Operating
Systems is to install the SESA Integration Package (SIP) using the SESA
Integration Wizard. This package extends the tables and fields in the SESA
DataStore so that they are prepared to accept Event Collector data.
The SESA Integration Package for the Event Collector must be installed on the
computer on which the SESA Manager is installed. You install the SIP by
running the SESA Integration Wizard on the SESA Manager computer. The
additional components let you view and manage reports for UNIX operating
system events in the SESA Console. You must install the SESA Integration
Package on every SESA Manager that will receive events from the Event
Collector.
Before running the Symantec Integration Wizard, you should run LiveUpdate on
your SESA Manager as well as any installed products to ensure that you have the
latest versions available.
Planning to install the collector component and SESA Agent
The second phase of installing the Symantec Event Collector for UNIX Operating
Systems is to install the collector component. The collector component reads
events from the UNIX operating system log files, formats them, and sends them
to the SESA Agent. The SESA Agent installs with the collector component if one
is not already present. The SESA Agent enables the communication and
configuration of events between SESA and the UNIX operating system product.
The Event Collector must be installed on a computer that has access to the UNIX
operating system log files. To install the Event Collector, use the Symantec
Event Collector for UNIX Operating Systems Installation Wizard.
Ensuring network connectivity between the Event Collector computer
and the SESA Manager
Appropriate routing must exist between the computer on which the collector
component will be installed and the SESA Manager for event messages to reach
the SESA Manager. In addition, ensure that there is no firewall or device policy
blocking the connection between the Event Collector and the SESA Manager.
Installing the Symantec Event Collector for UNIX Operating Systems
System requirements
Ensure network connectivity
You can verify the connectivity between two networked computers by executing
a successful ping command from each computer, and by running a test Telnet
session.
To execute the ping command
◆
On the SESA Manager computer, at the command prompt, type the
following command:
ping <AGENT-IP-ADDRESS>
where <AGENT-IP-ADDRESS> is the IP address of the computer on which
you are installing the Event Collector. If the computers are properly
connected, you receive several successful reply messages, and the request
does not time out.
This is only a test of connectivity. Your firewall may be configured to prevent
ping traffic without impeding SESA Agent connectivity.
To run a test Telnet session
◆
On the computer on which the collector component will be installed, at the
command prompt, type the following test command:
telnet <SESA-IP-ADDRESS> 443
where <SESA-IP-ADDRESS> is the IP address of the SESA Manager. The
connection appears to stop responding, but it is not refused. After you type a
few characters, a message appears indicating that the connection has been
lost.
System requirements
Before you install the Symantec Event Collector for UNIX Operating Systems,
ensure that the computer on which the SESA DataStore is installed has enough
hard disk space to accommodate the additional security events that UNIX
operating systems send to it.
19
20 Installing the Symantec Event Collector for UNIX Operating Systems
System requirements
In addition, ensure that the computer or computers on which you plan to install
the Event Collector meet the necessary requirements and that the following
conditions have been met:
SESA
SESA version 1.1 is installed and operating properly.
If you have an earlier version of SESA, you must first
uninstall it before you can install version 1.1. You cannot
migrate earlier versions of SESA to version 1.1 or reinstall
over earlier versions. Version 1.1 is not backward-compatible.
For more information, see the Symantec Enterprise Security
Architecture Installation Guide.
Third-party software
The Event Collector collects UNIX Syslog data from either of
the following platforms:
■
Sun Solaris 8/9
■
Red Hat Linux 7.2
For more information, see the UNIX Syslog documentation.
Note: If remote Syslog is used, each unique operating system
must report to a separate log file. However, different versions
of the same operating system can log to the same file.
The Symantec Event Collector for UNIX Operating Systems installs the SESA
Agent and the collector component on the same computer. This computer must
have access to the UNIX operating system log files.
Event Collector system requirements
The computer on which you install the SESA Agent must meet the following
minimum system requirements:
Operating system
Processor
Memory
■
Red Hat Linux 7.2
■
Sun UltraSPARC (64 bit) Solaris 8/9
■
Intel Pentium-compatible 133-MHz processor (up to and
including Xeon-class)
■
UltraSPARC II/III
■
32 MB of memory for the SESA Agent
■
64 MB RAM for each UNIX product (128 MB or more
recommended)
Installing the Symantec Event Collector for UNIX Operating Systems
System requirements
Hard disk space
Symantec software
Sun Java requirements
■
35 MB of hard disk space for Event Collector framework
program files
■
95 MB of hard disk space if the SESA Agent, JRE, and the
Event Collector are on one computer
One or both of the following installed:
■
Symantec Event Manager for Intrusion Protection 1.0
■
Symantec Incident Manager 2.0
Java Runtime Environment (JRE) version 1.3.1_02
The JRE is installed along with the Event Collector into a
subdirectory of the installation directory specified at
installation.
By default, the directory is /opt/Symantec/JRE/.
Network connection
TCP/IP connection to a network, with a fixed IP address
These requirements are in addition to resources or requirements of UNIX
operating system components that may be running on the same computer.
SESA Agent requirements
If you have more than one SESA-enabled product installed on a single computer,
these products can share a SESA Agent. However, each product must register
with the Agent. Consequently, even if an Agent has already been installed on the
computer for another SESA-enabled security product, you must install the
Event Collector to register the particular product with the Agent.
The SESA Agent is preconfigured to listen on IP address 127.0.0.1 and port
number 8086. The Symantec Event Collector for UNIX Operating Systems uses
this information to communicate with the Agent. If you must change the IP
address or port number for the Agent after it is installed, you must do so
through the SESA Console. Installed Agents are configured remotely using the
SESA Console.
For more information, see the Symantec Enterprise Security Architecture
Administrator’s Guide.
SESA Integration Package requirements
The SESA Integration Package (SIP) for the Symantec Event Collector for UNIX
Operating Systems is installed on the SESA Manager computer. The SIP requires
version 1.1 of SESA. If you have an earlier version of SESA installed, you must
uninstall it before you can install version 1.1. You cannot install version 1.1 over
an earlier version or migrate an earlier version to SESA 1.1.
21
22 Installing the Symantec Event Collector for UNIX Operating Systems
System requirements
SESA Manager requirements
Before installing any components on the SESA Manager, ensure that the SESA
Manager is installed and operating properly, and that it has a fixed IP address.
For more information on installing the SESA Manager, see the Symantec
Enterprise Security Architecture Administrator’s Guide.
You must install the SESA Integration Package for the Event Collector on the
SESA Manager before you install the collector component.
SESA DataStore requirements
After you install the SESA Integration Package and the collector component, the
collector component can forward events to SESA. The amount of disk space that
you need to accommodate the event data depends on how many devices are
logging events, how verbose they are, and how long you want to keep the event
data in the database.
128 GB should be sufficient to store events from several SESA Agents for 30
days. This number is in addition to disk space for other devices that may already
be reporting to SESA. A 128-GB SESA DataStore can store 17-19 million events.
You must ensure that the DataStore computer has a fixed IP address.
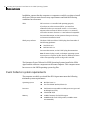
Table 2-1 describes the suggested minimum size of the SESA DataStore based on
the anticipated number of events received in 30 days.
Table 2-1
Minimum size of the SESA DataStore based on data rate
Data rate
Number of events in 30 days Minimum size of the SESA
DataStore
10 events per second
25,920,000
172 GB
30 events per second
77,760,000
518 GB
60 events per second
155,520,000
1,036 GB
100 events per second 259,200,000
1,728 GB
Installing the Symantec Event Collector for UNIX Operating Systems
Installing the Symantec Event Collector for UNIX Operating Systems
Installing the Symantec Event Collector for UNIX
Operating Systems
The Event Collector gathers security information from the UNIX operating
system. The Event Collector sends the information through the SESA Agent to
the SESA Manager for insertion in the SESA DataStore.
The Event Collector installation sequence is as follows:
■
Install the SESA Integration Package (SIP) on the SESA Manager using the
SESA Integration Wizard. If you are installing the Event Collector to more
than one computer that is being managed by the same SESA Manager, you
only need to install the SIP once.
See “Installing the SESA Integration Package” on page 23.
■
Install the Symantec Event Collector for UNIX Operating Systems collector
component and the SESA Agent. The Symantec Event Collector for UNIX
Operating Systems and the SESA Agent must be installed on the same
computer.
See “Installing the collector component and SESA Agent” on page 25.
■
Test the Event Collector installation to verify successful operation.
See “Testing the Event Collector installation” on page 28.
Installing the SESA Integration Package
The SESA Integration Package (SIP) for the Event Collector extends the
functionality of the SESA Manager to include information (such as tables, fields,
and reports) specific to the Symantec Event Collector for UNIX Operating
Systems.
Warning: Before you install the SESA Integration Package for the Event
Collector, back up the SESA Directory and SESA DataStore.
When installing more point products on the same SESA Manager, you may
notice a decrease in performance.
You install the SESA Integration Package by running the SESA Integration
Wizard. You must run the SESA Integration Wizard on every SESA Manager
that will receive UNIX operating system events.
Immediately after you finish installing the SESA Integration Package on the
SESA Manager computer, run LiveUpdate to ensure that you are using the latest
event signatures.
23
24 Installing the Symantec Event Collector for UNIX Operating Systems
Installing the Symantec Event Collector for UNIX Operating Systems
To install the SESA Integration Package
1
On the SESA Manager computer, insert the Symantec Event Collector for
UNIX Operating Systems CD into the CD-ROM drive.
2
If you have AutoStart enabled and the SESA Integration Wizard window
appears, cancel the SESA Integration Wizard.
You must install the SESA Integration Package using the command prompt.
3
At the command prompt, navigate to one of the following folders on the CD:
■
On Linux: /LinuxSyslogCollector
■
On Solaris: /SolarisSyslogCollector
4
Navigate to the SESA1.1-SIPI folder on the CD.
5
Type the following:
java -jar setup.jar
6
In the Welcome to the SESA Integration Wizard dialog box, click Next.
7
In the SESA Integration Requirements dialog box, do one of the following:
8
9
■
If the local SESA Manager is running, click Next.
■
If the local SESA Manager is not running, click Cancel.
You must run the SESA Integration Wizard on the computer on which
the SESA Manager is installed.
In the SESA Domain Administrator Information dialog box, do the
following:
■
In the SESA Domain Administrator Name text box, type the name of
the SESA Domain Administrator account.
■
In the SESA Domain Administrator Password text box, type the
password for the SESA Domain Administrator account.
■
In the Host Name or IP address of SESA Directory text box, type the IP
address of the computer on which the SESA Directory is installed.
If you are using authenticated SSL instead of the SESA default,
anonymous SSL, you must type the host name of the SESA Directory
computer. For example, mycomputer.com.
For more information on SESA default, anonymous SSL, and upgrading
to authenticated SSL, see the Symantec Enterprise Security Architecture
Installation Guide.
■
In the Secure Directory Port text box, type the number of the SESA
Directory secure port.
By default, the port number is 636.
Click Next.
Installing the Symantec Event Collector for UNIX Operating Systems
Installing the Symantec Event Collector for UNIX Operating Systems
10 In the Ready to proceed dialog box, do one of the following:
■
If you are ready to proceed, click Next.
■
If you want to change your settings, click Back.
11 In the Configuring Your System dialog box, after the process is completed,
click Next.
12 In the SESA Integration Successful dialog box, click Finish.
Installing the collector component and SESA Agent
The collector component reads the data from the UNIX operating system log
files, formats the data, and forwards it to the SESA Agent. The computer on
which you install the collector component must have access to the UNIX
operating system log files that you want to monitor.
Note: The JRE 1.3.1_02 is automatically installed along with the Event Collector
into a subdirectory of the installation directory specified at installation. By
default, the directory is /opt/Symantec/JRE/. The JRE is used by the collector
component and the SESA Agent only. It does not interfere with any other JRE
installed on the computer.
Install the collector component and SESA Agent
You install the collector component on computers with the supported Linux or
Solaris operating systems. If the computer is already running the current
version of the SESA Agent, the installation program installs only the collector
component and registers it with the SESA Agent. If the SESA Agent is not
already installed, the installation program prompts you to specify the
information that is needed to install it.
To install the collector component on Linux or Solaris
1
On the computer with access to the UNIX operating system log files, become
superuser.
Ensure that the computer is operating at run level 3 or above before
installing.
2
Insert the Symantec Event Collector for UNIX Operating Systems CD and
mount the CD-ROM drive.
3
At the command prompt, navigate to one of the following folders on the CD:
■
On Linux: /LinuxSyslogCollector/install
■
On Solaris: /SolarisSyslogCollector/install
25
26 Installing the Symantec Event Collector for UNIX Operating Systems
Installing the Symantec Event Collector for UNIX Operating Systems
4
Do one of the following:
■
On Linux, type:
./setup_linux.bin
■
On Solaris, type:
./setup_solarisSparc.bin
5
In the Welcome to the Symantec Event Collector for UNIX Syslog Install
Wizard dialog box, click Next.
6
In the Symantec Software License Agreement dialog box, click I accept the
terms of the license agreement, and then click Next.
7
In the Choose the setup type that best suits your needs dialog box, click
Collector Install, and then click Next.
8
In the Please enter the destination directory for installing the SESA Agent
dialog box, do one of the following:
9
■
To use the default directory, click Next.
■
To select another directory, in the Directory Name text box, type a
directory name other than root, and then click Next.
In the SESA Agent Information dialog box, do the following:
■
In the Primary SESA Manager IP address box, type the IP address of the
SESA Manager to which the SESA Agent directs events.
■
In the Primary SESA Manager Port box, type the port number (default
is port 443).
■
In the Secondary SESA Manager IP address box, type the IP address of
SESA Manager to which the SESA Agent directs events upon failure of
the primary SESA Manager.
If there is no secondary SESA Manager, leave this box blank.
■
In the Secondary SESA Manager Port box, type the port number of the
secondary SESA Manager.
If there is no secondary SESA Manager, leave this box blank.
10 Click Next.
11 In the Please enter the destination install directory for the Symantec Event
Collector for UNIX Syslog dialog box, do one of the following:
■
To use the default directory, click Next.
■
To select another directory, in the Directory Name box, type a directory
name other than root, and then click Next.
Do not use spaces in the destination directory on Solaris or Linux.
Installing the Symantec Event Collector for UNIX Operating Systems
Installing the Symantec Event Collector for UNIX Operating Systems
12 In the Symantec Event Collector for UNIX Syslog Information dialog box, do
the following:
■
In the Local UNIX Syslog Logfile Path Location box, type the path to the
directory that contains the local UNIX Syslog file.
On Linux, the default directory is /var/log/.
On Solaris, the default directory is /var/adm/.
■
In the Local UNIX Syslog Logfile Name box, type the name of the local
UNIX operating system log file that the Event Collector should be
monitoring for UNIX operating system events.
The default file name is messages.
■
To monitor UNIX operating system log files based on the last modified
time, click True.
13 Click Next.
14 In the Symantec Event Collector for UNIX Operating Systems will be
installed in the following location dialog box, verify the summary
information, and then click Next.
15 In the It is recommended that you run Java LiveUpdate to check for the most
recent collector updates dialog box, to run Java LiveUpdate, click Yes, and
then click Next.
The installation process may take several minutes. Do not close any
windows that appear during the installation process.
16 In the InstallShield Wizard has successfully installed Symantec Event
Collector for UNIX Syslog dialog box, click Finish.
To install the collector component in text mode on Linux or Solaris
1
On the computer with access to the UNIX operating system log files, become
superuser.
Ensure that the computer is operating at run level 3 or above before
installing.
2
Insert the Symantec Event Collector for UNIX Operating Systems CD and
mount the CD-ROM drive.
3
At the command prompt, navigate to one of the following folders on the CD:
■
On Linux: /LinuxSyslogCollector/install
■
On Solaris: /SolarisSyslogCollector/install
27
28 Installing the Symantec Event Collector for UNIX Operating Systems
Installing the Symantec Event Collector for UNIX Operating Systems
4
Do one of the following:
■
On Linux, type:
./setup_linux.bin -console
■
On Solaris, type:
./setup_solarisSparc.bin -console
5
Follow the on-screen instructions.
Testing the Event Collector installation
After the Event Collector is installed, you can verify that the appropriate
components are installed and working properly by doing the following:
■
Verifying the Event Collector installation
■
Verifying the SESA Manager IP address and port
■
Verifying SESA Agent operation
■
Verifying event collection in the SESA Console
Verifying the Event Collector installation
You must verify that the Event Collector is installed correctly.
Verify the Event Collector installation
To verify the installation, do the following:
■
On the Event Collector computer, verify that the appropriate daemons
are running.
■
Verify that the Symantec Event Collector for UNIX Operating Systems
appears in the SESA Console.
■
On the SESA Manager, verify that the Event Collector SESA Integration
Package was successfully installed.
To verify that the appropriate daemons have started on Linux or Solaris
1
On the computer on which you installed the Event Collector, become
superuser.
2
To verify that the SESA Agent daemon process is running, at the command
prompt, type the following command:
ps -el | grep agentd
3
To verify that the collector component daemon process is running, at the
command prompt, type the following command:
ps -el | grep run-
Installing the Symantec Event Collector for UNIX Operating Systems
Installing the Symantec Event Collector for UNIX Operating Systems
To verify that the Event Collector appears in the SESA Console
1
On the Windows taskbar, click Start > Programs > Symantec Enterprise
Security > SESA Console.
2
Log on to the SESA Console using a SESA user account with sufficient rights
to view SESA events.
The SESA user must belong to a role that has rights to the SESA-enabled
Symantec Event Collector for UNIX Operating Systems.
3
On the Events view tab, in the left pane, expand the appropriate SESA
DataStore.
4
Do one of the following:
5
■
Expand Host Intrusion Detection.
■
Expand Intrusion Detection.
Confirm that you have a new folder labeled Symantec Event Collector for
<UNIX> Syslog (where <UNIX> is either Linux or Solaris), and that it
contains the following reports:
■
All Events
■
Last 30 days
■
Last 24 hours
■
Last 8 hours
■
By Severity
(Host Intrusion Detection only)
■
By Generic Alert
(Host Intrusion Detection only)
6
On the Configurations view tab, expand the top-level domain.
7
Verify that the Symantec Event Collector for UNIX Operating Systems is
listed.
For more information about reports and views, see the Symantec Enterprise
Security Architecture Administrator’s Guide.
To verify that the Event Collector was successfully installed
1
On the Event Collector computer, on the Windows taskbar, click Start >
Settings > Control Panel.
2
In the Control Panel window, double-click Add/Remove Programs.
3
In the Add/Remove Programs dialog box, verify that Symantec Event
Collector for <UNIX> Syslog (where <UNIX> is either Linux or Solaris) is
listed.
29
30 Installing the Symantec Event Collector for UNIX Operating Systems
Installing the Symantec Event Collector for UNIX Operating Systems
Verifying the SESA Manager IP address and port
You must verify that the SESA Manager information is correct.
Verify the SESA Manager IP address and port
Verify that you specified the correct SESA Manager IP address (or host name)
and the correct number for the SESA Secure Directory port when you ran the
SESA Integration Wizard.
To verify the SESA Manager IP address and port on Linux or Solaris
1
On the Event Collector computer, become superuser.
2
Change directories to the installation folder:
/opt/Symantec/SESA/Agent
3
In a text editor, open the configprovider.cfg file.
4
Verify that the following options contain the correct settings for the SESA
Manager to which you want to send UNIX operating system events:
■
MgmtServer contains the SESA Manager IP address.
■
MgmtPort contains the SESA Agent port number.
To verify SESA Agent connectivity from the SESA Console
1
In the SESA Console, on the System view tab, in the left pane, expand
Organizational Units > Default.
2
Verify that the name of the computer on which the Event Collector is
installed is listed.
3
Right-click the computer name, and then click Properties.
4
In the Computer Properties dialog box, on the Services tab, in the Started
column, verify that the SESA AgentStart Service displays Yes.
Verifying SESA Agent operation
You must verify that the SESA Agent is operating correctly.
To verify SESA Agent operation on Linux or Solaris
1
On the computer on which you installed the Event Collector, become
superuser.
2
To verify that the Event Collector daemon process is running, at the
command prompt, type the following command:
ps -el | grep agentd
Installing the Symantec Event Collector for UNIX Operating Systems
Installing the Symantec Event Collector for UNIX Operating Systems
3
Change directories to the following installation directory of the SESA Agent:
/opt/Symantec/SESA/Agent
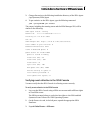
4
To get statistics on the SESA Agent, type the following command:
java –jar agentcmd.jar -status
The output, including the running status and the SESA Manager URL, will be
similar to the following:
SESA Agent status: running
Machine Id:
**********obscured**********
Listening on: 127.0.0.1:8086
SSL: On
SESA Manager URL: https://127.0.0.1:443/sesa/servlet/
Total number of post failures: 0
Outbound Thread State: WAIT
Items in Outbound Queue: 0
Queue Status for ProdId 3000
Queue is stored in memory
Flush Size (KB): 50
Flush Time (sec): 300
Flush Count: 35
Spool Size (KB): 100
Max Queue Size (KB): 2000
Entries waiting in queue: 0
Total Events processed: 0
Total Queue Size (bytes): 0
Verifying event collection in the SESA Console
You must verify that the SESA Console is collecting events correctly.
To verify event collection in the SESA Console
1
Log on to the SESA Console using a SESA user account with sufficient rights
to view SESA events.
The SESA user must belong to a role that has rights to the SESA-enabled
Symantec Event Collector for UNIX Operating Systems.
2
On the Events view tab, in the left pane, expand the appropriate SESA
DataStore.
3
Expand Global Events > All Events.
31
32 Installing the Symantec Event Collector for UNIX Operating Systems
After you install the Symantec Event Collector for UNIX Operating Systems
4
Under the menu bar, click Refresh.
5
Verify that the Application Start event has been logged by the Symantec
Event Collector for UNIX Operating Systems.
After you install the Symantec Event Collector for
UNIX Operating Systems
After you have successfully installed the Symantec Event Collector for UNIX
Operating Systems, you should perform the following tasks:
■
Run LiveUpdate on the SESA Manager.
■
Configure the SESA Manager to increase event throughput.
Running LiveUpdate on the SESA Manager
After installing the Symantec Event Collector for UNIX Operating Systems, you
should run LiveUpdate on each SESA Manager and on each installation of
Symantec Incident Manager (if installed).
As updates become available, you can update the SESA Manager.
To run LiveUpdate on the SESA Manager
1
On the computer on which you installed the SESA Manager, at the command
prompt, change directories to the following:
\Sesa\Bin
2
At the command prompt, type the following:
sesa-lulauncher
Configuring the SESA Manager to increase event throughput
The SESA Manager has many settings that affect the speed at which events
arrive at the SESA Manager for processing and insertion. If you anticipate more
than 1,000 events per minute, you may want to lower the rate of event throttling
or turn throttling off entirely.
Throttling the flow of events to the SESA Manager
The SESA Console has a throttling option available to regulate the flow of events
between the SESA Manager and client computers on which SESA Agents reside.
The Throttle desktop settings determine the delay, in seconds, of batched events
sent by the SESA Agent on the SESA Manager computer to the SESA Agent on
the client computers.
Installing the Symantec Event Collector for UNIX Operating Systems
After you install the Symantec Event Collector for UNIX Operating Systems
The default value for Throttle desktop is 5 seconds, which instructs SESA to wait
5 seconds after an Agent sends a batch of events before sending the next batch.
This severely limits the throughput of SESA Agents and therefore impedes
unwanted intruders from overloading the SESA Manager with unwanted events.
However, the greater the throttle setting, the greater the risk of stagnating
SESA-enabled security products that generate a large number of events.
If you are not seeing events flow to the SESA Manager rapidly enough, you may
want to first attempt lowering the value of the Throttle desktop setting to
resolve the problem. You can set Throttle desktop to 0 to turn off throttling.
To throttle the flow of events to the SESA Manager
1
On the Internet, go to:
https://<IP address or FQDN of the SESA Manager computer>/sesa/ssmc
2
Log on to the SESA Console using a SESA user account that has sufficient
rights to modify SESA configurations.
The SESA user must belong to a Manager role that has rights to the SESAenabled security product.
3
In the SESA Console, on the Configurations view tab, expand
<DomainName.SES> > SESA > Manager ConfigurationSESA.
4
Select the configuration that you want to edit.
5
In the right pane, on the Throttle tab, set the desired value for Throttle
desktop.
This is the time in seconds that SESA waits between sending batched events
from the SESA Agent queues on the SESA client computers to the SESA
Manager. The minimum value is 0, which disables throttling.
6
Click Apply.
33
34 Installing the Symantec Event Collector for UNIX Operating Systems
Uninstalling the Event Collector
Uninstalling the Event Collector
You uninstall the Symantec Event Collector for UNIX Operating Systems by
uninstalling the collector component on the client computer as well as removing
the SESA Integration Package from the SESA Manager computer.
Uninstalling the collector component
Uninstall the collector component from computers that no longer have access to
UNIX operating system log files.
Uninstall the collector component
You use the uninstaller program to uninstall the collector component. If no
other products on the collector component computer use the SESA Agent, the
uninstaller also removes the SESA Agent.
To uninstall the collector component on Linux or Solaris using the
InstallShield uninstaller program
1
On the Event Collector computer, become superuser.
2
Change directories to the Symantec Event Collector for UNIX Operating
Systems installation directory.
On Linux, the default directory is /opt/Symantec/LinuxSyslogCollector/
_uninst.
On Solaris, the default directory is /opt/Symantec/SolarisSyslogCollector/
_uninst.
3
At the command prompt, do one of the following:
■
For the default path, type:
./uninstaller.bin -is:javahome
■
If you used an Event Collector installation path other than the default
value during the installation, type the Java home directory for the
uninstallation. For example:
./uninstaller.bin -is:javahome /opt/Symantec/JRE
4
In the Welcome to the Symantec Event Collector for UNIX Syslog Uninstall
Wizard dialog box, click Next.
Installing the Symantec Event Collector for UNIX Operating Systems
Uninstalling the Event Collector
5
In the Symantec Event Collector for UNIX Syslog will be uninstalled from
the following location dialog box, verify the summary information, and then
click Next.
The Symantec Event Collector for UNIX Operating Systems and the daemon
process for the Event Collector (as well as the SESA Agent, if it is no longer
needed) are removed from the computer.
Directories that contain logs and other files modified after the installation
will remain in the installation directory. It is now safe to delete these files.
6
In the InstallShield Wizard has successfully uninstalled Symantec Event
Collector for UNIX Syslog, click Finish.
To uninstall the collector component on Linux or Solaris in text mode
1
On the Event Collector computer, become superuser.
2
Change directories to the Symantec Event Collector for UNIX Operating
Systems installation directory.
On Linux, the default directory is /opt/Symantec/LinuxSyslogCollector/
_uninst.
On Solaris, the default directory is /opt/Symantec/SolarisSyslogCollector/
_uninst.
3
At the command prompt, do one of the following:
■
For the default path, type:
./uninstaller.bin -console
■
If you used an Event Collector installation path other than the default
value during the installation, type the Java home directory for the
uninstallation. For example:
./uninstaller.bin -is:javahome /opt/Symantec/JRE
4
Follow the on-screen instructions.
Uninstalling the SESA Integration Package
Uninstalling the SESA Integration Package for the Symantec Event Collector for
UNIX Operating Systems removes only the information (such as tables, fields,
and reports) specific to the Symantec Event Collector for UNIX Operating
Systems from the SESA Manager.
You uninstall the SESA Integration Package (SIP) by running the SESA
Integration Wizard. You must run the SESA Integration Wizard to uninstall the
SIP on every SESA Manager on which you installed the SIP for the Symantec
Event Collector for UNIX Operating Systems.
35
36 Installing the Symantec Event Collector for UNIX Operating Systems
Uninstalling the Event Collector
Warning: To protect the integrity of the SESA Directory, if you uninstall the
SESA Integration Package from one SESA Manager, you must uninstall the
SESA Integration Package from all of the SESA Managers on which it was
installed.
Do not uninstall the SESA Integration Package from more than one SESA
Manager at a time.
To uninstall the SESA Integration Package
1
On the SESA Manager computer, insert the Symantec Event Collector for
UNIX Operating Systems CD into the CD-ROM drive.
2
If you have AutoStart enabled and the SESA Integration Wizard window
appears, cancel the SESA Integration Wizard.
You must uninstall the SESA Integration Package using the command
prompt.
3
At the command prompt, navigate to one of the following folders on the CD:
■
On Linux: /LinuxSyslogCollector
■
On Solaris: /SolarisSyslogCollector
4
Navigate to the SESA1.1-SIPI folder on the CD.
5
Type the following:
java -jar setup.jar -uninstall
6
In the Welcome to the SESA Integration Wizard dialog box, click Next.
7
In the SESA Integration Requirements dialog box, do one of the following:
8
■
If the local SESA Manager is running, click Next.
■
If the local SESA Manager is not running, click Cancel.
You must run the SESA Integration Wizard on the computer on which
the SESA Manager is installed.
In the SESA Domain Administrator Information dialog box, do the
following:
■
In the SESA Domain Administrator Name text box, type the name of
the SESA Domain Administrator account.
■
In the SESA Domain Administrator Password text box, type the
password for the SESA Domain Administrator account.
Installing the Symantec Event Collector for UNIX Operating Systems
Installing Java LiveUpdate on the SESA Manager
9
■
In the Host Name or IP address of SESA Directory text box, type the IP
address of the computer on which the SESA Directory is installed.
If you are using authenticated SSL instead of the SESA default,
anonymous SSL, you must type the host name of the SESA Directory
computer. For example, mycomputer.com.
■
In the Secure Directory Port text box, type the number of the SESA
Directory secure port.
By default, the port number is 636.
Click Next.
10 In the Ready to proceed dialog box, do one of the following:
■
If you are ready to proceed, click Next.
■
If you want to change your settings, click Back.
11 In the Configuring Your System dialog box, after the process is completed,
click Next.
12 In the SESA Integration Successful dialog box, click Finish.
Installing Java LiveUpdate on the SESA Manager
Included with the Symantec Event Collector for UNIX Operating Systems is a
SESA Integration Package that installs the Symantec Java LiveUpdate feature on
the SESA Manager. This package can be installed to allow for the configuration
of Java LiveUpdate through the SESA Console.
After Java LiveUpdate is registered with the SESA Manager, you can create
configurations to be distributed to any SESA-enabled product that uses Java
LiveUpdate.
The Java LiveUpdate configuration controls how Java LiveUpdate will execute
(for example, which proxies and hosts to use). The configuration does not
control the scheduling of LiveUpdate.
See “Using Java LiveUpdate” on page 49.
To install Java LiveUpdate on the SESA Manager
1
On the SESA Manager computer, insert the Symantec Event Collector for
UNIX Operating Systems CD into the CD-ROM drive.
2
If the installation program starts automatically, click Cancel, and then click
Exit to stop the automatic installation.
3
On the Windows taskbar, click Start > Run.
37
38 Installing the Symantec Event Collector for UNIX Operating Systems
Installing Java LiveUpdate on the SESA Manager
4
At the command prompt, type the following:
cmd
5
Press Enter.
6
On the CD-ROM drive, change directories as follows:
cd \JLU20SIPI
7
To launch the installation, type the following command:
java -jar setup.jar
8
In the Welcome to the SESA Integration dialog box, click Next.
9
In the SESA Integration Requirements dialog box, verify that you have the
SESA Manager running on this computer, and then do one of the following:
■
If you have satisfied the requirements, click Next.
■
If you have not satisfied the requirements, click Cancel.
The setup program closes so that you can install the necessary files.
10 In the SESA Domain Administrator Information dialog box, do the
following:
■
In the SESA Domain Administrator Name text box, type the name of
the SESA Domain Administrator account.
■
In the SESA Domain Administrator Password text box, type the
password for the SESA Domain Administrator account.
■
In the IP address of SESA Directory text box, type the IP address of the
computer on which the SESA Directory is installed (this may be the
same as the SESA Manager IP address if both are installed on the same
computer).
If you are using authenticated SSL instead of the SESA default,
anonymous SSL, you must type the host name of the SESA Directory
computer. For example, mycomputer.com.
For more information on SESA default, anonymous SSL, and upgrading
to authenticated SSL, see the Symantec Enterprise Security Architecture
Installation Guide.
■
In the Secure Directory Port text box, type the number of the SESA
Directory secure port.
By default, the port number is 636.
11 Click Next.
12 In the Ready to proceed dialog box, do one of the following:
■
If you are ready to proceed, click Next.
■
If you want to change your settings, click Back.
Installing the Symantec Event Collector for UNIX Operating Systems
Installing Java LiveUpdate on the SESA Manager
13 In the Configuring Your System dialog box, view the progress of the Java
LiveUpdate installation, and then click Next.
14 In the SESA Integration Successful dialog box, verify that your installation
is complete, and then click Finish.
39
40 Installing the Symantec Event Collector for UNIX Operating Systems
Installing Java LiveUpdate on the SESA Manager
Chapter
3
Using the Symantec Event
Collector for UNIX
Operating Systems
This chapter includes the following topics:
■
Configuring the Event Collector
■
Viewing reports for the Event Collector
■
Creating custom reports
■
Integrating with Symantec Incident Manager
■
Starting and stopping the Event Collector and SESA Agent daemons
■
Configuring the SESA Agent
■
Using LiveUpdate technology
Configuring the Event Collector
You can configure the Symantec Event Collector for UNIX Operating Systems to
filter events that you do not want to forward to the SESA Manager.
Filtering events
You perform event filtering by modifying the DE_CustomerRules.rule file in the
/<UNIX>SyslogCollector/kb directory (where <UNIX> is either Linux or Solaris).
The DE_CustomerRules.rule file is a special text file that you can edit to
determine how some events will be processed by the Event Collector.
42 Using the Symantec Event Collector for UNIX Operating Systems
Configuring the Event Collector
Filter events
Events are filtered based on their Standard Event Code. You must know the
Standard Event Code for an event before you can filter it. You determine the
Standard Event Code for a particular event by examining it in the SESA Console.
Then you can filter events so that they are not sent to the SESA Manager.
To determine the Standard Event Code for an event
1
Log on to the SESA Console using a SESA user account with sufficient rights
to view SESA events.
2
On the Events view tab, in the left pane, expand the top-level domain, and
then expand SESA DataStore.
3
Do one of the following:
■
Expand Host Intrusion Detection.
■
Expand Intrusion Detection.
4
Expand Symantec Event Collector for <UNIX> Syslog (where <UNIX> is
either Linux or Solaris).
5
Click All Events.
6
In the right pane, locate and double-click the event of the type that you want
to filter.
7
In the Event Details window, locate the Intrusion Symantec Signature field.
The string value of this field (such as SNMP_PROTOS_AttackTool) will be
the value on which you will filter.
To filter UNIX operating system events from being sent to the SESA Manager
1
On the Event Collector computer, log on as Administrator.
2
In a text editor, open the DE_CustomerRules.rule file in the Symantec
Event Collector for UNIX Operating Systems installation directory.
The default directory is /opt/Symantec/<UNIX>SyslogCollector/kb (where
<UNIX> is either Linux or Solaris).
Using the Symantec Event Collector for UNIX Operating Systems
Viewing reports for the Event Collector
3
Copy and paste the indicated sample area in the file header to make a
duplicate.
This serves as a template so you can replace the ExampleAlert value with
the Standard Event Code that you want to filter. For example, the following
lines will filter out any events with the Standard Event Code of
SNMP_PROTOS_AttackTool:
If {GenericAlert} is “SNMP_PROTOS_AttackTool” then
GoalState;
Endif
4
Delete the comment marker symbol (#) from the duplicated lines to make
them active.
Viewing reports for the Event Collector
The Symantec Event Collector for UNIX Operating Systems lets you use the
SESA Console to view events that are logged by the UNIX operating system.
The SESA Integration Package (SIP) that you installed on the SESA Manager
includes predefined reports for Symantec Event Collector for UNIX Operating
Systems events.
The reports that are specific to UNIX operating system events are stored in the
Symantec Event Collector for UNIX Operating Systems folder within the
following Event Families:
■
Host Intrusion Detection Event Family
■
Intrusion Detection Event Family
To view reports for the Event Collector
1
Log on to the SESA Console using a SESA user account with sufficient rights
to view SESA reports.
2
On the Events view tab, in the left pane, expand the top-level domain, and
then expand SESA DataStore.
3
Do one of the following:
4
■
Expand Host Intrusion Detection.
■
Expand Intrusion Detection.
Expand Symantec Event Collector for <UNIX> Syslog (where <UNIX> is
either Linux or Solaris).
43
44 Using the Symantec Event Collector for UNIX Operating Systems
Creating custom reports
Table 3-1 describes the reports that are specific to the Symantec Event Collector
for UNIX Operating Systems.
Table 3-1
Symantec Event Collector for UNIX Operating Systems reports
Report name
Format
Description
All Events
Table
Displays all events that are logged by the Event Collector.
Last 30 days
Table
Displays all events that are logged by the Event Collector
in the last 30 days.
Last 24 hours
Table
Displays all events that are logged by the Event Collector
in the last 24 hours.
Last 8 hours
Table
Displays all events that are logged by the Event Collector
in the last 8 hours.
By Severity
Pie chart
Displays the distribution of UNIX operating system
events by SESA severity level.
By Generic Alert
Pie chart
Displays the most frequent Generic Alert codes reported
by the Event Collector. The Generic Alert code is a
Symantec normalized code that uniquely identifies a
security event.
Creating custom reports
In addition to the reports in the Intrusion Detection and the Host Intrusion
Detection folders, you can create customized event reports that display data
that interests your organization.
For example, to create a report that shows all of the connection attempts for a
specific IP address, you can display the All Events report and add a filter that
reports the IP address in which you are interested.
For more information, see the Symantec Enterprise Security Architecture
Administrator’s Guide.
Integrating with Symantec Incident Manager
If you have Symantec Incident Manager installed, you can leverage many
powerful event escalation and incident management features to do the
following:
■
Manually escalate an event or selection of events to an incident.
■
Assign incidents to operational personnel and track status.
Using the Symantec Event Collector for UNIX Operating Systems
Starting and stopping the Event Collector and SESA Agent daemons
■
Receive targeted information describing incidents with known signatures
and the business impact.
For more information, see the Symantec Incident Manager Implementation
Guide.
Starting and stopping the Event Collector and SESA
Agent daemons
You can start or stop the Event Collector or the SESA Agent daemon if
necessary.
Start and stop the Event Collector and SESA Agent daemons
The Symantec Event Collector for UNIX Operating Systems runs as a daemon on
the host on which it is installed. To start and stop the Symantec Event Collector
for UNIX Operating Systems, you start and stop the daemon as necessary.
To start or stop the Event Collector daemon on Linux or Solaris
1
On the computer on which you installed the Event Collector, become
superuser.
2
At the command prompt, do one of the following:
Start the Symantec Event
Collector for UNIX Operating
Systems daemon
Stop the Symantec Event
Collector for UNIX Operating
Systems daemon
Do one of the following:
■
On Linux, type:
/etc/rc3.d/S99LinuxSyslogCollector
start
■
On Solaris, type:
/etc/rc3.d/S99SolarisSyslogCollector
start
Do one of the following:
■
On Linux, type:
/etc/rc3.d/S99LinuxSyslogCollector
stop
■
On Solaris, type:
/etc/rc3.d/S99SolarisSyslogCollector
stop
45
46 Using the Symantec Event Collector for UNIX Operating Systems
Configuring the SESA Agent
To start or stop the SESA Agent daemon on Linux or Solaris
1
On the computer on which you installed the SESA Agent, become superuser.
2
At the command prompt, do one of the following:
■
To start the SESA Agent daemon, type the following command:
/etc/rc3.d/S99sesagentd start
■
To stop the SESA Agent daemon, type the following command:
/etc/rc3.d/S99sesagentd stop
Configuring the SESA Agent
The SESA Agent uses default logging parameters that are appropriate for most
event collection circumstances. Table 3-2 lists the logging parameters.
Table 3-2
SESA Agent logging parameters
Logging
parameter
Default value
Description
Listen IP
127.0.0.1
The IP address on which the SESA Agent
listens.
Listen port
8086
The port on which the SESA Agent listens.
Management servlet EventLogger
The SESA Management servlet to which the
SESA Agent sends messages.
Note: This parameter should be changed with
caution.
Disconnected mode
retry interval
30 minutes
The retry interval for sending events to the
SESA Manager, when the SESA Manager
cannot be contacted.
Maximum queue
size
2000 kb
The maximum size of the queue in kilobytes.
Any subsequent log requests are refused.
App flush size
15 seconds
App flush time
50 kb
App flush count
35
The triggers that, when tripped, send
outbound SESA Agent data to the SESA
Manager.
Note: This applies only to batch events. Direct
events are always sent as soon as possible.
Using the Symantec Event Collector for UNIX Operating Systems
Using LiveUpdate technology
Table 3-2
SESA Agent logging parameters
Logging
parameter
Default value
Description
App spool size
100 kb
The size in kilobytes of the Event Collector
queue that the SESA Agent holds in memory
when not able to send the normal queue to the
SESA Manager. If the queue exceeds this size
and it still needs to grow, the queue is written
to the hard disk.
Encrypt config file
false
If true, the configuration file that is located on
the computer with the SESA Agent is
encrypted.
You can adjust these parameters in the SESA Console, on the Configurations
view tab.
For more information, see the Symantec Enterprise Security Architecture
Administrator’s Guide.
Using LiveUpdate technology
LiveUpdate technology lets installed Symantec products connect to a server
automatically for program updates. The connection is made through an HTTP or
FTP site. Using LiveUpdate technology assures that you always have the most
recent version of your licensed Symantec software installed.
Running LiveUpdate for the Event Collector manually
On a Solaris or Linux computer, LiveUpdate is invoked by running the installed
LiveUpdate.sh script. If you have distributed a SESA configuration for Java
LiveUpdate to the Event Collector computer, it will use those settings when
LiveUpdate runs.
To run LiveUpdate for the Event Collector manually
1
On the Event Collector computer, become superuser.
2
At the command prompt, change directories to:
/opt/Symantec/LiveUpdate
47
48 Using the Symantec Event Collector for UNIX Operating Systems
Using LiveUpdate technology
3
Do one of the following:
■
On Linux, type:
./liveupdate.sh LinuxSyslogCollector en_US
■
On Solaris, type:
./liveupdate.sh SolarisSyslogCollector en_US
About scheduling LiveUpdate for the Event Collector
The Event Collector installation will schedule automatic LiveUpdate sessions to
ensure that you regularly obtain the latest updates. Two LiveUpdate sessions
are scheduled at the following times:
■
Every Monday at 1AM
This session updates the Event Collector rules and knowledge base files.
■
Every Tuesday at 1AM
This session updates the Event Collector code.
On Solaris or Linux, the two new cron jobs are automatically added to the
crontab file. Ensure that the cron job has root user access to successfully execute
the command.
Appendix
A
Using Java LiveUpdate
This chapter includes the following topics:
■
Viewing Java LiveUpdate events
■
About Java LiveUpdate configurations
■
Working with Java LiveUpdate configurations
■
Editing Java LiveUpdate configuration properties
■
Modifying a Java LiveUpdate configuration
■
Distributing a Java LiveUpdate configuration
Viewing Java LiveUpdate events
When Java LiveUpdate is integrated with SESA, you can view events that report
the status of LiveUpdate sessions on computers in your network environment.
To see Java LiveUpdate events in the SESA Console, the SESA Agent, which is
installed with Java LiveUpdate on each Java LiveUpdate client computer, must
first establish a connection with the SESA Manager.
View Java LiveUpdate events
You can view the success or failure of this connection on the Events view tab of
the SESA Console. Any Successful Agent Start-up Events or Failed Agent Startup Events are listed in the left pane in the System Events folder’s SESA System
subfolder.
All other Java LiveUpdate events appear in the left pane in the System Events
folder’s LiveUpdate subfolder.
50 Using Java LiveUpdate
About Java LiveUpdate configurations
To view SESA Agent startup events
1
On the Events view tab, in the left pane, expand SESA DataStore.
2
Under SESA DataStore, expand System Events > SESA System.
3
Select one of the following reports:
■
Successful Agent Start-up Events
Failed Agent Start-up Events
The status bar in the lower-left corner of the window indicates how many
events are in the report and which events you are viewing.
■
To view all other Java LiveUpdate events
1
On the Events view tab, in the left pane, expand SESA DataStore.
2
Under SESA DataStore, expand System Events > LiveUpdate.
3
Select any of the reports.
The status bar in the lower-left corner of the window indicates how many
events are in the report and which events you are viewing.
About Java LiveUpdate configurations
Java LiveUpdate installs with a default configuration, as specified in the
LiveUpdate.conf configuration file. However, you may want to modify a
configuration or distribute additional configurations to Java LiveUpdate client
computers.
You can use the SESA Console to create and distribute additional LiveUpdate
configurations to one or more computers on which Java LiveUpdate is installed.
In addition, SESA provides a Default Java LiveUpdate configuration, which you
can also configure for distribution to Java LiveUpdate computers.
When you create or modify a Java LiveUpdate configuration, you must specify
which Java LiveUpdate computers to associate with the configuration. You can
specify individual computers, organizational units, configuration units, or any
combination that suits your network topology. You must also specify the SESA
organizational unit to which the computer or computers belong. As an option,
you can specify any configuration groups to which the computer or computers
belong.
Java LiveUpdate configurations let you specify network proxy server settings
that may be required for Java LiveUpdate sessions in your network
environment. You can also specify additional LiveUpdate HTTP or FTP servers
to use for downloading product updates. In addition, you can create a
LiveUpdate configuration to specify that certain LiveUpdate computers use a
LiveUpdate configuration file other than the default one. You can specify that
Using Java LiveUpdate
Working with Java LiveUpdate configurations
certain LiveUpdate computers use an internal LiveUpdate Administration host
server. Java LiveUpdate configurations also let you specify the maximum size of
LiveUpdate log files.
To create a new Java LiveUpdate configuration, you use the Create a new
Configuration Wizard.
After the configuration is created, you can make additional changes by selecting
Properties.
You can also configure the Default Java LiveUpdate configuration.
See “Working with Java LiveUpdate configurations” on page 51.
See “Distributing a Java LiveUpdate configuration” on page 54.
Working with Java LiveUpdate configurations
You can create a new Java LiveUpdate configuration, or modify an existing one,
such as the Default configuration.
Work with Java LiveUpdate configurations
Before you can distribute a Java LiveUpdate configuration, you must first
configure it for distribution. You can do this by modifying an existing
configuration, such as the Default Java LiveUpdate configuration, or you can
create a new Java LiveUpdate configuration.
To create a new LiveUpdate configuration, you must use the Create a new
Configuration wizard.
After you have created or modified a configuration as appropriate, you can
distribute it to Java LiveUpdate computers.
See “Distributing a Java LiveUpdate configuration” on page 54.
To modify an existing Java LiveUpdate configuration
1
Edit the Java LiveUpdate configuration properties to add the computers that
will use the Java LiveUpdate configuration.
See “Editing Java LiveUpdate configuration properties” on page 53.
2
Modify the Java LiveUpdate configuration to specify configuration settings.
See “Modifying a Java LiveUpdate configuration” on page 53.
To create a new Java LiveUpdate configuration
1
On the Configurations view tab, in the left pane, under the top-level SESA
domain, expand LiveUpdate > Java LiveUpdate.
2
Right-click Java LiveUpdate, and then click New.
51
52 Using Java LiveUpdate
Working with Java LiveUpdate configurations
3
In the first dialog box of the Create a new Configuration wizard, click Next.
4
In the General dialog box, type a configuration name, and optionally, a
description, and then click Next.
5
In the Computers dialog box, click Add.
6
In the Searching for Computers dialog box, in the Computer name text box,
type a specific computer name or a combination of letters and an asterisk,
and then click Search.
By default, the Computer name text box contains an asterisk (*), which
serves as a wildcard character, displaying all computers that have been
defined.
7
On the Found tab, select one or more computers, and then click OK.
8
In the Computers dialog box, repeat steps 5 through 7 as necessary, and then
click Next.
9
In the Configuration Groups dialog box, do one of the following:
■
If your computer or computers belong to a configuration group, click
Add, select the configuration group to which the computer or
computers belong, click OK, and then in the Configuration Groups
dialog box, click Next.
■
If your computer or computers do not belong to a configuration group,
click Next.
10 In the Organizational Units dialog box, to associate an organizational unit
with the selected computer, click Add.
11 In the Browse for Organizational Units dialog box, on the Found tab, select
the organizational unit to which the computer or computers belong, and
then click OK.
12 Repeat steps 10 and 11 as necessary.
13 Click Next, and then click Next again.
14 Review the Configuration summary, and then click Finish.
15 Click Close.
Using Java LiveUpdate
Editing Java LiveUpdate configuration properties
Editing Java LiveUpdate configuration properties
You must add the computers that will use the Java LiveUpdate configuration
before you can distribute the configuration. At a minimum, you must specify the
computer names and associated organizational units.
To edit Java LiveUpdate configuration properties
1
On the Configurations view tab, in the left pane, under the top-level SESA
domain, expand LiveUpdate > Java LiveUpdate.
2
Under Java LiveUpdate, right-click the configuration that you want to
modify, and then click Properties.
3
In the Configuration Properties dialog box, on the Computers tab, to add a
computer, click Add.
4
In the Searching for Computers dialog box, in the Computer name text box,
type a specific computer name or a combination of letters and an asterisk,
and then click Search.
By default, the Computer name text box contains an asterisk (*), which
serves as a wildcard character, displaying all computers that have been
defined.
5
On the Found tab, select one or more computers, and then click OK.
6
If your computer is associated with a configuration group, on the
Configuration Groups tab, click Add.
7
In the Find Configuration Groups dialog box, on the Found tab, select the
configuration group to which the computer belongs, and then click OK.
8
On the Organizational Units tab, to associate an organizational unit with the
selected computer, click Add.
9
In the Browse for Organizational Units dialog box, on the Found tab, select
the organizational unit to which the computer belongs, and then click OK.
10 Repeat steps 4 through 9 as necessary.
11 In the Configuration Properties dialog box, click OK.
Modifying a Java LiveUpdate configuration
To change an existing Java LiveUpdate configuration, you modify one or more
settings on the Java LiveUpdate tabs.
53
54 Using Java LiveUpdate
Distributing a Java LiveUpdate configuration
To modify a Java LiveUpdate configuration
1
On the Configurations view tab, in the left pane, under the top-level SESA
domain, expand LiveUpdate > Java LiveUpdate.
2
Under Java LiveUpdate, select the configuration that you want to modify.
Java LiveUpdate configuration settings tabs appear in the right pane.
3
Modify the configuration using the following tabs as necessary:
■
General configuration settings
■
Java LiveUpdate configuration settings
■
Hosts configuration settings
Distributing a Java LiveUpdate configuration
You can distribute a Java LiveUpdate configuration to any of the following
computer platforms:
■
Windows 32-bit
■
Linux
■
Solaris
■
AIX
■
HP-UX
■
Macintosh
To successfully distribute a Java LiveUpdate configuration, you must have
specified the target computers and organizational units when you created or
modified the Java LiveUpdate configuration.
To distribute a Java LiveUpdate configuration
1
On the Configurations view tab, in the left pane, under the top-level SESA
domain, expand LiveUpdate > Java LiveUpdate.
2
Under Java LiveUpdate, right-click a configuration, and then click
Distribute.
3
When you are prompted to distribute the configuration, click Yes.
A message is sent to the computers that are associated with the Java
LiveUpdate configuration, instructing them to contact the SESA Manager
for a new configuration.
Index
A
J
alerting, centralized 9
Application Event, category 13, 14
Java LiveUpdate
installing 37
running 47
scheduling 48
using 47
C
categories, of events 13
centralized
alerting 9
logging 9
reporting 9
collector application module 12
connectivity, ensuring 22
Critical, event severity level 13
D
data
managing for events 14
preparing for collection 19
processing, Event Collector 13
report generation 9
DE_CustomerRules.rule 41
E
events
categories 13
severities 13
throttling 32
I
incidents 9
Informational, event severity level 13
installation
Java LiveUpdate 37
planning for 17
SESA integration components 23
Symantec Event Collector for UNIX Operating
Systems 23
verifying 28
L
log data, preparing for collection 19
log files
installation requirement 20
monitoring 9
reading 25
logging, centralized 9
M
Major, event severity level 13
Minor, event severity level 13
N
notifications, configuring for events 9
O
overview, SESA 10
P
preinstallation configuration 19
products supported 9
Q
queue size 13
R
reporting, centralized 9
reports
All Events 44
By Generic Alert 44
56 Index
reports (continued)
By Severity 44
customizing 44
Last 24 hours 44
Last 30 days 44
Last 8 hours 44
S
Security, event category 13
SESA
about 10
events, mapping 10
integration components, installing 23
SESA Agent
communication and configuration of events 18
communication with SESA Manager 12
events logged in 13
requirements 20, 21
SESA Console
accessing event information through 10
and the Application Event category 14
centrally viewing and managing reports in 18
changing
queue size 13
the SESA Agent IP address and port
number 21
configuring Java LiveUpdate 37
creating and distributing LiveUpdate
configurations 50
reports added to 11
throttling the flow of events 32
verifying
event collection 31
SESA Agent connectivity 30
that the Event Collector appears in 29
viewing
events in 10
Java LiveUpdate events in 49
SESA DataStore
collected events 11, 14
events stored in 9
requirements 22
SESA Integration Package
installing 23
uninstalling 35
SESA Integration Wizard 11
SESA Manager
requirements 22
throttling the flow of events 32
SESA Manager (continued)
updating on demand 32
verifying IP address and port 30
severities, of events 13
Standard Event Code 12
supported products 9
Symantec Event Collector for UNIX Operating
Systems
about 9
components of 18
installing 23
starting and stopping daemon 45
system requirements for SESA integration 20
uninstalling 34
verifying operation 34
Symantec Incident Manager 12, 44
system requirements
Event Collector 20
SESA Agent 20, 21
SESA DataStore 22
SESA Integration Package 21
SESA Manager 22
T
throttling event flow 32
U
uninstallation of Event Collector 34
updates, SESA Manager 32
W
Warning, event severity level 13