1
SQL Anywhere® Studio
Security Guide
Part number: DC38177-01-0902-01
Last modified: October 2004
Copyright © 1989–2004 Sybase, Inc. Portions copyright © 2001–2004 iAnywhere Solutions, Inc. All rights reserved.
No part of this publication may be reproduced, transmitted, or translated in any form or by any means, electronic, mechanical, manual, optical, or
otherwise, without the prior written permission of Sybase, Inc.
Sybase, SYBASE (logo), AccelaTrade, ADA Workbench, Adaptable Windowing Environment, Adaptive Component Architecture, Adaptive Server,
Adaptive Server Anywhere, Adaptive Server Enterprise, Adaptive Server Enterprise Monitor, Adaptive Server Enterprise Replication, Adaptive
Server Everywhere, Adaptive Server IQ, Adaptive Warehouse, AnswerBase, Anywhere Studio, Application Manager, AppModeler,
APT Workbench, APT-Build, APT-Edit, APT-Execute, APT-Library, APT-Translator, ASEP, AvantGo, AvantGo Application Alerts, AvantGo
Mobile Delivery, AvantGo Mobile Document Viewer, AvantGo Mobile Inspection, AvantGo Mobile Marketing Channel, AvantGo Mobile Pharma,
AvantGo Mobile Sales, AvantGo Pylon, AvantGo Pylon Application Server, AvantGo Pylon Conduit, AvantGo Pylon PIM Server, AvantGo
Pylon Pro, Backup Server, BayCam, Bit-Wise, BizTracker, Certified PowerBuilder Developer, Certified SYBASE Professional, Certified SYBASE
Professional Logo, ClearConnect, Client Services, Client-Library, CodeBank, Column Design, ComponentPack, Connection Manager, Convoy/DM,
Copernicus, CSP, Data Pipeline, Data Workbench, DataArchitect, Database Analyzer, DataExpress, DataServer, DataWindow, DB-Library,
dbQueue, Developers Workbench, Direct Connect Anywhere, DirectConnect, Distribution Director, Dynamic Mobility Model, Dynamo, e-ADK,
E-Anywhere, e-Biz Integrator, EC Gateway, ECMAP, ECRTP, eFulfillment Accelerator, Electronic Case Management, Embedded SQL, EMS,
Enterprise Application Studio, Enterprise Client/Server, Enterprise Connect, Enterprise Data Studio, Enterprise Manager, Enterprise Portal (logo),
Enterprise SQL Server Manager, Enterprise Work Architecture, Enterprise Work Designer, Enterprise Work Modeler, eProcurement Accelerator,
eremote, Everything Works Better When Everything Works Together, EWA, E-Whatever, Financial Fusion, Financial Fusion (and design), Financial
Fusion Server, Formula One, Fusion Powered e-Finance, Fusion Powered Financial Destinations, Fusion Powered STP, Gateway Manager,
GeoPoint, GlobalFIX, iAnywhere, iAnywhere Solutions, ImpactNow, Industry Warehouse Studio, InfoMaker, Information Anywhere, Information
Everywhere, InformationConnect, InstaHelp, Intelligent Self-Care, InternetBuilder, iremote, iScript, Jaguar CTS, jConnect for JDBC,
KnowledgeBase, Logical Memory Manager, Mail Anywhere Studio, MainframeConnect, Maintenance Express, Manage Anywhere Studio, MAP,
M-Business Channel, M-Business Network, M-Business Server, MDI Access Server, MDI Database Gateway, media.splash, Message Anywhere
Server, MetaWorks, MethodSet, ML Query, MobiCATS, My AvantGo, My AvantGo Media Channel, My AvantGo Mobile Marketing, MySupport,
Net-Gateway, Net-Library, New Era of Networks, Next Generation Learning, Next Generation Learning Studio, O DEVICE, OASiS, OASiS logo,
ObjectConnect, ObjectCycle, OmniConnect, OmniSQL Access Module, OmniSQL Toolkit, Open Biz, Open Business Interchange, Open Client,
Open Client/Server, Open Client/Server Interfaces, Open ClientConnect, Open Gateway, Open Server, Open ServerConnect, Open Solutions,
Optima++, Orchestration Studio, Partnerships that Work, PB-Gen, PC APT Execute, PC DB-Net, PC Net Library, PhysicalArchitect, Pocket
PowerBuilder, PocketBuilder, Power Through Knowledge, power.stop, Power++, PowerAMC, PowerBuilder, PowerBuilder Foundation Class
Library, PowerDesigner, PowerDimensions, PowerDynamo, Powering the New Economy, PowerJ, PowerScript, PowerSite, PowerSocket,
Powersoft, Powersoft Portfolio, Powersoft Professional, PowerStage, PowerStudio, PowerTips, PowerWare Desktop, PowerWare Enterprise,
ProcessAnalyst, QAnywhere, Rapport, Relational Beans, RepConnector, Replication Agent, Replication Driver, Replication Server, Replication
Server Manager, Replication Toolkit, Report Workbench, Report-Execute, Resource Manager, RW-DisplayLib, RW-Library, S.W.I.F.T. Message
Format Libraries, SAFE, SAFE/PRO, SDF, Secure SQL Server, Secure SQL Toolset, Security Guardian, SKILS, smart.partners, smart.parts,
smart.script, SQL Advantage, SQL Anywhere, SQL Anywhere Studio, SQL Code Checker, SQL Debug, SQL Edit, SQL Edit/TPU,
SQL Everywhere, SQL Modeler, SQL Remote, SQL Server, SQL Server Manager, SQL Server SNMP SubAgent, SQL Server/CFT,
SQL Server/DBM, SQL SMART, SQL Station, SQL Toolset, SQLJ, Stage III Engineering, Startup.Com, STEP, SupportNow, Sybase Central,
Sybase Client/Server Interfaces, Sybase Development Framework, Sybase Financial Server, Sybase Gateways, Sybase Learning Connection,
Sybase MPP, Sybase SQL Desktop, Sybase SQL Lifecycle, Sybase SQL Workgroup, Sybase Synergy Program, Sybase User Workbench, Sybase
Virtual Server Architecture, SybaseWare, Syber Financial, SyberAssist, SybMD, SyBooks, System 10, System 11, System XI (logo), SystemTools,
Tabular Data Stream, The Enterprise Client/Server Company, The Extensible Software Platform, The Future Is Wide Open, The Learning
Connection, The Model For Client/Server Solutions, The Online Information Center, The Power of One, TotalFix, TradeForce, Transact-SQL,
Translation Toolkit, Turning Imagination Into Reality, UltraLite, UltraLite.NET, UNIBOM, Unilib, Uninull, Unisep, Unistring, URK Runtime Kit
for UniCode, Versacore, Viewer, VisualWriter, VQL, Warehouse Control Center, Warehouse Studio, Warehouse WORKS, WarehouseArchitect,
Watcom, Watcom SQL, Watcom SQL Server, Web Deployment Kit, Web.PB, Web.SQL, WebSights, WebViewer, WorkGroup SQL Server,
XA-Library, XA-Server, and XP Server are trademarks of Sybase, Inc. or its subsidiaries.
All other trademarks are property of their respective owners.
ii
Contents
About This Manual
SQL Anywhere Studio documentation . . . . . .
Documentation conventions . . . . . . . . . . . .
The Adaptive Server Anywhere sample database
Finding out more and providing feedback . . . .
.
.
.
.
.
.
.
.
.
.
.
.
.
.
.
.
.
.
.
.
.
.
.
.
.
.
.
.
I Basic Security Information
v
vi
ix
xi
xii
1
1 Keeping Your Data Secure
Security features overview . . . . . . . . . . . . .
Controlling database access . . . . . . . . . . .
Auditing database activity . . . . . . . . . . . . .
Running the database server in a secure fashion
Encrypting a database . . . . . . . . . . . . . . .
Encrypting portions of a database . . . . . . . .
Keeping your Windows CE database secure . . .
Security tips . . . . . . . . . . . . . . . . . . . . .
.
.
.
.
.
.
.
.
3
4
6
9
13
15
20
23
25
2 Adaptive Server Anywhere Transport-Layer Security
Introduction . . . . . . . . . . . . . . . . . . . . . . . . . . . .
Setting up transport-layer security . . . . . . . . . . . . . . .
Creating digital certificates . . . . . . . . . . . . . . . . . . .
Starting the database server with transport-layer security . .
Configuring client applications to use transport-layer security
Using transport-layer security for web services . . . . . . . .
27
28
30
31
39
41
44
.
.
.
.
.
.
.
.
.
.
.
.
.
.
.
.
.
.
.
.
.
.
.
.
.
.
.
.
.
.
.
.
.
.
.
.
.
.
.
.
.
.
.
.
.
.
.
.
II Configuring Adaptive Server Anywhere in a C2Compliant Manner
47
3 Installation
Hardware installation . . . . . . . . . . . . . . .
Operating system installation . . . . . . . . . .
Adaptive Server Anywhere software installation
Creating a database . . . . . . . . . . . . . . .
Running the database engine . . . . . . . . . .
.
.
.
.
.
.
.
.
.
.
.
.
.
.
.
.
.
.
.
.
.
.
.
.
.
.
.
.
.
.
.
.
.
.
.
.
.
.
.
.
49
50
51
52
56
58
iii
4 Auditing
Enabling and disabling auditing
Reading auditing output . . . .
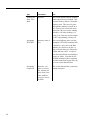
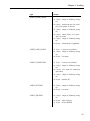
Audit records . . . . . . . . . .
Administration of audit records
Auditing of database utilities . .
Correlating audit records . . .
.
.
.
.
.
.
.
.
.
.
.
.
.
.
.
.
.
.
.
.
.
.
.
.
.
.
.
.
.
.
.
.
.
.
.
.
.
.
.
.
.
.
.
.
.
.
.
.
.
.
.
.
.
.
.
.
.
.
.
.
61
62
63
64
71
72
73
5 Restrictions and Other Security Concerns
Restrictions . . . . . . . . . . . . . . . . . . .
Security warnings . . . . . . . . . . . . . . .
Changing ownership on nested objects . . .
Revoking DBA authority . . . . . . . . . . . .
The TCB subset . . . . . . . . . . . . . . . .
.
.
.
.
.
.
.
.
.
.
.
.
.
.
.
.
.
.
.
.
.
.
.
.
.
.
.
.
.
.
.
.
.
.
.
.
.
.
.
.
.
.
.
.
.
75
76
79
80
82
83
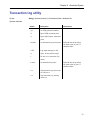
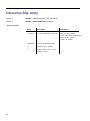
6 Restricted Syntax
Restricted syntax . . . .
Database engine/server
Initialization utility . . . .
Service creation utility .
Transaction log utility . .
Interactive SQL utility .
.
.
.
.
.
.
.
.
.
.
.
.
.
.
.
.
.
.
.
.
.
.
.
.
.
.
.
.
.
.
.
.
.
.
.
.
.
.
.
.
.
.
.
.
.
.
.
.
.
.
.
.
.
.
85
86
87
91
92
93
94
7 Integrated Logins
Using integrated logins . . . . . . . . . . . . . . . . . . . . . .
95
96
8 Connecting to the Adaptive Server Anywhere Service
Connecting to the Adaptive Server Anywhere service . . . . .
97
98
.
.
.
.
.
.
.
.
.
.
.
.
.
.
.
.
.
.
.
.
.
.
.
.
.
.
.
.
.
.
.
.
.
.
.
.
.
.
.
.
.
.
.
.
.
.
.
.
.
.
.
.
.
.
.
.
.
.
.
.
.
.
.
.
.
.
.
.
.
.
.
.
.
.
.
.
.
.
.
.
.
.
.
.
.
.
.
.
.
.
.
.
.
.
.
.
.
.
.
.
.
.
.
.
.
.
.
.
.
.
.
.
.
.
9 The Adaptive Server Anywhere C2 Patch
99
The Adaptive Server Anywhere C2 patch . . . . . . . . . . . 100
10 More Information
101
Where to look for more information . . . . . . . . . . . . . . . 102
Index
iv
103
About This Manual
Subject
This book describes security features available in SQL Anywhere Studio. It
includes basic security information, as well as instructions on how to operate
the current version of SQL Anywhere Studio in a manner that is comparable
to the C2-certified environment.
This book does not include all information on security-related features.
Current software is not C2 certified
Adaptive Server Anywhere version 7.0 achieved the C2 security certification of the US federal government. The C2 section of this manual describes
how to operate the current version of Adaptive Server Anywhere in a
manner comparable to the C2-certified configuration.
This book is not the certified document describing C2 compliance. The certified documentation is available from the Sybase Web site at http://www.sybase.com/detail?id=1010458 . Nothing in this document should be taken
to suggest that the current version of the software is C2 compliant. Use
of the phrase “equivalent to the C2-certified configuration” and similar
phrases does not imply actual C2 compliance. The only way to operate
in a C2-certified manner is to use the C2-certified release of the software
according to the C2-certified documentation.
Audience
This manual is for users of Adaptive Server Anywhere who wish to make
use of the security features in the software, or run the software in a manner
equivalent to the C2-certified configuration.
v
SQL Anywhere Studio documentation
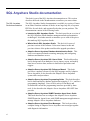
This book is part of the SQL Anywhere documentation set. This section
describes the books in the documentation set and how you can use them.
The SQL Anywhere
Studio documentation
The SQL Anywhere Studio documentation is available in a variety of forms:
in an online form that combines all books in one large help file; as separate
PDF files for each book; and as printed books that you can purchase. The
documentation consists of the following books:
♦ Introducing SQL Anywhere Studio This book provides an overview of
the SQL Anywhere Studio database management and synchronization
technologies. It includes tutorials to introduce you to each of the pieces
that make up SQL Anywhere Studio.
♦ What’s New in SQL Anywhere Studio This book is for users of
previous versions of the software. It lists new features in this and
previous releases of the product and describes upgrade procedures.
♦ Adaptive Server Anywhere Database Administration Guide This
book covers material related to running, managing, and configuring
databases and database servers.
♦ Adaptive Server Anywhere SQL User’s Guide This book describes
how to design and create databases; how to import, export, and modify
data; how to retrieve data; and how to build stored procedures and
triggers.
♦ Adaptive Server Anywhere SQL Reference Manual This book
provides a complete reference for the SQL language used by Adaptive
Server Anywhere. It also describes the Adaptive Server Anywhere
system tables and procedures.
♦ Adaptive Server Anywhere Programming Guide This book describes
how to build and deploy database applications using the C, C++, and Java
programming languages. Users of tools such as Visual Basic and
PowerBuilder can use the programming interfaces provided by those
tools. It also describes the Adaptive Server Anywhere ADO.NET data
provider.
♦ Adaptive Server Anywhere SNMP Extension Agent User’s Guide
This book describes how to configure the Adaptive Server Anywhere
SNMP Extension Agent for use with SNMP management applications to
manage Adaptive Server Anywhere databases.
♦ Adaptive Server Anywhere Error Messages This book provides a
complete listing of Adaptive Server Anywhere error messages together
with diagnostic information.
vi
♦ SQL Anywhere Studio Security Guide This book provides
information about security features in Adaptive Server Anywhere
databases. Adaptive Server Anywhere 7.0 was awarded a TCSEC
(Trusted Computer System Evaluation Criteria) C2 security rating from
the U.S. Government. This book may be of interest to those who wish to
run the current version of Adaptive Server Anywhere in a manner
equivalent to the C2-certified environment.
♦ MobiLink Administration Guide This book describes how to use the
MobiLink data synchronization system for mobile computing, which
enables sharing of data between a single Oracle, Sybase, Microsoft or
IBM database and many Adaptive Server Anywhere or UltraLite
databases.
♦ MobiLink Clients This book describes how to set up and synchronize
Adaptive Server Anywhere and UltraLite remote databases.
♦ MobiLink Server-Initiated Synchronization User’s Guide This book
describes MobiLink server-initiated synchronization, a feature of
MobiLink that allows you to initiate synchronization from the
consolidated database.
♦ MobiLink Tutorials This book provides several tutorials that walk you
through how to set up and run MobiLink applications.
♦ QAnywhere User’s Guide This manual describes MobiLink
QAnywhere, a messaging platform that enables the development and
deployment of messaging applications for mobile and wireless clients, as
well as traditional desktop and laptop clients.
♦ iAnywhere Solutions ODBC Drivers This book describes how to set
up ODBC drivers to access consolidated databases other than Adaptive
Server Anywhere from the MobiLink synchronization server and from
Adaptive Server Anywhere remote data access.
♦ SQL Remote User’s Guide This book describes all aspects of the
SQL Remote data replication system for mobile computing, which
enables sharing of data between a single Adaptive Server Anywhere or
Adaptive Server Enterprise database and many Adaptive Server
Anywhere databases using an indirect link such as e-mail or file transfer.
♦ SQL Anywhere Studio Help This book includes the context-sensitive
help for Sybase Central, Interactive SQL, and other graphical tools. It is
not included in the printed documentation set.
♦ UltraLite Database User’s Guide This book is intended for all
UltraLite developers. It introduces the UltraLite database system and
provides information common to all UltraLite programming interfaces.
vii
♦ UltraLite Interface Guides A separate book is provided for each
UltraLite programming interface. Some of these interfaces are provided
as UltraLite components for rapid application development, and others
are provided as static interfaces for C, C++, and Java development.
In addition to this documentation set, PowerDesigner and InfoMaker include
their own online documentation.
Documentation formats
SQL Anywhere Studio provides documentation in the following formats:
♦ Online documentation The online documentation contains the
complete SQL Anywhere Studio documentation, including both the
books and the context-sensitive help for SQL Anywhere tools. The online
documentation is updated with each maintenance release of the product,
and is the most complete and up-to-date source of documentation.
To access the online documentation on Windows operating systems,
choose Start ➤ Programs ➤ SQL Anywhere 9 ➤ Online Books. You can
navigate the online documentation using the HTML Help table of
contents, index, and search facility in the left pane, as well as using the
links and menus in the right pane.
To access the online documentation on UNIX operating systems, see the
HTML documentation under your SQL Anywhere installation.
♦ PDF books The SQL Anywhere books are provided as a set of PDF
files, viewable with Adobe Acrobat Reader.
The PDF books are accessible from the online books, or from the
Windows Start menu.
♦ Printed books The complete set of books is available from Sybase
sales or from eShop, the Sybase online store at
http://eshop.sybase.com/eshop/documentation .
viii
Documentation conventions
This section lists the typographic and graphical conventions used in this
documentation.
Syntax conventions
The following conventions are used in the SQL syntax descriptions:
♦ Keywords All SQL keywords appear in upper case, like the words
ALTER TABLE in the following example:
ALTER TABLE [ owner.]table-name
♦ Placeholders Items that must be replaced with appropriate identifiers
or expressions are shown like the words owner and table-name in the
following example:
ALTER TABLE [ owner.]table-name
♦ Repeating items Lists of repeating items are shown with an element of
the list followed by an ellipsis (three dots), like column-constraint in the
following example:
ADD column-definition [ column-constraint, . . . ]
One or more list elements are allowed. In this example, if more than one
is specified, they must be separated by commas.
♦ Optional portions Optional portions of a statement are enclosed by
square brackets.
RELEASE SAVEPOINT [ savepoint-name ]
These square brackets indicate that the savepoint-name is optional. The
square brackets should not be typed.
♦ Options When none or only one of a list of items can be chosen,
vertical bars separate the items and the list is enclosed in square brackets.
[ ASC | DESC ]
For example, you can choose one of ASC, DESC, or neither. The square
brackets should not be typed.
♦ Alternatives When precisely one of the options must be chosen, the
alternatives are enclosed in curly braces and a bar is used to separate the
options.
[ QUOTES { ON | OFF } ]
If the QUOTES option is used, one of ON or OFF must be provided. The
brackets and braces should not be typed.
ix
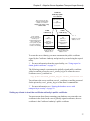
Graphic icons
The following icons are used in this documentation.
♦ A client application.
♦ A database server, such as Sybase Adaptive Server Anywhere.
♦ A database. In some high-level diagrams, the icon may be used to
represent both the database and the database server that manages it.
♦ Replication or synchronization middleware. These assist in sharing data
among databases. Examples are the MobiLink Synchronization Server
and the SQL Remote Message Agent.
♦ A programming interface.
API
x
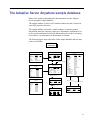
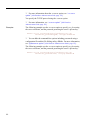
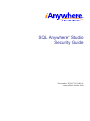
The Adaptive Server Anywhere sample database
Many of the examples throughout the documentation use the Adaptive
Server Anywhere sample database.
The sample database is held in a file named asademo.db, and is located in
your SQL Anywhere directory.
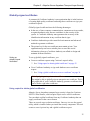
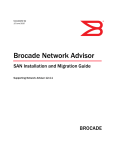
The sample database represents a small company. It contains internal
information about the company (employees, departments, and finances) as
well as product information and sales information (sales orders, customers,
and contacts). All information in the database is fictional.
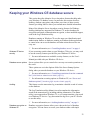
The following figure shows the tables in the sample database and how they
relate to each other.
asademo.db
sales_order_items
product
id
name
description
size
color
quantity
unit_price
integer
<pk>
char(15)
char(30)
char(18)
char(6)
integer
numeric (15,2)
id
line_id
prod_id
quantity
id = prod_id
ship_date
integer
smallint
integer
integer
date
Employee
<pk,fk>
<pk>
<fk>
emp_id = sales_rep
id = id
sales_order
customer
id
fname
lname
address
city
state
zip
phone
company_name
integer
<pk>
char(15)
char(20)
char(35)
char(20)
char(2)
char(10)
char(20)
char(35)
id
integer
cust_id
integer
order_date date
fin_code_id char(2)
char(7)
id = cust_id region
sales_rep
integer
<pk>
<fk>
<fk>
<fk>
emp_id
manager_id
emp_fname
emp_lname
dept_id
street
city
state
zip_code
phone
status
ss_number
salary
start_date
termination_date
birth_date
bene_health_ins
bene_life_ins
bene_day_care
sex
integer
<pk>
integer
char(20)
char(20)
integer
<fk>
char(40)
char(20)
char(4)
char(9)
char(10)
char(1)
char(11)
numeric(20,3)
date
date
date
char(1)
char(1)
char(1)
char(1)
code = fin_code_id
fin_code
contact
id
last_name
first_name
title
street
city
state
zip
phone
fax
integer
char(15)
char(15)
char(2)
char(30)
char(20)
char(2)
char(5)
char(10)
char(10)
<pk>
code
char(2)
type
char(10)
description char(50)
<pk>
code = code
fin_data
year
quarter
code
amount
char(4)
<pk>
char(2)
<pk>
char(2)
<pk,fk>
numeric(9)
dept_id = dept_id
emp_id = dept_head_id
department
dept_id
dept_name
dept_head_id
integer
char(40)
integer
<pk>
<fk>
xi
Finding out more and providing feedback
We would like to receive your opinions, suggestions, and feedback on this
documentation.
You can provide feedback on this documentation and on the software
through newsgroups set up to discuss SQL Anywhere technologies. These
newsgroups can be found on the forums.sybase.com news server.
The newsgroups include the following:
♦ sybase.public.sqlanywhere.general
♦ sybase.public.sqlanywhere.linux
♦ sybase.public.sqlanywhere.mobilink
♦ sybase.public.sqlanywhere.product_futures_discussion
♦ sybase.public.sqlanywhere.replication
♦ sybase.public.sqlanywhere.ultralite
♦ ianywhere.public.sqlanywhere.qanywhere
Newsgroup disclaimer
iAnywhere Solutions has no obligation to provide solutions, information
or ideas on its newsgroups, nor is iAnywhere Solutions obliged to provide
anything other than a systems operator to monitor the service and insure its
operation and availability.
iAnywhere Solutions Technical Advisors as well as other staff assist on the
newsgroup service when they have time available. They offer their help
on a volunteer basis and may not be available on a regular basis to provide
solutions and information. Their ability to help is based on their workload.
You can e-mail comments and suggestions to the SQL Anywhere
documentation team at [email protected]. Although we do not
undertake to reply to e-mails at that address, you can be sure we will read
your suggestions with interest.
xii
PART I
BASIC S ECURITY
I NFORMATION
This part describes basic security features in SQL Anywhere Studio
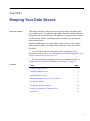
CHAPTER 1
Keeping Your Data Secure
About this chapter
This chapter describes Adaptive Server Anywhere features that help make
your database secure. In particular, this chapter describes auditing, database
encryption, and securing Windows CE databases. It also presents overviews
of other security features, providing pointers to where you can find more
detailed information.
Database administrators are responsible for data security. In this chapter,
unless otherwise noted, you require DBA authority to carry out the tasks
described.
☞ User IDs and permissions are major security-related topics. For
information on these topics, see “Managing User IDs and Permissions” [ASA
Database Administration Guide, page 427].
☞ For information about encrypting client/server communications, see
“Adaptive Server Anywhere Transport-Layer Security” on page 27.
Contents
Topic:
page
Security features overview
4
Controlling database access
6
Auditing database activity
9
Running the database server in a secure fashion
13
Encrypting a database
15
Encrypting portions of a database
20
Keeping your Windows CE database secure
23
Security tips
25
3
Security features overview
Since databases may contain proprietary, confidential, or private
information, ensuring that the database and the data in it are designed for
security is very important.
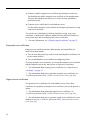
Adaptive Server Anywhere has several features to assist in building a secure
environment for your data:
♦ User identification and authentication These features control who has
access to a database.
☞ For information on these subjects, see “Creating new users” [ASA
Database Administration Guide, page 432].
♦ Discretionary access control features These features control the
actions a user can carry out while connected to a database.
☞ For more information, see “Database permissions overview” [ASA
Database Administration Guide, page 428].
♦ Auditing This feature helps you maintain a record of actions on the
database.
☞ For more information, see “Auditing database activity” on page 9.
♦ Database server options These features let you control who can carry
out operations (for example, loading databases). These options are set
when you start the database server.
☞ For more information, see “Controlling permissions from the
command line” [ASA Database Administration Guide, page 12].
♦ Views and stored procedures These features allow you to specify the
data a user can access and the operations a user can execute.
☞ For more information, see “Using views and procedures for extra
security” [ASA Database Administration Guide, page 452].
♦ Database encryption Database encryption features allow you to
choose the level of database encryption. You can choose to secure your
database either with simple encryption, or with strong encryption. Simple
encryption is equivalent to obfuscation. Strong encryption renders the
database completely inaccessible without an encryption key.
☞ For more information, see “-ek database option” [ASA Database
Administration Guide, page 171] and “DatabaseKey connection parameter
[DBKEY]” [ASA Database Administration Guide, page 187].
4
Chapter 1. Keeping Your Data Secure
♦ Transport-layer security You can use transport-layer security to
authenticate communications between client applications and the
database server. Transport-layer security uses elliptic-curve or RSA
encryption technology.
Separately licensable option required
Transport-layer security requires that you obtain the separatelylicensable SQL Anywhere Studio security option and is subject to
export regulations.
To order this component, see “Separately-licensable components”
[Introducing SQL Anywhere Studio, page 5].
☞ For more information, see “Adaptive Server Anywhere
Transport-Layer Security” on page 27.
♦ C2 certification C2 is a set of security guidelines established by the
U.S. government to maintain consistency within their organization. If you
are running Adaptive Server Anywhere 7.0, and if you have the
appropriate hardware, you can set up your machine to run in a C2
certified manner. The C2-certified documentation is available at
http://www.sybase.com/detail?id=1010458 .
☞ For information on running the current version of Adaptive Server
Anywhere in a manner equivalent to the C2-certified environment, see
“Installation” on page 49.
5
Controlling database access
By assigning user IDs and passwords, the database administrator controls
who has access to a database. By granting permissions to each user ID, the
database administrator controls what tasks each user can carry out when
connected. This section describes the features available for controlling
database access.
Permission scheme is
based on user IDs
When you log on to the database, you have access to all database objects that
meet any of the following criteria:
♦ objects you created.
♦ objects to which you received explicit permission.
♦ objects to which a group you belong to received explicit permission.
The user cannot access any database object that does not meet these criteria.
In short, users can access only the objects they own or objects to which they
explicitly received access permissions.
☞ For more information, see the following:
♦ “Managing User IDs and Permissions” [ASA Database Administration
Guide, page 427]
♦ “CONNECT statement [ESQL] [Interactive SQL]” [ASA SQL Reference,
page 332]
♦ “GRANT statement” [ASA SQL Reference, page 503]
♦ “REVOKE statement” [ASA SQL Reference, page 585]
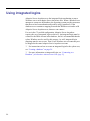
Using integrated logins
Integrated logins allow users to use a single login name and password to log
onto both your Windows operating system and onto a database. An external
login name is associated with a database user ID. When you attempt an
integrated login, you log onto the operating system by giving both a login
name and password. The operating system then tells the server who you are,
and the server logs you in as the associated database user ID. No additional
login name or password are required.
There are some security implications of integrated logins to consider. For
example, leaving the user profile Guest enabled with a blank password can
permit unrestricted access to a database that is hosted by that server.
Literally any user can log in to the server using any login ID and any
password because they are logged in by default to the Guest user profile.
☞ For more information, see the following:
♦ “Security concerns: unrestricted database access” [ASA Database
Administration Guide, page 82]
6
Chapter 1. Keeping Your Data Secure
♦ “Using integrated logins” [ASA Database Administration Guide, page 74]
♦ “LOGIN_MODE option [database]” [ASA Database Administration Guide,
page 665]
Increasing password security
Passwords are an important part of any database security system. To be
secure, passwords must be difficult to guess, and they must not be easily
accessible on users’ hard drives or other locations.
Implement minimum
password lengths
By default, passwords can be any length. For greater security, you can
enforce a minimum length requirement on all new passwords. You do this by
setting the MIN_PASSWORD_LENGTH database option to a value greater
than zero. The following statement enforces passwords to be at least 8 bytes
long.
SET OPTION PUBLIC.MIN_PASSWORD_LENGTH = 8
☞ For more information, see “MIN_PASSWORD_LENGTH option
[database]” [ASA Database Administration Guide, page 671].
Do not include
Passwords are the key to accessing databases. They should not be easily
passwords in ODBC data available to unauthorized people in a security-conscious environment.
sources
When you create an ODBC data source or a Sybase Central connection
profile, you can optionally include a password. Avoid including passwords
for greater security.
☞ For information on creating ODBC data sources, see “Creating an
ODBC data source” [ASA Database Administration Guide, page 53].
Encrypt configuration
files containing
passwords
When you create a configuration file, you can optionally include password
information. To protect your passwords, consider hiding the contents of
configuration files with simple encryption, using the File Hiding (dbfhide)
utility.
☞ For information on the File Hiding (dbfhide) utility to hide configuration
files, see “Hiding the contents of files using the dbfhide command-line
utility” [ASA Database Administration Guide, page 524].
Controlling the tasks users can perform
Users can access only those objects to which they have been granted access.
You grant permission on an object to another user with the GRANT
statement. You can also grant a user permission to pass on the permissions
on an object to other users.
7
The GRANT statement also gives more general permissions to users.
Granting CONNECT permissions to a user allows them to connect to the
database and change their passwords. Granting RESOURCE authority
allows the user to create tables, views, procedures, and so on. Granting DBA
authority to a user gives that user the ability to see and do anything in the
database. The DBA would also use the GRANT statement to create and
administer groups.
The REVOKE statement is the opposite of the GRANT statement—any
permission that GRANT has explicitly given, REVOKE can take away.
Revoking CONNECT from a user removes the user from the database,
including all objects owned by that user.
Negative permissions
Adaptive Server Anywhere does not support negative permissions. This
means that you cannot revoke a permission that was not explicitly granted.
For example, suppose user bob is a member of a group called sales. If a user
grants DELETE permission on a table, T, to sales, then bob can delete rows
from T. If you want to prevent bob from deleting from T, you cannot simply
execute a REVOKE DELETE on T from bob, since the DELETE ON T
permission was never granted directly to bob. In this case, you would have to
revoke bob’s membership in the sales group.
☞ For more information, see:
♦ “GRANT statement” [ASA SQL Reference, page 503]
♦ “REVOKE statement” [ASA SQL Reference, page 585]
Designing database objects for security
Views and stored procedures provide alternative ways of tuning the data
users can access and the tasks they can perform.
☞ For more information on these features, see:
♦ “Benefits of procedures and triggers” [ASA SQL User’s Guide, page 658]
♦ “Using views and procedures for extra security” [ASA Database
Administration Guide, page 452]
8
Chapter 1. Keeping Your Data Secure
Auditing database activity
Auditing is a way of keeping track of the activity performed on a database.
The record of activities stays in the transaction log. By turning on auditing,
the DBA increases the amount of data saved in the transaction log to include
the following:
♦ All login attempts (successful and failed), including the terminal ID.
♦ Accurate timestamps of all events (to a resolution of milliseconds).
♦ All permissions checks (successful and failed), including the object on
which the permission was checked (if applicable).
♦ All actions that require DBA authority.
The transaction log
Each database has an associated transaction log file. The transaction log is
used for database recovery. It is a record of transactions executed against a
database.
☞ For information about the transaction log, see “The transaction log”
[ASA Database Administration Guide, page 378].
The transaction log stores all executed data definition statements, and the
user ID that executed them. It also stores all updates, deletes, and inserts and
which user executed those statements. However, this is insufficient for some
auditing purposes. By default, the transaction log does not contain the time
of the event, just the order in which events occurred. It also contains neither
failed events, nor select statements.
Turning on auditing
The database administrator can turn on auditing to add security-related
information to the transaction log.
Auditing is off by default. To enable auditing on a database, the DBA must
set the value of the public option AUDITING to ON. Auditing then remains
enabled until explicitly disabled, by setting the value of the AUDITING
option to OFF. You must have DBA permissions to set this option.
❖ To turn on auditing
1. Ensure that your database is upgraded to at least version 6.0.2.
2. If you had to upgrade your database, create a new transaction log.
3. Execute the following statement:
SET OPTION PUBLIC.AUDITING = ’ON’
9
☞ For more information, see “AUDITING option [database]” [ASA
Database Administration Guide, page 637].
Retrieving audit information
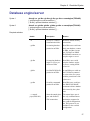
You can use the Log Translation (dbtran) utility to retrieve audit information.
You can access this utility from Sybase Central or from a command prompt.
It operates on a transaction log to produce a SQL script containing all of the
transactions, along with some information on what user executed each
command. By using the -g option, dbtran includes more comments
containing the auditing information.
To ensure a complete and readable audit record, the -g option automatically
sets the following options:
♦ -d Display output in chronological order.
♦ -t Include trigger-generated operations in the output.
♦ -a Include rolled back transactions in the output.
You can run the Log Translation utility against a running database server or
against a database log file.
❖ To retrieve auditing information from a running database server
1. Make sure your user ID has DBA authority.
2. With the database server running, execute the following statement at a
system command prompt:
dbtran -g -c "uid=DBA;pwd=SQL;..." -n asademo.SQL
☞ For information about connection strings, see “Connection
parameters” [ASA Database Administration Guide, page 176].
❖ To retrieve auditing information from a transaction log file
1. Close the database server to ensure the log file is available.
2. At a system command prompt, execute the following statement to place
the information from the file asademo.log and into the file asademo.SQL.
dbtran -g asademo.log
The -g option includes auditing information in the output file.
☞ For more information, see “The Log Translation utility” [ASA Database
Administration Guide, page 556].
10
Chapter 1. Keeping Your Data Secure
Adding audit comments
You can add comments to the audit trail using the sa_audit_string system
stored procedure. It takes a single argument, which is a string of up to 200
bytes. You must have DBA permissions to call this procedure.
For example:
call sa_audit_string( ’Started audit testing here.’ )
This comment is stored in the transaction log as an audit statement.
An auditing example
This example shows how the auditing feature records attempts to access
unauthorized information.
1. As database administrator, turn on auditing.
You can do this from Sybase Central as follows:
♦ Connect to the ASA 9.0 Sample data source. This connects you as the
DBA user.
♦ Select the asademo database icon and from the File menu, choose
Options.
♦ Select Auditing from the list of options, and enter the value ON in the
Public Setting box. Click Set Permanent Now to set the option and
Close to exit.
Alternatively, you can use Interactive SQL. Connect to the sample
database from Interactive SQL as user ID DBA with password SQL and
execute the following statement:
SET OPTION PUBLIC.AUDITING = ’ON’
2. Add a user to the sample database, named BadUser, with password
BadUser. You can do this from Sybase Central. Alternatively, you can
use Interactive SQL and enter the following statement:
GRANT CONNECT TO BadUser
IDENTIFIED BY ’BadUser’
3. Using Interactive SQL, connect to the sample database as BadUser and
attempt to access confidential information in the employee table with the
following query:
SELECT emp_lname, salary
FROM DBA.employee
11
You receive an error message: do not have permission to
select from employee.
4. From a command prompt, change directory to your Adaptive Server
Anywhere installation directory, which holds the sample database, and
execute the following command:
dbtran -g -c "dsn=ASA 9.0 Sample" -n asademo.SQL
This command produces a file named asademo.SQL, containing the
transaction log information and a set of comments holding audit
information. The lines indicating the unauthorized BadUser attempt to
access the employee table are included in the file as follows:
--AUDIT-1001-0000287812 -Select permission
--AUDIT-1001-0000287847 -Select permission
2004/02/11 13:59:58.765 Checking
on employee - Failed
2004/02/11 13:59:58.765 Checking
on employee(salary) - Failed
5. Restore the sample database to its original state so other examples you try
in this documentation give the expected results.
Connect as the DBA user, and carry out the following operations:
♦ Revoke Connect privileges from the user ID BadUser.
♦ Set the PUBLIC.AUDITING option to OFF.
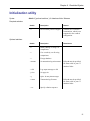
Auditing actions outside the database server
Some database utilities act on the database file directly. In a secure
environment, only trusted users should have access to the database files.
To provide auditing of actions, under Windows NT only, any use of dbtran,
dbwrite, or dblog generates a text file in the same directory as the database
file, with the extension .alg. For example, for asademo.db, the file is called
asademo.alg. Records containing the tool name, Windows user name, and
date/time are appended to this file. Records are only added to the .alg file if
the AUDITING option is set to ON.
12
Chapter 1. Keeping Your Data Secure
Running the database server in a secure fashion
There are several security features you can set either when starting the
database server or during server operation, including:
♦ Starting and stopping databases By default, any user can start an
extra database on a running server. The –gd option allows you to limit
access to this option to users with a certain level of permission in the
database to which they are already connected. The permissible values
include DBA, all, or none.
☞ For more information, see “-gd server option” [ASA Database
Administration Guide, page 142].
♦ Creating and deleting databases By default, any user can use the
CREATE DATABASE statement to create a database file. The –gu option
allows you to limit access to this option to users with a certain level of
permission in the database to which they are connected. The permissible
values include DBA, all, none, or utility_db.
☞ For information, see “-gu server option” [ASA Database Administration
Guide, page 148].
♦ Stopping the server The dbstop utility stops a database server. It is
useful in batch files, or in other cases where stopping the server
interactively (by clicking Shutdown on the Server Messages window) is
impractical. By default, any user can run dbstop to shut down a server.
The –gk option allows you to limit access to this option to users with a
certain level of permission in the database. The permissible values
include DBA, all, or none.
☞ For more information, see “-gk server option” [ASA Database
Administration Guide, page 144].
♦ Loading and unloading data The LOAD TABLE, UNLOAD TABLE,
and UNLOAD statements all access the file system on the database server
machine. If you are running the personal database server, you already
have access to the file system and this is not a security issue. If you are
running the network database server, unwarranted file system access may
be a security issue. The –gl option allows you to control the database
permissions required to carry out loading and unloading of data. The
permissible values are DBA, all, or none.
☞ For more information, see “-gl server option” [ASA Database
Administration Guide, page 144].
♦ Using transport-layer security to encrypt client/server
communications For greater security of network packets, you can use
13
transport-layer security to authenticate communications between client
applications and the database server. Transport-layer security uses
elliptic-curve or RSA encryption technology.
☞ For more information, see “Adaptive Server Anywhere
Transport-Layer Security” on page 27.
14
Chapter 1. Keeping Your Data Secure
Encrypting a database
As a database administrator, you can use database encryption to make it
more difficult for someone to decipher the data in your database. You can
choose to secure your database either with simple or with strong encryption.
Caution
Compressing an encrypted database removes encryption from the database.
Simple encryption
Simple encryption is equivalent to obfuscation and makes it more difficult
for someone using a disk utility to look at the file to decipher the data in
your database. Simple encryption does not require a key to encrypt the
database. Simple encryption technology is supported in previous versions of
SQL Anywhere Studio.
❖ To use simple encryption
1. Create a database using the dbinit -e option.
The following example create the database test.db using simple
encryption:
dbinit -p 4096 -e test.db
☞ For more information, see “Creating a database using the dbinit
command-line utility” [ASA Database Administration Guide, page 531].
Strong encryption
Strong database encryption technology makes a database inoperable and
inaccessible without a key (password). An algorithm scrambles the
information contained in your database and transaction log files so they
cannot be deciphered.
Caution
Protect your key! Be sure to store a copy of your key in a safe location. A
lost key will result in a completely inaccessible database, from which there
is no recovery.
The algorithm used to implement Adaptive Server Anywhere strong
encryption is AES: a block encryption algorithm chosen as the new
Advanced Encryption Standard (AES) for block ciphers by the National
Institute of Standards and Technology (NIST).
On any supported 32-bit Windows platform, you can also specify a separate
FIPS-approved AES algorithm for strong encryption using the AES_FIPS
type. When the database server is started with the -fips option, you can run
databases encrypted with AES or AES_FIPS strong encryption, but not
15
databases encrypted with simple encryption. Unencrypted databases can
also be started on the server when -fips is specified.
☞ For more information see “-fips server option” [ASA Database
Administration Guide, page 140].
The SQL Anywhere Studio security option must be installed on any machine
used to run a database encrypted with AES_FIPS.
Separately licensable option required
Strong database encryption using AES_FIPS requires that you obtain the
separately-licensable SQL Anywhere Studio security option and is subject
to export regulations.
To order this component, see “Separately-licensable components” [Introducing SQL Anywhere Studio, page 5].
To create a new database with strong encryption, you can use:
♦ The Database Initialization utility (dbinit) in combination with various
options to enable strong encryption.
Using the dbinit utility with the -ek option or -ep option creates a
database with strong encryption, allowing you to specify the encryption
key in a prompt box or on the command line. The dbinit -ea option sets
the encryption algorithm to AES or AES_FIPS for the FIPS-approved
algorithm.
☞ For more information, see “Initialization utility options” [ASA
Database Administration Guide, page 532] and “The Initialization utility”
[ASA Database Administration Guide, page 530].
♦ The ENCRYPTION clause in the CREATE DATABASE statement. The
KEY option sets the encryption key and the ALGORITHM option sets
the encryption algorithm to AES or AES_FIPS for the FIPS-approved
algorithm.
You can also use the Sybase Central Create Database wizard to create a
strongly encrypted database.
☞ For more information, see “CREATE DATABASE statement” [ASA
SQL Reference, page 338].
♦ The Unload Database utility (dbunload) with options to create a new
database with strong encryption. The -an option creates a new database.
To specify strong encryption and the encryption key in a prompt box or
on the command line use the -ek or -ep option. The -ea option sets the
encryption algorithm to AES or AES_FIPS for the FIPS-approved
algorithm.
16
Chapter 1. Keeping Your Data Secure
You can also use the Sybase Central Unload Database wizard to create a
strongly encrypted database.
☞ For more information, see “Unload utility options” [ASA Database
Administration Guide, page 593] and “The Unload utility” [ASA Database
Administration Guide, page 588].
❖ To create a strongly encrypted database (SQL)
1. Connect to an existing database from Interactive SQL.
2. Execute a CREATE DATABASE statement that includes the
ENCRYPTION clause and the KEY and ALGORITHM options.
For example, the following statement creates a database file named
myencrypteddb.db in the C:\ directory using FIPS-approved AES
encryption.
CREATE DATABASE ’c:\\myencrypteddb’
TRANSACTION LOG ON
ENCRYPTED ON
KEY ’0kZ2o52AK#’
ALGORITHM ’AES_FIPS’
❖ To create a strongly encrypted database (command prompt)
1. At a command prompt, use the dbinit utility to create a database. You
must include -ek or -ep to specify the encryption key at the command
prompt or a dialog box, respectively.
The following command creates a strongly encrypted database and
specifies the encryption key and algorithm.
dbinit -ek "0kZ2o56AK#" -ea AES_FIPS "myencrypteddb.db"
2. Start the database from the command prompt.
dbeng9 myencrypteddb.db -ek "0kZ2o56AK#"
☞ For more information about the encryption key, see “DatabaseKey
connection parameter [DBKEY]” [ASA Database Administration Guide,
page 187].
As with most passwords, it is best to choose a key value that cannot be easily
guessed. It is recommended that you choose a value for your key that
includes between 8 and 30 characters, a combination of upper and lower
case characters, and numbers, letters, and special characters.
17
Caution
Be sure to store a copy of your key in a safe location. You require the key
each time you want to start or modify the database. A lost key will result
in a completely inaccessible database, from which there is no recovery.
Controlling strong encryption
In Adaptive Server Anywhere, the database administrator has control over
four aspects of strong encryption, including: strong encryption status, the
encryption key, protection of the encryption key, and the encryption
algorithm.
Strong encryption status
Although you can’t simply turn strong encryption on or off in an existing
database, you can choose from two options when it comes to implementing
strong encryption. You can either create a database from scratch with strong
encryption, or you can rebuild an existing database and change the
encryption status at that time. Rebuilding the database unloads all of the data
and schema of an existing database, creates a new database (at which point
you can change a variety of settings including strong encryption status), and
reloads the data into the new database. You need to know the key to unload a
strongly encrypted database.
☞ For more information on these features, see
♦ “Reloading a database” [ASA SQL User’s Guide, page 588]
♦ “CREATE DATABASE statement” [ASA SQL Reference, page 338]
The encryption key
As with most passwords, it is best to choose a key value that cannot be easily
guessed. The key can be of arbitrary length, but generally the longer the key,
the better because a shorter key is easier to guess than a longer one. As well,
including a combination of numbers, letters, and special characters decreases
the chances of someone guessing the key. You must supply this key each
time you want to start the database. Lost or forgotten keys result in
completely inaccessible databases.
Protection of the encryption key
You can choose whether the encryption key is entered at the command
prompt (the default) or into a prompt box. Choosing to enter the key in a
prompt box provides an extra measure of security because the key is never
visible in plain sight. Clients are required to specify the key each time they
18
Chapter 1. Keeping Your Data Secure
start the database. In cases where the database administrator starts the
database, clients never need to have access to the key.
☞ For more information, see “-ep server option” [ASA Database
Administration Guide, page 138].
The encryption algorithm
When you strongly encrypt a database, your database is encrypted using the
AES algorithm.
AES has recently been through a period of international evaluation and has
now been chosen as the new Advanced Encryption Standard block cipher
algorithm. It has many properties that lend itself well to encryption of
Adaptive Server Anywhere databases in terms of performance and size. The
AES_FIPS algorithm is also available on any supported 32-bit Windows
platform.
☞ For more information about database encryption algorithms, see:
♦ “Initialization utility options” [ASA Database Administration Guide,
page 532]
♦ “CREATE DATABASE statement” [ASA SQL Reference, page 338]
Performance issues
Performance of Adaptive Server Anywhere is somewhat slower when the
database is encrypted. The performance impact depends on how often pages
are read from or written to disk, and can be minimized by ensuring that the
server is using an adequate cache size.
☞ You can increase the starting size of the cache with the -c option when
you start the server. For operating systems that support dynamic resizing of
the cache, the cache size that is used may be restricted by the amount of
memory that is available; to increase the cache size, increase the available
memory.
☞ For more information, see:
♦ “Using the cache to improve performance” [ASA SQL User’s Guide,
page 180]
♦ “-c server option” [ASA Database Administration Guide, page 126]
19
Encrypting portions of a database
If you wish to encrypt only portions of your database, you can do so using
the ENCRYPT function. The ENCRYPT function uses the same AES strong
encryption algorithm that is used for database encryption to encrypt the
values that are passed to it.
The ENCRYPT function uses a key to encrypt the values passed to it. The
key is case sensitive, even in case-insensitive databases. As with most
passwords, it is best to choose a key value that cannot be easily guessed. It is
recommended that you choose a value for your key that is at least 16
characters long, contains a mix of upper and lower case, and includes
numbers, letters and special characters. You will require this key each time
you want to decrypt the data.
Caution
Protect your key. Be sure to store a copy of your key in a safe location. A
lost key will result in the encrypted data becoming completely inaccessible,
from which there is no recovery.
Encrypted values can be decrypted using the DECRYPT function with the
same key that was specified in the ENCRYPT function. Both of these
functions return LONG BINARY values. If you require a different data type,
you can use the CAST function to convert the value to the required data
type. The example below shows how to use the CAST function to convert a
decrypted value to the required data type.
☞ For more information about using the CAST function, see “CAST
function [Data type conversion]” [ASA SQL Reference, page 112].
If database users need to access the data in decrypted form, but you do not
wish them to have access to the encryption key, you can create a view that
uses the DECRYPT function. This allows users to access the decrypted data
without knowing the encryption key. If you create a view or stored
procedure that uses the table, you can use the SET HIDDEN parameter of
the ALTER VIEW and ALTER PROCEDURES to ensure that users cannot
access the encryption key.
☞ For more information, see “ALTER PROCEDURE statement” [ASA SQL
Reference, page 278] and “ALTER VIEW statement” [ASA SQL Reference,
page 303].
Column encryption
example
20
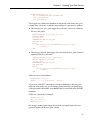
The following example uses triggers to encrypt a column that stores
passwords in a table called user_info. The user_info table is defined as
follows:
Chapter 1. Keeping Your Data Secure
CREATE TABLE user_info (
emp_id INTEGER NOT NULL PRIMARY KEY,
user_name CHAR(80),
user_pwd CHAR(80) )
Two triggers are added to the database to encrypt the value in the user_pwd
column when a new user is added or an existing user’s password is updated.
♦ The encrypt_new_user_pwd trigger fires each time a new row is added to
the user_info_table:
CREATE TRIGGER encrypt_new_user_pwd
BEFORE INSERT
ON user_info
REFERENCING NEW AS new_pwd
FOR EACH ROW
BEGIN
SET new_pwd.user_pwd=ENCRYPT(new_pwd.user_pwd,
’8U3dkA’);
END
♦ The encrypt_updated_pwd trigger fires each time the user_pwd column is
updated in the user_info table:
CREATE TRIGGER encrypt_updated_pwd
BEFORE UPDATE OF user_pwd
ON user_info
REFERENCING NEW AS new_pwd
FOR EACH ROW
BEGIN
SET new_pwd.user_pwd=ENCRYPT(new_pwd.user_pwd,
’8U3dkA’);
END
Add a new user to the database:
INSERT INTO user_info
VALUES ( ’1’, ’d_williamson’, ’abc123’)
If you issue a SELECT statement to view the information in the user_info
table, the value in the user_pwd column is binary data (the encrypted form
of the password) and not the value abc123 that was specified in the INSERT
statement.
If this user’s password is changed:
UPDATE user_info
SET user_pwd=’xyz’
WHERE emp_id=’1’
the encrypt_updated_pwd trigger fires and the encrypted form of the new
password appears in the user_pwd column.
21
The original password can be retrieved by issuing the following SQL
statement. This statement uses the DECRYPT function and the encryption
key to decrypt the data, as well as the CAST function to convert the value
from a LONG BINARY to a CHAR value:
SELECT CAST (DECRYPT(user_pwd, ’8U3dkA’) AS CHAR(100)) FROM
user_info
WHERE emp_id = ’1’
☞ For more information about the ENCRYPT and functions, see
“Alphabetical list of functions” [ASA SQL Reference, page 106].
22
Chapter 1. Keeping Your Data Secure
Keeping your Windows CE database secure
This section describes Adaptive Server Anywhere features that help make
your Windows CE database secure. In particular, this section describes
auditing, database encryption, and presents overviews of other security
features, providing links to where you can find more detailed information.
Many of the Adaptive Server Anywhere security features for Windows
desktop platforms are supported on Windows CE, such as database file
encryption and simple communication encryption, or have modified support,
such as the Log Translation utility.
Databases running on Windows CE uses the same user identification and
authorization features as databases running on Windows desktop platforms
to control who can access the database and what actions those users can
carry out.
☞ For more information, see “Controlling database access” on page 6.
Windows CE device
security
If you are storing sensitive data on your Windows CE device, you may wish
to use the security features provided for your Windows CE device.
☞ For more information on available security features, see the User’s
Manual provided with your Windows CE device.
Database server options
Server options allow you to control who can carry out certain operations on
the server.
These options are set in the Options field of the Server Startup Options
dialog when you start the database on your Windows CE device.
☞ For more information, see “Controlling permissions from the command
line” [ASA Database Administration Guide, page 12].
☞ For information on setting options on Windows CE, see “Server and
database options” [Introducing SQL Anywhere Studio, page 62].
Auditing
This feature uses the transaction log to maintain a detailed record of actions
on the database.
The Log Translation utility (dbtran) is used to translate the information
stored in the transaction log, including auditing information. The dbtran
utility is not supported on Windows CE, so you cannot translate a log stored
on a Windows CE device. Copy the transaction log file to your PC in order
to use this utility.
☞ For more information, see “Auditing database activity” on page 9.
Database encryption on
Windows CE
Database encryption features allow you to choose the level of database
encryption. You can choose to secure your database either with simple
23
encryption, or with strong encryption. Adaptive Server Anywhere supports
both simple and strong encryption on Windows CE.
This level of encryption is equivalent to obfuscation
and makes it more difficult for someone using a disk utility to look at the file
to decipher the data in your database. Simple encryption does not require a
key to encrypt the database.
Simple encryption
Simple encryption technology is supported in previous versions of
SQL Anywhere Studio.
This level of encryption scrambles the information
contained in your database and transaction log files so they cannot be
deciphered simply by looking at the files using a disk utility. Strong
encryption renders the database completely inaccessible without the key. If
you are encrypting a database to use on Windows CE, it must be encrypted
with the AES algorithm.
Strong encryption
☞ For more information, see “Encrypting a database” on page 15.
Communication
encryption and
Windows CE
You can encrypt client/server communications for greater security as they
pass over the network. Adaptive Server Anywhere provides two types of
communication encryption: simple and strong.
Simple communication encryption accepts communication packets that are
encrypted with simple encryption. This level of communication encryption
is supported on all platforms, including Windows CE and on previous
versions of Adaptive Server Anywhere.
Strong communication encryption is only supported over the TCP/IP port on
Solaris, Linux, Mac OS X, NetWare, and supported 32-bit Windows
operating systems. It is not available on Windows CE.
☞ For more information about encrypting communications, see .
24
Chapter 1. Keeping Your Data Secure
Security tips
As database administrator, there are many actions you can take to improve
the security of your data. For example, you can:
♦ Change the default user ID and password The default user ID and
password for a newly created database is DBA and SQL. You should
change this password before deploying the database.
♦ Require long passwords You can set the
MIN_PASSWORD_LENGTH public option to disallow short (and
therefore easily guessed) passwords.
☞ For information, see “MIN_PASSWORD_LENGTH option
[database]” [ASA Database Administration Guide, page 671].
♦ Restrict DBA authority You should restrict DBA authority only to
users who absolutely require it since it is very powerful. Users with DBA
authority can see and do anything in the database.
You may consider giving users with DBA authority two user IDs: one
with DBA authority and one without, so they can connect as DBA only
when necessary.
♦ Drop external system functions The following external functions
present possible security risks: xp_cmdshell, xp_startmail, xp_startsmtp,
xp_sendmail, xp_stopmail, and xp_stopsmtp.
The xp_cmdshell procedure allows users to execute operating system
commands or programs.
The e-mail commands allow users to have the server send e-mail
composed by the user. Malicious users could use either the e-mail or
command shell procedures to perform operating-system tasks with
authorities other than those they have been given by the operating system.
In a security-conscious environment, you should drop these functions.
☞ For information on dropping procedures, see “DROP statement” [ASA
SQL Reference, page 454].
♦ Protect your database files You should protect the database file, log
files, dbspace files, and write files from unauthorized access. Do not store
them within a shared directory or volume.
♦ Protect your database software You should similarly protect Adaptive
Server Anywhere software. Only give users access to the applications,
DLLs, and other resources they require.
25
♦ Run the database server as a service or a daemon To prevent
unauthorized users from shutting down or gaining access to the database
or log files, run the database server as a Windows service. On UNIX,
running the server as a daemon serves a similar purpose.
☞ For more information, see “Running the server outside the current
session” [ASA Database Administration Guide, page 21].
♦ Set ASTMP to a unique directory To make the engine secure on UNIX
platforms, set ASTMP to a unique directory, and make the directory read,
write, and execute protected against all other users. Doing so forces all
connections to use TCP/IP, which is more secure than the shared memory
connection.
♦ Strongly encrypt your database Strongly encrypting your database
makes it completely inaccessible without the key. You cannot open the
database, or view the database or transaction log files using any other
means.
☞ For more information, see “-ep server option” [ASA Database
Administration Guide, page 138] and “-ek database option” [ASA Database
Administration Guide, page 171].
26
CHAPTER 2
Adaptive Server Anywhere
Transport-Layer Security
About this chapter
This chapter shows you how to secure communications between the
Adaptive Server Anywhere database server and client applications using
transport-layer security.
☞ For information about MobiLink transport-layer security, see “MobiLink
Transport-Layer Security” [MobiLink Administration Guide, page 165].
☞ For information about setting up your Adaptive Server Anywhere web
server to use transport-layer security, see “Using transport-layer security for
web services” on page 44.
Separately licensable option required
Transport-layer security requires that you obtain the separately-licensable
SQL Anywhere Studio security option and is subject to export regulations.
☞ To order this component, see “Separately-licensable components”
[Introducing SQL Anywhere Studio, page 5].
Contents
Topic:
page
Introduction
28
Setting up transport-layer security
30
Creating digital certificates
31
Starting the database server with transport-layer security
39
Configuring client applications to use transport-layer security
41
Using transport-layer security for web services
44
27
Introduction
Separately licensable option required
Transport-layer security requires that you obtain the separately-licensable
SQL Anywhere Studio security option and is subject to export regulations.
☞ To order this component, see “Separately-licensable components”
[Introducing SQL Anywhere Studio, page 5].
Transport-layer security, an IETF standard protocol, secures client/server
applications using digital certificates and public-key cryptography.
Clients use trusted public certificates to encrypt data and authenticate servers
in the initial client/server handshake. Data transmitted by the client can only
be decrypted by the matching private key, which is stored in your database
server certificate.
For server authentication, the database server sends its public certificate to
the client. The client verifies the identity of the server using certificate fields
and the digital signature embedded in the certificate.
Efficiency
The transport-layer security standard overcomes the inefficiencies associated
with public-key cryptography. Once a secure connection is established, the
client and server exchange a common key. They use a highly efficient
symmetric cipher for the rest of their communication.
Supported platforms
To use transport-layer security, both the server and the client must be
operating on Solaris, Linux, NetWare, Mac OS X, or any supported 32-bit
Windows platform except Windows CE, and the connection must be over the
TCP/IP port.
FIPS-certified security options are available on Windows only.
FIPS 140-2 certification
Federal Information Processing Standard (FIPS) 140-2 specifies
requirements for security algorithms. It does not, however, specify
requirements for security protocols such as SSL or transport-layer security.
FIPS 140-2 is granted by the American and Canadian governments through
the National Institute of Standards and Testing (NIST) and the Canadian
Communication Security Establishment (CSE). Certicom has earned FIPS
certification for security algorithms implemented on Windows.
SQL Anywhere Studio offers transport-layer security with the option of
using the underlying FIPS-certified algorithms in the Certicom software.
To use transport-layer security, you must purchase a separate security option.
28
Chapter 2. Adaptive Server Anywhere Transport-Layer Security
☞ For information about how to order transport-layer security, see
“Separately-licensable components” [Introducing SQL Anywhere Studio, page 5].
You can use FIPS-certified security algorithms to encrypt your database
files, or to encrypt communications for database client/server
communication, web services, and MobiLink client/server communication.
☞ For more information, see:
♦
♦
♦
♦
“Encrypting a database” on page 15
“Using transport-layer security for web services” on page 44
“Starting the database server with transport-layer security” on page 39
“Configuring client applications to use transport-layer security” on
page 41
29
Setting up transport-layer security
To set up Adaptive Server Anywhere transport-layer security, perform the
following steps:
♦ Create digital certificates Create public certificates and server
certificates. Public certificates are distributed to client applications, while
server certificates are stored securely with database servers.
☞ See “Creating digital certificates” on page 31.
♦ Start the Adaptive Server Anywhere database server with
transport-layer security Use the -ec database server option to specify
the type of security, the server certificate, and the password to protect the
private key.
☞ See “Starting the database server with transport-layer security” on
page 39.
♦ Configure client applications to use transport-layer security
Specify the path and file name of trusted public certificates using the
Encryption connection parameter [ENC].
☞ See “Configuring client applications to use transport-layer security”
on page 41.
30
Chapter 2. Adaptive Server Anywhere Transport-Layer Security
Creating digital certificates
To set up transport-layer security you must generate digital certificates.
You can create self-signed certificates, use enterprise root certificates and
certificate chains, or have your certificates signed by a Certificate Authority
(CA).
♦ Self-signed certificates Self-signed certificates can be used for simple
setups involving a single database server. In this case, the private key
used to create trusted public certificates is stored with your database
server instead of a commercial Certificate Authority or dedicated facility.
☞ See “Self-signed root certificates” on page 31.
♦ Enterprise root certificates Enterprise root certificates increase data
integrity and extensibility for multi-server deployments.
♦ You can store the private key used to create trusted public certificates
in a secure central location.
♦ You can add database servers without reconfiguring clients.
See “Certificate chains” on page 32.
♦ Commercial Certificate Authorities You can use a third-party
Certificate Authority instead of an enterprise root certificate. Commercial
Certificate Authorities have dedicated facilities to store private keys and
create high-quality server certificates.
☞ See “Certificate chains” on page 32 and “Globally-signed
certificates” on page 35.
Certificate utilities
The SQL Anywhere Studio certificate generation utility, gencert, creates
certificates. It prompts you for certificate identification and file information
and uses RSA or elliptic-curve encryption technology. You can use the
certificate reader utility, readcert, to display certificate values and validate a
chain of certificates.
Self-signed root certificates
Self-signed root certificates can be used for simple setups involving a single
database server. In this case, the private key used to create trusted public
certificates is stored with your database server instead of a commercial
Certificate Authority or dedicated facility.
31
Tip
Use enterprise level certificate chains if you operate multiple database
servers or are looking for a higher level of certificate integrity.
☞ For more information about setting up certificate chains, see “Certificate chains” on page 32.
To set up self-signed certificates, you generate the following certificates
using the gencert utility:
♦ Public certificate The self-signed public certificate is distributed to
client applications. It is an electronic document including identity
information, the public key of the database server, and a self-signed
digital signature used for server authentication.
☞ For more information, see “Starting the database server with
transport-layer security” on page 39.
♦ Server certificate The server certificate is stored securely with a
database server. It is a combination of the self-signed public certificate
(that is distributed to clients) and the corresponding private key. The
private key gives the database server the ability to decrypt messages sent
by client applications.
Public certificate
public information
and
public key
self-signed
digital signature
Server certificate
public information
and
public key
self-signed
digital signature
private key
private key
Private key
A server identity certificate is created by
concatenating a public certificate and the
matching private key.
☞ For information about how to generate self-signed root certificates, see
“Certificate generation utility” [MobiLink Administration Guide, page 496].
Certificate chains
You can improve the security and extensibility of a multi-server environment
using certificate chains instead of self-signed certificates. Certificate chains
32
Chapter 2. Adaptive Server Anywhere Transport-Layer Security
require a Certificate Authority or an enterprise root certificate to sign
database server certificates.
☞ For more information about self-signed certificates, see “Self-signed
root certificates” on page 31.
Benefits of using
certificate chains
Certificate chains provide the following advantages:
♦ Extensibility You can configure client applications to trust any
certificate signed by an enterprise root certificate or Certificate Authority.
If you add a new database server, clients do not require a copy of the new
public certificate.
♦ Security The enterprise root certificate’s private key does not reside
with database servers. Storing the root certificate’s private key in a
high-security location, or using a Certificate Authority with dedicated
facilities, protects the integrity of server authentication.
The following diagram provides the basic enterprise root certificate
architecture.
Public enterprise
root certificate and
private key
public information
and
enterprise public key
Store the
enterprise private
key in a secure
location
Give a trusted copy of the
public enterprise root
certificate to each client
enterprise private key
public information
and
public key 1
public information
and
public key 2
private key 1
private key 2
signature 1
enterprise signature 1
signature 2
enterprise signature 2
Server
certificate (1)
Server
certificate (2)
...
To create certificates used in a multi-server environment:
33
♦ Generate a public enterprise root certificate and enterprise private key.
You distribute the public enterprise root certificate to client applications.
You store the enterprise private key in a secure location, preferably a
dedicated facility.
♦ Generate server certificates for each database server.
Use the public enterprise root certificate and enterprise private key to sign
each server certificate.
You can also use a third-party Certificate Authority to sign your server
certificates. Commercial Certificate Authorities have dedicated facilities to
store private keys and create high-quality server certificates.
☞ For more information, see “Globally-signed certificates” on page 35.
Enterprise root certificates
Enterprise root certificates increase data integrity and extensibility for
multi-server deployments.
♦ You can store the private key used to create trusted public certificates in a
secure central location.
♦ You can add database servers without reconfiguring clients.
To set up enterprise root certificates, you create the enterprise root certificate
and the enterprise private key that you use to sign server certificates.
☞ For information about creating server certificates, see “Signed server
certificates” on page 34.
☞ For information about how to generate enterprise root certificates, see
“Certificate generation utility” [MobiLink Administration Guide, page 496].
Signed server certificates
You generate server certificates for each database server. Since these
certificates are signed by an enterprise root certificate, you use the gencert -s
option.
☞ For information about generating signed server certificates, see
“Certificate generation utility” [MobiLink Administration Guide, page 496].
☞ For information about how to generate signed server certificates fo each
database server, see “Certificate generation utility” [MobiLink Administration
Guide, page 496].
34
Chapter 2. Adaptive Server Anywhere Transport-Layer Security
Globally-signed certificates
A commercial Certificate Authority is an organization that is in the business
of creating high-quality certificates and using these certificates to sign your
certificate requests.
Globally-signed certificates have the following advantages:
♦ In the case of inter-company communication, common trust in an outside,
recognized authority may increase confidence in the security of the
system. A Certificate Authority must guarantee the accuracy of the
identification information in any certificate that it signs.
♦ Certificate Authorities provide controlled environments and advanced
methods to generate certificates.
♦ The private key for the root certificate must remain private. Your
organization may not have a suitable place to store this crucial
information, whereas a Certificate Authority can afford to design and
maintain dedicated facilities.
Setting up
globally-signed
certificates
To set up globally signed certificates, you:
♦ Create a certificate request using Certicom’s reqtool utility.
☞ See “Using reqtool to obtain global certificates” on page 35.
♦ Use a Certificate Authority to sign each database server certificate
request.
☞ See “Using a global certificate as a server certificate” on page 36.
Globally-signing enterprise root certificates
You might be able to globally-sign an enterprise root certificate. This is
only applicable if your Certificate Authority generates certificates that
can be used to sign other certificates.
Using reqtool to obtain global certificates
Adaptive Server Anywhere transport-layer security is based on Certicom
SSL/TLS Plus libraries, which require elliptic-curve or RSA certificates.
You can obtain a global certificate from any Certificate Authority that can
supply certificates in the correct format.
There are several ways to obtain certificates. One way is to use the reqtool
utility, which is installed when you install the security component. This tool
creates a server’s private key and a global certificate request.
35
Example
The following example creates an elliptic-curve certificate request:
> reqtool
-- Certicom Corp. Certificate Request Tool 3.0d1 -Choose certificate request type:
E - Personal email certificate request.
S - Server certificate request.
Q - Quit.
Please enter your request [Q] : S
Choose key type:
R - RSA key pair.
D - DSA key pair.
E - ECC key pair.
Q - Quit.
Please enter your request [Q] : E
Using curve ec163a02. Generating key pair (please wait)...
Country: CA
State: Ontario
Locality: Waterloo
Organization: Sybase, Inc.
Organizational Unit: IAS
Common Name: IAS_Waterloo
Enter password to protect private key : mypwd123
Enter file path to save request : global.req
Enter file path to save private key : serv1_private_key.pri
The file global.req contains the public certificate and request information.
Paste the contents of this file into a form on the certificate-issuing web site.
The Certificate Authority will sign the request and create the public
certificate global.crt.
The file serv1_private_key.pri contains the corresponding private key. This
file is protected by the password you entered, but since the protection
provided by the password is weak, you must store this file in a secure
location.
☞ For more information about using reqtool, see the document reqtool.pdf,
located in the win32 subdirectory of your SQL Anywhere 9 installation.
Using a global certificate as a server certificate
You can use globally-signed certificates directly as database server
certificates. The following diagram shows the configuration for a
multi-server deployment:
36
Chapter 2. Adaptive Server Anywhere Transport-Layer Security
Certificate
Authority's public
root certificate
Give a trusted copy of the
certificate authority's public
certificate to each client.
Require each client to verify
certificate fields.
public information
and
root public key
root signature
Public
certificate (1)
Create certificate
requests using reqtool
and have your
Certificate Authority sign
them. Combine the
server's private key with
the signed certificate to
form the server identity.
Public
certificate (2)
public information
and
public key 1
public information
and
public key 1
signature 1
certificate authority
signature 1
signature 2
certificate authority
signature 2
private key 1
private key 2
Use matching server
identity (1) with one
database server
Use matching server
identity (2) with another
database server
...
certificates for other
database servers
To create the server identity, you must concatenate the public certificate
signed by the Certificate Authority and private key created using the reqtool
utility.
☞ For more information about the reqtool utility, see “Using reqtool to
obtain global certificates” on page 35.
The following example concatenates the globally-signed public certificate
global.crt and the private key serv1_private_key.pri to create the server
certificate server1_certificate.crt.
copy global.crt+serv1_private_key.pri server1_certificate.crt
You reference the server certificate server1_certificate.crt and the password
for the private key serv1_private_key.pri at the dbsrv9 command line.
☞ For more information, see “Starting the database server with
transport-layer security” on page 39.
Setting up clients to trust the certificate authority’s public certificate
You must ensure that clients contacting your database server trust the root
certificate in the chain. In the case of globally-signed certificates, the root
certificate is the Certificate Authority’s public certificate.
37
Certificate field verification
When using a globally-signed certificate, each client application must
verify field values to avoid trusting certificates that the same Certificate
Authority has signed for other clients.
☞ For more information about configuring client applications to trust
server certificates, see “Configuring client applications to use transport-layer
security” on page 41.
☞ For more information about using globally-signed certificates to
establish trust, see “Globally-signed certificates” on page 35.
38
Chapter 2. Adaptive Server Anywhere Transport-Layer Security
Starting the database server with transport-layer
security
To start the database server with transport-layer security, supply the server
certificate and the password protecting the server’s private key. Adaptive
Server Anywhere transport-layer security is only available over TCP/IP and
on Solaris, Linux, NetWare, Mac OS X, or any supported Windows platform
except Windows CE.
☞ For an overview of the steps required to set up transport-layer security,
see “Setting up transport-layer security” on page 30.
Use the -ec server option to specify the certificate and certificate_password
parameters.
Following is a partial dbsrv9 command line:
-ec cipher (certificate=server-certificate;certificate_password=password)
-x tcpip
♦ cipher can be rsa_tls or ecc_tls for RSA and elliptic-curve encryption,
respectively. For FIPS-approved RSA encryption, specify rsa_tls_fips.
rsa_tls_fips uses a separate approved library, but is compatible with
clients specifying rsa_tls with Adaptive Server Anywhere 9.0.2 or later.
The rsa_tls_fips cipher can only be used on supported 32-bit Windows
platforms.
The cipher must match the encryption (ECC or RSA) used to create your
certificates.
☞ For information about enforcing the FIPS-approved algorithm, see
“-fips server option” [ASA Database Administration Guide, page 140].
♦ server-certificate is the path and file name of the server certificate. If
you are using FIPS-approved RSA encryption, you must generate your
certificates using the RSA cipher.
☞ For more information about creating the server certificate, which can
be self-signed, or signed by a Certificate Authority or enterprise root
certificate, see “Creating digital certificates” on page 31.
♦ password is the password for the server certificate’s private key. You
specify this password when you create the server certificate.
You can also start the database server with simple encryption, which does
not assure data integrity or provide server authentication. Simple encryption
makes it more difficult for someone using a packet sniffer to read the
network packets sent between the client and the server. Simple encryption is
supported in previous versions of SQL Anywhere Studio.
39
☞ For more information about the -ec server option, see “-ec server
option” [ASA Database Administration Guide, page 135].
You specify the TCP/IP protocol using the -x server option.
☞ For more information, see “-x server option” [ASA Database
Administration Guide, page 163].
Examples
The following example uses the -ec server option to specify ecc_tls security,
the server certificate, and the password protecting the server’s private key:
dbsrv9 -ec ecc_tls(certificate=c:\test\serv1_ecc.crt;
certificate_password=mypwd) -x tcpip asademo.db
☞ You can hide the command-line options including passwords using a
configuration file and the File Hiding utility, dbfhide. For more information,
see “@data server option” [ASA Database Administration Guide, page 123].
The following example uses the -ec server option to specify rsa_tls security,
the server certificate, and the password protecting the server’s private key:
dbsrv9 -ec rsa_tls(certificate=c:\test\serv1_rsa.crt;
certificate_password=test) -x tcpip asademo.db
40
Chapter 2. Adaptive Server Anywhere Transport-Layer Security
Configuring client applications to use
transport-layer security
You can configure client applications to use transport-layer security. Using a
set of encryption connection parameters, you specify trusted public
certificates, the type of encryption, and the network protocol.
☞ For an overview of the steps required to set up transport-layer security,
see “Setting up transport-layer security” on page 30.
Server authentication
Server authentication allows a remote client to verify the identity of a
database server. Digital signatures and certificate field verification work
together to achieve server authentication.
Digital signatures
A database server certificate contains one or more digital signatures used to
maintain data integrity and protect against tampering. Following are the
steps used to create a digital signature:
♦ An algorithm performed on a certificate generates a unique value or hash.
♦ The hash is encrypted using a signing certificate’s or Certificate
Authority’s private key.
♦ The encrypted hash, called a digital signature, is embedded in the
certificate.
A digital signature can be self-signed or signed by an enterprise root
certificate or Certificate Authority.
When a client application contacts a database server, and each is configured
to use transport-layer security, the server sends the client a copy of its public
certificate. The client decrypts the certificate’s digital signature using the
server’s public key included in the certificate, calculates a new hash of the
certificate, and compares the two values. If the values match, this confirms
the integrity of the server’s certificate.
If you are using FIPS-approved RSA encryption, you must generate your
certificates using RSA.
☞ For more information about self-signed certificates, see “Self-signed
root certificates” on page 31.
☞ For more information about enterprise root certificates and Certificate
Authorities, see “Certificate chains” on page 32.
41
Verifying certificate fields
When using a globally signed certificate, each client must verify certificate
field values to avoid trusting certificates that the same Certificate Authority
has signed for other clients. This is resolved by requiring your clients to test
the value of fields in the identity portion of the certificate. A Certificate
Authority must guarantee the accuracy of the identification information in
any certificate that it signs.
☞ For more information about globally signed certificates, see
“Globally-signed certificates” on page 35.
When creating a certificate using the gencert utility, you enter values for the
organization, organizational unit, and common name fields. You verify these
fields using corresponding client connection parameters.
♦ Organization The organization field corresponds to the
certificate_company encryption connection parameter.
♦ Organizational unit The organizational unit field corresponds to the
certificate_unit encryption connection parameter.
♦ Common name The common name field corresponds to the
certificate_name encryption connection parameter.
☞ For more information about client-side encryption connection
parameters, see “Encryption connection parameter [ENC]” [ASA Database
Administration Guide, page 191].
Client security options
Clients use a set of encryption connection parameters for transport-layer
security.
The trusted_certificates
option
This is the only required option. Clients use the trusted_certificates
encryption option to specify trusted database server certificates. The trusted
certificate can be a server’s self-signed public certificate, a public enterprise
root certificate, or a public certificate belonging to a commercial Certificate
Authority.
☞ For more information, see “Creating digital certificates” on page 31.
Verifying certificate fields
42
The certificate_company, certificate_unit, and certificate_name encryption
protocol options are used to verify certificate fields, an important step for
server authentication. It is strongly recommended that you verify certificate
fields if you are using a third-party Certificate Authority to globally sign
certificates.
Chapter 2. Adaptive Server Anywhere Transport-Layer Security
☞ For more information about verifying certificate fields, see “Verifying
certificate fields” on page 42.
Establishing a client connection using transport-layer security
To set up client applications to use transport-layer security, use the
Encryption [ENC] connection parameter in your connection string. The
connection string takes the following form:
Encryption=cipher (trusted_certificates=public-certificate)
♦ cipher can be rsa_tls or ecc_tls for RSA and elliptic-curve encryption,
respectively. For FIPS-approved RSA encryption specify rsa_tls_fips.
rsa_tls_fips uses a separate approved library, but is compatible with
servers specifying rsa_tls with Adaptive Server Anywhere 9.0.2 or
later.The rsa_tls_fips cipher can only be used on supported 32-bit
Windows platforms.
The connection fails if the cipher does not match the encryption (RSA or
ECC) used to create your certificates.
♦ public-certificate is the path and file name of a trusted public
certificate. If you are using FIPS-approved RSA encryption, you must
generate your certificates using RSA.
☞ For more information about trusted_certificates and other client security
parameters, see “Client security options” on page 42.
☞ For more information about creating or obtaining the public certificate,
see “Creating digital certificates” on page 31.
☞ For more information about the encryption connection parameter, see
“Encryption connection parameter [ENC]” [ASA Database Administration
Guide, page 191].
Example
The following example uses the trusted_certificates encryption connection
parameter to specify the public certificate, public_cert.crt.
"UID=DBA;PWD=SQL;ENG=myeng;LINKS=tcpip;
ENC=ECC_TLS (trusted_certificates=public_cert.crt)"
The following example uses the trusted_certificates encryption connection
parameter to specify the public certificate, public_cert.crt, and verifies
certificate fields using the certificate_unit, and certificate_name encryption
connection parameters.
"UID=DBA;PWD=SQL;ENG=myeng;LINKS=tcpip;
ENC=ECC_TLS (trusted_certificates=public_cert.crt;
certificate_unit=test_unit;certificate_name=my_certificate)"
43
Using transport-layer security for web services
To set up transport-layer security for web services, perform the following
steps:
♦ Create digital certificates You must create public certificates and
server certificates. Public certificates (which can be Certificate Authority
certificates) are distributed to browsers or web clients. Server certificates
are stored securely with your Adaptive Server Anywhere web server.
☞ For general information about creating digital certificates, including
information about using Certificate Authorities, see “Creating digital
certificates” on page 31.
♦ Start the web server with transport-layer security Use the -xs
database server option to specify HTTPS, the server certificate, and the
password to protect the private key.
Following is a partial dbsrv9 command line.
-xs protocol(Certificate=server-certificate;Certificate_
Password=password;...) ...
• protocol can be https, or https_fips for FIPS-approved RSA
encryption. https_fips uses a separate approved library, but is
compatible with https.
Note
The Mozilla Firefox browser can connect when https_fips is used.
However, the cipher suite used by https_fips is not supported by
the Internet Explorer, Opera, or Safari browsers—if you are using
https_fips, these browsers cannot connect.
For information about enforcing the FIPS-approved algorithm, see
“-fips server option” [ASA Database Administration Guide, page 140].
• server-certificate The path and file name of the server certificate.
For HTTPS, you must use an RSA certificate.
• password The password for the server certificate’s private key. You
specify this password when you create the server certificate.
For more information about the -xs server option, see “-xs server option”
[ASA Database Administration Guide, page 165].
☞ For more information about the Certificate and Certificate_Password
parameters, see:
• “Certificate protocol option” [ASA Database Administration Guide,
page 208]
• “Certificate_Password protocol option” [ASA Database Administration
Guide, page 208]
44
Chapter 2. Adaptive Server Anywhere Transport-Layer Security
♦ Configure web clients Configure browsers or other web clients to trust
public certificates. The trusted certificate can be self-signed, an enterprise
root, or a Certificate Authority certificate.
☞ For general information about creating digital certificates, including
information about using Certificate Authorities, see “Creating digital
certificates” on page 31.
45
46
PART II
C ONFIGURING A DAPTIVE
S ERVER A NYWHERE IN A
C2-C OMPLIANT M ANNER
This part describes the mechanics of setting up, installing and running
Adaptive Server Anywhere in a C2-compliant manner. It also contains
additional information you may find useful when operating Adaptive Server
Anywhere in a manner equivalent to the C2-certified configuration.
CHAPTER 3
Installation
About this chapter
This chapter describes the procedures for installing Adaptive Server
Anywhere (ASA) in a manner equivalent to the C2 certified configuration.
The instructions contained in this document must be followed exactly to
ensure an environment equivalent to the certified environment.
Contents
Topic:
page
Hardware installation
50
Operating system installation
51
Adaptive Server Anywhere software installation
52
Creating a database
56
Running the database engine
58
49
Hardware installation
Set up the hardware as specified in the Hardware User’s Manual with the
restrictions listed in the Microsoft Windows C2 NT Administrator’s and
User’s Security Guide, chapter 4.
Additional hardware information is available in the Final Evaluation Report
(FER), which is available on Sybase’s website.
50
Chapter 3. Installation
Operating system installation
The first step in creating a C2 certified configuration involves installing and
setting up the operating system.
❖ To install and set up the operating system
1. Install Windows NT 4.0 in the C2 certified configuration (including
Service Pack 6a and the C2 security Hotfix), as specified in the Microsoft
Windows NT C2 Administrator’s and User’s Security Guide, Chapter 4.
2. Log in to Windows NT as Administrator.
3. From the Start menu, choose Programs ➤ Administrative Tools
(Common) ➤ User Manager for Domains.
4. Using the User Manager, create a user called sybase.
♦ Give this user a secure password.
♦ Add the user to only the Users group.
♦ Clear the User Must Change Password at Next Logon checkbox.
♦ Click Add, and then Close.
5. From the Policies menu, choose User Rights.
6. Check the Show Advanced User Rights checkbox, and then select Log
On As A Service from the Right dropdown list.
7. Click Add.
A dialog appears.
8. In the List Names From dropdown list, select \\machine_name.
9. In the Add Names field, type sybase, and click OK.
10. Click OK to close the dialog.
11. If you wish to audit logons and logoffs of users (which can help in
correlating Adaptive Server Anywhere audit records with Windows
users) choose Policies ➤ Auditing, and:
♦ Select the Audit These Events option.
♦ Check the Logon and Logoff checkbox under Success.
♦ Select any other events you want audited, and click OK.
12. Close the User Manager (optional).
51
Adaptive Server Anywhere software installation
Next, you have to install Adaptive Server Anywhere in a C2-compliant
manner. For C2 compliance you must use Adaptive Server Anywhere
version 7.0.0, English only, without any EBFs (express bug fixes), in a
standalone environment. Most of this book describes how to operate the
current version of the software, but this section refers specifically to the
C2-certified release.
❖ To install Adaptive Server Anywhere 7.0.0
1. Log in to Windows NT as administrator.
2. Download the Adaptive Server Anywhere C2 patch from
www.sybase.com/developer.
3. Run ASAC2Patch.exe and save the files into the default directory
(C:\ASAC2Patch ).
ASAC2Patch.exe is a self-extracting archive.
☞ For information on this patch, see “The Adaptive Server Anywhere
C2 patch” on page 100.
4. Open a command prompt window.
The Adaptive Server Anywhere installation includes MDAC (Microsoft
Data Access Components). The MDAC installation replaces some
Windows NT system DLLs which are part of the Windows NT TCB
(trusted computing base). To avoid this, you must first make copies of
these DLLs, and then replace them after the Adaptive Server Anywhere
installation. The Adaptive Server Anywhere C2 Patch includes three
batch files to facilitate this procedure.
The first batch file creates a temporary directory and copies fourteen .dll
files and one .exe file from the C:\winnt\system32 directory. To run the
first batch file, enter the following commands at the command prompt:
C:
cd \ASAC2Patch
mdac1
exit
5. Install the Adaptive Server Anywhere 7.0.0 software, using the following
guidelines:
♦ Clear the Adaptive Server Anywhere for NetWare checkbox.
♦ Clear the Adaptive Server Anywhere for Windows CE checkbox.
♦ Clear the UltraLite development components checkbox.
52
Chapter 3. Installation
♦ Clear all options under Synchronization.
♦ Clear the PowerDynamo 3.5, PowerDesigner, and Infomaker 7 options.
♦ If available, clear the Encryption for MobiLink Synchronization
checkbox.
♦ Use the default values for installation directories.
6. Reboot your machine after the installation is complete.
7. Log in to Windows NT as an administrator.
8. Install the Adaptive Server Anywhere C2 patch according to the
directions in readme.txt (located in C:\ASAC2Patch ).
You do not need to reboot the machine after this step.
9. Set permissions on the software directory as follows:
♦ Double-click My Computer. Right-click the directory containing the
Adaptive Server Anywhere software (it should be C:\Program
Files\Sybase ), and choose Properties.
♦ Open the Security tab and then click the Permissions button.
♦ Select Everyone, and change the Type of Access to Read.
♦ Click Add. On the dialog that appears, select \\machine_name from the
List Names From dropdown list. Select Administrators from the
Names list and click Add.
♦ Click Show Users. Select sybase from the Names list and click Add.
Change Type of Access to Full Control, and click OK.
♦ Make sure the list contains only the three entries mentioned above.
♦ Check the Replace Permissions on Subdirectories checkbox.
♦ Click OK, and answer Yes to the prompt.
10. Create a folder for the database and transaction log files. For example,
you may create a folder C:\Databases. In the remainder of this document,
this folder is referred to as the C2 database folder. Set the permissions
on this folder as follows:
♦ Double-click My Computer. Right-click the Databases folder and
select Properties.
♦ Click the Security tab and click the Permissions button.
♦ Remove the Everyone entry.
♦ Click Add. On the dialog that appears, select \\machine_name in the
List Names From dropdown list, and then type sybase in the Add
Names field. Change Type of Access to Full Control, and click OK.
53
♦ Click OK.
11. Create a folder under C:\ called ASTMP for the engine to use as
temporary storage space. Set the same permissions as for the Databases
folder in the previous step.
12. Set the System environment variable ASTMP to the temporary folder just
created by right-clicking the My Computer icon, and choosing Properties.
Click the Environment tab. In the Upper listbox, click any entry. Change
the Variable entry to ASTMP, and change the Value entry to C:\ASTMP.
Click Set, and then click OK.
13. The second batch file contained in the Adaptive Server Anywhere C2
Patch copies the .dll and .exe files from the temporary directory created
by mdac1.bat into the C:\winnt\system32 directory. To run the second
batch file, from the Start menu, choose Programs ➤ Command Prompt.
At the command prompt, enter the following commands:
C:
cd \ASAC2Patch
mdac2
exit
14. When putting Windows NT into the certified configuration, several
registry keys are deleted. During Adaptive Server Anywhere installation,
two of these keys are re-created. For Windows NT to remain in its
certified configuration, these keys must be deleted again. Use
regedt32.exe to delete the following registry keys:
Key
HKEY_LOCAL_MACHINE\SOFTWARE
Subkey
Microsoft\OS/2 Subsystem for Windows NT
Entry
delete all subkeys
Key
HKEY_LOCAL_MACHINE\SYSTEM
Subkey
CurrentControlSet\Control\Session Manager\Environment
Entry
Os2LibPath
Value
delete entry
15. You must also ensure that these files have the correct permissions as
shown below:
54
Files
C2-Level Permissions
BOOT.INI, NTDETECT.COM,
NTLDR
Administrators: Full Control SYSTEM: Full Control
Chapter 3. Installation
16. Close all open windows and reboot your machine.
You must reboot your machine for the Service Control Manager to read
changes to system environment variables.
17. Log in to Windows NT as administrator.
18. The third batch file contained in the Adaptive Server Anywhere C2 Patch
cleans up the temporary directory created by mdac1.bat. To run the third
batch file, open a command prompt window. At the command prompt,
enter the following commands:
C:
cd \ASAC2Patch
mdac3
exit
55
Creating a database
To operate in a C2 compliant configuration, your database must be C2
compliant as well. All connections to the database must use the integrated
login mechanism. Standard connections to the database (for example,
specifying a user ID and password) are not allowed in the certified
configuration.
❖ To create a C2 compliant database
1. Log in as sybase.
2. From the Start menu, choose Programs ➤ Command Prompt.
3. Use the dbinit utility to create a database with the following restrictions:
♦ You must use the -I switch to disable jConnect support.
♦ You must not use the -k, or -n switches.
♦ You must put the database file in your C2 database folder.
♦ If you specify a transaction log file using the -t switch, or a
transaction log mirror file using the -m switch, the files specified must
be in your C2 database folder.
☞ For information on using the dbinit utility in the certified
configuration, see “Initialization utility” on page 91. For information
about the database folder, see “Adaptive Server Anywhere software
installation” on page 52.
4. Once the database is created, you need to connect to the database.
This connection must only be used to set the min_password_length
option and the DBA’s password.
5. At a command prompt, type dbisqlc –c
UID=DBA;PWD=SQL;DBF=file where file is the full path of the
database file created above.
Interactive SQL appears after a few seconds.
☞ For information on using the dbisqlc utility in the certified
configuration, see “Interactive SQL utility” on page 94 and “Restrictions”
on page 76.
6. Type set option public.min_password_length=6 (or higher) and click
Execute.
7. Type grant connect to DBA identified by newpw where newpw is the
new password for the DBA account, and click Execute.
The new password must be at least as long as the number entered in
step 5, and should not be easy to guess.
56
Chapter 3. Installation
8. Type grant integrated login to sybase as user DBA, and click Execute.
9. Type set option public.login_mode=‘Integrated’, and click Execute.
10. Exit Interactive SQL by clicking the X in the top right corner of the
window.
57
Running the database engine
1. Log in to Windows NT as administrator.
You require administrator privileges to create, start, and stop services.
2. Open a command prompt.
3. Use the dbsvc utility to create a service with the following restrictions:
♦ You must use the -a switch to specify the sybase account, and the -p
switch to specify its password.
♦ You must not use the -as or -I switches.
♦ The executable name should be
C:\Program Files\Sybase\SQL Anywhere 9\win32\dbeng9.exe
for the personal database server, or
C:\Program Files\Sybase\SQL Anywhere 9\win32\dbsrv9.exe
for the database server.
♦ You must use the following engine parameters:
•
•
•
•
•
•
•
-n engine name
-sc
-gd DBA
-gk DBA
-gl DBA
-gu DBA
-x namedpipes(TDS=NO)
4. Enter the full path to any database files you wish to run.
The path should be in the format database-folder\filename.db, where
database-folder is your C2 database folder, and include any other relevant
parameters.
For example, the following command line creates a service called
asa_svc that starts manually, and refers to a network server. It runs under
the sybase account, whose password is sybase_password. It executes the
following command:
C:\Program Files\Sybase\SQL Anywhere 9\win32\
dbsrv9.exe -n asa_c2 -sc -gd DBA -gk DBA
-gl DBA -gu DBA -x namedpipes(TDS=NO)
database-folder\c2test.db
dbsvc -a sybase -p sybase_password -s manual
-t network -w asa_svc C:\Program Files\Sybase\
SQL Anywhere 9\win32\dbsrv9.exe -n asa_c2 -sc
-gd DBA -gk DBA -gl DBA -gu DBA
-x namedpipes(TDS=NO) database-folder\c2test.db
58
Chapter 3. Installation
☞ For information on using the engine and the server in the certified
configuration, see “Database engine/server” on page 87.
5. To start and stop the service, run the Windows NT service manager from
the control panel. From the Start menu, choose Settings ➤ Control Panel,
and then double-click Services.
The service you just created appears under Adaptive Server Anywhere svc where svc is the service name you specified on the dbsvc command
line.
6. Use the Start and Stop buttons to start and stop the service.
59
CHAPTER 4
Auditing
About this chapter
Contents
This chapter contains information on reading auditing output, and correlating
Adaptive Server Anywhere auditing output with Windows NT auditing.
Topic:
page
Enabling and disabling auditing
62
Reading auditing output
63
Audit records
64
Administration of audit records
71
Auditing of database utilities
72
Correlating audit records
73
61
Enabling and disabling auditing
Auditing is OFF when you create a database. However, you can enable and
disable auditing using the auditing public option at any time.
❖ To start auditing on a particular database
1. Turn the option ON using the following SQL statement:
SET OPTION public.auditing=’on’
Only users with DBA authority can set public options. Once this option
has been turned on, all permission checks and connection attempts are
audited.
❖ To stop (disable) auditing on a particular database
1. Turn the option OFF using the following SQL statement:
SET OPTION public.auditing = ’off’
Only a user with DBA authority can issue this statement.
☞ For more information and a complete list of the types of audit records
that the engine or server can generate, see “Audit records” on page 64.
Note
62
Auditing is optional when running in a C2 certified configuration.
Chapter 4. Auditing
Reading auditing output
You can use the dbtran utility to retrieve audit records from the transaction
log. The transaction log file is usually found in the dbname.log file, located
in the same directory as the database file.
The -g switch tells dbtran to include audit records in the output. The output
from dbtran is a SQL script with comments interspersed. This SQL script
can be used to recover the database if a failure occurs. When using the -g
option, the output file is entirely comments, since the -g option implies the
-d option (which records transaction log information in the order in which it
was contained in the log, not in the default commit order). Do not use output
in this format for recovery of a database. Each line is commented to avoid
accidental use of this file for recovery.
When a user connects to the database, an audit record is generated:
-CONNECT-1001-0000198970-dba-1998/dec/03 14:54
The data following the CONNECT are interpreted as follows:
♦ 1001 is the connection ID assigned to this connection. Any transactions
listed below with connection ID 1001 belong to this connection, until
another CONNECT-1001 is found.
♦ 0000198970
is the byte offset of the record in the transaction log.
♦ dba is the user name logged in on this connection.
♦ 1998/dec/03 14:54
is the date and time of the connection.
Other records have the connection ID and byte offset, but only the
CONNECT record has the user name and date/time. Note that disconnects
are not logged. If another CONNECT record is generated with the same
connection ID as a previous CONNECT record, you can assume that the first
user has disconnected. Although the connection ID is reused, the second
connection is entirely unrelated to the first.
63
Audit records
This section identifies the different audit records that may be generated by
the engine or server, the information contained in the record, and when the
record is generated. Descriptions of the audit records generated by the three
database utilities dblog, dbtran, and dbwrite in the .alg file appear in
“Auditing of database utilities” on page 72.
Type
Information
Use
Attempting
Operation
date/time, SQL of
attempted operation
This record displays the operation
being attempted. This is necessary
because of the way the transaction log
works.
The transaction log contains SQL to
replicate changes made to the database
data or schema if recovery becomes
necessary. Audit records become part
of this log so that each permission
check is recorded as it happens, and so
that the activity on the database can be
recreated later.
However, if a permissions check fails,
then the operation being attempted
doesn’t actually happen, and therefore
doesn’t get logged. In this case, there
is no way of knowing what was being
attempted. This is especially important
when a non-DBA user attempts something that requires DBA authority.
For this reason, all DDL statements
(and a few other statements as well)
are recorded before they are attempted.
Operation
Succeeded /
Failed
64
date/time, success
or failure
This record indicates the success or
failure of the most recent Operation
Attempt, Attempting to set public option, or Attempting SETUSER record
for the same connection ID.
Chapter 4. Auditing
Type
Information
Use
Checking
permission
date/time, type of
permission / authority, table name (if
applicable), column
name (if applicable), procedure /
function name (if
applicable)
This record indicates that a permission
or authority check of some kind took
place. The permission in question is
indicated, and can be one of:
DBA / Resource authority
Insert / Update / Select / Delete / Alter
/ Resource permission on a table
Update / Select / Resource permission
on a table and column
Grant Insert / Update / Select / Delete /
Alter / Resource permission on a table
Grant Update / Select / Resource
permission on a table and column
Execute permission on a procedure or
function
Grant Execute permission on a procedure or function
Checking
user
date/time, user
name
This record indicates that a user check
took place. This can help determine
ownership of objects, for example,
user bob owns table T. If an insert is
attempted on table T, we must check to
see if the current user is user bob. The
text of the record is Checking to see if
user is user name.
Set Public
Option
date/time, name of
option
This record indicates that a user attempted to set an option owned by the
PUBLIC user. Only users with DBA
authority are allowed to do this, so
this check will always be followed by
a DBA authority check. An Operation Succeeded/Failed record indicates
success or failure.
65
66
Type
Information
Use
Auditing Enabled / Disabled
date/time
This record indicates that the auditing
public option has been changed. This
record will always follow a Set Public
Option record. This record is generated whether auditing is turned on or
off. However, this record will not be
generated if the user sets the auditing
variable to ON when auditing is already on, or if the user sets the variable
to OFF when auditing is already off.
Attempting
SETUSER
date/time, name of
user
This record indicates that a user has
attempted a SETUSER command with
a parameter. Only users with DBA
authority are allowed to do this, so
this record will always be followed by
a DBA authority check. An Operation Succeeded/Failed record indicates
success or failure. Note that the SETUSER command with no arguments
is neither audited nor logged, since any
user can execute that statement.
Attempting
Connection
date/time, user
name (if successful), machine address (local if the
same machine),
port type, success
or failure
This record indicates that a connection
attempt took place.
Chapter 4. Auditing
Type
Information
Use
Trigger firing
/ finishing
date/time, name of
trigger
This record indicates that a trigger has
fired or finished executing. All audit
records for the same connection in
between these two records are auditing
the trigger execution. Note that triggers
execute with the permission of the
table owner, not the caller, so any
permission checks audited in between
Trigger firing and Trigger finishing
records are done with respect to the
table owner. Examining the SQL
statement that caused the trigger to
fire will reveal the table owner. Look
at the SQL statement for the same
connection immediately preceding the
Trigger firing record. It will be an
insert, update, or delete on a table.
The table name will be in the format
owner.table.
String
date/time, string
Records of this type can be inserted
into the audit trail using a system stored
procedure called sa_audit_string. This
procedure is executable only by users
with DBA authority. Any string (up to
128 characters) can be specified.
67
Table 6.2 – Format of audit records – fixed
Type
Format
Transaction redo header
1 byte
Connection identifier
3 bytes
date / time
11 bytes:
♦ 2 bytes year (for example, 1998)
♦ 1 byte month (1–12)
♦ 1 byte day (1–31)
♦ 1 byte hour (0–23)
♦ 1 byte minute (0–59)
♦ 1 byte second (0–59)
♦ 4 bytes microsecond (0–999999)
Audit type
1 byte
Table 6.3 – Format of audit records – variable by type
Type
Format
AUDIT_ENABLE_AUDITING
♦ 1 byte 1 (auditing enabled) or 0 (auditing disabled)
AUDIT_SET_PUB_OPTION
♦ 2 bytes length of following string
(n)
♦ n bytes option name
AUDIT_OP_ATTEMPT
♦ 2 bytes length of following string
(n)
♦ n bytes SQL of attempted operation
AUDIT_OP_SUCCESS
68
♦ 1 byte 1 (operation succeeded) or
0 (operation failed)
Chapter 4. Auditing
Type
Format
AUDIT_PERM_CHECK
♦ 1 byte
1 (success) or 0 (failure)
♦ 2 bytes length of following string
(n)
♦ n bytes permission type (for example, select, update, or execute)
♦ 2 bytes length of following string
(n)
♦ n bytes object (table, view, procedure, etc.) name
♦ 2 bytes length of following string
(n)
♦ n bytes column name, if applicable
AUDIT_USER_CHECK
♦ 1 byte
1 (success) or 0 (failure)
♦ 2 bytes length of following string
(n)
♦ n bytes user name
AUDIT_CONNECTION
♦ 1 byte
1 (success) or 0 (failure)
♦ 2 bytes length of following string
(n)
♦ n bytes user name (if connection
succeeded)
♦ 2 bytes length of following string
(n)
♦ n bytes machine ID
AUDIT_SETUSER
♦ 2 bytes length of following string
(n)
♦ n bytes user name
AUDIT_TRIGGER
♦ 2 bytes length of following string
(n)
♦ n bytes name of trigger
♦ 3 bytes fired or finished
69
Type
Format
AUDIT_STRING
♦ 2 bytes length of following string
(n)
♦ n bytes variable text string
70
Chapter 4. Auditing
Administration of audit records
The Log translation [dbtran] utility can retrieve audit records from the
transaction log. Using the -u or -x switches when invoking dbtran, records
can be filtered depending on the user name. Audit records cannot be deleted.
However, the transaction log can be purged or truncated using the dblog or
dbbackup utilities.
☞ For more information about purging the transaction log, see
“Transaction log utility” on page 93.
If the audit log (in the case of Adaptive Server Anywhere, the transaction
log) becomes full, the engine or server will rollback all pending transactions
and fail all subsequent requests. At this point, the transaction log must be
truncated in order to continue using the database. It is strongly
recommended that you back up the transaction log before truncating it. The
easiest way to back up the transaction log is to stop the engine, and then copy
the file to another disk. You can then delete the old transaction log file and
restart the engine or server. A new transaction log file will then be created.
71
Auditing of database utilities
Some database utilities perform actions that must be audited, but do not
necessarily communicate with a running engine or server. These utilities
must be audited separately. The utilities in question are dblog, dbwrite, and
dbtran. These utilities check the database or transaction log to see if auditing
is enabled. If so, they audit their invocation by writing to a file called
dbname.alg, located in the same directory as the database file.
The .alg file is a text file, and can be viewed with any standard editor, such
as Notepad. You can also use text-file sort and filter utilities (such as grep) to
retrieve audit records for a particular user or utility.
Each audit record consists of a single line, in the following format:
2000/07/07 15:31:17.316 - User NT user name invoking
utility name
You can delete records from this file at any time, simply by deleting them in
the editor and saving the file. You can also delete the file at any time.
Utilities that generate records into this file will fail if they cannot write to
this file (for example, if the file system is full). Accesses to the .alg file can
be audited using the Windows NT audit mechanism.
72
Chapter 4. Auditing
Correlating audit records
In some cases, it may be useful to know the name of the user who was
logged into Windows NT at the time that some audit records were generated.
For example, if a DBA notices a lot of failed logon attempts grouped
together, he may want to know who was logged into Windows NT at the
time that these attempts were made. There are two ways to do this,
depending on the type of information that is required.
In the above example, you would simply record the time at which the audit
event in question took place – all audit events include the date and time of
the event. Then, log into Windows NT as the administrator, and run the
Event Viewer application. From the Log menu, choose Security to see the
logon and logout audit records. Locate and double click the Logon/Logoff
event immediately before the date and time of the audit event in question. It
should be a Successful Logon event. The user name and domain of the user
that logged on will appear, and tell you who was logged into the
Windows NT workstation at the time that the audited event occurred. Note
that this is only possible if auditing of Windows NT logons and logouts was
enabled during “Operating system installation” on page 51.
If the audit log contains information about a specific connection, and you
need to correlate that with a particular Windows user, this second method is
easier. Since integrated login is used for all connections, the database user is
mapped to a particular Windows user. Since this mapping must be
one-to-one, we know that no other Windows user can be mapped to this
database user. To find the name of the Windows user given the database
login ID, execute the following SQL statement:
SELECT lg.integrated_login_id
FROM syslogin lg
KEY JOIN sysuserperm p
WHERE p.user_name=’login ID’
73
CHAPTER 5
Restrictions and Other Security Concerns
About this chapter
Contents
This chapter describes C2 certification restrictions and other security
concerns.
Topic:
page
Restrictions
76
Security warnings
79
Changing ownership on nested objects
80
Revoking DBA authority
82
The TCB subset
83
75
Restrictions
The following restrictions are required for Adaptive Server Anywhere to run
in the certified C2 configuration.
1. Do not delete, modify, or replace any files under the Adaptive Server
Anywhere installation directory, with the following exceptions:
♦ win32\util_db.ini – this file may be modified as required.
♦ win32\asasrv.ini – this file may be modified or deleted as required.
♦ win32\rebuild.bat – this file may be modified as required.
♦ win32\backup.syb – this file may be modified or deleted as required.
♦ win32\procdebug.bat – this file may be modified as required.
♦ win32\custom.SQL – this file may be modified as required.
♦ win32\tjava.pdf – this file may be deleted as required.
2. Do not add any new files under the Adaptive Server Anywhere
installation directory.
3. The sybase account password should only be given to one person.
4. The path for the sybase account should not contain any directories other
than %SystemRoot%\system32, %SystemRoot%, and the Adaptive
Server Anywhere win32 directory.
5. Grant only the Login as a Service privilege to the sybase account.
6. DBA authority is very powerful. Only grant DBA authority to those users
who require it. The number of DBA users should be kept to a minimum.
However, each person who requires DBA authority should be given a
separate account with DBA authority granted to it (for example, do not
use shared DBA accounts).
7. DBAs who will be using the database outside of their DBA capacity
should be given two different Adaptive Server Anywhere user
accounts—one with DBA authority and one without. DBAs should only
use the account with DBA authority when necessary.
8. The password for the DBA account must be changed upon creation of a
new database.
9. The value for the min_password_length public option must be set to at
least 6 upon creation of a new database.
10. The database engine or server must be run as a Windows NT service.
Adaptive Server Anywhere is only certified when running as a service.
76
Chapter 5. Restrictions and Other Security Concerns
11. The following switches must be specified on the engine or server start line
-sc -gd DBA -gk DBA -gl DBA -gu DBA
-x namedpipes(TDS=NO)
The engine or server start line is specified when executing the dbsvc
utility, so these switches must be included in the Details part of the dbsvc
command.
☞ For more information, see “Service creation utility” on page 92 for
details on dbsvc.
12. Do not use the -x parameter to start up any ports other than Named Pipes.
Adaptive Server Anywhere is only certified in a standalone environment.
13. Do not grant REMOTE_DBA authority to any user.
14. Do not grant execute permission on the following system procedures to
any user or group:
♦ xp_cmdshell
♦ xp_startmail
♦ xp_sendmail
♦ xp_stopmail
♦ xp_read_file
♦ xp_write_file
♦ sp_audit_string
♦ java_debug_version
♦ java_debug_connect
♦ java_debug_disconnect
♦ java_debug_get_existing_vms
♦ java_debug_free_existing_vms
♦ java_debug_wait_for_debuggable_vm
♦ java_debug_get_vm_name
♦ java_debug_release_vm
♦ java_debug_attach_to_vm
♦ java_debug_detach_from_vm
♦ java_debug_detach_request
♦ Any system procedures introduced after version 7.
15. Do not create stored procedures or functions owned by any user with
DBA authority.
77
16. Do not create triggers on any tables owned by any user with DBA
authority.
17. Upgrade older databases by running the dbupgrad utility before using
them.
☞ For more information about upgrading a database, see “Upgrading a
database using the dbupgrad command-line utility” [ASA Database
Administration Guide, page 600].
18. Databases must use a transaction log file. Do not use the -n switch (no
transaction log) when creating a database and do not execute dblog -n
(do not use a transaction log or mirror) on a database.
19. All database, transaction log, dbspace, write file, and mirror files should
be stored in non-shared, protected directories.
☞ For guidelines on how to protect a directory, see “Adaptive Server
Anywhere software installation” on page 52.
20. The java.net package is disabled in the engine or server. Java running in
the database will not be able to use this package.
21. The java_input_output public option must always be set to OFF (the
default).
22. Do not create a database user called guest. Such a user would allow any
Windows user to connect to the database using integrated login.
23. Always set the login_mode public option to Integrated during database
installation.
☞ For more information, see “Creating a database” on page 56.
24. All connections to the database must use the integrated login mechanism.
Standard connections to the database (that is, those specifying user ID
and password) are not allowed in the certified configuration.
25. All integrated login mappings must be one-to-one. No two Windows user
names may be mapped to the same database user.
26. Embedded SQL programs must not use the db_delete_file function
because the name of the file being deleted is not audited.
27. Do not grant SELECT access on sys.sysuserperm or sys.syslogin to any
non-DBA user.
78
Chapter 5. Restrictions and Other Security Concerns
Security warnings
Below are some other security issues to be aware of:
1. Since triggers execute with the permission of the table owner, it is
possible for any user with ALTER permission on a table to write a trigger
that accesses other tables owned by the same user. Please be aware that
by granting ALTER permission on a table to another user, you are
effectively granting all permissions on all of your tables to that user.
2. Audit records are created when a trigger is fired, and when the stored
procedure executed by the trigger finishes. The user ID listed in these
audit records is that of the owner of the table on which the trigger is
defined.
3. Stored procedures may contain the GRANT command. When such a
procedure is executed, the GRANT is done with the permissions of the
owner of the stored procedure, not those of the caller. Be aware of this
when creating stored procedures containing GRANT statements.
4. Windows NT has the ability to audit actions taken by users. It is
recommended that users configure Windows NT to audit the sybase user.
Note that such auditing could produce a large amount of data.
☞ For more information, see “Operating system installation” on
page 51.
5. Permissions on tables and columns are cumulative, but independent. This
means that if executing two different GRANT statements gives
overlapping permissions, revoking one of the two does not revoke the
other.
For example, if user fred executes GRANT UPDATE (Street) on the
Employee table to sue, Sue can update the Street column of table
Employee.
If user fred subsequently executes GRANT UPDATE on the Employee table
to sue, Sue is then able to update any column of the Employee table.
If user fred then executes REVOKE UPDATE on Employee from sue, the
second grant is revoked, but the first grant is still in effect. Sue still has
the ability to update the Street column of table Employee.
79
Changing ownership on nested objects
Views and procedures can access underlying objects that are owned by
different users. For example, if usera, userb, userc, and userd were four
different users, userd.viewd could be based on userc.viewc, which could be
based on userb.viewb, which could be based on usera.table. Similarly for
procedures, userd.procd could call userc.procc, which could call
userb.procb, which could insert into usera.tablea.
The following Discretionary Access Control (DAC) rules apply to nested
views and tables:
♦ To create a view, the user must have SELECT permission on all of the
base objects (for example, tables and views) in the view.
♦ To access a view, the view owner must have been granted the appropriate
permission on the underlying tables or views with the GRANT OPTION
and the user must have been granted the appropriate permission on the
view.
♦ Updating with a WHERE clause requires both SELECT and UPDATE
permission.
♦ If a user owns the tables in a view definition, the user can access the
tables through a view, even if the user is not the owner of the view and
has not been granted access on the view.
The following DAC rules apply to nested procedures:
♦ A user does not require any permissions on the underlying objects (for
example tables, views or procedures) to create a procedure.
♦ For a procedure to execute, the owner of the procedure needs the
appropriate permissions on the objects that the procedure references.
♦ Even if a user owns all the tables referenced by a procedure, the user will
not be able to execute the procedure to access the tables unless the user
has been granted EXECUTE permission on the procedure.
Following are some examples that describe this behavior.
Example 1: User1 creates table1, and user2 creates view2 on table1
♦ User1 can always access table1, since user1 is the owner.
♦ User1 can always access table1 through view2, since user1 is the owner
of the underlying table. This is true even if user2 does not grant
permission on view2 to user1.
80
Chapter 5. Restrictions and Other Security Concerns
♦ User2 can access table1 directly or through view2 if user1 grants
permission on table1 to user2.
♦ User3 can access table1 if user1 grants permission on table1 to user3
♦ User3 can access table1 through view2 if user1 grants permission on
table1 to user2 with grant option and user2 grants permission on view2 to
user3.
Example 2: User2 creates procedure2 that accesses table1
♦ User1 can access table1 through procedure2 if user2 grants EXECUTE
permission on procedure2 to user1. Note that this is different from the
case of view2, where user1 did not need permission on view2.
Example 3: User1 creates table1, user2 creates table2, and user3 creates
view3 joining table1 and table2
♦ User3 can access table1 and table2 through view3 if user1 grants
permission on table1 to user3 AND user2 grants permission on table2 to
user3.
♦ If user3 has permission on table1 but not on table2, then user3 cannot use
view3, even to access the subset of columns belonging to table1.
♦ User1 or user2 can use view3 if (a) user1 grants permission with grant
option on table1 to user3, (b) user2 grants permission with grant option
on table2 to user3, AND ©) user3 grants permission on view3 to that user.
81
Revoking DBA authority
Since the engine does not generally allow you to revoke DBA authority from
a user while that user is connected to the database, the easiest way to revoke
DBA authority is simply to wait until the user has disconnected, and then
issue a REVOKE DBA statement.
However, it may be necessary to immediately revoke DBA authority from a
user who is currently connected to the database, before the user has a chance
to do anything else. Assume for this example you are trying to revoke DBA
authority from user fred.
❖ To revoke DBA authority from a connected user
1. Connect to the same database as a different user with DBA authority.
For example, use a user ID other than fred.
2. Disable connections to the server by executing the following statement:
CALL sa_server_option(’ConnsDisabled’, ’ON’)
This prevents fred from connecting again once his existing connections
have been dropped.
3. List all the connections to the database by executing the following
statement:
CALL sa_conn_info( )
4. Write down the value of the Number column for each row containing fred
in the Userid column.
5. For each connection number you wrote down in step 4, execute the
following statement:
DROP CONNECTION number
This immediately drops each connection, rolling back any uncommitted
transactions. Note that any transactions committed by fred, as well as any
DDLs executed by fred before the DROP statement was executed, are not
rolled back and must be manually undone.
6. Execute the following SQL statement:
REVOKE DBA FROM fred
7. Re-enable connections to the server by executing the following statement:
CALL sa_server_option(’disable_connections’, ’OFF’)
82
Chapter 5. Restrictions and Other Security Concerns
The TCB subset
Following are the software modules and files that comprise the TCB (trusted
computing base) included in the certified configuration. (Note that all .exe
and .dll files are located in the win32 subdirectory of your Adaptive Server
Anywhere directory.)
1. Database engine / server
♦ dbeng9.exe
♦ dbsrv9.exe
♦ dbserv9.dll
♦ dbctrs9.dll
♦ libsybbr.dll
♦ dblgen9.dll
♦ dbcis9.dll
♦ dbjava9.dll
♦ *.sql in the scripts directory
♦ *.zip in the java directory
2. Interactive SQL
♦ dbisqlc.exe
♦ dbcon9.dll
♦ dblgen9.dll
♦ dbtool9.dll
♦ dblib9.dll
3. Database utilities
♦ dbackup.exe
♦ dbcollat.exe
♦ dbdsn.exe
♦ dberase.exe
♦ dbexpand.exe
♦ dbinfo.exe
♦ dbinit.exe
♦ dblog.exe
♦ dbping.exe
♦ dbshrink.exe
83
♦ dbstop.exe
♦ dbsvc.exe
♦ dbtran.exe
♦ dbunload.exe
♦ dbupgrad.exe
♦ dbvalid.exe
♦ dbwrite.exe
♦ sqlpp.exe
♦ dblgen9.dll
♦ dbtool9.dll
♦ dblib9.dll
84
CHAPTER 6
Restricted Syntax
About this chapter
Contents
This chapter lists the syntax for the engine and server, as well as several
database utilities used in the certified configuration.
Topic:
page
Restricted syntax
86
Database engine/server
87
Initialization utility
91
Service creation utility
92
Transaction log utility
93
Interactive SQL utility
94
85
Restricted syntax
This section lists the syntax for the engine and server, as well as several
database utilities used in the certified configuration. These tools are
documented in “Database Administration Utilities” [ASA Database
Administration Guide, page 493], but appear here for convenience, and also to
emphasize the required or restricted switches in the C2 certified
configuration. Note that where optional switches are listed, only those
switches listed may be used. Any switches that may be documented or listed
in the usage screen of the utility but are not listed here are not allowed in the
certified configuration.
Please consult the Adaptive Server Anywhere Reference manual for more
complete descriptions of each switch.
86
Chapter 6. Restricted Syntax
Database engine/server
Syntax 1
dbeng9 -sc -gd dba -gk dba -gl dba -gu dba -x namedpipes(TDS=NO)
[ optional-engine-or-server-switches ]
[ db-file [ optional-database-switches ] ] . . .
Syntax 2
dbsrv9 -sc -gd dba -gk dba -gl dba -gu dba -x namedpipes(TDS=NO)
[ optional-engine-or-server-switches ]
[ db-file [ optional-database-switches ] ] . . .
Required switches:
Switch
Description
Reason
–sc
Set up C2 Certified
communication links.
Disallows shared memory
connections.
–gd dba
Set starting database
permission to DBA.
Non-DBA users could start
their own database, connect
as DBA, and then execute
the UNLOAD or DROP
DATABASE statements, or
stop the engine or server.
–gk dba
Set stopping database
engine or server permission to DBA.
Non-DBA users could
stop the database engine
or server, causing denialof-service.
–gl dba
Set LOAD/UNLOAD
permission to DBA.
A non-DBA user could use
the UNLOAD command
to write to the file system
with the permissions of the
sybase user.
–gu dba
Set utility commands
permission to DBA.
Non-DBA users could use
the DROP DATABASE
statement to delete database
files owned by the sybase
user.
–x namedpipes(TDS=NO)
Starts the named pipes
port and disallows
TDS connections.
The named pipes port is
the only communications
mechanism supported in
the certified configuration;
the TDS protocol is not
included in the certified
configuration.
87
Optional engine or server
switches:
88
Switch
Description
Restrictions
–a logfile
Apply named transaction log file.
Used only in recovery.
–b
Run in bulk operations mode.
–c size
Make initial cache a maximum of
size bytes.
–ca 0
Disable automatic cache growth
to compensate for memory allocation.
–ch size
Set maximum cache size of size
bytes.
–cl size
Set minimum cache size of size
bytes.
–cs
Display cache sizing statistics.
–ct
Perform client-engine or server
character translation.
–d
Disable asynchronous I/O.
–e
Encrypt communications messages.
–f
Force database to start without
transaction log.
–ga
Automatically shutdown after last
database closed.
–gc num
Set checkpoint timeout period to
num minutes.
–ge size
Set external DLL thread stack
size.
–gf
Disable firing of triggers.
–gm num
Allow maximum num connections, if possible.
–gn num
Use num engine or server threads.
Used only in recovery.
Note that auditing is unavailable if the engine or
server is started with this
switch.
Chapter 6. Restricted Syntax
Switch
Description
–gp size
Set maximum page size of size
bytes.
–gr num
Set maximum recovery time to
num minutes.
–gt num
Allow num OS threads to run
concurrently.
–gw num
Background process every num
milliseconds. Default 500 milliseconds.
–gx num
Use num OS threads.
–m
Truncate transaction log after
checkpoint.
–n name
Name the database engine or
server.
–o file
Filename for copy of message
window.
–os size
Maximum size for the file specified by -o.
–p size
Set maximum communication
packet size.
–q
Quiet mode—suppress output.
–r
Read-only mode—database modifications not allowed.
–ti min
Client idle time before disconnect.
Default 240 minutes.
–tl sec
Client liveness timeout in seconds.
–tq time
Set quitting time.
–u
Use buffered disk I/O.
–v
Display product version information.
–z
Display debugging information.
Restrictions
Note that this also truncates the audit log after
checkpoint.
Has no effect in certified
configuration.
89
Switch
Description
–zo file
Redirect request logging information to file.
–zr level
Set request logging level. Level
may be ALL, SQL, or NONE.
–zs size
Maximum size for file specified
by -zo.
Restrictions
db-file is a fully-qualified database file or write file name. All files must
reside in your C2 database folder.
90
Chapter 6. Restricted Syntax
Initialization utility
Syntax
dbinit -I [ optional-switches ] c2-database-folder \ filename
Required switches:
Switch
Description
Reason
–I
Do not install jConnect support
jConnect uses TCP/IP to
communicate, which is not
supported in the certified
configuration.
Switch
Description
Restrictions
–b
Blank padding of strings for
comparisons
–c
Case sensitivity on all string
comparisons
–e
Encrypt database
–m name
Set transaction log mirror name
–o file
Log output messages to file
–p size
Set page size
–q
Quiet: do not print messages
–t name
Transaction log file name
–z cs
Specify collation sequence
Optional switches:
Full path must be specified;
file must reside in your C2
database folder.
Full path must be specified;
file must reside in your C2
database folder.
91
Service creation utility
Syntax 1
dbsvc [ optional-switches ] -d svc name
Syntax 2
dbsvc [ optional-switches ] -a sybase [ creation-switches ] -w svc-name
Details
Syntax 3
dbsvc [ -q ] -d svc name
Syntax 4
dbsvc [ -q ] -l
Required switches:
Switch
Description
Reason
–a sybase
Account name to use
The Adaptive Server Anywhere service must run as
the sybase user.
Switch
Description
Restrictions
–q
Do not print banner
–y
Delete or overwrite service without confirmation
Switch
Description
–p passwd
Specify the password for the
sybase account.
–s startup
Startup option. Startup must
be Automatic, Manual, or Disabled. Default is Manual.
–t type
Type of service. Type must be
Network or Standalone. Default
is Standalone.
Optional switches:
Creation switches:
Notes
Restrictions
For syntax 2, Details must contain the full path to the Adaptive Server
Anywhere engine or server executable, as well as the parameters for that
engine or server.
☞ For more information about the engine and server parameters, see
“Database engine/server” on page 87.
92
Chapter 6. Restricted Syntax
Transaction log utility
Syntax
dblog [ optional-switches ] c2-database-folder \ database-file
Optional switches:
Switch
Description
–g n
Set LTM generation number.
–il
Ignore LTM truncation point.
–ir
Ignore SQL Remote truncation
point.
–m name
Set transaction log mirror name.
–o file
Log output messages to file.
–q
Quiet: do not print messages.
–r
Do not use a transaction log
mirror.
–t name
Set transaction log name.
–x n
Zap transaction log current relative offset to n.
–z n
Zap transaction log starting
offset to n.
Restrictions
Full path must be specified;
file must reside in your C2
database folder.
Full path must be specified;
file must reside in your C2
database folder.
93
Interactive SQL utility
Syntax 1
dbisqlc [ optional-switches ] SQL-command
Syntax 2
dbisqlc [ optional switches ] filename
Optional switches:
94
Switch
Description
Restrictions
–c conn_str
Use connection string conn_str.
conn_str must contain
“INT=YES;LINKS=namedpipes”
and must not contain
“UID=“ or “PWD=“
–d delimiter
Specify command delimiter.
–q
Silent mode, no window.
–x
Syntax check only, no commands executed.
CHAPTER 7
Integrated Logins
About this chapter
Contents
This chapter describes how to use the integrated login in a manner
equivalent to the C2 certified configuration.
Topic:
Using integrated logins
page
96
95
Using integrated logins
Adaptive Server Anywhere uses the integrated login mechanism to map a
Windows user to an Adaptive Server Anywhere user. When a Windows user
attempts to connect to the database, the operating system provides assurance
that the user has been authenticated (usually using a password). If the
database server contains a mapping between that Windows user and a valid
Adaptive Server Anywhere user, that user can connect.
For use in the C2 certified configuration, Adaptive Server Anywhere
requires the use of integrated login exclusively. An integrated login must be
created for the DBA account in the database, and it is recommended that the
sybase Windows user be used for this purpose. As well, integrated login
mappings must be one-to-one. That is, two Windows user accounts may not
be mapped to the same Adaptive Server Anywhere account.
☞ For instructions on how to create an integrated login for the sybase user,
see “Creating a database” on page 56.
☞ For more information on integrated login, see “Connecting to a
Database” [ASA Database Administration Guide, page 37].
96
CHAPTER 8
Connecting to the Adaptive Server
Anywhere Service
About this chapter
Contents
This chapter describes how to connect to the Adaptive Server Anywhere
Service in a manner equivalent to the C2-certified configuration.
Topic:
Connecting to the Adaptive Server Anywhere service
page
98
97
Connecting to the Adaptive Server Anywhere
service
Once the Adaptive Server Anywhere service has been started, users can use
dbisqlc to connect to the engine and execute SQL statements. There are two
ways to tell dbisqlc how to connect:
1. You can use the -c switch and specify a connection string containing a
list of parameters that tell dbisqlc which engine and database to connect
to, and how to find it. For example, if your engine is named asademo, you
can connect to it using:
dbisqlc -c "ENG=asademo;LINKS=namedpipes;INT=YES
LINKS=namedpipes tells dbisqlc to use named pipes to connect to the
engine, and INT=YES tells dbisqlc to use the integrated login facility.
2. You can simply start dbisqlc, and fill in the fields on the connection
dialog. Note that you must select the Use integrated login option on the
Login tab, you must enter an engine name on the Database tab, and you
must check the Named pipes checkbox on the Network tab.
98
CHAPTER 9
The Adaptive Server Anywhere C2 Patch
About this chapter
Contents
This chapter describes the C2 patch to the Adaptive Server Anywhere 7.0.0
release. This chapter does not apply when running the current software in a
manner equivalent to the C2-certified environment.
Topic:
The Adaptive Server Anywhere C2 patch
page
100
99
The Adaptive Server Anywhere C2 patch
The Adaptive Server Anywhere C2 Patch contains two DLLs, three batch
files, and one text file. This section describes each file in the patch.
This section describes the C2 patch to the Adaptive Server Anywhere 7.0.0
release. It does not apply when running the current software in a manner
equivalent to the C2-certified environment.
100
File
Description
dblgen7.dll
Contains English language strings used by the Adaptive
Server Anywhere engine and tools. This file contains the
auditing string used by dbbackup to audit the use of the
-xo switch.
dbtool7.dll
Used by all of the database utilities, as well as dbisqlc.exe.
This file contains a fix to dbbackup to audit the truncation
of the transaction log.
mdac1.bat
This batch file creates a temporary directory and copies
fourteen .dll files and one .exe from the C:\winnt\system32
directory into the temporary directory. The Adaptive
Server Anywhere installation will replace these files, and
they must be copied before Adaptive Server Anywhere
installation so they can be restored after.
mdac2.bat
This batch file copies the files from the temporary directory
created by mdac1.bat into the C:\winnt\system32 directory,
overwriting those installed by Adaptive Server Anywhere.
One of the files is in use by the operating system, so it is
renamed before the file copy.
mdac3.bat
This batch file deletes the file that was renamed by mdac2.bat, as well as the temporary directory created by mdac1.bat.
readme.txt
This file contains instructions for installing the .dll files
included in the patch.
CHAPTER 10
More Information
About this chapter
Contents
This chapter contains a list of additional sources of information that may be
helpful while operating Adaptive Server Anywhere in the C2 certified
configuration.
Topic:
Where to look for more information
page
102
101
Where to look for more information
102
Subject
Source
Auditing
“Keeping Your Data Secure” on page 3
Connection parameters
For a list, run dbdsn -cl or see
“Client/Server Communications” [ASA
Database Administration Guide, page 85].
Database options
“Database Options” [ASA Database Administration Guide, page 613]
dbinit, dblog, dbtran,
dbisqlc, dbbackup and other
administrative utilities
“Database Administration Utilities” [ASA
Database Administration Guide, page 493]
dbsvc utility
“The Service Creation utility” [ASA Database
Administration Guide, page 569]
Engine / server switches
“The Database Server” [ASA Database Administration Guide, page 115]
Integrated login
“Connecting to a Database” [ASA Database
Administration Guide, page 37]
Java in the Database
“Introduction to Java in the Database” [ASA
Programming Guide, page 51] and “Using Java
in the Database” [ASA Programming Guide,
page 81]
Procedures, Functions,
Triggers
“Using Procedures, Triggers, and Batches”
[ASA SQL User’s Guide, page 655]
Security tips
“Keeping Your Data Secure” on page 3
Tables, Views
“Working with Database Objects” [ASA SQL
User’s Guide, page 29]
The GRANT and REVOKE
SQL statements
“SQL Statements” [ASA SQL Reference,
page 253]
The transaction log file
“Backup and Data Recovery” [ASA Database
Administration Guide, page 373]
User IDs and permissions
“Managing User IDs and Permissions” [ASA
Database Administration Guide, page 427]
Index
A
access
security features
4
Adaptive Server Anywhere
C2 Patch
100
C2 software installation
52
configuring client applications to use
transport-layer security
41
configuring database servers to use
transport-layer security
39
configuring web servers to use transport-layer
security
44
transport-layer security
27
Adaptive Server Anywhere transport-layer security
about
27
introduction
28
administration
audit records
71
AES encryption algorithm
about
15
audit records
64
auditing
about
9
C2 requirements
61
comments
11
correlating records
73
databases on Windows CE
23
enabling/disabling
62
example
11
log translation [dbtran] utility
12
option
62
reading output
63
retrieving audit information
10
security features
4, 9
transaction log [dblog] utility
12
turning on
9
utilities
72
write file [dbwrite] utility
12
B
backup utility [dbbackup]
C2 security
71
C
C2 database folder
C2 security
53
C2 installation
Adaptive Server Anywhere software
52
hardware
50
operating system
51
C2 security
about
v
creating-compliant databases
56
disclaimer
v
documentation
v
guidelines
4
more information
102
running compliant engines
58
cache size
encrypted database issues
19
certificate authorities
ASA transport-layer security
37
certificate chains
ASA transport-layer security
32
certificates
digital certificates in ASA transport-layer security
31
ciphers
ASA transport-layer security
27
clients
configuring to trust a public certificate
37
starting ASA with transport-layer security
41
columns
encrypting
20
comments
11
commercial certificate authorities
ASA transport-layer security
31
connecting
C2 security
98
integrated logins
6
conventions
documentation
viii
creating
103
Index
C2 compliant databases
creating databases
security
creating enterprise root certificates
ASA transport-layer security
creating signed certificates
ASA transport-layer security
cryptography
ASA public key
56
13
34
34
27
D
database access
controlling
database files
encrypting
security
database servers
C2 restricted syntax
security
starting with transport-layer security
databases
auditing on Windows CE
encrypting
security on Windows CE
user authorization on Windows CE
user identification on Windows CE
DBA authority
security tips
dbbackup utility
C2 security
dbeng9
C2 restricted syntax
dbinit utility
C2 restricted syntax
dbisqlc utility
C2 restricted syntax
dblog utility
auditing
C2 restricted syntax
C2 security
dbsrv9
C2 restricted syntax
transport-layer security
dbsvc utility
C2 restricted syntax
dbtran utility
auditing
104
6
15
15, 25
87
13
39
23
15
23
4
4
25
71
87
91
94
12
93
71
87
39
92
10, 12
C2 security
dbwrite utility
auditing
C2 security
DECRYPT function
using
deleting databases
security
digital certificates
ASA transport-layer security
digital signatures
ASA transport-layer security
disabling auditing
documentation
conventions
SQL Anywhere Studio
71
12
72
20
13
31
41
62
viii
vi
E
-ec option
securing client/server communications
39
enabling auditing
62
ENC connection parameter
securing client/server communications
41
ENCRYPT function
using
20
encryption
AES algorithm
15
ASA databases on Windows CE
23
client/server communications on Windows CE 24
columns
20
database files
15
passwords
7
performance of encrypted databases
19
simple
15
strong
15
encryption algorithms
AES
15
Rijndael
15
Encryption connection parameter
securing client/server communications
41
enterprise root certificates
ASA transport-layer security
31, 32, 34
F
feedback
documentation
providing
xii
xii
Index
FIPS
about
FIPS 140-2 certification
about
technical support
28
28
G
global certificates
using as a server certificate for ASA
transport-layer security
36
using reqtool for ASA transport-layer security 35
globally-signed certificates
ASA transport-layer security
35
I
icons
used in manuals
integrated logins
C2 security
security features
Interactive SQL utility [dbisql]
C2 restricted syntax
x
96
6
94
K
keeping your data secure
3
13
13
10, 12
71
M
making a new self-signed certificate
ASA transport-layer security
mappings
integrated logins
31
96
N
negative permissions
network server
transport-layer security
newsgroups
O
options
auditing
output
auditing
62
63
P
passwords
length
security features
security tips
patch
Adaptive Server Anywhere C2
performance
encrypted databases
permissions
about
negative
scheme
security features
public key cryptography
ASA
25
7
25
100
19
7
7
6
6
27
R
L
LOAD TABLE statement
security
loading data
security
log translation utility [dbtran]
auditing
C2 security
xii
7
39
reading
auditing output
63
records
administration
71
audit
64
correlating
73
reqtool
ASA transport-layer security
35
using
35
restrictions
security
76
root certificates
ASA transport-layer security
31
ASA transport-layer security client verification 37
running
C2 compliant database engines
58
S
security
about
v
105
Index
AES encryption
15
auditing
9, 10
C2 guidelines
4
creating databases
13
database server
13, 25
deleting databases
13
encrypting database files
15
FIPS
28
integrated logins
6
loading data
13
overview
4
passwords
7
restrictions
76
server command line
4
system functions
25
tips
25
unloading data
13
warnings
79
Windows CE
23
self-signed certificates
ASA transport-layer security
31
making for ASA transport-layer security
31
server authentication
ASA transport-layer security
41
server certificates
using global certificates in ASA transport-layer
security
36
server options
specifying for Windows CE databases
23
servers
starting with transport-layer security
39
service creation utility [dbsvc]
C2 restricted syntax
92
services
connecting to
98
setting up clients to trust the public certificate
ASA transport-layer security
37
setting up self-signed certificates
ASA transport-layer security
31
setting up transport-layer security
ASA
30
signed certificates
creating in ASA transport-layer security
34
simple encryption
about
15
ASA databases on Windows CE
24
SQL Anywhere Studio
106
documentation
stored procedures
security features
strong encryption
AES algorithm
ASA databases on Windows CE
database files
Rijndael
subset
TCB
support
newsgroups
vi
4
15
24
15
15
83
xii
T
TCB subset
technical support
newsgroups
TLS
ASA
transaction log utility [dblog]
auditing
C2 security
transport-layer security
ASA
efficiency in Adaptive Server Anywhere
how it works in ASA
setting up for ASA
supported platforms for ASA
troubleshooting
encrypted database performance
Trusted Computing Base
83
xii
27
12
71
27
28
28
30
28
19
83
U
UNLOAD statement
security
UNLOAD TABLE statement
security
unloading
data
unloading data
security
user authorization
ASA databases on Windows CE
user identification
ASA databases on Windows CE
user IDs
security features
13
13
13
13
4
4
4
Index
security tip
25
users
C2 security
96
using a global certificate as a server certificate
ASA transport-layer security
36
using certificate chains
ASA transport-layer security
32
using digital certificates
ASA transport-layer security
31
utilities
auditing
72
backup [dbbackup] in C2 security
71
initialization [dbinit]
91
Interactive SQL [dbisql]
94
log translation [dbtran] auditing
10, 12
log translation [dbtran] in C2 security
71
service creation [dbsvc]
92
transaction log [dblog]
93
transaction log [dblog] auditing
12
transaction log [dblog] in C2 security
71
write file [dbwrite] auditing
12
write file [dbwrite] in C2 security
72
write file utility [dbwrite]
auditing
C2 security
12
72
X
xp_cmdshell system procedure
security features
xp_sendmail system procedure
security features
xp_startmail system procedure
security features
xp_startsmtp system procedure
security features
xp_stopmail system procedure
security features
xp_stopsmtp system procedure
security features
-xs option
securing communications
25
25
25
25
25
25
44
V
verifying certificate fields
ASA transport-layer security
verifying servers
ASA transport-layer security
views
security features
42
41
4
W
warnings
security
web servers
starting with transport-layer security
web services
starting with transport-layer security
Windows CE
auditing
communication encryption
database server options
device security
encryption
security
user authorization
user identification
79
44
44
23
24
23
23
23
23
4
4
107