1
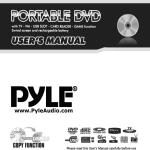
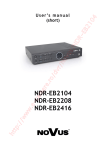
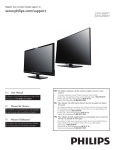
User Guide
INTRODUCTION
HDMI................................................................................................................................................5
SAFETY IS IMPORTANT.................................................................................................................5
IN THE BOX.....................................................................................................................................5
SAFETY INFORMATION
KEEP THIS INSTRUCTION.............................................................................................................6
IMPORTANT.....................................................................................................................................6
ELECTRICAL INFORMATION.........................................................................................................7
TV FUNCTIONS / TV CONNECTORS
TV FRONT CABINET FUNCTIONS.................................................................................................8
TV CONNECTIONS.........................................................................................................................9
CONNECTING THE TV ANTENNA...............................................................................................10
CONNECTING EXTERNAL DEVICES..........................................................................................10
CONNECTING DIAGRAM..............................................................................................................11
COMMON INTERFACE SLOT
COMMON INTERFACE.................................................................................................................12
WALL MOUNTING
WALL MOUNTING.........................................................................................................................13
REMOTE CONTROL
REMOTE CONTROL.....................................................................................................................14
REMOTE BUTTONS.....................................................................................................................15
BATTERY INSTALLATION............................................................................................................17
LET’S START
SWITCHING ON............................................................................................................................18
SELECTING SOURCE OPERATION............................................................................................18
FIRST TIME INSTALLATION.........................................................................................................19
CHANNEL LIST.............................................................................................................................19
ANALOGUE TV GUIDE
TV INFORMATION........................................................................................................................21
PICTURE.......................................................................................................................................21
SOUND..........................................................................................................................................22
SETTING.......................................................................................................................................23
FUNCTION....................................................................................................................................23
CHANNEL.....................................................................................................................................25
TELETEXT FUNCTION
TELETEXT FUNCTION.................................................................................................................27
DIGITAL TV GUIDE
CHANNEL......................................................................................................................................29
MANUAL PROGRAM.....................................................................................................................29
PROGRAM EDIT...........................................................................................................................30
CI MENU........................................................................................................................................32
TIMER............................................................................................................................................33
EPG...............................................................................................................................................34
SUBTITLE......................................................................................................................................34
FAV.................................................................................................................................................35
VGA & PC SETUP
PC SETUP.....................................................................................................................................36
PICTURE.......................................................................................................................................37
MULTIMEDIA & USB PVR FUNCTIONS
MULTIMEDIA.................................................................................................................................38
MY ALBUM....................................................................................................................................38
MY MUSIC.....................................................................................................................................39
MY MOVIE.....................................................................................................................................40
MY RECORDER............................................................................................................................40
USB PVR RECORDING & PLAYBACK FUNCTION.....................................................................42
PVR TIME SHIFT...........................................................................................................................42
USB PVR FUNCTION ATTENTIONS............................................................................................43
DVD OPERATION
BASIC OPERATION......................................................................................................................44
SUPPORTING DVD FORMAT.......................................................................................................45
DVD FUNCTIONS OPERATING INSTRUCTIONS.......................................................................46
MP3 / JPEG PLAYBACK...............................................................................................................48
FUNCTION SETTINGS.................................................................................................................49
DVD FUNCTION GENERAL SETUP.............................................................................................49
SYSTEM SETUP...........................................................................................................................49
LANGUAGE SETUP......................................................................................................................52
AUDIO SETUP...............................................................................................................................53
DOLBY DIGITAL SETUP................................................................................................................54
CARE AND MAINTENANCE.........................................................................................................55
TROUBLESHOOTING
DISPLAY TROUBLESHOOTING...................................................................................................56
SOUND AND TV TROUBLESHOOTING.......................................................................................56
DVD TROUBLESHOOTING..........................................................................................................57
SPECIFICATIONS
SPECIFICATIONS.........................................................................................................................58
DISPLAY MODE
ANALOGIC RGB FORMAT TABLE...............................................................................................59
YPBPR FORMAT TABLE...............................................................................................................59
ADDITIONAL INFORMATION
DISPOSAL....................................................................................................................................60
WARRANTY...................................................................................................................................60
HD Ready 1080p LCD/DVD TV
User Guide
Power Cable
Remote Control
2 x AAA Batteries
TV Function / TV Connectors
TV FRONT CABINET FUNCTIONS
3. Mains Power Switch - Completely turns ON or OFF the power to the TV set to save on electricity.
Sencor Touch Keyboard (controlled by a soft finger touch)
LABEL SIDE
TV Function / TV Connectors
TV CONNECTIONS
1
2
3
4
5
8
6
9
7
10
11
12
14
13
15
16
1. 12V DC power input
(intended for feeding to the TV
using a car battery power or
external 12V DC power
supply adapter)
2. HDMI input
3. PC VGA input
4. PC audio input
5. AV Video input
6. AV Right audio input
7. AV Left audio input
8. Y input
9. Pb input
10. Pr input
11. USB connector
12. SCART connecting terminal
13. SPDIF output
14. CI connector
15. TV signal input (TV Aerial input)
16. Audio Earphone output
TV Function / TV Connectors
(CVBS / YPbPr cables)
You can connect this TV to a compatible
device using CVBS and YPbPr cables.
Connect the red, white and yellow (CVBS)
or the red, green and blue (YPbPr) outputs
to the matching coloured inputs on the
compatible device. An additional audio
input is required.
TV Function / TV Connectors
1
25
2
3
26
4
5
27
6
7
8
9
28
29
30
31
32
33
34
35
36
37
38
39
40
41
42
43
10
11
12
13
14
15
16
17
18
19
20
21
22
23
24
INPUT
SOURCE
ATV
DTV
HDMI
SCART
YPBPR
AV
VGA
DVD
FIRST TIME INSTALLATION
ENGLISH
UK
CHANNEL LIST
Analogue (ATV) Setup
Between now and the end of 2012 the UK will be turning
off all old “analogue” TV transmitters and switching your
TV signal to “digital”. Digital TV offers new ways to enjoy
your TV. You will have a greater choice of TV channels
as well as access to additional features and services
which will enhance your TV-watching experience. This
LCD TV features a built-in Freeview Digital Tuner please refer to the DTV section of this instruction on
page 28.
Analogue (ATV) Setup
TV Information
PICTURE
PICTURE
PICTURE MODE
CONTRAST
BRIGHTNESS
COLOR
TINT
SHARPNESS
COLOR TEMP.
NOISE REDUCTION
MOVE
STANDARD
50
50
50
50
6
NORMAL
ON
SELECT
MENU
EXIT
Analogue (ATV) Setup
SOUND
SOUND MODE
BASS
TREBLE
BALANCE
AVL
MOVE
STANDARD
50
50
50
ON
SELECT
MENU
EXIT
Analogue (ATV) Setup
SETTING
SETTING
LANGUAGE
OSD TIMER
TRANSPARENCE
OVERSCAN
RESET
MOVE
ENGLISH
15 SEC
80
ON
SELECT
MENU
EXIT
FUNCTION
FUNCTION
SLEEP TIMER
ASPECT
TT LANGUAGE
BLUE SCREEN
SYSTEM LOCK
MOVE
OFF
FULL
WEST
ON
SELECT
MENU
EXIT
Analogue (ATV) Setup
ENTER PASSWORD
*
FUNCTION
ON
ON
ON
ON
SYSTEM LOCK
CHILD LOCK
KEY LOCK
PARENTAL
CHANGE CODE
MOVE
SELECT
MENU
EXIT
Analogue (ATV) Setup
CHANNEL
CHANNEL
UK
COUNTRY
AUTO SEARCH
MANUAL PROGRAM
PROGRAM EDIT
MOVE
SELECT
MENU
EXIT
CHANNEL
PROGRAM
COLOR. SYS
SOUND. SYS
MANUAL SEARCH
AFT
FINE
SKIP
MOVE
1
AUTO
AUTO
192.25 MHz
ON
OFF
SELECT
MENU
EXIT
Analogue (ATV) Setup
PROGRAM EDIT
01
02
03
04
05
06
07
08
09
10
11
12
13
14
15
16
17
18
19
20
NAME
INSERT
MOVE
21
22
23
24
25
26
27
28
29
30
LOCK
FAV
MENU
EXIT
TELETEXT FUNCTION
Digital TV Setup
If the TV finds some, but not all, of the Digital channels, the TV
is functioning correctly but the signal being received is not
strong enough. (The signal strength needs to be above 85% you can see the signal strength the TV is receiving when you
search channels/ programmes) you will need to increase the
signal reception in order to receive all of the channels available.
The most economical way to do this is by purchasing and
connecting a 'signal booster' in between the TV and the TV
aerial socket. If this does not solve the problem, you will need to
upgrade the TV aerial to a digital hi-gain compatible aerial.
Digital TV Setup
CHANNEL
CHANNEL
UK
COUNTRY
LCN
AUTO SEARCH
MANUAL PROGRAM
PROGRAM EDIT
CI MENU
TIMER
MOVE
SELECT
MENU
EXIT
CHANNEL
22
BEGIN
0
PROGRAM
START SEARCH
CHANNEL FOUND
SIG. QUALITY
SIG. STRENGTH
FREQUENCY
MOVE
0
0
474.00
SELECT
MENU
EXIT
Digital TV Setup
Digital TV Setup
Digital TV Setup
Digital TV Setup
Digital TV Setup
Digital TV Setup
VGA & PC Setup
PC SETUP
PC SETUP
50
100
100
97
H-POSITION
V-POSITION
CLOCK
PHASE
AUTO ADJUST
MOVE
SELECT
MENU
EXIT
VGA & PC Setup
PICTURE
PICTURE
PICTURE MODE
CONTRAST
BRIGHTNESS
COLOR TEMP.
MOVE
STANDARD
50
50
50
SELECT
MENU
EXIT
Multimedia & USB PVR Function
Multimedia & USB PVR Function
Multimedia & USB PVR Function
Multimedia & USB PVR Function
Multimedia & USB PVR Function
USB PVR RECORDING & PLAYBACK FUNCTION
USB PVR Recording
PVR Time Shift
Multimedia & USB PVR Function
PVR Recording
USB PVR Function
Important Information About USB PVR Function
You can purchase high speed memory sticks from most Electrical or PC stores.
Before making your purchase please confirm the memory stick meets the
minimum specifications as below:
Read Speed 20MB/s (Mega Byte Per Second)
Write Speed 6 MB/s (Mega Byte Per Second)
BASIC OPERATION
1. Turn ON and OFF the DVD function
- Turn on the LCD TV and then press INPUT repeatedly to select DVD mode.
2. Insert Disc to DVD
- Insert the Disc to the Disc slot (mirror (record) side of the disc has to face towards front of the unit),
the player will load the disc automatically.There will have an on screen indication “ CLOSE ” then
“LOADING”. After loading the disc content, it will switch to play mode automatically. If the disc is
already placed inside, the disc will be read automatically.
NOTE: - For some discs, after loading the content of the disc, need to press or select from the disc
menu to start.
- Please make sure when inserting the Disc, the mirror (record) side of the disc should be
facing you.
When inserting the Disc incorrectly, you may damage the DVD mechanism.
To eject the DVD Disc press:
DVD EJECT
(Valid in DVD mode)
3. Play the DVD
- According to the disc content, the disc menu will display for your selection. When playing the disc,
you may use
button to toggle between Play and Pause mode. This product also supports Menu,
Title, Sequential and Program playback.
4. Menu playback (for DVD/ super VCD and VCD 2.0 discs)
- Press D.MENU button
For DVD discs, the screen will display the DVD Disc Menu (Root Menu)
For Super VCD & VCD2.0 discs, the screen will display the Super VCD, VCD2.0 Disc Menu (PBC:
[OFF])
(Press the D.MENU button to display the PBC status).
Playback the Super VCD & VCD2.0 discs, the default PBC status is ON.
- For DVD discs, use the navigation buttons to select and Play the highlighted contents; For Super
VCD & VCD2.0 discs, use the numeric buttons to play your favorite content directly.
NOTE: PBC should be OFF.
- Press OK or
button to start from the highlighted content.
- Return to the Root Menu when playing the disc
For DVD discs, press D.MENU to display the Disc Menu.
For Super VCD & VCD2.0 discs, when PBC is ON, press D.MENU to display the Disc Menu .
- STOP
Press button once to stop. Press
button to resume from where you stopped.
Press button Twice to stop. Press
button to start from beginning.
In order to protect the disc, press button then press EJECT button to take the disc out. When the
disc is ejected, hold the disc edge slightly and take it from the eject direction to prevent scratches.
When not using the DVD function (in stand-by mode or using others modes for a long time), please
take out the disc to protect the DVD loader and the disc.
5. Title playback (for DVD disc only)
- Press TITLE button, there will have an on screen indication “Title Menu”.
- Press the direction or numeric buttons to select your favorite title.
- Then will play from the first chapter of the selected title.
6. Sequential playback (for DVD/ Super VCD/ VCD/ CD/ CD-G/HD-CD and Mp3/ JPEG discs
- For Super VCD & VCD discs, if PBC is “ON” status, press button will enter the disc menu. Press
D.MENU button to turn PBC OFF. Press button to start in sequent. For others, while it stopped,
press
button to start in sequent.
7. Program playback (for DVD/ Super VCD/ VCD/ CD/ CD-G/HD-CD and Mp3/ JPEG discs
- Using Program playback, you can select max. 16 tracks from the disc to playback in programmed
order.
- OSD for program playback as below.
Super VCD/ VCD/ CD /CD-G/ D-CD discs
DVD / MP3 / JPEG discs
PROG
T C
1 :
PROG
T
5
C
:
T
9
C
:
T
C
13 :
1
2
:
6
:
10
:
14
:
2
3
:
7
:
11
:
15
:
3
:
4
4
:
8
:
12
PLAY
:
16
[--]
[--]
[--]
[--]
CLEAR
5
6
7
8
[--]
[--]
[--]
[--]
9
10
11
13
PLAY
[--]
[--]
[--]
[--]
12
14
15
16
[--]
[--]
[--]
[--]
CLEAR
- If it is in PBC ON status, using program playback will turn to PBC OFF automatically.
- According to the highlight area input the title and chapter number by numeric buttons, press
to start; or move to the <PLAY> by navigation buttons, press OK button to start.
button
- While playing the program, you may press PROGRAM button to display the program menu for edit. To
clear the program by moving to <CLEAR> and press OK button. Or press
button to end the
program. When press
button again, the disc will play by sequent.
- While playing the program, there will have an on screen indication “PRG PLAY” and the current title and
chapter number .
SUPPORTING DVD FORMAT
This products can play the following format of DVD disc.
Disc Type Disc Size (Diameter )
Recorded Time
Recorded Content
Single side:120mins. Approx
DVD
12cm
Double side:240mins. Approx
Remarks
DVD format:
Compressed digital
audio and video
12cm
45mins. Approx
MPEG2
Compressed digital
audio and video
Include SVCD
VCD
12cm
74mins. Approx
MPEG1
Compressed digital
audio and video
Include:
VCD2.0/ VCD1.1
VCD1.0/ DVCD
CD
12cm
74mins. Approx
CD-DA: Digital audio
HD-CD
12cm
74mins. Approx
HD-DA: Digital audio
MP3/JPEG
12cm
600mins. Approx
Super VCD
Digital audio
NOTE: Also support DVD-R, CD-R, CD-RW playback.
WARNING! DO NOT INSERT OR PLAY 8CM DISC, THEY WILL GET STUCK.
Region Code
As it is usual for DVD movies to be released at different times in different regions of the world, all players
have region codes and discs can have an optional region code. If you load a disc of a different region
code into your player you will see the region code notice on the screen. The disc will not playback and
should be unloaded.
ALL
2
1
2
1
3
2
4
DVD FUNCTIONS OPERATING INSTRUCTIONS
1. Play (for DVD/ Super VCD/ VCD/ CD/ CD-G/HD-CD and Mp3/ JPEG discs)
- For DVD disc, press
button from root or title menu; while playing the DVD, you may play your favorite
title directly with title selection by pressing the TITLE button.
- For Super VCD & VCD discs, while playing the disc, you may play your favorite tracks by numeric buttons.
(NOTE: When using the Program playback or when it is PBC ON status, you can only use
or
buttons
to change the track)
- For CD, CD-G & HD-CD discs, while playing the disc, you may play your favorite tracks by numeric buttons.
- For MP3 / JPEG disc, you may play your favorite tracks by numeric buttons from the content menu.
- If input track number is not valid, it will not function.
NOTE: From track 1-10, use numeric buttons directly; For tracks over 10, use numeric buttons directly or
press - / -- button first(E.g. Track 15, press - / -- then 5)
2. Previous/Next (for DVD/ Super VCD/ VCD/ CD/ CD-G/HD-CD and Mp3/ JPEG discs)
- While playing the disc;
Press
button to play to the last Title / Chapter / track.
Press
button to play to the next Title / Chapter / track
- For super VCD & VCD discs, in PBC OFF status;
If the current track is the first one, press
button will stop the playback.
If the current track is the last one, press
button will stop the playback .
- For DVD discs, the above functions may vary due to different DVD disc's structure .
3. Forward/ Backward (for DVD/ Super VCD/ VCD/ CD/ CD-G/HD-CD and Mp3/ JPEG discs)
- While playing the disc, you may use forward or backward function .
- There are 5 speeds for forward or backward . Press
/
button to toggle between different speeds in
sequent. (FFx2 /FFx4 / FFx8 / FFx16 / FFx32 / Play, or FRx2 /FRx4 / FRx8 / FRx16 / FRx32 / Play).
While in forward or backward, you may press
to resume normal speed.
For CD, HD-CD, Mp3, forward or backward also has audio output.
For DVD discs, if backward to first title / chapter, it will start from the beginning.
For Super VCD & VCD discs, in PBC ON status, if backward to the first track, it will start from the beginning .
NOTE: During Forward or Backward, the sound will be off.
4. Slow motion(for DVD/ Super VCD/ VCDdiscs )
- While playing the disc, you may use slow motion function .
There are 5 speeds for slow motion. Press
button to toggle between different speeds in sequent.
(SF1/2, SF1/4, SF1/8, SF1/16, SF1/32, Play).
While in slow motion, you may press
to resume normal speed.
NOTE: During Slow motion, the sound will be off .
5. Pause (for DVD/ Super VCD/ VCD/ CD/ CD-G/HD-CD and Mp3/ JPEG discs)
- FOR CD, CD-G, HD-CD & MP3/JPEG discs, press
button to pause; press
button to resume.
- FOR DVD, Super VCD, VCD discs, press
button to pause; press
button to playback frame by
frame; press button to resume.
6. Repeat (for DVD/ Super VCD/ VCD/ CD/ CD-G/HD-CD and Mp3/ JPEG discs)
- Press REPEAT button once to display the current repeat mode .
For Super VCD, VCD, CD, CD-G, HD-CD, discs, while playing in sequent, you may use the repeat
playback.There are 2 repeat modes, press REPEAT to toggle between different modes in sequent.
(REPEAT (OFF)/ REPEAT (1)/REPEAT (ALL)).
For DVD discs, you may setup the repeat playback mode. There are 2 repeat modes, press REPEAT
to toggle between different modes in sequent. (REP: (OFF) / REP: (CHAPTER) / REP: (TITLE) / REP:
(ALL)).For MP3 / JPEG discs, while playing the disc, you may use the repeat playback. There are 3
repeat modes, press REPEAT to toggle between different modes in sequent. (REPEAT (OFF) /
REPEAT (1) / REPEAT (DIR) / REPEAT (ALL)).
7. Display (for DVD/ Super VCD/ VCD/ CD/ CD-G/HD-CD and Mp3/ JPEG discs)
- Press D.DISP button to activate the on screen roll-down menu for the current Title, Chapter, time and
other information.
For DVD discs, (2 pages) Press D.DISP button once to display first page as shown below :
Disc Type
DVD
Chapter
TT 0/3
Tiltle
-/-(Current/Full)
CC 1 / 2
Elapsed disc time
Title Elapsed 00:05:45
-/- (Current/ Full)
Press D.DISP button again to display second pages shown below:
Language
Audio
Audio Type
:English 1/1
:Others1/2 AC3 2CH
Subtitle -/-(Current/Full)or OFF
-/- (Current/ Full) or OFF
Angle ON/OFF
:OFF
For Super VCD discs, (2 pages),Press D.DISP button once to display first page: Disc type, Track -/(Current / Full), Mute status, PBC status, Repeat mode status, Current track time. Press D.DISP
button again to display second page: Audio-/--(Current/Full) or OFF, Audio type, Language, Subtitle
-/-(Current/Full) or OFF. Press D.DISP button again to turn off the on screen display.
For CD, CD-G, HD-CD, MP3 / JPEG discs, Press D.DISP button once to display first page: Disc type,
Track -/- (Current / Full), Mute status, Repeat mode status, Current track time.
- Press D.DISP button again to turn off the on screen display.
8. Goto (for DVD/ Super VCD/ VCD/ CD/ CD-G/HD-CD and Mp3/ JPEG discs)
- This function allows you to play your favorite Title / Chapter / track. Press GOTO button to activate the
on screen scroll-down menu for edit. According to the highlighted area, input your favorite Title /
chapter / Track number by numeric buttons or input the playback time. After editing, press OK to
start. If the input is invalid, it will not function .
NOTE: While editing, the GOTO button is not function.
- If it is in PBC ON status, this function will switch it to OFF.
- For Mp3/JPEG discs, use numeric buttons directly to select your favorite songs or pictures .
9. AUDIO (for DVD/ Super VCD/ VCD/ CD/ CD-G/HD-CD and Mp3/ JPEG discs)
- Press AUDIO button once to display current audio mode .
- Press again to toggle between different audio modes in sequent .
For Super VCD & VCD, CD, CD-G, HD-CD, MP3 discs: (L/L , R/R , STEREO, MIX MONO)
NOTE: Switching to Auto L / R audio channel may be varied due to different discs contents. Bilingual
VCD discs can use AUDIO button to switch between different languages.
10. Language (for DVD and Super VCD discs)
- Press AUDIO button once to display current language.
- Press again to toggle between different languages mode in sequent.
NOTE: For Multi-languages DVD & Super VCD discs, press AUDIO button to select your favorite language.
11. Subtitle (for DVD and Super VCD discs)
- Press SUBTITLE button once to display current sub-title.
- Press again to toggle between different subtitle modes in sequent.
NOTE: For Multi-languages subtitle DVD & Super VCD discs, press SUBTITLE button to select your
favorite subtitle language.
12. Angle (for DVD disc)
- Press ANGLE button once to display current playback angle.
- Press again to toggle between different playback angle codes in sequent. (E.g. Angle -/- (Current/Full)
or OFF)
NOTE: Only for DVD with multi-angle, press ANGLE button to select your favorite playback angle.
Selectable playback angle depends on the availability of the DVD contents.
13. Mute (for DVD/ Super VCD/ VCD/ CD/ CD-G/HD-CD and Mp3/ JPEG discs )
- Press MUTE button to mute the audio output. There will have an on screen symbol indicate “MUTE”.
- Press again to cancel, or Press VOL + to cancel and adjust the volume.
- In case there is no audio output, try to press MUTE button to cancel mute.
14. ZOOM (for DVD/ Super VCD/ VCD / Mp3 and JPEG discs)
- Press ZOOM button to zoom in the picture.
- There are 3 zoom modes, press ZOOM button to toggle between different zoom modes in sequent.
(Zoom OFF, Zoomx2 , Zoomx4)
- In Zoomx2 and Zoomx4, you may use the navigation buttons to pan the picture for your favorite portion.
15. A- B (for DVD/ Super VCD/ VCD/ CD/ CD-G/HD-CD and Mp3/ JPEG discs)
- In normal Playback, fast forward or fast reverse, press A-B button at where you want to start the
repeat portion. There will have an on screen indication “REPEAT A “.
- In normal Playback, fast forward or fast reverse, press A-B button again at where you want to stop
the repeat portion. There will have an on screen indication “REPEAT A B“.
- The repeat function started to playback the portion from A to B automatically.
- Press A-B button again to cancel. There will have an on screen indication “REPEAT OFF”.
For Super VCD, VCD & CD discs, repeat A-B is only function within the same track. When playing
the others, repeat A-B will cancel automatically.
For Super DVD discs, repeat A-B is only function within the same Title /Chapter. When playing the
others, repeat A-B will cancel automatically.
16. Volume (for DVD/ Super VCD/ VCD/ CD/ CD-G/HD-CD and Mp3/ JPEG discs)
- Press - VOL / VOL + buttons to adjust the output volume.
NOTE: Playback DVD discs in original code, is not adjustable
17. INTRO (for Super VCD/ VCD/ CD/ CD-G/ HD-CD )
- Intro/Scan/ 9 picture displays .
MP3/JPEG PLAYBACK
After loading the MP3 / JPEG disc, it will start to scan for the stored MP3 /JPEG folders. Then will
firstly display the MP3 contents automatically. Screen as follow:
File Number: 1/16
Disc
Display current
MP3 playback
function
Display the selected
file’s content.
01 MP3
01
02
03
04
05
06
07
08
09
10
File Number: 1/16
Highlight file for
current playback.
Display current
JPEG playback
function
Disc
01 PICTURE
01
02
03
04
05
06
07
08
09
10
Scroll bar to view
next page.
- Using the navigation buttons to check you favorite folder and playback the first file or move to the
your favorite file.
NOTE:
- Press / buttons to move the highlight to folders, documents or mode selection.
- Press numeric buttons to select the contents directly. For number over 10, use numeric buttons
directly or press - / -- button first(E.g. Track 15, press - / -- then 5)
- When playback MP3 files, there is no picture display, only audio output .
- Playing the JPEG discs, press PROGRAM button to select slide effects. There are 10 slide modes,
press PROGRAM button to toggle between different modes in sequent. (Start from top, Start from
bottom, Start from left, Start from right, Start from upper left corner, Start from four corners, etc)
- When play or pause with picture playback, you may use navigation butoons to flip / rotate the picture .
button to flip horizontally.
button to flip vertically.
button to rotate left 90°.
button to rotate right 90°.
- When play or pause with picture playback, Press
/
numeric buttons to view the corresponding pictures.
button to select next / previous page or press
FUNCTION SETTINGS
DVD Function General setup
SYSTEM SETUP
SOURCE
TV SYSTEM
TV TYPE
- Press DVD SETUP button to activate the DVD player
OSD menu;
- Press / button to move and highlight between
different sub-menu. Press / OK button to
enter the highlighted sub-menu.
- Press DVD SETUP button to exit the OSD menu, or
move the highlight to EXIT SETUP then press OK
button to exit .
PASS WORD
RATING
DEFAULT
EXIT SETUP
NOTE: In Setup mode, the following functions will be cancel or pause :
TITLE, SUBTITLE, DISPLAY, PLAY, SETUP, STOP, SLOW / STEP, AUDIO, F.FWD, F.REV, PREV,
NEXT, GOTO, ZOOM, ANGLE, PROGRAM, PREVIEW, REPEAT, A-B .
System Setup
SOURCE
Select according to what type of media you want to playback:
(DISC, USB, CARD)
Default setting is AUTO.
CARD and USB options is unavailable .
SYSTEM SETUP
TV SYSTEM
SOURCE
TV SYSTEM
TV TYPE
PASS WORD
AUTO
DISC
USB
CARD
This menu enables you to set the picture format for your
TV/DVD .
NTSC
This format is used by some other countries, e.g. USA
RATING
PAL
DEFAULT
This is the format used in the EUROPE and the default setting .
EXIT SETUP
AUTO
This format can be used if your TV/DVD is capable of both
PAL and NTSC formats.
SYSTEM SETUP
SOURCE
TV SYSTEM
TV TYPE
PASS WORD
NTSC
PAL
AUTO
RATING
DEFAULT
EXIT SETUP
NOTE: PAL format is generally used for TVs in
the EUROPE. Check your TV user guide for
supported formats.If NTSC is selected
with a non-compatible television you
may experience interference or picture
scrolling .
TV TYPE
DVDs are produced in a variety of screen aspect ratios. This menu enables you to select one of the three
aspect ratios :
SYSTEM SETUP
SOURCE
TV SYSTEM
TV TYPE
4:3PS
PASS WORD
4:3LB
16:9
RATING
DEFAULT
EXIT SETUP
4:3 PS
4:3 LB
16:9
- Select the most appropriate aspect
ratio for the DVD being viewed.
4:3PS
Pan and Scan is used for most normal television broadcasts and it is the
default setting. It has an aspect ration of 4:3. If you select this setting
when viewing a DVD the picture will fill the screen but, you will not see
the left and right edges of the picture.
4:3LB
Letter Box will show the DVD in its original aspect ratio so depending
on the size of your television screen, you may see black borders above
and below the picture .
16:9
Choose this setting if you have a widescreen television .
NOTE:
- Playback screen size may vary according to the discs contents.
- For discs with 4:3 contents, using any mode would only display a 4:3 screen
- Screen ratio selection should be according to the connected TV / Display
aspect ratio .
PASSWORD
- The default setting is locked. No Rating selection or change password could be done. To edit the Rating
setting, please enter default password “8888” by numeric buttons, then press OK button to confirm .
SYSTEM SETUP
- To change password, input any 4 digit number when
the lock is unlocked. Once the 4 digit number is entered,
that will be your new password .
SOURCE
TV SYSTEM
TV TYPE
PASSWORD
RATING
DEFAULT
EXIT SETUP
SYSTEM SETUP
RATING
- Playback for some discs with rating, you can select the
rating setting according to your preference. Rating
restriction divided in eight different category from KID
SAFE to ADULT.This option is valid when you press stop
button twice to playbac and then enter setup menu .
NOTE: Only editable when password is unlocked. And only
can function when password is locked. It does not,
however, reset either the Password or the Rating
setting.
DEFAULT SETTING
- Press OK button to restore factory default .
SYSTEM SETUP
SOURCE
TV SYSTEM
TV TYPE
PASSWORD
RATING
DEFAULT
EXIT SETUP
RESTORE
SOURCE
TV SYSTEM
TV TYPE
PASSWORD
RATING
DEFAULT
EXIT SETUP
1 KID SAFE
2G
3 PG
4 PG13
5 PG-R
6R
7 NG.17
8 ADULT
Language Setup
Press SETUP button to enter the DVD OSD menu.
LANGUAGE SETUP
OSD LANGUAGE
ENGLISH
AUDIO LANG
GERMAN
SUBTITLE LANG
SPANISH
MENU LANG
FRENCH
PORTUGUESE
ITALIAN
EXIT SETUP
- OSD Language
Use navigation buttons to select the OSD LANGUAGE
setup icon, press OK button to confirm. There are few
languages for your selection, press
/
buttons to
toggle between different languages.
NOTE: If the selected language is not included in you
DVD disc content, it will select the default
language of the disc automatically. The default
language setting is English .
- Audio Language
Use navigation buttons to select the AUDIO LANG setup icon, press OK button to confirm. There
are 6 languages for you selection, press
/
buttons to toggle between different languages.
(ENGLISH / GERMAN / SPANISH / FRENCH / PORTUGUESE / ITALIAN ).
Press OK button to confirm.
LANGUAGE SETUP
OSD LANGUAGE
AUDIO LANG
ENGLISH
SUBTITLE LANG
GERMAN
MENU LANG
SPANISH
EXIT SETUP
FRENCH
PORTUGUESE
ITALIAN
NOTE: -If the selected language is not included in your DVD
disc content, it will select the default language of the
disc automatically. The default language setting
is English.
-Only valid when you press stop button twice to
playback and then enter setup menu.
- Subtitle Language
Use navigation buttons to select the SUBTITLE LANG setup icon, press OK button to confirm.
There are 6 languages for you selection, press /
buttons to toggle between different languages.
(ENGLISH / GERMAN / SPANISH / FRENCH / PORTUGUESE / ITALIAN / OFF) Press OK button
to confirm.
LANGUAGE SETUP
OSD LANGUAGE
AUDIO LANG
ENGLISH
SUBTITLE LANG
GERMAN
MENU LANG
SPANISH
EXIT SETUP
FRENCH
PORTUGUESE
ITALIAN
OFF
NOTE: If the selected language is not included in you DVD disc content, it will select the default language
of the disc automatically. The default language setting is ENGLISH.Only valid when you press
stop button twice to playback and then enter setup menu..
MENU Language
LANGUAGE SETUP
OSD LANGUAGE
AUDIO LANG
SUBTITLE LANG
ENGLISH
MENU LANG
GERMAN
SPANISH
EXIT SETUP
FRENCH
PORTUGUESE
ITALIAN
- Use navigation buttons to select the MENU LANG setup
icon, press OK button to confirm. There are 6
languages for you selection, press / buttons to
toggle between different languages. (ENGLISH /
GERMAN / SPANISH / FRENCH / PORTUGUESE /
ITALIAN ) Press OK button to confirm.
- Only valid when you press stop button to playback and
then enter setup menu.
Audio Setup
Audio Output
AUDIO SETUP
AUDIO OUT
SPDIF/OFF
TONE
SPDIF/RAW
SPDIF/PCM
EXIT SETUP
- Use navigation buttons to select the AUDIO OUT setup
icon, press OK button to confirm.
- There are 3 modes for your selection; use navigation
buttons to select different modes, press OK button
to confirm.
(SPDIF / OFF SPDIF / RAW SPDIF / PCM) .
- SPDIF / OFF: Coaxial output off.
- SPDIF / RAW: When connected the coaxial output to your audio amplifier, playing back the discs with
Dolby, MPEG contents, the coaxial outputs the original signal to your amplifier. Your Amplifier must
have the corresponding decoding function.
- SPDIF / PCM: When connected with 2 channels digital stereo amplifier, playing back the discs with
Dolby, MPEG contents the coaxial outputs with 2 channel to your amplifier.
Tone
- Use
/
buttons to adjust the Tone setting.
AUDIO SETUP
AUDIO OUT
TONE
#
+4
+2
EXIT SETUP
+0
-2
-4
b
Dolby Digital Setup
Dynamic Range
DIGITAL SETUP
DYNAMIC RANGE
FULL
DUAL MONO
6/8
4/8
EXIT SETUP
2/8
- When switch the compress mode to “Audio output”,
adjust the compress ratio for different effect. When
selected FULL, the peak signal value is smallest.
When selected OFF, the peak signal value is biggest.
OFF
Dual Mono
DIGITAL SETUP
DYNAMIC RANGE
DUAL MONO
STEREO
MONO L
EXIT SETUP
MONO R
MIX MONO
MODE
LEFT SPEAKER
- You can select four different audio output, STEREO,
MONO L, MONO R, MIX MONO. The audio out
description of these Selections is shown in the table
below.
RIGHT SPEAKER
STEREO
STEREO-L
STEREO-R
L-MONO
L-MONO
L-MONO
R-MONO
R-MONO
R-MONO
MIX-MONO
L-MONO+R-MONO
L-MONO+R-MONO
CARE AND MAINTENANCE
Early malfunctions can be prevented. Careful and regular cleaning can extend the amount of time you
will have your new TV. Be sure to turn the power off and unplug the power cord before you begin any
cleaning.
Cleaning the screen
1. Here’ s a great way to keep the dust off your screen for a while. Wet a soft cloth in a mixture of
lukewarm water and a little fabric softener or dish washing detergent. Wring the cloth until it’s almost
dry, and then used it to wipe the screen.
2. Make sure the excess water is off the screen, and then let it air-dry before you turn on your TV.
Cleaning the cabinet
To remove dirt or dust, wipe the cabinet with a soft, dry, lint-free cloth. Please be sure not to use a wet
cloth .
Extended Absence
Teletext operation
If you expect to leave your TV dormant for a long time(such as a vacation), it’s a good idea to
unplug the power cord to protect against possible damage from lightning or power surges .
If you expect to leave your TV dormant for a long time (such as a vacation), it’s a good idea to
unplug the power cord to protect against possible damage from lightning or power surges.
Handing Discs
1. To remove a disc from its storage case, press on the centre of the case and take the disc out.
2. Hold the disc by the edges, to avoid touching the Recorded side of the disc .
Cleaning discs
1. Fingerprints and dust should be carefully wiped from the disc's surface with a soft Cloth.
Audio discs and DVD discs have no grooves to collect dust and microscopic debris so gently
wiping with a soft cloth should remove most particles. Wipe in a straight line from the inside
to the outside of the disc. Small dust particles and light stains should have no effect on
reproduction quality.
2. Never use chemicals such as record sprays, antistatic sprays, Benzine, or thinners to clean
the discs. These chemicals can irreparably damage the disc's surface.
3. Discs should be returned to their cases after use. This avoids serious scratches that could
cause the laser pickup to skip.
4. Do not expose discs to direct sunlight, high humidity, or high temperature for extended periods.
Exposure to high temperatures can warp the disc .
5. Do not stick paper or write anything with a ball point pen on the label side of the disc .
23.6" : 60cm
23.6" : 1920 x 1080
Video format
CVBS / RGB / YPbPr / VGA