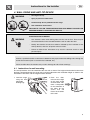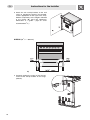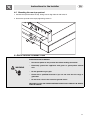
1
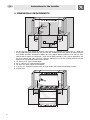
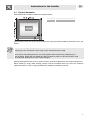
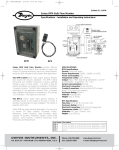
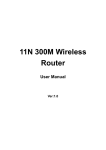
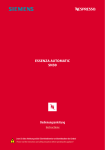
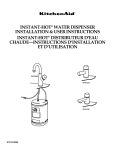
Table of Contents
1. IMPORTANT SAFETY INSTRUCTIONS ................................................................................. 4
2. DIMENSIONAL REQUIREMENTS .......................................................................................... 6
2.1 Product dimension ............................................................................................................. 7
3. UNPACKING, MOVING AND PLACING THE RANGE ........................................................... 8
4. WALL FIXING AND ANTI-TIP DEVICE ................................................................................... 9
4.1 Instructions for wall mounting ............................................................................................ 9
4.2 Mounting the rear top upstand ......................................................................................... 11
5. ELECTRICAL CONNECTION ............................................................................................... 12
5.1 US installation only / 3-wire branch circuit ....................................................................... 13
5.2 US installation and canadian installation / 4-wire branch circuit ...................................... 14
NOTE: THIS APPLIANCE MUST BE INSTALLED SOLELY AND EXCLUSIVELY BY A QUALIFIED
TECHNICIAN. ANY TECHNICAL PROCEDURES MUST BE CARRIED OUT BY AN AUTHORIZED
TECHNICIAN.
INSTRUCTIONS FOR THE INSTALLER: these are intended for the qualified engineer who is able to
install, commission and test the appliance
3
Important Safety Instruction
1. IMPORTANT SAFETY INSTRUCTIONS
READ AND SAVE THESE INSTRUCTIONS – Your Safety And the Safety of Others Are Very Important.
We have provided many important safety messages throughout this manual and on your appliance.
Read all instructions before using your appliance and always obey all safety messages.
RECOGNIZE SAFETY INFORMATION
This is a safety alert symbol. This symbol alerts you to potential hazards that can kill or hurt you and
others.
UNDERSTAND SIGNAL WORDS
A signal word – DANGER, WARNING, or CAUTION – is used with the safety-alert symbol. DANGER
identifies the most serious hazards. It means you can be killed or seriously injured if you do not
immediately follow instructions. WARNING means you can be killed or seriously injured if you do not
follow instructions. CAUTION indicates a potentially hazardous situation which, if not avoided, may
result in minor or moderate injury.
All safety messages will inform you as to potential hazards, inform you on how to reduce the risk of
injury and as to what can occur if the instructions are not followed.
IMPORTANT: Installation and grounding must comply with applicable local codes. Observe all
government local codes and ordinances.
WARNING
-
All ranges can tip
-
Injury to persons could result
-
Install anti-tip device packed with the range
-
See installation instructions
FAILURE TO FOLLOW THESE INSTRUCTIONS CAN RESULT IN DEATH OR
SERIOUS BURNS TO CHILDREN OR ADULTS.
NOTE: This range is NOT designed for installation in manufactured (mobile) homes or for installation in
Recreational Park Trailers.
DO NOT install this range outdoors.
For Massachussets Installations:
1 Installations must be performed by a qulified or licensed contractor, plumber or gas fitter qualified or
licensed by the state, province or region where this appliance is being installed.
2 Shut-off valve must be “T” handle gas cock.
3 Flexible gas connector must not be longer than 36”.
4
Important Safety Instruction
WARNING
To reduce the risk of fire, electrical shock, injury to persons, or damage
when installing the range, some basic precautions must be followed,
including:
-
Read all instructions
-
Proper installation is your responsibility. Have a qualified technician to install and ground this
appliance, in accordance with these installation instructions.
-
It is the responsibility of the installer to comply with the installation clearances specified on the
model/serial I.D. plate. The I.D. plate is visibly positioned in the oven door frame and must not be
removed.
CAUTION: To eliminate the risk of burns or fire caused by reaching over heated surface units, cabinet
storage located above the surface unit should be avoided.
-
ELECTRICAL GROUNDING REQUIRED: See the “Electrical Connection” section. It is under the
customer’s responsibility:
1 To contact a qualified electrician to install the appliance
2 To ensure that the electrical system is adequate and in conformance with the national ANSI/NFPA
70 ELECTRICAL CODE – LATEST EDITION, or the CSA STANDARD C22.1, CANADIAN
ELECTRICAL CODE, PART 1 – LATEST EDITION and all local codes and ordinances for the
kilowatt rating of the range.
-
Before you plug an electrical cord, be sure that all the controls are in the OFF position.
-
Never modify or alter the construction of the appliance. For example, do not remove leveling legs,
panels, wire or anti-tip brackets/screws.
CAUTION: This unit is design as a cooking appliance. Based on safety considerations, never use it for
warming or heating a room.
-
Do not obstruct ventilation openings and heat dispersal slits.
-
Immediately after installation carry out an inspection test of the appliance, following the instructions
on this booklet. If the appliance doesn’t work properly, disconnect it from the electrical and gas
supply and call the technical assistance centre. Do NOT attempt to repair the appliance.
-
Any adjustment and servicing must be performed only by qualified cooker installers or service
technicians.
-
Do not leave the packaging in the home environment. Separate the various waste materials and take
them to the nearest special wastage collection centre.
SAVE AND KEEP THIS BOOKLET
5
Instructions for the Installer
2. DIMENSIONAL REQUIREMENTS
1 24” (61 cm) min. when bottom of wood or metal cabinet is protected by not less than ¼ “ (0.64 cm)
flame retard millboard covered with not less than No. 28 MSG sheet steel, 0.015” (0.4 mm) stainless
steel, 0.024” (0.6 mm) aluminium or 0.020” (0.5 mm) copper. When installed in a 24” (61 cm) base
cabinet with 25” (63.5 cm) countertop – front of oven door protrudes 1-7/8” (4.8) cm beyond 24” (61
cm) base cabinet. 30” (76.2 cm) min. clearance between the to of the cooking platform and the
bottom of an unprotected wood or metal cabinet;
2 13” (33 cm) max. upper cabinet depth;
3 35- ½ “ (90 cm) min. cabinet opening widht;
4 18” (45.7 cm) upper cabinet to countertop;
5 2” (5 cm) min. clearance from the sides of range to side wall or other combustible material;
6 Junction box.
6
Instructions for the Installer
2.1 Product dimension
Overall dimension: location of electrical connection points.
A
7” - 180 mm
B
6” 3/4 - 170 mm
Check location where the range will beinstalled. The range should be located for convenient use in the
kitchen.
NOTE: Observe all governing codes and ordinances.
All openings in the wall or floor where range is to be installed must be sealed.
Some cabinet and building materials are not designed to withstand the heat produced by the
oven for baking. Check with your builder or cabinet supplier to make sure that the materials used
will not discolor, delaminate or sustain other damages.
Cabinet opening dimensions that are shown must be used. Given dimensions are minimum clearances.
When installing a range under existing cabinets and the installation does not satisfy the minimum
cabinet clearances, install a range hood above the cooktop to avoid burn hazards.
7
Instructions for the Installer
3. UNPACKING, MOVING AND PLACING THE RANGE
CAUTION: This unit is design as a cooking appliance. Based on safety considerations, never use it for
warming or heating a room.
-
It is recommended that the grates, griddle plate and flame, burner caps, front kick panel and oven
racks be removed to facilitate handling. This will reduce the weight for moving operations.
-
Remove the outer carton and packing material from the shipping base.
-
Remove angle-mounting brackets from range.
-
Due to the weight, a dolly / fork lift with soft wheels should be used to move this unit. The weight must
be supported uniformly across the bottom.
-
After transporting the professional range close to its final location, the range can be tipped back and
supported on the rear legs while the dolly is carefully removed.
The floor under the legs should be protected (wood, strips, carpet, paneling, and similar)
before pushing the unit into position.
The anti-tip device must be installed, gas and electrical connections should be made before
the range is placed in its final position.
8
-
For porper performance the professional range must be leveled. The range is leveled by adjusting
the four feet to set the appliance on a perfect level plane. For this purpose, loosen the lock nut and
unscrew the foot. The range of adjustment of the screw is 10mm.
-
Ensure that the burner caps are correctly seated on the burner bases of the range’s cooktop.
Instructions for the Installer
4. WALL FIXING AND ANTI-TIP DEVICE
WARNING
-
All ranges can tip
-
Injury to persons could result
-
Install anti-tip device packed with the range
-
See installation instructions
FAILURE TO FOLLOW THESE INSTRUCTIONS CAN RESULT IN DEATH OR
SERIOUS BURNS TO CHILDREN OR ADULTS.
ELECTRIC SHOCK HAZARD
WARNING
-
Use extreme caution when drilling holes into the wall or floor. There may be
concealed electrical wires located behind the wall or under the floor.
-
Identify the electrical circuits that could be affected by the installation of the
Anti-Tip Device, then turn off power to these circuits.
-
Failure to follow these instructions may result in electrcal shock or other
personal injury.
CAUTION: PROPERTY DAMAGE
-
Contact a qualified installer or contractor to determine the proper method fro drilling holes through the
wall or floor material (such as ceramic tile, hardwood, etc.)
-
Failure to follow these instructions may result in damage to wall or floor coverings.
4.1 Instructions for wall mounting
The anti tip brackets are to be attached to the rear wall as shown. The height of the bracket location from
the floor is determined after the range legs have been adjusted to the installation height as shown in the
installation instructions and the range has been leveled.
1 Level the range
using the front
adjustable
leveling legs.
2 From the floor,
measure the height
of the notch found
on the bracket. This
notch corresponds
to the centerline of
the holes for the
screws that will
fasten the brackets
to the wall.
9
Instructions for the Installer
3 Attach the two anti-tip brackets to the wall
using an appropriate fastener (for example,
screws appropriate for the type of the wall).
Adhere scrupulously to the heights indicated
in the figures (A) using the appliance’s
dimensions as a guide. (Type of screw
recommended 1/4” ).
A1XCU6 (35 1/2 ” - 900 mm)
A)
4 Correctly position the range so that the two
screws fit the anti-tip brackets on the range
perfectly.
10
Instructions for the Installer
4.2 Mounting the rear top upstand
1 Position the upstand above the top, taking care to align holes A with holes B.
2 Secure the upstand to the top by tightening screws C.
5. ELECTRICAL CONNECTION
ELECTRIC SHOCK HAZARD
WARNING
-
Disconnect power to the junction box before making connection
-
Electrically ground the appliance with green or green-yellow colored
wire
-
Do not ground to a gas pipe
-
Check with a qualified electricial if you are not sure that the range is
grounded
-
Do not have a fuse in the neutral or ground circuit
FAILURE TO FOLLOW THESE INSTRUCTIONS COULD RESULT IN DEATH,
FIRE OR SHOCK.
11
Instructions for the Installer
Make sure that the power line voltage matches the specifications indicated on the rating plate located in
the oven door frame.
This rating plate must never be removed.
If local codes permit and a separate ground wire is used, it is reccomended that a qualified electrician
determine that the ground path is adequate.
When a 4-wire or 3-wire, single phase 120/240 volt, 60 Hz, AC only electrical supply is available, a 50amp maximum circuit protection is required. When a 4-wire or 3-wire single phase 120/208 volt 60 Hz,
AC only electrical supply is available, a 50-amp maximum circuit protection is required, fused on both
sides of the line.
Wire size and connections must conform to the requirements of the National Electrical Code, ANS/NFPA
70 – last edition (*) or CSA Standard C22.1, Canadian Electrical code, Part 1 – Latest edition (**) and all
local codes and ordinances for the kilowatt rating of the range.
Copies of the standards listed may be obtained from:
(*) National Fire Protection Association Batterymarch Park – Quincy, Massachusetts 02269;
(**) CSA International 8501 East Pleasant Valley Road Cleveland, Ohio 44131-5575 .
This appliance is manufactured with a yellow-green or green ground wire connected to the appliance
chassis. After making sure that the power has been turned off connect the flexible connector. Picture 1
and 2 on page 12 connecting the appliance to the junction box using a UL listed conduit connector. Do
not shorten flexible metal conduit.
Picture 1 and Picture 2 on page 13 and 14, and the instruction provided below present the most common
way of connecting the appliance.
Your local codes and ordinaces, of course, take precedence to these instructions. Complete electrical
connections according to local and ordinances.
This range must be connected to a grounded, metallic, permanent wiring system, or a ground connector
should be connected to the ground terminal or wire lead on the range.
Connection at junction box must be copper wire only. Aluminium wires must not to be used
12
Instructions for the Installer
NOTE: Use this method only if local codes permit connecting cabinet-ground conductor to neutral wire of
power supply cord
WARNING
ELECTRIC SHOCK HAZARD
WARNING
-
Turn power supply off before connecting wires.
-
Electrically ground range.
-
Failure to follow these instructions can results in death, fire, or electrical
shock.
-
Improper connection of the equipment-grounding conductor can result
in a risk of electric shock. Check with a qualified electrician or
serviceman if you are in doubt as to whether the appliance is properly
grounded. Do not modify the power supply cord. If it will not fit the
outlet, have a proper outlet installed by a qualifies electrician.
5.1 US installation only / 3-wire branch circuit
Refer to picture 1, where local codes allow the
connection of ground wire from the applliance to
the branch circuit neutral wire (white colored wire):
-
The ground wire must be attached first;
-
If local codes permit, connect the green or
yellow-green ground wire from the appliance
and the white wire from the aplliance to the
branch circuit neutral wire (white colored wire).
-
Connect the red leads from the cooktop to the
junction to the corresponding leads in the
junction box.
pic.1)
13
Instructions for the Installer
5.2 US installation and canadian installation / 4-wire branch circuit
Refer to picture 2,
-
The ground wire must be attached first;
-
Connect the green or yellow-green ground wire
from the appliance to the ground in the junction
box (green colored wire). Do not connect
grounding wire to neutral wire in junction
box.
-
Connect the red leads from the appliance to the
corresponding leads in the junctionbox.
-
Connect the white wire from the appliance to the
neutral (white colored wire) wire in the junction
box.
pic.2)
NOTE: FOR MODEL RATED UP TO 4.3 KW CONNECT TO A 20A FUSE OR CIRCUIT BREAKER;
FOR MODEL RATED FROM 4.4 KW TO 6.6 KW CONNECT TO A 30A FUSE OR CIRCUIT BREAKER;
FOR MODEL RATED FROM 6.7 KW TO 8.8 KW CONNECT TO A 40A FUSE OR CIRCUIT BREAKER;
FOR MODEL RATED FROM 8.9 KW TO 11.0 KW CONNECT TO A 50A FUSE OR CIRCUIT BREAKER.
FOR BOTH US AND CANADIAN INSTALLATION: THIS APPLIANCE IS EQUIPPED WITH COPPER
LEAD WIRES AND MUST BE CONNECTED TO COPPER WIRES ONLY. ALUMINIUM WIRES MUST
NOT BE USED.
NOTE: Both power cables coming out of the cooker, must be connected according to the diagrams
shown in pictures 1 and 2
14