1
OWNER'S
SEWING
MANUAL
MACHINE
IMPORTANT SAFETY
INSTRUCTIONS
Your
sewing
machine
Read all instruct=on
is designed
before
and constructed
using this sewing
4.
Never
operate
ventilation
accumulation
only for HOUSEHOLD
use.
machine,
Never drop
6.
Do not
use outdoors.
7.
Do
operate
not
8.
reduce
1.
An
appliance
unplug
this
and before
2_
Always
should
never
appliance
the risk of electric
be left
from
the
unattended
electric
shock:
when
outlet
immediately
in. Always
after
10,
before
relampmg.
Replace
bulb
with
same type
rated
13,2 V d.c., 3 Watts.
3,
Do
not
reach
for
1t.
the
appliance
that
has fallen
into
water.
4.
Do
not place
or sink,
or store
appliance
where
Do not place {n or drop into
it can fall
or be pulled
water or other
into
a tub
or injury
fire,
not
Keep
fingers
Do not
allow
the sewing
Always
use the
Do not pull
Switch
the
15.
appliance
2.
Use this
Use only
this
to be used as a toy.
Close attention
is necessary
when this
aerosol
pulling
away
around
the
needle
(spray)
products
to the off
on cord.
from
all
machine
proper
are being used or where
('O"}
position,
then
remove
To unplug,
grasp the
plug,
not
moving
parts.
Special
care
is required
needle.
needle
plate.
The
wrong
plate
can cause
the
or push fabric
any adjustment
in
sewing
area,
machine
such
or changing
Atways
unplug
mentioned
while stitching.
the needle causing it to break.
covers,
off
presser foot,
the
('O')
as threading
sewing
lubricating,
in the instruction
when
needle,
making
changing
needle,
threading
and the like.
machine
or when
from
the
making
electrical
any
other
outlet
only
attachments
for
its intended
recommended
use as described
by the manufacturer
m this manual.
as contained
in
manual.
SAVE THESE INSTRUCTIONS
manual.
Never
working
,water.
center
operate
this
properly,
Return
the
appliance
if _t has a damaged
if it has been
appliance
for examination,
repair,
dropped
to the nearest
electrical
cord
or damaged,
authorized
or mechanical
IMPORTANT
or plug, if it is not
or dropped
dealer
into
or service
adjustment.
Be sure to keep machine
sunlight,
away heat sources,
humidity,
when
adjustments
ts used by or near children,
appliance
the
needles.
bobbin,
removing
I.
into any opening.
all controls
by
13.
shock,
to persons.
turn
unplug
tt may deflect
electric
Keep
free from
outlet.
Do not use bent
14,
burns,
blocked.
controller
is being administered.
12,
liquid.
WAR N i N G- Toreduce
the
r,sk
of
opening
and foot
and loose cloth.
any object
where
air
needle to break.
Unplug
immediately.
Do
dust,
any
machine
cord.
using
cteamng.
unplug
9.
with
of the sewing
or insert
To disconnect,
plug from
plugged
appliance
of lint,
5.
oxygen
DA N G ER- To
the
openings
and direct
SEARS, ROEBUCK
AND CO.
Dear Customer:
You have just
invested
in a very
please pause for a moment
fine
zigzag
and carefully
sewing
read this
machine.
booklet
Before
which
using your
contains
new Kenmore
instructions
on how
machine,
to operate
and care for your machine.
Specific
instructions
are given on threading,
obtain
the
best sewing
Advice
on the operation
Piease remember,
the
model
results
and avoid
and care of your
if you have questions
number
and serial number
tension
adjustments,
unnecessary
machine
about
when
cleaning,
servlce expense
is always
your
available
machine
oiling,
etc.
for conditions
at your
or need parts
This will
beyond
nearest
Sears Retail
and service, always
you inquire.
Kenmore Sewing Machine
Record
in space
number
of this
are located
provided
appliance.
below
the
The modei
on the nomenclature
model
number
plate,
number
and seriaf
and serial
as identified
number
on Page 6 of
this booklet.
Model No. 385.
Serial No.
Retain these numbers for future reference.
THIS
MODEL
IS A CENTER
NEEDLE,
LOW
BAR
SEWING
help you
our control.
MACHINE.
Store.
mention
SECTION
KNOW
YOUR
A Portable
For Straight
MACHINE
Case or Cabinet
is Available
.......
4
Locate and Identify
the Parts ..............
Identify
the Accessories
...................
SECTION
PREPARE
2.
YOUR
MACHINE
Check
Set the
Adjust
Thread
the Feed Balance Dial ............
Pressure Adjusting
Lever ...........
the Presser Foot Lever ....
Cutter
..............
•
10
.
Foot Storage Compartment
........
Presser FootTypes
...............
A.
Zigzag Foot
................
C,
Overedge Foot ..................
D, Quilter
.....
Zipper Foot ................
Satin Stitch Foot
................
Blind Hem Stitch Foot
.........
13
13
14
H, Stratght Stitch Foot
..............
J.
Sliding Buttonhole
Foot
........
N, Automatic
Buttonhole
Foot
............
Cheek the Presser Foot
................
Change the Presser Foot ..............
Choose the Needle and Thread
............
,
Check the Needle
..................
• Fabric, Needle, Thread and Stitch Length
• To Change the Needle
.................
Prepare the Bobbin
.....................
o To Remove the Bobbin from the Machine
• Horizontal
Spool Pin
...............
Additional
Spool Pin ...................
o Wind the Bobbin
.....................
• Insert the Bobbin into the Bobbin Holder
1 O--11
t 2_I5
12
13_15
13
13
13
SECTION
Chart
........
......
....
17
18_20
18
18
18
19
20
23
USE THE
24
CONTROLS
25
25
25
•
•
J
•
•
Direct Entry Stitch Buttons
................
Memory
Button
........................
Mirror
Image Button
...................
Clear Button
..................
Twin Needle Button
....................
27
28
28
28
29
o
•
Editing
Button
.......................
Stitch Width Control
Button
............
29
29
o
Stitch Length Control Button
Message Button
....................
29
30
PRACTICE
COMMON
Use the Seam Guides
--
..............
STITCHING
25
26
26
27
27
SKILLS
....................
31
Turn a Square Corner
...................
Sewing on Heavy Fabrics
...................
Dropping
the Feed Dogs
................
31
32
32
Basting
33
[]
.........................
Darning
[]
Sew a Button
......................
..........................
Put in a Zipper
SECTION
....
,
-
5.
LEARN
THE
of Sewing
Pattern
•
•
•
•
22
23_24
•
Position
Pintucking
Quilting
[]
Stitch
Topstitching
21_24
21
Functions
Chart
Stitches
Straight
36 _ 38
STITCHES
Stitch
Straight
34
35
....................
Chart
Prepare the Top Thread
...................
Thread the Needle
...................
Pick Up the Bobbin Thread
..............
Adjust the Top Thread Tension
............
TO
..................
....................
Up/Down
Needle Position
Button
...............
Control
Panel ....................
Display Sharpness Adjusting
Knob ............
Mode Button
............................
Pattern Selection
Buttons ...................
4.
14
14
14
15
15
16_17
16
17
LEARN
Stitch
Main Function
of Buttons
...............
•
Reverse Stitch Button
.................
• Auto-Lock
Button
....................
B
8
9
9
Accessory
Storage Box
....
Free-Arm
Sewing:
the Removabte
Extension
Tabfe
................
Know What the Presser Feet Will Do
E.
F
G,
3.
7_11
. . 7
8
on the Power
o
•
•
,
SECTION
FOR SEWING
Set Up the Machine ..................
• Plug m the Machine and Switch
Set the Foot Control
.................
•
•
•
•
5_6
6
Stitch
For Zigzag
.................
39
.....................
_
_],
40_46
[]
and
[]
.................
.......
.....................
the
Needle for Topstitching
............................
............................
....
47_56
47
48
.........
49
50
51
• Gathering
......................
Straight
Stretch[] .....................
Lock-a-Matic
Seam[] ....................
OutlineStretch[] .....................
Saddle
Stitch[] .......................
Zigzag
Stitches[] _[],
[] , [] and_],
•
Basic Zigzae
•
Satin
a
Overcasting
•
Mending
•
OveredgeSeam
•
KnitStitch
e
Double
•
Rick-RackStretch
Stitch
_
..................
57
_]
.....................
58
Stitch
[]
[]
...................
Darning
Small
•
Adjusting
...................
...................
[]
...............
Rips
...................
Evenness
of Darmng
Buttonholing
Density
_]
Hemmmg
................
_
and
[]
Blind
Hem
Stitch
(stretch)
•
Blind
Hem
Stitch
(woven)
•
Shell
Stitch
[]
•
Scallop
Stitch
•
Cut-Out
Work
Edging
RmnformngSt_tches
_.
•
•
a
Feather
Stitch
Fagoting
Casing
Elastic
Stretch
Needle
and
Stitch
with
[]
Stitching
Geometric
[_
[],
•
Two
Stitching
......................
61
•
Cycle
62
•
Test Sewing
62
•
Pattern
63
Memory
Stitching
by Pressing Mirro
Pattern
Single
Lock
87
Combinations
Units
...........
Alphabet
[]
Large and Small
Letters
66_68
68
•
Combining
Letters
Style
69_70
Adjusting
Style
_n Script
and Editing
Your
Distorted
Patterns
To Adjust
Distorted
Letters
.
74
and
[]
,
_,
77_79
SECTION
6.
PERFORMANCE
What to Do When
SECTION
7.
76
PROBLEMS
92
93
g4_95
96
......
..................
96
CARE
FOR ,YOUR
Cleaning
the Machine
97_98
MACHINE
.......................
78
Cleaning
the
Hook
Race ........................
.............
79
Assemble
.............
79
Oiling
_,
................
....
8O
PARTS LIST
81
INDEX
Holder
99
Race and Feed
[]
92
CHART
Hook
_
.......
or Numbers
the
_
.............
e2-93
96
Cleaning
Patterns
...........
..............
77
_,
......
....................
To Adjust
Bobbin
_,
91
.............
Program
CEeaning the
[2-2],
..........
[]
Combining
Patterns
90
and Numbers
in Block
8£
8_
......................
Mooogremm[]ng
~
Checking
8E
Image Button
•
_]
....................
Stitch
B7--9C
60
75
.................
[]
ere ....................
....................
73
[]
8_
Patterns
Stitching
.............
and
................
One Cycle
73
_
Stitch
84
85
[]
65
............
_,
and
Letters
'-
_
[]
•
.........
and Applique
[]
[] and[]
Decorate
[]
Decorative
e
......
.........................
Program
Cycle
and
83
59
72_76
[]
[]
[]
[]
ond[]
Stitches
_
_
.........................
Shading
[]
_
[],
................
_
Stitch
Elastic
Tw,n
[_,
.....................
•
Sand Stitch
70
[],
Patterns
Smocking
71
[],
[]
Stitch
Combining
...................
andEdgmgSt,tches
Cross Stitch
Stretch
•
...........
....
..........
with
65
on One Side .................
Buttonholes
Decorate
64_65
Buttonholing
_
_
the Stitch Width and Density
Stitch
Corded
[]
[]
Darning
[]
...................
[_
•
Manual
..................
.....................
Automatic
•
[]
Edge Zigzag
Automatic
• Adjust
52
53
54
55
56
57_63
the Hook
the Machine
....................................
.....................................
Race
....................
Dogs
99
...........
99
99
......................
.......................
99
100
10t_I02
103_104
Afulllineofsewing
cabEnets
isavailable
atyournearest
Sears
retailstoreorthroughourgeneral
catalog.
Another
option.., buyaCarrying
Case,,• thenyourKenmore
goes
anywhere,
canbestoredanywhere.
Fig. 2
Fig. 1
.J
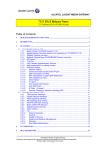
;SECTION
KNOW YOt
Locate and Identify the Parts
Thread
Upper
Take-up
Spool
Pin
Display sharpness
adiosting
knob
/
/
Th read Gu ide
Lever
Liquid
Crystal
Display
f
Top Thread
Control
Tension
Face Cover Plate
_St_t
Thread
Key board
Cotter
ch Pattern
Chart
Needle
_
Foot
\
\
Extension
Table
{Acc'esso ry storage
b ox)
J
\
Feed balancing
Needle
Position
Holder
Button
Button
Presser
Reverse
Stitch
Hook cover plate
release button
screw
_
Auto-Lock
Clamp
Foot
J
Button
dial
Needle
Plate
cover
p_ate
Locate and Identify the Parts (Continued)
Large spool
Bobbin
Carrying
holder
Handle
Hole for additional
spoo] pin
Bobbin
winder
spmdfe
Bobbin
w_ nder stopper
\
Large screw
dr_ver
__Lint
brush
Hand Wheel
Small
Prasser
Light and Power
Foot
Lever
Small
screw
spool
hoider
driver
Switch
Free Arm
\
Drop
teed lever
Additional
Machine
sockets
Nomenclature
spool
pin
Plate
Foot Control
Quilter
Power supply cord,,,/
Twin
needle
ACHINEF(
Set Up the Machine
e
Plug in the Machine
and Switch
on the Power
(_
Power
supply
Power
switch
[ 0-4
supply
Foot ^)
ppfy
cord
Power switch
f,
Machine
sockets
Machine
plug
I_)
Foot
Before
Turn
connecting
the power
conform
off the power
and power
For Your
control
control
on the machine
(_
Foot
plug
switch,
supply
cord,
make sure the voltage and frequency
to your electrica_
and insert
plug
(_)
shown
power.
the foot
When
display
control
plug
(_
machine
the
power
is turned
on, the straight
stitch
plug
in thts order.
Safetv
While
in operatLon,
touch
any moving
always
parts
keep your
eye on the sewing
such as the thread
take-up
area,
supply
cord
and do not
lever, balance
wheel
or
needle.
L
2,
Always
•
turn
off the power
When leaving
the machine
When attaching
•
3.
switch,
or removing
When cleaningthe
Do not place anything
and unplug
from
the power
15cm_
16cm
supply:
unattended.
parts.
machine.
on the foot
control,
except
in use.
Power supply
cord can be stored
in extension
table
light
is set on liquid crystal
automatically.
Store the power
1.
switch
Sewing
as shown,
=i
I
:SetUp
•
the Machine (Continued)
e
Set the Foot Control
Check the Feed Balance
•
Dial
Set the Pressure Adjusting
Lever
f
Pressu re
adjustin#
lever
Foot
The
foot
controi
Open race cover
control
regutates
the
speed at which
you
Sew.
"To increase
your
For
most
should
speed,
gently
press down
with
the bail of
You
sewing,
point
wifl
rarely
necessary,
foot.
To decrease speed,
release your
foot
pressure
slightly.
The foot
control
or decrease
Practice
sewing
is sensitive
your
sewing
OPERATING
increase
dial
in the Feed
("
_
Balance
to
adjust
to
regulate
to regulate
taste and needs.
your
the
the
dial.
feed
But,
if
balance
Any
stitch
such
as patterns
with
_[_,
[]
_
sew_ng on special
_
,[_
_
[_
and monogramm,ng
fabrtcs.
polarized outlet only one way. If the plug does not fit fully in the outlet,
reverse the plug. If it still does not fit, contact a qualified electrician
to install the proper outlet. Do not modify the plug in any way."
Model 21371 or YC-542 for use with Sewing Machine Models
385. 19150000 through 385. 19150999 and 385. 19153690."
cut
work,
the
drawn
be set at "3"
pressure
work,
to
for
"2"
for
basting
the
pressure
and
to
other
a lot of stretch
"1"
when
fine
fabrics.
sewing
and
chiffon,
Velours
may also require
and
basting,
manual
darning
lace,
knits
a "1" setting.
[],
0 ....
when
lever should
Reduce
embroidery.
organdy
(See p. 70 for details).
"stretch"
adjusting
sewing.
applique,
Set
for:
"For appliances with a polarized plug (one blade wider than the other).
To reduce the risk of electric shock, this plug is intended to fit in a
(For U.S.A. market only)
The pressure
regular
INSTRUCTIONS
"Foot Controller
Dial
").
speed immediately.
on a scrap of fabric
speed to your
and will
need
use this
Buttonholes
NOTE:
thegroove
to the arrow
plate
and embroidery.
RE YOURMACHINE
•
Adjust
the Presser Foot
Lever
posit_on
position
:OOt
lever
The Presser
Foot
Lever ra+ses and lowers your
presser
foot+
You
can raise
up posit+on
for
it about
1/4"
easy removal
help you place heavy
h}gher
than
the normal
of the presser foot
fabr+cs under
or to
the presser foot,
You
don't
after
you
cutter,
need
finish
a pair
sewing,
of smssors
Just
to
use the
cut the
thread
handy
thread
FOR SEWING
e
Accessory Storage
Box
•
Free-Arm
The extenston
easily
removed
Sewing:
table
the Removab|e
provides
added
Extension
sewing
Table
surface
and can be
For free arm sewing,
Bar tacking
and
you.
accessones are conveniently
machine
can dofree
makes sewing
arm sewtng.
easy for:
\
The iid of the accessory storage box lifts open toward
located
in the
Pull
the end
of the extension
table
away from
the machine,
illustrated,
For attaching
as
the table.
table until
its lugs fit
into the machine.
to reinforce
wabttines
made
around
Push the extension
10
sewing
This feature
for free arm sewing.
\
Sewing
box.
Your
garments
pockets,
plackets
on
ready-made
or home-
to
avoid
bunching
the needle,
fabric
::8
Stitching
sfeeves,
legs, or any circular
waistbands,
garment
area.
pants
Darning
socks
elbows,
or areas
or
mending
of wear
knees,
in children's
*
Sewing
buttons
on sJeeves, waistbands,
etc.
clothes,
11
The Presser feet
what
each foot
are an important
does in order
The Foot
Storage
Compartment
accessory
storage
box.
other
e
sewing
accessories
Foot Storage
feature
to use them
with
(See page
of this
machine.
You
need to know
effective|%
NOTE:
most of the presser feet is located
10),
wifl be found
Automatic
under
the
Foot
The numbers
in the
N and
The
buttonhole
foot
Storage
Compartment,
D: Quilter
[]
E: Zipper foot
\
C: Overedge
foot
F: Sat=n stitch
toot
J: Sliding
buttonhole
foot
H: Straight stitch foot
N: Automatic
buttonhole
12
Automatic
storage
Compartment
G: Blind hem
_t_tch foot
after each foot
you use the foot,
foot
Buttonhole
box as il]ustrated.
indicate the stitch
Foot
N
fits
in
patterns
the
where
accessory
•
Presser Foot Types
A.
Zigzag Foot
A:
Use this
C,
Zigzag
foot
C;
foot
for
both
straight
and zigzag stitching.
The
black
button
stde of the foot
remain
rigid
Overedge
on the
right
sets the foot
so that
you
to
can
This
foot
cted
for
casting
and
is especially
seams.
the fabric,
for
detailed
instru-
and
sewing
construover*
The smell
hold
help
brush
control
the raw edge in
keep
it
especially
on knit
Zipper
This
attachment
zigzag
foot
into
Sea p. 51 for
E:
turns
your
This
foot.
each side of your
detailed
instruc-
zipper
Pattern:
[]
Patterns:
[]
_
[]
may
regular
foot
stitch
with
the overedges
See
p.
59
guide the
the
Use
this
outlining
seam
straight.
Work,
Foot
Satin
foot
stitch
transparent
applique
as well
Decorative
foot
for
and Cut-Out
as for
aH your
Stitching
and
monogramming.
For
when
see p. 36 _ 38.
details
on
sewing
zippers,
Stitch
Patterns:
[]
_
[]
fabrics.
use this
zigzag
zipper,
keep
Stitch
F:
can be set to sew on
and
Satin
foot
The edges of the foot
Stitch
You
foot
F,
Zipper
a quilting
tions.
Stitch
Foot
from
ctsons.)
Stitch
E.
D: Quilter
and/or
guides
puckering,
(See p, 32
Quilter
Overedge toot
stitching
wire
p_ace
sew on heavy fabrics.
D.
Foot
and
for
[]
[]
or
stitch
61
Pattern:
the
[]
_
62
for
deta;Is_
Stitch
Patterns:
_,
[]
and
[]
13
•
Presser Foot
G.
Blind
Types
Hem Stitch
(Continued)
Foot
H.
Straight
G:' B_ind hem
stitch foot
Stitch
Foot
J.
H: Straight stitch foot
Sliding
J:
Buttonhole
N.
Foot
Automatic
N:
Siid}ng
buttonhole
toot
Buttonhole
Automatic
buttonhole
foot
foot
one
Foot
%
Use this
foot
hemming
The
foot
bottom
perfect
has
blind
topstltching.
ridges
on
to keep the fabric
slipping
top
for
and
and a guide
your
hem,
For
detailed
the
from
screw
to guide the folded
on
edge of
instructions,
see
p. 48, 50 and 72 _ 73.
Stitch
Patterns:
_].
[]
!4
_
Use
this
straight
and
Stitch
(Center
foot
exclusively
for
stitching.
Patterns:
needle
Use
this
foot-
buttonholing,
[]
and
position).
[]
help
holes
The
you
for
tt
measure
your
to
button-
accurately.
maximum
length
that
by this foot
is 30 ram.
detailed
Use
can
of
be made
instructions,
this
automatic
Simply
guide
buttonhole
For
manual
is'marked
set
of
the foot
p. 66 "_ 68.
Stitch
Stitch
[]
step,
on
the
and depress
You
can then
the same length of
as the button.
detailed
p, 64 and 6g _ 7I.
Patterns:
button
foot
control.
sew exactly
For
a
this
buttonhole
see
for
buttonholing,
Patterns:
instructions,
__
see
e
Check the Presser Foot
Your
presser foot
merely
o
_s held
snaps on the foot
If you need to remove
m place
holder,
by
which
a Foot
is seldom
or attach the foot
To Remove:
Holder.
Each
presser
the Presser Foot
Use the correct
removed.
hoJder,
Change
foot
here is what
Chart
you do:
To Attach:
and the
presser
detailed
foot
for the stitch
directions
you wish
for sewing
with
to sew.
Consult
the Stitch
Pattern
the various presser feet.
To snap off:
To snap on:
UPiDow_
needle
position
Presser bor_
utton
Presser
foot
lever
Foot
burton_
screw
To Remove:
Turn
the screw
the machine.
driver.
To Attach:
toward
the back
Use the
large screw
of
1.
Match
the
hote
holder
with
the
in
the
threaded
m the presser
bar.
Fit
holder
foot
hole
J
2.
the
foot
screw
into
To Snap
Off the
Presser
Foot:
To
the hole.
t.
3.
Tighten
toward
the screw by turning
you.
It
Press the
Up/Down
Needle
the needle to its highest
2.
Raise the presser foot.
3.
Press the
red button
The presser foot
Position
Button
to raise
position.
_j
Snap
On
Set
the
justing
drop
holder,
the
Presser
Foot:
1.
on the back of the foot
will
,-
2.
Place the
so the
off.
Pressure
on
presser
horizontal
the
foot
Lower
the
fool
holder
the
presser
foot
pin
is just
under
the groove
the foot holder.
3,
ad-
]ever at "3",
of
presser
to
foot
lock
in
place,
NOTE:
If you
foot
do not
holder
hear the presser
firmly
until
you
foot
snap in place,
press down
on the presser
hear the snap.
15
e Checkthe
•
Twin
.=
Black
Needle
shank
,,,_r
The choice
In your
of needle and thread
needle case, you will
Blue (1 1)
Orange
Purpie
find
..........
(11}
Red (14)
depends
........
the following
for stretch
for
Green
118)
.......
(This
needle
topstitching
for
NOTE:
16
Needle
........
These needles
heavy
has
and
weight
fabrics
decorative
top-
weight
a
larger
thread
hole
for
thread.)
fabrics
and decorative
top-
on these fabrics.
for sewing parallet
rative stitches.
are found
weight
on these fabrics.
thicker
stitching
Twin
fabrics
or meElium-heavy
medium-heavy
stitching
needles;
fabrics
for medium
.........
you are sewing.
color-coded
_ for Iightweight
..........
(16)
on the fabric
rows
of straight
in the accessory storage box.
or deco-
isee page 10)
Needle
1.
Look for barbed or blunt point.
2.
A damaged needle can cause permanent snags or runs in knits, fine silks
and silk-like fabrics.
Always
buy
smooth
and consistent
a good quality
thread,
in thickness.
it should
resist
tangling
and
be strong,
e
e To Change the Needle
Fabric, Needle, Thread and Stitch Length Chart
f
FABRIC
Lightweight:
Battste, Dimity,
Chiffon,
Silks, Fine Lace, Organza,
Crepe, Taffeta,
Voile,
Organdy
NEEDLE
SIZE AND
COLOR
1 !_O RANG
THREAD
E
SIZE
RECOMMENDED
STITCH
LENGTH
SETTING
Polyester
Core/Cotton
Wrap
Fine Mercerized
Cotton
Silk A
2.0
(12 stitches
inch}
50 Mercerized
Cotton
Polyester
Core/Cotton
Wrap
Silk A
2.0 _ 2,5
110 _ 12 stitches
per inch)
per
Medium Weight:
Cotton, Cotton Blends,
Percale, Gingham,
Shantung,
Pique,
Seersucker,
Satin, Kmts,
Su_tings, Linen,
Woo] Crepe, Leather
!4-RED
M_dium Heavy Weight:
Corduroy,
Denim, Wool,
Sailcloth,
Wool Flannel,
Gabardine,
Velvets,
Leather
14-RED
or
16-PURPLE
50 Mercerized
Cotton
Mercerized
Heavy-Duty
Polyester CorelCotton
Wrap
Silk A
2.5 ~ 3,0
(8 _ 10 st=tches
par inch}
18-GREEN
Heavy Duty Mercerized
Cotton
Polyester Core]Cotton
Wrap
Silk A
3.0
(8 stitches per
mnh)
Heavy Weight:
Coatings,
Upholstery
Cotton
Duck, Heavy
Twills,
Canvas
I
NOTE:
Raise
by
Decorative
top-stitching
on all types of fabric
16-PURPLE
1B-GREEN
Buttonhole
Twist
IUse as top thread
only)
4.0 _ 4_5
(4 _ 6 stitches
inch}
Cire Tricot
Loosen
toward
1 1-STRETCH
FABRIC
NEEDLEBLUE
Polyester
Core/Cotton
Wrap
S0 Mercerized
Cotton
2.0 _ 2.5
110 _ t2 stitches
per inch)
the
needle
pressing
the
bar to its highest
position
Up/Down
Position
Needle
Button:
per
1,
Stretch Fabric:
Polyester
Double Kntts,
Nylon Tricot,
Jersey,
Stretch Terry, Spande×,
Needle
clamp
SCrew
I
2.
Remove
3,
Insert
with
the
needle
clamp
screw
by turning
it
you.
the needle by pulling
the
new
the flat
needle
into
side away from
it downward.
the
needle
4.
Push the needle up as far as it wilt go.
5,
Tighten
the
needle
the large screwdriver
clamp
from
clam_
you.
screw
your
firmly
wit_
accessory
box,
•
To Remove the Bobbin from the Machine
•
Horizontal
Spool Pin
Ordinary
Spool
J
Spootstand.
sliding
the
the
release button
cover
hook
plate
cover
by
. _-Felt
Additional
spoolpin
(_)Takeoutthebobbin.
plate
to the right.
Lift
up
the
spool
thread
on
the
coming
off the spool
pin,
spool
Place the
pin
with
spool
the
of
thread
as shown.
The
additional
extra
pressing it
* "Fne small spool holder is used with
narrow or small thread spoo|s.
spool
bobbin
machine
pin
without
or twin
use,
insert
additional
spool
To
Attach the large spool holder
firmly against the thread spool.
18
r_
_
Hole
Small Spool
(_) Remove
_
_ _'_
needle sewing
the
wind
spool
the
(see page 80).
stand
and
an
pin in the hole.
Piece the felt
and spool
thread
off the spool
coming
is used to
unthreading
on the
pin with
as shown.
the
e
Wind the Bobbin
Th read gu i de
winding
spindle
jD
wJnder
stopper
Bobb]n
#®
0
Guide
(_) Thread
the thread
around
through
(_) Put the bobbin
the
(&) Depress the foot
Return
the bobbin
guide.
hole in the bobbin
on the bobbin
Stop the machine
_)
the thread
when
winder
from
spindle,
the inside to the outstde.
and push _t to the right.
it has made a few turns,
controt
winder
again.
,
When the bobbin
to its original
position
and cut the thread
is fully
wound,
by mowng
With
the free end of the thread
he_d in your
close to the hole in the bobbin,
it will
the spindle
stop automatically.
to the left,
and cut the thread
as shown.
hand,
depress
the foot
control.
.J
•
Insert the Bobbin into the Bobbin Holder
(_ Put the bobbin into the bobbin
holder so that the thread feeds
counter-clockwise (left).
2O
(_) Pull about 4 inches of thread
toward you through the tension
slot (_),
(_ Then pull the thread clockwise
toward the back of the machine
through the slot (_,
(_) Pull out about 15 cm (6") of thread
and attach the hook cover plateo
7_
¸ --
:
i ¸ !
....
....
Prepare the Top Thread
e Thread the Needle
®
Raise the presser foot
Press the Up/Down
(&) Draw thread
(_
Then
(_) Firmly
down
lifter,
needle position
into thread
around
button
guide using both
the check spring
draw the thread
from
right
twice
to rinse the needle.
hands.
holder.
to left over the take-up
lever and down
into
the take-up
lever
eye,
(_
Then
down
through
(_) Slide the thread
(_
Thread
the lower
behind
the needJe from
thread
gurde.
the needle bar thread
front
guide on the left.
to back.
21
PreparetheTop
Thread
(Continued)
• Pick Up the Bobbin Thread
|
tlU
/
.....i_._/
n_dle posit ion
button
._)
t_) Hold
your
the
top
left hand.
thread
_ightly
with
(_
,
Press
Up/Down
Needle
Position
Button
Twice.
Bring
thread.
22
the
J
the bobbin
thread
up
by pulling
the
top
.......
(_
Pull
both
threads
under
back of the presser
to 6 inches of thread
J
and to the
foot, leaving
c_ear.
4
® Adjust
the Top
Thread Tension
Choose the Correct
Top s_de ot fabric
The best tenmon
Setting
mark
wi]l
depend
on;
the stiffness
and thtckness
the number
of fabric
the type
Loosen__
Top
thread
Tension:
of the fabric
layers
of stitch
The top thread
_s1oo [oosa.
Tighten
Top
The top thread
is too tight.
side
Top stde
thread
of fa
of fa
For Straight
The
Sotch
_deal stratght
fabric,
If you
as shown
look
gaps, that
When
stitch
above,
at the
each stitch
adjusting
top
will
have threads
magnified
stitch,
thread
between
the two
layers
and
back,
you
will
notice
that
there
The bobbin thread
appears on the
upper surface ot the
tabr_c.
]'he top thread
appears on the
underside
ol the
tabrlc.
of
to show detail.
front
is smooth
locked
are no
and even.
tension,
the h_gher the number,
the t_ghter
the top
th read.
Tension
The
top
bottom
Lstoo
loose:
thread
of
the
side of the stitch
Tension
shows
through
fabric.
The
will
feel bumpy.
the
bottom
_stoo tight:
The bobbin
thread
the
the
top
of
of the stitch
will
will
fabric.
come through
The top
side
feel bumpy.
23
: PreparetheT0pThrea
•
Adjust
the
For Zigzag
Thread
Tension
(Continued)
Stitch
tn the correct
correct
Top
d (Continued)
zigzag stitch,
appearance.
the bobbin
To match
this
threads
appearance,
will
adjust
not
your
show
on the
top
side of fabric
Top tension
Top
Bottom side of Fabric
24
will
show slightly
on the bottom
Too Loose
Top side of Fabric
Bottom
Too
Tight:
Corner of each z_gzag will
the top side of fabrics.
threads
side.
See below
Top tension
Too Tight
Too
and the top
top tension.
pult together
on
Just Right
side of Febr_c
s=de of FabrEc
Top
Bottom
side of Fabric
side of Fabric
Loose:
Just Right:
The top thread will loop through bottom
side of fabric
and will be puIled almost
together.
MimmJze
the amount
of top thread visible on
the
bottom
side of fabric
without
causing
exo_sswe
puckering
or
causing
the bobbin
thread to show on the top side.
Results YaW
with _abrlc, thread and sewing conditions,
for the
Main Function
of Buttons
e
Reverse Stitch
Button
e
Auto-Lock
Button
•
Up/Down
Needle
Position
Button
"m
r_
U
q
_"
Up/Down
needle
POsition
11 ,o,,oo
Z3
Y
®
Reverse
stitch
button
J
Use th_s button
--
to:
At
secure seams.
--reinforce
the
(
seams
and
the
At Straight
Stitching,
(
Mending
) and Mending
The machine
Zigzag
and
hold
(
i}_i ),
reverse
stitch
button.
The
machine
will
sew
Stitching
Stitching
(
When you press this
!ii
).
will
take a few stitches
in
in reverse until
you release the button.
will
It the
needle
button,
the
At Utility
this
If
and Decorative
Press this
button
then
the
machine
stitch
at
running
will
Stitching:
button,
the needle
go up or down,
lowest
Stitching
Stitching
the
Zigzag
place and stop automatically.
Stitching
Press
Stitching
top
edges of pockets:
-_ )and
Straight
is up and
needle
will
you press this
go down
to its
and
press
position.
the
needle
button,
highest
is down
the
needle
will
you
go.to
its
position.
the machine
sew auto-lock
the end of pattern
and stops
automatically.
At Utility
Stitching
Press
will
this
and Decorative
button,
then
sew auto-lock
stitch
and stops
Stitching:
the
machine
immediately
automatically,
25
Control
Panel
•
Display sharpness
adjusting
knob
Display
......
will
Twin Need}e Button
Message
Button
Editmg
Button
(#10
_ #16)
Image Button
Pattern Selection Button
Direct
Stitch
Entry
Buttons
Button
Clear Button
Buttons
Stitch
Chart
Pattern
"_0
/
By turning
knob,
Mode Button
selected
Patterns on
#17th}sto mode,
#81 can be
Patterns #OO to #40 can be
selected on this mode.
26
Knob
Stitch Width
Control Button
Stitch Length
Control Button
Memory
Adjusting
Liquid Crystal D_splay
[
Mirror
Sharpness
the display
sharpness
change,
sharpness
of liquid
crystal
adjusting
display
e Mode Button
e
Pattern
Selection
Buttons
• Direct
F--
f
Pattern 30
7
When
the
mode
is set automatically.
Press
the
alphabet
power
mode
or script
switch
button,
Is turned
on,
the
utility
To Sefect
Press
to
change
alphabet,
to
block
a Stitch
two
You
indicate
whch
pattern
you
can
setection
indicates
select
these
patterns
patterns
can
by
pressing
pattern
buttons.
want to use.
The
following
pressing
The LED
[
Foot No.
CZ;CDCDC
CD CDI
Pattern:
to
Foot A }
Stitch No,
Foot No,
numbers
Utility mode _
f
0OT
Stitch No,
Buttons
® [ !2---
1
Ftashed
( :3 0 "e" _ _ ) alternately
'
Cursor
Stitch
Pattetn(Example)12
Utility mode i'_
® {-T_÷
Flooh
Entry
the stitch
be
selected
simply
by
button.
the mode selected.
27
Memory
The
Button
Memory
Button,
"memorize"
Memory
The
your
Button
LED
light
has recorded
NOTE:
•
If
after
wlll
your
you
stitch
button
with
pattern
you
its
LED
Light,
selection.
select
your
go on to show
Press
wilt
the
stitch
pattern.
the
machine
that
Mirror Image Button
Use this button
-
to:
sew & memorize
sew & memorize
size.
•
patterns
letters
in a mirror
and
numbers
image.
in two
third
The Clear
Button
of
patterns,
1,
the foot
are selecting
a
series
of
different
remember
them
Not
clear
with
with
selected.
the
first
any
of
you
have
one
stitch
pattern
at a
This
and ending
allows
you
to
made wh_ie programming
The Clear
Button
will
a
delete
at once if pressed after editing.
Control
The Clear
to clear a series
the last selected
mistakes
patterns.
elf stitches
Foot
ways
on whether
Pressed:
Button
t_me, beginning
series
2.
in two
depending
control.
Clear
correct
in order.
works
Foot Control
The
patterns,
you must press the memory
after each selection.
will
stitch
pressed
selection.
The machine
Clear Button
Pressed:
Button
deletes
all stitch
patterns
in the
series at once.
NOTE:
Turning
memory
28
off
the
completely.
machine
will
clear
the
e
Twin
Needle
Button
•
Editing
o
Button
Stitch
Width
Stitch
width
Contro{
Button
o Stitch Length Control Button
f
3ust
press this
button
and
the machine
automatically
reduces
the
w_dth
for twin
needle sewing,
Press
button
again
for
single
needle
sewing,
For detailed
instruction,
Use this button
maximum
--
to:
check
and
nations
before
o
correct
pattern
comb_-
sewing,
editing
and the light wiil
go out,
is completed
button
use the stitch
to select
page 94, 95).
editing
width
position,
control
(see
length
crystal
the stitch
width
will
To increase the stitch
Press the "+"
The stitch
width:
decrease,
width:
button,
width
will
display,
Press the "' i ,, button.
The stitch
see page 80.
and stitch
on liquid
To Decrease
press again when
For editing,
showing
witl increase,
be
o
Stttch
width
showing
and stitch
on liquid
To Decrease the stitch
Press the " - " button.
The stitch
To Increase
length
length will
crysta_
will
the stitch
be
display,
length:
decrease.
length:
Press the "'+" button.
The stitch
fength
will
increase,
29
e Message Button
Adjusting
(Example)
pattern
10
[lo --0 root ^ I
I
I
I
ISTRA!GHT
STITCH']
_iVCH.,FooT:k
oR
WIDTH TENSION:5,
CONTROL
I:E.
DLE POSITIONS
When
scrofl
*
you
press
Suitable
shown
presser
message
To continue
To return
button,
the message on the Hquid
H"
crystat
display
will
2 seconds.
foot,
on the liquid
When you want
3O
the
to the left after
Thread
crystal
tension,
the message
to the original
or
spemaI
sewing
method
display.
to stop the scrolling
to scroll
Pressure
screen
the thread
fabMc and thread
> Press L_
button.
>Press
button.
_-Press
_
_-_
button.
will
be
tension
being used.
may be required
depending
on the type
of
Use the Seam Guides
Turn
a Square Corner
Cornenng
uide
Cornen
ng gutcle
The seam guides
engraved
to
hefp
width.
The
lines
the 5/8"
and 7/8"
on the needle plate are
you
measure
are 1/8"
apart,
seam
with
To turn
a square corner
5/8"
from
the fabric
edge:
lines marked.
1.
2.
Stop
stitching
and
lower
Position
button
cornering
guide as shown,
Raise
the
when
presser foot
the
the
needle
fabric
and turn
by
edge
the fabric
pressing
facing
to line
the
you
Up/Down
lines
with
the
the edge with
the
5/8"
seam guide.
3.
Lower
the presser foot
and begin stitching
Needle
up
in the new direction.
Dropping
: Sewing on Heavy:Fabrics
the Feed Dogs
J
When
sewing
when
hemming
1,
Use Foot
NOTE;
from
3 to
12 layers
of
fabric,
such
as sewing
over
welt
®
seams
jeans.
A (Zigzag
foot}
This black button
with
locks
2.
Sew as usual.
3.
Stop when
4,
Lower
5.
Press and hold the black
6.
Release the black
the black
the foot
spring
button.
so it does not give with
the fabric.
The drop
your
needle reaches
the point
where the fabric
layers
increase,
lever
is located
Remove
underneath
extension
the free arm bed on the back
side of
table to operate.
the needle and raise the presser foot.
button
button
as you lower
and continue
the presser foot.
(_) To
raise the
feed
dogs,
lever in the direction
sewing.
push
the
of the arrow
as illustrated,
*
(_) For
the
arrow
Then
turn the handwheeL
Feed
dogs
normal
32
teed
the machine.
must
sewing.
always
be up for
dropping
lever in
the feed dogs, push
the direction
of the
as illustrated.
•
Basting
iCTICE
.......
[]
Sat the Machine
19
f
t
[19
Foot ]
Thread lension
0 to 2.5
Pressure Adiusting
Lever: 0
Drop
Drop teed lever
1,
A:
Zigzag
foot
the feed
dogs,
{see p. 32).
Press the foot
controi,
The machine
will
make one stitch
and stop
automattcaUy.
Blue needle No. 1_
J
2.
Release the foot
3.
Hold
the
fabric
place where
4.
adjusting
basting
taut
you want
Press the foot
When
control
and
slide
it to
the
the next stitch.
control
is comp]eted;-reset
lever to 3, reset
and raise the feed dog.
the
the tension
presser
diai
to 5
COMMON:STITCHING
SKI LLS
Set the M;_chine
10
iii
|
I
+
[io---O root A t
Thread tension
2to 6
Pressure Adjusting
F" Satin stitch
foot
Lever:
Drop teed lever
0
1.
Drop
2,
Stretch
the
between
embroidery
3.
the feed dogs.
Lower
(see p. 32).
fabric
with
the
hoops,
the presser
How to darn correctly.
hole
in
the
center
Make
as shown.
the
stitching
bar and sew at a slow
may prefer
speed.
turning
will
the
draw
points
little
of
each
holes
row
at the
blunt
ends_
or
the
Beginners
L or M movement.
Take care not to get circles.
4.
Move
the
fabric
have covered
back
and
the darning
forth
slowly
until
you
area,
The
5.
Turn
the
stitching
fabric
1/4
turn
over the first
and sew another
layer
of
quick
mastering
of
this
work
depends
guiding.
layer,
Therefore:
NOTE:
If your
fabric
separate
piece
refinforce
6.
When
darning
adjusting
is thin
lever
of
or badly
fabric
damaged,
under
the
use a
hole
to
it.
is
completed,
to 3, tension
reset
dial to
the
presser
5 and raise the
feed dog,
NOTE:
See pages 64
quick,
34
_
65,
automatic
easy way to mend
darmng
rips & holes.
for
a
-
Hold
-
Always
the hoop correctly.
--
Move work
work
from
left to right,
lengthways
{not sideways).
on
proper
Sew a Button
13
Thread tension
3_o6
Draw thread to
reverse side ot
tabric
Drop the feed dogs.
1.
\
F
Satin stlteh
foot
Match
5.
(see p. 32).
the button
holes to
the horizontal
Turn
the
right
hole
width
if necessary.
6.
Stitch
several times.
7.
After
you
slot on
the presser foot.
2.
Lower
3,
Turn
the toot
to hold the button
in place.
Drop teed lever
point
4.
the
hand
wheel
by hand
until
the
needle
needle will
stitch
enter
width
button
of
(+ or --}
the left hole of the button,
so the
8.
Draw
sewing
so the needle will
button.
sewing,
of thread
the thread
and knot
When
wheel
the
finish
3 to 4 inches
_s_ust above the button.
Press the
hand
Readjust
cut thethread
enter
the
but
the
stitch
leave
at the button.
to the
reverse side
of the fabric
the threads.
the
dogs tor normal
button
sewing,
=s completed,
razse the feed
It'sas easy
A
at A -- B -- C
Set the Machine
10
!
$ [lo
FootAJ
opening
Thread tension
2to 6
Top side
ot fabric
The Pin on the
J_
left hand side
Top edge of fabric
E;
Z_pper
foot
J
A.
Attach
1.
To
the zipper foot,
sew
attach
on
the zipper
2.
To
sew
attach
left
holder
side
of
the
to the right
zipper,
B,
Prepare
1.
Put the top sides of the fabric together
pins on
on
the
foot
foot,
your
fabric.
sew to the end of the zipper
Use the reverse to lock
foot,
the
the zipper
36
the
the foot
as shown,
right
side
holder
to
of
the
the left
zipper,
pins on
2.
Set the
zipper
stitch
opening.
length
and
opening,
the stitches.
at
"4.5"
and sewing
:Put in a Zipper
(Continued)
C
Zipper
teeth
(t/8")
C,
Sew In the zipper.
!.
FoJd
back
the
4,
left
seam
allowance
shown.
2.
3.
Turn
5.
under
form
a 1/8"
Place
the
fold
,the
right
seam
allowance
and pmm
Be
sure
slider)
teeth
next
to
the
1/8""
6,
place.
the
the foot
top
of
the
zipper
(the
holder
the
bottom
zipper
foot
on
of the zipper
the
pins on
Sew through
the
where
Lower
needle
fold
side at
hold
8.
Open the zipper.
9,
Lower
the
presser
foot
and
stitch
the
rest of the seam.
the needle
tape.
and the zipper
the slider
to
top
so that
and the zipper
to the point
the
to the right
foot.
pierces the fold
7.
NOTE:
Lower
the
to
_old.
zipper
Attach
the zipper
as
tape
begins.
the
fabric
and
raise the presser foot,
is at the top of the garment.
37
10. Closethe zipperandturnthefabrictop
sideup. Spread
flat.
1t.
Remove
foot
the
holder
zipper
to the
foot
left
and
attach
the
foot.
12.
across and
below
the bottom
Turn
foot
Stitch
tape.
38
along
and
the zrpper
through
the
continue
teeth,
as shown.
and
the
17.
zipper
two
inches
from
the top of the
Lower
the
needle
into
the fabric
and raise
Remove
the
basttn9
stitches
and open
the
zipper.
to gulde the
fabric
about
the presser foot,
of the
I6.
the corner
Stop
zipper.
15.
Stitch
z_pper.
13.
14,
pros on the z_pper
Lower
the
foot
and
stitch
seam.
Make sure the fold
the
is even,
rest of the
!:
W!:!"/
:i_?_i:_-_
Y!_ ! Z
_
: ?_:"
:
_?:_w
v
Chart of Sewing F,unctions
Now
that
you are familiar
this machine
performs
with
FUNCTION
BASTE
SUIT,
SEW
HEM
BUTTON,
and ready
SEW
to sew, what
are you
page for detailed
PATTERN(S)
going to sew? The following
instructions,
in many
chart
tells you
cases, you also have a choice
Ref. Page
FUNCTION
(in atphabettcal
STITCH
PATTERN[S)
40,52
40, 60
15, 16, 20, 27, 28
41~43,61,62,74
See all Stitches
40~45,53,55_56
10,19
33,40,
20
42, 62
16,28
41,43,
13
35,40
MEND
10,13,14,29
34,40,57,64_65
46, 66_71
PINTUCK
10
40,50
10
40,51
14,17,25,26,33,35
40_42,44,55,60,
4t
KNITS,
STRETCH
FABRIC
marked "S"
SEAMS
77_79
KEYHOLE
STITCH
WORK
DARN
A GARMENT/PROJECT
(WITH
STITCHES)
34
44.83
SHELLTUCKS
28
43,74
30,31
43,76
SMOCK
23,24,36,37,41
44,84
18,13,14,29
34.40,43,64,65
STRAIGHT
10, tl
40,47--52,54
15,20,21,27,28,
41_43,61_62,74,
STR ETCH
12anda]lStitehes
40_45,53,55_5B,
30,31
75_76
marked"S"
61~63,73o75_80,
23_26,28,36,37,
42~45,74,77,80,81
APP LY
EMBROIDER
F INISH
RAW
(create
EDGE
open work}
SEAM
STITCH
84~85
TOPSTITCH
41_54
FAGOTING
61_63,73,75_80,
84_85
73
REINFORCE
E LASTIC,
Raf. Page
13,14
QUILT
D ECORATE
functions
10
ROUNDED
EDGE
sewing
HEMS
BARTACK
CUT-OUT
what
GATHER
BUTTONHOLE
CROSS
order)
of stitches.
43, 76
30,31
BARTACK
BLIND
machine
you to the proper
STITCH
APPLIQUE
BATHING
your
and directs
25,33,35
42,44,77,79
10,13,34,38,55.56
40,44_45,58,
SADDLE
B3,
OUTLI
85~86
TRIMS,
25,26,33
42,44,78
TWiN
13~16,20,28
40_43,59_B2,74
STITCH
NE STITCH
SEW
NEEDLE
STITCH
lO
40,48
18
41,56
17
41,55
20_22
42,62,75
21,22,24,25,30,
42,80
36,40,41
ZIPPER
10
36_38,40
39
Stitch Pattern Chart
Stitch
Pattern
No,
STRAIGHT
10
Straight
(H}
I
f
Zigzag
,.w
LOCK-AMATIC
SEAM
Other
Attach.
Needle
Quilter
Zipper foot
Blind hem
stitch foot
Satin stitch foot
Check
Cha_
Foot
Thread
Tension
2~6
Adjusting
3
on p. 17
Refer to Page
Regutar seems, pintucking,
qugtmg, z_ppers,
topstitching,
darning,
mending,
basting,
gathering, etc.
3
4
34
_ 38
_ 52
(A}
,
Check
Cha_
on p. 1_7
11
Zigzag
(A)
2_6
For fastening
and securing
the end of a seam.
12
Check
Chart
Straight
at the beginning
and
54
for
53
(Press the Reverse Button at end of seam.}
11
STRAIGHT
STRETCH
Uses
Lever
(H)
2_6
3
Use on knits
topstitching.
and other stretch
fabrics
good
on p. 1__7
12
Iff
Zigzag
m
(A}
S
........
[.
ZIGZAG
tregu|ar)
13
Satin
Zigzag
(A}
Overedge
MENDING
14
4O
l Check
Chart
onp.
17
(A}
3~8
Mend, darn, fimsh edges, apply trims, embro
gather, buttons,
satin stitch, mor_ogram
decorative
stitches.
35
~ 59
der,
I
_
Check
Chart
Zigzag
;14
{C)
stitch foot
onp._
3_6
Use for sawing patches, repairing
straight
or
corner tears, finishing
seams on terrycloth
sewing bar tacks for belt loops and drapery
pleats !stronger
than zigzag),
6O
'
Stitch
pattern
OVEREDGE
SEAM
Uses
Other
Attach.
Foot
=;efer to Page
61
for overcesung0 for knits and woven
fabrics needing extra strength,
for narrow
seams on knits or heavy wmght woven fabrics.
I
72 _ 73
BLIND
STITCH
6
HEM
8lind Hem
Stitch
(G)
[_
s
55
place of straight
stitch on knits, bias
seams, tricot,
chiffon
for a flat, non*puckering
seem.
17
OUTLINE
STRETCH
Zigzag
(A)
s
su_ts, b!ezers,
18
SADDLE
STITCH
s
jumpers,
demm
56
outfits.
Zigzag
(A}
Blind
Stitch
Hem
_G)
33
Basting,
BASTING
19
Zigzag
(A}
tailor
tacks,
tack quirt
layers.
i
i
Stitch Pattern Chart
Stitch
Pattern
(continued):
No,
KNIT
STITCH
Foot
Other
Attach,
20
Blue
Zigzag
(A)
22
24
25
30
Zigzag
IA)
36
40
41
Satin
20
Needle
Adjusting
Lever
Thread
Tension
t11)
3 -
6
Uses
Refer to Page
3
Use for swlmwear
3
Use for sewing paratlel rows of straight
decorative
stitches adding an exquisite
touch to table linen and clothing.
and stretch
velour.
62
S
TWIN
NEEDLE
STITCHES
21
Twin
Needle
3_7
(F)
2_
21
22
I
Check
Chart
Zigzag
21
80
or
.....
SCALLOP
STITCH
or
{A)
on P. 1Z7
{A)
Check
Chart
.......
!
24
25
36
40
47
........
3 _ 6
3
Use for sca!Joped edges on collars, pockets
or ptacemats.
Create a delicate edge on thin
fabrics.
Decorate
edges on hemlines or
sleeves.
75
2 _ 6
3
Hand-quilting
stitch,
used to reinforce
stretch
and woven fabrics, use on spandex
undergarments and to decorativeJy
hem e_estic
fabric.
Usa for patchwork
quilting.
77
3_7
3
Use for fabrics that tend to fray
such as linens and gaberdines.
62
22
S
FEATHER
STITCH
25
25
26
Zigzag
S
_
DOUBLE
ZIGZAG
.........
EDGE
27
Check
Chart
Overedge
27
42
on p, t7
26
_C)
on p. IZ
extensively
H E STITC H ES
Stitch
Pattern
BLIND
STITCH
HEM
Attach.
28
Stitch
Blind
SHELL
STITCH
Other
Foot
No.
Hem
(G)
Needle
Thread
Tension
Adjusting
Lever
Refer to P_ge
U_6.$
Check
Chart
on p. 1_77
2~6
Use tot woven
overcasting.
fabrics:
blind
hem and
Check
Chart
6_9
Fimsh hems, sleeve and neck openTngs.
Use on nylon tricot and other lingerre to
overcast and seam,
Do shell tucking
On blouses and lingerie.
73
[_
28
on p. 17
Sattn IF)
74
L .......................
AUTOMATIC
DARNING
Check
Chart
29
2~6
Darn r_ps and holes Quickly
cally.
and automati-
64 _ 65
on. p. 17
29
CUT-OUT
APPLIQUE
Buttonhole
Sliding
(a)
WORK
30
31
Check
Chart
on p, 177
Sat,n IF}
[_
2_6
2
Use on cut-out work and applique
for edging
the designs, also on piacemats
blankets.
coIlarso cuffs and pockets.
76
Stitch
Pattern Chart (Continued)
Stitch
Pattern
No.
RICK*RACK
STRETCH
Foot
32
Zigzag
(A)
Other
Attach.
Needle
_
Check
_
Chert
on
p. 17
Thread
Tension
Adjusting
Lever
Refer to Page
Uses
2 _ 6
3
Decorate
3 _ 8
3
Elastic
garments
with one row
or several
63
32
Satin
ELASTIC
CASING
FAGOTING
[_
33
Use paper
behind
Satin
CROSS
STITCHING
(F}
Check
Chart
Satin
ELASTIC
STR ETCH
(F}
35
Zigzag
Satin
SMOCKING
STITCHES
{A)
36
Zigzag
onp.
Casing:
Fagoting:
Satin
Join two folded edges for
decorative
open=work
appearance.
2 ~ 6
3
Use in embroidery,
combine
numbers tot samplers.
3 ~ 6
3
Use for applying
2 _ 6
3
Smocking
curtains,
with letters
and
83
17
=I'
Check
_
Chert
on p. 17
=IP
Check
Chart
on p. 17
(A)
23
S
78 _ 79
Replace bias tape casings
in wrists and waists; tack
down elastic.
79
elastic.
(F}
23
24
36
37
41
Cheek
Chart
on p. 17
34
34
44
(F)
(F)
on children's
etc.
37
clothes,
4_
blouses,
84
Stitch
Pattern
No,
SAND
STITCHING
Other
Attach.
Foot
Needle
Check
Chart
38
Thread
Tension
Adjusting
Lever
1 or2
2~6
Refer
Uses
Fill
in designs
already
or Other
embro=dery
outlined
stitch,
with
to Page
85
satin
on p. 17
38
Satin
DECORATIVE
GEOMETRIES
43
{F}
[_
Check
Chart
on p, 17
43_
54
Decorate garments with one row
_ne stitch or a combination.
2-8
81
or severat,
I
54
Satin
IF}
[_
qua
l
SHADING
STITCH
Check
Chart
55
56
2~8
1 or2
Use for free hand machine
embroidery
attractwe shading st=tab applique,
86
and
on p. 17
55
56
STRETCH
STITCH
DECORATIVE
Satin
(F)
[_
Check
Chart
39_
4t,
2_6
)ecorate
with flower
Use m combination
or Ieaf designs.
|programmable}
or singly.
!
82,
!
87 ~ 89
on p. 17
57~
I 67
Satin
(F)
45
Stitch
Pattern
MONOGRAM
Numbers,
Letters,
Period,
Foot
No.
00_
40
Other
Attach.
Needle
Check
Chart
on p. 17
Satin
Thread
Tension
2-6
Adjusting
Lever
Uses
Numbers
and
programmed
letters
in
or
sequence
I Refer to Page
sentences
for
may
fF}
!
Space
BUTTONHOLE
l
46
Bartack
1
Rounded
2
Keyhole
3
91 ~ 93
be
monogramming.
Slidlng
Buttonhole
(J)
Automatic
buttonhole
IN}
Check
Chart
on p. 1j
2~6
Buttonholes
buttonholes.
Bartaek
m three
shapes:
also corded
Rounded
Keyhole
66 _ 71
Straight Stitches
When
you
[]_
turn
on your
matJcally
set
to
o
Stitch
Straight
machine,
sew
a
[_
and
[]
it is auto-
straight
stitch
Set the Machine
10
I
+
[io---e
FDoTA ]
Th read te nsio n
2to5
H: Straight
stitch foot
The Stitch
You
can
and
ways
seam.
Three
stitch
its Uses
use your
many
To sew a strmght
besides
basic
straight
just
sewing
common
stitch
in
a straight
uses for the
7.
At
the end of the
Raise the presser foot.
2.
Raise the needle to its highest position.
8.
When
you
automatically
3.
straight
Place
the
edge
stitching
4.
Quilting
{5/8"
Js most
Draw
the
lower
of
guide
the
line
on
fabric
the
next
to
needle
may
want
to
towards
the
back
stop
sew'rag,
the
rise to its highest
needle
will
pos=tion.
a
plate
9.
and
Raise
the
presser
foot
and
remove
the
fabric,
common).
threads
seam, you
reverse to loci{ the stitch.
1.
are:
PintucMng
stitch:
10.
Cut the threads,
the presser foot,
Topstitching
ALl are discussed
_n this
5.
Press the foot
6.
Hotd
controt.
section.
the fabric
atong
the
loosely
guide
t_ne,
and gently
so
that
guide
it
it
feeds
naturally.
Do
not
force
the
fabric
or try
to
pull
it
tight,
47
e
Topstitchlng
Set the Machine
_0
I
t
+
--e root Aj
[
Thread tension
2to6
A: Zigzag foot
G.
De
Stttch
and Its Uses
Topstitching
garment
BHnd hem
stitch foot
Here's
emphasizes
and keeps
the
lines
of
your
seams and edges fiat and
1.
Lower
2,
Keep
crisp,
right
Accent
of
suits or b_ouses with
topstitching
cuffs,
Use
How
around
the
one or two
outer
rows
edges
of
fapets or collars.
the
tepstitch_ng
tacking.
Auto-Lock
and
3.
button
to secure
unsightly
the
edge
EvenJy
guide
the
the
fabric
next
to
the
A,
fabric
an even row
along this
of topstitching
edge to
3/8"
the edge.
your
back-
NOTE:
You
can
from
left
easiiy
without
under
to
adiust
right
moving
the
page for
48
of
edge of Foot
produce
from
eliminate
the presser foot,
presser
instructions,
for
your
needle
topstitching
your
fabric
foot.
See the next
from
,,
:I?_C:
f_:i_!::,::,::,:,,: .... __i(!i:!i::i:i?ii!
i¸:iiii:i:!!;_i;i;_i
'¸!::
® Position
The
the Needle for Topstitching
needle
can be positioned
to
the left,
center
and
right.
[_o --e w3.sL_.2]
[,o --e _7.0L2.2]
i _o-_
1 wo.o
1t2.23
To position
You
the needle to the left:
can move
pressing
stitch
the
width
needle
control
To position
to any position
desired
by
button.
You
can move
pressing
W 0.0 on screen _sfor _eft needle position.
NOTE:
Left
or right
Besides
types
the
the needle at the center:
stitch
the needle
width
to
any position
controt
button.
W 3.5 on screen is for center
needle
needle
position
normal
straight
of topstJtching
that
Js recommended
stitch
are better
method
for
To position
desired
of
posttiono
topstitehing,
or produce
effect.
Always
use zigzag foot
Do not
use straight
A for
stitch
foot
teft and right
H.
You
can move the
pressing
for stitching
knits
by
needle position.
the needle to the right:
stitch
width
needle
control
to
any position
button.
W 7.0 on screen is for rightneedle
edge of the fabric.
this
a more
machine
elaborate
does
other
decorative
position,
desired
by
e
Pintucking
Sat the Machine
10
I
+ [Io--- ooT
AI
Sliding guide
Guide screw
Thread
2to 6
tension
]'he Stitch
and Its Uses
Pintucks
are
together
as blouses
form
narrow
to add design
Here*s How
close
1.
Attach
interest on such items
2.
Place the folded
3,
Positson
tucks
and pillowcases,
a permanent
front
spaced
One pintuck
crease on knit
the blind
hem stitch
fabnc
foot.
under
the presser foot.
can
pants.
4.
Adjust
the needle
the sliding
t/16"
inside from
guide on the blind
the folded
hem foot
edge and lower
to the folded
the presser foot,
edge by turning
the guide screw, as
shown.
5_
Feed the folded
NOTE:
if the fabric
the upper
5O
edge smoothly
tends
tension
against
to pucker,
slightly.
hold
the stid_ng guide.
the
material
slightly
taut
while
sewing.
Also,
decrease
LEA RNTH
•
Quilting
SettheMachine
1o
i
I
+
ti
(!0-4
F00 A ]
Quitter
SCrew
Thread tension
2to 6
D:
Here's How
Quilter
To do quilting successfully, foltow
or
A:
Zigzag toot
The Stitch
is stitching
together
with
You
stitch
toot
two
batting
layers
in
of
2.
Slide
between
can use quilting
of
garments,
cuffs
and collars,
In
quilting,
you
st}tches
or stitch
on entire
such
to
add
garments
as yokes,
can
quilt
pattern
to
guide
of the presser foot
(D) into the opening
stitches you desire.
3.
Tighten
the screw.
4.
Sew the first
5.
Sew other
under
as shown.
the screw to the w_dth
between
lines of
or
NOTE:
row
rows,
of stitching.
guiding
When you are quitting
Then
quilt
from
the quilting
guide over the prevlous
large areas, tack the layers
the center
together
row of stitching.
with
the basting
stitch.
out.
for table
stitch
Another
decorative
Instead
stratght
with
quilting
quilting
pockets,
it is also popular
addition
the
screw on the back
fabric
and warmth.
parts
fashions.
Straight
Loosen the quilter
and Its Uses
Quilting
dimension
H:
1.
these simple steps:
quilting
variation:
of qui_ting
with
rows of straight
stitches,
you can bartack
your
quilt
at regular
intervals+
combinations.
Set up the
bartack.
machine
as if you were
go'rag to sew a button
(see p. 35).
Position
your
fabric
and
E STITCHES
¸¸¸7:¸¸¸¸
¸ i:
•
Gathering
NOTE;
Set the Machine
10
l
1
FootA ]
+
3.
Steps 3 and 4 are for 5/8" seam allowances.
adjust your fabric accordingly.
Sew the first
row of stitches
with
the right
For other widths,
edge of Foot
A on the edge of
the fabric.
4.
Thread tension
1 to4
6.
A:
[ lo
Here's
How
Set the stitch
2.
Loosen
the right
edge of Foot
A following
the first
gather trim skirts,
sleeves
Use two rows of stitches.
length
the needle
weight
both
hands,
pull
the
you have the gathers
Knot
the threads
Here's
fabrics
at the top,
and tight,
firm
tension
to "'2"
smocking
gathers)
to "4o0".
thread
Using
until
bobbin
threads
from
row
each end of the fabric
you want,
at each end even out the gathers.
foot
w35L40)
(for medium
1.
52
Zigzag
and Its Uses
Use this stitch
to
want more fullness.
row with
of stitches,
5.
The Stitch
Sew the second
or as desired.
or any t=me you
How
(for light
1.
Set your
stitch
2.
Secure your
3.
Stitch
4.
Do not
5.
Pull the bobbin
6.
Knot
two
weight
length
and flounces)
rows
at the beginning.
as in steps 3 and 4 for medium
lock the threads
the threads
ruffles
at "4.5"_
gathering
rows,
fabrics,
threads
at the end of your
to produce
stitching
the fullness
and even out the gathers,
weight
fabrics.
rows.
you desire.
_ :
ES
straight stretch _]
12
A I
II
H
Thread tension
2_-0 6
A:
Zigzag foot
A NOTE ON STRETCH
H:
Straight stitch foot
Stretch
stitching
fabrics
as well.
strain
The Stitch
straight
is the
stitch,
This stitch
to
be used on stretch
fabrics
and
knits,
wall on curved seams and on any garments
that
It can be used on other
will
receive
a great deal of
clothes).
and lts Uses
stitch
and stretch
was developed
It works
(ie. children's
The stretch
This
STITCHING
stretch
especially
variation
deveJoped
of
the
for knits
fabrics.
can also be used for topstitching,
back
motion
the fabric
stitch
does
isometimes
stretches.
not
actually
called
stretch
as it is being
a "reverse-action"
stitch),
sewn, but
so that
it will
is stitched
in a forward
give instead
of break
and
when
Locl_*_Matic
Seam I _
Set the Machine
" I
Thread
,2to6
For general
the fastest
it
is
reverse
the
[il z- 0oTAj
tenslon
sewing,
programmed
stitches
reverse
the tock-a-matic
stitch
stitch
to
at the
automatically
beginning
button
and
is pressed
end of a seam,
Seams are sewn quickly
54
=s
and securely.
Lower
the needle
close to the top
edge of the
fabric.
way _o sew and secure a seam.
sew
when
at the
The
machine
four
stitches
forward.
will
in
sew
reverse
four
then
stitches
continue
forward,
sewing
When
you
touch
the reverse button.
The machtne
forward
reach
the
lower
wilJ sew four
stitches,
edge
of the fabric,
reverse stitches,
then stop sewing.
four
OutlineStretch [_
Set the Machine
17
f
]7
FOOT
A
Zigzag
foot
Thread tension
3to6
A:
Blue needle No. 11
The Stitch
and Its Uses
This stitch
pattern,
stitch,
is a narrow
eliminate
Here's
a variation
stretch
of the straight
stitch
puckering
on knit
and filmy
chiffons,
designed
fabrics
to
to
seam
produce
1.
Place your
2.
Sew as you would
Helpful
and
overcast
a narrow,
seam finish,
_t can be used
at the
almost
same time
inwsible
fabric
edge on the 5f8"
a straight
seam line
in order to produce
a 5!8"
seam.
stitch.
and bias
seams.
On tricot
How:
Hints
(for
lightweight
1,
Set the pressure
adjusting
2.
To seam and overcast
fabrics)
lever at "1 '" or "2"
to
seam or
a.
Set thestitch
b°
Sew with
tricot:
width
the right
at '3"
hand stitch
falling
off the fabric
edge.
55
Set the Machine
18
Ill
[18
Ill
root
Thread tension
2 to 6
A:
Zigzag foot
Here's
G: Blind hem
stitch foot
The Stitch
and Its Uses
The saddle
foward,
fourth
You
stitch
two
stitch
stitches
NOTE:
out-fits
Adjust
effect
56
one stitch
backward,
and
suits,
with
the
1.
Sew as you would
2,
To turn
hand-worked
blazers,
the saddle
needle
you want.
Iook
stitch.
for
corners:
Lower
b.
Raise the presser foot
the needle into the fabric
c.
Lower
the presser foot
and turn
on the fourth
stitch.
the fabric.
and continue
to sew,
a
)umpers,
position
for topstitchmg.
a.
Helpful
a lovely
topstitching
and denim
with
forward.
can achieve
when
is formed
How
the
Hint
The Blind
garment,
hem
stitch
foot
is good
to use when
Just set the edge guide with
topstltching
the guide screw,
near the edge of the
i3NWr00T A 1
Thread tension
3to 8
Here's
The
A:
Zigzag toot
How
many
patterns
Consuit
The St=tch and its Uses
The zigzag stitch
and most
versatile
it can be a utility
buttonholes,
and darning.
w_th
trims,
a decorative
stitches
hemming,
on your
machine.
for sewir_g buttons.
overcasting
mending
It can also be used to decorate
appliques
stitch.
and cut-out
work
or as
this
to
the specific
section
Satin
Stitch
variations for
as a utility
Mutt_ple
[]
Stitch
Zigzag
Overedge
Stitch
Seam
[]
[]
[]
[]
stitch
or as the width
:
Overcasting
Knit
sew a zigzag
this machine
The z_gzag stitch
is one of the most common
stitch
ways
on
stitch
detailed
are as varied
and length
as the stitch
settings
allow.
directions.
has several
variations,
discussed
in
Satin Stitch
set the Machine
13
t j3/vv_
A J
FOOT
Zigzag w{dth:
1
1.5
Stitch
length:
1
2
2.5
3
4.5
3.5
<
<
(
Thread tension
3to8
Pressure Adjusting
1 or2
3
Lever:
>-
< <
<
<
or
A:
Zigzag
\
F.
foot
Satin stitch foot
Close to 0
Defeutt
Stitch w_dth Stitch Length:
as desired
02 to 1.0
{or as desired)
The Stitch
and Its Uses
The Satin
stitch
decorative
overcast
linens,
The
stitch,
a raw
Satin
but
stitches
[]
used
it Can also be used to
example,
is especiailV
is the
to
and often
_
basis for
Once
the
blankets,
your
fabric
weight
and napkins).
stitch
and
58
is a versatile
edge (for
tablecloths
applique
Here's How
attractive
geometric
on this machine,
in
is set up to stitch,
are planning
fabrics.
Otherwise,
the
machine
you
stitch
as usual.
to use.
you may want
Too tight
to experiment
a satin stitch
on a scrap of
may pucker
some light
•
Overcasting
Stitch
set the Machine
13
FootA ]
113
Thread tension
3to 6
NOTE:
C:
These
wires keep light
from
rolling
Overedge foot
medium
The Stitch
Thts
and its Uses
zigzag
garment
variation
is
construction
and
edges of any sewing
proiect.
very
useful
in finishing
in
raw
The
machine
The
black
loose threads
3.
ridge and brush
wires
the
on
overedge
edge neat and the fabric
guide
fabric
stitch
and
over
For overcasting
hold
flat.
brush
in so thatthe
fabric
and
You
your
fabrtc
so
and the guide
foot
keep
4.
the
sew,
be
against
these
wilf
wires.
keep
that
the
you
fabric
by
The
guides
double
1.
the
the black
stop
fabric
fabric
ridge
sewing,
it
will
if you pull
the raw
edge of the seam
Start
the
fold
by
sliding
it
under
the
needle.
needle can stitch
sure your
drawing
fabric:
needle and Ioweringthe
edge
the
catch
it toward
your
needle
presser
foot
_s in the
lef_._!t
and brush
remove
to
Be sure
position.
2,
When
out.
straight.
can also fold
NOTE:
As you
folded
and overcast.
guide.
The black
Place
wilf
ridge
pushes
2.
weight
weight
a ridge
over them.
Here's How
1.
into
back
the
and
on the wtre
Lower
the
guide wires
3.
Fold
feed
the
so
that
both
are on the fabric.
fabric
to the
it into the machine
taft 1/8"
as you
and stitch.
you.
wires come to the edge.
Helpful
Start
Hints
overcasting
the fabr)c
about
wilt bunch
1/8"
inside
the raw corner
up and the stitches
wilt become
of your
tangled.
seam.
if you start
right
at the edge,
•
Mending
[]
Set the Machine
14
14
Thread
3to 6
......
FOOT
A]
tension
Here's How
A:
The Stitch
The
mending
nation
sewing
repairing
--
finishing
--sewing
d rapery
6O
patches
is a comb-
stitch.
Use the
you
would
use
stitch.
stitch
zigzag
straight
It
and is flatter
The mending
--
multiple
and
everywhere
zigzag
elasticity,
its Uses
or
zigzag
mending
basic
and
Zigzag foot
has
more
than a regular
ts especially
smoothly
straight
the
strength,
ztgzag.
useful
for:
and securely.
tears.
seams on terrycloth.
bar
tacks
pleats,
for
belt
loops
and
to Repair
Straight
--
position
Cornered
-
stitch
a Tear:
the tear under
from
the needle so that
each end to the center.
the stitching
Use a piece of fabric
will
catch
under
bgth
sides.
the tear to reinforce
your
mending,
•
Overedge Seam
[]
Sat the Machine
_5 _
i5
_
FO0_
i ill !ili i!iiii:¸
Thread _ens_on
3_o 7
_Black
ridge and
brush guide
C:
Overedge foot
The Stitch and its Uses
This stitch
pattern
the
stitches,
to
zigzag
stitch
and
combines
using
overcast
It also is a stretch stitch
for
knits
and
Here's
ext]a
the straight
the
overedge
seams
in
one
_o provide
strength
and
under
step.
black
2.
woven
fabrics.
Use
your
stitch
when
you
want
_when
attaching
a narrow
ribbing)
woven
fabrics
or on
where
so that
wire
guides
ridge and brush
Gently
edges
guide
the
atways
the raw
and
edges fit
touch
the
guide.
fabric
touch
so that
the
btack
the
raw
ridge
and
guide,
a narrow
that you do not have to press open
It is ideat for 1/4"
seams on knits
heavyweight
fabric
the
brush
this
seam
#lot.
Place
foot,
elastictty
for
1.
How
medium
NOTE',
to
you want
seam.
When
sewing
tunder
arms,
presser
foot
thickness
raise the
the hump
and keep stitches
over
bunching,
you
etc.)
to ease the presser
from
drawing
several
slightly
foot
When
by
over
in crotch,
stop
it to
fabric
or stitching
guides
if you pull
sewing,
the
will
remove
back
catch
it toward
the fabric
and
you,
out.
on the
The
wire
Knit Stitch
[]
•
Double
Edge Zigzag
Set the Machine
[_
Set the Machine
20
27
l!
,00,A
I27
Thread tension
3to 6
Footc )
Thread tension
3to7
Btack ridge and
brush guide
A:
Zigzag toot
Set the pressure
adjusting
so that
wilt retain
the
knit
you are sewing.
lever to "1 ",
its shape as
C. Overedge foot
The Stitch
This
and Its Uses
knit
stitch
swimwear
amount
is ideal
and
because
it
The Stitch
for sewing
stretch
provides
of elasticity
Th_s
velour,
the
fabrics
greatest
2.
Place
your
5/8"
seam.
Trim
the
to
allow
seam allowance
a
after
sewing,
NOTE:
Be careful
stitches.
62
not
to
that
can
tend
be
to
used
fray
and gabardines.
Here's How
for
sewing
extensively
Two
cut the
rows
of
simultaneously
to
insure
rave|.
and strength.
fabnc
stitch
such as linens
Here's How
1.
and Its Uses
that
zigzag,
sewn
your
stitches
over
seams
are
the edge
will
not
® Rick-Rack
Stretch
[]
set the Machine
32
FootA}
Thread tension
2to 6
A;
Zigzag foot
or
F
The Stitch
and its Uses
Sew on stretch
might
This
stitch
Satin stitch
foot
fabrics
in any area that
you
use a zigzag stitch.
stitch
can
be used
as a decorative
top
as welf.
63
A_tomaticD ar_ing
:_
Set the Machine
29
[29
FOOTj ]
Thread tension
2to6
\
Start
mark
J:
The
machine
Sliding buttonhole
foot
automatically
darns
rips
and
holes.
Large and smatl holes can be mended
quickly
and easily
Buttonhole
securely
For extra
pin
while
this unique
J is used to hotd
stitch.
the fabric
darning.
support
or strengthening
or baste a backing
under
64
foot
with
fabric
the hole to be darned.
the darn
such as organdy
Push foot
slide back,
Press down the foot control
The
machine will lock the stitches, sew
t6 rows of darning, lock the stitches
and stop automaticalIy.
Keep the foot
the machine
control
depressed
stops sewing.
until
For
other
extra
reinforced
The
(4/5")
strength
work
clothes
as shown
finished
long
darn
by 0.7
If hole is larger,
sew additional
hole ]s covered.
on
the
blue
jeans or
darn
can be
aboye.
measures
cm
move
darning
2.0
(114")
the fabric
units
cm
wide.
and
unti_ the
e Darning Small Rips
= Adjusting
Evenness of Darning
[29
I
d3!
U_ULi
%
J_
Small
rips can
the machine
Begin
be repaired
the first
machine
by programming
to sew a shorter
row
when
of the
When the left side
is _ower
darn.
darn stopping
you reach the bottom
When the right side
is _ower.
Select dl or d2 to
give
the
an even
stitch,
Select d4 or dSte
give an even stitch.
edge of
the rtp. For example,
you may on|y need to
sew 5 stitches.
Press the reverse button
but
do
not
hold
complete
the
it.
The
machine
16 rows with
will
5 stitches
now
129
}n each
m d21
row and stop automatically.
It is simple
the first
Press
darning
of same size as
ff there
memory
completed
Depress
to make a darning
one.
button
the first
the
when
you
have
_s a difference
point
(right
Press
_
Upon
pressing
m height
side) of darning,
between
the starting
make adjustment
point
by pressing
the
(left
C_
side) and the end
or C_3 button,
darning.
foot
control.
For
a second
button,
and adjust
between
dl
and dS.
of the same size.
Pressing
mirror
memory
button
the darning
image
will
is made
instead
of
give the same result
but
in the
button
reverse sequence.
the
_
button
the selection
is displayed
on the screen.
Set the Machine
_]
Buttonholder
[_ B,t Foot,. j_
Thread tension
2to6
N:
Automatic
buttonhole
foot
. a. Press the
Button
highest
_ULLLj
=rE:> B,2 FOOT
N
Rounded
Up!Down
to
raise
Needle
the
needle
Position
to
its
Draw
Lower
thepresser
foot.
Open the button
holder
c.
Remove
the foot
e, Place the
d.
Attach
the
by
holder.
automatic
tightening
buttonhole
the foot
holder
automatic
f.
buttonhole
three
The
to
meet
buttonholes
you
every sewing
buttonhole
the buttonhole
Before
different
types
need.
foot
will
NOTE:
If
sew
buttonholes
several
on
practice
holes on a scrap of the same fabric.
the
of
foot
of the holder
thickness
thickness
AIt
the
button
of
to
the foot,
it back as shown
use on the
button
above.
holder
of the
N.
towards
button
you to secure the button.
is more
end diameter
Add
thickness
setting,
Oiameter
actual
,1%,,
_
L_]-- easu,o
is 2 cm
in thickness,
Thickness
gauge
button-
If
(3/16")
2.5 cm {31/32"1
66
the
intend
under
mark.
than
0.4
cm
and set the button
(3/16"),
holder
as
shown.
length.
make
the left
by pulling
you
buttonhole
measure
are made in the same way.
automatic
garment,
three
button
Press the back
EXAMPLE:
sews
toward
the needle to the bottom
d.
=L=0B,3Foot,!
machine
threads
Lower
c.
screw.
The
both
b.
b. Raise the presser foot,
foot
position,
2. a.
and
(3/4")
set the
diameter.
in diameter
measure
And
2,5
and
0.5
cm
cm (31/32"),
use the sum for the
]-L_
STEP
2 !-[ ca sTEP
;
]--]
|
J
i
I
I
RAISEFOOT
[
3.
Depress
machine
the foot
stops
control
and
keep depressed
the
4. To
by itself,
will
be automatically
bartack
row
first,
and left
then
sewn:
the right
bartack.
will
sew
beginning
The buttonhole
The machine
until
stop automatically.
of
the
depress the foot
the front
row and back
another
*
To
reinforce
depress
foot
the
buttonhole
buttonhole
PRESS BHI KEY
or
to
press the
I
start
from
the
key
BH1,
then
5, Cut
the
opener
opening
m your
with
accessory
the
buttonhole
box.
control,
buttonhole
control
or make
again without
it denser
raising
stmply
the button-
hole foot.
67
e
Adjust
Stitch
the Stitch Width
and Density
Width:
Stitch
[r'-i
Density
11-"1
ws. o LO.41
__!
[__
f
in Entire
t
r
Buttonhole:
WS.0 LO.4]
____I
[__
D H
H I
Fine
stitches
The
width,
Press
stitch
"+"
of the entire
68
width
it is pre-set
or "--"
button
controls
the
stitch
at "5.0"
to
buttonhole.
adjust
The
stitch
density.
the
stitch
width
Press "+"
Coarse
stitches
length
button
It is pre-set
or "-"
of the entire
controls
the
stitch
at "0.4",
to adjust
buttonhole.
the stitch
density
Manual Bu_Onhoii:ng _
Set the Machine
[ _J step
Thread
2to6
A\
the
buttonhole
I -.--Is EPi
_]
tension
J:
Sliding buttonhole
to at
(_) a. Carefully
your
Sen_or_
mark
Insert
Do
not
any
other
put
finger,
object
sensor when
us{n0
the
sewJrlg
sliding
Otherwise
pattern
to the next
screw
buttonholes
buttonhole
the
sewing
indicator
steps.
driver
near or under
or
the
by
foot
J.
procedure
in
may
b.
c.
on
garment
buttonhole
under
marking
Slide both
threads
Move
slider
the
mark
foot.
the foot
The
machine
will
barrack
and
sew up the
left
running
with the
toward
Stop
the machine
at the top mark.
you.
to the left.
(A) away
from
the
bottom
start
mark
Line
up the
markings
bottom
mark
on your
garment.
Lower
the
presser
foot
(bar-tack}
(_
side of the buttonhole.
to the sliding
the
buttonhole
(_) a,
length
garment.
b, Change
e.
NOTE:
]
you
{C) on the slider
so that
meets the
/B).
on
the foot
and
with the
press
BH1
button.
advance
NOTE:
The
markings
on the
slider
are made
in
cenf_meters.
69
e
[_
(_) Press the memory
The
machine
down
Stop
directly
[
SIEP2
the right
the
button.
will
(_) Press the memory
bartack
and
sew
side.
The machine
of
machine
opposite
when
the
sTEp
first
you
are
stitch
the
the
will
buttonhole
foot
the machine
control
stops
Stitch
Density
on One Side
}
button,
autoqock
the end
and stop.
Keep
depressed
until
by rtself.
on the left hand side.
For Condition
Left
Side
A:
For Condition
Stitches
too
Far
Apart
(see above).
Turn
the
balance
dial
"+"
feed
Use
large
driver
in your
accessory
After
adjusting
your
adjustment
the
Stitches
too
the
slightly
Turn
screw
the
toward
Far
Apart
!
feed
balance
dial
slightly
buttonhole
to
be sure
mark
( _
"° '°
box,
feed
balance
dial,
sew another
test
_scorrect.
Remember
when
70
Side
(see above).
toward
NOTE:
Ri{Jht
B:
to return
the feed balance
you have completed
dial to the standard
the buttonholes,
)
Setthe Machine
Th rood ten,ion
2to6
Use
this
achieve
procedure
a taifored,
when
more
you
attraetwe
want
to
raised
1.
With
2.
Bring the ends toward
3.
Hook
4.
Lower
5.
Sew the buttonhole
buttonhole.
Use fitler
cord
(at least
75 inches
thread).
Try a practice
buttonhole
first.
of heavy
the buttonho{e
the fitter
cord
foot
raised, hook
you under
into
the forks
according
6_
Remove
7.
Pul{ the right
8.
Thread
NOTE:
the fabric
from
the end through
foot
on the front
where
sewing
will
needle,
spur at the back of the buttonhole
clear the front
to hold them
end.
tight.
wil_ start and lower
instructions
foot.
the foot.
on p. 69 to 70.
be sewn over the cord.
end cut the sewing
cord to tighten
they
of the J foot
to the buttonhole
a darning
until
the buttonhole
and the bartacks
the machine
end of the f{ller
cord on the cord
the buttonhole
the needJe into the garment
Each side of the buttonhole
the filler
threads.
it.
draw
to the bottom
side of the fabric
end cut.
To ad|ust stitch density, see p, 70.
71
H_imingla_d
E_ging Stitches
:_:
and []
Set the Machine
16
2I
22
28
30
31
G
A or F
A or F
G
F
F
28
Foot
Thread tension
2to6
The Stitches
Blind
Gt 8]imd hem stitch foot
covered
Hem Stitch
Shell Stitch
Scallop
WS,0
L2.0]
Stitch width:
Applique
....
5.0
Hemming
napkins
careful
hand
finished
look.
The
machine
much
dreamed
72
and
and
faster
YI :Z
Edging
craft
can
end
possible.
garments,
items
sewing
has
to produce
do
more
j
these
tablecloths,
often
precision
precisely
required
a professional,
than
stitches
you
ever
[]
(stretch}
are:
[]
[]
Stitch
Cut-OutWork
[ 28
in this section
[]
and
Edging
[]
and
[]
[]
[]
and
[]
Blind
Hem Stitch
(stretch)
[]
•
Blind
Hem Stitch
(woven)
Set the Machine
1/8-
28
Foot
a
Thread tenspon
2to 6
Light Weight Fabric
t/8"
to 2/8"
,_-_
:
_!
When the
needle
comes
_.
to the
screw
right
G.
Blind
ham
stitch
foot
Heavy Weight Fabric
J
The Stitches
and Their
The stretch
Blind
used
for
stronger
Hem
stretch
and
Uses
Stitch
fabrics
more
Here's How
elastic
_
is to be
because
It
of the
blind
is the
1,
Finish
the raw edge of your
2.
Measure,
turn
up your
hem any way you des=re.
(See Overcasting,
p, 59}
hem and pin,
hem
NOTE:
stitches,
3,
For light
Fold
the
weight
material
fabncs,
(Bottom
you may need a double
side out)
fold.
on the edge to be stitched
as shown,
leaving
1/8"
of the finished
hem edge
showing.
NO
=:'
.____:
4,
Turn
5,
Place the fold
NO
YES
the sliding
The
6.
long
guide
screw so that the stiding
of the hem against
zigzag
stitch
should
the sliding
barely
edge,
See at left for proper stitch
After
hemming,
press both
pierce
guide
is very close (1/16"}
guide so that
the folded
enough
blind
for woven
hem stitch
fabrics.
_
sides of the finished
hem,
is strong
Helpful
Hemming
Reduce
Hint
Thtn
pressure
Fabrics:
on the presser foot
extending
edge of the fabric,
edge shows
but
hem foot,
on the right,
still sew on the
1/8"
extended
apperance.
stitches.
The regular
the I/8"
to the left side of the bfind
to avoid
a distinct
line,
The right
side of the
garment
will
show only
the
blind
e Shell Stitch
[]
Set the Machine
28
FOOT
G
]
Thread tension
6to9
Woven
F-
Satin
stitch
Fabrics
foot
Here's How
[ 28
w5.0
Stitch width:
The Stitch
and its Uses
The Shell
Stitch
1.
L2.0 j
4.0 to 6,0
stitching
Shell
by sewing
Several
a blind
stitching
can be used to
Shell
tucking
tucks
on blouses
set the stitch
--
you may need to tighten
--
allow
the
width
needle
and length
as you des=re,
the top thread
to just
clear
the
slightly.
folded
edge of the
fabric
You can sew Shell
finish
hems,
openings.
can be used to create scalloped
and lingerie.
If you sew rows of sheil stitches,
space the rows
1/2"
apart.
rows of shell
are called shell tucks.
sleeve and neck
74
is formed
fabric,
--
zigzags,
2,
hem over folded
For best effect
Stitch
on knits
or soft silky
wovens
m any direction.
when
It
EAR N :T H E Sl
e
Scallop Stitch
[]
and
_2_
Set the Machine
21
)
[21
Foot^
Thread tension
3to 6
A:
Z_gzag foot
Here's How
or
1.
Sew your
2.
After
scattops
stitching,
at least 3/8"
trim
fabric
from
the folded
close to the
stitching.
a tear-away
backing
edge.
Be careful
not to cut the
th read.
Helpful
The St=tch and Its Uses
For thin
Use this
attractive
scaf!op
edges
projects,
such
mats,
on
You
thin
single
of
for support
can also
decorative
or
as collars,
fabrics,
stitch
decorate
can create
layer
backing
You
or
scaltop
pockets
w_th
whiie
create
or place-
layer
using
For hemlines
of fabric
with
for support
while
stitching.
and sleeves:
Use a tear-away
appearance
a
fabrics:
Use a single
sewing
as chiffon,
fabric
use this
your
a delicate
such
to
Hints
a
tear-away
For collars,
backing,
pockets
Place interfacing
if necessary.
or craft
between
projects:
the layers
of fabric
to provide
stiffness.
stitching,
scallop
stitch
edg_ngs on the hemlines
to sew
of dresses
s_eeves,
75
•
Cut-Out
Work
Edging and Applique
[]
and
[]
Set the Machine
30
(30
Foot }
.t
!'
Thread
2to
tension
Pressure Adjusting
Lever:
Here's How
F
1.
Satin stitch
foot
......
Cut-Out
Work
uses for
this stitch,
provide
edging
including
and
on
placemats,
Applique
but
,)
are the
major
sewing
blankets,
proiects,
collars0 cuffs
Cut the
interfacing
or baste the
sew
around
NOTE:
weight
slightly
1.
interfacing
applique,
smaller
than
2.
applique
each
r_
or
piece
in place and
with
a simple
on
Place
a piece
NOTE:
[],
You
3.
Baste
design
and
side
of tulle
trace
the
of the fabric.
or organdy
under
and pin in place.
may
want
the
to use a contrasting
to accent
your
layers together,
outside
the outline.
Stitch
around
pattern
[]
work.
stitching
Remove
just
the pins.
You may also use a satin stitch.
When sewing
curves,
the
fabric,
turn
the fabric.
Lower
raise
the
the presser foot
leave the needle
presser
foot
in
and
NOTE:
You
stitch
and stitch.
5.
Remove
inside the
the
design,
or
may
using
stitch
[],
also
use a narrow
satin
(see p. 58).
basting
design
using embroidery
76
Work
the right
insert fabric
4.
5.
Choose
outline
stitch
and pockets.
4,
For Cut-Out
the design
pieces.
Tape
pattern
it can also be used to
many
heavy
Here's How-
each piece of your
the design
3.
and Its Uses
For Applique
Use a fusible
behind
2.
The Stitch
-
and
cut
the
fabric
close to the stitching,
scissors.
tESI,
Reinforcing stitches
•
Feather
i
and
Stitch
o
Set the Machine
e_
i'
1;'
•
•
•
6
25
}
FOOT A
25
]
_:I,
Thread tension
2to 6
Ly
:
•
5,
'
ID
Q:
•
t
•
•
e
Q
0
The Stitch
This
it
stitch
A: Zigzag foot
and its Uses
is strong,
can reinforce
You
can
ments
You
or
use it
to
and decorative.
woven
sew spandex
decoratively
may also
and
use this
fabrics.
0
:
°o°,
Here's
useful
stretch
°
0:
!
_
•
0
1.
How
Sew this pattern on a seam that
already joined and pressed fiat.
2,
_s
Butt
this
two
stitch
folded
edges together
to ioin
them.
and use
undergar-
hem
elastic
stitch
in patchwork
fabric.
quilting.
77
e
Fagoting
Stitch
Sat the Machine
33
[33
Thread
3to 8
Fo0T
tension
1/8"
Paper
J
Here's
F
1.
Satin stJlch toot
How
Fold
under
each
fabric
edge
t/2"
and
press,
The Stitch
Use this stitch
create
an
design
For
2.
and Its Uses
to join
open
two
work
pieces of fabric
appearance
and
backing
to
add
3.
interest.
other
fagoting,
(p. 77).
stitches
see stitch
Sew
that
patterns
may
[]
be
used
and
edges to paper
1/8"
or tearaway
apart.
slowly,
needle
guiding
catches
the
the folded
fabric
so the
edge on each
side,
in
[]
Helpful
You
"'7.0"
78
Pin the two
Hint
may
want
to
for maximum
set the
effect.
stitch
width
on
e
Elastic Casing Stitch
[]
e
Elastic Stretch
Set the Machine
Stitch
[]
Set the Machine
35
33
toot F]
[15
root
Thregd tension
3to 6
Thread tension
3to 8
A:
Zigzag toot
or
Here's How
1.
F
Satin stitch foot
Slide
a piece
under
the
through
The Stitch
stitch
_n such
areas as wrists
children's
hetpfut,
to replace
clothing,
because
bias tape casings
and
this stitch
it reduces
1/8"
the
slot
elastic
then
in
waists.
2.
In
Foot
The Stitch
elastic on the bottom
side
the
fabric,
gent{y to avoid
the elastic.
is especially
bulk.
3.
Pull
fabric
pulling
sewing
on the elastic
and bartack
Satin stitch
toot
F
Sew the
of
F
up
(sa'cm stitch).
and Its Uses
Use this
of
foot,
Choose
it
and Its Uses
this
stitch
to
attach
elastic
to
garments.
through
Here's How
to gather
at both
the
ends.
Mark
the
elastic
and match
front,
into
these
center
quarters
to the
back
center
and
side
seams,
Place the
middle
of the elastic
under
the center
of the presser
foot
and
making
evenly
stitch
sure
the
into
place,
elastic
is
distributed.
79
f
Set
the
Machine
Additional
spool pro
4O
t t
40
FO01
Turn
off
twin
needle,
and
unplug
spool
on it with
Press the twin
FI
the machine
Insert
the
before
additional
the thread
changing
spool
comming
pin,
the needle
and
off the spool
put
the
to the
felt
and
as shown.
needle button,
Spool
pin
Thread te ns_on
3to7
A:
Zigzag foot
or
When threading
making
the
machine
sure you separete
on the sides of the needle
F
Satin stitch toot
===8===========
Threading
from
(_)
for
twin
the threads,
needle
sewing
plamng
follow
this chart
one m each thread
guide
bar,
to
(_
is the same as for single thread.
Refer to
page 21.
Twin needte
®
Draw
the
threads
down
and
slide them
through
the lower
thread
guide.
@ Slide
left,
®
one of the threads
and the other
Thread
the needle from
At corners,
Partially
When
NOTE;
needle
guide on the
sewing
they c_ear the fabric.
and carefully
is completed,
pivot
change
the fabric.
needle
and
reset
if necessary.
to single
off the power
To
avoid
machine
8O
the needle bar thread
to back,
raise the presser foot
To return
turn
front
raise the needle till
twin
tension
through
one on the r_ght.
the
needle sewing,
press the Twin
Needle button
or
switch.
thread
one thread
twisting,
at a tlme_
]t is advisable
to
thread
the
:;
:71
Decorate with Geometric Patterns
Set the Machine
49
FootF I
{49
Thread tension
2to 8
F
Satin stitch toot
.............
Here's
I.
How
Helpful
Adjust
the
stitch
width
and
length
as
You
These stttches
You
and Their
width
Experiment
special
effects
to combine
stitches
2.
Practice
stitches.
See
3.
Mark
the
fabric,
using a washable
4.
Lower
the needle
5.
Lower
the presser foot.
lines
on a scrap of fabric.
for
decoration
on
fabnc
the
Patterns"
with
these geometric
other
"Programming
(p.
87 _
90)
decorative
Decorative
for
detailed
instructions.
marker.
at the starting
pmnt.
Uses
ere purely decorative.
can sew one row
stitch
want
decorative
Stitch
The Stitches
may
you desire.
the stitch
J
Hint
and
or several
length
on a scrap
for
or vary the
special
of fabric
6.
effects.
to see whet
Lock
the
stitch
at the
beginning
{press
auto-lock),
7.
Gently
marked
are possible.
8.
Use the
stitches
guide
the
fabric
along
the
line.
auto-lock
to secure the
row
of
at the end.
81
The Stitches
Decorative
touch
82
and Their
stretch
to the items
Uses
patterns
can
be used for
you sew for your
home
adding
and family.
creative
and personalized
Cross Stitch
[]
Set the Machine
34
Foot l
f34
Center
Thread
2to6
tension
F
The Stitch
You
and its Uses
can make
embroidery
it would
can
other
numbers
sewing
designs
pattern,
if embroidered
combine
decorative
for
Here's How
beautiful
stitch
take
also
Satin stitch toot
cross
with
th_s
the
and
sampters
You
with
Choose
wool
2.
the
letters
and
1,
time
bV hand.
stitches
patterns
attractive
in half
For Cross-Stitching
if
a plain
flannel
you
fabric
close
weave
fabric
for the background
choose
backing
light
weight
such
as linen
or
1.
fabric,
fabric,
Start
first
use a tear away
2.
in the
row,
Then
Without
center
letting
count
a Pattern:
ofthe
design
the fabric
the
next
and sew the
feed naturally.
row
of
stitches
to
the
left or right.
for support.
or
other
3,
projects.
4.
5,
Ad!ust
the stitch
match
the pattern
Find
the
center
border,
choose
Count
the
program
width
of the
a starting
cross
stitches
design,
Use Auto-Lock
as you
desire to
3,
from
Add
or delete
button
or if the design
ts a
4,
point.
Begin
each row
corner
the
center
up and
B.
Single
stitches
by pressing
the
Clear
and reprogramming.
Use the
by lowering
of a previous
placement
insure straight,
the number,
(See p, 90, Pattern
For example:
and |ength
you have or plan.
the
needle
at the
stitch,
arrow
'" L_ " on Foot
F to
even rows.
Units.)
to begin and end,
For 2 cross stitches.
83
_is_cki_!i!i__ii
_i_!_i:
¸;_ ii_!i
i¸_'iiii_
_
i_:_i_i
_ _.__i
_
Stepi
{1 to 6)
Step li {7to8)
Sat the Machine
36
318"
2to6Thread
tension
or
A;
Zigzag toot
Here's
F"
Satin stitch
foot
How
1.
Choose
2.
Cut the fabric
3,
Set
a soft.
the
gathering
NOTE:
The Stitches
Smocking
or children's
and Their
is a delicate
clothes
Uses
decorative
or women's
fabric
three
the finished
stitch
times
Length
stitches
Loosen
apart
gingham
or challis.
width.
button
at
"4.5"
and
sew
rows
of
straight
across the area to be smocked.
the needle thread
the threads
such as batiste,
control
3/8"
4.
Knot
5.
Pufl the bobbin
6.
Secure the threads at the other
7.
Sew the decorative
8.
Pul_ outthe
tension
to make gathering
easier.
atong the edge.
threads
and distribute
the gathers eveniy.
treatment
blouses.
Helpfuf
Hint
These
stitches
you desire,
84
lightweight
stitches
gathering
end,
of your
chmce
between
the gathering
stitches.
stitches.
can be used
in combination
with
others
for
any decorative
effect
Set the Mach ine
F
FOOT
]
Thread tension
2to 6
Pressure Adjusting
I or2
F:
The Stitch
The
Lever:
Satin stitch
foot
Here's How
and Its Uses
sand stitch
fTIIs in outlined
embroidery
1.
Outilne
the
pattern
with
a Satin
Stitch
designs,
Set stitch
Set
stitch
width
at "1.5",
length
at
"0.3"
or
as you
desire,
2.
3.
FiJt in the design with the sand stftch.
Decrease
the stitch
width
to fill
in small
spaces.
4.
Sew
the
m rows,
pattern
starting
is filled
at the edge,
until
in.
85
Set the Machine
Pattern
55
56
Thread
2to8
tensio n
Pressure Adiust]ng
1 or2
F
The Stitches
These
neat|y
and Their
stitches
can
outline
apptiques
embroidered
create
motifs.
Satin stitch
toot
Here°s How
Uses
be used to
designs.
and
Lever:
quickly
Use them
your
own
and
to enhance
Draw'the
iron-on
destgn
on the
mterfac}ng
right
beneath
of the
fabric.
for support
Place a tear away
backing
or
where necessary,
machine
Use the
achieve
automatic
a desired
settings
effect,
and you may need to pivot
A second
row
row for a more
86
side
the fabric
or manually
Reduce
the
the stitch
to facilitate
length and
sewing
width
curved
to
areas
on sharp curves.
in the same or varied
pronounced
adjust
pressure
outline.
thread
color can be sewn
inside
the
first
•
61
F_
One Cycle Stitching
®_
Pro,sMomo_.[o
(_
Press the stitch
El
pattern.
Thread tension
2to6
I
'_
!
61
1
L--Cursor
F
Sad n stitch foot
See the Pattern
Single
Unit
Chart.
You will
sew one flower.
NOTE:
The machine will sew a single pattern each time the foot control is depressed,
Do not release the foot control until the machine stops automatically.
87
e
Two
Cycle Stitching
®®
Prosstho
Auto-Lock.
]
To sew two
the stitch
NOTE:
of
any stitch
pattern
Continue
pattern,
press the memory
button
tw)ce
after selecting
numbers.
to
press the
foot
control
until
the machine
stops
automati-
cally.
(_)
Press
thestitch
pattern.
[
(_) 5/
Press
the next stitch pattern.
[ ®
® [_
Press
Momory.
[ _,5_{51
DO_f,ash
(_)
Press the stitch
I
C,
59
{51
5 9 4- flash
[
0
59
{51
59
(_)
S_
.___
_
(_)
pattern.
Press Memory.
E /
Press the stitch
pattern.
G, 5 9
[
59
]
6 I w- flash
]
DD_"_ashj
To repeat
Q
5 9
{5 1
5 9
{5 1 --]flash
6 i
59
{51
°0
{5!
59
6I
,.O _-_flash
6'
59
61
O
*
_)
_)
88
Press Memory.
<-59
_-_
Press the Auto-Lock.
[e
59
[_
Press Memory.
[4-59
_- _lash
!
the
after stitching
("
*-
same
combination
the first
"means
more
of stitches,
just
press the
foot
combination.
memorized
patterns
exist
before
pattern
59.
control
again
Cycle Stitching
by Pressing Mirror
image Button
= Test Sewing Pattern Combinations
Step
r
Programmed
patterns
_
Press the Auto-Lock.
®®
®
Press Memory.
El
Press the stitch
@¥
Press Memory.
®®
Press Memory,
pattern.
Press Mirror
image,
Press Mirror
image,
_-_
To
Start
Sewing
at
the
Beginning
of
Your
To
Pattern
Press the Auto-Lock,
_
There
may
pattern
w_thout
Saw
Press Memory,
be
as much
instances
sewing
when
you
want
to
test
After
selecting
button,
in mirror
the
patterns
same number
image.
and
of
pressing the
pattecns
will
_°_C_ 1
be sewn
as necessary
then
a
If you
press
the
Memory
pattern
will
now
start
combination,
sewing
run
Remove
Lower
machine
of your
Sewing
at the
out
of
press the Mirror
all the patterns,
button,
The
Start
Beginning
of the
Pattern
You
Have Been Sewing:
Combination:
®
Programmed
patterns
at the
beginning
thread
the stitching
the
in the
middle
of a pattern,
Image Button.
needle
of the last pattern
at the
end
of
the
only.
last
completed
pattern,
T_ne machine
pattern
of thread
you
will
start
sewi6g.at
have been sewtng
and continue
sewing
the
when
beginning
you
of the
have run out
the remaining
patterns,
89
•
Pattern Single Umts
(Aid to Programming)
23
24
25
!
26--
*
Up to 31 patterns
*
The f°H°wmg
cannot
*
patterns
I
U
be used in programmed
The following
The foot
03
>
can be programmed
in the memory.
11 BH1 BH2 BH3 19 29
patterns
control
only
sewing.
a single pattern
each trine.
{K64
27
Jt 28--"
30'
31
38
32
39
40
41
42
_jJ
76
77
H 78
79
. _
*
90
The autoqock
stitch
is not
programmed
on above patterns,
80
)°X::))° 55
56
72
65
66
67
68
69
!
sewing.
are one-point
is depressed,
_)
70
71
is sewn
Memory Lock Alphabet and Numbers
Your
machine
(letters,
Each
numbers,
letter
threads.
will
sew the
punctuation
and number
The chart
26 letters
below
marks
is automatically
shows
where
of the alphabet
and numbers
in block
and script
styles,
Up to 31 patterns
end spaces) can be programmed.
locked at the beginning
to clip the extra threads,
The
and end enabling
Each pattern
Memory
start
you to remove
at " © '"
the connecting
lock
patterns:
patterns
shown
at the beginning
Use
_em
combine
alone
them
below
are automatically
and end of the
as a
with
single
letters,
locked
pattern.
design
numbers
on
a shirt
and other
or
craft
patterns.
f
91
•
•
Combining Letters in Block Style
Combining
Step
Step
_'_--,*
®
Large and Small Letters
----
R
FOOT
® t_::-_I---[°FOOT
[,_ ,t,
F
2B
-----[S
S
®
@
(_
22
(_
M
[_
--
22
(/3
tB
_fl
1
---
M
®
tB
I
F ]
_qF)_- flash
[-
]
_ 1t
_flash
®
@
-[
FOOT
F]
( I'| _ Ill )
----[
S I40 _- flash
]
---[
SMI
]
flash (I_)
SMIO_
®
29
®
7"
@
H
SMITO
_ flash
S 141 TH
_-flash ( T _ _I)
---[
J
]
@
k.
92
S 14_1THE] -_ flash
j
SI41TO_
flash.
]
l?
H
+-flash (H_)
@
....J
T
---[.
I?
]:
2B
"Lflash ( T "*" _ )
®
flash
oo
o
_- flash ( H _- _ )
----
=_MITHF]_-
flash
J
e
Combining
Letters
in Script
Style.
Step
FOOT
Q
2;
....
[ P
F 0 LqT____.
_"
® [_
---I
P E] _
®
---[
P ,
_
® _---[
®
®
®
_E
---[
® _---!
@
2e
flash
---
[
]
"_ flash
P • [3_
2B ---[
F]
flash
]
P,
S -_ flash
j
P,
S [3 *-
]
P.
S • +-flash
j
P,
-q" •
]
_
flash
"_ flash
P • S • H *-
___[ P ,
S , 1"1_ _
flash
I
@
---
P,
S . H • _
flash
]
P,
S
[
,
1"1 • [_
D
]
flash
0 [_
3E
O
flash
]
93
e Checking and Editing You r Program
(Example)
When patterns "A, B, C, D, E, F, G, H, i, J, K, L, M, N, 0" are memorized.
The iiquld crystal display will shown
*
Check pattern combination before sewing.
Q
[
*- flash
®
button,
more
Move the cursor
control
[
flash
alphabet
memorized
_'flash
@
to right
button
by pressing
(.P-I
+_O)
RBC_EFGHI
JK+
_-flash
(D**O)
RI_CDEFGH'÷]
*-flash
exist
width
off
control
screen after the ietter
button
-- for move to left).
( E "_"O )
Press E D IT button.
A and cursor alternately.
patterns
Delete pattern D}
:_BCDEFGH÷I
(I_0)
o Press the EDIT button again when editing is completed,
94
I_
I
I
I
l
(" -* "means
.
(A**O)
_- flash
(width
Q
I:I-'_KB
C D E F G +J
xI\
Press EDIT
t JKLMNJ
_r To Delete Patterns Without Adding: (Example:
SI_'B
cDEF GH_I
[_
[ABCDEFGH
+
H),
Move the cursor to alphabet
Press CLR
Press the
button,
EDIT
(alphabet
button
D by pressing
E will
again when
width
control
button
+
flash)•
editing
is completed.
(LED
will
go off),
_r To De|ere
and Add
Patterns:
|Replace
To Delete and Add Patterns:
D with Z)
(Add pattern Z between D and E}
L_ ! CDEFGH4
_flash
ABC_.E,,
_flash
(A_O)
J
FGHI
®
,q B C D _,E F G H ] J-i-]
+-flash ( _ '*'0)
_" flash {_D +_ 0 )
®
_flash
ABC
[ABCZEFGHI
Press pattern
D by pressing
width control
_-flash
(Z "_0)
Press MEM
button.
Press EDIT
button
button
+
Move
the
editing
is completed.
(D_II)
button.
cursor
button
Press pattern
again when
1
JKLMN]
control
35,
J+
"_flash (Z '_ II )
Press EDIT
to alphabet
n,s c c',%EFGH]
"":'-
JKe
buttom
Move the cursor
[
95
_ I_ )
EFGHI
_flash
Press EDIT
(Z
( A "*""0 )
to
between
alphabet
D and
E by
pressing
the
width
+,
35,
Press MEM
button,
Press EDIT
button
again when
editing
is completed.
95
e To Adjust Distorted Patterns
balance
dial
Comperssed
Correct
If decorative
manuel
on a particular
balancing
stitch
buttonholes
fabric,
patterns,
letters/numbers
are uneven
adjust
them
by
Patterns;
turning
"+",
Drawn
the
toward
the
in your
accessory box.
feed
balance
dial
Usa the large screw driver
Correct
Out Pattern;
by
turmng
toward
the "-",
Drawn
Out
the
feed
balance
dial
balance
dia}
or
when
Vou sew
with
the feed
•
To Adjust Distorted Letters or Numbers
dial,
* After sewing with an altered dial setting, you
must reset the dial to" !> "
Compressed
Correct
toward
96
Letters
by turning
the -+- •
or Numbers:
the
feed
balance
dial
Correct
toward
by
Letters or Numbers:
turning
the ....
the
feed
What to do When
Condition
Cause
The needle thread
breaks,
The bobbin
thread
The needle breaks.
breaks,
I,
The needle thread
is not threaded
2.
The needle thread
tenslon
3,
The needle
is bent
or blunt,
4.
The needte
is _ncorrectlv
5,
The needle thread
properly,
is too tight.
inserted,
and the bobbin
thread
rear of) the presser foot
when sewing
6,
The fabrtc
to the rear when
7.
The thread
is too
1.
The bobbin
thread
2.
Lint
3.
The bobbin
1.
The needle is incorrectly
2,
The needle
=sbent
3,
The needle
clamp
4,
5,
]s not drawn
Reference
are not set properly
under
(drawn
to the
is not threaded
in the bobbin
_sdamaged
21
23
17
17
22
Refer to page 17
properly
in the bobbin
Refer to page 20
holder,
Refer to page 99
turn
Change
smoothly.
the bobbin
Refer to page 17
inserted+
Refer to page 17
or blunt.
screw is loose.
Refer
to page 17
The tensFon of the needle thread
Refer
to page 23
Refer
to page 47
The fabric
is not drawn
is too
is too tight.
to the rear when
6.
The needle
fine for the fabric
1,
The sharpness
1.
The needle _s incorrectly
2.
The needle is bent
or blunt.
3.
The needle andJor
threads
4.
A blue ttpped
of the liquid
crystal
sewing
is finished.
Refer to page 17
being sewn,
disp{ay
is not
adjusted
properly.
Refer to page 26
Readjust
Screen is not clear,
Skipped stitches.
page
page
page
page
page
Refer to page 47
sewing,
holder,
and doesn't
to
to
to
to
to
is starting.
heavy for the needle.
has collected
Refer
Refer
Refer
Refer
Refer
Refer to page 17
inserted.
Refer to page 17
are not
needle is not
suitable
for the work
being used for sewing
stretch,
Refer
being sewn.
very fine fabrics
and
to page 17
Refer to page 17
synthetics.
5,
The needle thread
6.
The presser foot
7.
The wrong
needle
is not threaded
pressure
is used,
properly,
is not strong
enough.
Refer to page 21
Refer to
Change
page
8
the needie
97
Condition
Seam puckering.
The cloth is not feeding
smoothly,
Gathering.
Cause
The needle
thread
tension
2.
The needle
thread
is not threaded
3.
The needle _stoo
heavy for the fabric
4,
The stitch
is too tong for the fabric.
5.
The presser foot
1,
The feed dog is packed
2,
The presser foot
3.
The stitches
4.
The feed dog was not
pressure
is too tight.
is not
with
correctly.
being sewn,
correctly
dense
to page 8
Refer to page 99
Refer to page 8
Make stitch coarsen
weak.
raised after "drop
is too
to page 17
Refer
adjusted,
are too fine.
tension
to page 21
Refer
Make stitch
|int.
pressure is too
Refer
feed"
1.
The needle
thread
2.
The needle
is too heavy or bight for the fabrics
was used.
Refer to page 32
being sewn,
Refer to page 23
Refer to page 17
loose.
The machine
A thread
3,
The bobbin
winder
spindle
is kept
in the winding
posit_on.
Refer to page 19
Patterns are distorted.
1.
The bobbin
winder
spindle
is kept
in the winding
position.
Refer to page 19
The automatic buttonhole
1.
The stitch
stitches are not working.
Noisy operation.
sewing, ignore the button
you pressor does not
change the display on the
LCD.
is caught
length
2.
Interfacing
t.
There
2,
Lint
3.
When turn
Safety
in the hook
is not suitable
has built
caught
inserted.
Refer to page 99
for the fabric
in the hook
up in the bobbin
on the power
are not fully
race,
Js not used w=th stretch
is thread
stepping
Machine is stopped on the
is not plugged in or plugs
Refer to page 7
1.
2.
The machine doesn't work,
98
Refer to page 23
1.
length
Reference
switch,
Refer to page 68
being sewn.
fabrics.
Use interfacing
race.
Refer to page 99
holder
or hook
slight
resonant
Refer to page 99
race.
sound
is coming
out from
the
Not abnormal
motors.
circuit for static
electricity
countermeasure
is working,
Turn
turn
off the power
on the power
switch
switch
once, and
again.
Cleaningthe Machine
To insure
Unplug
that
your
machine
the machine
Remove
button
the cover
and remove
the presser foot
plate by sliding
the hook
Remove
and needle,
cover plate release
out
Clean the feed dogs, hook
race and bobbin
holder
with
the lint
the bobbin.
the set screw
the screwdriver
Remove
parts clean at all times.
brush and a soft dry cloth.
Brush out dust and ]int.
Take
at _ts best, you need to keep the essentlar
to the right.
Take out
with
operates
the needle
the bobbin.
{You
may atso use a vacuum
cleaner.)
on the left hand side of the needle
supplied
with
plate
the machine.
plate,
Lift
up the bobbin
holder
and remove
Insert
the
bobbin
holder
stopper
in the hook
race.
Attach
needle plate
with
so that
the
knob
fits
next
to
the
screw,
it.
99
Oiling the Machine
Open face cover
One or two
Remove
drops
plate and oil two
excess oil; otherwise
In case machine
Use Kenmore
is not
as shown
sewing
it may stain
used for an extended
machine
No other oiling is required.
100
points
below
at least once a year.
of oil is sufficient.
oil.
fabrics.
time,
oil it before
sewing.
PARTS
LIST
f
1
2
4
5
7
%
10
19
11
12
13
14
20
21
22
23
15
24
8
%
16
17
25
26
29
30
31
32
27
%
®
28
9
33
34
35
36
J
lOl
A_I parts
listed
herein
may be ordered
lrom
any
Sears
store
or
service center.
WHEN
ORDERING
FOLLOWING
REPAIR
PARTS,
ALWAYS
GIVE
THE
INFORMATION:
Center
for
Ref. No.
102
Zipper loot
13
822801001
Overedge foot
t4
826811006
Sliding buttonhole toot
Needle threader
15
*6864
000009906
Light bulb
17
647808009
Buttonhole opener
1. PART NUMBER
18
820832005
2.
19
647803004
Large screw driver
Small screw driver
PART DESCRIPTION
4. NAME OF ITEM
electronically
823803006
16
3. MODEL NUMBER
it the parts
12
you
need
are not stocked
transmitted
expedited
to
a Sears
locally,
your
Repair
Parts
order
will be
Distribution
handing.
Ret. No.
i
Description
Bobbin box with 10 bobbins
20
*6889
21
802424004
Oil and lint brush set
Lint brush
22
822020503
Large spool holder
23
822019509
Small spool holder
24
*200002008
Piping foot
25
*200003009
Gathering toot
26
*200005001
27
"200013105
Pin-Tucking loot
Hemmer toot
28
*200027102
Binder toot
29
*200028103
Roller foot
30
*200029104
Teflon toot
31
*200030108
1/4" Seam toot
32
*200031109
Applique toot
33
*200032100
Cording foot
1
*102869107
2
802422002
3
102403202
Spool pin te_t
4
813404013
No, 11 Stretch fabric needles (BLU)
647814020
No. 11 Single needles {ORG)
647814031
No. 14 Single needles (RED)
647814042
No. 16 Single needles (PUR)
34
*214872000
647814053
Walking foot
No, 18 Single needles (GRN)
Twin needle
35
*654805008
Embroidery foot
36
*941620000
Ruffler
• Quilter
5
826815000
6
625031500
7
826801003
Additional spool pin
Automatic buttonhole toot
8
823801015
Straight stitch toot
9
822508005
Zigzag toot
10
822804118
Satin stitch foot
11
820817015
Blind hem stitch loot
* These items are not furnished with the machine, but may be ordered
per instructions above.
INDEX
A
Cross stTtching ............
Cut-out work ..................
Accessories ....................
6
Accessory storage box .............
5, 10
Alphabet & numbers ..............
91
Appliqueing .............
43, 76
"Auto-Lock"
pattern
.........
25
Automatic buttonholing
..........
66_68
Automatic buttonhole foot
.............
...........
12, 14, 46, 66_68, 101_102
Automatic darning ............
43, 64_65
Additional spoo! pin .............
18
Auto-Lock button
.................
25
Basting ...................
33, 41
Blind hemming .........
41,43, 73
Blind hem stitch foot
...............
.............
12, 14,41,43,
101_102
Bobbin .........
6, 18_22, 99, 101_102
8obbin thread
.................
22_23
Bobbin winding .............
18_19
Bobbin windingspmdte
............
6, 19
Buttonhole
.............
46, 66"71
Buttonhole foot, automatic
............
.............
t2, 14, 46, 66_68, 101_102
Buttonhole foot, sliding
...............
........
12, 14, 43,46, 64, 69_71,101_102
Buttonhole opener ..........
6, 101_102
Buttonholing buttons
...........
26
Butto_t sewing .................
35
6
99
.....
99
26, 28
71
31
26
Hand
wheel
Hemming
Horizontal
.................
6
and edging stitching
.......
spool pin ................
72"73
18
K
Darning
...................
34
Decorative
stitching
........
45, 81_B2
Direct entry stitch button
..........
27
Display sharpness adjusting knob .......
26
Distorted
pattern
................
96
Double edge zigzag stitching
......
42, 62
Drop feed lever
..............
6, 32
Editing button
EdEtmg pattern
.............
combinations
26, 29
94_95
. ,,....
Elastic casings ..............
Elastic stretch stitching
........
Extension
table
...............
Knit stitching
and stitch
length
'
Face cover plate ..............
Fagoting
................
Feather stitching
.........
Feed balance diaJ ........
Foot controt
..............
Foot holder
................
17
5
78
42, 7-/
5, 8, g6
6, 8
15
..........
button
27
7
7
Manual buttonholing
.............
Memory
button
......
. .......
Mending
...............
Mirror image button
.............
Monogramming
.............
Message button
...........
Needle
Needle
Needle
......................
.....................
plug .................
socl<et
................
69"70
26, 28
40, 60
26, 28
46, 92
26, 30
12
10, 11
G
Gathering
42, 62
44, 79
44, 79
5, 10
Machine
Machine
Fabric, needle, thread
chart
.................
..............
Large screw driver ...........
6, 101_102
LED light .................
27, 28
Light and power switch .............
6
Lihgt bulb ................
t01_102
Lint brush ..............
6, 99, 101_102
Loek-a-Matic seam ............
40, 54
Mode
Foot storage compartment
Free arm sewing ..............
Carrying handle ................
Cleaning bobbin holder ......
Cleaning hook race and feed dogs
Clear button ...................
Corded buttonhole
.............
Cornering guide ...............
Control panet .............
44, 83
43, 76
52
..............
clamp ...................
plate
, ; ................
16_17,
101_102
5, 17
5, 31
Needle position
................
Needle set ......................
Needle, thread and fabric
Needle threader
..........
chart
49
6
.........
17
101_t02
H
Hook cover p_ate ..........
5, 18, 9g
103
Oiling.....................
Outlinestretch stitching .........
100
Overcasting
stitching
...............
Overedge foot
....
12, 13, 41"42,
Overedge seam ................
55
59
101 _102
4t, 61
Parts list ...................
Pattern chart ..................
101_102
26
Pattern
Pattern
Pattern
memory
select_on
selection
...............
............
button
............
Performance
problems
..............
Pintucking
.......................
Portable case ...................
Power
Power
Power
Presser
supply ....................
supply plug
.................
switch
...................
bar .....................
Presser foot ..............
Presser foot lever
.............
Pressure adjusting
lever
..............
Program sewing
...............
4t,
28
27
26"-27
97"_98
50
4
7
7
7
15
5, 12_14
6, 9
8
87_90
Twin needle button ............
Twin needle sewing .........
Saddle stitching
..............
Sand stftching
.................
Satin stitch foot ....
12_13,
43_46,
Satin stitching
.................
Scallop stitching
..............
Seam guides ...............
Sewing function
chart ...........
Sewing light .....................
Sewing on heavy fabrics ..............
Shading stitching
...............
41, 56
45, 85
101_t02
. , 58
42, 75
31
39
7
32
45, 86
Shell stitching
................
43, 74
Slidingbuttonhole
foot
...............
..............
12, 14, 46, 101_102
Small screwdriver
...........
6, 101"q02
Smocking
stretch stitching
.......
Spool pin fe!t ...................
Stitch length/width
control
buttons
.......................
Stitch lengthiw_dth
decrease button
Stitch length/width
increase button
Stitch pattern chart ..........
44, 84
6
.........
29, 49, 68
......
29
.....
29
5, 40_46
Strmght stitch foot
..........
Straight stitch ing ...........
Straight stretch stitching
..........
Stretch stitching
...........
55_56,
61"_63, 75~80, 82"85,
t2, 14,47
40, 47_49
53
40_45,
53,
87_89,
96
Q
Quilter ............
Quilting
.............
12, 13, 51,101_102
40, 51
R
Reinforcing
stitching
..........
Reverse stitch button
..........
Rick-Rack
stretch stitching
........
TO4
77
5, 25
44, 63
Take-up
Thread
Thread
Thread
Thread
Thread
Thread
lever
..............
cutter ................
guide .............
spool pin
...................
tensions
................
tension control
..........
chart
....................
5, 21
5, 9
19, 21, 80
5
23, 24
5, 23
17
Top stitching
.....................
48
Top thread
....................
21_24
Turning a square corner ............
31
Twin needle .....
6, 16, 80, 101_102
26, 29, 80
42, 80
U
Up/down needte pos_t_on button .......
....
, ............
5,15,17,22,25"26
Zigzag foot ....
12_13, 33, 40"42, 44, 47"-48
51_5B, 60, 62_63, 75, 77, 79, 80, 84,101_102
Zigzag stitching
...........
35,40, 57_59
Zigzag overcasting .................
59
Zipper application
...........
36_38
Zipper foot ......
12_13, 36_38, t0t_102
-"
÷
WAR RANTY
FULL
For
_"
25-YEAR
WARRANTY
25 years from
m the mechamca_
FULL
For
the date of purchase,
components
TWO YEAR
two
appear
years
ON SEWING
from
of purchase,
equtpment
of
the
HEAD
free of charge,
machine
repair
EQUIPMENT
Sears wiII,
sewing
defects
m material
or workmanshtp
which
appear
head.
ON ELECTRICAL
the date
m the e_ectrlcai
Sears will,
of the sewing
WARRANTY
MACHINE
tree
machine,
OF SEWING
of charge,
including
repair
MACHINE
detects
electromc
in mater_al
components,
or workmanship
motor,
wiring,
which
sw_tch
and
speed control.
FULL
t_
90-DAY
WARRANTY'
SERVICE
CENTER!DEPARTMENT
Th_s warranty
#
I_
For 90 days from
necessary for proper
WARRANTY
_1
ON ALL
the date
operation
AND
MECHANICAL
ADJUSTMENTS
of purchase,
Sears will, tree of charge, replace any parts
of the sewing machine, except for normal maintenance.
IS AVAILABLE
IN THE
g_ves you specific
PARTS
UNITED
BY RETURNING
THE
SEWING
MACHINE
and provlde
TO THE
NEAREST
mechamcat
SEARS
STATES.
serwce
SERVICE
#
#
_egat r_ghts, and you may also have other
rights
which vary from
state to state.
#
#
SEARS,
±
ROEBUCK
AND
CO., D/817
WA,
Hoffman
Estates,
IL 60179
SEWING
Now
that
or service,
MACHINE
you have purchased
s_mpw
contact
your
your
;<enmore
nearest
Sewing
Stars Service
Machine,
Center.
should
_ need ever exist
Be sure to provide
for repmr parts
aH pertinent
facts
when
you cail or visit.
The model
your
Sewing
WHEN
number
of your
Machine.
ORDERING
"PARTNUMBER
Machine
will
be shown
on your
nomenclature
plate
on th_= back of
See page 6 for location.
REPA
*PART
you
Sewing
If the
parts
Repair
Parts Distribution
need
R PARTS,
ALWAYS
DESCRIPTION
are not
Center
stocked
locally,
for haad_ing.
GIVE
*MODEL
your
THE
FQLLOWING
NUMBER
order
will
"NAME
INFORMATION:
OFITEM
be electromcatly
transmitted
to a Sears