1
FLU!FiLm
DIGITAL
BL01257-201
CAMERA
BeforeYou
Begin
FINEPIX XP30 Series
Owner's
r_
BasicPhotography
andPlayback
Manual
MoreonPhotography
Thank you for your purchase
of this product. This manual
describes how to use your
FUJIFILMdigital camera and tile
supplied software. Be sure that
you have read and understood
its contents and the warnings in
"ForYour Safety"(_ ii) before using the camera.
For information
on related products,
http://www.fuji_lm.com/products/digito/
FirstSteps
MoreonPlayback
Movies
Connections
Menus
visit our website at
comeros/index.html
Technical
Notes
Troubleshooting
Appendix
.....
ExifPrint .;_
O
Pictgridge
'.....
_For Your Safety
IMPORTANTSAFETYINSTRUCTIONS
• Readlnstructions:
All the safety
ing instructions
appliance
should
and operat
be read before the
is operated.
reference
and
in the
be adhered
on
operating
the
ap
only from
indicated
instructions
on the marking
and
product
the type
use
should
of power
label.
be
source
If you are
of power
supply
home, consult
appliance
dealer or local
your
company
For video
ed to operate
flom
battery
to your
products
intend
power,
or other
sources, refer to the operating
with
instructions
a polarized
line plug
than
feature
(a plug
the other)
the power
outlet
the
plug
having
This plug
electrician
to
try reversing
one
your
Do not defeat the safety
larized plug
blade
the plug
the plug
still fail to fit, contact
replace
Protection:
be routed
to be walked
upon
or
Power supply
so that they
on or pinched
against
them,
obsolete
purpose
outlet
of the po
type
plug
paying
to cords at plugs,
ceptades,
and the point where
table
The
serious
injury
fire or electric
damage
Ventilation:
shock
Slots and openings
are provided
operation
for ventilation,
of the video
tect it from
overheating,
must not be blocked
in the cabinet
to ensure reliable
product
and to pro
and these openings
or covered
never be blocked
video product
similar surface
The
open
by placing
the
on a bed, sofa, rug, or other
cart,
particular
convenience
should not be placed in a
such as a bookcase or rack
mended
unless proper
manufacturer's
ventilation
is provided
or the
instructions
have been ad
hered to This video product
should
placed near or over a radiator
or heat register
Attachments:
recommended
Do not
never be
use attachments
by the video
product
not
manu
as they may cause hazards
Water and Moisture:
product
re
they exit from
to a child
tripod,
product
should
structions,
Do not
near water
bath tub, wash
fur
bowl, kitchen
tub, in a wet basement,
pool, and the like
use this video
example,
near a
sink, or laundry
or near a swimming
or adult, and serious
Use only with
or table
An appliance
combination
moved
Any mounting
and should
the
bythe
with
care
exces
may
cause
the app%nce
and cart
combination
to overturn
a
recom
or sold with
of the ap
manufacturer's
use a mounting
and cart
should
stops,
product
bracket, or
may fall, causing
bracket,
follow
sory recommended
surfaces
tripod,
by the manufacturer,
the video
quick
product
to the appliance
stand,
p%nce
cart, stand,
video
sive furce, and uneven
facturer
likely
the appliance
on an unstable
If
your
cords
are not
by items placed
attention
be
will fit into
If you are unable to insert
should
to replace your obso
should
Overloading: Do not overload wall outlets and
extension cords as this can result in a risk of
This video product
built in installation
alternating
only one way This is a safety
fully into the outlet,
type
If you
into the outlet,
Power-Cord
Do not defeat the safety puq)ose
[rigs should
Grounding or Polarization: This video product
equipped
your electrician
pin
a grounding
feature.
is
type
(grounding)
This is a safety
lete outlet
not sure of the type
wider
a third
only fit into
outlet
product
Accessories: Do not place this video
operated
current
video
wire grounding
power
of the grounding
Power Sources: This video
is
This
a three
This plug will
contact
to.
• Follow Instructions: All operating
instructions
should be followed
power
with
are unable to insert the plug
• Heed Wernin_s: All warnings
should
Warnings:
equipped
plug, a plug having
• Retain Instructions: The safety and operating
instructions
should be retained Br future
pliance
Alternate
manufacturer
in
acces
I , _I.....
mally follow
Outdoor
Antenna Grounding:
antenna
or cable system
video
product,
system
is connected
to tlne
or cable
so as to provide
against
up static charges
Electrical
outside
be sure the antenna
is grounded
protection
If an
voltage
some
surges and
built
Section 810 of the National
Code, ANSWNFPA No
70, provides
information
with
respect to proper
ing
mast
and
Cleaning: Unplug
wall
outlet
grounding
discharge
location
tion
unit,
size of grounding
to grounding
openings
this video
and
require
product
Antenna
shock.
head
An
(NECFECT/ON
outside
not be located
power
circuits,
power
lines
outside
antenna
be taken
antenna
system
in the vicinity
of over
Nnes or other
or where
When
system, extreme
to keep from
Nght or
it can fall into such
or circuits
lines or circuits
be fatal
electric
touching
as contact
installing
an
care should
such power
with them
for this video
storm, or
unused
for
the video
product
win
prevent
due
to lighming
damage
and
to the
power
might
as opening
or removing
Refer all servicing
result
in
work
to restore the video
operation
product
coy
voltage
exhibits
this
a distinct
indicates
Parts: When
are required,
be sure the service
replacement
a
parts
technician
has used replacement
parts specified by the
manufacturer
or have the same d/aracteris
stitutions
original
may result
part.
Unauthorized
in fire, electric
Safety Check: Upon corn pletion
to service this video
you to dangerous
may
require extensive
or repairs to this video
yourself
by
as an improper
Replacement
other hazards
product
81027)
power
of
product
and
Ad
are covered
controls
change
in performance
need for service
tics as the
This
product,
to perform
that the video product
operating
condition
or
of any service
ask the set
safety
determine
sub
shock
checks
to
is in proper
or
to qualified
service personnel
Damage Requiring Service: Unplug
product
from tlne wall outlet
ing to qualified
BIIowing
should
When
vice technician
_rounding
Conductors
PARTH)
Power Lines:
volt
spill liquid
during a lightning
instructions.
that
technician
to its normal
system
other hazards
ZO
Never
it is left unattended
ors may expose
Powvr Servl_ e Grounding
E/ectrodeSy£em(NECART
of other
arid will often
product
line surges
(NECSECT/ON
_
dangerous
For added protection
Servicing: Do not attempt
"_
instructions
operating
adjustment
long periods of time, unplug it from the wall
outlet and disconnect
the antenna or cable
video
Lead
the
I
objects
through
or short out parts that could result
receiver
when
.----X-41r'r"v<<
I U4-
push
product
as they may touch
any kind on the video
electrodes,
AS PER
controls
damage
in a fire or electric
lightning:
electrode
the operating
iust only those
by a qualified
of any kind into
connec
_
Use a damp
conductors,
NAT/OhlAL ELECTRICALCOOE
Clamp
Do riot use Iiq
or aerosol deaners
Object and Liquid Entry: Never
unit,
EXAlt'PIE OF ANTENNA GROUNDINd
@ound
the
cloth for cleaning
discharge
for the grounding
from
ground
structure,
of the lead in wire to an antenna
of antenna
ments
supporting
product
before cleaning
uid cleaners
age points
of tlne
this video
F
• When
service
finis
video
and refer servic
personnel
under
the
conditions:
the
power
supply
cord
spilled,
or objects
or
plug
is
damaged.
• If liquid
has been
have
fallen inlo the video product
• If the video
product
has been
exposed
to
• If the video
product
has been
dropped
or
the cabinet
has been
damaged
rain or waten
If the video
product
does
not operate
nor
///
::]_<y
;;:
I
Safety Notes
• Make
sure that
you use your
camera
notes and your OvvrleF_ Monuo/carefully
• After reading
I
The icons
severity
of the
below
iniury
or damage
that
safety
D_o_s_,,, _
can result
and the product
This carl cause a fire or electric shock
_ower
in a safe place
About the Icons
are used in this document
indicated by the icon is ignored
as a result
Read these
before use
these safety notes, store them
shown
]
correctly
]
to indicate
the
if the information
Never attempt to chen_e or take apart the camera (never open
_
Failure to observe this precaution can cause fire or
Do,,ot
electric shock
_assemb/e
Should the case break open as the result of a fofl or other atcidem
is used incorrectly
point of purchase for consultation
flo not then_e, heat or unduly twist or pufl the tonnettien tord and
_'_
donot piece heavy ob.iectson the connection cord. These actions
could damage the cord and cause a fire or electric shock¸ If the
cord is damaged, contact your FUJIFILM dealer¸
The icons shown
tions which
below
are used to indicate
the nature of the instruc
[_
are to be observed
Donotpietethetameraonanunstabiesurfate.
camera to fall or tip over and cause iniury
Thiscancausethe
Donot touch any metal parts of the tamera durinq a thunderstorm.
_
Filled circles with an exclamation mark indicate an action that
must be performed ("Required")
(_
This can cause an electric shock due to induced current from
the lightning discharge
Do not use the battery except as spedfled.
shown by the indicator
DoDot heat, thanqe
If e problem arises, turn the camera off, remove the battery, end
disconnectand unpluff the ACpower ndapter. Continued use of
@
Load the battery as
or tahe apart the battery. Donot drop or suhjert
the battery to impacts, Donot store the battery with metallicprodutts. Anyoftheseactionscancausethebatterytoburstorleak
and cause fire or [niury as a result
the camera when it is emitting smoke, is emitting any urlusual
Useonly the battery or ACDower ndaoters s_edfled for use with this
(_
Donotaflowwaterorforeianobiedstoenterthetamera.
If water
remora. Do Dot u}e volta_es other ihen the power sopply volta_e
shown, The use of other power sources carl cause a fire
If the battery leeks end fluid qets in contact with Vour eves, skinor
dothieq, flush the affected area with clean water end seek medical
attentionorcaflanemerffentgnumherriqhtawag.
Do not use the churner to charge batteries other than those spod-
Whenyou are cleaning the camera or you do not plan to use the
thjtz
:ida
fire or electric shock
batteries can cause the battery to leak fluid, overheat or burst
(_
When carrying the battery, install it in a diqital camera or keep it
mUD
When charging ends. unplug the charger from the power socket.
Leawng the charger plugged into the power socket can cause
in the hard case, When storing tim battery, keep it in the hard case,
When discarding, coverthe Battery terminals with insulation tape.
Contact with other metallic objects or batteries could cause
tile batteryto ignite or burst
Keep memory cards out of the reach of small children,
Beca use
Using a flash too close to e person's eyes map temporarily affect the
(_
_
Take partkular
care when photograpNng
infants and
young children
Whena memory card is removed,the cardcould come out of theslot
_
Useyourhngertoholditandgent!yreleasethecard.
Injury could result to those struck by the ejected card
don or call an emergency number
Request
ofcharge
@
_
Donotusethiscamerainlocatinnsaffectedbyoilfumes,
mid_ordust
This carl cause a fire or electric shock
steam, hu-
Do not leave this camera in places subject to extremely high temperatures. Do not leave the camera in locations such as a sealed
"-I
vehicle or in direct sunlight
_'
Keepoutofthereachofsmallchildren,
injuryin the hands of a child
This can cause a fire
_'_
Do not place heavy objects on the camera.
This product could cause
This can cause the
heavy object to tip over or fall and cause injury
Do not move the camer a while the ACpower adapter
is still connect-
a fire or electric shock
Do not use the AC power adapter when the plug is damaged
plugsochetconnectionisloose.
shock
or the
This could cause a fire or electric
Do not coveror _i'_p the came_ or the ACpower ad_pter in a cinth
(_
orblankot, Thiscancauseheattobuildupanddistortthecas
ing or cause a fire
regular internal
testing and
cleaning for your camera.
::]'<y
;::
I
The Battery and Power Supply
Note: Check
the
type
of
your
camera
sections.
and
The
read
describes
the
]
used
in
• Charging the Battery
Charge the
charger
appropriate
battery
Charging
the
proper
and how to prolong
rect use can shorten
age, overheating,
use of
their life. Incor
batteryliG
above
+35°C
charge
the
40°C
or cause leak
if your
Li-ion
attempt
to
0°C
will not charge
camera
uses a
a fully
or modify.
chargers
charged
at shipment
before use
tery in its case when
need
warm
gradually
Charge the
•
loses its charge when
battery
one
or two
days befure use
life can be extended
offwhen
not in use
Battery
capacity
tures; a depleted
when
tery
cold
decreases
other warm
tery
the
Battery life
Read
At normal
temperatures,
recharged
about 300 times
crease in the length
the
battery
can be
A noticeable
of time the
battery
at
spare bat
in your
as nec
pocket
or
place and insert it in the camera
in direct
contact
other heating
devices
Do not place
with
may become
after extended
use
This
the bat
hand warmers
or
Information
camera
will
types iray
manual
be found elsewhere
Cautions:
uses AA
AA NiMH
on compatible
batbattery
in the camera
Handling the Batteries
• Do not expose to water, flame, or heat, or
store in warm or humid conditions.
left unused
may be impaired
for extended
Run the battery
if the battery
periods
when
is
fully
flat before storing it
If the camera will not be used for an extended
• Do not transport
remove
the battery
and store
it in a
dry place with an ambient
temperature
from +15 °C to +25 °C (+59 °F to +77°F)
not store in locations
temperature
exposed to extremes
of
Do
of
or store with metal
such as necklaces
or battery
objects
or hairpins.
• Do not disassemble
or modify
the batteries
casing.
• Do not subject
period,
if your
or rechargeable
reties.
placed
charged
this section
alkaline
de
hold a charge indicates
that it has reached
the end of its service life and should be re
Per_rmance
tempera
place and exchange
shooting
to the touch
This is normal
• Storage
at low
battery may not function
essary, or keep the battery
only when
by turning
Keep a tully charged
in a warm
clean.
and camera body
is normal
•
Battery
camera
physical
Keep the bat
Notes on the Battery
not in use
or use
imme
only.
to strong
to water.
• Keep the terminals
before charging
may be warm to the touch
diately after charging
not in use
The battery
drop or subject
• The battery
to be fully discharged
or heat
• Use with designated
• Do not
shocks.
objects
or hairpins
to flame
• Do not disassemble
• Do not expose
charged
does not however
or store with metal
such as necklaces
above
below
Handling the Battery
• Do not expose
battery.
is not
Charge the battery
•
Do not
Cautions:
• Do not transport
(+SO°F) or
at temperatures
to recharge
The battery
The battery
battery
+10°C
at temperatures
(+32 °F), the battery
battery
fire, or explosion
this section
rechargeable
supplied
will increase at am
below
(+95%)
(+104°F);
battery
The
times
battery
Do not attempt
Read
•
in the
bient temperatures
following
batteries
battery
to strong physical
• Do not
use batteries
formed,
or discolored
that
• Keep out of reach of infants
dren.
• Insert in the correct
shocks
are leaking,
de
and small chil
orientation
_:
0i'YO
L__!::_!_
I¸_!_t
y
• Do not mix old and new batteries,
with different
batteries
charge levels, or batteries
•
of
different types.
• If the camera will not be used for an extend
ed period, remove the batteries
the camera clock will be reset
• The batteries
may
be warm
The
capacity
periods
reduced
of disuse,
recharged
is normal
touch
tion
Capacity
discharging
handling
charging
capacity
temperatures
pocket
warm
Cold
some of their
terminals
to decrease
Keep spare
or other
as necessary
• Fingerprints
tends
at low
batteries
in a
clean
battery
the
before
Z_
camera
using
by repeatedly
using the discharge
setup
menu
a battery
and
with alkaline
re
charger
them
with
a
in the
leak, clean the battery
thoroughly
before in
new batteries
If fluid
contact
from the battery comes into
with skin or clothing,
flush
area with
section
applies
option
to aft camera
Use only FUJIFILM AC power
ers could
damage
• The AC power
desig
Other adapt
the camera
adapter
is Br indoor
• Be sure the DC plug is securely
to the camera
• Turn the
models.
adapters
nated for use with this camera.
camera
the adapten
batteries
draws
even
when
of!
been
left in the camera
riod
performance
terminals
inserting
This
off before
Disconnect
use only
connected
disconnecting
the adapter
by the
plug, not the cable
• Do not use with other devices
a small amount
of current
Ni MH batteries
that
• Do not expose to high
may be drawn
for an extended
down
mance
may also drop if the batteries
to discharge
no longer
in the camera
Ni MH batteries
hold
a charge
that
Battery perfor
are run
in a device such as a flashlight
option
pe
to the point
they no longer hold a charge
• The adapter
toud/during
• If the
reorient
to strong physical
may hum or become
use
adapter
shocks
hot to the
This is normal
causes
radio
interference,
or relocate the receiving
antenna
Use the
setup
menu
Batteries
even
heat and humidity
have
• Do not subject
serting
the affected
the batteries
them
The camera
down
f the batteries
compartment
can be increased
in the
discharge
Z_
be
long
• Do not disassemble
may recover
and other stains on the battery
soft, dry cloth
camera
may
after
are repeatedly
(!} (_,IJTION: Do not use the discharge
charge when warmed
Thoroughly
new,
place and exchange
batteries
can impair
option
batteries
when
or if they
before being fully discharged
This
and does not indicate a malfunc
immediately
after use.
Turn the camera
off and allow the batteries to cool before
• Battery
of Ni MH
temporarily
Note that
to tile
NiMH Bakeries
that
after repeat
edly being discharged
and recharged have
reached the end of their service life and must
water
fffluid
be replaced
Ni MH batteries
enters your eyes, immediatelv flush the
affected
area with water and seek
tery charger
medicalattention.
Re6r
Donotrubyoureyes.
become
warm
to the
Failure to observe this precaution could
charger
result in permanent visual impairment
ger with
to the touch
instructions
compatible
•
may
after charging.
with
the
Use the char
batteries
gradually
in a bat
Batteries
provided
for more information
Ni MH batteries
when
can be recharged
(sold separately)
only
lose their
charge
not in use
Disposal
Dispose
of used batteries
in accord with local
regulations
vii
::]_<y
;::
Using the Camera
Do not aim the
camera
]
at extremely
bright
In the event
that
light sources, such as the sun in a cloudless
aged, care should
sky. Failure to observe
with
damage
the camera
Before
taking
occasions
taking
this precaution
photographs
(such
on
on a trip),
FUJIFEM
Corporation
for damages
of product
any of the following
situa
• If liquid
comes in contact
crystal
wash
take a test shot
water
normally
can not accept
or lost profits
indicated should
tions arise:
skin, clean
sure that the camera is functioning
incurred
liability
as a result
malfunction
Take the
the area with
thoroughly
with
Unless intended
cannot
and then
and
• If liquid crystal enters your eyes, flush the aft
footed eye with clean water for at ]east 15
minutes and then seek medical assistance
• If liquid
crystal
is swallowed,
thoroughly
with
rinse
water.
camera system
infringe
copy
Although
the display
extremely
high
the consent
of the owner
contain
restrictions
apply
light This is not a malfunction,
some
photographing
tainments,
note
that
conlaining
copyright
restrictions
to the
of stage performances,
and exhibits,
pure]y for personal
to
even when
use
images
enter
of memory
or data protected
laws is only permissible
imposed
by those
under
within
copyright
xO-Picture
the
Cord
cal shocks while
are recorded
images
are being
using
do not
and images
re
are unaffected
and ,_
]aws
FUJIFILM Corporation
of
The typefaces
Taiwan
Inc
Macintosh,
QuickTime,
of Apple Inc
countries
included
by DynaComware
Windows
and Mac
in the U.S.A
7, Windows
correctly,
Vista, and the Windows
or physi
of the Microsoft group ofcompar@s
Adobe
and Adobe
Reader are either trademarks
recorded
logo are trademarks
or registered
trademarks
Incorporated
in the
of Adobe
USA
SDHC and
and/or
Systems
other
countries
The
SDXC Iogos
trademarks
of SD 3C, LLC. The HDMI logo is a
are
trademark
YouTube is a trademark of Google
Inc
All other trade names mentioned
in
this manual
trademarks
vfii
using
hospital
with
or
hospital
the camera
in a
or on an aircraft
NTSC (N ational Television
[s a color
television
mainly
[n the
PAL (Phases
a color
television
European
System Committee)
telecasting
Japan.
system
countries
sl)edflcation
USA,
Canada,
Alternation
adopted
and
by Line)
is
mainly
in
and China
Exif Print is a newly revised
format
in which
digital
information
tion during
camera file
stored with pho
is used for optimal
[
Direct
color reproduc
printing
_ead
_e%PorC_;Asi"n;"tOh:'_:;_are
]
or indirect
of licensed
are trademarks
herein are solely developed
and other
the camera to impact
staff before
hospital
with
Consult
it may
cards
OS are trademarks
To ensure that images
or airline
tographs
pixels that are always 1it or that
corded with the product
interfere
export,
software
in whole
without
or in part,
the permission
intended
Users are also asked
the transfer
do not subject
vomiting,
technology,
Note
may
equipment
your
Drink large
is manufactured
precision
right laws without
that
running
solely for personal use, imag
in ways that
aviation
adopted
mouth
using your digital
be used
This camera
with your
a cloth
soap
quantities
of water and induce
then seek medical assistance
es recorded
is dam
action
before
to en
LCD monitor
be taken to avoid contact
urgent
or
and view the result in the LCD monitor
the
crystal
important
as at weddings
the camera
could
image sensor
liquid
are the trademarks
ofthdr
respective
or registered
owners
of the
hibited
applicable
governing
bodies
is pro
IMPORTANT:
Read this section
before
using
the toponyms
includ-
Disclaimer
of Warranty:
(INCLUDING
ed in this product
THEIR
WARRANTIES,
[
Toponym Data License Agreement
]
PersonalUseOnl2L. Y_u agree to use this Data together
camera
Br the solely personal,
non commercial
similar
purposes.
in the fallowing
Accordingly,
for your personal
not remove
but subject
paragraphs,
use to (i) view
any copyright
disassemble
and may not transfer
time
for which
sharing
to the restrictions
or other
it, and (ii) save it, provided
notices
that you do
that appear and do not modify
reproduce,
or reverse engineer
or distribute
the
copy, modify,
any portion
of this Data,
it in any form, for any purpose,
cept to the extent
permitted
only be transferred
or sold as a complete
by mandatory
Corporation
and not as a subset thereo[
Restrictiens.
Except where
laws
Multi
ex
disc sets may
set as provided
MERCHANTABILITY,
Some States, Territories
certain warranty
exclusions,
so by FUJIFILM Corporation,
graph,
you may not
applications
installed
and without
with
or otherwise
by FUJIFILM
without
navigation,
with
connected
limitation
or similar
or computer
phones, palmtop
pagers, and personal digital
the preceding
positioning,
assistants
and Countries
so to that extent
the above
do not
allow
exd usion may
DisdaimerofLial_ilitv:
EUJIFILM
AND ITS UCENSORS (IN
YOU: IN RESPECT OF ANY CLAIM, DEMAND
OR ACTION, IRRESPECTIVE
OF THE NATURE OF THE CAUSE OETHE CLAIM, DEMAND OR ACTION
ALLEGING ANY LOSS, INJURY OR DAMAGES,
DIRECT OR INDIRECT,
WHICH MAY RESULT FROM THE USE OR POSSESSION OF THE INFOR
MATION;
OR FOR ANY LOSS OF PROFIT, REVENUE, CONTRACTS
SAVINGS, OR ANY OTHER
DIRECT, INDIRECT,
INCIDENTAL,
OR
SPECIAL
DAMAGES ARISING OUT OF YOUR USE OF OR
USETHIS INFORMATION, ANY DEFECT IN THE INFORMA
para
IN AN ACTION IN CONTRACT OR TORT OR BASED ON A WARRANTY,
or
dispatch, real
applications;
Corporation
CLUDING THEIR LICENSORS AND SUPPLIERS) SHALE NOT BE LIABLETO
TION, OR THE BREACH OF THESE TERMS OR CONDITIONS, WHETHER
systems,
devices
ANY
PERFORMANCE,
to do
to or in communication
any positioning
electronic
cellular
licensed
any products,
connected
fleet management
or in communication
bile or wireless
limiting
(a) use this Data with
with vehicles, capable of vehicle
time route guidance,
specifically
ITS LICENSORS
DISCLAIM
not apply to you
OR CONSEQUENTIAL
been
AND
SUPPLIERS)
FITNESS FOR A PARTICULAR PURPOSE OR NON
INFRINGEMENT
INABIUTYTO
you have
Corporation
AND
set forth
you m ay copy this Data only as necessary
Data in any way. Yuu agree not to otherwise
decompile,
with this digital
purposes
you were licensed, and not for service bureau,
FUJIFEM
LICENSORS
EXPRESS OR IMPLIED, OF QUALITY,
or (b)
EVEN IF FUJIFILM Corporation
OR ITS LICENSORS HAVE BEEN ADVISED
OF THE POSSIBILITY OF SUCH DAMAGES
Countries
do not
allow certain liability
tions, so to that extent
the above
Some States,Territories
exclusions
or damages
and
limita
may not apply to you
or any mo
devices,
and handheld
including
computers,
_You
ante
or PDAs
agree not to export
Data provided
from anywhere
to you or any direct product
with, and with
thereof
all licenses and approvals
any part of the
except
required
in compli
under, appli
cable export laws, rules and regulations
WarnincThe
Data may contain
due to the passage
of time,
and the nature of collecting
which
may lead to incorrect
inaccurate
changing
or incomplete
circumstances,
comprehensive
information
sources used
geographic
data, any of
EntireAqreement.
agreement
ing their
results
matter
Ne Warrantj_..This Data is provided
it at your
licensors
ranties
including
own risk
and suppliers)
of any kind,
make
reliability,
to, content,
fitness
use or results to be obtained
will be uninterrupted
and its licensors
no guarantees,
express or implied,
but not limited
effectiveness,
to you "as is," and you agree to use
EUJIFILM Corporation
representations
arising
quality,
or error free
or war
by law or otherwise,
accuracy, completeness,
fur a particular
from
(and their
purpose,
usefulness,
this Data, or that the Data or server
hereof,
oral agreements
subject
These terms
between
licensors
marten
and conditions
EUJIFILM Corporation
and
suppliers)
and supersedes
previously
in their
existing
constitute
entirety
between
the
(and % licensors,
and you pertaining
entire
indud
to the subject
any and all wdtten
or
us with respect to such
.................
/
GoverningLaw.
The above
terms
and conditions
shall be governed
the laws of the State of Illinois,
Netherlands,
(i) its conflict
oflaws
or (ii) the United
for Contracts
for the International
duded.
previsions,
You agree to submit
The Netherlands
without
giving
fur any and all disputes,
Copyright
to
license from
PSMA Australia
(wwvv psmo
com ou)
Nations Convention
Sale of Goods, which is explidtly
to the jurisdiction
by
effect
Based on data provided
under
Limited
ex
of the State of Illinois,
claims
and actions
arising
"co EuroGeographics"
from
or in connection
Geodetic.
with the Data provided
The geodetic
system
and longitude
isWGS 84.
_The
map
copyright
without
_This
device
Licensed Software
used by this device to record latitude
data induded
law and except
the permission
to you hereunder
in this device are protected
for personal
of the copyright
use may not
under
The following
be employed
notice
can not be used for purposes
on packaging:
TOPO ®"
of navigation
Copyriqht Holders
wurden
(,) 2010 NAVTEG All rights reserved
"Based upon
ZENRIN"
is a trademark
LTD u_2010
reserved
ZENRIN
of ZENRIN CO,
CO, LTD All rights
the Queen
fn Right of Canada, (,_ Queen's
Printer
"Copyright
ro 20O3;Tmp
numedca
anche
prodotta
Ontario, © Canada Post Corporation,
GeoBase ®, (_ Department
of
Natural Resources Canada, ZIP+4 ®, © United States Postal Service ®
2010
Authority"
"Copyright
Map Ltd"
,3 stata prodotta
riferimento
ed al tratto
material_'
Ltd,'
dalla Regione Toscana;'
the USPS®
der zustaendi
Crown Copyright
Geomatics
"La Banca Dad Italiana
fmr
BehGrden
entnommen3
"Copyright
usando quale
(o Her Majesty
BD
mit
Grundlagendaten
mit Genehmigung
gen Behoerden
CO., LTD "POWERED BY
wurden
der zustandigen
entnommen"or"Die
of ZENRIN
on all
"source:CO IGN France
"Die @undlagendaten
Genehmigung
est)
must appear
copies of the Data, and may also appear
holder
cartografla
e fomita
co 2000; Norwegian/Viapping
"s......igeoEPortugal"
"lnformaci6n
CNIG"
geogr4flca
"Based upon
electronic
propiedad
dd
data () National
Land Survey Sweden"
_wi
i
n_
i
"To pog ra fls ch e Gr u n dla g e: 0 Bu nd es a mt f(_r
Landestopographie;'
_About
This Manual
Before using the camera, read this manual and the warnings in "For Your Safety"(_
ii). For information on specific topics, consult the sources below.
®®,MemoryCards
Pictures carl be stored in the camera'sinternal memory or on optional SD,SDHC,and
SDXCmemory cards (_ 14),referred to in this manual as"memory cards/'
_quently-Used
Buttons
-I_ To delete a picture, display it full frame
and press the selector up (_).
-I_ To return instantly
to shooting
press the shutter button
mode,
halfway.
Shoot
the Cameraon in
PlaybackMode
-k When the camera is
off, playback can be
started by pressing the
[] button for about a
second.
xii
• Silent Mode
-I_ Press and hold the DISP/
BACKbutton to disable
camera lights and
sounds.
Product Features and Precautions for Use
• Water, Dust,and ShockResistance
']) The camera complies with JIS Class 8 water resistance and JIS Class 6 (IP68) dust resistance
standards, and has passed FUJlFILM drop tests (drop height: 1.5 m/4.9 ft.; impact surface: plywood, thickness 5 cm/2.0 in.) compliant with MIbSTD 81 OF Method 516.5: Shock.These results
were obtained through in-house testing and are not a blanket guarantee of water resistance
or invulnerability
water resistant.
to damage
or destruction.The
accessories
supplied
with the camera are not
• Before Use
':!) The front surface of the camera lens is protected
glass will appear in photographs;
by a sheet of glass. Foreign matter
']) Be sure that the battery-chamber
and connector covers are fully latched.The
ter, mud, or sand in the camera could cause malfunction.
']) Do not open or close the battery-chamber
or connector
for example while on or by a body of water.
']) Be sure the camera is completely
on the
keep the glass clean at all times.
dry before inserting
presence of wa-
cover with wet hands or near water,
or removing
batteries or memory
or connecting
the USB or A/V cable.
']) The camera does not float. Be sure to attach the strap and keep it around
cards
your wrist when
using the camera.
• During Use
':!) Restrict underwater
use to depths of 5 m (16 ft.) or less and periods shorter
':!) Do not open or close the battery-chamber
cover while under water.
']) Do not use in hot springs or heated pools.
':!) Do not dive into water with the camera or otherwise
':!) If the camera
is left on the sand, its temperature
get into the speaker or microphone.
':!) Sunscreen, suntan lotion, or other oily substances
be removed with a damp cloth.
':!) The camera may lose water resistance if subjected
retailer or a FUJIFILM-authorized
than 120 minutes.
subject it to excessive force.
may exceed operating
may discolor
limits and sand may
the camera body and should
to excessive force or vibration.
Consult your
repair technician.
xiii
• After Use
':!) Remove any foreign matter from the water-resistant
seal and adjacent
ter could damage the seal, lowering water resistance.
surfaces.
Foreign mat-
':!) After using the camera underwater or in locations where foreign matter might adhere to the
camera body, rinse the camera under the tap or leave it in a basin of flesh water for two to
three minutes.
':!) Liquid soaps, detergents,
never be used.
alcohol,
and other cleansers may affect water
resistance and should
':!) After use, remove water droplets and foreign matter with a dry cloth, firmly latch the batterychamber cover, and soak the camera in fresh water for about ten minutes. Dry the camera
thoroughly
•
after removing
it from the water.
Storageand Maintenance
':!'_Do not store at temperatures
below 0 °C (32 °F) or above 40 °C (104 °F).
':!) To ensure continued water resistance, it is recommended
that you have the water-resistant
seal replaced
about once a year (a fee is charged
FUJIFILM-authorized
•
repair technician
for this service). Contact
Cold Climates
':!) Battery performance
drops at low temperatures,
reducing
the number
of pictures that can be
taken. Insulate the camera to keep it warm or place it in your clothing.
':!) Use an NP-45A battery.
':!) Display response may slow at low temperatures.This
_V
your retailer or a
for more information.
is not a malfunction.
_Table of Contents
ForYourSafety ..................................................................
ii
IMPORTANT
SAFETY
INSTRUCTIONS
..................................
ii
SafetyNotes....................................................................
iv
About ThisManual ...........................................................
xi
Frequently-UsedButtons ...............................................
×ii
Product Featuresand Precautionsfor Use....................xiii
Before You Begin
.........
Symbolsand Conventions.................................................
I
Supplied Accessories.........................................................
I
Partsof the Camera ..........................................................
2
CameraDisplays...............................................................
4
Shooting........................................................................
4
Playback
.........................................................................
5
First Steps
Chargingthe Battery ........................................................
7
Inserting the Battery and a Memory Card.......................
9
Compatible
MemoryCards.............................................
14
Turning the Cameraon and Off ......................................
16
ShootingMode..............................................................
16
PlaybackMode...............................................................
16
BasicSetup ......................................................................
18
Basic Photography and Playback
Taking Picturesin _
(SceneRecognition) Mode,,,,,,19
Viewing Pictures.............................................................
23
More on Photography
Shooting Mode ................................................................
24
Choosinga ShootingMode............................................
24
ShootingModeOptions.................................................
25
MOTION
PANORAMA
..............................................
27
Recording GPSDatawith Pictures.................................
29
[] Intelligent FaceDetection .......................................
32
FocusLock........................................................................
33
[]
ExposureCompensation..........................................
35
MacroMode (Close-ups)...........................................
36
._ Using the Flash(Intelligent Flash)............................
37
Usingthe Self-Timer.................................................
39
XV
i_i:_ie of Contents
More on Playback
Connections
PlaybackOptions.............................................................
40
-k Favorites:RatingPictures.........................................
40
PlaybackZoom...............................................................
41
Multi-FramePlayback....................................................
42
[] Deleting Pictures......................................................
43
[] Image Search............................................................
44
[] PhotoBook Assist
......................................................
45
Creatinga PhotoBook.....................................................
45
ViewingPhotobooks......................................................
46
Editingand DeletingPhotobooks...................................
46
Viewing Panoramas........................................................
47
Viewing Pictureson TV...................................................
51
Printing Picturesvia USB................................................
52
Printingthe DPOFPrint Order.........................................
54
Viewing Pictureson a Computer....................................
56
Windows:InstallingMyFinePixStudio...........................
56
Macintosh:InstallingFinePixViewer
...............................
58
Connectingthe Camera..................................................
60
Movies
RecordingMovies............................................................
48
Viewing Movies...............................................................
50
xvi
Usingthe Menus:Shooting Mode ..................................
63
Usingthe ShootingMenu...............................................
63
ShootingMenuOptions.................................................
63
[] %OOT[NG
MODE
....................................................
63
[] ISO........................................................................
64
[] IMAGE
SEE............................................................
65
[] IMAGE
QUALIFY
.....................................................
66
[] FINEPIX
dOLOR
.......................................................
66
[] WHITE
BALANCE
....................................................
67
[] CONTINUOUS
.........................................................
68
[] FACE
DETECTDN
.....................................................
68
[] AFMODE...............................................................
69
[] MOVEQUALIFY
.....................................................
69
[] LEDILLUMINATOR
...................................................
69
_,_be
Usingthe Menus:Playback Mode ..................................
70
Usingthe PlaybackMenu...............................................
70
PlaybackMenu Options..................................................
70
[] PHOTOBOOK
ASSIST
................................................
70
[] PHOTO
NAViGATiON
................................................
71
[] iMAGE
SEARCH
......................................................
71
[] ERASE
...................................................................
71
[] EDIT......................................................................
72
[] MARKFORUPLOADTO
............................................
73
[] SLIDE
SHOW..........................................................
74
D REDEYEREMOVAL
.................................................
7S
[] PROTECT
................................................................
75
[] CROP
..................................................................... 76
[]
[]
[]
[]
RESIZE
...................................................................
76
IMAGE
ROTATE
.......................................................
77
COPY
.....................................................................
77
TRANSITION
...........................................................
78
!_1 MOVIETRIMMING
...................................................
78
[] MOVIE
JOIN...........................................................
79
[]
PRINT
ORDER
(DPOF)
..............................................
79
_Co_ ents
TheSetupMenu..............................................................
80
UsingtheSetupMenu....................................................
80
SetupMenuOptions......................................................
81
[] DATE/TIME
.............................................................
81
[] TiMEDIFFERENCE
...................................................
81
[] _tLANG .......................................................
81
[] SILENT
MODE
.........................................................
81
[] RESET
....................................................................
82
[] FORMAT
................................................................
82
[] LOCATION
SEARCH
..................................................
82
[] LOCATION
INFO
.......................................................
82
[] TRACKING
DATA
......................................................
83
[] Km/mile
................................................................
83
[] IMAGE
DISP
...........................................................
83
[] FRAME
NO.............................................................
84
[] OPERATION
VOh
......................................................
85
[] SHUTTER
VOLUME
..................................................
85
[] SOUND
..................................................................
85
[] PLAYBACKVOLUME
................................................
85
[] LdD
BRIGHTNESS
....................................................
85
[] LdD
MODE
.............................................................
86
[] AUTO
POWER
OFF
...................................................
86
[] DUAL
ISMODE
.......................................................
86
D RED
EYE
REMOVAL
.................................................
86
[] DIGITAL
ZOOM
.......................................................
87
[] SAVE
0% IMAGE
....................................................
87
[] GUIDANCE
DISPLAY
................................................
87
l_J VIDEO
SYSTEM
.......................................................
88
xv#
i_bie
of Co_ter_ts
Technical Notes
Troubleshooting
Problems and Solutions..................................................
93
OptionalAccessories
.......................................................
89
Printing........................................................................
89
Warning Messagesand Displays....................................
99
ComputerRelated
..........................................................
89
Appendix
Audio/Visual
.................................................................
89
Tipsand Tricks................................................................
103
Accessories
from FUJIFILM
..............................................
90
Internal Memory/Memory CardCapacity....................106
Caringfor the Camera.....................................................
91
Specifications................................................................
107
Storageand Use.............................................................
91
Condensation
................................................................
91
Cleaning.........................................................................
92
Traveling........................................................................
92
xviii
_ymbols
and Conventions
The following symbols are used in this manual:
(D :This information should be read before use to ensure correct operation.
_, :Additional information that may be helpful when using the camera.
_: Other pages in this manual on which related information may be found.
Menus and other text in the LCD monitor
are shown in bold.
In the illustra-
tions in this manual, displays may be simplified for explanatory purposes.
_p_plied
Accessories
The following items are included with the camera:
NP-45A rechargeab/e
80458
battery charger
%_ Attach ngthe Strap
• Strap
• UserGuide
USBcable
CD-ROM (contains
this manual)
battery
Attach tile strap as shown.
_Parts of the Camera
For more information,
(_)
l
refer to the page listed to the right of each item.
(2; ¢3....
ij
_'
49 ,;5_
i Selector button
Move cursorup
[]
(exposure
compensation)
button
(delete)button (xii)
Move cursorleft
(macro)button
(_
(35)
Move cursorright
,_ (flash)button (37)
36)
Move
Q
(selfltimer)button
cursordown
2
button
(39)
]
:_f
/
:>a' s 7¢¸_i_, _ia" _,'a
_Zoom control ...........................................................
20, 41 _
Shutter button..............................................................
21 _
Indicatorlamp (seebelow)
Strapeyelet ....................................................................
1
_ON/OFF button.............................................................
16 _
Battery-chambercoverlatch...................................
10,13
Flash.............................................................................
37 _
_Self-timer lamp ............................................................
39 _
Connectorcoverlatch........................................
51,52, 60
DISP(display)/BACKbutton .....................................
6,18
LEDilluminator.............................................................
69
Built-in GPSantenna....................................................
29 _
')_. (silent mode)button*..............................................
xii
[] (playback)button...................................................
23
Speaker.........................................................................
50
Microphone..................................................................
48 _
USBmulti-connector...............................................
52, 60
Memorycardslot..........................................................
11
LCDmonitor....................................................................
4
(-} (movierecording)button........................................
48
Batterylatch............................................................
10, 13
Batterychamber.............................................................
9
_Pressandholdthe DISP/BACKbuttonuntil 1_ isdisplayed.
_
The Indicator Lamp
The indicator lamp shows camera status as follows:
Camera status
Indicator lamp
Glows green
Focus locked.
Blinks green
Blur, focus, or exposure
Picture can be taken.
Recording
pictures.
Additional
Glows orange
Recording
pictures.
No additional
Blinks orange
Flash charging;
Blinks red
s
warning.
Blinks green and orange
_
.
: M<:>•
Lens or memory
pictures can be taken.
pictures can be taken at this time.
flash will not fire when picture
is taken.
error.
3
CameraDi_play£
The following types of indicator may be displayed during shooting and playback. Indicators vary with camera settings.
• Shooting
Movie quality................................................................
48
Number of availableframes........................................106
Sensitivity.....................................................................
64
®
Imagesizeand quality .............................................
65,66
FINEPIXcolor ................................................................
66
White balance
...............................................................
67
Battery level...................................................................
5
Dual ISmode................................................................
86
GPSsignalstrength.......................................................
29
Exposurecompensation................................................
35
Shootingmode.............................................................
24
IntelligentFaceDetectionindicator..............................32
Dateandtime ...............................................................
18
Blurwaming ............................................................
38,99
Continuousshootingmode...........................................
68
Focuswarning .........................................................
21,99
Silentmodeindicator................................................
3, 81
Focusframe ..................................................................
33
Self-timer indicator......................................................
39
Macro(close-up)mode.................................................
36
Internalmemoryindicator
Flashmode...................................................................
37
_ll_: indicatesthat nomemorycardis insertedandthat pictures
will bestoredinthe cameraginternalmemory(11).
• Playback
Playbackmodeindicator..........................................
23, 40
Intelligent FaceDetectionindicator.........................32, 75
_
[]_
_s
%o|
Red-eyeremovalindicator............................................
75
Portrait enhancer..........................................................
25
Silentmode indicator................................................
3, 81
Gift image.....................................................................
40
Framenumber..............................................................
84
|1213112050
1/250
10:00 AN
F4.5
GPSdata.......................................................................
30
[_ -1 _
_,,d
Mark for uploadto ........................................................
73
Photobookassist...........................................................
45
Favorites.......................................................................
40
DPOFprint indicator.....................................................
54
Protectedimage...........................................................
75
Battery Level
Battery
level is shown
as follows:
Indicator
Description
(white)
Battery partially
(white)
Battery more than half discharged.
(red)
b inksred
discharged.
Low battery. Charge as soon as possible.
Battery exhausted. Turn camera off and charge battery.
i:>;i!/i"t S 0 _ t }l e (i] a _IA_!!
_a
®¢
.....HidingandViewingIndicators
PressDISP/BACK
to cycle through shooting and playback indicators asfollows:
• Shooting:Indicators displayed/indicators hidden/best framing
• Playback:Indicators displayed/indicators hidden/-k favorites
6
"/
_ging
the Battery
The battery is not charged at shipment. Charge the battery before use.
1 Place the battery in the supplied
battery charger.
Insert the battery in the orientation
Tile camera uses an NP-45A recharge-{+.',@
indicated bythe (q-}(T_}(---} labels.
Bottery
ablebattery,
_Arrow
label
2 Plug the charger in.
Botterychorger
[
_'@(-}
lobe/
Plug the charger into a power outlet. The charging indicator will light.
®@TheCharging
Indicator
The charging indicator shows battery charge status asfollows:
Chargingindicator
Off
On (green)
On (yellow)
Blinks (yellow)
Battery status
Battery not inserted.
I
Action
I
Insert the battery.
Battery fully charged. I
Remove the battery.
Battery charging.
Battery fau t.
Unplug
the charger and remove the battery.
Ci_g!_i
itseBa_tey
3 Charge the battery,
Remove the battery when charging is complete.
See the specifications
(_ 111) for charging times (note that charging times increase at low temperatures).
<J>Unplug the charger when it is not in use.
8
{st
Steins
_lnsertinq
the Battery
and a Memory
Card
Although the camera can store pictures in internal memory, optional SD,
SDHC, and SDXC memory cards (sold separately) can be used to store additional pictures. After charging the battery, insert the battery and memory
card as described below.
I Open the battery-chamber
Pressthe latch as shown.
cover.
Be sure tile camera is off before opening tile
battery-chamber cover.
(!>Do not open the battery-chamber cover
when tile camera is on. Failureto observe this
precaution could result in damage to image filesor memory cards.
(!>Do not use excessive force when handling the battery-chamber cover.
(!>Remove water droplets and other foreign matter with a dry cloth before opening tile battery-chamber cover.
B_4 e_y a c _,
{ac
2 Insert the battery.
Insert the battery with the terminal first and
in the orientation shown by the label inside
the battery chamber, keeping the battery
latch pressed to one side. Confirm that the
battery is securely latched.
(!> Insert the battery in the correct orientation.
DO NOTuse force or attempt to insert the battery upside down or backwards. The battery
will slide in easily in the correct orientation.
Bottery Iotch
Lobe/
3 Insert the memory card,
Holding the memory card in the orientation
shown at right, slide it in until it clicks into
place at the back of the slot.
(!>Be sure card is in tile correct orientation; do
not insert at an angle or useforce. If the memory card is not correctly inserted or no memory card is inserted, _ will appear in the LCD
monitor and internal memory will be used for
recording and playback.
(!} SD/SDHC/SDXCmemory cards carl be locked,
making it impossible to format the card or to
record or delete images. Before inserting an
SD/SDHC/SDXCmemory card, slide tile writeprotect switch to tile unlocked position.
Write-protect
switch
_se_gieB_te_ya_<_aLte_
o_yC_d
4 Close the battery-chamber
cover.
Before closing the cover, check to confirm
that there is no dust, sand, or other foreign
matter on the water-resistant seal or ad)acent surfaces.
®_ Confirming
ThattheCoverIsLatched
Confirm that tile battery<hamber or connector cover does not protrude from the
camera body.
• Tile covers are latched when tile latches are in tile positions shown below at left.
Latch indicator
Unlatched
Latched
72
:: st',
_::
"'_e-_
iii
¸"_ _i_ _ _: U_-¸ _ _ _:_iA_i_:_i_Z!_hO_W (iii_i <_
% Removing
theBatteryandMemoryCard
Beforeremoving tile battery or memory card,turn thecameraoffand pressthe latch
to open the battery-chamber cover.
To remove the battery, press the battery latch to the side, and
slide the battery out of tile camera as shown.
Botterylotch
To remove the memory card, press it in and releaseit slowly. R_"_
The card can then be removed by hand. When a memory card
is removed, the card could come out of the slot too quickly.
Useyour finger to hold it and gently releasethe card.
iii
::
t ',t;
:
73
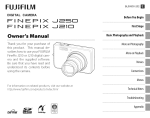
• CompatibleMemory(ards
FUJIFILM and SanDisk SD, SDHC, and SDXC memory cards have been approved for use in the camera. A complete list of approved memory cards
is available at http://www.fujifilm.com/support/digitol_comeros/compotibility/.
Operation is not guaranteed with other cards. The camera can not be used
with xD-P£ture Cards or MultiMediaCard (MMC) devices.
(!>MemoryCards
• Donotturnthecameraofforremovethememory
cardwhilethememory
cardisbeingformatted
ordataare beingrecorded
toor deletedfromthe card. Failure to observe this precaution
could damage tile card.
• Format SD/SDHC/SDXCmemory cards before first use, and be sure to reformat all
memory cards after using them in a computer or other device. For more information
on formatting memory cards, see"l_ FORMAT"(_ 82).
• Memory cards are small and carl be swallowed; keep out of reach of children. If a
child swallows a memory card, seek medical assistanceimmediately.
• miniSD or microSD adapters that are larger or smaller than the standard dimensions
of an SD/SDHC/SDXCcard may not eject normally; if the card does not eject, take
the camera to an authorized service representative. Do not forcibly remove the card.
• Do not affix labels to memory cards. Peeling labels can causecamera malfunction.
• Movie recording may be interrupted with some types of SD/SDHC/SDXCmemory
card. Usea a,Ass@ card or better when shooting HD movies.
14
{ st',tei_s
set
• Tile data in internal
memory
g _eBattey;_!_da£}e_
may be erased or corrupted
when
oy(_d
tile camera is re-
paired. Please note that the repairer will be able to view pictures in internal memory.
• Formatting a memory card or internal memory in the camera creates a folder in
which
pictures are stored. Do not rename or delete this folder or use a computer
or
other device to edit, delete, or rename image files. Always use the camera to delete
pictures from memory
cards and internal
copy them to a computer
memory;
before editing
or renaming
files,
and edit or rename the copies, not tile originals.
(!>Batteries
• Remove dirt from tile battery terminals with aclean, dry cloth. Failureto observe this
precaution could prevent the battery from charging.
• Do not aMx stickersor other objects to the battery. Failureto observe this precaution
could make it impossible to remove the battery from the camera.
• Do not short the battery terminals. The battery could overheat.
• Readthe cautions in "The Batteryand Power Supply"(_ vi).
• Useonly battery chargers designated for use with the battery. Failureto observe this
precaution could result in product malfunction.
• Do not remove the labelsfrom the battery or attempt to split or peel the outer casing.
• The battery gradually loses its charge when not in use. Charge the battery one or
two days before use.
Fst
',t
s
15
_g
the Camera on and Off
Shooting
Mode
Pressthe ON/OFFbutton to turn the
camera on.
PressON/OFF
again to turn the camera
off.
_, Switching
toPlayback
Mode
Press tile [] button to start playback.
Pressthe shutter button halfway to return
to shooting mode.
Play.backMode
To turn the camera on and begin
playback, press the [] button for
about a second.
Press the [] button again or press
the ON/OFFbutton to turn the camera
off.
_, Switching
toShooting
Mode
To exit to shooting mode, presstile shutter button halfway. Pressthe [] button
to return to playback.
T_ming
ti_e C_m_i_
on _n{i Off
(l> Fingerprints and other marks on tile protective glass covering the lens carl affect
pictures. Keeptile glass clean.
(!;>The ON/OFF
button does not completely end the supply of power to tile camera.
_' AutoPower
Off
The camera will turn off automatically if no operations are performed for tile length of
time selected for _ AUTO POWEROFF (_ 86). Toturn the camera on, use the ON/OFF
button or pressthe [] button for about a second.
i
_,t',t
:,
17
_Basic Setup
A language-selection dialog is displayed the first time the camera is turned
on. Set up the camera as described below (you can reset the clock or change
languages at any time using the [] DATE/TIME or _J _j_/LANG. options in
the setup menu; for information on displaying the setup menu, see page 81).
I Highlight a language and press MENU/OK
IIIIIIIIII1_
_/LANG,
_, PressDISP/BACK
to skip the current step. Any steps you skip
will be displayed the next time tile camera is turned on.
2 The date and time will be displayed. Press the selector
left or right to highlight the year, month, day, hour, or
minute and press up or down to change. To change the
order in which the year, month, and day are displayed,
highlight the date format and press the selector up or
down. Press MENU/OKwhen settings are complete.
TheCameraClock
If the battery is removed for an extended
language-selection
18
period, the camera clock will be reset and the
dialog will be displayed
when tile camera is turned on.
t ',
_:: ;
_g
Pictures in _r_ (Scene Recognition)
This section
describes
how
The camera
automatically
to take pictures
analyzes
in _
Mode
(scene recognition)
the composition
and adjusts
mode.
settings
ap-
propriately.
1 Turn the camera
Press the
8R
_
on,
ON/OFF button
shooting
indicators
to turn
the
camera
on.
will be displayed.
Themo_Icon
This icon indicates that the camera continuously
appropriate
searches for faces to select tile
scene, increasing the drain on the battery.
Tile camera selects the scene according to shooting conditions and tile type of
subject: O PORTRAIT
(portraits), 0 LANDSCAPE
(landscapes), _ NIGHT(poorly-lit landscapes), @ MACRO
(close ups), _ NIGHT
PORTRAIT
(poorly-lit
(backlit portraits),
portraits), @ BACKLIT
PORTRAIT
• AUTO(all other scenes)
19
i_!_ki_s<_
i:>ictures ir_ _:
(S{ene
:,_
w ¸ 2 I _ _¸ M _x::ie
2 Frame the picture.
Use the zoom control to frame the picture in the display.
Zoom out
QT
Zoom in
wQ
Hold the camera steady with both hands and brace your
elbows against your sides. Shaking or unsteady hands carl
bluryourshots
20
:}:_ 5<: s_
i};
;!_) y
ii!_i(i_q
i>ict(_ir__ (S(:er_;!_
:e_¸¸ _ q I ¸ _ _¸ _o{::i_
3 Focus.
Pressthe shutter button halfway to focus.
_, Tile lens may make a noise when the camera focuses; this
is normal.
If the cameraisable to focus,it will beep twice and the indicator lamp will glow green.
Ifthe cameraisunableto focus,the focus frame will turn red, !AF will be displayed, and the indicator lamp will blink green.
or use focus lock (_ 33).
Change the composition
4 Shoot.
Smoothly
press
theshutterbuttontherestoftheway
downtotakethepicture.
Ifthesubject
ispoorly
lit,tileflash
mayfirewhentilepictureistaken.Forinformation
onusingtileflashwhen
lighting
ispoor,
see"$Using
tileFlash
(Intelligent
Flash)"
(_
37).
_Viewing
Pictures
Pictures can be viewed in the LCD monitor. When taking important
graphs, take a test shot and check the results.
photo-
1 Press the [] button,
The most recent picture will be displayed.
2 View additional
pictures,
Press the selector right to view pictures in the
order recorded, left to view pictures in reverse
order.
Pressthe shutter button halfway to exit to shooting mode.
_] I::}:
:_) y
:> y:) <:k
23
_Shooting.
Mode
Choose a shooting mode according to the scene or type of subject.
(hoosin.go Shooting.Mode
1 Press MENU/OKto display the shooting menu.
2 Highlight [] SHOOTING MODE and press the
selector right to display shooting mode options.
3 Highlight the desired mode and press MENU/0K
24
Shootin.gModeOptions
Mode
Description
The camera automatically
analyzes the composition
and selects a scene
SCENERECOGNITIONaccording to shooting conditions and the type of subject.
I_ AUTO
Choose for crisp, dear snapshots.
situations.
This mode
P PROGRAMAE
O_ NATURAL& _.
The camera sets exposure automatically.
The camera takes two shots: one without
qfi_ NATURALLIGHT
Capture
PORTRAIT
natural lighting
the flash and one with.
conditions.
Choose for daylight
skin effect when shooting
shots of buildings
SPORT
Choose when photographing
moving
NIGHT
Choose this mode for poorly ]it twilight
Choose this mode for slow shutter
portraits.
and landscapes.
MOTIONPANORAMA Take up to three pictures and join them together
_-* NIGHT(TRIPOD)
in most
Choose for portraits.
PORTRAITENHANCERChoose for a smooth
LANDSCAPE
under low-light
is recommended
to form a panorama.
subjects.
or night scenes.
speeds when shooting
at night.
SUNSET
Choose this mode to record the vivid colors in sunrises and sunsets.
SNOW
Choose for crisp, clear shots that capture
nated by shining white snow.
_1 BEACH
the brightness
Choose for crisp, dear shots that capture the brightness
of scenes domi-
of sunlit beaches.
Mode
4_ UNDERWATER
"-" UNDERWATER
(WIDE)
waterproof
Choose for wide-angle underwater
ground behind the main subject.
<_ UNDERWATER
(MACRO)
Choose for underwater
_i" PARTY
Capture indoor
-_ FLOWER
Choose for vivid close-ups
TEXT
26
Description
Choose for when using an optional
undervvater.
close-ups
background
case to take photographs
shots that include more of the back-
of small objects.
lighting
under Iowqight
conditions.
of flowers.
Take clear pictures of text or drawings
in print.
, ...........
,/
Si_ooting
Moci_
•
_
MOTION
PANORAMA
In this mode, you can take up to three pictures and join them together to
form a panorama. Use of a tripod is recommended to assist in composing
overlapping shots.
1 Press the selector up to select a frame. Press the selector left or right to
highlight a pan direction and press MENU/OK
2 Take a photograph.
with the first shot.
Exposure and white balance for the panorama are set
3 Frame the next shot to overlap with the previous picture by superimposing @ on + so that they form a solid circle (0). The camera will release the
shutter automatically.
Pon direction
Disp/oy ofter 1st shot
i_ ,_'_
P ]otoqmi,
_y
Shutter re/eosed
27
Si_ooting Mode
4 Take the last shot as described
in Step 3.
_, To end shooting and create a panorama after the first or second shot, press the
multi selector up after completing Step 2 or Step 3 and proceed to Step 5.
5 Press MENU/OKto save the picture.
(l> Panoramas are created from multiple
frames.
The camera may in some cases be
unable to stitch the frames together perfectly.
(!) Tile desired results may not be achieved with moving
the camera, unvarying
in constant
subjects, subjects close to
subjects such as the sky or a field of grass, subjects that are
motion, such as waves and waterfalls, or subjects that undergo
changes in brightness.
marked
Panoramas may be blurred if the subject is poorly lit.
Depending on the page size and tile size of tile panorama, panoramas may print
with their edges cropped out or with wide margins at the top and bottom or at
both sides.
_Recordinq
GPS Data with
Pictures
To record GPS data with new pictures, press MENU/0Kand select one of the following options for [] LOCATION SEARCH in the setup menu (_ 82).
• PERMANENTLY
ON:The camera continues to update GPS data even when
turned off. The camera will be quicker to display GPS data when turned on,
but the drain on the battery will increase.
• WHENSWlTCHED
ON:The camera updates GPS data only when on. The camera
may need some time to acquire GPS data when turned on. This option is
selected automatically at battery levels of _
and below.
GPS works best outdoors
under clear skies.
During shooting, GPS data are displayed in the monitor as Im
shown at right. Signal strength is indicated bythe number
of bars; *;L is displayed when the camera is searching for a
signal and _:.j if no signal is detected. The current location
is shown by a place name or (if no place name is available) Loc_ion
by the longitude and latitude,
]
Si_rT_l
s_reng_h
The display of GPS information carl be turned off by selecting OFF for [] LOCATION INFO (_ 82).
(l>Using
GPS
increases
thedrain
onthebattery,
causing
battery
performance
todrop
atlowtemperatures.
(!)Thereceiver
mayhave
anerror
ofafewhundred
meters
(yards).
(!)Tilecamera
maybeunable
to receive
GPS
datainsomelocations.
If possible,
choose
anoutdoor
location
withfewobstructions
when
turning
tilecamera
on.
(l)Tileposition
recorded
whenaphoto
istaken
maydifferfromtheactual
location
if
some
timehaspassed
since
tilecamera
waslastabletoupdate
GPS
data.
(l)Select
OFF
for_ LOCATION
SEARCH
(_ 82)andI_ITRACKING DATA(_ 83) in
the setup menu when in a hospital and before takeoffand landing if traveling by air.
(!) Place names are current as of tile date on which tile map database was created
(_ 109)and will not be updated to reflect any changes after that date.
(!) Comprehensive place name data are unavailable in some countries and regions. If
no name is available, tile latitude and longitude will be displayed for a few seconds.
_® ViewingGPSData
During playback, pictures for which GPSdata exist are indicated
by a GPB icon. GPSdata are shown for a few seconds each time
tile picture is displayed.
30
riPS/con
_ ...........
,/
..... GP$
iiiTile camera may be unable to receive GPSdata if tile arlterlna (_ 2) is obstructed or
when underground, underwater, under a bridge or overpass, inside a car, building,
tunnel, or metal briefcase,between tall buildings, or in the vicinity of cell phones or
other devices that broadcast in the 1.5GHz band.
Obey all local regulations regarding tile use of GPSdevices. Note that tile use of
'"GPSdevices is restricted in some countries, including tile People'sRepublic of China.
Before going abroad, consult with tile embassy or a travel agent. Tile camera may
display is_,_
(no signal)in locations in which restrictions apply.
'"
'
s_
i};
1!_) y
37
_V:_ Intelligent
Face Detection
Intelligent Face Detection sets focus and exposure for human faces anywhere
in the frame, preventing the camera from focusing on the background in
group portraits. Choose for shots that emphasize portrait subjects.
To use Intelligent Face Detection, press MENU/OK
to display the shooting menu and select ON for
[] FACEDETECTION (_ 68). Facescan be detected
with the camera in vertical or horizontal orientation;
if a face is detected, it will be indicated by a green
border. If there is more than one face in the frame,
the camera will select the face closest to the center;
other faces are indicated by white borders.
(l> In some modes,tile camera may set exposure for the frame asa whole rather than
the portrait subject.
(l) If the subject moves as the shutter button is pressed, their face may not be in the
area indicated by tile green border when the picture is taken.
_Focus Lock
To compose photographs with off-center subjects:
1 Focus: Position the subject in the focus frame (E[+]_)
and press the shutter button halfway to lock focus
and exposure. Focus and exposure will remain locked
while the shutter button is pressed halfway (AF/AE
loci<).
2 Recompose:
Keep the button pressed halfway.
3 Shoot: Pressthe button all the way down.
{:¸OilL_S LO<I_
Although tile camera boasts a high-precision autofocus system, it may be unable to
focus on tile subjects listed below. If the camera is unable to focus, focus on another
subject at the same distance and use focus lock to recompose the photograph.
•
Veryshinysubjects
suchasmirrorsor carbodies.
• Subjects
thatshowlittlecontrastwith thebackground
(forexample,
subjectsinclothingthatisthesamecolor
Fast-moving
subjects.
Subjects
photographed
througha windowor otherre- asthebackground).
• Subjects
positioned
infrontofor behinda high-contrast
flectiveobject.
objectthat is alsoin thefocusframe(forexample,a
• light,Dark
subjeCtSsuch
asandhair
subjeCtSor
fur. thatabsorbratherthanreflect
Insubstantial
subjects,
suchassmokeorflame.
34
subjectphotographed
againstabackdrop
ofhighlycontrastingelements).
, ...........
,/
_posure
Compensation
To adjust exposure compensation
when photographing very bright, very dark, or high-contrast
subjects, press the selector up (1_). Pressthe selector up or down to choose an exposure compensation value and then press MENU/OIl.
Choose positive (+) volues
to increose exposure
Choose negotive ()
volues
to reduce exposure
A [] icon and exposure indicator are displayed at settings other than ±0. Exposure
compensation is not reset when the camera is turned off; to restore normal exposure control, choose a value of ±0.
Turn the flash offwhen using exposure compensation.
Exposure compensation is available only when P (PROGRAMAE) is selected for
shooting mode.
_
Macro
Mode
(Close-ups)
For close-ups, press the selector left (_) and select
_. When macro mode is in effect, the camera focuses on subjects near the center of the frame. Use
the zoom control to compose pictures (_ 20).
To exit macro mode, press the selector left (_) and
select '_
OFF
'
Useof a tripod is recommended to prevent blur caused
by camera shake.
36
_ ...........
,/
_g
the Flash (Intelligent
Flash)
When the flash is used, the camera's Intelligent Flash system instantly analyzes
the scene based on such factors as the brightness of the subject, its position
in the frame, and its distance from the camera. Flash output and sensitivity
are adjusted to ensure that the main subject is correctly exposed while preserving the effects of ambient background lighting, even in dimly-lit indoor
scenes. Use the flash when lighting is poor, for example when shooting at
night or indoors under low light.
Pressthe selector right (_.)and choose from the following flash modes:
Option
AUTO/_
(AUTOFLASH)
_,/_>,_
Description
Tile flash fires when required.
The flash fires whenever
(FORCED
FLASH) coloration
when
shooting
Recommended
a picture is taken.
S_./_
Capture
Use for backlit subjects or for natural
in bright light.
The flash does not fire even when
(SUPPRESSED
FLASH)recommended.
(SLOWSYNCHRO)
brightly
in most situations.
the subject
is poorly
both the main subject and the background
]it scenes may be overexposed).
lit.
Use of a tripod
is
under low light (note that
_, Ifthe flash will fire, [] will be displayed when the shutter button is pressedhalfway.
At slow shutter speeds, t"" will appear in the display to warn that pictures may be
blurred; use of a tripod is recommended.
The flash may fire several times with each shot. Do not move the camera until
shooting iscomplete.
_, The flash may causevignetting.
i
38
_ Red-Eye
Removal
When Intelligent FaceDetection (_ 32) and red-eye removal (_ 75)are
on, red-eye removal is available in auto (_,o; REDEYEREDUCTION),flash
on (<_; FORCEDFLASH),and slow sync (_; REDEYE& SLOW)modes.
Red-eyeremoval minimizes "red-eye"caused when light from the flash is
reflected from the subject's retinas asshown in the illustration at right.
_ ..............
_::_
,/
<O Using the Self-Timer
To use the self-timer, press the selector down (_)
and choose from the following options:
Option
(OFF)
Description
Self-timer
off.
The camera starts the timer when it detects two portrait
d._ (COUPLE
TIMER)
subjects close together.
Press the selector up to choose how close the subjects must be together before
the timer starts (the more hearts, the closer the subjects must be together).
_, To stop the timer before the picture
The camera will start the timer when
is taken, press DISP/BACK
it detects the selected
number
of portrait
d_'_,(GROUPTIMER)
subjects. Press the selector up to choose the number of subjects.
_, To stop the timer before the picture is taken, press DISP/BACK
The shutter
d_ (10SEO
self-portraits.
timer counts
The shutter
t!_ (2SEC)
is released ten seconds after the shutter
The self-timer
down.
button
is pressed.
Use for
lamp on the front of the camera blinks while
is released two seconds after the shutter
button
is pressed.
reduce blur caused by the camera moving when the shutter-release
)ressed. The self-timer lamp will blink as the timer counts down.
the
Use to
button
is
_yback
Options
To view the most recent picture in the LCD monitor, pressthe [] button.
Press the selector right to view pictures in the order recorded, left to view
pictures in reverse order. Keep the selector pressed to scroll rapidly to the
desired frame.
_, Picturestaker] using other cameras are indicated by a I_ ("gift image") icon during
playback.
* Favorites:RatingPictures
To rate the picture currently displayed in full-frame playback, press DISP/BACK
and press the selector up and down to select from zero to five stars.
4O
PlaybackZoom
Select T to zoom in on pictures displayed in single-frame playback; select W to
zoom out. When the picture is zoomed in, the selector can be used to view
areas of the image not currently visible in the display.
Zoom
w
indiccT_or
T
_A_
NcTvicjcTUon
windowshows
Press DISP/BACKto exit zoom.
_, Tile maximum zoom ratio varies with image size. Playback zoom is not available
with cropped or resized copies saved at a size of I_1 or smaller.
Multi-FramePlayback
Selecting W when a picture is shown full-frame in the LCD monitor displays
the current image with previous and following images in the background.
Select W to increase the number of images displayed to two, nine, or one
hundred, T to view fewer images.
T
When two or more images are displayed, use the selector to highlight images
and press MENU/OKto view the highlighted image full frame. In the nine- and
hundred-frame displays, use the selector to view more pictures.
42
........... ........
[]
Deletinq Pictures
To delete
individual
pictures, multiple
selected
[]
ERASE(_
choosefromtheoptionsbepictures,
or all71),and
pictures,
press MENU/OK, select _
low. Note that deleted pictures can not be recov ........................................................................
ered. Copy important pictures to a computer or other storage device before
proceeding.
Option
FRAME
Description
Press the selector left or right to scroll through
to delete the current
Highlight
SELECTED
FRAMES
pictures
picture
(a confirmation
pictures and press MENU/OR
dialog is not displayed).
and press MENU/OK to select or deselect
are protected or in a print order are shown by El).
complete, press DISP/RACKto display a confirmation
(pictures
that
When the operation is
dialog, then highlight
OK and press MENU/OKto delete the selected pictures.
A confirmation
dialog will be displayed; highlight
delete all unprotected
ALLFRAMES
pictures
(if a memory
OK and press MENU/OKto
card is inserted, only the pic-
tures on the memory card will be affected; the pictures in internal memory
are only deleted if no memory card is inserted). Pressing DISP/RACKcancels
deletion; note that any pictures deleted
not be recovered.
before the button
was pressed can
Protected pictures carl not be deleted. Remove protection from any pictures you
wish to delete (_ 75).
If a messageappears stating that tile selected images arepart of a DPOFprint order,
press MENU/OK
to delete the pictures.
'
'"
43
_KTJImage Search
Searchfor pictures.
I Select [] IMAGE SEARCH in the playback menu (_ 71), highlight one of
the following search criteria, and press MENU/OK:
• BYDATE:Search by date.
• BYGPSLOCATION
NAME:Search by location name (location names that do
not begin with a letter from A to Z are listed in the search conditions
under"#").
• BYFACE:Search for faces from the face recognition database.
• BY* FAVORITES:
Search by rating.
• BYSCENE:
Search by scene.
• BYTYPE
OFDATA:Find all still pictures, all movies, or edited pictures.
• BYUPLOAD
MARK:Find all pictures selected for upload to a specified destination.
2 Select a search condition.
Only pictures that match the search condition
will be displayed. To delete or protect selected pictures or to view the
search results in a slide show, press MENU/OKand choose [] ERASE (_ 43),
[] PROTECT (_ 75), or [] SLIDE SHOW (_ 74).
[]
PhotoBook Assist
Create books from your favorite photos.
Creatin.ga PhotoBook
1 Select NEW BOOK for [] PHOTOBOOK ASSIST in the playback menu
(_ 70) and choose from the following options:
• SELECT
FROMALL:
Choose from all available pictures.
• SELECT
BYIMAGESEARCH:
Choose from pictures matching selected search
conditions (_ 44).
_, Neither photographs
I_1 or smaller nor movies carl be selected for photobooks.
2 Scroll through the images and press the selector up to select or deselect.
To display the current image on the cover, press the selector down. Press
MENU/OKto exit when the book is complete.
_, Tile first picture selected becomes tile cover image. Presstile selector down to
select a different image for the cover.
3 Select COMPLETE PHOTOBOOK (to select all photos or all photos matching the specified search conditions for the book, choose SELECT ALL).
The new book will be added to the list in the photobook assist menu.
(l) Books carl contain
up to 300 pictures.
(l) Books that contain no photos are automatically
deleted.
Viewing Photobooks
Highlight a book in the photobook assist menu and press MENU/OKto display
the book, then press the selector left or right to scroll through the pictures.
Editing.andDeleting.Photobooks
Display the photobook and press MENU/OKThe following options will be displayed; select the desired option and follow the on-screen instructions.
• EDIT:Edit the book as described in "Creating a PhotoBook"(_
45).
• ERASE:
Delete the book.
_® Photobooks
Photobooks carl be copied to a computer using tile supplied MyFinePixStudio software.
46
...........
........
_Viewing.
Panoramas
If you press the selector down when a panorama is displayed full frame, the
camera will play back the picture from left to right. To pause playback, press
the selector down; press the selector down again to resume. To delete the
panorama, press the selector up (_) when playback is paused. To exit to fullframe playback, press the selector up while panorama playback is in progress.
'
":_
¢::> ::i<
47
_Recordinq
Movies
Press (°7 to shoot a movie. During recording,
RECand the time remaining will be displayed
in the LCD monitor and sound will be recorded via
the built-in microphone (be careful not to cover the
microphone during recording).
Timeovoilob/e is disployed
in monitor
To end recording, press the _o)button again. Recording ends automatically
when the movie reaches maximum length or memory is full.
Zoom carl be adjusted while recording is in progress.
Before recording, select a frame size using the [] MOVIE QUALITY option in the
shooting menu. Select 111"i11280
(1280x 720) for an aspect ratio of 16:9 (Hig h Definition) or _ (640 x480) to record longer standard definition movies.
Focus,exposure and white balance are adjusted automatically throughout recording. Tile color and brightness of tile image may vary from that displayed before
recording begins.
Sounds made by the camera may be recorded.
48
(!) The indicator lamp lights while movies are being recorded. Do not open tile battery chamber during shooting or while the indicator lamp is lit. Failureto observe
this precaution could prevent the movie from being played back.
(!) Vertical or horizontal streaksmay appear in movies containing very bright subjects.
This is normal and does not indicate a malfunction.
(!) The temperature of tile camera may rise if it is used to record movies for an extended period or if tile ambient temperature is high. This is normal and does not
indicate a malfunction.
_Viewing
Movies
During playback, movies are displayed in the LCD monitor
as shown at right. The following operations can be performed while a movie is displayed:
Option
Start/pause
playback
End playback/
delete
Advance/
rewind
Description
Press the selector down to start playback.
:]ause.
Pressthe selector up to end playback.
Press again
If playback
to
is not in
progress, pressing the selector up will delete the movie.
Pressthe selector right to advance, left to rewind.
is paused, the movie will advance or rewind
If playback
one frame
each time the selector is pressed.
PressMENU/OKto pause playback
Adjust volume
and display volume
con-
trois. Press the selector up or down to adjust the volume
and press MENU/OKto exit. Volume can also be adjusted
from the setup menu.
(l> Do not cover the speaker during playback.
50
;
_Viewing
Pictures
on TV
Connect the camera to aTV to show pictures to a group.
1 Turn the camera offand connect an optional A/V cable as shown below.
insert into
USB mu/ti-connector
Connect ye//ow p/ug to
video-injock
Connect white plug to
C_nnector cover
Bottery-chomber
cover
oudio-in jock
c!) When connecting cables,be sure tile connectors are fully inserted.
c!) Be sure tile battery-chamber cover is open before attempting to open or close
the con nector cover.
Image quality may drop during movie playback.
To view high definition movies on a high definition TV,the optional accessory
is required (_ 89, 90).
2 Tune the television to the video input channel.
supplied with the television for details.
3 Pressthe []
See the documentation
button for about a second to turn the camera on. The camera
monitor turns off and pictures and movies are played back on the TV. Note
that the camera volume controls have no effect on sounds played on the
TV; use the television volume controls to adjust the volume.
51
_Printing
Pictures
via USB
If the printer supports PictBridge, the camera can be connected _#I
directly to the printer as shown below and pictures can be printed
without first being copied to a computer. Note that depending on Pictltfidge
the printer, not all the functions described below may be supported.
rJ
1 Connect the supplied
USBcable as shown and turn the printer on.
(l) Besure the battery-chamber cover is open before attempting to open or close
the connector cover.
Connector cover
2 Press the []
Bottery-chomber
cover
button for about a second to turn the camera on.
3 Press the selector left or right to display a picture you wish to print.
4 Press the selector up or down to choose the number of copies (up to gg).
5 Repeat steps 3-4 to select additional pictures. Press MENU/OKto display a
confirmation dialog when settings are complete.
52
( (:
(:;
>crees
va
6 Press MENU/OKto start printing. Printing can be interrupted by pressing
DISP/BACI(,but note that some printers may not respond immediately.
If
the printer stops before printing is complete, turn the camera offand then
on again.
7 After confirming that PRINTING has cleared from the camera display, turn
the camera offand disconnect the USB csable.
Pictures carl be printed from internal memory or a memory card that has been
formatted in tile camera.
If no pictures are selected, tile camera will print one copy of tile current picture.
Page size,print quality, and border selections are made using tile printer.
®_ Printingthe Dateof Recording
To print the date of recording on pictures, press DISP/BACK
in tile PictBridge display
and select PRINT WITH DATE [-_ in tile PictBridge menu (to print pictures without
tile date of recordinq, select PRINT WITHOUT DATE).
iii
P_i_'_tMg Pictures
vi_ iJ_
Printingthe DPOFPrint Order
The [] PRINT ORDER (DPOF) option in the playback menu can be used to
create a digital "print order"for PictBridge-compatible
printers (_ 89) or devices that support DPOR
®_ DPOF
DPOF(Digital Print Order Format) is a standard that allows pictures to be _T_
printed from "print orders"stored in internal memory or on a memory card.
The information in the order includes the pictures to be printed and the DPOF
number of copies of each picture.
ii
I Select playback mode and press MENU/OI(todisplay the playback menu.
2 Highlight
[]
PRINT ORDER (DPOF) and press MENU/OK.
3 Highlight one of the following options and press MENU/OK:
• WITHDATE_: Print the date of recording on pictures.
• WITHOUTDATE:
Do not print the date of recording on pictures.
Some printers do not support date printing. Seethe printer manual for details.
4 Press the selector left or right to display a picture you wish to add to or
remove from the print order.
54
( <::
o
;
> _t_gPct_sva(_Sis
5 Pressthe selector up or down to choose the number of copies (up to 99).
To remove a picture from the print order, press the selector down until the
number of copies is zero.
6 Repeat Steps 4-5 to complete
settings are complete.
7 A confirmation
order.
the print order and press MENU/OKwhen
dialog will be displayed.
Press MENU/OKto save the print
_, Remove the memory card to create or modify a print order for the pictures in
internal memory.
_, Print orders carl contain a maximum of 999 pictures.
If a memory card isinserted containing a print order created by another camera,
a message will be displayed. Create a new print order asdescribed above.
_Viewing
Pictures
on a Computer
The supplied software can be used to copy pictures to a computer, where
they can be stored, viewed, organized, and printed. Before proceeding, install
the software as described below. DO NOTconnect the camera to the computer
until installation is complete.
Windows:InstallingMyFinePixStudio
1 Confirm that the computer meets the following
I
Windows T
CPU
Wind°wsXP_
2 GHz Pentiurnbetter
4 or
1GBor
15
GB or more
more
512
more
2 GMB
B orormore
1024 x 768 pixels or more with 24-bit color or better
A graphics processing unit (GPU) that supports DirectX 7 or later
Built-in
Other
Wind°ws Vista_
3 GHz Pentiurn 4 or better
RAMspace
Freedisk
Video
system requirements:
USB port recommended.
USB ports.
Internet connection
.NET Framework
forming
(broadband
Operation
is not guaranteed
recommended)
feature, and when
operating systems are
or computers that have
from earlier versions of Windows.
2 Start the computer.
before proceeding.
56
per-
or via e-mail.
Other versions of Windows are not supported.
Only pre-installed
supported; operation is not guaranteed on home-built
computers
been upgraded
other
required to install
(if necessary), to use auto update
such tasks as sharing pictures onqine
with
Log in to an account with administrator
privileges
( (:
(o
/;
\/e W "_ci _ i _t L__
3 Exit any applications
CD-ROM drive.
o !_ _ L_o _ _!:_b_t _!_
ix
that may be running and insert the installer CD in a
@_ Windows 7/Windows Vista
If an AutoPlay dialog is displayed, click SETUP.EXE. A "User Account Control"
dialog will then be displayed; click Yes (Windows 7) or Allow (Windows Vista).
The installer will start automatically; click Install MyFinePix
follow the on-screen instructions to install MyFinePix Studio.
Studio
and
_ fthe nstaerDoesNotStartAutomatca y
If the installer does not start automatically, select Computer or My Computer
from tile Start menu, then double<lick tile FINEPIX CD icon to open tile FINEPIX
4 If prompted to install Windows Media Player, DirectX, or .NET Framework,
follow the on-screen instructions to complete installation.
5 Remove the installer CD from the CD-ROM drive when installation is complete. Store the installer CD in a dry location out of direct sunlight in case
you need to re-install the software.
Installation is now complete.
(
:;
Proceed to'Connecting
the Camera"(_
60).
57
V i e w _ i_ 7 (t b__es o _q_ (i_o m a b_t e r
Macintosh: InstallingFinePixViewer
1 Confirm that the computer meets the following
CPU
OS
system requirements:
PowerPC or Intel
Pre-installed
copies of Mac OS X version
10.3.9 lO.6(visithttp://www.fuji£/m.
com/support/digito/comeros/compotibility/for
RAM
more information)
256 MB or more
Freedisk sPace A minimum
of 200 MB required
FinePixViewer is running
for installation
Video
800X 600 pixels or more with thousands
Other
Built-in USB port recommended.
with 400 MB available
when
of colors or better
Operation
is not guaranteed
with other
USB
)orts.
2 After starting the computer and quitting any applications that may be running, insert the installer CD in a CD-ROM drive and double-click Installer
for Mac OS X.
3 An installer dialog will be displayed; click Installing FinePixViewer to start
installation. Enter an administrator name and password when prompted
and click OK, then follow the on-screen instructions to install FinePixViewer.
Click Exit to quit the installer when installation is complete.
$8
( (:
(/;
4 Remove the installer CD from the CD-ROM drive. Note that you may be
unable to remove the CD if Safari is running; if necessary, quit Safari before
removing the CD. Store the installer CD in a dry location out of direct sunlight in case you need to re-install the software.
5 MacOSX10.5 or earlier: Open the "Applications" folder, start Image Capture,
and select Preferences... from the Image Capture application menu. The
Image Capture preferences dialog will be displayed; choose Other... in
the When a camera is connected, open menu, then select FPVBridge in
the "Applications/FinePixViewer"folder
and click Open. Quit Image Capture.
MacOSXlO.6: Connect
folder and start Image
select the camera and
era opens menu and
the camera and turn it on. Open the "Applications"
Capture. The camera will be listed under DEVICES;
choose FPVBridge from the Connecting this camclick Choose. Quit Image Capture.
Installation is now complete.
Proceed to"Connecting
the Camera"(_
60).
iew!_gPctt_tesot
_Cot_@tt<
Connecting
the Camera
1 If the pictures you wish to copy are stored on a memory
card into the camera.
_, Windows users may require the Windows
the first time.
CD when
card, insert the
starting
the software
for
¢!} Lossof power during transfer could result in lossof data or damage to internal
memory or the memory card. Chargetile battery before connecting tile camera.
2Turn
the camera off and connect
the
supplied USB cable as shown, making
sure the connectors are fully inserted.
Connect the camera directly to the computer; do not use a USBhub or keyboard.
(!} Be sure the battery-chamber
before attempting
connector cover.
to open
cover is open
or close the
Connector cover
Battery-chamber
Cover
3 Press the [] button for about a second to turn the camera on. MyFinePix
Studio or FinePixViewer will start automatically; follow the on-screen instructions to copy pictures to the computer. To exit without copying pictures, click Cancel.
_, If tile software does not start automatically, it may not be correctly installed.
Disconnect the camera and reinstall tile software.
60
( (:
(t
<} ;
For more information on using the supplied software, start the application
and select the appropriate option from the Help menu.
(J>If a memory card corltairling a large number of images is inserted, there may be a
delay before the software starts and you may be unable to import or save images.
Usea memory card reader to transfer pictures.
(!} Make surethat tile computer does not display a messagestating that copying is in
progress and that tile indicator lamp is out before turning the camera offor disconnecting tile USBcable (if the number of images copied is very large, the indicator
lamp may remain lit after tile message has cleared from the computer display).
Failureto observe this precaution could result in lossof data or damage to internal
memory or tile memory card.
(!} Disconnect tile camera before inserting or removing memory cards.
<!}In some cases,it may not be possible to access pictures saved to a network server
using the supplied software in the sameway ason a standalone computer.
(!} The user bears all applicable fees charged by the phone company or Internet service provider when using servicesthat require an Internet connection.
®_Disconnecting
theCamera
After confirming that tile indicator lamp is out, follow tile on-screen instructions to
turn tile camera off and disconnect tile USBcable.
Only uninstall the supplied software when it is no longer required or before beginning reinstallation. After quitting tile software and discorlrlecting the camera, drag
the "FinePixViewer"folder from "Applications" into the Trasharid select Empty Trash
in the Finder menu (Macintosh), or open the control panel and use"Programs and
Features"(Windows 7/Windows Vista)or"Add or Remove Programs"(Windows XP)to
uninstall MyFinePixStudio. Under Windows, one or more confirmation dialogs may
be displayed; read the contents carefully before clicking OK.
62
( :1
;
_g
the Menus:
Shootinq
Mode
Usingthe ShootingMenu
To display the shooting menu, press MENU/OKin
shooting mode. Highlight items and press the selector right to view options, then highlight an option and press MENU/OK Press DISP/BA(Kto exit when
settings are complete. The options available vary with the shooting
selected.
mode
Shooting Menu Options
Choose a shooting
mode according
to the type of subject (_
24).
63
Control
tilecamera's
sensitivity
toNgbt.
Higher
values
can
reduce
bluq
note,
boweveD
thatmottling
may
appear
inpictures
taken
athighsensitivities.
100
l
ISO
i
3200
Bright
÷--
Scene
--_
Less noticeable
_'--
Noise (mottling)
--.
Option
I
Description
AUTO
Sensitivity
3200/16tt/8^,t/400/,Sensitivity
LUU//UU
64
Dark
More noticeable
is adjusted automatically
in response to shooting conditions.
is set to tile specified value, which is shown in tile display.
I
" "
Choose the image size and aspect
ed. Large pictures can be printed
while small pictures require
recorded.
ratio at which
pictures
are record-
I1_ 4:3
at large sizes with no drop in quality,
less memory,
allowing
_r'
more pictures to be
Size----Aspect
®_ SizeVersusAspect Ratio
.....
Size
Option
Prints at sizesup to
I_
34x 25 cm (13.5 x lOin.)
I_
IDI
24x 18cm (9.5x 7in.)
17x13cm
(7x5 n.)
Aspectratio
4:3: Pictures have the same proportions
the camera display.
as
16:9: Suited for display on High Definition
(H D) devices.
I
t
4
I
I
16
rc_tio
Choose how much image files are compressed.
Option
I
FINE
NORMAL
Enhance contrast
Option
_i
STANDARD
let CHROME
Itl_ B&W
SEPA
Description
Low compression.
High compression.
and color saturation
Select for higher image quality.
Select this option to store more pictures.
or take pictures
I
in black and white.
Description
Standard contrast and saturation.
Recommended
in most situations.
IVivid contrast and color Choose for vivid shots of flowers or enhanced
......
and blues in landscapes.
Take pictures
Take pictures
greens
"
in black and white.
in sepia.
_, Settings other than _ STANDARD are shown by an icon in the LCD monitor.
Depending on the subject, the effects of I_t_,CHROME may not be visible in the LCD monitor.
66
U_i_g t _e M_ ¸¸_s: _i'_ooting
For natural colors, choose a setting
that matches
the light source.
Option
AUTO
Description
White balance adjusted
automatically.
-;÷:-
For subjects in direct sunlight.
:':_
For subjects in the shade.
Use under"dayJight'fluorescent
Use under"warm
Use under"cool
@,-
h_ :::tie
white"fluorescent
Use under incandescent
_, Results vary with shooting
the LCD monitor.
lights.
white"fluorescent
lights.
lights.
lighting.
conditions.
Play pictures
back after shooting
to check colors in
Capture
motion
inaseries
of pictures.
Option
Description
ON
OFF
The camera takes up to 3 pictures while the shutter button is pressed.
One photograph
is taken each time the shutter button is pressed.
_, Focus and exposure
are determined
_, The flash turns off automatically.
selected for [] CONTINUOUS.
_, Frame rate varies with shutter
The number
68
by the first frame in each series.
The previously
flash mode is restored when OFF is
speed.
of pictures that can be recorded
Choose whether
the camera automatically
trait subjects
32).
(_
selected
depends on the memory
detects
available.
and sets focus and exposure
for human
por-
Li_ir_c_:i_!!_Me:_(_: _iho<:)ti_
This option
controls
how the camera selects the focus area. Regardless of the option
the camera will focus on the subject in the center of the LCD monitor
Option
I
Mc ::<!_
selected,
when macro mode is on.
Description
[]
CENTER
Tile camera focuses on tile subject in the center of tile frame.
[]
TRACKING Position the subject in the center focus area and press the selector ]eft. Focus will
track the subject as it moves through the frame.
Note that in [] mode, the camera focuses continuously,
increasing
and that the sound of the camera focusing may be audible.
the drain on the battery,
Choose a frame size for movies (48).
Choose whether
the LED (2)
lights to illuminate
Option
nearby subjects when lighting
Description
ON
The LED lights during
OFF
LED off.
shooting.
_, The LED will not light when ON is selected for []
_, Selecting
is poor.
SILENT MODE
in the setup menu (81).
ON increases the drain on the battery. Select OFF when the LED is not in use.
_g
the Menus:
Playback
Mode
Usingthe PlaybackMenu
To display the playback menu, press MENU/OKin playback mode. Highlight items and press the selector
right to view options, then highlight an option and
press MENU/OK Press DISP/BACK
to exit when settings
are complete.
PlaybackMenuOptions
Create books from your favorite photos (_ 45).
70
.....
c
__J/_ _4@_
To show
was
_zm
, ,
the
direction
f,}_
/;
_ ...............
and
distance
,
from
your
present
position
to
the
location
where
a picture
taken:
1 Select an option
confirm
other than OFF for []
that the camera is receiving
LOCATION
GPS data (_
SEARCH in the setup menu (_
2
Display a picture with a G_S
3
Select [] PHOTO
NAVIGATION
in the playback menu. The approximate direction
and distance to the location where the picture was
icon.
taken are displayed as shown, using the units selected for [] Kin/
mile in the setup menu (83).
Distances over 1000 units are indicated
by">", those under 100 units by"<".
_, Photo navigation
ends when the next picture
Search for pictures (44).
Delete all or selected pictures
(_
82) and
29).
43).
is displayed.
[!;!
/
_s
_oo.ooo_
t_eMe_s:P,_y::>ack
Mc.:e
Create
aretouched
copy
ofthecurrent
picture.
1Display
thedesired
picture.
2 Select I_
EDIT in the playback
menu and choose from the following
Option
options:
Description
CROP
Crop the copy.
ASPECTRATIO Choose the aspect ratio.
BRIGHTNESS Adjust brightness.
CONTRAST
Adjust contrast.
COLOR
Choose positive values for"warmer"colors,
SEPIA
Convert the copy to sepia or black and white.
If the original
FACEMOSAIC
was taken with
Intelligent
negative
values for"cooler'colors.
Face Detection,
a mosaic effect can
be applied to up to four faces. If Intelligent
Face Detection was off or no
faces were detected, tile mosaic effect will be applied to tile center of tile
image.
3 Press MENU/ORto create a retouched copy (in some cases, additional
adjust settings as desired and press MENU/ORto save the copy).
_, Retouched
copies can not be further
_, Retouched
copies are 640x480
retouched,
pixels in size.
cropped,
options
or rotated.
will be displayed;
Select
pictures
forupload
toYouTube
orFacebook
using
MyFinePix
Studio
(Windows
only).
• Selecting Picturesfor Upload
1 Select YouTube to choose movies for upload to YouTube, FACEBOOK to choose photos and
movies for upload to Facebook.
2 Press the selector left or right to display pictures and press MENU/ORto select or deselect.
Press
DISP/BACKto exit when all the desired pictures are selected.
_, Only movies can be selected for upload to YouTube.
_, During playback, selected pictures are indicated by []
• RESET
ALL:DeselectingAllPictures
Choose RESET ALL to deselect all pictures.
message will be displayed
operation is complete.
while the operation
• Uploading Pictures(Windows Only)
Selected pictures can be uploaded
Studio.
YouTube
If the number
or []
of pictures
is in progress.
using the YouTube/Facebook
FACEBOOK icons.
affected
is very large, a
Press DISP/BACKto exit before the
Upload
option
in MyFinePix
Select with comero
4,
Upbod
For information
on installing MyFinePix Studio and connecting
"Viewing Pictures on a Computer"(_
56).
from computer
the camera to a computer,
see
te
i_ybackiYo_e
View
pictures
inanautomated
slide
show.
Choose
thetype
ofshow
and
press
MENU/OKto
Press DISP/RACKat any time during
any time by pressing
Option
NORMAL
FADE-IN
NORMAL
_
FADE-IN
_
MULTIPLE
the show to view on-screen
MENU/OK
Description
Press selector left or right to go back or skip ahead one frame. Select FADE-IN
for fade transitions between frames.
As above, except that camera automatically
Intelligent
Face detection.
zooms in on faces selected with
Display several pictures at once.
SCRAP
BOOKVIEWDisplay multiple pictures in random
SELECT
BGM Choose background music.
_, The camera will not turn off automatically
74
start.
help. The show can be ended at
positions
and sizes.
while a slide show is in progress.
is
If the current
Detection,
picture is marked with a _] icon to indicate
this option
eye is detected,
_Se
_s:is ;_yb;i:_<:ki_Sode
that it was taken with
Intelligent
Face
can be used to remove red-eye. The camera will analyze the image; if red-
the image will be processed
1 Display the desired
9 t!e
to create a copy with reduced
red-eye.
picture.
2 Select D RED EYE REMOVAL
in the playback
menu.
3 Press MENU/0K.
Red eye may not be removed
Results may differ depending
if the camera is unable to detect a face or the face is in profile.
on the scene.
Red eye can not be removed
from
pictures that
have already been processed using red-eye removal or pictures created with other devices.
The amount of time needed to process the image varies with the number of faces detected.
Copies created with
[]
RED EYE REMOVAL
Protect pictures from accidental
are indicated
by a r_l icon during
playback.
deletion.
1 Select []
PROTECT in the playback
2 Highlight
one of the following
menu.
options
and press MENU/OK:
• FI_MI:: Protect selected pictures.
Press the selector left or right to view pictures
MI:NII/OI( to select or deselect. Press DISI)/B,_CI(when the operation is complete.
• SETA//: Protect all pictures.
• RI:SI:T,_LL:Remove protection
':!) Protected
(_ .54).
and press
from all pictures.
pictures will be deleted
when
the memory
card or internal
memory
is formatted
(is!_gt_eMetus:P_y_i_ck
Mod<
_Q_
......
Create a cropped
copy of tile current
picture.
1 Display tile desired picture.
2 Select []
CROP in tile playback
3 Use tile zoom control
desired
portion
menu.
to zoom in and out and use tile selector to scroll tile picture until tile
is displayed.
4 Press MENU/OKto display a confirmation
dialog.
5 Press MENU/OKagain to save tile cropped
Larger crops produce
copy will be _,
copy to a separate file.
larger copies; all copies have an aspect ratio of 4:3. If the size of tile final
YES will be displayed
Create a small copy of the current
in yellow.
picture.
1 Display the desired picture.
2 Select []
RESIZE in the playback
3 Highlight
a size and press MENIJ/01(to display a confirmation
menu.
4 Press MENU/OKto save the resized copy to a separate file.
_, The sizes available
vary with the size of the original
image.
dialog.
tist_g
t_ei"Se_t_s:
_:_y
:,,,ck
iti(de
Rotate
pictures
taken
intallorientation
sothattheyaredisplayed
intallorientation
intheLCD
monitor.
1 Display the desired picture.
2 Select [] IMAGE ROTATEin the playback menu.
3 Pressthe selector down to rotate the picture 90 ° clockwise, up to rotate it 90 ° counterclockwise.
4 Press MENg/01{. The picture
automatically
be displayed
in the selected
orientation
whenever
it is played back on the camera.
_, Protected
pictures can not be rotated.
Remove protection
before rotating
pictures (75).
_, The camera may not be able to rotate pictures created with other devices.
Copy pictures from internal
1 Select
[]
memory
COPY in the playback
to a memory
card.
menu.
2 Highlight one of the following options and press the selector right:
• lltll INTERNALMEMORY_ [] CARD:Copy pictures from internal memory
• [] CARD-I_ lltll INTERNALMEMORY:Copy pictures from a memory
] Highlight
one of the following
options
• ALLFRAMES:Copy all pictures.
ends when the destination
_, DPOF print information
is not copied
card.
memory.
and press MENU/OK:
• FP_ME: Copy selected pictures.
Press the selector
MENU/OKto copy the current picture.
_, Copying
to a memory
card to internal
is full.
(_
81).
left or right
to view pictures
and press
U_i_g
ti*_Mei_u_:
Pi_yb_i_ck
Mode
Choose
thetransition
between
images
during
playback.
Option
WIPE
Description
Choose for a wipe transition
between
images.
SLIDE-IN
Images slide into the display.
FADE-IN
The next image fades in as the previous
OFF
No transition
Remove opening
between
or ending
image fades out.
frames.
footage to create an edited copy of the current
movie.
1 Display the desired movie.
2 Select l_] MOVIE TRIMMING
copy, proceed
in the playback
to Step 3; otherwise,
3 Press the selector down
frame is reached.
to begin
proceed
playback
menu. To remove footage
from the start of the
to Step 4.
and press it clown again when the new opening
4 Press MENU/OK.To remove footage from the end of the copy, proceed to Step 5; otherwise,
proceed to Step 6 (to exit without creating an edited copy, press DISP/BAClO.
5 Press the selector down
frame is reached.
to begin
6 Press MENU/OKto save the copy.
playback
and press it down
again when
the new closing
Add
existing
footage
totheendofthecurrent
movie
tocreate
anedited
copy.
1Display
thedesired
movie.
2Select
[] MOVIE
JOIN
intheplayback
menu.
3 Press the selector left or right to highlight
4 Press MENU/OKto add the highlighted
resulting
footage
copy, or press DISP/BACKto exit without
_, Both movies must have been recorded
combined
a movie.
to the end of the current
movie and save the
creating a copy.
at the same frame size and frame rate and have a
file size of no more than 2 GB.
Select pictures for printing
on DPOF- and PictBridge-compatible
devices (_
52).
_The Setup
Menu
UsingtheSetup.Menu
1 Display the setup menu.
1.1 Press MENU/OKto display the menu for the current mode.
1.2Pressthe selector left to highlight the tab for
the current menu.
tab
1.3 Press the selector down to highlight
SET.
"_
1.4 Press the selector right to place the cursor in the setup menu.
2 Adjust settings.
Highlight items and press the selector right to view options, then highlight
an option and press MENU/OK Press DISP/BACK
to exit when settings are
complete.
80
SetupMenu Options
Set the camera clock (18).
Switch the camera clock instantly
tion when traveling.
1 Highlight
from your home time zone to the local time at your destina-
To specify the difference
between
local time and your home time zone:
_ LOCAL and press the selector right.
2 Use the selector to choose the time difference
in increments of 15 minutes.
between
local time and your home time zone
3 Press MENU/OK
To switch
between
local time and your home time zone, highlight
_
LOCAL or 1_ HOME and
press MENU/OK
Option
HOME
]
Description
Switch to the time currently
selected for []
DATE/TIME
(see above).
-_......
LU_._L ISwitch to local time. If this option is selected, -_ and the time and date will be
disp ayed in ye ow for three seconds each time the camera is turned on.
Choose a language
(109).
Select ON to disable the speaker, flash, and LED illuminator in situations in which camera sounds
or lights may be unwelcome (note that the flash will still fire in o,_ mode).
The _: t_ p M_:!_:_,
Reset all settings
fault values.
except
[]
DATEITIME,
[]
TIME DIFFERENCE, and 1_ VIDEO SYSTEM to de-
1 Highlight [] RESETand press the selector right to display a confirmation dialog.
2 Highlight OK and press MENU/0K
Ifa memory
card is inserted
in the camera, this option
ory card is inserted, this option
':!} All data
including
will format internal
protected
pictures
will format the memory
memory.
will be deleted
memory. Be sure important files have been copied
L" Do not open the battery cover during formatting.
Turn the GPS receiver on or off (_
Option
I
from
29).
Description
PERMANENTLYONIThe camera updates GPS data even when off.
Select ON to display GPS data.
the memory
to a computer
WHENSWITCHEDON The camera updates GPS data while on.
OFF
GPS receiver off.
card. If no mem-
Select OK to begin formatting.
or other
card or internal
storage device.
TkeSet
>Me!_
Ir_l_
@ _I 6 D £
_e_auksle0EE)
SelectON to recordGPS data to a log file
on the memory
card (
29;be surethe clock issetto
the correcttime and date as described on page 18).A new logfile
iscreatedwhen ON isselected
and once every 24 hours thereafter.
Note thatthe camera willcontinue to update GPS dataeven
when off,
increasingthe drainon the battery.Choose OFF to disableGPS tracking.
':!}
GPS logs can be viewed in MyFinePix Studio.
':!}
See"GPS"(31)
forinformationon using GPS.
':!}
The indicatorlamp glows orange during recording GPS data even when the camera isturned
offwhile ON isselected.SelectOFF beforeremoving the batteryor memory card. Failure
to
observe thisprecautioncould damage the card.
':!}
Signalstrengthwillbe displayed in yellow and GPS data willnot be logged ifthe batteryis
low (_I=_or less),
no memory
card isinserted,
or the memory
card has lessthan 32MB
To resume the log,selectON afterinsertinga charged batteryor a memory
than 32 MB free.
':!; GPS tracking may be interrupted
during
Choose the units used for GPS information
movie recording
from
free.
card with more
and playback.
km (m) (kilometers
and meters), mi (ft) (miles
and feet), or mi (yd) (miles and yards).
Choose how long pictures are displayed
Option
I
3 SEC
after shooting.
Description
l Pictures are displayed
--
for three seconds
(3 SEC) or 1.5 seconds (1 .S SEC).
/Colors may differ slightly from those in the final image.
ZOOM(CONTINUOUS)/Pictures
OFF
in the LCD monitor
/Pictures
are displayed
until the MENU/OKbutton
are not displayed
_, OFF has no effect in continuous
shooting
after shooting.
mode.
is pressed.
mER
New
E_ :Q.
pictures
i_f_ul_s 0 CON_T;)
are stored
in image
files named
using a four-digit
file
Fromenumber
number assigned by adding one to the last file number used. The file
number is displayed during playback as shown at right. [] FRAME NO.
controls whether file numbering
is reset to 0001 when a new memory
i_ _
card is inserted
matted.
number
or the current
memory
card or internal
Option
continues
CONTINUOUS bet, whichever
with duplicate
Numbering
serted.
_, If the frame number
_, Selecting
number.
is for-
%o.looo_
•
"r'_'
File
number
Description
Numbering
RENEW
memory
,
Directory
[]
is higher.
Choose
this option
used or the first available file numto reduce
the number
of pictures
file names.
is reset to 0001 after formatting
or when a new memory
reaches 999-9999, the shutter release will be disabled
RESET (82)
_, Frame numbers
from the last file number
sets []
FRAME NO. to CONTINUOUS
for pictures taken with other cameras may differ.
card is in-
(101).
but does not reset the fiJe
Adjust
tilevolume
oftilesounds
produced
when
camera
controls
areoperated.
Choose
_|OFF
(mute)
todisable
control
sounds.
Adjust
thevolume
ofthesounds
produced
when
theshutter
isreleased.
Choose
,qOFF
(mute)
todisable
theshutter
sound.
Choose
thesounds
used
fortheshutter,
atstartup,
and
forcamera
controls.
Adjust
thevolume
formovie
playback.
Control
thebrightness
ofthedisplay.
Option
AUTO
......
Description
I LDisplay brightness
is automatically
adjusted during " shooting " in response to ambi"
ent lighting conditions.
Brightness is not adjusted during playback.
IPress the selector up or down to adjust brightness
and then press I_II:NU/01(.
M,_NUAL IChoose from values between
5 and +5.
"
Tiqe
I_tL_i::_
Men
_
_m_D
ODE
.......
Choose whether
the display
does not take effect during
l_?_ault_
_ _
automatically
dims to save power
mode.
This option
playback.
Option
Description
The display dims to save power
[]
in shooting
POWERSAVEON
seconds.
Normal [)rightness
if no operations
are performed
for a few
can be restored by pressing the shutter
but-
ton ha]fi,vay.
[]
POWERSAVEOFF
Choose the length
Automatic
of time
dimming
off.
before the camera turns off automatically
when
no operations
are
performed.
Shorter times increase battery life; if OFF is selected, the camera must be turned
off manually. Note that in some situations the camera turns off automatically
even when OFF
is selected.
Choose whether
image stabilization
mode (_Jh CONTINUOUS)
is performed
at all times when the camera
or only when the shutter
ING ONLY). Choose OFF to turn image stabilization
button
offwhen
is pressed halfway
86
is performed
(_/6/_2SHOOT-
using a tripod.
Choose ON to remove red-eye effects caused by the flash when shooting
Detection.
_, Red-eye reduction
is in shooting
only when a face is detected.
with
Intelligent
Face
T_ _St;
If ON is selected, selecting
further magni_ing
T at tile
maximum
optical
zoom
position
will trigger
tile image.
W
DIGITAL ZOOM on
T
I I{
Optico/ zoom
W
) I_
_ I
Dig/to/zoom
1
DIGITAL ZOOM ;ff
I(
)1
Optico/ zoom
:l; Digital zoom produces
lower quality
Select ON to save unprocessed
Choose whether
images than optical zoom.
copies of pictures taken with red-eye removal.
to display tool tips.
digital
_4
zoom,
Choose
avideo
mode
forconnection
toaTV.SECAM
isnotsupported.
Option
Description
Select this mode for connection
NTSC
PAL
to video devices in North America, the Carib-
bean, parts of Latin America, and some East Asian countries.
Select this mode for connection
to video devices in the United Kingdom
much of Europe, Austra ia, New Zea and, and parts of Asia and Africa.
and
_ptional
Accessories
The camera supports
manufacturers.
• Printing \_
a wide range of accessories from FUJIFILM and other
FINEPIX
XP30
Series
Audio/Visual\
_
A/V cable (optional)
USBcable
(supplied)
TV_
PictBridge-compotible
_rJnter_
HDMI cable
(soldseparately)
HDP-L 1
I
• ComputerRelated\
USBcable (supplied)
SDcard slotor card reader
Available
I
HDTV _
HD plover t
SDXC cards not supported.
separately.
89
Optionai
Accessories
Accessories
fromFUJIFILM
The following optional accessories are available from FUJIFILM. For the latest information on the accessories available in your region, check with your
local FUJlFILM representative or visit http://www.fujifi/m.comJproducts/digito/
c_mer_s/index.html.
Rechargeab!e NP-45A:Additional Brge-capacity NP-45A rechargeable
Li-ion batteries batteries can be purchased asrequired.
Battery
BC-45W:Replacement
battery chargers can be purchased
chargers
as required. The BC-45W charges an NP-45A battery
about 120 minutes at +20 °C (+68 °F).
A/Vcable
AV-CI: Use for viewing
in
pictures on TV.
HDP-L1 (requiresHDMIcable,availablefromthird party suppliers):ConHDp!ayers
90
nect to a High Definition (HD)TV to view photographs
and movies from SD/SDHC memory cards.
P<
_<::_ J',c1:_s
_g
for the Camera
To ensure continued
cautions.
enjoyment
of the product,
StorageandUse
If the camera will not be used for an
extended period, remove the battery
and memory card. Do not store or
use the camera in locations that are:
• exposed to rain, steam, or smoke
• very humid or extremely dusty
• exposed to direct sunlight or very
high temperatures, such as in a
closed vehicle on a sunny day
• extremely cold
• subject to strong vibration
• exposed to strong magnetic fields,
such as near a broadcasting antenna, power line, radar emitter, motor,
transformer, or magnet
• in contact with volatile chemicals
observe the following
pre-
• Condensation
Sudden increases in temperature,
such as occur when entering a heated
building on a cold day, can cause condensation inside the camera. If this
occurs, turn the camera off and wait
an hour before turning it on again. If
condensation forms on the memory
card, remove the card and wait for the
condensation
to dissipate.
such as pesticides
• next to rubber or vinyl products
Not_:
91
Cleaning_
Use a blower to remove dust from the protective glass covering the lens and
LCD monitor, then gently wipe with a soft, dry cloth. Any remaining stains can
be removed by wiping gently with a piece of FUJlFILM lens-cleaning paper to
which a small amount of lens-cleaning fluid has been applied. Care should
be taken to avoid scratching the protective glass or LCD monitor. The camera
body can be cleaned with a soft, dry cloth. Do not use alcohol, thinner, or
other volatile chemicals.
Traveling_
Keep the camera in your carry-on baggage. Checked baggage may suffer
violent shocks that could damage the camera.
92
I_ (:i _(:_
Not_ _,
_Problems
and Solutions
Water in the Camera
Problem
Solution
IThebattery-chambercoverwasnot fully closedbeforethe camerawasimmersed,or wasopened
Waterinthe camera
underwater: Takethe camerato a FUJIFILM-authorized
servicetechnicianfor repairs.Do not turn
the cameraon.
Power and Battery
Problem
Thecameradoesnot
turn on.
Solution
The battery is exhausted: Chargethe battery or inserta fully-charged sparebattery (7).
The battery is inserted incorrectly:Reinsertinthe correctorientation(10).
The battery-chamber cover is not latched: Latchthe battery-chambercover(10).
The battery is cold: Warmthe battery by placingit in a pocketor otherwarm placeand reinsert
it in the cameraimmediatelybeforetaking a picture.
There is dirt on the battery terminals: Cleanthe terminalswith a soft, dry cloth.
Thebattery runsdown
is selected for shooting mode: SelectI_1 mode to reducethe drain on the battery
(24).
[] TRACKING is selected for [] AF MODE: Selecta different AFmode(_ 69).
quickly.
The battery hasbeen charged many times:The battery hasreached
the end of its charging
life. Purchasea new battery.
PERMANENTLY
ON is selected for []
SWITCHED
[]
LOCATION
SEARCH: Select WHEN
ON orOFF (82).
TRACKING
DATA ison: Turn[]
TRACKING
DATA off(83).
93
Problem
Solution
Thecameraturns off
suddenly.
Chargethe battery or inserta fully-chargedsparebattery (7).
Chargingdoes not start.
Reinsertthe battery inthe correctorientation and makesurethat the chargerisplugged in(7).
Chargingisslow.
Chargethe battery at roomtemperature(vi).
Thecharginglamp lights, • There is dirt on the battery terminals: Cleanthe terminals with a soft, dry cloth.
but the battery doesnot • The battery has been charged many times: The battery hasreachedthe end of its chargcharge,
ing life. Purchasea new battery.If the batterystill fails to charge,contactyourFUJIFILM
dealer.
Menus and Displays
_n_ dHiPr°blemare
M: :u'r-n: ":splays
no[ in Lngnsn
ISelectENGLISH for []
mmlLANG, (
Solution
]8, 8])
I
Shooting
Problem
Solution
• Memory is full: Insert a new memorycardor delete pictures(
] ], 43).
• Memory is not formatted: Formatthe memorycardor internalmemory(
82).
No pictureis takenwhen " There is dirt on the memory card contacts: Cleanthe contactswith a soft, dry cloth.
the shutterbutton is
• The memorycard isdamaged:Inserta new memorycard(_ ]]).
• The battery is exhausted: Chargethe battery or insert afully-charged sparebattery (
pressed.
• The camera has turned offautomatkally: Turnthe cameraon (16).
7).
• The indicator lamp was orange when you attempted to record a panorama: Wait until
the indicatorlampsturns off(
3).
94
T_
_ ::;;
....
Problem
TheLCDmonitorgoes
darkafter shooting.
Solution
TheLCDmonitor may darkenwhile the flash charges.Wait for the flashto charge(37),
Thecameradoesnot
The subject is closeto the camera:Selectmacromode (36),
focus,
The subject is far away from the camera:Cancelmacromode(
The subject is not suitedto autofocus: Usefocuslock(33),
Macromode is not
available
36),
Choosea differentshootingmode (24),
Thecamerais slow to acquireGPSdata: Sometime may be neededto acquireGPSdata immedi-
GPS
ately after the cameraor [] LOCATION SEARCH is turned on or if the camerahasbeen
unableto acquireGPSdatafor anextendedperiod.
Intelligent FaceDetection Choosea differentshootingmode (24),
is not available,
The subject'sface is obscuredby sunglasses,a hat, long hair,or other objects:Remove
the obstructions,
The subject's face occupies only a small area of the frame: Changethe compositionsothat
Nofaceis detected,
the subject'sfaceoccupiesa largerareaof the frame (33),
The subject's head is tilted or horizontal: Askthe subjectto hold their head straight,
The camera is tilted: Keepthe cameralevel (20),
The subject'sface is poorly lit: Shootin bright light,
Wrongsubject is
selected,
Theselected subjectis closer to the centerof the frame than the main subject, Recompose
the
)ictureor turn facedetection off andframe the picture usingfocuslock(33),
_oisie_s
anti _oi_£ions
Problem
Solution
• Theflash is not available in the current shootingmode: Choosea differentshootingmode
(
Theflashdoesnot fire,
24),
• Thebattery isexhausted: Chargethe battery orinsertafully-charged sparebattery (
7),
• Thecamera isin continuousmode:SelectOFF for I_1 CONTINUOUS (
68),
• Thecamera isin silent mode:Turnsilent modeoff(81),
• Theflash is off (_):
Someflash modesare
not available.
Choosea differentflashmode (
37),
• The desired flash mode is not available in the current shooting mode:Choosea different
shootingmode(24),
• The camera is in silent mode: Turnsilent modeoff (81),
Theflashdoesnot fully
• The subject is not in range of the flash: Positionthe subjectin rangeof the flash(109),
light the subject,
• Theflash window isobstructed:Hold the cameracorrectly(20),
• Theprotective glasscovering the lens is dirty: Cleanthe glass(
92),
• Theprotective glasscoveringthe lensis blocked:Keepobjectsawayfrom the lens(20).
Picturesareblurred,
• !AF is displayedduring shooting and the focusframe is displayedin red: Checkfocus
beforeshooting(99),
• [t',_ is displayedduringshooting: Usethe flashor a tripod (38),
Picturesaremottled,
Verticallines appearin
pictures,
96
This is normalwhen slow shutter speedsare selectedat high temperaturesand doesnot indicate
a malfunction,
The camerahasbeen usedcontinuouslyat high temperatures, Turnthe cameraoff and wait for
it to cooldown,
Problem
Solution
"Smear"inthe form of
Verticalpurple or white linesmay appearafter the camera hasbeen usedcontinuously at high
vertical purpleor white
linesappearsin the
temperaturesor when a very bright object is in the frame; this phenomenonis commonto all CCD
imagesensorsand doesnot indicatea malfunction. Theselinesarerecordedin moviesbut do not
display,
appearin photographs,Avoidframing bright objectswhen filming movies,
Soundsmadebythe
I_3 TRACKING
cameraarerecordedwith
movies,
Zoom was adjusted during shooting: Donot adjustzoomduringshooting.
Intelligent FaceDetection is on: TurnIntelligent FaceDetectionoff (32),
is selected for l'dil AF MODE: Selecta differentAFmode(69),
Playback
Problem
Solution
Picturesaregrainy,
Thepictureswere takenwith a different makeor model ofcamera,
Playbackzoomis unavailable,
Thecurrentpictureis a resizedcopywith a sizeof I_],
Nosoundin movie
Playbackvolume istoo low: Adjustplaybackvolume(85),
The microphonewas obstructed:Holdthe cameracorrectlyduring recording
(
The speakeris obstructed: Holdthe cameracorrectlyduring playback(SO),
playback,
20, 48),
Selectedpicturesarenot Someof the picturesselectedfor deletionareprotected, Removeprotection usingthe devicewith
deleted,
which it wasoriginallyapplied (76),
Filenumbering is
The battery-chambercoverwas openedwhile the camerawas on, Turn the cameraoff before
unexpectedlyreset,
openingthe battery-chambercover(16),
....
_
97
Connections/Miscellaneous
Problem
Solution
• Thecamera is not properly connected:Connectthe cameraproperly(51),
• AnA/V cable was connectedduring movie playback:Connect the cameraoncemovie playbackhasended.
No pictureor sound.
• Input on the television is set to"TV": Setinput to"VlDEO':
• Thecamera isnot set to the correctvideostandard: Matchthe cameraI_ VIDEO SYSTEM settingto the TV(88)
• The volume on the TV is too low: Adjustthe volume,
Nocolor
Matchthe cameraE_ VIDEO
SYSTEM setting to the TV(88),
Thecomputerdoesnot
recognizethe camera.
Be surethe cameraandcomputerarecorrectlyconnected(60),
Picturescannot be
printed.
• Thecamera is not properly connected:Connectthe cameracorrectly(
• Theprinter is off: Turnthe printeron.
52).
Only onecopyisprinted/ Theprinter isnot PictBridgecompatible.
the dateis not printed.
Thecamerais unresponsive,
• Temporarycamera malfunction: Removeand reinsertthe battery (_ 9).
• The battery is exhausted:Chargethe battery (7)
or inserta fully-charged sparebattery
(
9),
Thecameradoesnot
function asexpected,
Removeand reinsertthe battery (
Nosound
Turnsilent modeoff (81)
9), If the problempersists,contactyour FUJIFILM
dealer,
_Warninq
Messages and Displays
The following warnings are displayed in the LCDmonitor:
Warning
(red)
(blinksred)
Description
Lowbattery. Chargethe battery (7)
or inserta fully-charged sparebattery (9).
Batteryexhausted.Chargethe battery (7)
or inserta fully-chargedsparebattery (9).
Slow shutter speed.Picturesmay beblurred; usethe flashor a tripod.
!AF
(displayed
in redwith red
focusframe)
Thecameracannot focus. Tryone of the following solutions:
Usefocuslockto focus onanother subject at the samedistance,then recomposethe picture
(
33).
Usemacromodeto focuswhentaking close-ups(36).
Apertureor shutter speed Thesubjectis too bright ortoo darkand the picturewill beover-or under-exposed.Ifthe subject
displayedin red
isdark, usethe flash (37).
FOCUSERROR
Cameramalfunction. Turnthe cameraoff andthen onagain,taking carenot to touchthe lens.If
TURNOFFTHECAMERA
the messagepersists,contacta FUJIFILM
dealer,
ANDTURNONAGAIN
The memory cardor internal memory isnot formatted or the memory card was formatted in a computer or other device:Formatthememorycardorinternalmemoryusing
CARD
NOTINITIALIZED the []
FORMAT option inthe camerasetupmenu (82).
The memory card contacts require cleaning: Cleanthe contactswith a soft, dry cloth. If
the messageis repeated,format the card(_ 82). If the messagepersists,replacethe card.
Camera malfunction: Contacta FUJIFILM
dealer,
PROTECTED
CARD
BUSY
The memorycardis locked.Unlockthe card(11).
The memorycardis incorrectlyformatted. Usethe camerato format the card(82).
W_,_
_ _,'ess_,c
s_c;_;spys
Warning
Description
Thememorycardis not formatted for usein the camera. Formatthe card(82).
Thememorycardcontactsrequirecleaningor the memorycardis damaged.Cleanthe contacts
CARDERROR
with asoft,drycloth. Ifthe messageisrepeated,
formatthecard(82).
replacethe card.
Ifthe messagepersists,
Incompatiblememorycard. Useacompatiblecard(14).
Cameramalfunction. Contacta FUJIFILM
dealer.
MEMORY
FULL
m MEMORY
FULL
INTERNAL
MEMORY
IS
FULL
INSERT
ANEWCARD
Thememorycardor internalmemory is full and picturescannot berecordedor copied, Delete
)icturesor inserta memorycardwith morefreespace,
Memory carderror or connection error:Reinsertthe cardor turn the cameraoff andthen
WRITEERROR
on again. If the messagepersists,contacta FUJIFILM
dealer.
Not enough memory remaining to recordadditional pictures: Deletepicturesor insert
a memorycardwith morefree space.
The memory card or internal memory is not formatted: Formatthe memorycard or
internalmemory(
READERROR
82).
The file iscorrupt orwas not created with the camera: Thefile cannot beviewed.
The memory card contacts require cleaning: Cleanthe contactswith a soft, dry cloth. If
the messageis repeated,format the card(_ 82). Ifthe messagepersists,replacethe card.
Camera malfunction: Contacta FUJIFILM
dealer.
100
\_ _ .....
Warning
M_¸_ ' _
_!_c:i _i_:_i_!_y':_
Description
The camera has run out of frame numbers (current frame number is 999-9999).
FRAMENO, FULL
PRESS
ANDHOLD
THEDISPBUTTON
TO
Format the
memorycardand selectRENEW for [] FRAME NO. inthe setupmenu, Takea picture
to reset frame numberingto 100-0001,then selectCONTINUOUS for [] FRAME NO
(84).
An attempt was made to choosea flash modeor adjust the volume with the camerain silent
DEACTIVATE
SILENTMODE mode, Exitsilent modebeforechoosinga flash modeor adjustingthe volume (81),
TOOMANYFRAMES
A searchhasreturned morethan 5,000results,or morethan 999frameswere selectedfor deletion, Performa different searchor selectfewerpictures,
PROTECTED
FRAME An attempt wasmadeto deleteto a protectedpicture,Removeprotectionandtry again(
75),
CANNOTCROP
picturescannot becropped,
CANNOT
CROP
The pictureis damagedor wasnot createdwith the camera,
0
CANNOT
EXECUTE
An attempt was made to createa resizedcopyat a sizeequal to or larger than the original,
IEI CANNOT
EXECUTE
Choosea smaller size,
CANNOT
EXECUTE
CANNOTROTATE An attempt was madeto rotate a picture that cannot berotated,
CANNOTROTATE Moviescannot berotated,
CANNOT
EXECUTE Retouchand red-eyeremovalarenot availablewith movies,picturestakenwith other cameras,
CANNOT
EXECUTEor picturesthat cannot be playedback,
T_
> :
;....
_
707
W_,_ _
t,'ess_,c
s _ c: _sp
ys
Warning
NOCARD
Description
Nomemorycardinsertedwhen m COPY is selectedinthe playbackmenu, Inserta memory
card,
m NOIMAGE
NOIMAGE
DPOFFILEERROR
CANNOTSETDPOF
Thesourceselectedfor []
COPY containsno images,Selecta differentsource,
The DPOFprint order on the current memorycard containsmore than 999 images, Copythe
)icturesto internalmemoryand createa new print order,
Thepicturecannot beprinted usingDPOF,
CANNOTSETDPOF Moviescannot beprinted using DPOF,
COMMUNICATION
ERROR A connectionerroroccurredwhile pictureswere beingprinted or copiedto a computeror other
device,Confirmthat the deviceis turned onandthat the USBcableis connected,
PRINTER
ERROR
Printerout of paperor ink, or otherprinter error, Checkprinter (seeprinter manualfor details),
Toresumeprinting, turn the printer off and thenturn it backon.
PRINTER
ERROR
RESUME?
Printerout of paperor ink, or other printererror, Checkprinter (seeprintermanualfor details). If
printing doesnot resumeautomatically,pressMENU/OKto resume.
An attempt was madeto print a movie,a picture not createdwith the camera,or a picture in a
CANNOTBEPRINTED
format not supportedby the printer. Moviesand somepicturescreatedwith other devicescan
not beprinted; if the picture is a still picture createdwith the camera,checkthe printer manual
to confirmthat the printer supportsthe JFIF-JPEG
or Exif-JPEG
format, If it doesnot, the pictures
cannot be printed,
702
_ps
and Tricks
The following tips and tricks will help you get the most from your camera.
Choose tile following settings for improved battery performance:
• [] FACEDETECTION(_ 68): OFF
[] AF MODE (_ 69): [] CENTER
[] LED ILLUMINATOR (_ 69):OFF
[] LOCATION SEARCH(_ 82):OFF
[]TRACKING DATA (_ 83): OFF
[] LCD MODE (_ 86): [] POWERSAVEON
[] DUAL ISMODE (_ 86): OFF
• Toprevent blur caused by the camera moving
use the two-second timer.
when the shutter button
• Totake a groupportrait that includesthe photographer,use the group
will not start until the person who has pressed the shutter button
frame.
is pressed,
timer. The timer
appears in the
103
T_:s
i
:<s
When ON is selected for [] FACEDETECTION(_ 68), you carl:
• Zoominonfaceswhen ZOOM (CONTINUOUS) is selected for [] IMAGEDISP.(_ 83).
• Remove
red-eyeby selectklg ON for [] RED EYEREMOVAL (_ 86).
zoo.,
i°o°faces
during
slide
s_lows/_
74/or
bypressing
th_s_l_ctor
down during playback.
• Searchforfacesusing [] IMAGE SEARCH(_ 44).
• Croptile background from portraits using [] CROP (_ 76).
104
A :: :: ,: ::>
ps
cks
To photograph
tile same scene both with and without tile
flash, select _,_NATURAL&_.
for r_'ISHOOTING
MODE
(_ 24). Use multi-frame
shots.
playback (_
42) to compare tile two
To photograph subjects that are in motion,
ING for rdlilAF MODE (_ 69).
To photograph
ON for []
poorlydit
select []
TRACK-
subjects close to the camera, select
LED ILLUMINATOR (_
69).
To fi ne-tune brightness of a photograph, select P PROGRAM
AE (_ 24) for _ SHOOTING MODE, choose an appropriate
white balance option (_ 67),and adjust exposure compensation (_ 35).
Ap:_et d x
105
_lnternal
Memory/Memory
Card Capacity
The following table shows the recording time or number of pictures available
at different image sizes. All fgures are approximate; file size varies with the
scene recorded, producing wide variations in the number of flies that can be
stored. The number of exposures or length remaining may not diminish at an
even rate. A limited number of test pictures can be taken when no memory
card is inserted.
Internal mem0ry
(approx.10 MB)
[]
'FINE
8GR
FINE
FINE
NORMAL
2
320
550
640
1100
1290
2210
I1_ 16:9
2
3
410
780
830
1570
1680
3160
3
5
630
1100
1260
2200
2540
4420
016:9
3
7
820
1540
1640
3090
3290
6200
1114:3
6
11
1420
2350
2860
4710
5740
9450
11116.'9
9
13
2070
2830
4150
5680
8330
11400
Individual
FINE
NORMAL
1 sec.
11 min.
24 min.
48min.
6 sec.
28 min.
58 min.
116min.
movie files can not exceed 2 GB in size.
]- Use a CLASS@ card or better when shooting
106
I
NORMAL
_]_1280 t
NORMAL
4GR
I
I[_]14:3
<
I
1_4:3
o
._
2GR
HD movies.
A :: :: ,.' <:x
_pecifications
Model
DigitalCameraFinePixXP30Series
Effectivepixels
14,2million
CCD
_,_.3-in,squarepixelCCDwith primarycolorfilter
Storage media
• Internal memory(approx.10MB)
File system
Compliantwith Design Rulefor Camera File System(DCE/,Exif2.3, and Digital Print Order
Format (DPOF)
File format
• Still pictures:Exif2,3 JPEG(compressed)
• Movies:AVl-format MotionJPEG
Image size (pixels)
• II]I 4: 3:4,320 × 3,240
• 1231
4: 3:3,072 × 2,304
• II]I 16: 9:4,320 × 2,432
• 1231
16: 9:3,072 x 1,728
• IE]I 4: 3:2,048 × 1,536
• IE]I 16: 9:1,920 × 1,080
Lens
Focallength
Digital zoom
• SD/SDHC/SDXC
memorycards
FujinonS× optical zoomlens,F3.9(wideangle)- F4.9(telephoto)
f=SO mm-25,O ram(35 mmformatequivalent:
28 mm 140ram)
• 4: 3: Approx 68 x (upto 34× whencombinedwith opticalzoom)
• 16:9: Approx 5 1 x (upto 25x when combined
with opticalzoom)
Aperture
F3.9/F6.2(wideangle),F4.9/F8.0(telephoto)
Focusrange
Approx.60cm (1.9ft.)-infinity (wideangle);1.0m (32 ft.)-inflnity (telephoto)
(distance
fromfrontof lens) • Macro:approx.9 cm-80 cm/3.Sin.-2.6 ft. (wideangle);40cm-80 cm/0.6ft.-2.6 ft. (telephoto)
A :: :: _.' :::
107
Sensitivity
Standardoutput sensitivityequivalent to ISO100,200,400,800,1600,3200; AUTO
Metering
2S6-segmentthrough-the-lens (TTL)
Exposurecontrol
ProgrammedAE
Exposurecompensation
-2 EV- +2 EVin incrementsof _J_
EV
Image stabilization
Digitalimage stabilization
Shutter speed
• AUTOmode:_/4s-_i, ooo
s
(combinedmechanka[and • Other modes:4s-_i,ooos
e[ectronkshutter)
Continuous
Up to 0,8 fps,max,3 frames
Focus
• Mode: SingleAF
• Focus-areaselection:CENTER,
TRACKING
• Autofocussystem:Contrast-detectTTLAF
White balance
708
Automaticscenedetection;six manual presetmodesfor directsunlight, shade,daylightfluorescent,warmwhite fluorescent,coolwhite fluorescent,and incandescent
Ap:_e
d×
Specific_ti_s
Self-timer
Off,2 sec.,10sec.,_._ (@UPLE
TIMER),_.'._(6%UPT%ER)
Flash
Auto flash; effective range when sensitivity is set to AUTO is approx.70cm-3.1 m/2.2 ft.I0.I ft. (wideangle),70 cm-2.7 m/2.2 ft.-8.8 ft. (tdepho_o);effective range in macromode is
approx.30cm-80 cm/O.9ft.-2.6 ft.
Flashmode
L(D monitor
Auto, fill flash, off,
slowsync
sync(red-eye
removal
off); autowith red-eyeremoval,fill
flashwith redeyeremoval,off,
slow
with red-eye
removal(redeyeremoval
on)
2.7-in., 230 k-dot color LCDmonitor;frame coverageapprox.96%
Movies
Framesize_
Languages
Arabic,Bulgarian,SimplifiedChinese,TraditionalChinese,Czech,Danish,Dutch,English,Farsi,
1280 (1,280x 720) or _
(640x 480);30fps;monauralsound
Finnish,French,German, Greek,Hebrew, Hungarian, Indonesian,Italian, Japanese,Kazakh,
Korean,Latvian, Lithuanian, Norwegian, Polish, Portuguese, Romanian, Russian,Serbian,
Slovak,Spanish,Swedish,Thai,Turkish,Ukrainian,Vietnamese
Date map database was October2010
(reared
A/V OUT
NTSC
or PALoutput with monauralsound
(audio/videooutput)
Digital inputloutput
/
v
USB2.0 High-Speed;sharesA/VOUTconnector,MTP/PTP
109
Sp_cification_
Power supply
NP-45Arechargeablebattery
Battery life (approximate
numberof framesthatcan
betakenwith a fully charged
battery)
NP-45A(type suppliedwith camera)
200
CIPAstandard,measuredin I_1 (auto)mode using battery suppliedwith cameraandSDmemory card.
Note: Numberof shotsthat can betakenwith battery varieswith battery chargeleveland will
declineat low temperatures.
Camera dimensions
99.2mm × 67.7mm × 23.1mm/3.9 in. × 2.6 in. × 0.9 in., excludingprojections
(WxHxD)
Camera weight
jShooting
weight
Operating conditions
Appmx. 148g/5.2 oz.,excludingbattery,accessories,
and memorycard
Approx. 165g/5.8 oz.,including battery andmemory card
• Temperature: -I0 °C- +40 °C/+14°F-+I04
°F
• Humidity: 10%-80% (nocondensation)
110
/ :: ,:
Spec:ific:_ti<_n_
Nominalvoltage
DC3.7 V
Nominal capacity
720 mAh
Operating temperature
0 °C- +40 °C/+32°F- +104 °F
Dimensions (Wx H× D)
31,0mm x 39,6mm x 6,0 mm/1,2 in, x 1,6in, x 0,2 in,
Weight
Approx.15.5g/O.5oz.
Ratedinput
l O0V-240 VAC,50/60 Hz
Input capacity
6,0V (I O0V/240VA)
Ratedoutput
4,2 V DC,550mA
Supported batteries
NP-45Arechargeablebatteries
Charging time
Approx.120minutes (+20 %/+68 °F)
Operating temperature
0 °C- +40 °C/+32°F- +104 °F
Dimensions (Wx H× D)
46 mm x 91 mm x 23 mm/1.8in. x 3.6 in. x 0.9 in., excludingprojections
Weight
Approx,65g/2,3 oz,,excludingbattery
Weight and dimensions
/ :: :: ,.'
vary with tile country
or region of sale.
177
Sp_ci_c_tions
• Notices
• Specifications subject to change without notice. FUJIFILMshall not be held liable for
damages resulting from errors in this manual.
• Although the LeD monitor is manufactured using advanced high-precision technology, small bright points and anomalous colors may appear, particularly in tile vicinity
of text. This is normal for this type of LeD monitor and does not indicate a malfunction; images recorded with the camera are unaffected.
• Digital cameras may malfunction when exposed to strong radio interference (e.g.,
electric fields, static electricity, or line noise).
• Due to tile type of lens used, some distortion may occur at the periphery of images.
This is normal.
172
Ap:_e
dx
Memo
773
FUJIFILm
FUJIFILM Corporation
7-3, AKASAKA 9-CHOME,
MINATO-KU, TOKYO 107-0052, JAPAN
http://www.fujifilm.com/products/digital
cameras/index.html