1
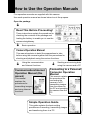
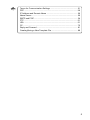
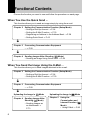
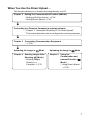
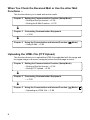
Communication/Internet Operation Manual
RICOH CO., LTD.
3-2-3, Shin-yokohama
Kohoku-ku, Yokohama-shi
222-8530, Japan
L2172552
Communication/Internet
Operation Manual
To ensure correct use of your
camera, read this manual
carefully before use. Keep the
manual handy for future use.
Introduction
Ricoh Service Offices
Thank you for purchasing a Ricoh RDC-i500. This manual explains the correct handling
procedures and precautions for your camera. To ensure the best performance, please
read the manual thoroughly before using the camera. Keep the manual handy for quick
future reference.
Ricoh Co., Ltd.
3-2-3, Shin-yokohama
Kohoku-ku, Yokohama-shi
222-8530, Japan
http://www.ricoh.co.jp/r_dc
Test Shots
Check that your camera is recording the images correctly by taking a number of test
shots.
Ricoh Factory Service Center
3235 Sunrise Blvd.,
Suite2 Rancho Cordova,
CA 95742
http://www.ricohzone.com/
Copyright
Reproduction or alteration of copyrighted documents, magazines, music and other
materials, other than for personal, home or similarly limited purposes, without the
consent of the copyright holder is prohibited.
Exemption from Liability
Ricoh Co., Ltd. assumes no liability for failure to record or play back images caused
by malfunction of the RDC-i500.
Warranty
This product is manufactured to local specifications and the warranty is valid within
the country of purchase. Should the product fail or malfunction while you are abroad,
the manufacturer assumes no responsibility for servicing the product locally or bearing the expenditure incurred therefor.
Radio Interference
Operating the RDC-i500 in the vicinity of other electronic equipment may adversely
affect the performance of both devices. In particular, operating the camera close to
a radio or television may lead to interference. If interference occurs, follow the procedures below.
– Move the camera as far away as possible from the TV, radio or other device
– Reorient the TV or radio antenna.
– Plug the devices into separate electrical outlets.
• This publication may not be reproduced in whole or part without the express written permission of Ricoh.
©2001 Ricoh Co., Ltd. All rights reserved.
• Ricoh reserves the right to change the contents of this publication without notice. Considerable care was
taken in preparing this manual. If, however, you have questions about any part of the manual, or note
mistakes or inaccuracies, please contact us at the address listed on the back cover.
Microsoft, MS and Windows are registered trademarks of Microsoft Corporation in the United States of America
and other countries.
Macintosh is a registered trademark of Apple Computer, Inc., in the United States of America and other countries.
CompactFlash is a registered trademark of SunDisk Corporation in the United States of America.
SmartMedia is a trademark of Toshiba Corporation.
All trademarked company and product names mentioned in this manual are the property of their respective owners.
Ricoh Europe B.V.
Photo Products Division
P.O. Box 75640
1118 ZR Schiphol
The Netherlands
http://www.ricoh-red.com/
htttp://www.ricoh-europe.com/
E-mail:[email protected]
Ricoh Europe B.V.
Düsseldorf Branch
Photo Products Division
Oberrather Straße 6
D-40472 Düsseldorf
Germany
Ricoh Photo Products (Asia), Ltd.
Unit D, E & F
24/F., China Overseas Building
139 Hennessy Road, Wan Chai
Hong Kong
Ricoh Australia Pty. Ltd.
8 Rodborough Road
Frenchs Forrest, N.S.W. 2086
Australia
http://www.ricoh.com.au
How to Use the Operation Manuals
Five operation manuals are supplied with this camera.
Use each operation manual as shown below to suit the purpose.
Open the package
➜
Read This Before Proceeding!
These instructions explain the procedure for
checking the contents of the package and
loading the battery to enable you to use the
camera straightaway.
➜
Basic operation
Camera Operation Manual
This manual explains in detail the preparations to take
before using the camera together with the procedures for
shooting and playback using the various functions.
Communication/Internet
Operation Manual (this
manual)
This manual
explains the
procedures for
transmitting images
and using Internet
functions.
➜
➜
Using the communication
and Internet functions
Sending and receiving data
using the camera and a PC
Connecting to a Personal
Computer Operation
Manual
This manual explains
the procedures for
connecting the
camera to a PC,
transmitting images
from the camera to
the PC and operating
the camera from the
PC.
Simple Operation Guide
This guide explains the basic setting
procedures of recording, transmitting images
and transferring them to a PC.
1
CONTENTS
How to Use the Operation Manuals ...................................................... 1
Functional Contents .............................................................................. 6
Chapter 1 Before Using the Communication and Internet
Functions
Camera Communication and Internet Functions ................................ 10
Internet Function .................................................................................. 10
Other Communication Function ........................................................... 11
The Internet ......................................................................................... 12
What is the Internet? ............................................................................ 12
Using the Internet with This Camera ................................................... 12
How the Internet Works ....................................................................... 13
Requirements for Accessing the Internet ............................................ 14
Provider ................................................................................................ 15
Dial-Up Function .................................................................................. 15
Flow Chart ........................................................................................... 16
Chapter 2 Setting the Communication Function
Preparations and Operation Flow ....................................................... 18
Operation Flow Chart ...........................................................................
Have You Made a Contract With a Provider? .....................................
Preparing Information before Setting ...................................................
Setting items for Communications .......................................................
18
20
20
22
Setting a Dial-Up Account ................................................................... 24
Setting a New Dial-Up Account ........................................................... 24
Changing a Dial-Up Account ............................................................... 31
Deleting a Dial-Up Account .................................................................. 32
Setting the E-Mail Function ................................................................ 33
Setting the Mail Environment ............................................................... 33
Registering an Address in the Address Book ..................................... 38
Registering a New Address ................................................................. 38
Checking the Address Book ................................................................. 39
Setting a Preset Memo ....................................................................... 41
At the end of this manual troubleshooting for error
messages, alphabetical index and index by functions are
listed for your convenience.
2
Setting a Preset Memo ........................................................................ 41
Checking a Preset Memo ..................................................................... 41
Setting Quick Send ............................................................................. 43
Setting Operation ................................................................................. 43
Setting Direct Upload .......................................................................... 47
Setting Direct Upload ........................................................................... 47
Checking Direct Upload Settings ......................................................... 49
Setting FTP Upload ............................................................................. 50
Setting FTP Upload .............................................................................. 50
Checking FTP Upload Settings ............................................................ 52
Chapter 3 Connecting Communication Equipment
Connecting the Camera to Communication Card .............................. 56
Connecting the Camera to an Ordinary Telephone Line .................... 56
Removing the Communication Card .................................................... 59
Checking the Modem Settings ............................................................ 60
Chapter 4 Sending Images After Shooting
Image Upload Function ....................................................................... 64
Upload Method ..................................................................................... 64
Files Uploadable by This Camera ........................................................ 65
Selecting an Image .............................................................................. 65
Sending an Image Using Quick Send ................................................ 68
Sending an Image Directly to a Computer ......................................... 70
Setting Upload ...................................................................................... 70
Uploading an Image ............................................................................. 72
Sending Images as an Attachment ..................................................... 73
Setting Upload ...................................................................................... 73
Uploading an Image ............................................................................. 78
3
Chapter 5 Using the Communication and Internet
Functions
Using the Communication and Internet Functions ............................. 82
Types of Functions ............................................................................... 82
Using E-Mail ........................................................................................ 83
Displaying the E-mail Menu .................................................................
Composing Mail ....................................................................................
Sending Mail .........................................................................................
Checking Incoming Mail (INBOX) ........................................................
Replying to and Forwarding Mail .........................................................
Resending Mail (OUTBOX) ..................................................................
83
84
86
87
91
92
Using Direct Upload ............................................................................ 95
Setting Upload ...................................................................................... 95
Uploading a File ................................................................................... 97
Uploading an HTML File ..................................................................... 98
HTML Template .................................................................................... 99
Transferring the HTML Template Files from a PC to the Camera .... 100
Creating an HTML File ....................................................................... 102
Deleting an HTML File ....................................................................... 104
Uploading an HTML File .................................................................... 105
Viewing the HTML Templates on a PC ............................................. 107
Appendix
Character Input ................................................................................. 112
Troubleshooting ................................................................................ 113
Index .................................................................................................. 120
Functional Index ................................................................................. 120
Alphabetical Index .............................................................................. 124
4
Tips
Terms for Communication Settings .................................................. 21
PPP ................................................................................................... 26
IP Address and Domain Name ......................................................... 26
Name Server ..................................................................................... 26
SMTP and POP ................................................................................. 34
FTP .................................................................................................... 51
URL ................................................................................................... 51
CC ..................................................................................................... 75
Reply and Forward ............................................................................ 91
Creating/Using a New Template File ................................................ 99
5
Functional Contents
Choose the function you want to use and follow the procedure on each page.
When You Use the Quick Send ...
This function allows you to send an image simply by using the e-mail.
Chapter 2
Setting the Communication Function (Setup Mode)
• Setting a Dial-Up Account → P.24
• Setting the E-Mail Function → P.33
• Registering an Address in the Address Book → P.38
• Setting Quick Send → P.43
➜
Chapter 3
Connecting Communication Equipment
• → P.55
➜
Chapter 4
Mode)
Sending Images After Shooting (
• Sending an Image Using Quick Send → P.68
When You Send the Image Using the E-Mail ...
This function allows you to send images attached to the e-mail.
Chapter 2
Setting the Communication Function (Setup Mode)
• Setting a Dial-Up Account → P.24
• Setting the E-Mail Function → P.33
➜
Chapter 3
Connecting Communication Equipment
• → P.55
➜
Uploading the Image in
Chapter 4
6
Mode
Sending Images After
Mode)
Shooting (
• Sending Images as
an Attachment →
P.73
Uploading the Image in
Chapter 5
Mode
Using the
Comunication and
Internet Function (
Mode)
• Using E-Mail → P.83
When You Use the Direct Upload ...
This function allows you to transfer the image directly to a PC.
Chapter 2
Setting the Communication Function (bMode)
• Setting a Dial-Up Account → P.24
• Setting Direct Upload → P.47
➜
Connecting to a Personal Computer (a separate volume)
• Chapter 7, “Setting the Receiving PC for Direct Upload”
* This section describes how to configure the receiving computer
➜
Chapter 3
Connecting Communication Equipment
• → P.55
➜
Uploading the Image in
Chapter 4
Mode
Sending Images After
Shooting (
Mode)
• Sending Images
Directly to a
Computer → P.70
Uploading the Image in
Chapter 5
Mode
Using the
Comunication and
Internet Function (
Mode)
• Using Direct Upload
→ P.95
7
When You Check the Received Mail or Use the other Mail
Functions ...
This function allows you to send and receive mails.
Chapter 2
Setting the Communication Function (Setup Mode)
• Setting a Dial-Up Account → P.24
• Setting the E-Mail Function → P.33
➜
Chapter 3
Connecting Communication Equipment
• → P.55
➜
Chapter 5
Using the Comunication and Internet Function (
• Using E-Mail → P.83
Mode)
Uploading the HTML File (FTP Upload)
This function allows you to upload the HTML file embedded with the image and
its original image to a server (computer) where the Web page is saved.
Chapter 2
Setting the Communication Function (Setup Mode)
• Setting a Dial-Up Account → P.24
• Setting FTP Upload → P.50
➜
Chapter 3
Connecting Communication Equipment
• → P.55
➜
Chapter 5
8
Using the Comunication and Internet Function (
• Uploading an HTML File → P.98
Mode + J )
1
Chapter
Before Using the Communication
and Internet Functions
Camera Communication and
Internet Functions ................... 10
Internet Function .......................... 10
Other Communication Function ... 11
The Internet .............................. 12
What is the Internet? .................... 12
Using the Internet with This
Camera ........................................ 12
How the Internet Works ................ 13
Requirements for Accessing the
Internet ......................................... 14
Provider ........................................ 15
Dial-Up Function .......................... 15
Flow Chart ................................ 16
Camera Communication and Internet Functions
The camera’s communication and Internet functions enable you to take
advantage of the following useful functions.
Internet Function
● Sending Images by E-Mail
You can send and receive e-mail. This function is useful for sending images as
an attachment.
→ P.73 “Sending Images as an Attachment”, → P.83 “Using E-Mail”
Note • You can send an image by a simple few steps procedure using the
quick send function. → P.68 “Sending an Image Using Quick Send”
● Uploading Images to a Homepage
You can upload an HTML file to which the image has been embedded to a
server where the Web page is saved. This function is useful, for example, when
you want several people to see images.
→ P.98 “Uploading an HTML File”
Send an e-mail with an attachment
Computer
The Internet
Dial-up lines
Upload the image to the
homepage
10
Other Communication Function
● Sending Images to a Computer
You can upload images recorded in the camera directly to a folder in the
computer (server). You can use this function, for example, to send images
which you have taken while being away from your office.
→ P.70 “Sending Images Directly to a Computer”
→ P.95 “Using Direct Upload”
Computer
(Server)
Before Using the Communication and Internet Functions
Office
1
Send the files to the office
computer one at a time
Dial-up lines
11
The Internet
This section gives you an idea of how the Internet works and what you can do
with this product on the Internet.
What is the Internet?
When a computer is connected to other computers, this is called a computer
network. There are many such networks all over the world. These networks can
be connected to each other by telephone line. The world’s largest computer
network connected in this way is the Internet.
Network
Using the Internet with This Camera
● Uploading Information to a Web Page
Numerous organizations, companies,
individuals, etc. make a wide variety of
information available on a Web page on the
Internet. The Web page contains not only
text information, but images, sound and
motion pictures.
This product allows you to embed the images
you have taken into an HTML file and upload
the file to a Web page.
12
You can browse the uploaded
HTML file on the PC Web
browser.
Note • The Internet uses an information system called WWW (World Wide
Web) or simply Web. Web information is supplied in the form of pages
and the homepage serves as the gateway to the Web pages.
How the Internet Works
This section provides a simple explanation of how the Web page works and
how to send and receive e-mail.
● Web Page
If you request to see a Web page, the request is delivered to the server storing
the Web page in question via the Internet. The server supplies the Web page in
response to the request.
Web Server
(computer storing
the Web pages)
Homepage
(the first page of
the Web page)
D Supply the
homepage
C Request to view
the homepage
The Internet
E The homepage will
be displayed.
B WWW (information
system) searches
the appropriate
server.
A Request to view
a homepage
13
1
Before Using the Communication and Internet Functions
● Communicating by E-Mail
E-mail (electronic mail) is the system of exchanging messages (mail) using the
Internet. Anyone who has access to the Internet can send and receive
messages at will. The system has the major advantage of being able to deliver
messages instantly to people living far away, regardless of distance. Basically it
is text information that is exchanged, but images can also be attached.
With this product, you can also transmit the images you have taken in a simple
operational sequence (Quick Send) or mail them as file attachments.
● E-Mail
Sending :
When a message is uploaded, it is sent first to the outgoing mail
server, and from there via the Internet to the receiver’s incoming
mail server. Each person has their own mail box in their incoming
mail server and the message is stored in the appropriate box.
Receiving : The receiver can get the message from the mail box by going to
their incoming mail server.
Outgoing mail server
Incoming mail server
Sender A
Receiver B
D The mail
C The mail will soon B The mail will be sent to
reaches the mail
be sent to the
the outgoing mail server.
incoming mail server
box of receiver
of receiver B.
B.
The Internet
Mail
Box
F Receiver B
receives
the mail.
E Receiver B
searches
the mail.
Receiver B
Server
A Sender A
sends a mail
to receiver B.
Sender A
Requirements for Accessing the Internet
To access the Internet, you need the following items in addition to your camera.
The software needed for performing a mail function or uploading an HTML file
to a Web page is already loaded in the camera.
● Telephone Line and Communication Card (option)
Depending on the environment, you need a telephone line, communication card
(CF card type), etc. By using a communication card, you can use the
communication and Internet function. Details are given in Chapter 3. → P.55
“Connecting Communication Equipment”.
● Information Supplied by the Provider
This information includes a telephone number, account name (name of the
contractor), password, etc for accessing the Internet.
14
Provider
● Making a Contract with a Provider
The provider is the company which provides the service of connecting you to
the Internet. Individual access to the Internet requires a contract with a
provider. When you make such a contract, you will be supplied with the
necessary information for accessing the Internet.
Note • If your company already has an Internet environment, you do not need
● Access Point
The contractor telephones the access point supplied by the provider and is
connected to the Internet via this point.
Internet service provider (ISP)
Access point
Dial-up lines
Contractor
Important
Note
The Internet
Entrance to
the Internet
• The provider charges a connecting fee according to the amount of
use. You are also required to pay the telephone company a charge for
calling the access point.
• Each provider offers its own services and charges vary accordingly.
For the latest information on providers, see Internet-related
magazines, etc.
Dial-Up Function
The dial-up IP connection is used to make a connection to the Internet only
when necessary. Normally, it is for accessing the Internet using the RDC-i500.
To make the dial-up IP connection, the access point (dial-up destination) and
other information must have already been set. → P.24 “Setting a Dial-Up
Account”
Note • “Dial-up IP connection” refers to being connected only when you
dialed, while “dedicated connection” refers to being constantly
connected to the Internet.
15
1
Before Using the Communication and Internet Functions
to make a contract with a provider. In this case, the necessary
information can be obtained from the system administrator .
Flow Chart
The following chart shows the general flow of operation, from preparation to
actual use of the communication and Internet functions.
Set the Communication Function
➜
Set the mode dial to [SET] (Setup mode) and set the
communication function. You will need the information supplied by
the provider or system administrator. → P.17 “Chapter 2”
Connect the Communication Equipment
➜
Connect the camera to the communication card.
→ P.55 “Chapter 3”
Preparations are now complete.
Follow the procedures below to actually use the communication function.
➜
Send a captured Image
➜
Set the mode dial to
(Play mode) and upload an image. There
are various ways of doing this. Choose the upload method best
suited to your purpose. → P.63 “Chapter 4”
When you want to use more various functions ...
Use the Communication and Internet Functions
(Communication mode) to use the
Set the mode dial to
communication and Internet functions. As well as sending images,
you can receive images and upload images to a Web page by
).
using the JOB Navi. function in Play mode (
16