1
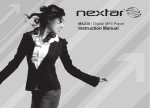
Important Notes
IMPORTANT SAFETY INSTRUCTIONS
Read this manual before use and keep it handy for future reference.
Precautions
DIGITAL VOICE RECORDER
MODEL:PPR80
To maintain optimum performance:
Do not use the unit in extreme hot, cold, dusty or high humidity.
Do not use or keep the unit in following places.
In a high humid area, such as a bathroom or hypogeum.
In an area exposed to direct sunlight ( e.g. inside car where it becomes extreme hot ).
Near sources with strong magnetism, such as a television, speaker or magnet.
In trembly places, such as on the car dashboard or shaky shelf.
For safety
Do not attempt to disassemble this unit.
Avoid pins or other objects from getting inside the Unit.
Do not throw the unit.
Attention :
When using headphones, listen at moderate volume.
Do not wear the earphones while driving or cycling. It may cause a traffic accident.
Be careful while walking, jogging, etc
INSTRUCTION MANUAL
www.PyleAudio.com
D
A. Stereo/Mono mode indicator
B. Sample frequency indicator
C. 24bit/16bit indicator
D. Lock indicator
E. Volume Level indicator
F. Battery Indicator
G. A-B Repeat indicator
H. Repeat mode indicator
O. Operation Status
Record
Pause
P. Record Level
I. Message file name
J. Message folder name
Built-in Memory
SD Card
K. Message number
L. Record time indicator
M. Schedule record indicator
N. SPLIT / CUT indicator
Q. Sound source indicator
Play
MIC / EXT MIC / LINE IN
R. VOX Level
Built-in L microphone
1
LCD display
14
Earphone Jack
2
LINE IN Jack
3
Next
Record/Stop
15
16
17
USB Jack
4
Play/Stop
Record indicator
5
Repeat/Folder
18
L Peak indicator
R Peak indicator
6
Volume +
19
7
Built-in R microphone
20
UP
MODE
8
9
SD socket
External MIC Jack
21
22
PRE
10
REC Level Control
23
ERASE / PAUSE
11
DC JACK
24
Volume -
12
HOLD
25
DOWN
13
Stereo/Mono SELECTOR
26
Battery compartment
27
Battery Installation
It will never affect files stored in the unit to replace batteries . If you shut down the unit with normal
operation , it will keep the date and time by previous setting .
About the Card and Basic Operation
Inserting and removing the Card
Push to open the battery cover.
Open the SD card door,push the card fully
until it clicks. Being careful about the direction
you insert it.
Insert 2 “AA” size batteries with
correct polarity.
Close the Card door .
* If the card door cannot be completely closed,
remove the card ,check its direction and then
insert it again.
Close the battery cover.
To turn on/off the unit
BATTERY INDICATIORS:
Press and hold the PLAY/STOP key more than
two seconds, and the red indicator will flash,
then enter into the default status --- voice mode.
* The batteries are fresh.
* The batteries are exhausted, and need to be charged up
or replaced.
Note: If necessary , it may provide power supply by connecting the unit ( USB jack ) to
a PC by USB cable ,or connecting the unit ( DC jack ) to electrical outlet by AC Adapter.
Press PLAY/STOP key more than two seconds,
then the LCD goes out ,and the unit is turned off.
BATTERY PRECAUTIONS
Follow these precautions when using batteries in this device:
1.Only use the battery with specified size and type .
2.Be sure to follow the correct polarity when installing the batteries as indicated on the
battery compartment .Reversed polarity may cause damage to the device .
3.Do not mix different types of batteries together (e.g.Alkaline and Carbon-zinc ) or old
batteries with fresh ones .
4.If the device would not be used for a long period of time ,remove batteries to prevent
damage or harm from possible battery leakage .
5.Do not try to recharge batteries without rechargeable function , or they will
overheat and rupture .( Follow battery manufacturer’s directions .)
6.Never try to remove the batteries while using .
Select / Switch File Folder and Other Settings
There are four memory storage areas(file folders) labeled A,B,C,D in the unit for your
choice , it can store 99 files in each file folder , so it can store 396 in all . Absolutely ,it
must be subject to its memory capacity .
Select a file folder
At voice mode, press the “A-B” key to switch
file folder .
* The Factory setting is “A” .
As the right photo , it shows the file folder name
on LCD .
At voice mode , press key ,it shows the recording
date and time about this file ,as right photo .
.
About Recording Files
Before recording , you can set the VOX function according as your demand . If it is turned
on , if the detected volume doesn’t reach the VOX level value set in advance, recording will
pause until it detects eligible volume ( VOX switch operation refers to page 9 ).Otherwise
it will continue recording soundless section in this file .
Preparing for recording
At voice mode ,you may select a desired file folder by
“A-B” key , and you may set VOX function at first . ”VOX”
appears on LCD while recording .
Tumble the Rec Level turn knob to adjust the REC
level while recording, it shows the Rec Level wave along
with the roll turn knob as the right photo .
(The longer wave the higher voice it can record.)
* The first several minutes sound may not be
recorded for activating the recorder .
Note : The name at the left of the LCD indicates the
current file. The number at right indicates the total time
recorded of the selected file folder.
If the unit is full, “ FULL” will appear on the LCD . Delete or
move files,or change another new SD card , it may record
right along .
HOLD and mic selection function
Slide the HOLD switch to the “ ON ” (Lock) position,
then all buttons lose function .
Slide the HOLD switch to the “ OFF ” position to
recover all buttons function.
Slide the Mic Selector switch to the “ST” or “MONO” position
according as your demand ,and “ ST ” or “ MONO ” appears
on LCD as right photos . ( “ ST ” is stereo. )
Recording file
After finishing preparing operation , just press REC/
STOP key once , then the REC record indicator
blinks ,and the current status displays on LCD, but at
this status, it will not record. Now you may also adjust
the Rec level value according as the external volume
by Rec Level Control .
* If the L/R Peak indicator blinks ,it means the external
volume is too high ,so you may adjust the Rec level turn
knob .
Then press REC/STOP or ERASE/PAUSE key to start recording
and timing .However ,if you press Mode key ,it will cancel recording
to return to voice mode .
If you need to pause, press the ERASE/PAUSE key .Then REC indicator
blinks ,it stops recording and timing until you press REC/STOP or ERASE/
PAUSE key .
Note :
Please keep at least 50mm away from the sound source for optimal quality.
Playback
Playing back a file
Select a desired file ,details display on LCD,
such as file name, location and duration, ect .
as right photo .
Then press PLAY/STOP key to play back it . you
may press ERASE/PAUSE key for a pause , press
PLAY/STOP key to stop it ,then press or key
to goto the previous or next file,Press “+ / -” to
adjust volume while playing back a file .
“0” is minimum volume , “31” is maximum volume.
* Long press or key to run Fast Rewind or
Fast Forward while playing back a file.
* For private listening, connect an earphone to
EARPHONE jack.
Deleting a File and Recorder Settings
Delete a file
Select a desired file , and press ERASE/PAUSE
key once to do this command,and select “ YES ”
or “ NO ” for your operation by
or
key , then
press PLAY/STOP key to confirm to delete it.
* For the Deletion of all files within a file folder refer
to following section .
Recorder setting
At voice mode, press Mode key to display the Recorder setting,and select a setting
item by or key ,and then press PLAY/STOP or
key to enter into branch setting
menu .
Confirm your setting according as your demand by PLAY/STOP key ,then press Mode or
key to return upper setting menu.
Playing back recording file repeatedly
There are four modes for playing back a file. Long press
Repeat/Folder key repeatedly to switch it among
Repeat one
,Repeat all
,Play normally
, and Intro Play
while playing.Then
the Repeat indicator will display on the left bottom
of LCD,and this setting will always be kept until you
switch it to another mode , the other way to set it refers
to page 11 . * Factory setting is “
”.
Note:
Repeat one
: Playing back the current selected file repeatedly ;
All Repeat
: Playing back all files in the current selected file folder repeatedly;
Play normally
: Playing back the selected file just for one time ;
Intro Play
: Playing back the first 10 seconds of each file from the current one to the last
orderly within this file folder .
Playing back a section within a file repeatedly
While playing back a file, press Repeat/folder key
once to set the starting point ”A”,and
displays
on the left bottom of LCD,it still plays back ,then press
it again to set the end point “B” at the desired point ,
displays on the left bottom of LCD.
At this rate ,it will play back that section repeatedly until
you press Repeat/folder key once again to resume normal
playing .
Recorder Setting and Main Menu
7. Edit Function : Set the Split or Cut function ,”split ” or
“cut” shows on LCD.
<1> Split :While playing a file, press A-B key to split it,
so it is separated into two sections by the
Split point ,and the second section is moved
to the end of this file folder .
<2> Cut : While playing a file, press A-B key once ,
icon displays on LCD , it still plays , press it
once more at desired point, then select “yes” or
“no” to decide erase the mid section or not in
this file .
8. Clean Up : It is for refreshing recording file list , and then goto voice mode .
9. Delete Folder File : Delete all files within current file folder .
10. Continue Last Playback : Continue the previous playing , if you have stopt playing
a file previously ,otherwise it will just goto voice mode.
Main menu and basic operation
Long press Mode key more than 3 secs. to goto
main menu , and current time appears on the
left top of the LCD , as right photo .
Select relevant item by or key, and press PLAY/
STOP key to enter into relevant mode .
Operation setting
Select Recorder to return to voice mode .
Select Music to goto Music menu, and you may look for a
downloading music here for playing after medialib updated .
1. All Music : All recording files and downloading music
files show here .
2. Artist : All downloading music files are sorted by artist
except recording files , so you may find out
desired song by artist .
3. Album : All downloading music files are sorted by
album except recording files ,you may find out
desired song by album .
4. Genre : All files are sorted by genre except recording
files ,you may find out music by genre .
5. Dir List : All musics in the “music folder” show here .
6. Record : All recording files show here .
7. Medialib Update : Refresh music files list .
Setting instructions .
1. Quality : If you set the file format for WAV ,then 96K for
Sample Rate and 24bit for Sample Bit are the
best quality recording .
If you set it for MP3 format , then HP is the best
quality (192 kbps is for Stereo ,128kbps is for
Mono) .
* Absolutely , the better record quality you set ,
the bigger memory space it will occupy .
2. File Format :There are two kinds of formats for recording files (MP3、WAV) .
3. VOX Setting : The VOX switch and VOX level value setting are included .
4. MIC ALC :The REC LEVEL control is available just when MIC ALC is OFF .
5. Delay Recorder : It is for recording automatically after the time set here in advance
since the REC indicator blinks before starting to recording formally.
* Factory setting is OFF.
6. Save to : There are two space for your choice to keep your files (built-in memory 、
SD card) .
Music Setting and System Setting
8. Play Set :
Set playing mode ,Repeat One、All Repeat、Intro
play、order (Play Normally ) ;
EQ select : There are 7 kinds of effects for your voice
file playing . <1> No effect ; <2>Pop Music ;
<3> Rock ; <4> Dance ; <5> Jazz ; <6> Classic ;
<7> Speech .
* factory setting is “ No effect ” .
3D select : There are 7 kinds of 3D for your voice file
playing . <1> Turn off tone ; <2> Generic ;
<3> Studio ; <4> Cathedral ; <5> Concert
hall ; <6> Submerge ; <7> Interior ; <8>
Psychotic .
* factory setting is “ Turn off tone ” .
Select Toolbox to goto System Setting .
1. Time Setting : Set date and time for this unit ,and
the display format is “Year/ Month/Day
Hour : minute” , set the value by and
keys , then press
and
keys to
select another item .
2. Schedule Record: Select the setting option by
or
key ,and set automatic recording time “once”
or “every day ” and the period of time by
or key , then the “ ” icon shows on right
bottom of the LCD ( Voice mode). So , it will
start to record voice automatically by your
setting .
If unit is turned off , it will turn on in advance
for 60 secs automatically ,then it counts
down ,and the time message shows on LCD.
When it is on , if it ‘s at main menu mode,
it will count down in advance for 10 secs. ;
If it ’s at voice mode , it will count down in
advance for 120 secs. ;
If it is playing back a recording file , it will
record directly on time without counting down ,
* Factory setting is OFF .
3. Timing Shutdown : Set automatic power shutting down time for this unit , and “ OFF ” ,10
minutes , 30 minutes and 1 hour for you choice .
* Factory setting is OFF .
4. Backlight Time : Set automatic shutting backlight time for LCD ,and “ Always On ” ,
5 secs.,10 secs.,15 secs. 20 secs.,30 secs. for your choice .
* Factory setting is Always On .
5. Languages : There are four languages for your choice. English ,simplified Chinese,
traditional Chinese, and Japanese .
* Factory setting is English .
System Setting and Others
Specifications
SPECIFICATIONS
6. Device Information : It shows the trade name ,mode ,
version ,production date and time
about this unit .
7. Recover System : Recover factory settings .
8. Format U Disk : Delete all files in this unit .
MP3
WAV
Copy (recording) files to a removable disk or computer,or copy music files to your
recorder according as your demand.
* This unit supports 7 formats for playing (MP3, WAV, WMA, FLAC, AAC, OGG ) .
CARE AND MAINTENANCE
RESETTING THE UNIT
.If the unit is exposed to a strong static electrical charge, the unit may lock up, or the LCD
may darkle. This is rare, if it does happen, just remove the batteries, then reinstall it , at this
rate, all settings will return to their original values, but all previous messages are saved.
TRAFFIC SAFETY
.Do not use it while operating a motorized vehicle. It may cause a traffic accident
and it is illegal in some areas.
.Even if your earphone is designed for open-air type to ensure you hear outside sound,
do not turn the volume up so high that you can not hear other voices around you.
.Use it with extreme caution or temporarily pause in latent accident situations.
CARE
.Keep the unit dry. If it gets wet, wipe it immediately. Liquid may contain minerals that
can corrode the circuits.
.Use and keep the unit only in normal temperature environments. Extreme temperature
may shorten the life of electronic devices,damage batteries and/or melt plastic parts.
.Keep the unit away from dirt and dust.
.Handle the unit gently and carefully. Dropping it may cause damage and cause the unit to
work improperly.
.Clean, wipe the unit with a damp cloth occasionally to keep it new face.
.Do not use harsh chemical detergent to clean.
.Damage to your unit will void the warranty.
56.6hours
37.8hours
SP
28.3hours
37.8hours
56.6hours
113.3hours
Stereo Recording Time 96kHZ 24bit
( 2 GB memory)
0.8 hours
96kHZ 16bit
48kHZ 24bit
48kHZ 16bit
PCM(WAV)
Memory ( SD or FLASH )
1.6 hours
96kHZ 16bit
48kHZ 24bit
48kHZ 16bit
2.4 hours
3.2 hours
4.8 hours
Micro SD: 32MB~ 32GB ; FLASH: 2 GB
MICROPHONE
Ext.Mic ( D3.5mm ,Stereo)
Loud Speaker
Output Power
R/P Frequency Response
Power Source
Battery Life Time
Earphone ( D3.5mm, Stereo )
MINI 5Pin
D2.5mm
16 ohms dyna mic speaker x 2
Speaker
100 mW
Earphone
10
mW
20 Hz to 20k Hz
2 x AA (LR6) Alkaline Battery , AC adaptor : 5 V
About 9 hours for recording
About 1 0 hours for playback
Record Date
Memorize recording date of message
Remain time
Display remaining time for recording
Size (mm)
2.4 hours
Quantization 16/24bit
Sampling Frequency 16/22.05/24/32/44.1/48/96kHz
Bit rate 32,64,96,128,192kbps
Stereo / Mono
USB V2.0 Socket
DC JACK
LP
1.2 hours
USB
EARPHONE
USB JACK
Other
Function
LP
MP
Recording format MP3
Channel
Jacks
SP
28.3hours
Mon Recording Time 96kHZ 24bit
( 2 GB memory)
1.6 hours
After finishing your operation, disconnect the unit with your PC by the Safety Remove
Hardware procedure.
MP
HP
Mon Recording Time
( 2 GB memory)
Download and upload files
Connect the unit to a computer by USB cable .
Max.396 (4 files total)
HP
Stereo Recording Time
( 2 GB memory)
18.9hours
IMPORTANT NOTES:
· Once message(s) is deleted or the unit is formatted, they can not be recovered.
· Format process will take about 20 seconds, during formatting time all keys are invalid.
Max.99 (single file)
Message Number
112 X 21 X 60 MM
* Specifications are subject to change without notice.
13