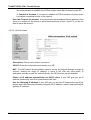
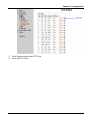
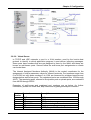
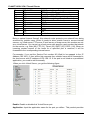
1
ADE-4200 / ADW-4200
ADSL VPN/Firewall Router
User’s Manual
Copyright
Copyright (C) 2003 PLANET Technology Corp. All rights reserved.
The products and programs described in this User’s Manual are licensed products of PLANET Technology, This
User’s Manual contains proprietary information protected by copyright, and this User’s Manual and all
accompanying hardware, software, and documentation are copyrighted.
No part of this User’s Manual may be copied, photocopied, reproduced, translated, or reduced to any electronic
medium or machine-readable form by any means by electronic or mechanical. Including photocopying,
recording, or information storage and retrieval systems, for any purpose other than the purchaser's personal
use, and without the prior express written permission of PLANET Technology.
Disclaimer
PLANET Technology does not warrant that the hardware will work properly in all environments and applications,
and makes no warranty and representation, either implied or expressed, with respect to the quality, performance,
merchantability, or fitness for a particular purpose.
PLANET has made every effort to ensure that this User’s Manual is accurate; PLANET disclaims liability for any
inaccuracies or omissions that may have occurred.
Information in this User’s Manual is subject to change without notice and does not represent a commitment on
the part of PLANET. PLANET assumes no responsibility for any inaccuracies that may be contained in this
User’s Manual. PLANET makes no commitment to update or keep current the information in this User’s Manual,
and reserves the right to make improvements to this User’s Manual and/or to the products described in this
User’s Manual, at any time without notice.
If you find information in this manual that is incorrect, misleading, or incomplete, we would appreciate your
comments and suggestions.
FCC Compliance Statement
This equipment generates and uses radio frequency energy and if not installed and used properly, that is, in
strict accordance with the instructions provided with the equipment, may cause interference to radio and TV
communication. The equipment has been tested and found to comply with the limits for a Class A computing
device in accordance with the specifications in Subpart B of Part 15 of FCC rules, which are designed to provide
reasonable protection against such interference in a residential installation. However, there is no guarantee that
interference will not occur in a particular installation. If you suspect this equipment is causing interference, turn
your Ethernet Switch on and off while your radio or TV is showing interference, if the interference disappears
when you turn your Ethernet Switch off and reappears when you turn it back on, there is interference being
caused by the Ethernet Switch.
You can try to correct the interference by one or more of the following measures:
w Reorient the receiving radio or TV antenna where this may be done safely.
w To the extent possible, relocate the radio, TV or other receiver away from the Switch.
w Plug the Ethernet Switch into a different power outlet so that the Switch and the receiver are on different
branch circuits.
If necessary, you should consult the place of purchase or an experienced radio/television technician for
additional suggestions.
CE mark Warning
The is a class B device, In a domestic environment, this product may cause radio interference, in which case
the user may be required to take adequate measures.
Trademarks
The PLANET logo is a trademark of PLANET Technology. This documentation may refer to numerous hardware
and software products by their trade names. In most, if not all cases, these designations are claimed as
trademarks or registered trademarks by their respective companies.
Revision
User’s Manual for PLANET ADSL VPN/Firewall Router:
Model: ADE-4200A/B, ADW-4200A/B
Rev: 1.0 (October 2003)
Part No.: EM-AD4200
ii
Table of Contents
CHAPTER 1. INTRODUCTION .............................................................................................................................. 1
1.1 AN OVERVIEW OF THE ADE-4200/ADW-4200 ................................................................................................. 1
1.2 PACKAGE CONTENTS....................................................................................................................................... 1
1.3 ADE-4200/ADW-4200 FEATURES .................................................................................................................. 1
1.4 ADE-4200/ADW-4200 APPLICATION .............................................................................................................. 3
CHAPTER 2. USING THE ROUTER...................................................................................................................... 5
2.1 CAUTIONS FOR USING THE ADE-4200/ADW-4200........................................................................................... 5
2.2 THE TOP PANEL LEDS .................................................................................................................................... 5
2.3 THE REAR PORTS ........................................................................................................................................... 6
2.4 CABLING......................................................................................................................................................... 7
CHAPTER 3. CONFIGURATION ........................................................................................................................... 8
3.1 BEFORE CONFIGURATION ................................................................................................................................ 8
3.2 CONNECTING THE ADE-4200/ADW-4200 ....................................................................................................... 8
3.3 CONFIGURING PC IN W INDOWS ....................................................................................................................... 8
3.3.1 For Windows 98/ME .............................................................................................................................. 8
3.3.2 For Windows NT4.0............................................................................................................................. 11
3.3.3 For Windows 2000 .............................................................................................................................. 12
3.3.4 For Windows XP.................................................................................................................................. 14
3.4 FACTORY DEFAULT SETTINGS ........................................................................................................................ 16
3.4.1 Username and Password.................................................................................................................... 16
3.4.2 LAN and WAN Port Addresses ........................................................................................................... 17
3.5 INFORMATION FROM THE ISP ......................................................................................................................... 17
3.6 CONFIGURING WITH THE W EB BROWSER........................................................................................................ 17
3.6.1 STATUS............................................................................................................................................. 19
3.6.2 Quick Start......................................................................................................................................... 20
3.6.3 Configuration ..................................................................................................................................... 20
3.6.3.1 LAN.............................................................................................................................................................20
3.6.3.1.1 Ethernet ................................................................................................................................................20
3.6.3.1.2 Wireless ................................................................................................................................................21
3.6.3.1.3 Port Setting ...........................................................................................................................................22
3.6.3.1.4 DHCP Server ........................................................................................................................................24
3.6.3.2 WAN ...........................................................................................................................................................24
3.6.3.2.1 ISP ........................................................................................................................................................24
3.6.3.2.1.1 RFC 1483 routed...........................................................................................................................26
3.6.3.2.1.2 RFC 1483 bridged.........................................................................................................................26
3.6.3.2.1.4 PPPoA routed................................................................................................................................27
3.6.3.2.1.4 IPoA routed ...................................................................................................................................28
3.6.3.2.1.5 PPPoE routed ...............................................................................................................................29
3.6.3.2.2 DNS ......................................................................................................................................................30
3.6.3.3 System........................................................................................................................................................30
3.6.3.3.1 Time Zone.............................................................................................................................................30
3.6.3.3.2 Remote Access .....................................................................................................................................31
3.6.3.3.3 Firmware Upgrade ................................................................................................................................32
3.6.3.3.4 Backup/Restore ....................................................................................................................................32
3.6.3.3.5 Restart Router.......................................................................................................................................32
3.6.3.3.6 User Management ................................................................................................................................33
3.6.3.4 Firewall .......................................................................................................................................................33
3.6.3.4.1 General Settings ...................................................................................................................................34
3.6.3.4.2 Packet Filter..........................................................................................................................................36
3.6.3.4.2.1 Port Filters.....................................................................................................................................36
3.6.3.4.2.2 Address Filters ..............................................................................................................................37
3.6.3.4.2.3 Packet filter example.....................................................................................................................37
3.6.3.4.3 Intrusion Detection ................................................................................................................................41
3.6.3.4.4 MAC Address Filter ...............................................................................................................................44
3.6.3.4.5 URL Filter..............................................................................................................................................45
3.5.3.4.5.1 Keyword Filtering ..........................................................................................................................46
3.5.3.4.5.2 Domain Filtering: ...........................................................................................................................46
3.6.3.5 VPN ............................................................................................................................................................47
3.6.3.5.1 PPTP ....................................................................................................................................................48
3.6.3.5.1.1 PPTP for Remote Access..............................................................................................................48
3.6.3.5.1.2 PPTP for LAN to LAN....................................................................................................................49
3.6.3.5.1.3 An Example of Configuring a Remote Access PPTP VPN Dial-in Connection ..............................50
3.6.3.5.1.4 An Example of Configuring a Remote Access PPTP VPN Dial-out Connection ............................54
3.6.3.5.1.5 An Example of Configuring a LAN-to-LAN PPTP VPN Connection...............................................56
3.6.3.5.2 IPSec ....................................................................................................................................................58
3.6.3.5.2.1 IPSec configuration .......................................................................................................................58
3.6.3.5.2.2 An Example of Configuring a LAN-to-LAN IPSec VPN Connection...............................................61
3.6.3.6 Virtual Server ..............................................................................................................................................63
3.6.3.6.1 An Example of Configuring a Web Server on the Local Network ..........................................................65
3.6.3.6.2 An example of configuring the Web Server & the Router to be accessible remotely.............................66
3.6.3.7 Advanced....................................................................................................................................................68
3.6.3.7.1 Routing Table ........................................................................................................................................68
3.6.3.7.2 Dynamic DNS .......................................................................................................................................69
3.6.3.7.2.1 Example of Configuring DDNS......................................................................................................69
3.6.3.7.3 Checking Emails ...................................................................................................................................70
3.6.3.7.4 Device Management .............................................................................................................................71
3.6.3.7.4.1 Embedded Web Server .................................................................................................................71
3.6.3.7.4.2 Universal Plug and Play (UPnP) ...................................................................................................72
3.6.3.7.4.3 SNMP Access Control ...................................................................................................................72
3.6.4 Save Configuration to Flash.............................................................................................................. 72
3.6.5 Logout ............................................................................................................................................... 73
CHAPTER 4. TROUBLESHOOTING................................................................................................................... 74
APPENDIX A. SPECIFICATION........................................................................................................................... 75
APPENDIX B. PRODUCT SUPPORT.................................................................................................................. 76
iv
Chapter 1. Introduction
1.1 An Overview of the ADE-4200/ADW-4200
The ADE-4200 ADSL VPN/Firewall Router and ADW-4200 ADSL Wireless VPN/Firewall
Router provide office and residential users the ideal solution for sharing a high-speed
ADSL broadband Internet connection on an 11Mbps wireless network or a 10/100Mbps
Fast Ethernet backbone. They can support downstream transmission rates of up to
8Mbps and upstream transmission rates of up to 1Mbps. The products support PPPoA
(RFC 2364 - PPP over ATM Adaptation Layer 5), RFC 1483 encapsulation over ATM
(bridged or routed), PPP over Ethernet (RFC 2516), and IPoA (RFC1577) to establish a
connection with ISP.
They also serve as an Internet firewall, protecting your network from being accessed by
outside users. Not only provide the natural firewall function (Network Address
Translation, NAT), they also provide rich firewall features to secure a user’s network. All
incoming data packets are monitored and filtered. Besides, they can also be configured
to block internal users from accessing to the Internet.
Furthermore, PPTP and IPSec VPN are also supported. Utilizing 56-bit DES and 168bit 3DES encryption, header authentication, and Internet Key Exchange (IKE) access
control, their full IPSec VPN (virtual Private Network) capability provides complete data
security and privacy for access and exchange of sensitive data. The PLANET ADE4200 and ADW-4200 offer the security and flexibility to make fast and simple secure
ADSL network connections.
1.2 Package Contents
1. One ADSL VPN/Firewall Router
2.
3.
4.
5.
6.
One CD-ROM containing the on-line manual
One RJ-11 ADSL/telephone cable
One straight-through CAT-5 Ethernet cable
One AC-DC power adapter (output: 12V DC, 1A)
One Quick Start Guide
1.3 ADE-4200/ADW-4200 Features
ADE-4200/ADW-4200 provides the following features:
ADSL Multi-Mode Standard: Supports downstream transmission rates of up to 8Mbps
and upstream transmission rates of up to 1024Kbps. It also supports rate management
that allows ADSL subscribers to select an Internet access speed suiting their needs and
budgets. It is compliant with Multi-Mode standard (ANSI T1.413, Issue 2; G.dmt
(G.992.1); G.lite (G992.2).
Wireless Ethernet 802.11b access point: ADW-4200 Provides a wireless Ethernet
1
PLANET ADE-4200/ADW-4200 ADSL VPN/Firewall Router
802.11b access point for extending the communication media to WLAN.
Fast Ethernet Switch: A 4-port 10/100Mbps fast Ethernet switch is supported in the
LAN site and automatic switching between MDI and MDI-X for 10Base-T and 100BaseTX ports is supported. An Ethernet straight or crossover cable can be used directly, this
fast Ethernet switch will detect it automatically.
Multi-Protocol to Establish A Connection: Supports PPPoA (RFC 2364 - PPP over
ATM Adaptation Layer 5), RFC 1483 encapsulation over ATM (bridged or routed), PPP
over Ethernet (RFC 2516), and IPoA (RFC1577) to establish a connection with the ISP.
The product also supports VC-based and LLC-based multiplexing.
Quick Installation Wizard: Supports a WEB GUI page to install this device quickly.
With this wizard, an end user can enter the information easily which they from the ISP,
then surf the Internet immediately.
Universal Plug and Play (UPnP) and UPnP NAT Traversal: This protocol is used to
enable simple and robust connectivity among stand-alone devices and PCs from many
different vendors. It makes network simple and affordable for users. UPnP architecture
leverages TCP/IP and the Web to enable seamless proximity networking in addition to
control and data transfer among networked devices.
Network Address Translation (NAT): Allows multi-users to access outside resource
such as Internet simultaneously with one IP address/one Internet access account.
Besides, many application layer gateway (ALG) are supported such as web browser,
ICQ, FTP, Telnet, E-mail, News, Net2phone, Ping, NetMeeting and others.
Firewall: Supports SOHO firewall with NAT technology. Automatically detects and
blocks the Denial of Service (DoS) attack. The packet filtering and SPI are also
supported. The hacker’s attack will be recorded associated with timestamp in the
security logging area. More firewall features will be added continually, please visit our
web site to download latest firmware.
Domain Name System (DNS) relay: provides an easy way to map the domain name (a
friendly name for users such as www.yahoo.com) and IP address. When a local
machine sets its DNS server with this router’s IP address, then every DNS conversion
requests packet from the PC to this router will be forwarded to the real DNS in the
outside network. After the router gets the reply, then forwards it back to the PC.
Dynamic Domain Name System (DDNS): The Dynamic DNS service allows you to
alias a dynamic IP address to a static hostname. This dynamic IP address is the WAN
IP address. For example, to use the service, you must first apply an account from this
free Web server http://www.dyndns.org/. There are more than 5 DDNS servers
supported.
Virtual Private Network (VPN): Allows a user to make a tunnel with a remote site
directly to secure the data transmission among the connection. Users can use
embedded PPTP client/server and IPSec supported by this router to make a VPN
tunnel or the user can run the PPTP client in PC and the router already provides IPSec
and PPTP pass through function to establish a VPN connection if the user likes to run
the PPTP client in his local computer.
2
Chapter 1 Introduction
PPP over Ethernet (PPPoE): Provide embedded PPPoE client function to establish a
connection. Users can get greater access speed without changing the operation
concept, sharing the same ISP account and paying for one access account. No PPPoE
client software is required for the local computer. The Always ON, Dial On Demand and
auto disconnection (Idle Timer) functions are provided too.
Virtual Server: Users can specify some services to be visible from outside users. The
router can detect incoming service request and forward it to the specific local computer
to handle it. For example, users can assign a PC in a LAN acting as a WEB server
inside and expose it to the outside network. Outside users can browse an inside web
server directly while it is protected by NAT. A DMZ host setting is also provided to a local
computer exposed to the outside network, Internet.
Rich Packet Filtering: Not only filters the packet based on IP address, but also based
on Port numbers.
Dynamic Host Control Protocol (DHCP) client and server: In the WAN site, the
DHCP client can get an IP address from the Internet Server Provider (ISP) automatically.
In the LAN site, the DHCP server can allocate up to 253 client IP addresses and
distribute them including IP address, subnet mask as well as DNS IP address to local
computers. It provides an easy way to manage the local IP network.
Static and RIP1/2 Routing: Supports an easy static table or RIP1/2 routing protocol to
support routing capability.
SNTP: An easy way to get the network real time information from an SNTP server.
Web based GUI: supports web based GUI for configuration and management. It is
user-friendly with an on-line help, providing necessary information and assist user
timing. It also supports remote management capability for remote users to configure
and manage this product.
Firmware Upgradeable: the device can be upgraded to the latest firmware through the
WEB based GUI.
Rich management interfaces: Supports flexible management interfaces with local
console port, LAN port, and WAN port. Users can use terminal application through
console port to configure and manage the device, or Telnet, WEB GUI, and SNMP
through LAN or WAN ports to configure and manage a device.
1.4 ADE-4200/ADW-4200 Application
Internet Connection with Firewall:
They are the perfect solution to connect a small group of PCs to a high-speed broadband
Internet connection. Multi-users can have high-speed Internet access simultaneously. With
their policy-based firewall and Intrusion detection function, the internal network is secured
from any hacker attack.
VPN Connectivity:
3
PLANET ADE-4200/ADW-4200 ADSL VPN/Firewall Router
The ADE-4200 and ADW-4200 VPN connectivity support client-to-VPN gateway and VPN
LAN-to-LAN connections. Using these connection capabilities, mobile workers may attach
to and access LAN resources from the public Internet while they are working at home or at
branches abroad. All corporate remote offices can deploy a ADE-4200 / ADW-4200 and
establish secure connection with headquarters and share resources and information
through the Internet in a safe and secure way.
4
Chapter 2. Using the Router
2.1 Cautions for using the ADE-4200/ADW-4200
Do not place the ADE-4200/ADW-4200 under high humidity and high
temperature.
Do not use the same power source for ADE-4200/ADW-4200 with other
equipment.
Do not open or repair the case yourself. If the ADE-4200/ADW-4200 is too
hot, turn off the power immediately and have a qualified serviceman repair it.
Place the ADE-4200/ADW-4200 on a stable surface.
Only use the power adapter that comes with the package.
2.2 The Top Panel LEDs
ADE-4200
ADSL VPN / Firewall Router
LAN
PWR
SYS
1
2
3
4
MAIL
PPP
ADSL
ADE-4200
5
PLANET ADE-4200/ADW-4200 ADSL VPN/Firewall Router
ADW-4200
ADSL Wireless VPN / Firewall Router
LAN
PWR
SYS
1
2
3
4
WLAN
MAIL
PPP
ADSL
ADW-4200
LED
PWR
SYS
LAN port
1~4
WLAN
(ADW-4200 only)
MAIL
PPP
ADSL
Meaning
Lit when power ON
Lit when system is ready
Lit when connected to Ethernet device
Green for 100Mbps; Orange for 10Mbps
Blinking when data transmit/received
Lit green when the wireless connection is
established. Flashes when sending or
receiving data.
Lit when there is email in the email account
Lit when there is a PPPoA/PPPoE
connection
Lit when successfully connected to an ADSL
DSLAM
2.3 The Rear Ports
Console
ADSL
LAN
12V DC
ON
RESET
OFF
4
9600, N, 8, 1
3
2
+
1
ADE-4200
ADSL
Console
LAN
12V DC
ON
OFF
9600, N, 8, 1
4
3
2
ADW-4200
Port
6
Meaning
1
+
Chapter 2 Using ADE-4200/ADW-4200
ADSL
Console
LAN 1 — 4
(RJ-45
connector)
Reset
PWR
Power Switch
2.4 Cabling
Connect the supplied RJ-11 cable to this port when
connecting to the ADSL/telephone network.
Connect a PS2 or DB9 RS-232 cable to this port
when connecting to a PC’s RS-232 port (9-pin serial
port). Please note that console cable is not
provided on standard package.
Connect an UTP Ethernet cable to one of the four
LAN ports when connecting to a PC or an
office/home network of 10Mbps or 100Mbps.
After the device is powered on, press it to reset the
device or restore to factory default settings.
The operation is as below:
0-3 seconds: reset the device
3-6 seconds: no action
6 seconds or above: restore to factory default
settings (this is used when you can not login to the
router, e.g. forgot the password)
Connect the supplied power adapter to this jack.
Power ON/OFF switch
The most common problem is bad cabling or ADSL line. Make sure that all connected
devices are turned on. On the front of the product is a bank of LEDs. As a first check,
verify that the LAN Link and ADSL line LEDs are lit. If they are not, verify that you are
using the proper cables.
7
Chapter 3. Configuration
The ADE-4200/ADW-4200 can be configured with your Web browser. The web browser
is included as a standard application in the following operation systems, UNIX, Linux,
Mac OS, Windows 98/NT/2000/Me, etc. The product provides a very easy and userfriendly interface for configuration.
3.1 Before Configuration
This section describes the configuration required by LAN-attached PCs that
communicate with the ADE-4200/ADW-4200, either to configure the device, or for
network access. These PCs must have an Ethernet interface installed properly, be
connected to the ADE-4200/ADW-4200 either directly or through an external repeater
hub, and have TCP/IP installed and configured to obtain an IP address through a DHCP
server or a fixed IP address that must be in the same subnet of the ADE-4200/ADW4200. The default IP address of the ADE-4200/ADW-4200 is 192.168.1.254 and subnet
mask is 255.255.255.0. The best and easy way is to configure the PC to get an IP
address from the ADE-4200/ADW-4200. Also make sure you have UNINSTALLED any
kind of software firewall that can cause problems accessing the 192.168.1.254 IP
address of the router.
Please follow the steps below for PC’s network environment installation. First of all,
please check your PC’s network components. The TCP/IP protocol stack and Ethernet
network adapter must be installed. If not, please refer to MS Windows related manuals.
Any TCP/IP capable workstation can be used to communicate with or through
the ADE-4200/ADW-4200 To configure other types of workstations, please
consult the manufacturer’s documentation.
3.2 Connecting the ADE-4200/ADW-4200
1. Connect the Router to a LAN (Local Area Network) and the ADSL/telephone
network.
2. Power on the device
3. Make sure the PWR and SYS LEDs are lit steady & LAN LED is lit.
4. Before proceeding to the next step, make sure you have uninstalled any software
firewall.
3.3 Configuring PC in Windows
3.3.1 For Windows 98/ME
1. Go to Start / Settings / Control Panel. In the Control Panel, double-click on
Network and choose the Configuration tab.
8
Chapter 3 Configuration
2. Select TCP / IP -> NE2000 Compatible, or the name of any Network Interface Card
(NIC) in your PC.
3. Click Properties.
4. Select the IP Address tab. In this page, click the Obtain an IP address
automatically radio button.
9
PLANET ADSL VPN / Firewall Router
5. Then select the DNS Configuration tab.
6. Select the Disable DNS radio button and click “OK” to finish the configuration.
10
Chapter 3 Configuration
3.3.2 For Windows NT4.0
1. Go to Start / Settings / Control Panel. In the Control Panel, double-click on
Network and choose the Protocols tab.
2. Select TCP/IP Protocol and click Properties.
3. Select the Obtain an IP address from a DHCP server radio button and click OK.
11
PLANET ADSL VPN / Firewall Router
3.3.3 For Windows 2000
1. Go to Start / Settings / Control Panel. In the Control Panel, double-click on
Network and Dial-up Connections.
2. Double-click LAN Area Connection.
3. In the LAN Area Connection Status window, click Properties.
12
Chapter 3 Configuration
4. Select Internet Protocol (TCP/IP) and click Properties.
5. Select the Obtain an IP address automatically and the Obtain DNS server address
automatically radio buttons.
6. Click OK to finish the configuration.
13
PLANET ADSL VPN / Firewall Router
3.3.4 For Windows XP
1. Go to Start / Control Panel (in Classic View). In the Control Panel, double-click on
Network Connections.
2. Double-click Local Area Connection
3. In the LAN Area Connection Status window, click Properties.
14
Chapter 3 Configuration
4. Select Internet Protocol (TCP/IP) and click Properties.
5. Select the Obtain an IP address automatically and the Obtain DNS server address
automatically radio buttons
15
PLANET ADSL VPN / Firewall Router
6. Click OK to finish the configuration.
3.4 Factory Default Settings
Before configurating this ADE-4200/ADW-4200, you need to know the following default
settings.
1. Web Configurator
Username: admin
Password : admin
2. Device IP Network settings in LAN site
IP Address : 192.168.1.254
Subnet Mask : 255.255.255.0
3. ISP setting in WAN site
PPPoE
4. DHCP server
DHCP server is enabled.
Start IP Address : 192.168.1.100
IP pool counts : 100
3.4.1 Username and Password
The default username and password are admin and admin respectively.
If you ever forget the password to log in, you may press the RESET button to
restore the factory default settings..
16
Chapter 3 Configuration
3.4.2 LAN and WAN Port Addresses
The parameters of LAN and WAN ports are pre-set in the factory. The default values
are shown below.
LAN Port
IP address
192.168.1.254
Subnet Mask
255.255.255.0
DHCP server
function
IP addresses for
distribution to PCs
Enabled
100 IP addresses continuing from
192.168.1.100 through
192.168.1.199
WAN Port
The PPPoE function is
enabled to
automatically get the
WAN port
configuration from the
ISP, but you have to
set the username and
password first.
(Actually, it can support up to 253
users.)
3.5 Information from the ISP
Before configuring this device, you have to check with your ISP (Internet Service
Provider) what kind of service is provided such as PPPoE, PPPoA, RFC1483, IPoA, or
PPTP-to-PPPoA Relaying.
Gather the information as illustrated in the following table and keep it for reference.
PPPoE
VPI/VCI, VC-based/LLC-based multiplexing, Username,
Password, Service Name, and Domain Name System
(DNS) IP address (it can be automatically assigned from
ISP or be set fixed).
PPPoA
VPI/VCI, VC-based/LLC-based multiplexing, Username,
Password, and Domain Name System (DNS) IP address (it
can be automatically assigned from ISP or be set fixed).
RFC1483 Bridged
VPI/VCI, VC-based/LLC-based multiplexing and configure
this product into BRIDGE Mode.
RFC1483 Routed
VPI/VCI, VC-based/LLC-based multiplexing, IP address,
Subnet mask, Gateway address, and Domain Name System
(DNS) IP address (it is fixed IP address).
IPoA
VPI/VCI, IP address, Subnet mask, Gateway address, and
Domain Name System (DNS) IP address (it is fixed IP
address).
3.6 Configuring with the Web Browser
Open the web browser, enter the local port IP address of this ADE-4200/ADW-4200 ,
which defaults at 192.168.1.254, and click “Go”, a user name and password window
prompt will appear. The default username and password are admin and admin.
17
PLANET ADSL VPN / Firewall Router
You will get a status report web page when login successfully.
At the configuration homepage, the left navigation pane where bookmarks are provided
links you directly to the desired setup page, including:
18
n
Status (ARP Table, PPTP Status, IPSec Status, Email Status, Event Log, Error Log
and UPnP Portmap)
n
Quick Start
n
Configuration (LAN, WAN, System, Firewall, VPN, Virtual Server & Advanced)
Chapter 3 Configuration
n
Save Config to FLASH
n
Logout
n
Language (provides user interface in English language)
Click on the desired item to expand the page in the main navigation pane.
3.6.1 STATUS
The Status section provides and contains many items including device H/W and S/W
information, LAN, WAN, Port status and all defined interfaces. It also provides useful
information for users to review the status of the device.
ARP Table - you will see the data of the IP address of each PC in your LAN as well as
its associated MAC address.
PPTP Status - it gives you a quick overview of the PPTP connection status.
IPSec Status - it gives you a quick overview of the IPSec connection status.
Email Status - it gives you a quick view to know if there is email in your pre-defined
email account. You will see the unread emails in the email server once you have
successfully configured the “Check Emails” in Configuration à Advance.
Event Log - it displays valuable system event logging information and status after the
power is turned on, such as ADSL line, WAN port, SNTP, Firewall, and etc.
Error Log - it shows the error message log. When you face a problem, please send this
error log to support for quick feedback.
UPnP Portmap - it displays the Virtual Servers (or Port Mappings) that created by
UPnP protocol implemented in Windows.
19
PLANET ADSL VPN / Firewall Router
3.6.2 Quick Start
If you use this device to access the Internet through the ISP, this web page is enough
for you to configure this router and access the Internet without a problem. Please check
Chapter 3.5 Information from the ISP, then enter the proper values into this web page,
click the Apply button and then Save Config to FLASH in the left panel. After the
router reboot, you may check the Status web page to check whether the router is
connected to the ISP or not. In most cases, you can access the Internet immediately. If
not, please refer to the sections below for more information.
3.6.3 Configuration
When you click this item, you get following sub-items to configure the ADSL router.
LAN, WAN, System, Firewall, VPN, Virtual Server and Advanced
These functions are described below in the following sections.
3.6.3.1 LAN
There are four items under the LAN section: Ethernet, Wireless, Port Setting and
DHCP Server.
3.6.3.1.1 Ethernet
When you click the Ethernet, you get the following figure.
20
Chapter 3 Configuration
It supports two Ethernet IP addresses in the LAN. With this function, the ADSL router
can support two different LAN subnets to access the Internet at the same time. Usually,
there is only one subnet in LAN, there is no need to configure a Secondary IP address.
The 192.168.1.254 is the default IP address for this ADSL router. The Advanced
Options will allow you to configure the routing protocol RIP version 1 or version 2 in
receiving and sending direction.
3.6.3.1.2 Wireless
When you click Wireless, you will get the following figure. This option is only available
for ADW-4200.
21
PLANET ADSL VPN / Firewall Router
ESSID: Enter the unique ID given to the Access Point (AP), which is already built-in to
the wireless broadband firewall gateway. To connect to this device, your wireless clients
must have the same ESSID as the device.
Regulation Domain: There are five Regulation Domains for you to choose from,
including North America (N.America), Europe, France, and Spain. The Channel ID
will be different based on this setting.
Channel ID: Select the ID channel that you would like to use.
Default Tx Key: Select the encryption key ID, please refer to Key (0-3) below.
Passphrase: This is used to generate WEP keys automatically by an input string and
pre-defined algorithm in WEP64 or WEP128. You can input the same string in both AP
and Client card to generate same WEP keys. Please note that you do not have to key in
Key (0-3) as below when the Passphrase is enabled.
WEP Encryption: To prevent unauthorized wireless stations from accessing data
transmitted over the network, the wireless broadband firewall gateway offers highly
secure data encryption, known as WEP. If you require high security in transmission,
there are two alternatives to select from, WEP 40 and WEP 128.
Key (0-3): Enter the key to encrypt wireless data. To allow encrypted data transmission,
the WEP Encryption Key values on all wireless stations must be the same as the device.
There are four keys for your selection. The input format is in HEX style, 5 and 13 HEX
codes are required for WEP64 and WEP128 respectively, the separator is “-“. Take
WEP64 case for example, 11-22-33-44-55 is a valid key, 1122334455 is invalid instead.
Hide_SSID: When enabled, the Wireless AP is invisible from the site-surveying by
Wireless clients. The wireless clients still can associate with this Wireless AP if entered
with the same ESSID value.
Reset: Reset the Wireless AP function
3.6.3.1.3 Port Setting
When you click Port Setting, you get the following figure. This allows you to configure
the port setting to solve some of the compatibility problems while connecting to the
Internet.
22
Chapter 3 Configuration
Port # Connection Type: Five options to choose from: auto, 10M half-duplex, 10M fullduplex, 100M half-duplex or 100M full-duplex. Sometimes, there are Ethernet
compatibility problems with legacy Ethernet devices. You can configure different types
to solve the compatibility issues.
Port # Rate Limit: When it is enabled, enter a rate value that is configured as multiple
of 32kbps. This function limits the inbound and outbound Ethernet throughput around
the value that you specified.
IPv4 TOS priority Control: TOS, Type of Services, is the 2nd octet of IP packet. The
bits 6-7 of this octet are reserved and bit 0-5 are used to specify the priority of the
packet. The definition of these bits is listed blow:
Two bits: reserved
One bit: high reliability
One bit: high throughput
One bit: No delay
Three bits: IP priority (0 to 7)
This feature uses bits 0-5 to classify the packets’ priority. If the packet is in high priority,
it will flow first and will not be constrained by the Rate Limit. Therefore, when this
feature is enabled, the embedded Ethernet switch IC will check the 2nd octet of each IP
packet. If the value in the TOS field matches in the checked values in the table (0 to 63),
this packet will treat it as high priority.
23
PLANET ADSL VPN / Firewall Router
3.6.3.1.4 DHCP Server
When you click DHCP Server, you get the following figure. You can disable or enable
the DHCP server or enable the DHCP relay functions.
If you check Disabled and click Next, then click Apply. The DHCP server function is
disabled. Each PC in the LAN should assign a fixed IP address and set the PC’s
gateway to the ADSL router.
If you check DHCP Server and click Next, you can configure parameters of the DHCP
server including the IP pool (starting IP address and ending IP address), leased time for
each assigned IP address, DNS IP address, Gateway IP address. Those messages are
sent to the DHCP client when it requests an IP address from the DHCP server. Click
Apply to enable this function. If you check “Use Router as a DNS Server”, the ADSL
Router will find the IP address from the outside network automatically and forward it
back to requesting PC in the LAN.
If you check DHCP Relay Agent and click Next, then you will have to enter the IP
address of the DHCP server which will assign an IP address back to the DHCP client in
the LAN. Click Apply to enable this function.
3.6.3.2 WAN
There are 2 items under the WAN section: ISP and DNS.
3.6.3.2.1 ISP
When you click ISP, you will get the following screen.
24
Chapter 3 Configuration
The factory default is rfc 1483-0. If your ISP uses the same access protocol, please
click Edit to input other parameters as below. If your ISP does not use rfc 1483-0, you
can delete it by clicking Delete. Then you may click Create to create a connection to
your ISP to surf the Internet. The following page is then shown.
Select one of the access methods among the 5 listed items and click Next to configure
the right connection method. Please refer to the following description and Section 3.5
Information from ISP.
is a shortcut to the Quick Start page.
25
PLANET ADSL VPN / Firewall Router
3.6.3.2.1.1 RFC 1483 routed
Description: Give a name for this connection.
VPI and VCI: Enter the information provided by your ISP.
NAT: The NAT feature allows multiple users to access the Internet through a single IP
account, sharing the single IP address. If users in the LAN site have public IP
addresses and can access the Internet directly, the NAT function can be disabled.
Encapsulation method: Select the protocol format, the default is LlcBridged. Select the
one provided by your ISP.
DHCP client: Enable or disable the DHCP client, specify if the Router can get an IP
address from the Internet Server Provider (ISP) automatically or not. Please click
Obtain an IP address automatically via DHCP client to enable the DHCP client function
or click Specify an IP address to disable the DHCP client function, and specify the IP
address manually. The setting of this item is specified by your ISP.
3.6.3.2.1.2 RFC 1483 bridged
26
Chapter 3 Configuration
Description: Give a name for this connection.
VPI and VCI: Enter the information provided by your ISP.
Encapsulation method: Select the protocol format, the default is LlcBridged. Select the
one provided by your ISP.
3.6.3.2.1.4 PPPoA routed
Description: Give a name for this connection.
VPI/VCI: Enter the information provided by your ISP.
NAT: The NAT feature allows multiple users to access the Internet through a single IP
account, sharing the single IP address. If users in the LAN site have public IP
addresses and can access the Internet directly, the NAT function can be disabled.
Username: Enter the username provided by your ISP. You can input up to 128
alphanumeric characters (case sensitive).
Password: Enter the password provided by your ISP. You can input up to 128
alphanumeric characters (case sensitive).
Service Name: This item is for identification purpose. If it is required, your ISP will
provide you the information. Maximum input is 20 alphanumeric characters.
Use the following IP address: If your ISP gives you a fixed IP address through PPPoA,
input the IP address on this field.
Authentication Protocol Type: Default is Auto.
PPPoA connection: This item provides 2 options.
¤ Always on: if you want to establish a PPPoA session when starting up. It will
27
PLANET ADSL VPN / Firewall Router
also automatically re-establish the PPPoA session when disconnected by the ISP.
¤ Connect to Demand: if you want to establish a PPPoA session only when there
is a packet requesting access to the Internet.
User Idle Timeout (in minutes): Auto-disconnect the broadband firewall gateway when
there is no activity on the line for a predetermined period of time. Input 0 if you do not
want to have idle timeout.
3.6.3.2.1.4 IPoA routed
Description: Give a name for this connection.
VPI/VCI: Enter the information provided by your ISP.
NAT: The NAT feature allows multiple users to access the Internet through a single IP
account, sharing the single IP address. If users in the LAN site have public IP
addresses and can access the Internet directly, the NAT function can be disabled.
Obtain an IP address automatically via DHCP client: If your ISP give you an IP
address dynamically with IPoA, please select this item.
Use the following IP address: If your ISP give you an fixed IP address through IPoA,
please select this item and manually configure the IP address, subnet mask and default
gateway IP address.
28
Chapter 3 Configuration
3.6.3.2.1.5 PPPoE routed
Description: Give a name for this connection.
VPI/VCI: Enter the information provided by your ISP.
NAT: The NAT feature allows multiple users to access the Internet through a single IP
account, sharing the single IP address. If users in the LAN site have public IP
addresses and can access the Internet directly, the NAT function can be disabled.
Username: Enter the username provided by your ISP. You can input up to 128
alphanumeric characters (case sensitive).
Password: Enter the password provided by your ISP. You can input up to 128
alphanumeric characters (case sensitive).
Service Name: This item is for identification purpose. If it is required, your ISP will
provide you the information. Maximum input is 20 alphanumeric characters.
Use the following IP address: If your ISP gives you a fixed IP address through PPPoE,
input the IP address on this field.
Authentication Protocol Type: Default is Auto.
PPPoE connection: This item provides 2 options.
¤ Always on: if you want to establish a PPPoE session when starting up. It will
also automatically re-establish the PPPoE session when disconnected by the ISP.
¤ Connect to Demand: if you want to establish a PPPoE session only when there
is a packet requesting access to the Internet.
User Idle Timeout (in minutes): Auto-disconnect the broadband firewall gateway when
there is no activity on the line for a predetermined period of time. Input 0 if you do not
want to have idle timeout.
29
PLANET ADSL VPN / Firewall Router
3.6.3.2.2 DNS
The WAN-DNS is shown as below.
A Domain Name System (DNS) contains a mapping table for domain name and IP
addresses. In the Internet, every host has a unique and friendly name such as
www.yahoo.com and an IP address. As the IP Address is hard to remember, the DNS
converts the friendly name into its equivalent IP Address.
You can obtain a Domain Name System (DNS) IP address automatically if your ISP has
provided it when you logon. Usually when you choose PPPoE or PPPoA as your WAN ISP protocol, the ISP will provide the DNS IP address automatically. You may leave it as
blank. Or your ISP may provide you with an IP address of their DNS. If this is the case,
you must enter the DNS IP address.
If you choose one of the other three protocols ─ RFC1483 routed /bridged and IPoA.
Check with your ISP, it may provide you with an IP address of DNS. You must enter the
DNS IP address if you set the DNS of your PC to the LAN IP address of this router.
3.6.3.3 System
There are six items under the System section: Time Zone, Remote Access, Firmware
Upgrade, Backup/Restore, Restart Router and User Management.
3.6.3.3.1 Time Zone
When you click Time Zone, you get the following figure.
30
Chapter 3 Configuration
The router does not have a real time clock on board; instead, it uses the Simple
Network Time Protocol (SNTP) to get the current time from the SNTP server from the
outside network. Please choose your local time zone, click Enable and click the Apply
button. You will get the correct time information after you ready establish a connection
to the Internet. If you prefer to enter your own SNTP server, please enter and use it as
the first choice.
Resync Poll Interval (in minutes) is the periodical interval of router’s SNTP client to
update (or re-synchronize) the current time with SNTP server after it synchronized with
SNTP server.
3.6.3.3.2 Remote Access
When you click Remote Access, input the time and then click Enable, you may
temporarily permit remote administration of the ADE-4200/ADW-4200. The maximum
time is 120 minutes.
31
PLANET ADSL VPN / Firewall Router
3.6.3.3.3 Firmware Upgrade
When you click Firmware Upgrade, it allows you to input the location of firmware
stored on your PC and click the Upgrade button to upgrade to the new firmware.
3.6.3.3.4 Backup/Restore
When you click Backup/Restore, it allows you to save your current settings into a file
on your PC. You can click the Backup to store the current settings on a file. If you like
to restore it back, please input the location of this configuration file in the PC and click
the Restore button to save it back.
3.6.3.3.5 Restart Router
When you click Restart Router, you have two functions. One is to restart it with current
settings and the other is to restart it with factory default settings if you check Reset to
32
Chapter 3 Configuration
factory default settings.
3.6.3.3.6 User Management
When you click User Management, you are able to edit existing user’s database or to
create other user accessing this device.
3.6.3.4 Firewall
This product also serves as an Internet firewall, not only does it provide a natural
firewall function (Network Address Translation, NAT), but it also provides rich firewall
features to secure a user’s network. Besides, it can also be configured to block internal
33
PLANET ADSL VPN / Firewall Router
users from accessing the Internet. The functions include:
1.
Firewall: prevent access from an outside network, the router provides three levels of
security support.
l
NAT natural firewall: it masks LAN users’ IP addresses which are invisible to
outside users on the Internet, making it much more difficult for a hacker to target a
machine on your network. This natural firewall is on when NAT function is enabled.
l
Firewall Security and Policy (General Settings): inbound direction of Packet Filter
rules to prevent unauthorized computers or applications accessing the local
network.
l
Intrusion Detection: Enable Intrusion Detection to detect, prevent and log
malicious attacks.
2.
Access Control: prevent access from a local network.
l
Firewall Security and Policy (General Settings): outbound direction of Packet
Filter rules to prevent unauthorized computers or applications accessing the
Internet.
l
MAC Filter rules: to prevent unauthorized computers accessing the Internet
l
URL Filter: to block the unwanted websites from accessing inappropriate material
from the local network.
To prevent unauthorized computers access to the Internet and local network, you can
either choose not to enable Firewall, add the MAC address and URL filter rules by
yourself, or enable the Firewall and modify the packet filter rules if required. The Packet
Filter is categorized as Port Filters and Address Filters, configured to filter the packets
based-on Applications (Port) and IP addresses of the computers respectively.
There are five items under the Firewall section: General Settings, Packet Filter,
Intrusion Detection, MAC Address Filter and URL Filter.
3.6.3.4.1 General Settings
When you click General Settings, you get the following figure.
34
Chapter 3 Configuration
Firewall Security: When you enable the Firewall security function, you can select one
of the firewall security policies. By default the firewall is set to disabled.
Firewall Policy: Select either All blocked/User-defined, High, Medium or Low security
level to enable the Firewall. The different among these three security levels is the presetting of port filter rules in the Packet Filter.
All blocked/User-defined: no pre-defined port or address filter rule by default, it
means all inbound (Internet to LAN) and outbound (LAN to Internet) packets will
be blocked. Users have to add their own filter rules for further access to the
Internet.
High, Medium and Low security level: By default, your system uses High,
Medium and Low firewall security levels between the WAN and LAN. For
example, when you select High, the Port Filters of the Packet Filter screen will be
set automatically according to High security level settings.
Firewall Logging: When both the Firewall Security and Firewall Logging are enabled,
the device will detect the blocked and/or intrusion packets, once the setting has been
configured. Then the router will log the corresponding (blocking or intrusion detection)
logs into the Event Log under Status.
Select the Apply button to save the setting.
Please note that the enabling of Firewall Security & selection of Firewall policy is belong
to the second level of Firewall as described above, it blocks and redirects certain ports
to limit the services that outside users can access with Port and Address Filter features.
Please refer to Intrusion Detection section for security level 3 protection - to prevent
your local area network (LAN) from malicious attacks, for example, port scan and
Denial-of-Service (DoS).
35
PLANET ADSL VPN / Firewall Router
3.6.3.4.2 Packet Filter
When you click Packet Filter, you get the following figure.
You may configure to filter inbound (incoming) and outbound (outgoing) packets based
on port or IP address.
If it is based on port, click Port Filters for more options. You may filter the packets based
on PORT and packet type (TCP or UDP or any). For example, the protocol number 1
means ICMP. You may enter 1 to protocol number of Raw IP Filtering web page. Port
ranges are supported.
If it is based on IP address, click Address Filters for more options. You may enter the IP
address and again to select the inbound or outbound packets.
For example, to allow TCP packet, port 0 to 1000 passing router between WAN and
LAN and blocks host IP address, 192.168.1.100. Then you have to configure the port
filter à add TCP filter > 0 to 1000 and ALLOW in both direction. Then click address filter
à add address filter à enter host IP 192.168.1.100, subnet mask 255.255.255.255 (for
this single host) and both direction.
3.6.3.4.2.1 Port Filters
The pre-defined port filter rules for high, medium and low security level are listed below.
When user enables Firewall Security feature for high, medium or low security level, the
Block WAN Request function (Ping packet) is enabled automatically.
Application
Protocol
Port Number
Start
End
Firewall - High
Inbound Outbound
HTTP(80)
DNS (53)
DNS (53)
FTP(21)
Telnet(23)
SMTP(25)
POP3(110)
TCP(6)
UDP(17)
TCP(6)
TCP(6)
TCP(6)
TCP(6)
TCP(6)
80
53
53
21
23
25
110
NO
NO
NO
NO
NO
NO
NO
36
80
53
53
21
23
25
110
YES
YES
YES
NO
NO
YES
YES
Firewall - Medium
Firewall - Low
Inbound Outbound Inbound Outbound
NO
NO
NO
NO
NO
NO
NO
YES
YES
YES
YES
YES
YES
YES
NO
YES
YES
NO
NO
NO
NO
YES
YES
YES
YES
YES
YES
YES
Chapter 3 Configuration
NEWS(119)
RealAudio
(7070)
PING
H.323(1720)
T.120(1503)
SSH(22)
NTP(123)
HTTPS(443)
ICQ (5190)
TCP(6)
UDP(17)
119
7070
119
7070
NO
NO
NO
NO
NO
YES
YES
YES
NO
YES
YES
YES
ICMP(1)
TCP(6)
TCP(6)
TCP(6)
UDP(17)
TCP(6)
TCP(6)
N/A
1720
1503
22
123
443
5190
N/A
1720
1503
22
123
443
5190
NO
NO
NO
NO
NO
NO
NO
YES
NO
NO
NO
YES
NO
NO
NO
NO
NO
NO
NO
NO
NO
YES
YES
YES
YES
YES
YES
NO
NO
YES
YES
YES
NO
NO
YES
YES
YES
YES
YES
YES
YES
YES
Note: Inbound: Internet to LAN, Outbound: LAN to Internet
3.6.3.4.2.2 Address Filters
There are no pre-defined address filter rules; you can add the filter rules to meet your
requirements. There are two kinds of address filters, one is inbound, the other is
outbound. The rules can be set to prevent unauthorized users (hosts or network) to
access the Internet from LAN (outbound) and/or access LAN from the Internet (inbound).
3.6.3.4.2.3 Packet filter example
The following provides an example of configuring a web server in LAN when the firewall
policy is set to High, Medium or Low security level.
The pre-defined port filter rule for HTTP is the same no matter if it is a high, medium or
low security level. The default setting is allowed for outbound access, not allowed for
inbound access. To setup a Web server located on the local network, when the firewall
policy is set, you have to configure the Port Filters setting first.
When the firewall policy is set, the port filters screenshot is as below, the inbound HTTP
access is not allowed.
37
PLANET ADSL VPN / Firewall Router
1.
Click Packet Filter, you will get the following figure.
2.
Click Port Filters, the pre-defined port filter rules screen of low security level is shown as
below.
38
Chapter 3 Configuration
3.
4.
Click Delete to delete the HTTP rule.
Click Add TCP Filter.
39
PLANET ADSL VPN / Firewall Router
5. Input the port number and set the inbound & outbound as Allow.
6. The port filter rule of HTTP is shown as below.
40
Chapter 3 Configuration
7. Configure the Virtual Server to enable the HTTP service in the virtual server setting and
input the WEB server’s IP address. If you try to setup a remote management of router
permanently, you may enter router’s IP instead.
3.6.3.4.3 Intrusion Detection
41
PLANET ADSL VPN / Firewall Router
The Intrusion Detection allows you to prevent your local area network (LAN) from
malicious attacks, for example, port scan and Denial-of-Service (DoS). The purpose of
such attacks is either to consume the computing resources of your router, or even to
bring down the router and network.
The Intrusion Detection also supports the blacklisting feature to minimize system
overhead that could be consumed in an attack, as well as protecting the network in the
meantime. The blacklist is empty initially when the firewall enabled. The initiator of an
attack will be blacklisted, that is, will be added to the blacklist. Whenever the router
receives a packet from the Internet, it will check the blacklist first to see if the initiator is
in the list. If it is, the packet will be dropped. A configurable value is associated with
each type of the attack, the initiator will be removed from the list when it times out.
Enable: select True to enable intrusion detection. Strongly recommend to set TRUE for
“Use Blacklist” and “Use Victim Protection” when enable “Intrusion Detection”.
Use Blacklist: select True to use blacklist. If enabled, external host addresses will be
saved into blacklist when the router detects the intrusion from these hosts.
Use Victim Protection: select True to use Victim Protection. If enabled, the router will
protect the internal host (the host is the victim at this moment) from suspicious attacks.
Victim Protection Duration: after the router has detected that an internal host has
been attacked, the router will record this external host IP into the Blacklist and block
traffic with this host for a set time limit in order to protect the host.
DoS Attack Block Duration: after a DoS attack is detected, the router will record this
external host IP into the Blacklist and block traffic with this host for a set time limit.
Scan Attack Block Duration: after a Scan attack is detected, the router will record this
external host IP into the Blacklist and block traffic with this host for a set time limit.
Maximum TCP Open Handshaking Count: set the maximum number of unfinished
TCP handshaking session per second. Once the maximum of unfinished TCP
42
Chapter 3 Configuration
handshaking session per second is reached, the router will consider the SYN flood
attack occurs.
Maximum Ping Count: set the maximum number of PING packets per second. Once
the maximum number of PING per second is reached, the router will assume that an
Echo storm attack has occurred
Maximum ICMP Count: set the maximum number of ICMP packet per second. Once
the maximum number of ICMP packet per second is reached, the router will consider
that an ICMP flood attack has occurred
Some pictures are shown below which show the router attacked by others.
1. Attacked by other with TCP packet/Port 1052 from source IP: 64.152.73.206.
2. Attacked by ICMP PING request.
3. Attacked by NetBIOS_NAME_SERVICE_PORT packet from other source IP :
43
PLANET ADSL VPN / Firewall Router
200.68.76.177 to port 137 (a netbios_ns port).
3.6.3.4.4 MAC Address Filter
When you click the MAC Address Filter, you get the following figure.
The MAC filtering function enables you to configure your router to block internal users
(MAC address) from Internet access.
Enable/Disable: to enable or disable MAC Address Filter feature.
Allowed/Blocked: To allow or block the following MAC addresses to surf outside
network only. If you check Allowed, please be sure your PC’s MAC address is listed. If
you check Blocked, please be sure your PC’s MAC address is not listed.
44
Chapter 3 Configuration
MAC Address: There are 10 entries to enter the MAC addresses you want manage. If
you select Blocked, the packet with the MAC address in the table will be dropped and
others will be forwarded. If you select Allowed, the packet with the MAC address in the
table will be forwarded and others will be dropped. Then select the Apply button to
save the setting.
3.6.3.4.5 URL Filter
When you click the URL Filter, you get the following figure. There are no pre-defined
URL filter rules; you can add the filter rules to meet your requirement.
The URL filtering function enables you to block unwanted websites from accessing
inappropriate material from the entire enterprise.
Enable / Disable: Check Enable / Disable radio button to activate or deactivate the
URL filter function.
Always Block: Check this button, if you wish not to access this website through out the
entire time. Or choose,
Block from: Check this button, if you only wish to block a URL in a specific time
interval. For example, if you wish to temporarily block a URL from Monday 8:00am until
Wednesday night at 7:40pm, in the space provided above, you should select 08:00,
Monday to 19:40, Wednesday.
Keyword Filtering: Check if you want to enable the Keyword Filtering function and
click Details button for further configuration options. Please refer below for more
information.
Domain Filtering: Check if you want to enable the Domain Filtering function and click
Detail button for further configuration options. Please refer below for more information.
45
PLANET ADSL VPN / Firewall Router
Disable All WEB traffic except for Trusted Domain: It allows internal users to
access only the specified/trusted domain. Please refer to the Domain Filtering
section first, before checking this option.
Enable Blocking Log: Check this button to log the corresponding logs into the Event
Log under Status.
Select the Apply button to save the setting.
3.5.3.4.5.1 Keyword Filtering
The ADSL Router allows the administrator to block some WEB URLs containing certain
keywords in this page. For example, if the keyword “xxx” is listed, the URL
http://www.new.site.com/xxx.html would be blocked, even if it is not included in the
domain filtering list. Keywords presented as site name are also blocked; that is,
http://www.xxxsite.com can not be accessed from the LAN.
To add a keyword, enter it in the Keyword field and click Apply.
3.5.3.4.5.2 Domain Filtering:
46
Chapter 3 Configuration
If the router is configured to allow internal users to access only certain specified
domains, check add the domain name into the Trusted Domain list. If the router is
configured to allow internal users to access all websites except for some forbidden
domains, add the forbidden domain name into the Forbidden Domain list. These
Forbidden Domains will be blocked, and users will no longer be able to access the
websites from the LAN.
The checking procedure is like these steps.
1.
Check the domain in the URL’s string if it is in the trusted list. If yes, send it to
outside world.
2.
If not, check if it is listed in the forbidden list or the function, disable all WEB traffic
except Trusted Domains, is checked, then drop this packet.
3.
If the packet is not matched with above two items, the send it to outside world.
To add a domain name, enter its host name, such as www.bad-site.com into the text
field under Domain and select either Trusted Domain or Forbidden Domain, then
click Apply. The specified domain will be shown in the Domain List. DO NOT include
http://, ONLY the sub-domain is allowed. For instance, taking “yahoo.com” as the
trusted domain means that www.yahoo.com, my.yahoo.com, and sports.yahoo.com will
also be trusted.
To remove a site that was previously added, select its name in the list box, and click the
Delete button to eliminate it from the list.
3.6.3.5 VPN
The router supports VPN to establish secure, end-to-end private network connections
over a public networking infrastructure. There are two types of VPN connections, the
remote access and LAN-to-LAN VPN. Deploying a remote access VPN enables users
to reduce the cost by leveraging the local dial-up infrastructures of the ISP, in addition,
47
PLANET ADSL VPN / Firewall Router
transmitting data over a secure VPN tunnel. LAN-to-LAN VPN is an alternative WAN
infrastructure that is used to connect offices and home offices to share network
resources with each other over a secure VPN tunnel.
This router supports two kinds of VPN standards, Point-to-Point Tunneling Protocol
(PPTP) and Internet Security Protocol (IPSec).
3.6.3.5.1 PPTP
There are two applications provided in PPTP, Remote Access and LAN-to-LAN
(please refer below for more information.). Click Create to select one of applications to
continually setup.
3.6.3.5.1.1 PPTP for Remote Access
For the Remote Access Application, please refer to the figure below.
Connection Name: Give a name for this connection.
Type: Check Dial Out to be a client, check Dial In to be a server. When this network
router acts as a client, please input the remote Server IP Address (or Hostname) to
establish a connection. When this network router acts as a server, please input the
Private IP Address Assigned to Dial in User address.
48
Chapter 3 Configuration
Username: If you are a Dial-Out user (client), enter the username provided by your
Host. If you are a Dial-In user (server), enter your own username.
Password: If you are a Dial-Out user (client), enter the password provided by your Host.
If you are a Dial-In user (server), enter your own password.
PPP Authentication Type: Default is Auto.
Data Encryption: The data can be encrypted by MPPE algorithm. Default is Auto, it is
negotiated when establishing a connection.
Key Length: The data can be encrypted by MPPE algorithm with 40 bits or 128 bits.
Default is Auto, it is negotiated when establishing a connection.
Mode: You may select Stateful or Stateless mode. The key will be changed in each
256 packets when you select Stateful mode. If you select Stateless mode, the key will
not be changed in each packet.
Idle Time: Auto-disconnect the router when there is no activity on the line for a
predetermined period of time. 0 means this connection is always on.
Click Apply after setting.
3.6.3.5.1.2 PPTP for LAN to LAN
For the LAN to LAN application, please refer to the figure below.
Connection Name: Give a name for this connection.
Type: Check Dial Out to be a client, check Dial In to be a server. When this network
router acts as a client, please input the remote Server IP Address (or Hostname) to
establish a connection. When this network router acts as a server, please input the
Private IP Address Assigned to Dial in User address.
Peer Network IP: Enter Peer network IP address.
49
PLANET ADSL VPN / Firewall Router
Netmask: Enter the subnet mask of peer network based on above Peer Network IP
setting.
Username: If you are a Dial-Out user (client), enter the username provided by your
Host. If you are a Dial-In user (server), enter your own username.
Password: If you are a Dial-Out user (client), enter the password provided by your Host.
If you are a Dial-In user (server), enter your own password.
PPP Authentication Type: Default is Auto.
Data Encryption: The data can be encrypted by MPPE algorithm. Default is Auto, it is
negotiated when establishing a connection.
Key Length: The data can be encrypted by MPPE algorithm with 40 bits or 128 bits.
Default is Auto, it is negotiated when establish a connection.
Mode: You may select Stateful or Stateless mode. The key will be changed in each
256 packets when you select Stateful mode. If you select Stateless mode, the key will
be changed in each packet.
Idle Time: Auto-disconnect the ADSL router when there is no activity on the line for a
predetermined period of time. 0 means this connection is always on.
Click Apply after setting.
3.6.3.5.1.3 An Example of Configuring a Remote Access PPTP VPN Dial-in Connection
Background of the Example
A remote worker establishes a PPTP VPN connection with the head office using
Microsoft's VPN Adapter, a piece of software included with Windows 2000/ME, etc. The
router is installed in the head office, connected to a couple of PCs and Servers.
Application Diagram
50
Chapter 3 Configuration
Configuring PPTP VPN in the Office
The input IP address 192.168.1.200 will be assigned to the remote worker, please make
sure this IP is not used in the Office LAN.
Configuring PPTP VPN in Remote Side
You can configure VPN client with commercial VPN client software package (e.g. SSH)
or the Dial-up Adaptor in Windows. Please follow the steps below if you are a Windows
2000 user.
1. Click Network and Dial-up Connection and Make new connection
51
PLANET ADSL VPN / Firewall Router
2. Follow the step and select “Connect to a private network through the Internet”
3. Enter the IP address of the ADSL Router located in the office
52
Chapter 3 Configuration
4. Follow the step, the following screen appears. The setup is completed.
5. To make the connection, click the Virtual Private Connection icon in Dial-up
Networking Group, and input the username & password set in ADSL Router.
53
PLANET ADSL VPN / Firewall Router
3.6.3.5.1.4 An Example of Configuring a Remote Access PPTP VPN Dial-out Connection
Background of the Example
Corporate establishes a PPTP VPN connection with the file server located in the remote
side. The router is installed in the office, connected with a couple of PCs and Servers.
Application Diagram
54
Chapter 3 Configuration
Configuring PPTP VPN in the Office
You can either input the IP address (69.1.121.33 in this case) or hostname to reach the
Server.
Refer also to PPTP VPN – remote access (dial-in) for the other parameters.
PPTP Status
55
PLANET ADSL VPN / Firewall Router
3.6.3.5.1.5 An Example of Configuring a LAN-to-LAN PPTP VPN Connection
Background of the Example
The branch office establishes a PPTP VPN tunnel with the head office to connect two
private networks by leveraging the Internet infrastructure. The routers are installed in
the head office and branch office accordingly.
Application Diagram
Configuring PPTP VPN in the Head Office
The input IP address 192.168.1.201 will be assigned to the router located in the branch
office. Please make sure this IP is not used in the head office LAN.
56
Chapter 3 Configuration
Configuring PPTP VPN in the Branch Office
The input IP address 69.1.121.3 is the Public IP address of the router located in the
head office. If you have a domain name assigned to this IP address - either you
registered the DDNS (please refer to the DDNS section), or you have a static IP with a
domain name, you can also use the Hostname instead of the IP address to reach the
router.
Refer also to Configuring PPTP VPN in the Head Office for other parameters.
PPTP Status in the Head Office
57
PLANET ADSL VPN / Firewall Router
3.6.3.5.2 IPSec
The router supports IPSec VPN to establish secure, end-to-end private network
connections over a public networking infrastructure. The specification is as below:
w
w
w
w
w
w
. Encapsulation: tunnel mode
. Support IKE authentication method: pre-shared key
. Security protocol: ESP and AH
. Authentication: MD5, SHA-1
. Encryption: DES, 3DES, AES
. Support PFS
3.6.3.5.2.1 IPSec configuration
When you click the IPSec, you get the following figure.
Click Create…
58
Chapter 3 Configuration
Connection Name: Give a name for this connection.
Local Network: Set the IP address, subnet or address range of the local network.
¤ Single Address: The IP address of the local host.
¤ Subnet: The subnet of the local network. For example, IP: 192.168.1.0 with
netmask 255.255.255.0 specifies one class C subnet starting from 192.168.1.1.
¤ IP Range: The IP address range of the local network. For example, IP:
192.168.1.1, end IP: 192.168.1.10
Remote Secure Gateway Address (or hostname): The IP address or hostname of
remote VPN device that is connected and establishes a VPN tunnel.
Remote Network: Set the IP address, subnet or address range of the remote network.
Proposal: Select the IPSec security method. There are two methods to check the
authentication information, AH (authentication header) and ESP (Encapsulating Security
Payload). Check ESP for a higher security, data will be encrypted and authenticated.
Check AH, data will be authenticated but not encrypted.
Authentication: Authentication establishes the integrity of datagram and ensures it is
not tampered with in transmit. There are three options, Message Digest 5 (MD5),
Secure Hash Algorithm (SHA-1) or NONE. SHA-1 is more resistant to brute-force
attacks than MD5, but it is slower.
¤ MD5: A one way hashing algorithm that produces a 128−bit hash.
¤ SHA-1: A one way hashing algorithm that produces a 160−bit hash.
Encryption: Select the encryption method from the pull-down menu. There are four
options, DES, 3DES, AES and NONE. The NONE means it is a tunnel only, no
encryption. 3DES and AES are more powerful but increases latency.
59
PLANET ADSL VPN / Firewall Router
¤ DES: Stands for Data Encryption Standard, it uses 56 bits as an encryption method.
¤ 3DES: Stands for Triple Data Encryption Standard, it uses 168 (56*3) bits as an
encryption method.
¤ AES: Stands for Advanced Encryption Standards, it uses 128 bits as an encryption
method.
Perfect Forward Secrecy: Choose whether to enable PFS using Diffie-Hellman publickey cryptography to change encryption keys during the second phase of VPN
negotiation. This function will provide better security, but extends the VPN negotiation
time. Diffie-Hellman is a public-key cryptography protocol that allows two parties to
establish a shared secret over an unsecured communication channel. There are three
modes, MODP 768-bit, MODP 1024-bit and MODP 1536-bit, MODP stands for Modular
Exponentiation Groups.
Pre-shared Key: This is for Internet Key Exchange (IKE) protocol, a string from 4 to
128 characters. Both sides should use the same key. IKE is used to establish a shared
security policy and authenticated keys for services (such as IPSec) that require key.
Before any IPSec traffic can be passed, each router must be able to verify the identity of
its peer. This can be done by manually entering the pre-shared key into both sides
(router or hosts).
Click Advanced Option to get the following figure.
SA Lifetime: Specify the number of minutes that a Security Association (SA) will stay
active before new encryption and authentication key will be exchanged. There are two
kinds of SAs, IKE and IPSec. IKE negotiates and establishes SA on behalf of IPSec, an
IKE SA is used by IKE.
Phase 1 (IKE): To issue an initial connection request for a new VPN tunnel. Default 240
minutes, range from 5 to 15,000 minutes.
Phase 2 (IPSec): To negotiate and establish secure authentication. Default 60 minutes,
range from 5 to 15,000 minutes.
A short SA time increases the security by forcing two parties to update the keys.
However, every time the VPN tunnel re-negotiates, the access through tunnel will be
60
Chapter 3 Configuration
temporarily disconnected.
3.6.3.5.2.2 An Example of Configuring a LAN-to-LAN IPSec VPN Connection
Background of the Example
The branch office establishes an IPSec VPN tunnel with the head office to connect two
private networks by leveraging the Internet infrastructure. The routers are installed in
the head office and branch office accordingly.
Application Diagram
Network Configuration and Security Plan
We want to setup a security channel between branch office and head office using LANto-LAN tunnel-mode connection. ESP, with MD5 as the authentication protocol and AES
as the encryption protocol is decided as the policy of security plan. Pre-shared key is
defined as 8 characters, 12345678.
Local Network ID
Local Router IP
Remote Network ID
Remote Router IP
IKE Pre-shared Key
VPN Connection Type
Security Algorithm
Branch Office
192.168.0.0/24
69.1.121.30
192.168.1.0/24
69.1.121.3
12345678
Tunnel mode
ESP:MD5 with AES
Head Office
192.168.1.0/24
69.1.121.3
192.168.0.0/24
69.1.121.30
12345678
Tunnel mode
ESP:MD5 with AES
61
PLANET ADSL VPN / Firewall Router
Configuring IPSec VPN in the Head Office
The local subnet (head office) is set as 192.168.1.0/24 (with netmask 255.255.255.0),
while the remote subnet (branch office) is set as 192.168.0.0 (with netmask
255.255.255.0). The IP address 69.1.121.30 in “Secure Gateway Address” field is the
Public IP address of the router located in the branch office. If you have a domain name
assigned to this IP address - either you registered the DDNS (please refer to the DDNS
section), or you have a static IP with a domain name, you can also use the Hostname
instead of the IP address to reach the router. Set “Proposal” as ESP: MD5/AES, PFS as
None and pre-shared key as as12345678 according the pre-defined security plan.
Configuring IPSec VPN in the Branch Office
The local subnet (branch office) is set as 192.168.0.0/24 (with netmask 255.255.255.0),
while the remote subnet (head office) is set as 192.168.1.0 (with netmask
255.255.255.0). The IP address 69.1.121.3 in “Secure Gateway Address” field is the
Public IP address of the router located in the head office. If you have a domain name
assigned to this IP address - either you registered the DDNS (please refer to the DDNS
section), or you have a static IP with a domain name, you can also use the Hostname
instead of the IP address to reach the router. Set “Proposal” as ESP: MD5/AES, PFS as
None and pre-shared key as as12345678 according the pre-defined security plan.
62
Chapter 3 Configuration
3.6.3.6 Virtual Server
In TCP/IP and UDP networks, a port is a 16-bit number, used by the host-to-host
protocol to identify to which application program it must deliver incoming messages.
Some ports have numbers that are pre-assigned to them by the IANA, and these are
known as well-known ports. Servers follow the well-know port assignments so clients
can locate them.
The Internet Assigned Numbers Authority (IANA) is the central coordinator for the
assignment of unique parameter values for Internet protocols. Port numbers range from
0 to 65536, but only ports numbers 0 to 1024 are reserved for privileged services and
designated as well-known ports. The registered ports are numbered from 1024 through
49151. The remaining ports, referred to as dynamic ports or private ports, are numbered
from 49152 through 65535.
Examples of well-known and registered port numbers are as below, for further
information, please see IANA web, http://www.iana.org/assignments/port-numbers.
Port
Number
1
20
21
22
23
25
Protocol
Description
ICMP
TCP
TCP
TCP & UDP
TCP
TCP
PING
FTP Data
FTP Control
SSH Remote Login Protocol
Telnet
SMTP (Simple Mail Transfer Protocol)
63
PLANET ADSL VPN / Firewall Router
53
69
80
110
119
123
161
443
1503
1720
4000
7070
TCP & UDP
UDP
TCP
TCP
TCP
UDP
TCP
TCP & UDP
TCP
TCP
TCP
UDP
DNS (Domain Name Server)
TFTP (Trivial File Transfer Protocol)
World Wide Web HTTP
POP3 (Post Office Protocol Version 3)
NEWS (Network News Transfer Protocol)
NTP (Network Time Protocol)
SNMP
HTTPS
T.120
H.323
ICQ
RealAudio
Being a natural Internet firewall, this network router protects your network from being
accessed by outside users. When it needs to allow outside users to access internal
servers, e.g. Web server, FTP server, E-mail server or News server, this modem can act
as a virtual server. You can set up a local server with specific a port number that stands
for the service, e.g. Web (80), FTP (21), Telnet (23), SMTP (25), POP3 (110), When an
incoming access request to the router for a specified port is received, it will be
forwarded to the corresponding internal server.
For example, if you set the Service Port number 80 (Web) to be mapped to the IP
Address 192.168.1.2, then all the http requests from outside users will be forwarded to
the local server with IP address of 192.168.1.2. If the port is not listed as a predefined
application, you need to add it manually.
When you click Virtual Server, you get the following figure.
Enable: Enable or disable this Virtual Server port.
Application: Input the application name for the port you define. This product provides
64
Chapter 3 Configuration
several pre-defined popular application and their port number.
Protocol: Select the properly protocol for the application.
Port: Input the port number for the application.
IP Address: Input the IP address that you want to allow accessing from outside users.
DMZ: The DMZ Host is a local computer exposed to the Internet. Therefore, an
incoming packet will be checked by the Firewall and NAT algorithms, then passed to the
DMZ host when a packet is not sent by a hacker and not limited by the virtual server list.
If you have disabled the NAT option in the WAN-ISP section, this Virtual
Server function will hence be invalid.
If the DHCP server option is enabled, you have to be very careful in
assigning the IP addresses of the virtual servers in order to avoid conflicts.
The easy way is that the IP address assigned to each virtual server should
not fall into the range of IP addresses that are to be issued by the DHCP
server. You can configure the virtual server IP address manually, but it is
still in the same subnet with the router.
3.6.3.6.1 An Example of Configuring a Web Server on the Local Network
To save time to configure, this router has listed the well-known protocol and port
number that stands for the most popular applications on the Virtual Server table, e.g.
Web (TCP/80), FTP (TCP/21), Telnet (TCP/23), SMTP (TCP/25), POP3 (TCP/110), IKE
(UDP/500), etc. This is an example to configure a Web server, just check Enable, and
input the IP address of the Web server.
Background of the Example
Setup the Web server in the office that can be visible to the outside network.
Configuring a Virtual Server
1. Set Web server IP address to a fixed IP = 192.168.1.100
2. Configure the Virtual Server
65
PLANET ADSL VPN / Firewall Router
3.6.3.6.2 An example of configuring the Web Server & the Router to be accessible
remotely
Background of the Example
Setup the Web server in the office that can be visible to the outside network. In the
meantime, set the router to be accessible remotely through HTTP. Since they use the
same protocol (TCP), we have to change the port number of either application to make
these two services available. Please note the access method to the Web server and
router is different in case 1 & 2, this is particularly related to port number setting, refer
below for details.
Example 1: Configuring a Virtual Server
1. Set Web server IP address to a fixed IP (this is the IP of the PC running your web
server software, e.g. 192.168.1.100)
2. Change the embedded web server’s HTTP port to 8080 by select Configuration ->
Advanced -> Device Management.
3. Configure the Virtual Server as the following.
66
Chapter 3 Configuration
Example 2: Configuring a Virtual Server
1. Set Web server IP address to a fixed IP = 192.168.1.100
2. Set Remote Access as Enable. User can access the router remotely through port 80.
3. Since the port number 80 is used by the router, the Web server port number needs
to be changed.
67
PLANET ADSL VPN / Firewall Router
3.6.3.7 Advanced
There are four items under the Advanced section: Routing Table, Dynamic DNS,
Checking Email and Device Management.
3.6.3.7.1 Routing Table
Click on the Routing Table and then choose Create Router to get the below figure to
add a routing table.
Destination: Enter the destination subnet IP.
Netmask: Subnet mask of destination IP addresses based on above destination subnet
IP.
Gateway: Enter the gateway IP address which the packet is forwarded to.
68
Chapter 3 Configuration
Interface: Enter the interface which the packet is forwarded to.
Cost: This is the same meaning as Hop. Usually, leave it as 1.
3.6.3.7.2 Dynamic DNS
Click Dynamic DNS to get the below figure then check the “Enable” button to access
the Dynamic DNS service.
The Dynamic DNS service allows you to alias a dynamic IP address to a static
hostname. This dynamic IP address is the WAN IP address. For example, to use the
service, you must first apply for an account from their Web server
http://www.dyndns.org/. There are several DDNS servers supported. Please first browse
the website to apply an account then configure the Dynamic DNS settings on this page.
Enable / Disable: Enable or disable the Dynamic DNS function.
Dynamic DNS: Select the registered DDNS server. You have to first browse their
website to apply username and password.
Domain Name, Username and Password: Enter the registered domain name,
username and password.
Period: Set the time period for the Router to exchange information with the DDNS
server. In addition to update periodically according to this period setting, the Router will
take the same action automatically whenever the assigned IP changes.
3.6.3.7.2.1 Example of Configuring DDNS
Background of the Example
Setup a Web server in the office that can be accessed via Domain Name instead of the
dynamic IP address.
69
PLANET ADSL VPN / Firewall Router
Configuring DDNS
1. Set the Web server and FTP server IP address as described in section Virtual
Server.
2. Apply an account from this free Web server http://www.dyndns.org/. There are more
than 5 DDNS services supported by this router.
3. Configure DDNS as the following.
3.6.3.7.3 Checking Emails
Click Checking Emails to get the below figure then check the “Enable” button to
access the service.
Disable: Check to disable the ADSL router from getting the email.
Enable: Check to enable the ADSL router to get the email by providing the required
information. Hence, the following fields will be activated and required.
70
Chapter 3 Configuration
Account Name: Enter the name of the account to which you have the POP access.
Normally, it is the text in your email address before the "@" symbol. If you have trouble
with it, please contact your ISP.
Password: Enter the password of the account
POP3 Mail Server: Enter your (POP) mail server name. If you have trouble with it, you
would want to contact your ISP or your external mail server's administrator. For further
assistance in tracking down this information, you will need to contact your Internet
Service Provider or Network Administrator.
Interval: Enter the value in minutes to check your email account periodically.
Automatically dial-out for checking emails: When the function is enabled, your ADSL
router will connect to your ISP automatically to check emails if your Internet connection
dropped. Please be careful when using this feature if your ADSL service is charged by
time.
3.6.3.7.4 Device Management
Click Device Management to protect and obtain system control while allowing device
monitoring. This in turn provides enhanced security of the device.
3.6.3.7.4.1 Embedded Web Server
HTTP Port: Default value for HTTP port is 80. A desired value is also allowed.
Simply specify a user-defined port number.
Management IP Address: Specify an IP address allowed to logon and access the
router’s web server.. Note: IP 0.0.0.0 indicates all users who are connected to this
71
PLANET ADSL VPN / Firewall Router
router are allowed to logon the device and modify data. ]
Expire to auto-logout: Specify a time frame for the system to auto-logout the device.
For Example: User A changes HTTP port number to 100, specified it’s own IP
address to be 192.168.1.55, and set the logout time to be 50 seconds. Device will
only allow User A which IP address is 192.168.1.55 to logon to the Web GUI by
typing: 192.168.1.254:100. After 50 seconds, the device will automatically logout
User A.
3.6.3.7.4.2 Universal Plug and Play (UPnP)
Disable: Check to disable UPnP function.
Enable: Check to enable UPnP function.
UPnP Port: Its default setting is 2800. It is highly recommended for users to use this
port value. You may wish to modify this port value, only if this value conflicts with
other ports already being used.
3.6.3.7.4.3 SNMP Access Control
Read Community: Specify a name in any string to be identified as the Read
Community and an optional IP address. This community string will be checked
against the string entered in the configuration file. Once the string name is matched,
user with this IP address will be able to view the data.
Write Community: Specify a name in any string to be identified as the Write
Community and an optional IP address. This community string will be checked
against the string entered in the configuration file. Once the string name is matched,
user with this IP address will be able to view and modify the data.
Trap Community: Specify a name in any string to be identified as the Trap
Community and an IP address. This community string will be checked against the
string entered in the configuration file. Once the string name is matched, user with
this IP address will be notified Traps.
Please note SNMP software is required in order to utilize this section.
3.6.4 Save Configuration to Flash
After configuring this network router, you have to save all of the configuration
parameters to FLASH.
72
Chapter 3 Configuration
3.6.5 Logout
To exit the website, choose Logout to exit completely. Please ensure that you have
saved the configuration settings before logout.
Be aware that the router is restricted to only one local PC accessing the configuration
Web pages. Once a current PC has logged onto the Web pages, other PCs cannot get
access except waiting for the current PC to log out of the page. If the previous PC
forgets to logout, the second PC can access the page after 3 minutes.
73
Chapter 4. Troubleshooting
If the ADE-4200/ADW-4200 Wireless ADSL Router is not functioning properly, you can refer
first to this chapter for simple troubleshooting before contacting your service provider. This
could save you time and effort but if the symptoms persist, then consult your service provider.
Problems Starting Up the ADE-4200/ADW-4200
Problem
None of the LEDs are
on when you turn on
the ADE-4200/ADW4200
Corrective Action
Check the connection between the adapter and the
ADE-4200/ADW-4200 . If the error persists, you may
have a hardware problem. In this case you should
contact technical support.
Problems with the WAN Interface
Problem
Initialization of the PVC
connection failed.
Corrective Action
Ensure that the cable is connected properly from the
ADSL port to the wall jack. The ADSL LED on the front
panel of the ADE-4200/ADW-4200 should be on. Check
that your VPI, VCI, type of encapsulation and type of
multiplexing settings are the same as what you
collected from your telephone company and ISP.
Reboot the ADE-4200/ADW-4200 . If you still have
problems, you may need to verify these variables with
the telephone company and/or ISP.
Problems with the LAN Interface
Problem
Can’t ping any station
on the LAN.
Corrective Action
Check the Ethernet LEDs on the front panel. The LED
should be on for a port that has a station connected. If it
is off, check the cables between your ADE-4200/ADW4200 and the station. Make sure you have uninstalled
any software firewall.
Verify that the IP address and the subnet mask are
consistent between the ADE-4200/ADW-4200 and the
workstations.
74
Appendix A. Specification
Product
ADSL VPN/Firewall Router
ADSL Wireless VPN/Firewall Router
Model
ADE-4200A / ADE-4200B
ADW-4200A / ADW-4200B
Hardware
Standard
ANSI T1.413 Issue 2
ITU G.992.1 (G.dmt) including
- Annex A (ADSL over POTS for ADE-3100A/-4100A)
- Annex B (ADSL over ISDN for ADE-3100B/ -4100B)
G.992.2 (G.lite) with fast retrain
Protocol
RFC 2364 - PPP over ATM (LLC/VCMUX)
RFC 2516 - PPP over Ethernet (LLC/VCMUX)
RFC 1577 - Classic IP over ATM (LLC/VCMUX)
RFC 1483 - Bridged IP over ATM (LLC/VCMUX)
RFC 1483 - Routed IP over ATM (LLC/VCMUX)
AAL and ATM Support
Integrated ATM AAL5 support
255 VPI plus 65535 VCI address range
Interoperability
Interoperable with major DSLAM suppliers
Ports
LAN
4 (10Base-T/100Base-TX, Auto-Negotiation, Auto MDI/MDI-X)
Wireless
None
WAN
1 x 802.11b wireless access point
1 (RJ-1, 10/100Base-TX, Auto-Negotiation)
LED Indicators
PWR, SYS, LAN 1 to 4, MAIL, PPP, ADSL, WLAN (ADW-4200 only)
Button
1 for reset/factory reset
Console
1 x RS-232 Console
ON/OFF switch
1 x ON/OFF switch on rear panel
Software
Protocol
IP, NAT, PPTP, ARP, ICMP, DHCP, PPPoE, PPPoA, IPoA, PPTP client, RIP1/2
Security
Native NAT firewall, Enhanced policy-based+ SPI firewall, Intrusion Detection,
URL Filter, Blocking log, Virtual Server, DMZ
VPN (IPSec)
MD5-HMAC/SHA1-HMAC/Certificates authentication, DES-CBC, 3DES-CBC
encryption, Internet Key Exchange, Manual Key Negotiation
Management
Web browser management, telnet, console, SNMP
Environment Specification
Dimension (W x D x H)
210 mm x 147 mm x 33 mm
Power
12V DC, 1A
Power Consumption
Maximum 10W, 34 BTU
Temperature:
Humidity
0~45 degree C (operating), -10~70 degree C (storage)
5%~ 95% (non-condensing)
Emission
EMI: FCC part 15, CE
75
Appendix B. Product Support
Most problems can be solved by using the Troubleshooting in Chapter 4. If you cannot
resolve the problem with the Troubleshooting Chapter, please contact the dealer where you
purchased this product. For any other questions, please contact PLANET directly at the
following email address: [email protected]
You can also download upgraded driver or software utilities for free from PLANET’s website
at http://www.planet.com.tw
76