1
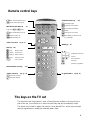
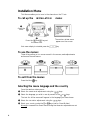
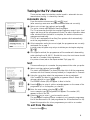
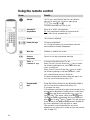
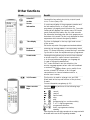
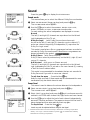
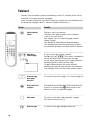
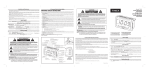
Introduction Thank you for purchasing this television set. Every effort has been made to simplify the operation and tuning of the receiver by the use of menus. These menus are displayed on screen when requested giving easy access to the various adjustments. This handbook has been designed to help you install and operate your TV set. We would strongly advice you read it thoroughly. Table of contents Installation TV set and remote control ......................................................................................2 Switching on.................................................................................................................2 The keys on the remote control.............................................................................3 The keys on the TV set .............................................................................................3 Menu installation: selecting menu language and country ...................................4 Tuning-in TV channels: automatic store .................................................................5 Sort ................................................................................................................................5 Manual store ................................................................................................................6 Favourite programmes and naming programmes................................................7 Operation Operating the remote control ................................................................................8 Other functions...........................................................................................................9 Using the menus: adjusting the picture ...............................................................10 Adjusting the sound, Dolby Surround .................................................................11 Child lock, storing adjustments.............................................................................12 Programming, message............................................................................................13 Teletext.......................................................................................................................14 Peripherals Connecting peripheral equipment........................................................................16 Tips..............................................................................................................................19 Glossary .....................................................................................................................20 Index ...........................................................................................................................20 1 Installation æ Installing the TV set Place your TV set on a solid, stable surface (please ensure this is strong enough). Do not place anything on the TV set which might damage it (plants or heat sources). For ventilation allow a space of at least 5cm around the TV set.  Connecting the aerial and the mains Insert the aerial plug into the socket M at the rear of the set. Insert the mains plug into a wall socket (220-240 V/50 Hz). ê Surround loudspeakers Connect the 2 Surround loudspeakers as illustrated opposite.The loudspeakers should be located at the rear or on either side of the listener (always connect 2 loudspeakers).The positive wire (the one with the black line) to the red loudspeaker connection, the negative wire to the black loudspeaker connection. ® Remote control Insert the 2 LR03-type batteries (supplied) making sure they are the right way around. In an effort to help protect the environment the batteries supplied with this television do not contain mercury or nickel cadmium. If a means of recycling batteries is available, please use this (if in doubt, contact your dealer). † Switching on Press the on/off key to switch on the television. A green indicator comes on and the screen lights up. If the indicator is red, press the key on the remote control. When the remote control is being used the indicator flashes orange. 2 Remote control keys EXT sockets selection (p. 9) Teletext functions (p . 14) Screen information (p. 9) enlarging a page INSTALLATION Menu (p Press the and temporary interruption . 4) hold selected sub-page keys reveal Personal Preferences (p. 9) overlay text on picture sound mode (p. 9) time display or direct access 16/9 formats (p. 9) to a sub-page. Video recorder k e y (p . 9) Standby (p . 8) Menu (p . 10) (red) picture menu (green) sound menu (p . 8) programme selection (yellow) features menu (blue) volume exit from menu / use of menus numerical keys mute key previous programme Switch teletext on/off (p "Smart controls k . 14) eys" (p . 8) Pr ogrammable k eys (p . 8) picture pre-setting sound pre-setting The keys on the TV set The television has 3 keys: MENU, - and +.These keys are located on the top, front or side of the set, (if on the front or side of the set they may be concealed by a flap). The MENU key is used to select the function to be altered.The - and + keys are used select programmes or modify the selected MENU item. 3 Installation Menu This Menu enables you to tune in the channels on the TV set. To call up the INSTALLATION menu: æ Open the cover  Press the and keys at the same time. If the menu display is not stable, press the The INSTALLATION menu appears on the screen. key. To use the menus: These 4 keys allow you to move around in the menus, make adjustments and access the sub-menus. To exit from the menus Press the blue key. Selecting the menu language and the country From the INSTALLATION menu: æ Select the LANGUAGE adjustment using the keys.  Select the language you wish to use by means of the or keys. The text for all the menus will appear in the language you have chosen. ê Select the COUNTRY adjustment using the ® Select your country using the keys or keys (GB for Great Britain). Warning: It is essential for correct channel tuning that these two adjustments are set correctly. 4 Tuning-in the TV channels There are two ways the television can be tuned in : automatic store or manual store (tuning - in channel by channel). Automatic store From the INSTALLATION menu ( and keys) (after ensuring LANGUAGE and COUNTRY have been set correctly) æ Select AUTO STORE ( keys) and press . The AUTO STORE menu appears. Searching begins. The TV set searches through the complete frequency range in your local region and stores all the programmes it finds.The search operation takes a few minutes.When the search is complete, the INSTALLATION menu reappears automatically. This TV set is equipped with an Easy Tune system which automatically sorts the programmes by name.  If the transmitter emits the correct signal, the programmes are correctly numbered. Go to page 7. In certain cases, the system may ask you to indicate your local region using keys to . ê If no signal is emitted, the programmes will be numbered in descending order starting from 99, 98, 97,.. Should this occur, the SORT menu should be used to re-number the programmes. If no picture is found, refer to the chapter entitled "Tips" (page 19). Sort This menu allows you to re-number the programmes in the order you prefer. æ Select SORT ( keys) and press . The SORT menu appears.The menu provides a list of all the programme numbers with their names (where provided), or frequencies or channels.  Using the keys, select the programme to be re-numbered. If, for example, you want to re-number programme 96 as 2: Select 96 using keys (or type ). The number chosen (96) will appear in blue in the list. ê Press the key to enter.A yellow rectangle appears on the name of the programme (or on its frequency or channel). ® Enter the new number using keys to . In our example, type . Programme 02 appears.The number (02) appears in blue in the list. † Press the key to enter ( can be used to cancel). The exchange of numbers is now complete. In our example, programme No. 96 has become No. 02 (and programme No. 02 has become No. 96). Repeat this operation for other programmes you wish to re-number To exit from the menu Press the blue key. 5 Manual store This menu allows you to store each programme manually. From the INSTALLATION menu ( and keys). æ Select MANUAL STORE ( keys) and press . The MANUAL STORE menu appears.  Select CHANNEL/FREQUENCY ( ). For certain countries this adjustment is not available. Use the keys to select tuning mode. FREQ. (frequency search) or CHAN.C and CHAN.S (channel search if you know the channel numbers on which the programmes are broadcast). ê Select SYSTEM ( ). Use to select EUROPE, EUR. W, EUR. E, UK or FRANCE (according to model). Selecting EUROPE guarantees automatic detection, with the exception of transmissions from France (standard LL': select FRANCE) or in certain cases of poor reception where EUR. W (BG), EUR. E (DK) or UK (I) should be selected. For more information see glossary on p. 20 ® Select SEARCH ( ) and press . The search begins.As soon as a programme is found, the search will stop. Go to section Ú. If you know the frequency (or the channel) of the programme you wish to receive, you can enter its number in directly using keys numbered to . If no picture is found, refer to "Tips" chapter (page 19). If you want to rerun the search, press again. † Select FINE TUNE ( ). If reception is not satisfactory, you can use the fine tuning function. Hold down the keys to adjust. Ú Select PRG NUMBER ( Use the keys or the ) to keys to enter the required number. º Select STORE ( ) and press . The OK message appears.The programme and its name (if it has one) are stored. repeat ®, Ú, º for each programme to be stored. To exit from the menu: Press the blue 6 key. Favourite Programmes This menu allows you to choose which programmes can be accessed using the key on the remote control. From the INSTALLATION menu: æ Select FAVOURITE PRG ( keys) and press The FAVOURITE PRG menu appears.All programmes found during the search are automatically included in the menu and appear in green.  Use the keys to select any programme you wish to remove from the list of favourites. ê Press to de-activate (or activate) a programme. The de-activated programmes appear in white, the activated programmes appear in green. Only the programmes and EXT sockets that are displayed in green in this menu can be accessed using the key. Warning: If all programmes are de-activated, the key will cease to function. To exit from the menu: Press the blue key. Programme names This menu allows you to name and modify names for programmes and EXT sockets. From the INSTALLATION menu: æ Select GIVE NAMES ( keys) and press . The GIVE NAMES menu appears with the list of programmes found automatically during installation. Certain programmes may not be named (the signal needed for identification is not always transmitted) or may be inappropriately named (only 5 characters are displayed).  Use the key to select the required programme. ê Use the keys to move to the area in which the programme name appears (up to 5 characters). A yellow rectangle appears in the chosen area. ® Use the † Use the keys to select or modify the character. keys to move around in the next programme. To exit from the Press the blue INSTALLATION menu: key twice. 7 Using the remote control Result: Press: / 8 Standby The TV set is switched off and the red indicator lights up.To switch the TV set on again, press or keys to . For further information, see "Tips" (p. 19). Selecting TV programmes Move up or down a programme. N.B.: Only programmes activated in the FAVOURITE PRGS menu can be accessed (see p. 7). Volume The volume is adjusted. Numerical keys Choose a programme. For a 2 figure number, the second figure must be entered before the dash disappears. Mute key Disables or enables the sound. Previous programme Return to the last programme watched. "Smar t Controls" k eys To access the presets of the TV set. Smart Picture Controls: Press the key to obtain the following settings: RICH, SOFT, NATURAL and return to MANUAL. Smart Sound Controls: Press the key to obtain the following settings: CONCERT, CLASSIC, JAZZ, POP, STADIUM and return to MANUAL. The values corresponding to these presets are given in the PICTURE and SOUND menus (see p. 10). Programmable keys These allow direct access to any adjustment made in the PICTURE and SOUND menus (see p. 10) To program the keys: If, for example, you wished to gain direct access to the BRIGHTNESS adjustment. Display the PICTURE menu (red key) and select BRIGHTNESS ( ). Use keys and to adjust, rather than the keys. The keys are now programmed. Exit from the menu (blue key). Press and again.This will give you direct access to the brightness adjustment. Repeat for any other adjustment you may wish to make. This operation may be repeated for any other adjustment you may wish to make (e.g. SOUND MODE: refer to page 11). Other functions Result: Press: Select EXT sockets Pressing this key selects E1 (EXT1), E2 (EXT2) and E2 Y/C in turn (see p. 16). Screen information To continuous display of the programme number and the information line on or off each time the programme is changed, press this button for 3 seconds. Pressing briefly displays the number, name, 16:9 mode sound mode and information line for a few seconds. The information line displays the title of the programme at the bottom of the screen.This line is only displayed for those programmes which transmit the signal by teletext. Time display The time is displayed in the top right-hand corner of the screen. This function only exists if the programme broadcasts teletext. Personal Preferences Restores the settings made in the FEATURES menu (see p. 12). Keep the button pressed during 3 secondes if you want to reset the adjustments per programme. Sound mode Pressing this key allows you to switch from STEREO to MONO sound (in case of stereo transmission), or to choose between language f or language g (in case of bilingual transmissions). For TV sets fitted with NICAM reception, the DIGITAL message appears when a NICAM broadcast is received.The key allows you to switch from DIGITAL STEREO to MONO or, for bilingual transmissions, to choose between DIGITAL f, DIGITAL g or MONO. 16/9 Formats This function is used to enlarge 14/9 and 16:9 (black band at the top and bottom of the picture) formats. For more information, see glossary (p. 20). Video recorder keys Press the key and one of the following keys simultaneously. v s r u q G 3 record, rewind, fast forward, stop, play, programming (on certain models), 1- or 2- digit programmes, programme selection, to enter a programme number, standby These keys function with video recorders in our range and with all models which use the RC5 signalling standard. 9 Using the menus æ Press the coloured key (red, green or yellow) to display the menu of your choice. PICTURE SOUND FEATURES  Use the keys to select your adjustments and the adjust or access the sub-menus. EXIT ê Press the blue keys to key to exit from the menu displayed. Picture æ Display PICTURE menu (red  Use the key). keys to select your adjustments and the keys Use to select the adjustments and to adjust. You can now access the adjustments BRIGHTNESS, COLOUR, CONTRAST and: SHARPNESS adjusts the clarity of the picture, TINT adjusts the colour temperature of the picture from “cool” (blue white) to “warm” (red white). NOISE REDUCT. Useful in case of poor reception to reduce picture noise (snowy picture). For picture adjustment see also "Tips" (p. 19). 10 Sound Press the green key to display the SOUND menu. Sound mode This menu allows you to select the different Dolby Surround modes. æ Select SOUND MODE (the keys) and press the The SOUND MODE menu appears.  Use the key. keys to select the NORMAL, DOLBY PRO LOGIC, DOLBY 3 STEREO or HALL SURROUND sound modes. Normal Dolby Pro Logic Dolby 3 Stereo Hall Surround For each setting, the active loudspeakers are displayed on screen. Normal The left (L) and right (R) channels are reproduced on the left and right loudspeakers of the TV set. Dolby Pro Logic* (with Dolby Surround sound sources) As well as the left (L) and right (R) channels, a centre channel (C) and a rear channel comprising 2 loudspeakers (S), reproduce the Dolby Pro Logic sound. This mode is used when a film or programme has been recorded or encoded in Dolby Surround sound.These films or programmes are always indicated by the symbol . Dolby 3 Stereo (with Stereo sources) Dolby 3 Stereo sound is produced only on the left (L), right (R) and centre (C) channels. Hall Surround (with mono or Stereo sources) The left (L) and right (R) channels are reproduced on the left and right loudspeakers of the TV set and on the rear channel (S), creating a "Hall Surround" ambient effect. This mode is recommended for broadcasts that are not encoded in Dolby Surround if you wish to use a rear channel. To exit from the menu : Press the blue key. Dolby Pro Logic and Dolby 3 Stereo modes are not recommended for mono transmissions (only the central channel is used). Sound level This menu is used to balance the volume between the loudspeakers. æ Select SOUND LEVEL ( keys) and press the The SOUND LEVEL menu appears. key.  Select TEST ( keys) and press the key.A continuous sound is emitted in turn from each channel: left, right, centre and rear channel. ê Use the keys to adjust the level of each channel independently: BALANCE, CENTRE and REAR.The sequence stops while the level is being changed and then automatically starts up again. To stop the test : Press the blue key. Levels may also be adjusted without using the test signal. * Manufactured under license from Dolby Laboratories Licensing Corporation. ”Dolby” ”Pro Logic” and the double-D symbol Laboratories Licensing Corporation. are trademarks of Dolby 11 Equalizer æ Select EQUALIZER ( keys) and press the The EQUALIZER menu appears. key.  Use the keys to select each frequency (from bass: 100 Hz to treble: 10 kHz) ê Use the keys to adjust the level. To exit from the menu : Press the blue key. Spatial This setting increased the stereo effect giving the impression that the loudspeakers are spaced further apart. Headphones This setting allows the volume of the headphones to be adjusted independently from the TV set. To exit from the menu : Press the blue key. Features Child Lock The child lock function is an electronic lock which disables the keys on the TV set. æ Display the FEATURES menu (yellow  Select CHILD LOCK ( ê Use key). keys). keys to switch to ON. ® Switch off the TV set and remove the remote control.The television can no longer be used. The TV set can only be switched on using the remote control. To cancel: Return CHILD LOCK to OFF in the features menu. Storing adjustments This function allows you to store your own picture and sound adjustments.The adjustments are restored every time your set is switched on, or by pressing the green key on your remote control. General storing æ First carry out your PICTURE and SOUND adjustments and adjust the volume ( key) and then:  Display the FEATURES menu (yellow ê Select STORE PP ALL ( key). keys) and press . The message OK appears.All the PICTURE and SOUND menu adjustments as well as the volume are stored. 12 Storing adjustments for each programme This function allows you to correct any differences in levels which may exist between TV channels and/or EXT sockets. It allows you to store BRIGHTNESS, COLOUR, SHARPNESS, NOISE REDUCT, SOUND MODE and volume adjustments ( key). æ Carry out desired corrections to settings for the programme (or EXT connection), and then:  Display the FEATURES menu (yellow key). ê Select STORE PP P: _ _ ( keys) and press . The message OK appears.The adjustments are stored. Repeat for each programme that needs correcting. Programming Sleeptimer From the FEATURES menu (yellow key). æ Select PROGRAMMING ( ) and press . The PROGRAMMING menu appears.  Select SLEEPTIMER and use to enter the length of time after which the TV will switch to standby mode (up to 180 mins). Press the key to display the length of time remaining. To cancel: Switch SLEEPTIMER back to 0. Programmed Switch on The following adjustments allow you to program the TV to automatically switch on with the programme of your choice. Select the adjustments using keys: æ SET CLOCK: Use keys to or the keys. N.B.: Every time the TV is switched on the clock is automatically updated on the basis of the teletext information in programme No. 1. If the TV set does not feature teletext, this update will not occur.  START TIME: Use keys ê STOP TIME: Use keys ® PRG NUMBER: Use keys † DAILY: Set this option to ON ( to or to or to keys. keys. or keys. key) if you want the programming to apply every day. Ú TIMER ACTIVE Set this option to ON to activate the timer. º Press the blue key to exit from menu. If you now switch the TV set onto standby ( key), it will automatically switch on at the time programmed. To cancel: Switch TIMER ACTIVE back to OFF. N.B.: For programming to function correctly do not use the on/off key on the front of the TV set to switch off the TV. The programmed switch on-off can be used together with the child lock function in order to limit the use of the TV set to a certain length of time. 13 Teletext Teletext is an information system, broadcast by certain TV channels, which can be consulted in the same way as a newspaper. It also provides subtitles for the hard of hearing or people who are unfamiliar with the broadcast language (cable TV network, satellite channels, etc.). Result: Press: / Switch teletext on/off Display or exit from teletext. The main index page presents a list of subjects to which you have access. Each subject has a corresponding page number (always 3 digits). If the selected TV channel does not broadcast teletext, P100 is displayed and the screen remains black (if this is the case, switch off teletext and choose another TV channel). Selecting a teletext page To type in the page number required. E.g. page 120, type .The number is displayed in the top left-hand corner of the screen, the page counter starts searching and then the page selected is displayed. Repeat to consult another page. If > xxx < flashes briefly or the counter continues searching, this means the page selected is not broadcast or is not available. If this is the case, choose another number. P120 14 Previous page/ Next page selection To consult the previous page (-) or the next page (+). Direct access to a subject Coloured zones are displayed at the bottom of the screen.The coloured keys allow access to the subjects or their corresponding pages. Main index To return to the main index (generally on page 100), press the white key . Previous page To return to the page displayed previously. Teletext (special features) Result: Press: / Subtitles Consult the main index to find out the page number for subtitles. Enter the subtitles page number (e.g. 888). The page counter searches and then the subtitles appear on screen. If no subtitles are available the page counter will continue to search. To exit from subtitles, press . Temporary interruption of the display To stop or return to the teletext display.The L symbol is displayed, and the television programme reappears on the screen.This function allows you to wait when the search for pages takes a long time. Enlarging a page To display the upper part, the lower part and then to return to the normal page size. Overlaying teletext on the TV picture To activate/de-activate the screen overlay. Reveal To reveal/conceal hidden information (solutions to games or questions/answers). Stop the sequence of subpages (hold) Certain pages have sub-pages which follow on automatically. If this is the case, this key will allow you to stop or start the sequence.The message I appears on the top left-hand corner of the screen. Direct selection of a sub-page To access a sub-page directly, press .The page number followed by four dashes will appear in the bottom left-hand corner of the screen.Type the number of the sub-page required using 4 numbers, e.g. type 0002 to consult sub-page 2. The page counter searches and then the sub-page is displayed. Press to return to current page. 15 Connecting peripheral equipment The EXT1 socket has audio and video inputs/outputs and RGB inputs. The EXT2 socket has audio and video inputs/outputs and S-VHS inputs. For further information, see glossary (p. 20). Video recorder ...with Decoder • If your video recorder has a euroconnector socket, carry out the above connections. Euroconnector sockets ensure better picture quality. • If your video recorder does not have a euroconnector socket (or if this is already being used by another device), then the only connection possible is via the aerial cable.Your video recorder is then considered as a TV programme by your TV set.You will therefore need to tune in your video recorder's test signal and assign it programme number 0 (see manual store chapter, p. 5). To reproduce the video recorder picture, press the key. Refer to your video recorder's operating instructions concerning the test signal (the video recorder must be equipped with an HF modulator). Connecting other equipment (satellite receiver, decoder, CDV/CDI, games...) Connect to socket EXT1 (or to EXT2 if it produces a S-VHS signals). 16 To select connected equipment Use key to select E1 (EXT1), E2 (EXT2) or, for S-VHS or Hi-8 equipment, E2 Y/C. Most equipment (decoder, video recorder) carries out the switchover itself. Front connections Carry out one of the following connections and then: Use the key to select E2 (for VHS or 8mm cameras) or E2 Y/C (S-VHS or Hi-8 cameras). For a mono sound camcorder, connect the audio signal to the AUDIO L input. Use the key to reproduce the sound on the left and right loudspeakers of the television. N.B.: If a peripheral is connected to EXT2, it is advisable to switch it off while using a front S-VHS connection. Headphones To adjust the headphones volume, use the HEADPHONES adjustment in the SOUND menu (p. 12).To adjust the volume on the TV set, use the or keys. You can also access the HEADPHONES adjustment directly using programmable keys and on the remote control (see p. 8). Amplifier Use an audio connection cable and connect the P sockets "L" and "R" on the set to the "AUDIO IN" "L" and "R" input on your hi-fi amplifier. 17 External loudspeakers For improved sound, you can connect 2 external L and R loudspeakers in the place of the left and right loudspeakers on the TV set. Connect as shown below and then switch off the internal loudspeakers on the TV set. The impedance of the loudspeakers must be between 8 and 16 Ohms. Surround loudspeakers Connect the 2 Surround loudspeakers as illustrated below. The loudspeakers should be located at the rear or on either side of the listening zone (always connect 2 loudspeakers). To make a copy of recordings: Carry out one of the following connections, then: Press to select E1. On the video recorder, select the euroconnector socket as the recording source. N.B.: Copying is not possible using front connections. 18 Tips Poor reception The proximity of mountains or high buildings may be responsible for ghost pictures, echoing or shadows. If this is the case, modify the orientation of the outside aerial. Check that the TV channel is tuned in correctly or try using fine tuning: see "fine tuning" (p. 6). The equipment connected to the TV gives a picture in black and white? Check that you have selected the correct E2 or E2 Y/C socket ( key). No picture Have you forgotten to connect the aerial socket? Have you chosen the correct system? (p. 6) Does your aerial enable you to receive broadcasts in this frequency range? Poorly connected euroconnector cables or aerial sockets are often the cause of picture or sound problems (sometimes the connectors can become half disconnected if the TV set is moved or turned). Check all connections. Picture adjustment If you have trouble obtaining a clear picture, select one of the smart control presets (p. 8) and store using the STORE PP ALL function in the FEATURES menu. The picture seems too red or too blue! Adjust the TINT (p. 10). In the event of difficult reception (snowy picture) switch the NOISE.REDUCT on the PICTURE menu to ON. (p. 10). The picture is badly adjusted? press the green key or re-adjust (p. 10). To reset the stored settings for each programme and return to the initial settings, hold the green key down for 3 seconds. No sound If on certain channels you receive a picture but have no sound, this means that you do not have the correct TV system. Modify the SYSTEM adjustment (p. 6). The left and right loudspeakers on the TV set do not work? Check that the external loudspeakers switch has not been activated by mistake (p.18). The Surround Sound loudspeakers do not work? For them to function correctly it is essential that both loudspeakers are connected: check connections. If in doubt, use the SOUND LEVEL menu (p.11) to check each channel. Remote control The TV set does not react to the remote control; the orange indicator on the TV set no longer flashes when you use the remote control? Replace the batteries. Standby When you switch the TV set on it remains in standby mode and the indication CHILD LOCK is displayed when you use the keys on the TV set? The child lock function is switched on (p. 12). To save electricity it is advisable to switch the TV set off using the ON/OFF key on the front of the set. If the set receives no signal for 15 mins, it automatically goes into standby mode. Still no results ? If you have a problem with your TV set, never attempt to repair it yourself: contact your dealer's after-sales service. Recycling directive Your TV set uses materials which are reusable or which can be recycled. To minimise the amount of waste in the environment, specialist companies recover used sets for dismantling and collection of reusable materials (consult your dealer). 19 Glossary Easy Tune: A system for automatically installing and storing programmes. PAL SECAM colour coding: PAL is used in the majority of European countries, SECAM in France, the CIS and the majority of African countries. The United States and Japan use a different system called NTSC. RGB Signals: These are separate Red, Green and Blue signals which directly drive the red, green and blue emmitterers in the cathode ray tube. Using these signals provides better picture quality. S-VHS Signals: These are 2 separate video signals from the S-VHS and HI-8 recording standards.The luminance signals Y (black and white) and chrominance signals C (colour) are recorded separately on the tape.This provides better picture quality than with normal videos (VHS and 8mm), where the Y/C signals are combined to give only one signal. Smart controls: Allow access to a series of picture and sound presets. MONO sound: The sound is in mono when only one channel is transmitted. STEREO sound: The sound is in stereo when the left and right channels are transmitted separately. NICAM sound: Process by which digital sound can be transmitted. System:Television pictures are not broadcast in the same way in all countries. There are different standards: BG, DK, I and L L' (France). The SYSTEM adjustment is used to select these different standards. 16/9: Refers to the ratio between the length and height of the screen.Wide screen televisions have a ratio of 16/9, that of your TV set is 4/3. Warning: If you intend to watch a 4/3 ratio picture in a 16/9 ratio format, the picture will be compressed vertically. 14/9 (only on certain models): Intermediate format which, by enlarging the picture, reduces the size of the black bands at the top and bottom of the pictures in cinemascope format. Index 16/9 (formats) ............................................9 Child lock..................................................12 Connections .............................................16 Decoder, (CDV), (CDI) and Games......16 Dolby Surround .......................................11 External loudspeakers............................18 Favourite programmes .............................7 Features .....................................................12 Fine tuning...................................................6 Headphones........................................12-17 Language used for menus ........................4 Menus .....................................................4-10 Picture (adjustments) .............................10 Programmable keys ...................................8 Programme names.....................................7 Programme number display.....................9 Programmes................................................8 20 Programming ............................................13 Remote control .........................................3 Selecting EXT sockets ........................9-16 Sleeptimer .................................................13 "Smart controls" ........................................8 Sort ...............................................................5 Sound (adjustments)...............................11 Stereo/ mono/ NICAM (sound mode).9 Storing adjustments ................................12 Surround loudspeakers ..........................18 Systems ........................................................6 Teletext......................................................14 Time (display) .............................................9 Tuning in TV channels ...............................5 TV keys ........................................................3 Video recorder (keys) ........................9-16