1
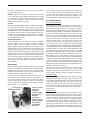
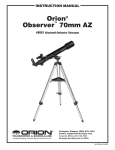
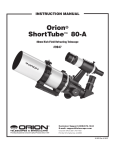
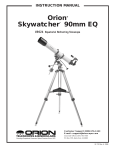
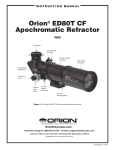
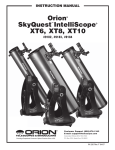
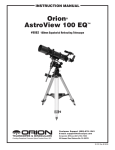
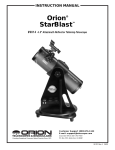
INSTRUCTION MANUAL
Orion
®
Apex™ Maksutov-Cassegrain
Optical Tube Assemblies™
#9820 Apex 90mm #9823 Apex 102mm #9825 Apex 127mm
Customer Support (800) 676-1343
E-mail: [email protected]
Corporate Offices (831) 763-7000
Providing Exceptional Consumer Optical Products Since 1975
P.O. Box 1815, Santa Cruz, CA 95061
IN 161 Rev. B
0109
Finder scope
bracket
Eyepiece adapter
Correct-image
finder scope
25mm Sirius
Plössl eyepiece
Dovetail holder
45° correct-image
diagonal
Meniscus
lens
Focus knob
Mounting block
Figure 1: The Apex Maksutov-Cassegrain optical tube assembly parts diagram. The Apex 102mm is shown,
but all models have similar components.
Welcome to a new world of adventure! Your Apex
Maksutov-Cassegrain (Mak-Cass) telescope is a
fine-quality instrument designed for both daytime
terrestrial viewing and nighttime stargazing.
Compact, portable, and easy to use, this versatile
scope will provide many hours of enjoyment for the
whole family.
WARNING: Never look directly at the Sun
through your telescope or its finder scope—
even for an instant—without a professionally
made solar filter that completely covers the
front of the instrument, or permanent eye
damage could result. Young children should use
this telescope only with adult supervision.
2
These instructions will help you set up and properly use and care for your telescope. Please read
them over thoroughly before getting started.
Parts List
Qty.
1
1
1
1
1
1
1
Description
Optical tube assembly
25mm Sirius Plössl eyepiece
45° correct-image diagonal
Correct-image finder scope
Finder scope bracket
Soft carry case
Optical tube dust cover
Getting Started
The Apex telescopes come nearly fully assembled from the
factory. The optics have been installed and collimated, so you
should not have to make any adjustments to them. Open the
box and inspect the contents to make sure all of the parts listed above are present. Refer to Figure 1 to see what the parts
look like, and how they will connect togther; the Apex 102mm
is shown, but all models have similar components.
Please keep the original shipping box. In the unlikely event
you should need to ship the telescope back to Orion for warranty repair service, you should use the original packaging.
The box also makes a very good container for storing the telescope when it is not in use.
Alignment thumb
screw (3)
Spring-loaded
tensioner
Eyepiece end of
finder scope
Alignment thumb screws
O-ring
Figure 3: To install the 6x26 finder scope in the finder
scope bracket, pull the spring-loaded tensioner while
inserting the eyepiece end of the finder scope into the
bracket.
All models:
Finder scope eyepiece
Figure 2: Insert the 6x20 finder scope into the bracket’s
rings so that it is oriented as shown.
Installing the Accessories
Apex 90mm:
To place the finder scope in the finder scope bracket, first
unthread the three alignment thumb screws on the bracket
until the screw ends are flush with the inside of the bracket’s
ring. Insert the finder scope into the bracket so that the eyepiece end of the finder scope (the end with the rubber
eyeguard) is closest to the bracket’s alignment thumb screws
(see Figure 2). Secure the finder scope in place by tightening
the three alignment thumbscrews.
Connect the finder scope bracket to the dovetail holder on the
optical tube with the thumb screw on the holder. Insert the 45°
diagonal into the eyepiece adapter and secure it with the
thumb screws on the eyepiece adapter. Insert an eyepiece
into the diagonal and tighten the thumb screws on the
diagonal.
Keep the dust cap over the front end of the telescope when it
is not in use. It is also a good idea to cover the eyepiece; use
the cover cap that came with it.
Mounting the Telescope on a Tripod
The Apex Maksutov-Cassegrain optical tube assemblies can
be mounted on any standard camera tripod that has a 1/4"-20
stud. The stud threads into the block on the underside of the
telescope’s optical tube (see Figure 4). Alternatively, the telescopes can be attached to an altazimuth or equatorial mount
equipped with a 1/4"-20 adapter. For the Apex 127mm, there
are several threaded holes in the mounting block; use the one
that will best balance the telescope on the tripod or mount.
Apex 102mm and 127mm:
To place the finder scope in the finder scope bracket, first
unthread the two black nylon alignment screws until the screw
ends are flush with the inside of the bracket’s cylinder. Place
the O-ring that comes on the base of the bracket over the
body of the finder scope until it seats into the slot on the middle of the finder scope. Insert the eyepiece end (narrow end)
of the finder scope into the end of the bracket’s cylinder that
does not have the alignment screws, while pulling the springloaded tensioner on the bracket with your fingers (see Figure
3). Push the finder scope through the bracket until the O-ring
seats just inside the front opening of the bracket’s cylinder.
Now, release the tensioner and tighten the alignment screws
a couple of turns each to secure the finder scope in place.
1/4”-20 stud
Mounting block
Figure 4: The
1/4”-20 stud on
standard camera
tripods will
thread into the
mounting block
on the underside
of the Apex
telescopes. The
Orion Paragon
HD-F2 tripod
shown utilizes a
quick-release
shoe to connect
the telescope to
the tripod.
3
Camera tripods or altazimuth mounts are desireable for terrestrial (land) viewing because they allow simple vertical and
horizontal movement of the telescope. An equatorial mount is
desirable for astronomical viewing because it allows easy
tracking of celestial objects as the Earth rotates. Also, the setting circles on the mount enable you to locate objects by their
celestial coordinates (right ascension and declination), which
can be found in many observing books and star atlases.
Focusing
Point the telescope so the front end is aimed in the general
direction of an object you wish to view. When you first look in
the eyepiece, the image you see may be fuzzy, or out of focus.
If so, gently turn the focus knob with your fingers until the
image becomes sharp. Go a little bit beyond sharp focus until
the image just starts to blur again, then reverse the rotation of
the knob, just to make sure you’ve hit the exact focus point.
You will have to readjust the focus when aiming at subjects of
varying distances, or after changing eyepieces.
If you have trouble focusing, rotate the focus knob counterclockwise as far as it will go. Now look through the eyepiece
while slowly rotating the focus knob clockwise. You should
soon see the point at which focus is reached.
Do You Wear Eyeglasses?
If you wear eyeglasses, you may be able to keep them on
while you observe, if your eyepieces have enough “eye relief”
to allow you to see the whole field of view. You can find out by
looking through the eyepiece first with your glasses on and
then with them off, and see if the glasses restrict the view to
only a portion of the full field. If they do, you can easily
observe with your glasses off by just refocusing the telescope
the needed amount.
If your eyes are astigmatic, images will probably appear the
best with glasses on. This is because a telescope’s focuser
can accommodate for nearsightedness or farsightedness, but
not astigmatism. If you have to wear your glasses while
observing and cannot see the entire field of view, you may
want to purchase additional eyepieces that have longer eye
relief.
Aligning the Finder Scope
The Apex 90mm comes with a 6x20 correct-image finder
scope, while the Apex 102mm and 127mm both come with a
6x26 correct-image finder scope. (The first number indicates
magnification, and the second number indicates the aperture
in millimeters.) The finder scope makes it easier to locate the
subject you want to observe in the telescope, because the
finder scope has a much wider field of view. Unlike most finder scopes, images viewed in the correct-image finder scope
will appear oriented the same as the naked eye, which makes
finding objects even easier. The 45° correct-image diagonal
provides a naked eye orientation for images in the main telescope, so the view in the finder scope and main telescope will
be oriented the same, which is a great convenience.
Before you use the finder scope, it must be precisely aligned
with the telescope so they both point to exactly the same
4
spot. Alignment is easiest to do in daylight, rather than at
night under the stars. First, insert the 25mm eyepiece into the
telescope’s focuser. Then point the telescope at a discrete
object such as the top of a telephone pole or a street sign that
is at least a quarter-mile away. Position the telescope so the
target object appears in the very center of the field of view
when you look into the eyepiece.
Now look through the finder scope. Is the object centered on
the finder scope’s crosshairs? If not, hopefully it will be visible
somewhere in the field of view, so only fine adjustment of the
finder scope bracket’s alignment thumb screws will be needed. Otherwise you’ll have to make coarser adjustments to
the alignment thumb screws to redirect the aim of the
finder scope.
Use the alignment thumb screws to center the object on the
crosshairs of the finder scope. Then look again into the telescope’s eyepiece and see if it is still centered there too. If it
isn’t, repeat the entire process, making sure not to move the
telescope while adjusting the alignment of the finder scope.
Finder scopes can come out of alignment during transport of
the telescope, so check its alignment before each observing
session.
If, when looking through the finder scope, you notice that the
image is fuzzy, you will need to focus the finder scope for your
eyes. For the 6x20 finder scope of the Apex 90mm this is
done by rotating the finder’s eyepiece. For the 6x26 finder of
the Apex 102mm and 127mm, this is done by first loosening
the lock ring that is located behind the finder’s objective lens
cell (see Figure 5). Once the lock ring is loosened, thread the
objective lens cell in or out until the image appears sharp.
Then, retighten the lock ring behind the lens cell. The finder
scope is now focused, and should not need focusing again for
your eyes.
Calculating Magnification (Power)
To calculate the magnification, or power, of a telescope with
an eyepiece, simply divide the focal length of the telescope by
the focal length of the eyepiece:
Magnification = telescope focal length ÷ eyepiece focal
length
For example, the Apex 102mm, which has a focal length of
1300mm, used in combination with the supplied 25mm eyepiece, yields a power of:
1300 ÷ 25 = 52x.
It is desirable to have a range of eyepieces of different focal
lengths to allow viewing over a range of magnifications. It is
not uncommon for an observer to own five or more eyepieces.
Orion offers many different eyepieces of varying focal lengths,
so check the catalog or website for a wide selection of additional eyepieces to choose from.
Every telescope has a useful limit of power of about 2x per
millimeter of aperture (i.e. 204 x for the Apex 102mm). Claims
of higher power by some telescope manufacturers are a misleading advertising gimmick and should be dismissed. Keep
in mind that at higher powers, an image will always be dimmer
Objective lens
Alignment
thumb screws
Focus
lock ring
Eyepiece
Spring-loaded
tensioner
Figure 5. The 6x26 correct-image finder scope
and bracket.
and less sharp (this is a fundamental law of optics). The
steadiness of the air (the “seeing”) can also limit how much
magnification an image can tolerate.
Always start viewing with your lowest-power (longest focal
length) eyepiece in the telescope. It’s best to begin observing
with the lowest-power eyepiece, because it will typically provide the widest true field of view, which will make finding and
centering objects much easier After you have located and
centered an object, you can try switching to a higher-power
eyepiece to ferret out more detail, if atmospheric conditions
permit. If the image you see is not crisp and steady, reduce
the magnification by switching to a longer focal length eyepiece. As a general rule, a small but well-resolved image will
show more detail and provide a more enjoyable view than a
dim and fuzzy, overmagnified image.
Terrestrial Viewing
For land viewing, it’s best to stick with low power eyepieces
that yield a magnification under 100x. At higher powers,
images rapidly lose sharpness and clarity due to “heat waves”
caused by Sun-heated air.
Remember to aim well clear of the Sun, unless the front of the
telescope is fitted with a professionally made solar filter and
the finder scope is covered with foil or some other completely
opaque material.
The Apex telescopes are capable of focusing on objects that
are quite close, so you can view fine details of objects that are
nearby. Try focusing on a flower or insect at close distance to
enter a normally unseen microscopic world. Check the specifications at the end of this manual for the closest focusing
distance for each of the Apex models.
Astronomical Viewing
When choosing a location for nighttime stargazing, make it as
far away from city lights as possible. Light-polluted skies
greatly reduce what can be seen with the telescope. Also,
give your eyes at least 20 minutes to dark-adapt to the night
sky. You’ll be surprised at how many more stars you will see!
Use a red flashlight, to see what you’re doing at the tele-
scope, or to read star charts. Red light will not spoil your darkadapted night vision as readily as white light will.
To find celestial objects with your telescope, you first need to
become reasonably familiar with the night sky. Unless you
know how to recognize the constellation Orion, for instance,
you won’t have much luck locating the Orion Nebula. A simple
planisphere, or star wheel, can be a valuable tool for learning
the constellations and seeing which ones are visible in the sky
on a given night. A good star chart or atlas, like the Orion
DeepMap 600, can come in handy for helping locate interesting objects among the dizzying multitude of stars overhead.
Except for the Moon and the brighter planets, it is pretty timeconsuming and frustrating to hunt for objects randomly,
without knowing where to look. It is best to have specific targets in mind before you begin looking through the eyepiece.
A. The Moon
The Moon, with its rocky, cratered surface, is one of the easiest and most interesting subjects to observe with your
telescope. The myriad craters, rilles, and jagged mountain formations offer endless fascination. The best time to observe the
Moon is during a partial phase, that is, when the Moon is not
full. During partial phases, shadows cast by crater walls and
mountain peaks along the border between the dark and light
portions of the lunar disk highlight the surface relief. A full
Moon is too bright and devoid of surface shadows to yield a
pleasing view. Try using a Moon filter to dim the Moon when it
is too bright; it simply threads onto the bottom of the eyepiece.
B.The Planets
The planets don’t stay put like stars do (planets don’t have
fixed R.A. and Dec. coordinates), so you will have to refer to
Sky Calendar at our website, www.telescope.com, or to
charts published monthly in Astronomy, Sky & Telescope, or
other astronomy references to locate them. Venus, Mars,
Jupiter, and Saturn are the brightest objects in the sky after
the Sun and the Moon. All four of these planets are not normally visible in the sky at one time, but chances are one or
two of them will be.
JUPITER The largest planet, Jupiter, is a great subject to
observe. You can see the disk of the giant planet and watch
the ever-changing positions of its four largest moons, Io,
Callisto, Europa, and Ganymede. If atmospheric conditions
are good, you may be able to resolve thin cloud bands on the
planet’s disk.
SATURN The ringed planet is a breathtaking sight when it is
well positioned. The tilt angle of the rings varies over a period
of many years; sometimes they are seen edge-on, while at
other times they are broadside and look like giant “ears” on
each side of Saturn’s disk. A steady atmosphere (good seeing) is necessary for a good view.You may probably see a tiny,
bright “star” close by; that’s Saturn’s brightest moon, Titan.
VENUS At its brightest, Venus is the most luminous object in
the sky, excluding the Sun and the Moon. It is so bright that
sometimes it is visible to the naked eye during full daylight!
Ironically, Venus appears as a thin crescent, not a full disk,
when at its peak brightness. Because it is so close to the Sun,
it never wanders too far from the morning or evening horizon.
5
No surface markings can be seen on Venus, which is always
shrouded in dense clouds.
MARS If atmospheric conditions are good, you may be able
to see some subtle surface detail on the Red Planet, possibly
even the polar ice cap. Mars makes a close approach to Earth
every two years; during those approaches its disk is larger
and thus more favorable for viewing.
C. Stars
Stars will appear like twinkling points of light in the telescope.
Even the largest telescopes cannot magnify stars to appear
as anything more than points of light. You can, however, enjoy
the different colors of the stars and locate many pretty double
and multiple stars. The famous “Double-Double” in the constellation Lyra and the gorgeous two-color double star Albireo
in Cygnus are favorites. Defocusing the image of a star slightly can help bring out its color.
D. Deep-Sky Objects
Under dark skies, you can observe a number of brighter
deep-sky objects with the Apex telescopes, including
gaseous nebulas, open and globular star clusters, and the
brighter galaxies. Most deep-sky objects are very faint, so it is
important that you find an observing site well away from light
pollution. Take plenty of time to let your eyes adjust to the
darkness. Don’t expect these objects to appear like the photographs you see in books and magazines; most will look like
dim gray “ghosts.” (Our eyes are not sensitive enough to see
color in deep-sky objects except in few of the brightest ones.)
But as you become more experienced and your observing
skills improve, you will be able to coax out more and more
intricate details.
Photography
When coupled to a 35mm single-lens reflex camera, the Apex
becomes a telephoto lens. For terrestrial or astronomical photography, you need only a T-ring for your specific camera
model. The T-ring attaches to your camera and threads onto
the Apex’s eyepiece adapter (see Figure 6).
Use the camera’s viewfinder to frame the picture. Use the
telescope’s focuser to focus the image. You may want to consider using a remote shutter release instead of the shutter
release on the camera; touching the camera can vibrate the
system and blur the resulting photographic image on the film.
Also, be sure to use a solid tripod.
Knurled ring
Eyepiece adapter
T-ring
6
Figure 6: A T-ring
is all that is
needed to
connect a 35mm
SLR camera to
the Apex
telescopes; it
threads onto the
eyepiece adapter
with eyepiece
and diagonal
removed.
If you would like to change the orientation of the camera relative to the telescope, do so by first loosening the knurled ring
located in front of the eyepiece adapter (see Figure 6). You
can then rotate the camera (and eyepiece adapter) to the
desired orientation. Retighten the knurled ring when done.
Care & Maintenance
Transporting and Storing
The included soft carry case provides an excellent way to
transport and store the optical tube and its accessories. To
place the optical tube in the case, the eyepiece, diagonal,
finder scope and bracket must be removed from the tube.
When removing the eyepiece and diagonal, remember to first
loosen the securing thumb screws. The finder scope and
bracket can be removed together by loosening the thumb
screw on the tube’s dovetail holder. Cover the front of the optical tube with the dust cover and the rear opening of the
eyepiece adapter with its cap. Now place the tube in the
case’s main compartment. The finder scope and bracket can
also be placed in the main compartment. Use the included
removable padded divider or padded tray to separate the finder scope and bracket from the optical tube. The Apex 90mm
and Apex 102mm come with one small padded divider and
one padded tray. The Apex 127mm comes with one padded
tray only. The padded tray will be on the bottom of the main
compartment of the case when it is shipped to you. For the
Apex 90mm, use the small divider to separate the finder
scope and bracket from the optical tube. For the Apex 102mm
and Apex 127mm, position the padded tray on top of the optical tube; the finder scope and bracket can be stored on top of
the tray so they will not damage the tube. The eyepiece and
diagonal should be covered with their caps and placed in the
external compartments of the case.
If you give your telescope reasonable care, it will last a lifetime. Store it in a clean, dry, dust-free place, safe from rapid
changes in temperature and humidity. Do not store the telescope outdoors, although storage in a garage or shed is OK.
Cleaning the tube
Your Apex Maksutov-Cassegrain telescope requires very little
mechanical maintenance. The optical tube is aluminum and
has a smooth painted finish that is fairly scratch-resistant. If a
scratch does appear on the tube, it will not harm the telescope. If you wish, you may apply some auto touch-up paint
to the scratch. Smudges on the tube can be wiped off with a
soft cloth and a household cleaner such as Windex or
Formula 409.
Cleaning Lenses
Any quality optical lens cleaning tissue and optical lens cleaning fluid specifically designed for multi-coated optics can be
used to clean the Apex’s front meniscus lens or exposed lenses of your eyepieces or finder scope. Never use regular glass
cleaner or cleaning fluid designed for eyeglasses. Before
cleaning with fluid and tissue, however, blow any loose particles off the lens with a blower bulb or compressed air. Then
apply some cleaning fluid to a tissue, never directly on the
optics. Wipe the lens gently in a circular motion, then remove
any excess fluid with a fresh lens tissue. Oily fingerprints and
smudges may be removed using this method. Use caution;
rubbing too hard may scratch the lens. For the large surface of
the meniscus lens, clean only a small area at a time, using a
fresh lens tissue on each area. Never reuse tissues.
Specifications
#9820 Apex 90mm OTA
Optical design: Maksutov-Cassegrain
Aperture: 90mm
Effective focal length: 1250mm
Focal ratio: f/13.9
Central obstruction diameter: 29mm
Primary mirror coating: Aluminum with overcoat
Meniscus lens coating: Anti-reflection multi-coatings on both
sides of lens
Eyepiece adapter: Accepts 1.25” format accessories, camera
t-threads
Eyepiece: 25mm Sirius Plossl, fully coated with multi-coatings, 1.25” format
Eyepiece: 25mm Sirius Plossl, fully coated with multi-coatings, 1.25” format
Magnification with supplied eyepiece: 52x
Actual field of view with supplied eyepiece: 0.92°
Diagonal: 45° correct-image diagonal, 1.25” format
Near focus (with supplied eyepiece and diagonal):
Approximately 11 feet
Finder scope: 6x magnification, 26mm aperture, correctimage, achromatic, 6.3° field
Optical tube mounting block: Fits standard photo-style
tripods
Case: Deluxe carry case for optical tube included
Weight: 4.8 lbs
Length: 12.0” (without eyepiece or diagonal attached)
#9825 Apex 127mm OTA
Optical design: Maksutov-Cassegrain
Aperture: 127mm
Effective focal length: 1540mm
Magnification with supplied eyepiece: 50x
Focal ratio: f/12.1
Actual field of view with supplied eyepiece: 0.96°
Central obstruction diameter: 39mm
Diagonal: 45° correct-image diagonal, 1.25” format
Primary mirror coating: Aluminum with overcoat
Near focus (with supplied eyepiece and diagonal):
Approximately 13.5 feet
Meniscus lens coating: Anti-reflection multi-coatings on both
sides of lens
Finder scope: 6x magnification, 20mm aperture, correctimage, achromatic, 6.2° field
Eyepiece adapter: Accepts 1.25” format accessories, camera
t-threads
Optical tube mounting block: Fits standard photo-style
tripods
Eyepiece: 25mm Sirius Plossl, fully coated with multi-coatings, 1.25” format
Case: Deluxe carry case for optical tube included
Magnification with supplied eyepiece: 62x
Weight: 3.7 lbs
Actual field of view with supplied eyepiece: 0.77°
Length: 10.5” (without eyepiece or diagonal attached)
Diagonal: 45° correct-image diagonal, 1.25” format
#9823 Apex 102mm OTA
Optical design: Maksutov-Cassegrain
Aperture: 102mm
Effective focal length: 1300mm
Focal ratio: f/12.7
Central obstruction diameter: 31mm
Primary mirror coating: Aluminum with overcoat
Meniscus lens coating: Anti-reflection multi-coatings on both
sides of lens
Near focus (with supplied eyepiece and diagonal):
Approximately 27 feet
Finder scope: 6x magnification, 26mm aperture, correctimage, achromatic, 6.3° field
Optical tube mounting block: Fits standard photo-style
tripods
Case: Deluxe carry case for optical tube included
Weight: 8.6 lbs
Length: 14.5” (without eyepiece or diagonal attached)
Eyepiece adapter: Accepts 1.25” format accessories, camera
t-threads
7
One-Year Limited Warranty
The Apex Maksutov-Cassagrain Opitcal Tube Assemblies are warranted against defects in
materials or workmanship for a period of one year from the date of purchase. This warranty is
for the benefit of the original retail purchaser only. During this warranty period Orion Telescopes
& Binoculars will repair or replace, at Orion’s option, any warranted instrument that proves to
be defective, provided it is returned postage paid to: Orion Warranty Repair, 89 Hangar Way,
Watsonville, CA 95076. If the product is not registered, proof of purchase (such as a copy of
the original invoice) is required.
This warranty does not apply if, in Orion’s judgment, the instrument has been abused, mishandled, or modified, nor does it apply to normal wear and tear. This warranty gives you specific
legal rights, and you may also have other rights, which vary from state to state. For further warranty service information, contact: Customer Service Department, Orion Telescopes &
Binoculars, P. O. Box 1815, Santa Cruz, CA 95061; (800) 676-1343.
Orion Telescopes & Binoculars
Post Office Box 1815, Santa Cruz, CA 95061
Customer Support Help Line (800) 676-1343 • Day or Evening
8