1
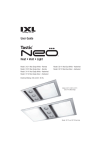
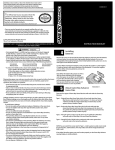
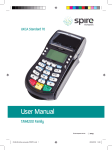
Premium DECT
Digital Baby Monitor
Secure 610
User Guide
2
TABLE OF CONTENTS
IMPORTANT SAFETY INFORMATION ....................................................... 3
GETTING STARTED .................................................................................. 6
ORICOM DIGITAL BABY MONITOR .......................................................... 7
SETTING UP .............................................................................................. 13
USING YOUR DIGITAL BABY MONITOR ................................................... 18
TROUBLESHOOTING ................................................................................ 39
CUSTOMER SUPPORT .............................................................................. 41
WARRANTY ............................................................................................... 42
IMPORTANT SAFETY INFORMATION
3
Important Safety Information
s )TISVERYIMPORTANTTHATYOUREADTHE5SER'UIDECAREFULLYASITCONTAINSDETAILED
information you will need to get the most from your Oricom Baby Monitor. If you
HAVEANYISSUESSETTINGUPORUSINGYOUR/RICOM"ABYMONITORPLEASECALLOUR
Customer support team. Our dedicated local team are more likely to be able to
help you than the retailer where you made your purchase.
s 9OUR/2)#/-"ABY-ONITORISDESIGNEDTOBEANAIDANDSHOULDNOTBEUSED
ASASUBSTITUTEFORRESPONSIBLEANDPROPERADULTSUPERVISIONOFACHILD
s 4HE"ABY-ONITORHASBEENDESIGNEDTOPROVIDESOMEADDEDREASSURANCEIN
the form of sound transmission for those times when you are not in the same
ROOMASYOURBABYPROVIDEDYOUALWAYSSTAYWITHINHEARINGRANGEOFTHEBABY
MONITOR DURING USE9OUR "ABY -ONITOR IS NOT A MEDICAL DEVICE NOR A DEVICE
TO PREVENT CASES OF 3UDDEN )NFANT $EATH 3YNDROME 3)$g3 OR COT DEATH
ANDYOUSHOULDNOTRELYONITFORYOURBABYgSWELLBEING)TISIMPORTANTTHATYOU
regularly check on your baby personally.
s -AKE SURE THE "ABY UNIT 0ARENT UNIT AND MAINS ADAPTOR CABLES ARE KEPT OUT
of reach of your baby and other young children at all times, at least one metre
away.
s .EVERPLACETHEBABYUNITORPARENTUNITINSIDEYOURBABYSCOTBEDORPLAYPEN
s .EVER COVER THE 0ARENT OR BABY UNITS WITH CLOTHESTOWELS OR BLANKETSOR ANY
OTHERITEM.EVERUSEORPLACEYOUR0ARENTOR"ABYUNITINORNEARMOISTUREOR
water (e.g. near bath or pool). Immersing in water could cause electric shock
ANDEVENDEATH
4
IMPORTANT SAFETY INFORMATION
s 4
HEINSTALLATIONLOCATIONPLAYSANIMPORTANTROLEINENSURINGPROPEROPERATION
Therefore, maintain a distance of at least one meter from other electronic
EQUIPMENT SUCH AS MICROWAVE OVENS OR HI¥l DEVICES OTHERWISE THEY COULD
CAUSE INTERFERENCE $URING CONTINUAL USE THE "ABY UNIT POWER ADAPTORS MAY
become warm to the touch. This is normal and should not be a concern.
Warning
2ISKOFSUFFOCATION
+EEPALLPACKAGINGMATERIALSANDPROTECTIVEFOILSOUTOFREACHOFCHILDREN
$ONOTPLACETHE!#!DAPTORCABLEINAHIGHWEARANDTEARLOCATION.EVERUSEA
frayed or compromised cord.
Battery safety
s "
ATTERIESREPRESENTAHAZARDTOHEALTHANDTHEENVIRONMENT
s 4HEY CONTAIN TOXIC ECOLOGICALLY HAZARDOUS HEAVY METALS $O NOT DISPOSE OF
BATTERIESINAlREASTHEYMAYEXPLODE$ISPOSEOFBATTERIESACCORDINGTOLOCAL
REGULATIONSNEVERINYOURHOUSEHOLDRUBBISH
s $ONOTDISMANTLECUTOPENCRUSHBENDPUNCTUREORSHREDCELLSORBATTERIES
If a battery leaks, do not let the battery liquid touch skin or eyes. If this happens,
immediately flush the affected areas with water, and seek medical assistance.
s $
ONOTMODIFYREMANUFACTUREATTEMPTTOINSERTFOREIGNOBJECTSINTOTHEBATTERYOR
immerse or expose it to water or other liquids. Batteries may explode if damaged.
IMPORTANT SAFETY INFORMATION
5
s 5
SE ONLY THE BATTERIES SUPPLIED WITH THE PRODUCT )MPROPER USE OR USE OF
UNAPPROVEDBATTERIESMAYPRESENTARISKOFlREEXPLOSIONOROTHERHAZARDAND
MAYINVALIDATEANYAPPROVALORWARRANTY
s )FYOUBELIEVETHEBATTERIESAREDAMAGEDREMOVEPRODUCTFROMTHECHARGERAND
STOPUSINGTHEPRODUCT#ONTACT/RICOMFORASSISTANCE.EVERUSEADAMAGED
battery.
Disposal
Always dispose of your products at the end of their life in accordance with
your local waste disposal requirements.Packaging materials all cardboard
and paper packaging should be recycled in accordance with your local council
waste regulations.
6
GETTING STARTED
This User Guide provides you with all
the information you need to get the most
from your Oricom Digital Baby Monitor.
'OTEVERYTHING
s "ABYUNIT
Please read this guide carefully and keep
it for future reference.
s X!!.I-(M!H
rechargeable batteries for
Parent unit (pre-installed)
Need help?
If you need assistance setting up or using your
/RICOM $IGITAL "ABY -ONITOR CALL OUR 3UPPORT
team on 1300 889 785. If you would like any
additional or replacement rechargeable batteries
for the parent unit (Part No.BAT1300MAH) order
online at www.oricom.com.au.
/URDEDICATEDADVISORSAREMORELIKELYTOBEABLE
to help you than the retailer where you made your
purchase.
!LTERNATIVELYYOUMAYlNDTHEANSWERINTHE@(ELP
section at the back of this guide.
Additional answers to Frequently Asked Questions
AREALSOAVAILABLEFROMWWWORICOMCOMAU
s 0ARENTUNIT
s 0ARENTUNITCHARGER
s XPOWERADAPTERS
s MMAUXAUDIOLEAD
ORICOM DIGITAL BABY MONITOR
Parent unit
Baby sound level LEDs
)NDICATESTHELEVELOFRECEIVED
SOUND4HE,%$SWILLLIGHTUP
PROGRESSIVELYASTHESOUND
increases. See page 19 for
further information.
Torch (on back of unit)
Press to switch the torch
feature on and off.
Mute LED
Red indicates that Mute All has
been switched on.
Amber indicates that Mute Low
has been switched on.
Mute Low
(on top of unit)
Press to toggle the
Baby unit microphone
SENSITIVITYBETWEEN
normal and Mute Low.
Mute All
(on top of unit)
Press to toggle the
0ARENTUNITRECEIVE
VOLUMEBETWEEN
on and off.
LCD Display
0OWERSAVINGBACKLIGHTTURNS
on when you press any button and
then switches off after 15 seconds.
Press to switch the music on the
Baby unit on or off.
Press to switch the Lightshow
on the Baby unit on or off.
Press to switch the Nightlight
on the Baby unit on or off.
Power on/off
(on top of unit)
Press and hold to
switch the power
on or off.
Link indicator
Steady green indicates that the
Baby and Parent units are linked.
Flashes green if no link established
for 30 seconds. Flashes red if no
link established after 30 seconds.
Also flashes green when the Talk
button is pressed on the Parent
unit to initiate parental talk back.
Battery status LED
Red light indicates the batteries
are low and need re-charging.
Talk (on side of unit)
Press to talk to your baby.
Menu
Press to open the menu.
Press and hold to exit the menu
and return to the idle screen.
7
Down
$ECREASESPEAKERVOLUME
Scroll through the
menu options.
OK
0RESSTOCONlRMTHEMENUOPTION
displayed.
Microphone
Up
)NCREASESPEAKERVOLUME
Scroll through the menu options.
8
ORICOM DIGITAL BABY MONITOR
Parent unit display icons
Menu options:
Lightshow Nightlight
Music
Feed Timer Setup
Battery status
4EMPERATUREALERTVIBRATEON
4EMPERATUREALERTVIBRATEOFF
$ISPLAYS THE TEMPERATURE AS
measured at the Baby unit
Full charge (75-100%)
Medium charge (51-74%)
Low charge (25-50%)
Empty (8-24%)
Flashing (0-7%). Typically you
will be able to use your Parent
unit for at least one hour after
the battery icon starts to flash.
Icon will scroll when charging
#RYINGALERTVIBRATEON
#RYINGALERTVIBRATEOFF
&EEDTIMERONVIBRATEON
&EEDTIMERONVIBRATEOFF
indicates when you can scroll
up or down through the menu
options
ORICOM DIGITAL BABY MONITOR
9
Parent unit charger
Front
Charging light
Red when the Parent unit is
correctly placed on the charger.
Back
Power socket
For connection to the mains
POWERSOCKETVIATHEPOWER
adaptor cable supplied.
10
ORICOM DIGITAL BABY MONITOR
Baby unit
Nightlight
Press to switch the
Nightlight on or off.
Lightshow
Press to switch the
Lightshow on or off.
Microphone
Power on/off
Press and hold to switch
the power on or off.
Find (on side of unit)
Press to emit an alert
beep from the Parent
UNITnUSEFULFORlNDING
THE0ARENTUNITIFYOUVE
misplaced it.
Nightlight
Illuminates around the base.
Temperature sensor
Make sure the sensor is placed
with clear space around it and
not in contact with any surfaces
TOENSUREITWORKSEFFECTIVELY
Music
Press to switch music on at
the Baby unit
(the music and duration will
be as last set at the Parent
unit).
Press again to switch the
music off.
Volume +/–
Increase or decrease the
LOUDSPEAKERVOLUMEFORPLAYING
music or for parental talk back.
Link indicator
Steady green indicates that
the Baby and Parent units are
linked. Flashes green if no link
established for 30 seconds.
Flashes red if no link established
after 30 seconds. Also flashes
green when the Talk button is
pressed on the Parent unit to
initiate parental talk back.
ORICOM DIGITAL BABY MONITOR
11
Back of Baby unit
Lightshow tilt control
(see page 25)
Lightshow focus
control
(see page 26)
mAh
Power socket
For connection to the mains
POWERSOCKETVIATHEPOWER
adaptor cable supplied.
Auxiliary input socket
5SETOPLUGINANEXTERNALAUDIO
source, e.g. MP3 player, so you
can play your own choice of
music to your baby.
12
ORICOM DIGITAL BABY MONITOR
Parent unit menu map
Lightshow
Turn (On/Off)?
Brightness
High
Medium
Low
Timer
5 min
10 min
15 min
Constant
Turn (On/Off)?
Nightlight
Brightness
High
Medium
Low
Timer
(Play/Stop)?
Music
(Start/Stop) Timer
Feed Timer
5 min
10 min
15 min
Constant
Duration
Set Time
Timer Repeat
Repeat On
Repeat Off
Timer Alert
Crying Alert
Setup
Lullabies
Scroll Options
Play All
Nature
Scroll Options
Play All
Scroll Options
Play All
Choose Song
Timer
Menu
5 min
10 min
15 min
Constant
Temp Alert
Backlight
Beep
Beep&Vibe
Vibrate
Screen only
On w alerts
Off w alerts
Classical
External
Beep
Beep&Vibe
Vibrate
Beep
Beep&Vibe
Vibrate
Screen only
Off
SETTING UP
13
Parent unit
1. Plug one of the power adaptor cables into the socket marked
on the back of
the Parent unit charger and plug the other end into the mains power wall socket
and switch the power on.
!CTIVATETHEBATTERIESBYPULLINGTHEPLASTICTABAWAYFROMTHEBACKOFTHE0ARENT
unit.
14
SETTING UP
3. Place the Parent unit into the charger. The red charging light will illuminate on
the charger and the battery icon will start scrolling on the Parent until display to
indicate that the batteries are being charged.
Low battery indicator
Battery icon
Charging light
,
EAVETHEBATTERIESTOCHARGEFORHOURSIFTURNEDOFFORHOURSIFTURNED
on) to reach maximum charge. When the batteries are fully charged the battery
icon on the display will show a full charge
.
Warning
/NLY USE THE POWER ADAPTORS SUPPLIED 5SING INCORRECT POWER ADAPTERS MAY
permanently damage your product. This product is designed for indoor use only.
SETTING UP
15
Battery performance
Rechargeable batteries in the Parent unit will last up to 20 hours in normal use. Please note that new
BATTERIESDONOTREACHFULLCAPACITYUNTILTHEYHAVEBEENINNORMALUSEFORSEVERALDAYS
The charge capacity of rechargeable batteries will reduce with time as they wear out, so reducing the
PERFORMANCETIMEOFTHE0ARENTUNIT%VENTUALLYTHEYWILLNEEDTOBEREPLACED.EWBATTERIESCANBE
OBTAINEDFROMTHE/RICOM$IGITAL"ABY-ONITOR3UPPORT#ENTRE
4HE0ARENTUNITRECHARGEABLEBATTERIESWILLLOSECHARGEOVERAPERIODOFTIMEEVENIFSWITCHEDOFF
Battery low warning – Parent unit
When the batteries are low – approximately within 1 hour of running out – the Parent unit will emit
a low battery alert, the low battery indicator will turn red, the display will show Low Battery and the
icon will flash. Place the Parent unit back on the charger to charge the batteries. To speed up the
CHARGINGPROCESSTURNTHE0ARENTUNITOFFWHENCHARGINGIFITSNOTBEINGUSED
Baby unit
1. Plug the remaining power adaptor cable into the socket marked
on the back
of the Baby unit and plug the other end into the mains power and switch on.
mAh
16
SETTING UP
Switch on and link the Parent and Baby units
1. Press and hold the
button on the Baby unit until the nightlight briefly
illuminates and the green Link indicator flashes.
2. Press and hold the BUTTONONTHE0ARENTUNITUNTILALLTHE,%$SONTHEUNIT
briefly illuminate. The green Link indicator will flash and the display will show I’m
Linking.
Warning
.EVERUSENONRECHARGEABLEBATTERIESINTHE0ARENTUNIT/NLYUSETHERECOMMENDED
TYPE n X !! .I-( M!H BATTERIES 5SING OTHER TYPES COULD PERMANENTLY
damage the unit. Charge the batteries as instructed in this user guide. The Parent unit
can still be used when it is in the charger.
Removing the batteries
)FYOUEVERNEEDTOREMOVETHEBATTERIESSIMPLYSLIDEOPENTHEBATTERYCOMPARTMENTCOVERANDUSETHE
RIBBONTOEJECTTHEBATTERIES
Once the units are linked the green Link indicator on the Parent unit and the Baby
unit will stop flashing and remain a steady green. The units are now ready to use.
IMPORTANT
4HELINKCONlRMATIONBETWEENTHETWOUNITSISVITALFORUSESOTHEYCANCOMMUNICATE)F
the link between the units is broken at any time, the Link indicators on both units will flash
green as they try to search for each other. The Parent unit displays I’m Linking...After 30
seconds, if the link is still broken, the Baby and Parent units Link indicators will flash red.
The Parent unit display will show No Link and you will hear an alert signal.
SETTING UP
s
s
s
s
17
If the link is broken:
CHECKTHATTHEMAINSPOWERISPLUGGEDINANDSWITCHEDONATTHE"ABYUNIT
CHECKTHATBOTHUNITSARESWITCHEDON
CHECKTHATTHEBATTERIESARECHARGEDINTHE0ARENTUNIT
CHECKTHATTHE0ARENTAND"ABYUNITSAREWITHINRANGEOFEACHOTHERINIDEAL
conditions the range is up to 300 metres outdoors and 50m indoors)
Positioning your units
The Baby unit should ideally be within 1m-2m of your baby for best performance.
If you place the Parent and Baby units too close together you will hear a high pitched noise, this is
normal. The units are designed to be located at a distance from one another, e.g. in separate rooms.
18
USING YOUR DIGITAL BABY MONITOR
Switching on/off
Switch the Baby unit on
1. Press and hold the
button until the nightlight briefly illuminates and the
green Link indicator flashes.
Once linked the green Link indicator will remain on.
Switch the Parent unit on
1. Press and hold the
BUTTON ON THE 0ARENT UNIT UNTIL ALL THE ,%$S BRIEmY
illuminate. The green Link indicator will flash and the display will show I’m
Linking.
Once the units are linked the green Link indicators on the Parent and Baby
units will stop flashing and remain a steady green. The units are now ready to
use.
Switch the Baby unit off
1. Press and hold the
switch off.
button on the Baby unit. The green Link indicator will
Switch the Parent unit off
1. Press and hold the
button on the Parent unit until an audible alert sounds.
The green Link indicator will switch off and the display will go blank.
USING YOUR DIGITAL BABY MONITOR
19
Baby sound level LED indicators
LEDs 1-2 = Green
(or Amber if
Mute Low is on)
LEDs 3-4 = Green
LEDs 5-7 = Red
4HESEVEN,%$SACROSSTHETOPOFTHE0ARENTUNITLIGHTUPTOINDICATETHELEVEL
OFSOUNDBEINGRECEIVEDFROMTHE"ABYUNIT4HE,%$SLIGHTUPPROGRESSIVELYAS
the sound increases.
LEDs 1-2 LIGHT UP 'REEN OR !MBER IF -UTE ,OW IS ON SEE PAGE WHEN
SOUNDSOFD"ANDD"ARERECEIVED
LEDs 3-4LIGHTUP'REENWHENSOUNDSOFD"ANDD"ARERECEIVED
LEDs 5-7LIGHTUP2EDWHENSOUNDSOFD"D"ORD"ARERECEIVED
Equivalent sound level examples:
D"D"NORMALCONVERSATION
D"LOUDCONVERSATION
D"D"LOUDTRAFlCNOISE
20
USING YOUR DIGITAL BABY MONITOR
Adjust the loudspeaker volume
At the Parent unit:
or
TO SELECT THE REQUIRED LEVEL4HE lRST PRESS WILL SHOW THE
1. Press
CURRENTSETTING4HEREAREVOLUMELEVELSANDOFF-UTE4HEVOLUMELEVELWILL
BESHOWNONTHEDISPLAYATEACHPRESSEG,EVELISSHOWNASVolume
.
until the display shows
)FYOUWISHTOSWITCHTHEVOLUMEOFFKEEPPRESSING
Volume Off. The Mute All indicator will illuminate.
At the Baby unit:
4HEREAREVOLUMESETTINGS
1. When Music is being played or Talk back is in progress from the Parent unit,
press the
or
BUTTONTOADJUSTTHEVOLUME
2. If no music or Talk back is in use, pressing the
or
BUTTONSWILLADJUSTTHE
VOLUMEANDABEEPWILLSOUNDATTHEAPPROPRIATEVOLUMELEVELSET
)FYOUTRYANDSETTHEVOLUMEHIGHERORLOWERTHANTHESETTINGSAVAILABLEONEITHERUNITYOUWILLHEARAN
error tone.
Setting the Parent unit to Volume OffISTHEEQUIVALENTOFSWITCHINGTHE-UTE!LLFEATUREON3EEPAGE
21 for more information on Mute All.
4HEDEFAULTLOUDSPEAKERVOLUMEONBOTHUNITSIS,EVEL
USING YOUR DIGITAL BABY MONITOR
21
Mute All feature – Parent unit only
4HE -UTE !LL FEATURE PREVENTS ANY SOUND COMING FROM THE 0ARENT UNIT
loudspeaker. With Mute All on you can still monitor your baby using the Baby
SOUNDLEVEL,%$INDICATORSPAGEANDTHE#RYING!LERTPAGE
1. To switch Mute All on, press the
Mute indicator will illuminated red.
2. To switch Mute All off, press the
switch off.
button located on the top of the unit. The
button again. The red Mute indicator will
"ECAREFULNOTTOACCIDENTALLYSWITCHTHETORCHFEATUREONAS-UTE!LLISAUTOMATICALLYACTIVATEDWHEN
this is done.
Mute Low – Parent unit only
&ORDISCREETOPERATIONWHENYOUDONOTWISHTOHEARANYLOWLEVELSOUNDSYOU
CAN STILL MONITOR YOUR BABY USING THE "ABY SOUND LEVEL ,%$ INDICATORS PAGE
19). When Mute Low is switched on, any sounds from the Baby unit to the
0ARENT UNIT WILL BE MUTED UNLESS A SOUND IS MADE ABOVE A SET LEVEL4HE SET
LEVELARESOUNDSTHATARELOUDERTHANTHElRSTTWOGREEN,%$SWOULDREGISTERAS
DESCRIBEDIN@"ABYSOUNDLEVEL,%$INDICATORSONPAGE
If the
or
buttons are pressed whilst Mute All or Mute Low has been set then Mute All or
,OWWILLBESWITCHEDOFFANDTHELOUDSPEAKERVOLUMEWILLRETURNTO,EVELAUTOMATICALLY
22
USING YOUR DIGITAL BABY MONITOR
)FTHE0ARENTUNITRECEIVESSOUNDUPTOTHELEVELOFTHElRSTTWO,%$STHENTHEY
WILLTURNAMBERBUTNOSOUNDWILLBEHEARDIFTHESOUNDRISESABOVETHISLEVEL
then the unit will un-mute so you can hear the sounds.
button located on the top of the Parent
1. To switch Mute Low on, press the
unit. The Mute indicator will turn amber.
2. To switch Mute Low off, press the
button again. The amber indicator will switch off.
Once the Mute Low sound threshold has been exceeded, baby sounds will be able to be heard for a
FURTHERSIXSECONDSEVENIFTHEYDONOTREACHTHE-UTE,OWTHRESHOLD
Talk Back
9OUCANUSETHE0ARENTUNIT4ALK"ACKFEATUREASAONEWAYINTERCOMTOCOMFORT
and reassure your baby. By speaking into the Parent unit your baby will hear
YOURVOICEFROMTHE"ABYUNIT0LEASENOTETHATWHENUSING4ALK"ACKYOUWILL
not be able to hear your baby until you release the
button.
button on the Parent unit to speak to your baby.
1. Press and hold down the
Whilst the
button is depressed the display will show Talk and the green
Link indicators will flash on both units.
9OUWILLBEABLETOACTIVATE4ALK"ACKMODEEVENIFOTHERFUNCTIONSHAVEBEENACTIVATEDATTHE"ABYUNIT
like Music playback or Nightlight on.
Press
or
ONTHE"ABYUNITTOADJUSTTHE4ALK"ACKVOLUMELEVELOFTHE"ABYUNITLOUDSPEAKER
button when the Baby unit and Parent unit are positioned in the same room.
$ONOTPRESSTHE
High-pitch noise will be generated if the
button is pressed when Baby unit and Parent unit are
close to each other or within 3 metres distance.
When using Talk Back, hold the Parent unit approximately 30cm in front of your mouth when talking to baby.
USING YOUR DIGITAL BABY MONITOR
23
Find
9OUCANPRESSTHE
button on the Baby unit to make the Parent unit sound
ANALERTTOHELPYOUlNDITIFITSBEENMISPLACED)FTHE0ARENTUNITLOUDSPEAKER
VOLUMEHADBEEN-UTEDORSETTOVOLUMEOFFTHEVOLUMELEVELWILLBERESETTO
THEDEFAULTSETTINGOF,EVEL
on the Baby unit. The paging alert will sound at the Parent unit and
1. Press
the display will show Here I am!
2. To stop the alert, press any button on the Parent unit or press the
button
again on the Baby unit. If no button is pressed after 2 minutes then the alert will
automatically stop.
Torch
4HE0ARENTUNITHASAHIGHINTENSITYWHITE,%$TORCHTHATCANBEUSEDWHENTHE
Parent unit is switched on or off.
1. Press the
on and off.
button located on the back of the Parent unit to switch the Torch
When the Torch is switched on it will automatically switch Mute All on as well. If you then press the
BUTTON-UTEWILLBEDISABLEDANDTHE4ORCHWILLREMAINON7HENTHE4ORCHISSWITCHEDOFFTHEPREVIOUS
Mute setting will be restored (No Mute, Mute All or Mute Low).
24
USING YOUR DIGITAL BABY MONITOR
The Parent unit menu
The
button on the Parent unit can be used to select and change settings on the
"ABYUNITWITHOUTHAVINGTORISKDISTURBINGYOURBABY9OUCANACCESSTHESETTINGSBY
1. Press
then press
or
the top of the display. Press
to scroll through the menu options shown on
when the option you want is displayed.
to scroll through the
4HE lRST SUB MENU OPTION WILL BE DISPLAYED PRESS
options. The ( arrows) indicate when you can scroll either up or down. Press
when the option you want is displayed.
3. To exit the menu at any time, press
BRIEmYANDSTEPBACKONEMENULEVEL
at a time, or press and hold
to return to the idle screen. If no buttons are
pressed for 10 seconds whilst accessing the menu, the display will return to idle
ANDANYUNSAVEDCHANGESWILLBELOST
Lightshow
4HE"ABYUNITHASA,IGHTSHOWFEATURETHATPROJECTSASTARRYIMAGEONTOTHECEILING
OFYOURBABYSROOM4HEREAREBRIGHTNESSLEVELSTOCHOOSEFROMANDYOUCANSET
a period of time for the Lightshow to illuminate using the Parent unit menu.
The Baby unit must be switched on for the Lightshow to work but need not be linked to the Parent unit.
Switch lightshow on/off using the Baby unit
1. To switch on, press the
BUTTON4HEBRIGHTNESSLEVELANDPERIODOFTIMEFOR
the lightshow to illuminate for will be as last set using the Parent unit.
2. To switch off, press the
button.
USING YOUR DIGITAL BABY MONITOR
25
Switch lightshow on/off using the Parent unit
1. To switch on, press the
button. The display will briefly show Lightshow On
and the Baby unit lightshow will turn on.
button. The display will briefly show Lightshow Off
2. To switch off, press the
and the lightshow will turn off.
9OUCANALSOSWITCHTHE,IGHTSHOWONOFFUSINGTHE0ARENTUNITMENUUSINGTHE,IGHTSHOWMENUOPTION
Select the lightshow brightness level using the Parent unit
1. Press
. Lightshow is displayed, press
.
2. Turn On? is displayed, press
to display Brightness and press
.
3. Press
or
to display either Low, Medium or High and press
to
select. The display will show SavedBRIEmYANDYOULLHEARACONlRMATIONTONE
The default setting is Medium.
Set the lightshow timer
1. Press
. Lightshow is displayed, press
.
2. Turn On? is displayed, press
until Timer is displayed and press
.
3. Press
or
to display either 5 min, 10 min, 15 min or Constant and
press
to select. The display will show Saved BRIEmY AND YOULL HEAR A
CONlRMATIONTONE
The default setting is Constant.
26
USING YOUR DIGITAL BABY MONITOR
Adjusting the lightshow angle and focus
5SETHEMANUALCONTROLSONTHE"ABYUNITPAGETOTILTTHELIGHTSHOWTOONE
side of the current position.
The focus wheel should be used to obtain a clear picture on the wall or ceiling.
Nightlight
9OUCANSETACOMFORTINGNIGHTLIGHTONTHE"ABYUNIT4HEREAREBRIGHTNESSLEVELS
to choose from and you can set a period of time for the nightlight to illuminate.
The Baby unit must be switched on for the nightlight to work, but need not be linked to the Parent unit.
4OADJUSTTHEBRIGHTNESSLEVELORSETTHE.IGHTLIGHTTIMERSEEPAGE
Switch nightlight on/off using the Baby unit
1. To switch on, press the
2. To switch off, press the
button.
button again.
Switch nightlight on/off using the Parent unit
1. To switch on, press the
button. The display will briefly show Light On and
the Baby unit nightlight will illuminate.
2. To switch off, press the
button. The display will briefly show Light Off and
the nightlight will turn off.
9OUCANALSOSWITCHTHE.IGHTLIGHTONOFFUSINGTHE0ARENTUNITMENUUSINGTHE.IGHTLIGHTMENUOPTION
USING YOUR DIGITAL BABY MONITOR
27
Select the nightlight brightness level using the Parent unit
1. Press
. Lightshow is displayed, press
to display Nightlight and press
.
2. Turn On? is displayed, press
to display Brightness and press
.
3. Press
or
to display either Low, Medium or High and press
to
select. The display will show SavedBRIEmYANDYOULLHEARACONlRMATIONTONE
The default setting is Medium.
Set the nightlight timer
1. Press
. Lightshow is displayed, press
to display Nightlight and press
2. Turn On? is displayed, press
until Timer is displayed and press
.
3. Press
or
to display either 5 min, 10 min, 15 min or Constant and press
to select.
The display will show SavedBRIEmYANDYOULLHEARACONlRMATIONTONE
The default setting is Constant.
.
28
USING YOUR DIGITAL BABY MONITOR
Play music from the Baby unit
The Baby unit has 19 songs that can be played to gently soothe your baby. The
SONGSHAVEBEENGROUPEDINTOCATEGORIES,ULLABIES.ATUREAND#LASSICAL
9OUCANSELECTONESONGTOPLAYREPEATEDLYORSELECTTHE0LAY!LLOPTIONFORA
medley of the songs from your selected category. The songs can be set to play
INALOOPFORORMINUTESORYOUCANLEAVETHEMPLAYINGCONSTANTLY
9OUCANALSOPLUGINANEXTERNALAUDIOSOURCELIKEAN-0OR#$PLAYERAND
play music or audio books of your choice to your baby. The auxiliary port is
located on the back of the Baby unit.
The default music setting is Lullaby, Play All songs Constantly
After power-on, there may be a delay of a few seconds before the Baby unit is ready to play music.
Turn music on/off using the Baby unit
1. To turn the music on, press the
button. The most recently selected song will
start playing at the time period last selected using the Parent unit.
2. To turn the music off, press the
button.
!DJUSTTHEVOLUMEOFTHEMUSICUSINGTHE
or
buttons on the Baby unit.
)FMUSICISPLAYEDATGREATERTHANVOLUMETHE#RYING!LERTMAYACTIVATEIF-UTE!LLISUSED
9OUCANALSOSWITCHTHEMUSICONOFFUSINGTHE0ARENTUNITMENUUSINGTHE-USICMENUOPTION
USING YOUR DIGITAL BABY MONITOR
29
Turn music on/off using the Parent unit
1. To turn the music on, press the
button.
The display will briefly show Music On and music will start playing from the Baby
unit.
2. To turn the music off, press the
button.
The display will briefly show Music Off and the music will turn off.
Choose a song to play using the Parent unit
1. Press
. Lightshow is displayed, press
until Music is displayed and press
.
2. Play? is displayed, press
to display Choose Song and press
.
5SETHE
or
buttons to display the category of song you want: Lullabies,
Nature or Classical or External. if you want to play music from your own audio
source and press
to select.
5SE THE
and
BUTTONS TO SCROLL THROUGH THE INDIVIDUAL SONG TITLES AND
press
when the option you want is displayed. Or, you can select Play All, to
play a medley of the songs from your selected category. The display will show
SavedBRIEmYANDYOULLHEARACONlRMATIONTONE
Connect an auxiliary player
1. Plug your player into the auxiliary input socket on the back of the Baby unit
using the aux audio lead supplied.
2. The music selection will immediately change to External BUT IT WONT START
playing until you switch the music feature on.
30
USING YOUR DIGITAL BABY MONITOR
Set a play time for music
1. Press
. Lightshow is displayed, press
until Music is displayed and press
.
2. Play? is displayed, press
until Timer is displayed and press .
5SETHE
or
buttons to scroll through the options: 5 min, 10 min, 15 min
or Constant and press
when the option you want is displayed. The display
will show SavedBRIEmYANDYOULLHEARACONlRMATIONTONE
Feed Timer
9OUCANSETA&EED4IMERONTHE0ARENTUNITTOACTASACOUNTDOWNTIMERTHAT
WILLALERTYOUWHENYOUNEXTNEEDTOFEEDYOURBABY9OUHAVEACHOICEOFALERT
TYPESBEEPBEEPVIBEANDVIBRATEANDYOUCANSETTHETIMERTOREPEATITSELF
once the alert sounds.
Set the feed timer countdown duration
1. Press
. Lightshow is displayed, press
until Feed Timer is displayed and press
2. Start? is displayed, press
to display Duration and press
.
.
and
3. The display will show 02h:00mORTHECURRENTLYSETTIMER5SETHE
BUTTONSTOSELECTTHElRSTDIGITANDPRESS . Repeat this procedure for each digit
and press
. The display will show SavedANDYOULLHEARACONlRMATIONBEEP
The timer can be set from 1 minute to 99 hours 59 minutes.
The feed timer default countdown duration is set at 02:00 (2 hours).
If the Parent unit is switched off, the feed timer countdown will be cancelled and you will need to start it
again when the unit is switched back on. The duration, alert type and repeat settings will still be retained.
USING YOUR DIGITAL BABY MONITOR
31
Start the feed timer countdown
1. Press
. Lightshow is displayed, press
until Feed Timer is displayed and press
.
2. Start? is displayed, press
. The display will briefly show Timer On and then
the timer will be shown counting down the seconds from the time you set.
7HEN THE TIMER HAS lNISHED COUNTING DOWN TO 00:00 you will hear an alert
beep and the timer and
icon will flash. Press any button on the Parent unit
to stop the alert. If you do not stop the alert it will automatically stop after 2
minutes (or it will start again if Timer Repeat has been set to On).
Cancel the feed timer countdown
1. Press
. Lightshow is displayed, press
until Feed Timer is displayed and press
.
2. Stop? is displayed, press
. The display will briefly show Timer Off , the timer
will then disappear and the display will return to idle.
Switch timer repeat option on or off
1. Press
. Lightshow is displayed, press
until Feed Timer is displayed and press
.
2. Start? is displayed, press
until Timer Repeat is displayed and press
.
3. 5SE THE
and
buttons to display either Repeat On or Repeat Off and
press
to select. The display will show SavedANDYOUWILLHEARACONlRMATION
beep.
When Repeat On has been set, the feed timer countdown will start again once the
alert has sounded if it is not switched off.
The default setting is Repeat On.
32
USING YOUR DIGITAL BABY MONITOR
Select the type of feed timer alert
1. Press
. Lightshow is displayed, press
until Feed Timer is displayed and press
.
2. Start? is displayed, press
until Timer Alert is displayed and press
.
3. 5SETHE
and
buttons to display either Beep, Beep&Vibe or Vibrate and
press
to select. The display will show SavedANDYOUWILLHEARACONlRMATION
beep.
Feed timer alert options:
Beep = Parent unit will emit an alert beep only.
Beep&Vibe0ARENTUNITWILLEMITANALERTBEEPANDVIBRATE
Vibrate0ARENTUNITWILLVIBRATEONLY
The default setting is Beep&Vibrate.
USING YOUR DIGITAL BABY MONITOR
33
IMPORTANT
4HE TEMPERATURE SENSOR USED IN THIS /RICOM $IGITAL "ABY -ONITOR IS INTENDED AS A
GUIDE TO PROVIDE PARENTS WITH AN INDICATION OF THE ROOM TEMPERATURE IN WHICH THE
Baby unit has been placed.
)T IS DESIGNED TO OPERATE WITHIN AN APPROXIMATE TOLERANCE OF # AND IS NOT
INTENDED TO BE AS ACCURATE AS SOME MEDICAL DEVICES 0LEASE NOTE THAT YOUR OWN
temperature reference e.g. your central heating thermostat may not be as accurate,
possibly due to tolerances and positioning of the thermostat in relation to the Baby
Monitor sensor.
(EALTHCARE PROFESSIONALS ADVISE THAT THE IDEAL TEMPERATURE FOR YOUR BABYS ROOM IS
BETWEEN #AND #
9OUR0ARENTUNITHASABUILTINMECHANISMTOPREVENTREPEATEDANNOYINGAUDIBLEALERTS
IFTHEROOMTEMPERATUREHOVERSAROUNDANALERTINGTHRESHOLD
Temperature monitor
There is a temperature sensor on the Baby unit to constantly monitor the
TEMPERATURE IN YOUR BABYS ROOM AND YOULL BE ALERTED IF IT GETS TOO HOT TOO
WARMORTOOCOLD4HE0ARENTUNITWILLVIBRATESOUNDANALERTBEEPANDDISPLAY
a message on the screen. The alerts on the Parent unit can be changed, see
page 35. The temperature will be constantly shown on the Parent unit display in
˚C. To stop an alert beep, press any button on the Parent unit.
34
USING YOUR DIGITAL BABY MONITOR
Temperature monitor indicators
Temperature
On the Parent unit
"ELOW #
$ISPLAYSHOWSToo Cold
n #
n #
$ISPLAYSHOWSToo Warm
/VER #
$ISPLAYSHOWSToo Hot
Select the type of temperature alert
1. Press
. Lightshow is displayed, press
until SetUp is displayed and press
.
2. Crying Alert is displayed, press
until Temp Alert is displayed and press
.
3. 5SE THE
and
buttons to display either Beep, Beep&Vibe, Vibrate,
Screen Only or Off and press
TOSELECT4HEDISPLAYWILLSHOW3AVEDAND
YOUWILLHEARACONlRMATIONBEEP
To stop an alert beep, press any button on the Parent unit.
USING YOUR DIGITAL BABY MONITOR
35
Temperature alert options
Beep = Parent unit will beep. icon will flash.
Beep&Vibe0ARENTUNITWILLBEEPANDVIBRATE icon will flash.
Vibrate0ARENTUNITWILLVIBRATE icon will flash.
Screen Only = icon will flash.
Off = No alerts. icon will not be displayed.
!LLOFTHEABOVEALERTSWILLALSODISPLAYTHEAPPROPRIATEMESSAGEToo Hot or
Too Cold.
Pre-set temperature alert range
The Baby unit comes with pre-set maximum and minimum temperatures. If the temperature falls below
ORGOESABOVETHESETTINGANALERTWILLSOUNDONTHE0ARENTUNITANDTHEDISPLAYWILLSHOWToo Cold or
Too HotASAPPROPRIATE4HETEMPERATUREALERTPRESETTEMPERATURESAREBELOW #ANDABOVE #
!LERTSWILLBEREPEATEDIFTHETEMPERATURECREEPSBY #INTOANALERTINGRANGE4HEDEFAULTSETTINGIS
Beep&Vibrate.
36
USING YOUR DIGITAL BABY MONITOR
Crying alert
4
HE CRYING ALERT WILL ONLY BE ACTIVATED IF -UTE !LL HAS BEEN SWITCHED ON OR
IF THE 0ARENT UNIT VOLUME HAS BEEN SWITCHED TO VOLUME OFF SEE PAGE FOR
information on the Mute All feature.
With Mute All switched on, if your baby starts to cry you will not be able to hear
THECRIESBUTIFTHECRIESSOUNDABOVEACERTAINLEVELIEIFTHEYREACHD"!
WHICHISTHESTRED"ABYSOUNDLEVEL,%$THENTHE0ARENTUNITWILLACTIVATETHE
CRYINGALERT4HEDEFAULTCRYINGALERTISFORTHE0ARENTUNITTOVIBRATEANDEMITAN
audible beep but you can select a different alert if you want to.
Select the type of crying alert
1. Press
. Lightshow is displayed, press
until SetUp is displayed and press
.
2. Crying Alert is displayed, press
.
3. 5SE THE
and
buttons to display either Beep, Beep&Vibe, Vibrate or
Screen Only and press
to select. The display will show Saved and you will
HEARACONlRMATIONBEEP
To stop an alert beep, press any button on the Parent unit.
Crying alert options
Beep = Parent unit will beep, Crying Alert will be displayed and
icon will flash.
Beep&Vibe0ARENTUNITWILLBEEPANDVIBRATECrying Alert will be displayed and
icon will flash.
Vibrate0ARENTUNITWILLVIBRATEONLYNOALERTBEEPWILLSOUNDCrying Alert will be displayed and the
icon will flash.
Screen Only = Crying Alert will be displayed and the
icon will flash.
The default setting is Beep&Vibrate.
4HE#RYING!LERTISA@USERALERTASDESCRIBEDONPAGE
USING YOUR DIGITAL BABY MONITOR
37
Backlight
9
OUCANSELECTWHETHEROR NOTTHE,#$BACKLIGHTCOMESON WHENAN ALERTIS
ACTIVATED7HEN THE BACKLIGHT COMES ON IT WILL STAY ON FOR SECONDS4HE
default setting is On.
. Lightshow is displayed, press
until SetUp is displayed and press
.
1. Press
2. Crying Alert is displayed, press
until Backlight is displayed and press
.
3. 5SETHE
and
buttons to display either On w alerts or Off w alerts and press
to select. The display will show SavedANDYOUWILLHEARACONlRMATIONBEEP
List of tones
9
OUR "ABY -ONITOR 0ACIlER UNIT CAN PRODUCE VARIOUS TONES4HEY HAVE THE
following meaning:
Tone
Meaning
Single tone
#ONlRMATIONTONEEGSETTINGSAVED
$OUBLETONEFAST
%RRORTONEEGMAXVOLUMEREACHEDWHEN
ADJUSTINGVOLUME
$OUBLETONESLOW 5SERALERTEGCRYINGALERTPAGINGALERTETC
Triple tone (fast)
System alert e.g. link lost, battery low etc.
5
SER!LERTTONESCANBESILENCEDBYPRESSINGANYBUTTONONTHE0ARENTUNIT
System Alerts can be silenced for a 5 minute period by pressing any button on
the Parent unit.
38
USING YOUR DIGITAL BABY MONITOR
Reset the units
Resetting either units will return the settings at that unit back to its default
settings.
2ESETTINGTHEUNITSISONLYADVISABLEIFYOUAREEXPERIENCINGDIFlCULTIESWITHYOURPRODUCT)TISAUSEFUL
feature that ensures your Baby Monitor is returned to its new “out of the box” settings.
Reset the Parent unit
1. Within 3 seconds of the Parent unit being switched on, press and hold the
button for at least 10 seconds. The display will show Reset for 2 seconds during
THERESETANDTHENYOUWILLHEARACONlRMATIONBEEPONCETHERESETHASBEEN
performed.
Reset the Baby unit
1. Within 3 seconds of the Baby unit being switched on, press the
button for at
least 10 seconds.
9OUWILLHEARACONlRMATIONBEEPONCETHERESETHASBEENPERFORMED
TROUBLESHOOTING
39
Should you experience difficulties operating the SC610 please refer to the
TROUBLESHOOTINGGUIDEBELOW)FYOUSTILLEXPERIENCEDIFlCULTIESPLEASECONTACT/RICOM
Customer Support on 1300 889 785 for assistance.
Troubleshooting
Problems
Link light does not
come on
Link light is flashing
green
Link light is red
Solutions
¥# HECK THAT BOTH THE "ABY AND 0ARENT UNITS ARE
switched on.
¥#HECKTHATTHEBATTERIESINTHE0ARENTUNITARECORRECTLY
installed and that they are charged.
¥# HECK THAT THE MAINS POWER IS PLUGGED IN AND
switched on at the Baby unit.
¥#HECKTHATTHEUNITSAREWITHINRANGEOFEACHOTHER
¥) F YOU HAVE PRESSED
to use the Talk Back
feature, the Link light will flash to indicate one-way
communication between the units.
¥4HEUNITSARESEARCHINGFORACOMMUNICATIONLINK
¥#HECKUNITSAREWITHINRANGEOFONEANOTHER
¥#HECKBOTHUNITSARETURNEDON
¥4HE LINK BETWEEN YOUR UNITS IS BROKEN9OU WILL ALSO
hear an alert on the Parent unit to let you know
there is no communication between the units. If this
happens, check that the mains power (or batteries) is
correctly connected and that the units are within range
of one another. See page 15 for instructions on linking
the units.
40
TROUBLE SHOOTING
¥0UTTHE0ARENTUNITBACKONTHECHARGERTOCHARGE
¥0LACE 0ARENT UNIT BACK ON THE CHARGER AS FREQUENTLY
ASPOSSIBLEORIDEALLYLEAVEITONTHECHARGERTOENSURE
the batteries remain charged.
¥4OSHORTENTHECHARGINGTIMEYOUCANTURNTHE0ARENT
unit off if it is not being used while it is charging.
Parent unit remains ¥9OUMAYHAVESETTHEVOLUMETOOLOWSEEPAGETO
SILENTORVERYQUIET
INCREASETHEVOLUME
¥9OUMAYHAVESWITCHEDA-UTEFEATUREONSEEPAGES
21-22.
9OUCANHEARAHIGH ¥4HEUNITSMIGHTBETOOCLOSETOEACHOTHER
pitched noise
¥4HEVOLUMESETTINGMIGHTBETOOHIGHSEEPAGE
Talk back feature is ¥#HECKTHATTHEVOLUMEISLOUDENOUGHATTHE"ABYUNIT
not working
see page 20.
¥#HECKTHEUNITSARELINKEDSEEPAGE
Battery low on
Parent unit
CUSTOMER SUPPORT
41
Customer Support
)FYOUHAVEANYPROBLEMSSETTINGUPORUSINGTHISPRODUCTYOUWILLlNDUSEFUL
tips and information in the Troubleshooting section of this user guide as well as
“Frequently Asked Questions” on our website www.oricom.com.au.
)F YOU HAVE FURTHER QUESTIONS ABOUT USING THE PRODUCT AFTER REVIEWING THE
RESOURCESABOVEORWOULDLIKETOPURCHASEREPLACEMENTPARTSORACCESSORIES
please call our Customer Support Team. Our dedicated local support team
are more likely to be able to help you than the retailer where you made your
purchase.
Important
Please retain your purchase receipt and attach to the back page of this user
GUIDEASYOUWILLNEEDTOPRODUCETHISIFWARRANTYSERVICEISREQUIRED4AKEA
few moments to register your product online: www.oricom.com.au
42
WARRANTY
How to make a claim under Warranty in Australia
Oricom has a simple warranty process for you to follow:
s 0LEASECALLOREMAILOUR#USTOMER3UPPORT4EAMCONTACTDETAILSFOLLOW
s !#USTOMER3UPPORT4EAMMEMBERWILLVERIFYAFTERTROUBLESHOOTINGWITHYOU
IFYOURPRODUCTQUALIlESUNDERWARRANTY)FSOTHEYWILLGIVEYOUA0RODUCT
Return Authorisation number.
s 7EWILLTHENEMAILORFAXA2ETURN!UTHORISATIONFORMANDA2EPAIR.OTICE
(if necessary), together with instructions on how to return the goods for
WARRANTYSERVICE
0LEASENOTETHATIFA#USTOMER3UPPORT4EAMMEMBERADVISESTHATYOURPRODUCT
does not qualify for return, this warranty does not apply to your product.
Products that are authorised to be returned to Oricom in Australia must include
all of the following:
s !COMPLETED2ETURN!UTHORISATIONFORM
s !COPYOFYOUR0ROOFOF0URCHASEPLEASEKEEPYOURORIGINALCOPY
s 4HEFAULTYPRODUCTINCLUDINGALLACCESSORIES3ENDTHEAPPROVEDRETURNSTO
Oricom International Pty Ltd
Locked Bag 658
South Windsor NSW 2756 Australia
Please note that this warranty excludes expenses incurred by you in returning
ANY FAULTY PRODUCT TO US 9OU MUST ARRANGE AND PAY ANY EXPENSES INCURRED
INCLUDINGPOSTAGEDELIVERYFREIGHTTRANSPORTATIONORINSURANCEOFTHEPRODUCT
TO RETURN THE FAULTY PRODUCT TO US HOWEVER WE WILL ARRANGE DELIVERY OF THE
repaired or replaced faulty product to you.
WARRANTY
43
Important Information
Repair Notice
Please be aware that the repair of your goods may result in the loss of any
user-generated data (such as stored telephone numbers, text messages and
CONTACT INFORMATION 0LEASE ENSURE THAT YOU HAVE MADE A COPY OF ANY DATA
SAVEDONYOURGOODSBEFORESENDINGFORREPAIR
Please also be aware that goods presented for repair may be replaced by
refurbished goods or parts of the same type rather than being repaired.
44
WARRANTY
Warranty Information (Australia)
4
HIS7ARRANTYISPROVIDEDBY/RICOM)NTERNATIONAL0TY,TD!".
5NIT3OVEREIGN0LACE3OUTH7INDSOR.37HEREINAFTERREFERREDTO
as “Oricom”.
Oricom makes no other warranties or conditions, express or implied, including
ASTOACCEPTABLEQUALITYANDlTNESSFORAPARTICULARPURPOSEEXCEPTASSTATEDIN
this Warranty. Any implied warranties that may be imposed by law are limited in
duration to the Warranty Period.
Oricom warrants that the product is free from defects in materials or
workmanship during the Warranty Period. This Warranty does not extend to any
PRODUCT FROM WHICH THE SERIAL NUMBER HAS BEEN REMOVED OR WAS PURCHASED
outside of Australia.
This warranty in no way affects your statutory warranty rights under the
Competition and Consumer Act 2010 or any other similar legislation.
The Warranty Period will be 3 years from the date of purchase of the product
EVIDENCED BY YOUR DATED SALES RECEIPT9OU ARE REQUIRED TO PROVIDE PROOF OF
PURCHASEASACONDITIONOFRECEIVINGWARRANTYSERVICES
9
OUAREENTITLEDTOAREPLACEMENTPRODUCTORREPAIROFTHEPRODUCTACCORDINGTO
the terms and conditions of this document if your product is found to be faulty
within the Warranty Period. This Warranty extends to the original purchaser only
and is not transferable. Rechargeable battery cells and rechargeable battery
PACKSIFSUPPLIEDWITHTHISPRODUCTARECOVEREDUNDERTHISWARRANTYFORAPERIOD
of 90 days.
WARRANTY
45
Products distributed by Oricom are manufactured using new materials or new
ANDUSEDMATERIALSEQUIVALENTTONEWINPERFORMANCEANDRELIABILITY3PAREPARTS
MAYBENEWOREQUIVALENTTONEW3PAREPARTSAREWARRANTEDTOBEFREEFROM
defects in material or workmanship for thirty (30) days or for the remainder of
the Warranty Period of the Oricom branded product in which they are installed,
WHICHEVER IS LONGER $URING THE7ARRANTY 0ERIOD /RICOM WILL WHERE POSSIBLE
repair and if not replace the faulty product or part thereof. All component parts
REMOVED UNDER THIS7ARRANTY BECOME THE PROPERTY OF /RICOM )N THE UNLIKELY
EVENTTHATYOUR/RICOMPRODUCTHASARECURRINGFAILURE/RICOMMAYSUBJECTTO
THE#OMPETITIONAND#ONSUMER!CTATITSDISCRETIONELECTTOPROVIDEYOU
WITH A REPLACEMENT PRODUCT OF ITS CHOOSING THAT IS AT LEAST EQUIVALENT TO YOUR
product in performance.
Oricom does not warrant that the operation of the product will be uninterrupted
or error free.
Oricom is not responsible for damage that occurs as a result of your failure to
follow the instructions that came with the product. These terms and conditions
together with any specific terms and conditions contained in the user guide
TO THE PRODUCT PURCHASED CONSTITUTE THE COMPLETE AND EXCLUSIVE AGREEMENT
between you and Oricom regarding the product.
.
OCHANGETOTHECONDITIONSOFTHIS7ARRANTYISVALIDUNLESSITISMADEINWRITING
ANDSIGNEDBYANAUTHORISEDREPRESENTATIVEOF/RICOM
/
RICOMWILLNOTBEINBREACHOFAWARRANTYEXPRESSLYSETOUTINTHIS5SER'UIDE
or under the Competition and Consumer Act 2010 and excludes any liability
for damages or any other remedy arising under any other legislation or the
common law if the damage occurs as a result of:
46
WARRANTY
1. failure by you to adhere to the warnings and follow the instructions set out in
this user guide for the proper installation and use of the product;
2. negligence on your part or misuse by you of the product;
3. an uncontrollable external cause which results in the product not functioning
INCLUDINGBUTNOTLIMITEDTOPOWERFAILURELIGHTNINGOROVERVOLTAGEAND
MODIlCATIONTOTHEPRODUCTORSERVICESCARRIEDOUTONTHEPRODUCTIONBYANYONE
OTHERTHAN/RICOMOR/RICOMSAUTHORISEDSERVICEPROVIDER
Oricom will not be liable for any damages caused by the product or the failure of
THEPRODUCTTOPERFORMINCLUDINGANYLOSTPROlTSORSAVINGSORSPECIALINCIDENTAL
or consequential damages. Oricom is not liable for any claim made by a third
party or made by you on behalf of a third party. This limitation of liability applies
whether damages are sought, or a claim made, under this Warranty or as a
tort claim (including negligence and strict product liability), a contract claim or
ANYOTHER CLAIM(OWEVER THISLIMITATION OFLIABILITY WILL NOT APPLY TO CLAIMS FOR
PERSONAL INJURY .OTHING IN THIS7ARRANTY EXCLUDES RESTRICTS OR MODIFIES ANY
condition, warranty, right or remedy which pursuant to the Competition and
Consumer Act 2010 applies to this Warranty and which may not be so excluded,
restricted or modified. For warranties that cannot be excluded, restricted or
MODIlED/RICOMLIMITSTHEREMEDIESAVAILABLETOTHOSESPECIlEDINTHERELEVANT
legislation.
Oricom products come with guarantees that cannot be excluded under the
!USTRALIAN#ONSUMER,AW9OUAREENTITLEDTOAREPLACEMENTORREFUNDFORAMAJOR
failure and compensation for any other reasonably foreseeable loss or damage.
9OUAREALSOENTITLEDTOHAVETHEGOODSREPAIREDORREPLACEDIFTHEGOODSFAILTOBE
OFACCEPTABLEQUALITYANDTHEFAILUREDOESNOTAMOUNTTOAMAJORFAILURE
Contact Details for Oricom support and Warranty claims in Australia
Oricom International Pty Ltd
Locked Bag 658
South Windsor, NSW 2756
Australia
Email: [email protected]
Phone: 1300 889 785
(Monday to Friday 8am to 6pm AEST)
Web: www.oricom.com.au
Fax: (02) 4574 8898
Contact details for Oricom Support and Warranty Claims in New Zealand
Email: [email protected]
Phone: 0800 674 266
(Monday to Friday 10am to 8pm NZST)
Web: www.oricom.co.nz
Ref: 07092011