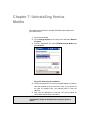
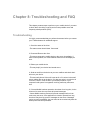
1
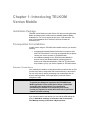
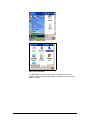
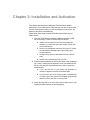
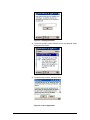
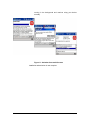
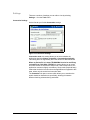
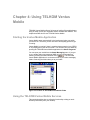
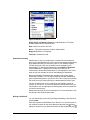
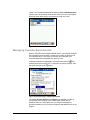
Ventus Mobile
Ventus Freedom 5.0
User Guide for Windows Mobile Pocket PC
Release 5.0
Document Version 1.12
Disclaimer
This document is provided “as is” without warranty of any kind, either
express or implied, including, but not limited to, the implied warranties of
merchantability, fitness for a particular purpose, or non-infringement. SEVEN
will not, in any event, be responsible for possible errors in this document or
for any damages, incidental or consequential (including, but not limited to
monetary losses), that might arise from the use of or inability to use the
document or the information in it, even if SEVEN has been advised of the
possibility of such damages.
Copyright
Copyright © 2005 SEVEN Networks, Inc. All Rights Reserved.
This publication, in whole or in part, may not be reproduced, stored in a
computerized or other retrieval system, or transmitted in any form, or by any
means whatsoever without the prior written permission of Seven Networks,
Inc.
Information in this publication is subject to change without prior notification.
Trademarks
SEVEN, SEVEN Always-On Mail, and SEVEN Mail are trademarks of
SEVEN Networks, Inc.
Domino is a trademark, and Lotus is a registered trademark of IBM
Corporation. Ericsson is the trademark or registered trademark of
Telefonaktiebolaget LM Ericsson. Microsoft, Outlook, Windows, and
Windows NT are either registered trademarks or trademarks of Microsoft
Corporation in the U.S. and/or other countries. Nokia is a registered
trademark of Nokia Corporation. Other product and company names
mentioned herein may be trademarks or trade names of their respective
owners, and are mentioned for identification purposes only.
Patents
Patents pending.
Release Version: 5.0
Release Date: June 2005
SEVEN Networks, Inc
http://www.seven.com
2
PT. Telekomunikasi Indonesia, Tbk.
Contents
Ventus Mobile
Ventus Freedom 5.0.............................................. 1
User Guide for Windows Mobile Pocket PC........1
Preface................................................................... 5
Audience.......................................................................................... 6
Audience................................................................ 6
Related Documentation.................................................................... 6
Related Documentation........................................ 6
Documentation Feedback................................................................. 6
Documentation Feedback..................................... 6
Chapter 1: Introducing TELKOM Ventus Mobile 7
Installation Package......................................................................... 7
Installation Package.............................................. 7
Prerequisites for Installation............................................................. 7
Prerequisites for Installation................................ 7
Network Connections....................................................................... 7
Chapter 2: Installation and Activation................. 9
Chapter 3: Settings and Tools............................15
Settings.......................................................................................... 16
Connection Settings................................................................ 16
Email Settings......................................................................... 17
Calendar Settings................................................................... 18
Contacts Settings.................................................................... 19
Chapter 4: Using TELKOM Ventus Mobile........ 20
Starting the Ventus Mobile Application........................................... 20
Starting the Ventus Mobile Application.............20
Using the TELKOM Ventus Mobile Services.................................. 20
TELKOM Ventus Freedom 5.0 User Guide
3
Using the TELKOM Ventus Mobile Services..... 20
Managing Your Emails................................................................... 21
Reading Emails and Attachments................................................... 21
Attachment Handling............................................................... 23
Writing a New Email................................................................ 23
Managing Calendar Appointments................................................. 24
Managing Calendar Appointments.................... 24
Chapter 5: Docking your Device to a Cradle.....26
Chapter 6: Upgrading Ventus Mobile................ 27
Chapter 7: Uninstalling Ventus Mobile.............. 28
Chapter 8: Troubleshooting and FAQ............... 29
Troubleshooting.............................................................................. 29
Troubleshooting.................................................. 29
Frequently Asked Questions........................................................... 30
Frequently Asked Questions.............................. 30
Chapter 9: Additional Support........................... 31
Additional support........................................................................... 31
Additional support...............................................31
4
PT. Telekomunikasi Indonesia, Tbk.
Preface
Welcome to TELKOM Ventus Mobile, which offers a full range of mobile
office applications to help you keep up with your important emails,
calendar and contacts. Ventus Mobile uses True Push technology, so
there is no need for synchronization and no delays in getting the latest
information.
TELKOM provides secure, real-time, wireless access to enterprise
applications through your mobile device. This guide provides information
for managing and using your mobile device.
This preface includes the following sections:
1. Audience
2. Related Documentation
3. Documentation Feedback
Audience
This guide is intended for enterprise users accessing corporate
applications and data using TELKOM Ventus Mobile and a mobile
device. It assumes that you have a mobile device with wireless access
and that you are familiar with using this device.
Related Documentation
The TELKOM document set includes the following documentation:
4. Ventus Freedom5.0 User Guide for Pocket PC - provides
instructions on how to use Ventus Mobile with Windows Mobile
Pocket PC devices, such as Qtek and HP iPAQ.
5. Ventus Freedom5.0 User Guide for Symbian S60 - provides
instructions on how to use Ventus Mobile with Nokia Symbian
Series 60 devices.
6. Ventus Freedom5.0 User Guide for Symbian S80 - provides
instructions on how to use Ventus Mobile with Nokia Symbian
Series 80 devices.
7. Ventus Freedom5.0 User Guide for Windows Mobile
Smartphone - provides instructions on how to use Ventus
Mobile with Microsoft Windows Mobile Smartphone devices.
For further information, please visit www.ventusmobile.com.
Documentation Feedback
The TELKOM Technical Publications department welcomes your
feedback. Please help us improve future releases of this document by
sending your comments and suggestions to [email protected].
6
PT. Telekomunikasi Indonesia, Tbk.
Chapter 1: Introducing TELKOM
Ventus Mobile
Installation Package
TELKOM Ventus Mobile for mobile Pocket PC devices running Windows
Mobile operating system is delivered as a standard Windows Mobile
installation file. You can recognize the file by the .CAB extension. The
name of the installation file for Pocket PC devices includes the
characters ‘PPC’.
Prerequisites for Installation
In order to start using the TELKOM Ventus Mobile services you need the
following:
•
an appropriate Windows Mobile Pocket device such as a Qtek
2020, HP iPAQ h6340. For a full list of supported devices please
contact your service operator or TELKOM reseller.
•
the installation package for the TELKOM Ventus Mobile for
devices running the Windows Mobile operating system iis
delivered as a standard installation (.CAB) file. This file should
be provided to you by your service operator or TELKOM reseller.
Network Connections
Your mobile device needs a working packet data connection and an APN
(Access Point Name) configuration that connects directly to the Internet.
You can verify this by opening a web page (not a wap page) with the
device’s Internet browser. If the page opens, you do not need to
configure the APN.
NOTE!
To provide true Always-On experience the TELKOM Ventus
Mobile application on the mobile device keeps a packet data
connection open to the Internet. The connection is
automatically re-initiated if it is temporarily lost. Please,
consult your operator for actual data costs, both in your home
network and when roaming.
If you cannot connect to the Internet, you can edit the APN settings by
going to Start Menu >Settings >Connections tab >Connections
icon>Manage existing connections >My Connection.
Figure 1. Settings menu
Figure 2. Connections
For additional help, please contact your IT administrator or service
provider. Some service providers deliver the settings to your device by
SMS on request.
8
PT. Telekomunikasi Indonesia, Tbk.
Chapter 2: Installation and Activation
This chapter describes how to install the TELKOM Ventus Mobile
application to your mobile device. Note that only one device can be used
for each email account. When you wish to change to a new device, the
old device should be uninstalled first.
Please follow these steps to install TELKOM Ventus Mobile to your
mobile device:
1. Copy the TELKOM Ventus Mobile installation package (.CAB
file) to the device. There are several ways to do this:
a. install it over a cable that uses device management
software e.g. ActiveSync (the cable usually comes with
your mobile device)
b. send it over a Bluetooth connection from your PC (make
sure Bluetooth is enabled both on the sending and
receiving device)
c.
storing it into a memory card that the device is able to
read
d. send it over an infrared link from your PC
2. Start the Client installation by clicking the name of the installation
file (.CAB). Locating the file depends on how you transferred the
file (you can also use the search function of the file explorer to
locate the file):
a. if you sent the file to your phone via Bluetooth or
infrared, it appears in the My Documents folder
b. if you have the file on the memory card or transferred it
via cable, open your phone’s File Explorer program and
find the file from your disk or memory card
3. Select the language to be used (this screen shows only if your
installer package contains several languages).
Figure 3. Language Selection
4. The device needs to reboot. Remove it from any attached cradle
and press ok to reboot.
Figure 4. Restart
5. Accept the licence terms, and press next.
Figure 5. Licence Agreement
10
PT. Telekomunikasi Indonesia, Tbk.
6. An informative screen about the packet data connection is
displayed. Press Next.
Figure 6. Packet Data Info
7. A screen asking you to select if you want calendar and contacts
to be synchronized is displayed. You can change the selection
later on. Press next.
Figure 7. Calendar And Contact Synch Selection
8. This step occurs only if there are events in your calendar and
you have selected the calendar to be synchronized. You can
select whether you want to replace the device calendar or merge
the device calendar with the desktop calendar. If your device has
TELKOM Ventus Freedom 5.0 User Guide
11
been used by someone else previously, it is recommended to
replace the calendar, to avoid getting their events into your
calendar (the device does not distinguish between different
people’s events).
Figure 8. Replace Or Merge Calendar
9. After this a connection is established. If there is a problem with
the APN (access point) a connection error will be displayed. You
can cancel the installation and go and set the correct APN. See
the Network Connections chapter above for details. The
installation resumes from where you left off when you start the
TELKOM Ventus Mobile application from Programs.
10. Once the connection has been made, the device generates an
activation code, which you will need to activate the TELKOM
Ventus Mobile service.
12
PT. Telekomunikasi Indonesia, Tbk.
Figure 9. Activation Code
11. If you have received an email to your desktop email requesting
the Activation Code, you can simply reply to the email with the
activation code as the first line of the reply. If you have not
received an email, deliver the activation code to your IT
Administrator who can activate your service using the code.
Figure 10. Example Activation Email
NOTE!
The Activation Code includes your personal encryption key for the service.
Therefore, you should send this code to your IT Administrator in a secure way. You
can, for example:
•
•
•
Inform it via a voice call
Send it via SMS
Send it via email, but only if you email it inside your company’s internal
network. It is not recommended to send it over the Internet!
12. Once your account is activated, Ventus Mobile starts itself
automatically (assuming there is an established internet
connection). When the activation is done, you will be informed by
an email delivered both to your mobile device and to your PC.
You can close the status screen and leave the application
TELKOM Ventus Freedom 5.0 User Guide
13
running in the background and continue using your device
normally.
Figure 11. Activation Successful Screens
Installation and activation is now complete.
14
PT. Telekomunikasi Indonesia, Tbk.
Chapter 3: Settings and Tools
The TELKOM Ventus Mobile application has been designed to perform
all basic configurations itself during the installation and client activation.
This chapter describes in detail what kinds of settings and tools you can
use to help you utilize the services efficiently and optimize your mobile
email, calendar and contact handling experience. The settings and tools
are explained in this chapter.
You can access the settings and tools by opening TELKOM Ventus
Mobile from Start> Programs and then opening the Tools menu.
Figure 12. Accessing Tools and Settings
Synchronize Calendar allows you to synchronize the mobile device and
desktop calendar over-the-air, merging the data from both. Normally you
do not need to use this as TELKOM Ventus Mobile keeps your calendar
synchronized automatically.
Synchronize Contacts allows you to synchronize the mobile device and
desktop personal contacts over-the-air, merging the data from both.
Normally you do not need to use this as TELKOM Ventus Mobile keeps
your contacts synchronized automatically.
Settings are explained below.
About displays the version of TELKOM Ventus Mobile.
Pause(/Resume) allows you to temporarily pause TELKOM Ventus
Mobile. Pausing the client does not cause you to lose any information as
the emails, calendar events and contacts are updated once you resume.
If you pause for a long time the oldest messages are not sent to your
device. Your administrator can set how old emails should be sent to your
device. By default messages are kept in queue for 4 days, meaning older
emails will not be sent to your device when you select Resume.
Settings
There are a number of settings you can edit or view by selecting
Settings… from the Tools menu.
Connection Settings
On the first tab you find the Connection settings:
Figure 13. Connection Settings
Connection mode: this setting allows you to select whether the
application should be Always connected or Connected periodically.
This setting does not significantly affect the amount of data transferred.
When my Pocket PC is in sleep TELKOM Mail checks for mail Every
n minutes from 7:00 AM to 7:00 PM: this setting allows you to control
how often emails are checked in sleep mode. If the interval is short, the
application consumes slightly more battery. Sleep mode (Suspend state)
means that the device has shut down the applications as opposed to idle
state, where only the screen has been shut down.
The Customize link opens a screen which allows you to set when the
emails should be checked more specifically, allowing for instance
different checking schemes during weekends.
16
PT. Telekomunikasi Indonesia, Tbk.
Figure 14. Customize Timings
Keepalives: defines if Ventus Mobile is allowed to send keepalive
signals. The recommended option is ‘Automatic’, which means that the
device starts sending keepalive signals only if it notices that the network
connection is lost periodically. The purpose is to ensure a connection in
networks where an idle connection is automatically cut after a certain
period.
Option ‘On’ means that the device sends keepalive messages with 2
minute intervals. Each message is approximately 10 bytes in size. Option
‘Off’ means keepalives are not sent from the device.
Keepalives are always sent from the server side at 15 minute intervals.
If keepalives are on (either with the setting ‘On’ or ‘Automatic’), and there
are excessive disconnects, Ventus Mobile goes to Paused mode.
Paused mode is indicated to the user by bringing the setting screen to
the front to inform the user that Ventus Mobile is paused. The purpose of
the pausing logic is to avoid extensive connection charges in networks
where there is a per-connection fee, e.g. when roaming.
When roaming, the optimal setting is to have connection mode ‘Always
connected’ and keepalives on ‘Automatic’. The benefit as compared to
Pausing the client and periodically retrieving the data is insignificant (only
keepalive data), unless you are roaming between networks of varying
cost. This is because the same amount of data will be pushed once the
connection is made. You can also pause Ventus Mobile to avoid
incurring roaming packet data cost.
Email Settings
On the Email tab the following settings are available:
TELKOM Ventus Freedom 5.0 User Guide
17
Figure 15. Email Settings
Email address: user’s email address. This is automatically set during
activation and should not be changed.
Keep emails less than: defines the maximum age of email messages
that are stored in the device’s inbox. If email items are older than this
time limit, Ventus Mobile clears those items from the device’s inbox
automatically. The items are not deleted from the server, so you can
access them from your desktop email. The purpose of this setting is to
save memory on your device. The setting is propagated within 6 hours
from being changed, so if you shorten the period old emails will be
deleted within that time frame.
Calendar Settings
On the Calendar tab you find the following settings:
Figure 16. Calendar Settings
Synchronize calendar: this setting defines if calendar data is kept
synchronized with the calendar on your mail server and vice versa.
Delete old events on sync: if this setting is on, old events are removed
from the calendar when you synchronize. You can define how old the
18
PT. Telekomunikasi Indonesia, Tbk.
events to be removed should be by changing the Synchronize events
less than n days old setting.
Synchronize events less than n days old: this setting allows you to
control how old calendar events are synchronized to your device.
Contacts Settings
On the Contacts tab can be found the following:
Figure 17. Contacts Settings
Synchronize contacts: with this setting you can define if contact
information is kept synchronized with the contacts on your mail server.
TELKOM Ventus Freedom 5.0 User Guide
19
Chapter 4: Using TELKOM Ventus
Mobile
TELKOM Ventus Mobile offers a full range of mobile office applications to
help you keep up with your important emails, calendar and contacts. This
chapter describes how to use TELKOM Ventus Mobile.
Starting the Ventus Mobile Application
Ventus Mobile starts automatically in the background when you switch
your device on. Therefore, you do not have to do anything special to get
it running.
Ventus Mobile is running if there is a packet data connection icon (GPRS
or 3G) displayed on your device screen. You can also verify the status by
opening the TELKOM Ventus Mobile application from Start> Programs.
You can open your emails from the Start> Messaging menu. If you get
to e.g. another inbox (text message, MMS etc) you can access your
mails by pressing the folder selection menu (
). The TELKOM
Ventus Mobile application is on the same level as your other messaging
folders. Selecting the folder takes you to your inbox.
Figure 18. Location of TELKOM Ventus Mobile Folder
Using the TELKOM Ventus Mobile Services
This section describes how to utilize the functionality to help you work
efficiently while away from your desktop.
Managing Your Emails
New emails arrive automatically when TELKOM Ventus Mobile is running
and there is a packet data connection. Ventus Mobile starts up
automatically and is running as long as you do not set it to ‘Paused’
state. If the network connection is lost, Ventus Mobile reconnects
automatically as soon as the network is available again.
All the actions performed on the mobile device are mirrored to the
desktop. For instance, when you read an email, it will be shown as ‘read’
on the mobile device and the desktop. If you delete an email, it will be
deleted from the server and cannot be accessed from the desktop
anymore. Similarly, whenever you read or delete emails on your desktop
Inbox, the changes are replicated to the mobile device’s Inbox.
When you receive a new email there is a notification displayed on the
screen. In Figure 11 above is an example. Clicking on the View-button
takes you to your inbox. Unread items are shown in bold. There are a
number of icons to indicate an emails status or properties:
- unread mail
- read mail
- unread mail with attachment.
- read mail with attachment
- system mail
- meeting request
Reading Emails and Attachments
Read the email by clicking on it in the inbox. The email contains all the
usual information such as sender, subject, timestamp etc. Attachments
are shown below the body text. If there are many attachments, you may
need to scroll right or down to find them.
Figure 19. Example Email
At the bottom of the mail you have the Edit menu and four icons (
): Delete, Reply, Back and Next. Opening the Edit menu
TELKOM Ventus Freedom 5.0 User Guide
21
displays the following commands: Mark for Download, Mark as
Unread, Move to…, Language, Select All, Copy and Edit My Text….
Figure 20. Edit Email Menu
Here is a short description of each command:
Delete: Deletes your email, just like on your desktop mail reader. The
mail is deleted from the mail server.
Reply: Replies to the sender. Sent mails are stored to your sent items
folder just as if you would have replied on your desktop.
Back: Moves to the previous email in the Inbox.
Next: Moves to the next email in the Inbox.
Mark for Download: Opens a dialog box which shows the size of the
attachments and prompts the user to proceed with download or not. If
you choose to download, all the attachments are downloaded.
Mark as Unread: Marks the email as unread. The change is reflected on
your desktop email application.
Move to…: Moves the email to a different folder on the server. The email
will not be available for reading on the mobile device after moving.
Language: The language option is for use with different character sets. If
you experience problems with e.g. Cyrillic or Japanese character, try
changing the character set with this option. Functionality depends on
which character sets are installed on your device.
Select All: Selects all the text in the email for e.g. copying etc.
Copy: Copies the selection to clipboard.
Edit My Text: Allows you to edit your standard message texts.
If you click and hold a message in the inbox, a menu with the commands
New, Delete, Move, Reply, Reply All, Forward, Mark as Unread
available is shown.
22
PT. Telekomunikasi Indonesia, Tbk.
Figure 21. Menu In Inbox
Delete, Reply and Mark as Unread, are explained above. The other
available selections are described here:
New: Click this to write a new mail.
Move…: This option moves the email to another folder.
Reply All: Replies to all recipients
Forward: Forwards the email.
Attachment Handling
Attachments or very long emails above a certain limit are truncated in
order to save bandwidth and in order to avoid unnecessarily downloading
large attachments that you would only open on your desktop anyway.
The limit is typically 10kb, but the setting can be changed by your
administrator. To download an attachment, select Mark for Download,
from the Edit menu. A popup will be shown which asks you for
confirmation to download the attachment. It also displays the size of the
email to help you estimate the cost of downloading the attachment.
Before downloading, the attachments are shown with a .patt (partial
attachment) extension. You can also forward the mail with attachments
without downloading them to your device first. This is done by forwarding
the email just as you would normally, the attachments will also be sent.
The size of attachments is only restricted by the available amount of
memory on your device. If you cannot download a large attachment, you
may be able to free enough space by deleting data you do not need from
your device and retrying.
Attachments can also be sent from the device. For more information, see
the Writing a New Email chapter below.
Writing a New Email
You can start writing a new mail by clicking and holding in the inbox and
selecting New.
Enter the recipients email address in the To field. You can also search in
the corporate contacts for the email address by pressing the -button.
Adding a contact from your personal contacts is done by pressing the
TELKOM Ventus Freedom 5.0 User Guide
23
-button. You can add attachments by selecting Tools >Add Attachment
from the menu at the bottom of the screen. Enter your text in the Subject
and Body fields and press the Send-button to send your email.
Figure 22. New Email
Managing Calendar Appointments
With the TELKOM Ventus Mobile calendar active, your calendar changes
are immediately mirrored when a change occurs either on the device or
your calendar server. This allows you to keep up-to-date with your
important appointments regardless of where you are.
Calendar invitations are displayed in your email inbox with the
-icon
instead of the normal email icon. To respond to a meeting request, open
the email and click on the
-button.
Figure 23. Responding to a Meeting Request
The actions Accept, Decline and Tentative are available, just like on
your desktop. If the meeting is out of date, these options are not
available. When you select the action, you will get a message box
prompting whether you wish to send a response and additional info in the
respons.
24
PT. Telekomunikasi Indonesia, Tbk.
Figure 24. Meeting Response Prompt
When you create appointments in the device calendar and add invitees,
the changes are also reflected in your desktop, and invitations are sent
by email. Attendees cannot be seen on the calendar entry on Windows
Mobile devices. For more information on using your calendar, please see
your device user manual.
NOTE!
You should not use any other 3rd party calendar or contact
synchronisation together with Ventus Mobile, as it will often
result in duplicate calendar entries and other problems.
For Windows Mobile devices, Ventus Mobile automatically
disables ActiveSync for calendaring and contacts during client
installation. Do not manually enable ActiveSync calendar later
on.
TELKOM Ventus Freedom 5.0 User Guide
25
Chapter 5: Docking your Device to a
Cradle
When the Windows Mobile device is connected to the PC via cable, the
TELKOM Ventus Mobile notices this and starts communicating directly
with the server over your LAN connection. Therefore, all changes in the
server or in the device are communicated directly to the connector over a
fixed connection. When the device is taken away from its cradle, the
Ventus Mobile starts to use the packet data connection again.
Chapter 6: Upgrading Ventus Mobile
Upgrading your TELKOM Ventus Mobile 5.0 can be done on top of a
Smartner Duality 4.0. If you have an older version, upgrading requires
you to first uninstall the old client, and then installing the new one. The
reinstallation process is similar to the initial installation.
Chapter 7: Uninstalling Ventus
Mobile
This chapter describes how to uninstall TELKOM Ventus Mobile from
your mobile device.
1. Pause Ventus Mobile.
2. Go to Settings>System on the start menu and select Remove
Programs.
3. From the application list, select TELKOM Ventus Mobile and
press Remove
Figure 25. Removing the Installation
4. Confirm the operation. You will be prompted whether you want to
clear the calendar (if the service was in use). If your device will
be used by someone else, you probably want to clear the
calendar.
5. Wait until the application is removed. You will be asked for
confirmation and the device will reboot.
NOTE!
Uninstallation clears all the email items from your device’s
Inbox.
Chapter 8: Troubleshooting and FAQ
This chapter presents steps to perform on your mobile device if you want
to check that it is working correctly and to locate possible errors and
frequently asked questions (FAQ).
Troubleshooting
It is highly recommended that you perform these tests before you contact
your IT administrators for additional support.
1. Check the status of the client
- The status screen should show ’Connected’
2. Pause and Resume the client
- This test reconnects the mobile device to the server immediately. If
there is some problem, the Ventus Mobile status screen will display an
error.
3. Reboot your mobile device
- This may help if your device has internal errors.
4. Send an email from the device to your own mailbox and check that it
arrives to your device.
- This test easily shows if the mail is sent at all or if it arrives in the email
server mailbox but not to the device. If it does not arrive in your device in
5 minutes, check if it has arrived to your desktop mailbox. If your
corporate email system is congested, receiving mails may take some
time.
5. If Ventus Mobile has been paused or shut down for a long time, let the
client run for some time to process all queued messages
- Ventus Mobile needs to process all queued messages before it can
receive any new ones. If the application is closed or paused for a long
time there may be a big queue of messages on the server. Messages
can be sent out immediately, but new ones can be received only after the
whole queue has been processed.
6. If you still experience problems, contact your IT administrator for
additional support. Please add the log files to your support request.
- To locate the log files, open Programs>File Explorer and browse to
the My Device>TELKOM Ventus Mobile folder. The log files are named
EXMController.txt and ExmTransprt.txt. If there are similar files with
the extension .old, please provide these also.
Frequently Asked Questions
Q: How do I prevent my data from falling into the wrong hands if my
device is stolen?
A: To minimise the security risk resulting from theft you can do the
following things:
30
•
In Settings>Password you can set your device to lock and
ask for a password if it is unused for a time.
•
You can report the theft to your administrator, who can
remotely clear the data synchronized to the device (emails,
contacts and calendar).
•
For enhanced security it is possible to use third party data
encryption software.
PT. Telekomunikasi Indonesia, Tbk.
Chapter 9: Additional Support
Additional support
For additional support on using the TELKOM Ventus Mobile service:
•
•
contact your IT administrator
contact your company’s PC HelpDesk
For additional help on your phone’s mobile connectivity, please contact
your phone manufacturer or your mobile operator.