1
INSTALLATION
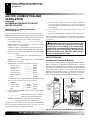
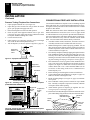
Assembling And Attaching Optional Brass Trim (Cont.)
Installing Hood
Installing Logs (VTGF33NR/VTGF33PR)
21
21
INSTALLATION
Continued
Set Screws
Side Brass
Trim
Adjusting
Plate
Top Brass
Trim
Slot
INSTALLING LOGS (VTGF33NR/VTGF33PR)
WARNING: Failure to position the parts in accordance with these diagrams or failure to use only parts
specifically approved with this heater may result in
property damage or personal injury.
CAUTION: Do not remove the warning and instruction labels attached to the heater base assembly. These markings contain important warranty information.
Shim
Slot
Mitered Edge
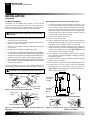
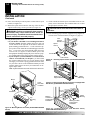
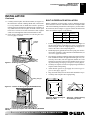
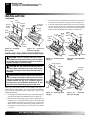
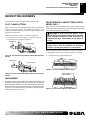
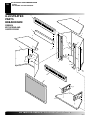
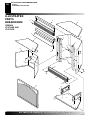
Figure 38 - Assembling Brass Trim
Trim
Hanging
Screws
Hanging
Notches
on Trim
Assembled
Brass Trim
Figure 39 - Attaching Brass Trim to Fireplace (EFP33PR Shown)
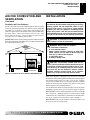
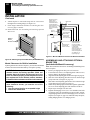
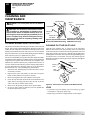
INSTALLING HOOD
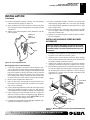
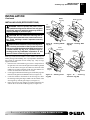
Install hood to top of firebox as shown in Figure 40. Use 3 Phillips
screws provided.
CAUTION: After installation and periodically thereafter, check to ensure that no flame comes in contact
with any log. With the heater set to High, check to see
if flames contact any log. If so, reposition logs according to the log installation instructions in this
manual. Flames contacting logs will create soot.
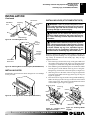
Each log is marked with a number. These numbers will help you
identify the log when installing. It is very important to install these
logs exactly as instructed. Do not modify logs. Only use logs
supplied with heater.
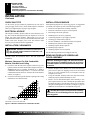
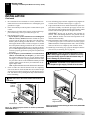
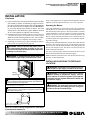
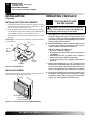
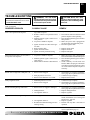
1. Place front logs (#1a and #1b) on top of the grate. Make sure
the notches in the bottom of the log fit over the grate prongs
(see Figure 41). Push back of log flush with metal grate bar.
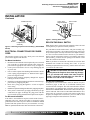
2. Rest middle log (#2) behind metal posts on front burner. Make
sure the grooves in the bottom of the log fit over the grate.
Bring the log forward next to the metal posts (see Figure 42).
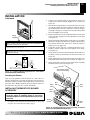
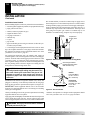
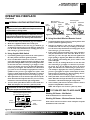
3. Slide the grooves in the back of the rear log (#3) against the
rear grate prongs. Make sure the peg on the log is on top (see
Figure 43, page 22).
4. Place the crossover log (#4) on the rear log and the middle log.
Make sure the peg on the rear log is in the hole in the bottom
of the crossover log. The crossover log should fit in the cutout
of the middle log (see Figure 44, page 22).
Front Log (#1a)
Middle Log (#2)
Front Log
(#1b)
Groove
Notch
Metal
Post
Figure 40 - Installing Hood to Firebox (EFP33PR Shown)
Grate
Prongs
Metal
Grate Bar
Figure 41 - Installing Front
Logs (#1a and #1b)
For more information, visit www.desatech.com
108117
Groove
Metal Post
Grate
Figure 42 - Installing Middle
Log (#2)