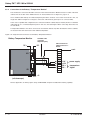
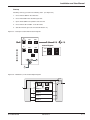
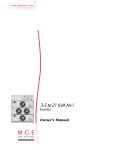
1
w w w. m g e u p s . c o m
Features
◗ Single and Parallel UPSs
◗ Battery Cabinet
◗ Maintenance Bypass
◗ Optional Up-link to an
IBM AS4000
Galaxy PW™
100 to 225kVA
Uninterruptible Power Systems
Installation and User Manual
86-133060-00 A00
Galaxy PW™ UPS 100 to 225kVA
IMPORTANT SAFETY INSTRUCTIONS
SAVE THESE INSTRUCTIONS – This manual contains important instructions for the Galaxy PW™ that must be
followed during operation of the equipment.
WARNING
Opening enclosures expose hazardous voltages. Always refer service to
qualified personnel only.
ATTENTION
L'ouverture des cabinets expose des tensions dangereuses. Assurez-vous toujours que le service ne soit fait que par des personnes qualifiees.
WARNUNG!
Das öffnen der Gehäuse legen gefährliche Spannungen bloss. Service sollte
immer nur von qualifizierten Personal durchgeführt werden.
WARNING
As standards, specifications, and designs are subject to change, please ask for
confirmation of the information given in this publication.
ATTENTION
Comme les normes, spécifications et produits peuvent changer, veuillez
demander confirmation des informations contenues dans cette publication.
WARNUNG!
Normen, Spezifizierungen und Pläne unterliegen Anderungen. Bitte verlangen
Sie eine Bestätigung über alle Informationen, die in dieser Ausgabe gemacht
wurden.
NOTE
This equipment has been tested and found to comply with the limits for a Class
A digital device, pursuant to part 15 of the FCC rules. These limits are designed
to provide reasonable protection against harmful interference when the equipment is operated in a commercial environment.
This equipment generates, uses, and can radiate radio frequency energy and, if
not installed and used in accordance with the instruction manual, may cause
harmful interference to radio communications. Operation of this equipment in a
residential area is likely to cause harmful interference in which case the user
will be required to correct the interference at user's own expense.
Certification Standards
◗
IEEE 587-1980/ANSI C62.41 1980 Standards for Surge Withstand Ability
◗
FCC rules and regulations of Part 15, Subpart J, Class A
◗
UL listed under 1778-ULC, Standards for Uninterruptible Power Supply Equipment
◗
NEMA PE 1 (National Electrical Manufacturers Association) - Uninterruptible Power Systems
◗
NEMA 250 (National Electrical Manufacturers Association)
– Enclosures for Electrical Equipment (1000 Volts Maximum)
ii
◗
NFPA 70 – National Electrical Code
◗
ISO 9001
◗
Occupational Safety & Health Administration (OSHA)
Important Safety Information and Standards
86-133060-00 A00
Installation and User Manual
WARNING
To reduce the risk of fire or electric shock, install in a temperature and humidity
controlled indoor area free of conductive contaminants.
This equipment is intended only for installations in a RESTRICTED ACCESS
LOCATION.
ATTENTION
Pour réduire le riske d'inccendie ou d'électrocution, installer dans une enciente
intérieure contrôlée en température et humidité et sans contaminants conducteurs.
Ce matériel est destiné seulement pour des installations dans un EMPLACEMENT RESTREINT d'cAccès.
WARNUNG!
Um die Gefahr von Feuer und elektrischem Schock zu reduzieren, muss das
Gerät in einem temperatur - und feuchtigkeitskontrollierten Raum, frei von
leitungsfähigen Verunreinigungen, installiert werden. Dieses Gerät ist nur für
die Installation an einem Ort mit eingeschränkter Zugangserlaubnis vorgesehen.
Diese Ausrüstung ist nur für Anlagen in einem EINGESCHRäNKTEN ZUGRIFF
STANDORT bestimmti.
WARNING
HIGH LEAKAGE CURRENT. Earth connection essential before connecting
supply.
ATTENTION
COURANT DE FUITE ELEVE. Raccordement a la terre indispensable avant
le raccordement au reseau.
WARNUNG!
Hoher Ableitstrom Vor Inbetriebnahme Schutzleiterverbindung herstellen.
How to Use This Manual and Symbol Usage
This manual is designed for ease of use and easy location of information.
Locate specific topics in the Table of Contents.
For terms used in the text refer to the Glossary.
Typographical conventions use single quote marks in procedures to denote a prompt for User action:
For example: 1. After the selections are complete, click on the “Save” button.
This manual uses four icon symbols with text to convey important information and tips.
WARNING
indicates information provided to protect the user and service personnel against
safety hazards and/or possible equipment damage.
CAUTION
indicates information provided to protect the user and service personnel against
possible equipment damage.
IMPORTANT
indicates information provided as an operating instruction, or as an operating tip.
NOTE
indicates information provided as an operating tip or an equipment feature.
86-133060-00 A00
How To Use This Manual and Symbol Usage
iii
Galaxy PW™ UPS 100 to 225kVA
CAUTION: Record All Serial Numbers!
RECORD ALL SERIAL NUMBERS FOR THE GALAXY PW™ AND COMPONENTS.
THESE SERIAL NUMBERS WILL BE REQUIRED IF YOUR SYSTEM NEEDS SERVICE.
KEEP THIS MANUAL IN A PLACE WHERE YOU CAN REFERENCE THE SERIAL
NUMBERS IF SERVICE IS REQUIRED!
UPS SINGLE SERIAL NUMBER: ___________________________________________________
UPS PARALLEL SERIAL NUMBER: _________________________________________________
BATTERY CABINET SERIAL NUMBER: ______________________________________________
MBP SERIAL NUMBER: ___________________________________________________________
ADDITIONAL MODULE SERIAL NUMBERS:
iv
____________________________
______________________________
____________________________
______________________________
____________________________
______________________________
____________________________
______________________________
____________________________
______________________________
____________________________
______________________________
____________________________
______________________________
____________________________
______________________________
____________________________
______________________________
____________________________
______________________________
CAUTION: Record All Serial Numbers
86-133060-00 A00
Installation and User Manual
Galaxy PW™
100 to 225kVA
Installation and User Manual
Revision History
G a l a x y P W ™ 1 0 0 t o 2 2 5 k VA I n s t a l l a t i o n a n d U s e r M a n u a l
Revision:
X1
Initial Release
06/2003
A00
ECN#: 003469
02/2006
86-133060-00 A00
Copyright © 2006 MGE UPS SYSTEMS, INC.
All rights reserved. Printed in U.S.A.
MGE UPS SYSTEMS, INC.
1660 Scenic Avenue
Costa Mesa, CA 92626
(714) 557-1636
Technical Support:
1-800-523-0142 (during business hours)
Customer Care Center:
1-800-438-7373 (Hours: 24/7)
86-133060-00 A00
v
Galaxy PW™ UPS 100 to 225kVA
(This page left blank intentionally)
vi
86-133060-00 A00
Contents
description
. . . . . . . . . . . . . . . . . . . . . . . . . . . . . . . . . . . . . . . . . . . . . . . . .page
IMPORTANT SAFETY INSTRUCTIONS . . . . . . . . . . . . . . . . . . . . . . . . . . . . . . . . . . .ii
Certification Standards . . . . . . . . . . . . . . . . . . . . . . . . . . . . . . . . . . . . . . . . . . . . . . . .ii
How to Use This Manual and Symbol Usage . . . . . . . . . . . . . . . . . . . . . . . . . . . . . . .iii
CAUTION: Record All Serial Numbers! . . . . . . . . . . . . . . . . . . . . . . . . . . . . . . . . . . .iv
Revision History . . . . . . . . . . . . . . . . . . . . . . . . . . . . . . . . . . . . . . . . . . . . . . . . . . . .v
Section 1
Introduction
section
description . . . . . . . . . . . . . . . . . . . . . . . . . . . . . . . . . . . . . . . . . . .page
1.0
1.1
1.2
1.3
1.4
Scope . . . . . . . . . . . . . . . . . . . . . . . . . . . . . . . . . . . . . . . . . . . . . .1 — 1
Section Descriptions . . . . . . . . . . . . . . . . . . . . . . . . . . . . . . . . . . .1 — 1
General Description . . . . . . . . . . . . . . . . . . . . . . . . . . . . . . . . . . .1 — 2
System Major Power Components . . . . . . . . . . . . . . . . . . . . . . . .1 — 3
Different Types of Galaxy PW™ Systems . . . . . . . . . . . . . . . . . .1 — 4
Single UPS System . . . . . . . . . . . . . . . . . . . . . . . . . . . . . . . . . . .1 — 4
Parallel UPS System . . . . . . . . . . . . . . . . . . . . . . . . . . . . . . . . . .1 — 4
System Specifications . . . . . . . . . . . . . . . . . . . . . . . . . . . . . . . . .1 — 5
Electrical Characteristics . . . . . . . . . . . . . . . . . . . . . . . . . . . . . . .1 — 5
Electrical Parameters for Selecting Protective Devices . . . . . . . .1 — 6
Normal AC Source . . . . . . . . . . . . . . . . . . . . . . . . . . . . . . . . . . . .1 — 6
Bypass AC Source . . . . . . . . . . . . . . . . . . . . . . . . . . . . . . . . . . . .1 — 7
Recommended Protection . . . . . . . . . . . . . . . . . . . . . . . . . . . . . .1 — 8
Protection Upstream of Galaxy PW™ . . . . . . . . . . . . . . . . . . . . .1 — 8
Protection Downstream of Galaxy PW™ . . . . . . . . . . . . . . . . . . .1 — 8
Parallel Connected UPS Units . . . . . . . . . . . . . . . . . . . . . . . . . . .1 — 9
1.4.1
1.4.2
1.5
1.5.1
1.6
1.6.1
1.6.2
1.7
1.7.1
1.7.2
1.8
Section 2
System Setup
2.0
2.0.1
2.0.2
2.0.3
2.1
2.1.1
2.1.2
2.2
86-133060-00 A00
Scope . . . . . . . . . . . . . . . . . . . . . . . . . . . . . . . . . . . . . . . . . . . . . .2 — 1
First steps by an on-site qualified Technical Engineer . . . . . . . .2 — 1
Final steps by MGE Field Service Engineer . . . . . . . . . . . . . . . . .2 — 1
Required Equipment and Tools . . . . . . . . . . . . . . . . . . . . . . . . . .2 — 1
Receiving . . . . . . . . . . . . . . . . . . . . . . . . . . . . . . . . . . . . . . . . . . .2 — 2
Handling . . . . . . . . . . . . . . . . . . . . . . . . . . . . . . . . . . . . . . . . . . . .2 — 2
Storage . . . . . . . . . . . . . . . . . . . . . . . . . . . . . . . . . . . . . . . . . . . . .2 — 3
Unpacking . . . . . . . . . . . . . . . . . . . . . . . . . . . . . . . . . . . . . . . . . . .2 — 4
Contents
ci
Galaxy PW™ UPS 100 to 225kVA
Section 2
System Setup (continued)
section
description . . . . . . . . . . . . . . . . . . . . . . . . . . . . . . . . . . . . . . . . . . .page
2.3
2.4
2.5
2.6
Galaxy PW™ Cabinet Major Components . . . . . . . . . . . . . . . . . .2 — 5
Battery Cabinet . . . . . . . . . . . . . . . . . . . . . . . . . . . . . . . . . . . . . . .2 — 6
Remote External Maintenance Bypass Cabinet . . . . . . . . . . . . . .2 — 7
General Instructions for Screens . . . . . . . . . . . . . . . . . . . . . . . . .2 — 8
Control Panel Indicators and Definitions . . . . . . . . . . . . . . . . . . .2 — 8
System Start-up . . . . . . . . . . . . . . . . . . . . . . . . . . . . . . . . . . . . .2 — 10
Single UPS unit or Redundant Parallel UPS . . . . . . . . . . . . . . .2 — 10
Parallel UPS Unit for Increased Output . . . . . . . . . . . . . . . . . . .2 — 11
2.6.1
2.7
2.7.1
2.8
Section 3
Installation
3.0
3.1
3.2
3.3
3.4
3.5
3.5.1
3.5.2
3.5.3
3.6
3.6.1
3.6.2
3.7
3.7.1
3.8
3.8.1
3.8.2
3.9
Section 4
Operation
4.0
4.1
4.1.1
4.1.2
4.1.3
4.1.4
4.2
4.2.1
4.2.2
4.3
c ii
Scope . . . . . . . . . . . . . . . . . . . . . . . . . . . . . . . . . . . . . . . . . . . . . .3 — 1
Optional Communications Card Installation . . . . . . . . . . . . . . . . .3 — 1
Notes on Connection of Power Circuits . . . . . . . . . . . . . . . . . . . .3 — 1
Power-Circuit Wiring Diagrams . . . . . . . . . . . . . . . . . . . . . . . . . .3 — 2
Hot Swap Options . . . . . . . . . . . . . . . . . . . . . . . . . . . . . . . . . . . . .3 — 2
Connections Between Cabinets . . . . . . . . . . . . . . . . . . . . . . . . . .3 — 4
Connections Between UPOZ Boards . . . . . . . . . . . . . . . . . . . . . .3 — 4
Connections Between UPS Cabinets and the
Remote External Bypass . . . . . . . . . . . . . . . . . . . . . . . . . . . . . . .3 — 4
Connections Between MUSI Boards . . . . . . . . . . . . . . . . . . . . . .3 — 5
Environmental Signal of the Media Contacts 11 Board . . . . . . . .3 — 7
Signal Reception . . . . . . . . . . . . . . . . . . . . . . . . . . . . . . . . . . . . .3 — 7
Signal Transmission . . . . . . . . . . . . . . . . . . . . . . . . . . . . . . . . . . .3 — 7
"Media Contacts 11" Standard Auxiliary Circuits Connection . . . .3 — 9
Battery Circuit Breaker "QF1" Connection . . . . . . . . . . . . . . . . .3 — 10
Installation of the "Temperature Monitor" in the
Battery Cabinet . . . . . . . . . . . . . . . . . . . . . . . . . . . . . . . . . . . . . .3 — 10
"Temperature Monitor" installation in a Battery Room . . . . . . . .3 — 11
Connection of the Battery "Temperature Monitor" . . . . . . . . . . .3 — 12
About Final Installation Steps . . . . . . . . . . . . . . . . . . . . . . . . . . .3 — 14
Scope . . . . . . . . . . . . . . . . . . . . . . . . . . . . . . . . . . . . . . . . . . . . . .4 — 1
Start-up of a Module . . . . . . . . . . . . . . . . . . . . . . . . . . . . . . . . . . .4 — 1
Start-up of an Inverter . . . . . . . . . . . . . . . . . . . . . . . . . . . . . . . . .4 — 1
Emergency Power Off . . . . . . . . . . . . . . . . . . . . . . . . . . . . . . . . .4 — 1
Single UPS Unit . . . . . . . . . . . . . . . . . . . . . . . . . . . . . . . . . . . . . .4 — 2
Parallel UPS Unit . . . . . . . . . . . . . . . . . . . . . . . . . . . . . . . . . . . . .4 — 2
Operation in On-line Mode . . . . . . . . . . . . . . . . . . . . . . . . . . . . . .4 — 3
Normal Operation . . . . . . . . . . . . . . . . . . . . . . . . . . . . . . . . . . . . .4 — 3
Operation with the Normal AC Source Down . . . . . . . . . . . . . . . .4 — 4
Operation with the Normal AC Source Restored . . . . . . . . . . . . .4 — 5
Contents
86-133060-00 A00
Installation and User Manual
Section 4
Operation (continued)
section
4.4
4.5
4.6
4.7
4.8
4.9
4.10
4.11
4.12
4.13
4.14
Section 5
description . . . . . . . . . . . . . . . . . . . . . . . . . . . . . . . . . . . . . . . . . . .page
Operation with Engine Generator Set . . . . . . . . . . . . . . . . . . . . .4 — 6
Battery Time . . . . . . . . . . . . . . . . . . . . . . . . . . . . . . . . . . . . . . . . .4 — 7
Inverter Shutdown or Overload . . . . . . . . . . . . . . . . . . . . . . . . . .4 — 7
4.6.1 Single UPS Unit (On-line mode) . . . . . . . . . . . . . . . . . . . . . . . . . .4 — 8
4.6.2 Parallel UPS Without Redundancy . . . . . . . . . . . . . . . . . . . . . . . .4 — 8
4.6.3 Parallel UPS With Redundancy . . . . . . . . . . . . . . . . . . . . . . . . . .4 — 9
Output Voltage Quality and Continuity . . . . . . . . . . . . . . . . . . . .4 — 9
4.7.1 Steady State Voltage Regulation . . . . . . . . . . . . . . . . . . . . . . . .4 — 10
4.7.2 Transient Voltage Regulation . . . . . . . . . . . . . . . . . . . . . . . . . . .4 — 10
Measurement System . . . . . . . . . . . . . . . . . . . . . . . . . . . . . . . . .4 — 11
4.8.1 Voltage Measurements . . . . . . . . . . . . . . . . . . . . . . . . . . . . . . . .4 — 12
4.8.2 Current Measurements . . . . . . . . . . . . . . . . . . . . . . . . . . . . . . . .4 — 12
4.8.3 Power and Frequency Measurements . . . . . . . . . . . . . . . . . . . .4 — 12
4.8.4 Battery Measurements . . . . . . . . . . . . . . . . . . . . . . . . . . . . . . . .4 — 12
Selections and Settings . . . . . . . . . . . . . . . . . . . . . . . . . . . . . . .4 — 13
Alarms . . . . . . . . . . . . . . . . . . . . . . . . . . . . . . . . . . . . . . . . . . . . .4 — 16
Maintenance Bypass Option . . . . . . . . . . . . . . . . . . . . . . . . . . . .4 — 16
Logging and Time-Stamping . . . . . . . . . . . . . . . . . . . . . . . . . . . .4 — 17
4.12.1 Event Time-Stamping . . . . . . . . . . . . . . . . . . . . . . . . . . . . . . . . .4 — 17
4.12.2 Consulting Logged (time-stamped) Events . . . . . . . . . . . . . . . .4 — 17
Setting the Date and Time for the UPS - Utilization
Via the Galaxy PW™ Display . . . . . . . . . . . . . . . . . . . . . . . . . . .4 — 18
Consulting Statistics . . . . . . . . . . . . . . . . . . . . . . . . . . . . . . . . . .4 — 19
4.14.1 Consulting Recorded Measurements . . . . . . . . . . . . . . . . . . . . .4 — 21
Maintenance
5.0
5.1
5.2
5.2
5.2.1
5.3
5.4
5.5
5.6
5.7
5.7.1
5.8
5.8.1
5.8.2
86-133060-00 A00
Scope . . . . . . . . . . . . . . . . . . . . . . . . . . . . . . . . . . . . . . . . . . . . . .5 — 1
Preventive Maintenance . . . . . . . . . . . . . . . . . . . . . . . . . . . . . . . .5 — 1
Replacement Parts . . . . . . . . . . . . . . . . . . . . . . . . . . . . . . . . . . . .5 — 2
Maintenance Isolation Procedures . . . . . . . . . . . . . . . . . . . . . . . .5 — 2
Single UPS Unit . . . . . . . . . . . . . . . . . . . . . . . . . . . . . . . . . . . . . .5 — 2
Steps for Parallel UPS Redundancy to Increase Output . . . . . . .5 — 4
Battery Maintenance . . . . . . . . . . . . . . . . . . . . . . . . . . . . . . . . . . .5 — 6
Visual Check . . . . . . . . . . . . . . . . . . . . . . . . . . . . . . . . . . . . . . . . .5 — 6
Functional System Checks . . . . . . . . . . . . . . . . . . . . . . . . . . . . . .5 — 6
Testing Parallel Systems . . . . . . . . . . . . . . . . . . . . . . . . . . . . . . .5 — 7
Galvanic Isolation and Voltage Matching Transformers . . . . . . . .5 — 7
Management of Computer Networks . . . . . . . . . . . . . . . . . . . . . .5 — 7
Integrated SNMP Agent . . . . . . . . . . . . . . . . . . . . . . . . . . . . . . . .5 — 7
Two-channel Network Board . . . . . . . . . . . . . . . . . . . . . . . . . . . .5 — 7
Contents
c iii
Galaxy PW™ UPS 100 to 225kVA
Appendices
description
. . . . . . . . . . . . . . . . . . . . . . . . . . . . . . . . . . . . . . . . . . . . . . . . .page
Appendix A
Front Control Panel Display Definitions . . . . . . . . . . . . . . . . . . . . . . . . . .A — 1
Display of Primary and Secondary Messages . . . . . . . . . . . . . . . . . . . . .A — 4
Primary Messages . . . . . . . . . . . . . . . . . . . . . . . . . . . . . . . . . . . . . . . . . .A — 5
Secondary Messages . . . . . . . . . . . . . . . . . . . . . . . . . . . . . . . . . . . . . . . .A — 6
Appendix B
Monitoring - Electrical Supervision Options . . . . . . . . . . . . . . . . . . . . . .A — 11
"Teleservice" . . . . . . . . . . . . . . . . . . . . . . . . . . . . . . . . . . . . . . . . . . . . . .A — 11
Utilization Via Teleservice . . . . . . . . . . . . . . . . . . . . . . . . . . . . . . . . . . . .A — 11
GTC Board . . . . . . . . . . . . . . . . . . . . . . . . . . . . . . . . . . . . . . . . . . . . . . .A — 11
GTC + Software . . . . . . . . . . . . . . . . . . . . . . . . . . . . . . . . . . . . . . . . . . .A — 11
Appendix C
Link to an IBM AS/400® Computer . . . . . . . . . . . . . . . . . . . . . . . . . . . .A — 13
Connect and Configure the AS400 Link . . . . . . . . . . . . . . . . . . . . . . . . .A — 13
MGE Warranty & Proprietary Rights for Three Phase Products
MGE Warranty . . . . . . . . . . . . . . . . . . . . . . . . . . . . . . . . . . . . . . . . . . . . . .W—1
Proprietary Rights Statement . . . . . . . . . . . . . . . . . . . . . . . . . . . . . . . . . .W—1
MGE Customer Care Center
Technical Support and Product Services . . . . . . . . . . . . . . . . . . . . . . . . .W—3
Who To Contact . . . . . . . . . . . . . . . . . . . . . . . . . . . . . . . . . . . . . . . . . . . . .W—3
Scheduling Field Service Engineer Support . . . . . . . . . . . . . . . . . . . . . . .W—3
Return Policy for Repair (RMA) . . . . . . . . . . . . . . . . . . . . . . . . . . . . . . . .W—3
Glossary
Term and Definitions . . . . . . . . . . . . . . . . . . . . . . . . . . . . . . . . . . . . . . . .G — 1
Reorder Form
c iv
. . . . . . . . . . . . . . . . . . . . . . . . . . . . . . . . . . . . . . . . . . . . . . .RO—1
Contents
86-133060-00 A00
Installation and User Manual
Figures
figure description . . . . . . . . . . . . . . . . . . . . . . . . . . . . . . . . . . . . . . . . . . . . . . . . .page
1-1:
1-2:
1-3:
2-1:
2-2:
2-3:
2-4:
3-13:
Galaxy PW™ System. . . . . . . . . . . . . . . . . . . . . . . . . . . . . . . . . . . . . . . .1 — 2
Galaxy PW™ Single UPS System. . . . . . . . . . . . . . . . . . . . . . . . . . . . . .1 — 4
Fuse Curve Chart. . . . . . . . . . . . . . . . . . . . . . . . . . . . . . . . . . . . . . . . . . .1 — 7
Handling Cabinet From the Bottom or Rolling on Bars. . . . . . . . . . . . . . .2 — 3
Dismantling Leg Supports and Attaching Spacers to Cabinet. . . . . . . . .2 — 4
Layout of the Major Cabinet Components. . . . . . . . . . . . . . . . . . . . . . . .2 — 5
Component Layout in a Battery Cabinet or a
Battery Circuit-breaker Enclosure. . . . . . . . . . . . . . . . . . . . . . . . . . . . . .2 — 6
350A and 1200A Maintenance Bypass Cabinet. . . . . . . . . . . . . . . . . . . .2 — 7
Control Panel Indicators. . . . . . . . . . . . . . . . . . . . . . . . . . . . . . . . . . . . . .2 — 8
Single UPS Unit Start-up Diagram. . . . . . . . . . . . . . . . . . . . . . . . . . . . .2 — 10
Parallel UPS Unit for Increased Output. . . . . . . . . . . . . . . . . . . . . . . . . .2 — 11
Galaxy PW™ Single UPS Unit Wire Diagram. . . . . . . . . . . . . . . . . . . . . .3 — 2
Single UPS Unit Power Circuit Connections. . . . . . . . . . . . . . . . . . . . . . .3 — 2
Parallel UPS Unit Power Circuit Diagram. . . . . . . . . . . . . . . . . . . . . . . . .3 — 3
Connections Between UPOZ Boards. . . . . . . . . . . . . . . . . . . . . . . . . . . .3 — 4
Two Parallel UPS Units Connections. . . . . . . . . . . . . . . . . . . . . . . . . . . .3 — 5
Three Parallel UPS Units Connections. . . . . . . . . . . . . . . . . . . . . . . . . . .3 — 6
Four Parallel UPS Units Connections. . . . . . . . . . . . . . . . . . . . . . . . . . . .3 — 6
Standard Auxiliary Circuits Connections. . . . . . . . . . . . . . . . . . . . . . . . . .3 — 9
Installing the "Temperature Monitor" in a Battery Cabinet. . . . . . . . . . .3 — 10
Temperature Monitor" Base. . . . . . . . . . . . . . . . . . . . . . . . . . . . . . . . . . .3 — 11
Single UPS Unit Connection of the Battery "Temperature Monitor". . . .3 — 12
Connection of the Battery "Temperature Monitor."
(In Parallel UPS Units with Batteries in Same Room.) . . . . . . . . . . . . .3 — 13
Connection to the "Media Contacts 11" Board. . . . . . . . . . . . . . . . . . . .3 — 14
4-1:
4-2:
4-3:
4-4:
4-5:
4-6:
4-7:
4-8:
4-9:
4-10:
4-11:
4-12:
4-13:
Control Panel and Circuit Breaker Diagram. . . . . . . . . . . . . . . . . . . . . . .4 — 1
Single UPS Diagram . . . . . . . . . . . . . . . . . . . . . . . . . . . . . . . . . . . . . . . .4 — 2
Parallel UPS Two Parallel Connected UPS Units. . . . . . . . . . . . . . . . . . .4 — 2
Parallel UPS Two to Four Parallel Connected UPS Units. . . . . . . . . . . .4 — 2
Normal Operation Indicator Diagram. . . . . . . . . . . . . . . . . . . . . . . . . . . .4 — 3
Normal AC Source Indicator Diagram. . . . . . . . . . . . . . . . . . . . . . . . . . . .4 — 4
Normal Operation Mode Indicator Diagram. . . . . . . . . . . . . . . . . . . . . . .4 — 5
Battery Charge Cycle Chart. . . . . . . . . . . . . . . . . . . . . . . . . . . . . . . . . . .4 — 6
Installation with an Engine Generator Set. . . . . . . . . . . . . . . . . . . . . . . . .4 — 6
Operating in On-line Mode Diagram. . . . . . . . . . . . . . . . . . . . . . . . . . . . .4 — 7
Overload Curve Diagram. . . . . . . . . . . . . . . . . . . . . . . . . . . . . . . . . . . . . .4 — 9
Measurement System Diagram. . . . . . . . . . . . . . . . . . . . . . . . . . . . . . . .4 — 11
Display of Alarm Messages.. . . . . . . . . . . . . . . . . . . . . . . . . . . . . . . . . .4 — 16
5-1:
5-2:
5-3:
5-4:
UPS Isolation Diagram for Normal AC Bypass Source. . . . . . . . . . . . . . .5
Panel Procedures for UPS Isolation. . . . . . . . . . . . . . . . . . . . . . . . . . . . .5
Start-up After Isolation Procedure is Completed. . . . . . . . . . . . . . . . . . . .5
Isolate All UPS’s Procedures Diagram. . . . . . . . . . . . . . . . . . . . . . . . . . .5
2-5:
2-6:
2-7:
2-9:
3-1:
3-2:
3-3:
3-4:
3-5:
3-6:
3-7:
3-8:
3-9:
3-10:
3-11:
3-12:
86-133060-00 A00
Contents
—
—
—
—
3
3
3
4
cv
Galaxy PW™ UPS 100 to 225kVA
Figures (continued)
figure description . . . . . . . . . . . . . . . . . . . . . . . . . . . . . . . . . . . . . . . . . . . . . . . . .page
5-5:
5-6:
5-7:
Start-up Procedure After Isolation Diagram. . . . . . . . . . . . . . . . . . . . . . .5 — 5
Redundancy for Increased Output Diagram. . . . . . . . . . . . . . . . . . . . . . .5 — 5
MAC Address Sticker. . . . . . . . . . . . . . . . . . . . . . . . . . . . . . . . . . . . . . . . .5 — 7
Tables
table description . . . . . . . . . . . . . . . . . . . . . . . . . . . . . . . . . . . . . . . . . . . . . . . . .page
1-1:
1-2:
1-2A:
1-3:
1-4:
1-5:
c vi
Electrical Parameters for Normal AC Source. . . . . . . . . . . . . . . . . . . . . .1 — 6
Electrical Parameters for Bypass AC Source. . . . . . . . . . . . . . . . . . . . . .1 — 7
. . . . . . . . . . . . . . . . . . . . . . . . . . . . . . . . . . . . . . . . . . . . . . . .1 — 7
Rating Recommended for Devices Upstream of Single UPS. . . . . . . . . .1 — 8
Rating Recommended for Devices Downstream of Single UPS. . . . . . .1 — 8
Parameters for Bypass AC Source and
Load Cables for a Parallel UPS. . . . . . . . . . . . . . . . . . . . . . . . . . . . . . . .1 — 9
Contents
86-133060-00 A00
Introduction
1.0
Scope
Introduction is a general description and overview of Galaxy PW™ 100 to 225kVA components, its intended use,
environment, and applicable specifications, power input/output requirements, and system characteristics for
different system configurations.
1.1
Section Descriptions
1
Introduction
Introduction is a general description and overview of the Galaxy PW™ 100 to 225kVA components, its intended use,
environment, and applicable specifications, power input/output requirements, and system characteristics for
different system configurations.
2
System Setup
System Setup describes receiving and handling of the Galaxy PW™ 100 to 225kVA, a description of major components, the battery cabinet, and definition of the control panel indicators. Includes electrical, mechanical and
environmental specifications.
3
Installation
Installation guides the User through single and parallel UPS unit power cable connections, hot swap options,
connections between cabinets, communication card connections, battery temperature monitoring. Wire diagrams
are included for configuring the unit to specifications.
4
Operation
Operation describes the theory of operation, start-up for single and parallel units, modes of operation, normal specifications for operating the Galaxy PW™ 100 to 225kVA. The User procedures include display messages,
measurement systems, alarms, battery cabinet, and log time-stamping procedures.
5
Maintenance
Maintenance procedures for isolation for maintenance, startup for single and parallel units, functional and visual
checks, software configurations, and testing scenarios.
Appendices
A
List of primary and secondary display messages.
B
Electrical supervision options. (Teleservice and GTC Cards)
C
Instructions of the optional IBM AS400 up link process.
86-133060-00 A00
Introduction
1—1
Galaxy PW™ UPS 100 to 225kVA
1.2
General Description
The cabinets are cooled by forced ventilation. The air enters via the doors and grids at the bottom and is discharged
through the roof, which means the cabinets can be positioned against the back wall.
Connections are made through the bottom. (Connections through the top are an available option.)
The connection cables may be run in three ways:
◗
In a trench running under the cabinets.
◗
Under a false floor.
◗
On the floor under the cabinets, in the free space equal to the height of the feet; in this case the cables
should be run side by side to avoid blocking the flow of air for ventilation.
The cables for connections are between:
◗
The battery and UPS cabinets (power and control cables).
◗
The bypass AC-source transformer in an auxiliary cabinet and the UPS cabinet.
Only the wires for the inter cabinet control connections between parallel-connected UPS units are supplied.
The other power cables for connections between cabinets are not supplied.
Figure 1-1: Galaxy PW™ System.
1—2
Introduction
86-133060-00 A00
Installation and User Manual
1.3
System Major Power Components
Rectifier/charger module (A) Converts 3-phase AC power from the normal AC source supply (1) into DC power
for the normal inverter input and float charges or recharges the battery.
Battery unit (D)
Provides backup power for the inverter in the event of a voltage drop or a normal AC
source failure.
Inverter module (B)
Converts the DC power supplied by the rectifier/charger module or the battery unit
into 3-phase AC power for the load.
Static bypass module (C)
Ensures the instantaneous transfer of the load to the bypass AC source input in the
event of an inverter shutdown (initiated by the user or by a protective device) or a
sudden overload.
Maintenance Bypass
Isolates the UPS for maintenance and transfers the load to bypass AC source input
without interrupting the supply of power. The maintenance bypass is made up of
three manual switches (Q3BP, Q4S and Q5N).
External Bypass
Option for parallel UPSs and Hot-Swapping.
Q5N:
Isolation of the inverters of all the parallel UPS systems from the load.
Q3BP:
Bypass for maintenance.
The normal AC input and the bypass AC input have different functions and, depending on the installation, may be
protected differently upstream and/or come from different sources.
When increased power is required, several Galaxy PW™ units may be connected in parallel (up to four, refer to
section 4.0). In this configuration, an "isolation" function is added for the UPS system as a whole for maintenance
purposes, without interrupting the supply of power to the load.
86-133060-00 A00
Introduction
1—3
Galaxy PW™ UPS 100 to 225kVA
1.4
Different Types of Galaxy PW™ Systems
1.4.1
Single UPS System
Figure 1-2: Galaxy PW™ Single UPS System.
inverter (B):
DC to AC
power
rectifier/
charger (A):
AC to DC
power
normal
AC input
(1)
isolation and
protection:
Q5N
*FUSE
*FUSE
QF1
(circuit breaker): Battery (D)
protection and isolation.
QF1: isolation
and protection
Q5N
(switch): Isolation of the UPS
(B) from the load.
battery (D):
backup power
Q4S
(switch): Isolation of the static
bypass (C) from the bypass
AC source (2).
Q3BP
(switch): Bypass switch for
maintenance.
FUE
(fuses): Protection of the
rectifier/charger (A) from the
normal AC source.
FUS
(fuses): Protection of the
inverter (B) from the load.
Switch Q3BP is lock on open
position on parallel UPS
systems constituted to
increase available power.
load
Q1
isolation
and
protection
harmonic
fliter
isolation:
Q4S
bypass
AC input
Legend:
Q1
(Molded CB NA): Isolation of
the rectifier/charger (A) from
the normal AC source (1);
rectifier/charger (A) start-up.
static bypass (C):
(2)
maintenance bypass:
Q3BP
Note: *The Fuse is to protect against catastrophic rectifier/inverter semiconductor failure.
1.4.2
Parallel UPS System
Parallel UPSs can be utilized when increased power is required (two to four parallel units), or an external bypass
must be added.
CAUTION
1—4
PARALLEL UPS WITH EXTERNAL MAINTENANCE BYPASS During maintenance operation, when CB1 (MBP) is closed and CB2 (UPS ISOLATION) is
open, each UPS control panel display will show a message “LOAD
PROTECTED” when the UPS is placed in ON-LINE MODE. In this mode the
critical load is not protected because it is supplied by the maintenance
bypass power.
Introduction
86-133060-00 A00
Installation and User Manual
1.5
System Specifications
1.5.1
Electrical Characteristics
UPS power rating in kVA
Normal AC input
number of conductors
rated voltage and tolerances
rated frequency and tolerances
THDI
power factor
Bypass AC input
number of conductors
rated voltage and tolerances
rated frequency and tolerances
Load
number of conductors
Ph/Ph voltages
Ph/N voltages
voltage fluctuations (Ph/Ph,Ph/N)
adjustable frequency and tolerances
(on battery power)
synchronization with bypass
transient voltage variation for 0 to 100% load step change
permissible overloads
Isc Ph/Ph (% of I rated)
Isc Ph/N (% of I rated)
THDU Ph/Ph and Ph/N for linear load
THDU Ph/Ph and Ph/N for non-linear load
(at 80% of Pn)
Battery
voltage floating
standard battery type
UPS characteristics
active power (kW)
efficiency at 50% load (%)
(values ± 1%)
efficiency at 100% load (%)
(values ± 1%)
heat losses (1)
in KW
in cal./s
storage temperature range ºF (ºC)
operating temperature range ºF (ºC)
relative humidity
maximum operating altitude without derating, FT(m)
noise level (dBA)
dimensions, in. (mm)
width
depth
height
weight lbs (kg)
standards
design
product and safety
electromagnetic compatibility
100
3 phases
480 V ± 10% (adjustable to ± 15%)
60 Hz / ± 10%
< 14%
up to 0.9
130
150
180
200
225
< 11%
< 10%
< 8%
< 7.6%
< 7.5%
3.2
5
2.6
4.1
2.4
3.7
2.1
3.3
3 phases
3 phases + neutral
480 V / ± 10%
60 Hz / ± 10%
3 phases
480 V
277 V
± 1%
3 phases + neutral
60 Hz ± 0.05 Hz
± 0.5 Hz (adjustable from ± 0.25 Hz to ± 2 Hz)
± 2% (with battery), +2%/-6% (without battery)
150% for 1 minute, 125% for 10 minutes
4.7
3.6
7.4
5.7
< 1.5% Ph/Ph, < 2% Ph/N
< 2% Ph/Ph, < 3% Ph/N
512V to 561V
gas-recombination sealed lead-acid battery
100
90.5
130
91
150
92
180
92.5
200
92.5
202.5*
93
92.5
93
93
93
93.5
93.5
13.5
3240
13.9
3340
14.1
3380
65
67
68
8.1
9.8
11.3
1940
2350
2700
-13 to 158 (-25 to 70) dry heat — unit without battery
-4 to 113 (-20 to 45) — unit with battery
32 to 95, 104 for 8 hours (0 to 35, 40 for 8 hours)
95% maximum non condensing at ambient temperature
< 3280 (< 1000)
62
63
64
47.8 (1215)
33 (840)
74.8 ± .39 (1900 ± 10)
3050 (1388)
NFPA / NEC / NEMA / OSMA
UL 1778 - ULC
FCC Part 15, Subport J, Class A - IEEE587 / ANSI 62.41
(1): The losses indicated are those produced at full rated load with the battery float charging. They must be taken into account when sizing the ventilation system.
* pf of 225kVA unit has 0.9 and remaining units have 1.0.
86-133060-00 A00
Introduction
1—5
Galaxy PW™ UPS 100 to 225kVA
1.6
Electrical Parameters for Selecting Protective Devices
1.6.1
Normal AC Source
The parameters given in Table 1-1 can be used to determine the required rating of the upstream protective circuit
breaker on the normal AC input for one single-UPS or parallel-UPS unit.
Normal and Bypass AC Input:
number of conductors
3 phases
rated voltage and tolerances
480 V ± 10% (adjustable to ± 15%)
rated frequency and tolerances
60 Hz / ± 10%
IMPORTANT
It is essential to choose the type of circuit breaker according to its breaking
capacity and the prospective short-circuit current at its place of installation.
This choice must also be made so as to protect the static-switch semiconductors with respect to the maximum permissible currents and ensure
discrimination between the UPS output fuses and the downstream
protection devices.
Table 1-1: Electrical Parameters for Normal AC Source.
Electrical parameters for the normal AC source
rated
UPS
output
in kVA
100
130
150
180
200
225
current normal AC source
rated current In for unit:
with battery at start
of charge cycle (1)
166
214
245
295
328
332
without battery (2)
for 25%
overload (3)
for 50%
overload (3)
159
205
236
283
316
320
199
256
295
354
395
400
239
308
354
425
474
480
(1) The rated normal AC source currents (In) have been determined for a rated phase-to-phase voltage of 480 V,
a battery with a 10 minute backup time at the beginning of its charge (412 x 1, 2 = 494 Volts) and full rated load
with a power factor of 0.9.
(2) The rated normal AC source currents (In) have been determined for float charging voltage and full rated load
with a power factor of 0.9
(3) The normal AC source currents given for an overload of 25% or 50% are maximum values. They have been
determined for a battery with float charging voltage and a load power factor of 0.9. When choosing the circuit
breaker rating, use the "rated current" column and check that the circuit breaker tripping curves are compatible
with the values in the overload columns.
1—6
Introduction
86-133060-00 A00
Installation and User Manual
1.6.2
Bypass AC Source
The parameters given in Table 1-2 and 1-2A can be used to determine the required rating of the upstream protective circuit breaker on bypass AC input.
NOTE
If the installation includes a transformer on the bypass AC input, allow for the
inrush current caused by magnetization of the transformer windings.
Table 1-2: Electrical Parameters for Bypass AC Source.
Electrical parameters for bypass AC source (480 V)
rated UPS
output
in kVA
100
130
150
180
200
225
current bypass AC source (1)
rated current In for unit:
for 25%
overload
120
150
156
205
180
236
217
283
241
316
271
320
for 50%
overload (3)
180
234
270
325
362
407
(1) The bypass AC source currents have been determined for a rated phase-to-phase voltage of 480 V, a load
power factor of 0.9 and for full rated load as well as overloads of 25% or 50%. When choosing the circuit breaker
rating, use the "rated current" column and check that the circuit breaker tripping curves are compatible with the
data in the overload columns. See table and chart below.
Table 1-2A:
UPS output
in kVA
100
maximum permissible current
130
38 In for 20 ms
150
33 In for 20 ms
180
27 In for 20 ms
200
25 In for 20 ms
225
22 In for 20 ms
50 In for 20 ms
Figure 1-3: Fuse Curve Chart.
t(s)
104
103
102
10 1
1
10- 1
10- 2
10- 3
10- 4
102
86-133060-00 A00
10 3
10 4
I(A)
Introduction
1—7
Galaxy PW™ UPS 100 to 225kVA
1.7
Recommended Protection
1.7.1
Protection Upstream of Galaxy PW™
The information provided here is purely indicative, for a single UPS unit. Check that all the criteria mentioned in the
previous section are taken into account (short-circuit current and protection of the static switch semiconductors on
the bypass AC input).
Table 1-3: Rating Recommended for Devices Upstream of Single UPS.
Ratings
1.7.2
rated UPS
output
in kVA
100
130
150
180
200
CB on normal
AC input
circuit breaker
125A
160A
250A
250A
400A
225
400A
control unit
125A
160A
200A
250A
400A
CB on bypass
AC input
circuit breaker
125A
160A
250A
250A
400A
control unit
125A
160A
200A
250A
400A
400A
400A
400A
Protection Downstream of Galaxy PW™
These protection devices ensure discrimination for each of the Galaxy PW™ output circuits. If the recommended
downstream protection is not installed and a short-circuit occurs, the result may be a break longer than 20-min on
all the other output circuits.
Table 1-4: Rating Recommended for Devices Downstream of Single UPS.
Ratings
rated UPS
output
in kVA
100 to 225kVA
1—8
downstream circuit
breaker(s)
circuit breaker
100A
control unit
63A curve C
100A curve B
Introduction
86-133060-00 A00
Installation and User Manual
1.8
Parallel Connected UPS Units
For installations with redundant units, take into account only the units required to supply the load power (e.g. for an
installation made up of 3 parallel-connected UPS units, one being redundant, only 2 UPS units are used to
determine bypass AC source and load currents and cable cross-sections).
Table 1-5 serves as an example for a parallel connected installation comprising up to four UPS units.
Table 1-5: Parameters for Bypass AC Source and Load Cables for a Parallel UPS.
Parameters
rated unit
output
in kVA
number of
parallelconnected
units
total UPS
rated output
in kVA
bypass AC
source or load
line current
in Amps
100
2
3
4
2
3
4
2
3
4
2
3
4
2
3
4
2
3
4
200
300
400
260
390
520
300
450
600
360
540
720
400
600
800
450
675
900
240
360
480
312
468
624
360
540
720
434
651
868
482
723
964
542
813
1084
130
150
180
200
225
86-133060-00 A00
Introduction
1—9
Galaxy PW™ UPS 100 to 225kVA
(This page left blank intentionally)
1 — 10
Introduction
86-133060-00 A00
System Setup
2.0
Scope
System Setup describes receiving and handling of the Galaxy PW™ 100 to 225kVA, a description of major components, the battery cabinet, and definition of the control panel indicators, which includes electrical, mechanical and
environmental specifications.
MGE also recommends obtaining an MGE field service engineer for final installation and basic startup for single and
parallel units.
CAUTION
Scheduling of the MGE Field Service Engineers typically should be done 7 to
10 days before they are required on-site. If the startup of the UPS is critical
to maintaining your schedule, please call the MGE toll free telephone number
at 1-800-438-7373 for assistance. The MGE Field Service Engineers will insure a
quick installation for the initial safe startup and configuration of your Galaxy PW™.
Final installation and start-up should be completed by a qualified MGE Field Service Engineer.
2.0.1
2.0.2
2.0.3
First steps by an on-site qualified Technical Engineer
Step 1.
Unpack and position the unit.
Step 2.
Connect the main (utility) power.
Step 3.
Connect the power circuits.
Final steps by MGE Field Service Engineer
Step 4.
Call MGE and wait for the MGE Field Service Engineer to complete the installation.
Step 5.
The MGE Field Service Engineer finalizes installation and the startup process.
Optional:
Procedure for temporary power prior to the final startup.
Required Equipment and Tools
The following equipment and tools are recommended for on-site installation:
◗
Digital volt meter (DVM)
◗
1/8 inch slotted screwdriver
◗
Pallet jack/forklift
◗
Conduit installation tools
◗
Nut driver set
86-133060-00 A00
System Setup
2—1
Galaxy PW™ UPS 100 to 225kVA
2.1
Receiving
On delivery, check that the equipment has not been damaged in transport (declare any damage to the carrier in
accordance with customary claim procedures).
Also check that the characteristics noted in the test report for the equipment correspond to those specified on the
order form. In the event of a non-conforming item, quote the delivery note reference number when making your
claim.
2.1.1
Handling
The cabinets are delivered on pallets, equipped with a shock absorbing system. Ideally, the equipment should be
unpacked just before installation (see "unpacking" section below). Cabinet weights and dimensions are specified on
the packaging. Cabinets may be handled in one of the following ways (see Figure 2-1):
Rolling on Bars (B)
Do not mount the foot pads, but place the cabinet on the rollers (at least three). The cabinet may be pulled on rollers
using a sling positioned horizontally. This technique should only be used when absolutely necessary (narrow
doorway or corridor, preventing the use of a fork-lift or pallet-mover).
From the Bottom (A)
The cabinets can be moved from the front or the rear (715 mm wide cabinets) using a pallet truck or fork-lift truck,
or on the 4 surfaces (1015 mm and 1215 mm wide cabinets) using a fork-lift truck.
Fork tunnel height:
140 ±10 mm.
Fork opening:
560, 650 or 700 mm according to cabinets width.
The 715 mm wide cabinets are designed to pass through 715 mm wide openings, and the other cabinets are
designed to pass through 825 mm wide openings. For narrow openings, (follow the instructions below) cabinets are
normally 825 mm deep.
This depth can be reduced to:
◗
817 mm by removing rear panels.
◗
805 mm by removing doors.
◗
800 mm by removing doors and door hinges.
unpack the cabinet, refer to section 2.2 ‘Unpacking’, page 4. The cabinet can then be handled by lifting machines
on all surfaces after the pallets have been dismantled by removing the rear panels, and remove the fixing screws
using a "torx" screwdriver.
Removing the doors:
1.
Open the door(s).
2.
Disconnect the door earth connection from the frame.
3.
For cabinets fitted with a control panel, carefully disconnect the ribbon cables from the panel circuit boards
located on the inside of the door.
4.
Knock out the hinge pins from below.
5.
Remove the door(s).
Removing the door hinges:
2—2
1.
Remove the screws holding the side panels to the hinges.
2.
Remove the central screw holding the hinge.
System Setup
86-133060-00 A00
Installation and User Manual
Figure 2-1: Handling Cabinet From the Bottom or Rolling on Bars.
A
From Bottom
2.1.2
B
On Rollers
Storage
The equipment must be stored in a dry and well-aired location, sheltered from rain, water sprays or splashes and
all chemical agents. Storage in original packing is recommended, since this packaging is designed to provide
maximum protection during storage and handling. If the unit must be unpacked prior to final installation, cover the
equipment with a shroud providing protection against dust, debris, or paint.
Please dispose of the packaging in accordance with the applicable legislation.
IMPORTANT
Transport: the temperatures must remain within the -30° to +50°C range and the
duration should not exceed 30 days.
Storage: the battery is of the sealed lead-acid or vented lead-acid type and should not be stored for more than six
months at 20°C without recharging for batteries that are initially fully charged (for partially charged batteries, the
storage time should be reduced). After the recommended maximum storage time, the battery must be charged,
requiring partial start-up of the equipment (rectifier-charger).
The battery cells can be stored at a temperature between -20°C and +45°C if delivered in their initial packing.
The ideal battery storage temperature is between 15° and 25°C (higher temperatures result in reduced storage life
or downgraded technical characteristics). If higher temperatures cannot be avoided during transport or storage,
please consult us.
86-133060-00 A00
System Setup
2—3
Galaxy PW™ UPS 100 to 225kVA
2.2
Unpacking
1.
Remove the packing box and the document holder on the top of the cabinet; raise the cabinet.
2.
Dismantle the blocks fixed beneath the cabinet by M12 screws, see Figure 2-2 (A or B), according to the width
of the cabinet);
3.
Dismantle the 4 M12 screws screwed on the 4 leg supports (C).
4.
Withdraw the "hexagonal spacer + leg" assemblies delivered inside the document holder.
5.
Screw the spacers onto the cabinet frame (C).
6.
Lock these spacers in position using a 24 mm flat wrench, and fit the cabinet on its legs.
7.
Adjust cabinet height and verticality by screwing or unscrewing the legs using a 13 mm flat wrench.
Figure 2-2: Dismantling Leg Supports and Attaching Spacers to Cabinet.
A
2—4
B
System Setup
C
86-133060-00 A00
Installation and User Manual
2.3
Galaxy PW™ Cabinet Major Components
Legend:
AA: cross-sectional view of the cabinet,
N: rack containing electronic boards,
B: front view of the cabinet,
O: Media Contacts 11 board,
C: front panel,
P: slot for communications boards,
D: rear panel,
Q: FUE input fuses,
1: normal AC input connection,
R: FUS output fuses,
2: bypass AC input connection,
S: RALI board,
E: load connection,
T: UPOZ /UCOZ board,
F: battery connection,
U: MUSI board,
G: air inlets,
V: backfeed protection (contactor),
H: air outlets,
W: control wire routing,
I:
X: fuses for overvoltage protection RC circuit on bypass,
cable exit through the bottom,
J: trough, if applicable,
K: rectifier/charger module,
Y: control-wire connection (auxiliary "Media Contacts 11" circuits and
communications options).
L: inverter module,
z: EP0I Board
M: static-bypass module,
3: VETI Board
Figure 2-3: Layout of the Major Cabinet Components.
AA
H
B
H
D
C
A
M N 3
K
L
O
P
T
V
S
U
M
G
R
Q
Z
W
Q1
Q4S
Q3BP
Q5N
1, 2, E,F
G
G
GND
L1L2 L3
1
N
L1L2 L3
F X
2
L1L2 L3
E
Y
I
A
J
86-133060-00 A00
System Setup
2—5
Galaxy PW™ UPS 100 to 225kVA
2.4
Battery Cabinet
Legend:
AA: cross-sectional view of the cabinet,
B: front view of the cabinet,
C: front panel,
D: rear panel,
E: cable ties to duckboard shelf,
F: cable exit through the bottom,
G: trough, if applicable,
H: connection of exposed conductive parts to duckboard shelf,
I:
cable exit to battery connection point in UPS cabinet,
J: cable exit to an additional battery cabinet, if applicable,
K: cable ties to duckboard shelf,
L: fixture locking circuit breaker "QF1" in the open position.
Figure 2-4: Component Layout in a Battery Cabinet or a Battery Circuit-breaker Enclosure.
AA
B
A
C
D
XR1
QF1
+
+
E
H
J
I
F
G
2—6
K
System Setup
L
A
86-133060-00 A00
Installation and User Manual
2.5
Remote External Maintenance Bypass Cabinet
350A and 1200A (See Figure 2-5)
Refer to “Installation Instructions” 90-133056-01 for detailed information about 350A cabinet.
Refer to Installation drawing 90-133077-00 for detailed information about 1200A cabinet.
If your installation is custom designed, a separate installation drawing may apply to your system.
All external wiring are provided and installed by the user.
Transfer instructions can be found in front of the cabinet including the proper operation of the kick key interlock.
Figure 2-5: 350A and 1200A Maintenance Bypass Cabinet.
1200A
350A
NEURTRAL
(NOT SHOWN)
CRITICAL LOAD
MBP
TERMINALS
F1, F2
MULTI CIRCUIT
MONITOR BOARD
CRITICAL LOAD
TRANSFER
INITIATE (SI)
MULTI CIRCUIT
MONITOR BOARD
F1, F2
F3 TO F8
TRANSFER INITIATE (SI)
ELECTRIC INTERLOCK
(KA)
ELECTRIC
INTERLOCK
(KA)
TB2
DISPLAY METER
TB1
CB2
UPS ISOLATION
NEUTRAL
CB1
MAINTENANCE
BYPASS
UPS
TERMINALS
GROUND
CB2
T1
CB1
MAINTENANCE
BYPASS
UPS OUTPUT
TB1
GROUND
REMOVABLE
PANELS
FOR POWER
CONDUIT ENTRY
SEISMIC
MOUNTING
CUTOUTS
CONTROL WIRE
ROUTING
REMOVABLE PANEL
FOR CONTROL AND
POWER
CONDUIT ENTRY
SEISMIC HOLE
LOCATION
FORKLIFT OPENINGS
(LEFT & RIGHT
SIDE TYPICAL)
86-133060-00 A00
System Setup
2—7
Galaxy PW™ UPS 100 to 225kVA
2.6
General Instructions for Screens
To display the desired information and enter commands using the
1.
▲, ▼ and ø
keys:
Press the
key to exit the time-stamping consultation mode and return to the main menu. If no commands
are entered for five minutes, the system automatically returns to the normal display mode.
To scroll through the screens displaying information:
1.
Press the
▲ and ▼ keys to scroll up and down through the screens.
For time-stamped events, the display begins with the last event logged. To access older events, press the
If during consultation, you wish to review more recent events, press the ▲ key.
2.6.1
▼ key.
Control Panel Indicators and Definitions
The control panel on the Galaxy PW™ UPS comprises the basic controls and indications required to check the
general status of the system. See Figure 2-6.
Located in the upper right part of the cabinet front, the control panel is designed to provide an easy and rapid
overview of system status. See Figure 2-6.
Interpretation of symbols is very simple and requires no particular training. The information concerns only the
cabinet on which the panel is located. Refer to Appendix A for a complete List of Primary and Secondary display
messages.
The panel indicates:
◗
Normal operation (load protected).
◗
Operation with load on battery power.
◗
Abnormal situations (operating problem).
◗
Dangerous situations (load not protected).
Figure 2-6: Control Panel Indicators.
1
2
3
4
5
6
1
2
7
22
8
9
10
11
12
13
V
14
15
A
15
W.Hz
17
16
18
fault
19
2—8
System Setup
20
21
86-133060-00 A00
Installation and User Manual
Control Panel Alphanumeric Legend:
1
"Rectifier/charger" light Indicates on/off and charging activity.
2
"Battery light"
Indicates battery status.
3
"Static-bypass" light
Indicates static bypass tolerance status.
4
"Inverter" light
Indicates inverter on/off status.
5
"Load" light
Indicates Load supplied and not supplied.
6
Buzzer
The buzzer sounds in load operating situations.
7
"Inverter ON" button
This button is used to start the inverter locally.
8
"Inverter OFF" button
This button turns the inverter off locally.
9 -10
Keys
These keys are used to select commands in the main menu and access the secondary
messages.
11
Key
12
ø
This key is used to validate the user’s choice.
Key
This key is used to access the main menu: display language, display-contrast setting,
sound level of the buzzer, lamp test, date and time settings, inverse-video and event log.
13
"V" Key
This key is used to access voltage measurements.
14
"A" Key
This key is used to access current measurements.
15
"W.Hz" Key
This key is used to access other measurements:
16
"Anomaly" light
This indicator light indicates the presence of anomalies.
17
This key is used to access the primary messages.
18
⁄
ı
19
"Forced-transfer"
Key
"Battery" Key
This key is used to access battery measurements:
This key is used to voluntarily transfer the load to the inverter or from the inverter to the
static bypass (return transfer).
20
"Alarm reset"
This key is used to reset stored alarms. The system accepts resetting only when alarms
have been cleared.
21
"Buzzer reset"
This key is used to stop the buzzer. However, new alarms set the buzzer off again.
22
Display
The display continuously indicates the system operating status.
86-133060-00 A00
System Setup
2—9
Galaxy PW™ UPS 100 to 225kVA
2.7
System Start-up
2.7.1
Single UPS unit or Redundant Parallel UPS
Proceed in the following order: See Figure 2-7.
1.
Close the upstream switches supplying normal and bypass AC source power (on the LV switchboard).
2.
Close normal AC input switch Q1. The system powers up:
- the rectifier/charger automatically starts.
- green light 1 on the control panel goes on.
- light 2 turns red.
3.
Close bypass AC input switch Q4S:
- green lights 3 and 5 on the control panel go on.
4.
Close inverter output switch Q5N.
5.
Close battery circuit breaker QF1:
- light 2 goes off.
6.
Open maintenance bypass switch Q3BP.
7.
Press the "inverter on" button 7 on the control panel:
- the green "inverter" light 4 flashes.
- the inverter starts, then, if the bypass AC source transfer conditions are satisfied, the load is transferred
to the inverter if the on-line mode is selected.
- the green "static-bypass" light 3 goes off.
- the green "inverter" light 4 shines for on-line mode.
Figure 2-7: Single UPS Unit Start-up Diagram.
Q1
Q4S
1
1
0
0
0
0
0
1
0
1
1
2
3
4
5
6
1
0
1
0
1
2
1
3
0
Q5N
1
1
2
1
Q3BP
0
1
0
1
0
7
1
22
QF1
8
4
0
1
5
0
0
1
I
0
1
0
1
6
7
2 — 10
8
System Setup
86-133060-00 A00
Installation and User Manual
2.8
Parallel UPS Unit for Increased Output
Proceed in the following order: See Figure 2-8.
1.
Check that all load devices are off or that the load is disconnected.
2.
Close the upstream switch supplying normal AC source power (on the LV switchboard).
3.
Close the normal AC input circuit breakers Q1 on the UPS units. The system powers up:
- the rectifier/chargers automatically start,
- the green "rectifier/charger" lights 1 in the control panels go on,
- lights 2 turn red.
4.
Close the battery circuit breakers QF1.
- lights 2 go off.
- green lights 3 and 5 on the control panels go on.
5.
Close Main 2 input switch Q4S for the units.
6.
Close output switches Q5N for the inverters and in the external bypass unit.
7.
Open maintenance bypass switch Q3BP in the external bypass unit.
8.
Press the "inverter on" button 7 on each control panel:
- the green "inverter" lights 4 flash.
9.
When a sufficient number of inverters are ready, the inverter-output contactors close:
- the green "inverter" lights 4 shine permanently green.
- the "static-bypass" lights 3 go off.
Figure 2-8: Parallel UPS Unit for Increased Output.
Q1
1
1
Q5N
Q4S
1
0
1
2
3
4
5
6
1
0
1
0
QF1
2
2
Q1
3
1
0 I
Q4S
1
0
0
7
Q5N
22
1
0
8
Q1
4
1
1
0
1
0
0
5
6
7
external bypass
Q5N 0
Q3BP 0
7
1
0
1
0
1
1
8
7
86-133060-00 A00
System Setup
2 — 11
Galaxy PW™ UPS 100 to 225kVA
(This page left blank intentionally)
2 — 12
86-133060-00 A00
Installation
3.0
Scope
Installation guides the User through single and parallel UPS unit power cable connections, hot swap options,
connections between cabinets, communication card connections, battery ‘temperature monitoring’ installation. Wire
diagrams are included for configuring the unit to specifications.
MGE recommends obtaining an MGE field service engineer for final installation and basic startup for single and
parallel units. Final installation and start-up should be completed and performed by a qualified MGE Field
Service Engineer.
3.1
Optional Communications Card Installation
Three slots are available on the "Media Contacts 11" board for optional communications. See the position of these
slots marked "P" in Figure 2-3, page 2—5.
Installation of Boards setup notes:
3.2
◗
Boards may be installed with the UPS on, without removing the protective covers.
◗
Boards must be pushed to the end of the slots to ensure correct installation.
◗
Board front plates must be screwed to the protective "Media Contacts 11" board cover.
◗
Wire routing holes are provided in the support for the "Media Contacts 11" board for tying down the wires;
◗
The control wires must then be routed through the cableway marked "W" in figure 2-3, page 2—5.
Notes on Connection of Power Circuits
◗
Open the doors and remove the lower terminal shields (secured by screws to the cabinet chassis) of the
UPS cabinets, connect the power cables, each cabinet must be grounded.
◗
All the cabinets must be interconnected for equipotential bonding, forming a mesh which is itself connected to the building structure and earthing electrode.
The connection drawings hereafter show the cabinets with doors open and terminal shields removed.
CAUTION
Before making connections, check that switches Q1, Q4S, Q3BP, Q5N and QF1 are
in the "open" position.
IMPORTANT
For parallel UPS with an external bypass unit, the power connections between
each UPS cabinet and the external bypass unit must imperatively be of the same
length. Outside the cabinets, separate the auxiliary wiring from the power cables.
86-133060-00 A00
Installation
3—1
Galaxy PW™ UPS 100 to 225kVA
3.3
Power-Circuit Wiring Diagrams
The single UPS wire diagram is for typical UPS installations shown in Figure 3-1. The heavy lines represent the
cables that must be connected (F), refer to section 3.5 ‘Connections Between Cabinets’ for more detail on cables.
Figure 3-1: Galaxy PW™ Single UPS Unit Wire Diagram.
Legend:
+ –
QF1 + –
D
F
1: Normal AC source,
E
F
2: Bypass AC source,
A: Rectifier/charger module,
1
Q1
2
( )
A
Q5N
B
Q4S
( )
B: Inverter module,
C: Static-bypass module,
C
Q3BP
D: Battery cabinet next to the
Galaxy PW™ UPS cabinet,
Galaxy PW
E: Additional battery cabinets,
F: The equipotential-bonding
connection between cabinets.
3.4
Hot Swap Options
The external bypass may be used to construct a bypass outside the UPS, thus making it possible to shutdown the
UPS for maintenance purposes.
The option may be used for single UPS units and redundant parallel UPS. For the power-circuit connections of a
single UPS unit see Figure 3-2, for the power-circuit connections of parallel UPS see Figure 3-3.
Power cables for UPS-to-bypass connections are not supplied.
Figure 3-2: Single UPS Unit Power Circuit Connections.
Legend:
Q3BP
1: Normal AC source.
D
F
1
2
Q4S
( )
2
Q1
( )
A
Q4S
+ –
QF1 + –
B
2: Bypass AC source.
E
A: Rectifier/charger module.
F
B: Inverter module.
Q5N
( )
C
Q3BP
Galaxy PW
Q5N
()
C: Static-bypass module.
D: Battery cabinet next to the
Galaxy PW™ UPS cabinet.
E: Additional battery cabinets.
F: The equipotential-bonding
connection between cabinets.
3—2
Installation
86-133060-00 A00
Installation and User Manual
Figure 3-3: Parallel UPS Unit Power Circuit Diagram.
Legend:
2
Q3BP
1: Normal AC source,
2: Bypass AC source,
D
F
1
2
2
Q1
( )
A
Q4S
+ –
QF1 + –
E
A: Rectifier/charger module,
F
B: Inverter module,
Q5N
B
( )
Q5N
C: Static-bypass module,
()
D: Battery cabinet next to the
Galaxy PW™ UPS cabinet,
C
E: Additional battery cabinets,
Galaxy PW
F: The equipotential-bonding
connection between cabinets.
D
F
1
2
Q1
( )
A
Q4S
+ –
QF1 + –
B
E
F
Q5N
( )
C
Galaxy PW
86-133060-00 A00
Installation
3—3
Galaxy PW™ UPS 100 to 225kVA
3.5
Connections Between Cabinets
These connections are made on the UPOZ board (marked T) and MUSI board (marked U). See Figure 2-3, page 2—5.
3.5.1
Connections Between UPOZ Boards
These connections are made using the cables (A) supplied, see Figure 3-4.
The purpose of the connection is to make a loop. Connector XM137 on the UPOZ board of one UPS unit must be
connected to connector XM136 on the UPOZ board of the next UPS unit and so on until the first board is returned
to origin.
Figure 3-4: Connections Between UPOZ Boards.
'UPOZ'
Galaxy PW 1
TM
XM137
XM138
'UPOZ'
Galaxy PW 2
TM
XM137
A
XM138
'UPOZ'
Galaxy PW 3
TM
XM137
XM138
3.5.2
Connections Between UPS Cabinets and the Remote External Bypass
Refer to the installation drawing included with the Maintenance Bypass Cabinet for control and power connections.
These connections are provided and installed by the user.
3—4
Installation
86-133060-00 A00
Installation and User Manual
3.5.3
Connections Between MUSI Boards
These connections are made using the special cables (A) supplied, see Figures 3-5.
1.
Connectors XM5, XM6 and XM7 on the MUSI board are used to transmit signals.
2.
Connectors XM10, XM11 and XM12 on the MUSI board are used to receive signals.
3.
Connector XM5 is associated with connector XM10 for communication with one UPS unit; similarly, XM6 is
associated with connector XM11 for communication with a second UPS unit and XM7 is associated with
connector XM12 for communication with a third UPS unit.
◗
For connection with two parallel UPS units, see Figure 3-5.
◗
For connection with three parallel UPS units, see Figure 3-6, page 3—6.
◗
For connection with four parallel UPS units, see Figure 3-7, page 3—6.
IMPORTANT
Outside the cabinets, group the "UPOZ" inter-board and "MUSI" inter-board
connections with the inter-cabinet auxiliary connections, and separate this
assembly using power cables.
Figure 3-5: Two Parallel UPS Units Connections.
'MUSI'
Galaxy PW 1
TM
XM5
XM10
XM6
XM11
XM7
XM12
'MUSI'
Galaxy PW 2
A
XM5
TM
XM10
XM6
XM11
XM7
XM12
86-133060-00 A00
Installation
3—5
Galaxy PW™ UPS 100 to 225kVA
Figure 3-6: Three Parallel UPS Units Connections.
'MUSI'
Galaxy PW 1
TM
XM5
XM10
XM6
XM11
XM7
XM12
'MUSI'
Galaxy PW 2
XM5
TM
XM10
XM6
A
XM11
XM7
XM12
'MUSI'
Galaxy PW 3
XM5
TM
XM10
XM6
XM11
XM7
XM12
Figure 3-7: Four Parallel UPS Units Connections.
'MUSI'
Galaxy PWTM 1
XM5
XM10
XM6
XM11
XM7
XM12
'MUSI'
Galaxy PWTM 2
XM5
XM10
XM6
XM11
XM7
XM12
A
'MUSI'
Galaxy PWTM 3
XM5
XM10
XM6
XM11
XM7
XM12
'MUSI'
Galaxy PWTM 4
XM5
XM10
XM6
XM11
XM7
XM12
3—6
Installation
86-133060-00 A00
Installation and User Manual
3.6
Environmental Signal of the Media Contacts 11 Board
Terminals XR2, XR3, XR4 and XR5 on the "Media Contacts 11" board of each type of unit can be used to receive
signals from the operating environment and to transmit signals concerning the operating status of the UPS, see
Figure 2-3, page 2—5 for the position of the board, item 1 and 2).
3.6.1
Signal Reception
The signals should be provided by volt-free contacts.
Emergency off:
An NC contact causes shutdown of the inverter and the rectifier/charger, opening of
the battery circuit breaker, blocking of the static bypass and activation of a relay
contact on the "Media Contacts 11" board.
Battery room
ventilation fault:
A ‘NO’ contact causes shutdown of the rectifier/charger.
Battery circuit
breaker QF1 closed:
A ‘NO’ contact prevents inverter start-up if the circuit breaker is open.
Battery temperature:
A PC-board, placed near the battery, supplies information on the battery temperature, thus enabling the rectifier/charger to regulate the battery voltage.
"Auxiliary" signals:
Depending on the selected settings, these signals may be used to provoke:
- forced shutdown of the inverter (whatever the status of the bypass AC source),
- protected shutdown of the inverter (load transfer to the bypass AC source).
- limiting of the current drawn by the rectifier/charger (programmable value) when
supplied by an engine generator set with an insufficient power rating. The additional
power required by the inverter is supplied by the battery which discharges,
- limiting of the battery charge current (programmable value) if the normal AC source
is replaced by an engine generator set with an insufficient power rating.
3.6.2
Signal Transmission
An auxiliary 24 V
power supply:
Isolated and backed up, is used to supply:
- the undervoltage release of the battery circuit breaker(s) QF1.
- the board that measures the temperature in the battery room.
"low battery"
warning signal:
"load on UPS" signal:
86-133060-00 A00
(Volt-free changeover contact) indicating that battery time is about to run out.
The warning threshold may be personalized.
(Volt-free changeover contact) indicating that the load is supplied by the
inverter. For a single-UPS unit, one volt-free changeover contact may be used
to indicate that the load is supplied by the bypass AC source.
Installation
3—7
Galaxy PW™ UPS 100 to 225kVA
"load on battery power" signal:
(Volt-free changeover contact) indicating that the inverter is supplied
by the battery in the following cases:
- normal AC source outage or voltage drop.
- rectifier/charger shutdown.
- rectifier/charger current limiting.
This signal, which may be used to initiate process saving and shutdown
procedures, is time-delayed 30 seconds to avoid unnecessary operations
following micro-breaks.
"Maintenance position" signal:
(Volt-free changeover contact) indicating that:
- maintenance bypass switch Q3BP is closed,
- bypass AC source input switch Q4S is open,
- inverter output switch Q5N is open,
- battery circuit breaker QF1 is open.
Signal to open battery
circuit breaker(s) QF1:
In the event the "emergency off" button is pressed or to avoid an excessive
battery discharge (lasting more than three times the rated backup time plus two
hours).
Repo Contact:
(Volt-free changeover contact) used to trip switching devices in the event of an
emergency shutdown.
"General Alarm" information:
(Volt-free changeover contact) which includes:
- internal faults.
- information on temperatures outside tolerances in the battery room (optional).
- overload information (> In).
- static-switch ventilation and power-supply faults.
NOTE
3—8
The maximum breaking capacity of the changeover contacts is 5A at 250V.
Installation
86-133060-00 A00
Installation and User Manual
3.7
"Media Contacts 11" Standard Auxiliary Circuits Connection
Connecting the auxiliary circuits to the three connectors on the "Media Contacts 11" board in the Galaxy PW™ UPS
cabinet, see the position of this board, marked "O", see Figure 2-3, page 2—5.
Recommended cable cross-section: 1 mm2. The male connectors that fit the female connectors on the board (XR2
to XR5) are supplied. The contacts are volt-free and are shown in the diagram under the following conditions: UPS
on, contact at rest. Contact breaking capacity: 250 V, 5 A.
Figure 3-8: Standard Auxiliary Circuits Connections.
XR2
12 - - - - - - - - - -1 10 - - - - - - - -1
XR2
10 - - - - - - - -1 10 - - - - - - - -1
XR3
XR4
XR5
XR3
XR4
XR5
XR2 connector
circuit
AC
AC
AC
-12V
power supply +12V
temperature
signal
input or output signals:
12
11
10
9
8
7
6
5
4
3
2
1
emergency shutdown breaker circuit REPO
(jumper Y
correction with optional electric boad for
measuring battery temperature
-12V
XA1 terminal block
thermal measuring
of the
harmoinc-filter
circulator
battery-room ventilation fault
input or output signals:
free auxilary contact
battery cubicle
XA13 terminal block
2
1
QF1 battery
circuit breaker
closed
2
1
QF1 battery
circuit breaker
opening command
OF1 battery circuit-breaker opening command
AC
XR4 connector
output signals:
10
9
8
7
6
5
4
3
2
1
Optional alarm
AC
EPO
XR4 connector
output signals:
10
9
8
7
6
5
4
3
2
1
86-133060-00 A00
harmonic filter
harmonics over-temperature fault
-12V
-12V
24V CC
XR1
2
1
XR3 connector
10
9
8
7
6
5
4
3
2
1
12 - - - - - - - - - -1 10- - - - - - - - - 1 10- - - - - - - - - 1 10- - - - - - - - - 1
Media Contacts 11 Board
AC
load or inverter
load or battery
low-battery shutdown warning
Installation
3—9
Galaxy PW™ UPS 100 to 225kVA
3.7.1
Battery Circuit Breaker "QF1" Connection
Connect the cable from connector XR3 (pins 2 to 8) on the "Media Contacts 11" board in the UPS cabinet to
connector XR1 in the battery cabinet containing battery circuit breaker QF1.
IMPORTANT
3.8
In the case of a complex installation with parallel units, there should be only one
emergency shutdown pushbutton and this pushbutton must interrupt all the units.
This pushbutton must therefore have as many contacts as there are units in the
installation. The emergency shutdown pushbutton turns off the rectifier/ chargers
and inverters, opens the battery circuit breakers (QF1), the input circuit breaker (Q1)
on the normal source, the backfeed protection contactor (K4S) on the bypass AC
source, blocks the static switches and activates a contact on the "Media Contacts 11"
board (terminals 1 to 3 on connector XR4).
Installation of the "Temperature Monitor" in the Battery Cabinet
The "Temperature Monitor" unit is placed inside the battery cabinet housing circuit-breaker QF1. See Figure 3-9.
1.
Open the unit cover, and before fixing, break the self-cleaving seal on the base of the unit for insertion of the
connecting cable.
2.
Fix the unit on the plate using the self-adhesive sticker and a screw (nut and washer combination, diameter 4
mm, length 16 mm, not supplied).
3.
Connect and put back the cover. The temperature sensor MUST be placed at the top of the cabinet to work
properly.
4.
Tie the connecting cable to the cabinet upright so that it does not pull on the unit.
Figure 3-9: Installing the "Temperature Monitor" in a Battery Cabinet.
Battery Cabinet
Temperature
Monitor unit
Tie the cable
to the cabinet
upright
QF1
to UPS Cabinet
3 — 10
Installation
86-133060-00 A00
Installation and User Manual
3.8.1
"Temperature Monitor" installation in a Battery Room
The "Temperature Monitor" should be secured against a wall or any vertical support. See Figure 3-10.
1.
Choose a location near the batteries and away from draughts which adversely affect the accuracy of
temperature measurements. Dimensions: 75 x 75 x 21 mm.
2.
Use the holes provided in the base plate to screw the unit to the vertical support, unless the connecting cable
runs on the surface, break the knock-out in the unit base plate provided for cable entry. Secure the cable by
suitable means so that it does not pull on the unit.
Figure 3-10: Temperature Monitor" Base.
Mounting Hole
board
Cable Entry
Mounting Hole
Dimensions: 75 x 75 x 21 mm
86-133060-00 A00
Installation
3 — 11
Galaxy PW™ UPS 100 to 225kVA
3.8.2
Connection of the Battery "Temperature Monitor"
This unit must be connected to the XR2 connector on the remote indications "Media Contacts 11" board of the UPS
cabinets. For the location of the "Media Contacts 11" board, marked "O" see Figure 2-3, page 2—5.
Use a shielded cable made up of 2 twisted telephone pairs with a conductor cross-section of at least 0.1 mm2, not
longer than 100 m in length. Do not forget to connect the cable shield to ground pin 12 on connector XR2;
In the case of a parallel UPS configuration, the connections between cabinets may be made by means of a shielded
cable made up of 1 or 2 twisted telephone pairs. In this case, the total length of all the connecting cables must not
exceed 100 m;
A "Temperature Monitor" unit can be connected to several UPS cabinets only when the batteries of these cabinets
are located in the same room at the same ambient temperature.
Figure 3-11: Single UPS Unit Connection of the Battery "Temperature Monitor".
Battery Temperature Monitor
DC +
Shielded cable
(2 twisted
telephone pairs)
DC-
12
11
10
9
8
7
6
5
4
3
2
1
XR2
XR1
-12
XR2 connector on
'Media Contacts 11'
Board:
each
-12V
+12V
DC +
DC -
power supply
temperature
signal
+12
(unit shown open)
Refer to Appendix C for link-up options using an IBM AS400 computer for additional monitoring capability.
3 — 12
Installation
86-133060-00 A00
Installation and User Manual
Figure 3-12: Connection of the Battery "Temperature Monitor." (In Parallel UPS Units with Batteries in Same Room.)
Battery Temperature Monitor
DC +
Shielded cable
(2 twisted
telephone pairs)
XR2 connector on
'Media Contacts 11' Board
in Galaxy PW unit 1:
DC-
12
11
10
9
8
7
6
5
4
3
2
1
XR2
XR1
-12
each
-12V
+12V
DC +
DC -
power supply
temperature
signal
XR2 connector on
'Media Contacts 11' Board
in Galaxy PW unit 2:
+12
(unit shown open)
12
11
10
9
8
7
6
5
4
3
2
1
Shielded cable
(1 or 2 twisted
telephone pairs)
each
DC +
DC -
temperature
signal
XR2 connector on
'Media Contacts 11' Board
in Galaxy PW unit n:
12
11
10
9
8
7
6
5
4
3
2
1
86-133060-00 A00
Installation
each
DC +
DC -
temperature
signal
3 — 13
Galaxy PW™ UPS 100 to 225kVA
Figure 3-13: Connection to the "Media Contacts 11" Board.
XR2
12 - - - - - - - - - -1 10 - - - - - - - -1
XR2
10 - - - - - - - -1 10 - - - - - - - -1
XR3
XR4
XR5
XR3
XR4
NOTE: the corresponding IBM AS400 signal names
are given in parapharase.
XR5
12 - - - - - - - - - -1 10- - - - - - - - - 1 10- - - - - - - - - 1 10- - - - - - - - - 1
Media Contacts 11 Remote Indicators Board
XR1
XR's connector
10
9
8
7
6
5
4
3
2
1
output signals:
load or inverter (ON)
load or battery (utility failure)
low-battery shutdown warning
(low battery)
1
2
3
4
5
6
1
7
2
8
3
9
4
5
load on bypass (bypass active)
6
7
9
10
11
12
13
14
15
8
commond W (system ground)
male 9-pin SUB-D
connector
IBM AS400
Galaxy PW
3.9
male 15-pin SUB-D
connector
About Final Installation Steps
After making the connections, install the front and rear base plates of the cabinets, clipping them to the feet of the
cabinets (unless the connecting cables are fed through these openings), and refit the terminal shields of the terminal
blocks, switches and circuit breakers.
3 — 14
Installation
86-133060-00 A00
Operation
4.0
Scope
Operation describes the start-up for single and parallel units, modes of operation, normal specifications for operating
the Galaxy PW™ 100 to 225kVA, including display messages, measurement systems, alarms, batteries, and log
time stamping operations.
WARNING
4.1
Rectifier/charger start-up is automatic when normal AC input circuit breaker Q1
is closed. DC voltage is present in the DC bus.
Start-up of a Module
Rectifier/charger start-up is automatic when the normal AC input circuit breaker Q1 is closed. The green
"rectifier/charger" light 1 on the control panel goes on. Close battery circuit breaker QF1.
Figure 4-1: Control Panel and Circuit Breaker Diagram.
1
2
3
4
5
6
2
normal
AC
input (1)
7
22
8
9
10
11
12
13
V
inverter (B):
DC to AC
power
rectifier/
charger (A):
AC to DC
power
1
14
15
15
isolation and
protection:
Q5N
*FUSE
*FUSE
Q1
isolation
and
protection
QF1: isolation
and protection
harmonic
fliter
W.Hz
A
battery (D):
backup power
17
16
18
fault
19
20
21
bypass
AC
input (2)
isolation:
Q4S
static bypass (C):
maintenance bypass:
Q3BP
4.1.1
Start-up of an Inverter
When the rectifier/charger is on, press the "inverter ON" button 7 on the control panel. The green "inverter" light
4 flashes.
4.1.2
Emergency Power Off (EPO)
The UPS emergency shutdown function is generally wired to a "mushroom-head" type emergency-off pushbutton.
In case of its use, the pushbutton contact has to reset.
IMPORTANT
86-133060-00 A00
After EPO/REPO, unit has to be reset by opening M2 feed (switch Q4S). Open
switch Q5N also, and then follow the procedure of single UPS for single unit or
parallel UPS for parallel units to start-up the system.
Operation
4—1
Galaxy PW™ UPS 100 to 225kVA
4.1.3
Single UPS Unit
The inverter starts, then, if the bypass AC source transfer conditions are satisfied, the load is transferred to the
inverter, if the on-line mode is selected.
For on-line mode:
◗
The green "inverter" light 4 remains on.
◗
The "static-bypass" light 3 goes off.
Figure 4-2: Single UPS Diagram .
A
B
1
D
C
2
4.1.4
Parallel UPS Unit
The inverter starts and awaits the start of the other inverters. When they are all on or enough have been started to
supply the rated load power, the output switch for each running inverter closes and the load is supplied with power:
◗
The green "static-bypass" light 3 goes off.
◗
The green "inverter" light 4 on the control panels of the running inverters goes on.
Figure 4-3: Two Parallel Connected UPS Units.
Q3BP
Q5N
1
S
2
2
Galaxy 1
1
2 Galaxy 2
Figure 4-4: Four Parallel Connected UPS Units.
Q3BP
Q5N
1
2
2
Galaxy 1
1
2 Galaxy 2
1
2 Galaxy 3
1
2 Galaxy 4
4—2
Operation
86-133060-00 A00
Installation and User Manual
4.2
Operation in On-line Mode
4.2.1
Normal Operation
Normal AC source power is available, see Figure 4-5.
◗
Lights 1 , 4 and 5 shine green on the control panel.
-The power necessary for the load is provided by the normal AC source (1) through the rectifier/charger (A)
and the inverter (B). The rectifier/charger (A) also supplies the power to float charge and recharge the
battery if any.
The output voltage (DC) is regulated to supply:
◗
The float-charging or the recharging voltage for vented lead-acid or Ni/Cd batteries.
- a single charge voltage for sealed lead-acid batteries.
The voltages depend on the number of battery cells and the battery manufacturer. Factory set, they may also be
adjusted by support technicians.
An electronic board continuously measures the battery temperature and automatically adjusts the voltages.
NOTE
In parallel Galaxy PW™ systems, the power drawn by the load is equally shared
between the different units.
Figure 4-5: Normal Operation Indicator Diagram.
1
4
5
1
2
A
B
1
D
C
2
86-133060-00 A00
Operation
4—3
Galaxy PW™ UPS 100 to 225kVA
4.2.2
Operation with the Normal AC Source Down
In the event of a normal AC source failure or voltage outside specified tolerances of ±10% in amplitude (±15%
optionally), the rectifier/charger (A) stops and the battery (D) supplies the necessary backup power to the load via
the inverter (B).
The battery, float-connected between the rectifier/charger and the inverter, discharges during this operating mode:
◗
lights 2 , 4 and 5 shine green.
The user is warned of battery operation by the slow beeping of the buzzer 6 , see Figure 4-6, and the message
"LOAD PROTECTED, BATTERY DISCHARGING", followed by the remaining backup time and the percent load.
This information is also available via volt-free changeover contacts for remote control devices.
Figure 4-6: Normal AC Source Indicator Diagram.
2
4
5
1
2
A
B
1
D
C
2
4—4
Operation
86-133060-00 A00
Installation and User Manual
4.3
Operation with the Normal AC Source Restored
When normal AC source power (1) is restored or its voltage returns to within specified tolerances, the system
automatically returns to its normal operating mode described above (on the condition it did not reach the end of
battery power). If the end of battery power was reached (with the resulting inverter shutdown), the rectifier/charger
(A) restarts automatically, but the inverter (B) must be restarted manually.
The rectifier/charger recharges the battery (D) which was discharged during the mains outage. During battery
charging, light 2 flashes green.
The message "BATTERY CHARGING" is displayed, together with the value of the recharging current and battery voltage.
Figure 4-7: Normal Operation Mode Indicator Diagram.
1
2
4
5
1
2
A
B
1
D
C
2
The battery charge cycle takes place in two steps: See Figure 4-8.
step 1: the battery is recharged at a constant current limited to 0.1C10 (i.e. 1/10th of the battery capacity specified
for a 10 hour discharge). The DC voltage increases with the battery charge until the charge level is reached.
step 2: the battery is recharged at constant voltage equal to the charge level. The charging current gradually
decreases until reaching a specified low value (floating current).
For vented lead-acid batteries, the rectifier/charger supplies the charging voltage for 0 to 255 hours (parameter
defined by the after-sales support department) and then the floating voltage. For sealed lead-acid batteries, the
charging and floating voltages are the same.
NOTE
86-133060-00 A00
If the normal AC source failure is shorter than 0 to 255 seconds (default value = 30
seconds) (parameter defined by after-sales support department), the charger
automatically supplies the floating voltage given the low battery discharge.
Operation
4—5
Galaxy PW™ UPS 100 to 225kVA
Figure 4-8: Battery Charge Cycle Chart.
U/I
U charge/floating
(sealed batteries)
voltage
U "floating"
(vented batteries)
0,1 C10
current
constant voltage
decreasing current
current
limiting
4.4
t
Operation with Engine Generator Set
If a stand-by generator is included in the installation, it is generally started automatically in the event of a normal AC
source failure and connected to the main low voltage switchboard. It is disconnected when normal AC source power
is restored.
With such a system, the required battery time may be reduced to the time necessary for starting and bringing on
line the stand-by generator. The battery (D) supplies power to the inverter (B) during the transfers:
◗
Normal AC source to the generator.
◗
Generator to the normal AC source.
The transfer sequences described above (normal AC source ➜ battery, battery ➜ generator, generator ➜ battery,
and battery ➜ normal AC source) are fully automatic. They in no way affect the load and require no manual
operation by the user.
NOTE
To avoid load surges on the generator, the rectifier/charger is started with a 10
second maximum current consumption walk-in (lasting 3 to 10 seconds,
depending on the percent load).
To avoid overloading an undersized engine generator set, it is possible to set a
maximum power level drawn by the normal AC input. Any additional power
required is supplied by the battery. This modification can be made on site by an
MGE UPS SYSTEMS field engineer
Figure 4-9: Installation with an Engine Generator Set.
Galaxy PW
generator
G
main LV switchboard
C
Mains 2
A
HV system
B
Mains 1
D
4—6
Operation
86-133060-00 A00
Installation and User Manual
4.5
Battery Time
The available battery time during a normal AC source outage depends on the:
◗
Rated capacity of the battery.
◗
Power consumed by the load.
◗
Temperature of the battery.
◗
Age of the battery.
The specified battery time corresponds to a minimum duration at full rated load.
The actual backup time can therefore be greater if the system operates below its full rated load during the normal
AC source outage. Operation on battery power can be extended beyond the specified time by reducing the load
power consumption (by disconnecting non-critical loads).
A "low battery" warning signal is sent via volt-free changeover contacts for remote control devices when the battery
voltage reaches a level slightly above the minimum level. This signal warns the user of the imminent end of battery
power. On the device itself, the buzzer beeps rapidly.
The message "LOW-BATTERY SHUTDOWN WARNING" is displayed, followed by the remaining backup time and
the percent load. Light 2 turns red and flashes.
Battery power stops when the voltage supplied by the battery reaches the minimum threshold. This results in
inverter shutdown and transfer of the load without interruption to the bypass AC source. Light 2 shines red (not
flashing). The message "LOAD NOT PROTECTED, ON-LINE MODE" is displayed and the buzzer sounds continuously.
If the bypass AC source also fails, the load is no longer supplied. The inverter automatically shuts down when the
time on battery power exceeds three times the specified backup time.
NOTE
4.6
The "low battery shutdown" warning signal can be sent with an adjustable time
delay prior to the effective end of battery power.
Inverter Shutdown or Overload
Devices or installations operating in on-line mode with a Bypass AC source.
Figure 4-10: Operating in On-line Mode Diagram.
3
5
1
2
A
B
1
D
C
2
86-133060-00 A00
Operation
4—7
Galaxy PW™ UPS 100 to 225kVA
4.6.1
Single UPS Unit (On-line mode)
In the event of a UPS shutdown (initiated by the user or by an internal protective device), the load is automatically
transferred to the bypass AC source. If transfer conditions are satisfied, transfer takes place instantly, without interruption to the load.
NOTE
Transfer conditions are not satisfied when bypass AC source characteristics are
outside tolerances (voltage: ±10%. frequency as per personalization. phase sync
with inverter ±3°).
In the event of a major transient overload (greater than 1.65 In), immediate transfer takes place as above, without
interruption to the load.
The return to the inverter is automatic when the overload disappears if the number of possible returns has not been
reached (0 to 255, programmable by personalization). If this number has been reached, the load continues to be
supplied by the bypass AC source. This operating mode allows start-up of load devices causing high inrush currents.
This system requires satisfied transfer conditions. If the conditions are not satisfied, the inverter will current limit to
165% of its rated current for 1 second before stopping.
In the event of a small but extended overload (i.e. a continuous level of power exceeding the full rated load), the
inverter will continue to supply power for a period depending on the magnitude of the overload (10 minutes for a
125% overload, 1 minute for a 150% overload). See the overload curve in Figure 4-11.
◗
In all the above cases, inverter shutdown and supply of the load via the bypass AC source results in the
following on the control panel:
- light 4 goes off,
- activation of the buzzer (continuous beep),
- light 3 shines green,
- the message "LOAD NOT PROTECTED, ON-LINE MODE" is displayed.
4.6.2
Parallel UPS Without Redundancy
WARNING
4—8
During maintenance operation, when CB1 (MBP) is closed and CB2 (UPS
ISOLATION) is open, each UPS control panel display will show a message
“LOAD PROTECTED” when the UPS is placed in ON-LINE MODE. In this
mode the critical load is not protected because it is supplied by the maintenance bypass power.
Operation
86-133060-00 A00
Installation and User Manual
The shutdown of one inverter results in overload on the other inverters in operation. Two cases may then arise:
A) if the overload on each remaining inverter is > than 1.65 in, the load is immediately transferred to the bypass
AC source.
B) if the overload is less than 1.65 in, the remaining inverters support the overload (see curve in Figure 4-11), and
the load is transferred to the bypass AC source.
After this transfer:
- the light 4 goes off,
- the buzzer is activated and sounds continuously,
- the light 3 goes on and turns green,
- the message "LOAD NOT PROTECTED, PARALLEL ON-LINE MODE" is displayed.
Figure 4-11: Overload Curve Diagram.
I
1,5 In
1,35 In
1,25 In
1,15 In
1,10 In
1,05 In
In
1
4.6.3
2
3
4
5
6
7
8
9 10
30
120 t (min)
Parallel UPS With Redundancy
The shutdown of one UPS unit is of no consequence for the load. The others each take up an equal amount of load
power and the load continues to be supplied normally.
◗
Unit shutdown results in the following on the control panel:
- Lights 4 and 5 go off,
- Activation of the buzzer (continuous beep),
- The message "LOAD NOT PROTECTED, PARALLEL ON-LINE MODE" is displayed.
- In the event of an overload, the system only loses its redundancy as long as the overload is less than the
total rated power of the functioning units. If the overload is greater, the operating mode is that previously
described for systems without redundancy.
4.7
Output Voltage Quality and Continuity
The output voltage is stable in amplitude and frequency and is free of interruptions or transients outside specified
tolerances, irrespective of normal AC source or load disturbances (outages, load step changes, etc.).
86-133060-00 A00
Operation
4—9
Galaxy PW™ UPS 100 to 225kVA
4.7.1
Steady State Voltage Regulation
For stable or slowly varying load conditions, the inverter output voltage is regulated to within ±0.5% in amplitude.
The frequency of the output voltage can theoretically be regulated to within 0.1% of the rated value, however the
output frequency range may be intentionally extended to a maximum of ±2 Hz so that the inverter can remain
synchronized with the bypass AC source and its inherent frequency fluctuations, thus enabling transfer of the load
to the bypass line at any time.
When the bypass AC source frequency returns to within the specified tolerances, the inverter is gradually resynchronized to the bypass line at a rate of 0.5 Hz to 2 Hz/s (as per the value personalized by the after-sales
support department), thus avoiding exposing the load to sudden frequency variations.
4.7.2
Transient Voltage Regulation
The inverter output voltage is not notably affected by instantaneous major variations in load characteristics.
This is made possible by the PWM (Pulse Width Modulation) chopping technique and the microprocessor-based
regulation system that instantly compensates for any variation. In particular, the inverter output voltage remains
within +/- 2% of the rated voltage for load step changes of 0 to 100% or of 100 to 0%.
The battery charge cycle takes place in two steps:
step 1: The battery is recharged at a constant current limited to 0.1C10 (i.e. 1/10th of the battery capacity specified
for a 10 hour discharge). The DC voltage increases with the battery charge until the charge level is reached.
step 2: The battery is recharged at constant voltage equal to the charge level. The charging current gradually
decreases until reaching a specified low value (floating current).
For vented lead-acid batteries, the rectifier/charger supplies the charging voltage for 0 to 255 hours (parameter
defined by the after-sales support department) and then the floating voltage. For sealed lead-acid batteries, the
charging and floating voltages are the same.
4 — 10
Operation
86-133060-00 A00
Installation and User Manual
4.8
Measurement System
The display may be used to read a number of input and output measurements made at different points in the system.
See Figure 4-12.
◗
◗
Normal AC source 1
- phase-to-phase voltages,
Inverter output 4
- frequency
◗
- currents of the three phases,
Total load 6
- frequency.
◗
- phase-to-neutral voltage.
Bypass AC source 2
- phase-to-phase voltages.
- phase-to-neutral voltage,
- currents of the three phases.
- phase-to-phase voltages,
- frequency.
- frequency,
- active and apparent power.
- currents of the three phases.
◗
Battery 3
- voltage.
- charge or discharge current.
- remaining battery time (for the UPS unit concerned).
- battery temperature.
Figure 4-12: Measurement System Diagram.
1
U -I-F
3
U-I
A
4
6
F
U-V-I-F-P
B
Q1
Q5N
1
QF1
2
U-V-I-F
2
86-133060-00 A00
D
C
Q4S
Operation
4 — 11
Galaxy PW™ UPS 100 to 225kVA
4.8.1
Voltage Measurements
These measurements may be accessed by pressing the "V" key 13 . The following data is displayed.
Note:
4.8.2
M1: normal AC source
RMS
M1
M2
LOAD
RMS
M2
LOAD
M2: bypass AC source
U12
----
----
----
V1
----
----
U23
----
----
----
V2
----
----
U31
----
----
----
V3
----
----
Current Measurements
These measurements may be accessed by pressing the "A" key 14 . The following data is displayed.
Note:
CF: crest factor
4.8.3
RMS
M1
M2
LOAD
RMS
M2
LOAD
U12
----
----
----
V1
----
----
U23
----
----
----
V2
----
----
U31
----
----
----
V3
----
----
Power and Frequency Measurements
These measurements may be accessed by pressing the "W.HZ" key 15 .
The following data is displayed.
Note:
PF: power factor
4.8.4
RMS
M1
M2
LOAD
RMS
M2
LOAD
U12
----
----
----
V1
----
----
U23
----
----
----
V2
----
----
U31
----
----
----
V3
----
----
Battery Measurements
These measurements may be accessed by pressing the "battery" key 18 . The following data is displayed.
4 — 12
RMS
M1
M2
LOAD
RMS
M2
LOAD
U12
----
----
----
V1
----
----
U23
----
----
----
V2
----
----
U31
----
----
----
V3
----
----
Operation
86-133060-00 A00
Installation and User Manual
4.9
Selections and Settings
These selections and settings may be accessed by pressing the "contrast" key 12 .
The following menu is displayed:
◗
◗
CHOOSE LANGUAGE
DATE AND TIME
CONTRAST SETUP
INVERSE VIDEO
BUZZER SETUP
PAST EVENTS
LAMP TEST
BATTERY TEST
FRENCH
SPANISH
ENGLISH
DUTCH
GERMAN
SWEDISH
ITALIAN
PORTUGUESE
Selecting the language:
Adjusting the display contrast:
DISPLAY CONTRAST SETUP
CHOOSE WITH KEYS
▲
OR
▼
VALIDATE WITH KEY ø
◗
Adjusting the buzzer volume:
BUZZER VOLUME SETUP
CHOOSE WITH KEYS
▲
OR
▼
VALIDATE WITH KEY ø
86-133060-00 A00
Operation
4 — 13
Galaxy PW™ UPS 100 to 225kVA
◗
Lamp test:
When this function is selected, all the lights shine orange for three seconds.
◗
Set Date and Time:
Use the "▲▼" keys to enter the data and confirm using the "ø " key.
DATE AND TIME SETUP
◗
YEAR
----
MONTH
--
DAY
--
HOURS
--
MINUTES
--
SECONDS --
Inverse Video:
When this function is selected, the text and background colors are reversed (white text on black or black
text on white).
◗
Past Events:
See section 3.15 "logging and Time-Stamping" for event details.
◗
CHARGE LEVEL
=
REMAINING SERVICE LIFE
= -- MONTH
■
MANUAL TEST press key ø
■
AUTO TEST
-- %
press key ø
Battery test:
the screen opposite is displayed when a battery test is requested. It indicates the battery charge status and
the remaining service life. A manual or automatic test may be requested.
- this screen is displayed during a battery test, whether manual or automatic,
TESTING BATTERY
U BATTERY =
4 — 14
Operation
--- V
86-133060-00 A00
Installation and User Manual
- this screen is displayed following a positive, manual battery test:
BATTERY TEST RESULT OK
- this screen is displayed following a negative, manual battery test:
BATTERY TEST RESULT NOT OK
- this screen is displayed following a positive, automatic battery test. It indicates the time since the last test and
provides access to test settings:
TIME SINCE LAST TEST
WEEK -- DAY -- HOUR -LAST BATTERY TEST RESULT OK
NEW PARAMETERS
YES = ▲
NO = ▼
- this screen is displayed following a negative, automatic battery test. It indicates the time since the last test
and provides access to test settings,
TIME SINCE LAST TEST
WEEK -- DAY -- HOUR -LAST BATTERY TEST RESULT NOT OK
NEW PARAMETERS
YES = ▲
NO = ▼
- this screen is displayed when the user requests access to the automatic test settings. It is possible to modify
the interval between two automatic tests,
SELECT TIME OF NEXT TEST WITH KEYS ▲ ▼
CHANGE UNITS WITH ø
WEEK -- DAY -- HOUR -confirm with key
- this screen is displayed when the battery test cannot be completed.
TEST INTERRUPTED
CHECK PRESENCE OF THE BATTERY
CHECK ALARMS
86-133060-00 A00
Operation
4 — 15
Galaxy PW™ UPS 100 to 225kVA
4.10
Alarms
The auto diagnostic system considers any system status other than normal as a problem.
Before taking any action, note down the messages displayed on the control panel.
Certain problems may prevent the control panel from functioning.
In this case, it is strongly recommended to call the MGE UPS SYSTEMS Customer Support Service at:
1-800-438-7373.
A) If the load is still correctly supplied with power, it has probably been transferred to the bypass AC source (static
bypass) and is therefore no longer protected (if the system is in on-line mode).
B) If the load is no longer supplied with power, transfer it manually to the maintenance bypass.
Figure 4-13: Display of Alarm Messages..
primary message
(ALARM MESSAGE N° 1)
(ALARM MESSAGE N° 2)
(LAST ALARM MESSAGE)
main screen
4.11
Maintenance Bypass Option
The Maintenance bypass option provides a direct bypass AC input source (mains 2) that can be used to supply the
critical load while the UPS is being serviced.
This operation is possible only if the system includes a bypass AC source. It results in the load being directly
supplied by the Bypass AC source via Maintenance Bypass switch Q3BP, thus ensuring a higher level of security in
the event of a malfunction.
Switching procedures are explained on drawings next to each switch in the UPS cabinet and the External Bypass unit.
4 — 16
Operation
86-133060-00 A00
Installation and User Manual
4.12
Logging and Time-Stamping
4.12.1 Event Time-Stamping
Time-stamping of events by Galaxy PW™ makes it possible to:
◗
Log the events.
◗
Consult the last 500 events that occurred on the Galaxy PW™ UPS.
◗
Consult general statistical data on UPS operation.
◗
Consult measurement records for a number of physical values concerning system operation.
The time-stamping information may be accessed via the Galaxy PW™ keypad and display (standard equipment).
This information may also be forwarded for the Teleservice function using the JBUS RS232/485 communications
board. When the optional JBUS RS232/485 communications board is installed, the time-stamped information can
be sent to the Teleservice center. Refer to Utilization of Teleservice Card options Appendix B.
4.12.2 Consulting Logged (time-stamped) Events
When the PAST EVENTS command is selected, the system displays a screen indicating the last event logged. Log
screens are very similar to those displayed for current events. However, log screens include a line indicating the
corresponding date and time with the mention "Appearance of" or "Disappearance of", followed by the standard text
for the event (see example opposite). Consult the user manual for indications on the meaning of events.
The complete log may comprise up to 500 events. If over 500 events have occurred, only the last 500 may be
consulted:
1.
Press the ▼ key to display the event that occurred just before the displayed event. If the displayed event is the
oldest in the list, the display is not modified.
2.
Press the ▲ key to display the event that occurred just after the displayed event. If the displayed event is the
most recent in the list, the display is not modified.
Example:
02/09/1997
07:25:03
Appearance:
MAINS 2 INPUT SWITCH Q4S IS OPEN
Note: numerical values are never indicated in screens for time-stamped events.
Example:
03/09/1997
15:30:23
Disappearance:
OVERLOAD
RATED CURRENT PER PHASE
= _ _ _ A
CHECK LOAD LEVEL
86-133060-00 A00
Operation
4 — 17
Galaxy PW™ UPS 100 to 225kVA
4.13
Setting the Date and Time for the UPS - Utilization Via the Galaxy PW™ Display
The time and date can be set for the UPS via the main menu on the display (see below), using the DATE AND TIME
command. The time-stamping information, statistics and measurement records are also available via the same
menu, using the PAST EVENTS command.
Simply select the desired command with the ">" sign that can be moved using the
command can be confirmed by pressing the
key.
▲ and ▼ keys. The selected
When the DATE AND TIME command is selected, the date and time is displayed in the order of year, month, day,
hours, minutes, and seconds. When you leave this command, the date and time is displayed in the reverse order.
DATE AND TIME SETUP
> YEAR
1997
MONTH
9
8
HOURS
8
DAY
MINUTES
11
SECONDS
42
▲▼
The current values are automatically displayed.
Modify any of the displayed values by:
1.
Position the ">" sign opposite the value to be modified. Then press the ø key.
2.
Use the
▲ and ▼ keys to modify the value.
3.
Use the
▲ key to increment the value by one.
4.
Use the
▼ key to decrement the value by one.
The selected value can be confirmed by pressing the ø key. A second value may then be selected for
modification, again using the ▲ and ▼ keys. Modifications are made and confirmed value by value.
5.
Press the
key at any time to exit the DATE AND TIME function.
That is the only means to leave the function. If no modifications to values are confirmed, exiting the function
corresponds to cancelling the request.
4 — 18
Operation
86-133060-00 A00
Installation and User Manual
4.14
Consulting Statistics
FIGURES SINCE COMMISSIONING
total backup time (h):
0
total time on static switch (h):
0
total time on UPS (d):
3627
total time with Tbatt >25°C (h):
1
FIGURES SINCE RESET
last reset:
elapsed backup time (min):
05/09/1997
0
Legend:
total backup time (h): This is the total time of operation on battery power since initial startup of the UPS. It
is expressed in hours.
total time on static
switch (h):
This is the total time of operation on the static switch since initial startup of the UPS.
It is expressed in hours.
total time on UPS (d): This is the total time that the load has been supplied by the UPS since initial startup.
It is expressed in days.
total time with
Tbatt > 25°C (h):
This is the total time of operation with the battery temperature greater than 25°C
since initial startup of the UPS. It is expressed in hours.
last reset:
This is the date that the information was last set to zero by the Teleservice function.
elapsed backup
time (min):
This is the total time of operation on battery power since the last reset. It is expressed
in minutes.
86-133060-00 A00
Operation
4 — 19
Galaxy PW™ UPS 100 to 225kVA
FIGURES SINCE RESET
nb of backups:
0
nb of backups < 1 min:
0
1 min < nb of backups < 3 min:
0
nb of backups > 3 min:
0
nb of overloads < 5 s:
0
nb of overloads > 5 s:
0
nb of times TBatt. > 25°C:
0
Legend:
nb of backups:
This is the number of times the load was supplied by the UPS from battery power
since the last reset.
nb of backups < 1 min: This is the number of times the load was supplied by the UPS from battery power for
less than one minute, since the last reset.
1 min < nb of
This is the number of times the load was supplied by the UPS from battery power
backups < 3 min:
for more than one minute and less than three minutes, since the last reset.
nb of backups > 3 min: This is the number of times the load was supplied by the UPS from battery power for
more than three minutes, since the last reset.
nb of overloads < 5’s: This is the number of times the UPS was overloaded (output current greater than In)
for less than five seconds, since the last reset.
nb of overloads > 5’s: This is the number of times the UPS was overloaded (output current greater than In)
for more than five seconds, since the last reset.
4 — 20
nb of times
This is the number of times the battery temperature was measured at over 25°C,
TBatt. > 25°C:
since the last reset.
Operation
86-133060-00 A00
Installation and User Manual
4.14.1 Consulting Recorded Measurements
Recorded measurements are presented in the same manner (see below):
◗
the lists indicate the last 30 measurements recorded for the given parameter. The chronological order of
the measurements is indicated in the Figure opposite.
◗
the most recent measurement is presented first, in the upper left-hand corner of the list. The following
measurement is listed just below, and so on until the 30th value listed in the bottom right-hand corner of
the list.
◗
the period T between two successive measurements is 30 days. The displayed measurements are instantaneous values.
PARAMETER NAME (units)
T=30 days
▼ last read: 05/09/1997
M(t+29T)|M(t+23T)|M(t+17T)|M(t+11T)|M(t+05T)
|
|
|
|
M(t+28T)|M(t+22T)|M(t+16T)|M(t+10T)|M(t+04T)
|
|
|
|
M(t+27T)|M(t+21T)|M(t+15T)|M(t+09T)|M(t+03T)
|
|
|
|
M(t+26T)|M(t+20T)|M(t+14T)|M(t+08T)|M(t+02T)
|
|
|
|
M(t+25T)|M(t+19T)|M(t+13T)|M(t+07T)| M(t+T)
|
|
|
|
M(t+24T)|M(t+18T)|M(t+12T)|M(t+06T)|
M(t)
NOTE
86-133060-00 A00
when this screen is selected, approximately ten seconds are required to call up
and display the information. If the number of measurements is greater than 30,
only the last 30 (the most recent) are displayed.
Operation
4 — 21
Galaxy PW™ UPS 100 to 225kVA
The battery capacity is the value measured by the UPS microprocessor. It is expressed in Ampere-hours. This
value changes over time depending on the parameters of the battery itself and its environment. This measurement
is used to check that the battery is capable of supplying the rated power in the event of a mains outage.
BATTERY CAPACITY (Ah)
T=30 days
▼ last read: 05/09/1997
97
96
95
94
0
0
|
|
|
|
|
|
0
0
0
0
0
0
|
|
|
|
|
|
0
0
0
0
0
0
|
|
|
|
|
|
0
0
0
0
0
0
|
|
|
|
|
|
0
0
0
0
0
0
The backup time is the value calculated by the UPS microprocessor on the basis of measurements carried out on
the battery. It is expressed in minutes. The calculation uses the percent load and the battery charge status at the
time of the measurement.
BACKUP (min)
T=30 days
▼ last read: 05/09/1997
120
115
110
105
0
0
|
|
|
|
|
|
0
0
0
0
0
0
|
|
|
|
|
|
0
0
0
0
0
0
|
|
|
|
|
|
0
0
0
0
0
0
|
|
|
|
|
|
0
0
0
0
0
0
The load level is the ratio between the power supplied by the UPS to the load at the time of the measurement and
the rated output of the UPS. It is expressed as a percentage.
OUTPUT LOAD LEVEL(%)
T=30 days
▼ last read: 05/09/1997
63
52
63
63
0
0
4 — 22
|
|
|
|
|
|
Operation
0
0
0
0
0
0
|
|
|
|
|
|
0
0
0
0
0
0
|
|
|
|
|
|
0
0
0
0
0
0
|
|
|
|
|
|
0
0
0
0
0
0
86-133060-00 A00
Maintenance
5.0
Scope
Maintenance procedures include preventive maintenance, isolation procedures for maintenance, startup for single
and parallel units after isolation, functional and visual checks, software options and configurations, and testing
scenarios.
5.1
Preventive Maintenance
The following preventive maintenance routines should be considered the minimum requirements; your installation
and site may require additional preventive maintenance to assure optimal performance from your installed Galaxy
PW™ and associated equipment. These routines should be performed twice a year (more often if required). We
strongly recommend contracting MGE Customer Support Services for preventive and remedial maintenance.
The technician or electrician performing preventive maintenance on the UPS must read thoroughly this manual
Galaxy PW™ Installation and Users Manual (MGE PN 86-133060-00) and be familiar with the indicators, controls,
and operation of the UPS prior to maintenance.
Technician or Engineer checks for preventive maintenance:
a.
Isolate and de-energize all Galaxy PW™ equipment for all maintenance operations.
b.
Ensure that all equipment is clean and free of loose dust, dirt, and debris. The exterior of the enclosures may
be cleaned with a mild solution of soap and water, lightly applied with a lint-free cloth.
c.
Inspect the air intake and exhaust plates and clean as required. Verify that air flows freely through the
equipment. Clean the air intake and exhaust plates, and the enclosure interior, with a vacuum cleaner.
d.
The Galaxy PW™ module is equipped with air filters that should be changed at regular intervals. Inspect the
filters regularly to determine how long the filters will last in your installation.
e.
Initiate the start-up procedure, as described in the Installation and Users Manual section 2.7 System Start-up,
page 2—10.
f.
Test the main operating sequences as applicable to your equipment configuration and installation.
86-133060-00 A00
Maintenance
5—1
Galaxy PW™ UPS 100 to 225kVA
5.2
Replacement Parts
There are no user replaceable parts inside the Galaxy PW™.
Three levels of replacement parts are available for the Galaxy PW™ UPS. The three levels are designated A, B,
and C. The level that you should keep on hand for your installation will vary depending on the type of maintenance
planned on site, and the configuration of your UPS system. Having the replacement parts on hand will prevent any
unacceptable delays (due to time involved obtaining spare parts) during critical periods, such as system start-up.
Any items used during start-up will be replaced by MGE at no charge. Contact MGE Customer Support Services for
specific recommendations.
A description of each level is provided below:
5.2
Level
Description
A
This level of replacement parts consists of consumable items, specifically fuses and air filters. It is
recommended to have these items on hand during installation of the UPS systems, including initial
start-up.
B
This level of replacement parts is recommended when the user can tolerate short-duration UPS downtime to obtain replacement parts in the event of a major UPS failure. This level of replacement parts
consists of consumable items, specifically fuses, air filters, an inverter leg, and the most critical circuit
board assemblies.
C
This level of replacement parts is recommended when the user can tolerate only a minimum of downtime in the event of a major UPS failure. This level of replacement parts consists of consumable items,
specifically fuses, air filters, an inverter leg, and a complete set of circuit board assemblies.
Maintenance Isolation Procedures
CAUTION
5.2.1
PARALLEL UPS WITH EXTERNAL MAINTENANCE BYPASS During maintenance operation, when CB1 (MBP) is closed and CB2 (UPS ISOLATION) is
open, each UPS control panel display will show a message “LOAD
PROTECTED” when the UPS is placed in ON-LINE MODE. In this mode the
critical load is not protected because it is supplied by the maintenance
bypass power.
Single UPS Unit
During maintenance, the UPS must be isolated from the normal and bypass AC source, the battery and the load.
UPS Isolation
Proceed in the following order: (see Figure 5-2):
1.
Shut down the inverter (press the "inverter OFF" button 8 for three seconds),
2.
Close bypass switch Q3BP,
3.
Open isolating switches Q5N, Q4S, QF1 and Q1.
The UPS is powered down once the capacitors have discharged (a few minutes).
5—2
Maintenance
86-133060-00 A00
Installation and User Manual
Start-up
Following servicing, proceed in the following order: (See Figure 5-3)
1.
Close switch Q1, then after approximately ten seconds, switches QF1, Q5N and Q4S,
2.
0pen bypass switch Q3BP,
3.
Start the inverter (press the "inverter ON" button 7 ).
Figure 5-1: UPS Isolation Diagram for Normal AC Bypass Source.
A
B
Q1
Q5N
1
QF1
D
C
Q4S
2
Q3BP
Figure 5-2: Panel Procedures for UPS Isolation.
7
8
1
Q1
Q4S
1
2
0
3
0
4
0
1
0
1
1
0
1
1
0
Q3BP
0
0
0
1
1
1
Q5N
1
0
1
0
1
0
QF1
5
0
6
1
0
1
0
I
0
1
1
0
Figure 5-3: Start-up After Isolation Procedure is Completed.
Q1
Q4S
1
1
0
0
F
1
Q3BP
0
1
Q5N
0
F
1
QF1
2
0
1
3
0
4
0
5
0
0
1
0
1
0
1
1
1
I
0
0
0
1
1
1
0
0
0
1
1
1
6
86-133060-00 A00
Maintenance
5—3
Galaxy PW™ UPS 100 to 225kVA
CAUTION
5.3
Work should be carried out in accordance with applicable safety regulations. to
avoid interrupting the load, the various switching operations must be carried out
in the correct order. Operations are explained in diagrams placed next to the
switches. the system cabinet is only partially powered down. The load is still
supplied via the bypass AC source and switch Q3BP.
Steps for Parallel UPS Redundancy to Increase Output
CAUTION
PARALLEL UPS WITH EXTERNAL MAINTENANCE BYPASS During maintenance operation, when CB1 (MBP) is closed and CB2 (UPS ISOLATION) is
open, each UPS control panel display will show a message “LOAD
PROTECTED” when the UPS is placed in ON-LINE MODE. In this mode the
critical load is not protected because it is supplied by the maintenance
bypass power.
First Isolate all UPSs: (Refer to section 5.2, page 5—2)
See Figure 5-6.
Proceed in the following order: (See Figure 5-4)
1.
Shut down the inverters (press the "inverter OFF" buttons 8 for three seconds).
2.
Close switch Q3BP and open switch Q5N in the external bypass unit.
3.
Open switches Q1, QF1, and Q5N on the UPS units.
Figure 5-4: Isolate All UPS’s Procedures Diagram.
7
8
Galaxy PW
2
1
3
4
external bypass
Q1
4
1
00
1
Q4S
0
Q5N
1
0
1
Q3BP 0
1
Q5N 0
1
0
0
1
1
QF1
5
0
1
6
5—4
0
0
1
I
0
1
Maintenance
86-133060-00 A00
Installation and User Manual
Start-up
Following servicing, proceed in the following order: (see Figure 5-5)
1.
Close switches Q5N on the UPS units.
2.
Close switch Q5N in the external bypass unit.
3.
Open switch Q3BP in the parallel-connection unit.
4.
Close switches Q1 and QF1 on the UPS units.
5.
Start the inverters (press the "inverter ON" buttons 7 ).
Figure 5-5: Start-up Procedure After Isolation Diagram.
Q1
1
1
Q4S
0
0
Q5N
1
0
1
2
3
4
external bypass
Q1
4
1
00
1
Q4S
0
Q5N
1
0
Q5N 0
1
Q3BP 0
QF1
1
1
0
0
1
1
5
0 1
8
6
7
Figure 5-6: Redundancy for Increased Output Diagram.
Q3BP
Q1
Q5N
1
Q5N
QF1
2
2
Q4S
Galaxy 1
1
2 Galaxy 2
1
2 Galaxy 3
1
2 Galaxy 4
86-133060-00 A00
Maintenance
5—5
Galaxy PW™ UPS 100 to 225kVA
5.4
Battery Maintenance
Consult the instructions supplied by the battery manufacturer. Below are a few general indications:
◗
Sealed lead-acid Batteries:
- these batteries require no maintenance, but check the terminals of each cell from time to time and clean
if necessary.
◗
Vented lead-acid Batteries:
- check the electrolyte level regularly and add water if necessary,
- check the voltage of each cell to determine if it is necessary to equalize the battery,
- check the terminals of each cell and clean if necessary.
5.5
Visual Check
Power down the system prior to any maintenance operations.
NOTE
5.6
5—6
In redundant parallel UPS systems the check may be carried out successively on
each UPS unit without interrupting the load. In other configurations, the load
must be supplied via the maintenance bypass (see "maintenance bypass" in the
"Alarm" section).
1.
Clean the system regularly, particularly the air filter inlet and outlet grills. Check that the air circulates freely in
the cabinets. Use a vacuum cleaner if necessary.
2.
Check that nothing hinders the ventilation at the top and at the back of the system.
Functional System Checks
1.
Check that lights 1 , 2 and 3 on the control panel are not red, to avoid an interruption in the supply of power
to the load due to incorrect transfer conditions or a battery problem.
2.
Press the "inverter OFF" button and check that the buzzer and control panel lights function correctly (see the
section on operating modes in the introduction).
3.
Press the "inverter ON" button and check again that the control panel lights function correctly.
4.
Run a transfer to battery test. With the inverter on, open input circuit breaker Q1. The orange "battery" light on
the control panel should light. After two minutes on battery power, close input circuit breaker Q1. The
rectifier/charger should automatically restart and the orange "battery" light on the control panel should go off.
Maintenance
86-133060-00 A00
Installation and User Manual
5.7
Testing Parallel Systems
5.7.1
Galvanic Isolation and Voltage Matching Transformers
The UPS can be equipped with an isolation or auto transformer on both the input and output to provide galvanic
isolation or voltage step-up or step-down as required.
5.8
Management of Computer Networks
5.8.1
Integrated SNMP Agent
This electronic board, installed in the UPS system, enables direct connection to all Ethernet networks using TCP/IP.
The UPSs may then be supervised via the computer network. Furthermore, they can be used to close system files
without having to add an external SNMP agent.
This board is fully compatible with "Solution Pac™" software.
The RJ45 connector of the communications option delivers information using the SNMP protocol. The sticker
located on the board indicates the UPS MAC address.
Figure 5-7: MAC Address Sticker.
0080C8ABAA01
◗
The MAC address is written in the following way: 0080C8 ZZ XX YY.
◗
The default IP address is 168.8.xx.yy (xx and yy are decimal values of XX and YY).
For example, MAC address 00 80 C8 AB AA 01 is related to IP address 168.8.170.1.
Please refer to the "userman.doc" user manual contained in the directory "emb/galaxy/snmp/release3.xx" of the
Solution-Pac CD-ROM in order to discover the management capabilities of your SNMP Galaxy PW™ UPS.
Please contact your sales representative for more detailed information.
5.8.2
Two-channel Network Board
This electronic board comprises two ports, each of which may be user set, either for the U-Talk protocol or as a relay
contact.
A) U-Talk is the protocol required to establish contact with the communications software.
B) Relay contacts may be used for specific network applications (IBM AS400, Novell, etc.).
86-133060-00 A00
Maintenance
5—7
Galaxy PW™ UPS 100 to 225kVA
(This page left blank intentionally)
5—8
86-133060-00 A00
Appendices
Appendix A
Front Control Panel Display Definitions
1
"Rectifier/charger" light
◗
light off: rectifier/charger OFF.
◗
light shines green: rectifier/charger ON.
◗
light shines red: rectifier/charger fault, the stored alarm indicates one or several of the following faults:
- input circuit breaker Q1 open,
- protection fuse at the rectifier/charger input (FUE) blown,
- abnormally high internal rectifier/charger temperature,
- abnormally high battery charge current,
- abnormally high battery voltage,
- fault, non-calibration or non-personalization of the electronic control board for the rectifier/charger,
- fault on the electronic power-supply board,
- abnormally high temperature in the harmonic filter inductor.
2
3
"Battery light"
◗
light off: battery float charging.
◗
light flashing green: battery recharging.
◗
light shines green: load on battery power.
◗
light flashing red: low-battery shutdown warning.
◗
light shines red: battery at end of backup time and circuit breaker QF1 open, or battery fault.
"Static-bypass" light
◗
light off: bypass AC source within specified tolerances and static bypass open.
◗
light shines green: static bypass closed.
◗
light shines red: the stored alarm indicates one or several of the following faults:
- bypass AC source voltage or frequency outside specified tolerances,
- static-bypass fault,
- abnormally high internal static-bypass temperature,
- static-bypass ventilation fault,
- power-supply fault for the static-bypass control function,
- fault on the electronic board controlling the transfer function,
- non-calibration or non-personalization of the electronic control board for the inverter,
- fault on the electronic power-supply board,
- fault on monitoring the "inverter ready" response channels (parallel UPS system).
86-133060-00 A00
Appendices
A—1
Galaxy PW™ UPS 100 to 225kVA
4
"Inverter" light
◗
light off: inverter OFF.
◗
light flashing green: inverter starting, inverter ON but not connected to the load.
◗
light shines green: normal inverter operation.
◗
light shines red: inverter fault, the stored alarm indicates one or several of the following faults:
- inverter shutdown due to inverter output voltage outside specified tolerances,
- protection fuse at the inverter output (FUS) blown,
- abnormally high inverter-output transformer temperature,
- abnormally high inverter temperature,
- output-voltage fault (amplitude or phase) (parallel UPSs),
- fault, non-calibration or non-personalization of the electronic control board for the inverter,
- fault on the electronic power-supply board.
5
6
"Load" light
◗
light off: load not supplied.
◗
light shines green: load supplied via the inverter or the bypass AC source (via the static bypass).
Buzzer
The buzzer sounds in the following situations:
◗
load supplied by the bypass AC source.
◗
load on battery.
◗
operating problems.
It sounds slowly and discontinuously for a minor problem or when the inverter is on battery power.
When the alarm "LOW BATTERY SHUTDOWN" is activated, the buzzer sounds more rapidly. Finally, if the inverter
shuts down, the beep is loud and continuous. The buzzer may be reset by pressing a button. If the buzzer is reset,
a higher level alarm will set it off again.
7
"Inverter ON" button
This button is used to start the inverter locally.
8
"Inverter OFF" button
This button turns the inverter off locally.
9 -10
Keys
These keys are used to select commands in the main menu and access the secondary
messages.
11
Key
This key is used to validate the user’s choice.
12
Key
A—2
ø
This key is used to access the main menu: display language, display-contrast setting,
sound level of the buzzer, lamp test, date and time settings, inverse-video and event log.
Appendices
86-133060-00 A00
Installation and User Manual
13
"V" Key
This key is used to access voltage measurements:
14
◗
normal AC source phase-to-phase voltages.
◗
bypass AC source phase-to-phase and phase-to-neutral voltages.
◗
load phase-to-phase and phase-to-neutral voltages.
"A" Key
This key is used to access current measurements:
15
◗
normal AC source, bypass AC source and load currents.
◗
percent load.
◗
load crest factor.
"W.Hz" Key
This key is used to access other measurements:
◗
normal AC source, bypass AC source and inverter frequencies.
◗
level of active and apparent power drawn by the load.
◗
load power factor.
◗
inverter load level (percent).
16
"Anomaly" indicator light
17
Key
18
"Battery" Key
⁄
This indicator light indicates the presence of anomalies.
This key is used to access the primary messages.
ı
This key is used to access battery measurements:
19
◗
battery voltage (or the DC voltage on frequency converters without a battery).
◗
battery current (charge or discharge).
◗
battery temperature.
◗
available battery backup time.
◗
inverter load level (percent).
"Forced-transfer"
This key is used to voluntarily transfer the load to the inverter or from the inverter to the static bypass
(return transfer). Transfer and return transfer are carried out only following confirmation requested by the
display and a warning as to the risk of an interruption in the supply of power to the load.
20
"Alarm reset"
This key is used to reset stored alarms. The system accepts resetting only when alarms
have been cleared.
21
"Buzzer reset"
This key is used to stop the buzzer. However, new alarms set the buzzer off again.
22
Display
The display continuously indicates the system operating status.
86-133060-00 A00
Appendices
A—3
Galaxy PW™ UPS 100 to 225kVA
Display of Primary and Secondary Messages
The display is structured around primary and secondary messages, measuring tables and setting screens. As a rule,
the message displayed on the screen is always a primary one. The secondary messages, if any, are accessed by
pressing keys 9 ▲ and 10 ▼. See Figure 2-6, page 2—8.
The presence of secondary messages is indicated by the arrow Ø at the end of the primary message. Return to
the primary messages is automatic if the keypad is not used for 2 minutes, or direct by pressing key 17 The display
screen lights up when a key is pressed, and goes off if no key is pressed for 5 minutes.
NOTE
Most functions may be directly accessed. For example, when voltagemeasurements are currently displayed, it is possible to directly access current
measurements by pressing the "A" button.
In addition to keypad operations, the graphical display brings up a window giving the overall device status. The
message displayed is then said to be primary (see list in the paragraph below). A primary message can be used to
access the measuring tables using keys 13 , 14 , 15 and 18 on the keypad The configuration screens can be
accessed by pressing key 12 .
A flashing arrow appears at the end of a primary message if there is a problem or an alarm. secondary messages
can be accessed by pressing key 9 on the keypad (see the list of secondary messages). The presence of another
message is indicated by the arrows Ø and ≠ at the end of the secondary message. They can be accessed by
pressing keys 9 and 10 on the keypad.
The return to the primary message is automatic after a 2 minute time delay or by pressing key 17 on the keypad.
IMPORTANT
A—4
Select English U. S. as the display language to match the displays as presented
in this manual.
Appendices
86-133060-00 A00
Installation and User Manual
Primary Messages
LOAD PROTECTED
ON-LINE MODE
This is the normal display when there are no alarms or problems and the load is correctly supplied by the inverter,
in on-line mode.
LOAD PROTECTED
PARALLEL ON-LINE MODE
This is the normal display when there are no alarms or problems and the load is correctly supplied by the inverter
in a parallel UPS system, in on-line mode.
LOAD NOT PROTECTED
ON-LINE MODE Ø
This display indicates that the load is not supplied by the inverter, or that there is no battery backup. The arrow Ø
indicates the presence of one or more problems specified in secondary messages.
The buzzer sounds continuously.
LOAD NOT PROTECTED
PARALLEL ON-LINE MODE Ø
Situation identical to that in the previous screen, but for parallel UPS systems.
LOAD PROTECTED
BATTERY DISCHARGING
Remaining battery time (min) = XX
% kW used = XXX
The load is supplied by the inverter, but the normal AC source is down or outside tolerances and power is supplied
by the battery.
This message indicates the remaining battery time in minutes prior to inverter shutdown and the percent load. The
battery time calculation takes into account:
◗
The percentage of full rated load power currently being drawn.
◗
The type of battery.
◗
Battery temperature.
◗
Battery age.
The buzzer sounds slowly and discontinuously.
LOAD PROTECTED
LOW-BATTERY SHUTDOWN WARNING
Remaining battery time (min) = XX
% kW used = XXX
This message replaces the preceding if the power outage persists and the warning level has been reached.
The user is warned that the battery is about to shut down.
The buzzer sounds rapidly and discontinuously.
86-133060-00 A00
Appendices
A—5
Galaxy PW™ UPS 100 to 225kVA
LOAD PROTECTED
ECO MODE
This is the normal display when there are no problems: the load is supplied by the inverter or the bypass AC source,
and battery backup is available.
LOAD NOT PROTECTED
ECO MODE Ø
This display indicates that the load is supplied but has no battery backup. The arrow Ø indicates the presence of
one or more problems specified in secondary messages.
The buzzer sounds continuously.
LOAD FORCED TO INVERTER
ECO MODE
The load has been transferred to the inverter following a specific request by the user.
Secondary Messages
LOAD ON MAINS 2
The load has been transferred to the bypass AC source (M2) and is no longer protected (only in on-line mode). The
buzzer sounds continuously.
MAINS 2 OUTSIDE TOLERANCES
TRANSFER DISABLED
CHECK MAINS 2
The bypass AC source (M2) frequency or voltage is outside tolerances and the inverter is unable to synchronize.
Transfer of the load from the inverter to the bypass AC source (M2) or vice-versa will result in an interruption of the
supply of power to the load. The buzzer sounds slowly and discontinuously.
BATTERY OVER TEMPERATURE,
CHECK VENTILATION
The battery temperature is outside tolerances. The buzzer sounds slowly and discontinuously
BATTERY ROOM VENTILATION
FAULT, CHECK VENTILATION
A fault requiring servicing has occurred in the battery room ventilation system. The rectifier/charger shuts down after
a 30-second time delay.
The user must take steps to re-establish correct operation of the ventilation system.
This message also signals an abnormally high temperature in the filter inductor.
The buzzer sounds slowly and discontinuously.
MAINS 1 OUTSIDE TOLERANCES
CHECK MAINS 1
The normal AC source (M1) frequency or voltage is outside specified tolerances and the rectifier/charger has shut
down. The inverter is on battery power.
MAINS 1 INPUT SWITCH Q1
IS OPEN
The normal AC input (M1) switch Q1 is open. It must be closed for rectifier/charger start-up. The buzzer sounds
slowly and discontinuously.
A—6
Appendices
86-133060-00 A00
Installation and User Manual
INTERNAL UPS FAULT
LOAD TRANSFER FAULT,
CALL MAINTENANCE
A fault has occurred in the static switch that transfers the load between the inverter and the bypass AC source (M2).
Servicing by the after-sales support department is required. The buzzer sounds continuously.
OVERLOAD
RATED CURRENT PER PHASE = XXXA
CHECK LOAD LEVEL
This display informs the user that load current is greater than rated current, and gives the value. The buzzer sounds
continuously.
UPS SHUTDOWN DUE T AN OVERLOAD
CHECK LOAD LEVEL
This message follows the preceding when the overload persists. The UPS has shut down and the buzzer sounds
continuously.
INVERTER NOT IN PHASE WITH MAINS 2
TRANSFER DISABLED,
CHECK MAINS 2
The phase difference between the inverter and the bypass AC source (M2) is outside tolerances. Transfer of the load
between the inverter and the bypass AC source (M2) will result in an interruption in the supply of power to the load.
For parallel UPSs, this message should be interpreted as meaning the phase difference between the inverter for
which the message is displayed and the other inverters is outside tolerances.
UPS SHUTDOWN
BY AN EXTERNAL COMMAND
The inverter has received a command to shut down. The command is in the form of a signal from received the
remote-indications relay board which has been set for this function.
◗
The inverter is started again.
MAINS 2 INPUT SWITCH Q4S IS OPEN
The bypass AC source (M2) input switch Q4S is open, i.e. backup power for the load via the bypass AC source (M2)
is not available.
INVERTER OUTPUT SWITCH Q5N IS OPEN
Inverter output switch Q5N is open, i.e. the load cannot be supplied via the inverter.
BYPASS SWITCH Q3BP IS CLOSED
Maintenance bypass switch Q3BP is closed. The system is in maintenance configuration and the load is supplied
by the bypass AC source.
STATIC SWITCH (M2) OFF
DUE TO AN OVERLOAD
The load is no longer supplied by the bypass AC source (M2), due to an extended overload. The buzzer sounds
continuously.
86-133060-00 A00
Appendices
A—7
Galaxy PW™ UPS 100 to 225kVA
BATTERY CHARGING
I BAT.=XXX A
U BAT. = XXX V
The battery is currently be recharged.
BATTERY AT END OF SERVICE LIFE CALL MAINTENANCE
The battery is nearing the end of its estimated service life. This information is based on average service-life calculations since its initial installation. The buzzer sounds slowly and discontinuously.
EMERGENCY OFF
This message is displayed when the external emergency-off pushbutton is pressed. The result is:
◗
Shutdown of the inverter.
◗
Shutdown of the rectifier/charger.
◗
Opening of the battery circuit breaker.
◗
Blocking of the static bypass.
◗
Opening of the backfeed protection contactor (M2),
◗
Opening of the Q1 circuit breaker (M1),
◗
Activation of a relay contact on the remote-indications relay board.
Servicing by the after-sales support department is required.
The buzzer sounds discontinuously.
THE BATTERY C.B. QF1 IS OPEN,
CHECK THE INSTALLATION
Battery circuit breaker QF1 is open. The load is no longer protected because battery power is no longer available
in the event of a normal AC source outage. The buzzer sounds continuously.
LOW BATTERY SHUTDOWN
The inverter has shut down at the end of battery power. The buzzer sounds continuously.
INTERNAL UPS FAULT,
INVERTER FAULT,
CALL MAINTENANCE
A fault has occurred in the inverter. Servicing by the after-sales support department is required. The buzzer sounds
continuously.
INTERNAL UPS FAULT,
CHARGER FAULT,
CALL MAINTENANCE
A fault has occurred in the rectifier/charger. Servicing by the after-sales support department is required.
The buzzer sounds slowly and discontinuously.
FORCED TRANSFER TO INVERTER REQUESTED,
POWER TO LOAD MAY BE INTERRUPTED,
CONFIRM YOUR REQUEST WITH KEY ø
The requested transfer to the inverter may provoke an interruption in the supply of power to the load if Mains 2
characteristics are not within the specified tolerances.
A—8
Appendices
86-133060-00 A00
Installation and User Manual
THE NUMBER OF UPS READY IS INSUFFICIENT,
LOAD TRANSFER IN STANDBY
This message may be displayed in non-redundant, parallel UPS systems, when the number of ready inverters in
not sufficient to supply the load.
INVERTER NOT CONNECTED
This message may be displayed in parallel UPS systems, when the inverter is not connected to the load.
PARALLEL UPS,
FORCED TRANSFER INHIBITED
This message is displayed when forced connection is requested on a parallel UPS system for a power extension.
INTERNAL UPS FAULT,
SELF-TEST FAULT
Communication between the system and the display is faulty. The buzzer sounds slowly and discontinuously.
FORCED TRANSFER TO M2 REQUESTED,
POWER TO LOAD MAY BE INTERRUPTED
CONFIRM YOUR REQUEST WITH KEY ø
This message is displayed following pressing of the "forced-transfer" key 20, when the load is supplied via the inverter.
UPS SUPPLIED BY A GENERATOR SET
This message informs the user that the UPS has received the order to limit the current drawn by the rectifier/charger.
It is displayed when the corresponding signal is transmitted by the remote indications board which must be
conFigure d for this function.
VENTILATION FAULT
This message is displayed when a fault occurs on a fan.
86-133060-00 A00
Appendices
A—9
Galaxy PW™ UPS 100 to 225kVA
(This page left blank intentionally)
A — 10
Appendices
86-133060-00 A00
Installation and User Manual
Appendix B
Monitoring - Electrical Supervision Options
"Teleservice"
"Teleservice" is a contract offering continuous remote supervision and maintenance of UPS systems via a modem.
Real-time communication is established with our "Teleservice" centre for communication of all alarms and events
occurring in the installation.
Utilization Via Teleservice
When the optional JBUS RS232/485 communications board is installed, the time-stamped information can be sent
to the Teleservice center.
The center can remotely consult the same information and carry out the same modifications as the user locally on
the display. Note that only the Teleservice centre can reset the counters for the statistical data.
GTC Board
This electronic board provides user access to the J-Bus communications protocol. Using the data and address
tables provided, the user can customize his installation.
GTC + Software
The user has access to the J-Bus protocol and, in addition, the associated software acquires system parameters
(measurements, status conditions) and transforms them into diagrams, alarm messages and tables. With the click
of a mouse, the user can locally or remotely supervise the UPS system (comprising one or many UPS units).
86-133060-00 A00
Appendices
A — 11
Galaxy PW™ UPS 100 to 225kVA
(This page left blank intentionally)
A — 12
Appendices
86-133060-00 A00
Installation and User Manual
Appendix C
Link to an IBM AS/400® Computer
The Galaxy PW™ can dialogue with an IBM AS/400® computer via a link in compliance with IBM communications
recommendations, thus enhancing the protection provided by your Galaxy PW™.
The IBM AS/400® computer must be configured for the link. This section describes the physical connections
required as well as the system values that must be modified on the AS/400®. For further information, consult the
following IBM documents:
◗
"Planning Guide, Appendix E" concerning physical connections.
◗
"Back-up and Recovery Guide", chapter 7 "Power Loss Recovery" concerning configuration of the AS 400®.
Connect and Configure the AS400 Link
Connections are made to the female client connector XR5 on the "Media Contacts 11" board. The corresponding
male connector is supplied; see Figure 3-12 below for the wiring diagram. A five-wire cable (not supplied) is required.
1.
2.
On the AS/400® side, use a 9 or 15-pin SUB-D connector. (Depending on the type of AS/400®.)
Certain values on the AS/400® must be configured to enable operation of the Galaxy PW™ — AS/400® link.
The values requiring modification and the corresponding procedures are presented in chapter 7 "Power Loss
Recovery" of the "Back-up and Recovery Guide" for the AS/400®.
Configuration values:
◗
QUPSMSGQ: UPS message queue;
◗
QUPSDLYTIM: Uninterruptible power supply delay time;
◗
QPWRRSTIPL: Power restore IPL.
86-133060-00 A00
Appendices
A — 13
Galaxy PWTM UPS 100 to 225 kVA
(This page left blank intentionally)
A — 14
86-133060-00 A00
MGE Warranty & Proprietary Rights for Three Phase Products
MGE Warranty
The liability of MGE UPS SYSTEMS, INC. hereunder is limited to replacing or repairing at MGE UPS SYSTEMS,
INC.’s factory or on the job site at MGE UPS SYSTEMS, INC.’s option, any part or parts which are defective, including
labor, for a period of 12 months from the date of purchase. The MGE UPS SYSTEMS, INC. shall have the sole right
to determine if the parts are to be repaired at the job site or whether they are to be returned to the factory for repair
or replacement. All items returned to MGE UPS SYSTEMS, INC. for repair or replacement must be sent freight
prepaid to its factory. Purchaser must obtain MGE UPS SYSTEMS, INC.’s Return Materials Authorization prior to
returning items. The above conditions must be met if warranty is to be valid. MGE UPS SYSTEMS, INC. will not be
liable for any damage done by unauthorized repair work, unauthorized replacement parts, from any misapplication of
the item, or for damage due to accident, abuse, or Act of God.
In no event shall the MGE UPS SYSTEMS, INC. be liable for loss, damage, or expense directly or indirectly arising
from the use of the units, or from any other cause, except as expressly stated in this warranty. MGE UPS SYSTEMS,
INC. makes no warranties, express or implied, including any warranty as to merchantability or fitness for a particular
purpose or use. MGE UPS SYSTEMS, INC. is not liable for and Purchaser waives any right of action it has or may
have against MGE UPS SYSTEMS, INC. for any consequential or special damages arising out of any breach of
warranty, and for any damages Purchaser may claim for damage to any property or injury or death to any person
arising out of its purchase of the use, operation or maintenance of the product. MGE UPS SYSTEMS, INC. will not
be liable for any labor subcontracted or performed by Purchaser for preparation of warranted item for return to MGE
UPS SYSTEMS, INC.’s factory or for preparation work for field repair or replacement. Invoicing of MGE UPS
SYSTEMS, INC. for labor either performed or subcontracted by Purchaser will not be considered as a liability by the
MGE UPS SYSTEMS, INC.
This warranty shall be exclusive of any and all other warranties express or implied and may be modified only by a
writing signed by an officer of the MGE UPS SYSTEMS, INC. This warranty shall extend to the Purchaser but to no
one else. Accessories supplied by MGE UPS SYSTEMS, INC., but manufactured by others, carry any warranty the
manufacturers have made to MGE UPS SYSTEMS, INC.. and which can be passed on to Purchaser.
MGE UPS SYSTEMS, INC. makes no warranty with respect to whether the products sold hereunder infringe any
patent, U.S. or foreign, and Purchaser represents that any specially ordered products do not infringe any patent.
Purchaser agrees to indemnify and hold MGE UPS SYSTEMS, INC. harmless from any liability by virtue of any patent
claims where Purchaser has ordered a product conforming to Purchaser’s specifications, or conforming to
Purchaser’s specific design.
Purchaser has not relied and shall not rely on any oral representation regarding the Product sold hereunder and any
oral representation shall not bind MGE UPS SYSTEMS, INC. and shall not be part of any warranty.
There are no warranties which extend beyond the description on the face hereof. In no event shall MGE UPS
SYSTEMS, INC. be responsible for consequential damages or for any damages except as expressly stated herein.
Proprietary Rights Statement
The information in this manual is the property of MGE UPS SYSTEMS, INC., and represents a proprietary article in
which MGE UPS SYSTEMS, INC., retains any and all patent rights, including exclusive rights of use and/or manufacture and/or sale. Possession of this information does not convey any permission to reproduce, print, or manufacture
the article or articles shown herein. Such permission may be granted only by specific written authorization, signed by
an officer of MGE UPS SYSTEMS, INC.
IBM, PC-AT, ES/9000, and AS/400 are trademarks of International Business Machines Corporation. MGE and MGE
UPS SYSTEMS are trademarks of MGE UPS SYSTEMS, INC. Other trademarks that may be used herein are owned
by their respective companies and are referred to in an editorial fashion only.
June 2004 Rev A01
Galaxy PWTM UPS 100 to 225 kVA
86-133060-00 A00
MGE Customer Care Center
Technical Support and Product Services
?
Technical questions? If you encounter a problem while following the instructions in this manual, or have
questions about the operation, repair, or servicing of your equipment, please direct calls to MGE UPS
SYSTEMS, INC. Customer Care Center or visit our web site www.mgeups.com for complete service information.
To insure that your questions are correctly answered, please obtain the part number, assembly number, and serial
number of the unit and include them in any discussions or correspondence.
Part Number:
_____________________________________________________________________
Assembly Number: _____________________________________________________________________
Serial number:
_____________________________________________________________________
Who To Contact
Technical Support:
1-800-523-0142 (during business hours)
Customer Care Center:
1-800-438-7373 (Hours: 24/7)
Customer FAQ
or International calls:
1-714-557-1636
Commitment: MGE UPS SYSTEMS, INC. is committed to providing easy to access factory trained experts that will
provide responses to any questions that you might have.
Scheduling Field Service Engineer Support
Scheduling of the MGE Field Service Engineers typically should be done 7 to 10 days before they are
required on-site. If the startup of the UPS is critical to maintaining your schedule, please call the MGE
toll free telephone number at 1-800-438-7373, to insure a safe installation and startup that will maintain
the MGE warranty and insure smooth performance
Return Policy for Repair (RMA)
Should you require factory service for your equipment, contact MGE’s Customer Support Services and obtain a Return
Materials Authorization (RMA) prior to shipping your unit. Never ship equipment to MGE without first obtaining an RMA.
Date:
______________________________________________________
RMA Number:
______________________________________________________
Contact Name: ______________________________________________________
Galaxy PW™ UPS 100 to 225kVA
(This page left blank intentionally)
W—4
86-133060-00 A00
Glossary
Term used
Definition/Meaning
@
At.
/
And/or.
+/-
Plus or Minus.
≤
Equal to or less than.
#
Number.
°C
Degree Celsius.
°F
Degree Fahrenheit.
Ø
Phase angle.
Ω
Ohm. unit of resistance.
®
Trade Mark.
2nd
Second.
AC or ac
Alternating current, also implies root-mean-square (rms).
Ambient Temp.
Temperature of surrounding air.
Ambient noise
Acoustical noise of surrounding environment.
ANSI
American National Standard Institute.
AWG
American Wire Gauge.
Breaker
Electrical circuit interrupter.
BTU or Btu
British thermal unit. Defined as the amount of heat required to raise the temperature of one
pound of water by 1°F.
BYPASS
See “Static Transfer switch”.
BYPASS mode
See “off-line mode”.
Carrier
The company or individual responsible for delivering goods from one location to another.
C
Common.
CB
Circuit breaker.
cm
Centimeter.
dB
Decibels.
86-133060-00 A00
Glossary
G—1
Galaxy PW™ UPS 100 to 225kVA
G—2
DC
Direct current.
Conduit
A flexible or rigid tube enclosing electrical conductors.
C.S.S.
Customer Support Service.
Current rating
The maximum current that a conductor or equipment can carry reliably without damage.
dBA
Decibel Adjusted.
dBrnC
Decibel above reference noise.
DC or dc
Direct current, or voltage.
Digital Meter
The LCD display on the front panel of inverter system.
Earth ground
A ground circuit that has contact with the earth.
Electrician
Refers to an installation electrician qualified to install heavy-duty electrical components in
accordance with local codes and regulations. Not necessarily qualified to maintain or repair
electrical or electronic equipment.
FET
Field effect transistor.
Freq.
Frequency.
Frequency slew rate
The change in frequency per unit of time. Given in term of Hz per second (Hz/sec.).
GND
Ground (safety).
Hz
Hertz, frequency measurement unit, 1Hz is one cycle per second.
Inverter mode
See “on-line” mode.
I
Current.
IEC
International Electrotechnical Commission.
IEEE
Institute of Electrical and Electronic Engineers.
Input branch circuit
The input circuit from the building power panel to the equipment.
Inverter
An electrical circuit that generates an AC voltage source from a DC voltage source.
IGBT
Insulated gate bipolar transistors
kVA
KiloVolt-Ampere. is equal to 1000 Volt-Ampere.
L
Line.
LCD
Liquid-Crystal Display unit.
LED
Light Emitting Diode.
Mains or Mains 1
Main AC input source.
Mains 2
Bypass AC input source.
mA
Milliampere.
MAX.
Maximum.
Glossary
86-133060-00 A00
Installation and User Manual
MCM
Thousand circular mil. standard wire sizes for multiple stranded conductors over 4/0
AWG in diameter. M is from Roman numerical system indicating 1000.
Module
Refers to individual power inverter module.
N
Neutral.
NC
Normally close.
NO
Normally open.
NEC
National Electrical Code.
NFPA
National Fire Protection Association.
NO. or No.
Part number.
On-line mode
Inverter output power is the primary energy source to load.
Off-line mode
Inverter output is off, and the load connected at the inverter output receives power
from utility line via a static transfer switch or maintenance bypass relay.
OSHA
Occupational Safety and Health Agency.
PCB
Printed circuit assembly.
PCB
Printed circuit board.
PWM
Pulse Width Modulation.
SCR
Silicon controlled rectifier.
Shipping damage
Any damage done to an article while it is in transit.
SPDT
Single Pole Double Throw.
Static Transfer
An solid state switching mechanism electronically controlled to pass AC power directly from the utility to an output load.
Technician
Refers to an electronic technician qualified to maintain and repair electronic equipment. Not necessarily qualified to install electrical wiring.
Test connector
DB-9 type connector on the LCD panel allowing MGE UPS SYSTEMS Customer
Support Service technician to access programmable and diagnostic features of the
system.
V
Volts
VA
Volt amperes
VA
Volt-amps, unit for apparent power measurement, equal V x I.
VAC or Vac
Voltage of AC type.
VDC or Vdc
Voltage of DC type.
ve
Battery voltage.
Via
By way of.
86-133060-00 A00
Glossary
G—3
Galaxy PW™ UPS 100 to 225kVA
(This page left blank intentionally)
G—4
86-133060-00 A00
Reorder Form
1660 Scenic Avenue
Costa Mesa, CA 92626
Use this form to report any errors, omissions, or other problems you have experienced, or to order
additional hardcopies of this document. A free copy of this document may be downloaded from the
proprietary MGE Rep Web site. Please contact your MGE UPS SYSTEMS Representative for assistance.
NAME
_______________________________________________________________________________________
COMPANY ___________________________________________________________________________________
STREET ADDRESS ____________________________________________________________________________
CITY ________________________________________ STATE __________________ ZIP ___________________
I would like to order______ (quantity @ $50.00 each) additional copies of the:
Galaxy PW™ UPS 100 to 225kVA
Installation and User Manual
86-133060-00 A00
I would like to report the following problems with this document:
w w w. m g e u p s . c o m
Contact MGE
United States
MGE UPS SYSTEMS
1660 Scenic Ave.
Costa Mesa, CA 92626
Tel: (714) 557-1636
(800) 523-0142
Fax: (714) 557-9788
email: [email protected]
www: mgeups.com
Canada
MGE UPS SYSTEMS
#9, 2789 Thamesgate Drive
Mississauga, ON L4T 4E8
Tel: (905) 672-0990
(877) 672-0990
Fax: (905) 672-7667
email: [email protected]
www: mgeups.com
Latin America and
Other International
MGE UPS SYSTEMS
1660 Scenic Ave.
Costa Mesa, CA 92626
Tel: (714) 513-7831
(800) 523-0142 ext. 7831
Fax: (714) 434-0199
email: [email protected]
www: mgeups.com
1 6 6 0 S c e n i c Av e n u e , C o s t a M e s a , C a l i f o r n i a 9 2 6 2 6 • ( 7 1 4 ) 5 5 7 - 1 6 3 6