1
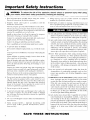
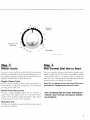
USER'S
GUIDE
€
4
Congratulations
on
your purchase
of a Maytag
Perfornla I'lclothes washer[
satisfaction
Read
is very
this manual
Y_ur
important
for best
to us.
results.
It con-
tains instructions
to acquaint
you wi tin proper
operating
and maintenance
procedures.
In addition
you will find
packed
with your clothes
mation
stain
on
removal
a Laundering
Tips
washer.
It contains
recommended
laundering
and special
laundering
Save
time
and money.
If
wrong,
we suggest
consulting
section. It is designed
lems before consulting
guide
infor-
procedures,
situations.
something
should
go
the "Before You Call"
to help you
a servicer.
solve
If you have questions,
write
number
and phone number)
us (include
or call:
Maytag Appliances
Attn: CAIR Center
Company
Sales
basic
your
prob-
model
Table
Safety Instructions
Operating
Controls
Special
P.O. Box 2370
Cleveland,
TN 37320-2370
1-800-688-9900
USA
1-800-688-2002
CANADA
.................
Tips ....................
at a Glance ..............
Features
.................
Care and Cleaning
Before
1-800-688-2080
USA TTY (for deaf, hearing
impaired
or speech impaired)
(Mon.-Fri.,
8am-Spin
Eastern
Interne[: h ttp: //www.maytag.com
Form
of Contents
No. 575CM[3
You Call ....................
Warranty
Guide
Time)
Guia
Part No. 35-6181
.................
.........................
de L'Utilisateur
del Usuario
MCS Part No. 21001717
1
2
3-4
5-6
6
7
8
.............
.................
10
20
Important
Safety
Instructions
WARNING:
To reduce the risk of fire, explosion, electric shock, or personal
your washer, follow basic safety precautions,
including the following:
L
1. Read all instructions
Retain all instructkms
carefully before using
for future reference.
2. Properly
install and locate
Installation Instructions.
Must be properly
the washer.
in accordance
grounded-See
with
9.
the
When moving,
have
installed
by a qualified
the washer
technician.
injury
checked
when
using
and
properly
10. Inlet hoses are subject to damage and deterioration
over
time. Check the hoses periodically for bulges, kinks, cuts,
wear or leaks and replace them every five years.
Installation Instructions.
Should anyone get an electric shock from the washer, dis
connect electrical power. Do not operate until it has been
repaired by a qualified service technician.
Do not add gasoline, dry-cleaning
solvents, or other flammable or explosive substances to the wash water. These
substances give off vapors that could ignite or explode.
Install or store where it will not be exposed to temperatures below freezing or exposed to the weather.
Connect to a properly rated, protected and sized power
supply circuit. See Electrical Requirements.
Connect
to adequate
ttave a qualified
3. 'Io prevent
plumbing
Do not wash articles which have been previously cleaned,
washed, soaked, or spotted with gasoline, dry-cleaning
solvents, oil, waxes, chemical solvents, alcohol, turpentine, or other flammable or explosive materials. 'I_hese
substances
will be retained in articles, and articles
and drain facilities.
service technician
install your washer.
injury to children:
Do not allow children
to play inside, on, or with the wash-
which still contain these flammable or explosive substances give off vapors that could ignite or explode.
er.
Close supervision
washer.
of chiktren
is necessary
When children are mature enough,
safe, correct use of the washer.
when using the
instruct
Observe these precautions
when using cleaning fluids,
spot or stain removers, etc. These products should be
labeled "nonflammable."
Use according to manufacturers directions
in a well ventilated
area or outdoors.
them in the
Keep all laundry aids out of the reach of children, preferablv in a locked cabinet. Use laundry aids only as directed "by the manufacturer
observing all warnings on container labels.
Thoroughly
rinse articles by hand before placing them
in the washer. Some of these products - rust removers
for exainple = will damage components and the finish
of the washer.
Destroy the carton and plastic bags after unpacking
the
washer. Cartons covered with rugs, bedspreads, or plastic
sheet can create a chamber with inadequate ventilatkm.
Remove the door to the washing compartment
washer is removed from service or discarded.
Keep area around and underneath
washer free from the
accumulation
of combustible
materials, such as lint,
paper, rags, gasoline, and all other flammable vapors
and liquids.
before the
4. Do not reach into the washer if the tub or agitator is moving. The washer is equipped with a safety switch for your
protection. If action does not stop when the washer l'id is
opened during the spin cycle, disconnect
the electrical
power to the washer. Do not operate the washer until it
has been repaired by a qualified technician.
5. Do not tamper
with the controls.
6. rio prevent personal injury and damage to the washer, do
not repair or replace any part of the washer or attempt
any servicing. Servking should be referred to a qualified
service technician.
7.
Do not wash
manu factuPer.
8.
Flame
resistant
remove
them.
tions carefully.
fiberglass
articles
unless
recommended
finishes
- improper
laundering
Follow
garment
manufacturer's
by
could
instruc-
HYDROGEN
GAS IS EXPLOSIVE!
for several minutes. This will release any accumulated
hydrogen gas, As this gas is flammable, do not smoke
or use an open flame during this time.
Recent studies have shown that if vegetable oil contaminated materials are incompletely washed, a carry-over
and buildup of the oil may contribute
to a chemical
reaction (spontaneous
combustion)
that could cause a
load to catch fire by itself. This would be more likely to
happen if the load were left in the dryer after tumbling
stopped
or if items were folded and stacked while
warm.
SAVE
1
THESE
Under certain condi-
tions, hydrogen gas may be produced
in a hot water
system that has not been used for two weeks or more.
If tim hot water system has not been used for such a
period, before using the washer, turn on all the hot
water faucets and let the water flow from each faucet
INSTRUCTIONS
Operating
Tips
For detailed reformation
on sorting, pretreating
stains, etc., see the enclosed
Laundering
Tips pamphleL
Detergent
• Use either liquid or granular
laundry
detergent.
For
best results, be sure detergent
is added to the washer BEFORE the load and be sure the wash water is
above 65 ° E
• Use the correct
amount
of detergent
soil level and water conditions.
you have hard water and very
for the load size,
Use more detergent
soiled loads.
if you have soft water or a lightly soiled load,
detergent.
(See manufacturer's
instructions.)
• Wipe up any
detergent
if
use less
spills on the washer.
Loading
• Put dry, unfolded
top row of holes
• Do not wrap
tor.
large
clothes loosely
for a maximum
items
in the tub, up to the
load.
like sheets
around
the agita-
• Mix large and small items for best
bulky items like blankets
separately.
circulation.
• When
items
laundering
permanent
delicate
construction,
knit items, never use
press
washable
less than
washer
of
shrinkage,
wrinkling
Tips
• The washer
will pause briefly
'lhese pauses are normal.
• 'Ihis
or items
woolens
or loosely
the MEDIUM
water
level setting. This will minimize
and pulling of seams.
Additional
Wash
is designed
throughout
each cycle.
so that it will not spin when
the lid is open. It will, however,
fill and agitate with
the lid open so water
is available
for pretreating
stains
or diluting
fabric
softener.
• If you open the lid during
a spin cycle, the washer
will stop. When the lid is closed and the control dial
pulled
out, the washer
will continue
point it was interrupted.
the cycle
at the
Controls
at a Glance
Large
Cold
(:;dd
_1_A6
Water
Oversize
Heavy
Step
Capacity
Plus / ©uiet
Duty ! 2 Speed
Motor
Water
to circulate
Step
Level
Select
freely
during
agitation.
It may become necessary,
due to bulky fabrics, to adjust
the water
level after agitation
begins.
To adjust
the
water level, turn the control to RESET and then back to
the desired
WATER
setting.
LEVEL
Wash/Rinse
SETTING
LOAD SIZE
Temperature
Your washer gives you a choice of hot, warm or cold
water for washing and cold or warm water for rinsing.
Use the chart below as a guide.
WASH/RINSE
Hot/Cold
Warm/Warm
TEMPS
LOAD TYPE
White and heavily
color-fast
items
Delicate
Moderately
Oversize
3/4 - Full
Large
1/2 - 3/4 Full
Medium
1/4 - 1/2 Full
Mini
REMEMBER:
Temp
Seres
Determine
the selected setting based on clothes load
size. Selection
should
provide
sufficient
water to permit clothes
Wash/Rinse
! 10 Cycles
_1_
Select
Level
Warm/Cold
Cold/Cold
soiled,
items
soiled,
colored items;
most permanent
press
Brightly colored,
items; washable
lightly
woolens
items
soiled
1/4 Full
Items must circulate freely for best results.
REMEMBER: In wash water temperatures below 65 ° F, detergents do not dissolve well or clean well. Care labels define
cold water as up to 85 ° F.
Regular
Fabrics
,1
Wrinkle Free
Fabrics
a
12
Start
F_U[ [o Slat
Step
Select
Pull Control
Cycle
Wrinkle
Free, or Delicates
Regular
Fabrics Cycle
Provides
normal
and normal
agitation
Wrinkle
Free Fabrics
Provides
normal
cycles.
spin
speeds
to
Note:
when
you change
Do not attempt
Damage
the setting.
to turn the control
dial coun-
to the timer will result.
Cycle
agitation
speed
for
six minutes,
a
pause,
then slow agitation
for the remainder
of the
wash cycle to protect wrinkle
free fabrics. Spin speed
will be normal to reduce water retention.
Cycle
Provides
slow agitation
for delicates
and knits.
a non-agitated
soak or to shorten,
skip or repeat any
part of a cycle. The control dial must be pushed
IN (off
terclockwise.
items. For maximum
Dial Out to Start
You may stop the washer at any time by simply pushing the control dial IN. Therefore
it is possible to obtain
position)
wash cottons and heavily soiled
cleaning, set the dial at 14.
Delicates
re> _t3p
Step
ro select a cycle, push the control dial IN (off position)
and turn it to the right (clockwise)
until the pointer is at
the number
of minutes desired for the wash load in tile
Regular,
/ Pus_
speed
and
normal
spin
speed
See Laundering Tips for proper washing procedures, stain removal, and special laundering situations.
Special
1. Liquid
The dispenser
bleach before
these
Features
Bleach
automatically
it reaches your
Dispenser
2. Fabric
dilutes
liquid
chlorine
wash load. 'Io use, follow
steps:
1.Measure
liquid
the instructions
chlorine
bleach
on the bottle.
carefully,
following
The dispenser
cally releases
the bleach to the dispenser
before adding
Avoid splashing
or over-filling
the dispenser.
the
NOTE:
• Never pour undiluted
liquid chlorine bleach directly
onto the load or into the wash tub. It is a powerful
chemical
and can cause fabric damage,
such as tearing or color
• If you
pour
pour
loss, if not used
prefer
to use
properly.
color-safe,
non-chlorine
amount
a
it into the wash tub with your detergent.
Do not
non-chlorine
bleaches into the bleach dispenser.
automatiliquid
fabLIQUID
DISPENSER
measured
of fabric
sof-
tener
into
dispenser
top to fill line only.
2. If fabric
below
water.
softener
line,
If it is necessary
bleach,
Dispenser
ric softener
at the proper
time during
the cycle. To
use, follow these steps:
1. Pour
2.Add
load.
Softener
the dispenser,
fabric softener
_
AGITATOR
comes
add
warm
to clean
pull
the
dispenser
off of the agitator. Then hold the dispenser
side up and twist to disengage
dispenser
with bottom
bottom from
top (see below). You are then able to clean
using warm water and a brush if necessary.
both
parts
lb reassemble,
hold both pieces in an upright
position.
Insert the inner chamber
into the outer chamber
using
the slots to position
locking position.
parts.
Rotate
until
OUTER
CHAMBER
Pour liquid chlorine bleach into
bleach dispenser.
INNER
CHAMBER
tabs
snap
into
3. Automatic
Lint
Filtering
The Lint Filtering
For this reason, the cycle will always be completed. If
heavier fabrics in such out-of-balance loads should ever
System
System
contain
does not require cleaning.
Wash and rinse water is filtered and re-filtered continuously to trap lint shed by most fabrics during the agitation cycle before it can be re-deposited
on the wash
load. The engineered bole design on the wash basket in
conjunction with water flow produced bv the agitator,
traps lint away from the clothes between the inner
wash basket and the outer tub. Lint is automatically
flushed from the washer during the spin cycle.
4. Safety
If for any
Spin
reason
you
open
the
washer
lid when
the
washer is in a spin or extract period, the operation
will
immediately
stop. This is for your personal
safety. If
your washer does not stop, call your service technician
immediately.
automatically
When the lid is closed,
resume.
the operation
will
excessive
moisture
at the completion
of the
the clothes in the washer
and reset
cycle, redistribute
the control
dial for the final spin period.
6. Overload
Protector
A built-in protector
automatically
shuts off the washer
motor in case of an overload.
This can occur if:
• The load being
washed
• Too many appliances
ating your washer.
is too heavy.
are plugged
• A low voltage
condition
• Lid is opened
and closed
The
overload
again when
temperature.
If the motor
protector
the motor
stops
exists
into the line oper-
on the line.
repeatedly.
permits
has
repeatedly,
cooled
the
waslner
to start
to a safe operating
call your service
technician.
5. Unbalanced
Spin
Load Compensator
Your new washer is designed
loads without slmtting
down
to handle out-of-balance
or interrupting
the wash-
ing cycle.
Care
& Cleaning
1. After washing,
2. Check
leave the lid open until the interior
is dryo
hoses to be sure there are no kinks or knots.
3. Your washer
should not be installed where temperatures will go below freezing, as damage to the washer
could result.
4. '11)clean, occasionally
sponge
5. Lifetime
wipe exterior
with a clean damp
or cloth. Do not use polish on plastic parts.
lubrication
er never needs
is done at the factory, so your wash-
to be oiled or greased.
6. Do not lay heavy or sharp objects on top of your washer.
7. The top of the washer should not be used for removing
stains from garments. Some stain removers, such as rust
remover, will mar the finish.
8. Remove
pins, buckles
or other sharp objects
clothes to prevent scratching interior parts.
9. Clothes
should
not be stored
from
in washer.
10. Bleach, detergent,
solvents, etc. spilled on the top of
your washer that are allowed to remain will remove the
glossy finish. Remove all spills with a damp, soft cloth.
11. If you close your home for the winter, have a service
technician dram the washer. Unplug cord from electrical
outlet and disconnect
hoses from faucets.
Before
You Call
Check
the
following
Won't Drain:
• Is the hose kinked
• Is the drain
if your
clothes
washer...
or knotted?
outlet
clogged?
Does Not Fill:
• Is the electrical
• Has
cord
a fuse blown
• Is the control
plugged
in correctly?
or is the circuit
dial pulled
faucets
• Are the hoses
kinked
• Is the control
dial set properly
• Hose
turned
on?
or knotted?
(not in the off position)?
for 30 minutes
filter screens
tripped?
out?
• Are the hot and cold water
• Turn off, let stand
breaker
then
may be plugged.
restart.
Disconnect
Motor
hoses
thermal
and
protector
clean
may have
engaged.
screens.
Water Temperature
Is Incorrect:
• Is the temperature
switch set correctly?
• Are the hoses
connected
• Are the hot and
• Is water
heater
Is Noisy:
• Is the washer
to the correct
cold faucets
turned
faucets
(hot to hot, cold to cold)?
on?
set correctly?
level and
firm to the floor?
Does Not Spin:
• Is the lid closed?
• Is the electrical cord plugged
in correctly?
• Has a fuse blown or is the circuit breaker tripped?
Is Leaking:
• Are the hose connections
tight at the faucets?
• Is end of drain hose correctly
For further
assistance
U.S. customers
using
inserted
in and secured
contact Maytag Appliances
Sales
U.S. 1-800-688-9900
or Canada
TTY for deaf, hearing
impaired
to drain facility?
Company,
Maytag
1-800-688-2002
or speech
impaired,
Customer
Assistance:
call 1-800-688-2080.
Performa
Clothes
FULL ONE-YEAR
byMaytag
Washer
WARRANTY
Any part which fails in normal
or replaced free of charge.
LIMITED
Warranty
home use during
the first year after the date of original
retail purchase
will be repaired
WARRANTY
After the first year from the date of original retail purchase,
which fail in normal home use will be repaired or provided
other costs, including labor, mileage and transportation.
through the time periods listed below, the designated parts
free of charge for the part itself, with the owner paying all
Second Year through Tenth Year
All parts of the transmission assembly
Second Year through Lifetime
The inner wash basket
]['he full warranty and the limited warranty apply when the appliance is located in the United States or Canada.
Appliances located elsewhere are covered by the limited warranty only, including parts that fail during the first year.
This warranty
gives you specific legal rights, and you may also have other rights that vary from state to state.
TO OBTAIN
"I'0 locate an authorized
service company
in your
chased;
or call Maytag Appliances
Sales Company,
ranty service, please call or write:
Maytag Appliances
Sales Company
Attn: CAIR Center
P.O. Box 2370
Cleveland,
"IN 37320-2370
U.S. 1-800-688-9900
U.S. Customers
using
TTY for deaf,
When contacting Maytag Appliances Sales
the following:
(a) Your name, address and telephone
(b) Model number and serial number
(c) Name and address of your dealer
(d) A clear description of the problem
(e) Proof of purchase.
WARRANTY
SERVICE
area contact
the Maytag
dealer from
Maytag Customer
Assistance.
Should
Company,
Canada
hearing
whom
your appliance
was puryou not receive satisfactory
war-
1-800-688-2002
impaired
Maytag Customer
or speech
Assistance
impaired,
call 1-800-688-2080.
about a service problem, please include
number;
(found on the back center of the control panel) of your appliance;
and the date the appliance was purchased;
you are having.
What is not covered by these warranties:
1.Conditions
and damages
resulting
from any of the
following:
a. Improper installation, delivery, or maintenance.
b. Any repair, rnodification,
alteration
or adjustment
not authorized by the manufacturer
or an authorized
servicer.
c. Misuse, abuse, accidents or unreasonable
use.
d. Incorrect electric current, voltage or supply.
e. Improper setting of any control.
2. Warranties are void if the original serial numbers have
been removed, altered, or ca n not be read ily determined.
3. Products purchased for commercial or industrial
4. The cost of service or service call to:
a. Correct installation errors.
use.
b. Instruct the user on proper use of the product.
c. l'ransport the appliance to the servicer.
5. Consequential
or incidental damages sustained by any
person as a result of any breach of these warranties.
Some states
do not allow
consequential
or incidental
sion may not apply,
the exclusion
damages,
or limitation
of
so the above exclu-
User's Guides, service manuals and parts catalogs are axailable from Maytag Appliances Sales Company, Maytag Customer Assistance.
MAYI'AG
MAYTAG
° 403 W. 4 th Street
_"
N.
•
° P.O. Box 39
f
,_
° Newton,
http://www.maytag
Iowa
corn
50208