1
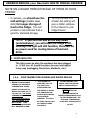
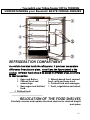
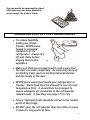
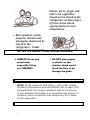
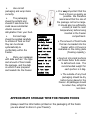
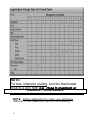
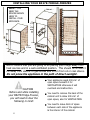
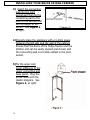
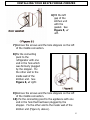
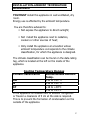
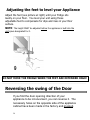
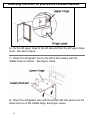
BR27B Built-in Combi Fridge-Freezer User Manual for your BR27B BUILT-IN COMBI FRIDGEFREEZER NOTE: This User Instruction Manual contains important information, including safety & installation points, which will enable you to get the most out of your appliance. Please keep it in a safe place so that it is easily available for future reference. 1 CONTENTS HT mod 140306 YOUR APPLIANCE’S SPECIFICATIONS …….…….3 SAFETY INFORMATION / ENVIRONMENTAL NOTE .. 4 USING YOUR FRIDGE……………….……………..………5-18 YOUR BR27B FRIDGE …………………….………………….5 BEFORE USING YOUR FRIDGE…………….……………….…6 UNDERSTANDING YOUR FRIDGE-FREEZER…………7-11 ARRANGING FOOD IN YOUR FRIDGE-FREEZER …12-14 NOTES ON USE …………………………………………………15 STORAGE GUIDE FOR YOUR FRIDGE-FREEZER …16-18 CLEANING AND MAINTENANCE ……………………19-21 TIPS FOR SAVING ENERGY …………………………………21 INSTALLING YOUR FRIDGE-FREEZER .……………..22-27 LEVELLING YOUR FRIDGE TO YOUR FLOOR ………..…28 HOW TO REVERSE THE DOOR SWING ………………29-31 TROUBLESHOOTING ………………………………….…32-34 CONDITIONS OF GUARANTEE……………………….………35 CONTACT DETAILS……………………………………………..36 2 Specifications of your BR27B Built-In Fridge-Freezer HT mod 02/03/06 Congratulations on purchasing a Baumatic BR27B Built-in Combi Fridge-Freezer! Your Fridge has: Â Â Â Â Â Â Â Â Â Â Â Â Â Â Â Â Gross capacity: 262 litres Net capacity (fridge/freezer) 163/88 litres Energy efficiency class: B Frost free Freezer Star rating: **** Automatic Fridge Defrost 4 Safety glass fridge shelves 2 Salad crispers 3 General racks Egg rack Bottle rack 4 Freezer drawers Ice cube tray Adjustable feet Reversible Doors Frost Free function Rated ‘B’ for energy efficiency. Dimensions mm (H x W x D) 1775 x 540 x 545 To fully enjoy using your appliance long into the future, please firstly familiarise yourself with the specifications, safety advice and operational instructions included in this manual. NOTE: When you install your Fridge-freezer, it is important to bear in mind its climatic rating. In order to find out the climatic rating of your appliance, check the data rating tag that can be found within it. It indicates the ambient temperature range within which your appliance will function. 3 Important Safety Information: Please Read this before installing & using. ELECTRICAL SAFETY • • • NOTE - This appliance must be grounded. In the event of a malfunction or breakdown, grounding will reduce the risk of electric shock by providing a path of least resistance of electrical current. You will be able to tell if it is because a non-grounded appliance will give off an electrical discharge. Manufacturer declines all responsibility for any damage due to nongrounding of appliance. DURING THE GUARANTEE PERIOD ONLY BAUMATIC SERVICE ENGINEERS OR AN AUTHORISED AGENT OF BAUMATIC SHOULD CARRY OUT REPAIRS ON THIS UNIT. DO NOT USE IF THE SUPPLY CORD IS DAMAGED. NEVER TAKE RISKS WITH FIRE! ENSURE YOU CONNECT THIS APPLIANCE TO A SUPPLY RATED AT 220-240V (or 200-230V) and 50HZ. NOTE: the supporting structure is constructed in panels of treated sheet steel, electrostatically enamelled to resist ill-treatment and to give long-lasting beauty and shine. :Do not attempt to alter the specifications of this appliance. Doing so could damage the machine, cause injury & invalidate your warranty. DO NOT USE ADAPTERS/SHUNTS. :Do not allow children to play with, near or inside this appliance. :Do not pull on the power supply cable to free the plug from the wall! :Do not attempt to use your appliance outdoors or any place where it is likely to come into contact with the elements. :Do not pull out or insert the plug with wet hands. :Before any cleaning or maintenance work, ensure that the appliance has been disconnected from the power supply. :Never allow the back coils of the Appliance to come into contact with any wall surface. ALWAYS ENSURE THAT THE SPACE INTO WHICH YOU ARE PLACING YOUR APPLIANCE IS FREE OF STORED ITEMS SUCH AS PAPERS OR OTHER FLAMMABLE MATERIALS. :NEVER block the VENTILATION OPENINGS OF THE APPLIANCE EITHER INSIDE OR ON ITS EXTERIOR. IT IS VITAL TO KEEP YOUR APPLIANCE WELL VENTILATED SO THAT THERE IS PROPER AIR FLOW BETWEEN THE BOTTOM OF THE UNIT AND THE PLINTH / KICK PLATE ON WHICH IT IS SITTING. :WARNING – DO NOT DAMAGE THE REFRIGERANT CIRCUIT. AT THE END OF THE FUNCTIONAL LIFE OF THE EQUIPMENT (WHICH USES COOLING GAS R600o [ISOBUTANE]) AND INFLAMMABLE GAS INSIDE THE INSULATING FOAM, IT MUST BE PLACED IN SAFETY BEFORE SENDING IT FOR PROPER WASTE DISPOSAL. PLEASE OBSERVE ALL INSTALLATION ADVICE IN THIS MANUAL FOR SAFE USAGE OF YOUR APPLIANCE. Note: Before discarding an old refrigerator/freezer, switch off and disconnect it from the power supply. Cut off and render any plug useless. Ensure that the door cannot jam (removing it is best), regardless of whether or not it can be pushed open from inside. AN OLD FRIDGE/FREEZER CAN BE A DEADLY PLAYTHING FOR CHILDREN! CONFORMITY TO W.E.E.E. DIRECTIVE 4 Your BR27 Built-in Combi Fridge - Freezer: 5 UNDERSTANDING your BR27B FRIDGE-FREEZER: UPON DELIVERY: When your Fridge-Freezer has been delivered, you will need to wait approximately 3 hours before turning it on. The fluid of the compressor installed in the appliance will need time to settle. PLEASE DO NOT PLUG IN ANY EARLIER THAN THIS! NOTE: THERE CAN BE AN ODOUR WHEN YOU FIRST SWITCH ON THE APPLIANCE. IT WILL VANISH WHEN THE UNIT STARTS COOLING. We recommend that you have the Fridge-Freezer delivered near to where you plan to install it so that this fluid can settle. SITUATING YOUR FRIDGE-FREEZER CAUTION: DO NOT PLACE THE APPLIANCE NEAR HEAT SOURCES. FOLLOW THE INSTALLATION ADVICE SHOWN ON PAGE 22. FOR FULL INSTALLATION ADVICE, PLEASE SEE PAGE 22 MAKE A NOTE OF THE LOCATION FOR YOUR NEW FRIDGE-FREEZER. MAKE SURE THAT IT WILL FIT PROPERLY SO THAT: 1) The doors can open freely & completely. 2) You can access your food conveniently. 3) There is sufficient space (5cm) at the back for the cooling coils of the condenser to give off heat safely & that they do not touch the plug (see SAFETY SECTION). NOTE: You can reverse the swing of the door to customise the unit to your location. Please see pages 26-29 for details. 6 UNDERSTANDING your Baumatic BR27B FRIDGE-FREEZER YOU SWITCH ON YOUR APPLIANCE by PLUGGING IT IN & SETTING THE THERMOSTAT. This can be found on the control panel, inside the Fridge, at the top. It looks like this: NOTE: When the control panel is connected to a power source, the green Power Indicator lamp (3) and the red Over-temperature warning lamp (4) illuminate. KE Y 1. TEMPERATURE SETTING Fridge-Freezer Thermostat setting Turning the knob setting clockwise (from a smaller dot to a larger dot) will make all the compartments of your fridgefreezer colder. Because the interior temperature may dip below 0°C, you should not leave your fridge on the maximum setting for long periods. -It takes time for your appliance to cool to the desired level. 7 UNDERSTANDING your Baumatic BR27B FRIDGE-FREEZER NOTE ON LONGER TERM STORAGE OF ITEMS IN YOUR FRIDGE: o In general, you should use the mid-settings (middle sized dots) for longer storage of food in the fridge. This will produce a mid-coldness that is good for standard storage. o Turning the dial to a smaller dot setting will give a milder coldness to the interior to your fridge-freezer. NOTE: If you turn the dial all the way down (anticlockwise), you will make the fridge STOP. Although the light will still function, there will be no power used for cooling items of food and drink. 2 . P O WE R I N D I C A T O R This light comes on after the appliance has been plugged in. It will turn off should the power become interrupted in any way (unplugging, blown fuse, blackouts, etc.). 3 & 4. OVER-TEMPERATURE WARNING AND BUZZER RELEASE ¾ WHEN THE APPLIANCE SENSES THE INTERIOR TEMPERATURE GOING ABOVE THE DEGREE TO WHICH YOU HAD SET IT TO COOL TO, THE OVERTEMPERATURE WARNING INDICATOR ¾ THIS SIGNAL IS CHECK THAT THE DOORS THE FACT THAT ARE CLOSED PROPERLY. SOMETHING HAS HAPPENED TO UPSET THE TEMPERATURE REGULATION INSIDE YOUR FRIDGEFREEZER. IT COULD (‘4’ IN FIGURE, P.7) WILL BLINK. THIS BE THAT A DOOR HAS WILL BE ACCOMPANIED PROPERLY. BY A BUZZING SOUND. ¾ UPON HEARING THIS, ALERTING YOU TO NOT BEEN CLOSED NOTE: WHEN THE TEMPERATURE IN THE FREEZER COMPARTMENT FALLS TO THE DESIRED LEVEL, THE RED OVER- TEMPERATURE LIGHT WILL AUTOMATICALLY GO OUT. 8 UNDERSTANDING your Baumatic BR27B FRIDGE-FREEZER Frost Free feature The BR27B Fridge-Freezer is unique in that it is FROST FREE. This means that you will NEVER HAVE TO DEFROST your appliance. It has a built-in frost prevention device. Error Indication ¾ Temperature sensors are installed in the refrigerator and in the freezer. ¾ The red warning lamp will blink if problems occur with the appliance’s temperature sensor. **************************************************************************************************************************************************************************************************************************************************************************************************************************************************************** REMINDER 1: Your FridgeFreezer’s thermostat automatically regulates the inside temperature of the compartments. ON THE MAXIMUM SETTING, YOUR FRIDGE WILL WORK HARDER TO MAINTAIN THIS LOW TEMPERATURE. AFTER YOU REACH THIS TEMPERATURE, YOU SHOULD TURN THE KNOB TO A MILDER SETTING. 9 REMINDER 2: Allow the unit time to settle after delivery. If your plug and power socket are now behind the fridge and you still need to move the unit into place, be especially careful. Remember to leave a safe distance between the back of the fridge and the wall or rear of the unit cabinet before installing. o You switch your fridge-freezer OFF by TURNING UNDERSTANDING your Baumatic BR27B FRIDGE-FREEZER THE THERMOSTAT KNOB TO POSITION ‘0’. REFRIGERATION COMPARTMENT As cold air circulates inside the refrigerator, it produces temperature differences from place to place. Area 6 (see the figure above) is the coldest. Different foods should be placed in different areas, according to their properties. 1. Eggs and Butter 2. Canned food and seasonings. 3. Beverages and bottled food. 4. Pickled food. 5. Wheat-based food, canned food, milk and bean curd. 6. Cooked food and sausages. 7. Fruit, vegetables and salad. ***************************************************** ********************************************************************************* RELOCATION OF THE FOOD SHELVES Carefully remove and replace the food shelves for desired height and space 10 CAREFULLY REMOVE AND REPLACE THE FOOD SHELVES TO CUSTOMISE THE INTERIOR OF YOUR FRIDGE TO YOUR INDIVIDUAL STORAGE NEEDS. UNDERSTANDING your Baumatic BR27B FRIDGE-FREEZER NOTE: When you first switch on the appliance, allow 24 hours for it to cool down to the desired temperature. During this time, DO NOT open the door often or place a lot of food inside the unit. * If the appliance is switched off then switched back on again after a short period, the compressor will start up again after approximately half-an-hour. This is part of the normal operation of the appliance. MAKING ICE CUBES Do not Pour water into the Ice cube tray. Fill use a knife or other metal tools take ice out of the tray once ice has to ¾ full in each cell of the trayto then been ofmade. place the tray in the topmost shelf the freezer compartment. 8 Ice can easily be removed by hand after the tray has been placed in warm water for a short time. ARRANGING FOOD IN YOUR FRIDGE-FREEZER • To reduce humidity inside your fridgefreezer, NEVER place liquids in unsealed containers in the refrigerator. Always dry off wet items before placing them in the appliance. • • Make sure that you arrange food in such a way that the door can close completely. Be especially wary of protruding items (such as bottles) between shelves and the inside of the door. • NEVER place warm food inside your refrigerator or freezer. Warm food must be allowed to cool at room temperature first. It should then be arranged to ensure adequate air circulation in the refrigerator compartment. If freezing, see page 17 for tips. • Crispy / delicate foods should be stored in the coldest parts of the fridge. • DO NOT open the refrigerator door too often or leave it open for long spells of time. 9 • ARRANGE meat and cleaned fish (wrapped in packages or sheets of plastic) which you will then use within 1-2 days. • You can put fruits and vegetables into the crisper without leaving them in their packaging. • Unpleasant odours within mean your fridge needs ARRANGING FOOD INmay YOUR FRIDGE-FREEZER cleaning or that food has spoiled. • If you are planning on being away from your refrigerator for a few days (such as going on holiday), make sure that you remove quickly perishable articles of food from your fridge before you go and dispose of them. • Always be mindful of the storage life of foods you are going to be freezing for a long time. Although the temperature of the freezer can dip to a very low level this does not mean that food can be stored indefinitely. Pay particular attention to the information printed on the packaging of the foods you are going to be placing in your freezer. • You should seal your food in suitable storage bags before placing them in the refrigerator or freezer. Label freezer • bags appropriately. 13 Always store food with a view to how often it will be used. Food consumed daily should be placed in the most convenient area so that you don’t end up leaving the door open for long periods while you search for food. • Do NOT store excess quantities or weights of food. Always try to leave gaps between your packages for better ARRANGING FOOD IN YOUR FRIDGE-FREEZER • storage results. • Do not place food too closely to the interior walls – items put too close to the walls may freeze to them! • If you place vegetables with their stalks or roots facing towards the cold source, you will be able to store them for longer. • The leaves on carrots, turnips, etc. should be removed before you store them. • Always store eggs vertically in the egg holder provided in the door. 8 Onions, garlic, ginger and other root vegetables should not be stored in the refrigerator as these types of food can be stored appropriately at room temperature. • Ripe squashes, melon, pawpaw, bananas and pineapples should not be stored in the refrigerator. Colder temperatures accelerate NOTES ON USING YOUR FRIDGE-FREEZER the ripening process. ALWAYS Cover and wrap foods, especially if they are PUNGENT. DO NOT place paper or plastic on the shelves which would block the flow of air through the grids. NOTE: At the maximum cold setting, with a high outside (ambient) temperature and well-stocked (full or nearly full) compartments, the Fridge’s operation may be continuous. If your appliance has taken in an unusually high amount of moisture, some ice deposits may temporarily form inside, on the evaporator. 9 REMINDER: You should regulate the temperature of your Fridge bearing the following in mind: o o o o o Ambient temperature How often the doors are opened and closed Quantity of food stored in the compartments Moisture content of what you place in your fridge The location of your appliance IN CASE OF A BLACKOUT (GENERAL POWER FAILURE) In case of Power Failure, find out how long the electricity will be off. If the failure is not going to be for any longer than 12 hours, leave the food in the freezer and keep the door closed. If the POWER FAILURE is going to last longer than 12 hours and some food defrosts, consume the latter as soon as possible. LONG ABSENCES (holidays, etc.): In the case of long absences, your appliance must be switched off, emptied out completely, dried and the doors left open to prevent the formation of mould and unpleasant odours. STORAGE GUIDE FOR YOUR FRIDGE-FREEZER The charts below are approximate guidelines only. STORING FOOD IN YOUR REFRIGERATOR 16 Remember to store food properly, observing advice on the packaging. STORING FOOD IN YOUR FREEZER suitable for freezing BEFORE they NOTE: When buying commercially are put into the freezer. Fresh foods – Foods to be stored in the freezer should be in good edible condition and 17 available frozen food, make sure that the packaging is neither sodden nor covered with frost (snow) before you place it in the freezer at home. ¾ Use correct packaging and wrap items correctly. ¾ The packaging should be airtight and shouldn’t leak since this could cause substantial vitamin loss and dehydration from your food. ¾ Foil and bags should be applied carefully to articles of food so that they can be stored systematically & comfortably within the freezer. ¾ Mark your packages with data such as: the type and amount of food inside the package, and the date on which it was prepared and loaded into the freezer. Defrosting Frozen Food – Partially thawed or defrosted food should be used as soon as possible. Defrosted food cannot be put back in the freezer unless it has been cooked first. ¾ ¾ It is very important that the food is frozen as quickly as possible. We therefore recommend that the size of the package not be too large. It should also be sufficiently cooled (at least to room temperature) before being inserted in the freezer compartment. ¾ The amount of fresh foods that can be loaded into the freezer within 24 hours is indicated on the rating plate (freezing capacity). ¾ Food cut into small portions will freeze faster & be easier to defrost and cook. The recommended weight for each portion is 2.5kg. ¾ The outside of any food packaging should be dry before being placed in the freezer. All packages should be odour-free, airtight & non-toxic. APPROXIMATE STORAGE TIME FOR FROZEN FOODS (Always read the information printed on the packaging of the foods you are about to store in your freezer). 18 NOTE: For fast, intensive cooling, turn the thermostat knob to a very high (i.e., close to maximum or CLEANING / MAINTENANCE maximum itself) position for some 24 hours. NOTE: Before attempting to clean your appliance, UNPLUG IT and make sure you do the following: 19 WE RECOMMEND THAT YOU CLEAN THE INSIDE OF YOUR REFRIGERATOR ONCE A MONTH. 9 Pay particular attention to the sealing rubber bars of the doors. These need to be kept clean for hygienic reasons as well as to allow the door to close properly. 9 Leave the door open during cleaning. 9 Remove detachable accessories and wash them with water and 1-2 spoonfuls of vinegar. Do not wash accessories in your washing machine! 9 In order to collect any liquid caused by spillages or from exposure to excessive humidity, take out the bottom drawer and soak up the water using a sponge as shown in the figure pictured below. Y 9 Clean the inside of your Fridge using a solution of soda bicarbonate in warm water (1 tbsp Bicarbonate to 2 litres of water). NEVER USE SOLVENTS TO CLEAN THE INSIDE OF YOUR REFRIGERATOR. MAINTENANCE FROM TIME TO TIME, YOU WILL NEED TO REPLACE THE INTERNAL BULB. REMEMBER TO UNPLUG YOU APPLIANCE FIRST Find the lamp housing in the top right of the refrigerator’s interior. Gently move the transparent lamp cover plate from the lamp cradle. Unscrew the bulb and replace with a new one, maximum of 15 CLEANING / MAINTENANCE w. HOW TO CLEAN THE CONDENSER – NOTE: You will be alerted to the presence of excessive amounts of dust on the condenser by a sound alarm. NOTE: YOU WILL NEED TO MOVE 20 THE APPLIANCE FROM ITS POSITION IN THE UNIT IN ORDER TO ACCESS THE CONDENSER. DO SO WITH CAUTION! Upon hearing this alarm, you should: • Check the air circulation through the bottom rail openings. Your fridge-freezer needs good ventilation at the plinth level at the bottom. • If necessary, clean or vacuum the dust from the condenser. See the instructions BELOW. The condenser consists of the coil structure at the back of the refrigerator. To clean it: 1. 2. 3. Disconnect from the power supply. Move the refrigerator out of its cabinet housing. TAKE EXTREME CARE whilst performing this. The back of the appliance consists of the condenser coils. These must be either dusted lightly or vacuumed. Be careful not to damage them as they are vital to the appliance’s good functioning. After cleaning, move the refrigerator back into place. NOTE – FROM TIME TO TIME, YOU WILL ALSO NEED TO CLEAN THE DRAIN PAN THAT SITS ATOP THE COMPRESOR. Do NOT remove it to clean it. IT LOOKS LIKE THIS (at right): TIPS FOR ENERGY SAVINGS 21 9 Try not to open the door too often, especially when the weather is wet and hot. Once you open the door, be sure to close it as soon as possible. 9 ALWAYS MAKE SURE THAT YOUR APPLIANCE HAS THE VENTILATION IT NEEDS. BE ESPECIALLY MINDFUL OF THE NEEDED AIRFLOW BETWEEN ITS PLINTH AND THE FLOOR (SEE INSTALLATION SECTION). 9 Use higher thermostat settings only if essential and not for constant, long-term use. 9 Before loading the appliance with packages of fresh foods, ensure they are cooled to an ambient temperature (except in the case of soup). 9 If the door seal (gasket) is damaged, the energy consumption will be much higher. To keep the sealing in good condition, be sure not to spill oils or fats on it. A damaged seal will need to be replaced. A crushed one (usually if the door has been reversed) can be fluffed with a hair dryer. 9 The condenser at the bottom of the appliance must always be clean and free of dust. 22 INSTALLING YOUR BR27B FRIDGE-FREEZER NOTE – YOU NEED THE SPACES SHOWN HERE TO INSTALL YOUR APPLIANCE. -- 200 cm² -- 1776 1782 mm 575cm NOTE: Ensure that you are going to be placing your fridge away from heat sources and in a well-ventilated position. This should be at least 3 cm away from electric or gas stoves and 30 cm from oil or coal stoves. Do not place the appliance in the path of direct sunlight. CAUTION Before and while installing your BR27B Fridge-Freezer, Your appliance needs 200 cm² of open space beneath it for VENTILATION otherwise it will overheat and malfunction. You need to remove the back of the cabinet unit to allow 200 cm² of open space, also for VENTILATION. You need to leave 4mm of space between each side of the appliance & the interior of the cabinet. you will need to bear the following in mind: 23 INSTALLING YOUR BR27B FRIDGE-FREEZER 1)After ensuring that the doors open the same way and in the direction you want, fix the joint sockets to the freezer and fridge doors using the provided screws See Figure 1, at left. 2) Move the appliance into the kitchen unit, ensuring the left side of the panel of the refrigerator is as close to the unit (cabinet) wall as possible. See Figure 2, at right. 23 INSTALLING YOUR BR27B FRIDGE-FREEZER 3) Insert the connecting pad into the joint socket and then fix the connecting pad to the door of the kitchen unit with a margin of 2022mm. See Figure 3, at right. 4) Properly place the appliance with a 3-4mm space between the left side and the wall of the cabinet. Ensure that the doors of the fridge-freezer and the kitchen unit can be easily opened and closed, and the connecting pad is correctly settled in the joint socket. 5) Fix the upper and lower stiffeners to the upper connection and base panel. Plug the screw holes with the plastic stoppers. See Figure 4, at right. 24 INSTALLING YOUR BR27B FRIDGE-FREEZER 6) Fill the left gap of the kitchen unit with the gasket. See Figure 5, at left. 7) Remove the screws and the hole stoppers on the left of the middle connection. 8) Fix the connecting pivot to the refrigerator with one end in the hole which was formerly plugged by the stopper. Fix the other end to the inside wall of the kitchen unit. See Figure 6, at right. 9) Remove the screws and the hole stoppers on the left of the middle connection. 10) Fix the connecting pivot to the appliance with one end in the hole that had been plugged by the stopper. Fix the other end to the inside wall of the kitchen unit (Figure 6, above). 25 INSTALLING YOUR APPLIANCE- CONTINUED Fitting Bar Install the Fitting Bar (shown in the picture below), so that it attaches to the top of the appliance and underneath the top of the cabinetry, indicated by the arrow: *Please be aware that the Fitting Bar is not attached to the appliance and needs to be secured during installation. 26 INSTALLATION-AMBIENT TEMPERATURE GUIDELINES YOU MUST install this appliance in well ventilated, dry room. Energy use is affected by the ambient temperature. You are therefore advised to: Not expose the appliance to direct sunlight; Not install the appliance next to radiators, cookers or other sources of heat; Only install the appliance at a location whose ambient temperature corresponds to the climate classification, for which the appliance is designed. The climate classification can be found on the data rating tag, which is located at the left on the inside of the appliance. Cooling Temperature Ranges Climate Classification Recommended Ambient Temp. SN +10 to +32° C N +16 to +32° C ST +18 to +38°C T +18 to +43°C If the appliance is installed next to another refrigerator or freezer a clearance of 5 cm at the side is required. This is to prevent the formation of condensation on the outside of the appliance. 27 Adjusting the feet to level your Appliance Adjust the feet (see picture at right) until your Fridge sits levelly on your floor. You level your unit using these adjustable feet to compensate for dips and rises in your floor surface. NOTE: The height MUST be adjusted before the appliance is built into the unit space designated for it. DO NOT MOVE THE FRIDGE WHEN THE FEET ARE EXTENDED HIGH! ************************************************************************************************************************************************************************************************************************************************************************************************************************************************************************************************************************************************************* Reversing the swing of the Door If you find the door opening direction of your appliance to be inconvenient, you can reverse it. The necessary holes on the opposite side of the appliance cabinet have been made in the factory and plugged. 28 Reversing the Doors on your BR27B FRIDGE-FREEZER 1) Firmly hold the door of the refrigerator and remove the screws from the right lower hinge. See Figure at left. 2) Remove the door and keep it in a safe place nearby. 3) Remove the lower pivot pin and install it in the left lower hinge hole. 4) Remove the middle hinge and the washer on the middle connection and then remove the freezer door. Put the door aside. See Figure, below. 5) Remove the upper right hinge cover and the hinge screws. Install the right upper hinge cover. See Figure, below. 29 Reversing the Doors on your BR27B FRIDGE-FREEZER 6) Fix the left upper hinge to the left side and then the left upper hinge cover. See above Figure. 7) Mount the refrigerator door to the left of the housing with the middle hinge connected. See Figure, below. 8) Mount the refrigerator door with the bottom left hole going onto the lower pivot pin of the middle hinge. See Figure, above. 30 9) After installation, open and close the door several times and fix then tighten the hinge screws when the door operates normally. Remove the top hinge cover of the refrigerator door. Remove the door by unscrewing the hinge (the door is supported only by the bottom hinge) and remove the hinge washer. See Figure, at right. (Continued from previous page) NOTE FOR AFTER REVERSING THE DOOR ¾ After you have reversed the door, check that the magnetic gasket seals correctly. It must NOT be creased or crushed so that there is a gap between it and the inside of the door. It must also seal all around the door. ¾ In case the seal does not fit perfectly, pull it out and rotate it by 180 degrees. ¾ Should the seal not adhere to the casings of the appliance correctly, it will have to be heated from a suitable distance using a hair dryer and lightly stretched in order to attain the required dimensions. ¾ During Transit the door seal may become compressed. Therefore it is advisable to reform and expand the seal to ensure optimum efficiency of the appliance. This can be done by running a warm cloth or using a hairdryer to warm the material and then massaging the seal by hand to re-enlarge and expand it so that the door is airtight. 31 Troubleshooting PROBLEM WHAT TO DO CHECK THAT THE PLUG IS WELL-INSERTED INTO THE POWER SOCKET. PLUG IN IF NECESSARY. YOUR FRIDGE DOES NOT APPEAR TO BE WORKING / NO APPARENT POWER CHECK THAT THERE IS POWER FROM THE MAINS – THERE MAY BE A BLACKOUT OR YOUR FUSES MAY HAVE BLOWN. CHECK THAT THE ELECTRONIC THERMOSTAT HASN’T BEEN TURNED ALL THE WAY DOWN TO ‘OFF’. CHECK THAT THE SOCKET IS SUFFICIENT AND NO ADAPTER OR EXTENSION LEADS HAVE BEEN USED. CHECK THAT THE POWER SUPPLY VOLTAGE CORRESPONDS TO THE APPLIANCE. YOU HAVE OVERLOADED THE APPLIANCE OR FOOD HAS BEEN PACKED TOO TIGHTLY. TAKE OUT AND CONSUME FOOD; LOOK FOR OUT-OF-DATE FOOD THAT CAN BE DISPOSED OF. YOUR FRIDGE APPEARS TO BE PERFORMING POORLY THE THERMOSTAT SETTING IS SET TOO LOW. SET IT HIGHER. ENSURE THAT THE DOOR HAS BEEN CLOSED PROPERLY. FOR INSTANCE, THERE MAY BE A PROBLEM INSIDE THE UNIT, KEEPING THE DOOR OPEN OR ANOTHER FAULT, SUCH AS A BROKEN OR MISSING DOOR SEAL. ENSURE THAT THERE IS NO DUST ON THE CONDENSER. ENSURE THAT THERE IS ENOUGH ROOM AT THE REAR AND SIDES OF THE UNIT. THERE IS A NOISE 32 THE COOLING GAS WHICH CIRCULATES MAY MAKE A SLIGHT NOISE (BUBBLING or a SOUND LIKE RUNNING WATER) EVEN WHEN THE COMPRESSOR IS NOT RUNNING. THIS IS NORMAL. IF THESE SOUNDS CHANGE, ENSURE: Troubleshooting YOUR UNIT IS WELL LEVELLED / NOTHING IS TOUCHING THE REAR OF THE UNIT / NO MATERIAL ON THE APPLIANCE IS VIBRATING. PROBLEM WATER LEAKS FROM MY APPLIANCE STRANGE ODOUR WHAT TO DO THE WATER OUTLET IS BLOCKED – CLEAN THE CLOGGED OPENING WITH A STRAW. THERE HAS BEEN SPILLAGE INSIDE THE APPLIANCE. MOP IT UP. FAILURE TO SEAL FOOD PROPERLY – FIND CONTAINER RESPONSIBLE AND SEAL IT PROPERLY. INTERIOR OF REFRIGERATOR IS DIRTY – CLEAN IT. ROTTING FOOD INSIDE REFRIGERATOR – TAKE IT OUT AND DISCARD. THE REFRIGERATOR DOOR HAS BEEN OPENED TOO OFTEN. CONTINUOUS OR LONG OPERATION OF THE COMPRESSOR THE FRIDGE DOOR HAS NOT BEEN CLOSED PROPERLY. TOO MUCH FOOD HAS BEEN LOADED INTO REFRIGERATOR. IMPROPERLY SET THERMOSTAT. FIRST TIME USE. EXCEPTIONALLY HOT WEATHER. FAILURE OF LAMP THE LIGHT BULB HAS BLOWN – CHANGE IT. TRIPPED FUSES OR POWER BLACKOUT. 33 REMINDER: THINGS TO KEEP IN MIND WHILE USING YOUR APPLIANCE: 34 1. A SLIGHT, CONTINUOUS SOUND WILL BE HEARD WHILE THE LIQUID REFRIGERANT CIRCULATES – THIS IS NORMAL. 2. EXCESSIVE VIBRATION IS AN INDICATION OF: A. THE FRIDGE IS NOT WELL POISITIONED AND ADJUSTED. B. THE FRIDGE HAS BEEN PLACED ON A WOODEN FLOOR OR IS TOO CLOSE TO WOODEN FURNITURE. 3. ELECTRICITY CONSUMPTION IS DETERMINED UNDER THE FOLLOWING OPERATING CONDITIONS FOR THE REFRIGERATOR: AMBIENT TEMPERATURE OF 25 DEGREES C. 4. IN WINTERS, IT IS NECESSARY TO KEEP THE REFRIGERATION TEMPERATURE TO 0C, NOT ABOVE 0C AND BELOW 10 C. BAUMATIC LTD. -CONDITIONS OF GUARANTEE. Dear Customer, The conditions of guarantee which apply to your Baumatic appliance are as follows: This product is guaranteed for 12 months from the date of original purchase. Baumatic Ltd will repair any defect that arises due to faulty materials or workmanship free of charge during this period. *In addition, your appliance is covered by a 5 year parts warranty. Baumatic Ltd will provide free of charge the parts required to repair the appliance, only if they are fitted by a Baumatic engineer, for any defect that arises due to faulty materials or workmanship within a period of 5 years from the original purchase date. *An additional and annually renewable insurance scheme for labour is available should you wish to extend the warranty period. Should any person other than an authorised representative of Baumatic Ltd interfere with the appliance, the policy is negated and Baumatic Ltd will be under no further liability. The guarantee covers the appliance for normal domestic use only, unless otherwise stated. Any claims made under the terms of the guarantee must be supported by the original invoice/bill of sale issued at the time of purchase. This guarantee is transferable only with the written consent of Baumatic Ltd. If the appliance fails and is considered either not repairable or uneconomical to repair between twelve months and five years from purchase date, a free of charge replacement will not be offered. The guarantee for any replacement will only be for the remainder of the guarantee on the original product purchased. This guarantee does not cover: x Sinks and taps X Failure to comply with the manufacturer’s instructions for use. X The replacement of cosmetic components or accessories. X Accidental damage or wilful abuse. X Subsequent loss or damage owing to the failure of the appliance or electrical supply. X Incorrect installation. X Losses caused by Acts of God, civil war, failure to obtain spare parts, strikes or lockouts. X Filters, fuses, light bulbs, external hoses, damage to bodywork, paintwork, plastic items, covers, baskets, trays, shelves, burner bases, burner caps, decals, corrosion, rubber seals.. In the course of the work carried out it may be necessary to remove the appliance from its operating position. Whilst all reasonable care will be taken, Baumatic Ltd cannot accept responsibility for damage sustained to any property whatsoever in this process. This guarantee is in addition to and does not diminish your statutory or legal rights. Contacting Baumatic. SALES TEL: 0118 933 6900 FAX: 0118 931 0035 SERVICE TEL: 0118 933 6911 FAX: 0118 986 9124 SPARES TEL: 0118 933 6922 FAX: 0118 933 6942 TECHNICAL / ADVICE TEL: 0118 9336933 FAX: 0118 9336942 For mainland UK and Northern Ireland, please contact one of the above numbers for further information or any other query you may have. For ROI (Republic of Ireland), please contact one the numbers below: TEL: 01 - 6266798 FAX: 01 - 6266634 Thank you for buying Baumatic. *Applies to UK, Scotland, Wales & Northern Ireland only. (Republic of Ireland has 1 year labour and 1 year parts warranty only) . 35 Baumatic Ltd Make-up for your kitchen Headquarters Baumatic Ltd. Baumatic Buildings, 6 Bennet Road, Reading, Berkshire RG2 0QX, United Kingdom Sales Telephone +44 118 933 6900 Sales Fax +44 118 931 0035 Service Telephone +44 118 933 6911 Service Fax +44 118 986 9124 Spares Telephone +44 118 933 6922 Technical / Advice Telephone +44 118 933 6933 E-mail: [email protected] [email protected] Http (Internet site): www.baumatic.com 36 37