1
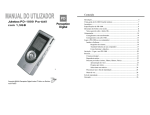
USER MANUAL
Model : SX-18D
(Version 1.0)
Table of Content
Introduction
1. FUNCTIONAL DESCRIPTION
1.1 Buttons
1.2 LED Indication
1.3 LCD Display
1.4 Connectors
2
2
2
2. PRODUCT SPECIFICATIONS
2.1 Technical Specification
2.2 Electrical Specification
2.3 Product Specification
2.4 Minimum PC system requirement
2.5 Accessories Bundling
3
3
3
3
3
4
3. USER INTERFACE DESCRIPTION
3.1 Buttons Description
3.2 LED and LCD Description
3.3 Connectors Description
3.3.1 Mini USB connector
3.3.2 SD/MMC/MS/SMC/XD Memory card slot
3.3.3 Compact Flash memory card slot
3.3.4 44 pins connector
3.3.5 Battery Compartment
5
5
5
6
6
6
6
7
7
4. DEVICE OPERATION
4.1 Copy (standalone) mode
4.2 USB mode
8
8
9
5. WINDOWS 98SE / ME INSTALLATION
5.1 Operating System Supported
5.2 Install device driver on Windows 98SE / ME
5.3 Verify windows98SE has properly installed the device driver
5.4 Troubleshoot
5.5 Installing new hard disk on Win98SE / ME
5.6 Configure new hard disk in Win98SE / ME
5.7 Format new hard disk in Win98SE / ME
10
10
10
12
12
13
13
18
6. WINDOES 200X / XP INSTALLATION
6.1 Operating System Supported
6.2 Verify windows has properly installed the device driver
6.3 Troubleshoot
6.4 Create Master Boot Record on the new hard disk.
6.5 Create Primary Partition Record on the new hard disk.
20
20
20
20
21
23
2
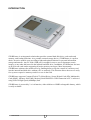
INTRODUCTION
STORXtreme is an integrated solution that provides external hard disk drive, card reader and
memory card backup functions. As a portable external storage device, STORXtreme is a perfect
choice for active mobile users providing a light and optimal solution for personal information
storage and transfer. Any PC with a USB port is enough for user to access documents, music,
images, or any other data stored in the internal hard disk drive. In addition, STORXtreme also acts
as an all-in-one card reader supporting all major memory card types. More importantly,
STORXtreme enhances the mobile users by enabling them to copy the content of a memory card
into the internal hard disk drive without a PC or notebook. This function allows the users to easily
free up more expensive memory cards for re-use in the field.
STORXtreme supports Compact Flash (CF), MicroDrives, Secure Digital Card (SD), Multimedia
Card (MMC), Memory Stick (MS), Memory Stick PRO/DUO. USB connection to PC is achieved
using USB 2.0 High Speed (480Mbps) link.
STORXtreme is powered by 2 x AA batteries, either Alakine or NiMH rechargeable battery, which
is easily available.
User Manual
1
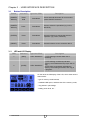
Chapter 1 : FUNCTIONAL DESCRIPTION
This section describe the various parts and functions of the device. You may refer to Chapter 3 :
User Interface Description for detail description.
1.1
Buttons
Button
Activation
[POWER/SELECT]
Press & Hold
Press & Hold
Press
Power On
Power Off
To select the the device operations
[ENTER]
Press
To execute the selected operation
[RESET]
Press
Reset the device
1.2
Operation
LED Indication
LED #
Definition
1
[HDD]
2
[CARD]
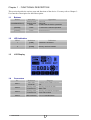
1.3
LCD Display
1.4
Connectors
Indication
Hard disk is accessed
Memory card is accessed
No.
Definition
CON 1
Mini USB
connector
CON 2
Memory Card
connector # 1
Memory Card slot for SD /
MMC / MS
CON 3
Memory Card
connector # 2
Memory card slot for Compact
Flash / Micro Drive
CON 4
HDD connector
User Manual
Purpose
Connect to PC USB 1.0 or 2.0
port
For 1.8” Hard disk drive
2
Chapter 2 : PRODUCT SPECIFICATIONS
2.1
Technical Specification
Copy mode
Data Transfer
Rate
CF to HDD
SD to HDD
: 3MBps
: 2.5MBps (2x) ,
3.4MBps (ultra speed)
MMC to HDD : 1 MBps
MS to HDD
: 0.5 MBps
MS Pro to HDD : 3.5 MBps
USB Transfer
Rate
This is a high speed USB device. Hard disk
operates in UDMA mode
Operating OS
Windows 98SE, ME, XP, 2K, Mac X (above)
Features
File System: FAT12, FAT16 or FAT32
Long Filename: Max 256 character, Support
Unicode character
Auto sleep: 30seconds (copy)
Card reader cum external hard disk storage
USB
compliance
USB 1.0, 2.0
2.2
Electrical Specifications
Operating
Condition
Temperature : 0OC ~ 70OC,
Relative Humidity : 90% (max)
Power Input
2 x AA Batteries (Alakine or NiMH
Rechargeable)
Operating
Current
80mA (Idling)
100uA (shutdown)
800mA (depend on hard disk startup)
500mA (depend on hard disk read/write)
480mA (charge through USB)
820mA (charge through DC)
2.3
Product Dimension
Weight
100gm / 200gm (with HDD)
Size
68 x 88 x 28 mm
2.4
Minimum System Requirement
PC
IBM Compatible PC
CPU
Pentium III (and above)
RAM
128 MB
USB Port
USB1.0 or 2.0
HDD space
20MB available
OS
Microsoft Windows 98SE / ME / XP / 2000
Mac OS X
User Manual
3
2.5
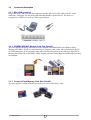
Bundled Accessories
USB cable
User Manual
Installation CD
4
Quick Installation Guide
Chapter 3 : USER INTERFACE DESCRIPTION
3.1
Button Description
Button
Activation
Operation Mode
[POWER/
SELECT]
Press
Hold
Standalone
Press and hold this button for 3 seconds to
power ON/OFF the device.
[POWER/
SELECT]
Press
Standalone
Press to select the operations (eg. COPY,
DELETE)
[ENTER]
Press
Standalone
Press this button to execute the selected
operation (eg. COPY, DELETE)
[RESET]
Press
Standalone
Press this button once to reset the device
3. 2
Description
LED and LCD Display
LED
Indication
Operation Mode
1
[HDD]
USB / Standalone
(1) LED blinking indicates Hard disk is
accessing
USB / Standalone
(1) LED blinking consistently indicates
memory card is detected and prompt user for
copy.
(2) LED blink inconsistently indicates the
memory card is being accessed, and copy is
in progress.
2
[CARD]
Description
On the left is the full display of the LCD, which show various
status mode :
- type of memory cards inserted,
- available HDD space, and data size of the memory cards,
- copy status in percentage,
- battery power level, etc ...
User Manual
5
3.3
Connectors Description
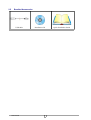
3.3.1 Mini USB connector
Plug in the mini USB cable into this connector and the other end of the cable to the PC or the
notebook’s USB port. Use the mini USB cable that bundle with this device. The device is
compliance to USB 2.0 as well as USB1.0 specification.
Notebook connector view
3.3.2 SD/MMC/MS/SMC Memory Card Slot (Slot #1)
This slot supports memory card such as Secure Digital card, Multimedia card, Memory Stick,
Memory stick PRO. The device also functions as a memory card reader when connected to the PC
via USB connection. It also supports other mini-sized memory cards such as Memory Stick DUO,
Memory Stick PRO DUO, RS MMC, MMC mobile and mini Secure Digital card through a memory
card adaptor.
3.3.3 Compact Flash Memory Card Slot (Slot #2)
This slot supports Compact Flash Type I and II, as well as MicroDrive card.
User Manual
6
3.3.4 44-pin Connector
Install the 1.8” Hard disk drive into this connector as shown in the picture below. Ensure that the
hard disk drive is connected in the correct direction.
3.3.5 Battery Compartment
Select the type of AA battery used : Alkaline or NiMH Rechargeable Batteries. Do not mix the
battery type, and remember if you are using rechargeable batteries, make sure they are fully charged
before use.
* Select type of battery.
* Insert the batteries and close the cover.
Do not insert the battery in reverse polarity.
User Manual
7
Chapter 4 : DEVICE OPERATION
4.1
Standalone Mode (Copy)
Step 1 :
Power ON the device by pressing [POWER] button for 3
seconds. The LCD will turn on, the {INSERT CARD} icon
will flash prompting you to insert a Memory Card.
Step 2 :
Insert the memory card (eg. SD card) into the appropriate
media slot, the device will detect the type of Memory Card
inserted, and its data size and show them on the LCD. The
{COPY} icon will flash prompting that the device is ready for
data backup.
Step 3 :
Press the [ENTER] button to start copy, the LCD icons will
display the operating status, indicating the percentage of data
being copied.
Step 4 :
When copy is completed, the LCD will display the {OK} and
{100%} icons, indicating the data is copied. You may remove
the memory card and turn OFF the device by pressing (for 3
seconds) the [POWER] button unit the LCD is turned OFF .
§
During copy, the content of the memory card is copied to the hard disk. The [CARD] and
[HDD] LEDs will blink indicating that both Memory Card and Hard Disk Drive is being
accessed and copy is in progress. A default directory [FILE] is created in the hard disk Root
Directory and the respective sub-folder for various type of Memory Cards will be created in the
format as follows :
Compact Flash (CF)
: starting [CF000001]
Secured Digital (SD)
: starting [SD000001]
Multimedia Memory (MMC) : starting [MC000001]
Memory Stick (MS)
: starting [MS000001]
User Manual
8
If an error occurs during copy, the [ERROR] icon will appear on the LCD, you may then repeat the
copy sequence. When a copy error occurs, the sub-folder created in the [FILE] directory is empty,
you may ignore and delete it.
Note :
In the unlikely event that the data backup fail, the copy
operation will stop, and the {ERROR} icon will show on the
LCD, you may choose to repeat the operation.
NOTE : The device Standalone Copy Mode support only FAT file system.
Error will occur if your Memory Cards or HDD is NTFS formatted.
4.2
USB mode
§ Connect the device to the PC via USB connection.
§
§
§
§
The system will detect the device. Refer to the “Window Installation” section if you have not
installed the Device Driver in the PC (for Windows 98se).
3 icons will appear on the “My Computer” screen.
Click on the Local disk icon or the Removable disk icon on the My Computer screen to access
the information on the storage media.
The device will automatically shutdown once the USB cable is unplugged from the device.
User Manual
9
Chatper 5 : WINDOWS 98SE/ME INSTALLATION
5.1
§
§
5.2
Operating System Supported
Windows 98 Second Edition (SE) or Windows Millennium Edition (ME)
The device driver can be found in the “Win98SE Driver” directory in the Installation CD
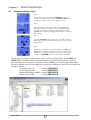
Install Device Driver on Windows 98 SE / ME
§
Connect the device to PC via USB connection.
§
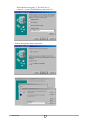
Power up the device. The system will detect “NEW HARDWARE FOUND” and prompt user to
install the device driver.
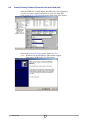
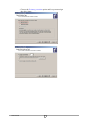
- Load the CD-ROM Installation Disk,
- Tick on “Search for best driver for your new device” and click Next..
User Manual
10
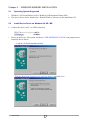
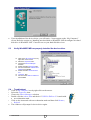
-
Select the directory path “F:\Win98SE driver”
(where F:\ is your CD-ROM drive) and click Next
- Follow through the online instruction …
User Manual
11
§
5.3
Upon installation of the device driver, you will notice 3 icons appear on the “My Computer”
screen. Refer the section on “Installing new hard disk on Win98SE / ME & configure new hard
disk drive in Win98SE / ME” if user do not see your hard disk drive icon.
Verify Win98SE/ ME has properly installed the device driver
q
q
q
q
q
q
q
q
5.4
§
§
§
§
§
§
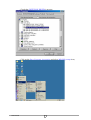
Click on the My Computer icon by
right-click on the mouse.
Select the Properties item.
Choose the Device Manager
selection
Double click the Disk drives item.
And check the three INSTEP EzII
DRIVE have installed.
Double click the Universal serial
bus
Controller item.
And check the USB 2.0 EzDrive II
has installed.
Troubleshoot
Click on My Computer icon by right-click on the mouse.
Select the Properties item.
Choose the Device Manager selection
Double click the others item and check if USB 2.0 EzDrive II is mark with
§ an exclamation mark.
Click on the item mark with an exclamation mark and then click Remove,
§
Refresh.
The windows will prompt for device driver again.
User Manual
12
5.5
Installing New HDD on Windows 98SE / ME
§ When a new HDD is installed to this device, Windows 98SE or ME cannot recognize it as local
drive because the new HDD does not contain the Master Boot Record and Primary Partition
Record information.
o User can either use Windows 2000 or XP system to create hard disk drive Master Boot Record
& Primary Partition Record, or
o User can use Window98SE /ME to configure the new hard disk drive as a Removable drive.
Windows 98SE /ME will enumerate the HDD as a Removable drive instead of Local drive.
§
5.6
Follow the step to configure the new HDD before format the hard disk drive. (Old data will be
destroy)
Configure new hard disk in Win98SE / ME
- Click on the “My Computer” icon by right-click on the mouse,
- Select the Properties item,
- Choose the Device Manager selection,
- Double click he Disk drivers item,
- Check the INSTEP EzII DRIVE0 is present,
- You will see two Removable drives on the My Computer screen.
User Manual
13
- Check that INSTEP EzII DRIVE0 is present,
- Click on the Start, Program, Accessories and select MS-DOS prompt item,
User Manual
14
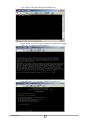
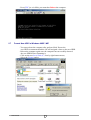
- Type FDISK in the MS-DOS prompt dialog box,
- If you cannot get to this screen, reboot the system and try again.
Type <Y> to enable large disk support.
- Enter the choice <5> to change current fixed disk drive,
User Manual
15
- 1~3 will depend on the number of HDD present in the computer. Since
20GB HDD is used in this example, enter the choice <2> to change the
current fixed disk drive.
- Next, enter choice <1> to create DOS partition or logical DOS Drive,
- Next, enter choice <1> to create Primary DOS partition,
User Manual
16
- Enter <Y> to create Primary DOS partition on current fixed disk drive 2,
- Enter <Y> to use maximum available size for a Primary DOS partition,
- Press [ESC] after Primary DOS partition is created,
User Manual
17
- Press [ESC] to exit fdisk, you must then Reboot the computer.
5.7
Format New HDD in Windows 98SE / ME
- You must reboot the computer after perform fdisk. Ensure the
new HDD is enumerated and the OS will assigned a letter to the new HDD.
- Reboot the computer again once the computer has successfully detected
the new HDD before formatting it,
- Click on the new Local Disk (L:) icon by right-button mouse,
- Select the Format option.
User Manual
18
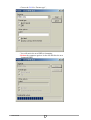
- Choose the Full for “Format type” ,
- You will notice the new HDD is formatting ,
- Reboot the computer again to let the OS initialize the new
formatted HDD.
User Manual
19
Chapter 6 : WINDOWS 200x / XP INSTALLATION
6.1
Operating System Supported
Windows 2K & Windows XP
Supported by Microsoft default driver. (Requires service pack from Microsoft Windows Update
website)
§
§
6.2
Verify windows has properly installed the device driver
§
Connect the device to PC via USB connection.
§
Turn ON the device. Windows will detect “NEW HARDWARE FOUND” and the Operating
System (OS) will automatically install the Mass Storage device driver. The Window OS will
initialize the Memory Card Reader as Removable drive and the hard disk as Local drive.
q
q
q
q
q
q
q
q
q
Click on the My Computer icon by
right-click on the mouse.
Select the Properties item.
Choose the Device Manager
selection
Double click on the Disk Drives
item
And check the three INSTEP EzII
DRIVE have installed.
Double click on the Storage
volumes item.
And check the Generic volume
properly installed.
Double click on the Universal serial
bus controller item.
And check the USB Mass Storage
Device has installed.
§
Upon installation, you will notice 3 icons appear on the “My Computer” screen. Refer to the
section on “Create Master Boot Record on the new hard disk & Create Primary Partition Record
on the new hard disk” if user do not see the hard disk drive icon.
6.3
Troubleshoot
Click on the My Computer icon by right-click on the mouse.
Select the Properties item.
Choose the Device Manager selection
Double click the Universal serial bus controller and check the USB Mass
Storage Device is mark with an exclamation mark.
Click on the item mark with an exclamation mark and then click
Remove,Refresh.
The windows will prompt for device drive again.
§
§
§
§
§
§
User Manual
20
6.4
Create Master Boot Record on the new hard disk.
- Login the PC as Administrator,
- Click on the My Computer icon by right-click on the mouse
and choose the Manager item,
- Or click on the Control Panel icon and follow by
Administrative tools.
- Click the Disk Management icon,
User Manual
21
- Click
Next in the write signature prompt and Upgrade Disk
wizard prompt,
- Tick on Disk 1 option and follow through the instruction,
- The new HDD will create a Master Boot Record on the
new hard disk,
- Proceed to create a new primary partition.
User Manual
22
6.5
Create Primary Partition Record on the new hard disk.
- After the HDD has created Master Boot Record (write signature),
you nee to create a primary partition on your new hard disk.
- Click on the Disk 1 Unallocated bar by right-click of the mouse.
- Choose the Create Partition option, follow by Next,
Note : Windows XP and Windows 2000 cannot support
More than 32GB for FAT32 file system.
User Manual
23
- Choose the Primary partition option and let system assign
the drive letter ,
User Manual
24
- Choose the FAT32 format, Default allocation unit size and
follow through the on-screen instruction.
- Note : Do not choose NTFS because the device Standalone
Copy Mode support only FAT or FAT32 format.
- The new HDD is formatted and ready to be used.
User Manual
25