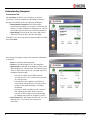
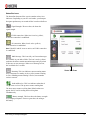
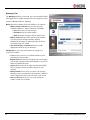
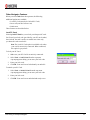
1
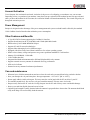
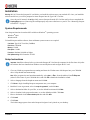
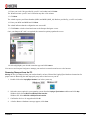
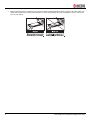
Contents Passport Basics ................................................................................................................................................................. 1 Checklist ................................................................................................................................................................................................. 1 About this guide .....................................................................................................................................................................................1 CDMA coverage and roaming ................................................................................................................................................................ 1 Passport Software .................................................................................................................................................................................. 1 Account Activation .................................................................................................................................................................................. 2 Power Management ............................................................................................................................................................................... 2 Other Features and Benefits .................................................................................................................................................................. 2 Care and maintenance ........................................................................................................................................................................... 2 Installation .......................................................................................................................................................................... 3 System Requirements ............................................................................................................................................................................ 3 Setup Instructions .................................................................................................................................................................................. 3 Removing Passport from the PC ......................................................................................................................................................5 Connecting to Passport Navigator ................................................................................................................................... 7 Connecting .............................................................................................................................................................................................7 Understanding Navigator ....................................................................................................................................................................... 8 Other Navigator Features ...............................................................................................................................................................13 Regulatory and Safety Information ................................................................................................................................. 18 Regulatory Notices ............................................................................................................................................................................... 18 Safety Information ................................................................................................................................................................................ 19 Consumer Limited Warranty ........................................................................................................................................... 20 ii User Guide for the Kyocera Passport PC Card Passport Basics Congratulations and thank you for purchasing the Kyocera Passport PC Card. Passport is a dual-band 1X EVDO PC card that enables you to communicate wirelessly from your laptop at high speeds on CDMA networks with all the benefits of CDMA technology. The modem offers 2G data transmission at 14.4 kilobits per second (Kbps); and 3G data transmission for 1X RTT at up to 143 Kbps, and 1XEVDO at up to 2.4 Mbps. With the modem installed in your PC, you can send and receive email messages, explore the Internet, access your corporate network, or use various software applications remotely. Passport works in any notebook running Windows 2000® or Windows XP® that has a standard Type II PC Card slot. Important: Do not insert Passport in to a PC Card slot until you have installed the Passport Navigator software Checklist The following items are included in your kit: • The Passport Wireless PC Card Modem • KWC Installation CD, which contains the software and the complete user guide • Quick reference guide About this guide This user guide contains all the information you need to properly install and use Passport. Before you can begin using Passport, it is essential that you follow the proper instructions for installation. You must first load the software provided on the CD-ROM included in the kit before you insert Passport PC card into your notebook PC. This initial setup process takes just a few minutes. An overview of the steps detailed in the “Setup Instructions” on page 3 follow: • Load the software, located on the Installation CD. • Insert Passport into your notebook’s PC card slot when prompted and complete the installation. • Connect to the Passport Navigator. CDMA coverage and roaming Passport operates on CDMA networks and can only be used where CDMA coverage is available. The companies that offer service on these networks are called wireless service providers. Every wireless service provider has a different coverage area and most wireless service providers post coverage maps on their web sites. You require an account with a CDMA wireless service provider to use Passport. Most CDMA service providers have roaming agreements that allow you to use your modem on other wireless service provider’s networks. When you use your modem on a network other than the one operated by your wireless service provider, you are “roaming” and you may be billed at a higher rate. Passport Software Passport comes with an application called Navigator, as well as modem drivers for each of the supported operating systems. (A driver is the software that forms the interface between your operating system and the modem.) Before you can use your modem, you must install the software from the CD-ROM that was included with your PC card. Passport Basics 1 Account Activation To use Passport, the card must be activated. Activation is the process of configuring your modem to use your account. Depending on how you purchased your modem, it may have been pre-activated. If the modem has not been pre-activated, when you insert the modem for the first time, the Activation Wizard will launch automatically. The wizard will guide you through the activation process. Power Management Passport is designed to take advantage of the power management and system overhead benefits offered by the standard 32-bit CardBus electrical interface that minimizes power consumption. Other Features and Benefits • • • • • • • • • • • • • A Type II PCMCIA format supporting the CardBus I/O interface Supports North American PCS (1900 MHz) and Cellular (800 MHz) bands Based on the QUALCOMM MSM6500 chipset Supports 2G and 3G network technologies Supports Short Messaging Service (SMS) messages Equipped with all necessary host software and drivers for various operating systems Works at lower battery voltage and operates at a greater speed than standard PC Card interface. Memory (FLASH/RAM): 128/64 MB 32-bit Cardbus interface Integrated dual band main antenna and a dial-band chip-based diversity antenna Supports external accessory antenna for enhanced diversity performance LED service indicator External accessory antenna for enhanced performance Care and maintenance • • • • • • • 2 When not in use, fold the antenna down and store where the card can be protected from being crushed or broken. Store your Passport in a dry and clean place. Storage temperature: −30° to 65°C [86° to 149°F]. Do not apply adhesive labels to Passport. This may cause the card to jam inside the PC card slot of your PC. The antenna extends freely. Do not force or hyper-extend the antenna. This may cause it to break. Passport easily fits into the PC card slot. Forcing Passport into the PC card slot may cause considerable damage. Protect your card from liquids, dust and excessive heat. Optimal signal strength is usually obtained when the antenna is perpendicular to the modem. The antenna should bend easily at the hinge. Do not forcefully bend the antenna. User Guide for the Kyocera Passport PC Card Installation Warning: DO NOT insert the Passport PC card before you install the software onto your notebook PC. Once you install the software and drivers you will be prompted to insert Passport into the Type II PC Card slot. Once the card is inserted, do not physically remove Passport from the PC Card slot until you have completed the Unplug/Eject process. Removing the card improperly may cause a fatal error to your PC. See “Removing Passport from the PC” on page 5. System Requirements Your Passport functions in notebook PCs with these Windows® operating systems: Windows® 2000 Windows® XP To install Passport and the software, these minimum system resources are required: Card slots: Type II PC Card slot (CardBus) Disk Drive: CD-ROM Memory: 32 MB Disk Space: 14 MB Processor: Pentium 166 MHz or higher Dial Up Networking: DUN bound to TCP/IP Setup Instructions Important: Install the software before you insert the Passport PC Card into the computer for the first time. Only after the software has been installed can Windows successfully detect and configure the PC card. 1. Close any Windows programs that are running and insert the CD that came with Passport into your CD-ROM drive. Setup should start automatically. Note: If the program does not launch automatically, select Start → Run... from the taskbar, Enter D:Setup.exe (where D is the letter of your CD-ROM drive) and click OK to launch the installation wizard. 2. Select a language from the dropdown menu and click OK. 3. Click Next to begin installing Passport components onto your computer. 4. Read the License Agreement, select “I accept the agreement”, and click Next. 5. Select a destination folder for your files, or use the default location and click Next. 6. Select a location for the program shortcuts, or use the default provided. Click Next. 7. Place a checkmark in the Create a desktop icon box and click Next. 8. Click Install. 9. Click Finish. The initial setup program closes and a Passport Navigator icon is placed on your desktop. Installation 3 10. Double-click the Passport Navigator icon. . The connections window appears. PLEASE INSERT CARD shows in the lower-left corner. 11. Insert your Passport PC card into your notebook’s PC card slot with the label facing up. Raise the antenna so that it is fully extended and pointed up at a 90° angle. Use in any other configuration may exceed FCC RF exposure limits. Recognition of your card could take a few minutes while your computer recognizes the new software drivers that were installed in the previous steps. If the connection program detects that your PC card is not yet activated, a pop-up window appears requesting that your run the Activation Wizard. If you PC card is already activated, skip ahead to step 18. 12. Click Next at the run wizard prompt. The Passport Navigator Setup Wizard appears. 13. Click Next. 4 User Guide for the Kyocera Passport PC Card 14. Enter your Lock Code (provided by your PC card vendor) and click Next. The Wizard activates your PC card. Activation may take a few minutes. 15. Click Next. The wizard requests your Phone Number (MDN) and MSID (IMSI_M). Both are provided by your PC card vendor. 16. Enter your MDN and MSID and click Next. The wizard indicates that the configuration was successful. 17. Click Finish to exit the wizard and return to the Passport Navigator screen. Once your Passport PC card is recognized, the connection options populate the screen. 18. Select (highlight) your desired connection type and click Connect. You can now use Passport Navigator to manage your modem’s connections and access to the internet. Removing Passport from the PC Warning: Do not eject Passport from your notebook until you have followed the Unplug/Eject Hardware instructions for proper removal. Removing the card improperly may cause a fatal error on your PC. 1. Double-click on the Unplug/Eject Hardware icon in the system tray. 2. Select the correct option for your operating system from the Unplug or Eject Hardware window and click Stop. Windows 2000: Select NEC PCI to USB Open Host Controller. Windows XP: Select NEC PCI to USB Open Host Controller. 3. Confirm the device to be stopped and click OK. 4. A Safe to Remove Hardware message appears, click Close. Installation 5 5. Remove the Passport PC card from your notebook. When removing Passport, always grip it by the sides of the card rather than from the top. Pulling on the antenna over time may damage the card. If available, use the Card Ejector tool on your laptop. 6 User Guide for the Kyocera Passport PC Card Connecting to Passport Navigator Connecting Navigator manages the modem’s connections, which is your passport to the internet. Use Navigator to connect to the internet, to check status, and to obtain information on your card and connection. 1. Insert your Passport PC card into the PC slot. 2. Double-click on the Passport Navigator icon on your desktop. -orSelect the Start → Programs → Kyocera Passport Navigator 2→ Passport Navigator. 3. Select your desired connection type and click the Connect button. Note that this button switches between “Connect” (when you are disconnected) and “Disconnect” (when you are no longer connected). 4. Select File > Exit to close Passport Navigator before you perform the Eject/Unplug routine to remove your PC card. See “Removing Passport from the PC” on page 5. Note: Use the minimize button to reduce the screen size to an icon that appears in your taskbar. Double-click on the icon to create the full-size screen again. Connecting to Passport Navigator 7 Understanding Navigator Connections Tab The Connections tab allows you to manage your wireless connections. This tab is displayed at the startup of Passport Navigator and initially shows the following information: • Wireless Network Connections shows the available connections from which you can select. Connections can include 1x-EVDO, 2GPassport, 3GPassport, etc. Your PC card vendor may have there own connection listed here. • Signal Strength is shown in the icon to the right of each connection. The more bars, the better the signal. From this screen, select your desired connection (like 1x-EVDO) and click Connect. Once Passport Navigator connects, the connection information is displayed. • Status of connection and transmission. • Duration of each individual call. It is not cumulative. • Signal Strength is indicated by the numbers of bars on the signal strength icon. The more bars, the better the signal. There are three main reasons why you might experience inadequate signal strength. • You may be outside of the CDMA network coverage area. See your wireless service provider for coverage maps. • Your antenna is not completely extended or is pointed in the wrong direction. You may be able to improve the signal strength by reorienting the antenna. • You may be inside a building or near a structure that is blocking the signal. If this is the case, you may be able to improve the signal strength by changing the position or location of your PC. • Traffic Counters show the amount of traffic sent, received, and total (sent + received) for the current active connection. 8 User Guide for the Kyocera Passport PC Card Status Bar Icons The Status Bar (bottom of the screen) contains various icon indicators. Depending on your PC card vendor, your Passport Navigator product may not contain all the icons described here. Signal Strength. The more bars, the better the signal stength. EVDO connection. When icon is active (yellow), an EVDO connection is established. IX connection. When icon is active (yellow), a IX connection is established. Note: If both EV and IX icons are active, an EVDO connection is established. SMS Message. This icon tells you if unread messages are available in your Inbox folder. The icon is active (yellow) each time the Inbox contains unread messages and greyed-out if there are no new messages. When a new message arrives, the icon blinks for 5 seconds. Roaming. This icon indicates current roaming status. Grey-out means no roaming. Active (yellow) means roaming is active. Blinking means roaming is active, but on another carrier's network. Status Bar Icons Send and Receive. This icon indicates when data is being sent or received. The up arrow means sending data. The down arrow means receiving data. When both arrows appear, the PC card is sending and receiving data simultaneously. Battery strength. This icon shows the battery strength of your laptop computer. The more green bars, the stronger the battery. Connecting to Passport Navigator 9 Messaging Tab The Messaging tab allow you to send, save, read, and delete Short Messaging Service (SMS) messages. The tab contains two main sections—Mailbox and New Message. Mailbox shows the contents of all your mailboxes. It contains: • Mailbox selection combo-box lets you select from the available mailboxes—Inbox, Sent Items, and Drafts. • Inbox shows any received messages. • Sent Items shows any sent messages. • Drafts shows any messages entered, but not sent. • Mailbox content field shows the contents of the mailbox you selected. Each message has date and time information. Messages are truncated if they do not fit. Unread messages are in bold. • View, Forward, Reply, and Delete buttons let you take appropriate action on all your messages. New Message lets you create and send a new message to a recipient. It contains: • To button lets you access your Address Book to select recipients for your message. • Recipient field shows the list of recipients for your message. You can put recipients in this field manually, or use the To button to populate this field. • Urgent button (located to the right of the Recipient field) lets you assign a priority (normal or urgent) to your message. • Message content field is where you write your message. Messages can be a maximum of 160 characters. Character count is displayed in the lower-left corner of the screen. • Save and Send buttons let you save your message as a draft, or send it to recipients. 10 User Guide for the Kyocera Passport PC Card Connection History Tab The Connection History tab shows a log of all connection activity. It contains: • Filter allows you to select a history list by connection type (All, 1xEVDO, 1xRTT, IS95A, IS95B, or Unknown). • History list shows detailed information about each connection, including: • Dialed phone number • Call type (1xRTT, 1xEVDO, etc.). • Date and time connected • Call duration • Byte sent • Byte received • Total bytes counter (per call) • IP Address used for connection • Export button lets you export the connection history information into a text file (CSV format). • Clean button lets you clear all connection history information from the list. • General Statistics label (bottom of the screen) displays these statistics: • Total number of connections • Total bytes counter (all calls) • Total duration of all calls Connecting to Passport Navigator 11 Address Book Tab The Address Book tab allows you to Add, Edit, Delete, and Search for contacts stored on your Passport PC card. You can also send a message to a selected contact. It contains: • Group combo-box lets you select a group of contacts to display in the contacts list. • Search field lets you search for a contact in the contacts list. For example, entering ba would return any contacts beginning those letters, like barbara, barry, etc. • Contact List shows all contacts available in the selected group. Contacts are listed in alphabetical order. A maximum of 200 contacts are listed. • Add, Edit, and Delete buttons let you add a new contact, edit an existing contact, or delete a contact. • Contact information field shows the address information for the selected contact. This includes mobile, home, work, and fax phone numbers, as well as email addresses. • Send Message button lets you send a message to the selected contact. Pressing this button opens the Messaging tab, where you can compose a message addressed to the contact. 12 User Guide for the Kyocera Passport PC Card Other Navigator Features When you select Tools from the top menu, the following additional options are available: • Lock PC Card (can also be Unlock PC Card) • Power off (can also be Power on) • Preferences These features are described below. Lock PC Card Selecting Lock PC Card lets you to lock your Passport PC card. You’ll need your lock code (provided by your PC card vendor). Once locked, the card is useless to another user since only you know the code to unlock it. Note: The Lock PC Card option is available only when your card is not actively connected. When connected, this option is greyed-out. To lock your PC Card: 1. Make sure your PC Card is not actively connected. 2. Select Tools → Lock PC Card from the top menu. A prompt appears asking you to enter your lock code. 3. Enter your lock code. 4. Click OK. Your card is now locked until you unlock it. To unlock your PC Card: 1. Select Tools → Unlock PC Card from the top menu. A prompt appears asking you to enter your lock code. 2. Enter your lock code. 3. Click OK. Your card is now unlocked and ready to use. Connecting to Passport Navigator 13 Power off Selecting Power off lets you conserve your PC's power, by turning off power to the Passport PC Card when the card is not used. Think of this as an “On/Off switch” for your PC Card. Follow these steps to power off your card: 1. When your PC Card is powered on and connected, your Passport interface looks similar to this. 2. Select Tools → Power off from the top menu. A prompt asks if you want to terminate your connection. 3. Click Yes. 4. A prompt tells you to wait while your PC Card is powering off. 14 User Guide for the Kyocera Passport PC Card 5. When the Power Off is complete, your Passport inteface looks like this (see illustration). PC CARD IS POWERED OFF appears in the bottom left corner. The green Disconnect button changes to a grey Connect. Your Passport PC Card is now powered off and helping conserve the power used by your PC. Follow these steps to power on your PC Card: 1. Select Tools → Power on from the top menu. A prompt tells you to wait while your card is powering on. 2. Once the card powers on, the grey Connect button changes to a green Connect. 3. Click the green Connect. 4. The indicator in the bottom left corner of the screen shows that Network Activity has returned. The Status field on the screen also shows Connected. Connecting to Passport Navigator 15 Preferences Selecting Preferences opens a sub menu of additional PC Card settings. • Show Welcome Screen check box. This enables showing of the Welcome Splash Screen when you start Passport Navigator. This option is enabled by default. • Start in System Tray check box. Specifies whether the Passport Navigator application starts “minimized” (i.e., appearing in the System Tray rather than open on the screen). This option is disabled by default. • Launch at Windows Startup check box. Specifies whether Passport Navigator launches at Windows startup. This option is disabled by default. • Set TCP window size to 64kB. Allows you to set TCP window size to 64kB. In some cases, the 64kB size may increase connection performance. • Enable Redialing Option checkbox. This enables Redialing functionality. This option is enabled by default. • Redial Attempts field. Allows you to specify the number of reconnect attempts. Possible values are 1 to 5. • Time between attempts field. Allows you to specify predefined time intervals to resume redial operation. 16 User Guide for the Kyocera Passport PC Card About your PC card You can access details about your Passport PC card. From the top menu, select Help > About. The About screen is displayed, with the following information about your PC card. • Manufacturer (Kyocera Wireless Corp.) • Model • Hardware revision • Firmware revision. • PRL version • ERI version • ESN in both decimal and hexadecimal format • MDN (your phone number) • MIN (Mobile Identification Number)\ • Activation status • Security lock • Device capability • RSSL. Current RSSI value • Receive bytes. Total number of bytes received since the lifetime counter was last reset. • Send bytes. Total number of bytes sent since the lifetime counter was last reset. • Total time. Total time in the lifetime session since the counter was last reset. Connecting to Passport Navigator 17 Regulatory and Safety Information This Section outlines important regulatory notices concerning your new Passport PC card. FCC ID:OVFKWC-KPC650, IC:3572A-KPC650 Regulatory Notices FCC/IC Notice: This device complies with part 15 of the FCC rules. Operation is subject to the following two conditions:(1) This device may not cause harmful interference, and (2) this device must accept any interference received, including interference that may cause undesired operation. This Class B digital apparatus complies with Canadian ICES-003. Cet appareil numérique de la classe B est conforme à la norme NMB-003 du Canada. Caution: The user is cautioned that changes or modifications not expressly approved by the party responsible for compliance could void the warranty and users’ authority to operate the equipment. Note: This equipment has been tested and found to comply with the limits for a Class B digital device, pursuant to part 15 of the FCC Rules. These limits are designed to provide reasonable protection against harmful interference in a residential installation. This equipment generates, uses and can radiate radio frequency energy and, if not installed and used in accordance with the instructions, may cause harmful interference to radio communications. However, there is no guarantee that interference will not occur in a particular installation. If this equipment does cause harmful interference to radio or television reception, which can be determined by turning the equipment off and on, the user is encouraged to try to correct the interference by one or more of the following measures. • Reorient or relocate the receiving antenna. • Increase the separation between the equipment and receiver. • Connect the equipment into an outlet on a circuit different from that to which the receiver is connected. • Consult the dealer or an experienced radio/TV technician for help. Caution: This device has been tested for compliance with FCC RF exposure limits in the laptop computers configurations with side PCMCIA slot, and can be used in laptop computers with substantially similar physical dimensions, construction, and electrical and RF characteristics. Always place the antenna in the upright position (oriented vertically) when using this data modem in a notebook computer. This PC card must not be co-location or operated in conjunction with any other antenna or transmitter. Use of this device in any other configuration may exceed the FCC RF Exposure compliance limit. If you have purchased this product under a United States Government contract, it shall be subject to restrictions as set forth in subparagraph (C)(1)(ii) of Defense Federal Acquisitions Regulations (DFARs) Section 252.227-7013 for Department of Defense contracts, and as set forth in Federal Acquisitions Regulations (FARs) Section 52.227-19 for civilian agency contracts or any successor regulations. If further government regulations apply, it is your responsibility to ensure compliance with such regulations. 18 User Guide for the Kyocera Passport PC Card Safety Information This section outlines important liability and safety guidelines concerning your new PC card. Important Notice Because of the nature of wireless communications, transmission and reception of data can never be guaranteed. Data may be delayed, corrupted (i.e., have errors) or totally be lost. Although significant delays or losses of data are rare when wireless devices such as the PC Card-Model KPC650 CDMA modem are used in a normal manner with a well constructed network, they should not be used in situations where failure to transmit or receive data could result in damage of any kind to the user or another party, including but not limited to personal injury, death or loss of personal property. No responsibility for damages of any kind resulting from delays or errors in data transmitted or received using the PC Card-Model KPC650 CDMA modem, or for failure of the PC Card-Model KPC650 to transmit or receive such data. Safety and Hazards Blasting Areas and HospitalsDo not operate the PC Card-Model KPC650 in areas where blasting is in progress, where explosive atmospheres may be present, near medical equipment, life support equipment, or any equipment which may be susceptible to any form of radio. AircraftFCC regulations prohibit using your KPC650 on a plane that is in the air. Do not operate the PC card in any aircraft whether the aircraft is on the ground or in flight. In aircraft, the PC card must be powered off. When operating it can transmit signals that could interfere with various onboard systems. VehiclesRF signals may affect improperly installed or inadequately shielded electronic systems in motor vehicles. Check with the manufacturer of the device to determine if it is adequately shielded from external RF energy Air bagsIf your vehicle has an air bag, DO NOT place installed or portable equipment or other objects over the air bag or in the air bag deployment area. If equipment is not properly installed, you and your passengers risk serious injury. Medical devices PacemakersWarning to pacemaker wearers: PC card, when in the ‘on’ position, may interfere with pacemakers. The PC card should be kept at least 15 cm (6 inches) away from the pacemaker to reduce risk. If you have any reason to suspect that interference is taking place, turn off your phone immediately. Contact your cardiologist for more information. Other medical devicesIf you use any other personal medical device, consult the manufacturer of the device to determine if it is adequately shielded from external RF energy. Your physician may be able to help you obtain this information. In health care facilitiesTurn your PC card off in health care facilities when instructed. Hospitals and health care facilities may be using equipment that is sensitive to external RF energy. Posted facilitiesTurn your PC card off in any facility when posted notices require you to do so. Potentially explosive atmospheresTurn off your PC card when you are in any area with a potentially explosive atmosphere. Obey all signs and instructions. Sparks in such areas could cause an explosion or fire, resulting in bodily injury or death. Areas with a potentially explosive atmosphere are often, but not always, clearly marked. They include: • fueling areas such as gas stations • below deck on boats • transfer or storage facilities for fuel or chemicals • vehicles using liquefied petroleum gas, such as propane or butane • areas where the air contains chemicals or particles such as grain, dust, or metal powders • any other area where you would normally be advised to turn off your vehicle engine Regulatory and Safety Information 19 Consumer Limited Warranty Kyocera Wireless Corp. (“KYOCERA”) offers you a limited warranty that the enclosed product or products (the “Product”) will be free from defects in material and workmanship for a period that expires one year from the date of sale of the Product to you, provided that you are the original end-user purchaser of the Product and provided that your purchase was made from an authorized supplier. Transfer or resale of a Product will automatically terminate warranty coverage with respect to that Product. This limited warranty is not transferable to any third party, including but not limited to any subsequent purchaser or owner of the Product. KYOCERA shall, at its sole and absolute discretion, either repair or replace a Product (which unit may use refurbished parts of similar quality and functionality) if found by KYOCERA to be defective in material or workmanship, or if KYOCERA determines that it is unable to repair or replace such Product, KYOCERA shall refund the purchase price for such Product, provided that the subject Product (i) is returned, with transportation prepaid, to a KYOCERA authorized service center within the one year warranty period, and (ii) is accompanied by a proof of purchase in the form of a bill of sale or receipted invoice which evidences that the subject Product is within the one year warranty period (“Proof of Purchase”). After the one year warranty period, you must pay all shipping, parts and labor charges. This limited warranty does not cover and is void with respect to the following: (i) any Product which has been improperly installed, repaired, maintained or modified; (ii) any Product which has been subjected to misuse (including any Product used in conjunction with hardware electrically or mechanically incompatible or used with accessories not approved by KYOCERA), abuse, accident, physical damage, abnormal operation, improper handling, neglect, exposure to fire, water or excessive moisture or dampness or extreme changes in climate or temperature; (iii) any Product operated outside published maximum ratings; (iv) cosmetic damage; (v) any Product on which warranty stickers or Product serial numbers have been removed, altered, or rendered illegible; (vi) cost of installation, removal or reinstallation; (vii) signal reception problems (unless caused by defects in material and workmanship); (viii) damage the result of fire, flood, acts of God or other acts which are not the fault of KYOCERA and which the Product is not specified to tolerate, including damage caused by mishandling, shipping and blown fuses; (ix) consumables (such as fuses); or (x) any Product which has been opened, repaired, modified or altered by anyone other than KYOCERA or a KYOCERA authorized service center. USE ONLY KYOCERA APPROVED ACCESSORIES WITH KYOCERA PHONES. USE OF ANY UNAUTHORIZED ACCESSORIES MAY BE DANGEROUS AND WILL INVALIDATE THE PHONE WARRANTY IF SAID ACCESSORIES CAUSE DAMAGE OR A DEFECT TO THE PHONE. KYOCERA SPECIFICALLY DISCLAIMS LIABILITY FOR ANY AND ALL DIRECT, INDIRECT, SPECIAL, GENERAL, PUNITIVE, EXEMPLARY, AGGRAVATED, INCIDENTAL OR CONSEQUENTIAL DAMAGES, EVEN IF ADVISED OF THE POSSIBILITY THEREOF, WHETHER FORESEEABLE OR UNFORESEEABLE OF ANY KIND WHATSOEVER, INCLUDING BUT NOT LIMITED TO LOSS OF PROFITS, UNANTICIPATED BENEFITS OR REVENUE, ANTICIPATED PROFITS ARISING OUT OF USE OF OR INABILITY TO USE ANY PRODUCT (FOR EXAMPLE, WASTED AIRTIME CHARGES DUE TO THE MALFUNCTION OF A PRODUCT) OR CONTRIBUTION OR INDEMNITY IN RESPECT OF ANY CLAIM RELATED TO A PRODUCT. REPAIR OR REPLACEMENT OF A DEFECTIVE PRODUCT OR REFUND OF THE PURCHASE PRICE RELATING TO A DEFECTIVE PRODUCT, AS PROVIDED UNDER THIS WARRANTY, ARE YOUR SOLE AND EXCLUSIVE REMEDIES FOR BREACH OF THE LIMITED WARRANTY, AND SUBJECT TO THIS WARRANTY, THE PRODUCTS ARE APPROVED AND ACCEPTED BY YOU “AS IS”. KYOCERA MAKES NO OTHER WARRANTIES, REPRESENTATIONS OR CONDITIONS OF ANY KIND, ORAL OR VERBAL, EXPRESS OR IMPLIED, STATUTORY OR OTHERWISE, WITH RESPECT TO THE PRODUCTS, INCLUDING BUT NOT LIMITED TO ANY IMPLIED WARRANTY OR CONDITION OF MERCHANTABILITY OR FITNESS FOR A PARTICULAR PURPOSE OR AGAINST INFRINGEMENT OR ANY IMPLIED WARRANTY OR CONDITION 20 User Guide for the Kyocera Passport PC Card ARISING OUT OF TRADE USAGE OR OUT OF A COURSE OF DEALING OR COURSE OF PERFORMANCE. NO DEALER, DISTRIBUTOR, AGENT OR EMPLOYEE IS AUTHORIZED TO MAKE ANY MODIFICATION OR ADDITION TO THIS WARRANTY. Some jurisdictions do not allow the exclusion or limitation of incidental or consequential damages, or allow limitations on how long an implied warranty lasts, so the above limitations or exclusions may not apply to you. This limited warranty gives you specific legal rights, and you may also have other rights which vary from jurisdiction to jurisdiction. For warranty service information, please call the following telephone number from anywhere in the continental United States and Canada: 1-800-349-4478 or 858-882-1401; or contact KYOCERA at the following address: 10300 Campus Point Drive, San Diego, California, 92121-1582, USA, Attention: Technical Support. DO NOT RETURN YOUR PRODUCTS TO THE ABOVE ADDRESS. Please call or write for the location of the Kyocera Wireless Corp. authorized service center nearest you and for procedures for obtaining warranty service. 82-N8035-4EN, Rev. 001 Consumer Limited Warranty 21