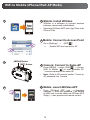
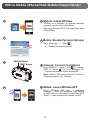
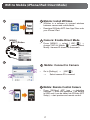
1
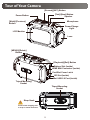
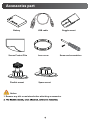
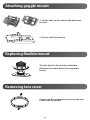
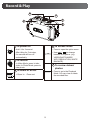
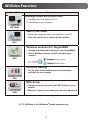
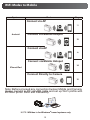
"$5*0/$".&3"
GC-XA1
6
&/(-*4)
#BTJD6TFS(VJEF
t#FGPSFVTFCFTVSFUPSFBEi4BGUFUZ1SFDBVUJPOTwQ
BOE
i$BVUJPOTwQ
UPVTFUIFQSPEVDUDPSSFDUMZ
t.BMGVODUJPOEVFUPXBUFSJNNFSTJPOBOEPUIFSEBNBHFT
DBVTFECZNJTVTFCZUIFDVTUPNFSJTOPUDPWFSFECZ
XBSSBOUZ
t#FGPSFVTFCFTVSFUPSFBEUIFi%FUBJMFE6TFS(VJEFwJOUIF
CVJMUJONFNPSZXJUIUIFDBNFSB
t'PSNPSFEFUBJMTPOUIFPQFSBUJPOTSFGFSUPUIFi%FUBJMFE
6TFS(VJEFwJOUIFCVJMUJONFNPSZ
t6TJOH8J7JEFPSFGFSUPUIFi%FUBJMFE6TFS(VJEFwJOUIF
CVJMUJONFNPSZ
'PS'VUVSF3FGFSFODF
&OUFSUIF.PEFM/PMPDBUFEPOUIFCPUUPNPGUIFDBNFSB
BOE4FSJBM/PMPDBUFEPOUIFCBUUFSZQBDLNPVOUPGUIF
DBNFSB
CFMPX
.PEFM/P
4FSJBM/P
®
Safety Precautions
CAUTION
RISK OF ELECTRIC SHOCK
DO NOT OPEN
CAUTION:
TO REDUCE THE RISK OF ELECTRIC SHOCK,
DO NOT REMOVE COVER (OR BACK).
NO USER-SERVICEABLE PARTS INSIDE.
REFER SERVICING TO QUALIFIED SERVICE PERSONNEL.
EBNBHFEJOBOZXBZTVDIBTQPXFSTVQQMZDPSEPS
QMVHJTEBNBHFEMJRVJEIBTCFFOTQJMMFEPSPCKFDUT
IBWFGBMMFOJOUPUIFBQQBSBUVTUIFBQQBSBUVTIBT
CFFOFYQPTFEUPSBJOPSNPJTUVSFEPFTOPUPQFSBUF
OPSNBMMZPSIBTCFFOESPQQFE
*GBNBMGVODUJPOPDDVSTTUPQVTJOHUIFDBNDPSEFS
JNNFEJBUFMZBOEDPOUBDUXXXKWDDPNPSCZQIPOFBU
$IBOHFTPSNPEJöDBUJPOTOPUBQQSPWFECZ+7$DPVME
WPJEUIFVTFSTBVUIPSJUZUPPQFSBUFUIFFRVJQNFOU
5IJTFRVJQNFOUIBTCFFOUFTUFEBOEGPVOEUP
DPNQMZXJUIUIFMJNJUTGPSB$MBTT#EJHJUBMEFWJDF
The exclamation point within an equilateral triangle is
QVSTVBOUUP1BSUPGUIF'$$3VMFT5IFTFMJNJUTBSF
intended to alert the user to the presence of important
EFTJHOFEUPQSPWJEFSFBTPOBCMFQSPUFDUJPOBHBJOTU
operating and maintenance (servicing) instructions in
the literature accompanying the appliance.
IBSNGVMJOUFSGFSFODFJOBSFTJEFOUJBMJOTUBMMBUJPO
5IJTFRVJQNFOUHFOFSBUFTVTFTBOEDBOSBEJBUF
NOTES:
SBEJPGSFRVFODZFOFSHZBOEJGOPUJOTUBMMFEBOE
t 5IFTFSJBMOVNCFSQMBUFJTPOUIFCBUUFSZQBDLNPVOU
VTFEJOBDDPSEBODFXJUIUIFJOTUSVDUJPOTNBZDBVTF
PGUIFDBNBSB
IBSNGVMJOUFSGFSFODFUPSBEJPDPNNVOJDBUJPOT
)PXFWFSUIFSFJTOPHVBSBOUFFUIBUJOUFSGFSFODF
CAUTION:
XJMMOPUPDDVSJOBQBSUJDVMBSJOTUBMMBUJPO*GUIJT
5IFNBJOQMVHSFNBJOTPQFSBCMF
FRVJQNFOUEPFTDBVTFIBSNGVMJOUFSGFSFODFUPSBEJP
t 3FNPWFUIFNBJOTQMVHJNNFEJBUFMZJGUIF
PSUFMFWJTJPOSFDFQUJPOXIJDIDBOCFEFUFSNJOFE
DBNDPSEFSGVODUJPOTBCOPSNBMMZ
CZUVSOJOHUIFFRVJQNFOUPòBOEPOUIFVTFSJT
WARNING:
FODPVSBHFEUPUSZUPDPSSFDUUIFJOUFSGFSFODFCZ
5IFDBNDPSEFSTIPVMEOPUCFFYQPTFEUPFYDFTTJWFIFBU
POFPSNPSFPGUIFGPMMPXJOHNFBTVSFT3FPSJFOU
TVDIBTEJSFDUTVOTIJOFöSFPSUIFMJLF
PSSFMPDBUFUIFSFDFJWJOHBOUFOOB*ODSFBTFUIF
TFQBSBUJPOCFUXFFOUIFFRVJQNFOUBOESFDFJWFS
IMPORTANT SAFETY INSTRUCTIONS
$POOFDUUIFFRVJQNFOUJOUPBOPVUMFUPOB
3FBEUIFTFJOTUSVDUJPOT
DJSDVJUEJòFSFOUGSPNUIBUUPXIJDIUIFSFDFJWFSJT
,FFQUIFTFJOTUSVDUJPOT
DPOOFDUFE$POTVMUUIFEFBMFSPSBOFYQFSJFODFE
)FFEBMMXBSOJOHT
SBEJP57UFDIOJDJBOGPSIFMQ
'PMMPXBMMJOTUSVDUJPOT
$MFBOPOMZXJUIESZDMPUI
Declaration of Conformity
%POPUCMPDLBOZWFOUJMBUJPOPQFOJOHT*OTUBMMJO
.PEFM/VNCFS($9"
BDDPSEBODFXJUIUIFNBOVGBDUVSFSTJOTUSVDUJPOT
%POPUJOTUBMMOFBSBOZIFBUTPVSDFTTVDIBTSBEJBUPST 5SBEF/BNF+7$
3FTQPOTJCMFQBSUZ+7$".&3*$"4$031
IFBUSFHJTUFSTTUPWFTPSPUIFSBQQBSBUVTJODMVEJOH
"EESFTT7BMMFZ3PBE8BZOF/+
BNQMJöFST
UIBUQSPEVDFIFBU
5FMFQIPOF/VNCFS
1SPUFDUUIFQPXFSDPSEGSPNCFJOHXBMLFEPOPS
QJODIFEQBSUJDVMBSMZBUQMVHTDPOWFOJFODFSFDFQUBDMFT 5IJTEFWJDFDPNQMJFTXJUI1BSUPG'$$3VMFT
0QFSBUJPOJTTVCKFDUUPUIFGPMMPXJOHUXPDPOEJUJPOT
BOEUIFQPJOUXIFSFUIFZFYJUGSPNUIFBQQBSBUVT
5IJTEFWJDFNBZOPUDBVTFIBSNGVMJOUFSGFSFODF
0OMZVTFBUUBDINFOUTBDDFTTPSJFTTQFDJöFECZUIF
BOE
UIJTEFWJDFNVTUBDDFQUBOZJOUFSGFSFODF
NBOVGBDUVSFS
SFDFJWFEJODMVEJOHJOUFSGFSFODFUIBUNBZDBVTF
6OQMVHUIJTBQQBSBUVTEVSJOHMJHIUOJOHTUPSNTPS
VOEFTJSFEPQFSBUJPO
XIFOVOVTFEGPSMPOHQFSJPETPGUJNF
3FGFSBMMTFSWJDJOHUPRVBMJöFETFSWJDFQFSTPOOFM
5IJT$MBTT#EJHJUBMBQQBSBUVTDPNQMJFTXJUI$BOBEJBO
4FSWJDJOHJTSFRVJSFEXIFOUIFBQQBSBUVTIBTCFFO
The lightning flash with arrowhead symbol, within an
equilateral triangle, is intended to alert the user to the
presence of uninsulated "dangerous voltage" within the
product's enclosure that may be of sufficient magnitude
to constitute a risk of electric shock to persons.
UIVTFOBCMJOH-"/DPOOFDUJPOUPCFFTUBCMJTIFE
XJUIJOUIFBSFBDPWFSFECZUIFSBEJPXBWFT)PXFWFS
BTSBEJPXBWFTQFOFUSBUFUISPVHIPCKFDUTTVDIBT
XBMMT
XJUIJOUIFSBOHFUIBUUIFZDPWFSTFDVSJUZ
1PXFS$POTVNQUJPON"8PSLJOH$VSSFOU
JTTVFTTVDIBTJOUFSDFQUJPOPGUSBOTNJTTJPOPS
VN"-FBLBHF$VSSFOU
JMMFHBMBDDFTTNBZBSJTFJGTFDVSJUZTFUUJOHTBSFOPU
DPOöHVSFE#FGPSFZPVDPOOFDUUPUIFOFUXPSL
JOBXJSFMFTT-"/FOWJSPONFOUSFBEUISPVHIUIF
Cautions
JOTUSVDUJPONBOVBMGPSUIFXJSFMFTT-"/EFWJDFJOVTF
BOEDPOöHVSFUIFTFDVSJUZTFUUJOHTBDDPSEJOHMZ
— Read Before Use —
'BJMVSFUPEPTPNBZJODSFBTFUIFSJTLPGQFSTPOBM
Notes on this equipment
t The camera shall not be exposed to excessive heat JOGPSNBUJPOCFJOHJOUFSDFQUFETVDIBTVTFSOBNFT
QBTTXPSETBOEUIFDPOUFOUPGZPVSNBJMTPSJMMFHBM
such as direct sunshine, fire or the like.
BDDFTTUPUIFOFUXPSL
5IFCBUUFSZNBZFYQMPEFJGJUHFUTIFBUFEVQ
t %VFUPUIFEFTJHOPGXJSFMFTT-"/OPUFUIBU
t The battery is not charged when purchased. Charge TFDVSJUZNBZCFCSFBDIFECZVOVTVBMPS
VOGPSFTFFBCMFNFBOT
the battery before using it for the first time.
t 'PSNPSFEFUBJMTPOXJSFMFTT-"/BOEOFUXPSL
t Do not or subject it to excessive shock or vibration. TFDVSJUZQMFBTFDPOTVMUUIFNBOVGBDUVSFSPGZPVS
XJSFMFTT-"/EFWJDF
t Before recording, be sure to conduct a trial
t +7$TIBMMOPUCFMJBCMFGPSBOZTFDVSJUZJTTVFT
recording.
USPVCMFTEBNBHFTPSMPTTFTBSJTJOHGSPNUIFVTF
t Store the recorded data periodically on computer.
PGUIJTGFBUVSF
+7$TIBMMOPUCFMJBCMFGPSBOZEBNBHFPSMPTTPGEBUB
t Do not press against the surface of the screen with Radio Waves Used by this Product
This product makes use of radio waves in the
force or subject it to strong impact.
ISM band (2.4 GHz).
%PJOHTPNBZEBNBHFPSCSFBLUIFTDSFFOT
Although a radio station license is not required
t When using the unit in a low temperature
environment (-10°C (-50°F) or below), the operating for using this product, please take note of the
following.
time may be shortened, or it may not function
t Do not use this product near the following
properly.
places
t *OEVTUSJBMTDJFOUJöDPSNFEJDBMFRVJQNFOU
TVDIBTNJDSPXBWFPWFOTBOEQBDFNBLFST
Precautions on Using Wi-Fi
t 4QFDJöFEMPXQPXFSSBEJPTUBUJPOTSBEJP
$BVUJPOTPO8J'J'VODUJPO
TUBUJPOMJDFOTFOPUSFRVJSFE
t 0QFSBUJPOJTOPUHVBSBOUFFEPOBMMEFWJDFT
t #MVFUPPUIEFWJDFT
t 5IJTGVODUJPOJTOPUEFTJHOFEGPSEJTBTUFSPSDSJNF
&RVJQNFOUTVDIBTUIFBCPWFNFOUJPOFEEFWJDFT
QSFWFOUJPO
NBLFTVTFPGUIFTBNFGSFRVFODZCBOEXJEUIBT
t $PNNVOJDBUJPONBZOPUCFDBSSJFEPVUQSPQFSMZOFBS
UIBUPG8J'J
SBEJPFRVJQNFOUPSCSPBEDBTUJOHTUBUJPOT*OUIJTDBTF
6TJOHUIJTQSPEVDUOFBSUIFBCPWFFRVJQNFOU
DIBOHFUIFMPDBUJPOBDDPSEJOHMZ
NBZDBVTFSBEJPXBWFJOUFSGFSFODFBOE
t Radio wave interference by Bluetooth devices
SFTVMUJODPNNVOJDBUJPOGBJMVSFPSBESPQJO
#MVFUPPUIEFWJDFTNBLFVTFPGUIFTBNFGSFRVFODZ
DPNNVOJDBUJPOTQFFE
CBOEXJEUI()[
BTUIBUPG8J'JEFWJDFT6TJOH
t Avoid using this product near a TV or radio
set.
UIJTQSPEVDUOFBSTVDIEFWJDFTNBZDBVTFSBEJPXBWF
57PSSBEJPTFUTNBLFVTFPGBSBEJPXBWF
JOUFSGFSFODFBOESFTVMUJOBESPQJODPNNVOJDBUJPO
GSFRVFODZCBOEXJEUIUIBUJTEJòFSFOUGSPN
TQFFEPSDPOOFDUJPOGBJMVSF*OUIJTDBTFUVSOPòUIF
UIBUPG8J'JBOEUIFSFGPSFIBTOPFòFDUPO
QPXFSPGEFWJDFTUIBUBSFOPUJOVTF
DPNNVOJDBUJPOCZUIJTQSPEVDUPSUIF57
SBEJPTFU
Security of Wireless LAN
)PXFWFSXIFOB57SBEJPTFUJTQMBDFEDMPTFUP
"OBEWBOUBHFPGXJSFMFTT-"/JTUIBUJOTUFBEPGVTJOHB
B8J'JQSPEVDUFMFDUSPNBHOFUJDXBWFTFNJUUFE
-"/DBCMFJUUSBOTNJUTJOGPSNBUJPOVTJOHSBEJPXBWFT
*$&4
$FUBQQBSFJMOVNÏSJRVFEFMBDMBTTF#FTUDPOGPSNFËMB
OPSNF/.#EV$BOBEB
t
CZUIF8J'JQSPEVDUNBZDBVTFOPJTFUPPDDVSJO
UIFTPVOEPSJNBHFTPGUIF57SBEJPw
Radio signals are unable to penetrate through
reinforced steel, metal, or concrete.
5IFSBEJPXBWFTVTFECZUIJTQSPEVDUBSFVOBCMF
UPQFOFUSBUFUISPVHISFJOGPSDFETUFFMNFUBMPS
DPODSFUFNBUFSJBMT
*UNBZEJóDVMUGPSDPNNVOJDBUJPOUPCF
FTUBCMJTIFEJGUXPSPPNTPSøPPSTBSFTFQBSBUFECZ
UIFTFNBUFSJBMT
$PNNVOJDBUJPONBZBMTPHFUXFBLFSXIFOUIFSF
BSFIVNBOTVCKFDUTPSQBSUTPGUIFCPEZJOCFUXFFO
UIF8J'JEFWJDFT
Do not connect to wireless networks that you
do not have authorization for.
0ODFDPOOFDUFEJUNBZCFDPOTJEFSFEBT
VOBVUIPSJ[FEBDDFTTBOEMFHBMBDUJPOTDBOCFUBLFO
BHBJOTUZPV
t Do not use the Wi-Fi function outside the
country of purchase.
%FQFOEJOHPOUIFDPVOUSZUIFSFNBZCF
SFTUSJDUJPOTPOUIFVTFPGSBEJPXBWFTBOEBOZ
WJPMBUJPOTDPVMECFQVOJTIBCMFCZMBX
t Exporting/Bringing the Unit Overseas
1FSNJTTJPOGSPNUIF64HPWFSONFOUNBZCF
SFRVJSFEXIFOCSJOHJOHUIFVOJUUPBOFYQPSU
DPOUSPMMFEDPVOUSZTFUCZUIF64HPWFSONFOU
TVDIBT$VCB*SBR/PSUI,PSFB*SBO3XBOEBBOE
4ZSJB"TPG/PWFNCFS
'PSNPSFJOGPSNBUJPODPOTVMUUIF64&NCBTTZ
$PNNFSDJBM4FSWJDF
Waterproof Function
5IJTDBNFSBJTFRVJQQFEXJUIBXBUFSQSPPGGVODUJPO
5IJTDBNFSBDBONBLFSFDPSEJOHTJONBSJOFXBUFSBOE
GSFTIXBUFS8FSFDPNNFOEUPTFMFDU<#MVFNBSJOF
>
<(SFFONBSJOF
>JO8IJUF#BMBODFGPSVOEFSXBUFSTDFOF
5IFXBUFSQSPPGJTUFTUFEJOBDDPSEBODFXJUI+7$UFTU
TUBOEBSEBOEJUEPFTOPUBTTVSFEBNBHFGSFFPSUSPVCMF
GSFFPQFSBUJPO8BUFSQSPPGGVODUJPOOPUFWBMVBUFECZ6-
The waterproof cannot be guaranteed if the camera
is subject to impact. 8BUFSQSPPG'VODUJPO+*4+BQBOFTF
*OEVTUSJBM4UBOEBSE
*19
t The cover for the ports must be firmly
closed.
tDo not use this product in water deeper
than 5 m (16 ft).
t Do not use in the following locations:
Place with higher water pressure than specified,
in hot springs or water of 40°C (104°F) or higher.
t
t Supplied accessories are not waterproof.
J.BMGVODUJPOEVFUPXBUFSJNNFSTJPO*19N
NJOVUFT
BOEPUIFSEBNBHFTDBVTFECZNJTVTFCZ
UIFDVTUPNFSJTOPUDPWFSFECZXBSSBOUZ
#FGPSFVTFCFTVSFUPSFBEUIFi%FUBJMFE6TFS(VJEFw
JOUIFCVJMUJONFNPSZXJUIUIFDBNFSB
5IFQSPEVDUZPVIBWFQVSDIBTFEJT
QPXFSFECZBSFDIBSHFBCMFCBUUFSZ
UIBUJTSFDZDMBCMF1MFBTFDBMM#"55&3:
GPSJOGPSNBUJPOPOIPXUPSFDZDMFUIJTCBUUFSZ
64"BOE$BOBEBPOMZ
— Maintenance After Use —
t After use in water or or a dusty environment,
rinse the camera as soon as possible with still
fresh water in basin.
tAlways keep the lens clean and wipe the
water droplets off the camera with a soft
and dry cloth.
t"JSESZUIFDBNFSBDPNQMFUFMZJOBTIBEFE
area.
JThe waterproof of the ports are not
guaranteed in all environments or
conditions*19NNJOVUFT
.
—CAUTION—
To maintain compliance with FCC’s RF exposure
guidelines, use only the supplied antenna.
Unauthorized antenna, modification, or
attachments could damage the transmitter and
may violate FCC regulations. This device complies
with Part 15 of the FCC Rules. Operation is
subject to the following two conditions:
(1) This device may not cause harmful
interference.
(2) This device must accept any interference
received, including interference that may Cause
undesired operation.
ATTENTION: The product you have purchased is
powered by a rechargeable battery
that is recyclable.
Please call 1-800-8-BATTERY for
information on how to recycle this
battery. (USA and Canada only)
*GUIJTTZNCPMJTTIPXOJUJTPOMZ
WBMJEJOUIF&VSPQFBO6OJPO
Tour of Your Camera
[Record]/[SET] Button
[Tele]/[Next] Button
Speaker
Power Button
Microphone
[Wide]/[Previous]
Button
Power/Charge
Light
LCD Monitor
Lens
[MENU]/[Delete]
Button
[Playback]/[Exit] Button
Battery Slot (inside)
HDMI Mini Connector (inside)
Port/Slot Cover Latch
SD Slot (inside)
Mini USB 2.0 Port (Inside)
Tripod Mounting
Socket
Tripod Mounting
Socket
Strap Hook
Protect from dropping with
a strap or similar measures.
5
Accessories part
Battery
Screen Protect Film
Flexible mount
Goggle mount
USB cable
Lens cover
Screw and screwdriver
Spare mount
Notice:
1. Remove any dirt or moisture before attaching accessories.
Attaching goggle mount
1. Lift the tabs on the rubber side and insert
the belt.
2. Secure with four screws.
Replacing flexible mount
Turn the knob in the direction indicated.
(Remove the mount when it is completely
loose.)
Removing lens cover
Press in on the protrusions to remove the lens
cover from the camera.
Getting Started
1 Load the battery
1
1. Slide the latch and open the cover.
2. Insert the battery according to the correct
polarity marks (+ or -).
2 Charge the Li-ion battery
1. A blinking light will indicate active charging.
2. In adapter charging mode, the full charging time
for a depleted battery is about 5 hours and the
light will turn off automatically after the charging
is completed.
3. In PC USB charging mode, a longer charging
time is required.
2
3 Insert the memory card
Adapter charging mode
PC USB
(Please use JVC
charging mode
authenticated adapter
AC-V10LU)
Using one with an output higher
than 5 V risks breakdown.
1. Slide the latch and open the cover.
2. Insert the SD card (Optional) into the slot until
it locks properly.
3. To remove the SD card, press inward to release
it and gently pull it out.
How to set the clock
1. Press the MENU button
2. Select [Time Setting] and then press
3
for Year, Month, Day, Hour, and Minute.
3. Press [SET
/
] to go for next.
Guide
1. Connect the camera to a computer.
2. Open [WiVideo
] Drive, then double click
[Start.pdf]
Note: Adobe Reader must be installed to read PDF
Supported SD card
-Panasonic
-TOSHIBA
-SanDisk
Record & Play
2
3
1
4
5
1
To power on
4
To access menu
Hold it for 2 second.
Press to open the option menu.
After idling for 5 minutes,
the camera will turn off
automatically.
6 Use
/
to change
between the options. (e.g.
VIDEO/PHOTO MODE,
WIFI, RESOLUTION, WHITE
BALANCE).
2
To record
In Video Mode, press to take
video. In Photo Mode, press to
take photo.
3
5
To zoom in or out
To review videos/
photos
Press to go to the Playback
Mode. You can view or delete
+:Zoom In. -:Zoom out.
WiFi to PC
WiVideo is the software to connect the camera with PC.
1 PC: Install WiVideo
1
2
6
3
Use camera to install [WiVideo] on
PC by plugging USB cable. If there is
no Auto-Installation, please go to [My
789;<7=
=
2 PC: Unplug the USB cable
3 Camera: Enable WiFi to PC
6
Press [MENU] Button 8 Select [ WiFi
then press [SET] Button to enter its menu.
6
] to turn on Wi-Fi. The
Select [ WiFi to PC
camera screen will show the Wi-Fi ID and
Password.
6
(The default password is 0000. Wi-Fi ID and
password can be edited on WiVideo via USB
connection.)
4
5
],
4 PC: Connect to Camera
6
Click [Detect Wi-Fi Camera] to search
camera.
6
Enter the Wi-Fi ID and Password shown on
camera to the WiVideo window.
NOTE: WiVideo is for Windows® based systems only.
WiVideo Function
Active Mode
Function
>=
?
!
=
WiFi/USB
Watch live video
6 Watch live streaming from your camera on your PC.
Use this camera as a remote home monitor.
WiFi
Wireless webcam for Skype/MSN
Change the video/audio setting of your Skype/MSN.
Select WiVideo Camera, which indicates your
camera.
WiFi
Account Setting
Set up your social website account information
and save to your camera.
USB
WiFi Setup
6
!"
#
camera.
6Name your camera and create your security password.
USB
NOTE: WiVideo is for Windows® based systems only.
WiFi Modes to Mobile
System
Mode
Page
Connect via AP
11
Android
Connect via Mobile Hotspot
12
Connect via AP
13
Connect via Mobile Hotspot
14
iPhone/iPad
Connect Directly to Camera
15
Note: Before proceed any connection bwteen Mobile and Camera,
==
?@'=
;GK
WiVideo (Enter SSID and Password).
NOTE: WiVideo is for Windows® based systems only.
1
WiFi to Mobile (Android: AP Mode)
1 Mobile: Install WiVideo
1
6
6
WiVideo is a software to connect wireless
between camera and mobile/tablet.
!= ;< ?? Q ?
onto mobile/tablet.
2
2 Mobile: Connect to Access Point
6
9
=Q789;X=
\7
$[Wi-Fi settings] $ [Wi-Fi]
(Enable WiFi and connect to AP)
3
[MENU] Button
[SET] Button
3 Camera: Connect to Same AP
6
4
?9^_`@78
9;K
78
[WiFi to Mobile ] to scan available AP
8==
?
Note: Refer to CD manual section 7 to set up
hotspot password into Camera.
4 Mobile: Launch WiVideo APP
6
? 9;<7 ?? = 8 =Q
8 =
$> is 0000 and it can be edited via WiVideo APP
08
=
=
1
WiFi to Mobile (Android: Mobile Hotspot Mode)
1 Mobile: Install WiVideo
1
6
6
WiVideo is a software to connect wireless
between camera and mobile/tablet.
!= ;< ?? Q ?
onto mobile/tablet.
2 Mobile: Enable Mobile Hotspot/AP
2
6
9
=Q789;X=
\7
$ Enable mobile hotspot/AP
Note: operation may vary, please refer to each
individual model.
3
[MENU] Button
[SET] Button
3 Camera: Connect to Hotspot/AP
6
4
?9^_`@78
9;K
78
[WiFi to Mobile
] to scan available AP
8==
?
Note: Refer to CD manual section 7 to set up
hotspot password into Camera.
4 Mobile: Launch WiVideo APP
6
? 9;<7 ?? = 8 =Q
8 =
$> is 0000 and it can be edited via WiVideo APP
08
=
=
1
WiFi to Mobile (iPhone/iPad: AP Mode)
1 Mobile: Install WiVideo
1
6
6
WiVideo is a software to connect wireless
between camera and mobile/tablet.
Download WiVideo APP from App Store onto
iPhone/ iPad.
2
2 Mobile: Connect to Access Point
6
9
=Q789;K
]
$ Enable WiFi and connect to AP
3
[MENU] Button
[SET] Button
3 Camera: Connect to Same AP
6
4
?9^_`@78
9;K 78
[WiFi to Mobile
] to scan available AP
8==
?
Note: Refer to CD manual section 7 to set up
AP password into Camera.
4 Mobile: Launch WiVideo APP
6
? 9;<7 ?? = 8 =Q
8 =
$> is 0000 and it can be edited via WiVideo APP
08
=
=
1
WiFi to Mobile (iPhone/iPad: Mobile Hotspot Mode)
1 Mobile: Install WiVideo
1
6
6
WiVideo is a software to connect wireless
between camera and mobile/tablet.
Download WiVideo APP from App Store onto
iPhone/iPad.
2
2 Mobile: Enable Personal Hotspot
6
9
=Q789;K
]
$ Enable [Personal Hotspot]
3
[MENU] Button
[SET] Button
3 Camera: Connect to Hotspot
6
4
?9^_`@78
9;K
78
[WiFi to Mobile
] to scan available AP
8==
?
Note: Refer to CD manual section 7 to set up
hotspot password into Camera.
4 Mobile: Launch WiVideo APP
6
? 9;<7 ?? = 8 =Q
8 =
$> is 0000 and it can be edited via WiVideo APP
08
=
=
1
WiFi to Mobile (iPhone/iPad: Direct Mode)
1 Mobile: Install WiVideo
1
6
6
WiVideo is a software to connect wireless
between camera and mobile/tablet.
Download WiVideo APP from App Store onto
your iPhone/ iPad.
2
[MENU]
[SET] Button
2 Camera: Enable Direct Mode
6
? 9^_`@7 8 9 ;K
7 8
choose [WiFi to Mobile
7 8
9!
^78z!==
=
3
3 Mobile: Connect to Camera
6
9
=Q789;K
]
$ Select camera ID to connect
4
4 Mobile: Remote Control Camera
6
? 9;<7 ?? = 8 =Q
8 =
$> is 0000 and it can be edited via WiVideo APP
08
=
=
1
Trouble Shooting
Problem/Situation
Cannot turn on the camera/ The
power turns off suddenly.
Camera cannot be turned on
after plugging power adapter.
Wi-Fi icon does not appear after
activating Wi-Fi.
The camera is frozen.
When the camera is connected
to the PC via USB cable, many
Autoplay windows may pop out.
They indicate the disks of the
camera.
Remediation/Solution
Battery pack is weak or depleted. Recharge the battery pack.
Please make sure that you use the JVC original power adapter and
connect it to the power outlet correctly.
Battery is low. Recharge the battery pack.
Please remove the battery/unplug the adapter. Then, insert the
battery/plug the adapter and turn on the camera again.
“DV” indicates the internal memory of the camera.
“Removable Disk” indicates the external memory (memory card
installed in the camera).
“WiVideo” indicates the bundled program. Please double-click it to
start installation automatically.
>=Q
==
?
want to connect.
The LCD shows “Connection
Failed”.
The camera is not in the wireless network service area or weak
network signal. Please make sure the Access Point is able to access
the Internet.
The camera does not support the type of encryption used on the
AP device.
The social websites update their websites without notice. Please visit
the website to update your account setting or upgrade your camera
The camera disables any Wi-Fi connection three minutes after
shooting starts. Use the menu to re-enable it.
Wi-Fi connections break off.
Reconnect in a clear radio environment. Remember that the
communication speed drops, interfering with connection, if the
receiver is too far away, there is something in between blocking
communications, or there is a microwave or wireless equipment in
use nearby.
Connecting a USB cable stops
photography. Photography is
not possible with a USB cable
connected.
Only time lapse and endless recording are available with a USB cable
connected. (Endless recording is limited to 720p 30 fps.)
There is no HDMI output.
HDMI output is disabled during photography.
The thermometer icon appears.
Turn off the camera and allow it time to cool down.
1