1
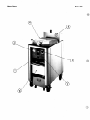
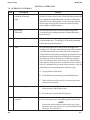
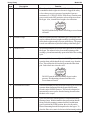
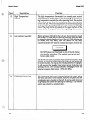
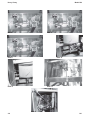
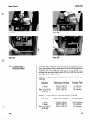
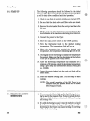
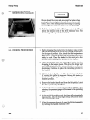
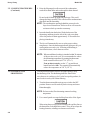
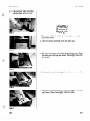
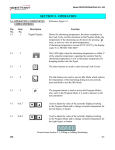
et 52
Y
\
Henny Penny
Model 520
SECTION 3. OPERATION
3-1. OPERATING CONTROLS
Item
1
Description
Main Power Switch
with Built- In Indicator
Lights
Function
A three way rocker switch with a center off position. Pressing
the left side of the rocker switch (COOK position) operates the
fryer, and the amber light illuminates. No light is visible when
the switch is in the OFF position. To filter, press the right side
of the rocker switch (PUMP position) to operate the pump
motor, and the red light illuminates.
2
Single Stage
Thermostat
An electromechanical device used to regulate temperature.
To set the desired cooking temperature, turn the thermostat
knob clockwise.
3
Temperature Light
Illuminates when the shortening temperature is below the
set-point temperature. The light goes off when the shortening
reaches the set-point temperature.
4
Timer
An electromechanical device that controls the length of the
cooking cycle. The timer controls the operation of the solenoid
valve and automatically resets at the end of the cooking time.
Set the desired cooking time by turning the gray knob clockwise
until the arrow points at the desired cooking time. Pushing on
the red button, activates the timing cycle and closes the solenoid. The red arrow times down to zero (0), while the black
arrow remains at the preset time. When the red arrow reaches
zero (0), it automatically goes back to the preset time. Also, the
solenoid opens, releasing the pressure inside the frypot.
A. Set gray knob to desired time.
B. Push red button to start timing cycle and build pressure.
C. When red arrow reaches zero (0), it resets to preset time
and pressure is released.
5
End of Cooking Cycle
A. The timer buzzer sounds, the solenoid valve opens to
release pressure, and the timer resets.
B. Move the timer switch to the OFF position.
6
402
Dead Weight Valve
Assembly
Maintains a constant level of steam pressure within the frypot.
Excessive steam pressure is vented through the exhaust stack.
NOTE
Remove the dead weight cap, and clean the cap, weight,
and orifice once a day to prevent over-pressurization inside
the frypot. See section 5-16.
3-1
Henny Penny
Item
7
Description
Safety Relief Valve
Model 520
Function
The safety relief valve is set at 14.5 PSI (99.9 KPa). In the
event that the dead weight valve becomes clogged, the safety
valve releases excessive pressure, keeping the frypot at a
maximum of 14.5 PSI (99.9 KPa). If this occurs, turn the main
power switch to the OFF position to release all pressure from
the frypot. Also, clean the dead weight valve at this time.
DO NOT pull the Safety Relief Valve Ring, or severe burns
will result.
8
Pressure Gauge
Indicates nominal pressure within the frypot. This gauge is not
used to calibrate the dead weight assembly. Operating pressure
of the dead weight assembly is preset at the factory .The gauge
is used as an indication of pressure build up within the frypot.
9
Solenoid Valve
An electromechanical device that causes pressure to be held in
the frypot. The solenoid valve closes at the beginning of the
cooking cycle and automatically opens at the end of the cooking
cycle.
10
Drain Valve
A two way ball valve, normally in the CLOSED position. To
open the drain, pull the handle slowly outward, away from the
fryer. This releases the oil from the frypot into the filter drain
pan. Push it back in to close the valve.
DO NOT open the drain valve while frypot is under
pressure. Hot shortening exhausts from this valve.
Severe burns will result.
11
Drain Interlock Switch
A microswitch that provides protection for the frypot in case the
operator drains shortening from the frypot while the main
switch is in the POWER position. The switch is designed to
automatically remove power from the heating elements when
the drain valve is open.
12
Filter Valve
A two way ball valve which operates in conjunction with the
filtering system. With the handle in the open position (handle
facing vertical by turning it counterclockwise) and the main
power switch in the PUMP position, this valve directs the
filtered shortening from the drain pan back to the frypot. To
close the filter valve, turn it clockwise to the horizontal position.
3-2
402
el 520
Fun~tio~
ke
High Temperature
Control
The high temperature thermostat is a manual reset control
which sensesthe temperature of the shortening. If the shortening temperature exceeds the safe operating limit, this control
will remove power from the contactors, thus removing heat
to the cook pot. When the temperature of the shortening drops
to preset safe operating limit, the control must be manually
reset. The reset button is located on the upper surface of the
recess in the front panel below the regulating thermostat.
Lid/Locking
Before pressure will build in the cook pot, the lid must be closed
and locked. To close the lid, push the lid down with one hand
by using the plastic handle on top of the lid. While holding the
lid closed with one hand,. turn the handle on the latch
counterclockwise 160 o (until it contacts the stop) to lock the lid.
Assembly
DO NOT place your free hand on top of the lid during
the latching procedure. The surface may be hot and
burns could result.
The lid will not latch or pressure build unless the handle is fully
latched. As pressure builds within the cook pot, the handle will
be locked in place. As long as the locking assembly is engaged,
it will prevent the handle from being moved clockwise and
opening the lid. The locking assembly disengages when the
internal pressure falls below 1 PSI (6.8 KPa).
15
Condensate Drain Pan
The condensate drain pan is located behind the panel, below
the drain and filter valve handles. Remove the panel and the
condensate pan is located on the left. It can be easily removed
by grasping the handle and pulling out carefully. The condensation pan should be emptied daily.
3-3
Henny Penny
Model 520
Item 6
Item 7
Item 9
Item 10
Item 11
3-4
Item 12
Item 9
101
The first step in the use of the Henny Penny Model 520 is to
learn the controls. Next, determine the time and temperature
settings. The following will assist you in determining these
settings but are approximate and will vary with the size and
quantity of the raw product.
Chicken - 9 piece fresh; 1 head, 2 l/2 - 2 3/4 lbs. (1.13 kg 1.24 kg)
1 head
2 head
Max Load 8 lbs.
(3.62 kg)
325°F (163°C)
325 “F (163 “C)
325 “F (163 “C)
11 minutes
12 minutes
13 minutes
Chicken - 9 piece frozen; 1 head 2 3/4 lbs. (1.24 kg)
tit
1 head
2 head
Max Load 8 lbs.
(3.62 kg)
T
etti
325 “F (163 “C)
325 “F (163 “6)
325 “F (163 “C)
,’
c
17 l/2 minutes
18 minutes
19 minutes
del 52
The following procedures should be followed in the initial
start-up of the fryer and each time the fryer is brought from
a cold or shut down condition back into operation.
1. Check to see that all control switches are turned OFF.
2. Be sure that the drain valve and filter valve are closed.
3. Remove the wire basket from the cook pot and leave the
lid open.
4. Fill the cook pot with shortening to level indicated. The
level indication is the maximum shortening level when hot.
5. Connect the power to the fryer.
6. Move the main power switch to the COOK position.
7. Turn the thermostat knob to the desired cooking
temperature. The temperature light will go on.
8. When the shortening has reached the desired cook
temperature, the temperature indicating light will be off.
9. Thoroughly stir the shortening to stabilize’the temperature
throughout. Make sure that the shortening at the bottom
of the pot is agitated and evenly heated.
10. After the shortening temperature has stabilized for a
minimum of 30 minutes, check the shortening temperature
using a good deep fat thermometer (Henny Penny part
no. 121006).
11. Lower the empty basket into the cook pot (food will be
added later).
12. Select the desired cooking time. You are ready to start
cooking.
NOTE: The overall operation of the 520 Fryer is no
different than our present Model 500 or Model
600 Pressure Fryers.
1. It is recommended that a high quality liquid frying shortening be used in the pressure fryer. Some low grade shortenings have a high moisture content and will cause foaming
and boiling over.
2. If a solid shortening is used, it must be melted to a liquid
first, then poured into the frypot. Attempting to melt a
shortening in the frypot may cause burning or scorching
of the fresh shortening.
“I
‘+I
el 520
Gloves should be worn and care must be taken when
pouring hot shortening into the unit. Severe burns could
result. Also, when adding fresh shortening to existing
shortening, care must be taken to avoid splashing.
3. Cold shortening should be filled approximately 112 inch
below the bottom level of the level indicator line. The
shortening will expand when heated.
Step 3
3-5. COOKING
1. Before dropping the product into the basket, make certain
that the shortening is at the correct cooking temperature
for the type of product. Also, check that the temperature
light is OFF. Once the product has been prepared, you are
ready to cook. Place the basket in the cook pot a few
seconds before placing the product in the basket.
2. Place the product into the submerged basket by first
dropping in the larger pieces. This gives the larger and
more difficult pieces a few .extra seconds to cook in the
shortening. Continue to place the remaining product in
the basket.
3. Lift the basket slightly out of the shortening and shake
it, causing the pieces to separate. Return the basket to
the shortening. Doing this will prevent white spots on the
finished product.
4. Remove the basket handle and close the lid quickly. Latch
the lid as previously described.
5. Activate the time as previously described. Within a few
minutes, the pressure gauge will increase to the operating
zone.
6. At the end of the cooking cycle, the fryer will automatically
depressurize. Also the timer light will go off and the timer
will automatically reset.
7. After the pressure drops to 0, open the lid latch assembly
by turning the handle clockwise 160 O.
Henny Penny
3-5. COOKING PROCEDURES
(Continued)
Model 520
8. Raise the lid promptly to allow most of the condensation
on the lid to drain down and out through the drain channel.
Do not let the lid slam up against the back stop. This could
damage the hinge assembly. This will also allow condensation to
drop back into the shortening.
NOTE: The condensation opening behind the pot needs to be
kept clear of obstructions. Failure to do so will cause the
moisture to back up onto the countertop.
9. Insert the handle into the basket, lift the basket out of the
shortening, and hang it on the side of the cook pot to drain.
Allow the product to drain approximately 15 seconds before
placing it into the tray.
10. The fryer will automatically recover to the preset cooking
temperature. Once the thermostat indicator light goes out, you
can begin the next cook cycle. If filtering of shortening is
desired at this time, refer to the next section.
NOTE: When no additional cooking is intended within 30 minutes
of the previous cook cycle, it is recommended to reduce
the shortening temperature (by turning the thermostat
knob counterclockwise) to 275o F (135o C).
Four product controls, use the “C” (up and down)
buttons and select Idle. The controls will automatically
reduce the temperature to 250o F (121o C).
3-6. FILTERING THE
SHORTENING
Cooking breaded products requires frequent filtering to keep
the shortening clean. The shortening should be filtered after
every three to six cooking cycles. For the best quality product, do
not exceed six cook cycles without filtering.
1. Turn the thermostat and the main power switch to the OFF
position. Remove and clean the fry basket in soap and water.
Rinse thoroughly.
NOTE: For best results, filter shortening at normal cooking
temperature.
2. Use a metal spatula to scrape build up from sides of the frypot.
When using the pot scraper, do not damage the capillary line on
the thermostat, or the high limit control. Also, do not scrape the
heating elements, or damage to elements could result.
3-8
600
el 520
The filter pan must be in the proper position beneath
the drain valve. This will prevent the splashing of the
hot shortening as it drains into the filter drain pan
which would cause burns.
3. Open the drain valve by pulling it forward slowly. This
will prevent excessive splashing of the hot shortening as
it drains into the filter drain pan.
4. As the shortening drains from the fry pot, use bushes
(Henny Penny part no. 12105) to scrape and clean the sides
of the fry pot and the heating elements. If the drain fills
with breading, use the white brush to push the breading
into the filter pan.
5. When all of the shortening has drained, scrape or brush
the sides and the bottom of the cook pot.
6. Rinse the cook pot as follows:
A. Close the drain valve by pushing the handle inward.
B. Open the filter valve by turning the handle counterclockwise.
Hold the lid closed so that the very first surge of the
shortening will not splash up or over the top of the cook
pot’. Severe burns will result.
C. Move the main power switch to the PUMP position.
Carefully open the lid to see if shortening is returning properly. Fill cook pot l/3 full, then turn off the
mum.
..
If there are air bubbles coming up in the shortening,
it is possible that the filter connecting union on the filter
tube line is not tightened properly. If so, turn off the
pump and use gloves to tighten the union. *This union
will be hot and severe burns will result.
el 520
3-6. FILTERING THE
S
TENING (Co~ti
D. Wash down and scrub the sides of the cook pot. Use
“L” brush to clean the heating elements.
E . After the sides and bottom are cleaned, open the drain
valve.
7. Pump all the shortening out of the filter pan and back into
the cook pot. Close the lid during the first surge of
pumping.
8. When the pump is pumping air only, the shortening in the
fry pot will appear to be boiling. Close the filter valve first
and then move the main power switch from PUMP to
OFF. This will keep the filter pump and lines from filling
up with shortening.
Note: When the appearance of boiling occurs, immediately
close the filter valve, then turn the pump off. This will
prevent aeration of the shortening, therefore increasing
shortening life.
9. Check the level of the shortening in the cook pot. Add fresh
shortening, if necessary, until it reaches the level indicator
line on the rear wall of the cook pot.
NOTE: Approximately 10 to 12 filterings can be made with
one filter paper envelope, depending on several
conditions; the quantity and type of product fried and
filtered, the type of breading used, and the amount
of crumb accumulation left inside the filter drain pan.
When the filter screen assembly and filter paper
become clogged and pumping flow rate slows down,
clean the screen assembly and change the filter
envelope. See procedure on page 3-11.
10. After completing the filtering operation, empty and
replace the condensation drain pan.
11. If cooking is to be continued at this time, move the main
power switch back to the COOK position and allow time
for reheating of the shortening.
GING T
ENVELOPE
F~LTE
The filter envelope should be changed after lo-12 filterings
or whenever it becomes clogged with crumbs. Proceed as
follows:
1. Move the main power switch to the OFF position.
2. Remove and empty the condensation drain pan.
3. Disconnect the filter union and remove the filter drain pan
from beneath the fry pot. The filter drain pan is provided
with casters for ease of movement.
FILTE
ti~~e~)
This union will be hot. Use protective glove or cloth
to prevent burns.
4. Lift the screen assembly from the drain pan.
Step 3
5. Wipe the shortening and crumbs from the drain pan. Clean
the drain pan with soap and water. Thoroughly rinse with
hot water.
6. Unthread the suction standpipe from the screen assembly.
Step 6
7. Remove the crumb catcher. Clean thoroughly with soap
and water. Rinse thoroughly with hot water.
ENVELOPE
(Co~ti~~ed)
8. Remove filter clips and discard the filter envelope.
9. Clean the top and bottom filter screen with soap and
water. Rinse thoroughly with hot water.
Step 8
Be sure that the filter screens, crumb catcher, filter
clips, and the suction standpipe are thoroughly dry
before assembly of filter envelope, as water will dissolve
the filter paper.
Step 10
10. Assemble the top filter screen to the bottom filter screen.
11. Slide the screens into a clean filter envelope.
12. Fold the corners in and then double fold the open end.
13. Clamp the envelope in place with two filter retaining clips.
tep 11
14. Replace the crumb catcher screen on top of the filter paper.
Screw on the suction standpipe assembly.
15. Place complete filter screen assembly back into filter drain
pan. Slide pan back into place beneath the fryer.
16. Connect the filter union by hand. Do not use a wrench to
tighten.
17. Slide the condensation drain pan back into place. The fryer
is now ready to operate.
tep 12
Henny Penny
3-8. CLEANING THE FRYPOT
Model 520
Taste the cold shortening every day for flavor. Watch the shortening
for foaming during the cook cycle. Discard the shortening as soon
as it shows signs of foaming. Drain and clean the frypot as follows:
1. Turn the power switch to OFF.
Place the filter drain pan under the drain valve to prevent
splashing or spilling of hot liquids. Failure to do so, results in
splashing and severe burns.
2. Pull out drain valve handle to drain hot shortening from frypot.
3. Close the drain valve, and discard the shortening in filter pan.
Install the filter drain pan under the fryer, leaving out the filter
screen assembly.
4. Fill the frypot to the level line with hot water. Add 2 to 4
ounces (6 to 12 ml) of fryer cleaner (Henny Penny part no.
12101) to the water and mix thoroughly. The fry basket can be
placed inside the frypot for cleaning.
Always wear safety goggles or face shield and rubber gloves
when cleaning the frypot. The highly alkaline cleaning solution
should not contact eyes or skin, or severe burns will result.
Carefully read the instructions on the cleaner. If solution
contacts your eyes, rinse thoroughly with cool water and see a
physician immediately.
5. Standard Controls: Set thermostat to 195o F (91o C) and turn
the power switch to POWER position.
Electronic Controls: Use the up and down buttons to select
the Clean mode. The controls will automatically heat the
solution up to 190o F (88o C).
NEVER PRESSURIZE TO CLEAN. Leave the lid open.
Water under pressure is super heated and causes severe burns.
600
3-13
Henny Penny
3-8. CLEANING THE FRYPOT
(Continued)
Model 520
6. When the set temperature is reached, turn unit off.
Watch cleaning solution constantly to make sure it does NOT
boil over causing damage to controls.
If the cleaning solution starts to foam and boil over, DO NOT
CLOSE THE FRYER LID, severe burns could result.
7. Let the cleaning solution stand for 15 to 20 minutes, with the
unit turned off.
8. Use fryer brush (Henny Penny part no.12105), to scrub the
inside of the frypot, the lid liner, and the counter top of the fryer.
Never use steel wool, it deteriorates the stainless steel.
Do not use the cleaning solution on the lid or the lid hinge.
These aluminum parts will corrode if the PHT cleaner contacts
them. Also, Do not use abrasive cleaners, or cleaner containing
chlorine, bromine, iodine, or ammonia chemicals on the stainless
steel. Deterioration of the stainless steel will result.
9 Open the drain valve and drain the cleaning solution from the
frypot into the drain pan and discard.
10. Replace the empty drain pan, close the drain valve, and refill the
frypot with hot water to proper level.
11. Add approximately 4 ounces of distilled vinegar and reheat the
vinegar solution to 195o F (91o C), or use the Clean mode on
electronic controls.
12. Using a clean brush, scrub the interior of the frypot and lid liner.
This neutralizes the alkaline left by the cleaning compound.
13. Drain the vinegar rinse water and discard.
14. Rinse down the frypot, using clean hot water .
15. Thoroughly dry the drain pan, and the frypot interior .
NOTE: Make sure the inside of the frypot, the drain valve
opening, and all the parts that will come in contact with the
new shortening, are as dry as possible.
16. Replace the clean filter screen assembly in the drain pan and
install under fryer .
17. Refill the fryer with fresh shortening.
3-14
700


![User Manual [ ] - American Industrial Systems, Inc.](http://vs1.manualzilla.com/store/data/005674734_2-58a82461c9fcf90cc8d42d376dad67a0-150x150.png)