1
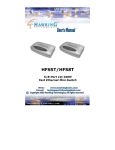
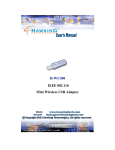
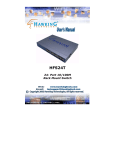
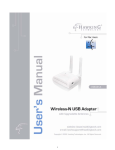
H-DS20L
USB 2.0 Docking Station
FCC Warning
This equipment has been tested and found to comply with the regulations for a Class B digital device,
pursuant to Part 15 of the FCC Rules. These limits are designed to provide reasonable protection against
harmful interference when the equipment is operated in a commercial environment. This equipment
generates, uses, and can radiate radio frequency energy and, if not installed and used in accordance with
this user’s guide, may cause harmful interference to radio communications. Operation of this equipment in
a residential area is likely to cause harmful interference, in which case the user will be required to correct
the interference at his/her own expense.
CE Mark Warning
This is a Class B product. In a domestic environment, this product may cause radio interference, in which
case the user may be required to take adequate measures.
VCCI Mark Warning
LIMITED WARRANTY
Hawking Technology guarantees that every USB Docking Station is free from physical defects in material
and workmanship under normal use for two (2) years from the date of purchase. If the product proves
defective during this two-year warranty period, call Hawking Customer Service in order to obtain a Return
Authorization number. Warranty is for repair or replacement only. Hawking Technology does not issue
any refunds. BE SURE TO HAVE YOUR PROOF OF PURCHASE. RETURN REQUESTS CANNOT
BE PROCESSED WITHOUT PROOF OF PURCHASE. When returning a product, mark the Return
Authorization number clearly on the outside of the package and include your original proof of purchase.
IN NO EVENT SHALL HAWKING TECHNOLOGY’S LIABILTY EXCEED THE PRICE PAID FOR
THE PRODUCT FROM DIRECT, INDIRECT, SPECIAL, INCIDENTAL OR CONSEQUENTIAL
DAMAGES RESULTING FROM THE USE OF THE PRODUCT, ITS ACCOMPANYING SOFTWARE
OR ITS DOCUMENTATION. Hawking Technology makes no warranty or representation, expressed,
implied or statutory, with respect to its products or the contents or use of this documentation and all
accompanying software, and specifically disclaims its quality, performance, merchantability, or fitness for
any particular purpose. Hawking Technology reserves the right to revise or update its products, software,
or documentation without obligation to notify any individual or entity. Please direct all inquiries to:
[email protected].
2
Basic Overview……………………………………………………………………...…….4
Safety Instructions………………………………………………………………...4
Introduction……………………………………………………………………….4
Features…………………………………………………………………………...4
System Requirements……………………………………………………………..5
Package Contents…………………………………………………………………5
Supported Operating Systems…………………………………………………….5
Technical Specifications…………………………………………………………………..6
Hardware Installation…………………………………………………………………..…7
Software Installation………………………………………………………………………9
3
SAFETY INSTRUCTIONS
1.
2.
3.
4.
5.
Always read the safety instructions carefully.
Keep this User’s Manual for future reference.
Keep this equipment away from humid environments.
Lay this equipment on a reliable, flat surface before setting it up.
If any of the following situations arise, have the equipment checked by a service
personnel:
The equipment has been exposed to moisture
The equipment has been dropped and/or damaged
The equipment has obvious signs of breakage
The equipment has not been working correctly or you could not get it to work
according to the User’s Manual.
INTRODUCTION
Hawking Technology’s USB 2.0 Docking Station is a unique expansion unit specially
designed to transform a Notebook Computer into a desktop equivalent. It provides
several desktop system connectivity capacities. The USB docking station allows you to
add up to four USB ports to your PC and up to a total of 127 additional hubs and other
devices. Installing the USB Docking Station is simple - there are no confusing cables,
plugs, or IRQs (Interrupt requests) to worry about. Just plug in your peripherals and
begin using them without re-booting your PC.
FEATURES
One USB Upstream Port Supports Full Speed (480Mbps).
Two USB Downstream Ports
One PS/2 Keyboard Port
One PS/2 Mouse Port
One USB File Transfer data link port
One Serial Port
One Printer Port
Standard IEEE-1284 parallel port
The Docking Station Uses USB self power
One 10/100 Ethernet LAN port (USB 2.0 Hi-Speed Docking Station With LAN only)
4
SYSTEM REQUIREMENTS
PC or Mac
MS Windows 98SE, ME, 2000, XP & Mac OS9.x & 10.1
Available USB Port
64 MB RAM or above
Pentium 233 MHz or higher
PACKAGE CONTENTS
Docking Station – 1pc
DC5V Power supply - 1pc
User’s Manual - 1pc
Software driver CD-ROM - 1pc
Type-A to Type-B USB Cable - 1pc
SUPPORTED OPERATING SYSTEMS
Windows 98SE, ME, 2000, XP
Mac OS 9.x and OS 10.1
5
Type
Docking Station With
LAN
Computer Port 1 upstream port Type B receptacle
I/O Ports
2 USB 2.0 downstream ports, Type A receptacle
1 PS/2 Keyboard port Mini Din 6-pin
1 PS/2 Mouse port Mini Din 6-pin
1 File Transfer port Type B receptacle
1 serial port DB 9-pin male
1 parallel port DB 25-pin female
Emission
Power
1 10/100M LAN port
8P8C RJ-45 shielding
CE, FCC
AC Input 100 V~240V
DC Output 5V, 2.5A
Environments Operating temperature: 0C~70C
Storage temperature:
-40C~70~C
Humidity: 90% RH (No condensing)
6
LED Status Indicators
Once the USB Port Replicator is connected, the Hub Link LED is lit green and the LAN
LED is lit after the Ethernet cable is connected.
Type
Docking
Station w/
LAN
# of LEDs Color Descriptions
1
2
2
Red The AC to DC power adapter is plugged
into the power port
Green When any of the hub ports, which are
connected to USB devices, are activated.
Green The LED for your Ethernet LAN port is
to indicate 10/100 Mbps speed.
Figure 1. USB Port Replicator Ports
Any
USB port
LAN Port
PS2 mouse &
keyboard connector
Connect to RS232 device
Connect to Printer
Link to another PC (II)
7
Figure 2. Upstream Port and Power Connector
Connect to
power adaptor
Connect to PC (I)
Connect the power adapter and plug it into the back of the docking station.
Find an unused electrical outlet and plug it in the power adapter.
Plug the flat end (A plug) of the USB cable into a free USB port on your PC.
Plug the square end (B plug) of the USB cable into the USB upstream connector
located on the back of the docking station.
At this point, Windows will automatically find the docking station and start installing
its drivers. Windows will prompt you for the software. See the next section for
details on how to install the software.
If you are not sure what version of Windows you are running, click on “Start”,
“Settings”, “Control Panel”, then double-click on “System.” An applet will appear and
provide you with your system’s information.
8
1. Two-Port Hub
Before you connect a USB device to one of the Hub ports, please follow the software
installation instructions provided in the subsequent pages of this User’s Manual.
2. PS/2 ports (Keyboard and Mouse port)
If you connect a PS/2 keyboard or mouse to the docking station and you are using a PC,
you will not need the software driver. However, if you are using a Mac, you will need to
install the software driver on the CD-ROM onto your computer. The software drivers
also allow Mac users to access PS/2 ports. To do this, please access the file name
“USB_PS2_Converter” which is located on the Mac directory of the CD-ROM.
3. File Transfer Port
You will need a type-A to Type-B USB cable (included in the package) for connecting
two PCs, two Macs, or a PC and a Mac. For Windows, please access the root directory of
the CD-ROM. For Macs, please access the file name “Installer”. Please refer to the
“Operation” section for further instructions/clarifications.
NOTE: At the time of this user’s manual publication, the file transfer port supports the
software drivers for Windows 98, 2000, ME, XP and Macs.
4. Serial Port
If you connect a serial port device (e.g., Modem) to the docking station and the docking
station is connected to a PC, you will need to reset the upstream port. Because serial ports
do not have hot plug and play interfaces, you must reset this function to locate your
device on the serial port.
5. Parallel Port
You can attach your computer to most parallel printer devices through this port to get a
faster printing result.
6. LAN port (only for Docking Station With LAN)
This port is designed to support 10/100 Mbps Ethernet. It also complies with the IEEE
802.3u, 100BASE-TX, and IEEE 802.3 10BASE-T standards.
9
Installation for Windows 98SE & ME
1. The H-DS20L Install wizard searches for new drivers. Click Next to continue.
2. Select "Search for the best driver for your device [Recommended]," and click Next to
continue.
10
3. Select "CD-ROM drive", and click Next to continue.
4. Windows will now search for the driver file for the device. Click Next to continue.
11
5. Windows has finished installing the software. Click Finish to end the Wizard.
* NOTE: Repeat the previous steps as needed.
6. If your operating system is Windows ME, click No to continue. Otherwise, click Yes
to reboot your computer.
12
7. The "Welcome to the Install Shield Wizard for PC-Linq" dialog window appears.
Click Next to continue.
8. Setup will add the program icon to the Program Folder listed below. Click Next to
continue.
9. Windows has finished installing the software. Click Finish to end the Wizard.
13
10. The PC-Linq icon will appear on the desktop.
Installation verification
Because the docking station is USB 2.0, the hub driver is based on the host device. The
device name may vary on your host device driver.
Windows 98SE
14
15
Windows ME
16
17
Installation for Windows 2000
1. The H-DS20L Install wizard helps you install a device driver. Click Next to continue.
2. Select "Search for a suitable driver for my device [recommended]." Click Next to
continue.
18
3. Select "Floppy disk drives" and click Next to continue.
4. The wizard found a driver. Click Next to continue.
19
5. Select "C:\WINNT\system32\drivers" for built-in hub driver (usbhub20.sys). Click
Open to continue.
6. Click OK to continue.
20
7. Windows has finished installing the software. Click Finish to continue.
8. This wizard helps you install a device driver. Click Next to continue.
21
9. Select "Search for a suitable driver for my device [recommended]." Click Next to
continue.
10. Select CD-ROM drives and click Next to continue.
22
11. The wizard found a driver. Click Next to continue.
12. Windows has finished installing the software. Click Finish to continue.
* NOTE: Repeat the previous steps as needed.
23
13. The "Welcome to the Install Shield Wizard for PC-linq" dialog window appears.
Click Next to continue.
14. Setup will add the program icon to the Program Folder. You may type a new folder
name, or select the default folder name. Click Next to continue. The PC-Linq icon
will appear on the desktop.
Note: If you connect the docking station to a PC via a USB 2.0 port, PCI card, or hub,
it will ask for the operating system for the USB 2.0 driver.
24
Installation verification
Because our docking station is USB 2.0, the hub driver is based on the host device. The
device name may vary on your host device driver.
Windows 2000
25
Installation for Windows XP
1. The H-DS20L Install wizard helps you install a device driver. Select "Install the
software automatically [Recommended]." Click Next to continue.
2. Click Continue Anyway.
26
3. The wizard has finished installing the software. Click Finish to continue.
* NOTE: Repeat the previous steps as needed.
4. The "Welcome to the Install Shield Wizard for PC-linq" dialog window appears.
Click Next to continue.
27
5. Setup will add the program icon to the Program Folder. You may type a new folder
name, or select the default folder name. Click Next to continue.
The PC-Linq icon
will appear on the desktop.
Note: If you connect the docking station to a PC via a USB 2.0 port,
PCI card, or hub, it will ask for the operating system for the USB 2.0
driver.
28
Installation verification
Because the docking station is USB 2.0, the hub driver is based on the host device. The
device name may vary on your host device driver.
Windows XP
29
30