1
GEAppliances
www.geappliances.com
Part No. 164B3333P104-3 Pub.No. 49-8868-2 10-99JR
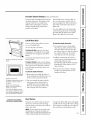
Congratulations!
YouAre/Vow Part of theGEFamily.
Safety Information
Anti-tip Device ............
3
Safety Precautions ......
3, 4
Oven ....................
5
Surface CookingUnits ......
RadiantSurface Units .......
6
7
Welcome to the GE f:amily.We're proud of our qualib7 products and we are
commiued to pro_4ding dependable se_a4ce. You'll see it in this eas?_tc-use Owner's
Manual and you'll hear it in tl_e fiiendly voices of our customer sel_4ce depamnent.
Best of all, you'll experience these values each time you use your range. That's
important, because your new range will be part of your fmnily fbr ma W years.
And we hope you will be part of ours for a long time m come.
We thank you %r buying GE. We appreciate your purchase, and hope you will
continue to rely on us whenever you need qualipy appliances for your home.
Operating
Instructions
Using the SurfaceUnits .. 8-10
Using the Oven ........
GE& You,A Service Partnership.
11-21
Using the Clockand timer..
17
IMPORTANT!
timed Baking & Roasting ... 18
OvenThermostat..........
19
Fill out the Consumer
Self-CleaningOven .....
Two easy ways to register your appliance!
20, 21
•
Through
•
Complete
Product
the internet
Registration
Card.
at',_-_-_v.geappliances.com
and mail the enclosed
Product
Registration
Card
Care and Cleaning
ControlPanel& Knobs .....
22
OvenLight ..............
24
CoilSurface Units .........
25
Broiler Pan & Grid .........
26
FORYOURRECORDS
Write the model and serial numbers here:
RemovableStorageDrawer.. 26
#
Anti-tip Device ...........
27
#
GlassCooktop...........
28
You can find them on a label on the fi'ont of the range behind the
storage (kawer.
TroubleshootingTips
Staple sales slip or cancelled check here.
Before YouCall
ForService ...........
Proof of the odginal purchase date is needed to obtain sezvice under
the warranty.
29-32
READTHISMANUAL
Inside you _4ll find ma W helpfld hints on how to use and maintain
your range properly.Just a little preventive care on your part can save
you a great deal of time and money over the life of your range.
Customer Service
IF YOUNEEDSERVICE
ProductRegistration ......
33
Warranty ...............
35
Service Telephone
Numbers ........
BackCover
2
You'll find ma W answers to common problems in the Before YouCarl
For Service section. If you review our chart of TroubleshootingTips
first, you may not need to call fbr set_ice at all.
If you do need setYice, you can relax knowing help is only a phone
call a_ay. A list of toll-fi'ee customer service numbers is included in
the back section of this manual. Oryou can al_ays call the GE Answer
Center ®at 800.626.2000, 24 hours a day, 7 days a week.
IMPORTANTSAFETYINFORMATION.
READALLINSTRUCTIONSBEFOREUSING.
WARNING!
For your safety, the information in this manual must be followed to minimize the risk of fire, electric
shock, or to prevent property damage, personal injury, or loss of life.
WARNINGANti-TIPDEVICE
All ranges can tip and injury could result.
Toprevent accidental tipping of the range, attach it to the wall and floor by installing the Anti--tip
device supplied.
Check if the device is installed and engaged properly. Make sure the chain fits securely into the slot
in the bracket.
ffyou pull the range out from the wall for any reason, make sure the device is properly
engaged when you push the range back against the wall. ff it is not, there is a possible risk of
the range tipping over and causing injuiy ityou or a child stand, sit or lean on an open door.
Please refer to the Anti-Tip
could result in tipping
device itfformation
of the range
in this manual.
Failure
to take this precaution
and injui T.
IMPORTANT
SAFETY
NOtiCE
The Cafifornia Safe Drinking Water and Toxic Enforcement Act requires the Governor of California to
publish a list of substances known to the state to cause cancer, birth defects or other reproductive
harm, and requires businesses to warn customers of potential exposure to such substances.
The fiberglass insulation in self-clean ovens gives off a very small amount of carbon monoxide during
the cleaning cycle. Exposure can be minimized by venting with an open window or using a ventilation
fan or hood.
SAFETY
PRECAUtiONS
When using electrical appliances, basic safety precautions should be followed, including the following:
Use this appliance only for its intended
pulpose as described in this Owner's Manual.
Be sure your appliance is properly installed
and grounded by a qualitied installer in
accordance with the provided installation
instructions.
Have the installer show you the location of
the circuit breaker or fuse. Mark it for easy
reference.
Do not attempt to repah or replace any
part of your range unless it is specitically
recommended in this manual. All other
sei_,icing should be referred to a qualitied
technician.
Teach children notto playwith
controls or anyother
partofthe
the
range.
Before performing any sei_,ice, disconnect
the range power supply at the household
distribution panel by remoxqng the fuse or
switching off the circuit breaker.
iiiiiiiiiiii_iii
Do not
allow anyone to climb, stand or
hang on the door, storage drawer or
cooktop. They could damage the range
and even tip it over, causing severe
personal inju U.
Do not store or use combustible materials,
gasoline or other flammable vapors and
liquids in the vicinity of this or any other
appliance.
Keep the hood and grease filters clean
to maintain good venting and to avoid
grease fires.
3
IMPORTANTSAFETYINFORMATION.
READALLINSTRUCTIONSBEFOREUSING.
A WARNING!
SAFETY
PRECAUTIONS
Do not store flammable
materials
in an
oven or near the cooktop.
Do not let cooking grease or other
flammable
materials accumulate
in or near
the range.
Never leave jars or cans of fat dripping
near your range.
Use only dt T pot holders-moist
or damp
pot holders on hot surfaces may result in
burns flom steam. Do not let pot holders
touch hot surface units or heating
elements. Do not use a towel or other
bulky cloth in place of potholders.
in or
Do not leave children alone-children
should not be left alone or unattended
in
an area where an appliance is in use. They
should never be allowed to sit or stand on
any part of the appliance.
CAUTION: Items of interest to children
should not be stored in cabinets above a
range or on the backsplash
(on some
models) of a range-children
climbing
on the range to reach items could be
seriously injured.
Ahvays keep dish towels, dish cloths, pot
holders and other linens a safe distance
fiom your range.
Ahvays keep wooden and plastic utensils
and canned food a safe distance fiom
your range.
Ahvays keep combustible
wall coverings,
curtains or drapes a safe distance fiom
your range.
.....Never wear loose-fitting or hanging
garments while using the appliance. Be
careful when reaching for items stored
over the range. Flammable material could
be ignited if brought in contact with hot
surface units or heating elements and
may cause severe burns.
For your safety, never use your appliance
for warming or heating the room.
Do not use water on _ease fires. Never
pick up a flaming pan. Turn the controls
ore Smother a flaming pan on a surface
unit by covering the pan completely with a
well-fitting lid, cookie sheet or fiat tray. Use
a multi-purpose dU chemical or foam-type
fire extinguisher.
Flaming grease outside a pan can be put
out by covering it Mth baking soda or, if
available, by using a multi-purpose dU
chemical or foam-type fire extinguisher.
Flame in the oven can be smothered
completely by closing the oven door and
turning the oven off or by using a multipurpose dU chemical or foam-type fire
extinguisher.
iiiiiiiiiiii_iii
Do not touch
elements
the surface units, the heating
or the interior surface of the
oven. These surfaces may be hot enough to
burn even though they are dark in color.
During and after use, do not touch, or let
clothing or other flammable
materials
contact, the surface units, areas nearby the
surface units or any interior area of the
oven; allow sufficient time for cooling first.
Potentially hot surfaces include the
cooktop, areas facing the cooktop, oven
vent opening, surfaces neat the opening,
crex4ces around the oven door and metal
trim parts above the door.
REMEMBER: The inside surface
of the oven
may be hot when the door is opened.
COOKMEATANDPOULTRY
THOROUGHLY...
Cookmeat and poultry thoroughly--meat to at least an INTERNALtemperatureof 160°Eand poultry
to at least an INTERNALtemperatureof 180°ECookingto these temperaturesusually protects against
foodbomeillness.
4
escapes can cause burns to hands, face
and/or
eyes.
Do not heat unopened
food containers.
Pressure could build up and the container
could burst, causing an in jm)7.
Keep the oven vent unobstructed.
Keep the oven flee from grease
buildup.
Place the oven shelf in the desued position
while the oven is cool. If shelves must be
handled
contact
when hot, do not let pot holder
the heating
elements.
Pulling out the shell to the stop-lock is a
convenience in lilting heaxT foods. It is also
a precaution against burns flom touching
hot surfaces of the door or oven walls.
directions.
Do not use the oven to dIT newspapers.
If overheated,
they can catch on fire.
Do not use the oven for a storage area.
Items stored in an oven can ignite.
Do not leave paper products, cooking
utensils or food in the oven when not
in use.
After broiling, always take the broiler pan
out of the range and clean it. Leftover
grease in the broiler pan can catch on fhe
the next time you use the pan.
iiiiiiiiiiii_iii
Do not
use aluminum foil to line oven
bottoms, except as suggested in this
manual. Improper installation of
aluminum foil may result in a risk of
electric shock or fire.
SELF-CLEANING
OVEN
.....Do not clean the door gasket. The door
gasket is essential for a good seal. Care
should be taken not to rub, damage or
move the gasket.
Clean only parts listed in this Owner's
Manual.
Do not use oven cleaners. No commercial
oven cleaner or oven liner protective
coating of any kind should be used in or
around any part of the oven. Residue flom
oven cleaners will damage the inside of the
oven when the sell-clean cycle is used.
Before sell-cleaning the oven, remove the
broiler pan, grid and other cookware.
Be sure to wipe up excess spillage before
starting the sell-cleaning operation.
ff the sell-cleaning mode malfunctions,
turn the oven off and disconnect the power
supply. Have it sei_4ced by a qualilied
technician.
5
IMPORTANT SAFETYINFORMATION.
READALLINSTRUCTIONSBEFOREUSING.
A WARNING!
SURFACE
COOKING
UNITS
Use proper pan size--select cookware having flat bottoms large enough to cover the surface unit
heating element. The use of undersized cookware will expose a portion of the surface unit to direct
contact and may result in ignition of clothing. Proper relationship of cookware to surface unit will
also improve efficiency.
.....Never leave the surfhce units unattended
at
high heat settings. Boilovers cause smoking
and greasy spillovers that may catch on fhe.
.....Do not use aluminum foil to line the drip
pans or anDvhere in the oven except as
described in this manual. Misuse could
result in a shock, fire hazard or damage to
the range.
.....Be sure the drip pans and the vent duct are
not covered and are in place. Their
absence during cooking could damage
range parts and wiring.
.....Only certain types of glass, glass/ceramic,
earthenware or other glazed containers
are suitable for cooktop se_ice; others
may break because of the sudden change
in temperature.
.....To minimize the possibility of burns,
ignition of flammable materials and
spillage, the handle of a container should
be turned toward the center of the range
without extending over nearby surface
units.
Always turn the surface
removing
units off before
cookware.
.....Do not immerse or soak the removable
surface units. Do not put them in a
dishwasher. Do not sell-clean the surface
units in the oven.
.....When flaming foods under the hood, turn
the fan on.
6
.....To avoid the possibility of a burn or electric
shock, ahvays be certain that the controls
for all surfhce units are at the OFFposition
and all coils are cool before attempting to
lilt or remove a unit.
Clean the cooktop
with caution,
ff a wet
sponge is used to wipe spills on a hot
cooktop, be careful to avoid steam burns.
.....Keep an eye on foods being flied at high or
medium high heat settings.
Foods for fiTing should be as dIT as
possible. Frost on flozen foods or moisture
on flesh foods can cause hot fat m bubble
up and over the sides of the pan.
.....Use little fat for effective shallow or deep
fat flTing. Filling the pan mo full of fat can
cause spillovers when food is added.
.....ff a combination
of oils or fats will be used
in flTing, stir together
fats melt slowly.
before
heating,
or as
Ahvays heat fat slowly, and watch as it heats.
.....Use a deep fat thermometer whenever
possible to prevent overheating fat beyond
the smoking point.
.....Carefullywatch for spillovers or
overheating of foods when flTing at high or
medium high temperatures.
.....
Never uy m move a pan of hot fat, especially
a deep fat fiTer. Wait until the fat is cool.
.....Do not allow water, other
to remain on the cooktop
panel.
liquids or grease
or the control
RADIANTSURFACE
UNITS
Usecare when touching the cooktop. Theglasssurface of the cooktop will retain heat after the
controls have beenturned off.
.....Avoid scratching the glass cooktop. The
cooktop can be scratched with items such
as sharp insuuments, rings or other,jewel U
and rivets on clothing.
.....Do not operate the radiant surfhce units if
the glass is broken. Spillovers or cleaning
solution may peneuate a broken cooktop
and create a risk of electrical shock.
Contact a qualitied technician immediately
should your glass cooktop become broken.
.....Never use the glass cooktop
cutting board.
surfhce as a
.....Do not place or store items that can melt or
catch fire on the glass cooktop,
it is not being used.
even when
.....Be careful when placing spoons or other
stirring utensils on glass cooktop surface
when it is in use. They may become hot and
could cause burns.
.....Do not stand on the glass cooktop. The
weight may cause the top to break.
.....Avoid heating an empty pan. Doing so may
damage the cooktop and the pan.
.....Clean the cooktop with caution. If a wet
sponge or cloth is used to wipe spills on a
hot surface unit, be careful to avoid steam
burns. Some cleaners can produce noxious
fumes if applied to a hot surface.
NOTE:We recommend that you avoid
wiping any surface unit areas until they
have cooled and the indicator light has
gone off. Sugar spills are the exception to
this. Please see the gleaning the glass
cooktop section.
.....When the cooktop is cool, use only the
recommended cleaning cream to clean
the cooktop.
.....To avoid possible damage to the cooking
surface, do not apply cleaning cream to
the glass surface when it is hot.
.....After cleaning, use a dIT cloth or paper
towel m remove all cleaning cream residue.
.....Read and follow all instructions and
warnings on the cleaning cream labels.
Readand follow this
Informationcarefull,
SAVETHESEINSTRUCTIONS
Using
the surface
units.
Throughout this manual, features and appearance may vary from your model
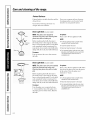
How to Set
Push fl_e knob in and urea in eifl_er
direction to the setting you want.
At both OFFand HI the control clicks
into position. You lnay hear slight
clickingsounds during cooking,
indicating the control is keeping the
power level you set.
I
Be sure you turn the control knob
to OFFwhen you finish cooking.
A smIhce unit ON indicator light,_ill glow
when any surface unit is on.
Surface Cookware
i/7 ¸
:
<
1"¸¸
Not over I inch.
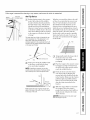
Tips (electric coil models only)
Use lnedium- or heax,)_weight cookware.
Aluminum cookware conduct_s heat faster
than other metals. Cast-iron and coated
cast-iron cookware are slow to absorb
heat, but generally cook evenly at low to
medium heat settings. Steel pans m W
cook unevenly if not combined with other
lnetals.
For best cooking result_s,pans should be
fiat on the bottom. Match the size of the
saucepan to the size of the surface unit.
The pan should not extend over the edge
of the sm'fhce unit more than 1 inch.
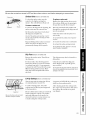
Wok Cooking (electriccoilmodelsonly)
Werecommend
that }/ouuseon/}/aflat-bottomed Placing the ring over the surf_me unit will
wok. The}/areavailableat }/ourlocalretailstore.
cruise a build-up of heat that will damage
the porcelain cooktop. Do not uy to use
Do not use woks that have support rings.
such woks without the ring. You could be
Use of these types ofwoks, ,_ith or
seriously burned if the wok tipped over.
without the ring in place, can be
dangerous.
Use only flat-bottomed woks.
Indicator Lights (glasscooktops
only)
A HOTSURFACEindicator light will glow
when any radiant element is turned on,
and _411relnain on until the surface is
cool enough to touch.
It comeson whentheunitishot to thetouch.
It stallsonevenafter theunitis turnedoff.
/t glowsbright/}/untiltheunitis safeto touch.
Deep Fat Frying
Do not overfill cookware _ith fat flint may
spill over when adding fbod. Frosty, fbods
bubble x4gorously.
8
Watch food fi_)5ngat high temperatures.
Keep range and hood clean from grease.
i_ii_i i_i
iiii_i_i _iI
FACE_%,
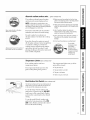
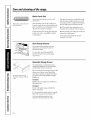
About the radiant surface units...
(glasscooktopsonly)
The radiant cooktop feaulres heating
units beneath a smooth glass surface.
NOTE."
A dight odoris normalwhena new
cooktopis usedforthefirst time.It is causedby
theheatingof newpartsandinsulatingmaterials
andwill disappearin a shorttime.
Never cook directly on the glass,
Always use cookware,
Tile surface unit will (_cle on and off to
maintain your selected control setting.
It is safe to place hot cookware on
the glass surface even when tile cooktop
is cool.
Always place the pan in the center of
the surface unit you are cooking on.
Even after tile surf_me units are umaed
off; tile glass cooktop retains enough heat
to continue cooking. To avoid overcooking, relnove pans fi'Oln tile suI(_lce
units when the food is cooked. Avoid
placing awthing on the surface unit until
it has cooled COlnpletely.
{{{iiiiiiili
Beforeyouusethecooktopforthefirst time,
cleanit withcleaningcream.Thishelpsprotect
thetopandmakesclean-upeasier
{{{iiiiiiili
Waterstains(mineraldeposits)areremovable
usingthecleaningcreamor full strengthwhite
vinegar
{{{iiiiiiili
Useof window c/eanermay.leave an
iridescent film on the cooktop. Thecleaning
cream will remove this discoloration.
{{{iiiiiiili
Don?storeheavyitemsabovethecooktop.If
they.dropontotheco&top,they.cancause
damage.
Do not use the surfaceas a cutting board.
Donotslide
cookwareacross
thecooktop
becauseit can
scratchtheglass-the.glassis scratch
resistant,not
scratchproof.
Temperature Limiter (glasscooktopsonly)
EveI T radiant StlI't-_|ceunit has a
telnperature lilniter.
The telnperamre lilniter protects dm
glass cookmp fl'Oln getting too hot.
Tile telnperamre lilniter may cTcle tile
units offfor a time if!
Thepan boilsdry.
Thepan bottomis not flat.
Thepan is off center
Thereisno panon theunit.
Dual Surface Unit Switch (glasscooktopsonly)
Theleft rearsurfaceunithastwo cookingsizesto
selectfromso youcanmatchthesizeof theunit
to thesizeof theco&wareyouare using.
To use the large (9-inch) sm(>me unit,
push in tile top portion of the COILSIZE
switch next to the control knob. Push in
and mm the control knob to the desired
setting.
To use file small (6-inch) surface unit,
push in tile bottom portion of the COIL
SIZE switch. Push in and turn tile control
knob to tile desired setting.
9
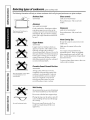
Selecting types of cookware. g/ass
ookto,
s o,/y;
The following information will help you choose cookware which will give good performance on glass cooktops.
Stainless Steel'.
recommended
Glass-ceramic:
usable,but notrecommended
Poor perforlnance.
May scratdl the
SUI_:dce.
Aluminum:
heavy weight recommended
Check pans for flat bottoms by
using a straight edge,
Stoneware:
Good conductivib_. Aluminum
resi(hles
sometimes appear as scratches on the
cooktop, but can be removed if cleaned
imlnediately.
Because of its low lnelting
point, thin weight alumimnn
shouM not
be used.
Poor performance.
CopperBottom:
Be sure the canner is centered over the
suKhce unit.
usable,but notrecommended
May scratdl the
SUI_:dce.
Home CanningTips:
recommended
Copper may leave residues which can
appear as scratdms. The resi&les can be
relnoved, as long as the cookmp is
cleaned immediately. However, do not let
these pots boil d U. Overheated metal can
bond to glass cookmps. An overheated
copper bottom pot will leave a resi&le
that will perlnanently stain the cooktop if
not relnoved imlnediately.
Porcela&
Enamel Covered Cast Iron:
recommended
Pans with rounded, curved, ridged
or warped bottoms are not
recommended.
As long as the cookware is covered
completely with porcelain enamel, this
cookware is recommended.
Cmltion is
recommended for cast iron cookware
that is not completely covered sdth
smooth porcelain enamel, as it m W
scratc:h the glass ceramic cooktop.
Wok Cooking
Werecommend
that youuseonlya flat-bottomed
wok. Theyareavailableat yourlocalretailstore.
Do not use woks that have support rings.
Placing the ring over the sm{hce unit will
cause a buil&up of heat that will damage
the cooktop.
Use only flat-bottomed woks.
10
Do not use round bottom woks. You
could be seriously burned if the wok
tipped over.
Make sure dm canner is flat on the
bottoln.
Use rec0es and procedures from
reputable sources. These are available
from manufacturers such as Ball ®and
Kerr ®and the department of A_'iculmre
Extension Service.
To prevent burns from steam or heat, use
cmltion when canning.
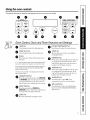
Usingthe oven controls.
Throughout this manual, features and appearance may vary from your model
O
@
TIME
•
•
G
0
CONTROLS
0
0
OvenControl,Clockand 7linerFeaturesand Settings
KITCHEN TIMER ON/OFFPad
BAKEPad
Press dfis pad to select die bake fimcdon.
0
0
BROIL HI/LO Pad
Press tiffs pad to select file broil fimction.
0
o
Display
Shows
the time of day and dm time set for
the timer.
O
If "F--and a numberor letter"flashin thedisplayand the
ovencontrolsignals,this indicatesa functionerrercode.
If yourovenwasset fora timedovenoperationwhenthe
poweroutageoccurred,theclockandall programmed
functionsmustbe reset.
0
START TIME Pad
O
CLOCKPad
Press this pad before setting the clock.
Press this pad and d_e INCREASEor
DECREASEpads to del W the starting of your
oven up to 9 hours and 59 minutes.
DECREASEPad
Short taps to this pad _dll decrease the time
or temperature by small amount.s. Press
and hold the pad m decrease the time or
telnperamre by larger amounts.
INCREASE Pad
COOKING TIME Pad
Press this pad and d_en press die INCREASE
or DECREASEpads to set the amount of time
you want your food to cook. The oven will
shut offwhen the cooking time has mn out.
STARTPad
Must be pressed to start any cooking or
cleaning fimction.
Short taps to this pad _4ll increase the time
or temperature by small amount.s. Press
and hold the pad m increase the time or
telnperamre by larger amounts
Thetimeofdaywill flashin thedisplaywhentherehas
beena poweroutage.
0
Press this pad to select the timer feature.
O
0
CLfaR/OFF Pad
Press tiffs pad to cancel ALL oven
operations except the clock and timer.
SELFCLEAN Pad
Press tiffs pad to select the self cleaning
flmction. Seethe Usingthe self-cleaning
oven section.
11
Special features of youroven control
Your new touch pad control has additional features that you may choose to use. The following are the features and
how you may activate them.
The special feature modes can only be activated while the display is showing the time of day. They remain in the
control's memory until the steps are repeated.
When the display shows your choice, press the STARTpad. The special features will remain in memory after a
power failure.
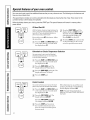
12 Hour Shut-Off
With thisfeature,shouldyouforgetandleavethe
ovenon,thecontrolwill automatically
turnoff the
ovenafter 12hoursduringbakingfunctionsor
after3 hoursduringa broil function.
If you wish to ulrn OFFthis feaulre, follow
the steps below.
_]
Press the BAKE and BROILItl/I.0 pads
at the stone time fbr 3 seconds until
the display shows SE
[]
Press die STARTTIMEpad. The
display,_4ll show 12 shdn (12 hour
shut-off). Press the STARTTIME
pad again and the display will
show no shdn(no shut-off).
%
Press tim STARTpad to activate the
no shut-offand
lemTe tim control
set in this special features
mode.
Fahrenheit or Celsius Temperature Selection
Yourovencontrolis set tousetheFahrenheit
temperature
selectionsbutyoumaychangethis
to usetheCelsiusselections.
[]
Press the BAKEand BROILHI/LOpads
at the same time fbr 3 seconds until
the display shows SE
Press the BROILHI/LOpad. The
display will show F (Fahrenheit).
_]
Press the BROILHI/LOpad again. The
display will show C (Celsius).
Press the STARTpad.
Control Lockout
Yourcontrolwill allowyoutolockout thetouch
padsso theycannotbe activatedwhenpressed.
[_
Press the BAKEand BROILHI/LOpads
at the same time fbr 3 seconds until
the display shows SE
Press the SELFCLEANpad. The
display will show 10C OFF.
Press the SELFCLEANpad again.
The display will show Log ON.
_ff] Press the STARTpad to activate
the control lockout feature and
leave the control set in this special
features mode.
12
When dfis feature is on and dm touch
pads are pressed tim control xdll beep
and the display _4ll show Log.
NOTE:Thecontrollockoutmodewill not
affect theCLOCK
andKITCHEN
tiMERON/OFF
touchpads.
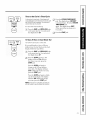
Tones at the End of a Timed Cycle
At theendof a timedcycle,3 shortbeepswill
soundfollowedby onebeepevery6 secondsuntil
theCLEAR/OFF
pad ispressed.Thiscontinual6
secondbeepmaybecanceled.
To cancel the 6 second
[_
beep:
Press the BAKE and BROILHI/LOpads
at dm stone time fbr 3 seconds undl
the display shows SE
[]
Press the KITCHENTIMERON/OFF
pad. The display shows CONBEEP
(continual beep). Press the MTCHEN
TIMERON/OFFpad
again. The display shows BEEP.
(This cancels the one beep evepy
6 seconds.)
_-] Press the STARTpad.
12 Hour, 24 Hour or Clock Black-Out
Yourcontrolis set to usea 12hourclock.
i I ( )ii
iifill
If you wouM prefer to have a 24 hour
lnilitapy time clock or black-out the clock
display, fbllow the steps below.
ii iiI
[_] Press the BAKEand BROILHI/LOpads
at the same time fbr 3 seconds until
the display shows SE
g]
Press the CLOCKpad once. The
display will show 12hr. Ifdds is
the choice you want, press the
STARTpad.
Press the CLOCKpad again to
change to dm 24 hour militaIy
time clock. The display _dll show
24 hr. ffthis is the choice you want,
press the STARTpad.
Press the CLOCKpad again to blackout the clock display. The display
will show OFF.If this is the choice
you want, press the STARTpad.
NOTE:If theclockis in theblack-outmodeyou
will notbe ableto usetheDelayStartfunction.
13
Special features of youroven control
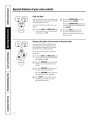
Cook and Hold
Yournewcontrolhasa cookandholdfeaturethat
keepscookedfoodswarmforup to 3 hoursafter
thecookingfunctionis finished.
!1
:
ii_ii _i_
i__ii _
i_il
i
i _
ii
_ iI _
_i!__i!_
i i
[]
Press the BAKEand BROILHI/LOpads
at dm stone time fbr 3 seconds until
the display shows SF.
As youusetheINCREASE
orDECREASE
pads
whensettinga timeor temperature,
youmay
noticethedisplaychangesslowly.Thisspecial
featureallowsyouto changethespeed.
To set fl_e speed you prefer, fbllow the
steps below.
_]
Press the BAKEand BROILHI/LOpads
at the stone time fbr 3 seconds until
the display shows SE
Press the INCREASEpad. The display
will showyou a set speed between
1 and 5.
[_
Press the INCREASEpad to increase
the speed up to the number 5.
Press the DECREASEpad to decrease
the speed down to the number 1.
[_] Press STARTto activate the setting
and Áem_ethe control set in this
special features mode.
Press die COOKINGTIMEpad. The
display _ill show Hid OFF.
Press d_e COOKINGTIMEpad again to
activate the feaulre. The displ W _ill
show HidON.
To activate dds feature, fbllow dm steps
below.
Changing the Speed of the Increase
14
[]
[_
Press tim STARTpad to activate
tim cook and hold feaulre and
lem_ethe control set in this special
feaulres mode.
or Decrease
Pads
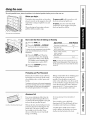
Usingthe oven.
Toavoid possible bums, place the shelves in the desired position before you turn the oven on.
Before you begin...
The shelves have stop-locks, so d_at when
To remove a shelf, pull it toward you, tilt
placed con'ecdy on d_e supporcs, they v_411 the front end up and pull it out.
stop before coming completely out, and
To replace, place dm end of the shelf
will not tilt.
When placing and removing cookware,
pull tim shelf out until it stops.
(stop-locks) on the support, tilt up dm
front and push the shelf in.
The oven has 4 shelf positions.
How to Set the Oven for Baking or Roasting
[]
Press the BAKE pad.
Type of Food
[_
Press the INCREASE or DECREASE
pad to set the oven temperature.
Frozenpies (on cookie sheet)
Tochangetheoventemperature
duringtheBake
cycle,presstheBAKEpadandset thenew
temperature.
%
Press the STARTpad. When the
oven starts to heat, tim changing
temperature will be in the display.
The display starts changing once
the telnperamre reaches 100°F.
[_] Press the CLEAR/OFF
pad when
baking is finished.
Preheating
Angelfoodcake,
bundtorpoundcakes
Shelf Position
B or C
A
Biscuits,
muffins,
brownies,
cookies,
cupcakes,
layercakes,
pies
BorC
Casseroles
BorC
NOTE:A coolingfanmayautomatically
turnon
and off to coolintemalparts.Thisisnormal,and
thefanmaycontinuetorunevenafter theovenis
turnedoff.
and Pan Placement
Preheat the oven if the recipe calls fbr it.
Preheating is necessapy fbr good resuks
when baking cakes, cookies, pasuy and
breads.
Baking resuks will be better if baking pans
are centered in the oven as much as
possible. Pans should not touch each
other or the walls of the oven. If you need
Topreheat,set theovenat thecorrecttemperature. to use two shelves, stagger the pans so one
Thecontrolwill beepwhentheovenispreheated is not directly above the other, and leave
andthedisplaywill showyourset temperature. approximately 1%" between pans, from
Thiswill takeapproximately10-15minutes.
the front, back and sides of the wall.
Aluminum Foil
You can use aluminum foil to line the
broiler pan and broiler grid. However,
you must rooM the foil tightly to the grid
and cut slit.sin it just like the grid.
Cut slits in the foil just like the grid.
Without dm slit.s, the foil will prevent f_tt
and meat juices from (kaining into the
broiler pan. The juices couM become
hot enough to catch on fre. If you
do not cut the slit.s,you are essentially
lying, not broiling.
Donot usealuminumfoil on thebottomof
theoven.
Never entirely cover a shelfwid_
ahnninum fbil. This will disturb the heat
circulation and result in poor baking.
A smaller sheet of fbil may be used to
catch a spillover by placing it on a lower
shelf several inches below the fbod.
15
Usingthe oven.
Toavoid possible bums, place the shelves in the desired position before you turn the oven on.
How to Set the Oven for Broiling
[]
Place the meat or fish on the broiler
grid in dm broiler pan.
_]
Follow suggested shelfposidons
the Broiling Guide.
[_] Press die BROILHI/LOpad once fbr
HIBroil.
To change to LOBroil,press the
BROILHI/LOpad again.
in
If yourovenis connectedto208 volts,raresteaks
maybe broiledbypreheatingthebroilerand
positioningtheovenshelf onepositionhigher.
Leave the door open to the broil
stop position. The door stays open
by itself, yet the proper temperature
is maintained in the oven.
Use LOBroil to cook fbods such as pouluy
or thick cuts of meat thoroughly,_ithout
over-browning them.
[_
Press the STARTpad.
_]
When broiling is finished, press the
CLEAR/OFF
pad.
Broiling Guide
Food
Comments
Bacon
1/2 lb.
(about8 thin slices)
4/
Ground Beef
Well Done
1 lb.(4 patties)
1/2 to 3/4" thick
10
Beef Steaks
Rare
Medium
Well Done
1" thick
1 to 1/Ibs.
C
C
C
6
8
12
5
6
11
Rare
Medium
Well Done
11/2"thick
2 to 2/Ibs.
C
C
C
10
15
25
7-8
14-16
20-25
Chicken
1 whole
2 to 2/Ibs.,
split lengthwise
A
35
10-15
Reducetime about5
to 10 minutesper side
for cut-upchicken.
Brusheach side with
melted butter.Broil
skin-side-downfirst.
LobsterTails
2-4
6 to 8 oz.each
13-16
Do not
turn
oveE
Cutthrough backof
shell. Spreadopen.
Brushwith melted
butter before broiling
andafter half of
broilingtime.
FishFillets
1/4 to 1/2" thick
Ham Slices
(precooked)
1" thick
Pork Chops
Well Done
2 (1/2" thick)
2 (1"thick)about 1 lb.
C
B
10
13
10
13
Slashfat.
LambChops
Medium
Well Done
2 (1" thick)about 10
to 12oz.
C
C
10
12
9
10
Slashfat.
2 (1/"thick)about
C
B
14
17
12
12-14
Medium
Well Done
16
Shelf
FirstSide Second Side
Position Time (rain.) Time (min.)
Quantityand/
or Thickness
4/
Arrangeill singlelayer.
Spaceevenly.Upto 8
pattiestake aboutthe
sametime.
Steakslessthan 1"
thickcookthrough
before browning.Pan
frying is recommended.
Slashfat.
Handleandturn very
carefully.Brushwith
lemon butter before
andduringcooking, if
desired.Preheat
broilerto increase
browning.
Increasetime 5 to 10
minutesper side for
1/" thick or homecuredham.
1 lb.
Using the clock and timer.
To Set the Clock
The clock must be set to tim cotx'ect time
Make sure the clock is setto the
correct time of day.
of day fbr the automatic
oven timing
flmctions to work properly. The time of
day cannot be changed during a timed
baking or self cleaning <?_cle.
[]
Press the CLOCKpad.
[_
Press the INCREASEor DECREASE
pads.
[_
Press the STAgTpad.
_]
Press the STARTpad.
[]
When the timer reaches :00, the
control will beep 3 times followed
by one beep eveU 6 seconds until
the KITCHENTIMERON/OFF
pad
is pressed.
To Set the timer
[
KITCHEN]
I TI M ER l
The timer is a minute timer only.
The timer does not control oven
operations. The maximum setting
on the timer is 9 hours and 59
minutes.
_]
Press the KITCHENTIMERON/OFF
pad.
[]
Press the INCREASE or DECREASE
pads until the amount of time you
want shows in the displ W.
If you make a mistake press the
KITCHENTIMERON/OFFpad and
begin again.
The6 secondtonecanbe canceledbyfollowing
thestepsin theSpecialfeaturesof youroven
controlsectionunderTonesat theEndof a
TimedCycle.
To Reset the Timer
Iffl_e display is still showing fl_e time
remaining, you may change it by pressing
the KITCHENTIMERON/OFFpad, then
press the INCREASEor DECREASE
pads
until the time you want appears in the
display.
If the remaining time is not in the display
(clock, delay start or cooking time are in
the display), recall the remaining time
by pressing the KITCHENTIMERON/OFF
pad and then pressing the INCREASEor
DECREASE
pads to enter the new time
you want.
To Cancel the timer
Press the KITCHENTIMERON/OFFpad
twice.
17
Using the timed baking and masting features.
NOTE: Foods that spoil easily-such as milk, eggs, fish, stuffings, poultry and pork-should not be allowed to sit for
more than 1 hour before or after cooking. Room temperature promotes the growth of harmful bacteria. Be sure that
the oven light is off because heat from the bulb will speed harmful bacteria growth.
The low temperature zone of this range (between 170°F.and 200°F.)is available to keep hot cooked foods warm.
Food kept in the oven longer than 2 hours at these low temperatures may spoil.
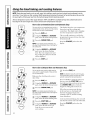
How to Set an Immediate Start and Automatic Stop
Theovenwill turnon immediatelyandcookfora
selectedlengthof time.A t theend of thecooking
time theovenwill turnoff automatically
[]
Press the BAKEpad.
[]
Using dm INCREASEor DECREASE
pads, enter the desired temperature.
[]
Press the COOKINGTIMEpad.
NOTE:If yourreciperequirespreheating,you
mayneedto addadditionaltimeto thelengthof
thecookingtime.
[_
Using the INCREASEor DECREASE
pads, enter the desired baking
time. The oven temperature and
the cooking time that you entered
will be displayed.
_]
Press the STARTpad.
The display shows the oven temperaulre
thatyou set and the cooking time
countdown. The displ W starts changing
once the temperaulre reaches 100°F.
The oven _4ll continue to cook for the
programmed amount of time, then shut
off automatically.
Press the CLEAR/OFF
pad to clear dm
display.
How to Set a Delayed Start and Automatic
Youcanset theovencontroltodelay-startthe
oven,cookfora specificlengthof timeandthen
turnoff automatically
Make sure the clock shows the correct
tilne of d W.
_]
Press the BAKEpad.
_]
Using the INCREASEor DECREASE
pads, enter the desired temperature.
Press the COOKINGTIMEpad.
NOTE:If yourreciperequirespreheating,you
mayneedto addadditionaltimeto thelengthof
thecookingtime.
_-_ Using the INCREASEor DECREASE
pads, enter the desired baking time.
Press the START TIMEpad.
Using the INCREASEor DECREASE
pads, enter the time ofdayyou
want the oven to mm on and
start cooking.
18
Stop
[77 Press file STARTpad.
NOTE:An attentiontonewill soundif youare
usingtimedbakinganddo notpresstheSTART
padafterenteringthebakingtemperature.
ffyou would like to check die times you
have set, press d_e STARTTIMEpad to
check the start time you have set or press
the COOKINGTIMEpad m check the
length of cooking time you have set.
_mn dm oven turns on at dm time
of day you hm_e set, the display will
show the changing temperature
(starting at 100°F.) and the cooking
time countdown.
At the end of timed baking, the oven will
mm off_The end of cycle tone will sound.
Press the CLEAR/OFF
pad to clear dm
display.
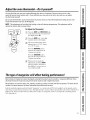
Adjust the oven thermostat--Do it yourself!
You may find that your new oven cooks differently than the one it replaced. Use your new oven for a few
weeks to become more familiar with it. If you still think your new oven is too hot or too cold, you can adjust
the thermostat yourself.
Do not use thermometers, such as those found in grocery stores, to check the temperature setting of your oven.
These thermometers may vary 20-40 degrees.
NOTE: This adjustment will not affect the broiling or the self-cleaning temperatures. The adjustment will be
retained in memory after a power failure.
To Adjust the Thermostat
E_] Press the BAKEand BROILHI/LOpads
at the stone time fbr 3 seconds until
the display shows SE
[]
Press the BAKEpad. A two digit
numt)er shows in die display.
[_
The oven temperature can be
a(tjusted up to (+) 35°F. hotter
or (-) 35°F. cooler.
Press the INCREASEpad to
increase d_e temperature in
1 degree increment_s.
Press the DECREASEpad to
decrease the temperature in
1 degree increment_s.
[]
When you hmTemade the
adjusunent, press the START
pad to go back to the time of
(tW displ W. Use your oven as
you would nonnally.
Thetype of margarine will affect bakingperformance!
Most recipes for baking have been developed using high fat products such as butter or margarine (80% fat). If you
decrease the fat, the recipe may not give the same results as with a higher fat product.
Recipe failure can result if cakes, pies, pastries, cookies or candies are made with low fat spreads. The lower the fat
content of a spread product, the more noticeable these differences become.
Federal standards require products labeled "lnargarine" to contain at least 80% f_ttby weight. Low fat spreads, on the
other hand, contain less f_ttand more water. The high moisture content of these spreads affects the texture and flavor of
baked goods. For best results with your old fm_orite recipes, use margarine, butter or stick spreads containing at least
70% vegetable oil.
19
Using the self-cleaning oven.
The oven door must be closed and aft controls must be set correctly for the cycle to work properly.
Before a Clean Cycle
We recommend venting your kitc:hen
,_ith an open,_indow or using a
ventilation f>mor 11oo(t during the first
self:dean (¢,cle.
Remove fl_e shelves, broiler pan, broiler
grid, all cookware and any alunlinum fbil
from the oven.
Wipe up heavy soil on the oven
bottom. (appearance may vary)
Do not clean the gasket. The fiberglass
lnaterial of the oven door gasket cannot
withstand abrasion. It is essential for the
gasket to remain intact. If you notice it
becolning worn or frayed, replace it.
Wipe up aW heaxT spillovers on the oven
bottoln.
The oven shelves can be self:cleaned, but
they _ill darken, lose their luster and
becolne hard m slide.
Make sure the oven light bulb cover is in
place and the oven light is of£
Soil on the front frame of the range and
outside the gasket on the door will need
to be cleaned by hand. Clean these areas
with hot water, soap-filled steel-wool pads
or cleansers such as Soft Scmb_ Rinse
well with clean water and dU.
extremely
sensitive to the fimles _ven
(hmng tim self:cleaning
(?,cle of any
range. Move birds to anoflmr well
ventilated room.
IMPORTANT'. The health
of some birds is
off
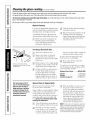
How to Set the Oven for Cleaning
Pressthe SELFCLEAN
pad.
Using the INCREASEor DECREASE
pads, enter the desired clean time, if
a time other than 4 hours is needed.
Clean c¢,cletime is normally 4 hours. You
can change tim clean time to a W time
between 3 hours and 3 hours, depending
on how dirty your oven is.
[_
Press the STARTpad.
The door locks mltolnatically. The display
will show the clean time relnaining. It will
not be possible to open the oven door
until the temperature drops below the
lock temperature and the LOCKEDDOOR
light goes of£
The oven shuts off automatically
the clean c_,cleis complete.
when
When the LOCKEDDOORlight is off, open
the door.
The words LOCKDOORwill flash and
the oven control will signal if you set
the clean (?,cle and forget to close the
oven door.
To stop a clean (¢,cle, press the
CLEAR/OFFpad.When the LOCKED
DOORlight goes offindicating the
oven has cooled below the locking
telnperamre, open the door.
2O
How to Delay the Start of Cleaning
Make sure the clock shows the correct
time of day.
[]
Press the SELFCLEAN
pad.
[]
Using tile INCREASEor DECREASE
pads, enter tile desired clean time.
[_
Press tile STARTTIMEpad. Tile
earliest start time you can set will
appear in the displ W.
_-] Using tile INCREASEor DECREASE
pads, enter tile time of dayyou want
tile clean o<:le to start.
Tile door locks automatically. Tile display
will show the start time. It will not be
possible to open the oven door until
the temperature drops below the lock
temperature and the LOCKEDDOOR
light goes off.
Tile oven shut_s off mlmmatically when
the clean (?,cle is coznplete.
When tile LOCKEDDOORlight is off, open
tile door.
[_] Press the STARTpad.
After a Clean Cycle
You may notice some white ash in tile
oven. Wipe it up with a dmnp cloth alter
tile oven cools.
You cannot set tile oven for cooking
until tile oven is cool enough for the
door to unlock.
If whitespotsremain,removethemwith a soapfilledsteel woolpadandrinsethoroughlywith a
vinegarand watermixture.
While file oven is self:cleaning, you
can press tile CLOCKpad to display
tile time ofd W. To remm to tile
clean countdown, press tile COOKING
TIME pad.
These deposit.s are usually a salt
residue that cannot be removed by
the clean _?_cle.
If the oven is not clean alter one clean
(?,cle, repeat file (?,cle.
ffthe shelves becozne
apply a small amount
cooking oil m a paper
tile edges of tile oven
paper towel.
hard to slide,
of vegetable oil or
towel and wipe
shelves with tile
21
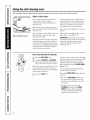
Care and cleaning of the range.
Be sure electrical power is off and all surfaces are cool before cleaning any part of the range.
If your range is removed for cleaning, servicing or any reason, be sure the anti-tip
device is re-engaged properly when the range is replaced. Failure to take this
precaution could result in tipping of the range and cause injurjz
How to Remove Packaging Tape
To assure no damage is (tone to tim finish
of the pro&lct, dm safest way to remove
the adhesive left from packaging tape on
new appliances is an application of a
household liquid dishwashing detergent,
mineral oil or cooking oil.
Apply widl a soft clot1 and allow to soak.
Wipe dU and then apply an appliance
polish to thoroughly clean and protect
the surf>me.
NOTE:Theplastictapemustbe removedfromall
chrometrim.It cannotbe removedif it isbakedon.
Control Panel
It's a good idea to wipe dm control panel
after each use. Clean wid_ mild soap and
water or vinegar and water, rinse with
clean water and polish dry with a sof_
cloth.
Moldedfib
Do not use abrasive cleansers, strong
liquid cleansers, plastic scouring pads or
oven cleansers on the control panel-they
will damage the finish. A 50/50 solution
of vinegar and hot water works well.
Control Knobs
Thecontrolknobsmaybe removedforeasier
cleaning.
Before relnoving file knobs for cleaning,
please note fllat tim knobs are in tim OFF
position. When replacing the knobs,
check the OFFposition to insure proper
placement.
The knob stein has a groove in each side.
The _'oove on one side has a spring clip.
The odler groove is clear (see
illustration). Check the inside of the knob
and find the molded rib.
Wash file knobs in soap and water or a
x4negar and hot water solution but do
not soak.
Replace the knob by fitting fl_e molded
rib inside the knob into the clear groove
on the stein.
Oven Vent (glass eooktopmodels only)
On models with glass cooktops, fl_e oven
is vented fl_rough an opening at file rear
of the cooktop.
Nevercovertheopeningwith aluminumfoil or
anyothermaterial
Oven Vent (electriccoilmodelsonly)
The oven is vented fllrough an opening
under the right rear surf_tce unit.
22
Nevercovertheopeningwith aluminumfoil or
anyothermaterial
Porcelain
Enamel Cooktop
(electric coil models only)
The porcelain enamel finish is sulr(ly but
breakable iflnisused. This finish is acidresistant. However, any acidic fbods
spilled (such as fi'uitjuices, tomato or
vinegar) should not be permitted to
remain on the finish.
If acids spill on the cooktop while it is
hot, use a (hy paper towel or cloth to
_ipe it up right away. X_len the smf_me
has cooled, wash with soap and water.
Rinse well.
For odmr spills such as f_ltspatterings,
wash xdd_ soap and water or cleansing
powders _ffter the surface has cooled.
Rinse well. Polish with a (hy cloth.
Lift-Off Oven Door
The oven door is removable
for easier
access to the light bulb.
\
\
Donotlift thedoorby thehandle.
Toremove the door, open it to the broil
stop position. Grasp firmly on each side
and lift the door straight up and off the
hinges.
Lift the door straight up and off the
hinges,
Donotp/acehandsbetweenthehingeandthe
ovendoorframe.
Toreplacethedoor,make sure the hinges
are in the broil stop position. Position the
slots in the bottom of the door squarely
over the hinges and slowly lower it over
both hinges.
Toclean theinsideof thedoor:
(appearance may vary)
The gasket is designed with a gap at
the bottom to allow for proper air
circulation.
Do not rub or clean the door
gasket--# has an extremely low
resistance to abrasion.
Toclean the outside of thedoor:
Use soap and water to thoroughly
clean the top, sides and front of the
oven door. Rinse well. You may also
use a glass cleaner to clean the glass on
the out_si(te of the door. Do not let
water drip into the vent openings.
Spillage of marinades, fruit juices,
tomato sauces and basting materials
containing acids may cause
discoloration and should be wiped up
imlnediately. When surface is cool,
clean and rinse.
Do not use oven cleaners, cleaning
powders or harsh abrasives on the
outside of the door.
Becmlse the area inside the gasket is
cleaned (luring the self-clean (_cle, you
do not need to clean this by hand.
The area out.side the gasket and the
fi'ont fi'ame can be cleaned _4th a
soap-filled steel wool or plastic pad,
hot water and detergent. Rinse well
with a vinegar and water solution.
If you notice the gasket becoming
worn, frayed or damaged in any way
or if it has become displaced on the
door, you should have it replaced.
Oven Shelves
Clean the oven shelves with an abrasive
cleanser or steel wool. After cleaning,
rinse the shelves with clean water and (tU
with a clean cloth.
NOTE."
Theovenshelvesmaybe cleanedin the
serf-cleaning
oven.However,theshelveswit
darkenin color,losetheirlusterandbecomehard
to slideif cleanedduringtheself-cleaning
cycle.
To make the shelves slide more easily apply
a small amount of vegetable oil or cooking
oil to a paper towel and wipe the edges of
the oven shelves with the paper towel.
23
Care and cleaning of the range.
Painted Surfaces
Painted surfaces include the sides and the
drawer front.
Clean these _ith soap and water or a
vinegar and water solution.
Do not rise commercial oven cleaners,
cleaning powders, steel wool or harsh
abrasives on any painted surfhce.
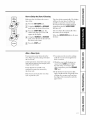
Oven Light Bulb (onsomemodels)
NOTE: The glass cover should be
removed only when cold. Wearing latex
gloves may offer a better grip.
_Socket
Jm
gm
I
I
Glasscover
t
Befbre replacing dm bulb, disconnect
electrical power to the range at dm main
fllse or circuit breaker panel. Let the bulb
cool COlnpletely befbre relnoving it. For
your safety, do not much a hot bulb with a
damp cloth. If you do, the bulb will break.
Toremove:
Turn to remove
the bulb.
the cover, then remove
Toreplace:
Put in a new 40-watt appliance bulb.
NOTE:
A 40-wattappliancebulbis smallerthana
standard40-watthousehold
bulb.
Installandtightenthecover
Reconnect
electricalpowerto therange.
Forimprovedlightinginsidetheoven,clean
theglasscoverfrequentlyusinga wet cloth.
Thisshouldbe donewhentheovenis
completelycool.
Oven Light Bulb (onsomemodels)
NOTE."The glass cover (on some models)
should be removed only when cold.
Wearing latex gloves may offer a better
grip.
Glasscover
Befbre replacing dm bulb, disconnect
electrical power to the range at dm main
filse or circuit breaker panel. Let the bulb
cool COlnpletely befbre removing it. For
your safety, do not touch a hot bulb _4th a
damp cloth. If you do, the bulb will break.
Toremove:
Turn tim glass cover counterclock_4se
1/4 mm until the tabs of the glass cover
clears the grooves of the socket. Remove
the bulb.
24
Toreplace:
Put in a new 40-watt appliance bulb. Place
the tabs of the glass cover into the _'oove
of the socket. Turn the glass cover
clockwise 1/4 ram.
NOTE'.
A 40-wattappliancebulbis smallerthana
standard40-watthousehold
bulb.
Reconnectelectrica/ power to the range.
Forimprovedlightinginsidetheoven,clean
theglasscoverfrequentlyusinga wet cloth.
Thisshouldbe donewhentheovenis
completelycool
Besurethecontrolsareturnedto OFFandthesurfaceunitsarecoolbeforeattempting
toremovethem.
Surface Units (electric coil models only)
Surfaceunit
Toreplace a surface unit:
To clean the sm_hce units, turn the
control to the highest setting for a
minute. The coils _ill bum offany soil.
Replace the (kip pan into the recess in
the cookmp. Make sure the opening in
the pan lines tip with the receptacle.
Toremove a surface unit:
_eceotacle
DrioBan
To remove the drip pans for cleaning,
surface units must be relnoved first.
the
Lift the surface unit about 1 inch above
the drip pan and pull it out.
Donotlift thesurfaceunitmorethan I inch.If
youdo,it maynot fie fiat on thedrippan when
youplugit backin.
Repeated lifting of tim suK_me unit more
than 1 inch above the drip pan can
permanently damage the receptacle.
Drip Pans
Insert the terminals of the surf_tce unit
through the opening in the drip pan and
into the receptacle.
Guide the surf_me unit into place so it
rests evenly.
Donot immersethesurfaceunitsin liquidsof
anykind.
Donotcleanthesurfaceunitsin a dishwasher.
Donotbendthesurfaceunitplug terminals.
Donotattemptto clean,adjustor in an}/way
repairtheplug-inreceptacle.
(electric coil models only)
Remove the surf_me unit_s.Then lift out
the drip pans.
The drip pans may also be cleaned in a
dishwasher.
For best results, clean d_e drip pans by
hand. Place fl_em in a covered container
(;lean fl_e area under fl_e drip pans
often. Built-up soil, especially grease,
may catch fire.
(or a plastic bag) with 1/4 olp ammonia
to loosen the soil. Then scrub with a soapfilled scouring pad if necessa U. Rinse
with clean water and polish with a clean
soft cloth.
Donotcoverthedrippanswith foil Usingfoil so
closeto thereceptacle
couldcauseshock,fire or
damageto therange.
Lift-Up Cooktop (electric coil models only)
Supportrod
Be sure all surface units are turned
off before raising the cooktop.
Cleantheareaunderthecooktopoften.Built-up
soil,especiallygrease,maycatchfire.
A support rod will hoM the cooktop tip
while you clean underneath it.
To make cleaning easier, die entire
cooktop may be lifted tip and supported
in the tip position.
After cleaning under fl_e cooktop wifll
hot, so_q)y water and a clean cloth, lower
the cooktop. Be carefill not to pinch
your fingers.
Be sure all dm surf_tce units are uu_ed off
befbre raising the cooktop. The surf_me
unit_s and (kip pans do not need m be
removed, however, you may relnove one
to make raising tim cooktop easier.
25
Care and cleaning of the range.
Broiler Pan & Grid
Donotdean thebroi/erpan orgrid ina serfcleaningoven.
After broiling, remove the broiler
pan from the oven.
After broiling, remove file broiler pan
_I'Ollltile oven. Remove tile _'id from tile
pan. Carefhlly pour out the _'ease fi'om
the pan into a proper container.
Wash and rinse tile broiler pan and grid
in hot water _ith a soap-filled or plastic
scouring pad.
Oven Heating Elements
Donotcleanthebakeelementor thebroil
dement.An;/softwill burnoff whenthe
elementsareheated.
To clean file oven floor, gently lif_
tile bake element. Clean _ith warill
soa W water.
Removable Storage Drawer
Thestoragedraweris a goodplacetostore
co&wareandbakeware.Donotstoreplastics
andflammablematerialin thedrawer.
Do not overload dm storage &awer. If din
drawer is too heax_,, it may slip off tile
track when opened. To open tile (kawer,
grasp tile center of tile handle and pull
straight out.
Toremove:
Pull tile (kawer straight out and lif_over
the guide smps.
Toreplace:
Lift over tile guide stops and slide dm
drawer into place.
To clean both tile inside and tile outside:
Wipe _4th soap and water. Rinse well.
Donotusecleansingpowdersor harsh
abrasiveswhichmayscratchthesurface.
26
fffood has burned on, sprinkle tile _'id
_ith detergent
while hot and cover _ith
wet paper towels or a dishcloth. Soaking
the pan _ill remove bimaed-on fbods.
Both file broiler pan and _'id may be
cleaned _ith a commercial oven cleaner.
Both dm broiler pan and _'id can also be
cleaned in a dishwasher.
Donotstorea soiledbreilerpan andgrid
anywherein therange.
If the range is removed for cleaning or any reason, make sure the chain is reattached.
Oetional
acketlocation
Backselash
Anti-Tip
[]
FactoryBracKet
\
range
Before placing range in the counter,
notice the location of the stability
bracket which is already attached to
the back of dm range. This location
should work fbr lnOSt installations.
However, it may be lnore convenient
to hook dm stability, chain to dm unit
when the stability, bracket is attached
to tim upper set of holes in the back
of range.
Backof
Chain
Device
3nsomemodela
Theupperlevelset ofholesis intendedfor use
with a backsplesh
kit.If thebacksplesh
is not
beingused,makesurethatthereareno
structuralsupportsfor thecountertopwhichwill
interferewith thestabilitybracketwhenlocated
in theupperset of holes.
_]
Fasten one end of the stability chain
to the floor or wall with the long
screw and washer supplied.
Whether you attach the chain to the wall
or floor, be certain that the screw is in at
least 3/4 inch thickness of wood other
than baseboard and that there are no
electrical ,dres or plumbing in the area
which the screw couM penetrate. Attach
the stability chain in a location which will
allow the chain to be in line ,_4th the
bracket side m aide as much as possible
when attached to the unit. Test to see if
the chain is securely f_tstened by ragging
on the chain.
•
Temporarily attach the loose end of
the chain to the rear of the
countertop with the tape fi'Oln the
packaging.
_]
Place the range in the counter cutout
lem_ingjust enough room between
the back of the range and the wall to
reach the stability, bracket.
Hook the loose end of the chain
onto the bracket by slipping the
nearest link of the chain into the slot
in the bracket. Make sure the chain is
pulled as tight as possible and that
there is no excess slack in the chain
after the chain is attached to the
bracket.
Wall plate
LongscreW_washer__ff _
Makecertainthescrewisgoingintothewall
plateat thebaseof thewallor oneof thestuds
in thebaseof thewall
Tape
_]
NOTE:If attachingto mason_ youcanbuy
suitablescrewsandanchorsat hardwarestores.
Usea masonrydrill todrill therequiredholes.
I\\\\\\\\\\\\\\\\\\\\\\\\\\\\\\\\\\\\\\\\\\\\\\
4_
%
Slide file range all fl_e
the counter. Once the
pushed back in place,
small mnount of slack
This is normal.
way back into
range is
there _4ll be a
in the chain.
CAUTION:Excessive
slackin thechaincould
allow therangeto tip over.
27
Cleaning the glass cooktop.(o,some
models)
Clean the glass surface with cleaning cream before you use the cooktop for the first time. Also, clean
the glass surface after each use. This helps protect the top and makes clean-up easier.
To clean the cooktop seal around the edge of the glass, let a wet cloth rest on # for a few minutes, then wipe clean.
Use a mild detergent if needed.
Do not use a knife or any sharp object on the seal because # will cut or damage it.
Normal Cleaning
Use only a recommended cleaning cretan,
such as Cerama Brite or another cooktop
[]
Clean tim suKhce _ifll tim cleaning
cretan after each use.
cleaning cretan, on the glass cooktop.
To maintain and protect tim suKhce of
your new glass cooktop follow these steps.
_]
Rub a few drops (less is better) of the
cleaning cretan onto soiled area
using a dmnp paper towel. Buff_4th
a d U paper towel until all soil and
%
Before you use tim cooktop for the
first time, clean it _4fll cleaning
cream. This helps protect the top
and makes clean-up easier.
cream
are relnoved.
For Heavy, Burned-On Soil...
[_
Allow the cooktop
Apply
cream
Spread
soiled
Using a razor scraper will not
damage the surface if the 45° angle
is maintained.
%
a few drops of cleaning
to the cool, soiled area.
the cream across the entire
area.
Hold scraper at a 45 ° angle against
the glass ceramic surfilce. This 45 °
angle makes the scraping easier.
Scrape soil with the enclosed razor
scraper. Keep slnall amount of
cream on the soil as you scrape.
Heavily soiled areas may require
repeated applications of cream. It
will be necessa U to press clown on
Our testingshows that if
you are cooking highsugar
mixtures such as jelly or
fudgeand have a spillover,
permanentdamage to the
cooktopsurface may occur
unlessthe spillover is
immediatelyremoved.
Special
Be sureto usea new sharprazorscraper.
Donot usea dull or nickedblade.
If any soil remains,
steps listed above.
repeat
the
To order more cream and/or
scrapers
for cleaning your glass cooktop,
please
call our toll-flee number:
National Parts Center ......
800-626-2002
Cleaner ..................
Scraper ..................
Cream& scraper kit .......
# WXIOX300
# WX5X1614
# WB64X5027
Care for Sugary Spills
Be sure to usea new sharprazorscraper.
Do not usea dull or nickedblade.
Sugmy spillovers (such as jellies, fudge,
candy syrups) or melted plastics can
cause pitting of the surface of your
cooktop (not covered by the warranty)
unless the spill is removed while still
hot. Special care shouldbe taken when
removinghot substances.
Turn off all surf)tce units afIected
by the spillover. Remove hot pans.
28
the razor scraper while scraping the
soiled area with cooktop cream.
to cool.
Wearing an oven mitt, hold the
razor scraper at a 45 ° angle to the
cooktop. Scrape the hot spill to a
cool area outside the surf_tce unit.
%
With the spill in a cool area, use a
(hy paper towel to remove any
excess. Any spillover remaining
should be left until the surf_lce of
the cooktop has cooled. Do not
continue to use the soiled surface
unit until all of the spillover has
been relnoved. Follow the steps
under Heaw Burned-On Soil to
continue the cleaning process.
NOTE:If pots with a thin overlayof aluminum,
copperor enamelare allowed to boil dry, the
overlaymay bondwith theglass cooktopand
leavea black discoloration.Thisshouldbe
removedimmediatelybeforeheatingagain
or thediscolorationmaybe permanent.
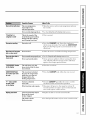
Before YouCall ForService...
Troubleshooting -tips
Save time and money! Review the charts on the following
pages first and you may not need to call for service.
Possible Causes
What To Do
Surface units will not
maintain a rolling boil
or cookingis not
fast enough
Improper cookware
being used.
• Use pans which are flat and match the diameter
of the surf_tce unit selected.
Surface units do
not workproperly
A fuse in your home may
be blown or the circuit
breaker tripped.
* Replace fllse or reset circuit breaker.
Cooktop controls
improperly set.
* Check to see the correct control
unit you are using.
Incorrect cleaning
methods being used.
* Use recolnmended
Cookware with rough
bottoms being used or coarse
particles (salt or sand were
between the cookware and
the surface of the cooktop.
* Be sure cookware bottolns and cookware are (:lean
befbre use. Use cookware with slnooth bottoms. Tiny
scratches are not relnovable but will become less
visible in time as a resuh of cleaning.
Glass Cooktop Models
tiny scratches (may
appearas cracks)
or abrasions on radiant
cooktop glass surface
Cookware
across
has been
the cooktop
cleaning procedures.
slid
surface.
Areas of discoloration
Improper
on the cooktop
being used.
Plastic melted
to the surface
Hot cooktop came into
contact with plastic placed
on the hot cooktop.
• See the Special Care infbrmation
glass cooktop section.
Pitting of the cooktop
Hot sugar mixture
on the cooktop.
* (;all a qualified
Frequent cycling offand
Improper
cookware
being used.
and on of surface units
Electric
Surface
is set for the surfilce
cookware
* Marks fi'om aluminum
and copper pans as well as
mineral
deposits fi'om water
with the cleaning cream.
spilled
technician
* Use only flat cookware
or food
can be relnoved
in the Cleaning the
for replacelnent.
to lninimize
cycling.
Coil Models
units not
functioning
properly
The surface
units
not plugged
in solidly,
are
The surface unit
controls
improperly
• With
the controls
unit is plugged
set.
off, check
completely
* Check to see the correct
unit you are using.
to make
sure the surface
into the receptacle.
control
is set for the surfilce
The drip pans are not set
securely in the cooktop,
* With the controls
off, check to lnake sure the drip
pan is in the recess in the cooktop
and that the
opening
in the pan lines up with the receptacle.
Large pans hold heat
close to the cooktop,
* Choose a pan that znatches
you are using.
The oven vent
* Pans on the fight rear surface unit |)lock air flow
is blocked.
the size of the surface
unit
from the oven vent and cause the cooktop to get hot.
/99
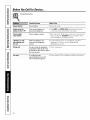
Before YouCall ForService...
Troubleshooting -tips
Po,,ihle
ca.,e,
Clock and timer
do not work
Oven light does
not work
What To Do
A fuse in your home may be
blown or the circuit breaker
tripped.
• Replace the fllse or reset the circuit t)reaker.
Oven controls
* See the Using the clock and timer section.
improperly
set.
Light bulb is loose or defective.
* Tighten
Switch operating
is broken.
• Call fbr smvice.
light
Oven temperature too
hot or too cold
Oven thermostat
needs adjustment,
Oven will not work
A fuse in your home
blown or the circuit
breaker tripped.
Oven controls
or replace
the bulb.
• See the Adjust the oven thermostat--Do
section.
may be
improperly
* Replace
set.
the fllse or reset the circuit breaker.
• See the Using the oven section.
Control signals after
entering cooking time
or delay start
You forgot to enter a
bake temperature
or
cleaning time.
Fooddoes not bake
Oven controls
or roast properly
Shelf positionis
incorrect
or the shelf is not level.
• See the Using the oven section.
Incorrect cookware or cookware
of improper
size being used.
• See dm Using the oven section.
Oven thermostat
adjustment,
• See the Adjust the oven thermostat--Do
section.
Fooddoes not
broil properly
improperly
• Press the BAKE pad and desired telnperamre
SELF CLEAN pad and desired clean time.
set.
needs
• See dm Using the oven section.
oven
• Make sure you press the BROIL HI/LO pad.
improperly
set.
Improper
shelf position
being used.
• See the Broiling Guide.
Cookware not suited
for broiling.
• Use dm broiling
Aluminum
foil used on the
the broiling pan and grid has
not been fitted properly and
slit as recommended.
• See the Using the oven section.
In some areas the power
(voltage) may be low.
• Preheat
it yourself!
pan and _'i(1 that calne with your oven.
the broil element
• Broil fbr the longest period
the Broiling Guide.
3O
or the
• See die Using the oven section.
Door not open to the broil stop
position as recommended.
controls
it yourself!
for 10 minutes.
of time recommended
in
Ovenwill not self-clean
Possible Causes
What To Do
The oven temperature
is too high to set a
self-clean operation.
• Allow the oven to cool to room
the conu'ols.
Oven controls improperly
set.
telnperamre
and reset
• See the Using the self-cleaning oven section.
"Crackling" or
"popping" sound
This is the sound of the
metal heating and cooling
during both the cooking
and cleaning functions.
* This is normal.
Excessivesmoking
Excessive soil.
* Press the CLEAR/OFFpad. Open the windows to
rid the room of smoke. Wait until the LOCKEDDOOR
light goes ofL Wipe up the excess soil and reset the
clean cycle.
Oven door will not open
after a clean cycle
Oven too hot.
* Allow the oven to cool below locking teznperamre.
Oven not clean after a
Oven controls not properly set.
• See the Using the self-cleaning oven section.
clean cycle
Oven was heavily soiled.
• Clean up heax y spillovers before starting the clean
cycle. Heavily soiled ovens may need to self:clean
again or fbr a longer period of time.
"fOCKOOOR"flashes
in the display
The self-clean cycle has
been selected but the door
is not closed.
* Close the oven door.
LOCKEDDOORlight
is on when you want
to cook
The oven door is locked
because the temperature
inside the oven has not
dropped below the
locking temperature.
* Press the CLEAR/OFFpad. Allow the oven to cool.
"F-- anda number
or letter"flash
in the display
You have a function
error code.
• Press the CLEAR/OFF
pad. Allow die oven to cool for
one hour. Put the oven back into operation.
If the function
* Disconnect all power to the range for at least 30
seconds and then reconnect power. If the traction
error code repeats, call for service.
Displaygoesblank
A fuse in your home
blown or the circuit
breaker
code repeats.
may be
* Replace the fllse or reset tim circuit breaker.
tripped.
The clock is in the
black-out mode.
* See the Special feaulres
of your oven control
section.
31
Before YouCall ForService...
Troubleshooting -tips
Possible
Causes
What To Do
Display flashes
Power
Unable to get the
display to show "SF"
Oven control pads were
not pressed
properly,
* The BAKE and BROIL HI/LO pads must be pressed
at the same time and held for 3 seconds.
Power outage,
clock flashes
Power
* Reset the clock. If the oven was in use, you must reset
it by pressing
the CLEAR/OFF pad, setting the clock
and resetting
any cooking fimction.
"Burning" or "oily"
odor emitting from
the vent
This is normal in a new
oven and will disappear
in time.
Strong odor
An odor from the insulation
* This is temporary.
around the inside of the oven
is normal for the first few times
the oven is used.
Fan noise
A cooling fan may
automatically
turn on and
off to cool internal
parts.
32
• Reset
failure.
outage
or surge.
the clock.
* To speed the process,
lllinilllllnl
of 3 hours.
cleaning oven section.
* This is normal.
set a self:clean
cycle for a
See the Using the self-
The cooling
f_m will turn
off and on.
GE Service
Protection
Plus
TM
GE, a name recognized
worldwide
%r quality and dependability,
Service Protection
Plus TM--comprehensive
protection
on all your
No Matter What Brand!
Benefits
We71 CoverAny Appliance.
Anywhere. Anytime.*
Include:
• Backed by GE
• All brands covered
• Unlimited
service calls
•
•
•
•
offers you
appliances--
All parts and labor costs included
No out-of-pocket
expenses
No hidden deductibles
One 800 number to call
You will be completely satisfied with our seia_ice protection or you may request
on the remaining value of yore" contract. No questions asked. It's that simple.
your money back
Protect your refi'igerator, dishwasher, washer and (hyer, range, TV, VCR and much more-any
brand[
Plus there's no extra charge fi_r emergency se_a_ice and low monthly financing is available. Even icemaker
coverage and fi_od spoilage protection is offered. You can rest easy, knowing that all your valuable
household products are protected against expensive repairs.
Placeyourconfidencein CEand c_,nusin the US tollf,ee at 800-626-2224
for more information.
*All
brtnds
coxered,
up
to 20}etrs
old,
in the
continental
[ .S.
_.___
Cut here
Please place in envelope and mail to:
General Electric Company
Warranty
Registration
P.O. Box 32150
Louisville,
Department
KY 40232-2150
33
Consumer
Product
Ownership
Registration
Dear Customer:
Thank you fi}r purchasing
our product
and thank
We are proud to have you as a customer!
Follow
these
three
steps
Complete
and mail
your
your
new
Ownership
Registration
today.
Have
tile peace
mind
ot knowing
can contact
unlikely
ot
we
ot a
moditication.
in us.
investment:
After mailing tile
registration
below,
store this document
Read your Owner's
Manual carefully.
It will help you
in a sate place. It
contains int'()rmation
operate your new
appliance properly.
ll}xm have questions,
or need InoI'e
information,
call the
GE Answer Center ®
you
you
Our
800
you in tlle
event
your confidence
appliance
Consumer
Product
satety
to protect
you for placing
will need should
require service.
service number is
C,E CARES
800.626.2000.
(800-432-2737).
Model
Number
Serial
Number
I
Important:
If you did not get a registration
card with your
product, detach and return the form below to
ensure that your product is registered,
or register
online at www.geappliances.com.
_._
Consumer
Product
Ownership
Model
I
Mr. [
First
Name
Street
Address
Mrs. [
I
I
I
I
I
I
I
I
I
I
I
I
I
I
I
I
I
i
t
I
I
i
i
i
I
1
Year
I,
Placed
""_'1,
I
Dav
.. l,
I
Serial
I
I
I
I
I
I
I
Name
Last
I
I
General Electric Company
Louisville, Kentucky
www geappliances
34
com
I
I
I
I
I
I
I
I
I
I
I
I
I
I
I
I
I
I I
pl,one
I
l-I,,
I
I
I
E-mailAdd_'e_
I
Number,
Occasionally
we may allow sele(ted (ompanies to send you information.
? Check here if you do not want this information.
GE Appliances
I
Number
Miss [I
I
Month
I
here
Registration
Number
I
I
Apt.#l
l)a(c
Ms. [
I
Cut
l-I,,,
l
GEElectric Range Warranty
All warranty service provided by our Factory Service Centers
or an authorized Customer Care® technician. For service,
call 800-GE-CARES.
GE Will Replace:
OneYear
Fromthe date of the
originalpurchase
Anypart of the range which f_lils(hie to a defect in materials or worklnanship.
During this full one-Fear warranty,GE _,_411
also provide, free of charge, all labor
and in-heine set_ice m replace the defective part.
Five Years
Fromthe date of the
originalpurchase
A replacementglasscooktopif it should: crack (hie to themml shock;
crack at the robber seal between the glass cookmp and the porcelain
It _ill also be replaced if the pattern wears offer ifa W of the radiant
units bum out. During this five-Fearwarranty,you will be responsible
labor or in-heine service.
discolor;
edge.
surface
for a W
Service trips to your home to teach you how to use the
product.
Replacement of house fuses or resetting of circuit
breakers.
Improper installation.
Damage to the product
or acts of God.
Failure of the product if it is abused, misused,
for other than the intended purpose or used
commercially.
Damage to the glass cooktop
other than the recommended
caused by accident,
fire, floods
or used
Incidental or consequential damage to personal
property caused by possible defects with this appliance.
caused by use of cleaners
cleaning creams.
Damage to the glass cooktop caused by hardened
spills of sugary materials or melted plastic that
are not cleaned according to the directions in
the Owner's Manual.
This warranty is extended to the original purchaser and any succeeding owner for products purchased for
home use within the USA. In Alaska, the warranty excludes the cost of shipping or service calls to your home.
Some states do not allow the exclusion or limitation of incidental or consequential damages. This warranty
gives you specific legal rights, and you may also have other rights which vary from state to state. To know
what your legal rights are, consult your local or state consumer affairs office or your state's Attorney General
Warrantee General Electric Company.Louisville, lot 40225
35
Service TelephoneNumbers.
GEAnswer Center®800.626.2000
The GE Answer Center ®is open 24 hours a day, 7 days a week.
In-HomeRepairService800-GE-CARES
(800-432-2737)
Expert GE repair sen4ce is only a phone call away.
SpecialNeedsService800.626.2000
800-TDD-GEAC(800-833-4322)
GE offers, fl'ee of charge, a brochure
with limited mobility.
to assist in planning a barder-fl'ee kitchen for persons
ServiceContracts800-626-2224
Purchase a GE sen4ce contract while your wmr'an b, is still in effect and you'll receive a
substantial discount. GE Consumer Sen4ce will still be there after your warranty expires.
PartsandAccessories800-626-2002
Indix4duals qualified to service their o_m appliances can hm_e pare or accessories sent directly
to their homes (VISA, MasterCard and Discover cards are accepted).
Instructionscontainedin thismanualcoverprocedurestobeperformedbyanyuser.Otherservicing
generallyshouldbe referredtoqualifiedservicepersonnelCautionmustbeexercised,since
improperservicingmaycauseunsafeoperation.
ServiceSatisfaction
If you are not satisfied with tim service you receive fl'om GE:
First, contact the people who serviced your appliance.
Next, if you are still not pleased, wdte all the details-including
your phone number--m:
Manager, Customer Relations
GE Appliances
Appliance Park
Louisville, KY 40225
3_
Printed in LaFayette, GA