1
How
ofyouroven
Howtousethe
p5
px?!
tousethe
lp14
Howtousethe
shelf
youcallfor
lusethe
—
.
L
Q~6
pi!m
p33
YourDirectLhneto GeneralElectric
TheGE AIWWX
%
To
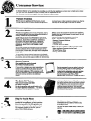
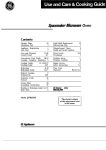
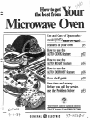
Read this book carefully.
It is designedto help you operate
and maintainyour new Microwave
Ovenproperly.
Keepit handyfor answersto your
questions.
If you don’t understandsomething
or needmore help. . .
Call, toll free:
The GE AnswerCenter’”
800.626.2000
consumerinformationservice
or write: (includeyour phone
number);
ConsumerAffairs
GeneralElectricCompany
AppliancePark
LouisviHe,KY40225
No.
Pleasecheck with your supplierto
be surehe has done so;also send
in your ConsumerProductOwnership RegistrationCard,If you move,
or if you are not the original purchaserpleasewrite to us,stating
modeland serialnumbers.This
appliancemustbe registered
Pleasebecertainthatit is.
H yourecdveda Ckm3ged
oven.. .
Thesenumbersare also cmthe
ConsumerProductOwnership
RegistrationCard that camewith
your MicrowaveOven.Before
sendingin this card, pleasewrite
thosenurrbws here:
=ial
Your supplieris responsiblefor
registeringyou as the owner.
GeneralElectricCompany
RangeProductService
AppliancePark
Louisville,KY 40225
You’llfind them cma labelinside
the ovenon the upper left side.
—..
It is importantthat we,the manufacturer,know the locationof your
MicrowaveOvenshoulda need
occur for adjustments.
Write to:
Write downthe ttndd and
said mmbwss
Model No.-“-
m! sure your Microwave
Oven is registered.
—
-.
Usethesenumbersin any
correspondenceor servicecalls
concerningyour MicrowaveOven,
immediatelycontactthe dealer(or
builder) that sold you the MicrowaveOven.
Savetimeandmoney.
check
Eh2km
youail m’SW’’vlce,
theProblemSolveron page33,
Hlists minor causesof operating
Pr~blem~that ~C)U
can ~orre~t
yourself.
Jtcould saveyou an unnecessary
servicecall.
This microwaveovenis LJLlist~dfor installationover electric
and gas ranges,
(a) Do NotAttmpt to operatethis
ovenwith the door open sinceopen
door operationcan resultin harmful
exposureto microwaveenergy.It is
importantnot to defeator tamper
with the safetyinterlocks.
(b)DoNat Placeany object
betweenthe ovenfront faceand the
door or allow soil or cleanerresidue
to accumulateon sealingsurfaces.
(c) Do Not Operatethe ovenif it is
damaged.It is particularlyimportant
that the ovendoor cJoseproperly
and that thereis no damageto the:
(1) door (bent),
(2) hingesand latches(brokenor
loosened),
(3) door sea!sandsealingsurfaces.
notbe
adjustedor repairedby anyone
exceptproperlyqualifiedservice
personnel.
-
BeforeMicrowaving. . . . . . . . . . . . 2
SafetyTips . . . . . . . . . . . . . . . . . . . . 3
Introductionto YourOven. . . . . . . 5
Setthe Clock,.. . . . . . . . . . . . . . . . 6
TouchControl Panel . . . . . . . . . 6,7
Time Cook . . . . . . . . . . . . . . . . . . . . 8
ManualDefrosting . . . . . . . . . . . . . 9
TempCook.... . . . . . . . . . . . . . . . 10
Hold/Timer. . . . . . . . . . . . . . . . . . . 11
AutomaticCooking. . . . . . . . . 12,13
AutomaticRoasting
&Chart . . . . . . . . . . . . . . . . . 14,15
AutomaticDefrosting. . . . . . . . . . 16
AutomaticCooking
RecipeGuide .,... . ..,,,..,,
17
Meats. . . . . . . . . . . . . . . . . . . 18,19
Vegetables. . . . . . . . . . . . . . 20,21
Desserts. ...,,,,.,,,.,,,
22,23
AutomaticCooking Chart .., 24,25
The ExhaustFeature . . . . . . . . . . 27
.CareofYourOven .*,.*, ,. 28,29
Spacemaker@
MicrowaveOven
ShdfGuide .$.. .. ... ... .,30-31
Grounding Instructions.., ..,,, 32
The ProblemSolver . . . . . . . . . . . 33
ConsumerServices.. . . . . . . . . . . 35
Warranty......, .,, .., BackC
over
●
@ Makesure all utensilsus~din
your microwaveovenare labeled
“suitablefor microwaving”.Check
your Cookbook forspectiic test
to determine”lnicrowave-safe”
utensils,
F@ertowels,wax paper,and
plasticwrap can beused tocover
dishesin orderto retain moisture
and preventspattering.
43
@ Somemicrowavedfoods require
stirring, rotating,orrcmrranging,
CheckyourCooktmok forspecific
instructions.
Ii?eactl
all
When using electrical appliances
basic safety precautions should
be followed, including the
following:
WARNING—-TOreduce the risk
of burns, electric shock, fire,
injury to persons or exposure to
excessivemicrowaveenergy:
e Use this applianceonly for its
intended use as described in this
manual.
e Read and follow the specific
“FWEZALJTIC)NSTO AVOID
POSSIBLE EXPCELJF?E
TO
EXCESSIVE MICROWAVE
ENEF&iY” fm.md cm page 2,
* This appliance must be
this
@ See door cleaning instructions on page 28.
e To reduce the risk of fire in
the oven cavity:
—-Donot overcook food. Carefully attend appliance if paper,
plastic, or other combustible
materials are placed inside the
oven to facilitate cooking,
—-Removewire twist-tiesfrom
paper or plastic bagsbefore
placing bag in oven.
—-Donot use your microwave
oven to dry newspapers.
—Do riotpoppqxxm In your
microwaveovenunless in a special microwavepopcorn accesgrounded. Connect only to
sory or unless you use popcorn
properly grounded outlet. See
labeledfor use in microwave
“GROUNDINGINSTF?UCTKXW3” ovens.
found cmpage32.
—-Donot operatethecwenwhile
s, For best operation,plug this
emptyto avoiddamageto the
applianceinto it own electrical
ovenandthe dangerof fire.If by
outlet, to preventflickering of
accident the wen should run
lights, blowing of fuse or tripempty a minute or two, no harm
ping of circuit breaker.
is done. Iioweva?,try to avoid
43 Installor locatethis appliance operating the oven empty at all
only in accordancewith the prom times—itsavesenergyand provialedinstallationinstructions.
longs life of the oven,
@ Do not cover or block any
—-Ifmaterialsinsidethe oven
openingscmthe appliance,
should ignite, keepoven door
C1OMXI,
turn oven off, and dise Do not useoutdoors.
connect
!he power cord, or shut
a Do not immersecord or plug
off
power
at the fww or circuit
in water,
breaker paneL
s Keepcord away from heated
s Some products such as
W’4rfaces.
whole eggs and sealedcona 00 not let cord hang over
tainers—forexample,closed
edge of table or counter.
glass jars—-mayexplode and
@ Do not operatethis appliance
should not be heatedin this
if it has a damaged cord or plug,
oven.
if it is not working properly, or if
@ Avoid heatingbaby foodin
it has been damaged or dropped.
glassjars, even without their
a This app!iance should be serlids; especiallymeatand egg
viced only by qualified service
mixtures.
personnel,(Xmtaat nearest
* IDon’tdefrostfrozenbeverauthorized service facility for
agm in narrow neckedbottles;
examination, repair or
adjustment,
e As with any appliance, close
supervision is necessary when
used by children.
(%?peeiallyCat’borlated ones.
Even if the container is opened,
pressurecan build up. Thiscan
causethe container to burst,
resulting in injury.
(cmntkwd
mxt
page)
—
.. .
49 Use metalonly as directedin
Cookbook. Metal strips as used
on meat, roasts are helpful when
used as shown in Cookbook.
TV dinners may be cooked in
metal trays but when using shelf
they must be replaced in their
box. However, when using metal
in microwave oven, keep metal
[other than metal she!f)at least
l-inch away from sidesof oven.
64 Cooking utensilsmay
become hot because of heat
transferred from the heated
food, This is especially true if
plastic wrap has been covering
the top and handles of the
utensil. Potholders may be
needed to handle the utensil.
e $ornetirnes,
theovenfloor
can13ecome
toohotto touch.
Be careful touching the floor
during and after cooking.
e Do not use any thermometer
in food you are microwaving
unless that thermometer is
designed or recommended for
use in the microwave oven.
* Remove thetemperature
probefromtheovenwhennot
usingit to cook with. if you leave
the probe inside the oven without
inserting it in food or liquid, and
turn on microwave energy, it can
create electrical arcing in the
oven, and damage oven walls.
* Plastic IJterMs-4%stic
utonsil$ designed for microwave
cooking arevery useful,but
should be used carefully, EikHi
microwave plastic may not be as
tolerant of overcooking com3iticms as are glass or ceramic
materials and may soften or
char if subjected to short periods
of overcooking. In longer exp6sures to overcooking, the food
and utensils could ignite. For
these reasons: 1) Use rnicr’owave plastics only “and use
{hem” in strict compliance with
the utensil manufacturer’s
recommendations} 2) Da not
wbject empty Mcmsils to microwaving, 3) Do not permit children
to UW3plastic ukmsils without
complcto supervision.
@ When cooking pork follow
our directions exactly and
always cook the meat to at least
170°. This assures that, in the
remote possibility that trichina
may be present in the meat, it
will be killed and meat will be
safe to eat.
e Boilingeggs (in and out of
shell) is not recommendedfor
microwave cooking. Pressure
can build up inside egg yolk and
may cause it to burst, resulting
in injury,
a Foods with unbroken outer
“skin”such as potatoes, hot
dogs or sausages, tomatoes,
apples, chicken livers and other
giblets, and eggs (see above)
should be pierced to allow
steam to escape during cooking.
@ ‘Boilable” cooking pouches
andtightlyclosedplasticbags
should be slit, pierced or vented
as directed in Cookbook. If they
are not, plastic could burst during or immediately after cooking,
possibly resulting in injury. Also,
plastic storage containers should
beat least partially uncovered
because they form a tight seal,
When cooking with containers
tightly covered with plastic wrap,
remove covering carefully and
direct steam away from hands
and face,
43 Lk3eOt the shelf Mxx3wM3ry.
(See your Cookbook for proper
LKR)
—F?emcwethe shelf from oven
when not in use.
—-Donot store or cook with
shelf cm floor of over?.Product
ciafmge may result.
—ML&potholders when handling
the shelf and utensils. They may
be hot.
—-Donot use microwave
browning dish cm shelf. The
shelf could overheat. Use of
shelf with Automatic Cooking
feature is not recommended,
4
T-I-E HCxx3:
e Have it installedand properly
grounded by a qualifiedinstaller.
See the special installation booklet packed with the microwave
oven.
@ The ventfanin yourSpacemaker@oven will operate
automaticallyunder certain
conditions(see Automatic Fan
Feature,page 7). While thefanis
operatingcautionisrequiredto
preventthestartingandspreactingof accidentalcookingfires
whiletheventfanisin use.For
thisreason:
—Neverleavesurfaceunits
unattendedat highheatsettings.
E30ilovercauses smoking and
greasy spillovers that may ignite
and spread if vent fan is operating. To minimize automatic fan
operation, use adequate sized
utensils and use high heat settings only when necessary,
—-intheeventofa greasefire,
smother flaming pan on surface
unit by cu;’erin!~ pan completely
with well-fitting lid, cookie sheet
or flat tray.
—-Neverflamefoodsunderthe
ovenwiththeventfanoperating
because it may spread the
flames,
—-Keephoodandgreasefilters
according to instructions
C!eanJ
on pages 27 and 29, to maintain
good venting and avoid grease
fires.
—-Usecarein raisingandlow-
eringthesmokeandspatter
shieldto avoid tipping over tall
cooking utensils.
l.--=
J
v--
‘
-.—-.—
.-
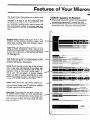
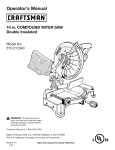
1. ~O~r Efancfle.Oven doesn’t operate unless door
is securely latched,
2, Door latch. Push in to open door.
3. Window withMetalShield.Screen allows ccmking to be viewed while keeping microwavesconfined in oven.
4. Plastic Mode Stirrer Cover. Protects the mode
stirrer which distributes microwave energy into
the cwen,
5. oven vents
& Oven Light. Goes cm when door is opened or
when oven is operating in any function,
7. ChmnF%XM’*
use
8. Micm7’hemometer’MRmlperatlm W“CW?*
with Temperature Cook and Auto Roast functions only.
9. ~e~eptac~efor TkNTlperatww
pr@e.
!0. ~OIJCil ~ontrol Pane! and ~igitd ~eadouti
Display. For detailed information of each feature,
see pages 6 and 7’,
.d
11. e%eixw wet%,
12” Cooktup!Jght.
13. i’kmdContlmkl:
Fan Switch.Pressonce for high and twice for low
speeds.Pressagain for off.
LampSwHch.Push and hold untii iamp lights.
Numbers, Located inside oven
$4. Model and Serial
at top left shk
15, SmGke and Spatter $MWf. This convenient
shield is hinged. When using range top flip shield
into out positibn. Shield directs surface smoke to
exhaust system. When vent fan is not in use,
shield bends under microwave oven.
16. AutomaticCookingChart.
PositionMetalShelf.Doublestheovencapac17. ‘!$w3
ity when reheating or cooking smaller food items.
(For complete use of shelf, see pages 30=31.)
——.
--
imL
Ea-z
Es&.-
..
I
EaKc
6$- @j-E&r
.L—
-
on
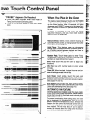
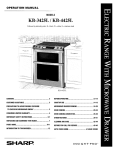
The Touch Control Panelallows you to set the oven
controls electronicallywith the touch of a finger, It’s
designed to be easy to use and understand, With
your microwave oven, you have the option of using
your automatic cooking control pads for quick and
easy convenience cooking. Or you may make your
own programs to suit your individualized cooking
style.
e WhenusingTemp Cook function, you haveentered
a temperature lessthan 80° or more than 199°,
43 Door is opened during “AUTO” cycle of Automatic
Cooking function, Close door an_dtouch START,
\
Readout Panel. Displays time of day, time or ternperature during cooking functions, power level
being used, cooking mode and pertinent instructions of what to do next.
———––.—
~—
-- ––—
—.=.
.
...——— --. —- . .
.-.———
-.....- —..
—
..
~-–—
... ..&--.-.—
4.,
T’empCook. Usethe temperatureprobe to cook by
using a preset temperature. When internal food
temperature reaches 80°, oven shows temperature
until preset temperature is reached and then turns
off. (See page 10.)
.
.—-.-...——. -..
..-.—
.-.
............. .
. .
—
...
-, .. -
——---
-.-——.
. . . . .
—..
..
--
.
-—- ——.
-.—-—.--,---.- ---------—
~——————
———
—————
———
——
.——
—
—i- ----— . ....
...
.—
——
—.
—.
—-—.,.
——.
—
—
-...-—
.
.....
———— —
——.
....
—,..
.
..—
— -— .,.... —
Time Cook. Microwave for a preset amount of time
using automatic Power Level 10 or change power
Ievel’aftersetting time, (Seepage 8.)
Clock. Touch this pad to enter time of day or check
time of day while microwaving. To set clock, first
touch CLOCK pad and then enter time of day, For
example, if time is 1:30, touch number pads 1, 3,
afid O and 1:30 will Appear in readout display,
“Start” will flash on readout directing you to touch
STAFtTthus setting the clock, If you wish to reset or
change time, simply repeat above process,
—
——
—
—
——.———
—-—
—
———-——
—
——.—..—--..-—._—....—”.
——.——.:..–...
——
—
Power Level. Touch this pad before entering another power level number if you want to change
from automa~icPower Level 10 (HIGH) for cooking
or Power Level3 (LOW)for defrosting,
. . ..
———:---——.=-—..—––
—.
--—
P=-
~
~———--——
--.—
——.
——
~~~Emum——.
—~
-—
Auto Cook. Touch this pad and then number pad
for desired Code number, and oven automatically
microwaves at pre-programmecl power levels and
determines the proper amount of cooking times
until the food is done and oven shuts off. (See
pages 12 and 13,)
.—.-~
--——
———
--... .-.———--------.
— —-.=------..
-- -. -.=.-.
—..
- .L..
-—.—.
.
—--—-—
.
—
—K–-—
—-==.
-=
.:—.—
--=
.
..... ........ .......... .... .- . :a.a—m....
t!-. E.s
.-— Iw.,,#.,,.
. .. . . . . ,,~s~,,,,.=g,,.”
.
.. . . .
-~
.
.
LIGHT ----—.
6
.
— --- --— . .—
.—.. . .. .. . .
—-.———
~~~~~g.———
—.. . . . . .————
ave
ChIReadout:
Appears
Probe has been forgotten when Auto Roast or
TempCook functions are being used.
Probe is not securely seated in oven wall receptacle.
The readout panel displays five 8’s and 18 POWER
on the upper portion and all of the oven functions
on the lower portion. After 15 seconds, all lights
disappear and “RESET” comes on in the upper portion. Touch the CLEAR/C)FFpad and oven is ready
for use.
[f power is disrupted at any time, the above
sequence reoccurs, and you must reset CLOCK
after touching CLEAR/OFF.
/
Manual Defrost,Gentle, more uniform thawing at
automatic PowerLevel3, or changepower levelafter
entering time. (Seepage 9,)
--. —..
- .--— -- -—— - ..=
- ...—. .. . . —.—.- ..nz
z
—.—
— . ..—
—.. . . . . -.
. ..-—-.
.——
.&.=
E i—.
-..
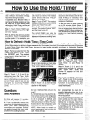
iloid/Tirner, This feature uses no microwave
energy while it functions as both a kitchen timer or
as a holding period between defrost and time or
temperature cooking. (See page 11.)
.=.
.- . -—
.. -—’-””””–—--–-––~
——
——
—
---,=,
-----——
.:= —.
. .. .. .......=—
—
. .—.
. - -—
-—.
-.:m:.
—
——.
—
.————
-.-.—......—
..........
.... ..— —
.
-
.
NumberPads. Touch these pads to enter Time,
Temperature,Pow@rLevel,Automatic Cooking Code
numbers or Auto D?frost food weight,
.——
—
Start. Must touch this pad for oven to begin any
functions.
Min f%f. Use with number pads to enter whole
minutes.
,@
–A
—.—-...------
——
Clear/Off.When touched, it stops the oven and erasesall settings except time of day.
~~
Auto Roast. Insert probe, touch this pad, and
desired number pad for Code to slow-cook or temperature cook meat with automatic preset program.
(See pages 14 and 15.)
——
-- ..—.
. .
-1
-
.—.- .. .. . .... .——.
-.—-
AutoDefrost,Touch this pad, then Code number,
—-
J—.—-
“E~~~=i~~~~@.~=
=
—--——~
———
--—---:--:-2z=-—
. --——
——
—-—-
_..
.
.
.
l:::=
.
.
. .
. . . .
----
----
.
.
-
— —— .—
=::
. .
--—.—~—=
—
.
.
.-.
-
—
-.=
——
-—-
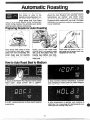
Cooking appliances installed under the oven might,
under some heavy usage conditions, cause temperatures high enough to overheat some internal parts
of the microwaveoven.
To prevent overheating from taking place, the vent
fan is designed to automatically turn on at !a”w
speed if excessivetemperatures occur, Should this
happen, the fan cannot be manually turned off, but
it will automatically turn off when the internal parts
have cooled, The fan may stay on up to approximately 30 minutes after the range and microwave
oven controls havebeen turned off.
~
——
~
---—
. .
——---L——..--..——.
—
——
——
:,$.
. . .
..——.—
..————
—-—
FAN
-
—-=-J. . ...
-——
.— -- - .
——
——..- ..::::>
.......
....................
-;=:==;
=:.::=:,
.--==
—
—
---—~-
-......—7—
food weight and the oven automatically sets Power
Levelsand defrosting time, (See page 16,)
—
-
-----–..—.
.
FAN
7
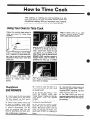
Time Cooking, or cooking your food according to a predetermined amount of time, is probably familiar to you from
conventional cooking, With your microwave oven, however,
you preset the time and the oven turns off automatically.
to
Follow the cooking steps below to
help you learn !O Time Cook
properly,
J
‘
----
Step 5: When time is up, oven
sounds, Display flashes “END”,
Oven, light, and fan shut off,
.——.—
‘
‘~EJ
,
Step 1: Fill a cup % full of water
and 1 teaspoon of freezedried coffee, Use a cup that has no metal
decoration. Place cup in cwen and
close door.
Step 3: Select your time, Touch 1,
2, and O for a minute and 20 seconds. “Cook Time”, Power 10,and
1:20 appear on the display, If another Power Level is desired touch
PC)WERLEVELand the number although Power Level 10 (HIGH] is
preferred for this cup of coffee,
Step 2: Touch TIME CJXIK, The
r~ad=out panel shows :0 and
Power 10, “Enter Cook Time”
flashes,
$MQP
4: Touch START,“CCKMTime
Left’”, Power 10,and time counting
down show cmdisplay,
C). I set my oven for the time called
for in the reeipa but at the end of
the time allowed, my dish wasn’t
done. what happerled?
A, $$inm }ICOUSO
powm’ varies due
to time or Icmntian, many Titne
Cook recipes give you a time range
to prevent overcooking. Set the
oven for minimum time, test the
food for doneness, and cook your
dish a little longer, if necessary.
Q. i want to cook’ my dish cm a
Power Level other than HIGH,what
do I need to do?
A. To change the Power Level,
touch the POWER LEVEL. pad,
“Enter Power” flashes cm the display panel, Enter the desired
number,
Q. C;IrI I il]terrupt tny Tirrw Cook
function to check th~ food?
A. ‘fes. To resume cooking, simply
close the door and touch START.
NOTE: Microwave power will not
come on until you are ready, YOU
must touch START for cooking to
begin,
Q. I touched the number pads and
selected my power level, When I
touched START,however,my oven
didn’t come on. Why not?
A, The TIME CC)OKpad must be
touched before setting the number
P~d~or else your oven will not bf+
gm cooking,
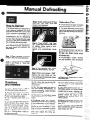
Step 3: Touch number pad “8” then
MIN Pad. “Def Time”, 8:00 and
Power 3 are displayed.
The Defrost setting is designed for
even thawing necessary for large
amounts of food and is one of the
most important advantages of a
microwave oven, Power Level 3 is
automatically set for defrosting,
but you may change this for more
flexibility. See your Cookbook for
the complete defrosting chart,
To become better acquainted with
your Defrost function, defrost frozen pork chops by following the
steps below.
@ Foodsfrozen in paper or plastic
can be defrosted in the package.
@ Forevendefrosting, somefoods
need to be broken up or separated
part of the way through the defrosting time.
/+7-—--
Step 4: Touch START,“f3ef Time
Left” shows and time counts down
on display, When cycle is completed, “END” flashes, the oven
signals and automatically shuts
off.
Step 1: Place package of frozen
chops in the oven and close door,
—
Tips
Step 2: Touch DEFRC)ST,Disdav
reads :0 and Power 3. “Enter ‘D@’f
?’ime” flashes,
@Homemadedinners can be frozen in shallow foil trays and heated
for later use. Select foods which
microwavewell,
@Prs-gmkaged frozen dinners
can be defrosted and microwave
cooked,
Step 5: Turn package over, close
door and repeatSteps2,3 and 4.
Step & When oven signals, “END;’
flashes and CWW’1shuts off> Re=
movepackageand separatechops
W finish defrosting,
-.
Cl.When I press START, I he~r a
dull thumping noise. What is it?
A. This sound is normal. It is letting
you know the oven is usifig a
Power Levellower than HIGH,
Q. Can I Defrost smaii it~m~ in ~
hurry?
A. Yes,but they will need more frequent attention than usual, Raise
the Power Lovet after entering the
time by kmching POWER LEVEL
and 7 or 10 Power Level 7 cuts the
time in !A:Power Level 10 cuts the
time to ‘~~.During either, rotate or
stir food frequently.
Q. Can I open the door during DE=
FFK3STto check on the progress
of my food?
A. Yes,You may open the door at
any time during microwaving, To
resume defrosting, close the door
and press START,
Q. Why don’t the defrosting times
in the Gookbook seem right for my
food?
A. Cookbook times are average,
Defrostingtime can vary according
to the temperatur~ in your freezer,
Set your oven for the time indicated in your Cookbook, If your
food is still not completely thawed
at the end of that time, re-set your
oven and adjust the time accordingly,
9
69 Check your Cookbook for other
defrosting tips,
Q. Can I select a Power Levelother
than automatic Power Level 3 for
defrosting?
A, Yes.Somesmaller foods may be
defrosted quicker on higher Power
Levels but for even, carefree defrosting, Power Level 3 is suggested. Check the chart in the
Cookbook for specific times and
Power Levels,
Q. When I’m &nteyingminutes with
no seconds do I need to touch W“
then “O”?
A. No, You touch the number pad
then the MiN Pad which automatically enters two “00”,
.—
How
Temp Cook
For many foods, internal temperature is the best
test of doneness.
Roasts or poultry are cooked to perfection when
temperature cooking, Heating or reheating foods
accurately to a ser~ing temp&ature you d-esireis
simpleand easy.
TEMP COOK takes the guesswork out of cooking
because the oven shuts off automatically when the
food is done.
gauges the internal temperature of your food; it
must be used when using TEMP COOK or AUTO
ROAST.To utilize your temperature probe properly,
follow the directions for use and insertion in this
book in the section entitled “How to Auto Roast”.
HANOLE
The TemperatLtt’e
IPr’cm?
The temperature probe is a food thermometer that
I
SENSOR
Step 1: Insert temperature probe
as directed in Cookbook and attach probe securely in oven wall.
Closethe door,
Step4: Touch POWERLEVELpad.
“Enter Power” flashes,Touch 5 for
MEDIUM power. “Temp”, 130 F
and Power 5 shows cmdisplay.
display panel shows F and Power
10,“Enter Temp” flashes,
CABLE
fND
I
Step 3: Touch 1, 3, 0 for 130’,
“Ternp”, 130 F and Power 10show
on display.
Step 5: Touch START, If internal
temperature ot the roast is less
than 80”, display will show
*’COOL”or if temperatureis 80” or
above, display shows temperature
counting upt
Step & When 180” is reached, the
oven will sound and automatically
shut off, Remove probe and food
from the oven,
Q. After \ followed the steps and
touched START,“ERROR” flashed
i n t he d is p Iay an d a s ig naI
sounded, What is wrong?
A. “ERROR” flashes on display if
you sot the temperature either below 80[’ or greater than 199”’.“i”he
oven tells you between the flaahIflg of “ERR0f3” what the incorrect entry was that you set. To
re-enter, touch CLEAR/OFF pad
ond begin steps again.
Q. Are there any foods I can’t
TEMPCOOK?
1%,Yes, Delicate butter icings, ice
cream, frozen whipped toppings,
etc., soften rapidly at warm tern=
peratwws, Batters and doughs as
well as frozen foods are also difficult to cook precisely with the
probe, It is best to TIME COOK
these foods.
Q. Why did “PFKX3E”flash cmthe
display after I touched Hart?
A. “PFlOBE” will flash on the display if you have riot securely
seated the end of the probe into
the receptacle in the oven wall or if
you touch TEMFICOOK and have
forgotten to use the probb,
10
---
/
CLIP
@ Usea lower power levelsetting;
it will heat more evenly even
though requiring more time.
e Be sure frozen food has been
completely defrosted before inserting probe. Probe may break off if
used in frozen foods.
@ Always insert probe into the
center of meaty areas; take care
not to touch the fa’{or the bone.
49 Insert probe as horizontally as
possible into foods as directed in
the recipes.Make sure the handle
does not touch the food.
@ Use the clip to keep the probe
in place while heating,
@ Cover foods as directed in
Cookbook for moisture control and
quick, even heating.
Q. Can I leave my probe in the
oven if it’s not inserted in the food?
A, No, If the probe is left inside the
oven, touehitig the oven wall, and
not inserted in food, you may damage the oven.
Ct. Can I TEMP COOK different
portions of food at different
temperatures?
At Yes. The temperature probe
gives you the freedom to cook different portions of food at different
temperatures to suit individual eatirtg styles. Simply place the probe
irr the food and change the temperature setting as needed.
a
How
Use
Your H0L13/TIMER, which operates without microwave energy,
has three timing functions.
It operates as a Minute Timer, it
can be set to delay cooking or may
be used as a hold setting after
defrosting. Hold/Timer can be set
up to 99 minutes and 99 seconds.
Sfep 1: Touch HOLD/TIMER pad.
The read-out panel shows :0. “~nter Time” flashes.
Step 2: Select the amount of time
you desire. Touch the appropriate
number pads, If, for example, you
are timing a three minute phone
call, touch 3, 0 and 0, The readout
panel shows 3:00 and “HOLD”
appears on display.
Step3:Touch START.The readout
display shows the time as it counts
down, and “Hold Time Left”.
Step 4: When time is up, oven
sounds.The readoutflashes“END”
and the timer turns off.
The t-iOLDtTIMER can also be
used to program “standing time”
between microwave cooking func-
tions. The time can range from one
second to 99 minutes and 99 secends. A HOLD, or “standing” time
may be found in some of your own
recipesor Cookbook.
To set the oven to delay cooking
up to 99 minutes follow Steps 1
and 2 to enter hold time, then set
time or temperaturedesired before
pressing START,When holding before temperature cooking, be sure
probe is in food before pressing
START,
to
Defrost-Hold/Time-Time
—
To help you become acquainted with the HQLD/TIMER feature as used with Time Cook or Temp Cook
follow Steps below to defrost a frozen casserolefor 15minutes, then hold 10minutes and then cook 25 minutes.
If using Temp Cook after Hold/Timer, be sure to insert probe correctly as shown in Automatic Roasting
section of this book,
Step 1: Removecasserolefrom the
freezer and place in oven. Touch
the DEFROST pad. The readout
panel shows “fEnter Def Time”, :0,
and Power 3.
--
Wep 3: $%Xstanding or hold time
by touching HC)LDITIMER,“Enter
Time” and :0appear on display.
Step 2: Touch 1, 5, 0 and O for
defrosting time. Def Time, 15:(30,
and Power 3 appear on the display
panel. (Defrosting is automatically
set on Power Level 3 but can be
Step 4: Touch 1,0, 0, and Oto hold
changed by touching POWER
for ten minutes, 10:00and *’I-KXJY’
LEVEL pad and the rww Power
appear on the display.
Level,)
Cl. What will happen if I ;]ccidentally reversethe instructic3ns’/
A. If you accidentally reverse the
sequence of programming instructions, your oven automatically
rearranges your program. Defrosting always comes first, then hoM,
and then the cooking function.
Q. Can I Defrost-l-bid only cm my
oven?
A. Sometimes.you may want to defrost a food, hold it, and refrigerate
it to be cooked later, All you need
to do is program in Defrost and
amount of time. Then program
Hotd and amount of time, Put your
thawed dish in the refrigerator and
cook later at a convenient time.
NOTE: Allow foods to remain at
room temperature only as long as
safe. Times will vary.
11
pad. The display shows “Enter
Gook Time”, :0, and Power 10
(HIGH),
Step 6: Touch 2, 5, 0, and O for
twenty-five minutes of cooking
time. “Cook Time”, 25:00, and
Power 10 appear on the display panel,
Step 7: Touch START. ‘iDef Time
Left”, Power 3, and 15:00counting
down show on display. As each
function is automatically performed oven display shows entered information.
Q. I programmed my oven for a
specific defrosting time but it defrosted longer than necessary.
What happened?
A, M/hen instructions conflict, the
oven carries out the last instruction. You may have set the oven to
Defrost for 4 minutes, Hold/’Time
for 2 minutes, and then Defrost for
6 minutes. In this case, the oven
would Defrost for 6 minutes and
Hold/Time for 2 minutes,
the sensor detects steam from the foods. C)ther
Auto Cook control settings, which are for fresh or
frozen foods, need additional time after steam has
been sensed. For these foods, the oven determines
the amount of additional time needed, then automatically switches the oven to Time Cook for the
necessary cooking time remaining. Oven beeps
when it switches to Time Cook (AUTOon readout is
repiaced by numbers indicating cooking time), and
ovendoor can beopenedfor stirring or rotating food.
Be carefui of steam when removing tight covers.
When you remove cover, direct the steam away
from hands and face.
Be sure the exterior of tne cooking container and
interior of microwave oven are dry.
Always cover food containersusinglids or plastic
wrap. Plastic wrap should be loose over food to
allowfor expansion.Seal by prwslng plasticwrap
firmlyaroundedges.Forbestresults,neverstretch
plasticwrap tightly over food, or use tight-sealing
pkl$$~C lids.
Always stiror rotateafterbeepingsignal.
NOTE:lke of wireshelfwithAutomaticCookingis
not recommended.
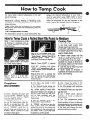
MATCHTHE PJMNJNTOFFCM3DTO THE SIZEOFT’HEC’X3N’TAH$JER.
FILLCONTAINERSAT LEAST112FULL.
BE
SURE
THE EXTERiOROFTHE COOKING
AND INTHWXl OF
OVENAREDRY.
ALWAYSCOVER!%300
FORAUTO CXM3KAND STIRCM?
ROTATEAFI”E13
!3EEP!NGSIGNAL.
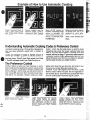
The Auto Cook pad may be used
to eliminate your need to fook
up cooking time in the Cookbook, or guessing how long to
set cooking time. By actually
sensing the steam which escapes as food microwaves,this feature automatically adjusts the oven’s
cooking time to various types and amounts of food.
Becausecooking containers must be covered, this
feature is best with -foodswhich you wish to steam
or to retain moisture. Foods which are best microwaved uncovered or only lightly covered should be
cooked using time or temperature settings.
After touching the Auto Cook pad, and pressing
Start, you will see the word AUTO cm the readout,
which indicates that the sensor has been activated
to sense steam from the food. To prevent the es=
cape of steam from the oven, do not open the door
while the word AU’TO is on the readout. If ‘door is
opened, ERROR appears. Close door and touch
STARTimmediately.
Setting 1, which is designed for easy reheating of
foods, automatically turns the oven off as soon as
——.=
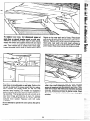
Use rnicrowave+~fe casseroles or
bowis for entrees and vegetabie%
Coverwith iids that fit, if iids are not
avaiiabie, use piastic wrap. Piastic
wrap shouid be ioo$e over food to
aiiowfor expansion.Seaiby pressing
piastic wrap firmiy around edges.
Use obiong or square contahwars
for chicken or cxwmon the cob.
Piastic wrap covering shouid he
ioose over food to aiiow for
expansion. Seai by pressingpiastic
wrap firrniy around edges.
Do not removefiirn-over tray; remove tray from box. Thick entrees
may need longer time. See chart
on page 24) Frozen Food In Metal
Tray: Remove foii, reinsert into
box and ciose ends.
—.
A
———.—...-—
RCInot UEWpaper piatos with auto—set.--,.....-..——
matic cookinf;. Use microwwxmafe
piatesor bowis for reheating.Cover
with ‘piastic wrap (you can stiii
use paper plates with reguiar Time
Cooking, Defrosting, etc.),
.-
!3iit pidstic pouches 1-inch as
shown obcwp. Break food up thoroughly after oven signais. For aiternate pouch method seepage 20.
12
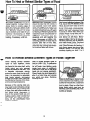
Foiiow controi panei or Automatic
Cooking Chart settings for casseroiesc Cover casseroie meat and
vegetables with sauce. COoi hot
in&edients or sauces, if not, use
TIME CC)OK,
Place covered food in
oven. Touch Auto Cook
pad, “Enter Code” flashes
on readout.
Touch number pad for
desired code, Code 2
shows and “Start” flashes
on readout.TouchSTART,
Word AUTO shows cm
readout, indicating steam
sensor is activated. IX)
N(3T OPEN DC)(3R,MAY
AFFECT COOKING PERFORMANCE,
Beep sounds when steam
is sensed and AUTO is
replaced by cook time.
Rotate or stir food, When
done, oven beeps and
stops.
&
Automatic cooking codes 1 through 9 are designed to
give you easy automatic results with a number of
foods.
Codes are arranged in lowest to highest amount of
power. For example, Code 1 gives least microwave
cooking power, Code 2 gives more power than Code
1, Code 3 increases power over Code 2 and so on,
Code 1, which has the least power, is used for quick
reheating jobs while the longer cooking foods like
stew or chili use higher codes. A Cooking Chart and
recipes, starting on page 17 give many tested usesfor
automatic cooking codes. Hernemberingthat you can
adjust the power up or down by hxmasing or decreasing the C~de will give you ~dded flexibility.
Another feature to give you more flexibility In Automatic Cooking is the preference control, which can be
usedto “fine tune” the power of Codes 2 through 9. By
simply adding
a Code, you can set the oven to
----a 1after
.
COW ustng 2070 less time than the cmcfe wcmki r-egu=
Iarly deliver, For example, if Code 4 cooks your vege=
tables more done than you like them, set Code 41 next
time and you will get 200/0less cooking time,
Likewise, if you wish slightly more time than a code
delivers, add a 9 after the Code. For the veaetabies in
the example above, Code 49 would provide-200/~
more
time for cooking than would {he regular Code 4.
Touch number pads 4 and 1 in that
order. Code flashes on readout
until “Start” is touched showing
that preference control is uwxf,
Code 4 showsand “Startt’ flashcm
on readout.
13
Touch START. AUTO shows on
readout ctisokw, DO N(3I” OPEN
DOOR until’ firit oven signal, then
rotate dish 1/2 turn, Close door and
touch START to finish cooking,
Auto Roast uses the temperature probe to cook to the
desiredservingtemperature,Unlike Temp Cook, which uses a
single power level, Auto Roast
uses up to 3 power settings which automatically
switch during ‘roasting, thus providing even tender
cooking results without overcooking.
Just as in conventional roasting, only tender roasts
should be Auto Roasted until specified internal
temperatures are reached. Less tender roasts
should be microwaved by time, according to the
Cookbook which comes with your oven. Complete
information on preparing roasts for microwaving is
in your cookbook.
I
L-–.--.—T-..
‘$,
...—
———— .
.—
Ii
1!
-- .....4
Place tender beef roasts on trivet
in microwave safe dish, Insert
probe from front horizontally into
center meaty area not touching
bone or fat, Cover with wax paper,
Poultry, pork or ham roasts need
no trivet. Add % cup water to roast
dish, cover with plastic wrap. (For
cooking bag method, see cookbook.) Insert probe into center
Place meat with probe in oven. lnsert cable end of probe firmly into
receptacleon oven wall.
1.‘T’ouchAU7Y3FU3ASTPad.f%adOlltfkhe$ “Enter
Fh3ast Code”. Touch number pad 2. “STWYT”
Flashes,Touch START.Readout Stl(lWS AUTO.
3. Oven monitors Internal temperature, autornatiCX311y
switching to lower power as meat’s temperaWre rises.This preventstoughening or overcooking+
2. At 80°, readout switches to show meat’s internal
Wmperaturo,
4. After temperature is reached, oven switches to
14C3LJ3
for ‘i hrt, then shuts off. Hold prevents overcooking while keeping meat warm.
* Use containers and coverings as directed at left. Place probe correctly in roast before cooking.
@ No attention to meat is necessarywhile cooking.
@ RecommendedCodes are also shown inside oven on Auto Roast Chart.
Eleef
Tender Roast
Rare
Medium
Well
Meatloaf
(loaf or round)
Pork
Loin Roast
Precooked Ham
Poultry
Whole Ghickcm
2
3
4
4
125°
140°
12-14
14-16
5-10
10-15
170°
170°
17-18
30”40
30
5-10
(total time)
170°
4
11!5”
1
—.-—..—. .—..=——--——
18-20
20
17-19
5-10
.....
5
190”
13-15
20
Turkey Breast
4
(Insert probe horizontally into meatiestarea.)
*Recommendedstandina time before servinu.
170°
13-15
20
(3 It).)
“
6)
Total time includes time to brirm food to 180° and
hold at that temperature until do~e.
Your Cookbook has a chapter on Automatic Simmering, including charts and recipes. Refer to this
chapter for additional techniques and cooking time.
Beef
Set Auto Simmer like Aub ~O@*
left . Readout shows
AUT’0 until food is 80”, then
switches to show food temperature until 180[])
E?XEIUIple
OVWI switches to FK3LDat 180”
until you remove food and turn off
oven. If stirring is recommended,
you can reset oven by retouching
START. Touch CLEARlOFF after
cooking,
Pot Roast’
stew
Chili
Chicken*
Stewing
Broiler/Fryer
Ham or Pork
Roast
6-8
6-8
11-13
11-12
4-6
4-6
soup
Stock/Vegetable
3-6
Splil F%x3
18”15
—.—-—=.-.
‘t%r frozen,add2 to 3 hC)LlrS.
15
.
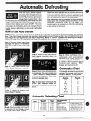
When the oven reaches half of the total defrosting
time, the readout flashes “TURN”, telling you to
turn food over and will not continue defrosting until
door is opened and “Start” is touched again.
After defrosting time is complete,the oven automatically goes into a holding period as shown on the
Automatic Defrosting Chart on this page. This
holding period is necessaryto finish the defrosting
of the interior of the food.
With the Auto Defrost feature,
the oven automatically sets the
defrostingtime and PowerLevels
for you. You choose the appropriate Code number from 1 to 6
for the food you are defrosting, then enter the food
weight in pounds and tenths of a pound (see Conversion Chart below) and touch START.The oven
calculates the defrosting time and changes Power
Levels during defrosting to give even defrosting
results.
NOTE: Before you begin, check the Auto Defrost chart located at the bottom of the oven when you open the
door. This chart shows minimum and maximum food weights for each Code number. Youwill needto know your
food weight and corresponding Code before beginning, NOTE:If “ERROR”appears after entering food weight,
check the Code Chart to make sure that weight corresponds to the Code number entered,
Step 1. Remove frozen meat from
package and place in microwavesafe dish. Place in oven and close
door.
Step !5:Touch STARTpad. Defrost
time begins counting down on
readout.
Step S: When defrosting time is
compfeisd, oven automatically
switches to a HOLD period of 5
minutes ior Coda3. “HOLD” shows
in readout. ‘V@’ien
holding time is
finished oven signals, “END”
flashes,and oven turns off.
Step 6: When% the defrosting time
IScompleted, the ovensignals and
“TURN” flashes in readout instead
of time cmuntlngdown.OperIdoor
and turn packageover.
If the weight is statadin pounds and
ounces, the ounces must be converted to tenths (,1) of a pound.
Step 2: Touch Auto Defrost Pad.
“Enter Code” flashes on readout.
step 7: Close door and touch the
START pad. Readout shows re=
rnairling defrosting time counting
down.
Stap 3: Touch number pad 3.
“Code 3“ shows on readout and
“Enter Weight” flashes.
Step 4: Touch numbw” pad 3 and 0
for weight of 3 ibs. Display shows
3.0, Code 3 and “Start” flashes.
.5—4+!9
Ibs>
,5—349Ibs
.5=-”5.9ItIs.
3.0–5,9 Ibs,
3.0--5.9it)s!
.5—3.9
Ibs.
16
5 min.
5 min.
5 min.
20 min.
.20min.
5 rein,
Ounces
Pounds
1=2
3
4-5
6-7
8
9.1Q
11
12-13
14-15
.1
.2
.3
.4
.5
.6
.7
.8
.9
REC0MMEN13Et3
,~LxN3s
Chicken piwxx
Fish
Ground Beef
Roasts,Bone In
Ftoasts,Fkmeloss
Steaksand ~hOfX
ncrcussaryto allow tho
moatto stand during
holding tlrnedYoumay
take tho meatout ~f
tho oven if you prefer.
AEak
Automatic Cooking Control is a fully automatic
electronic control system that lets your microwave
oven do the cooking for you. The charts and
recipes in this section are designed to help you
make the most of this truly new feature.
Standard cooking techniques require setting the
oven for a specified cooking time or a selected finished temperature. And that means looking up
recipes in a cookbook. . trying to convert old
recipes for microwave cooking. . .or just resorting
to guesswork. This control method works on an
entirely different basis--with a special electronic
sensor that detects steam from cooking food. The
oven “knows” how the food is cooking; so it can
automatically set the correct cooking time and
maintain the proper power Ievei for different ‘types
and amounts of food. And it’s adjustable to suit
your individual taste.
—
Simply touch two control pads—AUTOCOOK and
the desired Code number–and then START. A
chart on the oven control panel gives a compiete
list of CC@%for frequently prepared foods. The
readout display shows AUTO until steam is sensed
and then signals, and displays time counting down.
During AUTO, oven should not be opened, but
when cwen signals, most foods should be turned,
stirred, or rotated, Check the Autcmatic Cooking
Chart far suggestions.
Appropriate containers and coverings help assure
good cooking results. Containers should match in
size to the size of the food being cooked. Coverings
such as plastic wrap secured on all sides, the lid
that came with the container, or microwave-safe
plastic domes are ideal. For examples of containers
and coverings,see page 12and the following recipe
section of this book.
With Preference Control, you can adjust the Automatic Cooking f%atur~ to yuur individual taste by
adding either”1” or “9” after Code number, If after
trying the suggested Code, yOIJwould prefer less
cooking time, simply add the number “l” after the
Code and the oven automatically lessensthe cooking time by 20%,If you wish more cooking time, add
“9” after the Code to increasecooking time by 2CW0.
Automatic Roasting uses the te~perature probe
rather than the electronic sensor to cook meats
evenly to the desired degree of doneness.The oven
continually monitors the food’s internal temperature, Unlike ordinary Temperature Cooking, the
oven changes power levels two or three times
depending on the degree of donenessduring cooking to giv~ you the btist:e.suits.automatically. Meat
is cooked evenly,without tcilghening kxwauselower
power !eveisare usedas toe rnpattemperature rises
thus crookingmeats evenl~-tihile retaining the natural juices. After cooking, the oven switches automatically to Hold for an hour, Food stays warm
without overcooking.
I
-
MeatsandM
.-
The benefit is automatic setting and contra! of cooking, but just like conventional microwaving you must
check the food after the AUTO cycle [oven beepsand cook time begins to count down on display) and turn,
rotate or Sir as recommended.
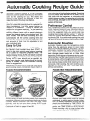
‘l%J
- ... ..—.—....-—
the round or loaf microwave-safe
containers. Fish loaves made with
precooked or canned fish useAuto
Cook Code 4. f3eefloaf USE%Auto
Cook Code $, Cover with plastic
wrap and rotate % turn after oven
signals. See the chart on following
page for recipes.
and pieces, or turkey parts should
be placed in a microwave-safe tlin. sqyare dish, 12 x 8 x 2-in, dish
or 3 qt. casserole. Cover securely
with plastic wrap or container lid.
H cooking bag is used for whole
chicken, shield breast bone with
$mall strip of foil. Rotate dish %
turfi when oven signals. Lk%e
Auto
Cook Code 4.
-
Chuck o? rump rcms$sshould be
placed in a cooking bag with %
cup water or marinade (see rnari=
nacie rscipes on page 98 in
Cookbook) and placed in a rnicrowave==safe
dish, Cut bag to fit close
to the sizeof the roast and tie open
PorkChops automaticallycook well
in 8 x 12 x 2-in. dish, covered with
plastic wrap, Add barbeque sauce
or other sauce cm each chop.
Microwave using Auto Cook Code
49 which is Code 4 with the added
digit 9 giving the Code 20% more
titie. (Seepage 17.)
SPaJ’edb$ and brisketshould be
automatically
cooked in round
glass container with lid or plastic
wrapt Makesure liquid coversmeat,
After oven signals, Mm over or
rearrange meats often,
,’
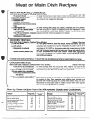
L&mthe following step-by-step instructions and tips when adapting your casserole recipes for Automatic
.
topped casseroles, remove cover after oven sig+
nais and add topping, then continue cooking
uncovered,
4: Allow precooked ingredients m’ hot SW.NXM
to
COOIslightly before adding other ingredients.
5: Meats and vqetables should be submerg~d in
liquid,
6: After oven sigoals, rotate dish % turn and stir
covering all ingredients with liquid,
W31emt
recipes that do not require adding irtgre~
clients at different stfigm during cooking or
recipes that require oxtr~ attention stirring
or rotating.
Uso microwave-sate containers that are appropriate in size to the food amount. Use 3 qt. corltainers or less.
For saucv casseroles,cover container with lid or
plastic wrap. (No vents.) For cheese or crurnb18
or
Makes6 to 8 Servings
1 lb. ground chuck . . . . . . . . . . . . . . In large mixing bowl, place meat, bread crumbs, pepper, salt, chiii
1/2 cup dry bread crumbs
powder, onion and egg. Mix well and form into 12bails. Arrange balls
1/8 teaspoon pepper
in a circle in 2 qt. casserole,Set aside.
1/2 teaspoon salt
A&JtoCook Code6 (Approx.Cooking Time—35 min.)
1 teaspoon chili powder
2 tablespoons dry minced onions
1 egg
112cup regular rice . . . . . . . . . . . . . . . In small mixing bowl place rice, beans, tomatoes and chili powder,
1 can (151/2oz.) kidneybeans
Mix well and pour in center of casserole and over meatballs. Cover
(undrained)
and microwave at Auto Cook Code 6. Rotate 1/2 turn when oven
fi can (16 02.9tomatoes,
choppwtsignals and time remaining appears an readout.
and undrained
1 takdespoanchilipowder
Auto Cook Code4 {Approx.
1/4 cupsoy131aucf!,,,•*,••
.
1/3 cup honey
1/3 cup shw’y
4 twwp$xms$Cwrwid’1
● ● ●
1 whole chlc!mm(about 3 lb,)
,*
min.)
Makes 4 Servings
In 2-cup glass measure,place soy sauce, honey and sherry. Stir until
blended. Add cornstarch; mix well, Microwave at HIGH (10) for 3 to
3-1/2 minutes, stirdng every minute until thickened, Tie chicken legs
and place in 12X8X 2+, microwave-safedish, breastside up. Brush
with half of sauce (reservehalf for later use.) Cover with plastic wrap,
no vent, Microwave on Auto Cook (Xx@ 4. When oven signals and
time rwnalning appears on readout, apply remaining sauce, recover
and continue ooddng,
*lf breast bone sewns prominent, a ‘t” strip@ fcdlmay be placed over bone to prevent splitt!ng of wrap,
Makes 6 Servings
Am) cook Cmk?7 @pproE*43XWMJMM+-’t IV* ‘t5 W?.)
1 em (tO-V2 oz.) ccmdenwxf ,, .In srnal~mixing bowl mix soup and milk; reserve 1/2 cup of the
mixture. Wend remaining soup mixture, rice, rnushroom$and haHof
erearn of
soup
1“1/4 Wps milk {1 WWpCarlW)
the cmicmsmupmix. Pour inta 12 X 8 x 2-in, glass dish.
3/4 cup M+guhwFlea,
f Wlr!(4 ‘025)
$M$Mms
and piMxM
f pkg. (1”1/2 !02,)dry anion $MMlp
mix
t cutup dMwn (Sbwg 3 h) ...F%Me chicken plee$$cmrice mixture, arranging with meatiest piehes
to outside of dish, Pour reserved soup mixture over chicken and
sprinkle with
soup mix. Cover with plastic wrap, rio vent.
Microwave at Auto Cook Code 7, rotate 1/2 turn when oven signals
and time remaining a’~pearscmreadout.
—
Page’w%
T
-
19
140
164
82
931
91
!37
11!3
‘or
.
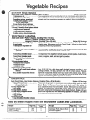
Whole or iarge halves of vegeta-
bles such as cauliflower or squash
use Auto Cook Code 5. Use round
or square container close to the
sizeof vegetable.AddVicup water.
Cover with lid or plastic wrap.Turn
cauliflower over after ovensignals.
For other vegetables,rotate %turn
. /.
.--.
..4..,
” “.
,
\.
vegetables
should be placed in round container similar in size to amount
being cooked (at least half full).
Cover and stir well after AUTO
cycle. Use Auto Cook code 1.
Fvecm or slices d vegetables
require % to % cup of water. Use
appropriatesizecoveredcontainer.
Stir or rotate after oven signals.
L@eAuto Cook Code 5.
-
Precooked/cann@d
Pauehes of frozen vegetables
sho~]ld be slit 1“ in center before
placing directly cmcwenfloor, L&
Auto Cook Coda .4,After oven signals,rearrangevegetableand rotate
pouch !+’turn.
Ait43rnaMy, frozen vegetables in
when oven signals.
vegetablesshould be placedin suitable size container (at least half
full) covered with lid or plastic
wrap,Add 1or 2
water.
Stir after oven signals. IA%?Auto
GcmkCode 3.
pouches can be slit with an “X”
shaped siit and placed in glass
cofitainw’ with “X” downward. After
cooking, pick up pm.mhand empty
food into dish through “X” opening,
Makes 4 Servings
tkuh (%ok Code !5(Approx. Cooking Tirne--l6 min.)
1 tablespoon oil...........••
.,. .Toss vegetableswith oil and butter in 2 qt. microwave-safecasserole.
Cover, Microwaveon Automatic Cook Code 5 stirring well when oven
1 tablespoon soft butter
signals and time remaining appears on readout. Serveirnmediate\y.
3 medium onions, quartered
1 small green pepper, cut in
●
●
l/4-irt. wide strips
2 cups thinly-shed cabbage
2/3 cup carrots. sliced cfiagcmaliy
1/4 cup (1 bunch) sliced green onions
1 cup M3ccxdi flowerets
1 cup cauliflower fhwerets
2 stah celery, sliced diagonally
Auto Cook CWk+4%Ma 1 (Approx.CookingThne-13 min.)
spinach1 (AppI’W*C%Mdng
Time-s rnin,)
Lasagna2 (Approx,ChokingTime=+%rnhL)
Makes6-8 %rvinqs
Piace ndodl~s, water aid oil into a 13 X 9 X 24n. dish. Cover w~h
plastic wrap. Microwave on Auto Cook Code 1.Aiiow to stand whiie
preparing remaining ingredients.
Remavepaperwrapping from box. Placeunopened box into oven and
microwave on Auto Cook Code 1. Drain weli.
In large bowl mix together tomato sauce, tomato paste, mushroo~s,
onion, oregano, basil, salt and garlic powder,
—
Recipe
-+%s@
21
Cabbage Rolls italian Style
02
Stuffed Peppers
83
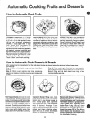
Pineapple Casserole is a tangy
dessert or meat accompaniment.
In 12 x 8 x Z-in, dish spread2 cans
(20 oz. ea,) drained pineapple
chunks, 1 cup sugar arid Yj cup
flour, Cover and microwave on
Auto Cook Code 2. When oven
signalsand time remaining appears
on readout, remove covering and
top with mixture of 2 cups butteryflavored cracker crumbs and 7Zcup
melted butter. Do not recover.
Touch “Start” and finish cooking.
f3aked Apples automatic cook well
Stewed Fruit and Fruit CQmpoks
using Auto Cook Code 2, Match
number of apples to size of tnicrowave-safe covered container (see
page 246 in Microwave Guide and
Cookbook). Use Auto Cook Code
2 for Baked Pearsand Applesauce
also.
should bestirred well beforemicrowaving,especiallyif sugaris added.
Cover; use Auto Cook Code 2 and
stir once or twice after oven signals and time appears on readout.
Touch “Start” a~d finish cooking.
After preparing the ingredients for the individual recipe as shown below the picture, fol{ow these steps
for cooking.
Step 1: Cover with plastic wrap and use Auto Cook
Step 3: When cooking is finished, turn out (upside
down) the Nat Cake and Cornbread, Invert Caramel
Code 3.
Step 2: When oven signals and time remaining
E$ixxlit Fling and let dish stand over ring a few
appearson readout,rfm=mve
covering and rotate dish
minutes before serving,
_&.+4.
=--—.
--%
Cook Code 3, Spread ~~cup melted
butter and !4 cup brown sugar in
/l-in. round glass dish. Sprinkle
with cinnamon and !4cup chapped
nuts if d~sired, Arrange 1 can
(1002,)refrigeratedbiscuitsaround
edges and place drinking glass,
OPW-If3f3d up, in center. See Steps
above for Automatic Cooking.
22
Makes 1 (lO-in.) Tube Cake
1 pkg. (Hayer’ size) ,,, . . . . . . . . In large bowl place cake mix, eggs, vanilla, oii and water. Blend on
fudge cake mix
medium speed Qfmixer, about 2 minutes, until smooth and creamy.
2 eggs
1 teaspoon vanilla extract
2/3 cup cooking oil
l-t/4 cups water
1/4 cup $inefychopped pecans . . . . . Lightly greasea 16cup plastic microwavefluted or straight-sided ring
mold. Sprinkle chopped nuts evenly over bottom, Pour batter over
A@o Cook Code 3 (Approx. Cooking Thne—18 min.)
●
●
nuts.
Cover with plastic wrap arid microwave on Auto Cook Code 3. Rotate
dish 1/4 turn and remove wrap when oven signals and remaining time
appears cmreadout. Touch ‘iStart” and continue cooking, Let stand in
dish 5 minutes before turning out,
Auto Cook Code 3 (Approx. Cooking The-–l6 min.)
1 can (20”22 oz.) pfepamt .... ,,. In El-in.square glass dish, spread pie filling.
cherry pie filling
Makes6 to 8 Servings
of white . . . . . . . fn small bowl, mix together cake mix, butter, nuts, and cinnamon until
2 cupsdryydkmf
cake mlx (1 pkg. [9. oz.] or
1/2 pkg. [47. 02.])
1/4 cup melted butter
1/2 cup coarsely chopped nuts
1 teaspoon fycmnd cinnamon
AutQ f%Mc Ctxk 3
Microwave on Auto Cook Code 3 rotating dish 1/2 turn and removing
plastic wrap when oven signals and remaining time appears cm
readout. ‘T’ouch“Start” and continue cooking.
Makes 1 (El-in.round) Cake
In ~ in, round dish ~lac~ butfer. Microwave at HiGH (10) for 3/4 to 1
minute until melted, Sprinkle sugar over butter. Drain pineapple (save
liquid) on paper towels and arrange in dish. Decorate with cherries.
Place a 2“ diameter drinking glass (4” tall) open side up in center of
c%okhg Th?’w-lo !mWL)
4/4 cup butter . . . . . . . .,, . . .,,..,..1
!/3 cup brown sugar
1 can (8-’l/4 oz.) pineapple slims
4
or candied
cut in half
3/4 cup all
crumbly. Sprinkle evenly over cherries or, in three rows so cherries
are visible, Cover with plastic wrap,
fkw ,, ,,,, ,,,,
1/2 @upSugar
#-f/2
pwvder
1/4
wilt
1/4 cup soft
1 Egg
Iiqdd frlmll
{1/3 c.)
3/4
WwMa GM?%%%
dish.’
in WTIalt
mixer bawl place flour, sugar, baking powder, salt, shortening, egg, liquid and vanilla. Beat 3 rnirwtes on [owest mixer speed,
scraping bawl constantly first 1/2 minute, Carefully spread batter over
fruit in dish, Ccwer with plastic wrap—no vent. Microwave on .Auto
Cook Code 3, Rotate 1/4 turn and remove wrap when oven signals
and time remaining appears cm readout. Tow% “Start” and continue
cookirtgo
‘Tip: Use a stnall drinking
cbw$w spreads.
glass like the type you buy containing
Page No, “Au&ooK&m4t”
I%x$ipe
.-
Basic Bread Pudding
Sif%?rN@d
i%dding
280
4
Streuseled Apples
~orr~bread Ring
Steamed Brown Bread
246
232
232
2
3
7
--23
-
—
—
w
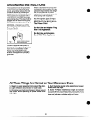
@ Use microwave-safeplates or casseroles,except
DO NOT USE PAPER PLATES with Automatic
Cooking.
@ Be sure the exterior of the cooking container
and interior of microwave oven are dry.
s Do not open oven door during AUTO cycle. May
effect cooking performance. After first beeping
signal (time appearson readout for codes except
Code 1), stir or rotate food.
@ Match the amount cf the food to the size of the
container. Fill containers at least 1Afull.
@ Stir or rotate after beeping signal.
~ Use of Automatic Cooking feature with wire
IS Add %-%cup water to fresh vegetables. Stir or
turn overvegetablesand meatsafterfirst beeping
shelf is not recommended.
signal.
“Auto Cook”
Code Contain6r
Food
Reheatingand!+%ozmFoods:
~annedFoods
1
Apprmx.
Microwave-safeccmtairmr rnatdwt to size
of find.
II
Time
Comments
2-3 minlcup
Cover with plastic wrap or lid to dish.
4 min./cwp
2 or more servingsareconsideredlarge
amounts.
Coverwithplasticwrapor lid.
Coverwith plastic wrap or lid to dish.
Cook in own container, or for quicker cooking,
in glass container. NOTE:If entree is in aluminure pan, removefrom box, removelid and pul
back in original closed box. If entreeis in paperboardcontainer,
renmve
fromboxandmicrowavewi!&original plastic covering}
Use bowl with plastic wrap or cover plate with
microwove-~afsp!ast~cdome.
RoomTt?mp,or thin (small
amountsat rofrigt temp.)
Refrig, temp. or thick (large
amountsat room temp.)
Oeli Foods
-
2
1-
Microwave-safecontainer matchedto size
of food.
Entrees
Frozen
Thin (under l“)
3
Cook in container.
(seecomments)
12-14min.
Thick(over 1“) 10oz.
4
Cook in container.
(see comments)
16-18min.
~1(-JZ,
.——
.eftcwers
-T-
4
1
FVDinner (10-12oz.)
GOoking:
3acon
‘4 slices)
. .. .
.
%ummfcrs
~r~~~~k~dirlgrodients
~UW..—,
Fitfld5
—..
& ~OLdtf~
6
---..—-—
7
2hicken
Wasts (4)
41
%wwrolo
‘ioc~s
7
4
~hol~ ( 3 lb%)
4
25=35min.
2-3 min./cup
Microwave-safe
container matchedto
sizeof food,
Cook in container,
{seecomments)
17=19min.
I -
12x 8 x 2-in: glass
dish lined with paper
towels. ~ov~r with
plastic wrap.
8=8rein,
2 qt. ca%iwmdo
$vNhlid
Dr mwwrWifhplantic
wr~pr
f+
,—.-...... .
3!5=45min.
12x Elx %irt. glass
dish, C&werwith
plastic wrap.
NOTE:Makosure
meatdown’t much
ccwcwirig.
##
,,
~
back in box. If dinner
hascnke or twownl$s,removebefore cooking.
When ovensignais, rotate %turn.
Makesuro ikquidcoversall ingredients.When
mm 8@nakr,
stir wQIL
##
4Ei=tX$ rnin:
—
22”26min.
No additional liquid rwmded.Whw’iovensigrrais,rotate !4turn. Note the preferencecontrol
1 isusedwith breaststo decreasecooking time
for best results.
6(3=70
min.
2-4 rnin,tpiwx
Whencwm signals,stir well and rotate Mturn,
Nti additional liquid needed.Whenoven
signals, rotate %turn.
f%{ on trivet and sit as s~raightas possible.
Flotato%turn when ovensignals.
12x 8 x Z-in.,glass
42-44min.
dish or ccmkwlgbag,
Coverwith 2 piecms d
overlappiflg plastic
wrap.
—,.=.....r...—-——
--.—.———
—...—
—.— ——
.:huck Ftomt
13x 9 x 2=in3g!ass
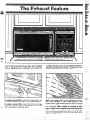
‘-- 1 hr. 30 tnin.- Add ?’-cup-water;Wh&”oven~ifjnals, rotate
9
‘/2turn,
1 hr. 40 min.
UPto 5 lb,)
dish. l%t in cooking
bag and swcurowith
tie, Slit bag 1“ at top
.. —
. .
-------.,=-.=--—
-..T
- —4.——.—
...neartie.
............ ...———.—
...—.--—.
..———.
fish ‘-- “-L--‘ -12x fj x 2-in. ghm
Illel$ (1 lb,)
G
Xl min.
Elafitawith butter and h?mcmjuice. b$%enoven
dish. Cover with
signals, rotato U turnj
plarltic wrap.
——...—..—
.... . . ... . ... - -.-”.,.-...-.------——
—-----— -——..- —..-...——-.—
—..
ruit
lakedAPP1OS
(4)
2
2 qt casserolewith
14-18fnin,
Core apple%No water needed.Whm ovcm
signals, rotate %turn
9
14-?8inin.
aked Pears(4)
c.
Core pew%NOwater nm?dtxf.Whenoven
signals, rotate ‘4 turn.
IF AFTER
AND
OF AUTO COOK CYCLE FCM2DNEEDS ADDITIONAL
USEAUTO COOK
cx?t3E#l.
SIMPLY
*’Auto
cook”
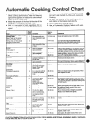
code Container
Food
Hamburger
Casserole
7
Meatloaf(IVZlb.)
8
Patties(4-5)
5“
Pork
SausagePatties
(’12” thicl(-4)
5
Chops
(3/4-1”thick)
SpareRibs
3 lb.)
[
49
Af3prox.
Y’i?ne
2 qt. glass dish with
lid.
Glassloaf dish. Cover
with plastic wrap,
8“ squaredish. Cover
with plastic wrap.
8“ glasssquaredish.
Coverwith plastic
wrap,
12x 8 x 2-in. glass
dish. Coverwith
plastic wrap,
45-55 min.
30-40min.
Comments
Makesure liquid coversall ingredients.When
ovensignals,stir well and rotate %turn.
Whenoven signals,rotate %turn,
12-14min.
Whenovensignals,rotate Mturn.
—
8 min.
Whenovensignais,rotate %turn.
33-38min.
i3astewith 1 tbsp. barbequesauce/chop.When
ovensignals,rotate %turn.
NOTE:The PreferenceControl 9 is usedfor
chopsto increasecooking time for better
resuits,
Meat must be coveredwith liquid. Whenoven
signals,rearrangemeatmakingsure it is submergedin liquld, it may be necessaryto rem’rm’rgeanother time during final cooking,
9
2 qt. glassdish. Cover
with lidor plastic
wrap,
1 hr, 30 min,1 hr, 50 min.
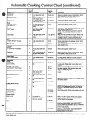
?Ice
nstant (Minute-1%cups)
2
9 min.
~aw(1 cup)
6
2 qt. @TKZ3 dish with
lid,
##
%Mood
‘ieces
1 lb. Shrimp or scallops)
1
5-6 min.
Whenovensignals,rotate %turn.
;asserole
6
II/zqt. giassdish with
iid,
2 qt. casserolewith lid
or coverwith piastic
35-45min.
Makesure liquid coversall ingredients,When
ovensignais,rotate %turn or stir,
55-60fnin,
Cut into piecxx+.
Makesure liquid coversail
mcraf,Wttenoven signals,stir & rotate %turn,
13min.
15min.
PiarXartichokes in dish stem side down, Add
%Wp water, Rotatedish %turn after oven
signals,
Add %cup water. Whenoven signals,stir weli.
No water needed,Start cooking stem side
down. At slfyraiturnovor,
~cfcl: cup water, Whencwensignals,rotate
;Uf3 to
24 min.
!Wak
1~/2
Ib, round steak)
Foliowinstructions on package,Cover,When
ovensignals,stir,
Use1 cup rice&2 cups water. Whenovensignals,rotate $/2 turn,
]WiS8
-ble$
%esh
\rtichokes
up to 4 med.)
2
%rrots (1 lb. siiced)
cauliflower(1 med.head)
5
5
,spam~us(1 lb, cut spears)
~
Ia x $ x %jn, fjlass
14mint
bwssel$prwts (t M,)
5
I Y*qt, @EMdish with
11mifi,
II
5
1 qt. glassdish with
hd:
2 qt, gltw%dish with
lid,
6-9 min.
Whenoven signals,rotate %turn, NOTE:Watch
hot dish & steaml
II
31
I %qt,gi~~s
ciiahwith
iid,
18+20mln,
16-19rein,
11-18rein,
10=12rein,
k)tatow *
5
rozerl f310cfl(10 oz.)
lroccoli
14-16min.
russetSprouts
$x.IfSpinach
iixecfVegetabios
ram Pouch
aby Lmws
3
3
3
,,
It
,,
4
ofn
4
Lay pouch in
“
mlc!rowave+afodish,
No cover necxkd.
,}
oils
8-10min.
8-10 min.
ti-lornin,
PIn[~ch
10-12min.
—-
Add 2 tbsp. water. Whenovensignals,stir weil.
NOTE:The PreferenceControl 1 is usedfor
broccoli to decreasecooking time for better
results,
Add 2 tbsp, water, Whenovensignals,stir weli,
,1
II
Makea 1“ slit in pouch, Whenovcmsignals,
break up frozen centar, and rotato %turn,
PJOTE:
Watch for hotsteam,
*4
Makea 1“ slit in pouch, Whcmovcmsignals,
breakUPIrozan center, androtateV2turn,
hiOTE:Watch for hot steam.NOTE:Preferonco
Control 1 is usedfor peasto decreasecooking
time for best results,
Makea 1“ slit in pouch, When ovensignais,
break up frozen center’,and rotate %turn,
NOTE:Watch for hot steam.
‘Excessively dry potatoes may not releaseenough m@Wre to activate sensor. Be sure potatoes are fresh not old
and dried-out.
Oc
andAnswers
Q. Do fresh or frozen vegetables require water
when using Auto Cook?
Q. Why does my oven automatically cut off after the
AUTO cycle when using Auto Cook Control Code 1
when it does not for other settings?
A. When using Code 1, there is no second phase of
minutes counting down. All the cooking is completed in the first phaseor AUTO.
A. Yes.Add water as recommendedon chart to the
vegetables and cover weil for even, corpplete
cooking.
Q. Wouid my piastic containers with very tight fitting iids be appropriate for Automatic Cooking?
A. No, most types of plastic storage dishes, butter
tubs,etc. with tight ’fitting lids are not recommended
for microwaving. Also tight fitting plastic lids may
prevent adequate steam from escaping and food
may not cook properly during Automatic Cooking.
Q. If my food is not completely cooked after using
the suggested Auto Cook Controi Code, what
shouid i CfO?
A. Thick starchy or dense foods may req’uiresome
additional time cooking. Use TIME COOK and
Power Level 10for a few minutes until completion.
Q. Do aii fresh or frozen vegetables require a
C!. 1tried to warm some chow mein noodles using
Auto Cook. Why didn’t this work?
standing period after cooking with AUTO COOK?
A. Most vegetables are cooked to a crisp “statedur-
A. Food must havesome moisture in order to create
steam which helps the auto sensor function.
Extremely dry foods such as chow mein noodles,
potato chips and other such foods do not have
enough moisture.
Q. May i use Auto Cook when i am cooking many
ing Auto Cook, just as in reguiar microwaving.
Therefore, it is recommended that you let the vegetables stand for up to 5 minutes depending on size
and density of pieces. This standing time also enhances the overall flavor and appearance of most
vegetables.
Q. What if i don’t fuiiy cover the dish in AtIto
foods in more than one dish or casseroie?
A. No, becauseof differoni food densities,attention
neededduring cooking, andfood amounts, it is best
to use TiME COOK when cooking manyfoods,
Cook?
A. Oven senses steam too quickiy which shortens
the cooking time thus leaving undercooked dish.
Recovertightly and resetAuto Cook,
Q. Do the shapes and sizes of food make a differ-
(2,Whywas my roastnot fullyrooked even though
the temperature on the readout was correct and
Auto Roast compieted?
A. When cooking with Auto Roast,the temperature
ence when using Auto Cook?
A. Yes, in some cases, iarger pieces wiil require ad-
probe must be inserted properiy as fuiiy described
in the Cookbook.
ditional Time Cooking, Be sure to check suggested
arrangement of pieces in the dish, since proper arrangement is often a succmssfuitip in reguiar microwaving,
Q. fWXJid i USE?Ado (23A tO tx3dfp#dding Or
(1. Are there any parthdar trivets that work better
than others’?
A. Yes, flat giass trivets such as iids or dish covers
many times during cooking: therefore, Time Cook is
recommended since you should not open the door
during the AUTO phase of cooking without aff@cting end cooking results.
give more even cooking resuits than piastic trivets.
Also, ceramic ridge-bottomed roasting dishes work
weli. Piastic trivets require meat to be turned over
more frequently because the grid design and iegs
allow the bottom of the meat to stay cooler as it
cooks, than glass trivets do.
(2. Why doesn’t the roast car!tinue co~king during
Q. My scaiiopecf potatoes were not completely
cooked when I removed the dish after Auto Cook.
the standing or holding thne?
A. The oven automatically reaches finished temper-
What is wrong?
A. If you prepared the sauce in the oven prior to
combining the sauce with potatoes, there may have
been too much remaining moisture in the oven,
Make sure you dry the oven completely before using Auto Cook since this function operates properly
by sensing steam in the oven. Also, starting Auto
Cook with hot foods create~ steam in the oven too
soon, and decreasesthe first sensing cycle.
Q. Are there any other foods which are best Time
Cooked, rather Man Auto Cooked?
& Bakery foods, candies, melted chocoiate or
ature and then decreases to a iower power ievel to
prevent overcooking, Thus an even temperature is
maintained.
sauces?
A. Most pudding and sauce recipes require stirring
Q. I entered Auto EX!frostCodQ 1, then the number
4 for 4 iba. cd chicken, The rwadout flashed “Start’*
but when I touched $tarl “EF16K)F?”
flashed. Why?
A. You must enter 4 and O denoting 4 Ibs. Touch
C1.EAF?/OFFand begin again. “ERROR”will also
flash if an improper weight for that particular code
has been entered.
foods when a dry or crisp surface is desirable, are
cooked best by Time Cook.
26
The
.
‘IL
L -
L-—l
“
-1
~
----------
Grew.
—
—
The exhaust hood feature on your GE microwave
oven is equipped with a metal filter which collects
grease. When the fan is operated, air is drawn up
through the fiite~and is then discharged through the
provided ventinq ‘tothe outside. The hood also has a
iight for illumin&ing the countsr surface,
- ‘“
To remove grease filter, grasp the “finger hold” on
th~ filter and push to the rear. The filter will drop outi
To replace grease Wter, insert the filter in the top
frame slot on the back of the opening. Push to the
reaf+and upward to snap into place.
Soak, then agitate filter in hot detergent solution,
Don’t use ammonia or other alkali because it will
darken metal. Light brushing can be used to remove
inbedded dirt, Rinse,shake and remove moisture before replacing, Filters should be cleaned at least
once a month, Never operate your hood without the
filter in place. In situations where flaming might
occur cmsurfaces below hood, filter can retard entry
of flames into the unit.
27
Your
Oven
Your New Microwave Oven is a Valuable Appliance,
Protect H From Misuse By Following These Rules:
43 Keep your oven clean and sweet-smelling.
Opening the oven door a few minutes after cooking
helps “air-out” the interior, An occasional thorough
wiping with a solution of baking soda and water
keeps the interior fresh.
#1f)on’f use sharp-edged utensils with your oven,
The interior and exterior oven walls can be
scratched. The ccmtrolpane!can be damagbd.
e Don’t remove the cover over’the “stirrer” at the
top of the oven (microwave feature 4 cm page 5).
You will damagethe oven.
BE
IS OFT
Walls, floor and plasticcover.Becausethere is little
heat except in the food, or sometimes in the utensils, spills and spatters are easy to remove. Some
spatters can be removed with a paper towel, others
may require a champcloth. Removegreasy spatters
with a sudsy cloth, then rinse and dry. Do not use
abrasive cleaners on oven walls, NEVER USE A
COMMERCIAL OVEN CLEANER ON ANY PART
OF W3URMICROWAVEOVEN.
lDoor4nside. Glass: Wipe up spatters daily, wash
when soiled, with a minimum of sudsy warm water,
Rinse thoroughly and dry.
Metal and plastic parts on door: Wipe frequently
with a damp cloth to remove all soil, DO NOT USE
ABRASIVES,SUCH AS CLEANING POWDEFtSOFl
STEEL AND PLASTIC PADS.THEY MAYMAR THE
SURFACE,
Special rtot~ when using Brown ‘N SearIWM3:
High
heat generated on bottom of Brown ‘N Sear Dish
can cause scorched appearing stains to bake orito
the ovfm floor if grease is present. Th~se may be
removed with Bar Keepers Friend@Cleanser by
SerVaasLaboratoriesr Inc.
After using Bar Keepers Friend@Cleanser, rinse
and dry thoroughly, following instructions on can,
Do not use EM’ Keepers Friend@Cleanser cm the
painted surfaces such as the walls. H may scratch
the paint.
Bar Kaepors Friend@)Cleanser is sold in many
grocery, hardwarm,and departmcmtstoros.
NW PARTOF THIS OVEN.
Automatic Temperature Probe. Probe is sturdy, but
care should be takefi M handling. Do not twist or
bend;avoid dropping temperature probe.
Clean as soon after using as possible. To clean,
wipe with sudsy cloth, then mb lightly with plastic
scouring ball if necessary,Wnse and dry. (C)rwash
in dishwasher,)
Case.Ck%arI
the outside of your oven with soap and
water, then rinse and dry, The outer pane of the
window is glass, AM wipe clean with a clampcloth,
Clwcwnetrim is best wiped with a damp cloth and
then with a dry towel.
ControlPanel.Cleanthe control panelof your microwave only with lightly dampened cloth. DO NOT
USE cleaning sprays or large amounts of soap and
water, These can causo problems with the control
mechanisms.
Door Surface. When cleaning surfaces of door and
oven that come together on closing the door, use
only mild, non-abrasive soaps or detergents
applied with a sponge or soft cloth.
..—
...
To replace hood lamp, first disconnect power at
n’mhl fuse or ch’clm !’mWker panel or pull plug.
Remove 2 screws from each side of lower panel,
steady the smoke and spatter shield with cmi hand
while removing and replacing the 2 screws on each
side. Then remove the 3 screws from front edge.
Lower the panel until it rests on range below. Place
fingers on tap near each end of lamp. Press down
and roll top of lamp gently toward front until it stops.
Remove.Replace with same type and wattage lamp.
Hold lamp near each end and insert prongs in
sockets. Gently roll top of lamp toward rear of range
until it stops, Raiselower panel and replace screws.
—
—
—
L7’
o
—=====—_—
-A
:-
‘“.:
To replaee your oven lamp, first disconnect power at
main fuse or circuit Im3aker or pull phqg.i?emov~the
top grill by taking off 2 screws which hold it in place,
Next, remove the single screw cm top left that
secures lamp housing, (On models so equipped,)
Open oven door for easier removal of the lamp housing assembly,Then grasp tab and pull out and up to
clear door hinge and front lip of oven, To remove
bulb, push it inward gently and t~rri to left, then pull
outward from socket, Replace with GE Lamp
x 25T8DC,
Clean off the grease and dust cm hood surfaces
often, Use a warm detergent solution. About 1 tablespoon of ammonia may be added to the water, Take
care not to touch the fiiters and enameled surfaces
with this. Ammonia will tend to darken metal, Wash
the smoke and spatter shield with a warm detergent
solution,
00 not attempt to operate the oven unless the grill is
in pkim.
29
The two-position wire shelf is specifically designed for added capacity
heating and reheating in your Spacemaker@microwave oven. Now heating and reheating,which are the most popular uses of microwave ovens,
may now be done in multiple quantities, so several foods are ready to
serveat the sametime.
When microwaving with the oven shelf, some techniques will differ from
the cookbook which camewith your oven. It is important to arrangefoods
properly, and this is sho~vnon the next page. Utensil size is important;
select from among the suggestions below. Also, food sizeshould be considered;foods over 3VZinches high, or 3 pounds are not recommendedfor
shelf cooking.
Batters and dough foods and also foods for oven meals using scratch
recipes should be cooked without the oven shelf, following cookbook
directions.
Use potholders when handling
foods heated together with your
ovenshelf,especiallywhen heating
larger amounts of food in 8 inch
square or other 2 quart size casseroles. Extra steam generated from
multiple food cooking may make
utensils hotter than with regular
microwaving.
Before placing food in the dishes You plan-to use for shelf rnicrowavifwt check to see that theYwill fit to9ether on
or under the ~helf.Also, be sure utensils are microwave safe.
Casserolesfor heatingor reheating
irlelude 1 cup measuring cup,
flx4x3-inch loaf dishes,9x5x3=inch
loaf dish@sor $in. pie plattx.
I
.—
or cihk%xiplates.
,,/’
“’:’
7
-.., ..,.........———
/
he wax paper or plastic wrap
instead of lids emcasseroles. Lids
may add too much height to dish.
\
\
To insert shelf, tip back slightly
and fit into shelf supports on back
won wall. !3d front of shelf cmside
support~ as shown,
—-.
.-
\ (’J” \
/“
Shdf has two positions. Use In low
posltiorl when twatlng two ca6w3roles or retwating frozen W dinners or erttrow,
30
The high shelf position more
evenly spaces the area above and
below shelf. Use this position for
heating plates of leftovers.
of
To Heator
.
-
TWo plates of leftovers may be re-
Reheating two casseroles (height
heated together. Arrange thick or
dense foods to outside edges of
plate and cover with plastic wrap.
Microwave at HIGH (10) for 3 minutes. Reverse position of plates
(top to bottom) and rotate% turn.
Continue microwaving at HIGH
(10) for 3 to 4 minutes. Continue
heating, if necessary,until hot,
should be less than 31/2inches) is
now possible. Cover with plastic
wrap. Usestaggeredarrangements
of food, placing food on right side
of shelf and left side of floor. Refer
to Heatingor ReheatingGuide (see
inside front cover of cookbook) for
suggested microwave time per
casserole and add together the
times. Microwave at HIGH (10),
reversing position of foods (top to
bottom) after half of time. Also,
heat several smaller bowls of leftovers this way, stirring and reversing positions after half of time.
To
When heating several different
types of food together, foods
which should be served hot must
be placed on the oven shelf, while
foods which are only warmed
should be placed on the floor. This
is because microwave energy
enters the oven from the top only.
Also, it is importantto remember
that foods absorb microwave
energy at different rates.Ratescan
be affected by the size of the food,
and its starting temperature.
TWofrozen individual entrees (5 to
7 oz. ea.) or two TV dinners (10 to
12 oz. ea.) are both ready to serve
at the same time. Remove batter
foods; cook these conventionally.
Return foil trays containing food
to boxes in which they were purchased. Place in oven with one TV
dinner on right shelf and the second dinner on left floor. Microwave at HIGH (10) for 6 minutes.
Reversepositions (top to bottom)
and rotate foods % turn. Continue
microwavingat HIGH (10)for 6 minutes. Check dinners for heating. If
one dinner seems less done than
desired, return it to the box and
continue heating on shelf 1 to 2
more minutes.
Typesof FoodsTogether
t-leat or reheat different types of
food at HIGH (10). To determine
heating times, add together times
for all foods. (see heating guide
inside front cover of cookbook)
After half of time, stir or rearrange
foods (do not reverse positions).
Check foods (top shelf especially)
after ?4of total time and remove
any which are done. Continue
cooking others.
Placeonshelflargeordensefood$
which need the most heating, such
as leftoverfried chicken, casseroles
of canned or leftover vegetables,
rice or pasta. Place on oven floor
those foods which fleed only be
warmed, such as bakery pies, rolls,
muffins or breads.
Because of the varying rates you
may need to start reheating a large
or dense food a few minutes ahead
of time, then add other smaller or
less dense foods. Alternately, if
one of the several foods you are
heating seems under cooked but
the others are heated satisfactorily, let the undw’heated food
continue cooking,
—
—-
31
—
This appliancemust be grounded.
In the eventof an electricalshort
circuit, grounding reducesthe risk
of electricshock by providingan
escapewire for the electric current.
This applianceis equippedwith a
cord havinga grounding wire with
a grounding plug. The plug must be
plugged into an outlet that is properly installedand grounded.(Fig. 1)
WARNING—improperuseof the
grounding plug can resultin a risk
of electricshock.
Wherea standardtwo-prongwall
receptacleis encountered,it is the
personalresponsibilityand obligation of the customerto haveit
replacedwith a properlygrounded
three-prongwall receptacle.
Do NotUnderAnyCircumstancesCutor Removethe
Thkd (Ground)ProngFrom
The PowerCord.
Do Not UseanAdapterPlug
WithThisAppliance.
Do NotUsean Extension
CordWithThisAppliance.
Fig. 1
u
INSURE PROPER
EXISTS BEFORE
GROUND
USE
Consult a qualified electricianor
servicemanif the grounding instructions are not completelyunderstood,or if doubt existsas to
whetherthe applianceis properly
grounded,
L Sewn or vapor escaping from around the door,
2. Light Wlection wound door or outer case.
3. Dimming oven li~htmxi change in
may occur whHe operating at power Ievds other
than high.
32
4. Dull thumpingsound WW operqtkig at power
~WE$~S
other then high,
& Some TV4WM MMererme might be noticed
while using yqur microwave CWemIt’s similar to the
interference caused by uther small appliances and
does notaindicate a problem with
-. your oven.
To SaveTimeand IMoney—
beforeyoucallfor serwice,
checkthe ProblemSolver
If you have a problem, it may be minor. Youmaybe able to correct It yourself, Just usethis Problem Solver to
locate your problem and then follow the suggested recommendations,
PROBLEM
POSSIBLE CAUSE AND IWWIEDY
OVENWILL NOT CC)’MEON
A fuse in your home may be blown or the ciriwit breaker-tripped.‘
Replacefuseor resetcirwit breaker,
Makesure3-prongplug on ovenis fully insertedinto wail receptacle. -
CONTROLPANELIJGHTED,
YET OVENWILL NOTSTART
Door not securelyGIQWXL
STARTmustbetouchedafterenteringcooking selection.
Anotherselsctkmenter$dalreadyin ovenandCLEAR/OFF.n@touched
tg cancelk.
Makesureym.Jhaveenteredcookingtime aftertouchir& TIME (X)-OK,CLEAR/OFFwas touched accidentally,Resetcooking program and
touch START.
Temperatureprobenot insertedproperlyor not beingusedduring AutoRoastor “%mpCook,
Makesureyou haveentereddesiredfinishedtemperatureaftertouching
GTEMPCOC?K/HOLD.
Make sure you entereda code number af&}i.uching AUTO COOK,
\\\ ‘->-::---,,
AUTOROASTor AUTODEFROST,
“ERROR”APPEARS
ON READOUT
WhenusingTernpCook,a temperaturelessth=’more
than 199°
has beenentered.
Door is openedduring4VNJTCY
cych?of Auto Cook function.CIosedoor
and touch START,
Weight is incorrect for Auto Defrost code on chart it is necessaryto
resetoven,
—.
“PROBi=”APPEARS
ON READOUT
Probe has Iwen forgotten or not seated properly In cwenwall when
usingAuto Roastor Temp Cook functions,
FOODS ARE EITHER OV!EFtCOOKEDOR LJNDE5KXX3KED
Cookingtirrws-mayvary becauseof startingfood temperature,food
densityor amountof foods in oven,TouchTIME COOK and additional
cooking time for completion,
incorrect Power Level entered, Check Cookbook for recommended
PowerLevelor changinglevelsduring cooking if necessary,
Dish was not rotated,turrwd or stirred. Some dishes require specific
iristructlons.CXwmkCookbookor recipefor theseinstructions.
TOOmanydishesin ovenat sametime, Cookingtime rnust~e increasxxi
when cooking more than one food item. Check Cookbook for reccq:
mendationon imxxwing time,
Dish npt completelycovered~s dhwcteciduring Auto Cook
Previousrnicxowtwlngleft humidity qr moisturein oven,thus lessening
the cookingtime in Auto Cook function,
Certainvegetablesneeda standing~lmeafter using Auto Cook, Check
AutomaticCcmk[ngChart,
OVWIdoor was optmedduring “ALUXY}cycle of Auto Cook furmtkm
Probsnot insertedproperlyinto meator dishwhen usingTemp Cook or
Auto Fkxwtfunctions, CheckCookbook or Auto Roast$action of this
book for specificinstruction% w33
—.
—.
. ..
.4
At General Electric we’re committed to providing you with the best appliancesweknowhowto buildand weknow
that youwantyourappliancesto giveyoumanyyearsof dependableservice.
Our ConsumerServicesare designedwithyourneedsand wantsin mind.
WarrantyProtection
Beforeyournewapplianceleftthe factory,it went
throughrigorousteststo detectmanufacturingdefects,
Andyouhavea writtenwarrantyto protectyou.Seethe
warrantyon thebackpageof thisbookfordetails.
a
ConvenientService
Whetheryourapplianceisinor out of warranty,you’re
just a phonecallawayfromournationwidenetworkof
FactoryTrainedServiceprofessionals,
SimplycallourGEserviceorganization.Lookin the
Whiteor YellowPagesof yourtelephonedirectoryfor
GENERALELECTRICCOMPANY,GENERAL
ELECTRICFACTORYSERVIC%P
GENERAL
ELEiCTRKXK)TPOINT
FACTORYSERVICEor
GENERALELECTRICCUSTOMERCARE@
SERVICE.
Servicecannormallybescheduledat yourconvenience
and thetechniciandrivesa fully-stockedpartsservice
truckso that, in mostcases,therepaircan becompleted
in onevisit,
Wetreproudof ourserviceand wantyouto bepleased,
but if forsomereasonyouare not happywiththeservice
youreceive,hereare threestepsto followfor furtherhelp.
‘w
~“
3
ServiceContracts
FIRST,contactthepeoplewhoservicedyourappliance.
Explainwhyyouarenot pleased.In mostcases,thiswill
solvetheproblem.
NEXT,if youarc stilinotpleasedwriteallthe
details—including
yourphonenumberto:
Manager,ConsumerRelations
CencralE!ectric
AppliancePark
Louisville,Kentucky40225
FINALLY,if yourproblemisstillnot resolved,write:
MajorApplianceConsumerActionPanel
20NorthWackerDrive
Chicago,Illinois60606
.-” -- - - &
z
$
1
For trouble-free
servicebeyond
the writtenwarrantyperiod.
If youpreferto budgetyourrepairexpenditures ~ ‘-- ::.,=- \
: ...~=.=.
.insteadof’beingsurprisedbythem,GEoffers
3+
#;
f
servicecontractsfor varyinglengthsof timeon
*
allGE majorappliances,Witha contract,We$ll
@
keepyourapplitmcein goodoperatingcondition ?&e&%:, ..J
duringthecontractperiodat no additional
ehtuge,
Servicecontractsletyoupaytoday%pricesfor
servicea month,a year,or scveraiyearsfrom
now.And,you’llreceiveservicefrom(33
trainedservicete~hnicirms
usingonlygenuine
GEparts.If youhaveanyquestionsabout
ServiceContraas,cal]TOLL=H?E22
800,626.2224.
(h ~eiltUQkY,cail 800.292.2057.)
TheQddi Fix@
SysteIrn
A programfordo-it-yourselfappliancerepair,
thesystemincludesstep=by-stq
repairmanuals
forrefrigerators,mostnon-microwave
electric
ranges,dishwashers,andstandardand large
capacitywashersanddryers,plusspecially
packaged
replacement
parts,and technicalhelp
witha to