1
P3PC-1132-02EN
5000N
Operator's Guide
CONTENTS
INTRODUCTION............................................................................. v
■ Regulatory Information ......................................................... v
■ Note, Liability ........................................................................ vi
■ Safety Precautions ............................................................... ix
Chapter 1
Overview of fi-5000N ............................................... 1
1.1 Overview.............................................................................. 2
1.2 Features............................................................................... 3
1.3 Examples of Operation....................................................... 4
Chapter 2
Names and Functions of Parts.............................. 7
2.1 Names of Parts.................................................................... 8
2.2 Keyboard ........................................................................... 10
Chapter 3
Installing the fi-5000N ........................................... 11
3.1 Installing the Scanner ...................................................... 12
3.2 Installing the fi-5000N....................................................... 12
3.3 fi-5000N's Settings and Connecting to the Network ..... 14
3.4 Changing the Language Setting...................................... 18
3.5 Automatic Turning Backlight Off Settings ..................... 19
3.6 Beep Sound Configuration .............................................. 20
fi-5000N Operator’s Guide
i
3.7 Pull Mode User Authentication Settings ........................ 21
3.8 Push Mode Automatic Logout Time Settings ................ 23
3.9 Host Connection Time-out............................................... 24
3.10 Displaying Device Information ....................................... 25
3.11 Initialization of fi-5000N................................................... 26
Chapter 4
Installing and Setting Driver................................. 27
4.1 Installing FUJITSU TWAIN 32 Scanner Driver................ 28
4.2 Installing ScandAll 21....................................................... 31
4.3 Installing FUJITSU ISIS Scanner Driver.......................... 33
4.4 Configuring Scanning Application.................................. 36
4.5 Uninstalling the Scanner Driver and Scanning
Application ........................................................................ 39
Chapter 5
Installing and setting the fi-5000N Software ....... 41
5.1 Installing fi-5000N Software............................................. 42
5.2 fi-5000N Software Overview............................................. 44
5.3 Adding and Deleting fi-5000N.......................................... 48
5.4 Managing User Information of fi-5000N.......................... 51
5.5 fi-5000N Administrator Settings ...................................... 56
5.6 Managing Scanner Information ....................................... 59
5.7 Settings of [Launch Options] .......................................... 64
5.8 Uninstalling the fi-5000N Software.................................. 67
ii
Chapter 6
User Authentication .............................................. 69
6.1 Fingerprint Registration................................................... 70
6.2 User Authentication by Fingerprint ................................ 74
6.3 User Authentication by PIN ............................................ 75
6.4 Changing the User’s PIN.................................................. 76
Chapter 7
Daily Care............................................................... 77
7.1 Cleaning Materials ............................................................ 78
7.2 Parts to Clean and Cleaning Method .............................. 79
Chapter 8
Troubleshooting .................................................... 81
8.1 Error Messages and Remedies ...................................... 82
8.2 Troubleshooting ............................................................... 88
8.3 Items to Check Before Asking for Repair....................... 90
8.4 Checking Labels on the fi-5000N .................................... 91
Chapter 9
Specifications ........................................................ 93
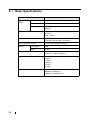
9.1 Basic Specifications......................................................... 94
9.2 Installation Specifications ............................................... 95
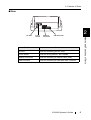
9.3 External Dimensions ........................................................ 96
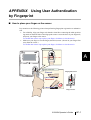
APPENDIX
Using User Authentication by Fingerprint .....AP-1
INDEX ........................................................................................ IN-1
fi-5000N Operator’s Guide
iii
iv
INTRODUCTION
Thank you for purchasing the fi-5000N.
This document describes how to handle fi-5000N and basic operation methods. Before you start using it, be
sure to thoroughly read this manual to ensure a correct use.
■Regulatory Information
FCC Declaration
This equipment has been tested and found to comply with the limits for a Class B digital device,
pursuant to Part 15 of the FCC Rules. These limits are designed to provide reasonable protection
against harmful interference in a residential installation. This equipment generates, uses, and can
radiate radio frequency energy and, if not installed and used in accordance with the instruction manual,
may cause harmful interference to radio communications. However, there is no guarantee that
interference will not occur in a particular installation. If this equipment does cause harmful
interference to radio or television reception, which can be determined by turning the equipment off and
on, the user is encouraged to try to correct the interference by one or more of the following measures:
•Reorient or relocate the receiving antenna.
•Increase the separation between the equipment and receiver.
•Connect the equipment into an outlet on a circuit different from that to which the receiver is located.
•Consult your dealer or an experienced radio/TV technician.
FCC warning: Changes or modifications not expressly approved by the party responsible for
compliance could void the user’s authority to operate the equipment.
ATTENTION
The use of a shielded interface cable is required to comply with the Class
B limits of Part 15 of FCC rules.
The length of the AC cable must be 2 meters (6.6 feet) or less.
Canadian DOC Regulations
This digital apparatus does not exceed the Class B limit for radio noise emissions from digital
apparatus set out in the Radio interference Regulations of the Canadian Department of
Communications.
This Class B digital apparatus complies with Canadian ICES-003.
Le pésent appareil numérique n’ément pas de bruits radioélectriques dépassant les limites applicables
aux appareils numériques de la classe B prescridtes dans le Réglesment sur le brouillage
radioélectrique dicté par le ministere des Communications du Canada.
Cet appareil numérique de la classe B est conformme à la norme NMB-003 du Canada.
fi-5000N Operator’s Guide
v
Bescheinigung des Herstellers / Importeurs
Für den fi-5000N wid folgendes bescheinigt:
•In Übereinsstimmung mit den Bestimmungen der EN45014(CE) funkentstört
•Maschinenlärminformationsverordnung 3. GPSGV, 06.01.2004: Der höchste Schalldruckpegel
beträgt 70 dB (A) oder weniger, gemäß EN ISO 7779.
■Note, Liability
BEFORE USING THIS PRODUCT, PLEASE READ THIS MANUAL CAREFULLY. IF THIS
PRODUCT IS NOT USED CORRECTLY, UNEXPECTED INJURY CAN OCCUR TO USERS OR
BYSTANDERS
Keep this manual in a safe place so that it can be easily referred to during use of this product.
While all efforts have been made to ensure the accuracy of all information in this manual, PFU
assumes no liability to any party for any damage caused by errors or omissions or by statements of any
kind in this manual, its updates or supplements, whether such errors are omissions or statements
resulting from negligence, accidents, or any other cause. PFU further assumes no liability arising from
the application or use of any product or system described herein; nor any liability for incidental or
consequential damages arising from the use of this manual. PFU disclaims all warranties regarding the
information contained herein, whether expressed, implied, or statutory.
Use in High-safety Applications
This product has been designed and manufactured on the assumption that it will be used in office,
personal, domestic, regular industrial, and general-purpose applications. It has not been designed and
manufactured for use in applications (simply called "high-safety applications" from here on) that
directly involve danger to life and health when a high degree of safety is required, for example, in the
control of nuclear reactions at nuclear power facilities, automatic flight control of aircraft, air traffic
control, operation control in mass-transport systems, medical equipment for sustaining life, and
missile firing control in weapons systems, and when provisionally the safety in question is not
ensured. The user should use this product with adopting measures for ensuring safety in such highsafety applications. PFU LIMITED assumes no liability whatsoever for damages arising from use of
this product by the user in high-safety applications, and for any claims or compensation for damages
by the user or a third party.
Fingerprint Authentication
Fingerprint authentication technology is employed in the fi-5000N. Data generated from a user's
fingerprint information is stored in this product as a source data to authenticate registered users
(referred to as "Authentication Data"). To help prevent misappropriation or misuse of the
Authentication Data, the product provides the following:
•Authentication Data is encrypted.
•Authentication Data is stored in a manner to make it difficult to search or extract.
•Authentication Data is used for the purpose of identifying PC's on the network, and in a way without
sending the Authentication Data to the network.
vi
The Authentication Data may be categorized as personal data and may
be subject to various data protection and privacy laws. You are
responsible for ensuring all use is in compliance with all such
applicable laws.
THE RELIABILITY OF THE FINGERPRINT AUTHENTICATION TECHNOLOGY AND THE
MEASURES USED TO PROTECT THE AUTHENTICATION DATA, SUCH AS ENCRYPTION,
ARE NOT GUARANTEED ALWAYS TO BE EFFECTIVE AND ACCURATE, OR WITHOUT
ERROR. YOU USE THE FINGERPRINT TECHNOLOGY AUTHENTICATION AT YOUR OWN
RISK. IN NO EVENT WILL PFU BE LIABLE FOR ANY LOST PROFITS, INCIDENTIAL OR
CONSEQUENTIAL DAMAGES ARISING FROM OR RELATING TO THE FINGERPRINT
TECHNOLOGY, AUTHENTICATION DATA, ANY PERFORMANCE OR LACK OF
PERFORMANCE OF THE FINGERPRINT TECHNOLOGY OR ANY MISUSE OR DISCLOSURE
OF THE AUTHENTICATION DATA, WHETHER BASED ON CONTRACT, TORT, STRICT
LIABILITY OR ANY OTHER CLAIM, EVEN IF PFU IS APPRISED OF SUCH DAMAGES.
Trademarks
Microsoft and Windows are registered trademarks of Microsoft Corporation in the United States and/
or other countries.
ISIS, QuickScan and their respective logos are trademarks or registered trademarks of Pixel
Translations, a division of Captiva Software Corporation in the United States.
Adobe, the Adobe logo, and Acrobat are either registered trademarks of Adobe Systems Incorporated
in the United States and/or other countries.
Other product names are the trademarks or registered trademarks of the respective companies.
How Trademarks Are Indicated In This Manual
References to operating systems (OS) are indicated as follows:
Windows 98
Microsoft® Windows® 98 operating system.
Windows Me
Microsoft® Windows® Millennium Edition operating system.
Windows 2000
Microsoft® Windows® 2000 Professional operating system.
Windows XP
Microsoft® Windows® XP Professional operating system,
Microsoft® Windows® XP Home Edition operating system.
Where there is no distinction between the different versions of the above operating system, the general
term "Windows" is used.
Manufacturer
PFU LIMITED
International Sales Dept., Imaging Business Division, Products Group
Solid Square East Tower, 580 Horikawa-cho, Saiwai-ku, Kawasaki-shi Kanagawa 212-8563, Japan
Phone: (81-44) 540-4538
All Rights Reserved, Copyright© PFU LIMITED 2005
fi-5000N Operator’s Guide
vii
About Maintenance
The user must not perform repairs on this device. Contact the store where you purchased it or an
authorized FUJITSU Image Scanner service provider to have repairs done on this product.
Warning Indications Used In This Manual
WARNING
This indication alerts operators to an operation that, if
not strictly observed, may result in severe injury or
death.
CAUTION
This indication alerts operators to an operation that, if
not strictly observed, may result in safety hazards to
personnel or damage to equipment.
Symbols Used In This Manual
ATTENTION
This symbol alerts operators to particularly important information. Be
sure to read this information.
This symbol alerts operators to helpful advice regarding operation.
HINT
A TRIANGLE symbol indicates that special care and attention is required.
The drawing inside the triangle shows the specific caution.
A CIRCLE with a diagonal line inside shows action which users may not
perform.
The drawing inside or under the circle shows the specific action that is not
allowed.
R
Outline characters on a colored background show instructions users should
follow.
It may also include the drawing that shows the specific instruction.
Screen Examples In This Manual
The screen examples in this manual are subject to change without notice in the interest of product
improvement. If the actual displayed screen differs from the screen examples in this manual, operate
by following the actual displayed screen while referring to the User's Manual of the device application
you are using. The screenshots in this manual were captured from the FUJITSU TWAIN32 device
driver, ScandAll 21 Image Capturing Utility Software, fi-5000N Software, FUJITSU ISIS device
driver, QuickScan™ image capturing software.
viii
■Safety Precautions
WARNING
Do not damage the AC cable.
A damaged AC cable may cause fire or electric shock. Do not place heavy objects on
AC cables, or pull, bend, twist, heat, damage or modify AC cables.
Do not use damaged AC cables or power plugs, or install any cables or power plugs
to loose wall sockets.
Use only specified AC cables and connector cables.
Use only specified AC cables and connector cables. Failure to use the correct cables
might cause electric shock and/or equipment failure.
Do not use the AC cable provided with this product for other devices, since this might
cause equipment failure and other troubles or an electric shock.
Use this device only at the indicated power voltage.Do not
connect to multiple-power strips.
Use this device only at the indicated power voltage and current. Improper power
voltage and current might cause fire or electric shock. Do not connect to multiplepower strips.
Do not touch the AC cable with wet hands.
Do not touch the power plug with wet hands. Doing so can cause electric shock.
Wipe any dust from the power plug.
Wipe off any dust from metal parts on the power plug or metal fittings with a soft, dry
cloth. Accumulated dust can cause fire or electric shock.
Do not install the device in locations that has oil smoke, steam,
humidity, and dust.
Do not install the device in locations subject to oil smoke, steam, humidity, and dust.
Doing so might cause a fire or electric shock.
fi-5000N Operator’s Guide
ix
Turn the device OFF if it is damaged.
If the device is damaged for any reason, turn the device off and unplug the power
cable. Contact the store where you purchased the device.
Do not put liquids inside the device.
Do not insert or drop metal objects in/on to the device. Do not splash or allow the
device to get wet.
If foreign objects (water, small metal objects, liquids, etc.) get inside the device, immediately turn off the device and disconnect the power plug from the power outlet. Then,
contact the store where you bought the device or the Maintenance Service Center.
Pay particular attention to this warning in households where there are small children.
Do not touch the inside of the device unless necessary.
Do not take apart or modify the device. The inside of the device contains high-voltage
components. Touching these components might cause electric shock or fire.
Do not use the device if there is a strange odor.
If you detect excessive heat coming from the device or detect other problems such as
smoke, strange smells or noises, immediately turn off the device and disconnect its
power plug. Make sure that any smoke coming from it has stopped, before contacting
the store where you bought the device or an authorized FUJITSU scanner service
provider.
x
CAUTION
Do not install the device on unstable surfaces.
Make sure that the device is installed on a flat, level surface and that none of its parts
extend beyond the surface top, such as a desk or table. Do not install the device on
unstable surfaces. Install the device on a level surface that is free of vibration to
prevent it from falling.
Install the device on a strong surface that will support the weight of the device and
other devices.
Do not place heavy objects or stand on top of the device.
Do not place heavy objects on the device or use the device's surface top to perform
other work. Improper installation might cause injuries and equipment failure.
Firmly insert the power plug.
Firmly insert the power plug as far it can go into the power outlet.
Do not use the device immediately after moving it from a cold
place into a warm room.
Do not use the device immediately after moving it from a cold place into a warm room.
Condensation may occur, which might lead to operating errors. Let the device dry
about one or two hours before you use it.
Before moving the device, disconnect the power plug from the
power outlet.
Do not move the device with the power and any other cable connected as this can
damage the cables, which can later cause fire, electric shock as well as injury.
Before moving the device, be sure to disconnect the power plug from the power
outlet, and all other cables. Make sure that the floor is free of any obstructions.
Protect the device from static electricity.
Install the device away from strong magnetic fields and other sources of electronic
noise. Also, protect the device against any static electricity, which can cause the
device to malfunction.
fi-5000N Operator’s Guide
xi
Disconnect the power plug from the power outlet when the
device is not used for a long period of time.
When the device is not going to be used for a long period of time, be sure to
disconnect the power plug from the power outlet.
Do not install the device in direct sunlight.
Do not install the device under direct sunlight or near heating apparatus. Doing so
might cause excessive heat to build up inside the device, which can cause device
trouble or even fire. Install the device in a well-ventilated location.
xii
Chapter 1
1
Overview of fi-5000N
1.1 Overview ............................................................................................................. 2
1.2 Features .............................................................................................................. 3
1.3 Examples of Operation ...................................................................................... 4
fi-5000N Operator’s Guide
1
1.1 Overview
The function of the fi-5000N is to connect a fi-series scanner to a computer through the network.
This framework is shown in the diagram below. This framework is referred to as the fi-5000N system hereinafter.
Scanner
fi-5000N
Network
Computer
.
This device connected to a fi-series scanner through the USB interface, can transmit scanned
images to a computer over networks. The fi-5000N makes it possible to scan documents without
touching a computer at sites where scanning documents are required. Furthermore, only permitted
operators can input images as this device has a built-in fingerprint identification mechanism.
With the fi-5000N, you can build up a system whereby you can scan documents easily and securely
without operating a computer in places where logon to a computer were required
2
1.2 Features
1.2 Features
1. Simple and secure operator identification with fingerprint authentication
With the fingerprint authentication technology, the user can be easily identified by a touch of
a finger. There is no need for special hardware or personal identification numbers (PINs).
2. High-speed scanning and transmission of data via network
3. By leveraging your current system, you can set up a distributed system easily.
With the TWAIN/ISIS interface equipped, you can make transition to remote scanning system that utilizes your current system resources.
4. Easy maintenance with the administrative tools on your computer
You can easily manage the fi-5000N such as registering or deleting fi-5000N's users, or
backing up/restoring users' information from the PC by using the bundled fi-5000N Software.
With the fi-5000N Software, you can manage multiple fi-5000N.
fi-5000N Operator’s Guide
3
Overview of fi-5000N
High speed scanning and high speed data transmission via a network becomes a reality with
the utilization of USB 2.0 for the scanner interface, and compatibility to 100BASE-TX for
the network interface.
1
1.3 Examples of Operation
There are two ways to perform scanning documents using fi-5000N.
1. Pull mode scanning
Computer with scanning application scan the documents from the scanner on the network
and capture the image data. This is called Pull mode because the image data is pulled from
the scanner to the computer via the network. In this mode, you can specify if user authentication process is enabled. If enabled, fi-5000N enter into user authentication waiting state
when scanning is initiated from the computer. After placing the document on to the scanner
(ADF or flatbed depending on your setting) and finishing the user authentication (with your
finger or PIN), the scanning will start. (Refer to "3.7 Pull Mode User Authentication Settings" (page. 21).
The major advantages of fi-5000N are security function by fingerprint authentication and
ease of operations. By integrating system utilizing fingerprint authentication results, following operations can be possible.
2. Push mode scanning
Operator places documents on to a scanner and press [Scan] button (or [Send to] depending
on the setting) to start scanning and to send the captured image data to a computer over the
network. This mode is called Push mode because the captured data is sent (pushed) form the
scanner to the computer. The operations are easy: Set the document on to the scanner. -->
Perform the user authentication. --> Press the [Scan] button. With these 3 steps, the captured
data is sent to the computer. (You can try Push-scan by following the procedures described
in Chapter2, "fi-5000N Getting Started" manual.)
The major advantages of fi-5000N are security function by fingerprint authentication and ease of
operations. By integrating system utilizing fingerprint authentication results, the following operations can be possible.
1. Switch PCs that receive the image data through the network.
The fi-5000N uses the fingerprint authentication result to identify the scanner operator.
Based on identified operator, the fi-5000N can be configured to switch destination PC that
receive scanned images.
(Used as a Shared scanner.)
2. Switch image data processing contents.
The fi-5000N can notify to the PC the fingerprint authentication results. Based upon the
results, the PC switches the contents of the data processing and/or retains operation records.
(such as switching storage folders, creating access rights, charging of fees, logging processing, etc.)
4
1.3 Examples of Operation
Two types of users are assumed for the fi-5000N: Administrator and the operator of the fi-5000N.
The following are expected for each type of user to perform:
■ Administrator
1
The Administrator is in the position to manage the fi-5000N, the scanner and the operator.
Overview of fi-5000N
1) Management of the fi-5000N:
Means the maintenance and configuration of this product
• Network configuration
• Message Display language configuration
• fi-5000N name configuration
• Trigger port configuration
• PIN (Personal Identification Number) configuration
2) Management of the Scanner:
Means the maintenance of the fi-series scanner connected to this product
and the configuration/verification of:
• Scanner connection
• Settings of the connected scanner
• Adjustment of the scanner
• Consumables and counters of the scanner
3) Management of the Operator:
Means the maintenance of the operators who carry out the scanning.
The four maintenance actions are:
• Registering new operator
• Changing operator information
• Deleting operator information
• Backing up/Restoring operator information
■ Operator (Referred to as "user" in this manual.)
The operator is the one who carries out the image scanning operations as below.
1) Starting up the system
Once the fingerprint is authenticated, the operator can start the application on the
system by pressing a button ([Scan] or [Send To]) on the scanner.
2) Management of one’s own fingerprint information
The operator can:
• Register his/her own fingerprint data.
• Re-register his/her own fingerprint data.
3) Management of one’s personal identification number (PIN)
The operator can change his/her own PIN.
fi-5000N Operator’s Guide
5
6
Chapter 2
Names and Functions of Parts
2
2.1 Names of Parts ................................................................................................... 8
2.2 Keyboard........................................................................................................... 10
fi-5000N Operator’s Guide
7
2.1 Names of Parts
This section describes the device’s parts.
■ Front
Sticker
Cover
Message Display
LED
ES
C
7
4
ID
8
1
5
9
0
SE
T
2
6
.
Security Cable Slot
3
Finger Guide
Fingerprint Sensor
Keyboard
Part Name
8
Finger Sensor
Function
Cover
Protects the Keyboard.
Sticker
Correct placement of finger is described.
Message Display
Displays the settings and status of the fi-5000N.
Keyboard
It is used for settings and PIN entry.
Finger Sensor
Verifies finger’s correct position.
Fingerprint Sensor
Sensor used for fingerprint recognition.
Security Cable Slot
Used for connecting the security cable.
Finger Guide
Used to guide finger for correct positioning.
(This guide is removable.)
2.1 Names of Parts
■ Rear
DC Inlet
Network
Connector
USB Connector
Names and Functions of Parts
Part Name
Power
Switch
2
Function
DC Inlet
Used for connecting the AC cable.
Power Switch
Used for turning ON/OFF the fi-5000N.
Network Connector
Used for connecting a network cable (LAN).
USB Connector
Used for connecting a USB cable from a scanner.
fi-5000N Operator’s Guide
9
2.2 Keyboard
The following illustration shows the keyboard located under the white cover.
ESC
SET
ID
8
9
4
5
6
1
2
3
0
ENT
.
7
This keyboard is used for the following operations:
• Fingerprint registration
• Login by PIN
• fi-5000N user PIN setting
• Displaying the network setting status
• Displaying the name of fi-5000N on the network
• Displaying the firmware version
• Displaying the status of the connected scanner
• fi-5000N network settings (administrator rights required)
• Pull mode user authentication settings (administrator rights required)
• Automatic logout time settings (administrator rights required)
• Message display's backlight automatic light-off (administrator rights required)
• Beep sound settings (administrator rights required)
• Host connection time-out settings (administrator rights required)
• fi-5000N language settings (administrator rights required)
• Initialization of fi-5000N settings
ATTENTION
10
The Administrator's PIN (Personal Identification Number) is necessary to configure the settings which require the Administrator rights.
The Administrator's PIN can be set from the fi-5000N Configuration
Tool.
Chapter 3
Installing the fi-5000N
3
3.1 Installing the Scanner ...................................................................................... 12
3.2 Installing the fi-5000N ...................................................................................... 12
3.3 fi-5000N's Settings and Connecting to the Network ..................................... 14
3.4 Changing the Language Setting ..................................................................... 18
3.5 Automatic Turning Backlight Off Settings ..................................................... 19
3.6 Beep Sound Configuration .............................................................................. 20
3.7 Pull Mode User Authentication Settings ........................................................ 21
3.8 Push Mode Automatic Logout Time Settings ................................................ 23
3.9 Host Connection Time-out .............................................................................. 24
3.10 Displaying Device Information ...................................................................... 25
3.11 Initialization of fi-5000N ................................................................................. 26
fi-5000N Operator’s Guide
11
3.1 Installing the Scanner
Install the scanner following the installation requirements described in your fi-series scanner manual.
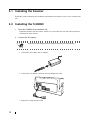
3.2 Installing the fi-5000N
1. Place the fi-5000N at its installation site.
Install this product near the scanner. Install it in a place that does not affect the operation or
maintenance of the scanner.
2. Connect the AC adapter.
ATTENTION
Use only the AC adapter and AC cable provided by the manufacturer.
1. Connect the AC cable to the AC adapter.
2. Connect the AC adapter connector to the fi-5000N’s DC inlet.
3. Plug the AC cable into the outlet.
12
3.2 Installing the fi-5000N
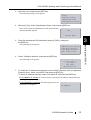
3. Connect the USB cable to the USB connector.
3
Be sure to use the USB cable provided with the scanner. Correct operation
with commercially available cables is not guaranteed.
4. Connect the other end of the USB interface cable to the scanner.
ATTENTION
The message "Scanner is disconnected" is displayed on the Message Display of fi-5000N if the scanner is not connected properly, or if the power of
the scanner is turned off. Check the connection of the scanner when it happens. Refer to the scanner product manual for details on turning on the
power of the scanner.
fi-5000N Operator’s Guide
13
Installing the fi-5000N
ATTENTION
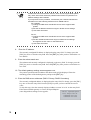
3.3 fi-5000N's Settings and Connecting to the Network
1. Turn on the power of the scanner and fi-5000N.
Refer to the scanner manual for details on turning on the power of the scanner.
Turn on the fi-5000N by pressing the "|" of the power switch located at the back of the fi5000N.
Power OFF
ATTENTION
Power ON
To change the language setting, refer to "3.4 Changing the Language Setting" (page 18)
2. When "The network cable is disconnected" appears on the fi-5000N’s Message Display, connect the network cable to the network connector at the back of fi-5000N.
The following screen appears.
If the network support DHCP and the process goes successfully, "Place your finger on the sensor." message appears.
HINT
14
When the above screen remains still, open the
cover of the fi-5000N, and press the [ESC]
key.
⇒ The following screen appears, and the IP
address obtaining operation is canceled.
Obtaining IP address
from DHCP server...
Cancel:[ESC]
Cannot obtain IP
address from DHCP
server.
Setup:[SET]
3.3 fi-5000N's Settings and Connecting to the Network
3. Open the cover and press the [SET] key.
The following settings screen appears.
Setup
Register Finger
Change PIN Code
Show Network Config
4. With the [L] key, select "Administrator Setup", and press the [ENT] key.
The screen to enter the Administrator's PIN (personal identification number) appears.
PIN:_
Cancel:[ESC]
3
5. Enter the Administrator PIN (the default setting is "5000"), and press
the [ENT] key.
Administrator Setup
Configure Network
Pull Mode Authentic
Auto Logout Time
6. Select "Configure Network", and press the [ENT] key.
The following screen appears.
Do you want to
use DHCP?
Use DHCP
Use Static IP
7. To obtain the IP address automatically from the DHCP (Dynamic Host Configuration
Protocol) server, select "Use DHCP" and press the [ENT] key.
To set the IP address manually, select "Use Static IP" and press the [ENT] key.
If "Use DHCP" is selected: It is not necessary to specify the IP address, subnet mask and
default gateway. Go to step 11.
If "Use Static IP" is selected: The following network configuration screen appears.
IP Address:
fi-5000N Operator’s Guide
15
Installing the fi-5000N
The following screen appears.
ATTENTION
Certain DNS servers and DHCP servers, which do not support DNS update,
may cause host name resolution problems when DHCP is specified in IP
address settings with fi-5000N.
If you experience such problems, consult with your network administrator
and take one of the following measures for fi-5000N and PC:
For fi-5000N,
1) Change to DNS server and DHCP server which support DNS
update.
2) Set the IP address lease time longer in DHCP server settings.
3) Use static IP method.
For PC,
1) Change to DNS server and DHCP server which support DNS
update.
2) Set the IP address lease time longer in DHCP server settings
and register the PC name on the DNS server.
3) Use static IP method.
8.
Enter the IP address.
The currently configured IP address is displayed on the entry field. To change, press the
[ESC] key once to clear the entry field. Press the [ENT] key after you have entered the correct address.
9. Enter the subnet mask next.
The subnet mask currently configured is displayed on the entry field. To change, press the
[ESC] key once to clear the entry field. Press the [ENT] key after you have entered the correct value.
10. The default gateway settings screen appears next.
The portion specified at the IP address and subnet mask will be displayed. Enter the
remaining portion of the default gateway and press the [ENT] key.
11. Enter the DNS server addresses (DNS1: Primary; DNS2: Secondary)
The currently configured address is displayed on the entry field. To change, press the [ESC]
key once to clear the entry field. Press the [ENT] key after you have entered the correct
value.
To skip this step, clear the currently displayed address or enter "0.0.0.0" on the entry field.
If the entered default gateway is correct, the Speed/Duplex
(Auto Negotiation) settings screen appears.
16
Select Speed/Duplex
Auto Negotiation
100BASE-TX Full
100BASE-TX Half
3.3 fi-5000N's Settings and Connecting to the Network
12. Press the [K] or [L] key to select one from among "Auto Negotiation", "100BASE-TX
Full", "100BASE-TX Half", "10BASE-TX Full" and "10BASE-TX Half", and press the
[ENT] key.
Usually "Auto Negotiation" is selected. The following
network settings confirmation screen appears when you
press the [ENT] key.
If the hub to connect fi-5000N does not support Auto negotiation, select the supported Speed/Duplex setting.
ATTENTION
IP :XXX.XXX.XXX
MASK:XXX.XXX.XXX
GW :XXX.XXX.XXX
OK:[ENT]/NG:[ESC]
Select "Auto Negotiation" if the hub supports auto negotiation function. If
auto negotiation function is not supported, select the Speed/Duplex that is
supported by the hub. The network communication may fail if the following
settings are done:
• When "100Base-TX Full" or "Base-TX Full" is selected for a hub that only
For a correct connection and conditions, refer to the manual of the Ethernet
hub.
13. Confirm the contents of the settings.
To change the settings, press the [ESC] key until it returns
to the setting screen of the item to change, and configure
again.
If the contents are correct, press the [ENT] key. The following screen appears.
Initializing
network...
With this, the network settings are completed.
HINT
If the fi-5000N is initialized, the settings done in this section will return to their
default values. In order not to forget the settings done in this section, make a
note of them.
MEMO
IP address: ................................
Subnet mask: .............................
Default gateway ..........................
DNS 1: .......................................
DNS 2: .......................................
When "Use DHCP" is selected in step 7, it is not necessary to note down for IP
address, Subnet mask and Default gateway.
fi-5000N Operator’s Guide
17
Installing the fi-5000N
supports auto negotiation.
• When "Auto Negotiation" is selected for a hub that does not support auto
negotiation.
• When the selected Speed/Duplex is not supported by the hub.
3
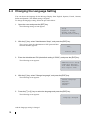
3.4 Changing the Language Setting
You can choose the language for the Message Display from English, Japanese, French, German,
Italian and Spanish. (The default setting is English.)
To change the language setting, follow the procedure below.
1. Open the cover and press the [SET] key.
The following settings screen appears.
Setup
Register Finger
Change PIN Code
Show Network Config
2. With the [L] key, select "Administrator Setup", and press the [ENT] key.
The screen to enter the Administrator's PIN (personal identification number) appears.
PIN:_
Cancel:[ESC]
3. Enter the Administrator PIN (the default setting is "5000"), and press the [ENT] key.
The following screen appears.
Administrator Setup
Configure Network
Pull Mode Authentic
Auto Logout Time
4. With the [L] key, select "Change Language", and press the [ENT] key.
The following screen appears.
Select Language
English
Japanese
French
5. Press the [K] or [L] key to select the language and press the [ENT] key.
The following screen appears.
Language changed
And the language setting is changed.
18
3.5 Automatic Turning Backlight Off Settings
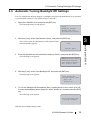
3.5 Automatic Turning Backlight Off Settings
You can configure the Message Display’s backlight to be turned off automatically if no operation
is performed for 5 minutes. (The default setting is "Auto off".)
1. Open the fi-5000N’s cover and press the [SET] key.
The following settings screen appears.
Setup
Register Finger
Change PIN Code
Show Network Config
3
2. With the [L] key, select "Administrator Setup", and press the [ENT] key.
The screen to enter the Administrator's PIN (personal identification number) appears.
PIN:_
3. Enter the Administrator PIN (the default setting is "5000"), and press the [ENT] key.
The following screen appears.
Administrator Setup
Configure Network
Pull Mode Authentic
Auto Logout Time
4. With the [L] key, select "Auto Backlight Off", and press the [ENT] key.
The following screen appears.
Turn backlight
automatically off?
Auto off
Always on
5. To turn the backlight off automatically after a certain period of time, select "Auto off",
to leave the backlight’s power always on, select "Always on" and then press the [ENT]
key.
The following screen appears.
Auto backlight off
setting changed
With this, the backlight setting is done.
fi-5000N Operator’s Guide
19
Installing the fi-5000N
Cancel:[ESC]
3.6 Beep Sound Configuration
The beep that sounds each time an operation is done, can be set on or off. (The default setting is
"Beep".)
1. Open the fi-5000N’s cover and press the [SET] key.
The following settings screen appears.
Setup
Register Finger
Change PIN Code
Show Network Config
2. With the [L] key, select "Administrator Setup", and press the [ENT] key.
The screen to enter the Administrator's PIN (personal identification number) appears.
PIN:_
Cancel:[ESC]
3. Enter the Administrator PIN (the default setting is "5000"), and press the [ENT] key.
The following screen appears.
Administrator Setup
Configure Network
Pull Mode Authentic
Auto Logout Time
4. With the [L] key, select "Beep On/Off", and press the [ENT] key.
The following screen appears.
Beep sound
Beep
Mute
5. To set the beep sound on, select "Beep"; to set it off, select "mute" and then press the
[ENT] key.
The following screen appears.
Beep sound setting
changed
With this, the beep sound setting is done.
20
3.7 Pull Mode User Authentication Settings
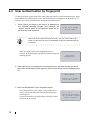
3.7 Pull Mode User Authentication Settings
You can set the user authentication function on or off, when performing a "Pull" mode scanning.
User authentication function is enabled as the default setting.
HINT
To configure the "pull" mode user authentication, follow the procedure below.
1. Open the fi-5000N’s cover and press the [SET] key.
The following settings screen appears.
Setup
Register Finger
Change PIN Code
Show Network Config
2. With the [L] key, select "Administrator Setup", and press the [ENT] key.
The screen to enter the Administrator's PIN (personal identification number) appears.
PIN:_
Cancel:[ESC]
3. Enter the Administrator PIN (the default setting is "5000"), and press the [ENT] key.
The following screen appears.
Administrator Setup
Configure Network
Pull Mode Authentic
Auto Logout Time
fi-5000N Operator’s Guide
21
3
Installing the fi-5000N
There are 2 ways to perform scanning: "Push" mode and "Pull" mode scanning.
In "Push" mode, scanning is started by pressing a scanner’s button ([Scan]
or [Send to] button) and the scanned image data is sent ("Pushed") to the
PC.
On the other hand, in "Pull" mode, scanning is started from the PC by using
the scanning application which captures ("Pulls") the image data from the
scanner.
The "Push" mode scanning requires user authentication (by fingerprint or
PIN) to identify the sender, while the "pull" mode does not necessarily
require user authentication. For security measures, you can enable the
user authentication function.
4. With the [L] key, select "Pull Mode Authentic.", and press the [ENT] key.
The following screen appears.
"Pull" mode
authentication:
Authenticate
Not authenticate
5. To perform user authentication, select "Authenticate"; if authentication is unnecessary, select "Not authenticate" and then press the [ENT] key.
The following screen appears.
"Pull" mode
authentication
setting changed
With this, the "Pull" mode user authentication setting is done.
The setting will take effect from the next scanning.
HINT
HINT
22
In a "pull" mode scanning, if the user
authentication is enabled, the following screen
will appear when the scanner driver is started
up.
Place your finger
on the sensor
(For specified user)
About Pull mode scanning using ScandAll 21
When you start up ScandAll 21, open the TWAIN dialog box, and click the
[Scan] button, the next message appears on monitor screen: "Please perform
user authentication by fi-5000N before scanning". This means fi-5000N is waiting for fingerprint authentication. Perform the user authentication. As soon as
the authentication is completed successfully, the scanning operation will start.
3.8 Push Mode Automatic Logout Time Settings
3.8 Push Mode Automatic Logout Time Settings
This setting applies only to Push mode scanning. After performing a scanning, if no other operations are done after a certain period of time, the current user will be logged out automatically. You
can specify this waiting time by following the procedure below.
The default time limit for an automatic logout is 0 second.
1. Open the fi-5000N’s cover and press the [SET] key.
The following settings screen appears.
Setup
Register Finger
Change PIN Code
Show Network Config
3
2. With the [L] key, select "Administrator Setup", and press the [ENT] key.
PIN:_
Cancel:[ESC]
3. Enter the Administrator PIN (the default setting is "5000"), and press the [ENT] key.
The following screen appears.
Administrator Setup
Configure Network
Pull Mode Authentic
Auto Logout Time
4. With the [L] key, select "Auto logout time", and press the [ENT] key.
The following screen appears.
Auto logout time
(0-60)[seconds]
0_
5. With the keyboard, input the waiting time before logging out (from 0 to 60 seconds)
and press the [ENT] key.
The following screen appears.
Auto logout time
setting changed
With this, the automatic log out time setting is done.
The setting will take effect from the next scanning.
fi-5000N Operator’s Guide
23
Installing the fi-5000N
The screen to enter the Administrator's PIN (personal identification number) appears.
3.9 Host Connection Time-out
When a login is performed with authentication by fingerprint or PIN, the fi-5000N waits a certain
period of time for a connection response from the host computer. You can specify this waiting time
by following the procedure below.
If there is no response from the host computer during the specified waiting time, "Host Connection
failure due to time-out" message will appear on the Message Display.
The default waiting time for the host’s connection response is 3 seconds.
1. Open the fi-5000N’s cover and press the [SET] key.
The following settings screen appears.
Setup
Register Finger
Change PIN Code
Show Network Config
2. With the [L] key, select "Administrator Setup", and press the [ENT] key.
The screen to enter the Administrator's PIN (personal identification number) appears.
PIN:_
Cancel:[ESC]
3. Enter the Administrator PIN (the default setting is "5000"), and press the [ENT] key.
The following screen appears.
Administrator Setup
Configure Network
Pull Mode Authentic
Auto Logout Time
4. With the [L] key, select "Host time-out", and press the [ENT] key.
The following screen appears.
Host connection
time-out
(1-60)[sec]
3_
5. With the keyboard, input the waiting time before the time-out is performed (from 0 to
60 seconds) and press the [ENT] key.
The following screen appears.
Host connection
time-out
setting changed
With this, the host connection time-out setting is done.
The setting will take effect from the next login.
24
3.10 Displaying Device Information
3.10 Displaying Device Information
With the procedure below, the following information can be displayed in the Message Display:
• The network setting status
• The network name of fi-5000N
• The firmware version
• The status of the connected scanner
1. Open the fi-5000N’s cover and press the [SET] key.
The following settings screen appears.
Setup
Register Finger
Change PIN Code
Show Network Config
(1) To display the network setting status, select "Show
Setup
Network Config." (For details about changing the network
Register Finger
settings, refer to "3.3 fi-5000N's Settings and Connecting
Change PIN Code
to the Network" (page 14))
Show Network Config
(2) To display the network name of fi-5000N, select "Show
Show Device Name
Device Name".(For details about changing the network
Firmware Version
name, refer to "5.5 fi-5000N Administrator Settings" (page
Show Scanner Info
56))
Administrator Setup
(3) To display the firmware version, select "Firmware
Version".
(4) To display the status of the connected scanner, select "Show Scanner Info."
The selected information will appear on the Message Display.
When the information extends to many pages, press the [ENT] key to display the next page.
If the [ENT] key is pressed at the last page, it will return to the screen on step 1.
fi-5000N Operator’s Guide
25
Installing the fi-5000N
2. With the [L] key, select one of the following items, and press the [ENT] key.
3
3.11 Initialization of fi-5000N
To reset the settings of the fi-5000N to the factory default, follow the procedure below.
ATTENTION
Initialization will delete all uses information, and the settings are reset to
default. Prior to performing initialization, back up the user information by
referring to "5.4 Managing User Information of fi-5000N" (page 51). Note
down the network setting information to restore them.
1. Turn on the power of the fi-5000N.
2.
Open the cover and press the [SET] key.
The following settings screen appears.
Setup
Register Finger
Change PIN Code
Show Network Config
.
3. Press the [ID] and [ ] key simultaneously for about 5 seconds.
The following screen appears.
Do you want to
initialize the
device?
YES:[ENT]/NO:[ESC]
4. To reset the settings to the factory default press [ENT].
The following screen appears.
The device has
been initialized.
Restart the device.
5. Restart the fi-5000N.
And with this, the initialization is completed. Now configure the fi-5000N settings.
(For details about the fi-5000N settings, refer to "3.3 fi-5000N's Settings and Connecting to the
Network" (page 14).)
26
Chapter 4
Installing and Setting Driver
In order to scan documents from the scanner connected to fi-5000N, it is necessary to install the
scanner driver and the application software onto the PC.
There are two types of scanner drivers and applications:
Scanner Driver:
Application:
FUJITSU TWAIN 32
Scanner Driver
ScandAll 21 (For FUJITSU TWAIN 32)
FUJITSU ISIS Scanner Driver
QuickScan Pro™ (For FUJITSU ISIS)
4
Install the appropriate scanner driver for the application you will use.
If necessary, install one of the applications mentioned above.
ATTENTION
• Although the scanner is bundled with its own scanner driver, to
connect the scanner to this product, you must use the scanner driver
bundled with this product.
• QuickScan Pro™ is not bundled with this product. Use the software bundled with the scanner.
Refer to the "Getting Started" provided with the scanner for installation
details.
• If you use ScandAll21, install the one included in the Setup CD-ROM
provided with this product. Changes to support fi-5000N is included with
this version.
4.1 Installing FUJITSU TWAIN 32 Scanner Driver ............................................... 28
4.2 Installing ScandAll 21 ...................................................................................... 31
4.3 Installing FUJITSU ISIS Scanner Driver ......................................................... 33
4.4 Configuring Scanning Application ................................................................. 36
4.5 Uninstalling the Scanner Driver and Scanning Application......................... 39
fi-5000N Operator’s Guide
27
4.1
Installing FUJITSU TWAIN 32 Scanner Driver
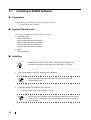
■ Preparation
Before starting the installation, check the following contents.
• Prepare the Setup CD-ROM.
• Uninstall any older versions of FUJITSU TWAIN 32 driver if already installed.
ATTENTION
• Although the scanner is bundled with its own scanner driver, to
connect the scanner to this product, you must use the scanner driver
bundled with this product.
• To uninstall previous versions, uninstall [Scanner Utility for Microsoft
Windows] from [Add/Remove Programs] of the Control Panel.
• We recommend you to check our website for the latest version of this
driver.
Our site is:
http://www.fujitsu.com/global/support/computing/peripheral/scanners
■ Installing
Windows XP screenshots are used in this section as examples.
The windows and operations may slightly vary depending on your OS.
HINT
1. Turn on the power of the PC, and log on to Windows.
ATTENTION
When using Windows 2000 or Windows XP, log on as a user with
"Administrator" rights.
2. Insert the Setup CD-ROM into the CD drive.
⇒ <SETUP DISK START UP SCREEN> appears.
ATTENTION
28
This screen may not appear when the "Autoplay" setting of your PC is OFF.
In this case, run "Install.exe" in this CD-ROM directly from the "Explorer" or
"My Computer".
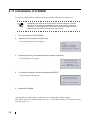
4.1 Installing FUJITSU TWAIN 32 Scanner Driver
3. Click [INSTALL PRODUCTS].
4. Click [TWAIN Driver] on the window below.
4
6. Follow the instructions on the window to install the application.
fi-5000N Operator’s Guide
29
Installing and Setting Driver
5. Select a language used for installation on [Choose Setup Language] window and click
[OK].
7. When the [InstallShield Wizard Complete] window appears, click [Finish].
⇒ Your PC will be restarted. Do not remove the Setup CD-ROM until your PC has completely restarted.
ATTENTION
To complete the installation successfully, you must restart your PC.
Installation of the scanner driver is completed.
HINT
30
In order to use the scanner, it is also necessary to have an application that
complies with the TWAIN standard.
Use "ScandAll 21" bundled with the fi-5000N.
To install ScandAll 21, refer to "4.2 Installing ScandAll 21" (page 31).
4.2 Installing ScandAll 21
4.2
Installing ScandAll 21
"ScandAll 21" is an image capturing software that complies with the TWAIN standard. The
FUJITSU TWAIN 32 scanner driver enables you to capture images with a FUJITSU image scanner
fi-series product.
ATTENTION
When using Windows 2000 or Windows XP, log on as a user with "Administrator" privileges (privileges of the administrator of your PC).
1. Insert the Setup CD-ROM into the CD drive.
⇒ <SETUP DISK START UP SCREEN> appears.
2. Click [INSTALL PRODUCTS].
4
Installing and Setting Driver
3. Click [ScandAll 21] on the window below.
fi-5000N Operator’s Guide
31
4. Select a language used for installation on [Choose Setup Language] window and click
[OK].
5. Install the application following the instructions on the window.
6. When the [InstallShield Wizard Complete] window appears, click [Finish].
ATTENTION
32
For finishing the installation, it may be necessary to restart your PC. Follow the
instructions on the window.
4.3 Installing FUJITSU ISIS Scanner Driver
4.3
Installing FUJITSU ISIS Scanner Driver
■ Preparation
Before starting the installation, prepare the Setup CD-ROM
ATTENTION
• Although the scanner is bundled with its own scanner driver, to connect
the scanner to this product, you must use the scanner driver bundled with
this product.
• We recommend you to check our website for the latest version of this
driver.
Our site is:
http://www.fujitsu.com/global/support/computing/peripheral/scanners
4
■ Installing
Installing and Setting Driver
Windows XP screenshots are used in this section as examples. The
windows and operations may slightly vary depending on your OS.
HINT
1. Turn on the power of the PC, and log on to Windows.
ATTENTION
When using Windows 2000 or Windows XP, log on as a user with
"Administrator" rights.
2. Insert the Setup CD-ROM into the CD drive.
⇒ <SETUP DISK START UP SCREEN> appears.
ATTENTION
This screen may not appear when the "Autoplay" setting of your PC is OFF.
In this case, run "Install.exe" in this CD-ROM directly from the "Explorer" or
"My Computer".
fi-5000N Operator’s Guide
33
3. Click [INSTALL PRODUCTS].
4. Click [ISIS Driver] on the window below.
5. Select a language used for installation on [Choose Setup Language] window and click
[OK].
6. Follow the instructions on the window to install the application.
34
4.3 Installing FUJITSU ISIS Scanner Driver
7. When the [Setup Complete] window appears, click [Finish].
⇒ Your PC will be restarted. Do not remove the Setup CD-ROM until your PC has completely restarted.
Installation of the scanner driver is completed.
HINT
fi-5000N Operator’s Guide
35
4
Installing and Setting Driver
In order to use the scanner, it is also necessary to have an application that
complies with the ISIS standard.
you can install "QuickScan Pro™" bundled with the scanner.
4.4
Configuring Scanning Application
Before performing a scanning operation, select the scanner from the scanning application.
The following describes how to select the scanner with respect to the FUJITSU TWAIN32 scanner
driver and the FUJITSU ISIS scanner driver.
The selection method may differ from the description below according to
the scanning application being used. Refer to the manual or the help file of
the scanning application being used.
HINT
■ For FUJITSU TWAIN32 Scanner Driver
This description uses the scanning application "ScandAll 21" as an example.
1. Start the application.
From the [Start] menu, select [All Programs] -> [Scanner Utility for Microsoft Windows] ->
[ScandAll 21].
2. From the menu, display the "Select Source" dialog box.
Select [Scan] -> [Select Source].
3. Select the scanner to be used.
The scanner connected to fi-5000N is displayed as "FUJITSU" + "Device Name" + "on
NET...". Select the name, and click the [Select] button.
The selection of scanner is completed.
With the scanning application, the scanner can be used in the same way as a scanner that is directly
connected to a PC. (Pull mode Scanning)
ATTENTION
36
The scanner to be used must be specified as "Favorite" on "Select Scanner" tab of "fi-5000N Configuration Tool".
Scanner specified as "Favorite" appears in "Select Source" dialog box.
When Pull mode scanning is enabled, user authentication is required. Perform user authentication with fingerprint or PIN. (To change the settings,
refer to "3.7 Pull Mode User Authentication Settings" (page 21)
4.4 Configuring Scanning Application
HINT
For details on scanning documents and configuring the scanning application, refer to the "Operator's Guide", "FUJITSU TWAIN32 Scanner Driver
Installation Guide", or "ScandAll 21" help supplied with the scanner.
■ For FUJITSU ISIS Scanner Driver
This description uses the scanning application "QuickScan Pro™" as an example.
1. Start the application.
From the [Start] menu, select [All Programs] -> [QuickScan] -> [QuickScan].
2. From the menu, display the "Scanner Selection" dialog box.
Select [Scan] -> [Select Source].
4
3. Select the scanner to be used.
Installing and Setting Driver
The scanner connected to fi-5000N is displayed as "Fujitsu + Device Name". Select the
name, and click the [Setup...] button.
⇒ The following window appears
In this window, the scanner name is displayed as "Fujitsu + Device Name + On NET".
Select the name, and click the [OK] button.
Selection of the scanner is completed.
With the scanning application, the scanner can be used in the same way as a scanner that is directly
connected to a PC.
fi-5000N Operator’s Guide
37
ATTENTION
HINT
38
The scanner to be used must be specified as "Favorite" on "Select Scanner" tab of "fi-5000N Configuration Tool".
Scanner specified as "Favorite" appears in the "Select Source" dialog box.
When Pull mode scanning is enabled, user authentication is required. Perform user authentication with fingerprint or PIN. (To change the settings,
refer to "3.7 Pull Mode User Authentication Settings" (page 21)
For details on scanning documents and configuring the scanning application, refer to the "Operator's Guide", or "QuickScan" help supplied with the
scanner.
4.5 Uninstalling the Scanner Driver and Scanning Application
4.5
Uninstalling the Scanner Driver and Scanning
Application
Follow the procedure below to uninstall the scanner driver and scanning application described in
this manual.
1. Start up your PC.
When using Windows 2000 or Windows XP, log in as a user with "Administrator" rights.
2. Exit all currently running programs.
3. Select [Control Panel] - [Add or remove Programs] from the [Start] menu.
⇒ This displays the "Add or remove Programs" screen which displays a list of the currently
installed applications.
4. Select the application to uninstall.
4
Installing and Setting Driver
(1) When uninstalling FUJITSU TWAIN 32
Select "Scanner Utility for Microsoft Windows".
(2) When uninstalling FUJITSU ISIS
Select "Fujitsu ISIS Drivers".
(3) When uninstalling ScandAll 21
Select "ScandAll 21".
5. Click the [Change/Remove] button.
⇒ The confirmation window for uninstalling appears.
6. Click the [OK] button.
⇒ This executes the uninstallation.
ATTENTION
Screen displays may vary slightly according to the operating system (OS) you
are using. Follow the on-screen instructions of the OS.
Example: When the OS is Windows 2000
• "Add or Remove Programs" → "Add/Remove Applications"
• [Change/Remove] button → [Add/Remove] button
fi-5000N Operator’s Guide
39
40
Chapter 5
Installing and setting the fi-5000N
Software
To control a fi-5000N connected to the network from your PC, and to scan with the scanner connected to the fi-5000N, install the "fi-5000N Software" on:
• The PC of fi-5000N’s Administrator
• The PCs used by the scanner’s users
This chapter describes the installation and operation procedures of the fi-5000N Software.
5
5.1 Installing fi-5000N Software.............................................................................42
5.2 fi-5000N Software Overview.............................................................................44
5.3 Adding and Deleting fi-5000N..........................................................................48
5.4 Managing User Information of fi-5000N..........................................................51
5.5 fi-5000N Administrator Settings ......................................................................56
5.6 Managing Scanner Information .......................................................................59
5.7 Settings of [Launch Options] ..........................................................................64
5.8 Uninstalling the fi-5000N Software..................................................................67
fi-5000N Operator’s Guide
41
5.1
Installing fi-5000N Software
■ Preparation
Before starting the installation, check the following contents.
• Prepare the Setup CD-ROM
■ System Requirements
The system requirements for the fi-5000N is as follow.
• Operating System
Microsoft Windows 98
Microsoft Windows 2000 Professional
Microsoft Windows Millennium Edition
Microsoft Windows XP Professional
Microsoft Windows XP Home Edition
• RAM
128 MB or higher
■ Installing
Windows XP screenshots are used in this section as examples. The
windows and operations may slightly vary depending on your OS.
HINT
1. Turn on the power of the PC, and log on to Windows.
ATTENTION
When using Windows 2000 or Windows XP, log on as a user with
"Administrator" rights.
2. Insert the Setup CD-ROM into the CD drive.
⇒ <SETUP DISK START UP SCREEN> appears.
ATTENTION
42
This screen may not appear when the "Autoplay" setting of your PC is OFF.
In this case, run "Install.exe" in this CD-ROM directly from the "Explorer" or
"My Computer".
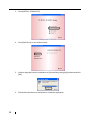
5.1 Installing fi-5000N Software
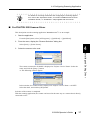
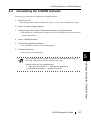
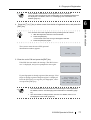
3. Click [INSTALL PRODUCTS].
4. Click [fi-5000N Software] on the window below.
5
6. Follow the instructions on the window to install the application.
7. When the [InstallShield Wizard Complete] window appears, click [Finish].
Installation of the fi-5000N Software is completed.
fi-5000N Operator’s Guide
43
Installing and setting the fi-5000N Software
5. Select a language used for installation on [Choose Setup Language] window and click
[OK].
5.2
fi-5000N Software Overview
■ Starting fi-5000N Configuration Tool
To start the fi-5000N software, from the [Start] menu, select [All Programs] -> [fi-5000N Software] -> [fi-5000N Configuration Tool].
ATTENTION
If Windows XP Service Pack 2 is installed, [Windows Security Alert] dialog
box may appear when starting up fi-5000N Software. If [Keep Blocking] is
selected with Windows firewall, PC cannot communicate with fi-5000N. In
this case, click [Unblock] to start the program.
■ [Select Scanner] Tab (Main Screen)
This screen (in which the [Select Scanner] tab is selected) is the main screen.
All kinds of administrative settings of fi-5000N can be done from this screen.
Tabs
Buttons
List View
The fi-5000Ns connected to the network are displayed in a list.
44
5.2 fi-5000N Software Overview
Name of Item
Function
[OK] button
Closes the screen and exits the fi-5000N Configuration Tool.
[Refresh] button
Updates and displays the latest information of the List View.
[Favorite] button
Selects a scanner to use among the scanners connected to the
network.
With the device name selected, when you click this button, a "*"
is displayed in the "Favorite" column, and it is configured as the
default scanner.
When using multiple scanners, this button helps you to switch
easily to other scanners.
[Add] button
Adds a new fi-5000N to the List View.
There is no need to add because the fi-5000N in the same
subnet as the PC is displayed automatically in the list.
To add an fi-5000N which is in other subnet, use this button.
[Delete] button
Deletes the selected fi-5000N from the list.
(An fi-5000N cannot be deleted if it is in the same subnet as your
PC.)
[User Config.] button
Registers/changes/deletes user information of the selected fi5000N.
Can be used only by the Operating Administrator.
The Administrator PIN is necessary.
[Admin.] button
Changes the name of the selected fi-5000N, network settings,
and Administrator PIN. Also, user information can be backed up
and restored.
Can be used only by the Administrator.
The Administrator PIN is necessary.
[Scanner Info.] button
Displays the information of the scanner that is connected to fi5000N. (It can be used by both, Administrator and users)
Consumables counters resetting, offset settings and power
saving settings can also be done. (Only by the Administrator)
45
Installing and setting the fi-5000N Software
fi-5000N Operator’s Guide
5
■ [Launch Option] Tab
The scanning application to be started when the button on the scanner ([Scan] or [Send To]) is
pressed, can be configured from this screen.
Name of Item
46
Function
Button:
Selects the button to be configured from among "Scan", and
"Send To 1 - Send To 9". You must set the following "Target",
"Argument" and "Start In", otherwise no application will start up.
Target:
Specifies the file name of the application to be started.
Argument:
Configures the argument to be passed to the specified application that is started.
With this function, you can also add more actions than just start
the scanning application when scanner button is pressed.
The argument that can be specified differs depending on the
application being used.
(Refer to "5.7 Settings of [Launch Options]" (page 64) for
details.)
Start In:
Specifies the default folder when the application starts.
5.2 fi-5000N Software Overview
■ [Advance] Tab
When receiving image data, the trigger port number for the fi-5000N, may conflict with other
applications.
This setting is used to change the trigger port number on the PC.
Name of Item
Function
Trigger port (PC):
Used to specify a trigger port number on the PC.
[Default] button:
Resets to the default number.
Installing and setting the fi-5000N Software
ATTENTION
5
When changing the trigger port number on the PC, you must also change
the trigger port on the fi-5000N. Refer to "5.5 fi-5000N Administrator Settings" (page 56). If the both port numbers are not the same, the fi-5000N
will not work correctly.
■ [Version] Tab
This tab shows the version information of the fi-5000N Configuration Tool.
fi-5000N Operator’s Guide
47
5.3
Adding and Deleting fi-5000N
When a fi-5000N is in the same subnet as the PC, it is automatically recognized and displayed in
the List View. However, when it is in other subnet, add or delete with the following procedure.
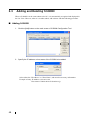
■ Adding fi-5000N
1. Click the [Add] button on the main screen of fi-5000N Configuration Tool.
2. Specify the IP address or host name of the fi-5000N to be added.
Select either the "IP Address:" or "Host Name", and enter the necessary information.
Example of entry: IP Address: 192.168.1.100
Host name: fi-5000n-00-01.fi-domain.xx.jp
48
5.3 Adding and Deleting fi-5000N
ATTENTION
Certain DNS servers and DHCP servers, which do not support DNS
update, may cause host name resolution problems when DHCP is specified
in IP address settings with fi-5000N.
If you experience such problems, consult with your network administrator
and take one of the following measures for fi-5000N and PC:
For fi-5000N,
1) Change to DNS server and DHCP server which support DNS
update.
2) Set the IP address lease time longer in DHCP server settings.
3) Use static IP method.
For PC,
1) Change to DNS server and DHCP server which support DNS
update.
2) Set the IP address lease time longer in DHCP server settings
and register the PC name on the DNS server.
3) Use static IP method.
3. Click the [OK] button.
HINT
5
There is no need to add it manually as it is automatically detected if it is on
the subnet.
Installing and setting the fi-5000N Software
fi-5000N Operator’s Guide
49
■ Deleting fi-5000N
1. Select the fi-5000N you want to delete from the List View of the main screen of fi5000N Configuration Tool.
2. Click the [Delete] button.
3. Click [Yes] when the confirmation message appears.
HINT
50
You cannot delete the fi-5000N which is in the same subnet as your PC.
5.4 Managing User Information of fi-5000N
5.4
Managing User Information of fi-5000N
You can register, change or delete the information of users on the fi-5000N using the user configuration function.
To use this function, the Administrator PIN is required.
■ How to Start
1. Select fi-5000N from the List View on the main screen on fi-5000N Configuration Tool,
and click the [User Config.] button.
5
HINT
The default Administrator PIN is "5000".
You can use [Admin.] button to change it.
Refer to "5.5 fi-5000N Administrator Settings" (page 56) for more details.
fi-5000N Operator’s Guide
51
Installing and setting the fi-5000N Software
2. The following screen appears. Enter the Administrator PIN, and click the [OK] button.
⇒The following screen appears.
List View
The user names registered in
fi-5000N are displayed in a
list.
The following settings can be configured.
■ Registering Users
Register a new user onto the fi-5000N with the following procedure.
1. Select [Add].
2. Enter the "User name", "New PIN", and "Host name/IP address", and click the [Enter]
button.
52
User Name
Enter the user name up to 16 characters. You cannot
leave it blank.
New PIN
Fill in the User PIN up to 6 digits. You cannot leave it
blank.
Host name/
IP address
Enter the IP address or the host name of the PC used by
the user. You cannot leave it blank.
Example: IP Address: 192.168.1.200
Host name: pc.fi-domain.xx.jp
5.4 Managing User Information of fi-5000N
⇒ The registering process runs.
It is possible to register a maximum of 32 users.
HINT
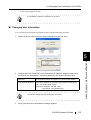
■ Changing User Information
You can change the information of registered users with the following procedure.
1. Select (click) the user name you want to change from the List View.
5
Installing and setting the fi-5000N Software
2. Change either the "New PIN" or the "Host name/IP address" when the user name
selected in the "User Name:" column is displayed, and click the [Enter] button.
HINT
New PIN
Fill in the User PIN up to 6 digits. You cannot leave it blank.
Host name/IP address
Enter the IP address or the host name of the PC used by the
user. You cannot leave it blank.
Example: IP Address: 192.168.1.200
Host name: pc.fi-domain.xx.jp
You cannot change the user ID and the user name.
3. Click [Yes] when the confirmation message appears.
fi-5000N Operator’s Guide
53
■ Deleting Users
You can delete the information of registered users with the following procedure.
1. Select (click) the user name you want to delete from the List View.
2. Click the [Delete] button.
3. Click [Yes] when the confirmation message appears.
■ Backing up User Information
1. Click the [Backup] button.
2. Specify the destination and the file name and click the [Save] button when the following screen appears.
3. The screen to set the backup password for the file to be saved appears.
Enter the password up to 16 characters. (To confirm, enter the password again.)
ATTENTION
This password is required when you do a restoration. Note that if you forget
the password, the backed up files cannot be restored.
4. Click the [OK] button.
⇒The user information is saved to a file.
54
5.4 Managing User Information of fi-5000N
■ Restoring User Information
1. Click the [Restore] button.
2. Specify the files created at the backup procedure, and click the [Open] button.
3. The screen for password verification appears.
Enter the password set during backup.
5
Installing and setting the fi-5000N Software
4. Click the [OK] button.
⇒ The user information is restored from the backup file.
fi-5000N Operator’s Guide
55
5.5
fi-5000N Administrator Settings
The administrator can confirm or change the device information of fi-5000N using
the administrator configuration function.
To use this function, the Administrator PIN is required.
■ How to Start
1. Select an fi-5000N from the List View on the main screen on fi-5000N Configuration
Tool, and click the [Admin.] button.
2. The following screen appears. Enter the Administrator PIN, and click the [OK] button.
HINT
56
The default Administrator PIN is "5000".
5.5 fi-5000N Administrator Settings
⇒The following screen appears.
The following settings can be configured.
■ Changing the fi-5000N unit name
5
Installing and setting the fi-5000N Software
The currently selected name of fi-5000N is displayed in "Name:"
To change, follow the procedure below.
1. Select the "Change fi-5000N configuration" check box.
2. Enter a name in the edit box.
Enter up to 20 characters.
3. Click the [Apply] button.
■ Changing the Trigger Port on the fi-5000N
The currently selected trigger port number for the fi-5000N is displayed.
To change, follow the procedures below.
1. Select the "Change fi-5000N configuration" check box.
2. Enter a number into the edit box.
Enter a number between 2000 and 60000. The default is 10002.
3. Click the [Apply] button.
fi-5000N Operator’s Guide
57
■ Changing the Administrator PIN
You can change the PIN of the administrator.
To change, follow the procedure below.
1. Select the "Change PIN:" check box.
2. Enter a new PIN into the edit box.
To confirm, enter the PIN again.
Enter numerals up to 6 digits.
3. Click the [Apply] button.
HINT
58
The administrator PIN is required to use administrator functions of fi-5000N
and fi-5000N Software. This PIN can be changed from fi-5000N.
5.6 Managing Scanner Information
5.6
Managing Scanner Information
With the scanner information management function, you can display the information of the scanner
connected to an fi-5000N, reset the consumables counter, configure the power saving mode, and
adjust the offset setting.
■ How to Start
Select an fi-5000N from the List View on the main screen on fi-5000N Configuration Tool, and
click the [Scanner Info.] button.
5
Installing and setting the fi-5000N Software
⇒The following screen appears.
To change the settings at the [Device Set] tab, the Administrator PIN is required.
fi-5000N Operator’s Guide
59
■ [Device Info] Tab
The list of the scanner functions is displayed in this screen.
The displayed items may differ depending on the scanner.
The displayed items are only the hardware functions, which may not be the same with the values
that can be specified during scanning mentioned earlier. The functions that can be achieved by the
software are not displayed.
Also, this tab does not appear if the scanner is in use or not connected. If the tab does not appear,
exit the application that the scanner is using or check the connection, and then display the tab.
60
5.6 Managing Scanner Information
■ [Device Set] Tab
You can display and configure the hardware settings and maintenance information of the scanner.
However, there may be items that cannot be displayed or configured (appears dimmed) depending
on the scanner.
The changed setting is reflected in the scanner after clicking the [OK] button.
This tab does not appear when the scanner is in use or not connected. If the tab does not appear,
exit the application that the scanner is using or check the connection, and then display the tab.
(To change the settings, the Administrator PIN is required.)
5
The approximate number of scanned pages since the last consumables replacement and the
remaining amount of imprinter ink are displayed in the red frame.
After replacing the consumables, you must click the corresponding [Clear] button to reset the
counter.
The consumables differ depending on the scanner. For further details refer to the Operator's Guide
supplied with the scanner.
fi-5000N Operator’s Guide
61
Installing and setting the fi-5000N Software
About Replacing Consumables
Also, messages such as the following may appear while using the scanner.
If this message appears, follow the instructions below to replace the consumables.
After clicking the [Ignore] button, this message will disappear and scanning will continue. Please
replace the consumable as soon as possible.
This message appears again after certain number of scans. If you do not wish this message to be
displayed, select the [This message not display again] check box.
To stop scanning and replace the consumable, click the [Cancel] button.
If the consumables are replaced, reset the consumable counters by clicking the [Clear] buttons
located in the [Device Set] tab.
About the Power Saving Settings
Specifies the timer of the lamp to turn off after scanning.
*The timer value range differs depending on the scanner.
62
5.6 Managing Scanner Information
About Offset and Scale Adjustment
If you click the [Offset] button, the following window appears.
You can change the offset amount of the start position, and the magnification of the sub-scan in
this window.
Fine adjustments can be done if the document position is different from the actual scanning
position.
Generally, there is no need to adjust the setting as it is adjusted to an optimum value at the factory.
*The setting range differs depending on the scanner.
When using the flatbed, you can specify the following modes to delete shadows on top edge and
left edge of the paper.
• "Enable eliminating a dark area on the top of the image" mode
• "Enable eliminating a dark area on the left side of the image" mode
*These modes may not appear depending on the scanner.
[Vertical Magnification Adjustment]
You can change the magnification correction value for sub-scan direction.
In case of ADF, the magnification value for feeding direction can be adjusted based on factory
adjustments.
In case of flatbed, the magnification value for the scanning head movement direction can be
adjusted based on factory adjustments.
(This function is used when the aspect ratio of the generated image looks different from the
scanned document.)
*The adjustable range differs depending on the scanner.
fi-5000N Operator’s Guide
63
Installing and setting the fi-5000N Software
[Offset Setting]
5
5.7
Settings of [Launch Options]
From the [Launch Options] tab, you can configure the application to start when a button on the
scanner ([Scan]/[Send to]) is pressed.
Depending on the setting, the scanner starts scanning automatically, saves the scanned image to
file, or displays images on the screen.
As an example of the "Launch Options" configuration with "ScandAll 21", an scanning application
provided with this product, is shown below.
"ScandAll 21" is provided with arguments designed for FUJITSU fi-series image scanners.
By using "ScandAll 21", you can easily experience a one-touch button operation.
The following arguments are available.
/ScanToFile:
Saves the scanned image to file.
/ScanToView:
Displays the scanned image on the monitor.
/Exit:
Exits the application after scanning. (ScanToFile only)
/PROGRES:0
Hides the FUJITSU TWAIN 32 progressive indicator window.
/SHOWUI:X
Displays or hides the FUJITSU TWAIN 32 setting window.
X=0: To hide
X=1: To display
X=2: Follows the setting done in ScandAll 21
/SCANDEF:XX
Specifies the setting file of FUJITSU TWAIN 32 (XX=00~99).
/NOSCNERR
Hides the FUJITSU TWAIN 32 error messages.
/NOAPPERR
Hides the ScandAll 21 error messages.
/AppendToView
Adds the currently scanned image to the previous one to
view.
/NOOPDLG
Specifies not to show the following dialog box that can be set
from Scan-Option.
File setting dialog
FTP server setting dialog
Print setting dialog
Microsoft SharePoint Portal Server setting dialog
Mail setting dialog
ATTENTION
64
You can combine and use these arguments. You have to put a space
between each argument. (before slash "/".)
The arguments require no particular order.
However, "/AppendToView" must be used alone because the other arguments will be ignored.
5.7 Settings of [Launch Options]
Example 1: When the [Scan] button is pressed, "ScandAll 21" starts up, performs the scanning
operation and displays the scanned image.
Name of Item
Setting
Button:
[Scan]
Target:
C:\Program Files\ScandAll 21\FImage.exe (*)
Argument:
/SHOWUI:09/ScanToView
Start in:
C:\Program Files\ScandAll 21\ (*)
Name of Item
Setting
Button:
[Send to 1] (*)
Target:
C:\Program Files\ScandAll 21\FImage.exe (*)
Argument:
/SHOWUI:09/ScanToFile
Start in:
C:\Program Files\ScandAll 21\ (*)
* [Target] and [Start in] may differ depending on where "ScandAll 21" is installed. The
example above is based on the default setting.
The "9" character which appears in "Argument" indicates a space.
You can assign 9 different functions to the [Send to] button.
By pressing the [Function] button on the scanner’s operator panel, the [Send to] button’s
function can be changed in the following order: [1]J[2]J...[9]J[C]J[1]J...
(Function [C] cannot be used).
fi-5000N Operator’s Guide
65
5
Installing and setting the fi-5000N Software
Example 2: When the [Send to] button is pressed, "ScandAll 21" starts up, performs the scanning
operation and saves the scanned images.
ATTENTION
The following settings are required on ScandAll 21.
<Start ScandAll 21>
1. From the [Start] menu, select [All Programs] -> [Scanner Utility for
Microsoft Windows] -> [ScandAll 21], and start ScandAll 21.
<Select Scanner>
2. From the menu bar, select [Scan] -> [Select Source].
3. Select "FUJITSU" + "Device name" + "on NET...".
<Configuring scanning setting>
4. From the menu bar,
For Example 1, select [Scan] -> [To View].
For Example 2, select [Scan] -> [To File].
5. For Example 2, configure the file format, destination to save file to, and
click the [Scan] button.
6. Configure the scan settings when the "TWAIN Driver" window appears,
and click the [Close] button.
<Configuring not-to-display the FUJITSU TWAIN 32 setting screen>
If you do not want to let the FUJITSU TWAIN 32 setting screen appear after
pressing the [Scan] or [Send to] button on the scanner’s operator panel, follow the steps below.
(*When the argument "SHOWUI:0" is specified, the following steps are not
required.)
7. From the menu bar, select [Scan] -> [Option...].
8. Clear the "TWAIN Dialog" check box.
<Configuring not-to-display any other setting screen>
If you do not want to let any other ScandAll 21’s setting screen appear after
pressing the [Scan] or [Send to] button on the scanner’s operator panel, follow the steps below.
(*When the argument "NOOPDLG" is specified, the following steps are not
required.)
9. From the menu bar, select [Scan] -> [Option...].
10. From "Other Scan Dialog", clear the check box of the items that you do
not want to show.
For Example 2, if you clear the "To File Dialog" check box, you would
not have to assign a file name each time a scanning is performed. (Verify that the "Use Counter" check box on the "Scan To File" window is
selected.)
*For details on the ScandAll 21 settings, refer to the ScandAll 21 Help.
66
5.8 Uninstalling the fi-5000N Software
5.8
Uninstalling the fi-5000N Software
Follow the procedure below to uninstall the fi-5000N Software.
1. Start up your PC.
When using Windows 2000 or Windows XP, log in as a user with "Administrator" rights.
2. Exit all currently running programs.
3. Select [Control Panel] - [Add or Remove Programs] from the [Start] menu.
⇒ This displays the "Add or Remove Programs" screen which displays a list of the currently
installed applications.
4. Select "fi-5000N Software".
5. Click the [Change/Remove] button.
⇒ The confirmation window for uninstalling appears.
6. Click the [OK] button.
⇒ This executes the uninstallation.
ATTENTION
5
Installing and setting the fi-5000N Software
Screen displays may vary slightly according to the operating system (OS) you
are using. Follow the on-screen instructions of the OS.
Example: When the OS is Windows 2000
• "Add or Remove Programs" → "Add/Remove Applications"
• [Change/Remove] button → [Add/Remove] button
fi-5000N Operator’s Guide
67
68
Chapter 6
6
User Authentication
6.1 Fingerprint Registration .................................................................................. 70
6.2 User Authentication by Fingerprint ................................................................ 74
6.3 User Authentication by PIN ............................................................................. 75
6.4 Changing the User’s PIN ................................................................................. 76
fi-5000N Operator’s Guide
69
6.1 Fingerprint Registration
For user authentication, register each user’s fingerprint information on this product. However,
injured users and users with difficulties in registering fingerprints can be authenticated by using a
PIN (personal identification number).
Register users' fingerprints following the procedure below.
1. Open the Cover.
ES
C
7
4
ID
8
1
5
9
SE
0
T
2
6
.
3
Confirm that the "Place your finger on the sensor" (this
indicates the "Logout" status) is displayed on the fi-5000N
Message Display.
Place your finger
on the sensor
2. Then press the [SET] key on the fi-5000N’s keyboard.
The following screen appears.
Setup
Register Finger
Change PIN Code
Show Network Config
3. Select "Register Finger", and press the [ENT] key.
The list of registered users on fi-5000N appears.
Select User
1(user's name)
2(user's name)
3(user's name)
70
6.1 Fingerprint Registration
ATTENTION
The fi-5000N’s Administrator must register the user in advance.
The user name registered by the Administrator in the fi-5000N Software will
be displayed. For details, refer to "5.4 Managing User Information of fi5000N" (page 51)
4. Press the [K] or [L] key to select a user from the list of registered users, and press the
[ENT] key.
User Authentication
You can also select the registered user by entering user ID number:
HINT
1. With the keyboard, enter the user ID number.
2. Press the [ENT] key.
⇒The name of the user to log in will appear selected.
3. Press the [ENT] key again.
The screen to enter the user's PIN (personal
identification number) appears.
PIN:_
Cancel:[ESC]
5. Enter the user’s PIN and press the [ENT] key.
If the PIN does not match, the message "The PIN is incorrect" is displayed, and you are prompted to enter again.
The PIN is incorrect
If your fingerprint is already registered, the message "Your
finger is already registered. Register again?" is displayed.
Press the [ENT] key to re-register your fingerprint, otherwise press the [ESC] key.
ATTENTION
Your finger is
already registered.
Register again?
YES:[ENT]/NO:[ESC]
• The Administrator sets the initial user’s PIN during the user registration.
For details, refer to "5.4 Managing User Information of fi-5000N" (page
51).
• The user is able to change his/her own PIN. For details, refer to "6.4
Changing the User’s PIN" (page 76).
fi-5000N Operator’s Guide
6
71
If the PIN matches, the following screen appears.
Confirm the correct finger placement by looking at the
sticker inside of the cover. For the details, please refer to
"APPENDIX Using User Authentication by Fingerprint."
Press [ENT] key, then the following screen appears and the
registration of the fingerprint starts.
Look at the sticker
inside of cover for
finger placement
OK:[ENT]
Registration:
Place your finger
on the sensor
6. Place the finger to register on the fingerprint sensor.
If your fingerprint is correctly captured, a buzzer sounds
and at the same time the following screen appears.
Processing...
Remove your finger
from the sensor
7. Remove your finger from the fingerprint sensor.
The following screen appears and the fingerprint verifications will be repeated twice.
Fingerprint will
be verified twice.
Place your finger
on the sensor
8. For verification procedure, place the registered finger on the fingerprint sensor again.
If the first verification is successfully done, the following
screen appears.
First Verification
is successful
9. Second verification starts.
Starting Second
Verification.
Place your finger
on the sensor
72
6.1 Fingerprint Registration
10.When the 2nd verification process has been completed,
the following message appears.
Second Verification
is successful
6
Then the message indicating that the fingerprint data is
being saved is displayed.
Next, the finishing registration message appears.
Registration is
successful
OK:[ENT]
Press [ENT] key to finish the registration.
fi-5000N Operator’s Guide
73
User Authentication
Saving fingerprint
data...
6.2 User Authentication by Fingerprint
To change from the logout status to the status when the scanner can start scanning (login), fingerprint authentication must be done. (Also, PIN authentication is equipped as an alternative to an
injured users or users with difficulties in fingerprint authentication.)
1. When "Place your finger on the sensor" is displayed on
the fi-5000N Message Display (this indicates the
"Logout" status), place on the fingerprint sensor the finger that has been registered.
HINT
Place your finger
on the sensor
When you learn to place the finger correctly, you can remove the Finger
Guide. For the removal, refer to "APPENDIX Using User Authentication by
Fingerprint."
When the finger placed on the fingerprint sensor is
detected, the following message appears and the fingerprint
capturing begins.
Capturing
fingerprint...
2. If the capturing of your fingerprint is successfully done, a buzzer sounds and at the
same time the following screen appears. Remove your finger from the fingerprint sensor.
Identifying...
Remove your finger
from the sensor
3. Next, the identification of your fingerprint begins.
If the identification of your finger is successfully done, a
buzzer sounds and at the same time the following login
screen appears.
Load the document on to ADF and press [Scan] or [Send
to] button on the scanner.
74
(user's name)
Load the documents
onto scanner & press
[Scan]/[Send to]
6.3 User Authentication by PIN
6.3 User Authentication by PIN
PIN authentication is equipped as an alternative to injured users or users with difficulties in fingerprint authentication.
1. When "Place your finger on the sensor" is displayed on the fi-5000N Message Display
(this indicates the "Logout" status), open the cover and press the [ID] key.
The "Select User" screen appears as follows.
User Authentication
Select User
1(user's name)
2(user's name)
3(user's name)
2. Select the registered user with the [K], [L] keys, and press the [ENT] key.
You can also select the registered user by entering user ID number:
HINT
1. With the keyboard, enter the user ID number.
2. Press the [ENT] key.
⇒The name of the user to log in will appear selected.
3. Press the [ENT] key again.
The next screen appears, and the PIN is prompted.
PIN:_
Cancel:[ESC]
3. Enter the user’s PIN, and press the [ENT] key.
If the PIN does not match, the message "The PIN is incorrect" appears, and you are
prompted to enter again.
4. If the PIN matches, the login screen appears.
(user's name)
Load the documents
onto scanner & press
[Scan]/[Send to]
fi-5000N Operator’s Guide
6
75
6.4 Changing the User’s PIN
The initial user’s PIN value is set by the Administrator during the user registration. However the
user is able to change his/her own PIN.
Change the user's PIN following the procedure below.
1. When "Place your finger on the sensor" is displayed on the fi-5000N Message Display
(this indicates the "Logout" status), open the cover and press the [SET] key.
The following settings screen appears.
Setup
Register Finger
Change PIN Code
Show Network Config
2. With the [L] key, select "Change PIN Code", and press the [ENT] key.
The "Select User" screen appears as follows.
Select User
1(user's name)
2(user's name)
3(user's name)
3. Select the registered user with the [K], [L] keys, and press the [ENT] key.
The next screen appears, and the PIN is prompted.
Current PIN:
_
Cancel:[ESC]
4. Enter the current PIN and press the [ENT] key.
If the PIN does not match, the message "The PIN is incorrect" appears and you are prompted to enter again. If the
PIN matches, the message "New PIN:" appears.
New PIN:
_
Cancel:[ESC]
5. Enter the new PIN and press the [ENT] key.
For confirmation, re-enter the PIN again.
If the registration of the new PIN is successfully done, the
following screen appears.
With this, the user's PIN is changed.
76
PIN has been
changed
Chapter 7
Daily Care
7
This chapter describes how to clean the fi-5000N.
Before you clean the fi-5000N, turn off its power and unplug the AC
adapter from the outlet.
7.1 Cleaning Materials............................................................................................ 78
7.2 Parts to Clean and Cleaning Method .............................................................. 79
fi-5000N Operator’s Guide
77
7.1 Cleaning Materials
Cleaning Materials
Parts Number
Cleaner F1
(or isopropyl alcohol)
CA99501-0013
Lint-free dry cloth
Commercially available
Remarks
1 bottle
Moisten the cloth with this
fluid and wipe the scanner
clean.(*)
Do not use it for cleaning
printed characters, logos and
marking areas.
* For details about the cleaner F1, contact the FUJITSU dealer where you purchased the fi-5000N.
78
7.2 Parts to Clean and Cleaning Method
7.2 Parts to Clean and Cleaning Method
Part to clean
Cleaning Method
Remarks
Cover
Wipe the Cover with a lint-free dry
cloth.
Fingerprint
Sensor
Wipe the Fingerprint Sensor gently with a dry lint-free cloth.
Cleaning the Fingerprint Sensor
The sensor might not function correctly in the following situations. Clean the
sensor surface on a regular basis.
• Sensor surface is dirty with dust or any other dirt
• Sensor surface is wet.
• There are dew drops on the sensor surface.
Clean the fingerprint sensor when the following problems occurs. Cleaning
the sensor might solve such problems.
• The Display Message shows "Sensor surface not clean. Please wipe
sensor, and restart device".
• Although the finger is away from the sensor, the Display Message
keeps showing "Remove your finger from the sensor".
• Fingerprint registration failures and/or fingerprint identification failures
occur frequently.
fi-5000N Operator’s Guide
79
7
Daily Care
ATTENTION
Do not splash any liquids or allow
the fi-5000N to get wet.
Do not use flammable solvents
such as benzine.
80
Chapter 8
Troubleshooting
8
8.1 Error Messages and Remedies ....................................................................... 82
8.2 Troubleshooting ............................................................................................... 88
8.3 Items to Check Before Asking for Repair ...................................................... 90
8.4 Checking Labels on the fi-5000N .................................................................... 91
fi-5000N Operator’s Guide
81
8.1
Error Messages and Remedies
If an error occurs in fi-5000N, a temporary error or device alarm message will appear on the Message Display.
Temporary errors are errors that can be resolved by the user, while device alarms are malfunctions
errors that require recovery work by support engineers.
■ Temporary Errors
If the same message still appears after following the contents listed below, contact the store where
you purchased the scanner or an authorized FUJITSU scanner service provider.
Message
Remedies
Sensor surface not clean. Please
wipe sensor, and restart device.
The fingerprint sensor surface is dirty.
Turn off the power, wipe the surface lightly with a dry lintfree cloth.
Scanner is disconnected
Check the following:
• Is the scanner turned on?
• Is the USB cable connected to the scanner?
• Is the USB cable damaged?
Unsupported device is
connected
Check that the connected scanner is among the following:
fi-4120C/4120C2/4220C/4220C2/5110C/4530C. Any
other scanner and devices are not supported.
The network cable is
disconnected
Check the following:
• Is the network cable (LAN) connected to the network?
• Is the network cable (LAN) connected to this device?
• Is the network cable (LAN) connected to a hub (router,
etc.)?
• Is the hub turned on?
• Is the network cable (LAN) damaged?
• Is the correct network cable being used?
(Correct: straight cable; incorrect: cross cable)
The IP address is already in use
by another device
It is possible that the IP address is already in use by
another device.
Consult with the network administrator and change any
one of the IP addresses.
Position your finger
a little lower
Check the following:
Did you placed your finger in the correct position on the
sensor?
* Refer to "APPENDIX Using User Authentication by Fingerprint" (page 1).
Position your finger
a little higher
Position your finger
a little more right
Position your finger
a little more left
82
8.1 Error Messages and Remedies
Message
Unable to capture fingerprint.
Place finger on sensor correctly
Remedies
• Verify that you are placing your finger in the correct
position. Refer to "APPENDIX Using User Authentication by Fingerprint" (page 1)
• During fingerprint registration, do not remove your finger until the beep sounds.
Your fingerprint cannot be captured as your finger is wet.
Clean your registered finger. Also, moisten a cloth with
Cleaner F1 and wipe the sensor’s surface lightly.
User is not registered.
Place the finger that is registered on the sensor.
(This message disappears after 3 seconds and the device
returns to logout status)
Invalid ID number
Check your ID number, and enter the correct ID number.
The PIN is incorrect
Check your PIN, and enter the correct PIN.
The New PIN entries do not
match
Check whether the PIN is incorrect.
This fingerprint is not registered.
Do the following:
• Change your finger position on the fingerprint sensor.
• Check with the PIN whether you are a registered user.
• Check whether it is a different finger that has been
registered.
• Register your finger again.
Unable to register fingerprint.
Please register again.
Refer to "APPENDIX Using User Authentication by Fingerprint" (page 1) and register your fingerprint again.
Unable to register this finger.
Register different finger.
The finger may not be in optimal condition (extremely dry
skin, wounded, etc.) for registration. Register another finger.
Failed to save fingerprint data
Register your fingerprint again. If the problem persists,
turn off and on the power, and configure the fingerprint
settings again.
Invalid IP address
Check whether the IP address entered is incorrect.
Invalid subnet mask
Check whether the subnet mask entered is incorrect.
Invalid gateway address
Check whether the gateway address entered is incorrect.
Invalid DNS server address
Check whether the DNS entered is incorrect.
Host connection failure due to
time-out
Check the following:
• fi-5000N is connected via network to the PC specified
by the logged-in user.
• The PC specified by the logged-in user is running.
• fi-5000N Software is installed on the PC specified by
the logged-in user.
• The trigger port settings for fi-5000N and the settings
for the PC specified by the logged-in user are identical.
fi-5000N Operator’s Guide
83
8
Troubleshooting
Capturing failure
Your finger is wet.
Please wipe finger and sensor.
Message
84
Remedies
Host busy with other fi-5000N.
Wait few minutes and try sending
again.
The host computer is performing a scanning operation
with other fi-5000N. Wait until this operation is finished
and try scanning again.
DNS server is not configured
Set the DNS server in "Configure Network".
Cannot access DNS server
In "Configure Network", check whether the DNS server is
set correctly.
Name resolution failure
The destination host name configured by the logged in
cannot be converted into an IP address.
Check whether the host name settings are correct.
Failed to start Application
At [Launch Option] tab in the "fi-5000N Configuration
Tool" dialog box, verify that "Target" is set correctly.
Cannot obtain IP address from
DHCP server.
Consult with the network administrator whether the DHCP
server is working properly.
If the DHCP server is not working properly, configure the
settings of the fixed IP address.
Document jam
Document jam occurred during scanning operation. Correct the jammed conditions.
Press [ENT] key on fi-5000N keyboard.
If the PC which is to receive the scanned data is showing
an error message, follow the instructions.
ADF cover opened
Scanner ADF paper chute, hopper or imprinter cover is
opened. Confirm that scanner ADF paper chute, hopper
and imprinter are closed completely.
Press [ENT] key on fi-5000N keyboard.
If the PC which is to receive the scanned data is showing
an error message, follow the instructions.
No paper on ADF paper chute
Scanner's ADF paper chute or the hopper has no document on it.
Confirm that document are loaded correctly on the ADF
paper chute or on the hopper.
Press [ENT] key on fi-5000N keyboard.
If the PC which is to receive the scanned data is showing
an error message, follow the instructions.
Multifeed error
Multifeed occurred during scanning operation. Remove
the document in the scanner's document feeding path and
correct the multifeed conditions.
Press [ENT] key on fi-5000N keyboard.
If the PC which is to receive the scanned data is showing
an error message, follow the instructions.
Shipping lock malfunction
Confirm that the shipping lock is in released position.
Press [ENT] key on fi-5000N keyboard.
If the PC which is to receive the scanned data is showing
an error message, follow the instructions.
8.1 Error Messages and Remedies
Message
No print cartridge
Remedies
Confirm if the imprinter's print cartridge is installed correctly and the connection parts are clean and not contaminated.
Press [ENT] key on fi-5000N keyboard.
If the PC which is to receive the scanned data is showing
an error message, follow the instructions.
For the remedies to solve scanner related temporary errors, refer to troubleshooting section on
"FUJITSU TWAIN 32 User's Guide" in the Setup CD-ROM included in the scanner.
8
Troubleshooting
fi-5000N Operator’s Guide
85
■ fi-5000N Device Alarms
If one of the following messages are shown on fi-5000N Message display, it is likely that fi-5000N
has hardware problem. In this case, turn off the fi-5000N power and turn it on again. If the same
device alarm occurs, contact the store where you purchased fi-5000N or an authorized FUJITSU
scanner service provider.
Message
86
Buzzer
frequency
LED
(Nothing is displayed)
Blinks at 1 second
intervals
-
(Nothing is displayed)
Blinks at 2 seconds
intervals
-
Memory Error
Restart the device
-
-
Failure of loading program.
Restart the device.
-
-
PCI Initial Error.
Restart the device.
-
Once
(long)
MACROM Read Error
Restart the device
-
Once
(long)
Hardware error of fingerprint sensor.
Restart the device.
-
Once
(long)
Failure of fingerprint sensor initialization.
Restart the device.
-
Once
(long)
Calibration of fingerprint sensor failed.
Restart the device.
-
Twice
Network configuration failure.
Restart the device.
-
Twice
8.1 Error Messages and Remedies
■ Scanner Device Alarms
If one of the following messages are shown on fi-5000N Message display, it is likely that the scanner has hardware problem. In this case, turn off the scanner and fi-5000N power and turn them on
again. If the same device alarm occurs, contact the store where you purchased the scanner or an
authorized FUJITSU scanner service provider.
No.
Message
No
Message
Temporary shortage of scanned data
12
LSI malfunction
2
EEPROM Error
13
Heater malfunction (ADF Front)
3
Fuse for ADF motor blown
14
Heater malfunction (ADF Back)
4
Background changeover unit failure
15
Heater malfunction (Flatbed)
5
Optical error
16
Motor fuse malfunction
6
Imprinter error
17
Lamp fuse malfunction
7
Fuse for Imprinter blown
18
Optical error (ADF Front)
8
Flatbed motor malfunction
19
Optical error (ADF Back)
9
Memory malfunction
20
Optical error (Flatbed)
10
Sensor malfunction
21
Fan malfunction
11
Internal communication error of the
scanner
22
Option board malfunction
fi-5000N Operator’s Guide
8
Troubleshooting
1
87
8.2 Troubleshooting
Before you ask for repair service, check the following first.
If you cannot solve the problem even after checking the following items, contact the store where
you purchased the fi-5000N, or contact an authorized FUJITSU scanner service provider.
Symptom
fi-5000N cannot be
turned on. (Power lamp
(LED) is not lighted)
Nothing is displayed on
the Message Display
The fi-5000N’s keyboard
does not respond when
the keys are pressed
88
Check this item
Remedy
Is the power switch turned on?
Turn on the power switch.
Are the AC adapter and the power
cable of fi-5000N connected
correctly?
Re-connect the AC adapter and
the power cable correctly.
Turn off the power, and
disconnect the USB cable. Is the power
restored when you turn on the power
again?
Check whether there is a problem
with the USB cable or the power
cable.
Turn off the power, and
disconnect the network cable. Is the
power restored when you turn on the
power again?
Check whether there is a problem
with the network cable or the network (such as hub, router).
The power lamp (LED) could be
damaged If any of the following is
observed:
Is the lamp on the network connector
blinking (orange)?
Do messages appear on the Message
Display?
Can the problematic fi-5000N be seen
from the fi-5000N software?
Turn on the power again.
Is the power lamp of fi-5000N lighted
up?
Turn off the power switch. Check
that the AC adapter and the
power cable are connected, and
then turn on the power.
Turn off the power of fi-5000N, and
disconnect the USB cable. Does the
problem prevail even after you turn on
the power again?
Check whether there is a problem
with the USB cable or the power
cable.
Turn off the power of fi-5000N, and
disconnect the network cable. Does the
problem persist even after you turn on
the power again?
Check whether there is a problem
with the network cable or the network (such as hub, router).
Are the power lamp of fi-5000N lighted,
and messages displayed on the Message Display?
Turn off the power switch. Check
that the AC adapter and the
power cable are connected, and
then turn on the power.
8.2 Troubleshooting
Check this item
Remedy
Scanning does not start
when the [Scan] or
[Send to] button is
pressed.
Is the scanner showing an error code?
(Does "U" or "E" appear on the Function Number display of the scanner?)
Note down the displayed message, and take the appropriate
action subject to the displayed
message.
Does any error message appear on the
fi-5000N?
Take the appropriate action subject to the displayed message.
Turn off the fi-5000N and reconnect the
USB cable. Does the problem persist
even after you turn on the power
again?
Check whether there is a problem
with the USB cable or the scanner.
Turn off the fi-5000N and reconnect the
network cable. Does the problem persist even after you turn on the power
again?.
Check whether there is a problem
with the network cable or the network (such as hub, router).
Fi-5000N does not
appear in the [Select
Scanner] tab of the fi5000N Software.
(Unable to communicate over the network)
1. Is the network cable connected?
2. Is the Hub turned on?
3. Is the fi-5000N's IP address set correctly?
4. Is the fi-5000N turned on?
Check whether there is a problem
with the network cable or the network (such as hub, router).
A message informing
that scanner is not found
appears during scanning.
Verify in the fi-5000N Software the following points:
1. Is the fi-5000N being used set as
"favorite"?
2. Is the scanner connected to the fi5000N?
3. Does the fi-5000N appear as "Inactive" in the [Scanner Select] tab?
4. Did you set the fi-5000N network
connection using DCHP configuration?
Start the fi-5000N Software, and
check whether there is a problem
with the network settings or
whether the fi-5000N is selected
correctly.
fi-5000N Operator’s Guide
89
8
Troubleshooting
Symptom
8.3 Items to Check Before Asking for Repair
Collect the following information before you contact the dealer where you bought the scanner or
an authorized FUJITSU scanner service provider.
Item to check
90
Example
Remarks
Model
fi-5000N
For details on the model
name refer to "8.4 Checking
Labels on the fi-5000N" (page
91)".
Serial number
000001
For details on the serial number refer to "8.4 Checking
Labels on the fi-5000N" (page
91)".
Production date
2004-12
(December, 2004)
For details on production date
refer to "8.4 Checking Labels
on the fi-5000N" (page 91)".
Firmware version
0700
For details on how to check
the firmware version, refer to
"3.10 Displaying Device Information" (page 25)
Date of purchase
2004/12/11
Symptoms
There is no response when
pressing the [SET] button.
Frequency of
malfunction
Once a week
Type of OS
(Windows®)
Windows XP (with SP2)
Connected Scanner
Information:
Model
Serial Number
Production date
Date of purchase
fi-4220C2
00001
2004-11 (November, 2004)
2004-12 (December, 2004)
Scanner driver name and
version
FUJITSU TWAIN 32
V 9.16.5
Scanning Application
name and version
ScandAll 21, V4.2.31
Explain the symptom as much
as possible.
For details of the scanner
information, refer to the Operator’s Guide of the connected
scanner.
8.4 Checking Labels on the fi-5000N
8.4 Checking Labels on the fi-5000N
The following illustrations are samples of the product labels of the fi-5000N.
MODEL fi-5000N
PART NO. PA03368-B***
SER. NO. ******
DATE 2004-11
16V
0.5A 1.0kg
8
MADE IN JAPAN
Troubleshooting
Label A (Example): Compliance of the device with specifications is shown.
Label B (Example): Information on the device is shown.
MODEL fi-5000N
PART NO. PA03368-B***
SER. NO. ******
DATE 2004-11
16V
0.5A 1.0kg
MADE IN JAPAN
fi-5000N Operator’s Guide
91
92
Chapter 9
Specifications
This chapter lists the fi-5000N specifications.
9
9.1 Basic Specifications ........................................................................................ 94
9.2 Installation Specifications ............................................................................... 95
9.3 External Dimensions........................................................................................ 96
fi-5000N Operator’s Guide
93
9.1 Basic Specifications
Item
Message
Display
94
Specification
Type
Monochrome with backlight (LCD display)
Panel size
20 characters x 4 lines
Language
English, German, French, Italian, Spanish,
Japanese
Keyboard
[ID], [SET], [ESC], [ENT ], [L], [K], [.], Numeric
key (0~9)
Total: 17 keys
Fingerprint Sensor
Static capacity method
Resolution: 500 dpi (256 x 300 pixels)
Finger (Detection) Sensor
Type: Infrared light photo-reflector
Memory
Flash ROM
2 MB
RAM
32 MB
Scanner Interface
USB 2.0 / 1.1 compatible
(USB 2.0/1.1 Auto-recognition)
Supported scanners
fi-4120C
fi-4220C
fi-4120C2
fi-4220C2
fi-5110C
fi-4530C
Network Interface
LAN
IEEE802.3 (10BASE-T)
IEEE802.3u (100BASE-TX)
9.2 Installation Specifications
9.2 Installation Specifications
Item
Dimensions
Weight
Specification
Depth
Width
Height
176 mm
(6.93 in)
125 mm
(4.92 in)
62 mm
(2.44 in)
1.0kg (2.2lb)
Input power
Voltage
100 to 120 VAC ±10%
Phases
Single-phase
Frequency
50 / 60 ± 3Hz
Power consumption
8 W or less
Item
Device
status
Operating
Not operating
Temperature
5 to 35°C
(41 to 95°F)
-20 to 60°C
(-4 to 140°F)
Humidity
20 to 80 %
8 to 95 %
fi-5000N Operator’s Guide
Specifications
Ambient
condition
9
Specification
95
9.3 External Dimensions
(6.93 in.)
The following shows the external dimensions of the fi-5000N:
(2.44 in.)
(4.92 in.)
(Unit: mm)
96
APPENDIX Using User Authentication
by Fingerprint
■ How to place your finger on the sensor
Pay attention to the following points when performing fingerprint registration or authentication.
• For reliability, align your finger such that the virtual line connecting the white positioning marks on the both sides of the fingerprint sensor crosses the base of your fingernail,
and press your finger to the sensor.
To confirm the correct way to place your finger, click here to view the movie.
• Make sure your finger covers the finger (detection) sensor. (Do not let your finger float
away from the sensor.)
To confirm the correct way to place your finger, click here to view the movie.
Finger Position
A
Finger Placement
Correct
Fingerprint Sensor
Incorrect
Finger Sensor
fi-5000N Operator’s Guide
AP-1
The following finger conditions may cause a registration or authentication
failure.
ATTENTION
• The skin of finger gets rough or is extremely dry.
• The finger surface is wounded or has suffered an abrasion so that the
fingerprint mark becomes thin.
• The fingerprint has been changed due to a rapid gain or loss of weight.
Washing, wiping, or using a different finger may improve the situation.
■ Caution on fingerprint sensor usage
• Discharge static electricity from your finger by touching a metallic object before placing
•
•
•
your finger on the sensor. Static electricity may cause a sensor failure. This procedure is
particularly important in dry winter season.
Do not scratch, or pick at the sensor with a sharp-pointed item. This can damage the sensor.
Do not rub the surface with your fingernail or hard item. This can damage the surface and
lead to failure.
Do not touch the surface with a muddy or dirty finger which may damage, or contaminate
the surface leading to failure.
Do not put a sticker on the sensor or paint its surface. This can lead to failure.
•
• The following may cause difficulties in capturing fingerprints. Clean the sensor on a regular
basis.
- Sensor surface is dirty with dust or fat content from finger.
- Sensor surface is moist with perspiration
- Sensor surface is moist with dew condensation
• If the following problems occur, clean the sensor surface. The situation may improve.
"Processing... Remove your finger from the sensor" message keeps appearing.
Registration or authentication failures occur frequently.
• When cleaning the sensor, use a dry lint-free cloth and wipe it gently.
AP-2
■ Removing Finger Guide
For the ease of fingerprint registration by letting you place your finger correctly, the Finger
Guide is installed on the fi-5000N fingerprint sensor area. When you get accustomed to
placing the finger correctly on the fingerprint sensor, you can remove the Finger Guide.
To remove the Finger Guide, follow the instructions below.
1) Hold both sides of the Finger Guide.
2) Squeeze the guide lightly to detach its pins.
3) Lift the guide up and remove it from the fi-5000N.
A
ES
C
7
4
ID
8
1
5
9
SE
0
T
2
6
.
3
fi-5000N Operator’s Guide
AP-3
AP-4
INDEX
A
FUJITSU ISIS
AC adapter .............................................. 12
AC cable
................................................. 12
Add button ............................................... 45
Adding fi-5000N
...................................... 37
FUJITSU TWAIN32
.............................. 36
Connecting to the Network ...................... 14
Cover ......................................................... 8
...................................... 48
D
Admin. button .......................................... 45
Administrator ............................................. 5
DC Inlet
Administrator Settings ............................. 56
Delete button ........................................... 45
Advance Tab ........................................... 47
Deleting
Ambient condition
................................... 95
Application
.............................................. 36
Argument
................................................ 46
Arguments ............................................... 64
Authentication by Fingerprint
.................. 74
..................................................... 9
fi-5000N
Users
.............................................. 50
.................................................. 54
Device Info Tab
Device Setting Tab .................................. 61
DHCP
...................................................... 15
Displaying Network settings
B
.................................. 54
Backlight Off Settings .............................. 19
Beep Sound Configuration ...................... 20
ENT Key .................................................. 10
ESC Key .................................................. 10
External dimensions .......................... 95, 96
Button ...................................................... 46
........................................ 45
Finger Guide .............................................. 8
Changing
Administrator PIN ................................. 58
Finger Sensor ............................................ 8
.................................. 53
Fingerprint Sensor ..................................... 8
............................................. 53
Firmware version ..................................... 25
................... 18
FUJITSU ISIS .......................................... 27
.............................................. 78
FUJITSU TWAIN ..................................... 27
User Information
Changing Language Setting
Cleaner F1
F
Favorite button
C
User PIN
.................... 25
E
Backing up
User Information
....................................... 60
Cleaning Materials
.................................. 78
Configuring Application
fi-5000N Operator’s Guide
IN-1
H
Host Connection Time-out
P
...................... 24
PIN
.......................................................... 15
Power consumption ................................. 95
I
............................ 62
Power Saving Settings
ID key ...................................................... 10
Power Switch ............................................. 9
Initialization of fi-5000N ........................... 26
Pull mode
Input power
............................................. 95
............................................ 4, 21
Pull mode user authentication ................. 21
Push mode
Installing
................................ 42
fi-5000N Software
.......................................... 4, 21
Push Mode Automatic Logout Time
........ 23
FUJITSU TWAIN 32 ............................. 28
ScandAll 21 ......................................... 31
Installing the fi-5000N
............................. 12
Q
QuickScan Pro
........................................ 27
K
Keyboard ............................................. 8, 10
R
Refresh button ......................................... 45
Registering Users .................................... 52
L
Language for Message Display
.............. 18
Launch Options Tab ................................ 46
LED ........................................................... 8
Replacing Consumables
......................... 61
Reset to Factory default
.......................... 26
Restoring
User Information
.................................. 55
M
S
Magnification Adjustment ........................ 63
ScandAll 21
Message Display ....................................... 8
Scanner Drivers ....................................... 27
............................................. 27
Scanner Info. button ................................ 45
Network Connector
N
Scanner Information ................................ 59
................................... 9
Security
Network name of fi-5000N
...................... 25
..................................................... 8
Show Scanner Info. ................................. 25
Specifications
O
Offset
...................................................... 63
Operator .................................................... 5
.......................................... 93
Ambient condition ................................. 95
Dimensions
......................................... 95
Input power
......................................... 95
Power consumption
Weight
.............................. 95
................................................ 95
Start in folder ........................................... 46
IN-2
Static IP ................................................... 15
T
Trigger port
............................................. 47
Turn on the power ................................... 14
U
Uninstalling
fi-5000NSoftware
................................. 67
the Scanner Driver and Scanning
Application
.............................. 39
USB cable ............................................... 13
USB Connector ......................................... 9
User Authentication by PIN ..................... 75
User Config. button ........................... 45, 51
V
Version Tab ............................................. 47
W
Waiting time for the host’s connection
.... 24
Weight ..................................................... 95
fi-5000N Operator’s Guide
IN-3
fi-5000N Operator’s Guide
P3PC-1132-02EN
Date of issuance: February, 2005
Issuance responsibility: PFU LIMITED
Copying of the contents of this manual in whole or in part and
copying of the scanner application is forbidden under the copyright
law.
z The contents of this manual are subject to change without notice.
z PFU LIMITED. is not liable whatsoever for any damages resulting
from use of this scanner and procedures described in this manual,
profit loss due to defects, and any claims by a third party.
z