1
HOW TO USE
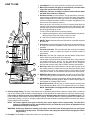
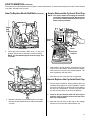
1. Cord Retainer. To use, push electrical cord down into cord retainer.
2. Motor Filter Indicator (red light) (on some models). Indicates when
motor filter needs to be cleaned or replaced.
3. HEPA Filter Indicator (red light) (on some models) Indicates when
the HEPA filter needs to be replaced.
4. Dirt Alert Indicator (on some models). The dirt alert sensor uses infrared technology to indicate whether or not floors are clean. When debris
breaks the light beam, the yellow light comes on indicating additional
cleaning is needed in this area. If there is no break in the light beam, the
floor is clean and no light will come on.
1
When using your new vacuum you may be cleaning deep down dirt
missed by your old vacuum causing the light to stay yellow longer. With
frequent cleaning, after the first few times you use your Eureka vacuum,
the yellow light should go on less.
2
To check if the dirt alert sensor is working properly:
A. While the yellow light is on, tip the vacuum backwards on rear wheels,
lifting the brush roll off the carpet a couple of inches.
3
4
B. After a few seconds the yellow light should turn off.
5. ON/OFF Switch. International symbol I means On, International symbol
O means Off.
5
6
6. Filter Screen. Located inside dust cup. Must be removed from dust cup
to empty cup. Must be reinstalled in dust cup before use for correct
operation.
7
7. Pre-motor tube filter. The pre-motor tube filter removes the smallest
dust particles. Clean or replace as needed to maintain maximum
performance.
8
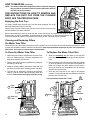
8. Dust Cup. The dust cup collects the dust and debris. Empty before
debris reaches the maximum fill line on dust cup.
9
Certain types of fine particles like powder, plaster dust, or fine road dust
can restrict airflow very quickly. The fine particles will decrease
performance even before the dust cup appears to be full. Empty the
dust cup and clean the motor filter to restore maximum performance.
10
14
13
11
9. Dust Cup Lever. When facing cleaner, slide the dust cup latch to the
left release position to release dust cup and motor filter. Slide the dust
cup latch to the right to the engage position to secure dust cup and
motor filter in cleaner. You will notice a snap as the lever locks in place.
12
10. HEPA Filter Door Latch. Squeeze latch and pull out to remove HEPA
Filter Door giving access to the HEPA Filter. Push on latch to close door.
11. Handle Release. There are two positions. Step on handle release. The
first is the normal operating position. Step on handle release again to
lower handle for cleaning under furniture.
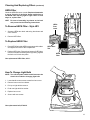
12. Brush Roll Control. Flip this lever to choose between cleaning hard
floors and carpeting. Brush roll is “off” for hard floors and “on” for carpets.
NOTE: When handle is in upright position, brush roll automatically
shuts off.
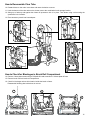
13. Cleaner Height Setting. The front of the cleaner has an adjustment that raises or lowers the cleaner base to match the
type of floor surface. With the cleaner cord unplugged, set the adjustment to lowest setting for maximum carpet cleaning.
If the cleaner is difficult to push, move adjustment to next highest setting until cleaner is comfortable to push. The
brush roll bristles must reach the carpet for effective cleaning. The optimal hard floor cleaning adjustment is located next to
lowest carpet setting. For ease in moving the adjustment knob, place handle in operating position and tilt cleaner back to
remove weight from front wheels.
NOTE: The suction against some types of flooring may require higher cleaner height setting. The Hard Floor
setting is recommended, but the actual setting used for your hard floor may need to be adjusted for best
performance and ease of movement.
WARNING: Avoid injury. Keep loose clothing, hair, fingers, and all other parts of body away from any moving part
(such as the revolving brush). Turn off the switch and unplug the cleaner before changing the cleaner
height setting.
14. Headlight. The headlight is visible when cleaner is in operating position.
7