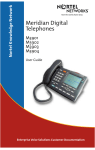
1
Nortel Knowledge Network
Meridian
Communications
Adapter
M3902
M3903
M3904
M3905
User Guide
Enterprise Voice Solutions Customer Documentation
While you are away from your desk: Call Forward
38
Contents
Introduction
1
About the document ............................................................................... 1
Before you use the MCA ......................................................................... 1
Use the MCA to make data calls ............................................................. 2
Dialing methods
3
Switching between keyboard and AT dialing ........................................... 3
Make a data call
4
Keyboard dialing ................................................................................... 4
AT dialing ............................................................................................. 4
Keypad dialing ...................................................................................... 5
Release a data call ................................................................................. 6
Default parameters for Asynchronous and Synchronous ............................ 7
Keyboard dialing menus ........................................................................ 7
Keyboard dialing
9
Abort current command ......................................................................... 9
Auto Dial .............................................................................................. 9
Speed Call .......................................................................................... 10
Script File ............................................................................................ 11
Script File directory .............................................................................. 12
Delete Script File .................................................................................. 13
Escape code ........................................................................................ 14
Manual answer (asynchronous) ............................................................ 15
Remote Loopback ................................................................................ 15
Ring Again .......................................................................................... 16
Ring Again (synchronous) ..................................................................... 16
Display parameters (asynchronous) ....................................................... 17
AT dialing
18
A/ (repeat last command) .................................................................... 18
ATA (answer) ...................................................................................... 18
ATCn (carrier detect enable/disable, where n = 0, 1) ............................. 18
ATDxxxx (dial, where x = 0–9) ............................................................. 18
ATEn (echo, where n = 0, 1) ................................................................. 18
i
Contents
ATOn (on-line, where n = 0, 1) ............................................................. 19
ATQn (result code, where n = 0, 1) ....................................................... 19
ATV n (verbal result, where n = 0, 1) ..................................................... 19
ATXn (result code selection, where n = 0–4) ........................................... 19
ATZn (soft reset, where n = 0, 1) ........................................................... 20
ATDPxxxx (voice call, where x = 0–9) .................................................... 20
ATF3 (Handsfree/mute) ........................................................................ 20
ATF4 (Hold) ......................................................................................... 20
ATF5 (Select) ....................................................................................... 20
ATH0 (hang up data call) ..................................................................... 20
ATHP (hang up voice call) ..................................................................... 20
ATTSP! (transparent mode) ................................................................... 20
ATIn (product identification code, where n = 0, 1, 4) .............................. 21
AT&Cn (carrier detect control, where n = 0, 1) ....................................... 21
AT&Dn (response to DTR, where n = 0–3) .............................................. 21
AT&Rn (clear-to-send options, where n = 0, 1) ....................................... 21
AT&Sn (data-set-ready options, where n = 0, 1) ..................................... 21
AT&F (factory configuration profile) ....................................................... 21
AT&Yn (recall user profile on power-up, where n = 0, 1) ........................ 22
S-registers
ATSn=x ............................................................................................... 22
ATSn? ................................................................................................. 22
S0 (number of rings incoming; range = 0–255) ...................................... 22
S1 (ring count; read only) ..................................................................... 23
S2 (escape character; range = 0–255) .................................................. 23
S3 (carriage return character; range = 0–127) ....................................... 23
S4 (line feed character; range = 0–127) ................................................ 23
S5 (backspace character; range = 0–32, 127) ....................................... 23
S9 (carrier detect response time) ........................................................... 23
S10 (lost carrier hand up delay) ............................................................ 23
S11 (DTMF tone duration) ..................................................................... 23
S6 (waiting time before blind typing) ..................................................... 23
S7 (wait time for carrier/dial tone; range = 1–255) ................................ 23
S8 (pause time for comma; range = 0–255) ........................................... 24
S12 (escape code guard time; range = 0–255) ...................................... 24
S52, S53, S54 (product code response) ................................................. 24
ii
22
Contents
S66 (AT/KBD autobaud interpretation; range = 0, 1) ............................. 24
S51 (delay until modem pool activation; range = 0–255) ........................ 24
Dial modifier ....................................................................................... 25
Introduction to Keypad dialing
26
Keypad dialing .................................................................................... 26
MCA Data Parameters for Keypad dialing commands ............................ 29
Keypad dialing commands .................................................................. 31
Additional asynchronous features
34
Autobaud ............................................................................................ 34
Autoparity ........................................................................................... 34
Modem Pooling ................................................................................... 34
Additional synchronous information ...................................................... 35
Parity and character length on the MCA ................................................ 35
Voice call origination ........................................................................... 36
Asynchronous troubleshooting
37
Modem pooling ................................................................................... 37
Power failure ....................................................................................... 37
Troubleshooting symptoms and solutions ................................................ 37
Synchronous troubleshooting
40
iii
Contents
iv
Introduction
Introduction
About the document
The Meridian Communications Adapter (MCA) is an interface that supports many
desktop applications. This User Guide describes how to use the MCA to interface
with these desktop applications and the Meridian 1.
This guide displays information pertaining to synchronous operation in italic type.
The Meridian Communications Adapter (MCA) passes synchronous and
asynchronous data through Nortel Networks systems by using the M3900 Series
Meridian Digital Telephone. The MCA supports Data Terminal Equipment; there is
no way to configure the MCA for Data Communications Equipment, but a “null
modem” adapter can be used to allow compatibility between Data
Communications Equipment and the MCA.
MCA on the M3900 Series Meridian Digital Telephones works with Release 24
minimum.
Just as your phone has a unique directory number (extension), the MCA has a
data directory number configured in the system.
Attached to the MCA via its RS-232 serial port is a dumb terminal or personal
computer. The dumb terminal talks directly to the MCA. A personal computer uses
special communications software to access the serial port. Examples of such
software include Crosstalk, ProCom Plus, Reflections, and Smartcom. Serial
printers may also be connected to the MCA.
Once a data call is established you can perform data communications through the
M3900 Series Meridian Digital Telephone to a far end service, such as a
mainframe, a modem pool, other personal computers, or printers.
The MCA uses EEPROM non-volatile read/write memory for permanent storage
of settings and configuration parameters. In synchronous mode Auto Dial and
Speed Call numbers are stored within your Meridian 1 system.
Note: The Meridian SL-100 does not support the MCA on the M3900 Series Meridian
Digital Telephone.
Before you use the MCA
All M3900 telephones that are compatible with the MCA have a display. The
display facilitates operating the data parameters from the telephone keypad.
The MCA is a cartridge accessory which inserts into the Accessory Connection
Module on your M3900 Series Telephone. You must install the ACM into your
1
Introduction
M3900 series telephone.Once the ACM is installed, the MCA cartridge accessory
is inserted into the ACM to provide an interface to data functions. To install the
ACM refer to the Accessory Connection Module Installation Guide packaged with
the ACM.
Use the following procedures to install the MCA to the telephone:
• Plug the MCA Accessory Cartridge into the ACM opening in the back of the
telephone footstand.
• Plug the MCA transformer into the appropriate external electrical outlet (use
only the transformer designed for your MCA).
• Connect the Adapter plug, attached to your transformer, into the wall jack.
• Connect the six conductor line cord from the telephone to the Adapter jack
attached to your ATA transformer.
• Connect the MCA to the your data equipment.
For countries outside Canada, Japan and the US, separate purchase of a power
supply cordset is necessary. Care should be taken to match the plugs on the
cordset to the wall receptacle and the power supply. Be certain to select a safety
certified cordset, compliant with local, regional and national installation codes.
CAUTION
Before handling internal telephone components, you must
discharge static electricity from your hands and tools by touching
any grounded metal surface or conductor.
Use the MCA to make data calls
Before you use the MCA to make data calls, do the following:
• Make sure the red LED on the MCA is blinking at a constant rate. This indicates
the MCA has power and is ready for operation.
• Attach your terminal or PC serial port to the MCA 25 pin D connector via an
RS-232 or V.35 cable.
• Make sure that your terminal or PC is powered up and ready to send data.
• If you are using a PC, make sure your communication software is running.
CAUTION
Use only the line cord provided with your Meridian M3900
Telephone when installing and removing options.
2
Dialing methods
Dialing methods
The MCA provides three methods for making data calls through the Nortel
Networks PBX: keyboard dialing, AT dialing, and keypad dialing. You use
Keyboard and AT dialing by entering commands at a terminal or on a PC running
software to make it emulate a terminal. Keypad dialing is done through the
telephone keypad.
Keyboard dialing is menu driven. Data calls are made by pressing the < CR > to
get the Main menu. By navigating through the menus, different features can be
activated.
AT dialing is very similar to methods used to make modem calls with a Hayes
Smartmodem1. The user enters a command starting with the letters AT followed by
a few letters to distinguish the command, then presses the carriage return < CR >
Key.
Keypad dialing on the M3900 telephone is done by pressing the Options Key
followed by a two digit MCA data parameters number. To release the keypad
telephone dialing, press the Options Key.
Switching between keyboard and AT dialing
To switch between AT dialing and keyboard dialing, you must be in an idle state
(not connected to a far end data device).
The most recent prompt must be
either:
NO CARRIER
or
RELEASED
To switch to AT dialing:
AT
At this point you may type AT to get AT
dialing
or
or
< CR >
Press the Carriage Return Key to activate
keyboard dialing.
1.Smartmodem is a trademark of Hayes Microcomputer Products Inc.
3
Make a data call
Make a data call
The procedures in this section describes how to make basic data calls. There are
three methods used to make a data call; keyboard dialing, AT dialing and keypad
dialing.
Note: Throughout this guide, <CR> refers to a Carriage Return.
Keyboard dialing
<CR>
1. Press the Carriage Return.
ENTER NUMBER OR H (FOR HELP)
£ and <CR>
2. Enter the number of the far end data
device and Press the Carriage Return
<CR>.
CALL CONNECTED SESSION STARTS
<CR>
3. Press the Carriage Return.
Follow normal procedures to login and use
the data service.
AT dialing
AT dialing is used in conjunction with your personal computer. To use AT dialing
follow these instructions:
AT + <CR>
1. Enter AT and press the Carriage
Return.
OK
ATDxxxx
<CR>
2. Enter the ATDxxxx (where xxxx is the
number of the far end data device).
3. Press the Carriage Return.
CONNECT
<CR>
4. Press the Carriage Return.
Follow the normal procedures to login and
use the data service.
4
Make a data call
Keypad dialing
Keypad dialing is accessed through the Options. Press the Options Key and use
the Navigation Keys to scroll to MCA data parameters. Once you are familiar
with your MCA option number, you can press the Options key and dial the MCA
data parameters option number, followed by the parameter number.
• The Options Key on the M3902 is on the right side of the telephone.
• The Options Key on the M3903 and M3904 is on the front edge of the
telephone.
• The Options Key on the M3905 is a Programmable Line/Feature Key
(self-labeled) located at the left side of the upper portion of the display area.
If you know the MCA data parameter
number:
Options
/
1. Press the Options Key
2. Dial the number on the telephone
keypad. Your telephone display shows
MDIAL
ENTER DIGITS Options EXIT
3. Dial the number of the far end data
device. The display prompts (if call is
successful)
DATA CALL CONNECTED
The terminal prompts
CALL CONNECTED.SESSION STARTS
<CR>
4. Press the Carriage Return.
Follow normal procedures to login and use
the data service.
5
Make a data call
Release a data call
To release a call while in
asynchronous mode, use any of the
following methods:
Break
Break
Break
or
Options
/
+ • or
Press the Break Key(s) on your PC
keyboard for 1.6 seconds or longer.
Note: This method is not supported on
terminals with non-overlapping timed
break.
Press the Break Key(s) on the PC Keyboard
three times in quick succession. The break
must be at least 100 milliseconds and all
three breaks must be within one second.
or
Press the Options Key on the telephone
and dial the Asterisk Key
or
Drop DTR (Data Terminal Ready).
Note: To drop DTR you need a
programmable F-Key designated as DTR.
Note: DTR can drop on its own and in this
case, the MCA connection automatically
drops.
Note: If the far end data device releases
the call, the MCA automatically drops its
end.
Release a synchronous call using one
of these methods:
Options
/
+ •
Press the Options Key on your telephone
and dial the Asterisk Key
When a data call is disconnected, the
terminal displays the following:
RELEASED
or
NO CARRIER (AT dialing mode)
6
Make a data call
Default parameters for Asynchronous and Synchronous
The MCA is configured in asynchronous mode when it is shipped from the factory.
The MCA defaults to synchronous or asynchronous mode from the telephone. The
mode is determined prior to resetting the parameters. Listed here are the default
parameters. The mode is determined prior to resetting the parameters. Refer to the
“Reset data parameters” section in this guide for more information.
Asynchronous
Synchronous
Keyboard dialing
Hot Line Off
Autoanswer
Autoanswer
DTR OFF
DTR OFF
DCD ON
DCD ON
Baud rate 9600
Baud rate 56000
Hot Line OFF
Virtual Leased Line OFF
Remote Loopback
Remote Loopback OFF
Full duplex
Full duplex
Asset RTS ON
PSDS OFF
Space parity
Internal clock
Terminal mode
Modem mode
SL-1 Mode
V.25 bis OFF
Keyboard dialing menus
Main Menu
C — CALL
A — AUTO DIAL
P — DISPLAY PARAMETERS
CTRL-Z TO ABORT KEYBOARD
DIALING
S — SPEED CALL
M — MODIFY
D — SCRIPT FILE
DIRECTORY
7
Make a data call
Script File Menu
L — LEARN SCRIPT
D — DELETE SCRIPT
SELECT:
E —ESCAPE CODE
Q — QUIT SCRIPT MENU
Modify Menu
A — AUTO NUMBER
S — SPEED NUMBER
R — REMOTE LOOPBACK
SELECT:
M — MANUAL ANSWER
F — SCRIPT FILE
Q — QUIT MODIFY
Learn Script Menu
A — LEARN AUTO DIAL SCRIPT
S — LEARN SPEED SCRIPT
SELECT:
8
D — SCRIPT FILE
DIRECTORY
Q — QUIT LEARN MENU
Keyboard dialing
Keyboard dialing
This chapter explains the keyboard dialing commands and how to use them. You
can enhance your data call dialing by using features such as Speed Call and file
scripting.
Keyboard dialing is menu-driven. See Figure 1 for menus. Use them as a
reference when following procedures.
Each procedure in this chapter assumes you are beginning at the initial prompt of
ENTER NUMBER OR H (FOR HELP):
To get the initial prompt, hold down the break key(s) for at least 1.6 seconds and
press the carriage return (<CR>). This will release a current data call if you are on
one.
Abort current command
To abort the current command:
Ctrl
+
<CR>
Z
1. Press the Control Key and press the Z
Key.
RELEASED
2. Press the Carriage Return.
ENTER NUMBER OR H (FOR HELP)
Note: This command will not work during
an active data call. First you must release
the call.
Auto Dial
To use Auto Dial:
A
<CR>
1. Select A (Auto Dial) and press the
Carriage Return.
CALLING
To define (change):
M
<CR>
2. Select M (Modify) and press the
Carriage Return.
9
Keyboard dialing
Terminal displays Modify menu.
A
<CR>
3. Select A (Auto Number) and press the
Carriage Return.
AUTO DIAL NO.
XX <CR>
4. Enter the Auto Dial number and press
the Carriage Return.
Speed Call
To use Speed Call:
S
<CR>
1. Select S (Speed call) and press the
Carriage Return.
ENTER ACCESS CODE
XX <CR>
2. Enter access code (Speed call code)
and press the Carriage Return.
CALLING
To define (change):
M
<CR>
1. Select M (modify) and press the
Carriage Return.
Terminal displays Modify menu.
S
<CR>
2. Select S (Speed Number) and press
the Carriage Return.
ENTER ACCESS CODE
XX <CR>
3. Enter access code (Speed Call code) of
the number you wish to define or
change. It can be one, two, or three
digits.
ENTER NUMBER: xxx
(xxx = access code)
XXXX <CR>
10
4. Enter extension number (DN) to be
represented by the access code, and
press the Carriage Return.
Keyboard dialing
Script File
To use Script File:
script name
<CR>
Enter script name and press the Carriage
Return.
The MCA will connect to the far end data
device and the script will be executed
automatically. The MCA will follow the
same steps you took when writing the
script. It works like a macro file.
To define the Script File:
M
<CR>
1. Select M (Modify) and press the
Carriage Return.
Terminal displays Modify menu.
F
<CR>
2. Select F (Script File) and press the
Carriage Return.
Terminal displays Script File menu.
L
<CR>
3. Select L (Learn Script) and press the
Carriage Return.
Terminal displays Learn Script menu.
A
S
<CR>
<CR> XX
4. Select A (Learn Auto Dial script) and
press the Carriage Return.
or
Select S (Learn Speed Call script) and
press the Carriage Return. Enter
Speed Call code at prompt
ENTER ACCESS CODE
<CR>
5. Press the Carriage Return.
ACTIVATE LEARN MODE? (Y/N)
Y
<CR>
6. Select Y and press the Carriage
Return.
ENTER SCRIPT NAME
11
Keyboard dialing
Name <CR>
7. Enter the name you want to call the
script by and press the Carriage
Return.
ESCAPE CODE =[+] MODIFY (Y/N)
(+ = escape code key symbol)
N
<CR>
8. Select N and press the Carriage
Return.
Terminal displays Main menu.
Esc
Esc
Esc
Esc
<CR>
Esc
9. Make a data call, following the exact
procedure you wish the script to
remember. Press the Escape Key twice
(see page 14) to enter privacy mode
for password protection. Press the
Carriage Return <CR> to exit privacy
mode.
10. When you wish to end the script, press
the Escape Key three times in quick
succession.
11. Release the data call and immediately
place an Auto Dial or Speed Call for
which the Learn Script process was set
up. At this point the script is saved.
Script File directory
To view a list of your script files:
D
and <CR>
1. Select D (Script File directory) and
press the Carriage Return.
Your terminal lists the script file names and
length in bytes, plus each script’s
associated speed call access code (an A in
the access code column stands for the Auto
Dial script). See the example:
12
Keyboard dialing
SCRIPT FILE DIRECTORY
ACCESS
CODE
SCRIPT
NAME
LENGTH
(BYTES)
A
EMAIL
262
21
MAINFRAME
455
33
DBASE
345
Delete Script File
M
<CR>
1. Select M (Modify) and press the
Carriage Return.
Terminal displays Modify menu.
F
<CR>
2. Select F (Script File) and press the
Carriage Return.
Terminal displays Script File menu.
D
<CR>
3. Select D (Delete Script File) and press
the Carriage Return.
Terminal displays Delete menu.
A
S
<CR>
<CR>
4. Select A (Auto Dial) and press the
Carriage Return.
or
Select S (Speed Call) and press the
Carriage Return. Enter speed Call
code at prompt:
ENTER ACCESS CODE
SCRIPT [script name] EXISTS
DELETE? (Y/N)
Y
<CR>
5. Select Y and press the Carriage
Return.
DELETING
13
Keyboard dialing
Escape code
To change Escape code:
M
<CR>
1. Select M (Modify) and press the
Carriage Return.
Terminal displays Modify menu.
F
<CR>
2. Select F (Script File) and press the
Carriage Return.
Terminal displays Script File menu.
E
<CR>
3. Select E (Escape Code) and press the
Carriage Return.
ESCAPE CODE =[+] MODIFY (Y/N)
Y
<CR>
4. Select Y and press the Carriage
Return.
ENTER ESCAPE CODE
X
<CR>
5. Enter the new Escape code (can be a
control character) and press the
Carriage Return.
There are three uses for the Escape code
character:
Note: A guard timer of one second
distinguishes the escape sequences. In
other words, one escape character is not
interpreted as a pause until a full second
elapses in which you do not enter another
escape character.
Esc
Esc
14
Esc
— One escape character inserts a pause in
a script file.
— Two escape characters puts you into
privacy mode, useful for skipping part of
a script file procedure for password
protection.
Keyboard dialing
— Press the Carriage Return to leave
privacy mode.
<CR>
Esc
Esc
E sc
— Three escape characters saves a script
file to the MCA EEPROM.
Manual answer (asynchronous)
M
<CR>
1. Select M (Modify) and press the
Carriage Return.
Terminal displays Modify menu.
M
<CR>
2. Select M (Manual Answer) and press
the Carriage Return.
MANUAL ANSWER (Y/N)
Y
<CR>
3. Select Y and press the Carriage
Return.
Incoming data calls will give you this
prompt:
INCOMING CALL. ANSWER (Y/N)
If you respond Y to the prompt in step 2,
an incoming data call will connect
automatically and you will receive the
prompt:
INCOMING CALL CONNECTED
Remote Loopback
To perform a remote loopback test:
M
<CR>
1. Select M (Modify) and press the
Carriage Return.
Terminal displays Modify menu.
R
<CR>
2. Select R (Remote Loopback) and press
the Carriage Return.
15
Keyboard dialing
Remote loopback will be enabled for the
next data call only. This feature is useful for
diagnostic purposes.
Ring Again
When the far end number is busy you
receive the prompt:
BUSY, RING AGAIN? (Y/N)
or
BUSY, PREVIOUS RING AGAIN ACTIVE,
REPLACE? (Y/N)
Y
<CR>
1. Select Y and press the Carriage
Return. Ring Again is activated and
notifies you when the far end is free.
RING AGAIN PLACED
When the far end data device is free you
receive the prompt:
DATA STATION NOWAVAILABLE, PLACE
CALL (Y/N)
Y
<CR>
2. Select Y and press the Carriage
Return.
Note: You must answer Ring Again within
30 seconds after you are prompted or it
cancels. You can only set Ring Again to
monitor one busy line at a time.
Ring Again (synchronous)
Synchronous calls can only be made from the telephone keypad.
16
Keyboard dialing
Display parameters (asynchronous)
To list information about MCA
configuration from the terminal:
P
<CR>
Select P (display parameters) and press the
Carriage Return.
The following example shows the items
listed with possible values for each.
The first three parameters give information
on the current version MCA you have (they
do not change).
For more detailed descriptions of these
parameters, see Keypad dialing.
Engineering code = NT2K0047
Release = 01
Firmware = 3.5
Baud Rate = 19200
Parity = ODD
DTR = ON (Data Terminal Ready)
DCD = ON (Data Carrier Detect)
VLL = OFF (Virtual Leased Line)
Hotline = OFF
Remote Loopback = OFF
Manual Answer = OFF
Data Directory Number = 4000
Auto Dial No. = 3600
17
AT dialing
AT dialing
AT dialing is similar to the methods used to make data calls with a Hayes
Smartmodem. Some AT commands do not apply to the MCA, and are not
supported.
Most AT commands begin with the letters AT (not case sensitive). These two letters
are followed by a one- or two-character command (sometimes followed by
additional parameters) and a carriage return. Each command line is limited to a
maximum of 40 characters (not including the AT and spaces).
You will not hear any tones when using AT dialing with the MCA.
Note: Remember that all of these commands (except A/ and the escape code) are
followed by a carriage return).
If you don not include a numerical parameter with a command, the MCA assumes
the parameter to be zero (0).
A/ (repeat last command)
This sequence repeats the last command you entered. It is not preceded by AT and
not followed by carriage return.
ATA (answer)
This answers an incoming data call when the MCA is set for manual answer
(S-register 0 = 0).
ATCn (carrier detect enable/disable, where n = 0, 1)
Carrier detect is enabled when n = 1, disabled when n = 0. When enabled, the
carrier detect lead will be off until a data call has been established.
ATDxxxx (dial, where x = 0–9)
This performs a manual data call. The digits, xxxx, represent the phone number of
the far end data device.
ATEn (echo, where n = 0, 1)
Commands do not echo back to your terminal when n = 0. Meaning, you do not
see your commands, only their result. Commands will echo when n = 1.
18
AT dialing
ATOn (on-line, where n = 0, 1)
This will put you on-line if you had previously used the escape code (three escape
characters) to go off-line. The same result applies to both case n = 0 and n = 1.
ATQn (result code, wheren=0,1)
Result codes (call progress prompts) are not sent to your terminal when n = 1. That
is, you will not see call progress prompts. When n = 0 result codes are sent to
your terminal.
ATV n (verbal result, where n = 0, 1)
Verbal prompts are sent to your terminal when n = 1. Numeric prompts are sent
when n = 0. The following chart lists the result codes and their meaning.
Numeric
Verbal
Description
0
OK
Command was successful.
1
CONNECT
Far end has answered.
2
RING
Local end is ringing.
3
NO CARRIER
Call was released.
4
ERROR
Command line contains an error.
Extended codes:
5
CONNECT 1200
1200 baud connection complete.
7
BUSY
Busy signal is detected.
10
CONNECT 2400
2400 baud connection complete.
11
CONNECT 4800
4800 baud connection complete.
14
CONNECT 19200
19200 baud connection complete.
ATXn (result code selection, where n = 0–4)
When n = 0, the MCA supports result codes 0–4. When n = 1 or 2, the MCA
supports result codes 0–5, 10–12, and 14. When n = 3 or 4, the MCA supports
result codes 0–5, 7, 10–12, and 14.
19
AT dialing
ATZn (soft reset, where n = 0, 1)
This returns S0 through S49 registers and AT configurations to their default
settings. The same result applies to both case n = 0 and n = 1.
Registers S50 through S69 will be reset to their default values only upon
power-up.
The following commands are extensions to AT dialing used to support the MCA.
ATDPxxxx (voice call, where x = 0–9)
This allows you to make a voice call from your terminal. The digits, xxxx,
represent the number of the person you wish to call. S8 registers are not
applicable. For example, a comma (pause) delays by one digit, and a maximum
of 32 digits are allowed.
ATF3 (Handsfree/mute)
This allows you to mute your end of a Handsfree call, and repeat the command to
toggle back to normal Handsfree operation.
ATF4 (Hold)
This puts an active voice call on hold.
ATF5 (Select)
This takes a voice call off hold (as if you pressed its DN key).
ATH0 (hang up data call)
This releases an active data call. You must first be off-line (hit three escape
characters).
ATHP (hang up voice call)
This releases an active voice call, just as if you pressed the Release key on the
phone.
ATTSP! (transparent mode)
You can display the raw signaling messages sent between the PBX and the MCA
using this command. This mode is used by some special software applications.
20
AT dialing
ATIn (product identification code, where n = 0, 1, 4)
When n = 0, the MCA displays the contents of S-registers S52–S54. The default is
“960” (Smartmodem V-series 9600 modem). Other possible values are: “122”
(Smartmodem 1200) and “240” (Smartmodem 2400).
When n = 1, the result is “206.”
When n = 4, the result is “a037800c004420” and then “b100000000” (these
are the same values that Smartmodem V-series 9600 returns).
AT&Cn (carrier detect control, where n = 0, 1)
When n = 0, carrier detect lead is always asserted.
When n = 1, the carrier detect remains off except when the call is terminated.
AT&Dn (response to DTR, where n = 0–3)
When n = 0, the MCA ignores the status of DTR.
When n = 1, the MCA resumes the off-line command state when on-to-off
transition of DTR occurs.
When n = 2, the MCA drops the call when on-to-off transition of DTR occurs.
When n = 3, the MCA hangs up when on-to-off transition of DTR occurs and
returns its Hayes parameters to their default settings.
AT&Rn (clear-to-send options, where n = 0, 1)
When n = 0, the CTS lead remains off.
When n = 1, CTS is always present.
AT&Sn (data-set-ready options, where n = 0, 1)
When n = 1, the DSR lead is off.
When n = 0, DSR is always present.
AT&F (factory configuration profile)
This returns S0 through S49 registers and AT configurations to their default
settings.
21
S-registers
AT&Yn (recall user profile on power-up, where n = 0, 1)
This returns S0 through S49 registers and AT configurations to their default
settings. The same result applies to both case n = 0 and n = 1.
To enter the AT command state from the
on-line data transfer state:
Off-line mode
Esc
Esc
Esc
1. Press the escape character three times
in quick succession.
ATH0
2. To return to a command mode (AT or
keyboard dialing) while also dropping
the call, use the break key(s). Enter
ATH0.
ATO0 or ATO1
3. To return to on-line mode, enter ATO0
or ATO1.
Note: While the MCA is learning a script
(keyboard dialing), it will ignore the
on-line escape sequence.
S-registers
S-registers are used to configure the MCA. Some S-registers do not apply to
communication through a PBX, but are included for completeness.
ATSn=x
Enter ATSn when you wish to change and x is the new value. Where n is the
number of the S-register (0–69).
ATSn?
Enter ATSn to return the value of the S-register in decimal. Where n is the number
of the S-register (0–69).
S0 (number of rings incoming; range = 0–255)
Auto answer is disabled when n = 0. Any other value will be equal to the number
of rings before an incoming data call is answered.
22
S-registers
S1 (ring count; read only)
This returns the current number of rings for an incoming data call when read.
S2 (escape character; range = 0–255)
This holds the ASCII value of the escape character. If the S2 register is set to a
value of 128 or greater, then escape character action is disabled.
S3 (carriage return character; range = 0–127)
This holds the ASCII value of the carriage return (used for command line
termination and prompt termination). The default is 13.
S4 (line feed character; range = 0–127)
This holds the ASCII value of the line feed character. The default value is 10.
S5 (backspace character; range = 0–32, 127)
This holds the ASCII value of two values, one for the backspace key and one for
the character echoed to move the cursor back one position.
S9 (carrier detect response time)
Not applicable.
S10 (lost carrier hand up delay)
Not applicable.
S11 (DTMF tone duration)
Not applicable.
S6 (waiting time before blind typing)
Not applicable.
S7 (wait time for carrier/dial tone; range = 1–255)
This holds the Carrier Detect time-out value. When the time (in seconds) elapses,
the attempted call is released. The default value is 30 seconds.
23
S-registers
S8 (pause time for comma; range = 0–255)
A comma included in the dialing sequence is interpreted as a delay. The default
delay time is two seconds.
S12 (escape code guard time; range = 0–255)
The guard time aids in recognition of the escape sequence, useful since different
numbers of escape characters mean different things. For example, one Escape
character is not recognized as a pause until the guard timer expires, indicating no
other Escape characters were entered as part of the Escape sequence.
This holds the value of the guard time in milliseconds. The value of each digit is 20
milliseconds. The default value is 50 (one second).
S52, S53, S54 (product code response)
These registers contain the Product Identification code and will output a three digit
code in response to the “ATI0” command.
Default value is “960” (Smartmodem V-series 9600 modem). Other possible
values are: “122” (Smartmodem 1200) and “240” (Smartmodem 2400). These
registers will not be altered by software reset.
S66 (AT/KBD autobaud interpretation; range = 0, 1)
A value of zero (0) means only Hayes autobaud is possible. A value of one (1)
means both Hayes and keyboard dialing autobaud is allowed.
S51 (delay until modem pool activation; range = 0–255)
Each increment of S51 represents a 0.25 second delay before outbound modem
pool activation. Default is 16 (4 seconds). This register will not be altered by
software reset.
24
S-registers
Dial modifier
Dial modifiers are special parameters used to tell the MCA how to dial the data
number.
Description
Modifier
Digit for dialing
0–9
Characters for dialing
ABCD
While dialing, instructs PBX to begin dialing the digits entered to
this point. After dialing, this character is outpulsed as tone.
#
After dialing, this character is outpulsed as a tone.
*
Delay processing for a period of time, set by S8 register. Default
is two seconds.
, (comma)
Return to command state after dialing.
; (semicolon)
You can use these characters while dialing but they have no
effect in the dialing sequence.
!@
PRTW
25
Introduction to Keypad dialing
Introduction to Keypad dialing
Keypad dialing can be used in both synchronous and asynchronous mode. The
MCA data parameter commands accessed through the Options Key, require a
Display on the telephone. Keypad dialing commands are most useful for making
simple data calls or for modifying the MCA configuration. The M3902, M3903,
M3904, and M3905 access the MCA data parameters through the Option Key.
• M3902 Option Key - one of the fixed key on the right side edge of telephone.
• M3903 and M3904 Option Key - one of the fixed keys on the bottom edge of
the telephone.
• M3905 Option Key - is a Programmable Line/Feature Key (self-labeled)
located on the right hand side of the upper portion of the telephone display
area.
Keypad dialing
You can use the telephone keypad for voice calls or to operate the MCA, by using
the Options Key.
General instruction for using Keypad
dialing:
Options
/
1. Pressing the Options Key.
2. Use the up and down Navigation Keys
to scroll to MCA data parameters.
3. Press the Select Key.
MCA data parameters
Select
4. Use the right and left Navigation Keys
to scroll through the MCA data
parameters sublist.
5. Dial the two digits listed for your data
selection.
26
Introduction to Keypad dialing
Note 1: When you have given a
Keypad command to the MCA, it
remains in that mode until you press the
Options Key or Quit Key.
Note 2: You cannot make an outgoing
call while in an active MCA command.
Note 3: You can receive calls while the
MCA is performing an active command.
Options
/
or
Quit
Example: MCA data parameter
Keypad dialing command for Ring
Again:
Options
/
6. Press the Options Key
or
Press the Quit Key to end session.
Ring Again (synchronous or
asynchronous)
1. Press the Options Key.
2. Use the up and down Navigation Keys
to scroll to the MCA data parameters.
MCA data parameters
3. Press the Select Key.
Select
4. Use the right and left Navigation Keys
to scroll through the sublist.
fl›
5. Dial the number next to the data
parameter you choose, for Ring Again
the number is 64.
When the called port is busy, the display
on the telephone reads:
27
Introduction to Keypad dialing
RING AGAIN PLACED
Ring Again is automatically placed.
To verify that the call is connected
after Ring Again is placed:
Options
/
1. Press the Options Key.
2. Use the up and down Navigation Keys
to scroll to MCA data parameters.
MCA data parameters
3. Press the Select Key to choose MCA
data parameters.
Select
4. Use the right and left Navigation Keys
to scroll through the MCA data
parameters sublist.
5.
fl›
Dial the number next to the data
parameter you choose. For Ring
Again Dial 64. Check for the prompt.
Data Call Connected
This indicates that the call is established.
To cancel Ring Again:
Options
28
/
1. Press the Options Key.
Introduction to Keypad dialing
2. Use the up and down Navigation Keys
to locate the MCA data parameters.
3. Press the Select Key.
MCA data parameters
Select
4. Use the right and left Navigation Keys
to Scroll through the MCA data
parameters sublist.
‹·
5. Dial the number next to the data
parameter you choose. In this example
dial 39.
DATA RING AGAIN CANCELLED ENTER
Options Key or Quit Key TO EXIT
Note: In this chapter, feedback from the MCA refers to what you see on the telephone
Display.
MCA Data Parameters for Keypad dialing commands
There are certain steps that are the same for each Keypad dialing command. Use
the following steps prior to and after each Keypad dialing command:
To enter MCA data session:
Options
/
1. Press the Options Key.
2. Use the Navigation Keys to scroll to
MCA Data Parameters.
Note: Once you are familiar with the
Option menu item number for MCA data
parameters, you can press options, the
MCA data parameters number and then
select the parameter you want.
3. Dial the number or symbol under the
MCA Command number column.
29
Introduction to Keypad dialing
To end MCA data session:
Options
/
or
Quit
4. Press the Options Key to end the
session.
or
Press the Quit Key to end session.
Example
To initiate a Manual Data Call:
Options
/
1. Press the Options Key.
2. Use the Navigation Keys to scroll to
and select MCA data parameters.
MCA data parameters
Select
3. Press the Select Key.
4. Press the right Navigation Key to scroll
through MCA data parameters until
Manual Data Call appears in the
display.
Select
5. Press the Select Key.
6. Dial the Octothorpe Key and the far
number of the far end data device.
Options
/
Quit
30
7. Press the Options Key to end the MCA
session.
or
Press the Quit Key to end the MCA
session.
Introduction to Keypad dialing
Keypad dialing commands
MCA
MCA parameter
Command
number
Keypad dialing notes
£
Manual Data Call
Dial £ and the far end number of the data device.
•
Release Data Call
Dial •.
‚fi
Language Selection
Listed as the first item in the Options Menu.
¤‚
Asynchronous Mode
Dial ¤‚.
¤⁄
Synchronous Mode
Dial ¤⁄.
¤¤
Baud Rate
Dial ¤¤. Dial the digits for the actual baud rate e.g.,
19200.
¤‹
Space Parity
Dial ¤‹.
¤›
Odd Parity
Press Options, select MCA data parameters, dial ¤›.
Press Options Key or Quit Key to end session.
¤fi
Even Parity
Dial ¤fi.
¤fl
Mark Parity
Dial ¤fl.
¤‡
Host Mode
Dial ¤‡.
¤°
Terminal Mode
Dial ¤°.
¤·
Hotline Off
Dial ¤·.
‹‚
Hotline On
Dial ‹‚.
‹⁄
Virtual Leased Line Off
Dial ‹⁄.
‹¤
Virtual Leased Line On
Dial ‹¤.
If a power failure occurs while Virtual Leased Line is on,
the MCA automatically calls back the Auto Dial number
when power returns.
‹‹
Forced DTR Off
Dial ‹‹.
‹›
Forced DTR On
Dial ‹›.
This feature is useful for sending data to a printer or for
PC to PC connections where neither is configured as the
Host.
31
Introduction to Keypad dialing
MCA
MCA parameter
Command
number
‹fi
Keypad dialing notes
Dynamic Carrier Detect Off Dial ‹fi.
This feature is included for those communication software
packages that require a transition of Carrier Detect from
low (0) to high (1) in order to activate Answer mode.
‹fl
Dynamic Carrier Detect On Dial ‹fl.
‹‡
Remote Loopback Off
Again
Dial ‹‡.
‹°
Remote Loopback On
Dial ‹°.
‹·
Cancel Data Ring
Dial ‹·.
›‚
Full Duplex
Dial ›‚.
›‚
Full Duplex
Dial ›‚.
›⁄
Half Duplex
Dial ›⁄.
›¤
Modem Mode
Dial ›¤.
›‹
Network Mode
Dial ›‹.
››
Internal Clock
Dial ››.
›fi
External Clock
Dial ›fi.
›fl
PSDS Mode Off
Dial ›fl.
›‡
PSDS Mode On
Dial ›‡.
›°
Enable Echo Canceller
Dial ›°.
›·
Disable Echo Canceller
Dial ›·.
fi‚
SL-1 Mode
NA
fi⁄
SL-1/DMS-100 Mode
Dial fi⁄.
fi¤
NA
fi‹
NA
fi›
V.25 bis mode Off
Dial fi›.
fifi
V.25 bis mode On
Dial fifi.
This feature allows you to answer calls automatically with
DTE.
fifl
32
Bisync On
Dial fifl.
Introduction to Keypad dialing
MCA
MCA parameter
Command
number
Keypad dialing notes
fi‡
HDLC On
Dial fi‡.
fi°
Assert RTS Off
Dial fi°.
When RTS is ON the MCA forces the RTS lead active and
assumes the local DTE is always ready to transmit or
receive data. There is no flow control.
fi·
Assert RTS On
Dial fi·.
RTS OFF allows RTS/CTS hardware flow control
handshaking. The local DTE can stop the data flow by
dropping the RTS lead, and the MCA drops the CTS lead.
The MCA then sends a message to the far end to drop the
CTS lead. When the DTE is ready, it starts the flow by
raising the RTS lead. The MCA raises the CTS lead and
the data transmits again.
Utilizing flow control (RTS OFF) allows the MCA to
operate with printers or other DTE devices that also
utilities flow control.
fl‚
Auto Dial Programming
Dial fl‚. Display reads:
ADIAL
ENTER DIGITS,
fl⁄
Auto Dial Call
Dial fl⁄.
fl¤
Data Parameter Display
Dial fl¤.
fl‹
EIA leads Status Display
Dial fl‹.
TXD
o
. . .
RXD DCD
o
DTR
DSR
The display shows the status of the EIA leads of the
RS-232 connected to the MCA. A dark circle indicates the
lead is active. This feature is used for troubleshooting.
When in synchronous mode TXD and RXD are dark.
These are not used in this mode, and have no meaning.
fl›
Monitor data call
Dial fl›. When call port is busy, the display on the
telephone reads: RING AGAIN PLACED
Refer to Keypad command 39 to turn Ring Again off.
flfi
Reset to Default
Parameters
Dial flfi.
Unplugging the telephone does not reset MCA
configuration.
33
Additional asynchronous features
MCA
MCA parameter
Command
number
Keypad dialing notes
flfl
Emulation selection
Dial flfl and use the volume control key, scroll the
telephone’s display until the correct modem type appears.
fl‡
Lock/unlock data
parameters
Dial fl‡.
VDN Key Assignment
Dial fl°.
fl°
Even if parameters are locked, they can be changed for a
call. The new parameters are used only for the active call.
MCA returns to the locked parameter settings when you
release the call.
This feature is used when your telephone is programmed
to have more than one Voice DN (VDN). This assigns the
VDN of your choice to originate voice calls through the
MCA.
Additional asynchronous features
Autobaud
Autobaud is enabled each time you release a data call.
Each time you press carriage return to activate keyboard dialing or the letters AT
to activate AT dialing, the MCA times the length of bits received and sets the baud
rate accordingly.
Autoparity
The MCA automatically sets the parity each time the letters AT are entered for AT
dialing.
In Keyboard dialing you must enter a period ( . ) and press carriage return. This
is normally the first step to take when your terminal displays a garbled prompt.
Modem Pooling
When you dial a modem pool, the
MCA prompts:
ENTER REMOTE NUMBER
XXXX < C>
34
1. Enter number of external modem to
access and press the Carriage Return
Key.
Additional asynchronous features
CALL CONNECTED.SESSION STARTS
Additional synchronous information
Use fifi and fi‡ (HDLC On) for Group IV FAX. Use fifi and fifl (Bisync On)
for video.
When V.25 fifi) is turned on, the MCA automatically switches to synchronous
mode. When in the V.25 mode, auto answer is not available.
If an MCA in synchronous mode calls another data module in asynchronous
mode, the call is connected. You must drop the call.
Parity and character length on the MCA
In Asynchronous mode the MCA is designed to work with 8 bit data characters.
You can use various parity settings, but the total character length must equal 8
bits. The MCA accepts the following character lengths and parity settings:
8 data bits, no parity bit
7 data bits + one bit of Even parity
7 data bits + one bit of Odd parity
7 data bits + one bit of Mark parity
7 data bits + one bit of Space parity
For ASCII data, 8 bits no parity equals 7
bits with space parity.
The MCA controls parity only when it displays prompts before the data call is
established. In this case, the MCA outputs the prompts to the DTE with the parity
settings defined with P23–P26, or it determines parity automatically with
the < c > < c >. sequence.
Once the data call is established, the MCA does not check or regenerate parity.
The MCA will transport the 8 bit character to the far end with the parity
unchanged.
35
Additional asynchronous features
Voice call origination
By using a special cable, the MCA can communicate with two DTEs at the same
time. The primary channel is the main communication channel offering MCA
features. The second channel can respond to Voice Call Origination commands
(VCO) only. This provides the ability to make a voice call across the second
channel while simultaneously using the primary channel to transmit or receive
high speed data. Below is the pinout list to connect the second channel.
RS-232 pin
V.35 Pin
TxD
14
18
RxD
16
21
Gnd
7
7
Note: The VCO baud rate is 2400.
36
Asynchronous troubleshooting
Asynchronous troubleshooting
If data is sent in idle mode (when there is no active call), you can not use keypad
dialing. You must stop sending the data from the DTE.
You must disconnect pin 22, if you are using an RS-232 cable to connect the MCA
to an ADM3/5 terminal.
If you are changing the MCA from Synchronous to asynchronous, change the baud rate
before you change the mode from synchronous to asynchronous.
Some terminals drop DTR with this mode change. If this happens, the display does not
show RELEASED.
Before you select VLL you must program Auto Dial.
The receiving data module always adapts to the sending data parameters. The
sending data module never adapts to the answering data module parameters.
Modem pooling
Synchronous mode does not support modem pooling.
Power failure
When there is an active call between two MCAs, a power failure on either side
does not disconnect the call. The call connection remains until the power returns.
The MCA always retains the previous data parameters. There is no resetting
required in the case of power failure.
Troubleshooting symptoms and solutions
Symptom
Solution
No response when you
type <CR> or AT at the
terminal.
1.
Dial ¤°to make sure you are in terminal mode.
2.
Make sure your PC or terminal’s power is on and you are on-line.
3.
You need to connect a null modem cable between your MCA, if the
equipment is not configured as Data Terminal Equipment.
4.
Make sure the MCA is receiving external power. Check the power
cable, make sure the connection is secure and there is power.
37
Asynchronous troubleshooting
Symptom
The prompt:
CALL
CONNECTED.SESSION
STARTS
Solution
5.
If you have a Display on your telephone, dial fl‹get into EIA
Monitor mode. Check to see that the MCA is receiving signals from
your terminal by watching the RXD indicator on the Display while
entering carriage returns on the keyboard. If the indicator flashes,
the connection is correct. If not, make sure the cable connection is
secure and the cable is a standard RS-232.
6.
Dial fl¤ ensure that the MCA is in the Asynchronous mode).
Dial ¤‚ change to the Asynchronous mode.
7.
Dial •to ensure that the MCA is in the idle mode.
8.
If there is not a display, press ¤‚. If you hear a beep, then the
MCA is in synchronous mode. Then change the baud rate
¤¤change to synchronous mode ¤‚.
9.
Check the configuration parameters of the far end data device. If
they do not match those of your MCA, the call can not go through.
If this happens change the parameters of your MCA to match.
RELEASED
Garbled prompts appear
on your terminal when
you type <CR>.
Enter a period ( .) followed by <CR> to perform an autoparity.
You do not get response
from the host computer
when you try to log on.
First, release the call. Turn on Remote Loopback and make the call
again. Type some characters at your terminal. If they echo back and
appear on your terminal, the problem is with the far end data device. If
the characters do not appear on your terminal, the problem is with the
MCA. Contact your telephone system administrator.
You try to make a data
call from the initial
prompt (or Main menu) in
keyboard dialing. You
see the prompt:
First, hold down the break key(s) for two seconds, enter <CR> and try
again to make the data call. If the problem continues, your MCA is
possible disabled. Contact your system administrator.
CALLING
but no number appears
and after 30 seconds you
get the prompt:
NO SYSTEM RESPONSE
38
Asynchronous troubleshooting
Symptom
Solution
MCA does not operate at
all.
1.
Check the LED in the back of the telephone to see if it is flashing. If
the LED is steadily lit, the MCA needs to be
configured in your system, or the MCA is not functioning correctly.
If the LED is not lit, the MCA requires external power.
2.
Make sure the cable from your terminal or PC is connected to the
MCA.
-
Check the data parameters for your display.
-
Make sure the transformer is plugged in, or the closet
power is connected.
-
Make sure the cable between the MCA and your telephone is connected and is crimped.
39
Synchronous troubleshooting
Synchronous troubleshooting
After the call is connected send the data using bit error rate testers (BERT). If there
is no transmission, or if there are excessive errors, the MCA is probably defective.
Return it for repair.
40
Index
A
abort current command 9
access code 10
answer 18
AT dialing 18
extensions to 20
AT/KBD autobaud interpretation
Auto Dial 9
autobaud 34
autoparity 34
Directory (Script File) 12
Display 26
DTMF tone duration 23
E
24
B
backspace character
baud rate
autobaud 34
break key(s) 9
echo back 18
EEPROM 1
Escape code 14
guard timer 14, 24
Escape key 12, 14, 23
change 14
F
factory configuration profile
23
Handsfree 20
hang up data call 6, 20
hang up voice call 20
Hayes dialing 18
Hold 20
C
carriage return 4, 23
carrier detect 18
carrier detect control 21
carrier detect response time
clear-to-send options 21
21
H
23
D
data call 4
Data Terminal Equipment 1
data-set-ready options 21
default configuration 7
default data speed 34
delay until modem pool activation 24
dial 4, 18
modifiers 25
I
initial prompt
9
K
keyboard dialing 9
keypad dialing 26
L
Learn Script menu 8
LED 2
line feed character 23
lost carrier hand up delay
23
41
Index
M
Main menu 7
manual answer 15
menus (keyboard) 7
Modem Pooling 34
Modify menu 8
mute 20
N
number of rings incoming
numeric result 19
22
O
off/forced dtr command 31
off/loopback command 32
off-line 19
off-line mode 22
on-line 19
P
parameters
default 7
display 17
parity
autoparity 34
pause time for comma 24
product code response 24
product identification code 21
keyboard 15
repeat last command
response to DTR 21
result code 19
extended 19
Ring Again 16, 27
cancel 28
ring count 23
RS-232 2
18
S
Script File 11
Script File Directory 12
Script File menu 8
serial port 2
soft reset 20
software, communications 2, 3
Speed Call 10
S-registers 21, 22
synchronous troubleshooting 40
T
terminal 2
transparent mode 20
troubleshooting 40
V
R
verbal result 19
voice call 20
recall user profile on power-up 22
release data call 6
Remote Loopback
wait time for carrier/dial tone 23
waiting time before blind typing 23
42
W
While you are away from your desk: Call Forward
38
Title to and ownership of Meridian SL-1 software shall at all times
remain with Nortel Networks. Meridian SL-1 software shall
not be sold outright and the use thereof by the customer shall be
subject to the parties entering into software agreements as specified
by Nortel Networks.
Information contained in this document is subject to change.
Nortel Networks reserves the right, without notice, to make
changes in equipment design or program components as progress
in engineering, manufacturing or technology may warrant.
Reordering number: NT2F75AA A0779717
(c/o 15 each per package P0903781)
Internal Manufacturing part number:
P0903781
Standard, Issue 1.00
Printed in Canada
June 1999
www.nortelnetworks.com