1
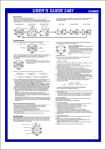
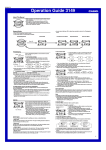
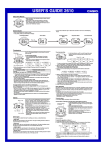
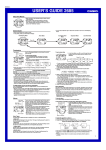
MO0310-EA
Operation Guide 1138 1173
• Press C to change from mode to mode. Each mode is explained in detail in the
following sections.
• After you perform an operation in any mode, pressing C returns to the Timekeeping
Mode.
General Guide
• You can use the Remote Control functions while in the Timekeeping Mode.
Timekeeping Mode
Alarm Mode
Time Setting Mode
A
C
+
SET
P
STOP
PLAY
▲
–
P
▲
C
–
POWER
TV/VCR
B
P
▲
B
▲
TV/VCR
A
TV/VCR
POWER
POWER
Stopwatch Mode
+
[ Module No. 1173 ]
[ Module No. 1138 ]
The operational procedures for Modules 1138 and 1173 are identical. All of
the illustrations in this manual show Module 1138.
Timekeeping Mode
Signal Emitter
Month
Day of week
Date
A
• This watch will control only televisions and video tape
decks that are equipped with remote control sensors.
• For details on how to set the time and date, see “Time
Setting Mode”.
POWER
TV/VCR
B
P
STOP
C
In addition to normal timekeeping, the Timekeeping
Mode also provides you with remote control capabilities
for your TV* or video tape deck.
* The terms “TV” and “television” as used in this
manual refer to both standard televisions and the
cable box of cable TV systems.
PLAY
Seconds
Minutes
Hour
PM indicator
Note
The remote control buttons of the watch are marked
according to their functions. In this manual, the buttons
are referred to by using their marking in bold
characters.
Example: Press POWER to switch on the television.
Other (unmarked) buttons are indicated using the
letters A, B, and C, as shown in the illustration.
Manufacturer code (video tape deck)
Manufacturer
Code
TOSHIBA
27
GOLDSTAR
28
PHILIPS
39
ZENITH
6
GOLDSTAR
29
RCA
1
7
HITACHI
22
RCA
2
8
HITACHI
23
RCA
36
9
JVC
30
SAMSUNG
16
10
JVC
31
SAMSUNG
17
11
JVC
32
SHARP
19
13
JVC
35
SHARP
20
14
MITSUBISHI
15
SONY
3
18
MITSUBISHI
37
SONY
4
24
PANASONIC
12
SONY
5
25
PANASONIC
33
TOSHIBA
26
34
TV Mode indicator
Signal Emitter
A
POWER
TV/VCR
A
▼
▼
▼
B
TV
TV
P
SET
STOP
C
P
TV Mode
(for television remote
control)
Video Mode
(for video tape deck
remote control)
PLAY
In order to be able to use this watch for remote control of a television or video tape
deck, you must first set the appropriate manufacturer code. The manufacturer code
tells the watch what signals to use for remote control. The Manufacturer Code Table
shows the names of the manufacturers that correspond to each code. For full details
on how to actually set the manufacturer code, see “To set the manufacturer code”.
Some TV or tape deck models may not work properly with this watch, even
though they are made by one of the manufacturers in the Manufacturer Code
Table. Also, you may find that you can control a TV or tape deck using a code
for a manufacturer that is different from the ones in the table. For details on
finding the code you should use, see “How to find the right code”.
Note
• Replacing the battery will cause the remote control data setting (TV/video
manufacturer codes) to be altered. Be sure that you make a note of your codes
before you have the battery replaced.
• There are some manufacturers with more than one code. Try the various codes
available for your equipment to find the one that works best.
• You have to set separate codes for your TV and tape deck, even if they are made by
the same manufacturer.
• You might not be able to use this watch to control models that combine a TV and
tape deck into a single unit, multi-functional TVs that can be used as computer
monitors, or other televisions or tape decks equipped with special functions.
Manufacturer code (TV/Cable Box)
Manufacturer
Code
Manufacturer
Code
GE
18
MITSUBISHI
14
SAMSUNG
20
GE
21
MITSUBISHI
15
SCIENTIFIC ATLANTIC (C)*
10
GOLDSTAR
29
MITSUBISHI
37
SCIENTIFIC ATLANTIC (C)*
11
HITACHI
28
PANASONIC
12
SHARP
19
JERROLD (C)*
8
PANASONIC
33
SONY
3
JERROLD (C)*
9
PANASONIC (C)*
13
TOSHIBA
26
JVC
30
PHILIPS
39
TOSHIBA
27
JVC
31
PIONEER (C)*
25
ZENITH
6
JVC
32
RCA
1
ZENITH (C)*
7
MAGNAVOX
22
RCA
2
MAGNAVOX
23
RCA
36
5
MAGNAVOX
24
SAMSUNG
16
35
MAGNAVOX
34
SAMSUNG
17
38
* “(C)” indicates cable box.
• Holding down
increases the code number at high
speed.
• See the Manufacturer Code Table for details on
manufacturer codes.
Manufacturer code
About the remote control function
Code
1. Switch on the TV or video tape deck whose
manufacturer code you want to set.
2. In the Timekeeping Mode, hold down B until a
manufacturer code appears flashing on the display.
3. Press A to select either the TV Mode ( TV indicator
shown on the display) or Video Mode (
indicator
shown on the display).
to increase the code number.
4. Press
TV
C
Manufacturer
Code
38
Press A.
Normal Timekeeping Mode
Manufacturer
PHILIPS
The Timekeeping Mode is actually made up of three sub-modes. Use the A button
while in the Timekeeping Mode to switch between the sub-modes.
P
Code
21
To set the manufacturer code
About the Timekeeping sub-modes
B
Manufacturer
GE
4
5. To test whether or not the displayed manufacturer code
is correct for your equipment, point the Signal Emitter
(red window) at your TV or tape deck and press
POWER. Note that the TV/tape deck should be
switched on.
• If the above operation switches the power of your TV or
tape deck off, it means that the correct code has been
selected.
• Certain TVs and tape decks may be slow to respond after
receiving a remote control signal. With such units, try
holding down POWER for one or two seconds.
• If nothing happens when you press POWER, use steps 4
and 5 to try another code.
6. When you have the correct manufacturer code, press B to return to the
Timekeeping Mode.
• See “To use the remote control functions” for information on using the remote control
functions.
• If you can’t find a code that works with your equipment, see “How to find the right
code”.
• If you do not press any buttons for a few minutes while the manufacturer code is
flashing, the flashing will stop and the watch automatically returns to the
Timekeeping Mode.
How to find the right code
Use the following operation if you have difficulty finding a manufacturer code that
works with your equipment.
1. Switch on the TV or video tape deck whose manufacturer code you want to set.
2. In the Timekeeping Mode, hold down B until a manufacturer code appears flashing
on the display.
3. Press A to select either the TV Mode ( TV indicator shown on the display) or Video
Mode (
indicator shown on the display).
4. Press
until manufacturer code 01 appears.
• Code 01 comes sequentially after code 39.
• Holding down
increases the code number at high speed.
5. To test whether or not the displayed manufacturer code is correct for your
equipment, point the Signal Emitter (red window) at your TV or tape deck and press
POWER. Note that the TV/tape deck should be switched on.
• If the above operation switches the power of your TV or tape deck off, it means that
the correct code has been selected. Skip to step 6.
• Certain TVs and tape decks may be slow to respond after receiving a remote control
signal. With such units, try holding down POWER for one or two seconds.
• If nothing happens when you press POWER, press
to advance to the next code
and repeat step 5 to test the code.
• Note that some codes in the Manufacture Code Table do not have manufacturer names.
The watch does not emit remote control signals while these codes are set, and so
you should not use them.
6. After you have found the correct manufacturer code, press B to return to the
Timekeeping Mode.
1
Operation Guide 1138 1173
Alarm Mode
Hourly time signal
on indicator
To use the remote control functions
1. In the Timekeeping Mode, press A to select either the
TV Mode ( TV indicator shown on the display) or Video
Mode (
indicator shown on the display).
Signal Emitter
TV mode
indicator
Indicator
A
B
2. Point the Signal Emitter (red window) at your TV or tape
deck and use the buttons on the right side and the
bottom of the watch to perform the operation that you
want (see the table below).
• Each time you perform an operation, an indicator
appears on the display to show which operation is being
performed.
POWER
TV/VCR
TV
P
STOP
C
Mode indicator
When the Daily Alarm is switched on, the alarm sounds for
20 seconds at the preset time each day. Press any button
to stop the alarm after it starts to sound.
When the Hourly Time Signal is switched on, the watch
beeps every hour on the hour.
To set the alarm time
A
B
C
PLAY
Alarm on
indicator
Hour
1. Hold down B while in the Alarm Mode until the hour
digits start to flash on the display. The hour digits flash
because they are selected.
• This operation will switch the Daily Alarm on
automatically.
2. Press ▲ to change the selection in the following
sequence.
Video Mode
Operation
Button
Operation
POWER
Switches power on and off
Switches power on and off
TV/VCR
Switches between TV and
video function
Switches between TV and
video function
STOP/
No function
Stops tape transport
PLAY/
No function
Starts tape playback
Changes to the next higher
channel
Changes to the next higher
channel
▲/
Increases volume
Starts fast forward operation
▼/
Decreases volume
Start rewind operation
Changes to the next lower
channel
Changes to the next lower
channel
/+
/–
Minutes
Hour
Minutes
TV Mode
Indicator
Indicator
to increase the selected digits. Holding down
increases the selection at
3. Press
high speed.
• The format (12-hour and 24-hour) of the alarm time matches the format you select for
normal timekeeping.
• When setting the alarm time using the 12-hour format, take care to set the time
correctly as morning or afternoon (P).
4. After you set the alarm time, press B to return to the Alarm Mode.
To switch the Daily Alarm and Hourly Time Signal on and off
Press A while in the Alarm Mode to change the status of the Daily Alarm and Hourly
Time Signal in the following sequence.
[ Alarm on indicator/Hourly Time Signal on indicator ]
Both ON
Note
• This watch is equipped with buttons that cover as wide a range of remote control
functions as possible. Note, however, that if your TV or tape deck is not equipped
with some of these functions, nothing will happen when you press the corresponding
button on this watch.
• For televisions that do not have a TV/video switching function, pressing the TV/VCR
button may switch teletext, etc. on and off.
Both OFF
Daily Alarm
only
Hourly Time
Signal only
To test the alarm
Hold down A while in the Alarm Mode to sound the alarm.
Time Setting Mode
To set the time and date
Troubleshooting Guide
Problem: Remote control functions do not work at all.
• Possible Cause: Use of the wrong mode (TV/Video)
Action: Make sure the watch is in the TV Mode when you are trying to control a
TV, or in the Video Mode when you are trying to control a video tape
deck. See “About the Timekeeping sub-modes” for details on changing
modes. You cannot control any other remote control device (besides a
TV or video tape deck) using this watch.
• Possible Cause: Wrong manufacturer code
Action: You must set the correct manufacturer code for the type of TV or video
tape deck you are trying to control. See “To set the manufacturer code”.
• Possible Cause: The path between the signal emitter and TV/video tape deck is
blocked or too long (more than 16 feet/5 meters).
Action: Make sure that the path between the watch’s signal emitter and the
signal receiver on your TV or tape deck is not blocked by clothing, your
hand, furniture, etc. Reduce the distance between the signal emitter and
TV/video tape deck if necessary.
Problem: Some remote control functions do not work.
• Possible Cause: Too much distance between the watch and TV/video tape deck,
or improper pointing of the watch’s signal emitter.
Action: The distance between the watch and TV/video tape deck should be less
than 16 feet/5 meters. Also, make sure that the signal emitter is pointing
directly at the TV/video tape deck when you are performing a remote
control function.
• Possible Cause: Use of button on the watch for which the TV/video tape deck does
not have a corresponding function.
Action: Some TV or tape deck models may not have functions that correspond to
the functions provided on the watch.
Problem: Video deck functions do not work at all.
• Possible Cause: Your video tape deck might have a dual code (A Code/B Code or
Video 1/Video 2) remote control receiver.
Action: Try switching the setting (between A Code/B Code or Video 1/Video 2)
on your video tape deck until you find the correct setting for use with the
watch.
Day of week
Month
Date
1. Use C to enter the Time Setting Mode.
• The seconds digits flash, because they are selected.
2. Press ▲ to change the selection in the following
sequence.
A
B
SET
Seconds
Hour
Minutes
Day of Week
Date
Month
P
C
Hour
Seconds
Minutes
• While the selection is flashing, press A to switch
between 12-hour and 24-hour formats.
PM indicator
3. While the seconds digits are selected (flashing), press
to reset the seconds to
“00”. If you press
while the seconds count is in the range of 30 to 59, the
seconds are reset to “00” and 1 is added to the minutes. If the seconds count is in
the range of 00 to 29, the minutes count is unchanged.
4. While any other digits (besides seconds) are selected (flashing), press
to
increase the number. While the day of the week is selected, pressing
advances
to the next day. Holding down
changes the current selection at high speed.
5. After you set the time and date, press C to return to the Timekeeping Mode.
• The watch does not make any allowance for leap years. Be sure to manually set
February 29 (when one occurs) for the appropriate date.
• If you do not press any buttons for a few minutes while a selection is flashing, the
flashing stops and the watch goes back to the Timekeeping Mode automatically.
Stopwatch Mode
C
Minutes
▼
▼
▼
B
Clear
B
Clear
▼
(c) Split time and 1st-2nd place times
A
B
A
B
B
Start
Split
Stop
Split release Clear
▼
Seconds
▼
▼
(b) Split time measurement
A
B
B
A
Start
Split
Split release Stop
▼
Hours
▼
▼
(a) Elapsed time measurement
A
A
A
A
Start
Stop
Re-start
Stop
B
▼
A
The Stopwatch Mode lets you measure elapsed time, split
times, and two finishes. The range of the stopwatch is 23
hours, 59 minutes, 59 seconds.
▼
Mode indicator
First runner Second runner Record time of
finishes.
second runner.
finishes.
Record time of
first runner.
2