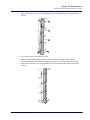
1
EdgeFLEX 600
HARDWARE INSTALLATION MANUAL
Part Number: 770-0170-AA
Release: 2.0
July 2007
© Copyright 2007 Carrier Access Corporation. All rights reserved. All noted trademarks are the property of Carrier Access
Corporation in the U.S. and various countries.
The information presented in this manual is subject to change without notice and does not represent a commitment on the
part of Carrier Access Corporation. The hardware and software described herein are furnished under a license or nondisclosure agreement. The hardware, software, and manual may be used or copied only in accordance with the terms of this
agreement. It is against the law to reproduce, transmit, transcribe, store in a retrieval system, or translate into any medium
- electronic, mechanical, magnetic, optical, chemical, manual, or otherwise - any part of this manual or software supplied
with the EdgeFLEX 600 for any purpose other than the purchaser’s personal use without the express written permission of
Carrier Access Corporation.
Contact Information:
Carrier Access Corporation
5395 Pearl Parkway
Boulder, CO 80301-2490
Corporate Phone: (303) 442-5455
Fax: (303) 443-5908
www.carrieraccess.com
Customer Support Direct: (800) 786-9929
E-mail: [email protected]
PREFACE
Compliance
Safety of Information Technology Equipment
EdgeFLEX™ 600 is safety certified by an independent laboratory and is compliant with the following
safety standards:
UL60950, 1st Edition / CSA C22.2 No. 60950-1-03
EN60950-1
FCC Requirements, Part 15
This device complies with Part 15 of the FCC Rules. Operation is subject to the following two
conditions:
This device may not cause harmful interference, and
This device must accept any interference received, including interference that may cause
undesired operation
This equipment has been tested and found to comply with the limits for a Class A digital device pursuant
to Part 15 of the Federal Communications Rules. These limits are designed to provide reasonable
protection against harmful interference when equipment is operated in a commercial environment. This
equipment generates, uses, and can radiate radio frequency energy, and if not installed and used in
accordance with the instruction manual may cause harmful interference to radio communications.
Operation of this equipment in a residential area is likely to cause harmful interference, in which case
the user will be required to correct the interference at the user’s own expense.
CAUTION! MODIFICATIONS NOT EXPRESSLY APPROVED BY THE MANUFACTURER COULD VOID
THE USER'S AUTHORITY TO OPERATE THE EQUIPMENT UNDER
FCC RULES.
NOTE: See Chapter 2, EdgeFLEX 600 Installation for installation instructions to meet FCC
Part 15 requirements.
Industry Canada ICES-003
English
This class A digital apparatus complies with Canadian ICES-003.
French
Cet appareil numérique de la classe A est conforme à la norme NMB-003 du Canada.
NOTE: See Chapter 2, EdgeFLEX 600 Installation for installation instructions to meet
Canadian ICES-003 requirements.
Preface
Compliance
Europe EN55022 and AS/NZS CISPR22
WARNING! THIS IS A CLASS A PRODUCT. IN A DOMESTIC ENVIRONMENT THIS PRODUCT MAY
CAUSE RADIO INTERFERENCE IN WHICH THE USER MAY BE REQUIRED TO TAKE ADEQUATE
MEASURES.
NEBS Level 3 Requirements
The chassis, power supply and controller are NEBS Level 3 Certified. For other service cards, refer to
their chapter in this manual, to determine NEBS compliance.
Grounding per NEBS is covered in the Installation chapter of this manual, and is required for NEBS
Level 3 compliance.
iv
EdgeFLEX 600 - Release 2.0
Preface
Compliance
EdgeFLEX 600 - Release 2.0
v
Preface
Safety Notices
Safety Notices
Class 1 Laser Product Safety Warning
The EdgeFLEX 600 is a Class 1 Laser Product. This product complies with 21 CFR 1040.10 and
1040.11 except for deviations pursuant to Laser Notice 50, dated July 26, 2001, as well as European
requirements EN 60825-1 and EN 60825-2. Operational wavelengths are in the range 830-1620 nm.
This symbol on the front panel indicates the presence of invisible laser light. Under normal
operation, Class 1 lasers are considered eye-safe and not harmful. Optical interfaces do not
need to be shut down when connecting or disconnecting optical fibre. However, care should
always be exercised to minimize exposure when working with lasers. Avoid looking into the
transceiver or an unconnected fibre with the naked eye or through the use of viewing optics.
When an interface is not connected with a fibre, replace the dust plug to help protect the
transceiver optics and reduce the chance of accidental exposure to laser light.
Only Small Form-Factor Pluggable (SFP) optical transceivers approved for use by Carrier Access
should be used within this system. Use of non-approved transceiver devices may result in an increased
risk of exposure to invisible laser light or an inoperative optical port.
CAUTION! USE OF CONTROLS OR ADJUSTMENTS OR PERFORMANCE OF PROCEDURES OTHER
THAN THOSE SPECIFIED HEREIN MAY RESULT IN HAZARDOUS RADIATION EXPOSURE.
CAUTION! THE USE OF OPTICAL INSTRUMENTS WITH THIS PRODUCT WILL INCREASE EYE
HAZARD.
vi
EdgeFLEX 600 - Release 2.0
Preface
Safety Notices
DC Power Supply Warnings
The DC power supply must be installed in a restricted area, such as an equipment closet or room, in
compliance with Articles 110-16, 110-17, and 110-18 of the National Electric Code, ANSI/NFPA 70.
The DC power source must be isolated from the AC power source and must have a proper ground.
The grounded conductor of the DC supply circuit can be connected to the frame grounding conductor
of the EdgeFLEX 600. In this case, the following conditions apply:
The EdgeFLEX 600 must be connected to the DC power supply grounded conductor or bonding
jumper from the grounding terminal bar or bus to which the DC power supply grounded
conductor is connected.
The EdgeFLEX 600 must be located in the same area as other equipment having a connection
between the grounded conductor of the same DC supply circuit and the grounding conductor,
and also the point of grounding of the DC system. The DC system must not be grounded
elsewhere.
The DC power supply must be located on the same premises as the EdgeFLEX 600.
You must not switch or disconnect devices in the grounded conductor between the DC power
supply and the point of connection of the grounding electrode conductor.
A readily accessible disconnect device may be provided in the fixed wiring for a DC power
supply. The device must be rated for the voltage and current specified.
For safety purposes, the DC power supply requires connection to a grounded outlet. To prevent possible
injury from voltages on the telecommunications network, disconnect all telecommunications network
lines before disconnecting the DC power supply from the grounded outlet.
EdgeFLEX 600 - Release 2.0
vii
Preface
Service and Maintenance - End User
Service and Maintenance - End User
All service to the EdgeFLEX 600 shall be undertaken ONLY by qualified service personnel. There are
no user serviceable parts inside the unit.
Do NOT plug in, turn on or attempt to operate an obviously damaged unit.
Ensure the supply voltage for the product is within the range indicated on the identification label.
During any service and maintenance procedure, if an optical interface must be disconnected
insert the dust plug shipped with the unit into the transceiver interface to minimize exposure
to invisible laser light and to protect the optics.
AC Power Supply
AC Power Supply Fuse Rating and Type: 250V, 2A time lag fuse (i.e., Littelfuse 0213 002 or
equivalent)
CAUTION! FOR CONTINUED PROTECTION AGAINST THE RISK OF FIRE, REPLACE ONLY WITH THE
SAME TYPE AND RATING OF FUSE.
CAUTION! POUR NE PAS COMPRETTA LA PROTECTION CONTRE LES RISQUES D'INCENDIE,
REMPLACER PAR UN FUSIBLE DE MEME TYPE ET DE MEMS CARACTERISTIQUES NOMINALES.
If fuse replacement is required, ensure that the power switch on the unit is turned off and the power cord
is removed from the AC source prior to replacement.
DC Power Supply
DC powered devices use redundant power supplies, each with its own power cord.
CAUTION! THIS UNIT HAS MORE THAN ONE POWER SUPPLY CORD. DISCONNECT
THE 2 POWER SUPPLY CORDS BEFORE SERVICING TO AVOID ELECTRIC SHOCK.
CAUTION! CET APPAREIL COMPORTE PLUS D'UN CORDON D'ALIMENTATION. AFIN
DE PRÉVENIR LES CHOCS ÉLECTRIQUES, DEBRANCHER LES 2 CORDONS
D'ALIMENTATION AVANT DE FAIRE LE DÉPANNAGE.
viii
EdgeFLEX 600 - Release 2.0
Preface
Safety Information
Safety Information
CAUTION! ALWAYS USE CAUTION WHEN INSTALLING TELEPHONE LINES. READ THE CAUTIONS
BELOW FOR DETAILS ON SAFETY GUIDELINES TO PREVENT INJURY.
Never touch uninsulated telephone wires and terminals unless the telephone line has been
disconnected at the Network Interface (NI) as voltage potentials as high as 300 VAC may be
present across the transmit and receive pairs
Only use No. 26 AWG or larger telecommunication line cord, to reduce the risk of fire
Never install telephone wiring during a lightning storm
Never install telephone jacks in wet locations unless the jack is specifically designed for wet
locations
Refer to the installation section of this manual for a safe and proper installation procedure. All
wiring external to this equipment should follow the current provision of the National Electrical
Code
Notices
This manual contains important information and warnings that must be followed to ensure safe
operation of the equipment.
DANGER! A DANGER NOTICE INDICATES THE PRESENCE OF A HAZARD THAT CAN OR WILL
CAUSE DEATH OR SEVERE PERSONAL INJURY IF THE HAZARD IS NOT AVOIDED.
CAUTION! A CAUTION NOTICE INDICATES THE POSSIBILITY OF INTERRUPTING NETWORK
SERVICE IF THE HAZARD IS NOT AVOIDED.
WARNING! A WARNING NOTICE INDICATES THE POSSIBILITY OF EQUIPMENT DAMAGE IF THE
HAZARD IS NOT AVOIDED.
NOTE: A Note indicates information to help you understand how to perform a procedure or
how the system works. Notes should be read before performing the required action.
EdgeFLEX 600 - Release 2.0
ix
Preface
Electrostatic Discharge (ESD) Precautions
Electrostatic Discharge (ESD) Precautions
ESD can damage processors, circuit cards, and other electronic components. Always observe the
following precautions before installing a system component.
1. Do not remove a component from its protective packaging until ready to install.
2. Wear a wrist grounding strap and attach it to a metal part of the system unit before handling
components. If a wrist strap is not available, maintain contact with the system unit throughout
any procedure requiring ESD protection.
WARNING! INTEGRATED CIRCUITS (ICS) ARE EXTREMELY SUSCEPTIBLE TO ELECTROSTATIC
DISCHARGE. UNLESS YOU ARE A QUALIFIED SERVICE TECHNICIAN WHO USES TOOLS AND
TECHNIQUES THAT CONFORM TO ACCEPTED INDUSTRY PRACTICES, DO NOT HANDLE ICS.
The ESD warning label appears on packages and storage bags that contain
static-sensitive products and components.
x
EdgeFLEX 600 - Release 2.0
Preface
Warranty
Warranty
Carrier Access warrants to Distributor that Products are free from substantial defect in material and
workmanship under normal use given proper installation and maintenance for period of five (5) years
from the date of shipment by Carrier Access. This warranty shall not apply to Products that have been
either resold or transferred from Distributor’s customer to any other party. Any such transfer shall void
the above warranty.
Distributor will promptly notify Carrier Access of any defect in the Product. Carrier Access or its agent
will have the right to inspect the Product or workmanship on Distributor’s premises or Distributor’s
customer’s premises. Carrier Access has the option to: (a) repair, replace, or service at its factory or on
the premises the Product or workmanship found to be defective; or (b) credit BUYER for the
PRODUCT in accordance with Carrier Access’s depreciation policy. Refurbished material may be used
to repair or replace the Product. Products returned to Carrier Access for repair, replacement, or service
will be shipped prepaid by Distributor.
Limitation of Warranty & Limitation of Remedies
Correction of defects by repair, replacement, or service will be at Carrier Access’s option and constitute
fulfillment of all obligations to Distributor for breach of warranty.
Carrier Access assumes no warranty liability with respect to defects in the Product caused by:
a. modification, repair, installation, operation, or maintenance of the Product by anyone other
than Carrier Access or its agent, except as described in Carrier Access’s documentation; or
b. the negligent or other improper use of the Product; or
c. handling or transportation after title of the Product passes to Distributor.
Other manufacturer’s equipment purchased by Carrier Access and resold to Distributor will be limited
to that manufacturer’s warranty. Carrier Access assumes no warranty liability for other manufacturer’s
equipment furnished by Distributor.
Distributor understands and agrees as follows: THE WARRANTIES IN THIS AGREEMENT
REPLACE ALL OTHER WARRANTIES, EXPRESSED OR IMPLIED, AND ALL OTHER
OBLIGATIONS OR LIABILITIES OF CARRIER ACCESS, INCLUDING ANY WARRANTIES OF
MERCHANTABILITY AND FITNESS FOR A PARTICULAR PURPOSE. ALL OTHER
WARRANTIES ARE DISCLAIMED AND EXCLUDED BY CARRIER ACCESS.
THE REMEDIES CONTAINED IN THIS AGREEMENT WILL BE THE SOLE AND EXCLUSIVE
REMEDIES WHETHER IN CONTRACT, TORT, OR OTHERWISE, AND CARRIER ACCESS
WILL NOT BE LIABLE FOR INJURIES OR DAMAGES TO PERSONS OR PROPERTY
RESULTING FROM ANY CAUSE WHATSOEVER, WITH THE EXCEPTION OF INJURIES OR
DAMAGES CAUSED BY THE GROSS NEGLIGENCE OF CARRIER ACCESS.
THIS LIMITATION APPLIES TO ALL SERVICES, SOFTWARE, AND PRODUCTS DURING
AND AFTER THE WARRANTY PERIOD. IN NO EVENT WILL CARRIER ACCESS BE LIABLE
FOR ANY SPECIAL, INCIDENTAL, OR CONSEQUENTIAL DAMAGES OR COMMERCIAL
LOSSES EVEN IF CARRIER ACCESS HAS BEEN ADVISED THEREOF.
No agent, Distributor, or representative is authorized to make any warranties on behalf of Carrier
Access or to assume for Carrier Access any other liability in connection with any of Carrier Access’s
Products, software, or services.
EdgeFLEX 600 - Release 2.0
xi
Preface
Warranty
Warranty Product Returns
Before returning any equipment to Carrier Access Corporation, first contact the distributor or dealer
from which you purchased the product.
A Return Material Authorization (RMA) number is required for all equipment returned to Carrier
Access Corporation. Call Carrier Access Corporation Customer Support at (800) 786-9929 or
(303) 442-5455 for RMA number, repair/warranty information and shipping instructions. Be prepared
to provide the following information:
Carrier Access Corporation serial number(s) from the system chassis or circuit card(s)
Name of distributor or dealer from which you purchased the product
Description of defect
xii
EdgeFLEX 600 - Release 2.0
TABLE OF CONTENTS
Preface
Compliance . . . . . . . . . . . . . . . . . . . . . . . . . . . . . . . . . . . . . . . . . . . . . . . . . iii
Safety Notices . . . . . . . . . . . . . . . . . . . . . . . . . . . . . . . . . . . . . . . . . . . . . . . vi
Service and Maintenance - End User. . . . . . . . . . . . . . . . . . . . . . . . . . . . . viii
Safety Information . . . . . . . . . . . . . . . . . . . . . . . . . . . . . . . . . . . . . . . . . . . . ix
Notices . . . . . . . . . . . . . . . . . . . . . . . . . . . . . . . . . . . . . . . . . . . . . . . . . . . . . ix
Electrostatic Discharge (ESD) Precautions . . . . . . . . . . . . . . . . . . . . . . . . . . x
Warranty . . . . . . . . . . . . . . . . . . . . . . . . . . . . . . . . . . . . . . . . . . . . . . . . . . . xi
1
EdgeFLEX 600 Overview
Hardware Overview . . . . . . . . . . . . . . . . . . . . . . . . . . . . . . . . . . . . . . . . . .
EdgeFLEX 600 Front View . . . . . . . . . . . . . . . . . . . . . . . . . . . . . . . .
Site Planning . . . . . . . . . . . . . . . . . . . . . . . . . . . . . . . . . . . . . . . . . . . . . . .
Power Requirements . . . . . . . . . . . . . . . . . . . . . . . . . . . . . . . . . . . . . .
Cooling Requirements. . . . . . . . . . . . . . . . . . . . . . . . . . . . . . . . . . . . .
Technical Specifications . . . . . . . . . . . . . . . . . . . . . . . . . . . . . . . . . . . . . .
Chassis Specifications . . . . . . . . . . . . . . . . . . . . . . . . . . . . . . . . . . . . .
Electrical Specifications . . . . . . . . . . . . . . . . . . . . . . . . . . . . . . . . . . .
Environmental Specifications . . . . . . . . . . . . . . . . . . . . . . . . . . . . . . .
Compliance Specifications . . . . . . . . . . . . . . . . . . . . . . . . . . . . . . . . .
Related Documentation . . . . . . . . . . . . . . . . . . . . . . . . . . . . . . . . . . . . . . .
2
1-2
1-2
1-3
1-3
1-3
1-3
1-3
1-3
1-4
1-4
1-4
EdgeFLEX 600 Installation
Preparing for Installation . . . . . . . . . . . . . . . . . . . . . . . . . . . . . . . . . . . . . .
Required Tools to Unpack and Install the Chassis . . . . . . . . . . . . . . .
Unpacking the EdgeFLEX 600 . . . . . . . . . . . . . . . . . . . . . . . . . . . . . .
Checking the Contents. . . . . . . . . . . . . . . . . . . . . . . . . . . . . . . . . . . . .
Chassis Components . . . . . . . . . . . . . . . . . . . . . . . . . . . . . . . . . . . . . . . . .
Fan Tray, System Interfaces, and Power Supply Units. . . . . . . . . . . .
Front Panel LEDs and System Interfaces Locations . . . . . . . . . . . . . .
Power Supply Unit LED Locations. . . . . . . . . . . . . . . . . . . . . . . . . . .
Installing the EdgeFLEX 600 Chassis in a Rack . . . . . . . . . . . . . . . . . . . .
Installing Flanges on the Chassis . . . . . . . . . . . . . . . . . . . . . . . . . . . .
Rack Installation . . . . . . . . . . . . . . . . . . . . . . . . . . . . . . . . . . . . . . . . .
Installing the Decorative Bezel . . . . . . . . . . . . . . . . . . . . . . . . . . . . . . . . .
Connecting Power . . . . . . . . . . . . . . . . . . . . . . . . . . . . . . . . . . . . . . . . . . .
Requirements for DC Power Connections . . . . . . . . . . . . . . . . . . . . .
Connecting Chassis to Ground . . . . . . . . . . . . . . . . . . . . . . . . . . . . . .
2-2
2-2
2-2
2-2
2-3
2-3
2-3
2-3
2-4
2-4
2-6
2-7
2-7
2-7
2-8
Table of Contents
Wiring and Connecting DC Power . . . . . . . . . . . . . . . . . . . . . . . . . . . 2-9
Connecting System Cables . . . . . . . . . . . . . . . . . . . . . . . . . . . . . . . . . . . . 2-10
System Management Connections. . . . . . . . . . . . . . . . . . . . . . . . . . . 2-10
System Management Connectors. . . . . . . . . . . . . . . . . . . . . . . . . . . . 2-10
Connecting the Management Cable(s). . . . . . . . . . . . . . . . . . . . . . . . 2-10
Connecting the Local Console Cable. . . . . . . . . . . . . . . . . . . . . . . . . 2-11
Connecting the Timing Input Cable. . . . . . . . . . . . . . . . . . . . . . . . . . 2-11
Connecting the Timing Output Cable . . . . . . . . . . . . . . . . . . . . . . . . 2-11
Connecting the Alarm Contacts . . . . . . . . . . . . . . . . . . . . . . . . . . . . . 2-11
Connecting Network Cables. . . . . . . . . . . . . . . . . . . . . . . . . . . . . . . . . . . 2-12
Selecting the Appropriate Network Cables . . . . . . . . . . . . . . . . . . . . 2-12
Connecting to 10/100 Ethernet Interfaces . . . . . . . . . . . . . . . . . . . . . 2-13
Connecting to DS1/E1 Interfaces. . . . . . . . . . . . . . . . . . . . . . . . . . . . 2-13
Connecting to Optical Interfaces . . . . . . . . . . . . . . . . . . . . . . . . . . . . 2-14
Powering Up and Checking LEDs . . . . . . . . . . . . . . . . . . . . . . . . . . . . . . 2-15
Powering Up the Chassis . . . . . . . . . . . . . . . . . . . . . . . . . . . . . . . . . . 2-15
Card LED Locations . . . . . . . . . . . . . . . . . . . . . . . . . . . . . . . . . . . . . 2-15
Checking System Status LEDs . . . . . . . . . . . . . . . . . . . . . . . . . . . . . 2-16
Check Management Port (Ethernet) LEDs . . . . . . . . . . . . . . . . . . . . 2-16
Check I/O Card LEDs . . . . . . . . . . . . . . . . . . . . . . . . . . . . . . . . . . . . 2-17
Routing Cables . . . . . . . . . . . . . . . . . . . . . . . . . . . . . . . . . . . . . . . . . . . . . 2-18
Routing System and Network Cables . . . . . . . . . . . . . . . . . . . . . . . . 2-18
3
Adding and Replacing Components
Replacing the Air Filter . . . . . . . . . . . . . . . . . . . . . . . . . . . . . . . . . . . . . . .
Replacing a Fan Tray . . . . . . . . . . . . . . . . . . . . . . . . . . . . . . . . . . . . . . . . .
Replacing an SFP Module . . . . . . . . . . . . . . . . . . . . . . . . . . . . . . . . . . . . .
Removing/Installing Cards. . . . . . . . . . . . . . . . . . . . . . . . . . . . . . . . . . . . .
Operating the Ejector Latches . . . . . . . . . . . . . . . . . . . . . . . . . . . . . . .
Card Removal/Insertion . . . . . . . . . . . . . . . . . . . . . . . . . . . . . . . . . . . .
Nonreplaceable Components . . . . . . . . . . . . . . . . . . . . . . . . . . . . . . . . . . .
A
3-2
3-3
3-5
3-6
3-7
3-7
3-9
Connector Pin Assignments
Pin Locations . . . . . . . . . . . . . . . . . . . . . . . . . . . . . . . . . . . . . . . . . . . . . .
Ethernet (RJ-45) Pinout (management port) . . . . . . . . . . . . . . . . . . . . . .
Serial Port Pinout . . . . . . . . . . . . . . . . . . . . . . . . . . . . . . . . . . . . . . . . . . .
Timing Port Pinout . . . . . . . . . . . . . . . . . . . . . . . . . . . . . . . . . . . . . . . . . .
Timing In Ports . . . . . . . . . . . . . . . . . . . . . . . . . . . . . . . . . . . . . . . . .
Timing Out Ports . . . . . . . . . . . . . . . . . . . . . . . . . . . . . . . . . . . . . . . .
Alarm Inputs Pinout . . . . . . . . . . . . . . . . . . . . . . . . . . . . . . . . . . . . . . . . .
Alarm Outputs Pinout. . . . . . . . . . . . . . . . . . . . . . . . . . . . . . . . . . . . . . . .
A-2
A-2
A-3
A-3
A-3
A-4
A-4
A-5
Index
xiv
EdgeFLEX 600 - Release 2.0
CHAPTER
1
EdgeFLEX 600 Overview
In this Chapter
Hardware Overview
Site Planning
Technical Specifications
Related Documentation
EdgeFLEX 600 Overview
Hardware Overview
Hardware Overview
The EdgeFLEX 600 is a carrier-class multiservice telecommunications switch. The EdgeFLEX 600
complies to the building equipment standards published by both Telcordia (NEBS) and the European
Telecommunications Standards Institute (ETSI). It is 10.40 inches (6 rack-units, 264.16 mm) in height,
17.26 inches (438.4 mm) wide, and 11.81 inches (300 mm) deep with cables, and may be installed in a
ETSI-compliant 600mm or 300mm rack or NEBS-style 19- or 23-inch rack.
EdgeFLEX 600 Front View
The following illustration shows the front view of the EdgeFLEX 600 equipped with typical interfaces.
The paragraphs following the illustration describe the corresponding features indicated in the
illustration.
5
AC
T/S
BY
84/63 IMA / PACKET SERVER
4
84/63 CESoP SERVER
1
T1/E1 MULTISERVICE
3
EdgeFLEX 600
2
EdgeFLEX 600
1
6
Management (MGMT) card provides:
• alarm relay contacts (inputs and outputs)
• system timing inputs and outputs
• management serial ports
• out-of-band management Ethernet ports
• GBIC slots for passive CWDM Mux/Demux or Optical Add/Drop Multiplexor modules
• System Lamp Test button and Alarm Cutoff switch
SCPX - System Controller and Packet Fabric; also provides trunk interfaces (either Gigabit Ethernet
or SONET/SDH)
SCPX 2 - slot for second System Controller and Packet Fabric, with trunk interfaces; equipping the
EdgeFLEX 600 with two SCPX cards provides for redundant operation.
PODs - hot-swappable interface modules, up to six per EdgeFLEX 600 chassis
Dual redundant hot-swappable DC power supply modules
Dual redundant fan trays and an air filter (behind decorative bezel) EdgeFLEX 600
1-2
EdgeFLEX 600 – Release 2.0
EdgeFLEX 600 Overview
Site Planning
Site Planning
Power Requirements
The EdgeFLEX 600 is available with redundant DC power input connections. The power connectors
are pluggable terminal blocks rated at 41 amps, -40 to -72 VDC, -48 VDC nominal. The maximum
power consumption for an EdgeFLEX 600 device is approximately 675 watts, drawing maximum
16 amps at 40 volts. Maximum current draw (worst case) is 16 amps. Typical power consumption for
an EdgeFLEX 600 (assuming two SCPX cards, plus five of the six POD positions populated) is
approximately 345 watts.
Cooling Requirements
The EdgeFLEX 600 chassis is typically installed in a rack with multiple other devices. To allow for
adequate heat dissipation, the operating environment must provide proper airflow to allow each chassis
to operate at a temperature range of 32° to +122°F (0° to +50°C).
Technical Specifications
Chassis Specifications
The following table lists the chassis specifications for the EdgeFLEX 600 chassis.
Specification
Value
Height
10.4 inches (264.16 mm, 6 rack units)
Width
17.26 inches (438.4 mm)
Depth
11.8 inches (300 mm). Note: dimensions include cable
requirements.
Weight
Approximately 42 lbs. (19 kg), depending on configuration
Mounting
19-inch telco rack, 300mm or 600mm ETSI rack (standard)
23-inch telco rack (optional)
Electrical Specifications
The following table lists the electrical specifications for the EdgeFLEX 600.
Specification
Value
Input voltage (DC)
-40 to -72 VDC
Input current
16 amps maximum
DC Power consumption
675 watts maximum, 345 watts typical
EdgeFLEX 600 – Release 2.0
1-3
EdgeFLEX 600 Overview
Related Documentation
Environmental Specifications
The following table lists the environmental specifications for the EdgeFLEX 600 chassis.
Attribute
Measurement
Operating temperature
32° to 122 °F (0° to 50 °C) stable
Storage temperature
-40° to 158 °F (-40° to 70 °C)
Operating altitude
0 to 14,000 ft. (0 to 4000 m)
Operating humidity
5% to 85% maximum relative humidity,
noncondensing
Compliance Specifications
The following table lists the compliance specifications for the EdgeFLEX 600 chassis.
Attribute
Measurement
Safety
CSA 60950-1-03/UL 60950-1
EN 60950-1
EMC
FCC Part 15-Class A
ICES 003 Class A
VCCI Class A
EN 55022 Class A
EN 300386
EN 55024
GR-1089-CORE
Optical
CDRH Class 1
EN 60825-1, 60825-2
Related Documentation
For more information about Carrier Access products, refer to the following documents:
EdgeFLEX 100/600 System Overview
EdgeFLEX 100 and EdgeFLEX 600 Command Line Interface User Manual
EdgeFLEX 600 Release Notes
1-4
EdgeFLEX 600 – Release 2.0
CHAPTER
2
EdgeFLEX 600 Installation
In this Chapter
Preparing for Installation
Chassis Components
Installing the EdgeFLEX 600 Chassis in a Rack
Installing the Decorative Bezel
Connecting Power
Connecting System Cables
Connecting Network Cables
Powering Up and Checking LEDs
Routing Cables
EdgeFLEX 600 Installation
Preparing for Installation
Preparing for Installation
Required Tools to Unpack and Install the Chassis
You may need the following tools to unpack and install the EdgeFLEX 600 chassis in a rack:
Cable cutters
#2 screwdriver (Phillips or flathead)
ESD wrist strap
Unpacking the EdgeFLEX 600
The EdgeFLEX 600 is shipped in a foam enclosure within a sturdy cardboard container. Carefully slice
the strapping tape on the top of the box. Avoid penetrating too deeply into the interior of the shipping
container so as not to damage the contents.
Checking the Contents
Before beginning installation, unpack the shipping container and confirm that you received all of the
necessary components.
1. Carefully inspect all items for shipping damage. If you notice any damage, do not install the
device. Call Carrier Access Corporation Technical Support for instructions.
2. Ensure that the content includes:
One EdgeFLEX 600 chassis, including all orderable card options
Accessory Kit, containing
Two 19-inch flanges for rack mounting
(23-inch flanges must be ordered as an optional accessory)
Panduit grounding lug with lock nuts
Two power connector blocks
Two alarm terminal blocks
Front cable management flange
Decorative bezel to cover fan trays and air filter
Seventeen 6-32 1/4-inch Phillips flathead screws (attach mounting flange to the chassis)
Eight 10-32 1/2-inch Phillips round-head screws (used to rack-mount the chassis)
EdgeFLEX 600 Release Notes (hard copy)
Carrier Access Corporation Software CD
Carrier Access Documentation CD containing the following:
- EdgeFLEX 600 Release Notes
- EdgeFLEX 600 Hardware Installation Guide
- EdgeFLEX 100 and EdgeFLEX 600 Command Line Interface User Manual
One management serial cable (9 pin female mini D-Sub connectors)
Anti-static wrist strap
3. Confirm that the items in the shipping container match those on the packing list affixed to the
shipping container.
2-2
EdgeFLEX 600 - Release 2.0
EdgeFLEX 600 Installation
Chassis Components
Chassis Components
Fan Tray, System Interfaces, and Power Supply Units
The following components are standard features of the EdgeFLEX 600 chassis:
System interfaces (Ethernet, RS-232, etc.)
Air filter
Fan tray assembly (located in the front right of chassis)
Cable management flange at the left front
Bezel at the right front of the chassis
DC power input connectors (located on the modular Power Supply Unit at the top of the chassis)
Front Panel LEDs and System Interfaces Locations
The following illustration shows the location of the alarm/status LEDs on the Management card, and
the system management interfaces, timing interfaces, and alarm relay contacts.
System Alarm LEDs
Alarm Relay Contact Blocks
RS-232 Serial Management Ports 1 & 2
Timing Inputs and Outputs
Management Ethernet Ports 1 & 2
OMT Receptacles 1 & 2
Lamp Test Button
Alarm Cutoff Button
Power Supply Unit LED Locations
The following illustration shows the location of the alarm/status LEDs on the EdgeFLEX 600 DC
Power Supply Units. The PSU OK LED indicates the status of the PSU; green indicates that the PSU is
functioning properly, red indicates that the PSU is experiencing a fault or (in the case of a redundant
PSU with the system powered by the other PSU) that DC power has not been connected to the PSU.
EdgeFLEX 600 - Release 2.0
2-3
EdgeFLEX 600 Installation
Installing the EdgeFLEX 600 Chassis in a Rack
The Fan Fault LEDs indicate the status of the fan trays installed in the EdgeFLEX 600. Each PSU has
a Fan Controller built in and the two PSUs share control over the two Fan Tray Units. The CTRL LED
indicates that the Fan Controller circuit on the PSU is operating correctly; the MAIN and AUX LEDs
indicate the status of each Fan Tray Unit.
Power Supply Unit Status Indicator
Fan Fault Indicators
Installing the EdgeFLEX 600 Chassis in a Rack
Installing Flanges on the Chassis
Determine whether you are installing the EdgeFLEX 600 chassis into a ETSI-compliant or 19-inch
rack, or a 23-inch rack, and ensure that you have the appropriate flanges. Flanges for a 19-inch rack or
ETSI-compliant rack are approximately 0.5 inches wide and are included in the accessory kit. Flanges
for a 23-inch rack are approximately 4.5 inches wide, and are a separately ordered option. Four
6-32 ¼-inch flathead screws are used to connect each flange to the chassis.
To install 19 or 23 inch flanges on the EdgeFLEX 600 chassis, perform the following steps:
1. Position the right-hand mounting flange so that the holes in the flange align with the
corresponding holes in the chassis, and that the flange face is in front, as shown in step 2.
2-4
EdgeFLEX 600 - Release 2.0
EdgeFLEX 600 Installation
Installing the EdgeFLEX 600 Chassis in a Rack
2. Insert each of the four 6-32 1/4-inch flathead screws through the flange holes and into the
chassis.
3. Use a #2 screwdriver to tighten the screws.
4. Position the left-hand mounting flange so that the holes in the flange align with the
corresponding holes in the chassis, and that the flange face is in front, as shown in step 2.
5. Insert each of the four 6-32 1/4-inch flathead screws through the flange holes and into the
chassis.
EdgeFLEX 600 - Release 2.0
2-5
EdgeFLEX 600 Installation
Installing the EdgeFLEX 600 Chassis in a Rack
Rack Installation
To install the EdgeFLEX 600 chassis in a rack, you need the following:
Two people able to lift at least 45 pounds
Eight 10-32 1/2-inch round-head screws to secure the chassis to the rack (included in the
shipment).
#2 screwdriver (flat or Phillips)
To install the EdgeFLEX 600 chassis into a rack, perform the following steps:
1. Ensure that you have enough space allocated in the rack to install the EdgeFLEX 600 chassis.
2. Lift the chassis to the desired location in the rack.
3. Align the holes in the flanges with the holes in the rack.
4. Optionally, align the cable management flange as shown in the following illustration.
Cable Management Flange
5. Insert a mounting screw into the topmost left and right flange holes and tighten the screws
using the #2 screwdriver.
6. Insert the mounting screws in the remaining screw holes on the left and right sides of the
chassis.
2-6
EdgeFLEX 600 - Release 2.0
EdgeFLEX 600 Installation
Installing the Decorative Bezel
Installing the Decorative Bezel
A decorative bezel is included in the Accessory Kit to cover the fan tray and air filter. Snap the bezel
onto the ball stud as shown in the following illustration.
Connecting Power
DANGER! BEFORE INSERTING OR EXTRACTING A EDGEFLEX 600 DC POWER SUPPLY UNIT,
ENSURE THAT THE PSU’S CIRCUIT BREAKER
POWER CONNECTOR HAS BEEN UNPLUGGED.
SWITCH IS IN THE OFF POSITION, AND THAT THE DC
Requirements for DC Power Connections
The EdgeFLEX 600 DC model can be powered from a DC supply operating between -40 and -72 VDC.
The power connector is located on the front of the Power Supply Module(s), which are located in the
top two slots of the EdgeFLEX 600 chassis. The PSU modules are redundant and hot-swappable.
Use a separate circuit breaker to power each power supply. This will allow one power supply
to keep the EdgeFLEX 600 operating while the other power supply is powered down for
maintenance.
Use 7 to 8 gauge wire for up to 50 foot run to power the device.
Use a circuit breaker rated for 25 Amps for the power leads.
EdgeFLEX 600 - Release 2.0
2-7
EdgeFLEX 600 Installation
Connecting Power
Connecting Chassis to Ground
To connect the EdgeFLEX 600 chassis to ground, perform the following steps:
1. Slide the attached Panduit ground lug onto an appropriate ground wire (8 AWG), and crimp
securely.
2. Place the ground lug over the two posts in the lower left corner of the rear of the chassis as
shown below.
3. Fasten the two locking nuts securely onto each post.
2-8
EdgeFLEX 600 - Release 2.0
EdgeFLEX 600 Installation
Connecting Power
Wiring and Connecting DC Power
To connect power to the EdgeFLEX 600 chassis, perform the following steps:
1. Ensure that the DC circuit breaker on the front of each PSU is off.
2. Ensure that the local DC power source is off. Using 8 AWG wire, wire the power supply
connector block as shown below. Insert the DC RTN wire into the left-hand terminal position,
and the DC supply wire into the right-hand terminal position. Tighten each terminal retaining
screw using a flathead screwdriver.
3. Plug the power connector block into the receptacle on the front of the PSU and use a #2 Phillips
screwdriver to secure the connector to the PSU.
4. Engage the local DC power source.
EdgeFLEX 600 - Release 2.0
2-9
EdgeFLEX 600 Installation
Connecting System Cables
5. When the connector block has been secured as shown below, the circuit breaker switch may be
switched to the ON position to power the EdgeFLEX 600.
Connecting System Cables
System Management Connections
The front panel of the EdgeFLEX 600 provides all the connections for the system cables. For pinouts
of system management connectors, see Appendix A, “Connector Pin Assignments”.
System Management Connectors
The Management card (MGMT) provides all system management connectors. The following
illustration shows the location of the system management connectors on the MGMT card.
Alarm Relay Contact Blocks
RS-232 Serial Management Ports 1 & 2
Timing Inputs and Outputs
OMT Receptacles 1 & 2
Management Ethernet Ports 1 & 2
System Alarm LEDs
Lamp Test Button
Alarm Cutoff Button
Connecting the Management Cable(s)
To connect an Ethernet cable to the management connector on the EdgeFLEX 600, perform the
following steps:
1. Locate the 10/100 Ethernet cable to use as the LAN connection for network management.
2. Insert the LAN cable RJ-45 connector into the port labeled ETH 1.
NOTE: If you are configuring a redundant LAN connection, repeat steps 1 and 2 and connect
the second LAN cable to the port labeled ETH 2. Note: use of both ETH 1 and ETH 2
simultaneously is not currently supported.)
2-10
EdgeFLEX 600 - Release 2.0
EdgeFLEX 600 Installation
Connecting System Cables
Connecting the Local Console Cable
To connect a local console cable (included in the Accessory Kit) to the RS-232 serial connector on the
EdgeFLEX 600, perform the following steps:
1. Locate the local console cable to use as the local connection for network management.
2. Connect the cable to the mini RS-232 port labeled COM 1 on the front of the chassis.
Connecting the Timing Input Cable
The EdgeFLEX 600 provides two timing inputs, supporting RJ-48C form-factor connectors. To connect
a cable to the timing connector on the EdgeFLEX 600, perform the following steps:
1. Locate the cable from the external timing source.
2. Insert the cable’s RJ-48C connector into the port labeled TIMING IN 1 on the front of the
EdgeFLEX 600.
3. (optional) If a secondary timing source is available, connect it to the port labeled TIMING IN
2 on the front of the EdgeFLEX 600.
Connecting the Timing Output Cable
The EdgeFLEX 600 provides two timing outputs, OUT 1 and OUT 2 adjacent to the timing inputs. The
OUT ports may be used to pass the timing signal received by the EdgeFLEX 600 to another device.
The OUT ports provide a pass through of the timing signal when the EdgeFLEX 600 is powered off.
When the EdgeFLEX 600 is powered, the timing OUT 1 port is synchronized to the timing signal
received on timing port IN 1. OUT 2 is connected to IN 2 in the same manner.
Connecting the Alarm Contacts
The EdgeFLEX 600 is equipped with four voltage sense inputs (range 5 to 75Vdc) for detecting external
circuit closures, and contact outputs (NO/C/NC) for Critical, Major, Minor, Audible and Visible alarms.
Refer to Appendix A for the connector pinouts, and the Management card label for contact location. To
connect the alarm contact wiring to the relay connectors, perform the following steps:
1. Remove the alarm terminal blocks from the EdgeFLEX 600 accessory kit.
2. The round holes in the top and bottom rows are the wire insertion points. These holes have a
spring-loaded retaining mechanism. To release the retaining mechanism, carefully insert a
small probe (such as a small screwdriver) into the square hole directly above or below the
desired wire location, then insert the wire into the corresponding round hole. Remove the probe
to re-engage the retaining mechanism and lock the wire in place.
Insert the wires from the contact closures into the appropriate locations on the terminal blocks
in this fashion until the connections to each block have been made as desired.
EdgeFLEX 600 - Release 2.0
2-11
EdgeFLEX 600 Installation
Connecting Network Cables
3. Re-insert the terminal blocks into the receptacles on the chassis, and fasten the two retaining
screws on each terminal block.
Connecting Network Cables
Selecting the Appropriate Network Cables
The EdgeFLEX 600 is capable of providing a variety of different interface types to connect to the
network. In general, the ports on the SCPX cards are regarded as high-speed “trunk” or network-side
ports, and the ports on the linecards in the upper slot positions are regarded as “tributary” or customerside ports, though no such distinctions between interfaces are made in the management system. The
EdgeFLEX 600 can accommodate the following network interfaces:
2-12
Interface Type
Connector Type Cable Type
DS1/E1
High-density
connector
Carrier Access custom cable to breakout panel providing RJ-48
interfaces
10/100 Ethernet
RJ-45
100-ohm Category 5 UTP
Gigabit Ethernet
LC duplex
Multi-mode 62.5/125 micron fiber optic.
Note: ETSI compliant cabinets may require BTW-style (31.5mm
maximum depth) low-profile strain relief housing on fiber optic
cables, in order to meet the 300mm depth requirements.
SONET/SDH
OC-3/STM-1,
OC-12/STM-4, or
OC-48/STM-16
LC duplex
Single-mode 9/125 micron fiber optic, nondispersion shifted.
Note: ETSI compliant cabinets may require BTW-style (31.5mm
maximum depth) low-profile strain relief housing on fiber optic
cables, in order to meet the 300mm depth requirements.
EdgeFLEX 600 - Release 2.0
EdgeFLEX 600 Installation
Connecting Network Cables
Connecting to 10/100 Ethernet Interfaces
To connect 10/100 Ethernet network cables to the EdgeFLEX 600, perform the following steps:
1. At the front of the chassis, locate the 10/100 Ethernet cable(s) to install.
2. Insert the RJ-45 cable connector into the appropriate 10/100 Ethernet interface connector on an
Ethernet card.
Connecting to DS1/E1 Interfaces
The EdgeFLEX 600 DS1/E1 interface cards use a special high-density connector and octopus cable
connect to a sixteen port breakout-panel that provides standard RJ-style physical interfaces.
To connect the DS1/E1 POD to the DS1/E1 breakout panel, perform the following steps:
1. At the front of the chassis, locate the high-density connector on the DS1/E1 POD to be
connected.
2. Insert the high-density plug on the octopus cable into the high-density connector on the DS1/
E1 card as shown below. The connector will snap into place if seated correctly.
3. Connect the sixteen DS1/E1 connectors on the octopus cable to the sixteen DS1/E1 RJ-48
connectors into the back of the DS1/E1 breakout panel, as shown below. Each connector on the
breakout cable is tagged with its port number; be sure to plug the correct connector into each
receptacle on the breakout panel.
EdgeFLEX 600 - Release 2.0
2-13
EdgeFLEX 600 Installation
Connecting Network Cables
4. Finally, connect the individual DS1/E1 lines to the physical interfaces provided on the breakout
panel. (In the example below, ports 15 and 16 are connected by a small loopback connector for
testing purposes.)
Connecting to Optical Interfaces
DANGER! DO NOT LOOK DIRECTLY INTO THE END OF A FIBER-OPTIC CABLE. FIBER-OPTIC
CABLES WITH LIGHT EMITTING FROM THE END OF THE CABLE CAN CAUSE INJURY TO YOUR EYE.
To connect optical network cables (SONET/SDH OC-3/12/48, STM-1/4/16 or Gigabit Ethernet) to the
EdgeFLEX 600, perform the following steps:
1. At the front of the chassis, locate the fiber optic cable(s) to install.
2. Remove the dust plugs from SFP optics module, and set aside for safe keeping. Whenever fiber
optic cables will be removed from the SFP module for more than a short time, the dust plugs
should be re-inserted into the SFP to keep the optics clean and free from dust.
Similarly, if there are dust plugs on the duplex cable connector of the fiber optic cable, remove
and store these for future use.
3. Insert the LC duplex cable connector into the appropriate optical interface connector on the
card. Note that fiber orientation of the transceiver is Transmit on the left, Receive on the right.
2-14
EdgeFLEX 600 - Release 2.0
EdgeFLEX 600 Installation
Powering Up and Checking LEDs
Powering Up and Checking LEDs
Powering Up the Chassis
After you install the power cables, system cables, and network cables, you are ready to power up the
EdgeFLEX 600. To power up the chassis, perform the following steps:
1. Ensure that the ground cable and all the power cables are installed and secure.
2. Apply DC power from the power source, as appropriate.
3. Turn the circuit breaker switch to ON.
Turning on the circuit breakers applies power to all the components in the chassis. The system powers
up and the LEDs on the power supply and Management Card provide the operational status.
Card LED Locations
The following illustration shows the LED locations for various I/O modules that may populate a
EdgeFLEX 600 chassis.
10/100 ETHERNET
GIGABIT ETHERNET
T1/E1 MULTISERVICE
T1/E1 CESoP
16 T1/E1 CESoP SERVER
84/63 CESoP SERVER
AC
T/S
BY
84/63 IMA / PACKET SERVER
1
EdgeFLEX 600 - Release 2.0
2-15
EdgeFLEX 600 Installation
Powering Up and Checking LEDs
Checking System Status LEDs
The EdgeFLEX 600 system status LEDs are located on the SCPX card, the Power Supply Units, and
the Management Card. The following table lists the normal state and alarm state of these LEDs. Refer
to the illustration in Card LED Locations, on page 2-15 for the location of the LEDs.
Card/Location
LED Label
Management Card MIN (Minor)
MAJ (Major)
CRI (Critical)
OMT 1, 2
ACO
SCPX
Power
Active/Standby
PSU
Fault
Alarm
OK
PSU - Fan Fault
CTRL
Normal State / Meaning
Alarm State / Meaning
Off
Off
Off
On (Green) - valid GBIC
module is installed &
recognized
Off - no GBIC installed
Off
On (Amber)
On (Red)
On (Red)
On (Amber) - the GBIC module
cannot be recognized by the
EdgeFLEX 600.
On (Green)
On (Green) - SCPX is Active
system controller
Off
On (Green)
MAIN
On (Green) - The fan
controller circuitry on the PSU
is operating properly.
On (Green)
AUX
On (Green)
On (Amber) - When ACO has been
pressed but Alarms are still
present.
Off
On (Amber) - SCPX is in Standby
mode
On (Red)
Red (PSU not switched on or
no DC supply connected)
On (Red) - the fan controller on the
PSU is experiencing a fault.
On (Red) - Main Fan Tray has
failed or is not present.
On (Red) - Auxiliary Fan Tray has
failed or is not present.
Check Management Port (Ethernet) LEDs
There are two RJ-45 ports for Ethernet management of the EdgeFLEX 600 located on the Management
card. Refer to the illustration in Card LED Locations, on page 2-15 for the location of the LEDs.
Each Ethernet management port has two status LEDs; LINK/ACT and SPEED. The LINK/ACT LED
is on the right and indicates the presence of an Ethernet link and/or traffic activity on that link. The
LINK SPEED LED is on the left of the port and indicates the speed of the Ethernet link, either 10Mbps
or 100Mbps. The following table lists the interpretation of the states of the two LEDs.
LED
Meaning
Link / Activity
(right LED)
On (Green) to indicate Link
Blinking (Green) to indicate Activity
Off to indicate No Link Detected
Green - 100 Mbps
Amber - 10 Mbps
Speed
(left LED)
2-16
EdgeFLEX 600 - Release 2.0
EdgeFLEX 600 Installation
Powering Up and Checking LEDs
Check I/O Card LEDs
The I/O cards contain LEDs that represent card and/or port status, depending on the cards installed in
the EdgeFLEX 600. Refer to the illustration in Card LED Locations, on page 2-15 for the location of
the LEDs. The following table shows the states and interpretation of the LEDs.
Card Type
LED Label
Description
Normal State
Alarm State
Any
Power
Card has powered up
Green
On (Red), or Off
Fault
Card is experiencing a
fault condition
Off
On (Red)
Active (Act)
Card is Active
member of a
redundant pair
Ports 1 - 4
Green (Link), Blinking
(Activity)
On (Amber), or
Off
Dual Gigabit Ethernet 1 - 2
Ports 1 and 2
Green (Link), Blinking
(Activity)
On (Amber), or
Off
Octal Fast Ethernet
(left LED)
Speed
Green = 100 Mbps
Off = 10 Mbps
On (Red), or Off
(right LED)
LINK
• Green = Link without On (Red)
Activity
• Blinking = Link with
Activity
Quad SONET/SDH
or 84/63 CESoP
Server
OC-3/OC-12
STM-1/STM-4
1-4
Ports 1 - 4
Green (Link)
Amber (LOS), or
Off
Quad SONET/SDH
SCPX
OC-12/48
STM-4/STM-16
1-4
Ports 1 - 4
Green (Link)
Amber (LOS), or
Off
16 port T1/E1
(all varieties)
1 - 16
Ports 1 - 16
Green (OK)
Red (Fault), or Off
(unprovisioned)
Standby (Sby) Card is Standby
member of redundant
pair
Quad Gigabit
Ethernet SCPX
EdgeFLEX 600 - Release 2.0
1-4
2-17
EdgeFLEX 600 Installation
Routing Cables
Routing Cables
Routing System and Network Cables
The EdgeFLEX 600 accessory kit includes a cable management bracket that you can use to position the
system and network cables around the chassis.
If you installed the optional cable management bracket (see Rack Installation, on page 2-6), use the
following guidelines to route the cables:
Route the power cables from the PSU units to the left side and secure using a tie-wrap.
Route all management cables through the cable management bracket on the left front of the
chassis and secure them using a tie-wrap.
Route all network cables through the cable management bracket and secure them using a tiewrap.
CAUTION! FIBER-OPTIC CABLES ARE DELICATE AND CARE MUST BE EXERCISED WHEN
DRESSING CABLES TO AVOID DAMAGE TO THE CABLE. BE SURE NOT TO BEND THE CABLES TOO
TIGHTLY; FIBER OPTIC CABLES TYPICALLY HAVE A MINIMUM BEND RADIUS OF 1.2 INCHES
(30.5 MM) WHICH MUST BE OBSERVED. REFER TO THE MANUFACTURER’S SPECIFICATIONS FOR
THE SPECIFIC CABLES BEING INSTALLED.
2-18
EdgeFLEX 600 - Release 2.0
CHAPTER
3
Adding and Replacing Components
In this Chapter
Replacing the Air Filter
Replacing a Fan Tray
Replacing an SFP Module
Removing/Installing Cards
Nonreplaceable Components
Adding and Replacing Components
Replacing the Air Filter
Replacing the Air Filter
The air filter should be replaced or cleaned on a regular basis. This may be done while the unit is
operating. To replace the air filter, perform the following steps:
1. Remove the front bezel that covers the fan tray and air filter.
2. With a #2 Phillips screwdriver, unscrew the captive thumbscrews at the top and bottom of the
fan tray and air filter cover by turning it counterclockwise until the filter cover is free from the
chassis. Place the cover to one side.
3-2
EdgeFLEX 600 - Release 2.0
Adding and Replacing Components
Replacing a Fan Tray
3. The air filter is located to the right of the fan tray. Grasp the filter removal strap and carefully
pull the air filter out of the chassis.
NOTE: If you have large fingers, it may be difficult to pop the removal strap up enough to
grasp it. A small hook or tool may help.
4. Insert the new air filter into the chassis, reversing the procedure in Step 3.
5. Replace the fan tray/air filter cover removed in Step 2, and with a #2 Phillips screwdriver,
secure the captive retaining screws at the top and bottom of the cover by turning them clockwise
until tight.
6. Reinstall the front bezel.
Replacing a Fan Tray
The EdgeFLEX 600 fan tray assembly is hot swappable, and can be replaced with power applied,
though if the fan tray is removed, it should be replaced as quickly as possible to avoid overheating.
Note that older (pre Release 1.4.0) EdgeFLEX 600 platforms were equipped with two fan trays, and that
they are NOT interchangeable with Release 1.4.0 or later hardware. Have the appropriate replacement
fan tray unit on hand before beginning this procedure.
To replace a faulty fan tray, perform the following steps:
1. Remove the front bezel that covers the fan tray and air filter.
EdgeFLEX 600 - Release 2.0
3-3
Adding and Replacing Components
Replacing a Fan Tray
2. With a #2 Phillips screwdriver, unscrew the captive thumbscrews at the top and bottom of the
filter cover by turning them counterclockwise until the filter cover is free from the chassis.
Place the filter cover to one side.
3. With the fan tray cover removed, the EdgeFLEX 600’s fan tray will be visible, as shown in the
figure below.
Fan Tray
removal handle
Air Filter
removal handle
Retaining screws
for Fan Tray
3-4
EdgeFLEX 600 - Release 2.0
Adding and Replacing Components
Replacing an SFP Module
4. Unscrew the captive retaining screw at the bottom of the fan tray. Grasp the fan tray removal
handle and pull the fan tray out of the chassis, as shown below.
5. Insert a replacement fan tray in the empty slot, aligning it with the internal guides in the chassis.
Slide the fan tray assembly into the chassis completely, until it is fully seated, and the front of
the handle is flush with the front of the chassis.
6. With a #2 Phillips screwdriver, screw the captive retaining screw by turning it clockwise until
it is tight and the fan tray assembly is secure in the chassis.
7. Reinstall the fan tray cover, and tighten the retaining thumbscrews at the top and bottom of the
cover.
8. Reinstall the decorative bezel.
Replacing an SFP Module
The EdgeFLEX 600 optical interfaces are field-replaceable and hot swappable, and can be replaced
with power applied. To replace a faulty SFP module, perform the following steps:
1. Remove any cabling from the SFP module.
2. Replace the SFP dust plugs to protect the optics. Likewise, replace the dust plugs on the duplex
cable connector of the fiber optic cables if the cable will not be reinstalled immediately.
NOTE: Depending on the type of SFP module, steps 2 and 3 may need to be reversed.
The bail on some SFP modules cannot be moved with the dust plugs installed.
EdgeFLEX 600 - Release 2.0
3-5
Adding and Replacing Components
Removing/Installing Cards
3. Flip down the extractor bail.
4. Grasp the extractor bail and gently but firmly pull to remove the SFP module.
5. Insert the replacement SFP module into the empty slot, and using the extractor bail, gently but
firmly push until fully seated.
NOTE: Be sure to replace with the same type of SFP, unless there is no software
configuration present for the port in question.
6. Flip the extractor bail to the upright position.
7. Remove the SFP dust plug from the SFP module, and if necessary, remove the dust plugs from
the fiber optic cable’s duplex connector.
NOTE: Depending on the type of SFP module, steps 5 and 6 may need to be reversed.
The bail on some SFP modules cannot be moved with the dust plug installed.
8. Reconnect the optical cabling to the SFP.
Removing/Installing Cards
The EdgeFLEX 600 cards (SCPX, service modules, Management card, and DC PSUs) are
hot-swappable and may be removed or inserted while the unit is fully powered.
NOTE: Blank faceplates covering empty positions in the EdgeFLEX 600 chassis do not
have ejector latches, and may be removed simply by unscrewing their two captive
thumbscrews.
CAUTION! THE EDGEFLEX 600 IS DESIGNED TO BE OPERATED WITH EITHER A CARD OR
BLANK FACEPLATE IN EVERY FRONT-PANEL POSITION. OPERATING THE EDGEFLEX 600 WITH
UNCOVERED SLOTS WILL INTERFERE WITH THE AIRFLOW THROUGH THE CHASSIS AND IMPAIR
SYSTEM COOLING.
3-6
EdgeFLEX 600 - Release 2.0
Adding and Replacing Components
Removing/Installing Cards
CAUTION! REMOVING THE MANAGEMENT CARD WILL BREAK ANY OUT-OF-BAND
MANAGEMENT CONNECTIVITY TO THE EDGEFLEX 600! IF MANAGEMENT CONNECTIVITY IS TO
BE MAINTAINED, BE SURE THAT A FUNCTIONING IN-BAND MANAGEMENT CONNECTION IS
ESTABLISHED AND OPERATIONAL PRIOR TO EXTRACTING THE MANAGEMENT CARD.
WARNING! WHEN INSERTING OR EXTRACTING A EDGEFLEX 600 DC POWER SUPPLY
UNIT, MAKE SURE THE PSU CIRCUIT BREAKER SWITCH IS IN THE OFF POSITION, AND THAT THE
DC POWER CONNECTOR HAS BEEN UNPLUGGED PRIOR TO REMOVING OR INSERTING A PSU.
CAUTION! WHEN INSERTING OR EXTRACTING POD CARDS, USE A SMOOTH, QUICK MOTION
TO ENSURE CONNECTIONS FROM THE CARD TO THE BACKPLANE ARE MADE OR BROKEN
SIMULTANEOUSLY.
Operating the Ejector Latches
The EdgeFLEX 600 card ejector latches combine a lock with an ejector. To unlock and eject a card,
slide the lock toward the end of the handle, and simultaneously pull the handle.
Card Removal/Insertion
To remove and insert a card, perform the following steps:
1. With a #2 Phillips screwdriver, unscrew the captive thumbscrews at the right and left sides of
the card until they are loose.
EdgeFLEX 600 - Release 2.0
3-7
Adding and Replacing Components
Removing/Installing Cards
2. As shown in the following illustrations, grasp the ejector latch, slide the locking bar towards the
end of the handle, then pull the ejector latch. This will force the card to disengage from the
backplane and slide out of the chassis. Use a smooth, quick action to ensure all electrical
contacts from the card to the backplane are broken at once.
NOTE: The SCPX cards and the Management card have ejectors at each end of the card.
Be sure to operate both ejector handles simultaneously.
3. To install a card, align the card with the guides inside the chassis, and slide the card gently into
the chassis. As the card approaches the chassis, be sure that the guide pins are aligned with the
guide holes as shown in the illustration below.
3-8
EdgeFLEX 600 - Release 2.0
Adding and Replacing Components
Nonreplaceable Components
4. At this point, be sure the ejector latch is perpendicular to the card (in the ejected position), then
gently press the ejector latch toward the card. The ejector latch should engage with the chassis
and draw the card into its fully-inserted position. Use a smooth, quick action to install the card
so that electrical connections from the card to the backplane are made at once. When the card
is fully inserted, the ejector latch will snap into its locked position.
If you feel more than a slight amount of resistance, STOP and recheck that the card is correctly
aligned with the chassis guides.
5. After inserting the card fully, use a #2 Phillips screwdriver to tighten the captive thumbscrews
at the right and left sides of the card by turning clockwise until secure.
Nonreplaceable Components
The fan tray assemblies, air filter, Management Card, SCPX cards, service cards, Power Supply Units,
OMT modules and SFP modules are the only user-replaceable components of the EdgeFLEX 600
chassis.
If you suspect any other component of the EdgeFLEX 600 to be faulty, contact your Carrier Access
representative.
EdgeFLEX 600 - Release 2.0
3-9
Adding and Replacing Components
Nonreplaceable Components
3-10
EdgeFLEX 600 - Release 2.0
APPENDIX
A
Connector Pin Assignments
In this Appendix
Pin Locations
Ethernet (RJ-45) Pinout (management port)
Serial Port Pinout
Timing Port Pinout
Alarm Inputs Pinout
Alarm Outputs Pinout
Connector Pin Assignments
Pin Locations
Pin Locations
The tables in this appendix list the connector pin assignments for the ports on the Management card.
The following illustration provides pinout numbering arrangements for reference.
2
8
2
18
1
7
1
17
1
6
5
9
System Alarm LEDs
RS-232 Serial Management Ports 1 & 2
Alarm Relay Contact Blocks
Timing Inputs and Outputs
1
8
OMT Receptacles 1 & 2
Management Ethernet Ports 1 & 2
1
Lamp Test Button
Alarm Cutoff Button
8
Ethernet (RJ-45) Pinout (management port)
Pin
A-2
Signal
1
TD+ (Transmit to UTP)
2
TD- (Transmit to UTP)
3
RD+ (Receive from UTP)
4
Not used
5
Not used
6
RD- (Receive from UTP)
7
Not used
8
Not used
EdgeFLEX 600 - Release 2.0
Connector Pin Assignments
Serial Port Pinout
Serial Port Pinout
Pin
Signal
1
Carrier Detect (not used)
2
Receive Data
3
Transmit Data
4
Data Terminal Ready
5
Ground
6
Data Set Ready
7
Request to Send
8
Clear to Send
9
Ring Indicator (not used)
Timing Port Pinout
Timing In Ports
The EdgeFLEX 600’s two Timing In ports provide both timing input and output connections, as shown
in the following table.
Pin
Signal
1
BITS_IN_RRING
2
BITS_IN_RTIP
3
Not used
4
BITS_OUT_TRING
5
BITS_OUT_TTIP
6
Not used
7
Not used
8
Not used
EdgeFLEX 600 - Release 2.0
A-3
Connector Pin Assignments
Alarm Inputs Pinout
Timing Out Ports
The EdgeFLEX 600’s two Timing Out ports provide only timing output pins, as shown in the following
table. When the EdgeFLEX 600 is powered, the timing output is synchronized to the input timing
signal. When the EdgeFLEX 600 is not powered, the input timing signal is connected directly to the
output pins as a pass through.
Pin
Signal
1
Not used
2
Not used
3
Not used
4
BITS_OUT_TRING
5
BITS_OUT_TTIP
6
Not used
7
Not used
8
Not used
Alarm Inputs Pinout
The alarm inputs are polarity insensitive; the A and B designations in the following table simply
represent the labeling on the management card itself.
The circuitry associated with these pins will sense voltage and/or current changes on the two IN pins in
a set (i.e., pins 1 and 2 represent Input 1). The Voltage Threshold is 5-75Vdc and maximum current is
0.5 Amps.
The inputs are current limited and will never present a load greater than 2 milliamps to the source. The
platform is protected from excessive voltage at its input by a 0.5A non-user-serviceable fuse.
NO and NC status applies to a powered system only; when the system is powered down, NO becomes
NC as a fail-safe mechanism.
Pin
A-4
Signal
1
Input 1 B
2
Input 1 A
3
Input 2 B
4
Input 2 A
5
Input 3 B
6
Input 3 A
7
Input 4 B
8
Input 4 A
EdgeFLEX 600 - Release 2.0
Connector Pin Assignments
Alarm Outputs Pinout
Alarm Outputs Pinout
Pin
Signal
1
Audible Minor Alarm Common
3
Audible Minor Alarm Normally Open
5
Audible Minor Alarm Normally Closed
7
Audible Major Alarm Common
9
Audible Major Alarm Normally Open
11
Audible Major Alarm Normally Closed
13
Audible Critical Alarm Common
15
Audible Critical Alarm Normally Open
17
Audible Critical Alarm Normally Closed
2
Visible Minor Alarm Common
4
Visible Minor Alarm Normally Open
6
Visible Minor Alarm Normally Closed
8
Visible Major Alarm Common
10
Visible Major Alarm Normally Open
12
Visible Major Alarm Normally Closed
14
Visible Critical Alarm Common
16
Visible Critical Alarm Normally Open
18
Visible Critical Alarm Normally Closed
NOTE: The pin number ordering is staggered to reflect the top row of pins, then the bottom
row of pins.
EdgeFLEX 600 - Release 2.0
A-5
Connector Pin Assignments
Alarm Outputs Pinout
A-6
EdgeFLEX 600 - Release 2.0
INDEX
Index
A
normal states . . . . . . . . . . . . . . . . . . . . . . . . . . . . . 2-16
power supply . . . . . . . . . . . . . . . . . . . . . . . . . . . . . . 2-3
accessory kit, contents . . . . . . . . . . . . . . . . . . . . . . . . . 2-2
air filter, replacing . . . . . . . . . . . . . . . . . . . . . . . . . . . . 3-2
airflow . . . . . . . . . . . . . . . . . . . . . . . . . . . . . . . . . . . . . 1-3
airflow requirements . . . . . . . . . . . . . . . . . . . . . . . . . . 1-4
alarm contacts . . . . . . . . . . . . . . . . . . . . . . . . . . . . . . 2-11
management connections . . . . . . . . . . . . . . . . . . . . . 2-10
management ports, LEDs . . . . . . . . . . . . . . . . . . . . . 2-16
B
O
bezel installation . . . . . . . . . . . . . . . . . . . . . . . . . . . . . 2-7
breakout-panel (DS1/E1) . . . . . . . . . . . . . . . . . . . . . . 2-13
optical connections . . . . . . . . . . . . . . . . . . . . . . . . . . 2-14
optical transceivers, service . . . . . . . . . . . . . . . . . . . . 3-5
C
P
cable management, routing and dressing . . . . . . . . . . 2-18
cables, routing . . . . . . . . . . . . . . . . . . . . . . . . . . . . . . 2-18
cards, removing/installing . . . . . . . . . . . . . . . . . . . . . . 3-6
chassis ground . . . . . . . . . . . . . . . . . . . . . . . . . . . . . . . 2-8
compliance specifications . . . . . . . . . . . . . . . . . . . . . . 1-4
cooling requirements . . . . . . . . . . . . . . . . . . . . . . . . . . 1-3
power
connection requirements . . . . . . . . . . . . . . . . . . . . . 2-7
connections . . . . . . . . . . . . . . . . . . . . . . . . . . . . . . . 2-9
requirements . . . . . . . . . . . . . . . . . . . . . . . . . . . . . . 1-3
D
DC Power, warnings . . . . . . . . . . . . . . . . . . . . . . . . . i-vii
E
ejector latches . . . . . . . . . . . . . . . . . . . . . . . . . . . . . . . . 3-7
environmental specifications . . . . . . . . . . . . . . . . . . . . 1-4
Ethernet 10/100 interfaces . . . . . . . . . . . . . . . . . . . . . 2-13
F
fan tray, replacing . . . . . . . . . . . . . . . . . . . . . . . . . . . . 3-3
fiber connectors . . . . . . . . . . . . . . . . . . . . . . . . . . . . . 2-14
filter, air . . . . . . . . . . . . . . . . . . . . . . . . . . . . . . . . . . . . 3-2
flanges, rack mount . . . . . . . . . . . . . . . . . . . . . . . . . . . 2-4
G
ground . . . . . . . . . . . . . . . . . . . . . . . . . . . . . . . . . . . . . 2-8
H
heat dissipation . . . . . . . . . . . . . . . . . . . . . . . . . . . . . . . 1-3
I
inputs, alarm contacts . . . . . . . . . . . . . . . . . . . . . . . . . 2-11
L
LEDs
management card . . . . . . . . . . . . . . . . . . . . . . . . . . . 2-3
M
R
rack mount flanges . . . . . . . . . . . . . . . . . . . . . . . . . . . 2-4
S
safety specifications . . . . . . . . . . . . . . . . . . . . . . . . . . 1-4
service
air filter . . . . . . . . . . . . . . . . . . . . . . . . . . . . . . . . . . 3-2
fan tray . . . . . . . . . . . . . . . . . . . . . . . . . . . . . . . . . . 3-3
linecards, installing . . . . . . . . . . . . . . . . . . . . . . . . . 3-6
linecards, removing . . . . . . . . . . . . . . . . . . . . . . . . . 3-6
SFP modules . . . . . . . . . . . . . . . . . . . . . . . . . . . . . . 3-5
SFP, replacing . . . . . . . . . . . . . . . . . . . . . . . . . . . . . . . 3-5
specifications
compliance . . . . . . . . . . . . . . . . . . . . . . . . . . . . . . . 1-4
environmental . . . . . . . . . . . . . . . . . . . . . . . . . . . . . 1-4
system management . . . . . . . . . . . . . . . . . . . . . . . . . 2-10
system timing . . . . . . . . . . . . . . . . . . . . . . . . . . . . . . 2-11
T
temperature range . . . . . . . . . . . . . . . . . . . . . . . . . . . . 1-3
terminal block
alarm contacts . . . . . . . . . . . . . . . . . . . . . . . . . . . . 2-11
power . . . . . . . . . . . . . . . . . . . . . . . . . . . . . . . . . . . 2-9
timing inputs . . . . . . . . . . . . . . . . . . . . . . . . . . . . . . . 2-11
transceivers, replacing . . . . . . . . . . . . . . . . . . . . . . . . . 3-5
U
unpacking . . . . . . . . . . . . . . . . . . . . . . . . . . . . . . . . . . 2-2
Index
W
W
wiring
Ethernet interfaces . . . . . . . . . . . . . . . . . . . . . . . . . 2-13
fiber optic connectors . . . . . . . . . . . . . . . . . . . . . . 2-14
ground connection . . . . . . . . . . . . . . . . . . . . . . . . . . 2-8
management connections . . . . . . . . . . . . . . . . . . . . 2-10
power . . . . . . . . . . . . . . . . . . . . . . . . . . . . . . . . . . . . 2-9
timing . . . . . . . . . . . . . . . . . . . . . . . . . . . . . . . . . . . 2-11
wiring, alarm contacts . . . . . . . . . . . . . . . . . . . . . . . . 2-11
Index - 2
EdgeFLEX 600 - Release 2.0