1
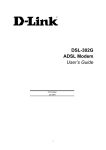
N1 Wireless Router
Quick Installation Guide
Page 4 of 4
Siemens Speedstream 4200
Open and remove
contents of box. You will
find the following items:
Step A
If you have not already done so please connect the SpeedStream 4200
modem directly to your computer with a network cable (Ethernet), ensure
your Internet connection is working. If you are having any problems
setting up the Optus-provided SpeedStream 4200 modem, you will need
to contact the Optus ADSL support line.
Installation Software CD
Thankyou for purchasing a Belkin router, you will need to run through the
following steps once to set up your router.
Note: If you are using an Optus provided ADSL service and you are using a
D-Link or Siemens modem provided to you by Optus (not purchased by you
in a retail store), please refer to pages 3 and 4 of this installation guide.
If you are not using Optus ADSL, continue on this page.
N1 Wireless Router
Step B
1 Hardware Connections
Step A
After you have confirmed that your Internet connection is set up and you
can browse the web, you will need to follow the remaining steps in this
document. Log into the modem by opening up Internet Explorer on your
PC and type http://10.1.1.1 in the address bar and press enter.
Unplug your modem’s power cord.
Power Supply
Put the Router next to the modem.
Raise the Router’s antennas.
��������
Step C
������
Click on “Setup” in the menu on the left, then click “Mode”.
�����
Ethernet Cable
Step D
Under “Select the operation mode” select NAPT and click Apply.
User Manual on CD
Step E
Step B
Locate the networking cable that connects your modem and
computer.
Click on OK to save settings then click the Reboot button to restart the
modem.
Step F
It’s as easy as 1-2-3
Wait approximately 2 minutes, then close your web browser. This is
usually done by clicking the cross on the top right hand corner of the
screen.
1
Step G
Unplug that cable from your modem, and plug
it into any gray port on the back of the
Router.
Hardware Connections:
Use the instructions in this
Guide to connect your router,
computer, and modem.
Step C
Restart your web browser and ensure you can surf the internet, then
close your browser and continue with this guide.
2
© 2006 Belkin Corporation. All rights reserved. All trade names
are registered trademarks of respective manufacturers listed.
P75168au
F5D8231au4
3
Setup Assistant:
Insert the CD into your
computer and follow the
on-screen instructions.
Finish:
You’re ready to surf the
internet.
Find your new networking cable (it came in the box with your
Router) and connect it to the yellow port on the back of
the Router.
Connect the other end to your
modem, in the port that’s
now free.
Page 2 of 4
Is your new network
protected?
Every square Kilometre of Australia is
struck by lightning on average at least
once a year, in some high occurrence
areas this can be as often as 8 times a
year. Your home network will shortly be
connected to thousands of kilometres
of both power and phone cables,
exposing your home network to the
potentially destructive forces of nature.
Page 3 of 4
Hardware Connections (continued)
Australian Optusnet ADSL Customers Only
Step D
D-Link DSL302G
Plug in your modem’s power cord and power up.
Step A
Wait 2 minutes for the modem to start up and connect to your ISP...
If you have not already done so please connect the DSL-302G modem
directly to your computer with a network cable (Ethernet), ensure your
Internet connection is working. If you are having any problems setting up
the Optus-provided DSL-302G modem, you will need to contact the Optus
ADSL support line.
Plug the router’s power supply into the black port on the
back of the router. Plug the other end into the wall
outlet and power on.
Step B
Your networking equipment, your
peripherals, your computer and
your irreplaceable data can all be
destroyed in a flash.
After you have confirmed that your Internet connection is set up and you
can browse the web, you will need to follow the remaining steps on this
document. Log into the modem by opening up Internet Explorer on your
PC and type http://10.1.1.1 in the address bar and press Enter.
Belkin surge protectors provide
world-class protection against
surges, spikes and line noise.
Step E
Step C
Our Warranties are your Security!
Wait 2 minutes for the router to start up.
On the web browser screen click on “Advanced Network Setup” in the
menu on the left.
Belkin’s Gold Series surge
Protectors are backed by:
If your PC is off then power up your PC, if you have any software
firewall on your PC then disable this now. (Refer to your
firewall user manual, this can be
turned back on once the setup is
completed), if you are unsure
continue anyway.
• Lifetime Product Warranty
– Belkin will replace, free
of charge, any defective
Surgemaster product, even if
rendered faulty by a surge or
spike whilst protecting your
equipment.
• Lifetime Connected Equipment
Warranty – Belkin will repair or
replace any equipment damaged
by a power disturbance up to a
stated value.
• Data Recovery Warranty
– If your computer or hard drive
is damaged we will provide data
recovery services at no cost to
you.
Step D
Select “Enable NAT” option.
Step E
Click on OK to save settings.
Step F
2 Setup Assistant
A warning message will appear in the middle of the screen, click on OK.
Insert the CD (supplied with your Belkin router) into your computer.
Step G
The Setup Assistant will automatically appear on your computer’s screen.
Follow the instructions presented to you.
Wait approximately 2 minutes, then close your web browser. This is
usually done by clicking the cross on the top right hand corner of the
screen.
Once you are successfully surfing
the web you may restart your
firewall software if you
have any installed on
your PC.
3 Finish
You’re ready to surf the internet.
Step H
Restart your web browser and ensure you can surf the internet, then
close your browser and continue with this guide.
Prior to connecting the Belkin
router to your network, and in
order to successfully use your
Belkin router with an Optusnet
supplied ADSL modem, it is
necessary to enable Network
Address Translation (NAT) on the
Optus modem.