1
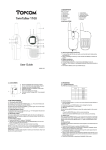
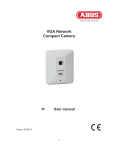
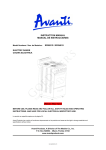
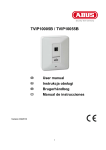
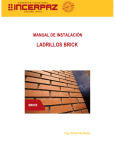
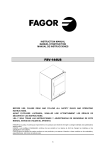
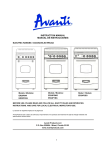
INSTRUCTION MANUAL
MANUAL DE INSTRUCCIONES
Model Number / No. de Modelo:
W892F
WASHING MACHINE
LAVADORA
BEFORE USE, PLEASE READ AND FOLLOW ALL SAFETY RULES AND OPERATING
INSTRUCTIONS.
La sección en español empieza en la página 21.
Avanti has a policy of continuous improvement on its products and reserves the right to change materials and specifications
without notice.
Avanti Products, A Division of the Mackle Co., Inc.
P.O. Box 520604 - Miami, Florida 33152
www.avantiproducts.com
REGISTRATION INFORMATION
Thank you for purchasing this fine Avanti product. Please fill out this card and return it within 100
days of purchase and receive these important benefits to the following address:
Avanti Products, A Division of the Mackle Co., Inc.
P.O. Box 520604 - Miami, Florida 33152 USA
?
Protect your product:
We will keep the model number and date of purchase of your new Avanti product on file to help you
refer to this information in the event of an insurance claim such as fire or theft.
?
Promote better products:
We value your input. Your responses will help us develop products designed to best meet your future
needs.
-------------------------------------------------(detach here)---------------------------------------------------------------Avanti Registration Card
__________________________________
Name
________________________________________
Model #
Serial #
__________________________________
Address
________________________________________
Date Purchased
Store/Dealer Name
__________________________________
City
State
Zip
________________________________________
Occupation
__________________________________
Area Code
Phone Number
As Your Primary Residence, Do You:
?Own
?Rent
Did You Purchase An Additional Warranty:
?Extended
?None
Reason For Choosing This Avanti Product:
Please indicate the most important factors
that influenced your decision to purchase
this product.
?Price
?Product Features
? Avanti Reputation
?Product Quality
?Salesperson Recommendation
?Friend/Relative Recommendation
?Warranty
?Other_______________________
Your Age:
?under 18 ?18-25 ?26-30
?31-35
?36-50 ?over 50
Marital Status:
? Married
?Single
Is This Product Used In The:
?Home
?Business
How Did You Learn About This Product:
? Advertising
?In Store Demo
?Personal Demo
?Other_________________________________
Comments______________________________
_______________________________________
_______________________________________
2
3
HELP US HELP YOU...
Read this guide carefully.
Write down the model and serial numbers.
It is intended to help you operate and maintain
your new washing machine properly.
You'll find them on a plate located on the rear
outside wall of the washing machine.
Keep it handy to answer your questions.
If you don't understand something or you need
more assistance, please call:
Please write these numbers here:
____________________________________
Date of Purchase
Avanti Customer Service
800-220-5570
____________________________________
Model Number
Keep proof of original purchase date (such as
your sales slip) with this guide to establish the
warranty period.
____________________________________
Serial Number
Use these numbers in any correspondence or
service calls concerning your washing
machine.
If you received a damaged washing machine,
immediately contact the dealer (or builder) that
sold you the washing machine.
Save time and money. Before you call for
service, check the Troubleshooting Guide. It
lists causes of minor operating problems that
you can correct yourself.
IF YOU NEED SERVICE
We're proud of our service and want you to be
pleased. If for some reason you are not happy
with the service you receive, here are some
steps to follow for further assistance.
FIRST, contact the people who serviced your
washing machine. Explain why you are not
pleased. In most cases, this will solve the
problem.
NEXT, if you are still not pleased, write all the
details, including your telephone number, and
send it to:
Customer Service
Avanti Products
10880 NW 30 Street
Miami, FL 33172 USA
4
T ABLE OF CONTENTS
REGISTRATION INFORMATION
2
HEL P US HELP YOU…
4
PARTS & FEATURES
6
IMPORTANT SAFETY INS TRUCTIONS
7
INSTALLATION INSTRUCTIONS
7
BEFORE USING YOUR APPLIANCE
7
SELECTING A LOCATION
8
ADJUSTING THE LEVELING LEGS
8
REMOVING THE SHIPPIN G BOLTS
8
CONNECTING THE WATER SUPPLY HOSE
8
WATER CONNECTION
9
POSITIONING THE DRAIN HOSE
10
ELECTRICAL CONNECTION
10
OPERATING YOUR APPLIANCE
11
CONTROL PANEL
11
PREPARATION
12
OPERATING INSTRUCTIONS
13
DELAY START SETTING
14
WASHING TIPS AND HINTS
15
CARE AND MAINTENANCE
16
CLEANING YOUR APPLIANCE
16
VACATION TIME
17
TROUBLESHOOTING GUIDE
17
SERVICE FOR YOUR APPLIANCE
18
YOUR AVANTI PRODUCTS WARRANTY
19
WIRING DIAGRAM
20
INSTRUCCIONES EN ESP AÑOL
21~31
5
PARTS & FEATURES
7
8
1
9
2
3
4
5
10
6
1.
2.
3.
4.
5.
6.
7.
8.
9.
10.
WORKTOP
CONTROL PANEL
DETERGENT DRAWER
DOOR
BASE COVER
LEVELING LEGS
DRAIN HOSE (1 PC)
INLET HOSE (2 PCS)
POWER SUPPLY CORD
PUMP FILTER COVER
ACCESSORIES
INLET HOSE
PLASTIC COVER
FAUCET ADAPTER
2 PIECES
4 PIECES
2 PIECES
6
IMPORTANT SAFETY INSTRUCTIONS
?WARNING?
?
?
?
?
?
?
?
?
?
?
?
?
?
?
?
To reduce the risk of fire, electrical shock, or
injury when using your portable washer, follow
these basic precautions:
Read all instructions before using the appliance.
Do not wash articles that have been previously cleaned in, washed in, soaked in, or spotted with
gasoline, dry-cleaning solvents, or other flammable or explosive substances, as they give off
vapors that could ignite or explode.
Do not add gasoline, dry-cleaning solvents, or other flammable or explosive substances to the
wash water. These substances give off vapours that could ignite or explode.
Under certain conditions, hydrogen gas may be produced in a hot-water system that h as not been
used for 2 weeks or more. HYDROGEN GAS IS EXPLOSIVE. If the hot-water system has not
been used for such a period, before using a washing machine, turn on all hot-water faucets and let
water flow from each for several minutes. This will release any accumulated hydrogen gas. As the
gas is flammable, do not smoke or use an open flame during this time.
DANGER or WARNING: Risk of child entrapment.
Child entrapment and suffocation are not problems of the past. Junked or abandoned appliances
are still dangerous . . . even if they will “just sit in the garage a few days.”
Before you throw away your old portable washer: Take off the lid.
Never allow children to operate, play with, or crawl inside the portable washer. Close supervision
of children is necessary when the washer is used near children.
Do not reach into the washer if the agitator or tub is moving.
Do not install or store this appliance where it will be exposed to the weather.
Do not tamper with controls.
Do not repair or replace any part of the washer or attempt any servicing unless specifically
recommended in the user -maintenance instructions or in published user -repair instructions that
you understand and have the skills to carry out.
Never clean portable washer parts with flammable fluids. The fumes can create a fire hazard or
explosion.
Do not place the washer in steamy rooms or where the washer is directly exposed to rain.
Moisture may destroy the electrical insulation causing an electrical shock hazard.
Do not store, use gasoline, or any other flammable vapors and liquids in the vicinity of this or any
other portable washer. The fumes can create a fire hazard or explosion.
If the power cord is damaged, it must be replaced by the manufacturer or its service agent or a
similar qualified person in order to avoid a hazard.
-Save these instructions -
INSTALLATION INSTRUCTIONS
?
BEFORE USING YOUR AP PLIANCE
? Remove the exterior and interior packing.
? You will need the following tools:
? Wrench
? Pliers
? Phillips Head Screwdriver
? Check to be sure you have all of the following parts:
? 2 Inlet Hoses
? 2 Faucet Adapters
? 4 Plastic Covers
? 1 Instruction Manual
? Clean the interior surface with lukewarm water using a soft cloth.
? Allow 2 inches of space between the back and sides of the appliance.
7
SCREWDRIVER
WRENCH
PLIERS
?
?
?
?
?
Put your l aundry into the washer evenly. Uneven laundry may cause noise or vibration.
Don’t use excessively hot water (50°C or more). Plastic parts may be deformed or damaged.
Also, clothing may be deformed or bleached.
Before washing, check all pockets. If nails or pins remain in pockets, they may damage the
washer or clothes.
Never splash water on the control panel.
Plug the washer into an exclusive properly installed-grounded wall outlet. Do not under any
circumstances cut or remove the third (ground) prong from the power cord. Any questions
concerning power and/or grounding should be directed toward a certified electrician or an
authorized Avanti Products service center.
?
SELECTING A LOCATION
Before you install the washing machine, select a location with the following characteristics:
? A hard level surface (if the surface is uneven, see Adjusting The Leveling Legs).
? Away from direct sunlight. Direct sunlight may affect the acrylic coating, plastic and electrical
components.
? Adequate ventilation.
?
?
Room temperature that will not fall belo w 0? .
Away from sources of heat such as coal or gas. Make sure that the washing machine does not
stand on its power cord. Ventilation openings must not be obstructed by carpeting when the
portable washer is installed on a carpeted floor.
?
ADJUSTING THE LEVELING LEGS
If the floor is uneven adjust the legs (do not insert pieces of wood, or any
other objects under the feet) as following:
? Loosen the leg bolt by turning it with your hand until it is at the desired
height.
? Tighten the locking nut by turning it in the reverse direction with the
wrench.
Place the washer on a sturdy flat surface.
If the washer is placed on an uneven or weak surface, noise or vibration
occurs (Allowable is 1°).
?
REMOVING THE SHIPPING BOLTS
For transportation reason, the suspended part located inside the washing
machine is locked by four shipping bolts and screws. Before using the
washing machine, remove the four shipping bolts as following:
? Loosen all bolts with the wrench before removing them.
? Take each bolt head and pull it out. Repeat for each bolt.
? Fill the holes with the supplied plastic covers.
? Keep the shipping bolts for future use.
?
CONNECTING THE WATER SUPPLY HOSE
The water supply hose must be connected to the washing machine at one end and to the water faucet
at the other. Do not stretch the water supply hose. If the hose is too short and you do not wish to
move the water faucet, replace the hose with a longer, high-pressure hose.
Select appropriate faucet as shown in the figures below. If none of these faucets are available, use
the faucet adapter provided.
8
The end of faucet spout should be longer than 10mm (0.4”), or the connector cannot be fixed properly.
Water leakage could develop.
?
?
?
Con nect the water inlet hoses to the connectors in water inlet valves by turning the connecting
nuts.
Connect the other ends of water inlet hoses to the faucets by turning the connecting nuts.
If you have both cold and hot water supplied, please make sure to connect the inlet hoses by cold
to cold and hot to hot.
NOTE: Be sure the rubber rings are inside the connecting nuts.
?
WATER CONNECTION
For normal kitchen-sink tap only use the inlet hose with cold water inlet.
Connect the inlet hose to the male hose thread adapter by turning it clockwise to be fixed tightly.
Make sure to insert the rubber ring enclosed. Then connect tightly to your sink.
Note: Some faucets may require you to also use the female hose thread adapter between the male
adapter and your sink faucet as shown below. Make sure the rubber ring is inserte d and
connect to your sink.
If water leaks from faucet connection or washer connection, turn off water and
tighten fully using a wrench. Be careful not to over tighten and damage water
connection. Turn on water supply and make sure no leaks are present.
9
?
POSITIONING THE DRAIN HOSE
The end of the drain hose may be positioned as following two ways:
? Over the edge of a sink
The drain hose must be placed at a height of between 0.6 ~ 0.9 m. To keep the drain hose spout
bent, use the supplied plastic hose guide. Secure the guide to the wall with a hook or to the
faucet with a piece of string to prevent the drain hose from
moving.
? In a drain pipe
We recommend you use a vertical pipe with height between 0.6 ~
0.9 m. The inside diameter of the drain pipe must be larger than
the outside diameter of the drain hose.
NOTE: The outlet of the drain hose must be in the height of 0.6 ~ 0.9
m above floor level, otherwise, the washing machine cannot work
normally.
?
ELECTRICAL CONNECTIO N
? Warning?
Improper use of th e grounded plug can result in the risk of electrical shock. If the power cord is
damaged, have it replaced by an authorized Avanti Products service center.
This portable washer should be properly grounded for your safety.
The power cord of this appliance is equipped with a three-prong plug
which mates with standard three prong wall outlets to minimize the
possibility of electrical shock.
Do not under any circumstances cut or remove the third ground prong
from the power cord supplied.
STANDARD 120
VOLTS, 60 HERTZ,
3-WIRE SOCKET
L1
NEUTRAL
SIDE
GROUND
This appliance requires a standard 110-120 Volts~A.C./60Hz electrical
outlet with three-prong ground.
The cord should be secured behind the appliance and not left exposed
or dangling to prevent accidental injury.
Never unplug the appliance by pulling the power cord. Always grip the
plug firmly and pull straight out from the receptacle.
Do not use an extension cord with this appliance. If the power cord is
too short, have a qualified el ectrician or service technician install an
outlet near the appliance.
10
120± 12
V.A.C.
0
V.A.C.
115± 12
V.A.C.
ROUND
GROUNDING
PRONG
OPERATING YOUR APPLIANCE
?
CONTROL PANEL
1
1.
2.
3.
4.
5.
2
3
4
Detergent Dispenser
Display Panel
Delay Start Selection Button
Extra Rinse Selection Button
Water Temperature Selection Button
5
6.
7.
8.
9.
11
6
7
8
Cycle Selection Button
Fabrics Selection Button
Start/Pause Selection Button
Power Selection Button
9
?
1.
2.
6.
PREPARATION
Connect the water inlet hose 3.
to the water faucet. Don’t
switch on the power if the
water pressure is lower than
0.05MPa and higher than
0.5MPa.
Open the water faucet.
Insert the plug into the
socket. For safety the plug
should have ground
connection.
4.
Place the drain hose in the
correct position.
5.
Open the door and put the
wash load into the tub
evenly. Then close the door.
2.Turn on the water faucet.
Pull out the detergent drawer and add the wash detergent and 7. Push back the detergent
softener to the corresponding position as following:
drawer.
? For pre-wash detergent
WARNING: DO NOT pull out the
? For wash detergent
detergent drawer while the
? For softener
appliance is in operation because
When using the liquid detergent (recommended for programs
this may cause water to spill out.
without pre-wash process), insert the detergent cup and follow
the instructions on the package.
When using the soap powder, remember to remove the liquid
detergent cup.
NOTE: DO NOT overflow the deterg ent and softener
compartment.
?Warning?
When using liquid chlorine bleach you must follow these steps.
Failure to follow these directions may result in damaged clothes.
1.
2.
3.
4.
5.
Insert the load to be washed into the unit
Turn on the unit to your desired mode.
Add dete rgent or liquid soap (see page 12 for details).
Wait for 3 minutes after the washing cycle starts. Then measure the correct amount of liquid
chlorine bleach (do not exceed 1/3 cup) otherwise you will damage the clothes.
Open the drawer and pour the liquid chlori ne bleach into center section 2 of drawer
12
6.
?
Do not pour undiluted liquid bleach directly into the load or drum.
OPERATING INSTRUCTIONS
PRESS DOWN POWER BUTTON.
Press once to turn the washing machine ON, press again to turn the washing machine OFF.
After the washing program has been finished, the power will automatically turn off.
NOTE: If the power is left ON for longer than 10 minutes without any buttons being touched, the
power will turn off automatically.
PRESS DOWN FABRICS BUTTON.
Choose the right available program according to wash load as following:
COTTON
PERM PRESS
DELICATES
KNIT/WOOL
The default Fabrics is Perm Press.
For different FABRICS program, there are different default water temperature and cycle process as
following:
FABRICS
COTTON
PERM PRESS
DELICATES
KNIT/WOOL
WATER
TEMPERATURE
HOT/COLD
WARM/COLD
WARM/COLD
COLD/COLD
CYCLE
WASH+RINSE+SPIN
WASH+RINSE+SPIN
WASH+RINSE+SPIN
WASH+RINSE+SPIN
PRESS DOWN CYCLE BUTTON.
Press the button repeatedly to select the available wash process as following:
WASH+RINSE+SPIN
PREWASH+WASH+RINSE+SPIN
SPIN
WASH+RINSE
The default cycle is WASH+RINSE+SPIN.
RINSE+SPIN
NOTE: Prewash is only available when washing COTTON and PERM PRESS.
PRESS DOWN WASH/RINSE WATER TEMPERATURE BUTTON.
Press down the water temperature selection button, you can choose to inlet cold water or hot water for
the wash and rinse process as following:
HOT/COLD
WARM/WARM
WARM/COLD
COLD/COLD
The default water temperature is WARM/COLD.
NOTE: HOT/COLD is only available when washing COTTON and PERM PRESS.
IMPORTANT: A single cold hose system does not allow the washing machine to automatically
regulate incoming water temperatures to match those listed on the control panel. Only COLD/COLD
can be available.
PRESS DOWN EXTRA RINSE SELECTION BUTTON.
Press down the button when Extra Rinse is needed.
When you choose Extra Rinse, you will see the indicator lights up on the control panel.
NOTE: Extra Rinse is not available for Spin only process.
PRESS DOWN DELAY START SELECT BUTTON.
Press this button repeatedly to choose the delayed start time (From 1 to 24 hours in one hour
increment).
After the Delay Start has been chosen, the Delay Start indicator flashes and the LED displays the
remaining delay time.
To cancel the Delay Start, press down the power button or press down the Delay Start repeatedly to
13
choose zero delay start time and press down the Start/Pause button.
PRESS DOWN START/PAUSE BUTTON ONCE AND THE MACHINE WILL BEGIN OPERATION.
Press to start and pause the washing programs.
During operation, time countdown can be seen in LED display.
When the program is finished, open the door and remove the laundry.
NOTE: The door will not open until 3 minutes after the appliance stops or the power turns off.
The Door Locked indicator lights whenever the door is locked and unable to open.
NOTE:
? Clothes easily discolored should be washed separately so as to prevent inter-dyeing.
? If you want to change a selected program, please press the START/PAUSE button first, then
press the corresponding buttons to set the program before pushing START/PAUSE button.
? When SPIN and RINSE+SPIN cycles are ON, do not use detergent.
? If you want to drain water during washing, press the START/PAUSE button, then select SPIN
cycle. Press START/PAUSE button again to restart.
?
DELAY START SETTING
Select this course when you have to go out or do something else.
? Press down the power button.
? Load the washing machine and select the appropriate wash program.
? Press Delay Start button continuously to select the delay start time. (From 1 hour to 24 hours)
? Press START/PAUSE button to start the course.
14
?
WASHING TIPS AND HINTS
Sort your laundry according to the following characteristics:
? Types of fabric care label symbol: Sort laundry into cottons, mixed fibers, synthetics, silks, wools
and rayon.
? Color: Divide whites and colors. Wash new, colored items separately.
? Size: Placing items of different sizes in the same load will improve the washing action.
? Sensitivity: Wash delicate i tems separately, using the delicate wash program for pure new wool,
curtains, and silk articles. Check the labels on the items you are washing or refer to the fabric care
chart.
EMPTY POCKETS
Coins, safety pins and similar items can damage linen, the washing machine drum, and the water
tank.
SECURING FASTENERS
Close zippers and fasten buttons or hooks; Loose belts or ribbons should be tied together.
PREWASHING COTTON
Cotton and Perm Press are not normally necessary. You new washing machine, combined with
modern detergents, will give perfect washing results, thus saving energy, time, water and detergent.
However, if your cotton is particularly dirty, use a prewash with a protein-based detergent.
DETERMINING LOAD CAPACITY
Do not overload the washing machine or your laundry may not wash properly.
DETERGENT TIPS
The type of detergent you use is based on the type of fabric (cotton, Perm Press, delicates and wool),
color, wash temperature, degree and type of soiling. Always use “low suds” laundry soap, which is
designed for automatic washing machine.
Follow the detergent manufacturer’s recommendations based upon the weight of the laundry, the
degree of soiling, and the hard ness of the water in your area. If you don’t know how hard your water
is, ask your water authority.
NOTE: Keep detergents and additives in a safe dry place out of the reach of children.
Fabric Care Chart
Resistant material
Can be ironed at 100 ? max
Delicate fabric
Do not iron
Item may be washed at 95?
Can be dry cleaned using any solvent
Dry clean with perchloride, lighter fuel,
pure alcohol or R113 only
Item may be washed at 60?
Item may be washed at 40?
Dry clean with aviation fuel, pure alcohol
or R113 only
Item may be washed at 30?
Do not dry clean
Item may be hand washed
Dry flat
Dry clean only
Can be hung to day
Can be bleached in cold water
Dry on clothes hanger
Do not bleach
Tumble dry, normal heat
Can be ironed at 200 ? max
Tumble dry, reduced heat
Can be ironed at 150 ? max
Do not tumble dry
15
CARE AND MAINTENANCE
?
CLEANING YOUR APPLIANCE
? Clean the surface of your washer regularly with soft fabric.
? Clean the inner tub regularly, especially immediately after starch or bleach operation.
? Clean the filter in the inlet valve or inlet hose regularly in order to prevent it from clogging.
Unplug the power cord.
Remove the inlet hose and clean
the filter with a brush.
Clean the surface of
the washing machine
with a soft cloth
regularly.
Clean the inner tub
regularly, especially after
washing starched or
bleached laundry.
?
Clean the detergent drawer.
Pull out the detergent drawer from its housing, clean an d rinse it thoroughly. Then dry it and insert
back to the correct position.
?
Clean the pump filter.
Clean the debris filter 2 or 3 times a year.
1. Remove the filter cover from the front of the washing machine. And ensure that there is no
water in the tub and the electricity supply is disconnected.
2. Place a pan or cloth under the filter cover to prevent water from spilling on your floor.
3. Remove the filter by rotating it half a cycle in the counterclockwise direction and pulling it out.
4. Clean the filter and replace it in its housing reversely.
5. Replace the base cover.
16
?
VACATION TIME
PROBLEMS WITH YOUR APPLIANCE?
You can solve many common appliance problems easily, saving you the cost of a possible service
call. Try the suggestions below to see if you can solve the problem before calling the servicer.
TROUBLESHOOTING GUIDE
PROBLEM
Washer does not operate.
No water or insufficient water supply.
Water supplies and drains continuously
The washing machine does not drain.
Detergent remains in the detergent drawer after
the wash program is complete.
Washing machine vibrates or is too noisy.
POSSIBLE CAUSE
Not plugged in.
The circuit breaker tripped or a blown fuse.
The POWER button is not turned on.
The door is not closed.
Make sure the water source is turned on.
The water source faucet is not turned on.
The water source hose is frozen.
The water intake hose is bent.
The filter on the water intake hose is clogged.
The drain hose is not positioned at the correct
height (0.6 ~ 0.9 m).
The drain hose is squashed or bent.
The water hose mesh filter is clogged.
The washing machine is running without sufficient
water pressure.
Check to assure that the washer is level.
The shipping bolts were not removed.
The washing machine is touching another object.
The laundry load is not balanced.
17
SERVICE FOR YOUR APPLIANCE
We are proud of our customer service organization and the network of professional service
technicians that provide service on your Avanti portable washers. With the purchase of your Avanti
portable washer, you can be confident that if you ever need additional information or assistance, the
Avanti Products Customer Service Team will be here for you. Just call us toll-free.
AVANTI PRODUCTS CUSTOMER SERVICES
Product Information
800-323-5029
Whatever your questions are about our products,
help is available.
Part Orders
800-220-5570
You may order parts and accessories that will be
delivered directly to your home by personal
check, money order, Master Card, or Visa.
An Avanti Products authorized service center will
provide expert repair service, scheduled at a time
that is convenient for you. Our trained servicers
know your portable washer inside and out.
In -Home Repair Service
800-220-5570
18
YOUR AVANTI PRODUCTS WARRANTY
Staple your sales receipt here. Proof of
original purchase date is needed to obtain
service under warranty.
WHAT IS COVERED
LIMITED ONE-YEAR
WARRANTY
For one year from the date of purchase by
the original owner, Avanti Products will, at
its option, repair or replace any part of the
appliance that proves to be defective in
material or workmanship under normal
use. During this period Avanti Products
will provide all parts and labor necessary
to correct such defects free of charge, so
long as the appliance has been installed
and operated in accordance with the
written instructions in this manual. In
rental or commercial use, the warranty
period is 90 days.
LIMITED 5 YEAR WARRANTY ON PLASTIC TUB
After one year and until five years from date of
purchase, Avanti will furnish a replacement plastic
tub, for one which is defective in material or
workmanship. You will be responsible for labor.
LIMITED 7 YEAR WARRANTY ON STAINLESS
STEEL TUB
After one year and until seven years from date of
purchase, Avanti will furnish a replacement stainless
steel tub, for one which is defective in material or
workmanship. You will be responsible for labor.
WHAT IS NOT COVERED
?
?
?
?
?
?
?
?
Incidental or consequential damages.
Service calls to:
Correct the installation of your washer.
Instruction on how to use your washer.
Replace house fuses or incorrect house
wiring or plumbing.
Repairs performed by unauthorized
servicers.
Repairs when your washer is used in other
than normal, single-family household use.
?
?
?
?
19
Service calls that are related to external
problems, such as abuse, misuse,
inadequate electrical power, accidents, fire,
floods, or acts of God.
Failure of the prod uct if it is used for other
than its intended purpose.
Pickup and delivery.
Repairs caused by unauthorized
modifications made to the appliance.
This warranty does not apply outside the
Continental U.S.A.
WIRING DIAGRAM
CONTROL PCB
BL
EVS
W
EVP
BL
BR
R
R
GR
GR
R
BR
GR
R
GR
EVF
COLD
WATER VALVE
DRAINAGE
PUMP
M8
FILTER
12
FA
BR BL
T
13
HOT
14
Y/G
11
WATER
LEVEL SWITCH
M7
M6
CAPACITOR
MRC MRL MRN
HOT
WATER VALVE
MC
M5
M2
DOOR SWITCH
M1
BLACK
120V~
60Hz
ML
R
R
W
W
GR
GR
M3
WASH MOTOR
20
INSTRUCCIONES EN ESPAÑOL
IMPORTANTE : Instrucciones de Seguridad
ADVERTENCIA:
Mientras opera su lavadora automática, y para reducir el riesgo de fuego, descarga eléctrica o daños
personales, tenga en cuenta estas precauciones básicas.
Lea todas las instrucciones antes de usar su lavadora automática.
NO LAVE prendas que hayan sido previamente limpiadas, lavadas, remojadas o manchadas con
gasolina, solventes para lavado en seco u otras sustancias inflamables o explosivas, ya que estas
liberan gases que pueden encenderlas o hacerlas explotar.
NO AÑADA gasolina, solventes para lavado en seco u otras sustancias inflamables o explosivas al
agua. Estas sustancias emiten gases que podrían encender o hacer explotar su lavadora automática.
Bajo ciertas circunstancias, un sistema de agua caliente que no ha sido usado por más de dos
semanas, puede producir gas hidrógeno. El GAS HIDROGENO ES EXPLOSIVO. Si el sistema de
agua caliente no ha sido usado por más de dos semanas, abra todas las llaves de agua caliente y
deje correr el agua por algunos minutos, antes de usar su lavadora automática. Esta acción liberará
el gas hidrógeno que se pueda haber acumulado. Recuerde que este gas es inflamable, no debe
fumar ni hacer fuego abierto durante este periodo.
PELIGRO – ADVERTENCIA: Riesgo de niños atrapados.
Niños atrapados o asfixiados no son un riesgo del pasado. Aparatos abandonados o considerados
chatarra todavía son peligrosos… aun cuando “estén en el garaje por unos días”.
Antes de deshacerse de su lavadora automática antigua: asegúrese de quitarle la tapa.
Nunca deje que los niños operen, jueguen o gateen dentro de la lavadora automática. Es necesario
supervisar de cerca a los niños cuando la lavadora automática esta en uso.
No toque el interior de la lavadora automática si la mezcladora o el cilindro interno de lavado están en
movimiento.
No instale o almacene esta lavadora automática en un lugar donde esté expuesta a las inclemencias
del clima.
No fuerce los controles.
No repare ni reemplace ninguna pieza de la lavadora automática, ni trate de realizar mantenimientos
salvo los específicamente recomendados en las instrucciones de “Mantenimiento de Usuario” o en
las instrucciones de alguna publicación de “Reparación de Usuarios” que usted entienda y se sienta
calificado para realizar.
Nunca limpie las piezas de la lavadora automática con líquidos inflamables. El humo puede causar un
incendio o una explosión.
No ubique la lavadora automática en una habitación en la que esté directamente expuesta al vapor o
a la lluvia. La humedad puede destruir el aislamiento eléctrico aumentando las posibilidades de una
descarga eléctrica.
No almacene, ni use gasolina o algún otro líquido o gas inflamable cerca de esta o alguna otra
lavadora automática. El humo puede causar un incendio o una explosión.
Si el cable eléctrico esta dañado, deberá ser reemplazado por el fabricante, por la agencia de
servicios de este o por una persona calificada para evitar peligros que atenten contra su seguridad.
-GUARDE ESTAS INSTRUCCIONES-
21
INSTRUCCIONES PARA LA INSTALACION
ANTES DE USAR SU LAVADORA PORTATIL
Quite los empaques exteriores e interiores.
Necesitará las siguientes herramientas:
Llave inglesa (wrench)
Alicate / Pinzas (pliers)
Destornillador (screwdriver)
Aseg úrese de tener todas estas piezas:
2 mangueras de acceso de agua
2 adaptadores para grifo
4 cubiertas plásticas
1 manual de instrucciones
Limpie las superficies internas de la lavadora automática con agua tibia y un paño suave
Cuando ubique la lavadora automática asegúrese de dejar un espacio libre, de 2 pulgadas, hacia
atrás y hacia los lados.
Coloque la ropa dentro de su lavadora automática de manera uniforme, de lo contrario, podría causar
ruido y/o vibración.
No use agua muy caliente (50 C o más). Las piezas plásticas podrían deformarse o dañarse.
Inclusive, la ropa también podría deformarse o desteñirse.
Antes de lavar asegúrese de revisar los bolsillos de las prendas. Los clavos o pernos dejados en los
bolsillos podrían dañar la lavadora automática o las prendas durante el proceso de lavado.
No salpique agua sobre el panel de control.
Conecte la lavadora automática a un enchufe de pared (con conexión a tierra). El enchufe de pared
deberá ser exclusivo para el uso de la lavadora automática. Bajo ninguna circunstancia, quite la
tercera punta (conexión a tierra) del cable eléctrico. Cualquier pregunta que tenga sobre el
funcionamiento eléctrico o sobre la conexión a tierra, deberá ser dirigida a un electricista certificado o
a un centro de servicio autorizado por Avanti Products.
ELIGIENDO LA UBICACIÓN
Antes de instalar la lavadora automática, elija una ubicación con las siguientes características:
Una superficie resistente y plana (si la superficie no es plana, vea “Ajustando las Patas Niveladoras”)
Un lugar donde los rayos del sol no caigan directamente, estos podrían afectar el recubrimiento
acrílico o piezas plásticas o eléctricas de la lavadora automática.
Ventilación adecuada.
La temperatura de la habitación no deberá caer por debajo de los 0 C.
Deberá estar alejada de fuentes de calor, tales como carbón o gas.
Asegúrese que la lavadora automática no esté sobre el cable eléctrico.
Cuide que las aberturas de ventilación no estén obstruidas por la alfombra cuando la lavadora
automática se haya colocado sobre un piso con este material.
AJUSTANDO LAS PATAS NIVELADORAS
Si el piso no está nivelado, no inserte pedazos de madera u otros objetos, ajuste las patas de la
lavadora automática de la siguiente manera:
Desenrosque el tornillo de la pata niveladora hasta que llegue a la altura deseada.
Para fijar la pata en su lugar, enrosque la tuerca con la llave inglesa (Vea Fig. 1)
Ubique la lavadora automática en una superficie resistente.
Si la lavadora automática no es ubicada en una superficie plana o resistente podría causar ruidos y/o
vibraciones.
22
QUITANDO LOS PERNOS DE EMBALAJE
Para asegurar los accesorios que se encuentran suspendidos dentro de la lavadora automática
durante su transporte, esta cuenta con cuatro pernos.
Antes de usar su lavadora automática, quite los cuatro pernos de la siguiente manera:
Desenrosque los cuatro pernos con la llave inglesa.
Cuando estén desajustados, hale los pernos por la cabeza.
Tape los cuatro orificios con las cubiertas plásticas que vienen con la lavadora automática.
Guarde los pernos en caso que tenga que transportar la lavadora en el futuro.
CONECTANDO LA MANGUERA DE ABASTECIMIENTO DE AGUA
La manguera de abastecimiento de agua debe estar conectada por un extremo a la lavadora
automática y por el otro al grifo de agua .
No estire la manguera de abastecimiento de agua.
Si la manguera no es lo suficientemente larga, y usted no desea mover la llave de agua, reemplace la
manguera original por una mas larga. Esta manguera deberá ser de alta presión.
Seleccione una llave de agua adecuada como se indica en las figuras siguientes (vea Fig.2). Si no
encuentra ninguna de las llaves mostradas use el adaptador de llave de agua que viene con la
lavadora automática.
El tubo terminal de la llave de agua debe tener más de 10mm (0.4”) de largo o el conector no
funcionará correctamente, esto podría producir fugas de agua.
Conecte la manguera de abastecimiento de agua a los conectores que se encuentran en las válvulas
de entrada de agua de la lavadora automática, para esto tendrá que girar las tuercas conectoras.
Conecte el otro extremo de la manguera de abastecimiento de agua al grifo girando las tuercas
conectoras.
Si usted tiene un sistema de grifos de agua caliente y fría, asegúrese de conectar la manguera que
sale de la válvula de entrada de agua caliente con la llave de agua caliente y la de entrada de agua
fría con la llave de agua fría. (Vea Fig.2).
NOTA: Asegúrese que los aros de jebe estén dentro de las tuercas conectoras.
CONEXIÓN DE AGUA
Para un grifo de cocina standard, conecte su manguera de abastecimiento a la válvula de entrada de
agua fría.
Conecte la manguera de abastecimiento al adaptador de rosca “macho” girándola en dirección de las
manillas del reloj hasta que esté bien enroscado.
Asegúrese de haber colocado el aro de jebe entre la manguera de abastecimiento y el adaptador de
rosca “macho”. Luego, conecte la manguera al grifo firmemente.
NOTA: Algunos grifos pueden requerir el uso de un adaptador de rosca “hembra” entre el adaptador
“macho” y la llave del lavadero. En ese caso, asegúrese que el aro de jebe esté colocado entre
ambos adaptadores.
El siguiente grafico le explicará el procedimiento. (Fig.2A).
Si tiene un problema de fuga de agua en la llave o en la válvula de entrada de la lavadora
automática, cierre el ingreso de agua y ajuste firmemente las conexiones con una llave inglesa.
23
Tenga cuidado de no ajustar excesivamente las piezas, esto podría dañar las conexiones de agua.
Finalmente, abra la llave del agua y verifique que no existan mas fugas de agua.
UBICANDO LA MANGUERA DE DESAGUE
El extremo final de la manguera de desagüe deberá estar ubicado en una de las siguientes
posiciones:
? Sobre el borde del fregadero
La manguera de desagüe deberá estar ubicada a una altura de entre 2 a 3 pies (60 a 90 cm).
Para mantener la forma curva de la manguera de desagüe, use la guía plástica para
mangueras que viene con la lavadora automática. Asegure la guía a una pared con un
gancho o al grifo con una soguilla, de esta manera evitará qu e la manguera de desagüe se
mueva de su sitio.
?
En un tubo de desagüe
Le recomendamos usar un tubo vertical con una altura de
entre 2 a 3 pies (60 a 90 cm). El diámetro interior del tubo de
desagüe debe ser mayor al diámetro externo de la manguera
de desagüe.
NOTA: El extremo final de la manguera de desagüe deberá estar a
una altura de entre 2 a 3 pies (60 a 90 cm) sobre el nivel del piso, de
lo contrario, la lavadora automática no funcionará adecuadamente.
FIG. 2B
CONEXIÓN ELECTRICA
CUIDADO
El uso inapropiado del cable con conexión a tierra aumenta las probabilidades de una descarga
eléctrica. Si el cable está dañado, hágalo reemplazar por un centro de servicio autorizado por Avanti
Products.
Esta lavadora automática deberá tener una conexión a tierra apropiada para no comprometer su
seguridad.
El cable eléctrico de esta lavadora está equipada con un enchufe de tres puntas. Este enchufe encaja
perfectamente con los enchufes de pared Standard de tres entradas, de esta manera reducirá la
posibilidad de una descarga eléctrica.
Por ningún motivo corte o retire la tercera punta del enchufe del cordón eléctrico de la lavadora
automática.
Esta lavadora requiere un enchufe eléctrico de tres entradas de 110 a 120 voltios y 60Hz A.C.
El cordón eléctrico deberá permanecer asegurado a la parte posterior de la lavadora automática, no
deberá estar expuesto o colgando para evitar una lesión accidental.
Nunca desenchufe la lavadora automática tirando del cordón eléctrico. Siempre tome el enchufe y
hale de él para desenchufar la lavadora.
No use una extensión con esta lavadora. Si el cable eléctrico es corto, contrate un electricista
calificado y haga instalar un enchufe cerca de la lavadora.
USANDO SU LAVADORA PORTATIL
PANEL DE CONTROL
24
1.
2.
3.
4.
5.
6.
7.
8.
9.
Dispensador de detergente
Panel de exhibición
Botón de selección de INICIO RETARDADO
Botón de selección de enjuague
Botón de selección de temperatura del agua
Botón de selección de ciclo de lavado
Botón de selección de tela
Botón de selección inicio/pausa
Botón de encendido
PREPARACION
1. Conecte la manguera de abastecimiento de agua al grifo.
2. Abra la llave del agua.
Si la presión del agua es menor a 0.05MPa y mayor a 0.5MPa, no encienda la lavadora.
3. Por su seguridad, conecte la lavadora solo a un enchufe con conexión a tierra.
4. Coloque la manguera de desagüe en la posición correcta.
5. Abra la puerta de la lavadora automática e introduzca y ubique las prendas a lavar de manera
uniforme. Cierre la puerta.
6. Abra el cajón del dispensador de detergente, añada el detergente l íquido y el suavizante de la
siguiente manera:
(1) para el detergente del pre-lavado
(2) para el detergente del lavado
(3) para el suavizante
Cuando use detergente liquido (recomendado para programas sin proceso de pre-lavado), añada el
recipiente para detergente liquido y siga las instrucciones que aparecen en el empaque.
ADVERTENCIA
Cuando use blanqueador líquido siga los siguientes pasos. De no seguir estas indicaciones podría
dañar la ropa.
1. Coloque las prendas a lavar dentro de la lavadora 2. Encienda la lavadora y seleccione el tipo de
lavado 3. Añada detergente o jabón líquido 4. Espere 3 minutos después que el ciclo de lavado h aya
empezado. Luego mida la cantidad correcta de blanqueador líquido (sin exceder 1/3 de taza) de lo
contrario podría dañar la ropa.
5. Abra el cajon y vierta el blanqueador líquido en la sección central del cajón (II) 6. No vierta
blanqueado líquido sin diluir directamente en la ropa o el cilindro de lavar
Cuando use detergente en polvo, recuerde que deberá quitar el recipiente para detergente líquido.
NOTA: NO llene los recipientes de detergente y suavizante hasta el tope, ello causará que estos se
desborden.
7. Empuje el cajón dispensador de detergente hasta cerrarlo completamente.
ADVERTENCIA: NO abra el cajón dispensador mientras la lavadora automática esté en
funcionamiento, esto podría causar que el agua se derrame.
INSTRUCCIONES DE FUNCIONAMIENTO
PRESIONE EL BOTON DE ENCENDIDO (POWER)
Presiónelo una vez para encender la lavadora automática, presiónelo nuevamente para apagarla.
Si el ciclo de lavado ha terminado, la lavadora se apagará automáticamente.
NOTA: Si la máquina está encendida por 10 minutos, y no se escoge ninguna opción (mediante los
botones de selección) esta se apagará automáticamente.
25
PRESIONE EL BOTON PARA SELECCIONAR EL TIPO DE TELA (FABRICS)
Seleccione el programa tomando en consideración las prendas a lavar:
ALGODÓN – PLANC HADO PERMANENTE – DELICADOS – TEJIDOS DE PUNTO/LANA
El programa pre-seleccionado es PLANCHADO PERMANENTE.
Cada programa tiene un ciclo de lavado y una temperatura de agua especifico:
TIPO DE TELA
ALGODÓN
PLANCHADO PERM
DELICADOS
TEJ. PTO/LANA
TEMPERATURA DEL
AGUA
CALIENTE / FRIA
TIBIA / FRIA
TIBIA / FRIA
FRIA / FRIA
CICLO
LAVAD O+ENJUAGUE+CENTRIFUGADO
LAVADO+ENJUAGUE+CENTRIFUGADO
LAVADO+ENJUAGUE+CENTRIFUGADO
LAVADO+ENJUAGUE+CENTRIFUGADO
SELECCIONAR EL CICLO DE LAVADO (CYCLE)
Presione el botón de selección de ciclo repetidamente, el orden de los ciclos es el siguiente:
LAVADO + ENJUAGUE + CENTRIFUGADO >
PRELAVADO +LAVADO +ENJUAGUE + CENTRIFUGADO >
CENTRIFUGADO >
ENJUAGUE + CENTRIFUGADO >
LAVADO + ENJUAGUE
El ciclo de lavado pre-seleccionado es LAVADO+ENJUAGUE+CENTRIFUGADO
NOTA: El PRELAVADO podrá ser escogido sólo si es que ha seleccionado los siguientes tipos de
tela: ALGODÓN y PLANCHADO PERMANTENTE.
SELECCIONAR LA TEMPERATURA DEL AGUA PARA EL CICLO LAVAR/ENJUAGAR
(WASH/RINSE WATER TEMPERAT URE)
Presione el botón de selección de temperatura del agua, usted puede elegir la temperatura del agua
para el proceso de lavado y enjuague de la siguiente manera:
CALIENTE/FRIA >
TIBIA/TIBIA >
TIBIA/FRIA >
FRIA/FRIA
La temperatura pre-seleccionada de fábrica es TIBIA/FRIA.
NOTA: La temperatura CALIENTE/FRIA podrá ser escogida sólo si es que ha seleccionado los
siguientes tipos de tela: ALGODÓN y PLANCHADO PERMANTENTE.
IMPORTANTE: Si usted usa el sistema de una sola manguera de abastecimiento de agua (fría), la
máquina no podrá regular la temperatura del agua tal y como se muestra en el panel de control. En
este caso sólo se podrá usar la opción FRIA/FRIA.
SELECCIONAR LA OPCION ENJUAGUE ADICIONAL (EXTRA RINSE)
Presione este botón cuando la carga requiera un enjuague adicional.
Cuando escoja esta opción, vera que la luz indicadora se enciende en el panel de control.
NOTA: La opción ENJUAGUE ADICIONAL no está disponible cuando se eligió solamente el proceso
CENTRIFUGADO.
SELECCIONAR LA OPCION INICIO RETARDADO (DELAY START)
Presione este botón repetidamente para elegir aplazar el inicio del proceso (de 1 a 24 horas, en
26
incrementos de 1 hora).
Después de haber escogido la hora de inicio, el indicador de INICIO RETARDADO se encenderá y
apagará repetidamente; además, la pantalla LED indicará el tiempo restante.
Para cancelar el INICIO RETARDADO:
Presione el botón de ENCENDIDO
Presione el botón de INICIO RETARDADO repetidamente hasta que el contador llegue a 0 (cero),
luego, presione el botón INICIO/PAUSA.
PRESIONE EL BOTON INICIO/PAUSA UNA VEZ Y LA LAVADORA COMENZARA A FUNCIONAR
(START/HOLD)
Al presionar este botón usted iniciará o hará una pausa en los programas de lavado.
Mientras la lavadora esté funcionando, el tiempo restante (para terminar el proceso) se podrá ver en
la pantalla LED.
Cuando el programa termine, abra la puerta de la lavadora y saque sus prendas.
NOTA:
La puerta no abrirá sino hasta después de 3 minutos de haber terminado el proceso o haber apagado
la lavadora (presionando el botón de encendido – POWER)
Cuando el programa haya terminado, abra la puerta y retire las prendas.
NOTA:
? Las prendas que destiñen fácilmente, se deben lavar por separado, así evitará que manchen
otras prendas.
? Si usted desea cambiar un programa seleccionado, haga lo siguiente
? Presione el botón INICIO/PAUSA
? Presione los botones correspondientes al nuevo programa
? Presione el botón INICIO/PAUSA
? Cuando los ciclos CENTRIFUGADO o ENJUAGUE+CENTRIFUGADO estén activos, no use
detergente.
? Si usted desea drenar agua durante el ciclo de lavado, haga lo siguiente:
? Presione el botón INICIO/PAUSA, luego seleccione el ciclo CENTRIFUGADO
Presione el botón INICIO/PAUSA para reiniciar el lavado
PROGRAMANDO EL INICIO RETARDADO (DELAY START)
Elija esta opción cuando tenga que salir o tenga otra cosa que hacer.
? Presione el botón de ENCENDIDO
? Cargue la lavadora automática con las prendas y seleccione el programa de lavado
apropiado
? Presione este botón repetidamente para aplazar el inicio del proceso (de 1 a 24 horas, en
incrementos de 1 hora).
? Presione el botón INICIO/PAUSA para iniciar este programa (el conteo regresivo aparecerá
en la pantalla LED)
CONSEJOS DE LAVADO
Separe sus prendas de acuerdo a las siguientes características:
? Tipo de tela: Algodón, tela mixta, sintética, seda , lana o rayón
? Tipo de Cuidado requerido durante el lavado
? Color: Separe las prendas blancas de las de color. Lave las prendas nuevas de color por
separado
? Tamaño: Lavar prendas de distinto tamaño mejora los resultados del lavado
? Sensibilidad: Lave prendas delicadas por separado, use el programa de lavado DELICADO
para prendas de “pura lana nueva”, seda y cortinas.
Revise las etiquetas de las prendas que va a lavar o remítase a la cartilla de cuidado según
27
el tipo de tela en este manual.
VACIE LOS BOLSILLOS
Monedas, alfileres de seguridad u otros artículos metálicos pueden dañar telas como el lino, el
cilindro de la lavadora y el tanque de agua.
CUIDADO CON LOS SUJETADORES
Asegure las cremalleras, botones y ganchos de las prendas. Las correas no deben estar sueltas y los
lazos deben estar atados.
PRELAVANDO PRENDAS DE ALGODÓN
Normalmente los programas de lavado ALGODÓN y PLANCHADO PERMANTENTE no son
necesarios. Su nueva lavadora automática combinada con los detergentes modernos le dará unos
resultados de lavado perfectos, de la misma manera le ahorrarán de energía, tiempo, agua y
detergente.
Sin embargo, si su prenda de algodón está particularmente sucia, use el ciclo de prelavado con un
detergente en base a proteínas.
DETERMINE LA CAPACIDAD DE CARGA
No sobrecargue la lavadora automática, si lo hace, esta no lavará apropiadamente.
CONSEJOS SOBRE EL DETERGENTE A USAR
El detergente que use debe ser apropiado para el tipo de tela de las prendas a lavar (algodón,
planchado permanente, delicados y lana), el color, la temperatura de lavado, el grado y tipo de
manchas.
Siempre use un jabón de lavado de poca espuma, diseñado para lavadoras automáticas.
Siga las recomendaciones del fabricante de detergente respecto al peso de la carga, el grado de
suciedad, y la dureza del agua en su zona. Si no sabe este dato, diríjale esa pregunta a su autoridad
pertinente.
NOTA: Mantenga el detergente y otros aditivos de limpieza en un lugar seco y fuera del alcance de
los niños.
CARTILLA DE CUIDADO SEGÚN EL TIPO DE TELA (vea pag.15)
Material resistente
Puede ser planchado (100 C máx.)
Tela delicada
No planchar
La prenda se debe lavar a 95 C
Lavar en seco con cualquier solvente
La prenda se debe lavar a 60 C
Lavar en seco con percloruro, combustible
para encendedor, alcohol puro o R113
La prenda se debe lavar a 40 C
Lavar en seco con combustible de avión,
alcohol puro o R113
La prenda se debe lavar a 30 C
No lavar en seco
La prenda se puede lavar a mano
Secar sobre superficie plana
Blanqueador solo con agua fría
Se puede colgar
No usar blanqueador
Colgar en un perchero
Puede ser planchado (200 C máx.)
Secar a temperatura regular
Puede ser planchado (150 C máx.)
Secar a temperatura reducida
No usar secadora de ropa
CUIDADO Y MANTENIMIENTO (vea pg.16)
? Limpie regularmente la superficie exterior de su lavadora automática con un paño suave.
28
?
Limpie regularmente el cilindro interior de la lavadora, especialmente después de haber
usado almidón o blanqueador.
?
Limpie el filtro que se encuentra dentro de la válvula de suministro de agua o la manguera de
abastecimiento, de esta manera prevendrá obstrucciones.
1.
2.
3.
4.
Desconecte el enchufe
Retire la manguera de abastecimiento y limpie el filtro con un cepillo
Limpie el cajón dispensador del detergente.
Remueva el cajón dispensador de su casillero, límpielo profundamente y enjuaguelo.
Séquelo e introdúzcalo en nuevamente en su sitio.
?
Limpie el filtro de la bomba.
?
Limpie el filtro 2 o 3 veces al año.
1. Quite el cobertor del filtro que se haya en la parte delantera de la lavadora automática.
Asegúrese que no queda agua en el cilindro de la lavadora y que el enchufe está
desconectado.
2. Ponga un recipiente o un paño debajo del cobertor del filtro para prevenir que el agua se
derrame en el suelo.
3. Quite el filtro girándolo media vuelta (en sentido antihorario) y halándolo.
4. Limpie el filtro y póngalo nuevamente en su lugar.
5. Coloque nuevamente el cobertor del filtro en su sitio.
DURANTE LAS VACACIONES
1. Cierre la llave del agua, desconecte la manguera de abastecimiento de agua y deje que el
agua drene de la misma.
2. Haga funcionar la lavadora por un minuto en el ciclo centrifugado.
3. Desconecte el cordón eléctrico.
29
PROBLEMAS CON SU LAVADORA PORTATIL?
Usted puede resolver fácilmente algunos problemas de su lavadora, de esta manera se ahorrará el
costo de una posible reparación. Intente resolver los problemas de su aparato con las siguientes
sugerencias antes de llamar a un técnico.
PROBLEMA
La lavadora no funciona.
CAUSA POSIBLE
No está enchufada .
Hubo un corto circuito o un fusible voló.
El botón de encendido está apagado.
La tapa no está cerrada.
Asegúrese que la llave de agua esté abierta.
No hay agua o el nivel de
agua es muy bajo.
La llave de agua no está abierta.
La manguera de abastecimiento está congelada.
La manguera de abastecimiento está doblada.
El filtro de la manguera está obstruído.
El nivel de agua sube y
baja continuamente.
La lavadora no desagua.
La manguera de drenaje no está ubicada a la altura
correcta (entre 2 y 3 pies).
La manguera está doblada.
El filtro de la manguera está obstruído.
Queda detergente en el cajón La lavadora está funcionando sin la suficiente presión de
después que terminó el lavado. agua.
La lavadora vibra o hace mucho Verifique que la lavadora esté nivelada.
ruido.
Los pernos de transporte no se quitaron.
La lavadora está tocando otro objeto.
La carga de prendas no está balanceada.
30
SERVICIO PARA SU LAVADORA
Estamos orgullosos de la organización de nuestro servicio al cliente y de los técnicos profesionales
que proveen servicio a su lavadora automática Avanti. Cuando compra un producto Avanti, usted
puede estar seguro que si alguna vez necesita información o asistencia, el equipo de servicio al
cliente de Avanti Products estará ahí para ayudarlo. Llámenos de manera gratuita.
SERVICIO AL CLIENTE DE AVANTI PRODUCTS
Información de producto
800-323-5029
Cualquier sea su pregunta sobre nuestros productos, la
ayuda está disponible.
Pedido de piezas
800-220-5570
Usted puede ordenar piezas y accesorios que serán
enviados directamente a su casa con cargo a un cheque
personal, Giro Postal, Ordenes de dinero, Mastercard o Visa.
Servicio de reparación a
domicilio
Un centro de servicio autorizado de Avanti Products
le proveerá de un servicio de reparación experimentado,
este será programado a la hora que le sea más
conveniente. Nuestro equipo de servicio está totalmente
entrenado y conocen su lavadora por dentro y fuera.
31
PRINTED IN CHINA
32