1
RFID Application Kit ATAK2270
....................................................................................................................
User Manual
4871E–RFID–04/08
Table of Contents
Section 1
Introduction................................................................................................................. 1-1
1.1
RFID Products Promoted by ATAK2270 Kit ...................................................................... 1-1
1.2
Included Hardware Components ....................................................................................... 1-1
1.3
Equipment Needed ............................................................................................................ 1-1
Section 2
Getting Started ........................................................................................................... 2-1
2.1
Hardware Settings and Connector Positions ..................................................................... 2-1
2.2
Software Installation........................................................................................................... 2-3
2.2.1
AVR Programming Guide .................................................................................... 2-3
Section 3
Description of the Application Board System ............................................................. 3-1
3.1
System Overview ............................................................................................................... 3-1
3.2
Power Supply..................................................................................................................... 3-1
3.3
Antenna Interface............................................................................................................... 3-1
3.3.1
Frequency Tuning Mode Selection ...................................................................... 3-2
3.3.2
RF Field Control................................................................................................... 3-2
3.3.3
Antenna Interface Parts List ................................................................................ 3-4
Section 4
Basic Transponder Functionality Getting Started....................................................... 4-1
4.1
System Installation............................................................................................................. 4-1
4.2
Checking Simple Transponder Function............................................................................ 4-1
Section 5
Host Software............................................................................................................. 5-1
5.1
Software Structure ............................................................................................................. 5-1
5.2
Start Window...................................................................................................................... 5-2
5.2.1
Setup ................................................................................................................... 5-2
5.2.2
Options ................................................................................................................ 5-2
5.2.3
Application ........................................................................................................... 5-3
5.2.4
Exit....................................................................................................................... 5-5
5.2.5
Info....................................................................................................................... 5-5
RFID Application Kit ATAK2270 User Manual
i
4871E–RFID–04/08
Table of Contents (Continued)
5.3
5.4
ii
4871E–RFID–04/08
Transponder Type Software Interface Description ............................................................ 5-6
5.3.1
TK5530/e5530 Read-only Transponder Menu .................................................... 5-6
5.3.2
TK5552/T5552 Read/Write Transponder............................................................. 5-7
5.3.3
TK5551 Read/Write Transponder........................................................................ 5-9
5.3.4
T5557/ATA5567 Multifunction Read/Write Transponder ................................... 5-11
5.3.5
ATA5570 Multifunction Read/Write Transponder with Sensor Input ................. 5-15
5.3.6
ATA5577 Enhanced Read/Write Transponder with AFE-Options ..................... 5-16
Operating Common Transponder Features ..................................................................... 5-23
5.4.1
Password PWD Mode........................................................................................ 5-23
5.4.2
Answer On Request AOR Mode........................................................................ 5-24
5.4.3
Readout Manufacturer (Traceability) Data......................................................... 5-25
RFID Application Kit ATAK2270 User Manual
Section 1
Introduction
1.1
RFID Products Promoted by ATAK2270 Kit
The RFID application kit (ordering code ATAK2270) promotes the key features of various RFID products
from Atmel®.
The following products are supported by the kit:
1.2
1.3
U2270B
Read/write base station IC
TK5530/e5530
Read-only transponder
TK5551
Standard read/write transponder
TK5552/T5552
Read/write transponder micromodule with 1-Kbit memory
T5557/ATA5567
Multifunctional read/write transponder
ATA5570
Multifunctional read/write transponder with sensor input
ATA5577
Enhanced read/write transponder
Included Hardware Components
Microcontroller board with piggybacked antenna board
Reader antenna coil 100 mm∅, L = 700 µH, Q = 36
Serial communication cable RS232
Jack connector cable for power supply
Power supply 120V to 240V
Installation software and documentation on CD-ROM
Atmel Standard Products CD-ROM
IC samples (3 pieces of each): U2270B-MFP; TK5530-HM232-PP; TK5551M-PP; TK5552A-PP;
T555711-TAS; T555715-PAE; ATA556711-TAS; ATA556715-PAE; ATA5570-TAS; ATA5577Mxxx-xx;
ISO Card ATA556715-PAE; Coin Tag ATA556715-PAE
Transponder SMD antenna coil SDTR 1103, 4.77 mH, Q = 25 (Manufacturer: Predan)
Transponder test board ATAB5570 with sensor input
Equipment Needed
Host PC with Windows® 95 or higher
RFID Application Kit ATAK2270 User Manual
1-1
4871E–RFID–04/08
Section 2
Getting Started
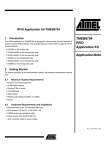
Build up the RFID reader application system according to the configuration shown on the cover and in
Figure 2-1:
1. Plug the antenna into the socket of the interface board.
2. Connect a serial RS232 cable between the RS232 connector and either COM1 or COM2 of the PC.
3. Connect the supply line from the 12V power source to the jack connector. Alternatively use the
mains SMPS.
2.1
Hardware Settings and Connector Positions
The main board with the AVR® ATmega8515L controls piggiybacked reader interface and maintains the
communication with the host. On delivery the AVR is fleshed with the current firmware and does not
need any special programming or settings. Check that jumper J3 on the antenna interface is in the
default position en.
Figure 2-1.
Application Board Unit
RFID Application Kit ATAK2270 User Manual
2-1
4871E–RFID–04/08
Getting Started
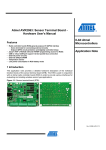
Figure 2-2.
Antenna Interface Board
Figure 2-3.
Application Board Top View
2-2
4871E–RFID–04/08
RFID Application Kit ATAK2270 User Manual
Getting Started
2.2
Software Installation
The ATAK2270 host installation software as well as the related datasheets and documentation are provided by the CD-ROM included in the kit. Furthermore, the up-to-date software and documentation are
available via the web.
Execute the setup.exe file found on the CD-ROM to launch the installation and generate the
ATAK2270.exe program file. If the default settings are accepted during installation, the program file will
be installed to path: X:\Programme\ATAK2270\ATAK2270.exe.
Note:
2.2.1
Administrator rights are required to install this software.
AVR Programming Guide
The AVR base board (Figure 2-3) is equipped with two programming interfaces, ISP and JTAG allowing
reprogramming or updating the firmware of AVR flash memory.
ISP is a downloading method. Only six I/O lines are needed. The provided header works with the
ATSTK500 as well as the AVR ISP In-System Programmer. Both of these are available from Atmel or
distributors for very low cost program development. To program the flash memory and the EEPROM,
first connect the programming tool to the MB using a six-pin ribbon connector. Make sure that proper orientation is maintained by aligning pin1. The files types accepted use Intel Hex format.
To program a hex file into the target AVR device, select “Program AVR” and then “Connect...” from the
“Tools” menu in AVR Studio. Once AVR Studio has been opened, connect to the STK500 or AVRISP by
selecting “STK500 or AVRISP” in the Platform List. Then select “Connect...”. The driver for the STK500
and AVRISP is then started, and the STK500 dialog should appear. Note that the system supports other
programming platforms as well, like the JTAGICE or the JTAGICE mkII.
Then select the AVR target device from the pull-down menu on the “Program” tab and locate the Intelhex file to download. Select the “program” button. Repeat for the EEPROM section.
The same steps apply when using the JTAGICE MKII.
The JTAG Platform allows more control during software development by allowing real-time debugging of
the source code. The JTAGICE MKII supports setting breakpoints and stepping through the code being
executed on the target micro. This is very useful for a more complex software project such as this one.
Fuse Settings:
Fuse bits must be set properly for the kit to function. The only fuse bits that should be set are listed
below.
JTAG Interface Enabled; (JTAGEN = 0)
Serial program downloading (SPI) enabled; (SPIEN = 0)
Boot Flash section size = 512 words Boot start address = $FE00; (BOOTSZ = 11)
Brown-out detection level at VCC = 2.7V; (BODLEVEL = 1)
Int. RC OSC. 8MHz; Start-up time; 6CK + 64 ms; (CKSEL = 0100 SUT = 10)
All others should be unchecked.
RFID Application Kit ATAK2270 User Manual
2-3
4871E–RFID–04/08
Section 3
Description of the Application Board System
3.1
System Overview
The ATAK2270 application board unit (Figure 2-3) consists of a ready-to-run standard microcontroller
main board equipped with the Atmel AVR® microcontroller ATmega8515L, combined with a piggybacked
antenna interface board containing the U2270B reader IC.
The following functionality is controlled by the AVR microcontroller:
Handling of the bi-directional data communication between the RS232 interface and the host PC
Execution of the read and write commands to be sent to the antenna interface
Decoding of the specific read data delivered by the antenna interface
The source program is written in C, and the compiled hex code is loaded in the 8-kByte Flash of the
microcontroller.
3.2
Power Supply
To operate the reader board, an external power supply in the range of DC 10V to 15V/200 mA has to be
connected to the jack, alternatively use the mains SMPS. A bridge rectifier placed at the connector input
is used for polarity independence.
3.3
Antenna Interface
The antenna interface (Figure 2-2) is supplied and controlled by the main board via header pin X2/1. The
current power supply voltage is indicated by LED1, Power. To adapt a specific antenna coil to the resonant frequency and the Q factor, the components CANT1/CANT2 and R14 (Figure 2-2) can be changed.
For the antenna included in the kit, the parameters are matched as follows:
Resonant frequency:
fres = 125 kHz ±1%, adjusted by CANT1/CANT2 with jumper 3 in
position dis
Whole antenna quality factor:
Q = 20, adjusted by R14
RFID Application Kit ATAK2270 User Manual
3-1
4871E–RFID–04/08
Description of the Application Board System
3.3.1
Frequency Tuning Mode Selection
The reader interface has a built-in frequency tuning feature. By the host software, the resonant frequency of the LC antenna circuit can be switched in four steps. Therefore the board is equipped with two
stages of high-voltage transistor switches to tune the resonator via switched capacitors.
Table 3-1. The Frequency Tuning Can Be Selected Using Jumper J3
Tuning Mode
Jumper J3 Position
Disabled
1-2
Enabled
2-3
In default setting Tuning Mode is activated, allowing the adjusting of antenna frequency by host menu.
The binary control of the two tuning stages enables the selection of one out of four frequency states.
According to the menu definition the frequency steps are designated as follows:
High Frequency
134.2 kHz (acc. ISO11784/85)
Semi High Frequency
130 kHz
Semi Low Frequency
125 kHz
Low Frequency
121 kHz
In disabled mode, the interface operates with the fixed frequency adjusted typically to 125 kHz.
The currently selected frequency stage is displayed on the application board by the red LEDs Tune 1
and Tune 2 (shown in Figure 2-2, see Table 5-1 for interpretation).
3.3.2
RF Field Control
The status of the RF field controlled by the microcontroller is indicated by the yellow LED RF on.
3-2
4871E–RFID–04/08
RFID Application Kit ATAK2270 User Manual
RFID Application Kit ATAK2270 User Manual
X2/9
X2/10
X1/11
X1/7
X1/3
X2/5
M2
DZ1
LD1
Power
R1
Green
M12
Data in
Data out
M11
C3
R2
IN
LD4
RFon
7808
U2
R7
C6
Yellow
10
C4
6
16
7
1
3
2
13
12
11
OUT
M4
VS
14
R15
LD2
TUNE1
CFE
HIPASS
DGND
GND
OE
OUTPUT
STANDBY
VBATT
VEXT
DVS
MS
5
Red
R17
R16
COIL1
COIL2
INPUT
RF
15
R9
9
8
4
BF820
T1
R18
R11
R10
BAS21
D3
D2
BAS21
CANT2
LD3
TUNE2
BAS21
D6
R19
Red
R21
R20
C9
BF820
T2
R22
1 2 3
J3
R14
CANT1
BAS21
D5
R13
R12
D4
BAS21
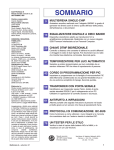
Components for tuning application
BAV21
CTUNE1
C8
C7
M15
D1
1
Antenna
BAS21
D7
2
X3
CTUNE2
L1
M14
L2
M13
Components
for feedback
application
Figure 3-1.
X1/6
X2/1
M1
VCC
R3
C5
R8
Description of the Application Board System
Circuit Diagram of the Antenna Interface
3-3
4871E–RFID–04/08
Description of the Application Board System
3.3.3
3.3.3.1
3.3.3.2
3.3.3.3
Antenna Interface Parts List
U1
U2
U2270 B
LM7808
SO16
TO220
D1
D2
D3
D4
D5
D6
D7
DZ1
BAS21
BAS21
BAS21
BAS21
BAS21
BAS21
BAS21
BZX84C
SOT23
SOT23
SOT23
SOT23
SOT23
SOT23
SOT23
SOT23
LD1
LD2
LD3
LD4
TLMC3100 (green)
TLMT3100 (red)
TLMT3100 (red)
TLMA3100 (yellow)
PLCC2
PLCC2
PLCC2
PLCC2
BF820
BF820
SOT23
SOT23
3.6 kΩ
360Ω
10 kΩ
1 kΩ
68 kΩ
43 kΩ
1 kΩ
390 kΩ
75 kΩ
100 kΩ
24Ω
1 kΩ
3.6 kΩ
1.5 kΩ
100Ω
1 kΩ
3.6 kΩ
1.5 kΩ
100Ω
0805
0805
0805
0805
0805
0805
0805
0805
0805
0805
0805
0805
0805
0805
0805
0805
0805
0805
0805
Diodes
LEDs
Transistors
T1
T2
3.3.3.4
5.6V
Resistors
R1
R2
R3
R7
R8
R9
R10
R11
R12
R13
R14
R15
R16
R17
R18
R19
R20
R21
R22
3-4
4871E–RFID–04/08
RFID Application Kit ATAK2270 User Manual
Description of the Application Board System
3.3.3.5
Capacitors
CANT1
CANT2
CTUNE1
CTUNE2
C3
C4
C5
C6
C7
C8
C9
3.3.3.6
1.8 nF II 120 to 180 pF/100V
330 (270) pF/100V
150 pF/100V
330 pF/100V
10 µF/16V
22 µF/16V
22 µF/16V
220 nF
6.8 nF/100V
2.2 nF/100V
4.7 nF
COG
COG
COG
COG
radial
0805
0805
radial
radial
radial
0805
0805
0805
0805
Miscellaneous
SUB-D 9-pole socket
3-pole connector for coil
Gold-pin block for jumper (1 × 3-pole)
2 gold-pin block 1 × 18-pole (used for pin connector to the main board)
The antenna coil included in the kit measures the following parameters related to 125 kHz:
Inductance
Coil diameter
Winding number
Wire diameter
L = 700 µH
d = 100 mm
n = 60
dw = 0.25 mm
RFID Application Kit ATAK2270 User Manual
3-5
4871E–RFID–04/08
Section 4
Basic Transponder Functionality Getting Started
4.1
System Installation
1. Install the host software according to the instructions in Section 2.2.
2. Connect the application board unit with the host PC using the RS232 serial cable included in the kit.
3. Connect a 12V (AC or DC) power supply to the board using the jack connector cable. The power-on
status is indicated by green LEDs labelled Power located, one each, on the interface and main
board.
4. Start the host software on the host PC. If the program was installed to the default location, it is
located at: X:\Programme\ATAK2270\ATAK2270.exe.
5. After the start window has appeared, select the COM port and the transponder version to be used.
4.2
Checking Simple Transponder Function
1. Select the transponder type to be used.
2. Place transponder close to the base-station antenna.
3. Enter the transponder’s configuration details such as bit rate, coding, ID-code length, and signature.
(For non-specialized applications, use the default settings).
4. Click on Configure Transponder (this function programs selected settings into configuration block
5. Choose the Write tab to program the indicated data blocks of the transponder
6. Select Program Transponder.
7. To read out the transponder, click on the Read button in the Read tab to show the transponder code.
RFID Application Kit ATAK2270 User Manual
4-1
4871E–RFID–04/08
Section 5
Host Software
Figure 5-1.
5.1
Start Window of the ATAK2270 Host Software
Software Structure
The software included supports the following Atmel transponder types:
TK5530/e5530 read-only
TK5551 read/write
TK5552/T5552 read/write (1 kBit)
T5557/ATA5567 multifunctional read/write
ATA5570 multifunctional read/write with sensor input
ATA5577 Advanced multifunctional read/write
All transponder types and their particular features and functions can be controlled by the same host software. The features specific to the different transponder types are set individually using the appropriate
configuration window for that transponder.
Note:
This software does not evaluate all settings offered by the various transponder types. If an unsupported feature is selected in the software, a message will be displayed.
RFID Application Kit ATAK2270 User Manual
5-1
4871E–RFID–04/08
Host Software
5.2
Start Window
The host software menu bar has five menus: Setup, Option, Application, Exit, and Info.
5.2.1
Setup
Select the appropriate transponder in the Setup -> Transponder menu (Figure 5-2). The user interface
displayed depends on the transponder chosen.
Figure 5-2.
Transponder Menu
In the submenu COM-Port, select the RS232 serial port used to communicate with the RFID application
kit (COM-Port). (To check that communication is established between the PC and the application board,
press F12 on the PC keyboard. If the correct COM port is selected, all the LEDs will light up; if the LEDs
do not light, change the COM port.)
Figure 5-3.
5.2.2
COM-Port Menu
Options
The submenu Tuning offers two different tuning modes: manual tuning (High to Low Frequency) or Autotuning (Figure 5-4). To enable the autotuning feature, set jumper J3 on the antenna interface to en (see
Table 3-1).
In manual tuning mode, the user can choose from four frequency stages – Low, Semi Low, Semi High,
and High – typically between 121 kHz to 134.2 kHz. In autotuning mode, the software scans through the
four frequency steps until a transponder is read out; if no response is received, a failure message is displayed. The currently selected frequency stage is indicated on the application board, binary encoded by
the Tune1 and Tune2 LEDs (for interpretation, see Table 5-1).
5-2
4871E–RFID–04/08
RFID Application Kit ATAK2270 User Manual
Host Software
Figure 5-4.
Tuning Menu
Table 5-1. Tuning Stage LED Indication
Tune2
Tune1
Frequency
0
0
High
0
1
Semi High
1
0
Semi Low (default)
1
1
Low
Select the submenu RF-Field to switch the antenna’s RF field ON or OFF. The current status is indicated
by the yellow LED, RF On, on the interface board. ON is the default value.
Clicking Demoboard Reset resets the application board and returns all changes in the option menu to
the default values. The reset can also be triggered by pressing F12.
Figure 5-5.
5.2.3
RF-Field Menu
Application
Figure 5-6.
Application Menu
RFID Application Kit ATAK2270 User Manual
5-3
4871E–RFID–04/08
Host Software
5.2.3.1
Write Bit String
The input text box in theWrite Bit String window can be used to enter programming data, which can be
sent to any block. The bit string entered can be freely composed; therefore, it is important to consider the
bit sequence, specified above the text box. For the supported transponder types, typical default configurations can be displayed in the text box by clicking a corresponding Load standand block... buttons.
Clicking the Write button, sends the bit string to the transponder using the write times specified in the
Writing Timing area.
Figure 5-7.
5-4
4871E–RFID–04/08
Write Bitstring Window
RFID Application Kit ATAK2270 User Manual
Host Software
5.2.3.2
Timing Test
If specific antennas have to be matched to a transponder IC, the Timing Test feature can be used to
determine the appropriate write timing needed for OOK data downlink. The write time ranges for logical
one, logical zero, and gap can be defined. When the Start Test button is clicked, data is written to the tag
starting with the minimal time values. Following this, the programmed data content will be read back and
verified, and the results displayed in the window.
The write-read-compare procedure continues through all the time ranges with the specified time step
width. The current time settings of the write execution with related results are displayed in a table. When
the timing test is finished, the resulting table can be printed or saved to the directory where the program
was started.
The test is restricted to a defined transponder configuration as follows:
Bitrate
Rf/32
Coding
Manchester
Code Length
Block 1 to 2
Signature
Header
Figure 5-8.
5.2.4
Timing Test window
Exit
To exit the program, click Exit.
5.2.5
Info
To see information about the software version and release date, Clicking About in the Info menu.
RFID Application Kit ATAK2270 User Manual
5-5
4871E–RFID–04/08
Host Software
5.3
Transponder Type Software Interface Description
5.3.1
TK5530/e5530 Read-only Transponder Menu
Figure 5-9.
TK5530 Read Tab
Selecting Transponder >TK5530/e5530 from the Setup menu, opens the the TK5530 user interface. A
Read tab is displayed. The read tab is divided into two areas – Configuration Setup and Read Timings.
The following parameters can be configured in the Configuration Setup area:
Bitrate:
Rf/32, Rf/40 or Rf/64
Coding:
Manchester or Bi-phase
ID-Code Length:
32, 64, 96 or 128 bit
Signature:
Header
Note:
For further details, refer to the e5530 datasheet.
The timing parameters for decoding can be set in the Read Timing area. Under normal operating conditions, the default values can be used.
To read the transponder, click the Read button. A message box is displayed showing either the decoded
transponder code (in hex) or an error report. Decoding is caried by transferring the Configuration Setup
and Read Timing settings to the microncontroller on the RFID application kit. The incoming data stream
is decoded to binary values using real-time analysis and sent to the PC.
The Default button restored the default settings. The Cancel button is used to exit the application.
5-6
4871E–RFID–04/08
RFID Application Kit ATAK2270 User Manual
Host Software
5.3.2
TK5552/T5552 Read/Write Transponder
Figure 5-10. TK5552 Read Tab
Selecting Transponder >TK5552/T5552 from the Setup menu, opens the the TK5552 user interface.
Two tabs are available – Read and Write. The Read tab is divided into two areas – Configuration Setup
and Read Timings. The following parameters can be configured in the Configuration Setup area:
Bitrate:
Rf/16 and Rf/32
Coding:
Manchester and PSK
ID-Code Length:
Block0, Block1, Block1 to 2, Block 1 to 3, ..., Block 1 to 31
Signature:
Header
Lock Block 0:
Selecting this check box locks the configuration block of the transponder.
This means that the bit rate, coding, etc., are locked and cannot be changed.
Use this feature with care.
Start up delay:
Select the No radio button for no delay (only POR) or select 8.192 radio
button for POR and an additional 8192 clocks of the RF field.
Modulation defeat:
When Mod. off is selected, no data will be transmitted. It appears as if no
transponder is in the RF field.
Note:
The base station IC U2270B does not support the reading of all bit rates and codings offered by the transponder type. If a non-supported mode is configured, a warning message will be displayed on the screen.
To change the configuration setup, click the Configure Transponder button to program the configuration block of the transponder. (The transponder should be placed close to the application board antenna)
The timing parameters for decoding can be set in the Read Timing area. For standard read mode, the
default values can be used.
RFID Application Kit ATAK2270 User Manual
5-7
4871E–RFID–04/08
Host Software
To read the transponder, click the Read button. If a Header Signature is used, ensure that the related
Header has already been programmed into the transponder from the Write tab. Decoding is caried by
transferring the Configuration Setup and Read Timing settings to the microncontroller on the RFID application kit via RS232 interface. The incoming data stream is decoded to binary values sent to the PC.
The Default button restored the default settings. The Reset Transponder button sends the reset command to the transponder. (There is no change in the configuration or data blocks of the transponder.)
The Cancel button is used to exit the application. The Direct Access... button enables block-wise reading of the transponder. Ensure that the correct header for the chosen block is typed into the Header text
field.
Figure 5-11. TK5552 Write Tab
The Write tab has two sections: Write Setup and Write Timing. The buttons Block 1 to 7, Block 8 to 15,
Block 16 to 23, and Block 24 to 31 show all 31 data blocks in groups of 7 blocks. The first byte in Block 1,
the header byte, can be edited in the header text field on the Read tab.
Clicking Write Timing allows the timing parameters for writing to be set. Under normal operating conditions, the default values can be used.
The transponder can be programmed using the Program Transponder button. The data for each block is
entered in hexadecimal (characters 0 to 9 and A to F). Choose the blocks to be programmed by selecting
the check box in the Write column. To protect the data from being overwritten, the Lock feature can be
used. Once set, the information cannot be overwritten. Use this feature with care. Click the Default button to restore the default setting. The Reset Transponder button sends the reset command to the
transponder. (There is no change in the configuration or data blocks of the transponder.) To exit the
TK5552 user interface, click on the Cancel button.
5-8
4871E–RFID–04/08
RFID Application Kit ATAK2270 User Manual
Host Software
5.3.3
TK5551 Read/Write Transponder
Figure 5-12. TK5551 Read Tab
Selecting Transponder >TK5551 from the Setup menu, opens the the TK5530 user interface. Two tabs
are available – Read and Write. The Read tab is divided into two areas – Configuration Setup and Read
Timings. The following parameters can be configured in the Configuration Setup area:
Bitrate:
Rf/8, Rf/16, Rf/32, Rf/40, Rf/50, Rf/64, Rf/100 and Rf/128
Coding:
Manchester, Biphase, direct, PSK..., FSK,...
ID-Code Length:
Block0, Block1, Block 1 to 2, Block 1 to 3, ..., Block 1 to 7
Signature:
Header, Sequence Terminator, Block Terminator, and Block and Sequence
Terminator
Password:
Selecting this check box activates password mode
(see Section 5.4.1 ”Password PWD Mode” )
Lock Block 0:
Selecting this check box locks the configuration block of the transponder.
This means that the bit rate, coding, etc., are locked and cannot be changed.
Use this feature with care.
Stop-Mode enable:
Obey stop command
Answer On Request:
Activates anticollision mode (selecting this shows an additional button for AOR
wake-up, see Section 5.4.2 ”Answer On Request AOR Mode” ).
Note:
The base station IC U2270B does not support the reading of all bit rates and codings offered by the transponder type. If a non-supported mode is configured, a warning message will be displayed on the screen.
RFID Application Kit ATAK2270 User Manual
5-9
4871E–RFID–04/08
Host Software
To change the configuration setup, click the Configure Transponder button to program the configuration
block of the transponder. (The transponder should be placed close to the application board antenna)
The timing parameters for decoding can be set in the Read Timing area. For standard read mode, the
default values can be used.
To read the transponder, click the Read button. Decoding is carried by transferring the Configuration
Setup and Read Timing settings to the microncontroller on the RFID application kit via RS232 interface.
Using real-time analysis, the incoming data stream is decoded to binary values sent to the PC.
The Default button restored the default settings. The Stop Transponder-Modulation button is used tp
send a stop command to the transponder. (This halts modulation until POR or AOR wake-up command.)
The Cancel button is used to exit the application. The Direct Access... button enables block-wise reading of the transponder. Ensure that the correct header for the chosen block is typed into the Header text
field.If Sequence Terminator is selected, only Block 0 and the Maxblock are readable (for example, if
Block 1 to 5 is configured, then Block 5 is also readable using Direct Access).
Figure 5-13. TK5551 Write User Tab
The Write tab has two sections. Write Setup and Write Timing. The first byte in Block 1, the header byte,
is adjusted in the header text field of the Read tab. The Password check box is the same as the one in
the Configuration Setup; when selected, Block 7 changes to password.
The timing parameters for writing can be set in the Write Timing section. Under normal operating conditions, the default values can be used. The programming of the transponder is performed by clicking the
button Program Transponder. The data for each block is entered in hex. Choose the blocks to be programmed by selecting the check box in the Write column. To protect the data from being overwritten,
select the Lock check box. Once the lock bit is set, the information cannot be overwritten. Use this feature with care. Click the Default button to restore the default settings. To exit the TK5551 user interface,
click the Cancel button.
5-10
4871E–RFID–04/08
RFID Application Kit ATAK2270 User Manual
Host Software
5.3.4
T5557/ATA5567 Multifunction Read/Write Transponder
The ATA5567 offers an improvement over T5557’s slow power-on behavior. Apart from this difference,
both transponders are functionally identical and thus can be managed by same user interface. Both transponders are backward compatible to the older T5551/TK5551 version. Therefore, they can be operated
in the Compatible or Basic Mode.
Figure 5-14. T5557/ATA5567 Mode Selection
5.3.4.1
T5557/ATA5567 Compatible Mode
For Compatible Mode refer to Section 5.3.3 ”TK5551 Read/Write Transponder” .
5.3.4.2
T5557/ATA5567 Extended Mode
In contrast to Compatible Mode, Extended Mode is enhanced by additional features, which can be
enabled. These include:
SST Sequence Start Marker
Inverse Data Mode
OTP General Data Protection
Enlarged Data Rates
Fast Write Mode
Traceability Manufacturer Data
The operation in Password PWD, Answer AOR, or Direct Access Mode can be handled as described in
Section 5.4 ”Operating Common Transponder Features” .
RFID Application Kit ATAK2270 User Manual
5-11
4871E–RFID–04/08
Host Software
Figure 5-15. Extended Mode Main Read Tab
Selecting Extended Mode displays the Read tab (Figure 5-15). The Read tab is divided into two areas –
Configuration Setup and Read Timings.
5.3.4.3
Configuration Setup
5-12
4871E–RFID–04/08
Bitrate: Rf / (n + 2) for n = 0 to 126 (default setting Rf/32)
Coding: Manchester, Biphase 1('50), Biphase 2 ('57), Direct, PSK..., FSK,...
(refer to the T5557 datasheet), (default = Manchester)
ID-Code Length: Block0, Block1, Block 1 to 2, Block 1 to 3, ..., Block 1 to 7 (default = Block 1 to 7)
Signature: 8-bit Header, Sequence Start Terminator (default = Header 6Eh)
Use 12-bit Header: RFID application complying to the ISO/IEC 11784/85 standard. For example, for
animal IDs, the 11-bit binary header 0000 0000 001(0) is used. For this reason, a three-nibble header
window is specified (default = 002h)
Password: Activates password mode used for protection against overwriting and Answer On Request
(AOR) Function (default = not activated)
Lock Block 0: Setting this bit locks the Configuration Block 0 of the transponder. Once the lock bit is
set, the bit rate, coding etc., are locked and cannot be changed. Use this feature with care.
Inverse Data: Data uplink is performed inversely when activated (default = not activated)
Answer On Request (AOR): Activates anticollision mode. (When this check box is selected, an
additional button appears for AOR wake-up.) (Not activated is the default.)
RFID Application Kit ATAK2270 User Manual
Host Software
POR-Delay: In the default setting, the modulation starts after 192 clock cycles (1.5 ms at 125 kHz) are
recognized. When actively selecting POR-Delay, the modulation delay measures 8382 clock cycles
(67 ms at 125 kHz)
Fast Write: When Fast Write is selected, the write times in the Write menu are reduced by half
OTP: If OTP is set, all memory blocks are write-protected
These configuration parameters are sent to the transponder when the Configure Transponder button is
clicked. The transponder should be placed close to the reader antenna when this is at that time.
Note:
5.3.4.4
The base station IC U2270B does not support the reading of all bit rates and codings offered by the transponder type. If a non-supported mode is configured, a warning message will be displayed on the screen.
Data Read
When a read command is executed by clicking the Read button, the current Read Timing parameters,
among others, are sent to the microcontroller baseboard via the RS232 interface. The data stream coming in from the antenna interface is analyzed in real time as specified by the timing definition. Afterwards,
the microcontroller transfers the decoded binary values to the host. Default timing settings are suitable
for the transponder samples contained in the kit. If a Header Signature is used, ensure that the related
Header has already been programmed into the transponder using the Write menu.
Note:
When reading a transponder, the specific programmed configuration has to be matched with settings on the
host menu, such as Bitrate, Coding, ID-Code Length, and Signature. If the configuration of the transponder
is unknown, a reconfiguration is needed.
Click the Default button to resets the default settings.
Click the Reset Command button to send the OP code 00 to the transponder. This initializes the Read
Mode operation.
5.3.4.4.1 Block Read Mode (Direct Access)
Figure 5-16. Direct Access Dialog Box
Click the Direct Access button to read data blockwise from page 0. Select the required block number
from the drop-down list. To read data without using the block header, it is useful to configure the transponder to match the Sequence Start Terminator signature in advance.
RFID Application Kit ATAK2270 User Manual
5-13
4871E–RFID–04/08
Host Software
5.3.4.4.2 Traceability Data
The Traceability Data button allows direct access to page 1, which contains the 64-bit traceability data as
defined by ISO/IEC 15963-1. Refer to section Section 5.4.3 ”Readout Manufacturer (Traceability) Data”
for further details.
Exit
Use the Cancel button to terminate T5557 operation.
5.3.4.5
Data Write
Figure 5-17. T5557 Write Tab
The Write tab has two sections; Write Setup and Write Timing . The first byte in Block 1, the header byte,
is adjusted in the Header text field on the Read tab. The Password check box is the same as in the Configuration Setup. If the check box is selected, Block 7 changes to password.
In Write Timing, on the right side, the timing parameters for writing can be set. Default values are suitable for antenna Q factors in the range of 5 to 20 and also for ATA5567 transponder samples provided
with the kit.
The transponder can be programmed using the Program Transponder button. The data for each block is
entered in hex. Choose the blocks to be programmed by selecting the check box in the Write column. To
protect the data from being overwritten, the Lock feature can be used. Once set, the information cannot
be overwritten. Use this feature with care. Click the Default button to restore the default setting. To exit
the T5557 user interface, click the Cancel button.
5-14
4871E–RFID–04/08
RFID Application Kit ATAK2270 User Manual
Host Software
5.3.5
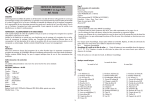
ATA5570 Multifunction Read/Write Transponder with Sensor Input
The ATA5570 is derived from the T5557; however, it is enhanced by an additional sensor input. Depending on the connected sensor resistance, the uplink data is sent either in direct or inverse mode.
Table 5-2. Data Mode Depending on Resistance
Resistance
Pin 4-5
Jumper J2
Sent Data
> 140 kΩ
Open
Direct
< 70 kΩ
Closed
Inverse
To promote the sensor functionality, a special application board is available, ATAB5570.
Figure 5-18. RFID Development Board ATAB5570
Even though the ATA5570 transponder has its own menu item (see Figure 5-19), the software routines
of the T5557 are used. Hence, to operate the ATA5570 refer to the instructions for the T5557/ATA5567,
see Section 5.3.4 ”T5557/ATA5567 Multifunction Read/Write Transponder” .
Figure 5-19. ATA5570 Mode Selection
Note:
To read out the traceability data, jumper J2 on the transponder board has to be replaced, and the Inverse
Data check box in the Configuration Setup menu must be selected. Do not execute the Transponder Configuration command.
RFID Application Kit ATAK2270 User Manual
5-15
4871E–RFID–04/08
Host Software
5.3.6
ATA5577 Enhanced Read/Write Transponder with AFE-Options
When the ATA5577 transponder is selected, it can be operated in either Basic Mode (compatible with
the T5557/ATA5567/TK5551) or in Extended Mode for enhanced functionality.
Figure 5-20. ATA5577 Mode Selection
5.3.6.1
Basic Extended Mode Selection
The ATA5577 user guide describes the software functionality using the Extended Mode. Functions that
are not supported by Basic Mode are indicated.
When Extended Mode is selected, the Transponder Setting tab opens. The Extended Mode has the following additional options when compared with the Basic Mode: Inverse Data, Fast Write, and OTP
protection check boxes as well as a larger choice of bit rates. These settings are not available with the
Basic Mode.
Figure 5-21. Transp. Settings Tab
5-16
4871E–RFID–04/08
RFID Application Kit ATAK2270 User Manual
Host Software
The structure of the ATA5577 user interface differs from the other transponder types.
In the Setup window, four tabs – Transp. Settings, Write, Read and ISO 11784 – and the Downlink section allow the configuration, reading, writing and programming and reading transponder according ISO
11784/85 standard.
5.3.6.2
Downlink Settings
The Downlink section, above the tabs, indicates the current downlink mode from the reader to the transponder. Downlink modes are selectable as follows:
Downlink Protocol
Fixed Bit Length, Long Leading Reference or Leading Zero Reference
(1-of-4 Coding is not supported by the software)
Fast Write Method
Not released for Basic Mode selection
Password Mode
see Section 5.4.1 ”Password PWD Mode”
Note, downlink write commands must be sent with the protocol mode that is currently used by the transponder, otherwise the transponder will not understand the command.
5.3.6.3
Transponder Setting tab
The Transp. Setting tab is divided into two sections. The first, the Configuration Setup on the left side, is
used to define bit set of block0. The second section AFE-Option Setup, on the right, is used to adjust the
behavior of Analog Front-End AFE via bit set of block3/page1. The resulting bit strings are displayed at
the bottom of each section in the Bitstring of Configuration Block text boxes.
Click the Default Configuration Set restores the default Configuration Setup settings. Click the Default
AFE-Option Set, restores the AFE options. The Reset Transponder button is used to isse a a reset command to transponder within the field.
5.3.6.3.1 Configuration Setup:
Selected parameters are sent to the transponder by clicking the Write Configuration Set button. Default
parameters are indicated in bold.
Bitrate:
– Basic Mode
Rf/8, Rf/16, Rf/32, Rf/40, Rf/50, Rf/64, Rf/100 and Rf/128
– Extended Mode
Rf / (2n + 2) for n = 0 to 63 (default Rf/32)
Coding:
Manchester, Biphase, direct, PSK..., FSK,...
ID-Code Length:
Block0, Block1, Block 1 to 2, Block 1 to 3, ..., Block 1 to 7
Password:
Activates password mode (default = not activated)
(see Section 5.4.1 ”Password PWD Mode” )
Lock Config. Block:
Locks the configuration block0 of the transponder (default = not
activated)
Once locked, the configuration can never be changed. Use this feature
with care
Answer On Request:
Activates anticollision mode (selecting this shows an additional button on
the read tab for AOR wake-up,
see Section 5.4.2 ”Answer On Request AOR Mode”
RFID Application Kit ATAK2270 User Manual
5-17
4871E–RFID–04/08
Host Software
Not released in Basic Mode:
Terminator:
– Basic Mode
Sequence Terminator
– Extended Mode
Sequence Start Marker Terminator
Initial. Delay:
Modulation switch on delay after POR (0 = 192 Tc; 1 = 8192 Tc)
Inverse Data:
Data uplink is performed inversely when activated (default = not activated)
Fast Downlink:
Reduces clock cycles for logical 1/0 detection (default = not activated)
OTP:
Allows a general data protection (default = not activated)
Note:
If the selected settings are not supported by the reader, a warning message is displayed before the configuration is executed.
5.3.6.3.2 AFE Option Setup:
In the Analog Front-End (AFE) Option section, the behavior of the transponder can be influenced in
terms of damping and modulating during downlink and uplink operation. Selected parameters are sent to
the transponder by clicking the Write AFE-Option Set Button. Default parameters that are needed for
Basic Mode are indicated in bold.
Clamp Voltage:
Clamp Low, Clamp Medium, Clamp High
Soft Modulation
No Soft Modulation, One Pulse Weak, One Pulse Strong, Two
Pulses, Smooth
Gap Detection Threshold
Low, Medium, High
Clock Detection Threshold
Low, Medium, High
Modulation Voltage
Modulation Low, Modulation Medium, Modulation High
Modulation Delay
No Delay, One Pulse Delay, Two Pulses Delay
Write Damping
WD and Low Attenuation, WD and High Attenuation, Low
Attenuation, High Attenuation, WD Only, OFF
Downlink Protocol
Fixed Bit Length, Long Leading Ref, Leading Zero Ref, 1of 4
Coding Ref
Lock Block 0:
Setting this bit locks the whole configuration block of the
transponder. Once locked, the configuration can never be
changed. Use this feature with care.
Note:
5-18
4871E–RFID–04/08
Changing the setup of Write Damping or Downlink Protocol has an impact on the write timing. For later
reconfiguration, if the write timing is not known, configuration will not be possible.
RFID Application Kit ATAK2270 User Manual
Host Software
5.3.6.4
Selecting Write tab
Figure 5-22. ATA5577 Write Tab
In the Extended Mode, the Fast Write check box in the Downlink section is released (This is the only difference to the Write tap in Basic Mode).
However the Fast Write feature makes less sense for programming via resonating antenna coupling, due
to the needed time duration determined by the gap time of the ON/OFF Keying (OOK). Nevertheless, the
feature is performed by the software.
It may be worth considering for production programming transponders in Fast Mode by direct coupling or
by antennas with low Q factors. If the Fast Write is selected the default values of the Write Timing will be
reduced accordingly.
In the Write tab, the block data 1-7 and write timing text boxes are automatically populated with their
default values. If the Write check boxes are not selected, the blocks will not be written. If the Lock check
boxes are selected, the block will be permanently locked.
The data for each block is entered in hex. The blocks to be programmed are chosen by selecting the
check box in the Write column. To protect the data from being overwritten, select the Lock check box.
Once the lock bit is set, the information cannot be overwritten. Use this feature with care. Click the
Default button to restore the default settings. To exit the menu, click the Cancel button.
The default write timing set should be suitable for typical antenna with Q factors in low to medium range.
For special transponders, three ranges of antenna Q factors are selectable. According to Q selection,
the required write timing parameters are transferred to the timing window.
RFID Application Kit ATAK2270 User Manual
5-19
4871E–RFID–04/08
Host Software
5.3.6.5
Selecting Read tab
Figure 5-23. ATA5577 Read Tab
The Read menu displays the content of the data blocks 1-7. To read data from an unknown transponder,
the configuration of the transponder must be first known and entered in the Bitrate, Coding, MaxBlock
and Synchronization fields.
The default Read Timing is derived from the Bitrate setting and normally suitable for most transponder
applications.
The synchronization of the transponder can be configured in the Synchronization area. (Terminator is
selected by default.) If Synchronization Bits is chosen, an 8 bit header can be entered. E6h is entered by
default in this field. An extended header can be configured by clicking the 12 Bit Header check box and
entering the longer header in either the Binary or Hex text field. For an ISO11784/85 transponder, the
default header 002h or 003h are needed.
Click the Read button to read the transponder block data as specified by the settings. The transponder
data is read only once. To read the transponder continually, select the Continuously Read check box. To
receive audible notification, select the Sound On check box. This indicates an incorrect or correct
reading.
To read a specific block from page 0 or page 1, click the Direct Access button. The Direct Access message box is displayed, see Figure 5-24. Select the Page radio button, (Page 0 or Page 1), then select the
required block from the drop-down list. If the block is password protected, select the Use Password
check box and enter the correct password (in Hex).
Note, before reading, the transponder needs to be configured with terminator synchronization.
5-20
4871E–RFID–04/08
RFID Application Kit ATAK2270 User Manual
Host Software
Figure 5-24. Direct ccess Dialog Box
In the Read tab, an AOR button is displayed if AOR has been configured in the Transp. Settings tab (see
Figure 5-21). The execution of the command initiates the Answer on Request procedure (Section 5.4.2
”Answer On Request AOR Mode” ).
Click the Reset Transponder button to initialize a reset. This initializes the standard Read Mode of the
transponder.
Transponder manufacturer data can be read by clicking the Traceability Data button (Section 5.4 ”Operating Common Transponder Features” ).
5.3.6.6
Selecting ISO 11784 Setup tab
Figure 5-25. ATA5577 ISO 11784 Setup Menu
RFID Application Kit ATAK2270 User Manual
5-21
4871E–RFID–04/08
Host Software
The ISO 11784 Setting tab allows the programming and reading of a transponder according to the ISO
standard 11784/85 used for animal ID or waste logistics. Opening the ISO 11784 Settings tab, the reader
automatically changes the field frequency from 125 kHz to 134.2 kHz as specified by standard. The ISO
11784 Settings tab has two sections: Program Transponder and Read Transponder.
Program Transponder
The protocol data to be stored by ATA5577 is 128 bits and needs a memory space of block 1-4.
Fixed configuration:
– Data Coding
DBP Biphase
– Code Length
128 Bit
– Data Rate
RF/32
– Header
11 bit (00000000001)
Code numbers and flags as specified by ISO11784 code structure can be entered explicitly into the
related windows.
Identification Code numbers to be enter:
– National ID
free decimal number [0 to 274 877 906 943], default 1
– Country Code
according to ISO 3166 default 999 for test purpose
– Data Block Flag
default not activated
– Trailer Data
free decimal number [0 to 16 383]
– Animal ID Flag
default activated
In addition to the Identification Code, the protocol is enlarged by a 16-bit CRC error detection code
and 24 bit space for data extension.
Click the Next Tag button to program the transponder in the field with the ISO settings above. With
each subsequent click of the Next Tag button, the ID number is incremented and the current transponder is programmed with the new data. The converted binary data set can be saved to a folder
by clicking Save Data button. The Save Data button remains active, afterwards saving all transponder data into the specified folder. Click again Save Data button to deactivate saving mode.
Read transponder
Click the Read Tag button to read the transponder. The read data stream of 128 bit length is
decoded and displayed in related parameter windows. In addition, the integrity of received data is
checked again by the 16 bit CRC error detection. The CRC error detection result is indicated by the
color of the CRC- Result ball; green indicating that the received data is correct and grey indicating
that the received data is incorrect.
5-22
4871E–RFID–04/08
RFID Application Kit ATAK2270 User Manual
Host Software
5.4
Operating Common Transponder Features
5.4.1
Password PWD Mode
The transponder can be protected from unauthorized overwriting of memory data using passwords. If the
transponder is configured in password mode, each block write command sent to the transponder has to
be expanded by the expected password as specifed by the content of block7. To avoid data transmission
of Block 7, the transponder is configured with MAXBLK = 6; thus transponder will respond without the
hidden password contained in block 7.
5.4.1.1
Initializing Password Mode
Note:
Commands in brackets relate to SW description for 5551, 5557, and 5567.
1. Place a transponder in close proximity to the reader antenna.
2. Select the Write tab and type an individual password (in hex) into the Block 7 text box.
3. Click the Program Transponder button.
4. Open the Transp. Settings (Read) tab and set the following:
– Data rate
RF/32
– Coding
Manchester
– ID Code Length
Block 1to7
– Signature
Terminator (select the Terminator check-box)
– Password (Select the Password check box)
5. Click Write Configuration Set. (Configure Transponder) button. Password mode is initialized on the
transponder.
6. Select the Password check box in the Downlink area. Enter the password for Block 7 used in step 2
above (not needed for 5551, 5557 and 5567).
From now on reconfiguration or reprogramming of block data is only possible if the password in the
Downlink window matches the transponder password programmed in block 7.
5.4.1.2
Disabling Password Mode
1. Deselect the Password check box in the Transp. Settings (Read) tab and click Write Configuration
Set. (Configure Transponder). Password mode is disabled.
2. Deactivate the Password check box in the Downlink area. (Not needed for 5551, 5557 and 5567)
RFID Application Kit ATAK2270 User Manual
5-23
4871E–RFID–04/08
Host Software
5.4.2
Answer On Request AOR Mode
The AOR feature is used to address an individual transponder, among others in a common field. For
AOR mode to function, transponders must be also be configured for password mode. Each transponder
has to be programmed with a unique password. If the reader sends an AOR wake-up sequence that
matches a password of one transponder present in the field, the transponder starts to transmit its ID
code continuously. The transponder remains active until a POR occurs or until a new command with a
different password is sent.
Note:
5.4.2.1
For the AOR test procedure, it is recommended to designate all transponders with an individual password
number.
Initializing AOR Mode
Note:
Commands in brackets relate to SW description for 5551, 5557 and 5567
1. Place a transponder in close proximity to the reader antenna.
2. Select the Write tab and type an individual password (in hex) into the Block 7 text box.
3. Click the Program Transponder button.
4. Open the Transp. Settings (Read) tab and set the following:
– Data rate
RF/32
– Coding
Manchester
– ID Code Length
Block 1to7
– Signature
Terminator (select the Terminator check-box)
– Password (Select the Password check box)
– AOR (Select the AOR Password)
5. Click Write Configuration Set. (Configure Transponder) button. AOR mode is initialized on the
transponder.
6. Repeat Step 1. to Step 5. to configuring each transponder for selective AOR operation.
5.4.2.2
Testing AOR Mode
1. Place all of the configured transponders in the RF field.
2. Open the Read tab
3. Select the Password check box in the Downlink window.
(Not needed for 5551, 5557 and 5567).
4. Enter the password of the transponder you want to read in the Password text box.
5. Click the AOR wake-up button.
6. Click the Read button to read out the transponder with the specified password.
7. To stop reading the transponder, click the Reset Transponder button.
No transponder can be read.
8. Repeat Step 2. to Step 7. to read the next transponder.
5-24
4871E–RFID–04/08
RFID Application Kit ATAK2270 User Manual
Host Software
5.4.3
Readout Manufacturer (Traceability) Data
The Traceability Data button allows direct access to block 1 an 2 of page 1 which contain the 64-bit
traceability data programmed and locked by Atmel during production. The data consist of both,
ISO/IEC15693 and ISO/IEC7816-6 compliant identifiers:
ACL
Allocation Class
MFC
Manufacturer Code
UID
Unique Identification Class
Furthermore, the trace data contain production specific information from manufacturer:
Lot ID
Lot ID Number
Wafer
Wafer Number
DOW
Die On Wafer Number
To read out the data, the Terminator synchronization has to be configured in advance, but the trace data
cannot be synchronized by a header.
Figure 5-26. Traceability Data Window
ACL
Allocation Class
MFC
Manufacturer Code
UID
Unique ID Customer
Lot ID
Lot ID Production Number
Wafer
Wafer Production Number
DOW
Die On Wafer Production Number
The Traceability Data window shows the data contents in two formats:
The text box Block 1 and Block 2 show the binary data stream stored by Block 1 and Block 2, 32 bits
each. The bit position of the various ISO identifiers is shown.
The text box ACL, MFC, UID, Lot ID, Wafer, and DOW show the trace information converted to hex
format for easier interpretation of the data.
RFID Application Kit ATAK2270 User Manual
5-25
4871E–RFID–04/08
Headquarters
International
Atmel Corporation
2325 Orchard Parkway
San Jose, CA 95131
USA
Tel: 1(408) 441-0311
Fax: 1(408) 487-2600
Atmel Asia
Room 1219
Chinachem Golden Plaza
77 Mody Road Tsimshatsui
East Kowloon
Hong Kong
Tel: (852) 2721-9778
Fax: (852) 2722-1369
Atmel Europe
Le Krebs
8, Rue Jean-Pierre Timbaud
BP 309
78054 Saint-Quentin-enYvelines Cedex
France
Tel: (33) 1-30-60-70-00
Fax: (33) 1-30-60-71-11
Atmel Japan
9F, Tonetsu Shinkawa Bldg.
1-24-8 Shinkawa
Chuo-ku, Tokyo 104-0033
Japan
Tel: (81) 3-3523-3551
Fax: (81) 3-3523-7581
Technical Support
[email protected]
Sales Contact
www.atmel.com/contacts
Product Contact
Web Site
www.atmel.com
Literature Requests
www.atmel.com/literature
Disclaimer: The information in this document is provided in connection with Atmel products. No license, express or implied, by estoppel or otherwise, to any
intellectual property right is granted by this document or in connection with the sale of Atmel products. EXCEPT AS SET FORTH IN ATMEL’S TERMS AND CONDITIONS OF SALE LOCATED ON ATMEL’S WEB SITE, ATMEL ASSUMES NO LIABILITY WHATSOEVER AND DISCLAIMS ANY EXPRESS, IMPLIED OR STATUTORY
WARRANTY RELATING TO ITS PRODUCTS INCLUDING, BUT NOT LIMITED TO, THE IMPLIED WARRANTY OF MERCHANTABILITY, FITNESS FOR A PARTICULAR
PURPOSE, OR NON-INFRINGEMENT. IN NO EVENT SHALL ATMEL BE LIABLE FOR ANY DIRECT, INDIRECT, CONSEQUENTIAL, PUNITIVE, SPECIAL OR INCIDENTAL DAMAGES (INCLUDING, WITHOUT LIMITATION, DAMAGES FOR LOSS OF PROFITS, BUSINESS INTERRUPTION, OR LOSS OF INFORMATION) ARISING OUT OF
THE USE OR INABILITY TO USE THIS DOCUMENT, EVEN IF ATMEL HAS BEEN ADVISED OF THE POSSIBILITY OF SUCH DAMAGES. Atmel makes no
representations or warranties with respect to the accuracy or completeness of the contents of this document and reserves the right to make changes to specifications
and product descriptions at any time without notice. Atmel does not make any commitment to update the information contained herein. Unless specifically provided
otherwise, Atmel products are not suitable for, and shall not be used in, automotive applications. Atmel’s products are not intended, authorized, or warranted for use
as components in applications intended to support or sustain life.
© 2008 Atmel Corporation. All rights reserved. Atmel®, logo and combinations thereof, AVR ®, and others, are registered trademarks or trademarks of Atmel Corporation or its subsidiaries. Windows ® and others are registered trademarks or trademarks of Microsoft Corporation in the US
and/or other countries. Other terms and product names may be trademarks of others.
4871E–RFID–04/08
/xM