1
Apple Remote Desktop
Administrator’s Guide
Version 3
K Apple Computer, Inc.
© 2006 Apple Computer, Inc. All rights reserved.
The owner or authorized user of a valid copy of Apple
Remote Desktop software may reproduce this
publication for the purpose of learning to use such
software. No part of this publication may be reproduced
or transmitted for commercial purposes, such as selling
copies of this publication or for providing paid for
support services.
The Apple logo is a trademark of Apple Computer, Inc.,
registered in the U.S. and other countries. Use of the
“keyboard” Apple logo (Option-Shift-K) for commercial
purposes without the prior written consent of Apple
may constitute trademark infringement and unfair
competition in violation of federal and state laws.
Apple, the Apple logo, AirPort, AppleScript, AppleTalk,
AppleWorks, FireWire, iBook, iMac, iSight, Keychain, Mac,
Macintosh, Mac OS, PowerBook, QuickTime, and Xserve
are trademarks of Apple Computer, Inc., registered in the
U.S. and other countries.
Apple Remote Desktop, Bonjour, eMac, Finder, iCal, and
Safari are trademarks of Apple Computer, Inc.
Adobe and Acrobat are trademarks of Adobe Systems
Incorporated.
Java and all Java-based trademarks and logos are
trademarks or registered trademarks of Sun
Microsystems, Inc. in the U.S. and other countries.
UNIX is a registered trademark in the United States and
other countries, licensed exclusively through
X/Open Company, Ltd.
019-0629/02-28-06
3
Contents
Preface
9
10
10
10
11
About This Book
Using This Guide
Remote Desktop Help
Notation Conventions
Where to Find More Information About Apple Remote Desktop
Chapter 1
13
13
15
18
21
22
23
25
26
Using Apple Remote Desktop
Administering Computers
Deploying Software
Taking Inventory
Housekeeping
Supporting Users
Providing Help Desk Support
Interacting with Students
Finding More Information
Chapter 2
28
28
29
31
32
33
34
35
36
36
36
37
Getting to Know Remote Desktop
Remote Desktop Human Interface Guide
Remote Desktop Main Window
Task Dialogs
Control and Observe Window
Multiple-Client Observe Window
Report Window
Changing Report Layout
Configuring Remote Desktop
Customizing the Remote Desktop Toolbar
Setting Preferences for the Remote Desktop Administrator Application
Interface Tips and Shortcuts
Chapter 3
39
39
40
40
41
Installing Apple Remote Desktop
System Requirements for Apple Remote Desktop
Network Requirements
Installing the Remote Desktop Administrator Software
Setting Up an Apple Remote Desktop Client Computer for the First Time
3
Chapter 4
41
42
42
43
43
44
46
46
46
47
48
Upgrading the Remote Desktop Administrator Software
Upgrading the Client Software
Method #1—Remote Upgrade Installation
Method #2—Manual Installation
Upgrading Apple Remote Desktop Clients Using SSH
Creating a Custom Client Installer
Considerations for Managed Clients
Removing or Disabling Apple Remote Desktop
Uninstalling the Administrator Software
Disabling the Client Software
Uninstalling the Client Software from Client Computers
49
49
50
50
51
52
52
53
53
54
54
54
55
55
56
56
Organizing Client Computers Into Computer Lists
Finding and Adding Clients to Apple Remote Desktop Computer Lists
Finding Clients by Searching the Local Network
Finding Clients by Searching a Network Range
Finding Clients by Network Address
Finding Clients by File Import
Making a New Scanner
Making and Managing Lists
About Apple Remote Desktop Computer Lists
Creating an Apple Remote Desktop Computer List
Deleting Apple Remote Desktop Lists
Creating a Smart Computer List
Editing a Smart Computer List
Creating a List of Computers of from Existing Computer Lists
Importing and Exporting Computer Lists
Transferring Computer Lists from Apple Remote Desktop 3 to a New Administrator
Computer
Transferring Remote Desktop 2 Computer Lists to a New Remote Desktop 3
Administrator Computer
Transferring Old v1.2 Computer Lists to a New Administrator Computer
57
57
Chapter 5
59
59
61
62
62
65
65
66
67
4
Understanding and Controlling Access Privileges
Apple Remote Desktop Administrator Access
Setting Apple Remote Desktop Administrator Access Authorization and Privileges
Using Local Accounts
Apple Remote Desktop Administrator Access Using Directory Services
Creating Administrator Access Groups
Enabling Directory Services Group Authorization
Apple Remote Desktop Guest Access
Apple Remote Desktop Nonadministrator Access
Virtual Network Computing Access
Contents
68
68
69
69
Command-Line SSH Access
Managing Client Administration Settings and Privileges
Getting an Administration Settings Report
Changing Client Administrator Privileges
Chapter 6
71
71
72
73
73
75
75
76
Setting Up the Network and Maintaining Security
Setting Up the Network
Using Apple Remote Desktop with Computers in an AirPort Wireless Network
Getting the Best Performance
Maintaining Security
Remote Desktop Authentication and Data Transport Encryption
Encrypting Observe and Control Network Data
Encrypting Network Data During Copy Items and Install Packages Tasks
Chapter 7
77
78
78
79
80
80
80
81
81
81
82
82
83
84
85
85
87
88
88
88
90
90
91
91
92
92
92
93
93
Interacting with Users
Controlling
Controlling Apple Remote Desktop Clients
Control Window Options
Switching the Control Window Between Full Size And Fit-To-Window
Switching Between Control and Observe Modes
Sharing Control with a User
Hiding a User’s Screen While Controlling
Capturing the Control Window to a File
Switching Control Session Between Full Screen and In a Window
Sharing Clipboards for Copy and Paste
Controlling VNC Servers
Setting up a Non–Mac OS X VNC Server
VNC Control Options
Configuring an Apple Remote Desktop Client to be Controlled by a VNC Viewer
Observing
Changing Observe Settings While Observing
Changing Screen Titles While Observing
Viewing a User’s Account Picture While Observing
Viewing a Computer’s System Status While at the Observe Window
Shortcuts in the Multiple Screen Observe Window
Observing a Single Computer
Observing Multiple Computers
Observing a Computer in Dashboard
Sending Messages
Sending One-Way Messages
Interactive Chat
Viewing Attention Requests
Sharing Screens
Contents
5
93
94
94
94
95
95
Chapter 8
6
96
96
97
98
98
98
99
99
100
101
101
101
103
104
104
105
106
107
108
109
110
111
111
112
113
114
116
118
119
124
125
126
127
127
128
128
Sharing a Screen with Client Computers
Monitoring a Screen Sharing Tasks
Interacting with Your Apple Remote Desktop Administrator
Requesting Administrator Attention
Canceling an Attention Request
Changing Your Observed Client Icon
Administering Client Computers
Keeping Track of Task Progress and History
Enabling a Task Notification Script
Getting Active Task Status
Using the Task Feedback Display
Stopping a Currently Running Task
Getting Completed Task History
Saving a Task for Later Use
Creating and Using Task Templates
Editing a Saved Task
Installing Software Using Apple Remote Desktop
Installing by Package and Metapackage
Installing Software on Offline Computers
Installing by Using the Copy Items Command
Using Installers from Other Companies
Upgrading Software
Copying Files
Copy Options
Copying from Administrator to Clients
Copying Using Drag and Drop
Restoring Items from a Master Copy
Creating Reports
Collecting Report Data
Using a Task Server for Report Data Collection
Report Database Recommendations and Bandwidth Usage
Auditing Client Usage Information
Finding Files, Folders, and Applications
Comparing Software
Auditing Hardware
Testing Network Responsiveness
Exporting Report Information
Using Report Windows to Work with Computers
Maintaining Systems
Deleting Items
Emptying the Trash
Setting the Startup Disk
Contents
Appendix A
129
129
130
131
131
132
133
133
135
135
136
137
137
138
138
139
139
140
140
141
141
142
143
143
145
145
147
152
152
153
154
155
156
159
Renaming Computers
Synchronizing Computer Time
Setting Computer Audio Volume
Repairing File Permissions
Adding Items to the Dock
Changing Energy Saver Preferences
Changing Sharing Preferences for Remote Login
Setting Printer Preferences
Managing Computers
Opening Files and Folders
Opening Applications
Quitting Applications Without Logging Out the User
Putting a Computer to Sleep
Waking Up a Computer
Locking a Computer Screen
Displaying a Custom Picture on a Locked Screen
Unlocking a Computer Screen
Disabling a Computer Screen
Logging In a User at the Login Window
Logging Out the Current User
Restarting a Computer
Shutting Down a Computer
UNIX Shell Commands
Send UNIX Command Templates
Executing a Single UNIX Command
Executing Scripts Using Send UNIX Command
Built-in Command-Line Tools
Automating Functions
Setting the Client’s Data Reporting Policy
Creating a Template Data Reporting Policy
Designating the Task Server and Setting the Report Data Collection Location
Scheduled Tasks
Using AppleScript with Remote Desktop
Using Automator with Remote Desktop
161
161
161
162
162
163
163
164
Icon and Port Reference
Client Status Icons
Apple Remote Desktop Status Icons
List Menu Icons
Task Status Icons
System Status Icons (Basic)
System Status Icons (Detailed)
TCP and UDP Port Reference
Contents
7
8
Appendix B
165
165
167
169
169
169
169
170
172
172
173
173
Report Field Definitions Reference
System Overview Report
Storage Report
USB Devices Report
FireWire Devices Report
Memory Report
PCI Cards Report
Network Interfaces Report
Network Test Report
Administration Settings Report
Application Usage Report
User History Report
Appendix C
174
174
AppleScript Remote Desktop Suite
Classes and Commands for the Remote Desktop Application.
Appendix D
180
PostgreSQL Schema Sample
Index
182
Contents
Preface
About This Book
What Is Apple Remote Desktop?
Apple Remote Desktop is easy-to-use, powerful, open standards-based, desktop
management software for all your networked Macs. IT professionals can remotely
control and configure systems, install software, offer interactive online help to end
users, and assemble detailed software and hardware reports for an entire Mac network.
You can use Apple Remote Desktop to:
 Manage client computers and maintain, update, and distribute software
 Collect more than 200 system-information attributes for any Mac on your network
 Store the results in an SQL database and view the information using any of several
hardware or software reports
 Control and manage multiple computer systems simultaneously, making shutdown,
restart, and sending UNIX commands fast and easy
 Provide help and remote assistance to users when they encounter problems
 Interact with users by sending text messages, observing and controlling users’
screens, and sharing their screens with other client users
You can use Apple Remote Desktop to manage your client systems. IT administrators
use Remote Desktop in education and business to simplify and empower the
management of their organizations computer assets. For system administrators, Apple
Remote Desktop can be used to administer large numbers of servers, like a virtual
Keyboard-Video-Mouse (KVM) sharing unit. In computer administration environments,
it’s the ideal solution for managing remote systems, reducing administration costs, and
increasing productivity.
Apple Remote Desktop can also be used by educators to facilitate instruction in
computer labs or one-on-one learning initiatives. Used in a classroom, Apple Remote
Desktop enhances the learning experience and allows teachers to monitor and control
students’ computers.
9
Using This Guide
The Apple Remote Desktop Administrator’s Guide contains chapters to help you use
Remote Desktop. It contains overviews and explanations about Apple Remote
Desktop’s features and commands. It also explains how to install and configure Apple
Remote Desktop on clients, how to administer client computers, and how to use
Remote Desktop to interact with computer users.
This guide is provided on the Apple Remote Desktop installation disc and on the Apple
Remote Desktop support website as a fully searchable, bookmarked PDF file. You can
use Apple’s Preview application or Adobe (Acrobat) Reader to browse the contents of
this guide as well as search for specific terms, features, or tasks.
Remote Desktop Help
Remote Desktop Help is available using Help Viewer. To open Remote Desktop Help,
choose Help > Remote Desktop Help. The help files contain the same information
found in this guide, and are useful when trying to accomplish a task when this guide is
unavailable.
Additionally, the Remote Desktop Help contains new information, corrections, and latebreaking information about Apple Remote Desktop. The most up-to-date information is
available through Remote Desktop Help before it’s available on the web as an updated
PDF file.
Notation Conventions
This guide and Remote Desktop Help contain step-by-step procedures to help you use
Remote Desktop’s commands effectively. In many tasks shown in this manual and in
Remote Desktop Help, you need to choose menu commands, which look like this:
Choose Edit > Clear.
The first term after Choose is the name of a menu in the Remote Desktop menu bar.
The next term (or terms) are the items you choose from that menu.
10
Preface About This Book
Terminal Command Conventions
Notation
Indicates
monospaced font
A command or other Terminal text
$
A shell prompt
[text_in_brackets]
An optional parameter
(one|other)
Alternative parameters (type one or the other)
underlined
A parameter you must replace with a value
[...]
A parameter that may be repeated
<anglebrackets>
A displayed value that depends on your configuration or settings
Commands or command parameters that you might type, along with other text that
normally appears in a Terminal window, are shown in this font. For example:
You can use the doit command to get things done.
When a command is shown on a line by itself as you might type it in a Terminal
window, it follows a dollar sign that represents the shell prompt. For example:
$ doit
To use this command, type “doit” without the dollar sign at the command prompt in a
Terminal window, then press the Return key.
Where to Find More Information About Apple Remote
Desktop
For additional information related to Apple Remote Desktop, try these resources.
You’ll find more information in the Apple Remote Desktop Read Me file and on the
Apple Remote Desktop website:
www.apple.com/remotedesktop/
You can find the most recent edition of the Apple Remote Desktop Administrator’s Guide at:
 the Apple Server Division Documentation page
www.apple.com/server/documentation/
 the Remote Desktop section of Apple.com, and
www.apple.com/remotedesktop/
 the Help Menu in the Remote Desktop application
Preface About This Book
11
The Apple Remote Desktop Support website provides a database of technical articles
about product issues, use, and implementation:
www.apple.com/support/remotedesktop/
To provide feedback about Apple Remote Desktop, visit the feedback page:
www.apple.com/feedback/remotedesktop.html
For details about how to join the Apple Remote Desktop Mailing list, visit:
lists.apple.com/mailman/listinfo/remote-desktop/
To share information and learn from others in online discussions, visit the Apple
Remote Desktop Discussions Forum:
discussions.info.apple.com/appleremotedesktop/
For more information about PostgreSQL go to:
www.postgresql.org
For more information about using Apple products for IT professionals go to:
apple.com/itpro/
12
Preface About This Book
1
Using Apple Remote Desktop
1
Apple Remote Desktop helps you keep Macintosh computers
and the software running on them up to date and trouble
free. And it lets you interact directly with Macintosh users to
provide instructional and troubleshooting support.
This chapter describes the main aspects of Apple Remote Desktop’s administration and
user interaction capabilities and tells you where to find complete instructions for using
them.
Administering Computers
Apple Remote Desktop lets you perform a wide range of client hardware and software
administrative activities remotely, from an administrator computer (a computer on
which administrator software resides):
 Keep users’ software up to date by using Apple Remote Desktop to deploy software
and related files to client computers.
 Create reports that inventory the characteristics of client computer software and
hardware.
 Use Apple Remote Desktop’s remote administration capabilities to perform
housekeeping tasks for client computers.
13
You can administer client computers individually, but most Apple Remote Desktop
features can be used to manage multiple computers at the same time. For example, you
may want to install or update the same applications on all the computers in a particular
department. Or you may want to share your computer screen to demonstrate a task to
a group of users, such as students in a training room.
Marketing department
Engineering department
To manage multiple computers with a single action, you define Apple Remote Desktop
computer lists. A computer list is a group of computers that you want to administer
similarly. Computer lists let you group and organize computers for administration.
Setting up computer lists is easy; you simply scan the network or import the identity of
computers from files.
A particular computer can belong to more than one list, giving you a lot of flexibility
for multicomputer management. A computer can be categorized by its type (laptop,
desktop), its physical location (building 3, 4th floor), its use (marketing, engineering,
computing), and so forth.
Once you’ve set up computer lists, you can perform most of the computer
administration activities described next for groups of client computers.
14
Chapter 1 Using Apple Remote Desktop
Deploying Software
Apple Remote Desktop lets you distribute software and related files to client computers
from your Apple Remote Desktop administrator computer or from a computer running
Mac OS X Server.
Deploy
configuration files
Deploy
drag-and-drop
application folders
Deploy
install packages
(.pkg or .mpkg)
Administrator
computer
Set startup
partition
Deploy UNIX
shell scripts
Xserve cluster node
Mac OS X Server
Network
install images
Marketing department
NetBoot
images
Engineering department
Distributing Installer Packages
You can distribute and automatically install packages in .pkg and .mpkg formats. Apple
Remote Desktop lets you install software and software updates on one or more client
computers without user interaction or interruption, or even if no user is logged in. After
installation, Apple Remote Desktop erases the installer files. If the computers need to
be restarted, as they do following an operating system update, you can restart them
from Apple Remote Desktop.
Chapter 1 Using Apple Remote Desktop
15
For example, you can use Apple Software Update to download an iCal update or an
operating system update to a test computer. If the update works as expected and
introduces no compatibility issues, copy the installer package to the administrator
computer to distribute to computers that need upgrading. Note that this approach
conserves Internet bandwidth, because only one copy of the package needs to be
downloaded.
You can also use Apple Remote Desktop to deploy new versions of computational
software to Xserve computers in a cluster node.
You can use the PackageMaker tool (included on the Apple Remote Desktop
installation CD and with Apple’s developer tools) to create your own installer packages,
such as when you want to:
 Distribute school project materials or business forms and templates
 Automate the installation of multiple installer packages
 Deploy custom applications
Before performing remote installations, you can send an Apple Remote Desktop text
message to notify users, perhaps letting them know that you’ll be using Apple Remote
Desktop to lock their screens at a particular time before you start the installation.
Using Network Install Images
You can also distribute and install software, including the Mac OS X operating system,
by using Network Install images.
On Mac OS X Server, use the Network Image Utility to create a Network Install image.
You can create the image by cloning a system that’s already installed and set up, or by
using an installation disc or an image downloaded using Apple Software Update. If you
choose to auto-install, you won’t have to interact with each computer. On the Apple
Remote Desktop administrator computer, set the startup disk of remote client systems
to point to the Network Install image, and then remotely reboot the clients to initiate
installation.
Before initiating installations that require computers to be restarted afterwards, send
an Apple Remote Desktop text message to client users to notify them of a pending
installation. For example, tell users you’ll log them off at 5:00 p.m. to install an
operating system update.
Using NetBoot Images
Another kind of system image you can create using Mac OS X Server is a NetBoot
image. Like a Network Install image, a client computer uses NetBoot images to start up.
Unlike a Network Install image, the boot software is not installed on the client system.
Instead, it resides on a remote server. It is recommended you use a NetBoot image that
has Apple Remote Desktop installed and configured. Otherwise, administering the
computer using Apple Remote Desktop after starting up from NetBoot is impossible.
16
Chapter 1 Using Apple Remote Desktop
Client computers that boot from a NetBoot image get a fresh system environment
every time they start up. For this reason, using NetBoot images is useful when a
particular computer is shared by several users who require different work environments
or refreshed work environments, or when you want to start a new experiment or use a
different computing environment in a cluster node.
You can use Apple Remote Desktop to set the startup disks of client systems to point to
the NetBoot image, and then restart the systems remotely using Apple Remote
Desktop. Users can also choose a NetBoot image for startup by using the Startup Disk
pane of System Preferences. With just a few clicks you can reconfigure all the
computers in a lab or cluster without having to manually restart and configure each
computer individually.
Distributing Preference Files
Managed computers often require a standard set of preferences for each instance of an
application. Use Apple Remote Desktop to distribute preference files when you need to
replace or update a application preferences. For example, you can copy a standardized
preference file to the currently logged in user’s Library/Preferences folder.
Using UNIX Shell Scripts
You can use Apple Remote Desktop to distribute and run UNIX shell scripts on client
computers.
For example, a script can mount an AFP server volume, from which it downloads a disk
image to client computers. The script might also download an installer package and
then perform a command-line installation.
On an Xserve in a cluster node, you could also run a script that mounts an Xserve RAID
disk designed for high throughput and then downloads large data sets for processing.
You can also use Apple Remote Desktop to distribute AppleScript files that automate
PDF workflows, or job instructions for computational clusters.
Distributing Drag-and-Drop Applications
You can distribute and install self-contained (drag-and-drop) applications by copying
them to one or more client computers. Use this approach, for example, to distribute
application updates.
Verifying Installations
To check whether an installation has been completed successfully, use Apple Remote
Desktop’s remote control capabilities.
For example, you can start an application remotely, or search for particular files. You can
also use the File Search report to verify that all files for an application are installed
correctly.
Chapter 1 Using Apple Remote Desktop
17
Taking Inventory
Apple Remote Desktop lets you capture data describing the attributes of client
computers, then generate reports based on the data.
You specify how often you want to capture data, the data you want to capture, and the
computers you want to profile. You can collect data just before generating a report if
you need up-to-the-minute information. Or you can schedule data to be collected by
Apple Remote Desktop at regular intervals and stored in its built-in SQL (Structured
Query Language) database for use on an as-needed basis.
You can also specify where you want the database to reside—on the local
administrator computer, or on a server where the Apple Remote Desktop administrator
software is installed and always running, so data can be captured on an ongoing basis.
Administrator
computer
Mac OS X Server
ARD SQL
database
ARD SQL
database
SQL tools
Xserve cluster node
Marketing department
Engineering department
Using the collected data, Apple Remote Desktop generates reports tailored to your
specifications.
18
Chapter 1 Using Apple Remote Desktop
File Search Report
Use the File Search report to search client systems for specific files and folders and to
audit installed applications.
This report can help you find out how many copies of a particular application are in use
so you don’t violate license agreements.
Spotlight File Search
Use the Spotlight Search report to search Tiger client systems for specific files and
folders. The information in the report is updated as files matching your search change
on the client systems.
Software Version Report
Use the Software Version report to make sure that all users have the latest application
versions appropriate for their systems.
Software Difference Report
Use the Software Difference report to detect application versions that are out of date,
nonstandard, or unacceptable for some other reason. Or, you can learn whether a user
has installed an application that shouldn’t be installed.
System Overview Report
The System Overview report makes visible a wide variety of client computer
characteristics. Using this report, you can review information about a client’s AirPort
setup, computer and display characteristics, devices, network settings, system
preferences, printer lists, and key software attributes.
There are numerous uses for this report, such as identifying problems or verifying
system configurations before installing new software, or determining how many
devices of a particular type (such as scanners) are in a particular lab.
Hardware Reports
Several reports provide details about particular hardware used by client computers—
storage, FireWire devices, USB devices, network interfaces, memory, and PCI cards.
Use these reports to determine, for example, which computers need more memory,
which computer has the fastest processor speed, and how much free space is left on a
particular disk.
Administration Settings Report
Use the Administration Settings report to determine which Apple Remote Desktop
administrator privileges are enabled or disabled for you in the Sharing pane of System
Preferences on individual client computers.
User History Report
Use the User History report to show you who has logged in to a client, how they
logged in, and for how long.
Chapter 1 Using Apple Remote Desktop
19
Application Usage Report
Use the Application Usage report to find out which applications have been running on
your client computers and who ran those applications.
Network Test Report
A Network Test report helps you measure and troubleshoot the communication
between your administrator computer and your client computers. The Network
Interfaces report might also help troubleshooting network hardware issues.
Use this report to help identify reasons for network communication problems that
could affect Apple Remote Desktop. For example, if you’re unable to copy items to
particular client computers from the administrator computer, you may find you have a
bad connection to the computers. Using this information can help you isolate the
problem to a particular cable or hub.
Generating Your Own Reports
Because the Apple Remote Desktop database is in standard SQL format, you can also
use your favorite SQL scripts to query, sort, and analyze the collected data. In addition,
you can export data from the database into a file so you can import it for viewing in a
different program, such as a spreadsheet application.
20
Chapter 1 Using Apple Remote Desktop
Housekeeping
Apple Remote Desktop provides several ways to remotely control client computers for
housekeeping activities, which you can conduct using one or more Apple Remote
Desktop windows.
Restart/
shutdown/sleep
Administrator
computer
Mac OS X Server
Empty
Trash
Remote screen
control
Set startup
partition
Execute UNIX
shell script
NetBoot
images
Send text
notification
Xserve cluster node
Marketing department
Engineering department
Managing Power State
Use Apple Remote Desktop to control the power state of client computers.
For example, you may need to have all computers turned off during maintenance of a
power generation unit or during a holiday shutdown. You can send an Apple Remote
Desktop text message reminding users to shut down their computers at a particular
time. Any computers still running when you need to start maintenance can be
detected and shut down remotely with Apple Remote Desktop.
Chapter 1 Using Apple Remote Desktop
21
Locking Computer Screens
You can lock the screens of client computers for specified durations when you don’t
want the computers to be used. For example, you may need to perform network
maintenance and want to make sure computers don’t use the network for a few hours.
You can display custom pictures or text messages on locked computer screens to let
users know when the computers are available again.
Reclaiming Disk Space
Periodically empty the Trash on client computers to conserve disk space.
Automating Periodic Maintenance
Use AppleScript and UNIX shell scripts to automate periodic maintenance, such as
checking permissions or deleting log files.
Controlling Screens
Use Apple Remote Desktop’s remote screen control to perform activities on the
desktop of Xserve computers, or use graphical applications on them. Apple Remote
Desktop replaces the need for KVM (keyboard-video-mouse) switches for accessing
Xserve computers without a monitor attached.
You can also remotely control a user’s computer to help determine reasons for slow
performance or other problems.
Changing Startup Disks
Change the startup disk of a client computer to perform diagnostic or troubleshooting
activities.
For example, start up a computer using a server-based NetBoot image that’s been set
up for troubleshooting. When you’re finished, reset the startup disk to the original boot
volume.
Managing Shared Computers
On computers that are shared among users, check for files that need to be deleted,
close applications, log users off, or perform other activities needed to prepare
computers for the next users.
Supporting Users
Apple Remote Desktop lets you interact with users from your administrator computer
in these ways:
 Provide help: respond to users who need help by using Apple Remote Desktop to
receive user requests and to remotely diagnose and fix problems.
 Interact: conduct instructional interactions with students in a school or corporate
training environment—from controlling or observing student screens to sharing your
screen with all your students in order to perform a demonstration.
22
Chapter 1 Using Apple Remote Desktop
Providing Help Desk Support
When a user is having trouble, Apple Remote Desktop provides several ways to interact
with the user and his or her computer to diagnose and fix the problem.
Administrator
computer
Use
text chat
Copy
items
Control, observe, and
share screens
Marketing department
Engineering department
Requesting Help
A user can discreetly notify you of a problem by sending a request for help using an
Apple Remote Desktop text message.
Users initiate requests using the commands in the menu that appears when they click
the Apple Remote Desktop icon in the menu bar. A notification on the administrator
computer alerts you to the message, and you can use several techniques to obtain
more information and troubleshoot the problem.
Chatting with the User
Conduct two-way Apple Remote Desktop text communication with the user to obtain
more information.
Screen Monitoring
Use Apple Remote Desktop to observe the user’s screen if you need more details to
understand the problem.
Chapter 1 Using Apple Remote Desktop
23
Screen Controlling
Use Apple Remote Desktop to control the user’s screen in order to diagnose and fix the
problem. You may have unlimited control, or a user can grant you temporary guest
access so you can control the computer only during troubleshooting.
There are two levels of control available. You can take complete control of the user’s
computer, or you can share control of the keyboard and mouse with the user.
Screen Sharing
If the problem is caused by incorrect actions by the user, share your screen with the
user as you demonstrate the correct way to perform the action.
Using Reports
Use hardware and software reports as diagnostic tools to determine whether the client
computer setup is part of the problem. For example, if a user can’t save his or her work,
the storage report can help you determine whether it’s a disk space issue.
Deploying New Software or Files
If software or configuration settings are part of the problem, use Apple Remote
Desktop to copy new configuration files, installer packages, or other items to client
computers.
24
Chapter 1 Using Apple Remote Desktop
Interacting with Students
Apple Remote Desktop helps instructors teach more efficiently by letting them interact
with student computers individually or as a group.
Broadcast
text messages
Observe and
share one or
multiple screens
Administrator
computer
Control
screen
Lock
screens
Log out
students
Distribute
items electronically
Open applications
or files
One-to-one
help desk support
Classroom
Using Text Messages
Send Apple Remote Desktop text messages to communicate with students. For
example, notify them that a classroom activity will start soon or that they have ten
minutes to finish an examination.
Monitoring Student Computers
View student computer screens on your computer, so you can monitor student
activities or assess how well they’re able to perform a particular task. You can also
monitor the applications running on any student’s computer.
Sharing Screens
Display your screen or a student’s screen on other student computers for training and
demonstration purposes.
Controlling Screens
Show students how to perform tasks by controlling their screens from your computer,
opening applications and using files as required.
Chapter 1 Using Apple Remote Desktop
25
Locking Screens
Lock student screens to prevent students from using their computer when you want
them to focus on other activities.
Terminating Computer Use
Remotely log students out or shut down their computers at the end of a class or
school day.
Distributing and Collecting Files
Distribute handouts electronically, at a time that won’t disrupt class activities or when
they’re needed for the next class activity, and collect homework files.
Automating Website Access
Open a webpage on all student computers. Drag a URL from Safari to your desktop,
then copy it to student computers and open it in Safari. You can also copy files and
open them in the appropriate applications on student computers.
Providing One-to-One Assistance
Provide help when a student needs it, conducting private and discreet computer-tocomputer interactions.
Finding More Information
You’ll find detailed instructions for performing the tasks highlighted in this chapter—
and more—throughout this manual.
26
To learn more about
See information for
Starting on page
Remote Dekstop interface
Window and icon functions
page 28
Computer lists
Creating computer lists
page 49
Apple Remote Desktop
administration
Administrator privileges
Administrator computers
page 59
Controlling screens
Controlling
page 78
Observing screens
Observing
page 85
Deploying software
Installing software
Upgrading software
page 101
Distributing files
Copying files
page 106
Taking inventory
Data collection options
Auditing software
Auditing hardware
Network responsiveness
Customizing reports
Exporting report data
page 111
Client use reporting
User login accounting
Application usage
page 114
Chapter 1 Using Apple Remote Desktop
To learn more about
See information for
Starting on page
Housekeeping tasks
Deleting items
Emptying the Trash
Setting startup volumes
Renaming computers
Sleeping and waking
Locking screens
Logging users out
Restart and shutdown
page 127
Automating tasks
Configuring data gathering
Scheduling tasks
Using UNIX shell scripts
page 152
Additional information can be obtained at several Apple websites:
 For information about NetBoot and Network Install, download the system imaging
administration guide at:
www.apple.com/server/documentation
 You can find PackageMaker’s documentation at Apple’s Developer Connection:
http://developer.apple.com/documentation/DeveloperTools/Conceptual/
SoftwareDistribution/index.html?
Chapter 1 Using Apple Remote Desktop
27
2
Getting to Know Remote Desktop
2
Remote Desktop is the administrator application for Apple
Remote Desktop. Its attractive interface is powerful, yet
simple to use. Remote Desktop’s interface is customizable,
allowing you to get the information you want quickly, the
way you want it.
This chapter contains screenshots and short descriptions of Remote Desktop’s interface,
as well as detailed instructions for customizing the appearance and preferences of the
application. You will learn about:
 “Remote Desktop Human Interface Guide” on page 28
 “Configuring Remote Desktop” on page 36
 “Interface Tips and Shortcuts” on page 37
Remote Desktop Human Interface Guide
The following sections give basic information about the human interface of Remote
Desktop, Apple Remote Desktop’s administrator application.
 “Remote Desktop Main Window” on page 29
 “Task Dialogs” on page 31
 “Control and Observe Window” on page 32
 “Multiple-Client Observe Window” on page 33
 “Report Window” on page 34
 “Changing Report Layout” on page 35
28
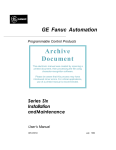
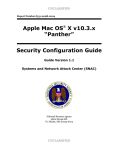
Remote Desktop Main Window
The main window of Remote Desktop has a customizable toolbar, groups of lists, tasks,
and scanners on the left, and the main window area to the right. “List Menu Icons” on
page 162 contains icons seen in the list menu of the main window.
K
L
A
B
C
D
E
H
F
G
I
J
A
All Computers list: The All Computers list is a list of all client computers that you plan to
administer. It includes all the clients you have authenticated to, as well as the client computers
that you plan to authenticate to. Computers need to be in the All Computers list before you can
command or administer them. If you have a 10-client license, the All Computers list can contain
only 10 computers.
B
Apple Remote Desktop computer lists: A list of computers you create to group computers in
ways that are convenient for you. Any list is a subset of the client computers in the All
Computers list. If you add a computer directly to a computer list, it is added automatically to the
All Computers list as well.
C
Smart computer lists: A smart computer list is a list of computers which is a subset of the client
computers in the All Computers list that meet a predetermined criteria. Smart Computer lists
update themselves based on your criteria compared to the contents of the All Computers list.
D
Group folders: Groups are tools to help you organize all your possible lists, tasks, and scanners.
Groups look like folders, and can be collapsed to hide the group contents.
E
Saved tasks: Saved tasks are listed in the left portion of the main window. They have the icon of
the type of task and have a user-changeable name.
Chapter 2 Getting to Know Remote Desktop
29
30
F
Scanner: Scanners find clients to add to the All Computers list. You can make new scanners and
customize them for your needs.
See “Making a New Scanner” on page 52.
G
Task server list: This lists tasks delegated to the Task Server, rather than run those run directly
from the application. When all the target computers have come online and participated in the
task, the task is labeled as complete.
H
Active tasks list: This list shows all tasks that are currently running or scheduled and
uncompleted.
I
Task history list: The task history list shows a list of most recently run tasks, as defined in the
Remote Desktop preferences. You can inspect each task by double-clicking it. Once a task is
completed (whether successfully or not) it is moved to the Task History list.
J
Task status icon: These icons represent the current state of a task. See “Task Status Icons” on
page 162.
K
Client status icon: Icon representing the current state of a client computer. See “Client Status
Icons” on page 161.
L
Customizable toolbar: The toolbar can be fully customized with icons of your most-used Apple
Remote Desktop features.
Chapter 2 Getting to Know Remote Desktop
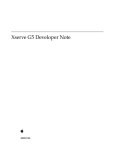
Task Dialogs
When you click a task, a dialog appears to let you set task parameters or confirm the
task.
A
B
G
C
D
E
F
A
Task type header: This header area shows you the kind of task represented.
B
Saved task name: When you save a task, you name it for your own use.
C
Task configuration area: This area is different for every task. It’s where you set operating
parameters for the task to be performed.
D
Participating computers: This area shows you the computers that will be affected by the task.
You can add or remove computers in this area without changing computer list membership.
E
Schedule task button: When you click this button in a task dialog, you can set a time to
perform the task as well as repeat the task. See “Scheduled Tasks” on page 155 for more
information.
F
Save task button: When you click this button in a task dialog, you can name and save the task
as configured. Saved tasks appear in the left side of Remote Desktop’s main window.
G
Task templates: This control allows you to save current task configuration settings, or apply
previously saved settings to the current task. These templates are stored on a per-task basis.
For example, the Send UNIX Commands template pop-up has an extensive list of built-in
templates, while other tasks may have none.
Chapter 2 Getting to Know Remote Desktop
31
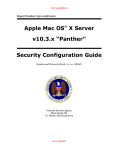
Control and Observe Window
This window is the same for both controlling and observing a single client. The only
difference is the state of the Observe or Control toggle button. When it’s selected, you
have control over the remote client.
A
B C D E F
I
G H
J
32
A
Observe or control toggle: When this button is selected, you have control over the remote
client.
B
Share mouse control: When this button is selected, you share mouse control with the user.
C
Fit screen in window: When this button is selected, the remote client is scaled to the Control
window size.
D
Lock computer screen for control: When this button is selected, the remote client screen
shows a lock, and your view allows you to view the client desktop normally.
E
Capture screen to file: When this button is clicked, the remote client screen is saved to a local
file at the selected image quality.
F
Fit screen to full display: When this button is selected, your display doesn’t show your
computer desktop, only that of the remote computer, at full possible resolution.
G
Get clipboard from client: When this button is clicked, the contents of the remote client
Clipboard are transferred to the local Clipboard.
Chapter 2 Getting to Know Remote Desktop
H
Send clipboard to the client: When clicked, the remote client Clipboard receives the contents
of the local Clipboard.
I
Image Quality: Adjusts the screen color depth from black and white to millions of colors.
J
Desktop of Controlled Computer: Resize this window from the lower right corner.
Multiple-Client Observe Window
When you observe many clients at the same time, they all appear in the same window.
If you have more computers than will fit in the window, they are divided across several
pages.
H
B
A
C
I
D
E
F
G
I
A
Page Delay: Adjusts the number of seconds before automatically advancing to the next page of
screens.
B
Computers Per Page: Adjusts the number of client screens visible on each page.
C
Image Quality: Adjusts the screen color depth from black and white to millions of colors.
D
Display Computer Information: Shows the computer information area, which contains desktop
titles, account pictures, and status icons.
E
Computer title selector: Changes the titles displayed underneath the client screens (you can
choose the computer name, IP address, or hostname).
F
Account picture: Shows the login icon of the currently logged in user.
Chapter 2 Getting to Know Remote Desktop
33
G
Computer status: Shows basic computer status beneath each client screen.
H
Cycle through pages: Manually advances to the next page of screens.
I
View Options: Reveals the view option controls.
J
Observed computers: Contains the scaled desktops of the observed client computers.
Report Window
Reports serve as valuable shortcuts when you’re copying files and organizing computer
lists.
34
C
B
A
C
B
D
E
F
A
Report category: Most reports have subcategories to help you find the information you want.
In the report window, you switch between the subcategories using these tabs.
B
Save report to file: Saves the report to a plain text file.
C
Print: Formats and prints the report window.
D
Open selected: Opens the item selected in the report. The item opens on the client computer.
Chapter 2 Getting to Know Remote Desktop
E
Delete selected: Deletes the item selected in the report from the remote computer.
F
Copy to this computer: Copies selected items to the administrator computer.
Changing Report Layout
You can customize report layouts for your own purposes. By default, reports include a
column for each information type you selected before running the report, in the order
presented in the report dialog. The columns in the report are initially sorted by
computer name.
You can resize or rearrange the columns of a report, as well as sort the rows by column.
Additionally, in the File Search report, you can choose what information is displayed
about a found item. By default, the item name, kind, parent path, actual size, and
modification date are displayed.
To change what information is displayed:
1 In the File Search report window, select or deselect each report column as desired.
Report column
If checked, will show
Name
The item name
Parent path
The path to the folder that the item is in
Full path
The full file path
Extension
The file extension indicating the file type (.app, .zip, .jpg)
Date modified
The last date and time the file was changed and saved
Date created
The date and time the file was created
Actual size
Actual file size, in kilobytes or megabytes
Size on disk
Amount of disk space used by the file, in kilobytes
Kind
File, folder, or application
Invisible
A checkmark indicating whether it is visible in the Finder
Version number
If an application, the version reported
Version string
If an application, the version reported
Owner
The item owner’s short name
Group
The item’s group name
Permissions
The item’s UNIX permissions (for example, -rw-r--r--)
Locked
A checkmark indicating whether it is a locked file
2 After making your selections, click Generate Report as usual.
When the report window appears, you can rearrange the columns or sort by a different
column.
Chapter 2 Getting to Know Remote Desktop
35
Configuring Remote Desktop
You can configure the Remote Desktop administrator application to meet your work
needs. Remote Desktop has an interface that is both flexible and functional.
Customizing the Remote Desktop Toolbar
The Remote Desktop application has a fully customizable toolbar, which provides a
quick way to perform tasks. To perform a task, just click the appropriate icon in the
toolbar. To show or hide the toolbar, click the toolbar button in the upper-right corner
of the application window. You can add, remove, or rearrange the task icons in the
toolbar to suit your needs.
To customize the application toolbar:
1 Choose Window > Customize Toolbar.
2 Drag your favorite toolbar items or the default set of items to the toolbar. To remove an
item, drag it from the toolbar. To rearrange items, drag them into the order you prefer.
3 Choose whether to display toolbar items as text, icons, or both. Selecting “Use Small
Size” shrinks the items in the toolbar.
Setting Preferences for the Remote Desktop Administrator Application
In Remote Desktop preferences, you can select options that affect how the
administrator application interacts with client computers.
To open the Preferences window:
 Choose Remote Desktop > Preferences.
In the General pane, you can set:
 What double-clicking a client computer does (Get Info, Control, Observe, Text Chat)
 Whether to show the client idle time
 What warnings may appear when quitting the application
 A new serial number
 A new Remote Desktop application password
In the Control & Observe pane, you can set:
 Whether a remote screen is shown in a window or a full screen
 Whether control of the mouse and keyboard is shared with the client computer
when the client is controlled
 Whether a remote screen is shown at its actual size in a window or if it shrinks to fit
the window
In the Task Server pane, you can set:
 Whether Remote desktop is using another computer as a Task Server, or whether this
copy of Remote Desktop is being used as a Task Server
36
Chapter 2 Getting to Know Remote Desktop
 Whether other Apple Remote Desktop administrators can access your local Task
Server
 Whether clients collect user and application tracking data
 A saved template for scheduling client reporting policies
In the Labels pane, you can set:
 Label colors and text for labeling computers
In the Tasks pane, you can set:
 Whether to automatically change focus to the active task
 Whether to execute a notification script on task completion
 Limits on task history list contents and time until removed
In the Security pane, you can set:
 Whether to accept messages from client users
 Whether to allow control of the computer while Remote Desktop is active
 The default encryption preference for control and observe sessions
 The default encryption preference for Copy Items and Install Packages tasks
 Which features of Remote Desktop are available to nonadministrator users
See “Apple Remote Desktop Nonadministrator Access” on page 66.
Interface Tips and Shortcuts
There are a number of features of the Remote Desktop interface which make it
particularly flexible and powerful. The following lists a few built-in shortcuts to features
which can make using Remote Desktop more productive.
Computers can be selected from any window
Any computer in any window—report windows, task windows, computer lists, observe
windows—can be a target for some task. For example, if you are observing 10
computer screens and need to send a text message to one, select the screen with a
single click and then choose Interact > Send Text Message. Likewise, if you get a
software report on 50 computers and notice that one of the computers is missing
some vital piece of software, you can drop that software onto the selected computer
within the report window.
Treating all windows as possible computer selection lists for tasks may save you lots of
time switching between the Remote Desktop window and other windows as you
accomplish your work.
Chapter 2 Getting to Know Remote Desktop
37
Drag and drop works on configuration dialogs
Configuration dialogs accept dragged items. Computer lists in the dialogs accept
dragged computers. The Copy Items dialog accepts dragged files to copy, without
having to browse the file system for them. Save yourself time and effort by dragging
available items to dialogs rather than browsing for them.
Making lists from reports or other lists
You may need to make a list based on the outcome of some report, but you don’t
know which computers will need to be included. After getting a report and sorting on
the desired column, you can select the computers and make a new list from the
selection. If you double-click the list icon, you open another window containing the
computers in the list. This is useful for comparing lists, or for using the new window as
a source from which to drag computers to other lists.
Saved Tasks and Task Templates save you time
You may spend a lot of time coming up with the perfect software search to find exactly
what you need. You shouldn’t recreate that search every time you need it. Save your
tasks, and duplicate them. With a little editing, you can have a number of similar saved
tasks for specific uses. Alternatively, you can use task templates to save settings across
task dialogs, applying the same settings through various tasks.
38
Chapter 2 Getting to Know Remote Desktop
3
Installing Apple Remote Desktop
3
To use Apple Remote Desktop, install the administration
software on the administrator computer first, and then install
and enable the client software on the computers you want to
manage. You’ll need your install disc, the serial number, and
either the printed Welcome instructions, or these instructions.
This chapter describes how to install Apple Remote Desktop for system administration
and user interaction and gives complete setup instructions. You can learn about:
 “System Requirements for Apple Remote Desktop” on page 39
 “Installing the Remote Desktop Administrator Software” on page 40
 “Setting Up an Apple Remote Desktop Client Computer for the First Time” on page 41
 “Upgrading the Remote Desktop Administrator Software” on page 41
 “Upgrading the Client Software” on page 42
 “Creating a Custom Client Installer” on page 44
 “Considerations for Managed Clients” on page 46
 “Removing or Disabling Apple Remote Desktop” on page 46
System Requirements for Apple Remote Desktop
Administrator and client computers:
 Mac OS X or Mac OS X Server version 10.3.9 or later (Mac OS X version 10.4 or later is
required for some features).
 Mac OS Extended (HFS+) formatted hard disk.
 For observing and controlling other platforms: a system running VNC-compatible
server software.
NetBoot and Network Install (optional)
 Mac OS X Server version 10.3 or 10.4 with NetBoot and Network Install services
enabled
39
Network Requirements
 Ethernet (recommended), AirPort, FireWire, or other network connection
See “Setting Up the Network” on page 71 for more information.
Installing the Remote Desktop Administrator Software
To set up Apple Remote Desktop on administrator computers, you install the software
on the computer you plan to use to administer remote computers. Then, you open the
application setup assistant, and add to the main list of computers.
To install Apple Remote Desktop on an administrator computer:
1 Insert the Apple Remote Desktop installation disc.
2 Double-click the Remote Desktop installer package and follow the onscreen
instructions.
The Remote Desktop application will be installed in the Applications folder.
3 Launch Remote Desktop (in the Applications folder).
The Remote Desktop Setup Assistant appears.
4 Enter the serial number.
The serial number can be found on the Apple Remote Desktop Welcome document
that came with your software.
Optionally, enter a registration name and organization.
5 Click Continue.
6 Enter a Remote Desktop application password and verify it.
The Remote Desktop application password is used to encrypt names and passwords of
client computers for Apple Remote Desktop. You can store this password in your
keychain for convenience, or you can require that the password be entered each time
you open Remote Desktop.
7 If you have another unlimited-licensed copy of Apple Remote Desktop acting as a Task
Server (a dedicated computer running Remote Desktop for report data collection and
delegated install tasks), enter the server address and click Continue.
8 Set the default data collection scope and time for newly administered computers.
These settings will be stored as the default upload schedule, which can be applied to
computers when you add them for administration. For more detailed information, see
“Setting the Client’s Data Reporting Policy” on page 152.
9 Click Done.
The main application window appears.
40
Chapter 3 Installing Apple Remote Desktop
10 Configure some client computers for administration, find them in a scanner, and add
them to a computer list. See:
 “Setting Up an Apple Remote Desktop Client Computer for the First Time” on page 41
 “Finding and Adding Clients to Apple Remote Desktop Computer Lists” on page 49
Setting Up an Apple Remote Desktop Client Computer for the
First Time
The following section contains information on setting up Apple Remote Desktop 3 on
client computers. Since Apple Remote Desktop v1.2 was included with Mac OS X v10.3
computers and Apple Remote Desktop v2.2 was installed with Mac OS X v10.4
computers, all Apple Remote Desktop 3 client installations are upgrade installations,
even if you are setting up clients for the first time.
See “Upgrading the Client Software” on page 42 for more information.
If the Apple Remote Desktop client software was removed from the computer, you can
install a fresh copy of the most recent client software by installing Apple Remote
Desktop manually.
See “Method #2—Manual Installation” on page 43 for more information.
If you’re setting up Mac OS X Server for the first time using Server Setup Assistant, you
can enable Apple Remote Desktop as one of the initial services. This allows you to
administer a server immediately after server software installation by providing Remote
Desktop with the user name and password of the default system administrator.
Upgrading the Remote Desktop Administrator Software
Upgrading Remote Desktop is just like installing it for the first time. The only difference
is that the final button in the installer reads “Upgrade” rather than “Install.” The installer
upgrades existing software to its latest version, imports previously created lists, and
restarts the underlying processes after completion.
See “Installing the Remote Desktop Administrator Software” on page 40, for detailed
instructions.
If you are upgrading from version 1.2 and changing administrator computers, you’ll
need to transfer your existing computer lists. See “Transferring Old v1.2 Computer Lists
to a New Administrator Computer” on page 57. Be sure to transfer your lists from Apple
Remote Desktop v1.2 to the new computer before upgrading to Apple Remote Desktop
3. If you upgrade from version 1.2 to version 3 on the same administrator computer,
this list migration is done for you.
Chapter 3 Installing Apple Remote Desktop
41
Upgrading the Client Software
This section contains information on installing Apple Remote Desktop 3 on client
computers. Since Apple Remote Desktop client software was automatically included on
the clients running Mac OS X v10.3 and v10.4, all Apple Remote Desktop 3 installations
are upgrade installations, even if you are setting up clients for the first time.
You can only upgrade Apple Remote Desktop v1.x and v2.x computers if they meet the
minimum system requirements (see “System Requirements for Apple Remote Desktop”
on page 39). Please note that there is no supported “downgrade” to any previous
version, and if you upgrade the client computers to version 3, you will not be able to
administer them with earlier versions of Remote Desktop.
There are two methods to upgrade the client computer’s software.
Method #1—Remote Upgrade Installation
This method works best with existing clients already configured using a previous
version of Apple Remote Desktop. If used with existing administered clients, use
Remote Desktop to identify those clients running a previous version. You may then
upgrade them to the latest version. The main benefit of this upgrade method is the
ease of installation and the retention of previous client settings, if any.
This method only works for Apple Remote Desktop 1.2 clients and later. Earlier versions
of Apple Remote Desktop like 1.0 must be upgraded to version 1.2 using Mac OS X’s
Software Update, or they must be updated manually. See “Method #2—Manual
Installation” on page 43 for more information.
To upgrade existing client software remotely using Apple Remote Desktop:
1 Enable the existing version of Apple Remote Desktop on the client computers.
2 Configure the clients for administration.
See “Setting Apple Remote Desktop Administrator Access Authorization and Privileges
Using Local Accounts” on page 61.
3 If the client computers are not in an existing Remote Desktop computer list, find the
client computers using an Apple Remote Desktop scanner.
See “Finding and Adding Clients to Apple Remote Desktop Computer Lists” on page 49
for more information.
4 Select the client computers to be upgraded.
5 Choose Manage > Upgrade Client Software.
6 Click Upgrade.
42
Chapter 3 Installing Apple Remote Desktop
Method #2—Manual Installation
This method works best if you have never enabled Apple Remote Desktop on your
clients and have an existing software distribution infrastructure. This method also
allows for the greatest power and configuration flexibility. Also, if you don’t want Apple
Remote Desktop to upgrade your clients using the Upgrade Client Software feature,
you can perform a manual upgrade.
The custom installer not only installs the needed software but also prepares and
configures the client computer for administration and can be configured to add or edit
user names and passwords for Apple Remote Desktop authentication.
To manually upgrade the client software:
1 Use Remote Desktop to create a client software installer package.
For detailed instructions, see “Creating a Custom Client Installer” on page 44.
2 Copy and install the package on the client computers. You need the name and
password of a user with administrator privileges on the computer to install the
package.
There are several ways to do this. For example, you can:
 Distribute the package by removable media, such as a CD.
 Copy the installer to the clients over the network using file sharing.
 Copy the installer to the clients using command-line tools like scp (if ssh is enabled),
and use Apple’s command-line installation tool, “installer,” to install the package
remotely. This process is described in detail in “Upgrading Apple Remote Desktop
Clients Using SSH” on page 43.
 Add the custom installer package to a Network Install image, using System Image
Utility to automatically include the software and your custom settings when clients
install the operating system using Mac OS X Server 10.4’s NetBoot and Network
Install features.
Warning: Custom install packages that create user names contain sensitive password
data. Take care to store such custom installers securely.
Upgrading Apple Remote Desktop Clients Using SSH
You may not be able to or want to use Remote Desktop to upgrade existing clients to
Apple Remote Desktop 3. If the clients have SSH enabled (called Remote Login in
System Preferences), and are available on the network, you can still upgrade the client
computers.
You still need to use Remote Desktop to create a custom installer package. You also
need the user name and password of a user with system administrator privileges on
the client computer.
Chapter 3 Installing Apple Remote Desktop
43
To upgrade existing client software using SSH:
1 Create the custom client installer package.
For detailed instructions, see “Creating a Custom Client Installer” on page 44.
2 Open the Terminal application (located in /Applications/Utilities/).
3 Copy the installer package to the client computer by typing:
$ scp -r <path to installer package> <user>@<host>:<path to package
destination>
For other options, see the scp man page.
4 Log in to the client computer by typing:
$ ssh <user>@<host>
For other options, see the ssh man page.
5 On the client computer, install the package by typing:
$ sudo installer -pkg <path to package> -target /
For other options, see installer man page.
Creating a Custom Client Installer
To install the Apple Remote Desktop client software on computers, you use the
administrator application, Remote Desktop, to create a custom client installer. The
custom client installer not only installs the Apple Remote Desktop system software, but
can create user names and passwords on the client computer with their Apple Remote
Desktop privileges already assigned. You’ll use an assistant to create a custom client
installer package. Any values set in the custom installer will apply to all the computers
that receive the installation.
While creating a custom installer, you will have a chance to create new Apple Remote
Desktop administrator user names with passwords, and automatically set Apple
Remote Desktop access privileges and preferences.
Warning: Custom installer packages that create user names contain sensitive
password data. Take care to store and transmit such custom installers securely.
To create the client installer:
1 Open Remote Desktop.
2 Choose File > Create Client Installer.
The Custom Installer Setup Assistant appears.
3 Choose to create a custom installer and click Continue.
If you choose not to create a custom installer, you can create a basic installer that sets
no preferences on the client computer.
44
Chapter 3 Installing Apple Remote Desktop
4 Click Continue to begin creating a custom installer.
5 Choose whether to start Remote Desktop sharing at system startup.
This changes the setting found in the Sharing pane of System Preferences.
6 Choose whether to hide or show the Apple Remote Desktop menu bar icon.
7 Click Continue.
8 Choose whether to create a new user for Apple Remote Desktop login. Click Continue.
A new user account can be created to grant Apple Remote Desktop administrator
privileges. Creating a new user account does not overwrite existing user accounts or
change existing user passwords.
If you choose not to create a new user account, skip to step 10 after clicking Continue.
9 Add a new user by clicking Add and filling in the appropriate information.
Click OK after adding each user, and click Continue when you’re ready to go on.
10 Choose whether to assign Apple Remote Desktop administrator access privileges to
Directory Services groups.
If you choose to do so, select “Enable directory-based administration.”
See “Apple Remote Desktop Administrator Access Using Directory Services” on page 62
for more information on using this method to grant Apple Remote Desktop
administrator access.
11 Choose whether to assign Apple Remote Desktop administrator access privileges to
specific users. Click Continue.
If you choose not to assign administrator access privileges, skip to step 14.
12 Click Add to designate a user to receive Apple Remote Desktop access privileges.
13 Provide the user’s short name and set the privileges as desired.
See “Apple Remote Desktop Administrator Access” on page 59 for more information.
Click OK after each user, and click Continue when you’re ready to go on.
14 Choose whether to allow temporary guest control by requesting permission on the
client computers.
See “Considerations for Managed Clients” on page 46 for more information.
15 Choose whether to allow non–Apple VNC viewers to control the client computers, and
click Continue.
See “Virtual Network Computing Access” on page 67 for more information.
16 If desired, select and enter information in any or all of the four System Data fields.
This information appears in Apple Remote Desktop System Overview reports. For
example, you can enter an inventory number for the computer, a serial number, or a
user’s name and telephone number.
Chapter 3 Installing Apple Remote Desktop
45
17 Click Continue.
18 Select a location for the installer.
19 Click Continue to create the installer.
An installer metapackage (.mpkg file) is created in the designated location.
20 Click Done.
Considerations for Managed Clients
If you plan on restricting what applications can open on a managed client, you’ll need
to make sure that Apple Remote Desktop’s processes are allowed to run. A managed
client is a client computer whose environment is governed by Mac OS X Server’s
Workgroup Manager. The following options need to be enabled in Workgroup
Manager’s client and group application preference settings:
 “Allow approved applications to launch non-approved applications”
 “Allow UNIX tools to run”
Removing or Disabling Apple Remote Desktop
Apple Remote Desktop’s client components are bundled as part of Mac OS X and
Mac OS X Server. You may choose to remove or disable parts of it to fit your own
personal computing needs. The following section describes how to uninstall or disable
key Apple Remote Desktop components.
Uninstalling the Administrator Software
To remove the administrator software completely, you must remove the application,
the encrypted list of computer user names and passwords, and the client information
database.
To remove the administrator software:
1 Drag the Remote Desktop application to the Trash.
2 Empty the Trash.
3 Delete the Apple Remote Desktop database from /var/db/RemoteManagement/ using
the following commands in the Terminal application:
$ sudo rm -rf /var/db/RemoteManagement
4 Delete the Remote Desktop preferences files using the following commands in the
Terminal application.
$ sudo rm /Library/Preferences/com.apple.RemoteDesktop.plist
$ sudo rm /Library/Preferences/com.apple.RemoteManagement.plist
$ rm ~/Library/Preferences/com.apple.RemoteDesktop.plist
46
Chapter 3 Installing Apple Remote Desktop
5 Delete the Remote Desktop documentation using the following commands in the
Terminal application.
sudo rm -r /Library/Documentation/Applications/RemoteDesktop
6 Delete the Apple Remote Desktop support files from /Library/Application Support/
using the following commands in the Terminal application:
$ rm -rf ~/Library/Application\ Support/Remote\ Desktop/
$ sudo rm -rf /Library/Application\ Support/Apple\ Remote\ Desktop/
7 Delete the Apple Remote Desktop installation receipts from /Library/Receipts/ using
the following commands in the Terminal application:
$ rm -r /Library/Receipts/RemoteDesktopAdmin*
$ rm -r /Library/Receipts/RemoteDesktopRMDB*
8 Delete the Apple Remote Desktop Dashboard Widget (after closing every instance of
the Widget) using the following commands in the Terminal application:
$ sudo rm -r /Library/Widgets/Remote\ Desktop/
Disabling the Client Software
You may want to temporarily disable Apple Remote Desktop on a client without
removing the software.
Warning: Because Apple Remote Desktop is part of the default Mac OS X 10.3 and
10.4 installation, do not remove the Apple Remote Desktop client components.
To disable the client software on a client computer:
1 On the client computer, open System Preferences and click Sharing.
If necessary, enter the user name and password of a user with administrator privileges
on that computer.
2 Deselect Apple Remote Desktop in the Sharing pane.
3 Quit System Preferences.
Apple Remote Desktop is now disabled and the underlying software is deactivated.
Alternately, you can disable only the administrator privileges by doing the following:
a Click Access Privileges.
b Deselect each user account that you enabled for Apple Remote Desktop
administration.
c Click OK.
d Quit System Preferences.
Chapter 3 Installing Apple Remote Desktop
47
Uninstalling the Client Software from Client Computers
To remove Apple Remote Desktop client software from Mac OS X clients, you need to
remove a number of software components from each client system.
Warning: It is not recommended that you uninstall the client software. Disabling the
client software is sufficient to stop Apple Remote Desktop system activity. See
“Disabling the Client Software” on page 47 for instructions.
To uninstall client software:
1 Open Terminal (located in /Applications/Utilities).
2 Delete the client pieces from /System/Library/ using the following commands in the
Terminal application:
$ sudo rm -rf /System/Library/CoreServices/Menu\ Extras/RemoteDesktop.menu
$ sudo rm -rf /System/Library/CoreServices/RemoteManagement/
$ sudo rm -rf /System/Library/PreferencePanes/ARDPref.prefPane
$ sudo rm -rf /System/Library/StartupItems/RemoteDesktopAgent/
3 Delete the client preferences from /Library/Preferences/ using the following command
in the Terminal application:
$ sudo rm /Library/Preferences/com.apple.ARDAgent.plist
$ sudo rm /Library/Preferences/com.apple.RemoteManagement.plist
4 Delete the client installation receipts from /Library/Receipts/ using the following
command in the Terminal application:
$ sudo rm -r /Library/Receipts/RemoteDesktopClient*
$ sudo rm -rf /var/db/RemoteManagement/
48
Chapter 3 Installing Apple Remote Desktop
4
Organizing Client Computers Into
Computer Lists
4
Apple Remote Desktop uses lists of client computers to
logically organize the client computers under your control.
Connecting to client computers on the network and adding
them to your list is necessary to administer them.
This chapter describes finding clients and organizing them into lists for Apple Remote
Desktop administration and user interaction. You can learn about:
 “Finding and Adding Clients to Apple Remote Desktop Computer Lists” on page 49
 “Making and Managing Lists” on page 53
 “Importing and Exporting Computer Lists” on page 56
Finding and Adding Clients to Apple Remote Desktop
Computer Lists
Before you can audit, control, or maintain any client, you need to add it to an Apple
Remote Desktop computer list. To find computers that aren’t on the local subnet, your
local network’s routers and firewalls must be properly configured to pass network
“pings,” and TCP/UDP packets on ports 3283 and 5900.
Remote Desktop has four different methods for discovering possible clients: searching
the local networks, searching a range of IP addresses, using a specific IP address or
domain name, and importing a list of IP addresses. Once you have found a potential
client, you see the following default information:
Search column
Description
(none)
Displays a small icon indicating whether the computer is already in the
Master List.
(none)
Displays a small icon showing what kind of access the client is capable of.
See “Client Status Icons” on page 161.
Name
The name given to the computer in the Sharing pane of System
Preferences.
IP Address
The computer’s IP address, if any.
49
Search column
Description
DNS Name
The computer’s DNS name, found by reverse lookup, if any.
ARD Version
Apple Remote Desktop client software version.
Network Interface
Which interface the client responded through.
If you want to change the default display list for the scanner, you can select Edit >
View Options and choose any of the other available options (which include Computer
Info Fields, Ethernet ID, Label, or others).
To add a computer to a computer list, you first authenticate to the computer.
Authenticated computers are found in the All Computers list in the Remote Desktop
window. You can add a computer to the All Computers list without authenticating, but
you will be unable to administer the client until you provide a valid user name and
password.
Finding Clients by Searching the Local Network
When you select a local network scanner, Remote Desktop sends a subnet broadcast to
computers in the same subnets as the administrator computer. All possible clients on
the local subnets appear in a list on the right side of the Remote Desktop window.
To search for clients on the local network:
1 Select a scanner at the left of the Remote Desktop window.
2 Select Local Network.
All responding clients are listed in the Remote Desktop window.
3 Select the desired computers.
4 Drag the selected computers to the All Computers list.
5 Authenticate by providing a user name and password for an Apple Remote Desktop
administrator.
The computer is now in your All Computers list.
Finding Clients by Searching a Network Range
To locate computers by network range, you provide a beginning and ending IP address
to scan, and Apple Remote Desktop queries each IP address in that range in sequence,
asking if the computer is a client computer. This method works best when searching for
clients outside the local subnet, but on the local area network.
Alternatively, you can use a text file that contains IP address ranges (in this format
“192.168.0.1-192.168.3.20”), and use text file import to find clients. See “Finding Clients by
File Import” on page 52.
50
Chapter 4 Organizing Client Computers Into Computer Lists
To search a range of network addresses:
1 Select a scanner at the left of the Remote Desktop window.
2 Select Network Range.
3 Enter the beginning and ending IP address.
4 Click the Refresh button.
All responding clients are listed in the Remote Desktop window.
5 Select the desired computers.
6 Drag the selected computers to the All Computers list.
7 Authenticate by providing a user name and password for an Apple Remote Desktop
administrator.
The computer is now in your All Computers list.
Finding Clients by Network Address
If you know the exact IP address or fully qualified domain name of a computer, you can
use that IP address or domain name to add the computer to your All Computers list.
To add a specific address immediately to the All Computers list:
1 Choose File > Add By Address.
2 Enter the IP address or fully qualified domain name.
3 Enter the user name and password.
4 Choose whether to verify the name and password before adding it to the All
Computers list.
5 Click Add.
Alternatively you use the scanner to try an address or domain name and check
availability before attempting to add it to the All Computers list.
To search for a specific address:
1 Select a scanner at the left of the Remote Desktop window.
2 Select Network Address.
3 Enter the IP address or fully qualified domain name in the Address field.
4 Click the Refresh button.
If the client responds successfully, it is listed in the Remote Desktop window.
5 Select the desired computers.
6 Drag the selected computers to the All Computers list.
7 Authenticate by providing a user name and password for an Apple Remote Desktop
administrator.
The computer is now in your All Computers list.
Chapter 4 Organizing Client Computers Into Computer Lists
51
Finding Clients by File Import
You can import a list of computers into Apple Remote Desktop by importing a file
listing the computers’ IP addresses. The list can be in any file format (text, spreadsheet,
word processor) and must contain either IP addresses or fully qualified domain names
(such as foo.example.com).
File import also allows you to add ranges of IP addresses by expressing the range in the
following format: xxx.xxx.xxx.xxx-yyy.yyy.yyy.yyy. For example, a text file with the line
“192.168.0.2-192.168.2.200” would add all IP addresses in that address range.
To import a list of computers from a file:
1 Select a scanner at the left of the Remote Desktop window.
2 Select File Import.
3 Browse for the file by clicking the Open File button, or drag a file into the window.
Alternatively, you can enter the file’s pathname in the File field.
All responding clients are listed in the Remote Desktop window.
4 Select the desired computers.
5 Drag the selected computers to the All Computers list.
6 Authenticate by providing a user name and password for an Apple Remote Desktop
administrator.
The computer is now in your All Computers list.
Making a New Scanner
You may want several scanners in order to search for specific address ranges or to do
other types of searches. You can make and save your own scanner so you can quickly
do the search at any time.
You can rename scanners to make them easy to identify.
To make a custom search list:
1 Choose File > New Scanner.
2 Rename the newly created scanner.
3 Select the scanner icon.
4 Choose a search type from the pop-up menu to the right.
52
Chapter 4 Organizing Client Computers Into Computer Lists
5 Customize the search by entering the specific parameters for the search (such as an IP
address range, or file location).
You can find out how to customize the search in the following sections:
Â
Â
Â
Â
“Finding Clients by Searching the Local Network” on page 50
“Finding Clients by Searching a Network Range” on page 50
“Finding Clients by Network Address” on page 51
“Finding Clients by File Import” on page 52
6 Click the Refresh button.
All responding clients are listed in the Remote Desktop window.
Select your scanner icon and click the Refresh button whenever you want to run the
search.
Making and Managing Lists
You use lists to organize and perform management tasks on client computers. You can
make groups of lists, and rearrange the lists by dragging them up and down the left
side of the main window. Apple Remote Desktop has several different kinds of lists. The
following section describes the kinds of lists, and explains how to create lists and use
them for client management.
About Apple Remote Desktop Computer Lists
Apple Remote Desktop displays computers in lists in the main section of the Remote
Desktop window. The default computer list is called the All Computers list. This is a full
list of all possible clients that you have located and authenticated to. You can create
other lists to group the computers on your network in any way you wish.
Computer lists have the following capabilities:
 You can create as many lists as you want.
 The All Computers list can have up to the number of computers your license allows.
 Computers can appear in more than one list.
 Lists can be made in any grouping you can imagine: geographic, functional,
hardware configuration, even color.
 Click a list name and keep the mouse over the list name, you can edit the list name.
 If you double-click the list icon, you open another window containing the computers
in the list.
Chapter 4 Organizing Client Computers Into Computer Lists
53
Creating an Apple Remote Desktop Computer List
You can make more specific, targeted lists of computers from your All Computers list.
The easiest way to make a new list is to use computers already in the All Computers list.
You can also create blank lists and add computers to them later.
To create an Apple Remote Desktop computer list:
1 Select the All Computers list icon in the main Remote Desktop window.
2 Select the computers you want to add to the new list.
3 Choose File > New List From Selection.
4 Name the computer list.
Alternatively, you can choose File > New List to create a blank list and drag computers
from the All Computers list, or from the scanner search results, to the blank list.
Deleting Apple Remote Desktop Lists
You can delete Apple Remote Desktop computer lists and scanner lists that you
created. You cannot delete the All Computers list, Task Server list, or Task History list.
To delete a list:
m Select the list and press the Delete key.
Creating a Smart Computer List
You can create a computer list which automatically populates based on custom criteria.
Once you create a smart list, any computer added to the All Computers list (or other
specified list) which matches the criteria will automatically be added to the smart list.
You can match any or all of the following criteria:
 Name
 IP Address
 DNS Name
 Label
 Apple Remote Desktop version
 Startup Volume
 Installed RAM
 CPU Information
 Machine Model
 Mac OS version
 Computer is in List
In order to use a smart list which populates from any list except the All Computers list,
you need to add the “Computer is in List” criterion and specify the source list.
54
Chapter 4 Organizing Client Computers Into Computer Lists
To create a smart computer list:
1 Choose File > New Smart List.
2 Name the smart computer list.
3 Choose “any” or “all” criteria to match.
4 Select the attribute to select by, using the pop-up windows and text entry field.
5 Add any other criteria with the Add (+) button.
6 Click OK.
The new smart list appears in Remote Desktop’s main window.
Editing a Smart Computer List
You may want to edit the smart lists you have created. The editing window is the same
as the one used to create the smart list. The options available are the same as those
listed in “Creating a Smart Computer List” on page 54.
To edit a smart computer list:
1 Select the smart list in Remote Desktop’s main window.
2 Choose File > Edit Smart List.
3 Change the smart computer list as desired.
Creating a List of Computers of from Existing Computer Lists
You may want a list which combines the results of several different lists and smart lists.
You can create aggregate lists by using the “Computer is in List” option. The list created
will have the computers from the source lists, but not indicate which source list they
came from.
To create an list of computer lists:
1 Create the lists which will serve as the sources of the smart list.
See “Creating an Apple Remote Desktop Computer List” on page 54 or “Creating a
Smart Computer List” on page 54 for more information.
2 Create the Smart List which will draw its computers from the previously created lists.
“Creating a Smart Computer List” on page 54 for more information.
3 In the Smart List creation dialog, choose to match all of the stated conditions.
4 For the first condition, select “Computer is in List.”
5 Select a source list from the pop-up menu.
6 Add another condition by clicking the Add (+) button.
7 Repeat steps 4-6, adding Computer Lists for all of the source lists.
Chapter 4 Organizing Client Computers Into Computer Lists
55
8 Add other conditions and criteria as desired.
9 Create the final Smart List by clicking OK.
The new Smart List appears in Remote Desktop’s main window.
Importing and Exporting Computer Lists
When setting up Apple Remote Desktop 3, you may not necessarily use the same
computer you used for the previous version of Apple Remote Desktop. Rather than
create new lists of client computers, you can transfer existing lists between computers,
with benefits and limitations depending on the transfer circumstance. The following
sections will help you import or export your computer lists.
 “Transferring Computer Lists from Apple Remote Desktop 3 to a New Administrator
Computer” on page 56
 “Transferring Remote Desktop 2 Computer Lists to a New Remote Desktop 3
Administrator Computer” on page 57
 “Transferring Old v1.2 Computer Lists to a New Administrator Computer” on page 57
Transferring Computer Lists from Apple Remote Desktop 3 to a New
Administrator Computer
You may want to move your existing computer lists to the new administrator computer
running Apple Remote Desktop 3. Lists transferred in this way retain their client
computers as well as the original name of the list. You can only use these instructions
to move computer lists between administrator computers which run Apple Remote
Desktop 3. When you import or export a computer list, the user name and password
used for Apple Remote Desktop authentication are not exported. Once you’ve
imported the computer list, you will still need to authenticate to the computers.
To transfer the computer lists:
1 In the main Remote Desktop window, select the list you want to move.
2 Choose File > Export List.
3 Select a name and a file location for the exported list.
The default file name is the list name. Changing the file name, however, does not
change the list name.
4 Click Save.
A .plist file is created in the desired location.
The XML-formatted .plist file is a plain text file that can be inspected with Apple’s
Property List Editor or a text editor.
5 Copy the exported file to the desired administrator computer.
6 On the new administrator computer, launch Remote Desktop.
7 Choose File > Import List.
56
Chapter 4 Organizing Client Computers Into Computer Lists
8 Select the exported list, and click Open.
The list now appears in Remote Desktop’s main window.
Transferring Remote Desktop 2 Computer Lists to a New Remote
Desktop 3 Administrator Computer
If you are installing Apple Remote Desktop 3 on a computer different from the version
2.x administrator computer, you may want to move your existing computer lists to the
new administrator computer running Apple Remote Desktop 3. When you import or
export a computer list, the user name and password used for Apple Remote Desktop
authentication are not exported. Once you’ve imported the computer list, you will still
need to authenticate to the computers.
To transfer the computer lists:
1 In the main Remote Desktop window, select the list you want to move.
2 Make sure Remote Desktop lists the computer’s name and IP address.
3 Choose File > Export Window.
4 Select a name and a file location for the exported list, and click Save.
The default file name is the window’s title.
5 Copy the exported file to the desired administrator computer.
6 On the new administrator computer, launch Remote Desktop.
7 Using the Scanner, add the clients by File Import.
See “Finding Clients by File Import” on page 52, for detailed instructions.
The list now appears in Remote Desktop’s main window.
8 Select the computers in the list.
9 Choose File > New List From Selection.
The new list now appears in Remote Desktop’s main window.
Transferring Old v1.2 Computer Lists to a New Administrator
Computer
If you are installing Apple Remote Desktop 3 on a computer other than an older
administrator computer using Apple Remote Desktop 1.2, you need to move your
existing computer lists to the new administrator computer before installing version 3.
These instructions only apply when moving Apple Remote Desktop 1.2 computer lists
to a new computer.
Throughout these instructions, the computer with the original lists is the “source
computer.” The computer that will have Apple Remote Desktop 3 installed is the “target
computer.”
Chapter 4 Organizing Client Computers Into Computer Lists
57
To transfer the computer lists:
1 Open Keychain Access (located in /Applications/Utilities) on the source computer.
2 Choose File > New Keychain.
3 Name the new keychain, and click Create.
4 Enter a password for the new keychain.
This is a temporary password that you will use to retrieve the information in the
keychain. Do not use your login password or other sensitive password.
5 If necessary, click Show Keychains to show the administrator keychain.
6 Select the source computer’s main keychain.
If the keychain is locked, unlock it and authenticate.
7 Select only the Apple Remote Desktop entries in the keychain.
8 Drag the Apple Remote Desktop entries to the newly created keychain.
9 Provide the source computer keychain password for each entry.
10 Quit Keychain Access on the source computer.
11 Copy the newly created keychain from the source computer (~/Library/Keychains/
<keychain name>) to the same location on the target computer.
You can copy the keychain over the network, or use a removable storage drive.
12 On the target computer, open Keychain Access in the Finder.
13 Choose File > Add Keychain.
14 Select the keychain that was copied from the source computer, and click Open.
15 If necessary, click Show Keychains to show the keychains.
16 Unlock the newly imported keychain, using the password designated for that keychain.
17 Select the Apple Remote Desktop entries.
18 Drag the Apple Remote Desktop entries to the main keychain on the target computer.
Provide the temporary keychain password for each entry.
19 Quit Keychain Access on the source computer.
When you open Apple Remote Desktop on the new computer, you will notice that the
computer lists from the old computer are available.
58
Chapter 4 Organizing Client Computers Into Computer Lists
5
Understanding and Controlling
Access Privileges
5
There are several different ways to access and authenticate to
Apple Remote Desktop clients. Some depend on Apple
Remote Desktop settings, and others depend on other client
settings, or third-party administration tools.
This chapter explains the various access types, their configuration, and their uses.
You can learn about:
 “Apple Remote Desktop Administrator Access” on page 59
 “Apple Remote Desktop Administrator Access Using Directory Services” on page 62
 “Apple Remote Desktop Guest Access” on page 65
 “Apple Remote Desktop Nonadministrator Access” on page 66
 “Virtual Network Computing Access” on page 67
 “Command-Line SSH Access” on page 68
 “Managing Client Administration Settings and Privileges” on page 68
Apple Remote Desktop Administrator Access
Access privileges allow an Apple Remote Desktop administrator to add computers to a
list and then interact with them. If no access privileges are allowed on a client
computer, that computer cannot be used with Apple Remote Desktop. Access
privileges are defined in the Apple Remote Desktop section of the Sharing pane of the
client computers’ System Preferences.
The recommended access privileges for a client computer depend on how it’s used.
 If the computer is used in a public area, such as a computer lab, you may want to
allow administrators full access privileges.
 If the computer is used by one person, you may not want to give administrators full
access privileges. Also, you may want a user who administers his or her own
computer to take responsibility for creating passwords and setting the access
privileges for the computer
59
The following table shows the settings in the Apple Remote Desktop settings in the
Sharing Preference pane and the features of Remote Desktop that they correspond to.
For example, if you want a certain administrator to be rename computer file sharing
names, you will need to grant that user that privilege by selecting “Change Settings”.
checkbox in the Apple Remote Desktop settings in the Sharing Preference pane on the
client computer.
60
Select
To allow administrators to
<a user name>
Select any other privileges. (If you select only this box, the
administrator can see the client computer in the Computer Status
window and include it in Network Test reports.)
Generate reports
Create hardware and software reports using the Report menu; use
Set Reporting Policy and Spotlight Search.
Open and quit applications
Use these Manage menu commands: Open Application, Open
Items, Send UNIX Command and Log Out Current User.
Change settings
Use these Manage menu commands: Rename Computer, Send
UNIX Command and Set Startup Disk.
Delete and replace items
Use these Manage menu commands: Copy Items, Install Packages,
Send UNIX Command and Empty Trash. Also delete items from
report windows.
This item must be enabled in order to use the Upgrade Client
Software feature.
Send text messages
Use these Interact menu commands: Send Message and Chat.
Restart and shut down
Use these Manage menu commands: Sleep, Wake Up, Restart,
Send UNIX Command, and Shut Down.
This item must be enabled in order to use the Upgrade Client
Software feature.
Copy items
Use these Manage menu and Server menu commands: Copy
Items, Send UNIX Command and Install Packages.
This item must be enabled in order to use the Upgrade Client
Software and Change Client Settings features.
Control
Use these Interact menu commands: Control, Share Screen, Lock
and Unlock Screen.
This item must be enabled in order to use the Upgrade Client
Software and Change Client Settings features.
Chapter 5 Understanding and Controlling Access Privileges
Setting Apple Remote Desktop Administrator Access Authorization
and Privileges Using Local Accounts
To prepare a client for administration, you activate the existing version of Apple
Remote Desktop on the client computer and set Apple Remote Desktop administrator
access privileges by using the Sharing pane of the computer’s System Preferences. You
set access privileges separately for each user account on the computer. Follow the
steps in this section to set access privileges on each client computer.
Note: You can skip this step if you create a custom installer that automatically enables
your desired client settings.
To make changes on a client computer, you must have the name and password of a
user with administrator privileges on the computer.
To set administrator privileges on a computer:
1 On the client computer, open System Preferences and click Sharing.
If the preference pane is locked, click the lock and then enter the user name and
password of a user with administrator privileges on that computer.
2 Select Apple Remote Desktop in the Sharing service pane.
3 Click Access Privileges.
4 Select each user that you want enabled for Apple Remote Desktop administration
authentication.
5 Select a listed user whose access privileges you want to set, and then make the
changes you want to the access privileges. Your changes take effect immediately.
Hint: Holding down the Option key while clicking the user’s checkbox will
automatically select all the following checkboxes for access.
See “Apple Remote Desktop Administrator Access” on page 59 for more information.
6 Repeat for additional users whose access privileges you want to set.
7 If desired, enter information in any or all of the four Computer Information fields.
This information appears in Apple Remote Desktop System Overview reports and
optionally in the computer list views. For example, you can enter an inventory number
for the computer, a serial number, or a user’s name and telephone number.
8 Click OK.
9 To activate the Apple Remote Desktop client, make sure to select the Apple Remote
Desktop checkbox, or select Apple Remote Desktop and click Start.
Chapter 5 Understanding and Controlling Access Privileges
61
Apple Remote Desktop Administrator Access Using Directory
Services
You can also grant Apple Remote Desktop administrator access without enabling any
local users at all by enabling group-based authorization if the client computers are
bound to a directory service. When you use specially named groups from your
Directory Services master domain, you don’t have to add users and passwords to the
client computers for Apple Remote Desktop access and privileges.
When Directory Services authorization is enabled on a client, the user name and
password you supply when you authenticate to the computer are checked in the
directory. If the name belongs to one of the Apple Remote Desktop access groups, you
are granted the access privileges assigned to the group.
Creating Administrator Access Groups
In order to use Directory Services authorization to determine access privileges, you
need to create groups and assign them privileges. There are two ways of doing this:
Method #1
You can create groups and assign them privileges through the mcx_setting attribute
on any of the following records: any computer record, any computer list record, or the
guest computer record.
To create an administrator access group:
1 Create groups as usual.
If you are using Mac OS X Server, you use Workgroup Manager to make them.
2 After you have created groups, you edit either the computer record of the computer to
be administered, its computer list record, or the guest computer record.
3 Use a text editor, or the Apple Developer tool named Property List Editor to build the
mcx_setting attribute XML. The XML contains some administrator privilege key
designations (ard_admin, ard_reports, etc.), and the groups that you want to possess
those privileges. The following privilege keys have these corresponding Remote
Desktop management privileges:
62
Chapter 5 Understanding and Controlling Access Privileges
Management Privilege
ard_admin
ard_reports
ard_manage
ard_interact
Generate reports
X
X
X
Open and quit applications
X
X
Change settings
X
X
Copy items
X
X
Delete and replace items
X
X
Send messages
X
X
Restart and shut down
X
X
Control
X
X
Observe
X
X
Show being observed
X
X
X
In the XML, you name a privilege key and make the value the name of the group or
groups you want to possess the privilege.
Use the sample XML below to make your management/key designation XML.
4 When you have created the snippet of XML, you enter this whole snippet into a
computer record or computer list record.
If you are using Workgroup Manager, you enable the preference to “Show All Records
Tab and Inspector” and use the Inspector to copy the entire snippet of XML the value
which corresponds to the “MCXSettings” attribute name.
Chapter 5 Understanding and Controlling Access Privileges
63
The following is the sample XML format you need to use to assign management
privileges via MCX keys. It assigns the above “ard_interact” privileges to the groups
named “some_group” and “staff.” It also assigns the “ard_manage” privileges to the
group named “staff,” the “ard_admin” privileges to the group “my_admin_group,” and
leaves no group with the “ard_reports” privilege set. Here’s the XML:
<?xml version="1.0" encoding="UTF-8"?> <!DOCTYPE plist PUBLIC "-//Apple
Computer//DTD PLIST 1.0//EN" "http://www.apple.com/DTDs/PropertyList1.0.dtd"> <plist version="1.0"> <dict>
<key>mcx_application_data</key>
<dict>
<key>com.apple.remotedesktop</key>
<dict>
<key>Forced</key>
<array>
<dict>
<key>mcx_preference_settings</key>
<dict>
<key>ard_interact</key>
<array>
<string>some_group</string>
<string>staff</string>
</array>
<key>ard_manage</key>
<array>
<string>staff</string>
</array>
<key>ard_admin</key>
<array>
<string>my_admin_group</string>
</array>
<key>ard_reports</key>
<array>
</array>
</dict>
</dict>
</array>
</dict>
</dict>
</dict> </plist>
This example attribute defines four privileges, although any of them may be left out.
For more information on using Workgroup Manager, and Open Directory, see their
documentation at:
www.apple.com/server/documentation
64
Chapter 5 Understanding and Controlling Access Privileges
Method #2
You can create groups with special names that correspond to the privilege keys above:
ard_admin, ard_reports, ard_manage, and ard_interact. The corresponding privileges
are automatically assigned to these specially named groups. If you have already created
these groups for use with Apple Remote Desktop 2, they will continue to work as
expected with Apple Remote Desktop 3.
Enabling Directory Services Group Authorization
In order to enable group-based authorization for Apple Remote Desktop access, you
create the appropriate groups in your Directory Services master directory domain.
To complete this task, you need to be the Directory Services administrator and have
access to your organization’s users and groups server.
To enable Apple Remote Desktop authorization by group:
1 Use one of the methods in the section “Creating Administrator Access Groups” to
create groups with Apple Remote Desktop access privileges assigned to them.
2 Add users to the groups.
3 Make sure the client computers to be administered are bound to your directory system.
4 Set the clients to use directory authorization by using the Change Client Settings
feature or make a custom installer.
5 Choose to enable directory-based administration on the clients using Directory Access
found in /Applications/Utilities/.
Apple Remote Desktop Guest Access
You can configure an Apple Remote Desktop client to give temporary, one-time access
to an Apple Remote Desktop administrator who does not have a user name or
password for the client computer. Each time the Apple Remote Desktop administrator
would like to control the client computer, he or she must request permission from the
remote client’s user.
Warning: Granting access to control a screen is the most powerful feature in Apple
Remote Desktop, and can be equivalent to unrestricted access.
Chapter 5 Understanding and Controlling Access Privileges
65
To allow guest access:
1 On the client computer, open System Preferences and click Sharing.
If prompted, enter the user name and password of a user with administrator privileges
on that computer.
2 Select Apple Remote Desktop in the Sharing pane.
3 Click Access Privileges.
4 Select “Guests may request permission to control screen.”
5 Click OK.
Apple Remote Desktop Nonadministrator Access
Remote Desktop can operate in what is referred to as “user mode.” User mode is
activated when a nonadministrator user opens Remote Desktop to administer Apple
Remote Desktop client computers. The administrator of the computer with Remote
Desktop installed can choose which features and tasks are available to
nonadministrator users.
Limiting Features in the Administrator Application
User mode is a great way to delegate administrative tasks, or give users only the
features of Remote Desktop that they really use. For example, you might not allow
nonadministrators to copy or delete files, but you may want them to be able to
observe client screens and send messages to client users.
You can choose to allow nonadministrators to:
 Observe, control, and share screens
 Lock and unlock screens
 Send text messages and chat
 Sleep and wake client computers
 Log out users
 Restart and shut down computers
 Open or quit files and applications
 Rename computers
 Generate reports and software searches
 Copy items, delete items, and empty the Trash
 Create Apple Remote Desktop custom client installers
Â
Â
Â
Â
Â
66
Upgrade clients and change client settings
Install packages
Set the client computer’s startup volume
Set the client’s data reporting policy
Send UNIX commands
Chapter 5 Understanding and Controlling Access Privileges
Each of these features can be enabled or disabled independently of each other, or you
can enable all of Remote Desktop’s features for nonadministrator users.
To enable User Mode:
1 Make sure you are logged in as an administrator user.
2 Open Remote Desktop.
3 Choose Remote Desktop > Preferences.
4 Click the Security button.
5 Enable or disable features, as desired.
6 Close the Preference’s window.
Virtual Network Computing Access
You can use Apple Remote Desktop to access a Virtual Network Computing (VNC)
server and view and interact with the server’s screen. VNC access is determined by the
VNC server software. To access a VNC server, it is only necessary to know the IP address
or fully qualified domain name and the password designated in the VNC server
software.
This password does not necessarily correspond to any other password on the system,
and is determined by the VNC configuration.
VNC access is similar to Apple Remote Desktop’s Control command. It allows you to use
your keyboard and mouse to control a VNC server across a network. It doesn’t give any
other Apple Remote Desktop administrator privileges except those of the currently
logged-in user.
Non-Apple VNC viewers can control Apple Remote Desktop clients if the client allows it.
Allowing a non-Apple VNC viewer access to an Apple Remote Desktop client is less
secure than using Apple Remote Desktop to control the client. The VNC protocol
implemented in third-party VNC viewers may not encrypt keystrokes sent over the
network, so sensitive information can be intercepted.
Warning: Granting VNC access to control a screen is the most powerful feature in
Apple Remote Desktop, and can be equivalent to unrestricted access.
Chapter 5 Understanding and Controlling Access Privileges
67
To allow VNC access:
1 On the client computer, open System Preferences and click Sharing.
If prompted, enter the user name and password of a user with administrator privileges
on that computer.
2 Select Apple Remote Desktop in the Sharing pane.
3 Click Access Privileges.
4 Select “VNC viewers may control screen with password.”
5 Enter a VNC password.
Warning: Do not use the same password as any local user or Apple Remote Desktop
login.
Command-Line SSH Access
Command-line SSH access is not granted or managed using Remote Desktop. This type
of access is managed in the Sharing pane of System Preferences (called “Remote
Login”) and is separate from Apple Remote Desktop access types. When you log in to a
client remotely using SSH, you have the user privileges assigned to the user name and
password. These may or may not include computer administrator privileges.
You can use SSH to access a client using a user account created for Apple Remote
Desktop, but you are limited to performing whatever tasks were allowed to that user
when the account was created. Conversely, only the users specified in the Apple
Remote Desktop access privileges can access a computer using Apple Remote Desktop.
Apple Remote Desktop privileges are completely separate and distinct from local
computer administrator UNIX privileges.
Managing Client Administration Settings and Privileges
Regular audits of administration settings can help maintain a secure Remote Desktop
administration environment. Using the various administrator options given with Apple
Remote Desktop administrator privileges, you can create specialized logins for certain
tasks, limiting potentially disruptive power of certain sub-administrators. The following
section gives detailed instructions for checking the administrator privilege settings of
client computers, and changing those settings.
68
Chapter 5 Understanding and Controlling Access Privileges
Getting an Administration Settings Report
You can query active Apple Remote Desktop clients for a report on what commands
they are accepting from your administrator authentication.
The report is a list of the Apple Remote Desktop administrator access types each with
an “On” or “Off” to indicate whether that access type is available to you.
To get an administration settings report:
1 Select a computer list in the Remote Desktop window.
2 Select one or more computers in the selected computer list.
3 Choose Report > Administration Settings.
4 Click Get Report.
Changing Client Administrator Privileges
Once the client computers are able to be administered, you can change the
administrator access privileges for multiple computers simultaneously, using the
Change Client Settings command. If you are using Directory Services to designate
administrator privileges, you don’t need to change the settings on the clients.
To make changes on a client, you must have the name and password of a user with
administrator privileges on the computer. Additionally, you must already have the
Control privilege.
Note: You do not have to make a selection on every page of the assistant. You can click
Continue to move to the next set of settings.
To change administrator privileges on each computer:
1 Select a computer list.
2 Select one or more computers in the selected computer list.
3 Choose Manage > Change Client Settings.
The client assistant appears. Click Continue.
4 Choose whether to start Remote Desktop sharing at system startup.
This changes the setting found in the Sharing pane of System Preferences.
5 Choose whether to hide or show the Apple Remote Desktop menu bar icon.
6 Click Continue.
7 Choose whether to create a new user for Apple Remote Desktop login. Click Continue.
New users can be used to grant Apple Remote Desktop administrator privileges.
Creating a new user does not overwrite existing users or change existing user
passwords.
If you choose not to create a new user, skip to step 9 after clicking Continue.
Chapter 5 Understanding and Controlling Access Privileges
69
8 Add a new user by clicking Add and filling in the appropriate information.
Click OK after adding each user, and click Continue when you’re ready to go on.
9 Choose whether to assign Apple Remote Desktop administrator access privileges to
Directory Services groups.
If you choose to do so, select “Enable directory-based administration.”
See “Apple Remote Desktop Administrator Access Using Directory Services” on page 62
for more information on using this method to grant Apple Remote Desktop
administrator access.
10 Choose whether to assign Apple Remote Desktop administrator access privileges to
specific users. Click Continue.
If you choose not to assign administrator access privileges, skip to step 13.
11 Click Add to designate a user to receive Apple Remote Desktop access privileges.
12 Provide the user’s short name and assign the privileges as desired.
See “Apple Remote Desktop Administrator Access” on page 59 for more information.
Click OK after each user, and click Continue when you’re ready to go on.
13 Choose whether to allow temporary guest control by requesting permission on the
client computers.
14 Choose whether to allow non-Apple VNC viewers to control the client computers, and
click Continue.
See “Virtual Network Computing Access” on page 67 for more information.
15 If desired, select and enter information in any or all of the four System Data fields.
This information appears in Apple Remote Desktop System Overview reports. For
example, you can enter an inventory number for the computer, a serial number, or a
user’s name and telephone number.
16 Click Continue to review the clients’ settings.
17 Choose whether to execute the change using the application or a dedicated task
server.
18 Click Change to change the clients’ settings
The client configuration assistant contacts all of the selected computers and changes
their administration settings.
70
Chapter 5 Understanding and Controlling Access Privileges
6
Setting Up the Network and
Maintaining Security
6
This chapter describes the main aspects of setting up your
network for use with Apple Remote Desktop system
administration, as well as best-practice tips for your network.
Additionally, it contains information about Apple Remote
Desktop security features, and detailed instructions for
enabling them. You can learn about:
 “Setting Up the Network” on page 71
 “Using Apple Remote Desktop with Computers in an AirPort Wireless Network” on
page 72
 “Getting the Best Performance” on page 73
 “Maintaining Security” on page 73
Setting Up the Network
Your network configuration determines Apple Remote Desktop’s performance and
usability. AirPort and AirPort Extreme networks offer slower performance than almost
any Ethernet network. Therefore, file copying, client monitoring, and reporting are
slower over AirPort and AirPort Extreme connections. Network routers and firewalls also
shape, direct, or block network traffic; these things can have an effect on Apple Remote
Desktop’s reliability and efficiency. Here are a few guidelines to keep in mind when
setting up Apple Remote Desktop on your network:
 The more AirPort clients connected to a base station, the lower the bandwidth for
each computer. AirPort Base Stations are not considered “switched networks.”
 Local Hostname (name using Apple’s Bonjour technology, that looks like: name.local)
browsing does not extend beyond the local subnet. Local Hostnames do not resolve
across routers like domain names do.
 Networks with switches have fewer collisions and packet errors than networks with
hubs. This means greater reliability and speed. Consider using switches instead of
hubs.
71
 Organize computers you’re administering using Apple Remote Desktop into small
groups, and close the Remote Desktop administrator application when not in use.
This helps reduce the number of status queries, thus reducing network traffic.
 If a client has a slow network type, consider running it in a list separate from the
faster clients. A single slow client can slow down network operations.
 If network traffic passes through firewalls, make sure you have a large Maximum
Transmission Unit (MTU) setting (1200 or greater). Too small an MTU setting can result
in black screens when sharing or sending screens.
 If you are using a wide-area network (WAN), or metropolitan area network (MAN),
make sure that the defrag bit is turned off in your router so packets don’t get
chunked up. This can result in black screens when sharing or sending screens.
 Network Address Translation (NAT) networks (such as those that use the Mac OS X
Internet Sharing feature) can pose configuration and access difficulties.
If you want to use Remote Desktop from behind a NAT router to access computers
beyond the NAT router, you need to set TCP and UDP port forwarding for ports 3283
and 5900 to your administrator computer. Similarly, if you wish to access a single client
computer that is behind a NAT router, you need to set the router to forward TCP and
UDP ports 3283 and 5900 to the client computer you wish to access.
Using Apple Remote Desktop with Computers in an AirPort
Wireless Network
Using Apple Remote Desktop to observe or control client computers connected using
AirPort wireless technology can sometimes result in impaired performance or cause
communication errors to appear in the Computer Status window.
To get the best performance from Apple Remote Desktop with computers in an AirPort
wireless network:
 Make sure that all AirPort Base Stations and all Apple Remote Desktop client
computers have the latest versions of Apple Remote Desktop software, AirPort
software, and Mac OS X software installed.
 Limit the number of clients that connect to an AirPort Base Station. AirPort clients on
a base station receive all network communication packets sent to any one client on
that base station. Although clients ignore packets that aren’t addressed to them, CPU
resources are used to identify and discard the packet.
 Scale the Control and Observe window. Apple Remote Desktop has server-side
scaling that will allow for less traffic across the network as you scale the window to
smaller sizes.
 Try not to use tasks that multicast traffic such as Share Screen and File Copy. File
Copy tries to initiate a series of individual copies if there is a significant number of
multicast networking errors.
72
Chapter 6 Setting Up the Network and Maintaining Security
 Wireless networks also are not suited for multicast traffic. However Apple Remote
Desktop’s multi-observe feature is different because it doesn’t use multicast traffic.
 Display shared screens in black and white rather than in color.
 Configure your AirPort Base Station with a station density of High and increase the
multicast rate to 11 Mbps using AirPort Admin Utility. Using the base station density
and multicast rate settings limits the range of each AirPort Base Station’s network,
requiring client computers to be fewer than 50 meters from a base station.
Getting the Best Performance
To get the best performance when using the Share Screen, Observe, and Control
commands:
 Use the fastest network possible. This means favoring Ethernet over AirPort,
1000Base-T over 100Base-T, and 100Base-T over 10Base-T.
 If you’re using AirPort, adjust the multicast speed higher.
 Don’t mix network speeds if possible.
 Reduce the use of animation on remote computers. For example, you can simplify
Dock preference settings by turning off animation, automatic hiding and showing,
and magnification effects.
 View the client’s screen in a smaller window when using the “fit to window” option.
 View the client’s screen with fewer colors.
 Use a solid color for the desktop of the screen you’re sharing.
 Share screens only on local networks. If you share a screen with a computer
connected across a router, screen updates happen more slowly.
 Set the Control and Observe image quality to the lowest acceptable for the given
circumstance.
Maintaining Security
Remote Desktop can be a powerful tool for teaching, demonstrating, and performing
maintenance tasks. For convenience, the administrator name and password used to
access Remote Desktop can be stored in a keychain or can be required to be typed
each time you open the application. However, the administrator name and password
for each client computer are stored in the administrator’s preferences and are strongly
encrypted.
Chapter 6 Setting Up the Network and Maintaining Security
73
Administrator Application Security
 Make use of user mode to limit what nonadministrator users can do with Remote
Desktop.
See “Apple Remote Desktop Nonadministrator Access” on page 66.
 If you leave the Remote Desktop password in your keychain, be sure to lock your
keychain when you are not at your administrator computer.
 Consider limiting user accounts to prevent the use of Remote Desktop.
Either in a Managed Client for Mac OS X (MCX) environment, or using the Accounts
pane in System Preferences, you can make sure only the users you designate can use
Remote Desktop.
 Check to see if the administrator computer is currently being observed or controlled
before launching Remote Desktop (and stop it if it is).
Remote Desktop prevents users from controlling a client with a copy of Remote
Desktop already running on it at connection time, but does not disconnect existing
observe or control sessions to the administrator computer when being launched.
Although this functionality is helpful if you want to interact with a remote LAN which
is behind a NAT gateway, it is possible to exploit this feature to get secretly get
information about the administrator, administrator’s computer, and its associated
client computers.
User Privileges and Permissions Security
 To disable or limit an administrator’s access to an Apple Remote Desktop client, open
System Preferences on the client computer and make changes to settings in the
Remote Desktop pane in the Sharing pane of System Preferences. The changes take
effect after the current Apple Remote Desktop session with the client computer
ends.
 Remember that Apple Remote Desktop keeps working on client computers as long
as the session remains open, even if the password used to administer the computer
is changed.
 Don’t use a user name for an Apple Remote Desktop access name and password.
Make “dummy” accounts specifically for Apple Remote Desktop password access and
limit their GUI and remote login privileges.
Password Access Security
 Never give the Remote Desktop password to anyone.
 Never give the administrator name or password to anyone.
 Use cryptographically sound passwords (no words found in a dictionary; eight
characters or more, including letters, numbers and punctuation with no repeating
patterns).
 Regularly test your password files against dictionary attack to find weak passwords.
74
Chapter 6 Setting Up the Network and Maintaining Security
 Quit the Remote Desktop application when you have finished using it. If you have
not stored the Remote Desktop password in your keychain, the application prompts
you to enter the administrator name and password when you open it again.
Physical Access Security
 If you have stored the Remote Desktop password in your keychain, make sure the
keychain is secured and the application isn’t running while you are away from the
Remote Desktop window.
 If you want to leave the Remote Desktop application open but need to be away from
the computer, use a password-protected screen saver and select a hot corner so you
can instantly activate the screen saver.
Remote Desktop Authentication and Data Transport Encryption
Authentication to Apple Remote Desktop clients uses an authentication method based
on a Diffie-Hellman Key agreement protocol that creates a shared 128-bit key. This
shared key is used to encrypt both the name and password using the Advanced
Encryption Standard (AES). The Diffie-Hellman key agreement protocol used in Remote
Desktop 3 is very similar to the one used in personal file sharing, with both of them
using a 512-bit prime for the shared key calculation.
With Remote Desktop 3, keystrokes and mouse events are encrypted when you control
Mac OS X client computers. Additionally, all tasks except Control and Observe screen
data, and files copied via Copy Items and Install Packages are encrypted for transit
(though you may choose to encrypt these as well by changing your application
preferences). This information is encrypted using the Advanced Encryption Standard
(AES) with the 128-bit shared key that was derived during authentication.
Encrypting Observe and Control Network Data
Although Remote Desktop sends authentication information, keystrokes, and
management commands encrypted by default, you may want additional security. You
can choose to encrypt all Observe and Control traffic, at a certain performance cost.
Encryption is done using an SSH tunnel between the participating computers. In order
to use encryption for Observe and Control tasks, the target computers must have SSH
enabled (“Remote Login” in the computer’s Sharing Preference pane). Additionally,
firewalls between the participating computers must be configured to pass traffic on
TCP port 22 (SSH well known port).
If the you are trying to control a VNC server which is not Remote Desktop, it will not
support Remote Desktop keystroke encryption. If you try to control that VNC server,
you will get a warning that the keystrokes aren’t encrypted which you will have to
acknowledge before you can control the VNC server. If you chose to encrypt all
network data, then you will not be able to control the VNC server because Remote
Desktop is not able to open the necessary SSH tunnel to the VNC server.
Chapter 6 Setting Up the Network and Maintaining Security
75
To enable Observe and Control transport encryption:
1 Choose Remote Desktop > Preferences.
2 Click the Security button.
3 In the “Controlling computers” section, select “Encrypt all network data.”
Encrypting Network Data During Copy Items and Install Packages
Tasks
Remote Desktop can send files for Copy Items and Install Packages via encrypted
transport. This option is not enabled by default, and you must either enable it explicitly
for each copy task, or in a global setting in Remote Desktop’s preferences. Even installer
package files can be intercepted if not encrypted.
To encrypt individual file copying and package installation tasks:
m In the Copy Items task or Install Packages task configuration window, select “Encrypt
network data.”
To set a default encryption preference for file copies:
1 In the Remote Desktop Preferences window, select the Security pane.
2 Check “Encrypt transfers when using Copy Items,” or “Encrypt transfers when using
Install Packages” as desired.
Alternatively, you could encrypt a file archive before copying it. The encrypted archive
could be intercepted, but it would be unreadable.
76
Chapter 6 Setting Up the Network and Maintaining Security
7
Interacting with Users
7
Apple Remote Desktop is a powerful tool for interacting with
computer users across a network. You can interact by
controlling or observing remote screens, text messaging with
remote users, or sharing your screen with others.
This chapter describes Remote Desktop’s user interaction capabilities and gives
complete instructions for using them. You can learn about:
 “Controlling” on page 78
 “Observing” on page 85
 “Sending Messages” on page 92
 “Sharing Screens” on page 93
 “Interacting with Your Apple Remote Desktop Administrator” on page 94
77
Controlling
Apple Remote Desktop allows you to control remote computers as if you were sitting in
front of them. You can only control the keyboard and mouse of any one computer at a
time. There are two kinds of remote computers that Apple Remote Desktop can
control: Apple Remote Desktop clients and Virtual Network Computing (VNC) servers.
Controlling Apple Remote Desktop Clients
Apple Remote Desktop client computers can be controlled by any administrator
computer that has the Control permission set. See “Apple Remote Desktop
Administrator Access” on page 59 for more information about Apple Remote Desktop
permissions.
While you control an Apple Remote Desktop client computer, some keyboard shortcut
commands are not sent to the remote computer, but they affect the administrator
computer. These include:
Â
Â
Â
Â
Â
78
Change Active Application (Command-Tab and Command-Shift-Tab)
Show or Hide Dock (Command-Option-D)
Log Out User (Command-Shift-Q)
Take Screen Shot (Command-Shift-3, -4)
Force Quit (Command-Option-Escape)
Chapter 7 Interacting with Users
Also, special keys including the sound volume, screen brightness, and Media Eject keys
do not affect the client computer.
These instructions assume the that observed computer has Apple Remote Desktop
installed and configured properly (see “Setting Up an Apple Remote Desktop Client
Computer for the First Time” on page 41) and that the computer has been added to an
Apple Remote Desktop computer list (see “Finding and Adding Clients to Apple
Remote Desktop Computer Lists” on page 49).
To control an Apple Remote Desktop client:
1 Select a computer list in the Remote Desktop window.
2 Select one computer from the list.
3 Choose Interact > Control.
4 To customize the control window and session, see “Control Window Options” on
page 79.
5 Use your mouse and keyboard to perform actions on the controlled computer.
If your Remote Desktop preferences are set to share keyboard and mouse control, the
remote computer’s keyboard and mouse are active and affect the computer just as the
administrator computer’s keyboard and mouse do.
If your preferences aren’t set to share control, the remote computer’s keyboard and
mouse do not function while the administrator computer is in control.
Control Window Options
When controlling a client, the control window contains several buttons in the window
title bar which you can use to customize your remote control experience. There are
toggle buttons that switch your control session between two different states, and there
are action buttons that perform a single task. In addition to the buttons, there is a
slider for image quality.
The toggle buttons are:
 Control mode or Observe mode
 Share mouse control with user
 Fit screen in window
 Lock computer screen while you control
 Fit screen to full display
The action buttons are:
 Capture screen to a file
 Get the remote clipboard contents
 Send clipboard contents to the remote clipboard
Chapter 7 Interacting with Users
79
Switching the Control Window Between Full Size And Fit-To-Window
When controlling a client, you can see the client window at full size, or scaled to fit the
control window. Viewing the client window at full size will show the client screen at its
real pixel resolution. If the controlled computer’s screen is larger than your control
window, the screen show scroll bars at the edge of the window.
To switch in-a-window control between full size and fit-to-window modes:
1 Control a client computer.
2 Click the Fit Screen In Window button in the control window toolbar.
Switching Between Control and Observe Modes
Each control session can be switched to a single-client observe session, in which the
controlled computer no longer takes mouse and keyboard input from the
administrator computer. This allows you to easily give control over to a user at the
client computer keyboard, or place the screen under observation without accidentally
affecting the client computer.
See “Observing a Single Computer” on page 90 for more information on Apple Remote
Desktop observe mode.
To switch between control and observe modes:
1 Control a client computer.
2 Click the Control/Observe toggle button in the control window toolbar.
Sharing Control with a User
You can either take complete mouse and keyboard control or share control with an
Apple Remote Desktop client user. This allows you to have more control over the client
interaction as well as prevents possible client side interference.
This button has no effect while controlling VNC servers. See “Controlling VNC Servers”
on page 82 for more information.
To switch between complete control and shared mouse modes:
1 Control a client computer.
2 Click the “Share mouse and keyboard control” button in the control window toolbar.
80
Chapter 7 Interacting with Users
Hiding a User’s Screen While Controlling
Sometimes you may want to control a client computer with a user at the client
computer, but you don’t want the user to see what you’re doing. In such a case, you
can disable the client computer’s screen while preserving your own view of the client
computer. This is a special control mode referred to as “curtain mode.” You can change
what’s “behind the curtain” and reveal it when the mode is toggled back to the
standard control mode.
To switch between standard control and curtain modes:
1 Control a client computer.
2 Click the “Lock computer screen while you control” button in the control window
toolbar.
Capturing the Control Window to a File
You can take a picture of the remote screen, and save it to a file. The file is saved to the
administrator computer, and is the same resolution and color depth as the controlled
screen in the window.
To screen capture a controlled client’s screen:
1 Control a client computer.
2 Click the “Capture screen to a file” button in the control window toolbar.
3 Name the new file.
4 Click Save.
Switching Control Session Between Full Screen and In a Window
You can control a computer either in a window, or using the entire administrator
computer screen. The “Fit screen to full display” toggle button changes between these
two modes.
In full screen mode, the client computer screen is scaled up to completely fill the
administrator screen. In addition to the client screen, there are a number of Apple
Remote Desktop controls still visible overlaying the client screen.
In in-a-window mode, you can switch between fitting the client screen in the window
or showing it actual size, possibly scrolling around the window to see the entire client
screen. See “Switching the Control Window Between Full Size And Fit-To-Window” on
page 80 for more information.
To switch between full screen and in-a-window modes:
1 Control a client computer.
2 Click the “Fit screen to full display” button in the control window toolbar.
Chapter 7 Interacting with Users
81
Sharing Clipboards for Copy and Paste
You can transfer data between the Clipboards of the administrator and client computer.
For example, you may want to copy some text from a file on the administrator
computer and paste it into a document open on the client computer. Similarly, you
could copy a link from the client computer’s web browser and paste it into the web
browser on the administrator computer.
The keyboard shortcuts for Copy, Cut, and Paste are always passed through to the
client computer.
To share clipboard content with the client:
1 Control a client computer.
2 Click the “Get the remote clipboard contents” button in the control window toolbar to
get the client’s Clipboard content.
3 Click the “Send clipboard contents to the remote clipboard” button in the control
window toolbar to send content to the client’s Clipboard.
Controlling VNC Servers
Virtual Network Computing (VNC) is remote control software. It allows a user at one
computer (using a “viewer”) to view the desktop and control the keyboard and mouse
of another computer (using a VNC “server”) connected over the network. For the
purposes of these instructions, VNC-enabled computers are referred to as “VNC clients.”
VNC servers and viewers are available for a variety of computing platforms. Remote
Desktop is a VNC viewer and can therefore control any computer on the network
(whether that computer is running Mac OS X, Linux, or Windows) that is:
 Running the VNC server software
 In an Apple Remote Desktop computer list
If the you are trying to control a VNC server which is not Remote Desktop, it will not
support Remote Desktop keystroke encryption. If you try to control that VNC server,
you will get a warning that the keystrokes aren’t encrypted which you will have to
acknowledge before you can control the VNC server. If you chose to encrypt all
network data, then you will not be able to control the VNC server because Remote
Desktop is not able to open the necessary SSH tunnel to the VNC server. For more
information, see “Encrypting Observe and Control Network Data” on page 75.
These instructions assume the observed computer has been added to an Apple
Remote Desktop computer list (see “Finding and Adding Clients to Apple Remote
Desktop Computer Lists” on page 49). When adding a VNC server to an Apple Remote
Desktop computer list, you only need to provide the VNC password, with no user name.
To control a VNC client computer:
1 Select a computer list in the Remote Desktop window.
82
Chapter 7 Interacting with Users
2 Select one computer from the list.
3 Choose Interact > Control.
If the controlled computer’s screen is larger than your control window, the screen
scrolls as the pointer approaches the edge of the window.
4 To customize the control window and session, see “Control Window Options” on
page 79.
5 Use your mouse and keyboard to perform actions on the controlled computer.
Regardless of your Apple Remote Desktop preferences, controlled VNC servers share
keyboard and mouse control. The remote computer’s keyboard and mouse are active
and affect the computer just as the administrator computer’s keyboard and mouse do.
Setting up a Non–Mac OS X VNC Server
This section contains very basic, high-level steps for setting up a non–Mac OS X client
to be viewed with Remote Desktop. This section cannot give detailed instructions, since
the client operating system, VNC software, and firewall will be different.
The basic steps are:
1 Install VNC Server software on the client computer (for example, a PC, or a Linux
computer).
2 Assign a VNC password on the client computer.
3 Make sure the client’s firewall has the VNC port open (TCP 5900).
4 Make sure “Encrypt all network data” is not selected in the Security section of the
Remote Desktop Preferences.
5 Add the computer to the Remote Desktop’s All Computers list using the client’s IP
address.
6 Put the client computer’s VNC password in the Remote Desktop authentication box.
There is no user name for a VNC server, just a password.
Apple Remote Desktop Control and the PC’s Ctrl-Alt-Del
If you use Remote Desktop to administer a PC that’s running VNC, you may be
wondering how to send the Ctrl-Alt-Del command (Control-Alternate-Delete) from a
Mac to the PC. Though Mac and PC key mappings differ, you can use an alternate key
combination to send the command.
 For full-size (desktop) keyboards, use Control-Option-Forward Delete.
 For abbreviated keyboards (on portable computers), use Function-Control-OptionCommand-Delete.
Chapter 7 Interacting with Users
83
VNC Control Options
After you have added a VNC server to a computer list (or when you are first adding it),
you can set a custom port for VNC communication, and you can designate a display to
control.
To set a custom port on an existing computer list member:
1 Select a computer list in the Remote Desktop window.
2 Select a VNC Server computer in the Remote Desktop window.
3 Choose File > Get Info.
4 Click Edit in the Info window.
5 At the end of the IP Address or fully qualified domain name, add a colon followed by
the desired port.
For example, if you want to connect to a VNC server (vncserver.example.com) that is
listening on TCP port 15900, you would enter:
vncserver.example.com:15900
6 Click Done.
To set a custom VNC port when adding a computer by address:
1 Choose File > Add By Address.
2 Enter the IP address or fully qualified domain name.
3 At the end of the IP Address or fully qualified domain name, add a colon followed by
the desired port.
For example, if you want to connect to a VNC server (vncserver.example.com) that is
listening on TCP port 15900, you would enter:
vncserver.example.com:15900
4 Enter the user name and password.
5 Click Add.
To designate a display to control:
1 Add a custom port number, as described above.
2 Use the display number for the last number in the custom port designation (display
designations start at 0 for the default primary display).
For example, f you want to control the default display on a VNC server
(vncserver.example.com) that is listening on TCP port 5900, you would enter:
vncserver.example.com:5900
If you want to control the second display, you would enter:
vncserver.example.com:5901
84
Chapter 7 Interacting with Users
If you want to control the third display, you would enter:
vncserver.example.com:5902
Configuring an Apple Remote Desktop Client to be Controlled by a
VNC Viewer
When configured to do so, an Apple Remote Desktop client can be controlled with a
non–Apple VNC viewer.
Allowing a non–Apple VNC viewer access to an Apple Remote Desktop client is less
secure than using Remote Desktop to control the client. The non–Apple VNC software
expects the password to be stored in a cryptographically unsecured form and location.
To configure a client to accept VNC connections:
1 On the client computer, open System Preferences.
2 Click Sharing, select Apple Remote Desktop, then click Access Privileges.
3 Select “VNC viewers may control screen with the password.”
4 Enter a VNC password.
5 Click OK.
Warning: Do not use the same password as any user or Apple Remote Desktop
administrator. The password may not be secure.
Observing
You may not want to control a computer, but merely monitor what is on its screen.
Observing a remote computer is similar to controlling one, except your mouse
movements and keyboard input are not sent to the remote computer. Apple Remote
Desktop client computers can be observed on any administrator computer that has the
“Observe” permission set. See “Apple Remote Desktop Administrator Access” on
page 59 for more information about Apple Remote Desktop permissions.
Chapter 7 Interacting with Users
85
Remote Desktop allows you to observe multiple clients on the same screen, cycling
through the list of observed computers. This allows you to monitor many screens
without having to select each one individually.
Dealing With Many Client Screens
When observing a single client, you can see the client window at full size, or scaled it to
fit the observe window. To switch between the full size and fitting to the window, click
the Fit to Window button, just as you would in a control window.
If you’re observing more clients than you’ve chosen to fit on one screen, you can cycle
through multiple pages by clicking the Previous or Next button.
Cycle Pages: Use these buttons to manually switch to the previous or next page of
screens.
Getting More Information on Observed Clients
There is a computer information area beneath each of the observed desktops. It’s
automatically disabled when the administrator is viewing more computers than the
computer information area is able to show effectively (a threshhold of about 220 pixels
across). This could happen if:
 the initial selection of computers is too great for the window size
86
Chapter 7 Interacting with Users
 the observe window is resized, shrinking the information beneath the threshold
 the setting for the number of viewed machines is changed
The computer information area is reenabled when the sizes are returned to more than
the image size threshhold.
Changing Observe Settings While Observing
While you are observing multiple computers, you can adjust the Apple Remote
Desktop observe settings using the controls at the top of the observe window.
These settings will be visible after clicking View Options in the toolbar.
To change your observe settings:
 Page Delay: Adjust the number of seconds before automatically advancing to the
next page of screens.
 Computers per page: Adjust the number of client screens visible on each page.
 Image Quality: Adjust the screen color depth from black and white to millions of
colors.
 Titles: Change the titles of the displayed screens in the computer information area.
 Account Picture: Add the currently logged-in user’s account picture under each
observed desktop.
See “Viewing a User’s Account Picture While Observing” on page 88 for more
information.
 Computer Status: Add a status overview icon underneath the observed desktop.
See “Viewing a Computer’s System Status While at the Observe Window” on page 88
for more information.
Chapter 7 Interacting with Users
87
Changing Screen Titles While Observing
While you are observing multiple computers, you can change the title underneath the
desktops shown in the observe window.
The main title can be the:
 Name (the computer sharing name)
 IP Address
 Host Name
To change your observe window titles:
1 Click View Options in the observe window’s toolbar.
2 Select Display Computer Information.
3 From the Title pop-up menu, select the desired title.
4 Click Done.
Viewing a User’s Account Picture While Observing
Remote Desktop can display the user’s account picture and a user-created status
underneath the observed desktop.
The user’s account picture is their system login icon, so it might be either a picture
taken from an iSight camera, or a custom image selected in the Accounts pane of
System Preferences.
To view a user’s account picture:
1 Click View Options in the observe window’s toolbar.
2 Select Display Computer Information.
3 Select Account Picture.
4 Click Done.
Viewing a Computer’s System Status While at the Observe Window
Remote Desktop can display certain system status information underneath the
observed desktop. This information gives you a basic assessment of the following
service statistics:
 CPU Usage
 Disk Usage
 Free Memory
88
Chapter 7 Interacting with Users
There are two levels of detail for system statistics. The top level is a single icon (a red,
yellow, or green icon).
Icon
Indicates
or
One or more service statistic is red. This takes precedence over any
yellow or green indicator.
or
One or more service statistic is yellow This takes precedence over
any green indicator.
Service is operating within established parameters.
No service informaiton available.
You show the second level of detail by placing the mouse pointer over the high-level
status icon. The icon changes to an “i” and you can click the “i” to get more information.
Clicking the icon exposes per-service status icons:
Service
CPU Usage
Icon
Status
Usage is at 60% or less
Usage is between 60% to 85%
Usage is at 85% or higher
No status information is available
DIsk Usage
Usage is at 90% or less
Usage is between 90% and 95%
Usage is at 95% or higher
No status information is available
Free Memory
Less than 80% used
Between 80% and 95% used
Chapter 7 Interacting with Users
89
Service
Icon
Status
Over 95% used
No status information available
To show system status in the observe window:
1 Click View Options in the observe window’s toolbar.
2 Select Display Computer Information.
3 Select Computer Status.
4 Click Done.
Shortcuts in the Multiple Screen Observe Window
You can access several Apple Remote Desktop commands using icons in the observe
window. You can customize the observe window with the commands that are most
useful to you. For example, you may want to access the Copy Items command, the Text
Chat command, and the Lock Screen command, using the buttons in the observe
window toolbar. You perform Remote Desktop tasks on any computer by selecting its
screen and choosing a task from the Remote Desktop menus or the observe window
toolbar.
Regardless of your toolbar customizations, you’ll be able to advance through pages
manually, change the titling of the observed screens, change the number of client
screens per page, change the number of seconds before paging, or change the color
depth of the observed screens.
Observing a Single Computer
When you observe a single computer, the observed screen appears in a window on
your administrator computer. If a screen saver is active when you observe the screen,
the screen saver remains in effect. The observe window contains a “Share mouse
control” button to switch to controlling the screen.
To observe a single computer:
1 Select a computer list in the Remote Desktop window.
2 Select a computer in the Remote Desktop window.
3 Choose Interact > Observe.
If the observed computer’s screen is larger than the observe window, the screen will
scroll as the pointer approaches the edge of the window.
4 To customize the single-client observe window and session, see “Control Window
Options” on page 79. The observe window’s options are the same as those of the
control window.
90
Chapter 7 Interacting with Users
Observing Multiple Computers
When you observe multiple client computers, each client screen is scaled down, so that
several computers can be viewed at the same time. You can set the number of client
screens that appear at any one time. See “Setting Preferences for the Remote Desktop
Administrator Application” on page 36 for more information.
If a client has a screen saver running when you start observing, the screen saver
remains in effect.
The screens will cycle through the entire list of selected computers, a few at a time,
switching every 30 seconds, altered by the speed setting.
To observe multiple computers:
1 Select a computer list in the Remote Desktop window.
2 Select one or more computers in the selected computer list.
3 Choose Interact > Observe.
The remote computer screens appear in a window.
Observing a Computer in Dashboard
If you are using Mac OS X version 10.4 or later, you can use the Dashboard widget to
observe one client computer. The computer must be in your All Computers list and be
authenticated with permission to Observe. Apple Remote Desktop does not have to be
launched to use the widget.
To observe using Dashboard:
1 Add the computer to your All Computers list.
See “Finding and Adding Clients to Apple Remote Desktop Computer Lists” on page 49
for detailed information.
2 Activate Dashboard, and click the widget’s icon to run it.
3 Click the widget’s “Info” button to flip the widget over.
4 Supply a hostname or IP address, login name, and password or simply select the
computer you want to observe (if it’s listed).
5 Click Done.
Chapter 7 Interacting with Users
91
Sending Messages
Apple Remote Desktop allows you to communicate with users of Apple Remote
Desktop client computers using text messaging. You can use text messages to give
instructions or announcements, to collaborate remotely, or troubleshoot with users.
There are two types of text messaging: one-way messages and two-way interactive
chat. Text messages and chat are available only to Apple Remote Desktop client
computers; they are not available to VNC client computers.
Sending One-Way Messages
You can use a one-way text message to send announcements or information to users
client computers. The announcements appear in front of open application windows
and can be dismissed by the user.
To send a one-way text message:
1 Select a computer list in the Remote Desktop window.
2 Select one computer from the list.
3 Choose Interact > Send Message.
4 Enter your message.
5 Click Send.
The text message appears on the screen of all the selected computers.
Interactive Chat
You can start an interactive text chat with the user of an Apple Remote Desktop client
computer. This allows instant feedback from users, so you can collaborate or
troubleshoot.
To begin an interactive chat:
1 Select a computer list in the Remote Desktop window.
2 Select one or more computers in the selected computer list.
3 Choose Interact > Chat.
4 Enter your message, one line at a time.
The message appears real-time on the user’s screen as you type.
92
Chapter 7 Interacting with Users
5 Press the Return key to complete and send each line.
Viewing Attention Requests
After a client user sends an attention request, the Apple Remote Desktop administrator
can read the attention request text.
To view attention requests:
1 Choose Window > Messages From Users.
2 Select the message you want to view.
3 Click Display to view the request’s message.
Sharing Screens
Apple Remote Desktop allows you to show your screen (or the screen of a client
computer in your list) to any or all Apple Remote Desktop client computers in the same
computer list. You can, for example, show a presentation to a classroom of computers
from a single computer.
Sharing a Screen with Client Computers
You can share a client computer’s screen, or the administrator’s screen, with any
number of clients. The client screen displays what is on the shared screen, but cannot
control it in any way.
To share a computer’s screen:
1 Select a computer list in the Remote Desktop window.
2 Select on or more computers in the selected computer list.
These computers include the target computers and the source computer.
3 Choose Interact > Share Screen.
4 Select the screen to be shared.
If you want to share the Apple Remote Desktop administrator screen, select “Share your
screen.”
If you want to share a client screen, select “Share a different screen,” and drag a
computer from an Apple Remote Desktop computer list to the dialog.
5 Click Share Screen.
The selected computer shows the shared computer screen.
If the target computer’s screen resolution is lower than the shared computer’s, only the
top left part of the shared screen (up to the lowest screen resolution) is seen on the
target screen.
Chapter 7 Interacting with Users
93
Monitoring a Screen Sharing Tasks
You may want to keep track of the screen sharing tasks you have begun. You can get
information on all active screen sharing tasks, and can sort the tasks by time started,
source screen, or target computers.
To view current active screen sharing tasks:
m Choose Window > Active Share Screen Tasks.
Interacting with Your Apple Remote Desktop Administrator
Users of Apple Remote Desktop client computers can initiate contact with a Remote
Desktop administrator. Clients can ask for attention from the administrator, or cancel
that attention request.
Additionally, users of Apple Remote Desktop client computers can set an identifying
icon for a Remote Desktop administrator to view. The Remote Desktop administrator
can choose whether to view the icon or not.
Requesting Administrator Attention
At times, Apple Remote Desktop client computer users need to get the attention of the
Apple Remote Desktop administrator. If an Apple Remote Desktop administrator is
currently monitoring the client computer, the client user can send an attention request.
To request administrator attention:
1 Click the Apple Remote Desktop status icon and choose Message to Administrator.
The attention request window appears.
2 If the network has more than one Apple Remote Desktop administrator available,
choose an administrator from the “Send message to” pop-up menu.
3 Enter the message.
4 Click Send.
The attention request icon appears on the administrator’s screen.
94
Chapter 7 Interacting with Users
Canceling an Attention Request
If a user no longer needs the Apple Remote Desktop administrator’s attention, he or
she can cancel the attention request after it has been sent.
To cancel an attention request:
1 Click the Apple Remote Desktop status icon and choose Message to Administrator.
2 Click the Apple Remote Desktop status icon in the menu bar and choose Cancel
Message.
Changing Your Observed Client Icon
By default, the icon that the Remote Desktop administrator sees while observing is the
login icon for the currently logged-in user. If you had an iSight camera active when
setting up your computer, you may have taken a picture of yourself for your user icon.
You can change this icon, and it will change on the administrator’s observation screen.
To change your login icon:
1 Prepare the picture you want to use.
You could use a graphic file, or take a picture using an iSight camera.
2 Open System Preferences.
The System Preferences application launches.
3 Select the Accounts pane.
4 Select your account, and choose the Picture button.
5 Replace your current account picture with the new picture.
6 Close System Preferences.
Chapter 7 Interacting with Users
95
8
Administering Client Computers
8
Apple Remote Desktop gives you powerful administrative
control. You can manually or automatically get detailed
information about every computer, install software, and
maintain systems from a single administrator computer.
This chapter describes Remote Desktop’s capabilities and gives complete instructions
for using them. You can learn about:
 “Keeping Track of Task Progress and History” on page 96
 “Installing Software Using Apple Remote Desktop” on page 101
 “Upgrading Software” on page 105
 “Copying Files” on page 106
 “Creating Reports” on page 111
 “Maintaining Systems” on page 127
 “Managing Computers” on page 135
 “UNIX Shell Commands” on page 143
 “Automating Functions” on page 152
Keeping Track of Task Progress and History
The task history area is on the left side of the Remote Desktop window (see “Remote
Desktop Main Window” on page 29) with all computer lists and scanners. Every time
you execute a task (generating a report, copying a file, restarting a computer), the task
name, affected computers, task result, and time you execute it is stored in the Task
History window (accessible via Window > Task History). The Task History list, in the main
Remote Desktop window, shows the task name and result. You can collapse the Task
History list to reduce its size.
You can select a task in the Task History list to see some information about it, and
double-click it to view a more detailed description of the task, as well as the computers
involved with it. Tasks in progress appear in the Active Tasks list, where you can stop
and restart them.
96
Remote Desktop keeps track of three kinds of task progress: active, Task Server, and
completed. Active tasks are those which are currently being processed by the client
computers, and the client computers have not all reported back to the administrator
console. Some tasks are so short that they only briefly appear in the list of current tasks;
other tasks may take a long time and remain there long enough to return to the task
and view the progress as it happens. The Active Tasks list is located in the left side of
the Remote Desktop window, and has a disclosure triangle to expand or hide the list.
Task Server tasks are those which have been assigned to the task server (either the one
running on the administrator’s computer, or a remote one) which have not yet
completed for all the task participants.
Completed tasks are those which have received a task status for all participating client
computers. The task description and computer list then moves to the task history list.
The task history list is located in the left side of the Remote Desktop window, and has a
disclosure triangle for expanding or hiding the list.
In addition to the task status and notification features of Remote Desktop, you can set a
task notification shell script to run when any task has completed. This script is for all
tasks, but it can be as complex as your needs require.
Enabling a Task Notification Script
When a task completes, Remote Desktop can run a script that you create. This script is
for all completed tasks, and it must be a shell script. There is a default notification script
provided, which you can customize for your needs. The script must be a shell script, but
you can use various other scripting environments like AppleScripts with the osascript
command.
To enable a task notification script:
1 Make sure you are logged in as an administrator user.
2 Open Remote Desktop.
3 Choose Remote Desktop > Preferences.
4 Click the Tasks button.
5 Select “Enable task notification script.”
6 Choose the location of the script.
The default notification script is located at /Library/Application Support/Apple/Remote
Desktop/Notify.
7 Close the Preferences window.
Chapter 8 Administering Client Computers
97
Getting Active Task Status
When you get a task’s current status, you see the progress of the task, the computers
involved, and their feedback to the administrator computer.
To get status on a currently running task:
1 Select the Active Tasks list.
2 Select the desired task in the Remote Desktop window.
The task status and computers involved are shown in the Remote Desktop window.
You can make sure the main window always shows the currently running task in the
main work area by setting a preference. Otherwise, the main window will continue to
show the last selected computer list.
To automatically show task status in the main window:
1 Make sure you are logged in as an administrator user.
2 Open Remote Desktop.
3 Choose Remote Desktop > Preferences.
4 Click the Tasks button.
5 Select “Always change focus to active task.”
6 Close the Preference’s window.
Using the Task Feedback Display
You can use the task feedback display to:
 Retry a task on selected computers
 Cancel a task in progress
Tasks in progress appear in the Active Tasks list, where you can stop them, or run them
again.
To use the task feedback window:
1 Select the task in the task history list or active task list.
2 Change the task as desired:
a Click the retry button to perform the task again.
b Click the stop button to cancel the active task.
Stopping a Currently Running Task
If a task is in progress and Remote Desktop is still waiting for feedback from the client
computers, you can stop the task. You use the Active Tasks list to stop the command in
progress.
98
Chapter 8 Administering Client Computers
To stop a currently running task:
1 Select the Active Tasks list.
2 Select the desired task in the Remote Desktop window.
The task status and computers involved are shown in the Remote Desktop window.
3 Click the Stop button in the top-right of the main window.
Getting Completed Task History
After a task has received feedback from all the involved client computers, or they have
experienced a communication time-out, the task is moved to the Task History list. The
Task History list is located in the left side of the Remote Desktop window, and has a
disclosure triangle to expand or hide the list. This list stays populated as long you’ve set
in the Remote Desktop preferences. The Task History list can also be viewed in a
separate window with the tasks sorted by date.
To get status on a completed task:
1 Open the Task History list using the disclosure triangle.
2 Select the desired task in the Remote Desktop window.
The final task status and computers involved are shown in the Remote Desktop
window.
or
m Select Window > Task History.
The final task status and computers involved are shown in a separate window.
Saving a Task for Later Use
You may want to save a task for later, repeated use. If you find yourself repeating
certain tasks, you can save those tasks and the information about which computers go
with them. Observe and Control tasks cannot be saved.
Saved tasks appear in a list on the left side of the Remote Desktop main window.
To save a task for later use:
1 Open the task you want to save.
For example, if you want to save a Copy Items task, select Manage > Copy Items.
2 Configure the task as desired.
3 Before executing the task, click Save.
4 Name the saved task.
The task appears in a list on the left side of the Remote Desktop main window.
Chapter 8 Administering Client Computers
99
Creating and Using Task Templates
In each task configuration dialog, you can save a task’s settings to a template to reuse
for future tasks of that same type. For example, if you always use certain copy options
for a Copy Items task, you can save those settings as a template, and have them apply
to any newly created Copy Items task. Once a task template is saved, you can select any
one of the saved templates from the Templates pop-up menu. Selecting a template
automatically configures the dialog box according to the saved template.
If you want to perform a task similar to an existing template, you start with that
template using the Template pop-up menu, then you customize the resulting task
configuration dialog after applying the template. For example, if you always want to
use the same Copy Items options, but you want vary the group of computers you apply
it to, you create a task template by configuring the copy options dialog without
selecting target computers and then saving it via the Templates pop-up menu. Then
whenever you make a new Copy Items task with target computers selected, you can
apply the saved settings by selecting those settings from out of the Templates pop-up
menu and add your own settings afterward.
You are free to make as many templates as you want either from existing templates or
from scratch. Once saved, a template can be made the task’s default, with all new
instances of the task opening with the default template settings. You can also edit the
task template list from the Template pop-up list, removing a template, or making it the
task default. There are existing, built-in templates for the Send UNIX Command task
which can not be removed, see “Send UNIX Command Templates” on page 143 for
more information.
Note: Templates are only stored for their own task type. For example, Copy Items saved
templates are not available for use with Rename Computer tasks, etc.
To create a task template:
1 Open a task configuration window.
You can use existing saved tasks, or a newly created task.
2 Configure the task as desired.
3 Click the Template pop-up menu, and select Save as Template.
4 Name the template, and click OK.
To apply a task template:
1 Open a task configuration window.
You can use existing saved tasks, or a newly created task.
2 Click the Template pop-up menu, and select the template you want.
The settings in the template are now applied to the dialog window.
3 If desired, customize the task further.
100
Chapter 8 Administering Client Computers
Editing a Saved Task
You may want to change a previously saved task, changing whether what the task does
or changing the target computers.
To edit a saved task:
1 Double-click the saved task you want to edit.
Alternatively, you could use Control-click or right-click and choose Edit Task from
contextual menu.
2 In the task description window, change the task parameters.
You can alter task preferences, and change the computer list. Remove computers by
selecting them and pressing the Delete key; add computers by dragging them from a
list to the task.
After a task is completed, the task name, result, and time you last ran it are stored for
review. The task feedback window gives a detailed account of the task, and reports
success or failure for each participating client computer.
To view the task feedback window:
m Select the task in the Task History list.
Installing Software Using Apple Remote Desktop
There are several methods you can use to install software with Apple Remote Desktop.
The following section describes how to install software using installer packages and
metapackages, using the copy command in Remote Desktop, using installers made by
other software companies, or using NetBoot or Network Install.
Warning: Distributing copyrighted software without the appropriate license
agreement is a violation of copyright law.
Installing by Package and Metapackage
You can install new software automatically and without user intervention by copying
installer packages (.pkg or .mpkg files) to one or more remote clients. Apple Remote
Desktop copies the package to the computers you choose, runs the installer with no
visible window or user interaction required, and then erases the installer files on
completion.
Chapter 8 Administering Client Computers
101
You can choose to initiate the installation of a package from the designated Task Server
rather from a Remote Desktop task. This allows you to install packages on to computers
that may not be connected to the network (with a status of “Offline”) when you run the
task. The Task Server monitors the network for the next time the offline client comes
online again. Then the Task Server performs the installation. For more information
about designating a Task Server, see “Using a Task Server for Report Data Collection” on
page 112 and “Designating the Task Server and Setting the Report Data Collection
Location” on page 154. For detailed instructions about installing via the Task Server, see
“Installing Software on Offline Computers” on page 103.
You can install multiple packages in succession. When you execute installation of
multiple packages, Remote Desktop copies over all the selected packages and then
installs them. It also detects whether a restart is required and will give you a visual cue.
You can tell the task to restart the computers upon completion, or restart the
computers manually later.
It is not possible to stop the installation of a package. Once the installation starts, it will
complete (assuming no errors occur on the client). However, you can click the Stop
button to stop remaining packages from being copied over and therefore halt the
install.
Alternatively, an administrator can use the PackageMaker application (available on the
Apple Remote Desktop CD or with the Apple Developer Tools) to create a metapackage
that contains several installers to be run in sequence. In addition to creating
metapackages, you can also use PackageMaker to create packages for custom software
that your organization may have developed. More information about making and using
packages and metapackages is available on the Apple Developer Connection website:
developer.apple.com
To copy and install software using a .pkg file:
1 Select a computer list in the Remote Desktop window.
2 Select one or more computers in the selected computer list.
3 Choose Manage > Install Packages.
4 Select a .pkg or .mpkg file to install.
Alternatively, you can drag an installer package on to the package list window.
5 Select whether to restart the target computers after installation.
6 Select the option to run the task from “This application.”
This option is preferable when installing on computers that are all currently online.
If you want to install the software via a Task Server, see “Installing Software on Offline
Computers” on page 103.
102
Chapter 8 Administering Client Computers
7 Select other installation parameters, as desired.
For more information on the available options, see “Copy Options” on page 107.
Note: Client computers are not restarted automatically after an installation is complete
unless explicitly selected in the task command.
8 Click Install.
During installation, a progress bar appears in the task header in the main window. No
progress bars appear on the client computer. The copied package is deleted from the
client computer if an error occurs during installation. However, a failed installation may
leave behind other files created by the installer.
Installing Software on Offline Computers
Using Apple Remote Desktop, you can install software on a computer that is not
currently connected to the network (with a status of “Offline”). The installation does not
occur when initially ordered, but when the offline computer next becomes available.
The installation itself is handled by a designated Task Server. The Task Server will
continue to monitor the network for the next time the offline client comes online
again. For more detailed information about setting up and using a Task Server, see
“Designating the Task Server and Setting the Report Data Collection Location” on
page 154.
To install software on offline clients:
1 Select a computer list in the Remote Desktop window.
2 Select one or more computers in the selected computer list.
Any or all may be offline.
3 Choose Manage > Install Packages.
4 Select a .pkg or .mpkg file to install.
Alternatively, you can drag an installer package into the Packages list.
5 Choose whether to run the task from the Task Server designated by Remote Desktop’s
preferences.
To set up or alter the Task Server, see “Using a Task Server for Report Data Collection”
on page 112 and “Designating the Task Server and Setting the Report Data Collection
Location” on page 154.
6 Select other installation parameters, as desired.
For more information on the available options, see “Copy Options” on page 107 and
“Installing by Package and Metapackage” on page 101.
7 Click Install.
Chapter 8 Administering Client Computers
103
Installing by Using the Copy Items Command
Many applications can be installed simply by copying the application or its folder to the
client computer. Consult the application’s documentation to verify that you can simply
copy the application to the hard disk to install it.
To install software by copying:
1 Select a computer list in the Remote Desktop window.
2 Select one or more computers in the selected computer list.
3 Choose Manage > Copy Items.
4 Add software to the “Items to copy” list.
For more information, see “Copying Files” on page 106.
Repeat this step until all the software you want to copy is in the list.
5 Select a destination.
There are several preset locations available in the “Place items in” pop-up menu,
including the Applications folder. If you do not see the location you want, you can
specify a full pathname.
6 Select your copy options.
See “Copy Options” on page 107 for more information on the available options.
7 Click Copy.
The software is copied to the indicated location. If the copy operation is unsuccessful,
an error message appears in the task feedback window.
Using Installers from Other Companies
The Install Packages command only works with installers that use the .pkg or .mpkg file
format, and some applications can’t be installed by simply copying the application to
the hard disk. To install software using installers with different file formats, you use a
combination of tasks.
To install software with third-party installers:
1 Select a computer list in the Remote Desktop window.
2 Select one or more computers in the selected computer list.
3 Choose Manage > Copy Items.
4 Add the software installer to the “Items to copy” list.
For more information, see “Copying Files” on page 106.
5 Select a copy destination.
6 Select After Copying Open Items.
7 Click Copy.
104
Chapter 8 Administering Client Computers
The software is copied to the indicated destination. If the copy is operation
unsuccessful, an error message appears in the task feedback window.
8 Select a computer that received the copy of the installer.
9 Choose Interact > Control.
10 Control the screen of the selected computer and complete the installation process
interactively.
Upgrading Software
Upgrading software is similar to installing software. However, the method of upgrading
software depends on the original method of installation. As a general rule, upgrades
should not be done while users have their applications open. Make sure the software
to be upgraded is not running.
Warning: Distributing copyrighted software without the appropriate license
agreement is a violation of copyright law.
Upgrading consists of three main tasks:
 Finding out if a piece needs to be updated
 Removing the old version
 Installing the new version
To upgrade software on client computers:
1 Run a Software Version report to determine what version of the software client
computers have.
See “Generating a Software Version Report” on page 118 to learn how to run the report.
2 Remove the old version of the software.
If the software was originally installed using a package or metapackage, it should be
removed automatically when you install the new version.
If the software was originally installed using the Copy Items command, you can delete
the old version, or simply replace the old version with the new version when you install
the new version.
If the software was originally installed using another company’s installer application,
you may need to use an uninstaller before installing the new version. Consult the
software’s manual for instructions on removing its software. If an uninstaller application
is necessary, you can copy it to each of the client computers and run it remotely.
Chapter 8 Administering Client Computers
105
3 Use the appropriate installation method to install the new version of the software. For
more information, see:
 “Installing by Package and Metapackage” on page 101
 “Installing by Using the Copy Items Command” on page 104
 “Using Installers from Other Companies” on page 104
Copying Files
Apple Remote Desktop makes it easy to copy items (other than the system software)
on one or more client computers.
Copying files works fastest with a small number of files. For example, ten files that are
10 KB each generally take longer than one file that is 100 KB. Consider copying a single
file archive (like a .zip or .sit file) to remote computers for faster copying. Remember
that Mac OS X applications are bundles of many smaller files. Although the application
you want to copy looks like a single file in the Finder, it may contain hundreds, or even
thousands of smaller files.
If a client computer is asleep when you attempt to copy items, Remote Desktop tries to
wake the client. If it can’t wake the client and the copy does not proceed, you should
use Remote Desktop to wake the target computer, and then attempt the copy again.
106
Chapter 8 Administering Client Computers
If you choose to copy out to many client computers simultaneously, Remote Desktop
uses network multicasts to send the files. If there is a significant number of multicast
networking errors, Remote Desktop tries to copy individually to each client computer.
Copy Options
Each time you copy an item to a remote computer, you have the chance to customize
the operation to allow fine-grained control of the location and file owner of the copied
file, the network bandwidth used, and what to do in case of failure or duplicate files.
Copy Destination Locations
There are several preset destinations available in the “Place Items In” destination popup menu, including the Applications folder. If you do not see the destination you want,
you can specify a full pathname.
Owner and Group for Copied File
By default, the copied files inherit the owner and group of the enclosing destination
folder. For additional flexibility, you have several options for handing file ownership.
You can:
 Preserve current owner
 Set the owner to the current console user
 Specify user and group
Encryption
You can encrypt the copy transport stream to protect the data sent across the network.
By selecting the “Encrypt network data” option, you exchange performance for security.
This option is also available in the Install Packages dialog.
Copy Failure Handling
By default, if a single computer fails to get the copied file, the copy operation continues
to all participating computers. However, there may be times when you want a copy
operation to stop if one of the copies fails. You can choose to cancel the entire copy
operation if one participating computer reports a failure. This option is also available in
the Install Packages dialog.
Network Bandwidth Limits
File copies are done at the maximum sustainable rate for the network. This allows
Apple Remote Desktop to use all the resources at its disposal to quickly and efficiently
finish the copy. Depending on what else is being done on the network, you may want
to explicitly limit the copy data transfer rate. You can set an approximate maximum
data rate in kilobytes per second for file copies. This option is also available in the Install
Packages dialog.
Chapter 8 Administering Client Computers
107
More Options When the Item Already Exists
If an item with the same name as the item you selected to copy already exists at the
destination, you have several options for handing the name conflict. You can:
 replace the existing item
 replace the existing item if the existing item is older
 rename the existing item
 rename the item being copied
 always ask which of the above options you want to use
Post-Copy Action
You can choose to open a copied item immediately after it’s copied. If you select this
option, the file will open with the parent application that created it.
Copying from Administrator to Clients
Using Apple Remote Desktop, you can copy items to any number of client computers
simultaneously.
To copy items to clients:
1 Select a computer list in the Remote Desktop window.
2 Select one or more computers in the Remote Desktop window (or any window).
3 Choose Manage > Copy Items.
4 Add software to the “Items to copy” list.
Click the Add button to browse local hard disks for items to copy, or drag files and
folders to the list.
If you want to remove an item from the list, select the item and click Remove.
Repeat this step until all the software you want to copy is in the list.
5 Select your copy options.
See “Copy Options” on page 107 for more information on the available options.
6 If you want to schedule this event for another time, or set it to repeat, click the
Schedule button.
See “Scheduled Tasks” on page 155 for more information about scheduling events.
7 Click Copy.
The software is copied to the indicated destination. If the copy is unsuccessful, an error
message appears in the task feedback window.
108
Chapter 8 Administering Client Computers
Copying Using Drag and Drop
Using Apple Remote Desktop, you can copy items by dragging them between Finder
windows on your administrator computer, the Remote Desktop window, and control
windows. For example, you can drag an item from a Finder window to a selected
computer in the Remote Desktop window.
You can use this feature to collect needed files from remote computers or distribute
files between remote computers.
Copying from the Finder to a Client
You can copy files, applications, or folders from the administrator’s Finder windows to
remote computers. You can also drag items directly on to a control window.
To copy items from the Finder to a client:
1 Select a computer list in the Remote Desktop window.
2 Select one or more computers or select the desired Control window.
3 Switch to the Finder.
4 Locate the item you want to copy in the Finder.
5 Drag the item you want to copy from the Finder to the selected clients in the Remote
Desktop window or control window.
Copying onto a Control window puts the file wherever you drop it.
6 Select your copy options.
See “Copy Options” on page 107 for more information on the available options for copy
tasks.
7 Click Copy.
Copying from a Client to the Finder
Using Apple Remote Desktop, you can copy files, applications, or folders from a remote
computer to the administrator’s computer. The process requires that you find the file
you want to copy, using a report or locating them in a control window.
Note: Copied items retain their original owners and permissions.
To copy items from a client to the administrator’s computer:
1 Select a computer list in the Remote Desktop window.
2 Select one or more computers in the selected computer list.
3 Choose a file search report to find the item.
See “Finding Files, Folders, and Applications” on page 116 for more information.
4 Select the item you want to copy in the report window.
5 Drag the item you want to copy from the report window to the administrator’s Finder,
or click the Copy To This Computer button in the menu bar of the report window.
Chapter 8 Administering Client Computers
109
Alternatively, you can drag items from a control window to the administrator
computer’s desktop.
Restoring Items from a Master Copy
Your client computers can restore non-system software from a master copy. This is
helpful if you want to make sure each client computer has the same software. You can
automate the software restore process by using the instructions in “Automating
Functions” on page 152.
You may want to start by creating a disk image that contains the Mac OS X applications
and items you want to copy. Alternatively, you can copy files from any local disk, such
as a hard disk, CD, disk partition, or other disk.
The Copy Items command does not copy system software that is hidden (that is, not
visible in the Finder). It can copy the Applications folder, Library folder, and Users folder,
as well as any folders at the root of the hard disk that were created by the computer’s
administrator user.
Important: You cannot use the Copy Items feature to copy Mac OS X system software
to client computers
To restore files using the Copy Items command:
1 Make a master copy of the volume that has the files to be restored.
You can use any volume, such as a spare hard disk, a CD, or a mounted disk image
(.dmg) file.
2 Mount the master copy volume on the administrator computer.
Master copy volumes must be local volumes, not mounted from over a network.
3 Open Remote Desktop.
4 Select a computer list in the Remote Desktop window.
5 Select one or more computers in the selected computer list.
6 Choose Manage > Copy Items.
7 Add the master copy volume to the Copy Items list.
8 Select your copy options.
See “Copy Options” on page 107 for more information on the available options for copy
tasks.
9 If you want to schedule this event for another time or set it to repeat, click the
Schedule button.
See “Scheduled Tasks” on page 155 for more information about scheduling events.
10 Click Copy.
110
Chapter 8 Administering Client Computers
Creating Reports
Apple Remote Desktop allows you to query client computers for many kinds of
information, from installed software to network speed and reliability. Creating reports
gives you valuable information about the client computers. Reports also help when
you’re copying files and organizing computer lists.
Collecting Report Data
There are three search strategies that Apple Remote Desktop uses when searching for
report information: new data, cached data, and Spotlight data.
With a new data search, the Remote Desktop application queries a client directly, and
waits for the client computer to respond with the desired information. A new data
search gets the most recent information, but takes longer since the client computer
has to gather all the data and send it over the network to the waiting administrator
computer. New data reports are also generated by clients whose reporting policy is set
to send data only in response to a report query. See “Setting the Client’s Data
Reporting Policy” on page 152.
The next source of information is a cached data search. With a cached data search, the
application queries Apple Remote Desktop’s internal database of collected system
information (such as hardware information and system settings), file information
(including installed applications and versions, and software names), or both. You
determine how often the data is collected, and what type of data is stored. See “Setting
the Client’s Data Reporting Policy” on page 152.
Chapter 8 Administering Client Computers
111
The database, which is a PostgreSQL database located at /var/db/RemoteManagement/
RMDB/ can be accessed using other tools besides Remote Desktop. To find out more
about the database schema, see “PostgreSQL Schema Sample” on page 180.
The last kind of new data search is a Spotlight search. This is not a static report on
saved data in a database, but it’s an interactive search of the client computers. A
Spotlight search can only be done on client computers running Mac OS X 10.4 or later.
Spotlight searches a comprehensive, constantly updated index that sees all the
metadata inside supported files—the “what, when and who” of every piece of
information saved on your Mac—including the kind of content, the author, edit history,
format, size, and many more details. Spotlight searches are “live” meaning that the
window reflects changes in the found files even after the command is executed.
Using a Task Server for Report Data Collection
You can use a computer other than the administrator computer to collect your report
data, if you have another unlimited-managed computer license for Apple Remote
Desktop. Using a server that is always running and has the benefits of uninterrupted
power and steady uptime, you can dedicate those computing resources to report data
collection. Such a server is referred to as a Task Server. To use a Task Server, you need:
 a computer that will be running when the clients are set to upload their report data
 an unlimited license for the Remote Desktop server
 a separate unlimited license for the administrator computer
To set up a Task Server, you need to:
1 Install Remote Desktop on the server.
See “Installing the Remote Desktop Administrator Software” on page 40.
2 Configure the server to be the Task Server.
You do this via the server settings in the Remote Desktop preferences.
See “Designating the Task Server and Setting the Report Data Collection Location” on
page 154
3 Install Remote Desktop on the administrator computer.
See “Installing the Remote Desktop Administrator Software” on page 40.
4 Configure Remote Desktop on the administrator computer to use the Task Server as its
source for report data.
You do this using the server settings in the Remote Desktop preferences.
See “Designating the Task Server and Setting the Report Data Collection Location” on
page 154.
5 Set the client reporting policy to tell clients to send report information to the Task
Server.
112
Chapter 8 Administering Client Computers
You do this using the Get Info window of any client computer or the client’s own Apple
Remote Desktop preferences.
See “Setting the Client’s Data Reporting Policy” on page 152 and “Creating a Template
Data Reporting Policy” on page 153.
Report Database Recommendations and Bandwidth Usage
You can have a single Apple Remote Desktop data collection database for any number
of clients. However, avoid having all the clients upload their report information at the
same time. As the number of clients grows, the network usage from the clients as they
upload their report data could come in bursts over a short period of time
overwhelming the network buffer on the Task Server. In such a case, you will probably
give yourself your own denial-of-service attack. Increasing the number of Task Server
computers can divide the network and computing load among several computers for
better performance and better network citizenship. However, since there is no way to
aggregate report data across several collectors and display it on one administrator
computer, you would need multiple administrators to balance your network load in this
manner.
If you use a single database for a large number of clients, it is recommended that you
stagger the generation of report caches over the time between which you want to run
reports. For example, if you normally run a report every week, then set 1/7th of your
clients to rebuild caches on day one, another 1/7th for the next day and so on.
Additionally, they should stagger the cache rebuild over the course of the day as well.
It is recommended that you keep in a given list the minimum number of computers
necessary for your purposes. When a list is selected, the clients in the list send status
updates at a minimum of every 20 seconds. If you have a large number of clients in a
list (for example, 1000), this makes about 50 updates a second.
Creating more lists doesn’t create more resource overhead for Remote Desktop, and
can allow you to quickly and easily administer the clients you want with a minimum
wait. Depending on your network and list sizes, you may find that smaller lists may
result in more productive and reliable administration.
What Bandwidth Does the Default System Overview Report Use on a LAN?
The average System Overview Report cache is about 20 KB. While reporting, the admin
and clients will always try to use all available bandwidth (most IP-based client/server
applications work this way). Therefore, on a 10Mbit/sec. network, the report data
collection for a single client may use 100% of the bandwidth for a period of 0.016
seconds. Assuming a list of 1000 computers, all trying to report at the same time, this
may use 100% of the bandwidth for 16 seconds. Naturally, faster networks will perform
better, and networks with a slow bottleneck like a DSL or modem line perform worse.
Chapter 8 Administering Client Computers
113
System Report Size
The file system data which is uploaded to the report database (labeled “File Search
data” in the Scheduling sheet of the Task Server preference pane) contains a significant
amount of data. For a client with 10 GB of files on the hard disk, the report data
uploaded can easily reach 5 MB in size. With hundreds or thousands of clients, this
amount can add up quickly and might tax network resources. In addition, by choosing
to upload user accounting data and application usage data, you are further increasing
the size of the uploaded data for any one client. Since you may not want to store all the
possible information for a given client computer, you can customize which type of data
is collected, as desired.
Auditing Client Usage Information
With Apple Remote Desktop, you can get detailed information about who has been
using the client computers and how. There are two reports that help you audit
information about how the clients are being used:
 the User History report
 the Application Usage report
Generating a User History Report
The User History report is used to track who has logged in to a computer, when they
logged in and out, and how they accessed the computer. The client stores 30 days of
accumulated data, so the requested time can’t be more than the last 30 days. The
report shows the following information:
 computer name
 user’s short name
 access type (login window, tty, SSH)
 login time
 logout time
 remote login host (originating host to the login session: localhost, or some remote
computer)
Note: Multiple users logged in via Fast User Switching can lead to confusing or
conflicting reports. When a second or third user logs in to a computer, there is no way
of knowing which user is the active user. Session length may not reflect actual usage,
and login and logout times overlap.
User History report information is collected by default if you are installing Remote
Desktop for the first time. If you have upgraded an older version of Remote Desktop,
you need to enable its collection explicitly in the clients’ reporting policy. See “Setting
the Client’s Data Reporting Policy” on page 152 for instructions.
114
Chapter 8 Administering Client Computers
To generate a User History report:
1 Select a computer list in the Remote Desktop window.
2 Select one or more computers in the selected computer list.
3 Choose Report > User History.
4 Select the time frame for the user history information.
5 Click Generate Report.
The newly generated report window appears.
Generating an Application Usage Report
The Application Usage report shows which applications have been running on a given
client, their launch and quit time, and who launched them. The client stores 30 days of
accumulated data, so the requested time can’t be more than the last 30 days. The
following fields are shown by default in the report:
 Computer name
 Name of application
 Launch date
 Total running time
 Time as frontmost application
 User name of process owner
 Current state of application
Application Usage report information is collected by default if you are installing
Remote Desktop for the first time. If you have upgraded an older version of Remote
Desktop, you need to enable its collection explicitly in the clients’ reporting policy. See
“Setting the Client’s Data Reporting Policy” on page 152 for instructions.
To generate an Application Usage report:
1 Select a computer list in the Remote Desktop window.
2 Select one or more computers in the selected computer list.
3 Choose Report > Application Usage.
4 Select the time frame for application usage.
5 Click Generate Report.
The newly generated report window appears.
Chapter 8 Administering Client Computers
115
Finding Files, Folders, and Applications
Apple Remote Desktop allows you to search the contents of client computer hard disks
for specific files, folders, or applications. Additionally, it can compare the results of such
searches to the items on the administrator computer. These searches can compare
software versions, fonts, applications, or installed packages.
Using Spotlight to Find Items
You can use Spotlight to find items on client computers. A Spotlight search can be
done only on client computers running Mac OS X v10.4 or later. Spotlight searches are
“live,” meaning that the window reflects changes in the found files even after the
command is executed. Spotlight searches cannot be used for offline client computers.
The Spotlight Search window is similar to the Spotlight Search window found locally
on a Mac OS X v10.4 computer. It supports many of the same features and queries as
Spotlight on a local computer. For more information on running a Spotlight search, see
Spotlight Help.
To search for software items using Spotlight:
1 Select a computer list in the Remote Desktop window.
2 Select one or more computers in the selected computer list.
3 Choose Interact > Spotlight Search.
4 Choose the desired search parameters and enter a search term.
The results are updated immediately in the window.
116
Chapter 8 Administering Client Computers
The results of the search are listed in the pane at the bottom of the window.
Note: The “Home” Spotlight search location means the Home folder of the currently
logged in user.
Generating a File Search Report
The File Search report allows you to find up to a total of 32,000 items on selected
computers. The items can be files, folders, or applications, but they can only be items
accessible (or visible) in the Finder.
The search parameters include:
 Name
 Parent path
 Full path
 Extension
 Date created
 Date modified
 Size on disk
 Kind
 Version number
 Version string
 Owner
 Group
 Lock status
The search parameters for Apple Remote Desktop are slightly different from those used
by the Finder’s Find command. For example, Apple Remote Desktop does not search by
visibility or by label. The report display can be customized as well. See “Changing
Report Layout” on page 35 for more information.
To search for software items:
1 Select a computer list in the Remote Desktop window.
2 Select one or more computers in the selected computer list.
3 Choose Report > File Search.
4 Choose the desired search parameter from the pop-up menu and enter a search term.
5 If you want to customize the report display, do so now.
For more information about the report display, see “Changing Report Layout” on
page 35 for more information.
6 To search using new data, check Rebuild Data For Report; to search using saved data
only, uncheck Rebuild Data For Report.
Chapter 8 Administering Client Computers
117
7 Click Search.
The newly generated report window appears.
Comparing Software
Apple Remote Desktop has several specialized reports for comparing software on client
computers with software on the administrator computer. These reports can’t be run
comparing two client computers. One computer in the comparison must be the
administrator computer.
Generating a Software Version Report
The Software Version report compares application versions on client computers with
application versions on the administrator computer. You can select up to 10
applications to compare. Command-line tools and unbundled Java (.jar) applications do
not report their version.
To generate a Software Version report:
1 Select a computer list in the Remote Desktop window.
2 Select one or more computers in the selected computer list.
3 Choose Report > Software Version.
4 Select the software you want to compare, from the application list.
You can select up to 10 applications.
If the application you want doesn’t appear in the list, click the Add (+) button to
browse for the application.
5 To search using new data, check Rebuild Data For Report.
6 Click Generate Report.
The newly generated report window appears.
Generating a Software Difference Report
The Software Difference report compares the applications, fonts, and installed
packages of the selected client computers with those on the administrator computer.
The resulting report lists the items compared, their version, location, and whether or
not they were found on the selected client computers.
The Software Difference report can compare all executable Mac OS X and Classic
applications. Unbundled Java (.jar) applications and command-line utilities are not
included in the report. The report can compare all the fonts in the /System/Library/
Fonts/ and /Library/Fonts/, as well as the Fonts folder for the currently logged in user.
Comparing installed packages returns a list of all package receipts in /Library/Receipts/.
You can use this report to find out if your clients have the applications or fonts they
need. Comparing differences in installed packages can help you troubleshoot software
conflicts, and keep your client computers up to date.
118
Chapter 8 Administering Client Computers
To generate a Software Difference report:
1 Select a computer list in the Remote Desktop window.
2 Select one or more computers in the selected computer list.
3 Choose Report > Software Difference.
4 Select the software type you want to compare.
Selecting Applications compares all executable applications. You can limit which folder
on the administrator computer Remote Desktop uses to look for applications.
Selecting Fonts compares all fonts in /Library/Fonts/, /System/Library/Fonts/, and user
font directories.
Selecting Installed Packages compares all package receipts in /Library/Receipts/.
5 To search using new data, select Rebuild data for report.
6 Click Generate Report.
The newly generated report window appears.
Auditing Hardware
You can get a report about the hardware of any client computer. Hardware information
can be accessed using a number of different reports. Although some basic hardware
information can be found in the System Overview report, several more focused
hardware reports provide more detailed information.
To get a basic System Overview report:
1 Select a computer list in the Remote Desktop window.
2 Select one or more computers in the selected computer list.
3 Choose Report > System Overview.
4 Select or deselect hardware items as desired.
5 To search using new data, select Rebuild data for report.
6 Click Get Report.
The newly generated report window appears.
Chapter 8 Administering Client Computers
119
Getting Serial Numbers
Although there is no specific serial number report for Apple Remote Desktop, the serial
number of any client is in the Computer section of the System Overview Report. In
addition to using Apple Remote Desktop to retrieve a computer’s serial number, you
could use the command-line tool systemprofiler with Apple Remote Desktop’s Send
UNIX Command feature.
To generate a serial number report:
1 Select a computer list in the Remote Desktop window.
2 Select one or more computers in the selected computer list.
3 Choose Report > System Overview.
4 Select Serial Number from the Computer section.
5 Select or deselect other items as desired.
6 To search using new data, check Rebuild Data For Report.
7 Click Get Report.
The newly generated report window appears.
Getting Storage Information
The Storage report collects information about the client computer’s internal hard disks.
It can get information about the hardware itself, the volumes on the disk, file system
information, and journaling information for the disk.
For a complete listing of Storage report options, see “Report Field Definitions
Reference” on page 165.
Basic information about hard disk volumes and size can also be found in the storage
section of the System Overview report.
To generate a Storage report:
1 Select a computer list in the Remote Desktop window.
2 Select one or more computers in the selected computer list.
3 Choose Report > Storage.
4 Select the hard disk information desired.
5 To search using new data, select Rebuild Data For Report.
6 Click Get Report.
The newly generated report window appears.
120
Chapter 8 Administering Client Computers
Getting FireWire Device Information
The FireWire Devices report gets information about FireWire devices connected to the
client computer. It can get the following information from a device:
 Manufacturer
 Model
 Device speed
 Software version
 Firmware revision
For more information about FireWire Devices report options, see “Report Field
Definitions Reference” on page 165.
The number of attached FireWire devices can also be found in the Devices section of
System Overview report.
To generate a FireWire Devices report:
1 Select a computer list in the Remote Desktop window.
2 Select one or more computers in the selected computer list.
3 Choose Report > FireWire Devices.
4 Select the FireWire information desired.
5 To search using new data, select Rebuild Data For Report.
6 Click Get Report.
The newly generated report window appears.
Getting USB Device Information
The USB Devices report gets information on Universal Serial Bus devices (scanners,
keyboards, mice, and so forth) connected to the client computer. It can get the
following information from a device:
 Product name and ID
 Vendor name and ID
 Device speed
 Bus power amps
For more information about the USB Devices report options, see “Report Field
Definitions Reference” on page 165.
Basic information about attached USB devices can also be found in the Devices section
of the System Overview report.
Chapter 8 Administering Client Computers
121
To generate a USB Devices report:
1 Select a computer list in the Remote Desktop window.
2 Select one or more computers in the selected computer list.
3 Choose Report > USB Devices.
4 Select the USB device information desired.
5 To search using new data, select Rebuild Data For Report.
6 Click Get Report.
The newly generated report window appears.
Getting Network Interface Information
The Network Interfaces report gets information for all network interfaces, including
inactive interfaces. It also gets detailed network, output, and Ethernet statistics from
client computers.
The Network Interfaces report can be used to find network errors or faulty network
equipment, troubleshoot network performance, and query the network settings of the
client computers.
All detailed statistics are refreshed when the client restarts, and address information
may change if your client uses DHCP to get a network address.
For a complete listing of Network Interfaces report options, see “Report Field
Definitions Reference” on page 165.
Basic information about network settings can also be found in the Network and AirPort
section of the System Overview report.
To generate a Network Interfaces report:
1 Select a computer list in the Remote Desktop window.
2 Select one or more computers in the selected computer list.
3 Choose Report > Network Interfaces.
4 Select the interface information desired.
5 To search using new data, select Rebuild Data For Report.
6 Click Generate Report.
The newly generated report window appears.
122
Chapter 8 Administering Client Computers
Getting Memory Information
The Memory report gets specific information about the installed memory in a client
computer. In addition to reporting how much memory the client has, it shows
information about each memory module, including the module’s:
 Slot identifier
 Size, type, and speed
Memory reports can be used for managing computer resources, hardware
troubleshooting, or deciding which client computer can handle a memory-intensive
application or task.
For more information about the Memory report options, see “Report Field Definitions
Reference” on page 165.
Basic information about system memory can also be found in the Computer section of
the System Overview report.
To generate a Memory report:
1 Select a computer list in the Remote Desktop window.
2 Select one or more computers in the selected computer list.
3 Choose Report > Memory.
4 Select the module information desired.
5 To search using new data, select Rebuild Data For Report.
6 Click Get Report.
The newly generated report window appears.
Getting PCI Card Information
The PCI Cards report gets information about the PCI cards installed in a client
computer. It shows information about each PCI card, including each card’s:
 Slot name
 Card name, type, memory, and revision
 Vendor and device IDs
 ROM revision
For more information about the PCI Cards report options, see “Report Field Definitions
Reference” on page 165.
Basic information about a client’s PCI cards can also be found in the Computer section
of the System Overview report.
Chapter 8 Administering Client Computers
123
To generate a PCI Cards report:
1 Select a computer list in the Remote Desktop window.
2 Select one or more computers in the selected computer list.
3 Choose Report > PCI Cards.
4 Select the PCI card information desired.
5 To search using new data, select Rebuild Data For Report.
6 Click Get Report.
The newly generated report window appears.
Testing Network Responsiveness
Apple Remote Desktop can test network responsiveness between your administrator
computer and client computers. It sends network packets to the clients and reports the
time taken to receive confirmation from the clients.
You can choose how many network packets to send, how often they are sent, and how
long the administrator computer waits for a reply before listing a packet as lost.
To generate a Network Test report:
1 Select a computer list in the Remote Desktop window.
2 Select one or more computers in the selected computer list.
3 Choose Report > Network Test.
4 Select the options you want.
Choose the number of packets sent from the Packets pop-up menu (Total Packets to
Send).
Choose how often to send the send packets from the Interval pop-up menu (Interval
Between Packets).
Choose how long to wait before reporting a packet as lost from the Time Out pop-up
menu (Packet Time Out).
5 Click Get Report.
The newly generated report window appears.
Evaluating the Network Test Report
You can use the Network Test report to diagnose whether task failures in Apple Remote
Desktop are due to network congestion or to some other factor. You may, for example,
find that a Copy Items task is failing on a particular subnet, due to network congestion
on that subnet.
124
Chapter 8 Administering Client Computers
Here are some suggestions for evaluating your network performance based on this
report:
 The number of routers between your computer and another computer can affect the
time the packets take to return. When you evaluate the times for a computer, you
should compare them to the times for a computer in the same area of the network
or with the same number of intervening routers.
 If the maximum time for a packet to return from a computer is significantly greater
than the time for other computers in the same area of the network, there may be a
problem with the computer.
 If a single computer has a large number of lost packets, there may be a problem with
the network connection to that computer.
 If several computers in the same area of the network have a large number of lost
packets, there may be a network connection problem or a problem with an
intervening router or bridge.
Exporting Report Information
You can export reports into a comma-delimited or tab-delimited text file. All the
columns of information in the report window are included, and the report rows are
exported in the order they’re sorted at the time of export.
Exported reports can be put into a database, spreadsheet, or word processor for further
analysis or organization, or be sent to another administrator. You could even use
certain reports as input files for network scanners for Remote Desktop.
Alternatively, you could access the report’s SQL database directly with your own SQL
query tools or applications. Using standard SQL database queries you can get any or all
information out of the report database for use with other applications or databases.
To export a report:
1 Generate any report, and bring the report window to the front.
2 If desired, sort the report rows by selecting a new column to sort by.
3 If you do not want to export the entire report, select the rows to be exported.
4 Choose File > Export Window.
5 Name the file, and choose a location to save to.
6 Select a text encoding.
 Western (Mac OS Roman): Best choice if the report information uses the Roman
alphabet, and the exported document will be opened in an application or on an
operating system that does not support Unicode text encoding (for example, some
installations of Mac OS 9).
 Unicode (UTF-8): Best choice if the exported file will be opened on Mac OS X and
contains no Asian language characters (such as Chinese or Japanese).
Chapter 8 Administering Client Computers
125
 Unicode (UTF-16): Best choice if the report contains Asian language characters.
7 Select a field separator.
 Tab: Inserts a Tab character between column values.
 Comma: Inserts a comma between column values.
8 If you have selected only some rows of the report and want to export only the selected
rows, select Export Selected Items Only.
9 Click Save.
Using Report Windows to Work with Computers
After you’ve created a report, you can use it to select computers and then do any of the
following:
 Create new computer lists.
Select computers in the report window and select File > New List From Selection.
 Generate other reports.
Select any number of rows in a report window; then choose another report from the
Report menu. The new report will be generated based on the computers in the
selected rows.
 Initiate any management task.
Select any row in a report window; then choose a management task from the
Manage menu. This has the same effect as selecting the computer in an Apple
Remote Desktop computer list.
 Interact with users.
Select any row in a report window; then choose a task from the Interact menu. This
has the same effect as selecting the computer in an Apple Remote Desktop
computer list.
 Delete a file from a computer.
Select a file in any file or software report window and click the Delete button.
 Copy an item to your computer.
Select an item in any software report window and click Copy to This Computer.
126
Chapter 8 Administering Client Computers
Maintaining Systems
Apple Remote Desktop provides easy and powerful tools for maintaining client
computers, including tasks such as deleting files, emptying the Trash, and setting
computer startup options.
Deleting Items
If you delete a file from a client computer, it is moved to the client’s Trash.
To delete an item from a client:
1 Select a computer list in the Remote Desktop window.
2 Select one or more computers in the selected computer list.
3 Choose Report > File Search.
4 Find the software you want to delete, using the File Search report.
For more information, see “Finding Files, Folders, and Applications” on page 116.
5 Select the item or items you want to delete in the File Search report window.
6 Click Delete Selected in the report window.
7 Click Delete.
Chapter 8 Administering Client Computers
127
Emptying the Trash
Apple Remote Desktop allows you to empty the Trash on clients to free up disk space.
To find out how much free disk space is on a computer, create a System Overview or
Storage report using the Report menu.
As a part of routine maintenance for client computers, you can free disk space by
emptying the Trash. Emptying the Trash completely removes any items you’ve
previously deleted on the client. You can use the System Overview report to see how
much disk space you can recover by emptying the Trash.
To empty the Trash:
1 Select a computer list in the Remote Desktop window.
2 Select one or more computers in the selected computer list.
3 Choose Manage > Empty Trash.
4 Click Empty.
Setting the Startup Disk
Apple Remote Desktop can set the startup disk on any client computer. You can choose
between a volume on a local hard disk or any available NetBoot volume.
The startup disk must have a valid operating system installed on it. To set the startup
volume on a local hard disk for multiple computers at once, the local volume name
must be the same for all computers.
Alternatively, you can set the startup disk to be a NetBoot volume provided by
Mac OS X Server. This allows you to start up a number of clients from a NetBoot server.
To set the startup disk:
1 Select a computer list in the Remote Desktop window.
2 Select one or more computers in the selected computer list.
3 Choose Manage > Set Startup Disk.
The list that appears shows the client’s local hard disk, a custom NetBoot server item,
and a list of all available NetBoot and Network Install servers available on the local
network subnet.
4 Choose the client’s local hard disk or a NetBoot server volume.
5 If you want to choose a specific local hard disk volume, select Hard Disk, click Edit, and
enter the desired volume name.
6 If you want to choose a custom NetBoot server volume, enter the server IP address or
fully qualified domain name, and the NetBoot volume name.
7 If desired, select Restart When Done.
128
Chapter 8 Administering Client Computers
If you select Restart When Done, the client computer will restart after having its startup
volume set. You need to have Restart privileges to use this option.
8 Click Set.
Renaming Computers
Apple Remote Desktop can set the name that a client computer uses for file sharing.
You can rename multiple computers with the same name followed by a number (such
as Computer1, Computer2, and so on). This is especially useful for differentiating client
computers after a clean system installation.
Note: The Rename Computer feature does not change the Local Hostname or the DNS
name of a client computer.
To rename a computer:
1 Select a computer list in the Remote Desktop window.
2 Select one or more computers in the selected computer list.
3 Choose Manage > Rename Computers.
4 Enter the new computer name.
5 If desired, select “Append a unique number for each computer.”
Selecting this option appends a unique number to the end of the computer name. For
example, if you rename three computers “Computer,” the computers will be named
“Computer1,” “Computer2,” and “Computer3.”
6 Click Rename.
Synchronizing Computer Time
Maintaining synchronized clocks across your clients is essential for management
reliability. Synchronized times allow for more precise audits and allow you to accurately
correlate events between clients on the network. In addition, many internet services
rely on, or benefit from, clock times that are synchronized to a Network Time Protocol
(NTP) server. Any scheduled event benefits from synchronized client time.
All Mac OS X clients can be set to automatically synchronize their clocks with an NTP
server. Mac OS X Server can be configured to act as an NTP server as well. In order to
maintain synchronization across your clients, you should choose a single NTP server to
synchronize to. Apple provides an NTP server at time.apple.com.
Setting computer time requires the use of Apple Remote Desktop’s Send UNIX
Command feature and its built-in command-line tool, systemsetup. See “Built-in
Command-Line Tools” on page 147 for more information about the tool.
Chapter 8 Administering Client Computers
129
To synchronize client computer clocks:
1 Select a computer list in the Remote Desktop window.
2 Select one or more computers in the selected computer list.
3 Choose Manage > Send UNIX Command.
4 Use the provided Templates for Send UNIX Command to set the time server (see “Send
UNIX Command Templates” on page 143 for more information).
a Select System Setup > Network Time from the Template pop-up menu.
b Click Send.
c Select System Setup > Network Time Server from the Template pop-up menu.
Change the time server from time.apple.com to whichever time server you want, if
desired.
5 Alternatively, manually enter the UNIX command.
a Type or paste the following UNIX command:
systemsetup -setusingnetworktime on -setnetworktimeserver <NTP server
address>
b Set the user permissions for this command to be sent as the user “root.”
6 Click Send.
Setting Computer Audio Volume
You may want to standardize or otherwise configure the output volume of your
computers. You could use this to silence a lab of computers all playing music, or turn
up the volume on a single remote computer for a user’s benefit. You can also set the
alert volume separately from the output volume and input volume. Additionally you
can set “output muted.” Muting the volume causes the computer to remember what
the previous volume level was and return to it when the sound is enabled again.
Setting computer audio volume requires the use of Apple Remote Desktop’s Send UNIX
Command feature, AppleScript, and the command-line tool osascript. See “UNIX Shell
Commands” on page 143 for more information. See AppleScript’s StandardAdditions
dictionary for information about using this tool.
To set a computer’s audio volume:
1 Select a computer list in the Remote Desktop window.
2 Select one or more computers in the selected computer list.
3 Choose Manage > Send UNIX Command.
4 Use the provided Templates for Send UNIX Command to set the computer volume (see
“Send UNIX Command Templates” on page 143 for more information).
a Select Miscellaneous > Volume On from the Template pop-up menu.
b Set the desired volume level in the Send UNIX Task dialog.
130
Chapter 8 Administering Client Computers
5 Alternatively, manually enter the UNIX command.
a Type or paste the following UNIX command:
osascript -e 'set volume output volume any_number_from_0-100'
b or for Mac OS X v.10.3 clients enter or paste the following:
osascript -e 'set volume any_number_from_0-7'
6 Click Send.
Repairing File Permissions
Sometimes a client’s system file permissions can be corrupted or changed from their
expected values. In such a case, it may be necessary to manually repair the permissions
on the client. Repairing permissions returns system and library files to their default
settings.
Repairing file permissions requires the use of Apple Remote Desktop’s Send UNIX
Command feature, and the command-line tool diskutil. See “UNIX Shell Commands” on
page 143 for more information. For information about using this tool, see diskutil’s man
page.
To repair a computer’s file permissions:
1 Select a computer list in the Remote Desktop window.
2 Select one or more computers in the selected computer list.
3 Choose Manage > Send UNIX Command.
4 Type or paste the following UNIX command:
diskutil repairPermissions /
5 Set the user permissions for this command to be sent as the user “root.”
6 Click Send.
Adding Items to the Dock
If you install software on your client computers by dragging and dropping, the file,
folder, or application isn’t immediately added to the user’s Dock. The instructions
provided here are a workaround for clients that are not part of a managed client
environment.
Note: Dock management is best done in a Mac OS X Server Workgroup Management
environment. If you use Mac OS X Server to manage client settings and preferences,
the correct place to change the Dock is within the management settings of Workgroup
Manager.
To add an application or other item to the Dock:
1 Select a computer list in the Remote Desktop window.
2 Select one or more computers in the selected computer list.
3 Choose Manage > Send UNIX Command.
Chapter 8 Administering Client Computers
131
4 Type or paste the following UNIX command (replace /Path_To_Application with your
own path to the desired application, and be sure to include the application file
extension, .app):
defaults write com.apple.dock persistent-apps -array-add '<dict><key>tiledata</key><dict><key>file-data</key>
<dict><key>_CFURLString</key><string>/Path_To_Application
</string><key>_CFURLStringType</key><integer>0</integer></dict>
</dict></dict>';killall -HUP Dock
Use “persistent-others” instead of “persistent-apps” if the item is anything other than an
application.
5 Set the permissions for those of currently logged-in user.
6 Click Send.
Changing Energy Saver Preferences
You can get and change the settings found in the Energy Saver pane of System
Preferences. You can change the computer sleep time, as well as other Energy Saver
Options. You can set all the clients to have the same sleep time and even turn on the
preference necessary for them to respond to the Apple Remote Desktop Wake
command (“Wake for Ethernet network administrator access”).
Changing the Energy Saver preferences requires the use of Apple Remote Desktop’s
Send UNIX Command, and its built-in systemsetup command-line tool. See “Built-in
Command-Line Tools” on page 147 for more detailed information about the
systemsetup tool.
To change the Energy Saver preferences:
1 Select a computer list in the Remote Desktop window.
2 Select one or more computers in the selected computer list.
3 Choose Manage > Send UNIX Command.
4 Use the provided Templates for Send UNIX Command to set the energy saver
preferences.
a Select any one of the following Energy Saver items from the System Setup group:
 Restart After Freeze
 Restart After Power Failure
 System Sleep Time
 Display Sleep Time
 Wake On Network Access
 Wake On Modem Activity
b Change the template values to the desired values, and click Send.
5 Alternatively, manually enter the UNIX command.
132
Chapter 8 Administering Client Computers
a Type or paste the following UNIX command:
systemsetup -setsleep minutes number_of_minutes_to_sleep -setwakeonmodem
(on | off) -setwakeonnetworkaccess (on | off) -setrestartpowerfailure
(on | off) -setrestartfreeze (on | off)
b Set the permissions for this command to root.
6 Click Send.
Changing Sharing Preferences for Remote Login
Mac OS X’s Sharing System Preference pane allows you to enable or disable SSH login
access to the computer. You can use Remote Desktop to change enable or disable a
remote computer’s preference.
Setting the remote login sharing preference requires the use of Apple Remote
Desktop’s built-in command-line tool, systemsetup. See “Built-in Command-Line Tools”
on page 147 for more detailed information about the tool.
To change the Remote Login sharing preference:
1 Select a computer list in the Remote Desktop window.
2 Select one or more computers in the selected computer list.
3 Choose Manage > Send UNIX Command.
4 Use the provided Templates for Send UNIX Command to set the Remote Login (SSH)
setting (see “Send UNIX Command Templates” on page 143 for more information).
a Select System Setup > Remote Login (SSH) from the Template pop-up menu.
b Set the login for on or off.
5 Alternatively, manually enter the UNIX command.
a Type or paste the following UNIX command:
systemsetup -setremotelogin (on | off)
b Set the permissions for this command to root.
6 Click Send.
Setting Printer Preferences
You can set the default printer for your client computers so that they all have the same
default and configured printer. There are several ways to set up printer preferences for
a client computer. If you have a computer whose printer setup is correct, you can use
Remote Desktop to copy the necessary configuration files to the client computers. If
you don’t have a configured computer available, you can use the command-line tools
in Mac OS X to set the printer preference.
Setting the printer preference via Remote Desktop involves using the Copy Items task.
See “Copying from Administrator to Clients” on page 108 for more information.
Chapter 8 Administering Client Computers
133
To set up printer preferences using Copy Items:
1 Set up a client computer’s print preference using the Printer Setup Utility.
2 Use the Copy Items task to copy the following file and folder to all the target
computers:
/private/etc/cups/printers.conf
/private/etc/cups/ppd/
Because these files are hidden in the Finder, you may have to use the Terminal or the
Finder’s “Go to Folder” command to add them to the “Items to copy” list.
3 Choose a “Same relative location” as the copy destination.
4 Choose to replace existing items.
5 Click Copy.
6 Restart the client computers’ printer process by restarting the clients.
If you are comfortable with the command-line, you can use Remote Desktop’s Send
UNIX Command to configure all the client computer preferences at once.
Setting printer preferences using Send UNIX Command requires the use of the built-in
lpadmin command-line tool. For more information, see the lpadmin man page.
To set up printer preferences using Send UNIX Command:
1 Select a computer list in the Remote Desktop window.
2 Select one or more computers in the selected computer list.
3 Choose Manage > Send UNIX Command.
4 Type or paste the following UNIX command:
lpadmin -p printer_name -E -v lpd://printer_and_queue_address -m
printer_model_ppd_file -L “text_description_of_printer_location”
5 Set the user permissions for this command to “root.”
6 Click Send.
134
Chapter 8 Administering Client Computers
Managing Computers
Using Apple Remote Desktop, you can control multiple client computers
simultaneously, issuing commands that are found in Mac OS X’s Apple menu (Log Out,
Sleep, Restart, etc.), as well as other commands.
Opening Files and Folders
Apple Remote Desktop can open existing items (files, folders, and applications) on
client computers. The item to open must be on the administrator computer, in addition
to being on the client computers, and must have the same name, type, size,
permissions, and file creation date as the item on the administrator computer.
The Open Items command opens files in the application used to create them, if it exists
on the client computer, or in the application assigned to open files with that file’s
extension. Folders open in the Finder. Applications are opened, or brought to the front,
if already open.
Chapter 8 Administering Client Computers
135
To open an item:
1 Select a computer list in the Remote Desktop window.
2 Select one or more computers in the selected computer list.
3 Choose Manage > Open Items.
4 Click the Add (+) button and browse for the item on the administrator computer.
Alternatively, drag the item from the administrator computer’s Finder to the Open
Items dialog.
5 Click Open when the item is selected.
The Open Items dialog shows the icon and name of the item to open.
6 Click Open.
Opening Applications
Apple Remote Desktop can open applications on client computers. The application to
open must be on the administrator computer, in addition to being on client computers.
If the application is already open, the Open Application command brings it to the front.
You can open both Mac OS X and Classic applications with this command.
The application on the administrator computer must have the same name, type, and
permissions as the one to be opened on the client computer.
To open an application:
1 Select a computer list in the Remote Desktop window.
2 Select one or more computers in the selected computer list.
3 Choose Manage > Open Application.
The Open Application dialog shows the applications installed and found in the
Applications folder at the top level of the hard disk of the administrator’s computer.
4 Select the application or click the Add (+) button and browse to find the desired
application on the administrator computer.
Alternatively, drag the item from the administrator computer’s Finder to the Open
Application dialog.
The Open Application dialog shows the icon and name of the application to open.
5 Click Open.
136
Chapter 8 Administering Client Computers
Quitting Applications Without Logging Out the User
Apple Remote Desktop can quit running applications on client computers. You can quit
both Mac OS X and Classic applications with this command. The administrator must be
able to use the Send UNIX Command on the client computer. You can get more
information on the killall command by seeing its man page.
Note: Unsaved changes to documents on the client will be lost.
To quit an open application:
1 Select a computer list in the Remote Desktop window.
2 Select one or more computers in the selected computer list.
3 Choose Manage > Send UNIX Command.
4 Use the provided Templates for Send UNIX Command to quit an application (see “Send
UNIX Command Templates” on page 143 for more information).
a Select Miscellaneous > Quit Application from the Template pop-up menu.
b Fill in the desired Application Name.
5 Alternatively, manually enter the UNIX command.
a Type or paste the following UNIX command:
killall “application_name”
b Set the user permissions for this command to be sent as the user “root.”
6 Click Send.
Putting a Computer to Sleep
Apple Remote Desktop can put client computers to sleep. This has the same result as
choosing the Sleep command on the client: the display sleeps, the hard disks spin
down, and the computer’s central processor and network interface are put in a lowpower mode.
Note: Although you can put computers to sleep which are on other network subnets
besides your own, and via AirPort, you will not be able to wake them using Remote
Desktop.
To put a computer to sleep:
1 Select a computer list in the Remote Desktop window.
2 Select one or more computers in the selected computer list.
3 Choose Manage > Sleep.
4 Click Sleep.
Chapter 8 Administering Client Computers
137
Waking Up a Computer
Apple Remote Desktop can wake up computers that have gone to sleep or been put to
sleep with Remote Desktop. To wake a computer using Remote Desktop, the
computer’s networking hardware must support waking via network packet
(wakeonlan), and the computer must have “Wake For Ethernet Network Administrator
Access” enabled in the Wake Options of Energy Saver preferences.
You cannot wake up computers connected to the network via AirPort or computers not
located on your local subnet. Apple Remote Desktop uses a “wakeonlan” packet to
wake sleeping client computers. The packet can only be delivered by way of a local
broadcast address, so it only works on a local area network. Also, the network hardware
still needs to be powered to receive and act on the packet. AirPort and other wireless
network interfaces completely power down on sleep and therefore can’t receive or act
on a wakeonlan packet.
If you must wake computers on a different subnet, you may want to use a computer on
that subnet as a type of sentry. It never sleeps, and runs another licensed copy of
Remote Desktop, as well as allows itself to be controlled by your local copy of Remote
Desktop. That way you can control the “sentry” computer and instruct it to wake client
computers on its local subnet.
To wake a computer:
1 Select a computer list in the Remote Desktop window.
2 Select one or more computers from the list that show a status as “Sleeping” or offline.
3 Choose Manage > Wake.
4 Click Wake.
Locking a Computer Screen
Apple Remote Desktop can lock a computer screen. When you lock a computer screen,
no one can see the desktop or use the mouse and keyboard on that computer. By
default, Apple Remote Desktop displays a picture of a padlock on locked screens, but
you can display a custom picture. See “Displaying a Custom Picture on a Locked
Screen” on page 139 for more information.
You can continue to work with computers using Remote Desktop after you’ve locked
their screens.
138
Chapter 8 Administering Client Computers
To lock a computer screen:
1 Select a computer list in the Remote Desktop window.
2 Select one or more computers in the selected computer list.
3 Choose Interact > Lock Screen.
4 Enter a message to be displayed on the locked screen, if desired.
5 Click Lock Screen.
The client screen goes black, except for the administrator’s name, the default picture,
and any message text.
Displaying a Custom Picture on a Locked Screen
You can display a picture of your choice on the client screen while it is locked by Apple
Remote Desktop. When creating images, make sure the image size will fit on the client
computer’s screen. For example, if you have clients with 800 x 600 screens, a picture
that is 1024 x 768 will be scaled down to fit the screen.
To create a custom locked screen picture:
1 Create a picture using a graphics program, such as AppleWorks.
2 Save the picture in PICT, TIFF, GIF, JPEG, or any other QuickTime-compatible static image
format.
QuickTime-compatible movies or QuickTime VR objects cannot be used.
3 Name the picture “Lock Screen Picture”.
4 Copy the “Lock Screen Picture” file to /Library/Preferences/ on the client computer.
Unlocking a Computer Screen
You must use Apple Remote Desktop to unlock any computer screen locked by Remote
Desktop. When you unlock a computer screen, you restore the desktop and use of the
mouse and keyboard on that computer.
To unlock a computer screen:
1 Select a computer list in the Remote Desktop window.
2 Select one or more computers from the list that show a “Locked Screen” status.
3 Choose Interact > Unlock Screen.
4 Click Unlock Screen.
Chapter 8 Administering Client Computers
139
Disabling a Computer Screen
Sometimes you may want to control a client computer with a user at the client
computer, but you don’t want the user to see what you’re doing. In such a case, you
can disable the client computers screen while preserving your own view of the client
computer. This is a special control mode referred to as “curtain mode.” You can change
what’s “behind the curtain” and reveal it when the mode is toggled back to the
standard control mode.
This feature only works with Mac OS X v.10.4 clients.
To disable a computer screen while you work:
1 Control a client computer.
See “Controlling Apple Remote Desktop Clients” on page 78 or “Controlling VNC
Servers” on page 82 for detailed information.
2 Click the Lock Computer Screen While You Control button in the control window
toolbar.
Alternatively, if you are not currently in a Control window and have added the “Control
Computer in Curtain Mode” button to your toolbar, click that toolbar icon. You can also
select Interact > Curtain.
Logging In a User at the Login Window
Apple Remote Desktop can log in any user on a client computer by using AppleScript
System Events and the Send UNIX Command feature. Using these powerful features
you can log in any number of client computers to the same user name simultaneously
from the login window.
This script is for use on computers at the login screen only.
To log in a user:
This method uses the osascript command. For detailed information on osascript,
see the osascript man page.
1 Select a computer list in the Remote Desktop window.
2 Select one or more computers in the selected computer list.
3 Choose Manage > Send UNIX Command.
4 Type the following AppleScript in the UNIX Command window, adding the user name
and password:
osascript <<EndOfMyScript
tell application "System Events"
keystroke "<user name>"
keystroke tab
delay 0.5
keystroke "<password>"
delay 0.5
140
Chapter 8 Administering Client Computers
keystroke return
end tell
EndOfMyScript
5 Choose user “root” to run the command.
6 Click Send.
The client computer executes the script.
Logging Out the Current User
Apple Remote Desktop can log out the current user on a client computer. Other users,
besides the current active user, who are logged in using Fast User Switching are not
logged out using this command. Using this command returns the client computer to
the login window.
Unsaved work will stop the logout process.
To log out a user:
1 Select a computer list in the Remote Desktop window.
2 Select one or more computers in the selected computer list.
3 Choose Manage > Log Out Current User.
4 Click Log Out.
Restarting a Computer
Apple Remote Desktop can restart a client computer. This has the same result as
choosing the Restart command from the client computer’s Apple menu.
This feature is especially useful when used with the Install Packages command. Install
Packages doesn’t restart the computer, even if the package requires it. You can restart
the computer using Remote Desktop after installing a package.
To restart a computer:
1 Select a computer list in the Remote Desktop window.
2 Select one or more computers in the selected computer list.
3 Choose Manage > Restart.
4 Select the type of restart.
You can allow users to save files or cancel the restart, or you can force an immediate
restart, which will cause the users to lose unsaved changes to any open files.
5 Click Restart.
Chapter 8 Administering Client Computers
141
Shutting Down a Computer
Apple Remote Desktop can shut down a client computer. This has the same result as
choosing the Shut Down command from the client computer’s Apple menu.
Note: If you shut down an Apple Remote Desktop client, you cannot start it up using
Remote Desktop.
This command is especially useful when used with Energy Saver preferences. You can
set your client computers to start up every morning at a designated time and use
Remote Desktop to shut them down at night. The next morning, they will start up and
be ready to administer.
To shut down a computer:
1 Select a computer list in the Remote Desktop window.
2 Select one or more computers in the selected computer list.
3 Choose Manage > Shut Down.
4 Select the type of shutdown.
You can choose to allow users to save files or cancel the shutdown, or you can force an
immediate shutdown, which will cause the users to lose unsaved changes to any open
files.
5 Click Shut Down.
142
Chapter 8 Administering Client Computers
UNIX Shell Commands
In addition to its own tasks, Apple Remote Desktop provides a way to easily execute
UNIX commands on client computers. In order to send UNIX commands to the client
computers, the client computers must have the BSD subsystem installed. The UNIX
commands are shell command, which means you can write a script with conditionals,
loops, and other functions of the shell, and not just send a single command.
Send UNIX Command Templates
Remote Desktop has a few built-in UNIX shell command templates for use with Send
UNIX Command. In the Send UNIX Command task configuration dialog, you can select
any one of the commands from the Templates pop-up menu. Selecting a template
pastes a generic script into the UNIX command field. All you have to do is customize
the script to your situation. For example, if you want to set a manual IP address for a
client computer, you would select the Manual IP template from the Template >
Network Setup pop-up menu, replace the placeholder indicated in the pasted-in UNIX
command with the real IP address, and send the command.
You are free to make as many templates as your want from either existing templates or
from scratch. Once saved, a template can be made the task’s default, with all new
instances of the task opening with the default template settings.
Chapter 8 Administering Client Computers
143
For more information about Task Templates, see “Creating and Using Task Templates”
on page 100.
The built-in Send UNIX Command templates include:
144
Template sub-menu
Template name
Network Setup
Â
Â
Â
Â
Â
Â
Â
Â
List All Services
Manual IP
DHCP
BOOTP
Manual with DHCP Router
DNS Servers
Search Domains
Web Proxy
System Setup
Â
Â
Â
Â
Â
Â
Â
Â
Â
Â
Â
Â
Â
Â
Â
Â
Â
Allow Power Button To Sleep
Bonjour Name
Current Date
Current Time
Time Zone
Network Time
Network Time Server
Remote Apple Events
Remote Login (SSH)
Restart After Freeze
Restart After Power Failure
System Sleep Time
Display Sleep Time
Hard Disk Sleep Time
Delay After Power Failure
Wake On Modem Activity
Wake On Network Access
Miscellaneous
Â
Â
Â
Â
Â
Â
Â
Â
Â
Â
Login User
Quit Application
Volume Off
Volume On
List Required Software Updates
Install Required Software Updates
Repair Disk Permissions
Computer Uptime
Free Swap Space
Top Users
Chapter 8 Administering Client Computers
Executing a Single UNIX Command
Using the UNIX Command window, you can send a single command to the selected
client computers. The command is executed using the bash shell.
To execute a single UNIX command:
1 Select a computer list in the Remote Desktop window.
2 Select one or more computers in the selected computer list.
3 Choose Manage > Send UNIX Command.
4 Type or paste the command.
If your command is a multi-line script, enter each command on its own line. If you want
to break up a single-line command for better readability, use a backslash (\) to begin a
new line.
5 Set the permissions used to execute the command.
You can choose the currently logged-in user, or choose the name of another user on
the client computers.
6 Click Send.
Executing Scripts Using Send UNIX Command
There are two kinds of scripts you can execute via the command line. First, and most
common with command lines, is a shell script. A shell script is a file containing a
collection of UNIX commands that are all executed in sequence. Shell scripts can have
normal programming procedures like loops, conditionals, and variables. Shell scripts
are text files with UNIX line endings. Shell scripts are interpreted using the bash shell.
The second kind of script you can execute, and the most common in the Mac OS X
environment, is an AppleScript. AppleScripts are files that contain English-like
commands, using the AppleScript programming language and they are created using
the Script Editor application.
Running a UNIX command as the current user will fail if the target computer is at the
login window, since there is no current user at that point. You can use root user for
tasks by entering root in the specified user field of the task dialog. You don’t actually
need to have the root account enabled on the client computer to specify the root user.
You should never use sudo or su to do tasks as the root user. They are interactive and
expect further input and response from your script. Instead, run your script as root or
whatever user you were planning on.
Executing Shell Scripts with Remote Desktop
Shell scripts can be copied, then executed. If a script has any degree of complexity, or if
it cannot be expressed on a single line, you can use Copy Items to copy the script file to
the client computers, then execute it using Send UNIX Command. To send a single-line
command you can simply use Send UNIX Command.
Chapter 8 Administering Client Computers
145
To copy and execute a script:
1 Prepare and save your script.
Make sure your script is saved as plain text with UNIX line breaks.
2 Open Remote Desktop.
3 Select a computer list in the Remote Desktop window.
4 Select one or more computers in the selected computer list.
5 Use the Copy Items command to copy your script to the client computers.
See “Copy Options” on page 107 and “Copying from Administrator to Clients” on
page 108 for more information.
6 After copying the script, choose Manage > Send UNIX Command.
7 Execute the script by typing:
sh script pathname
8 Click Send.
Executing AppleScripts with Remote Desktop
AppleScripts can be executed on client computers in two ways. They can be saved and
executed as an application, or sent at once using the command line.
To learn more about AppleScript, see AppleScript Help in Help Viewer or go to:
www.apple.com/applescript/.
To send and execute an AppleScript:
1 Save the AppleScript as an application.
2 Open Remote Desktop.
3 Select a computer list in the Remote Desktop window.
4 Select one or more computers in the selected computer list.
5 Use the Copy Items command with the Open Items option selected in the Copy Items
dialog.
See “Copy Options” on page 107 for more information.
To execute an AppleScript using the Send UNIX Command:
This method uses the osascript command. See the osascript man page for more
information.
1 Select a computer list in the Remote Desktop window.
2 Select one or more computers in the selected computer list.
3 Choose Manage > Send UNIX Command.
4 Type or paste the AppleScript in the UNIX Command window, like this:
osascript -e 'First line of script' -e 'Next line of script' [ -e ... ]
146
Chapter 8 Administering Client Computers
Alternatively, you could use a UNIX “read standard input” redirection which looks like:
osascript <<EndOfMyScript
...insert script here...
EndOfMyScript
For example, a simple script to create a folder and set its label would be entered as:
osascript <<EndOfMyScript
tell the application “Finder”
make new folder
set the name of the result to “New Folder”
set the label index of folder “New Folder” to 2
end tell
EndOfMyScript
5 Click Send.
The client computer executes the script.
Built-in Command-Line Tools
Apple Remote Desktop includes three powerful command-line tools that can be used
with Send UNIX Command: networksetup, systemsetup, and kickstart. The tools
themselves are embedded within the Apple Remote Desktop client software, and do
not interfere with existing installations of the software on Mac OS X Server.
The locations of two of the tools’ (networksetup and systemsetup) are added to the
default shell PATH, so you can access them through Remote Desktop as if they were
installed in one of the standard UNIX tool locations.
The kickstart tool is not in the default shell path. It must be activated explicitly at its
location:
/System/Library/CoreServices/RemoteManagement/ARDAgent.app/Contents/
Resources/kickstart
Any command in the Mac OS X Server command-line guide that uses networksetup or
systemsetup can be used in Remote Desktop using the Send UNIX Command task. To
change any settings using these tools, you must run them with root permissions.
The command-line guide can be found at:
www.apple.com/server/documentation/
Using networksetup
The command-line tool networksetup is used to configure a client’s network settings.
You can use it to create or modify network locations, change IP addresses, set network
service proxies, and much more. You can find the command-line syntax, explanations,
and an example in the tool’s help prompt by entering the following line in Terminal:
 For Mac OS X 10.3 clients use the following:
Chapter 8 Administering Client Computers
147
/System/Library/CoreServices/RemoteManagement/ARDAgent.app/Contents/Support/
networksetup -help
 For Mac OS X v.10.4 clients use the following from Send UNIX Command:
networksetup -help
A few of the capabilities of networksetup are listed below.
flag
description
-listallnetworkservices
Displays a list of all the network services on the server’s hardware
ports. An asterisk (*) denotes that a network service is disabled.
-setmanual
networkservice ip subnet
router
Set the TCP/IP configuration for network service to manual with IP
address set to ip, Subnet Mask set to subnet, and Router address
set to router. Example:
networksetup -setmanual "Built-in Ethernet”
192.168.100.100 255.255.255.0 192.168.100.1
-setdhcp networkservice
[clientid]
Use this command to set the TCP/IP configuration for the specified
network service to use DHCP. The client ID is optional. Specify
“Empty” for [clientid] to clear the DHCP client id. Example:
networksetup -setdhcp “Built-in Ethernet”
-setbootp networkservice
Use this command to set the TCP/IP configuration for the specified
network service to use BOOTP.
networksetup -setbootp “Built-in Ethernet”
-setmanualwithdhcprouter
networkservice ip
Use this command to specify a manual IP address to use for DHCP
for the specified network service. Example:
networksetup -setmanualwithdhcprouter “Built-in
Ethernet” 192.168.100.120
-setdnsservers
networkservice dns1
[dns2]
Use this command to specify the IP addresses of servers you want
the specified network service to use to resolve domain names. You
can list any number of servers (replace dns1, dns2, and so on with
the IP addresses of domain name servers). If you want to clear all
DNS entries for the specified network service, type “empty” in place
of the DNS server names. Example:
networksetup -setdnsservers “Built-in Ethernet”
192.168.100.100 192.168.100.12
-setsearchdomains
networkservice domain1
[domain2]
Use this command to designate the search domain for the
specified network service. You can list any number of search
domains (replace domain1, domain2, and so on with the name of a
local domain). If you want to clear all search domain entries for the
specified network service, type “empty” in place of the domain
name. Example:
networksetup -setsearchdomains “Built-in Ethernet”
company.com corp.com
148
Chapter 8 Administering Client Computers
flag
description
-setwebproxy
networkservice domain
portnumber (on | off)
[username password]
Set Web proxy for a network service with domain and port number.
Turns proxy on. Optionally, specify on or off to enable and disable
authenticated proxy support. Specify username and password if
you turn authenticated proxy support on. Example:
networksetup -setwebproxy “Built-In Ethernet”
proxy.company.com 80 on bob mypassword
-help
Displays a list of all the commands available in the Network Setup
Tool, with explanatory information.
Any command in the Mac OS X Server command-line guide which uses networksetup
can be used in Remote Desktop using the Send UNIX Command task.
Using systemsetup
The command-line tool systemsetup is used to configure other nonnetwork system
settings. You can use it to query or alter time zones, network time servers, sleep
settings, Energy Saver preferences, Remote Login (SSH) preferences, and more. You will
find the command-line syntax, explanations, and example in the tool’s help prompt by
entering the following line in the Terminal:
/System/Library/CoreServices/RemoteManagement/ARDAgent.app/Contents/Support/
systemsetup -help
A few of the capabilities of systemsetup are listed below:
Flag
Description
-setallowpowerbuttontosleepcomputer
(on | off)
Enable or disable whether the power button can
sleep the computer. Example:
systemsetup
-setallowpowerbuttontosleepcomputer
on
-setdate mm:dd:yy
Use this command to set the current month, day,
and year. Example:
systemsetup -setdate 04:15:02
-setlocalsubnetname name
Set Local Hostname to name. Example:
systemsetup -setlocalsubnetname LabMac1
-setnetworktimeserver timeserver
Use this command to designate a network time
server. Enter the IP address or DNS name for the
network time server. Example:
systemsetup -setnetworktimeserver
time.apple.com
-setremoteappleevents ( on | off )
Use this command to set whether the server
responds to events sent by other computers (such
as AppleScripts). Example:
systemsetup -setremoreappleevents on
Chapter 8 Administering Client Computers
149
Flag
Description
-setremotelogin ( on | off )
Sets remote login (SSH) to either on or off.
Important If you turn off remote login, you won’t
be able to administer the server using SSH for
remote login. Example:
systemsetup -setremotelogin on
-setrestartfreeze ( on | off )
Use this command to specify whether the server
restarts automatically after the system freezes.
Example:
systemsetup -setrestartfreeze on
-setrestartpowerfailure ( on | off )
Use this command to specify whether the server
automatically restarts after a power failure.
Example:
systemsetup -setrestartpowerfailure
on
-setsleep minutes
Sets amount of idle time until computer sleeps.
Specify “Never” or “Off” for computers that should
never sleep. Important: if you set the system to
sleep, you will not be able to administer the
server remotely while it is sleeping. Example:
systemsetup -setsleep 60
-settime hh:mm:ss
Sets the current time. The provided time
argument should be in 24-hour format. Example:
systemsetup -settime 16:20:00
-settimezone timezone
Use this command to set the local time zone. Use
“-listtimezones” to list valid timezone arguments.
Example:
systemsetup -settimezone US/Pacific
-setusingnetworktime ( on | off )
Sets whether using network time is on or off.
Example:
systemsetup -setusingnetworktime on
-setWaitForStartupAfterPowerFailure
seconds
Set the number of seconds after which the
computer will start up after a power failure. The
<seconds> value must be a multiple of 30
seconds. Example:
systemsetup setWaitForStartupAfterPowerFailure 30
-setwakeonmodem ( on | off )
Use this command to specify whether or not the
server will wake from sleep when modem activity
is detected. Example:
systemsetup -setwakeonmodem on
-setwakeonnetworkaccess ( on | off )
Use this command to specify whether the server
wakes from sleep when a network admin packet
is sent to it. Example:
systemsetup -setwakeonnetworkaccess
on
150
Chapter 8 Administering Client Computers
Any command in the Mac OS X Server command-line guide that uses systemsetup
can be used in Remote Desktop using the Send UNIX Command task.
Using kickstart
The kickstart command-line utility is embedded within the Apple Remote Desktop
client software. It allows you to install, uninstall, activate, configure, and restart
components of Apple Remote Desktop without restarting the computer. You can
configure all the features found in the Remote Desktop section of the Sharing System
Preferences. The kickstart utility can be used via SSH to configure remote computers,
including Xserves. The kickstart utility is located at:
/System/Library/CoreServices/RemoteManagement/ARDAgent.app/Contents/
Resources/kickstart.
The syntax and list of actions possible with kickstart are available by running
kickstart as follows:
$sudo /System/Library/CoreServices/RemoteManagement/ARDAgent.app/Contents/
Resources/kickstart -help
If you are running the kickstart utility through Apple Remote Desktop’sSend UNIX
Command function, you don’t need the full path, just the name kickstart and root as
the command’s user.
You can use the sudo command with an administrator account to use the kickstart
utility, or you can use the root user via Send UNIX Command. All commands presented
in this section should be typed as one line of text. It’s OK if the text wraps as you enter
it; just be sure not to enter return characters.
The following are some examples of actions possible with kickstart:
 Activate Remote Desktop sharing, enable access privileges for all users, and restart
the Apple Remote Desktop Agent:
$ sudo /System/Library/CoreServices/RemoteManagement/ARDAgent.app/
Contents/Resources/kickstart -activate -configure -access -on -restart
-agent -privs -all
 Activate Remote Desktop sharing, enable access privileges for the users “admin”, grant
full privileges for the users “admin,” and restart the Apple Remote Desktop Agent and
Menu item:
$ sudo /System/Library/CoreServices/RemoteManagement/ARDAgent.app/
Contents/Resources/kickstart -activate -configure -access -on -users
admin -privs -all -restart -agent -menu
 Activate Remote Desktop sharing, and disable access privileges for all users:
$ sudo /System/Library/CoreServices/RemoteManagement/ARDAgent.app/
Contents/Resources/kickstart -activate -configure -access -off
 Shut down the Apple Remote Desktop Agent process:
$ sudo /System/Library/CoreServices/RemoteManagement/ARDAgent.app/
Contents/Resources/kickstart -agent -stop
Chapter 8 Administering Client Computers
151
 Deactivate Remote Desktop access for a computer:
$ sudo /System/Library/CoreServices/RemoteManagement/ARDAgent.app/
Contents/Resources/kickstart -deactivate -configure -access -off
Automating Functions
You can automate any command or function in Remote Desktop. Additionally, Remote
Desktop supports scripting (either UNIX or AppleScript) to help automate their client
management.
Setting the Client’s Data Reporting Policy
To speed up reporting and allow reporting from offline clients, Apple Remote Desktop
uses saved client system and file information. You can automate the collection of this
information by setting the data reporting policy. This schedule determines how often
the client updates its system and file information for reports.
In accordance with the collection schedule you set, each client computer connects to a
central reporting database and uploads the information you designate. There are
certain trade-offs to the frequency of these updates. If you require all the clients to
update their information too often, you run the risk of added network traffic and slower
client performance during updates. If you don’t require the clients to update often
enough, the report data that you receive may be out of date. You should take care to
balance your reporting needs and your network and client performance needs.
The collection policy includes four kinds of information: system data, file data, user
accounting data, and application usage data.
System data includes all possible reported information for the following reports:
 System Overview
 Storage
 USB Devices
 FireWire Devices
 Memory
 PCI Cards
 Network Interfaces
The file data includes all possible reported information for the following reports:
 File Search
 Software Version
 Software Difference
152
Chapter 8 Administering Client Computers
The user accounting data includes all possible reported information for the following
report:
 User History
The application usage data includes all possible reported information for the following
report:
 Application Usage
To set a client’s data reporting policy:
1 Select a computer list in the Remote Desktop window.
2 Select one or more computers in the selected computer list.
3 Choose File > Get Info.
4 If you have selected only one computer, select the Data Settings tab, and click the Edit
button.
If you have selected more than one computer, this tab is already selected.
5 Select “Upload on a schedule.”
To disable a client’s automatic data collection, deselect “Upload on a schedule.”
6 If you have already made a default schedule, you can use it by clicking “Use default
schedule” to automatically fill in the appropriate information and click Done.
Otherwise, choose the day or days the data collection should occur.
For more information about setting a default schedule, see “Creating a Template Data
Reporting Policy” on page 153.
7 Set the time at which the collection occurs.
8 Choose which data types to upload: System Data, File Search Data, Application Usage
Data or User Accounting Data, or any combination.
9 In order to upload Application Usage Data and User Accounting Data, you need to
specify collection of that data.
Choose Collect Application Usage Data to tell a client computer to save report
information for the Application Usage Report.
Choose User Accounting Data to tell a client computer to save report information for
the User History Report.
10 Click Apply.
Creating a Template Data Reporting Policy
To speed up client configuration for data reporting, you can set a default time and
frequency of report data collection. This template must be applied to any computer or
group of computers that you want to use it. Afterwards, the setting can be customized
on a per-computer or group basis.
Chapter 8 Administering Client Computers
153
To set the default data reporting policy template:
1 Choose Remote Desktop > Preferences.
2 Select Task Server.
3 Check which additional data types the clients will collect: Application Usage Data, User
Accounting Data, or both.
4 Check “Upload report data to the Task Server on a schedule.”
5 Click Change Schedule.
6 Choose the day or days the data collection should occur.
7 Set the time at which the collection should occur.
8 Choose which data types to upload: “System Data,” “File Search Data,” “Application
Usage Data,” “User Accounting Data,” or any combination.
9 Click OK.
Designating the Task Server and Setting the Report Data Collection
Location
To speed up reporting, Apple Remote Desktop uses a database of client system and file
information. You can automate the collection of this data for reports, and determine
where the database will reside. By default, the database is stored on the administrator
computer. Use these instructions to change the data collection location.
Warning: If you change the location of the report database from the one selected in
the initial setup, you will need to reset the collection policies for the client computers.
The database will not be moved, but will be regenerated at the next collection
interval.
First, determine where the data will be located: on the administrator computer, or a
remote computer (called a Task Server). A Task Server needs to be an unlimited-client
licensed Apple Remote Desktop administrator computer and have TCP and UDP ports
3283 open to all of the reporting client computers (and TCP port 5900 open, if you
want to control the clients). If you choose to use another Apple Remote Desktop
administrator computer’s database, you must configure it to allow data access to other
Apple Remote Desktop administrators. The default Task Server is the computer upon
which you installed Remote Desktop.
See also “Using a Task Server for Report Data Collection” on page 112.
If you choose to store the data locally and you have an unlimited client license, you can
allow other Apple Remote Desktop administrators with unlimited-managed computer
licenses to access the database on your computer by selecting the “Allow remote
connections to this server” option.
154
Chapter 8 Administering Client Computers
To set the Task Server location:
1 Open Remote Desktop.
2 Choose Remote Desktop > Preferences.
3 Click Task Server.
4 If you want to use the database on this administrator computer, select “Use Task Server
on this computer.”
5 If you use your Remote Desktop administration computer as a Task Server on the local
administrator computer, click “Allow remote connections to this server.”
6 If you want to use a database on another administrator computer, select “Use remote
Task Server.”
Then, enter the IP address or fully qualified domain name of the other Apple Remote
Desktop administrator computer, and click Select.
7 Close the window to save changes.
Scheduled Tasks
You can use Apple Remote Desktop to automate and schedule almost any task. For
example, you can make sure a particular application or a specific set of fonts is always
available on a client computer by setting Remote Desktop to copy applications and
fonts to the client every night.
When you schedule an automated task, information about the scheduled task is saved
on the administrator computer. At the appointed time, the client software on that
computer activates and initiates the task. Remote Desktop must be open to perform a
scheduled task.
Setting Scheduled Tasks
Any task with the Schedule Task button in the task configuration window can be
scheduled. Tasks that you have scheduled appear on the left in the main Remote
Desktop window.
To schedule a task:
1 Select a computer list in the Remote Desktop window.
2 Select one or more computers in the selected computer list.
3 Choose the task you want to schedule from the menu bar.
4 Configure the task as needed.
5 Before executing the task, click the Schedule button.
The scheduling information is revealed.
6 Choose when and how often you want the task to execute.
7 If you want the task to repeat, click Repeating Every then set the repeat interval.
Chapter 8 Administering Client Computers
155
8 Click OK.
9 Save the task and choose where the task will appear in the Remote Desktop window.
Editing Scheduled Tasks
Once saved, a task can be changed and all future executions of the task will reflect the
changes. You may want to edit which computers are affected by the task or any other
task parameter.
To edit a task schedule:
1 Double-click a scheduled task in the Remote Desktop window.
2 Edit the task, as needed.
3 Click the Schedule Task button.
4 Edit the task schedule, as needed.
5 Click OK.
6 Click Save.
Deleting Scheduled Tasks
Unneeded tasks can be deleted. If you want to keep the task, but stop it from
repeating, you should edit the scheduled task instead of deleting it. See “Editing
Scheduled Tasks” for more information.
To delete a scheduled task:
1 Select the saved task in the Remote Desktop window.
2 Press the Delete key.
3 Click Delete.
Using AppleScript with Remote Desktop
AppleScript is a powerful and versatile scripting language that is built into Mac OS X.
You can use AppleScript to create shortcuts, automate repetitive tasks, or even make
custom applications that save you a great amount of time. AppleScript is an Englishlike language you can use to write scripts that contain commands. Scripts can make
decisions based on user interaction, or by parsing and analyzing data, documents, or
situations. Remote Desktop is scriptable, as are many other Mac OS X applications, and
it can be controlled with AppleScript commands. AppleScript is a complete language
with conditional statements, comparison and arithmetic operations, and the ability to
store variables.
This documentation doesn’t teach AppleScript language syntax or programming
practices. For information about learning how to program with AppleScript, see the
AppleScript online help.
This section provides a brief description of AppleScript, a brief discussion of using the
Remote Desktop AppleScript Dictionary, and a sample script.
156
Chapter 8 Administering Client Computers
Remote Desktop’s AppleScript Basics
AppleScript scripts consist of commands that are sent to objects. Objects can be a wide
variety of things, including applications, scripts, windows, settings, or the Finder. These
objects can receive a specific set of commands and respond with the desired actions.
Essentially, a script tells an application (Remote Desktop in this case) to either complete
a certain task or retrieve information. You can give the script decision-making
capabilities by using conditional statements; you can give the script a memory by
defining variables.
Remote Desktop has made all of its fundamental functions scriptable. The tasks that
you perform as an administrator by pointing and clicking the mouse can all be
accomplished by running an AppleScript. For example, you can:
 Get information on or rename a computer
 Add computers to a list
 Copy or install items
 Execute a report task
Using the Remote Desktop AppleScript Dictionary
Each scriptable application contains an AppleScript dictionary—the list of objects and
messages that an application can understand. For example, in Remote Desktop’s
dictionary there is an object named “computer list” that has this entry:
computer list n [inh. item] : A list which holds computers.
ELEMENTS
contains computers; contained by application.
PROPERTIES
id (Unicode text, r/o) : The unique identifier (UUID) of the computer list.
name (Unicode text) : The name of the computer list.
A “computer list” is an object which contains other objects (“computers” in this case)
and has properties like its “id” and its “name.” When queried, this object can return the
values for the properties (in Unicode text as indicated), but you can’t change “id” from
within the script (it’s labeled r/o for read-only). This object can be acted upon by the
“verbs,” or messages, in a script.
The dictionary also contains “verbs,” or messages. These verbs are commands that act
on the objects in the dictionary. For example, in Remote Desktop’s dictionary there is a
verb named “add,” and this is its entry:
add v : Add a computer to a task.
add computer : The computer.
to computer list : The computer list (or task) to add the computer to.
Chapter 8 Administering Client Computers
157
This entry tells you what the verb can act on and how. This entry says that Remote
Desktop can add a specified computer to a computer list. The objects “computer” and
“computer list” are being acted upon by “add.”
To access the full AppleScript dictionary for Remote Desktop:
1 Launch Script Editor in the /Applications/AppleScript/ folder.
2 Select File > Open Dictionary.
3 Choose Remote Desktop.
4 Click Open.
The AppleScript Dictionary for Remote Desktop is also available in Appendix C,
“AppleScript Remote Desktop Suite.”
Sample AppleScript
This AppleScript is one that could be used to do a quick cleanup of a group of
computers. First, it locks the computer screens to prevent interference. Second, it
deletes all items left on the currently active desktops of the client computers. Finally, it
finishes by emptying the clients’ trash and unlocking the screens.
This script is for educational use only and no warranty is explicit or implied as to the
suitability of this script for your computing environment. Additionally, this sample
script deletes items on the target computers. Use at your own risk.
-- Start commanding the local copy of Remote Desktop
tell application "Remote Desktop"
-- decide which list to perform this on, in this case it's called
"Classroom"
set these_computers to computer list "Classroom"
-- decide what locked screen text you want displayed
set screen_message to "Please wait" as Unicode text
-- make a UNIX script which executes an AppleScript on the remote
computers
set the UNIX_script to "osascript -e 'tell application \"Finder\" to
delete every item of the desktop whose class is not disk'"
-- set the lock task parameters
set lock_task to make new lock screen task with properties {name:”Lock
Classroom”, message:screen_message}
-- perform the task
execute lock_task on these_computers
-- set the UNIX script parameters
set clean_task to make new send unix command task with properties
{name:”Clean Desktop”, showing output:false, script:UNIX_script}
158
Chapter 8 Administering Client Computers
-- perform the task
execute clean_task on these_computers
-- empty the trash afterward
execute (make new empty trash task) on these_computers
-- unlock the screen when finished
execute (make new unlock screen task) on these_computers
end tell
Using Automator with Remote Desktop
Accomplish all of your time-consuming, repetitive manual tasks quickly, efficiently, and
effortlessly with Automator workflows. It’s simple to create custom workflows just by
dragging items, pointing, and clicking. You can easily automate Remote Desktop tasks
such as Lock Screen or Install Packages, then repeat those tasks again and again.
Simple and easy-to-understand application actions are the building blocks, so you
don’t have to write any code. Each actions has all of the options and settings available
to you.
Here’s the sample AppleScript above, but done using Automator:
Chapter 8 Administering Client Computers
159
Using Automator actions, you can even create your own interfaces to Apple Remote
Desktop functions without having to give users access to Remote Desktop. For
instance, say you wanted to give all your teachers a tool to lock and unlock screens in
their classrooms. You still need to configure Remote Desktop and set up computer lists,
but instead of giving the teachers all access to Remote Desktop, you can create an
Automator plug-in or application. This plug-in lets them select only the computers in
their classroom, and the plug-in does the rest of the work for them.
You can create an Automator workflow, application, Finder plug-in, or iCal alarm similar
to the AppleScript mentioned above. By stringing together Remote Desktop actions in
Automator, you accomplish the same work as an AppleScript, but without having to
write code.
160
Chapter 8 Administering Client Computers
Icon and Port Reference
A
Appendix
A
The following tables illustrate some of the icons found in the
main window of Remote Desktop. The final table shows
which network port numbers are in use by Apple Remote
Desktop.
Client Status Icons
The following icons appear next to the names of computers in a scanner search results
list. The icons show the status of each computer in the list.
Icon
What it means
Accessible to Apple Remote Desktop
Offline Apple Remote Desktop client
Ping response at IP address, but no Apple Remote Desktop client
response
Apple Remote Desktop Status Icons
The Apple Remote Desktop status icon appears in the menu bar of each Apple Remote
Desktop client. The status icon has several states, depending on the status of the client
computer.
Icon
What it means
Not Active
Apple Remote Desktop is installed but is not currently running on
the client computer.
Ready
Apple Remote Desktop is installed and running on the client.
Administered
Apple Remote Desktop is installed and running on the client
computer, the administrator is actively observing or controlling,
and the client is set to indicate when it is being observed.
161
List Menu Icons
The following icons are used in the Apple Remote Desktop list area of Remote
Desktop’s main window.
Icon
What it means
Master list
Apple Remote Desktop list
Smart list
Scanner
Active Task list
Task History list
Task Server queue
Task Status Icons
The following icons are used in task list areas of Remote Desktop’s main window.
Icon
What it means
Running
Finished successfully
Exited with error
Incomplete
Queued
Scheduled
162
Appendix A Icon and Port Reference
System Status Icons (Basic)
The following icons are shown as initial high-level status indicators for observed client
computers.
Icon
Indicates
or
One or more service statistic is red. This takes precedence over any
yellow or green indicator.
or
One or more service statistic is yellow This takes precedence over
any green indicator
Service is operating within established parameters.
No service informaiton available.
System Status Icons (Detailed)
The following icons are shown after further inspection of observed client computer
status indicators.
Service
Icon
CPU Usage
Status
Usage is at 60% or less
Usage is between 60% to 85%
Usage is at 85% or higher
No status information is available
DIsk Usage
Usage is at 90% or less
Usage is between 90% and 95%
Usage is at 95% or higher
No status information is available
Free Memory
Less than 80% used
Between 80% and 95% used
Appendix A Icon and Port Reference
163
Service
Icon
Status
Over 95% used
No status information is available
TCP and UDP Port Reference
Apple Remote Desktop uses the following TCP and UDP ports for the functions
indicated.
164
Port
Protocol
Function
5900
TCP
Observe and Control
5900
UDP
Send screen, share screen
3283
TCP
Reporting
3283
UDP
Everything else
22
TCP
Encrypted file transfer, observe,
and control (via SSH tunnel)
Appendix A Icon and Port Reference
Report Field Definitions Reference
B
Appendix
B
The following sections describe the available fields in some of
the Apple Remote Desktop reports. For information on
generating reports, see “Creating Reports” on page 111.
The file search reports (File Search, Software Version, and Software Difference) are not
included because their fields closely match those already found in the Finder.
System Overview Report
List category
Field name
Notes or example
AirPort
AirPort Active
Yes/No
AirPort Firmware Version
Version number
AirPort Hardware Address
00:30:65:01:79:EC
AirPort Locale
AirPort Type
AppleTalk
AirPort Installed
Yes/No
AirPort Network Channel
Channel number 1-11
AirPort Network Name
Network name
AppleTalk Active
Yes/No
AppleTalk Network
AppleTalk Node
AppleTalk Zone
Computer
Active Processors
Number of processors
Available user memory
Memory in KB
Boot ROM
ROM version number
Bus Clock Speed
In MHz
Bus Data Size
CPU Speed
In MHz
Serial number
165
List category
Field name
Notes or example
Velocity Engine
Yes/No
L2 Cache Size
In KB
L3 Cache Size
In KB
Machine Model
Memory
In KB
Empty RAM Slots
PCI slots Used
Processor Count
CPU Type
Internal value
Sales Order Number
VM Size
Total RAM Slots
Devices
ATA Device Count
Firewire Device Count
Keyboard Connected
Mouse Connected
Optical Drive Type
SCSI Device Count
USB Device Count
Display
2nd Monitor Depth
In bits
2nd Monitor Type
2nd Monitor Resolution
Pixels horizontal and vertical
Monitor Depth
In bits
Monitor Type
Monitor Resolution
Modem
Pixels horizontal and vertical
Modem Country
Modem Driver
Modem Firmware Version
Modem Installed
Yes/No
Modem Interface
Modem Model
Network
First Ethernet Address
en0 MAC address
NetBooted
Yes/No
Primary IP Address
Primary Network Collisions
Primary Network Flags
166
Appendix B Report Field Definitions Reference
List category
Field name
Notes or example
Primary Network Hardware
Address
Primary Network Input Errors
Primary Network Input Packets
Primary Network Output Errors
Primary Network Output Packets
Primary Network
Preferences
Printing
Sleep Display
Yes/No
Sleep Hard Disk
Yes/No
Sleep Computer
Yes/No
Wake for Ethernet Access
Yes/No
Printer Name
Printer Sharing
Yes/No
Printer Type
Printer Version
Remote Desktop
Computer Info #1
Computer Info #2
Computer Info #3
Computer Info #4
Sharing
Software
Storage
Computer Name
File sharing name, “Bob’s
Computer”
FTP Access
Yes/No
Remote AppleEvents
Yes/No
Remote Login
Yes/No
UNIX hostname
foo.example.com
Web Sharing
Yes/No
Windows Sharing
Yes/No
Kernel Version
System Version
Mac OS X v10.4.2 (8C46)
Free Disk Space
In KB, MB, or GB
Total Disk Space
In KB, MB, or GB
Trash Size
In KB, MB, or GB
Appendix B Report Field Definitions Reference
167
Storage Report
List category
Field name
Hardware Options
Drive Manufacturer
Notes or example
Drive Model
Drive Revision
Drive Protocol
Removable
Yes/No
Serial Number
Logical Unit Number
Detachable
Volume Options
Creation date
UNIX GMT format
Disk Name
Macintosh HD
File Count
Folder Count
Total Disk Space
Free Space
In KB, MB, or GB
Startup Disk
File System Options
UNIX Mount Point
/dev/disk0s10
Disk Format
HFS, HFS+, UFS
Owner
Group
Yes/No
Permission Modes
Permissions
Yes/No
Write Access
Backup Options
168
Modification date
UNIX GMT format
Case Sensitive
Yes/No
Preserves Case
Yes/No
Journaling Capable
Yes/No
Journaled
Yes/No
Last Backup date
UNIX GMT format
Last Check date
UNIX GMT format
Appendix B Report Field Definitions Reference
USB Devices Report
Field name
Notes or example
Product Name
Product ID
Vendor ID
Vendor Name
Device Speed
1.5Mb, 12Mb
Bus Power
In mA
Date collected
FireWire Devices Report
Field name
Notes or example
Device Speed
200, 400, 800 Mbits per second
Software Version
Manufacturer
Model
Firmware Revision
Date collected
Memory Report
Field name
Notes or example
Slot Identifier
DIMM0/J21
Size
In MB
Speed
PC133-222 (Mac OS X 10.3 only)
Type
SDRAM
Date collected
PCI Cards Report
Field name
Notes or example
Card Name
Slot Name
Slot4
Card Type
Display
Vendor ID
Device ID
Appendix B Report Field Definitions Reference
169
Field name
Notes or example
ROM Revision
Displays only
Card Revision
Card Memory
Displays only
Date collected
Network Interfaces Report
List category
Field name
Notes or example
Network Overview
Name
Location name
Active
Yes/No
Primary
Yes/No
Configured With
Ethernet
Hardware Address
00:30:65:01:79:EC
Interface Name
en0
Flags
Active Interface
Domain
Router Address
IP Address
Broadcast Address
DNS Server
Subnet Mask
IP Addresses
Broadcast Addresses
DNS Servers
Subnet Masks
Network Statistics
Network Collisions
Network Input Errors
Network Input Packets
Network Output Errors
Network Output Packets
Output Statistics
Output Queue Capacity
Output Queue Size
Output Queue Peak Size
Output Queue Drop Count
Output Queue Output Count
Output Queue Retry Count
170
Appendix B Report Field Definitions Reference
example.com
List category
Field name
Notes or example
Output Queue Stall Count
Ethernet Statistics
Ethernet Alignment Errors
Ethernet FCS Errors
Frame Check Sequence errors
Ethernet Single Collision Frames
Ethernet Multiple Collision
Frames
Ethernet SQE Test Errors
“heartbeat” test errors
Ethernet Deferred Transmissions
Ethernet Late Collisions
Ethernet Excessive Collisions
Ethernet Internal MACTransmit
Errors
Ethernet Carrier Sense Errors
Ethernet Frame Too Long
Ethernet Internal Mac Receive
Errors
Ethernet Chip Set
Ethernet Missed Frames
Ethernet Receiver Overruns
Ethernet Receiver Watchdog
Timeouts
Ethernet Receiver Frame Too
Short
Ethernet Receiver Collision
Errors
Ethernet Receiver PHY Errors
Ethernet Receiver Timeouts
Ethernet Receiver Interrupts
Ethernet Receiver Resets
Ethernet Receiver Resource
Errors
Ethernet Transmitter Underruns
Ethernet Transmitter Jabber
Events
Ethernet Transmitter PHY Errors
Physical Errors
Ethernet Transmitter Timeouts
Ethernet Transmitter Interrupts
Ethernet Transmitter Resets
Appendix B Report Field Definitions Reference
171
List category
Field name
Notes or example
Ethernet Transmitter Resource
Errors
Ethernet Collision Frequencies
Network Test Report
Field name
Notes or example
Computer
Computer sharing name
Min,. Time
Shortest time for ping response
Max. TIme
Longest time for a ping response
Avg. Time
Average time for ping response
Lost Packets
Number of pings without a response
Total Packets
Number of pings sent.
Administration Settings Report
List category
Privileges
Data Settings
172
Field name
Notes or example
Computer
Computer sharing name
Generate Reports
On or off
Send Messages
On or off
Open & Quit
On or off
Restart & Shutdown
On or off
Change Settings
On or off
Copy Items
On or off
Delete Items
On or off
Control
On or off
Observe
On or off
Show Observe
On or off
Collect Application Usage Data
On or off
Collect User Accounting Data
On or off
Upload Schedule
Time and days to upload
information
Upload System Data
On or off
Upload File Data
On or off
Upload Application Usage Data
On or off
Upload User Accounting Data
On or off
Appendix B Report Field Definitions Reference
List category
Field name
Notes or example
General
Version
Apple Remote Desktop version
and build number
Last Contacted
Relative date
Application Usage Report
Field name
Notes or example
Computer name
File sharing computer name
Name
Application name
Launch date
24 hour local time and date
Total run time
Length of time the application was running
Frontmost
Length of time the application was the frontmost application
User name
Short user name of application process owner
State
What the application is doing now (running, terminated, etc.)
User History Report
Field name
Notes or example
Computer name
file sharing computer name
User name
Login type)
Console, tty, ssh
Login time
Date and 24 hour format local time
Logout time
Date 24 hour format local time
Remote Login Host
Originating host to the login session, localhost, or some remote
computer
Appendix B Report Field Definitions Reference
173
AppleScript Remote Desktop
Suite
C
This appendix shows the contents of Remote Desktop’s
AppleScript Dictionary.
This appendix is not a substitute for the AppleScript Dictionary view in Script Editor.
It is included as a quick reference so that AppleScript commands might be found by a
search of PDF contents. The Dictionary itself has the most recent information about
scriptable objects and events in Remote Desktop, and better usability.
Classes and Commands for the Remote Desktop Application.
add v: Add a computer to a task.
add computer: The computer.
to computer list: The computer list (or task) to add the computer to.
control v: Start a control session with the computer.
control computer: The computer to control.
execute v: Executes a task.
execute task: The task to execute.
[on computer list]: The computer list (or computer) on which to run the task.
observe v: Start an observation session.
observe item: The computer, list, or computer list to observe.
release v: Release computers from a control or observation session.
release item: The computer, list, or computer list to release.
remove v: Remove a computer from a task.
remove computer: The computer to remove.
from computer list: The computer list (or task) to remove the computer from.
stop v: Stops an executing share screen task.
stop task: The task to stop.
174
Appendix
C
application n [inh. application; see also Standard Suite]: Remote Desktop’s top level
scripting object.
ELEMENTS
contains computers, computer lists, copy items tasks, copy to me tasks, documents,
empty trash tasks, install package tasks, lock screen tasks, logout tasks, open
application tasks, open item tasks, rename computer tasks, restart tasks, send message
tasks, send unix command tasks, set local startup disk tasks, set network startup disk
tasks, share screen tasks, shutdown tasks, sleep tasks, unlock screen tasks, upgrade
client tasks, wake up tasks, windows.
PROPERTIES
selection (item, r/o): The current selection.
computer n [inh. item]: A physical computer.
ELEMENTS
contained by application, computer lists.
PROPERTIES
boot volume (Unicode text, r/o): The boot volume of the computer.
CPU (Unicode text, r/o): The CPU type of the computer.
current application (Unicode text, r/o): The current frontmost application on the
computer.
current user (Unicode text, r/o): The currently logged in user on the computer.
DNS name (Unicode text, r/o): The DNS name of the computer.
id (Unicode text, r/o): The unique identifier (UUID) of the computer.
Internet address (Unicode text, r/o): The Internet address of the computer.
last activity (date, r/o): The time of the most recent activity on the computer.
last contacted (date, r/o): The time of last contact with the computer.
machine model (Unicode text, r/o): The model of the computer.
name (Unicode text, r/o): The name of the computer.
physical memory (Unicode text, r/o): The physical ram installed in the computer.
primary Ethernet address (Unicode text, r/o): The primary ethernet address of the
computer.
remote desktop version (Unicode text, r/o): The version of the Remote Desktop client
running on the computer.
status message (Unicode text, r/o): The current status of the computer.
system version (Unicode text, r/o): The Mac OS version running on the computer.
computer list n [inh. item]: A list which holds computers.
ELEMENTS
contains computers; contained by application.
PROPERTIES
id (Unicode text, r/o): The unique identifier (UUID) of the computer list.
name (Unicode text): The name of the computer list.
Appendix C AppleScript Remote Desktop Suite
175
copy items task n [inh. task > item]: Copy items to the target computers.
ELEMENTS
contained by application.
PROPERTIES
bandwidth limit (integer): Network usage limit in kilobytes per second (0 = unlimited).
conflict resolution (ask what to do/rename the existing item/rename the item being
copied/replace/replace if older): Specifies what to do if the item(s) already exist in this
location.
copy items (list): A list of files and/or folders to copy.
destination group (Unicode text): If ownership is set to a ‘specific owner’, a valid group
name on the destination computer.
destination owner (Unicode text): If ownership is set to a ‘specific owner’, a valid user
name on the destination computer.
destination path (alias): If the location is ‘specific folder’, a fully specified path to the
destination folder.
encrypting (boolean): Should the items be encrypted during copying
location (applications folder/current users desktop folder/current users home directory/
same relative location/specific folder/system folder/system fonts folder/system
preferences folder/top folder of the boot disk): The target location to copy to.
ownership (current console user/current owner/destination folder owner/specific
owner): Specifies the new ownership of the copied item(s).
should open (boolean): Should the items be opened after being copied
stopping on error (boolean): Should the copy terminate if an error occurs during
copying
copy to me task n [inh. task > item]: Copy items from the target computers to the
administrator computer.
ELEMENTS
contained by application.
PROPERTIES
bandwidth limit (integer): Network usage limit in kilobytes per second (0 = unlimited).
conflict resolution (ask what to do/rename the existing item/rename the item being
copied/replace/replace if older): Specifies what to do if the item(s) already exist in this
location.
copy items (list): A list of files and/or folders to copy.
destination path (alias): If the location is ‘specific folder’, a fully specified path to the
destination folder.
encrypting (boolean): Should the items be encrypted during copying
location (applications folder/current users desktop folder/current users home directory/
same relative location/specific folder/system folder/system fonts folder/system
preferences folder/top folder of the boot disk): The target location to copy to.
176
Appendix C AppleScript Remote Desktop Suite
empty trash task n [inh. task > item]: Empty the trash on the target computers.
ELEMENTS
contained by application.
install package task n [inh. task > item]: Install package(s) on the target computers.
ELEMENTS
contained by application.
PROPERTIES
after installing (attempt restart/do nothing/force immediate restart): Specifies what to
do after installing the package(s).
bandwidth limit (integer): Network usage limit in kilobytes per second (0 = unlimited).
delegating to task server (boolean): Should this task be delegated to the task server
encrypting (boolean): Should the packages be encrypted during copying
packages (list): A list of packages to install.
stopping on error (boolean): Should the copy terminate if an error occurs during
copying
lock screen task n [inh. task > item]: Lock the screen(s) on the target computers.
ELEMENTS
contained by application.
PROPERTIES
message (Unicode text): Message to display on the screen(s).
logout task n [inh. task > item]: Log out the current user on the target computers.
ELEMENTS
contained by application.
open application task n [inh. task > item]: Launch an application on the target
computers.
ELEMENTS
contained by application.
PROPERTIES
application (alias): The path to the application to open.
open item task n [inh. task > item]: Open files on the target computers.
ELEMENTS
contained by application.
PROPERTIES
files (list): A list of files to open.
rename computer task n [inh. task > item]: Change the name of the target
computers.
ELEMENTS
contained by application.
PROPERTIES
Appendix C AppleScript Remote Desktop Suite
177
naming uniquely (boolean): Should each machine be forced to have a numerically
unique name
target name (Unicode text): The new name for the computer.
restart task n [inh. task > item]: Restart the target computers.
ELEMENTS
contained by application.
PROPERTIES
user can save changes or cancel (boolean): Is the user allowed to save changes or
cancel the restart
send message task n [inh. task > item]: Send a text message to the target
computers.
ELEMENTS
contained by application.
PROPERTIES
message (Unicode text): Message to display on the screen(s).
send unix command task n [inh. task > item]: Send a UNIX command or script to the
target computers.
ELEMENTS
contained by application.
PROPERTIES
script (Unicode text): The command string to be executed.
showing output (boolean): Should the complete output of command be displayed in a
window
user (Unicode text): The user to execute the command as.
set local startup disk task n [inh. task > item]: Set the startup volume on the target
computers.
ELEMENTS
contained by application.
PROPERTIES
boot volume (Unicode text): Specific volume of drive to boot (optional).
restarting (boolean): Should the machine be restarted after setting the startup volume
set network startup disk task n [inh. task > item]: Set the startup volume on the
target computers.
ELEMENTS
contained by application.
PROPERTIES
from server (Unicode text): Internet address of the server to boot from.
mount volume (Unicode text): Volume name on server to mount.
restarting (boolean): Should the machine be restarted after setting the startup volume
178
Appendix C AppleScript Remote Desktop Suite
share screen task n [inh. task > item]: Share a computers screen to the target
computers.
ELEMENTS
contained by application.
PROPERTIES
source computer (computer): The computer (other than the admin) whose screen to
share.
shutdown task n [inh. task > item]: Shutdown the target computers.
ELEMENTS
contained by application.
PROPERTIES
user can save changes or cancel (boolean): Is the user allowed to save changes or
cancel the shutdown
sleep task n [inh. task > item]: Put the target computers to sleep.
ELEMENTS
contained by application.
task n [inh. item]: A task. This abstract class represents the tasks which can be
executed by Remote Desktop. There are subclasses for each specific type of task.
ELEMENTS
contained by application.
PROPERTIES
computer list (computer list): The computer list associated with the task.
id (Unicode text, r/o): The unique identifier (UUID) of the computer.
name (Unicode text): The name of the task.
recurrence (Unicode text, r/o): A string which describes the task recurrence, if defined.
starting at (date): If the task is scheduled, the date and time of the first execution.
unlock screen task n [inh. task > item]: Release the screen(s) of the target
computers.
ELEMENTS
contained by application.
upgrade client task n [inh. task > item]: Upgrade the Remote Desktop client on the
target computers.
ELEMENTS
contained by application.
wake up task n [inh. task > item]: Wake up the target computers.
ELEMENTS
contained by application.
Appendix C AppleScript Remote Desktop Suite
179
PostgreSQL Schema Sample
D
This chapter contains SQL commands to assist SQL
programmers in obtaining the database schema used in
Apple Remote Desktop’s report database. You can use this
knowledge about the schema to create your own
applications that access Apple Remote Desktop report
information.
Sample list of main database schema
Command:
/System/Library/CoreServices/RemoteManagement/rmdb.bundle/bin/psql -U ard -c
"\\d propertynamemap" ard
Output:
Table "public.propertynamemap"
Column
|
Type
| Modifiers
---------------+------------------------+----------objectname
| character varying(128) | not null
propertyname
| character varying(128) | not null
propertymapid | integer
|
Sample list of system information table
Command:
/System/Library/CoreServices/RemoteManagement/rmdb.bundle/bin/psql -U ard -c
"\\d systeminformation" ard
Output:
Table "public.systeminformation"
Column
|
Type
| Modifiers
--------------+--------------------------+-----------
180
computerid
| character(17)
| not null
objectname
| character varying(128)
| not null
propertyname | character varying(128)
| not null
itemseq
| integer
|
value
| character varying(512)
|
Appendix
D
lastupdated
| timestamp with time zone |
Sample list of property names
Command:
/System/Library/CoreServices/RemoteManagement/rmdb.bundle/bin/psql -U ard -c
"select * from propertynamemap" ard
Output:
objectname
|
propertyname
| propertymapid
-----------------------+------------------------------+--------------Mac_SystemInfoElement | WirelessCardIsActive
|
0
Mac_SystemInfoElement | WirelessCardFirmwareVersion
|
1
Mac_SystemInfoElement | WirelessCardHardwareAddress
|
2
Mac_SystemInfoElement | WirelessCardLocale
|
3
Mac_SystemInfoElement | WirelessCardType
|
4
Mac_SystemInfoElement | WirelessCardInstalled
|
5
Mac_SystemInfoElement | WirelessChannelNumber
|
6
Mac_SystemInfoElement | WirelessNetworkAvailable
|
7
Mac_SystemInfoElement | WirelessIsComputerToComputer |
8
......
Sample list of table from one computer
Command:
/System/Library/CoreServices/RemoteManagement/rmdb.bundle/bin/psql -U ard -c
"select * from systeminformation" ard
Output:
computerid
value
|
|
objectname
lastupdated
|
propertyname
| itemseq |
-------------------+----------------------+-----------------+---------+--------------------+-----------------------00:03:93:af:15:cc | Mac_HardDriveElement | CreationDate
2005-02-25T03:30:07Z| 2005-02-26 22:21:38-08
|
0 |
00:03:93:af:15:cc | Mac_HardDriveElement | FileSystemType
18475
| 2005-02-26 22:21:38-08
|
0 |
00:03:93:af:15:cc | Mac_HardDriveElement | FreeSpace
4101610
| 2005-02-26 22:21:38-08
|
0 |
00:03:93:af:15:cc | Mac_HardDriveElement | GroupName
admin
| 2005-02-26 22:21:38-08
|
0 |
Appendix D PostgreSQL Schema Sample
181
A
aborting a task 98
access
changing privileges 69
group-based 62
via local account 61
Access Privileges 59
adding Dock items 131
administrator announce 92
Apple keyboard keys 79
Apple Remote Desktop menu icon 94, 95
application use report 115
asset tracking
application use 115
FireWire devices 121
hardware 119
management 118
memory 123
PCI cards 123
software 118
software changes 118
USB devices 121
B
basic file copy 108
best practices
networking 71
reporting 113–114
security 73
C
chat 92
cleaning up hard disks 128
client data upload policy 152
clipboard sharing 82
computer audio volume 130
computer list
making a new 54
removing 54
smart 54
computer lists 49
description of 53
182
Index
Index
computer sharing names 129
Control/Observe preferences 36
controlling a client 78
control window 32
buttons 79–82
Copy and Open 108
copying items
data encryption 107
overview 106
UNIX permissions 107
copying to relative locations 107
Copy Items options 107
CPU serial number, accessing 120
Create Custom Installer 43, 44
curtain mode 81, 140
customizing reports 35
D
Dashboard observe 91
deleting files 128
demonstration mode 93
designated data collector 112
directory services 62
drag and drop
copies 109
installation 104
E
enabling SSH on clients 133
encryption
one-time use 76
scheme description 75
setting defaults 75
Ethernet address tracking 122
F
file mirroring 110
file system maintenance 131
finding free disk space 120
firewall settings 49
full screen display 81
G
General preferences 36
group-based authorization 65
guest access 65
H
hard disk maintenance 131
hardware asset management 119
Help Desk Mode. See sharing control
human interface
customizing 36
icons 29
tips and shortcuts 37
I
installation, Remote Desktop 40
Install Packages options 107
K
keyboard shortcut exceptions 78
kickstart tool 147, 151
L
launching remote applications 136
limiting access privileges 66
limiting features to administrators 66
logging in remote users 140
logging out users 141
M
main window 29
Managed Client settings 46
mcx_setting attribute 62, 64
metadata search 116
mirroring a folder 110
moving computer lists 56–57
multi-observe 85, 91
window 33
muting a computer 130
N
NetBoot 128
networking best practices 71
networking with AirPort 72
Network Install 128
network interface audit 122
network performance tuning 73
networksetup tool 147
Network Time Protocol (NTP) server 129
notification script 97
O
observation settings 87, 88
Observe Widget 91
observe window 32, 33
Index
offline installation 103
Open Directory 62
P
package installation 101, 105
preferences 36
preference standardization 133
printer setup 133
Property List Editor tool 62
putting wired clients to sleep 137
Q
quitting applications 137
R
reclaiming hard disk space 127
Remote 42
removing client software 47, 48
removing files 127
removing Remote Desktop 46
renaming
copied items 108
multiple computers 129
repairing UNIX permissions 131
replacing copied items 108
report
access privileges 69
Application Usage 115
File Search 117
Software Difference 118
Software Version 118
System Overview 119
User History 114
report data sources 111
reporting best practices 113–114
reporting policy template 153
report window 34
restarting client computers 141
reusing tasks 99, 100
S
saving reporting policy preferences 153
saving reports 125
saving settings 99
saving tasks 99, 100
scan
file import 52
IP range 50, 52
LAN 50
scanner display 49
scanners 49
screen pushing 93
screen sharing console 94
Scripting Remote Desktop
AppleScript 156–159
183
Automator 159
Secure Screen Blanking. See curtain mode.
security
best practices 73
preferences 36
sending scripts via UNIX command 145–147
serial number 40
setting boot disk 128
setting encryption defaults 75
setting Energy Saver preferences 132
setting up a Task Server 154
setting wake-on-LAN 132
sharing control 80
Sharing Preference 59
sharing screens 93
software installation 101
software version report 105
Spotlight search 116
SSH access description 68
start VNC server 68
system requirements 39
systemsetup tool 132, 133, 147, 149
T
task history 96
task progress 96, 98
task results 99
task schedules 155
Task Server
data collection 112
Install Package 103
preferences 36
setup 154
task status 98
task templates
saving 100
UNIX commands 143
templates
UNIX commands 143
temporary access 65
testing network performance 124–125
text announce 92
text chat 92
184
Index
third-party installers 104
Tiger-only features
Spotlight search 116
tips
using report windows 126
using the observe window 90
tracking. See asset tracking.
trashing files 127, 128
U
uninstalling client software 47, 48
uninstalling Remote Desktop 46
unique computer names 129
UNIX command templates 143
updating software 118
upgrading
client software 42
Remote Desktop 41
user history report 114
user interface. See human interface.
user login report 114
user mode 66
user requests, viewing 93
using a time server 129
V
VNC 67
connecting to server 82
Control-Alt-Delete 83
custom display designation 84
Mac OS X Client as VNC server 85
non–Mac OS X basic set-up 83
port customization 84
W
wakeonlan packet 138
waking wired clients 138
window, shortcuts 37
Workgroup Manager 46, 131
X
XML 64