1
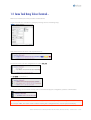
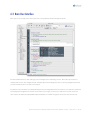
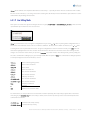
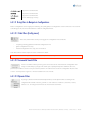
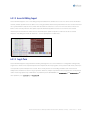
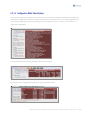
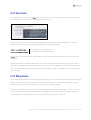
Terminal
User’s Manual
TELCONI TERMINAL 1.0 USER’S MANUAL
Telconi Terminal Version 1.01
©2005 Telconi GmbH, Munich, Germany. Cisco®, Cisco Systems®, Cisco IOS®, and IOS® are registered trademarks of Cisco Systems, Inc. or
its affiliates in the U.S. or certain other countries.
Contents
Preface .................................................................................................................................................................................................................................5
About this Manual ............................................................................................................................................................................................................6
1
2
3
Introduction...............................................................................................................................................................................................................7
1.1
The Joy and Pain of Using Cisco IOS®.......................................................................................................................................................7
1.2
Same Task Using Telconi Terminal….......................................................................................................................................................9
Prerequisites and Requirements.................................................................................................................................................................... 10
2.1
Supported Operating Systems ............................................................................................................................................................... 10
2.2
Supported Platforms, IOS® and PIX Versions ..................................................................................................................................... 10
2.3
Downloading Telconi Terminal............................................................................................................................................................... 11
2.4
Obtaining Your License Key..................................................................................................................................................................... 11
2.4.1
Full License Key .................................................................................................................................................................................. 11
2.4.2
Evaluation License Key ..................................................................................................................................................................... 11
Installing Telconi Terminal ................................................................................................................................................................................. 12
3.1
Installing Telconi Terminal on Microsoft Windows .......................................................................................................................... 12
3.2
Installing Telconi Terminal on MacOS X................................................................................................................................................ 12
3.3
Installing Telconi Terminal on Unix/Linux............................................................................................................................................ 13
4
Installing Your License Key................................................................................................................................................................................ 14
5
Cisco IOS®/PIX Configuration Requirements............................................................................................................................................... 15
5.1.1
Cisco IOS® Secure Shell (SSH) Configuration ............................................................................................................................. 16
5.1.2
Cisco IOS® Secure Shell (SSH) Proxy Requirements................................................................................................................ 16
5.2
Cisco® PIX Configuration Requirements ............................................................................................................................................. 17
5.2.1
6
Cisco® PIX Telnet and SSH Configuration ................................................................................................................................... 17
Using Telconi Terminal ....................................................................................................................................................................................... 18
6.1
Device Management and Connecting ................................................................................................................................................. 18
6.2
Device Connection Parameters ............................................................................................................................................................. 18
6.2.1
Hostname-/IP-Address.................................................................................................................................................................... 18
6.2.2
Device Description ............................................................................................................................................................................ 19
6.2.3
Device Username .............................................................................................................................................................................. 19
6.2.4
Device Password................................................................................................................................................................................ 19
6.2.5
Device Enable-Password ................................................................................................................................................................. 19
6.2.6
TELNET, SSH1 and PROXY Options ................................................................................................................................................ 19
6.2.7
Proxy Settings ..................................................................................................................................................................................... 20
6.2.7.1
Proxy-Host .................................................................................................................................................................................. 20
6.2.7.2
Proxy-Username and Proxy-Password.............................................................................................................................. 20
Telconi Terminal Users’s Manual, ©2005 Telconi GmbH, Munich, Germany (DOCV1.0.2)
2/37
6.2.8
Saving or Changing a Device Configuration .............................................................................................................................. 20
6.2.9
Removing a Device from the Device List .................................................................................................................................. 20
6.3
Basic User Interface.................................................................................................................................................................................... 21
6.4
Configuration, Exec and Debug Sessions............................................................................................................................................ 22
6.4.1
8
6.4.1.1
Line Selection Mode ................................................................................................................................................................ 22
6.4.1.2
Line Editing Mode..................................................................................................................................................................... 23
6.4.1.3
Using Filters to Navigate in Configurations ..................................................................................................................... 24
6.4.1.3.1
Static Filters (Config views)........................................................................................................................................................................24
6.4.1.3.2
Incremental Search Filter ...........................................................................................................................................................................24
6.4.1.3.3
Dynamic Filters...............................................................................................................................................................................................24
6.4.1.4
Access-List Editing Support .................................................................................................................................................. 25
6.4.1.5
Copy & Paste............................................................................................................................................................................... 25
6.4.1.6
Configuration Mode Inline Displays ................................................................................................................................... 26
6.4.2
Exec Session ........................................................................................................................................................................................ 27
6.4.3
Debug Session.................................................................................................................................................................................... 27
6.5
7
Configuration Session ...................................................................................................................................................................... 22
Using the Help Facility............................................................................................................................................................................... 28
6.5.1
Partial Help ........................................................................................................................................................................................... 28
6.5.2
Full Help ................................................................................................................................................................................................ 28
6.6
Cisco IOS®/PIX Responses and Messages ........................................................................................................................................... 29
6.7
Action Buttons ............................................................................................................................................................................................. 30
6.7.1
Logging in and Refreshing a Session .......................................................................................................................................... 30
6.7.2
Commit and Revert ........................................................................................................................................................................... 30
6.7.2.1
Commit ........................................................................................................................................................................................ 30
6.7.2.2
Revert ........................................................................................................................................................................................... 30
6.7.3
HTML-Output ....................................................................................................................................................................................... 31
6.7.4
ASCII-Format Output......................................................................................................................................................................... 31
6.7.5
Logout ................................................................................................................................................................................................... 31
Controlling Telconi Terminal............................................................................................................................................................................. 32
7.1
Command Line Options (Unix/Linux and Windows only) ............................................................................................................. 32
7.2
Apple Script Support (MacOS X only) .................................................................................................................................................... 32
7.2.1
Application Startup ............................................................................................................................................................................ 32
7.2.2
Setting the Hostname / IP-Adress ............................................................................................................................................... 32
7.2.3
Accessing AppleScript Functionality from the Command Line ......................................................................................... 33
Telconi Terminal Data and File Storage.......................................................................................................................................................... 34
8.1
Base Directory .............................................................................................................................................................................................. 34
8.2
File Types........................................................................................................................................................................................................ 34
8.3
Device Specific Files ................................................................................................................................................................................... 35
8.3.1
Device Connection Configuration Files (.dev) ......................................................................................................................... 35
8.3.2
Device Configuration Backup Files (.txt) .................................................................................................................................... 36
Telconi Terminal Users’s Manual, ©2005 Telconi GmbH, Munich, Germany (DOCV1.0.2)
3/37
8.3.3
Logfiles (.log) ...................................................................................................................................................................................... 36
8.4
Licensing Information File (.lic) .............................................................................................................................................................. 36
8.5
Update Information Files (.upt) .............................................................................................................................................................. 36
Trademark Notices .................................................................................................................................................................................................. 37
Credits ......................................................................................................................................................................................................................... 37
Telconi Terminal Users’s Manual, ©2005 Telconi GmbH, Munich, Germany (DOCV1.0.2)
4/37
Preface
Cisco® routers, switches and PIX firewalls are usually configured using a poor command line interface (CLI) and require
general knowledge of networking technologies, protocols and Cisco IOS®. Some existing network management
applications may cover fault-, software- and other management tasks pretty well. For most other tasks, however, you'll
have to step down to the command line interface.
Telconi Terminal, a network management productivity application for Cisco IOS®/PIX based devices, helps network
administrators to accomplish their daily work more efficiently and comfortably by complementing the IOS®/PIX command
line interface with a more convenient, interactive visual user interface.
In a network management model, it most closely resembles a local craft terminal or element manager. The application
requires knowledge of the underlying networking technologies, network protocols and IOS®/PIX and does not try to
remove the complexities of router configuration and network administration.
Telconi Terminal Users’s Manual, ©2005 Telconi GmbH, Munich, Germany (DOCV1.0.2)
5/37
About this Manual
This manual describes Telconi Terminal software version 1.0. Future changes and additions will be documented in separate
release notes and revisions of this manual. Please also look for release note documents if you are using a newer version. If
you find any mistakes in this manual, or if you think that some portions of this manual are incomplete, please send an
email message to [email protected] and we will consider to correct or improve this manual.
Telconi Terminal Users’s Manual, ©2005 Telconi GmbH, Munich, Germany (DOCV1.0.2)
6/37
1 Introduction
This section assumes some sense of humor and contains no important information for using Telconi Termial. You can skip
this section if you’re in a hurry.
1.1 The Joy and Pain of Using Cisco IOS®
The Cisco IOS®/PIX command line interface (CLI) is quite flexible and allows you to enter complex configurations elegantly
with only a few configuration lines. For historical and other reasons, however, it has some flaws for the novice and even for
the more experienced user. Its original intention appears to try to keep users from entering configuration lines before
they think, which makes sense. Assume we want to remove a secondary IP address definition on an Ethernet interface.
Now we type:
$ telnet <router>
Username: <your-user-name>
Password: <your password>
Router>
(In this example, the router was configured using aaa-new model and administrative users) Now we arrived at the first
prompt. We can’t do much here. Now we have to proceed to the privileged level by:
Router> enable
Password:
<your password>
All right, now we see another prompt:
Router#
Having arrived at this point, we usually do a “show running-config”. Thanks to the command line abbreviation and
completion functionality, typing isn’t so hard. So we keep on typing the TAB key until it beeps or remember working
abbreviations, such as “sh run”. Now, usually multiple screens of configuration data are displayed, scrolling up and
prompting to press space for each point. At some point, we enter the configuration mode to get to another prompt by:
Router# configure terminal
Router(config)#
Telconi Terminal Users’s Manual, ©2005 Telconi GmbH, Munich, Germany (DOCV1.0.2)
7/37
As we did a “show running” before, we figured out what the interface number of our target interface is, maybe we have
to scroll a bit back with our terminal emulation. Okay, the interface of choice was “Ethernet 1” because we’ve seen this
configuration fragment in our (possibly quite longish) output:
interface Ethernet 1
ip address 10.1.2.1 255.255.255.0
ip address 10.1.2.3 255.255.255.0 secondary
Now, we enter the context of that interface:
Router(config)# interface Ethernet 1
Router(config-if)#
The commands can be abbreviated, like “int ether 1”, as long as not ambiguous. So, after having arrived at the 4th
prompt now, we can now the configure secondary ip-address (as long as we remember what it was we wanted to do in
the first place):
Router(config-if)# no ip address 10.1.2.3 255.255.255.0 secondary
It is important to note that completion does not work for parameters such as IP addresses or netmasks. Command
completion will only work for keywords – not values such as numbers or addresses. We have to type in the entire line (or,
of course, use our terminal emulation, scroll back, copy the entire line in our paste buffer, just type in “no” and then paste
the line with the terminal emulation. Usually we would type TAB and ? several times during the whole process, causing
help facility output to scroll the context way up, making it hard to scroll back to our configuration output. Finally, we want to
check if everything is ok. We now have the convenience to press CTR L -Z and break back to levels, right back to our EXEC
mode prompt:
Router#
Now, we enter something like “show interface Ethernet 1”, or “show running-config” again. Assuming we like
what we see, the router does not yet have the configuration saved in its non-volatile memory. To do so, we type the
command:
Router# write
We’re done.
Telconi Terminal Users’s Manual, ©2005 Telconi GmbH, Munich, Germany (DOCV1.0.2)
8/37
1.2 Same Task Using Telconi Terminal…
With Telconi Terminal, the whole procedure would look like:
Log in and enable the router/device (usually by selecting a device and clicking okay):
Click on the interface of choice in the dynamic filter list:
Position the mouse over the configuration line and hit DELETE
Hit R ETU R N to send the line:
To save the change to non-volatile memory and to reload and redisplay the configuration, push the commit button:
Point is, things will be much easier to enter. However, you’ve to know exactly what you are doing. You need to understand
the concepts of IOS®, the router’s entities and the meaning of the configuration lines. You can’t just click and play.
Telconi Terminal Users’s Manual, ©2005 Telconi GmbH, Munich, Germany (DOCV1.0.2)
9/37
2 Prerequisites and Requirements
2.1 Supported Operating Systems
As a multi-platform application, we currently support the following operating systems:
- Windows 98, Windows NT 4.0, Windows 2000, Windows XP
- MacOS X 10.3 (Panther release)
- Sun Solaris SPARC (Solaris 8 and later distributions)
- Sun Solaris INTEL (Solaris 9 and later distributions)
- Linux (7.2 and later distributions)
- FreeBSD (4.8 and later distributions)
Other Unix platforms will follow on demand. If your operating system platform is currently not supported, please contact
[email protected].
2.2 Supported Platforms, IOS® and PIX Versions
Telconi Terminal has been designed to support all IOS® based devices or PIX Firewalls. This version has been tested with
many devices such as Cisco® Series 1400, 1600, 1700, 2500, 3600, 7200 and 7400 routers and Catalyst 2900XL/3500XL
switches running IOS® version 12.x. It also has been tested in with Cisco®PIX 506 and 515 firewalls and various PIX software
versions. It is not possible, however, to test all combinations of routers, switches, firewalls, IOS® or PIX versions and line
cards, so Telconi Terminal might not work correctly with your configuration. If you encounter problems with your
configuration, please feel free to contact [email protected] and report your configuration.
Telconi Terminal Users’s Manual, ©2005 Telconi GmbH, Munich, Germany (DOCV1.0.2)
10/37
2.3 Downloading Telconi Terminal
Before you install, please make sure you’re using the latest version for your supported platform. The latest version can be
downloaded from our web site http://www.telconi.com. You can also use anonymous FTP to download the distribution file
from our FTP server ftp://ftp.telconi.com. The distribution archive’s filename includes the platform and the program
version, for example:
Telconi_WIN32_101.zip (for any supported Microsoft Windows Version)
Telconi_MACOS_101.dmg (for any supported MacOS X Version 10.3 or newer)
Telconi_FRBSD_101.tgz (for FreeBSD, Version 4.8 or newer)
Telconi_LINUX_101.tgz (for Linux, 7.2 Distributions or newer)
Telconi_SPARC_101.tgz (for Sun Solaris SPARC, Version 8 or newer)
Telconi_SOL86_101.tgz (for Sun Solaris x86, Verison 9 or newer)
Once the software is installed, it displays information about new versions as they become available (version checking will
only work if your computer has direct access to the Internet).
2.4 Obtaining Your License Key
In order to run Telconi Terminal, you require a license key. Some versions have a compiled-in evaluation key, but you can
request an evaluation license key any time, which will be automatically issued and sent to you via email.
2.4.1 Full License Key
If you’re intending to purchase a full license key, please contact [email protected]. If you have already purchased a full
license, the license key we issued has been sent to you via email after your order was processed. A full license key will
display no expiration date after being installed. Full license keys may or may not limit the number of devices in the device
list, depending on the type of license purchased. Please refer to our licensing information for more details.
2.4.2 Evaluation License Key
You can request an evaluation license key on our web site http://www.telconi.com any time. Evaluation license keys will
expire after some time and limit the number of managed devices in the device list. If you wish a longer evaluation period
or the ability to manage more devices for your evaluation, we can issue a different key on request.
Please also refer to our licensing information for more detailed information on terms and conditions of evaluation or full
licenses. For questions about licensing, please contact [email protected].
Telconi Terminal Users’s Manual, ©2005 Telconi GmbH, Munich, Germany (DOCV1.0.2)
11/37
3 Installing Telconi Terminal
3.1 Installing Telconi Terminal on Microsoft Windows
Telconi Terminal is distributed on Windows as a ZIP archive. Depending on the version of Windows you’re using, you may
require an additional utility such as WinZIP to extract the archive. With a recent version of Windows, you should be able to
extract the archive with Explorer and no tools are required.
The archive contains the program file telconi.exe and other associated files, such as documentation in PDF format.
Telconi Terminal does not need to be run an installer or setup program and only needs the .exe file to work. To install, copy
the telconi.exe program file to any location (such as to C:\Programs\Telconi\).
If you already have installed a previous version of Telconi Terminal on your system before, just replace the old version with
the new one. Do not remove any of the files in the data directory.
Optionally, you might want to add an alias to the start menu or desktop using Windows Explorer.
If you’re intending to use Telconi Terminal from the command line on Windows, you should also consider set PATH
environment variable to point to the directory to which you copied telconi.exe.
3.2 Installing Telconi Terminal on MacOS X
Telconi Terminal is distributed on MacOS X as a
mountable disk image file (.dmg). After downloading
the distribution file with a web browser, the image will
usually be mounted automatically. If the disk image file
was not mounted automatically, double click the disk image file (.dmg).
To install, copy the Telconi Terminal application to your harddisk by dragging the
application icon to your preferred location (such as the applications folder or the
desktop). There is no need to run an installer program.
Please note, it is possible, but not recommended, to run the application directly from the mountable disk image (some
functionality like AppleScript might not function correctly).
If you already have installed a previous version of Telconi Terminal on your system before, just replace the old version with
the new one. Do not remove any of the files in the data directory.
Telconi Terminal Users’s Manual, ©2005 Telconi GmbH, Munich, Germany (DOCV1.0.2)
12/37
3.3 Installing Telconi Terminal on Unix/Linux
Telconi Terminal is distributed on Unix/Linux as a .tgz file (GNU zipped tar archive). The archive contains an executable file
called “telconi” along with other associated files, such as documentation in PDF format. Depending on your web browser
and environment, extracting the archive by using the command line might not be required. If you’re using the command
line, you can extract the archive file using the GNU version of the “tar” command. For example:
$ tar zxvf Telconi_LINUX_101r1.tgz
Not all versions of the “tar” command support the “z” option (such as some distributions of the Sun Solaris Operating
System). If your system has the “gunzip” utility available, however, you can use the following sequence of commands to
extract the archive:
$ mv Telconi_SPARC_101.tgz Telconi_SPARC_101r1.tar.gz
$ gunzip Telconi_SPARC_101.tar.gz
$ tar xvf Telconi_SPARC_101.tar
Alternatively, you might wish to install the free GNU tar utility package. The archive contains a single executable file called
“telconi”. Copy this file to a location which is included in your PATH variable, such as /usr/local/bin (or adjust your
PATH variable setting in your shell’s profile). There are no other files required to run Telconi Terminal.
If you already have installed a previous version of Telconi Terminal on your system before, just replace the old version with
the new one. Do not remove any of the files in the data directory.
Unix/Linux versions assume X11. Make sure your X11 environment is setup correctly (like the DISPLAY variable and X11
server access rights). It is also possible to use Telconi Terminal remotely by either using X11 forwarding in conjunction
with SSH or by setting the DISPLAY variable to a remote X11 server. Please note that using X11 applications remotely may
require significant bandwidth.
Note about Linux versions: some Linux installations may not have all required shared libraries installed. If you get error
messages or warnings about missing shared libraries using Linux as you try to start the application, please install the
required missing libraries for your Linux distribution.
Telconi Terminal Users’s Manual, ©2005 Telconi GmbH, Munich, Germany (DOCV1.0.2)
13/37
4 Installing Your License Key
If you run the program for the first time and there is no valid license key installed, the software prompts you to enter a
license key. Please enter the license key exactly as it has been sent to you – including the licensee name or email address.
After entering the license key, use the “Save License” push button to store the license.
The picture to the left shows the licensing Window. It will
appear if there’s no valid license installed. It will also appear if a
valid license has expired. You also can invoke the licensing
Window from the application menu to enter a different license
key (for example, to configure a full license key and remove an
evaluation license key). The license details in the lower part of
the window display the characteristics of your license key, such
as the license type, the license expiration date (for evaluation
licenses) and the number of licensed devices.
The information you enter will become active only after you click
the “Save License” button.
Depending on the license key you install, the number of devices you can enter in the device list may be limited.
Automatically generated evaluation licenses limit the number of managed devices to 5.
Telconi Terminal Users’s Manual, ©2005 Telconi GmbH, Munich, Germany (DOCV1.0.2)
14/37
5 Cisco IOS®/PIX Configuration Requirements
Telconi Terminal uses session protocols such as SSH or TELNET to connect o your device. There is no need to enable SNMP
management protocols on the device in order to use Telconi Terminal.
The router must be accessible through an IP network. We currently do not support serial lines. The device must be
configured for multiple TELNET or SSH connections and must have an IP address assigned. This initial configuration must be
preconfigured using a traditional terminal application (only if the device is configured for the first time). A sample minimal
configuration using a single TELNET session password is:
enable password secret
interface Ethernet0
ip address 10.1.1.1 255.255.255.0
line vty 0 4
password secret
Using this model, there are no usernames required when logging in (the username field in the login window is omitted).
Cisco IOS® also supports a commonly used alternative model, allowing to authenticate with different user names, which
can be configured like:
aaa new-model
aaa authorization exec default local
username admin password secret
enable password secret
In this case, you need to enter the username, user password and enable password to log in. Some configurations will not
require an enable password, such as:
aaa new-model
aaa authorization exec default local
username superuser privilege 15 password 0 secret
Here, you need to enter the username and password to log in, but you don’t need to enter an enable password. Note this
setup will work regardless whether you’re using TELNET or SSH protocols.
Telconi Terminal Users’s Manual, ©2005 Telconi GmbH, Munich, Germany (DOCV1.0.2)
15/37
5.1.1 Cisco IOS® Secure Shell (SSH) Configuration
In order to connect securely to your device, the system image also must support it. Please refer to the documentation
which system images are available for your device. In addition, the device must also have a RSA key pair configured, which
can be created as follows:
router# configure terminal
router(config)# crypto key generate rsa
5.1.2 Cisco IOS® Secure Shell (SSH) Proxy Requirements
It is possible to use a Unix box as a SSH-proxy to access the device via TELNET. The Proxy is accessed with SSH Verison 1.5
and password authentication. The SSH server on the proxy host must be configured to allow SSH protocol version 1
connections. Please refer to the documentation of your SSH server software for more information.
Because of some compatibility issues and default daemon behavior, Telconi Terminal does not use a SSH forwarding
mechanism to connect from the proxy host to the device via TELNET and assumes a CLI telnet client in the PATH of the
proxy user. Please make sure the proxy user’s environment is setup correctly by manually connecting to the proxy host via
SSH first and then try to use the CLI telnet client to connect to your device.
If you’re using proxy connections, please also note that hostname resolution of the device’s hostname will be performed
on the proxy host and not on your machine.
Telconi Terminal Users’s Manual, ©2005 Telconi GmbH, Munich, Germany (DOCV1.0.2)
16/37
5.2 Cisco® PIX Configuration Requirements
With Cisco® PIX Firewalls, Telconi Terminal works with all access methods as for Cisco IOS® based devices (Telnet, SSH,
Proxy). Please refer to your device’s documentation for further information on how to enable access protocols such as
Telnet or SSH on a PIX Firewall. This section will provide a basic configuration guideline for configuring Cisco® PIX firewalls
in order to work with Telconi Terminal.
5.2.1 Cisco® PIX Telnet and SSH Configuration
First, if not already configured, a session password and an enable password has to be configured like this:
firewall# configure terminal
firewall(config)# passwd secret
firewall(config)# enable password secret
For Telnet, the protocol must be enabled (might be by default) on the inside interface as follows (the network and
netmask must be changed to your network):
firewall# configure terminal
firewall(config)# telnet 10.0.0.0 255.255.255.0 inside
If you want to use SSH, you must also create a key, like:
firewall# configure terminal
firewall(config)# hostname fire
fire(config)# domain-name mydomain.com
fire(config)# ca generate rsa key 512
fire(config)# ca save all
For SSH, the protocol must be enabled on the inside interface as follows (the network and netmask must be changed to
your network):
fire# configure terminal
fire(config)# ssh 10.0.0.0 255.255.255.0 inside
Note that the default username for SSH based connections on is simply "pix" if you did not configure user authentication.
Telconi Terminal Users’s Manual, ©2005 Telconi GmbH, Munich, Germany (DOCV1.0.2)
17/37
6 Using Telconi Terminal
6.1 Device Management and Connecting
Telconi Terminal manages devices and connection information in a single window.
The picture on the left shows the device
window. The list on the right hand shows all
known devices, while the parameter fields on
the left hand show active connection
parameters being used for the session.
Depending on the connection type and you
device’s configuration, some parameters are
required while others are optional. If not all
required parameters are given, the OK button
will be disabled. Please read the next section
carefully for a description of connection
parameters.
The number of devices displayed in the device
list may be restricted by the type of license
installed.
6.2 Device Connection Parameters
This section describes all connection parameters in detail. Please also consider the device configuration requirements
section of this manual for detailed information on supported device configurations.
6.2.1 Hostname-/IP-Address
Specifies the Device’s management Hostname or IP-Address. If you’re using a Hostname and not an IP address, the
hostname will be resolved by the local resolver library each time you connect (in most cases, by the domain name server).
If you’re using a proxy host to connect to the device, the hostname is resolved by the proxy host instead of your local
computer. Please make sure that the names you’re using are known to the system(s) or specify the device’s IP address.
Telconi Terminal Users’s Manual, ©2005 Telconi GmbH, Munich, Germany (DOCV1.0.2)
18/37
6.2.2 Device Description
The description is an optional value, which will appear in the device list instead of the hostname or IP address if given. If
this field is left empty, the device list will show the hostname or IP address. The purpose of this field is simply a way of
organizing your devices by names instead of IP addresses. Note that device descriptions only appear in the device list, not
in filenames of device specific files or on the command line options or AppleScript values.
6.2.3 Device Username
Depending on your device’s configuration, this field may be optional. If you are working with Cisco IOS® and did not
configure administrative users (by using “aaa new model”) and only specified a TELNET password in the “line vty x x”
section, the username parameter must be omitted. If you’re not sure whether you need a username or not, use an
ordinary TELNET client and try to connect to your device. If the device prompts for an username, this field has to be filled
with an username. The username parameter is always required when using the SSH protocol. On a PIX firewall, the default
SSH username is “pix”.
6.2.4 Device Password
The password field specified either a TELNET or SSH password and is always required. If you’re using TELNET, the password
is either the user’s password specified in the field above, or the virtual terminal password specified in the “line vty x x”
section of your IOS® configuration. Please note that IOS® requires a password (at least on the virtual terminal line) to let you
connect with TELNET at all. If your device has no password configured yet, you need to connect a terminal on the serial
console port and configure a password. If you’re using SSH, please fill this field with the user’s password.
6.2.5 Device Enable-Password
The enable password is required in most cases. It is not required if the user given already is configured for “privilege
level 15” on the IOS® device. If your user already has sufficient privileges, you must omit the enable password
parameter.
6.2.6 TELNET, SSH1 and PROXY Options
The radio button in the left area lets you choose the connection type. You can check TELNET, SSH1 or PROXY. If you check
PROXY, you need to fill all the PROXY connection fields. If you check SSH1, the username becomes a required parameter.
Telconi Terminal Users’s Manual, ©2005 Telconi GmbH, Munich, Germany (DOCV1.0.2)
19/37
6.2.7 Proxy Settings
This section describes proxy connection method parameters. Using this variant may be desired in some environments,
especially if you can reach a Unix host via SSH protocol, but do not have direct access to the devices via TELNET (because
TELNET may be blocked by a firewall). If you choose proxy as the connection method, Telconi Terminal will first login to a
Unix based host and then use telnet to connect to the specified device. It requires the Unix host to be configured to meet
the protocol requirements. Telconi Terminal assumes SSH protocol version 1. It also assumes a TELNET client in the PATH of
the given Unix user account.
6.2.7.1 Proxy-Host
Specifies a hostname or IP address of a Unix-based proxy host. If you specify a hostname, the hostname is resolved for
each connection using the local domain name resolver mechanism. Please make sure that any name you specify can be
resolved from your client. Also note that if you choose the proxy connection method, the hostname of the actual device is
not resolved by your client, but by the resolver of the proxy host. This parameter is only required if you checked the proxy
option.
6.2.7.2 Proxy-Username and Proxy-Password
These fields specify the username and the password on the Unix-based proxy host. The values are required only if you
checked the proxy option.
6.2.8 Saving or Changing a Device Configuration
Telconi Terminal saves device configurations (all connection parameters) automatically once you log in successfully. In
order to add a new device, enter the connection parameters, log in once, and the configuration for this device will be
added. If you need to alter an existing device configuration (maybe because the password on a given device has been
changed), just select the device in the device list, alter the parameters that need to be changed and connect to the device.
After successfully connecting to the device, the changed values are stored.
6.2.9 Removing a Device from the Device List
To remove a device, please select one in the device list and use the button labeled with a minus sign. Please note that if
you remove a device, not all information about the device will be erased (such as log files and configuration backups).
Please refer to the file handling section for more information on device specific files stored by Telconi Terminal.
Telconi Terminal Users’s Manual, ©2005 Telconi GmbH, Munich, Germany (DOCV1.0.2)
20/37
6.3 Basic User Interface
Once you are successfully connected to your device, the application window will appear like this:
The main window has three tabs, letting you select Configure, Exec and Debug sessions. These tabs represent three
independent sessions. The configuration tab automatically loads and displays the device’s running configuration and lets
you interact with the device in a full-screen fashion.
The drawer on the left shows a list of dynamically discovered configuration filters for interfaces, lines and other entities for
fast configuration navigation. The controls on the top let you re-login, reconnect one of the three sessions and access
other actions, like ASCII text output, HTML output and buttons to commit changed or revert to the last saved version.
Telconi Terminal Users’s Manual, ©2005 Telconi GmbH, Munich, Germany (DOCV1.0.2)
21/37
6.4 Configuration, Exec and Debug Sessions
6.4.1 Configuration Session
To enable the config session, select the Config tab of the main view. It represents a session in configuration mode and
allows you to edit or add individual configuration lines in a full-screen fashion. It also gives you access the routers built-in
help facility as you type. The configuration displayed is always the “running-config” of your router. The Config session
operates in two modes. Each mode has it’s own keyboard and mouse bindings.
6.4.1.1 Line Selection Mode
This mode is used to select configuration lines and operations on configuration lines. As you move your mouse over the
configuration view, lines on which you can apply operations (like edit, add, negate), appear in a highlighted fashion as
follows:
In selection modes, the following keys bindings apply:
H (also H OME)
first line, beginning of configuration
G (also E ND)
last line, end of configuration
C U R SO R -left
select previous word
C U R SO R - r i g h t
select next word
C U R SO R - u p , K , P o r CTR L - P
previous line
C U R SO R - d ow n , J o r N o r CTR L - N
next line
TAB
next configuration section
S HIFT -TA B
previous configuration section
A, I , + (also I NSE R T)
add a new line after selected line
BAC K S PACE o r -
enter editor with line negated (i.e. with “no”)
R ETU R N, E o r C
start editing this line
S PACE
scroll down a page
(also PA G E D OWN)
B (als o PA GE U P)
scroll back (up) a page
You can also just click on a line using the mouse. If you select a word of a line, only words before the selection will be
copied.
Telconi Terminal Users’s Manual, ©2005 Telconi GmbH, Munich, Germany (DOCV1.0.2)
22/37
N o te : We’ve defined some keyboard alternatives to Cursor keys – especially for those who are used to the Unix vi editor.
The line selection mode (i.e., selecting a line before entering line edit mode) in Telconi Terminal is quite similar to vi. Some
default Emacs key-bindings will also work.
6.4.1.2 Line Editing Mode
After you’ve selected a line (by left-clicking the mouse or typing +, R ETU R N or BAC K S PACE , A , C o r E ), a little terminal
input window opens within the line selection area:
N o te: if you intend to insert a new global configuration line, just enter + or a after any other global configuration line or
the last line of an indented section such as an interface definition. To add a new line within an interface, use + or a while
selecting the first or any other but the last one of a given configuration section. To leave this mode, press ESC left-click
outside the highlighted area. The line selection mode will also be entered once the mouse leaves the viewing area. No
changes are sent to the router unless you press the R ETU R N key in this mode. In line editing mode, you may simply use
the same command line editing keys as you normally would. With exception of ESC, the command line editing keystrokes
are transparently passed to the CLI interface, such as:
CTRL -A
move to the beginning of line
CTRL -E
move to the end of line
CTRL -W
delete word
CTRL -K
delete to end of line
CTRL -B
one character backward
CTRL -F
one character forward
CTRL -L
redisplay current line
C U R SO R -left
one character backward
C U R SO R - r i g h t
one character forward
TAB
complete command
?
get help
ESC
return to line selection mode
As shown above, it is also possible to access the built-in router help facility. The help overlays appear after a left mouse
click, the?-key or C U R SO R - U p . Once an overlay is visible, items on the help overlay can be selected and copied to the
command line as follows:
C U R SO R - u p
previous item of help overlay
C U R SO R - d ow n
next item of help overlay
Telconi Terminal Users’s Manual, ©2005 Telconi GmbH, Munich, Germany (DOCV1.0.2)
23/37
C U R SO R - r i g h t
copy item to command line
R ETU R N
copy item to command line
Left -M o use
copy item to command line
S PACE
scroll in multi-page overlays
6.4.1.3 Using Filters to Navigate in Configurations
Router configurations can be lengthy and confusing. To quickly jump to a configuration section of interest or to search for
something specific, Telconi Terminal features a built-in configuration filter.
6.4.1.3.1 Static Filters (Config views)
These static, built-in filters allow you to toggle the configuration view as follows:
-
everything, including global and indented configuration lines
-
global configuration lines only
-
indented configuration lines only, such as interfaces
Static filters will be available only if the Search / Filter field is blank.
Note: static filters are currently available for the MacOS X implementation only.
6.4.1.3.2 Incremental Search Filter
You also can define a filter by entering some text in the Search / Filter field. The configuration view
changes incrementally as you type. This allows you to quickly find specific definitions for users,
passwords, IP-addresses and so on. If you search for patterns in indented sections of the configuration file, the entire
section – and not just the single line – will be included in the search result.
6.4.1.3.3 Dynamic Filters
As you log in, Router Terminal automatically builds up a list of dynamic filters according to the
configuration file loaded. In this list, you will see such entities as interfaces, controllers, routers,
addresses etc. Selecting an item will set the incremental search filter.
Telconi Terminal Users’s Manual, ©2005 Telconi GmbH, Munich, Germany (DOCV1.0.2)
24/37
6.4.1.4 Access-List Editing Support
Telconi Terminal supports access-List editing and synchronization for standard access lists. Lines of lists can be marked for
deletion, shifted up/down and so on. Once a list is changed it will be marked “unsynchronized”. The user can then view and
run a synchronization script for the list, which will retransmit the entire list as seen on screen to the device. We’ve also
built in some lock-out protection. The update script will automatically disable an active access-list for all associated
interfaces prior to transmission. After the list is transmitted, the update script will re-enable the list for associated
interfaces. List editing also works for other lists – such as “priority-lists” or “dialer-lists”.
6.4.1.5 Copy & Paste
Telconi Terminal supports Copy & Paste functionality, although there are some limitations. In configuration editing mode,
single lines or words can be copied and pasted. Also input from external programs can be pasted in edit mode, however, it
is not possible to paste multiple lines at a time. This is mostly because error handling would become inconsistent if
multiple lines would be inserted in a single operation. However, multiple copied from other programs lines can be pasted
it Exec mode. Copy & paste key combinations are platform specific. On MacOS X, use C omman d -C and C ommand -V . On
other platforms, use C on t r ol -C and C on t r ol -V .
Telconi Terminal Users’s Manual, ©2005 Telconi GmbH, Munich, Germany (DOCV1.0.2)
25/37
6.4.1.6 Configuration Mode Inline Displays
Telconi Terminal allows you to quickly access various types of status and other information information from within the
editing mode. Configuration mode inline displays are invoked when moving the mouse over certain configuration lines
and selection a display option. The following example shows the output of a “show interface FastEthernet 0”
command in a subwindow:
The next example shows accounting information for the same interface:
The version line of a configuration has quite some interesting output options:
Telconi Terminal Users’s Manual, ©2005 Telconi GmbH, Munich, Germany (DOCV1.0.2)
26/37
6.4.2 Exec Session
To enable the Exec session, select the E xec tab of the main view. It represents an individual session and is used to enter
non-configuration commands, such as displaying interfaces and so on.
Using the Exec session is similar as using the line editing mode in configuration mode., including the use of the help
facility However, the following key bindings apply (if the help overlay is not displayed):
CTRL - P or C U R SO R - u p
one command up in command history
CTRL - N o r C U R SO R - d ow n
one command down in command history
N o te : In the line selection mode, these keys will not show the command history, but position the line selection cursor
accordingly.
Despite of an often more readable output and are more convenient way to use the help system, using the Exec mode is
quite similar as using traditional terminal emulation. You may also enter the configuration mode in Exec mode, but make
sure to reload the configuration view after you have made any changes to obtain a configuration view consistent with the
routers memory.
6.4.3 Debug Session
If you enable debugging in Exec mode, debugging output is being sent to a terminal with monitoring enabled. Debugging
output is written directly to your terminal and is disturbing if you use the same session to enter commands. So using a
traditional terminal, you usually would connect a second session for debugging output.
The debug session represents a separate session with debugging output enabled (as if you type terminal monitor ) in
the Exec session. This session is automatically initiated and configured as you log in. Usually, you would not type in this
session and look at it’s output only. The last line of this window is also displayed in the status line.
Telconi Terminal Users’s Manual, ©2005 Telconi GmbH, Munich, Germany (DOCV1.0.2)
27/37
6.5 Using the Help Facility
As mentioned earlier, Telconi Terminal lets you access the router’s built-in help system in a comfortable manner. Using a
traditional terminal software, help system output is written below your current line, causing the display to scroll and
disturbing your vision and context. In Telconi Terminal, help system output is being captured and displayed in dynamic
overlay windows. In addition to a more convenient display, you also can select items in those overlays to copy them to your
command line. Alternatively, of course, you might want to use the command completion feature of IOS®.
6.5.1 Partial Help
If the cursor is in a word (i.e. not after a SPACE character), the router outputs partial help. Partial help shows you possible
completions for the word you’ve started to type, such as:
Help is invoked by pressing the?-key. In the configuration view, you can alternatively use the C U R S U R - U p key. Here, the
character before the cursor is not a SPACE character. Command line completion does not work, as two choices are
possible: controllers and configuration. In Telconi Terminal, you can highlight items by using either the mouse or cursor
keys. To copy an item to the command line, use either the R ETU R N - key, C U R SO R - R i g h t - key or left-click with the
mouse. To hide the help overlay again, use the ESC -key. Use the S PACE key to scroll to the next page a multi-page
overlay.
6.5.2 Full Help
Full help, a somewhat more descriptive help system output, is being shown if the cursor is not in a word, i.e. after a space
character or at the beginning of a line. Full help includes a descriptive line for each item. Keyboard use is identical as with
partial help. Here is some sample output:
Telconi Terminal Users’s Manual, ©2005 Telconi GmbH, Munich, Germany (DOCV1.0.2)
28/37
6.6 Cisco IOS®/PIX Responses and Messages
The router gives you feedback as you enter wrong commands, some required entity hasn’t been configured yet and so on.
Usually, this is output to the terminal in separate lines, causing the screen to scroll as with the help system. For example:
router(config)#no interface serial 0
% Removal of physical interfaces is not permitted
router(config)#
or
router(config)#this does not work
^
% Invalid input detected at '^' marker.
router(config)#
The ladder example shows a caret indicating the position the parser would not understand. Using Telconi Terminal, the
same messages are displayed as overlays – just like the help facility:
and
Telconi Terminal Users’s Manual, ©2005 Telconi GmbH, Munich, Germany (DOCV1.0.2)
29/37
6.7 Action Buttons
6.7.1 Logging in and Refreshing a Session
The L og i n -button brings up the login dialog again. All three sessions will be terminated and you have to
enter your connection information again.
The Refresh -button is used to reload the current session only (i.e. the session selected by the tab above the main viewing
window). It remembers the passwords you initially typed, terminates the current session and reloads it. This is being used
mainly to refresh the configuration view in the main window after having applied some modifications.
6.7.2 Commit and Revert
These two buttons should be used with caution. They are used to control the routers non-volatile memory
(NVRAM). What you see in the configuration view is the “running-configuration” of the router, the
configuration in the routers volatile memory (RAM). Any configuration changes you make will be lost after a reboot (or
reload) of the router, unless you copy the current configuration to the non-volatile memory (NVRAM). Note that if you
either c ommi t or rever t the current configuration, the displayed configuration is consistent with what the router will use
at the next reboot phase. Otherwise, the router will fallback to the last committed variant of your configuration.
6.7.2.1 Commit
This button will commit any changes in the running configuration and make them permanent (by writing it to NVRAM).
After a reboot of the router, uncommitted changed will be lost. The commit button is equivalent to typing
Router# write
Router# show config
in an exec session. This button also will automatically reload the configuration written. It will reload from the non-volatile
memory in this case, as they’re identical at this point, but will reload more quickly than loading the running configuration.
6.7.2.2 Revert
The rever t button will revert to the last committed version of the routers configuration. Any changes since the last
committed version will be undone. The commit button is equivalent to typing
Router# configure memory
Router# show config
Telconi Terminal Users’s Manual, ©2005 Telconi GmbH, Munich, Germany (DOCV1.0.2)
30/37
in an exec session. Like the c ommi t button also will automatically reload the configuration written. It will reload from the
non-volatile memory in this case, as they’re identical at this point, but will reload more quickly than loading the running
configuration.
6.7.3 HTML-Output
HTML is a flexible format for printing, documentation, Email and more. Telconi Terminal now supports HTML output
for all modes and platforms. To use it, simple push the HTML button in the main Window. On Windows and Mac OS
X, the configured default browser is invoked with the output. On Linux and FreeBSD (and future other Unix variants such as
Solaris), Mozilla is assumed to be installed.
6.7.4 ASCII-Format Output
Sometimes it is desirable to output the configuration or exec views to ASCII text format. This button will open a
platform specific application (for example, Notepad on Windows or TextEdit on MacOS X) to display ASCII output. In
order to save or otherwise use the ASCII output, please use the functionality of the external program.
6.7.5 Logout
The logout button disconnects from a connected device. If more than one sessions are active (such as
Configuration and Exec sessions), all sessions will be terminated.
Telconi Terminal Users’s Manual, ©2005 Telconi GmbH, Munich, Germany (DOCV1.0.2)
31/37
7 Controlling Telconi Terminal
7.1 Command Line Options (Unix/Linux and Windows only)
Specifically for NMS integration purposes, Telconi Terminal for Windows and MacOS X support command line options. You
can specify a hostname or IP address. If the hostname or IP address is already known to Telconi Terminal, the login window
will preload all connection parameters for the given device. If the device is not yet known, the window will appear with all
but the hostname/IP address parameter empty and the hostname/IP address filled with the hostname specified in the
option. The following example loads connection parameters for host 10.0.0.1 at startup on Unix/Linux systems:
$ telconi –h 10.0.0.1
The same parameter is specified in a similar way using Windows versions:
C:\> telconi.exe –h 10.0.0.1
Both examples assume a correctly set PATH environment variable.
7.2 Apple Script Support (MacOS X only)
For the same purpose as command line options for Windows and Unix/Linux versions, Telconi Terminal for MacOS X
features some AppleScript support.
7.2.1 Application Startup
If Telconi Terminal is being invoked from within another application, we first have to make sure that it is
running. The following AppleScript will startup Telconi Terminal (if not already running) and put it’s window in the front:
tell the application “Telconi Terminal”
activate
end tell
Please Note: This will only function correctly if MacOS X already knows how to find the Telconi Terminal
application. Make sure you only have one and the latest version of Telconi Terminal installed. MacOS X will learn about
Telconi Terminal as you copy/drag it to your hard disk with the Finder.
7.2.2 Setting the Hostname / IP-Adress
The following AppleScript will bring up the connection dialog of Telconi Terminal for the specified
Telconi Terminal Users’s Manual, ©2005 Telconi GmbH, Munich, Germany (DOCV1.0.2)
32/37
hostname or IP-Address. If the host is known to Telconi Terminal, all connection parameters will be loaded from the
device database. Otherwise, you will have to enter the remaining connection parameters for the first time you connect:
tell the application “Telconi Terminal”
set host to “10.0.1.253”
end tell
7.2.3 Accessing AppleScript Functionality from the Command Line
AppleScript can be also used from the Unix command line utilizing the osascript command. The following
shell script activates Telconi Terminal and sets the host to the first argument:
#!/bin/sh
HOST=$1
osascript -e "tell the application \"Telconi Terminal\"" \
-e "activate" \
-e "set host to \"$HOST\""
\
-e "end tell"
# EOF
To connect to a router with the address 10.0.1.253, the script above can be called like:
bash$ tt 10.0.1.253
Telconi Terminal Users’s Manual, ©2005 Telconi GmbH, Munich, Germany (DOCV1.0.2)
33/37
8 Telconi Terminal Data and File Storage
This section describes how Telconi Terminal internally stores configuration, logging and device data. Normally, you would
not need to access these files directly. The content of some of the files should be considered internal and might change in
future versions, so it is not recommended to access these files directly from other applications or scripts.
The purpose of this section is to help users deal with sensitive data. For example, logging and device connection
configuration files may contain passwords. Also, device configuration files contain passwords with weak encryption.
Note file storage and file formats are subject to change in future versions of Telconi Terminal. Do not rely on specific
formats and files when using scripting or other external programs to access these files.
8.1 Base Directory
Telconi Terminal stores all permanent information in a directory called “Telconi”. The location of this base directory is
platform specific. On MacOS X and Unix/Linux, the directory will be created in the home directory of the user. On Microsoft
Windows versions, it is located in the user’s path, one level above the “Desktop” directory. For all platforms, no other
methods of data storage are being used (such as the registry on Windows etc.). If you want to backup your configuration
and files, or transfer your configuration to another computer, all you need to consider are the files located in the base
directory.
8.2 File Types
The base directory contains the following types of information (the file type is determined by the extension of the file):
<file>.dev – Device connection configuration file
<file>.log – Logging file
<file>.txt – Device configuration backup file
<file>_YYMMDDHHMMSS.txt – old configuration backup file with timestamp
<file>.upt – Version update status information
<file>.lic – Licensing information
Future versions of Telconi Terminal might add new file types and change existing formats.
Telconi Terminal Users’s Manual, ©2005 Telconi GmbH, Munich, Germany (DOCV1.0.2)
34/37
8.3 Device Specific Files
Device specific files are stored for each configured router, switch or firewall. The filename of device specific files is
composed using the hostname or IP address as specified in the connection window and a file extension (which specifies
the type of information). For example, a device configured with the IP address 10.0.0.1 will be represented in the base
directory by the following files:
10.0.0.1.dev, 10.0.0.1.log, 10.0.0.1.txt, 10.0.0.1_050721093138.txt
Please note the base name for device specific files is always taken from the hostname or IP address of that device, and not
from the device description which appears in the device list. Therefore, the device’s description can be changed without
altering the base name.
8.3.1 Device Connection Configuration Files (.dev)
Device connection configuration files contain all values required to connect to a specific device, such as usernames,
passwords, hostnames or ip addresses, the connection method and so on. A special file named last.dev contains a link
to the most recently connected device (which will load as the application is started).
The following shows an example device connection configuration file for a device with the IP address 10.0.0.1:
! Telconi Terminal V1 config for "10.0.0.1"
device config
device-type IOS
device-description cisco
device-connection-type telnet
device-hostname 10.0.0.1
device-username XXXXXXXXX
device-password XXXXXXXXX
device-enable-password XXXXXXXXX
device-remote-address 10.0.0.2
device-local-address 10.0.0.1
! EOF
These files also contain access values like passwords. Although the username and password values are not readable and
not stored in clear text, they can be easily decoded. If you are concerned about security, make sure that no other users can
access these files.
Telconi Terminal Users’s Manual, ©2005 Telconi GmbH, Munich, Germany (DOCV1.0.2)
35/37
8.3.2 Device Configuration Backup Files (.txt)
Device configuration backup files contain a copy of the device’s configuration as last seen by Telconi Terminal. If Telconi
Terminal notices a change in the configuration, it creates a time-stamped file of the previous version before it writes the
current configuration.
These files also contain access values like passwords. Although the username and password values are not readable and
not stored in clear text, they can be easily decoded. If you are concerned about security, make sure that no other users can
access these files. Please also note, removing the device from the device list does not delete any backup files.
8.3.3 Logfiles (.log)
A logfile is created for each device. It contains a connection history, change history and so on. The format of these files is
similar to syslog messages on a Unix system.
Please note that certain operations (such as changing a password on a device) will result in logging lines containing
sensitive information. If you are concerned about security, you should make sure no other users can access these files.
You also can remove logfiles. Please also note that removing the device from the device list does not delete log files.
8.4 Licensing Information File (.lic)
The license .lic File contains the license key. This information might be useful for automated deployment or customized
distribution of the application. Basically, this files contains the license key you’ve entered in the licensing window (the key
shown is not valid):
! Telconi Terminal License File V1
license-name [email protected]
license-key 12345-12345-12345-12345
! EOF
8.5 Update Information Files (.upt)
Telconi Terminal is capable to display information about new software versions in the main window. In order to reduce the
number of HTTP requests to query for a new version, it maintains some state files. Files with the .upt
extensions are used to cache information about new versions and to remember the last version check.
Telconi Terminal Users’s Manual, ©2005 Telconi GmbH, Munich, Germany (DOCV1.0.2)
36/37
Trademark Notices
PIX Firewall is a trademark. Cisco®, Cisco Systems®, Cisco IOS®, and IOS® are registered trademarks of Cisco Systems, Inc. or
its affiliates in the U.S. or certain other countries. InterMapper® is a registered trademark of Dartware, LLC. Apple, MacOS
and MacOS X are trademarks or registered trademarks of Apple Computer, Inc. in the United States and other countries.
Sun, Sun Microsystems, and Solaris are trademarks or registered trademarks of Sun Microsystems, Inc. in the United States
and other countries. Microsoft, Windows NT, Windows, Windows 2000 and Windows XP are registered trademarks or
tradem arks of Microsoft Corporation in the United States and/or other countries. UNIX is a registered trademark in the
United States and other countries, licensed exclusively through X/Open Company Ltd. Linux is a trademark of Linus
Torvalds. WinZIP® is a trademark of WinZIP International, LLC. All other trademarks, service marks, registered trademarks,
registered service marks mentioned on this site are the property of their respective owners.
Credits
Telconi Terminal for Microsoft Windows and Unix is based in part on the work of the FLTK project (http://www.fltk.org).
Microsoft Windows and Unix versions also use “FLU – FLTK Utility Widgets” by Jason Bryan. The SSH1 (Secure Shell) protocol
was re-implemented by Telconi. However, some algorithms have been adopted from a free software package called
PuTTY. The portions of PuTTY used by Telconi Terminal are subject to the following license:
PuTTY is copyright 1997-2004 Simon Tatham.
Portions copyright Robert de Bath, Joris van Rantwijk, Delian Delchev, Andreas Schultz, Jeroen Massar, Wez Furlong, Nicolas Barry, and CORE
SDI S.A.
Permission is hereby granted, free of charge, to any person obtaining a copy of this software and associated documentation files (the
"Software"), to deal in the Software without restriction, including without limitation the rights to use, copy, modify, merge, publish,
distribute, sublicense, and/or sell copies of the Software, and to permit persons to whom the Software is furnished to do so, subject to the
following conditions:
The above copyright notice and this permission notice shall be included in all copies or substantial portions of the Software.
THE SOFTWARE IS PROVIDED "AS IS", WITHOUT WARRANTY OF ANY KIND, EXPRESS OR IMPLIED, INCLUDING BUT NOT LIMITED TO THE
WARRANTIES OF MERCHANTABILITY, FITNESS FOR A PARTICULAR PURPOSE AND NONINFRINGEMENT. IN NO EVENT SHALL SIMON TATHAM
BE LIABLE FOR ANY CLAIM, DAMAGES OR OTHER LIABILITY, WHETHER IN AN ACTION OF CONTRACT, TORT OR OTHERWISE, ARISING FROM,
OUT OF OR IN CONNECTION WITH THE SOFTWARE OR THE USE OR OTHER DEALINGS IN THE SOFTWARE.
Telconi Terminal Users’s Manual, ©2005 Telconi GmbH, Munich, Germany (DOCV1.0.2)
37/37


![Installation Guide: AT-TQ2450 [Rev A] (PDF Version)](http://vs1.manualzilla.com/store/data/005654085_1-f326a5d33793ff2ec849a19a13c1dba6-150x150.png)